In this tutorial, we will use Django Channels to create a real-time application that updates a list of users as they log in and out.
With WebSockets (via Django Channels) managing the communication between the client and the server, whenever a user is authenticated, an event will be broadcasted to every other connected user. Each user’s screen will change automatically, without them having to reload their browsers.
NOTE: We recommend that you have some experience with Django before beginning this tutorial. Also, you should be familiar with the concept of WebSockets.
Free Bonus: Click here to get access to a free Django Learning Resources Guide (PDF) that shows you tips and tricks as well as common pitfalls to avoid when building Python + Django web applications.
Our application uses:
- Python (v3.6.0)
- Django (v1.10.5)
- Django Channels (v1.0.3)
- Redis (v3.2.8)
Objectives
By the end of this tutorial, you will be able to…
- Add Web sockets support to a Django project via Django Channels
- Set up a simple connection between Django and a Redis server
- Implement basic user authentication
- Leverage Django Signals to take action when a user logs in or out
Getting Started
First, create a new virtual environment to isolate our project’s dependencies:
$ mkdir django-example-channels
$ cd django-example-channels
$ python3.6 -m venv env
$ source env/bin/activate
(env)$
Install Django, Django Channels, and ASGI Redis, and then create a new Django project and app:
(env)$ pip install django==1.10.5 channels==1.0.2 asgi_redis==1.0.0
(env)$ django-admin.py startproject example_channels
(env)$ cd example_channels
(env)$ python manage.py startapp example
(env)$ python manage.py migrate
NOTE: During the course of this tutorial, we will create a variety of different files and folders. Please refer to the folder structure from the project’s repository if you get stuck.
Next, download and install Redis. If you’re on a Mac, we recommend using Homebrew:
$ brew install redis
Start the Redis server in a new terminal window and make sure that it is running on its default port, 6379. The port number will be important when we tell Django how to communicate with Redis.
Complete the setup by updating INSTALLED_APPS in the project’s settings.py file:
INSTALLED_APPS = [
    'django.contrib.admin',
    'django.contrib.auth',
    'django.contrib.contenttypes',
    'django.contrib.sessions',
    'django.contrib.messages',
    'django.contrib.staticfiles',
    'channels',
    'example',
]
Then Configure the CHANNEL_LAYERS by setting a default backend and routing:
CHANNEL_LAYERS = {
    'default': {
        'BACKEND': 'asgi_redis.RedisChannelLayer',
        'CONFIG': {
            'hosts': [('localhost', 6379)],
        },
        'ROUTING': 'example_channels.routing.channel_routing',
    }
}
This uses a Redis backend which is also needed in production.
WebSockets 101
Normally, Django uses HTTP to communicate between the client and server:
- The client sends an HTTP request to the server.
- Django parses the request, extracts a URL, and then matches it to a view.
- The view processes the request and returns an HTTP response to the client.
Unlike HTTP, the WebSockets protocol allows bi-directional communication, meaning that the server can push data to the client without being prompted by the user. With HTTP, only the client that made a request receives a response. With WebSockets, the server can communicate with multiple clients simultaneously. As we will see later on in this tutorial, we send WebSockets messages using the ws:// prefix, as opposed to http://.
NOTE: Before diving in, quickly review the Channels Concepts documentation.
Consumers and Groups
Let’s create our first consumer, which handle the basic connections between the client and the server. Create a new file called example_channels/example/consumers.py:
from channels import Group


def ws_connect(message):
    Group('users').add(message.reply_channel)


def ws_disconnect(message):
    Group('users').discard(message.reply_channel)
Consumers are the counterpart to Django views. Any user connecting to our app will be added to the “users” group and will receive messages sent by the server. When the client disconnects from our app, the channel is removed from the group, and the user will stop receiving messages.
Next, let’s set up routes, which work in almost the same manner as Django URL configuration, by adding the following code to a new file called example_channels/routing.py:
from channels.routing import route
from example.consumers import ws_connect, ws_disconnect


channel_routing = [
    route('websocket.connect', ws_connect),
    route('websocket.disconnect', ws_disconnect),
]
So, we defined channel_routing instead of urlpatterns and route() instead of url(). Notice that we linked our consumer functions to WebSockets.
Templates
Let’s write up some HTML that can communicate with our server via a WebSocket. Create a “templates” folder within “example” and then add an “example” folder within “templates” - “example_channels/example/templates/example”.
Add a _base.html file:
<!doctype html>
<html lang="en">
<head>
  <meta charset="utf-8">
  <meta name="viewport" content="width=device-width, user-scalable=no, initial-scale=1.0, maximum-scale=1.0, minimum-scale=1.0">
  <meta http-equiv="X-UA-Compatible" content="ie=edge">
  <link href="//maxcdn.bootstrapcdn.com/bootstrap/3.3.7/css/bootstrap.min.css" rel="stylesheet">
  <title>Example Channels</title>
</head>
<body>
  <div class="container">
    <br>
    {% block content %}{% endblock content %}
  </div>
  <script src="//code.jquery.com/jquery-3.1.1.min.js"></script>
  {% block script %}{% endblock script %}
</body>
</html>
And user_list.html:
{% extends 'example/_base.html' %}

{% block content %}{% endblock content %}

{% block script %}
  <script>
    var socket = new WebSocket('ws://' + window.location.host + '/users/');

    socket.onopen = function open() {
      console.log('WebSockets connection created.');
    };

    if (socket.readyState == WebSocket.OPEN) {
      socket.onopen();
    }
  </script>
{% endblock script %}
Now, when the client successfully opens a connection with the server using a WebSocket, we will see a confirmation message print to the console.
Views
Set up a supporting Django view to render our template within example_channels/example/views.py:
from django.shortcuts import render


def user_list(request):
    return render(request, 'example/user_list.html')
Add the URL to example_channels/example/urls.py:
from django.conf.urls import url
from example.views import user_list


urlpatterns = [
    url(r'^$', user_list, name='user_list'),
]
Update the project URL as well in example_channels/example_channels/urls.py:
from django.conf.urls import include, url
from django.contrib import admin

urlpatterns = [
    url(r'^admin/', admin.site.urls),
    url(r'^', include('example.urls', namespace='example')),
]
Test
Ready to test?
(env)$ python manage.py runserver
NOTE: You can alternatively run
python manage.py runserver --noworkerandpython manage.py runworkerin two different terminals to test the interface and worker servers as two separate processes. Both methods work!
When you visit http://localhost:8000/, you should see the connection message print to the terminal:
[2017/02/19 23:24:57] HTTP GET / 200 [0.02, 127.0.0.1:52757]
[2017/02/19 23:24:58] WebSocket HANDSHAKING /users/ [127.0.0.1:52789]
[2017/02/19 23:25:03] WebSocket DISCONNECT /users/ [127.0.0.1:52789]
User Authentication
Now that we have proven that we can open a connection, our next step is to handle user authentication. Remember: We want a user to be able to log into our app and see a list of all of the other users who are subscribed to that user’s group. First, we need a way for users to create accounts and log in. Begin by creating a simple login page that will allow a user to authenticate with a username and password.
Create a new file called log_in.html within “example_channels/example/templates/example”:
{% extends 'example/_base.html' %}

{% block content %}
  <form action="{% url 'example:log_in' %}" method="post">
    {% csrf_token %}
    {% for field in form %}
      <div>
        {{ field.label_tag }}
        {{ field }}
      </div>
    {% endfor %}
    <button type="submit">Log in</button>
  </form>
  <p>Don't have an account? <a href="{% url 'example:sign_up' %}">Sign up!</a></p>
{% endblock content %}
Next, update example_channels/example/views.py like so:
from django.contrib.auth import login, logout
from django.contrib.auth.forms import AuthenticationForm
from django.core.urlresolvers import reverse
from django.shortcuts import render, redirect


def user_list(request):
    return render(request, 'example/user_list.html')


def log_in(request):
    form = AuthenticationForm()
    if request.method == 'POST':
        form = AuthenticationForm(data=request.POST)
        if form.is_valid():
            login(request, form.get_user())
            return redirect(reverse('example:user_list'))
        else:
            print(form.errors)
    return render(request, 'example/log_in.html', {'form': form})


def log_out(request):
    logout(request)
    return redirect(reverse('example:log_in'))
Django comes with forms that support common authentication functionality. We can use the AuthenticationForm to handle user login. This form checks the supplied username and password, then returns a User object if a validated user is found. We log in the validated user and redirect them to our homepage. A user should also have to ability to log out of the application, so we create a logout view that provides that functionality and then takes the user back to the login screen.
Then update example_channels/example/urls.py:
from django.conf.urls import url
from example.views import log_in, log_out, user_list


urlpatterns = [
    url(r'^log_in/$', log_in, name='log_in'),
    url(r'^log_out/$', log_out, name='log_out'),
    url(r'^$', user_list, name='user_list')
]
We also need a way to create new users. Create a sign-up page in the same manner as the login by adding a new file called sign_up.html to “example_channels/example/templates/example”:
{% extends 'example/_base.html' %}

{% block content %}
  <form action="{% url 'example:sign_up' %}" method="post">
    {% csrf_token %}
    {% for field in form %}
      <div>
        {{ field.label_tag }}
        {{ field }}
      </div>
    {% endfor %}
    <button type="submit">Sign up</button>
    <p>Already have an account? <a href="{% url 'example:log_in' %}">Log in!</a></p>
  </form>
{% endblock content %}
Notice that the login page has a link to the sign-up page, and the sign-up page has a link back to the login.
Add the following function to the views:
def sign_up(request):
    form = UserCreationForm()
    if request.method == 'POST':
        form = UserCreationForm(data=request.POST)
        if form.is_valid():
            form.save()
            return redirect(reverse('example:log_in'))
        else:
            print(form.errors)
    return render(request, 'example/sign_up.html', {'form': form})
We use another built-in form for user creation. After successful form validation, we redirect to the login page.
Make sure to import the form:
from django.contrib.auth.forms import AuthenticationForm, UserCreationForm
Update example_channels/example/urls.py again:
from django.conf.urls import url
from example.views import log_in, log_out, sign_up, user_list


urlpatterns = [
    url(r'^log_in/$', log_in, name='log_in'),
    url(r'^log_out/$', log_out, name='log_out'),
    url(r'^sign_up/$', sign_up, name='sign_up'),
    url(r'^$', user_list, name='user_list')
]
At this point, we need to create a user. Run the server and visit http://localhost:8000/sign_up/ in your browser. Fill in the form with a valid username and password and submit it to create our first user.
NOTE: Try using
michaelas the username andjohnson123as the password.
The sign_up view redirects us to the log_in view, and from there we can authenticate our newly created user.
After we log in, we can test our new authentication views.
Use the sign up form to create several new users in preparation for the next section.
Login Alerts
We have basic user authentication working, but we still need to display a list of users and we need the server to tell the group when a user logs in and out. We need to edit our consumer functions so that they send a message right after a client connects and right before a client disconnects. The message data will include the user’s username and connection status.
Update example_channels/example/consumers.py like so:
import json
from channels import Group
from channels.auth import channel_session_user, channel_session_user_from_http


@channel_session_user_from_http
def ws_connect(message):
    Group('users').add(message.reply_channel)
    Group('users').send({
        'text': json.dumps({
            'username': message.user.username,
            'is_logged_in': True
        })
    })


@channel_session_user
def ws_disconnect(message):
    Group('users').send({
        'text': json.dumps({
            'username': message.user.username,
            'is_logged_in': False
        })
    })
    Group('users').discard(message.reply_channel)
Notice that we have added decorators to the functions to get the user from the Django session. Also, all messages must be JSON-serializable, so we dump our data into a JSON string.
Next, update example_channels/example/templates/example/user_list.html:
{% extends 'example/_base.html' %}

{% block content %}
  <a href="{% url 'example:log_out' %}">Log out</a>
  <br>
  <ul>
    {% for user in users %}
      <!-- NOTE: We escape HTML to prevent XSS attacks. -->
      <li data-username="{{ user.username|escape }}">
        {{ user.username|escape }}: {{ user.status|default:'Offline' }}
      </li>
    {% endfor %}
  </ul>
{% endblock content %}

{% block script %}
  <script>
    var socket = new WebSocket('ws://' + window.location.host + '/users/');

    socket.onopen = function open() {
      console.log('WebSockets connection created.');
    };

    socket.onmessage = function message(event) {
      var data = JSON.parse(event.data);
      // NOTE: We escape JavaScript to prevent XSS attacks.
      var username = encodeURI(data['username']);
      var user = $('li').filter(function () {
        return $(this).data('username') == username;
      });

      if (data['is_logged_in']) {
        user.html(username + ': Online');
      }
      else {
        user.html(username + ': Offline');
      }
    };

    if (socket.readyState == WebSocket.OPEN) {
      socket.onopen();
    }
  </script>
{% endblock script %}
On our homepage, we expand our user list to display a list of users. We store each user’s username as a data attribute to make it easy to find the user item in the DOM. We also add an event listener to our WebSocket that can handle messages from the server. When we receive a message, we parse the JSON data, find the <li> element for the given user, and update that user’s status.
Django does not track whether a user is logged in, so we need to create a simple model to do that for us. Create a LoggedInUser model with a one-to-one connection to our User model in example_channels/example/models.py:
from django.conf import settings
from django.db import models


class LoggedInUser(models.Model):
    user = models.OneToOneField(
        settings.AUTH_USER_MODEL, related_name='logged_in_user')
Our app will create a LoggedInUser instance when a user logs in, and the app will delete the instance when the user logs out.
Make the schema migration and then migrate our database to apply the changes.
(env)$ python manage.py makemigrations
(env)$ python manage.py migrate
Next, update our user list view, in example_channels/example/views.py, to retrieve a list of users to render:
from django.contrib.auth import get_user_model, login, logout
from django.contrib.auth.decorators import login_required
from django.contrib.auth.forms import AuthenticationForm, UserCreationForm
from django.core.urlresolvers import reverse
from django.shortcuts import render, redirect


User = get_user_model()


@login_required(login_url='/log_in/')
def user_list(request):
    """
    NOTE: This is fine for demonstration purposes, but this should be
    refactored before we deploy this app to production.
    Imagine how 100,000 users logging in and out of our app would affect
    the performance of this code!
    """
    users = User.objects.select_related('logged_in_user')
    for user in users:
        user.status = 'Online' if hasattr(user, 'logged_in_user') else 'Offline'
    return render(request, 'example/user_list.html', {'users': users})


def log_in(request):
    form = AuthenticationForm()
    if request.method == 'POST':
        form = AuthenticationForm(data=request.POST)
        if form.is_valid():
            login(request, form.get_user())
            return redirect(reverse('example:user_list'))
        else:
            print(form.errors)
    return render(request, 'example/log_in.html', {'form': form})


@login_required(login_url='/log_in/')
def log_out(request):
    logout(request)
    return redirect(reverse('example:log_in'))


def sign_up(request):
    form = UserCreationForm()
    if request.method == 'POST':
        form = UserCreationForm(data=request.POST)
        if form.is_valid():
            form.save()
            return redirect(reverse('example:log_in'))
        else:
            print(form.errors)
    return render(request, 'example/sign_up.html', {'form': form})
If a user has an associated LoggedInUser, then we record the user’s status as “Online”, and if not, the user is “Offline”. We also add a @login_required decorator to both our user list and log out views to restrict access only to registered users.
Add the imports as well:
from django.contrib.auth import get_user_model, login, logout
from django.contrib.auth.decorators import login_required
At this point, users can log in and out, which will trigger the server to send messages to the client, but we have no way of knowing which users are logged in when the user first logs in. The user only sees updates when another user’s status changes. This is where the LoggedInUser comes into play, but we need a way to create a LoggedInUser instance when a user logs in, and then delete it when that user logs out.
The Django library includes a feature known as signals that broadcasts notifications when certain actions occur. Applications can listen for those notifications and then act on them. We can exploit two helpful, built-in signals (user_logged_in and user_logged_out) to handle our LoggedInUser behavior.
Within “example_channels/example”, add a new file called signals.py:
from django.contrib.auth import user_logged_in, user_logged_out
from django.dispatch import receiver
from example.models import LoggedInUser


@receiver(user_logged_in)
def on_user_login(sender, **kwargs):
    LoggedInUser.objects.get_or_create(user=kwargs.get('user'))


@receiver(user_logged_out)
def on_user_logout(sender, **kwargs):
    LoggedInUser.objects.filter(user=kwargs.get('user')).delete()
We have to make the signals available in our app configuration, example_channels/example/apps.py:
from django.apps import AppConfig


class ExampleConfig(AppConfig):
    name = 'example'

    def ready(self):
        import example.signals
Update example_channels/example/__init__.py as well:
default_app_config = 'example.apps.ExampleConfig'
Sanity Check
Now we are finished coding and are ready to connect to our server with multiple users to test our app.
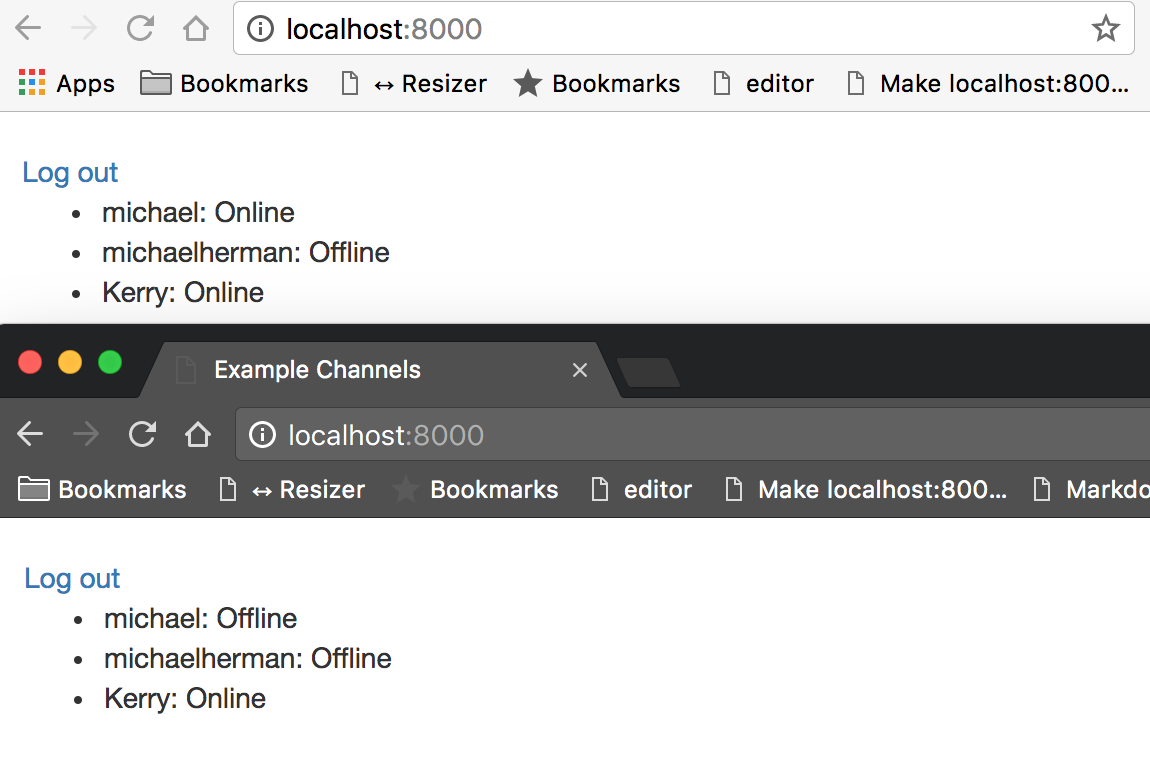
Run the Django server, log in as a user, and visit the homepage. We should see a list of all of the users in our app, each with a status of “Offline”. Next, open a new Incognito window and log in as a different user and watch both screens. Right when we log in, the regular browser updates the user status to “Online”. From our Incognito window, we see that the user logged in also has a status of “Online”. We can test the WebSockets by logging in and out on our different devices with various users.
Observing the developer console on the client and the server activity in our terminal, we can confirm that WebSocket connections are being formed when a user logs in and destroyed when a user logs out.
[2017/02/20 00:15:23] HTTP POST /log_in/ 302 [0.07, 127.0.0.1:55393]
[2017/02/20 00:15:23] HTTP GET / 200 [0.04, 127.0.0.1:55393]
[2017/02/20 00:15:23] WebSocket HANDSHAKING /users/ [127.0.0.1:55414]
[2017/02/20 00:15:23] WebSocket CONNECT /users/ [127.0.0.1:55414]
[2017/02/20 00:15:25] HTTP GET /log_out/ 302 [0.01, 127.0.0.1:55393]
[2017/02/20 00:15:26] HTTP GET /log_in/ 200 [0.02, 127.0.0.1:55393]
[2017/02/20 00:15:26] WebSocket DISCONNECT /users/ [127.0.0.1:55414]
NOTE: You could also use ngrok to expose the local server to the internet securely. Doing this will allow you to hit the local server from various devices such as your phone or tablet.
Closing Thoughts
We covered a lot in this tutorial - Django Channels, WebSockets, user authentication, signals, and some front-end development. The main take away is this: Channels extends the functionality of a traditional Django app by letting us push messages from the server to groups of users via WebSockets.
This is powerful stuff!
Think of some of the applications. We can create chat rooms, multiplayer games, and collaborative apps that allow users to communicate in real time. Even mundane tasks are improved with WebSockets. For example, instead of periodically polling the server to see if a long-running task has completed, the server can push a status update to the client when it finishes.
This tutorial just scratches the surface of what we can do with Django Channels, too. Explore the Django Channels documentation and see what else you can create.
Free Bonus: Click here to get access to a free Django Learning Resources Guide (PDF) that shows you tips and tricks as well as common pitfalls to avoid when building Python + Django web applications.
Grab the final code from the django-example-channels repo. Cheers!