Watch Now This tutorial has a related video course created by the Real Python team. Watch it together with the written tutorial to deepen your understanding: Django Migrations 101
Since version 1.7, Django has come with built-in support for database migrations. In Django, database migrations usually go hand in hand with models: whenever you code up a new model, you also generate a migration to create the necessary table in the database. However, migrations can do much more.
You are going to learn how Django Migrations work and how you can get the most out of them over the course of four articles and one video:
- Part 1: Django Migrations: A Primer (current article)
- Part 2: Digging Deeper into Migrations
- Part 3: Data Migrations
- Video: Django 1.7 Migrations - primer
In this article, you’ll get comfortable with Django migrations and learn the following:
- How to create database tables without writing any SQL
- How to automatically modify your database after you changed your models
- How to revert changes made to your database
Free Bonus: Click here to get access to a free Django Learning Resources Guide (PDF) that shows you tips and tricks as well as common pitfalls to avoid when building Python + Django web applications.
The Problems That Migrations Solve
If you are new to Django or web development in general, you might not be familiar with the concept of database migrations, and it might not seem obvious why they’re a good idea.
First, let’s quickly define a couple of terms to make sure everybody is on the same page. Django is designed to work with a relational database, stored in a relational database management system like PostgreSQL, MySQL, or SQLite.
In a relational database, data is organized in tables. A database table has a certain number of columns, but it can have any number of rows. Each column has a specific datatype, like a string of a certain maximum length or a positive integer. The description of all tables with their columns and their respective datatypes is called a database schema.
All database systems supported by Django use the language SQL to create, read, update and delete data in a relational database. SQL is also used to create, change, and delete the database tables themselves.
Working directly with SQL can be quite cumbersome, so to make your life easier, Django comes with an object-relational mapper, or ORM for short. The ORM maps the relational database to the world of object oriented programming. Instead of defining database tables in SQL, you write Django models in Python. Your models define database fields, which correspond to the columns in their database tables.
Here’s an example of how a Django model class is mapped to a database table:
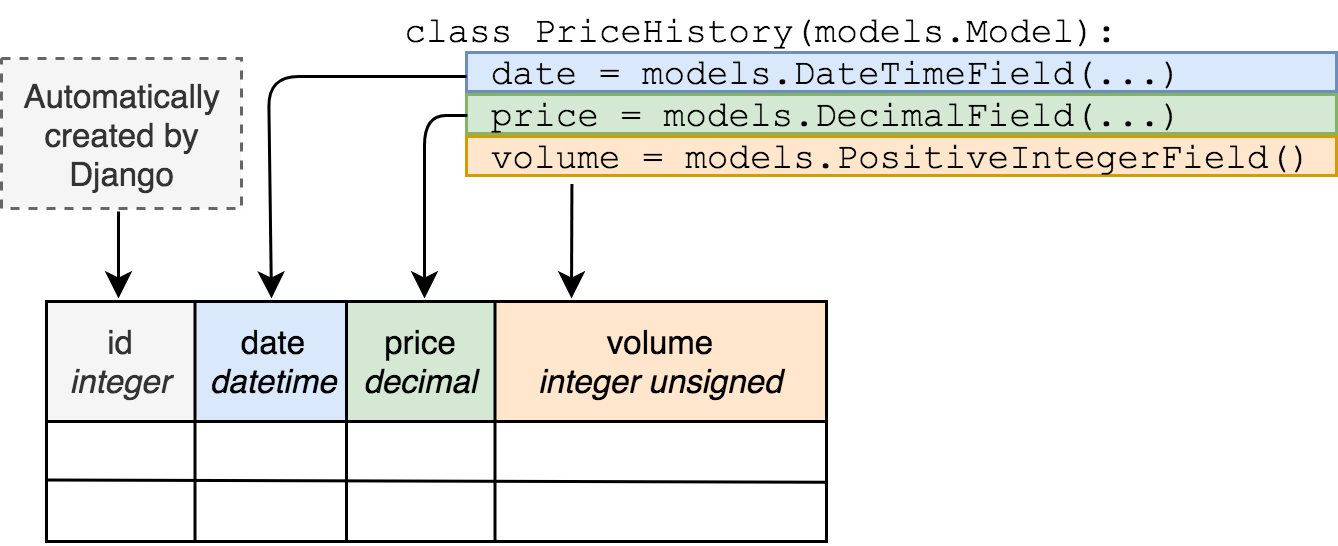
But just defining a model class in a Python file does not make a database table magically appear out of nowhere. Creating the database tables to store your Django models is the job of a database migration. Additionally, whenever you make a change to your models, like adding a field, the database has to be changed too. Migrations handle that as well.
Here are a few ways Django migrations make your life easier.
Making Database Changes Without SQL
Without migrations, you would have to connect to your database and type in a bunch of SQL commands or use a graphical tool like PHPMyAdmin to modify the database schema every time you wanted to change your model definition.
In Django, migrations are primarily written in Python, so you don’t have to know any SQL unless you have really advanced use cases.
Avoiding Repetition
Creating a model and then writing SQL to create the database tables for it would be repetitive.
Migrations are generated from your models, making sure you don’t repeat yourself.
Ensuring Model Definitions and the Database Schema in Sync
Usually, you have multiple instances of your database, for example one database for each developer in your team, a database for testing and a database with live data.
Without migrations, you will have to perform any schema changes on each one of your database, and you will have to keep track which changes have already been made to which database.
With Django Migrations, you can easily keep multiple databases in sync with your models.
Tracking Database Schema Change in Version Control
A version control system, like Git is excellent for code, but not so much for database schemas.
As migrations are plain Python in Django, you can put them in a version control system just like any other piece of code.
By now, you’re hopefully convinced that migrations are a useful and powerful tool. Let’s start learning how to unleash that power.
Setting Up a Django Project
Throughout this tutorial, you are going to work on a simple Bitcoin tracker app as an example project.
The first step is to install Django. Here is how you do that on Linux or macOS X using a virtual environment:
$ python3 -m venv env
$ source env/bin/activate
(env) $ pip install "Django==2.1.*"
...
Successfully installed Django-2.1.3
Now you have created a new virtual environment and activated it, as well as installed Django in that virtual environment.
Note that on Windows, you would run env/bin/activate.bat instead of source env/bin/activate to activate your virtual environment.
For easier readability, console examples won’t include the (env) part of the prompt from now on.
With Django installed, you can create the project using the following commands:
$ django-admin.py startproject bitcoin_tracker
$ cd bitcoin_tracker
$ python manage.py startapp historical_data
This gives you a simple project and an app called historical_data. You should now have this directory structure:
bitcoin_tracker/
|
├── bitcoin_tracker/
│   ├── __init__.py
│   ├── settings.py
│   ├── urls.py
│   └── wsgi.py
|
├── historical_data/
│   ├── __init__.py
│   ├── admin.py
│   ├── apps.py
│   ├── migrations/
│   │   └── __init__.py
|   |
│   ├── models.py
│   ├── tests.py
│   └── views.py
|
└── manage.py
Within the bitcoin_tracker directory, there are two sub-directories: bitcoin_tracker for project-wide files and historical_data containing files for the app you created.
Now, to create a model, add this class in historical_data/models.py:
class PriceHistory(models.Model):
    date = models.DateTimeField(auto_now_add=True)
    price = models.DecimalField(max_digits=7, decimal_places=2)
    volume = models.PositiveIntegerField()
This is the basic model to keep track of Bitcoin prices.
Also, don’t forget to add the newly created app to settings.INSTALLED_APPS. Open bitcoin_tracker/settings.py and append historical_data to the list INSTALLED_APPS, like this:
INSTALLED_APPS = [
    'django.contrib.admin',
    'django.contrib.auth',
    'django.contrib.contenttypes',
    'django.contrib.sessions',
    'django.contrib.messages',
    'django.contrib.staticfiles',
    'historical_data',
]
The other settings are fine for this project. This tutorial assumes that your project is configured to use an SQLite database, which is the default.
Creating Migrations
With the model created, the first thing you need to do is create a migration for it. You can do this with the following command:
$ python manage.py makemigrations historical_data
Migrations for 'historical_data':
  historical_data/migrations/0001_initial.py
    - Create model PriceHistory
Note: Specifying the name of the application, historical_data, is optional. Leaving it off creates migrations for all apps.
This creates the migrations file that instructs Django on how to create the database tables for the models defined in your application. Let’s have another look at the directory tree:
bitcoin_tracker/
|
├── bitcoin_tracker/
│   ├── __init__.py
│   ├── settings.py
│   ├── urls.py
│   └── wsgi.py
|
├── historical_data/
│   ├── migrations/
│   │   ├── 0001_initial.py
│   │   └── __init__.py
|   |
│   ├── __init__.py
│   ├── admin.py
│   ├── apps.py
│   ├── models.py
│   ├── tests.py
│   └── views.py
|
├── db.sqlite3
└── manage.py
As you can see, the migrations directory now contains a new file: 0001_initial.py.
Note: You might notice that running the makemigrations command also created the file db.sqlite3, which contains your SQLite database.
When you try to access a non-existing SQLite3 database file, it will automatically be created.
This behavior is unique to SQLite3. If you use any other database backend like PostgreSQL or MySQL, you have to create the database yourself before running makemigrations.
You can take a peek at the database with the dbshell management command. In SQLite, the command to list all tables is simply .tables:
$ python manage.py dbshell
SQLite version 3.19.3 2017-06-27 16:48:08
Enter ".help" for usage hints.
sqlite> .tables
sqlite>
The database is still empty. That will change when you apply the migration. Type .quit to exit the SQLite shell.
Applying Migrations
You have now created the migration, but to actually make any changes in the database, you have to apply it with the management command migrate:
$ python manage.py migrate
Operations to perform:
  Apply all migrations: admin, auth, contenttypes, historical_data, sessions
Running migrations:
  Applying contenttypes.0001_initial... OK
  Applying auth.0001_initial... OK
  Applying admin.0001_initial... OK
  Applying admin.0002_logentry_remove_auto_add... OK
  Applying admin.0003_logentry_add_action_flag_choices... OK
  Applying contenttypes.0002_remove_content_type_name... OK
  Applying auth.0002_alter_permission_name_max_length... OK
  Applying auth.0003_alter_user_email_max_length... OK
  Applying auth.0004_alter_user_username_opts... OK
  Applying auth.0005_alter_user_last_login_null... OK
  Applying auth.0006_require_contenttypes_0002... OK
  Applying auth.0007_alter_validators_add_error_messages... OK
  Applying auth.0008_alter_user_username_max_length... OK
  Applying auth.0009_alter_user_last_name_max_length... OK
  Applying historical_data.0001_initial... OK
  Applying sessions.0001_initial... OK
There is a lot going on here! According to the output, your migration has been successfully applied. But where do all the other migrations come from?
Remember the setting INSTALLED_APPS? Some of the other apps listed there also come with migrations, and the migrate management command applies the migrations for all installed apps by default.
Have another look at the database:
$ python manage.py dbshell
SQLite version 3.19.3 2017-06-27 16:48:08
Enter ".help" for usage hints.
sqlite> .tables
auth_group                    django_admin_log
auth_group_permissions        django_content_type
auth_permission               django_migrations
auth_user                     django_session
auth_user_groups              historical_data_pricehistory
auth_user_user_permissions
sqlite>
Now there are multiple tables. Their names give you an idea of their purpose. The migration that you generated in the previous step has created the historical_data_pricehistory table. Let’s inspect it using the .schema command:
sqlite> .schema --indent historical_data_pricehistory
CREATE TABLE IF NOT EXISTS "historical_data_pricehistory"(
  "id" integer NOT NULL PRIMARY KEY AUTOINCREMENT,
  "date" datetime NOT NULL,
  "price" decimal NOT NULL,
  "volume" integer unsigned NOT NULL
);
The .schema command prints out the CREATE statement that you would execute to create the table. The parameter --indent formats it nicely. Even if you are not familiar with SQL syntax, you can see that the schema of the historical_data_pricehistory table reflects the fields of the PriceHistory model.
There is a column for each field and an additional column id for the primary key, which Django creates automatically unless you explicitly specify a primary key in your model.
Here’s what happens if you run the migrate command again:
$ python manage.py migrate
Operations to perform:
  Apply all migrations: admin, auth, contenttypes, historical_data, sessions
Running migrations:
  No migrations to apply.
Nothing! Django remembers which migrations have already been applied and does not try to rerun them.
It is worth noting that you can also limit the migrate management command to a single app:
$ python manage.py migrate historical_data
Operations to perform:
 Apply all migrations: historical_data
Running migrations:
 No migrations to apply.
As you can see, Django now only applies migrations for the historical_data app.
When you are running the migrations for the first time, it is a good idea to apply all migrations to ensure your database contains the necessary tables for the features you might take for granted, like user authentication and sessions.
Changing Models
Your models are not set in stone. Your models will change as your Django project gains more features. You might add or remove fields or change their types and options.
When you change the definition of a model, the database tables used to store these models have to be changed too. If your model definitions don’t match your current database schema, you will most likely run into a django.db.utils.OperationalError.
So how do you change the database tables? By creating and applying a migration.
While testing your Bitcoin tracker, you realize that you made a mistake. People are selling fractions of a Bitcoin, so the field volume should be of the type DecimalField instead of PositiveIntegerField.
Let’s change the model to look like this:
class PriceHistory(models.Model):
    date = models.DateTimeField(auto_now_add=True)
    price = models.DecimalField(max_digits=7, decimal_places=2)
    volume = models.DecimalField(max_digits=7, decimal_places=3)
Without migrations, you would have to figure out the SQL syntax to turn a PositiveIntegerField into a DecimalField. Luckily, Django will handle that for you. Just tell it to make migrations:
$ python manage.py makemigrations
Migrations for 'historical_data':
  historical_data/migrations/0002_auto_20181112_1950.py
    - Alter field volume on pricehistory
Note: The name of the migration file (0002_auto_20181112_1950.py) is based on the current time and will be different if you follow along on your system.
Now you apply this migration to your database:
$ python manage.py migrate
Operations to perform:
  Apply all migrations: admin, auth, contenttypes, historical_data, sessions
Running migrations:
  Applying historical_data.0002_auto_20181112_1950... OK
The migration has been applied successfully, so you can use dbshell to verify that the changes had an effect:
$ python manage.py dbshell
SQLite version 3.19.3 2017-06-27 16:48:08
Enter ".help" for usage hints.
sqlite> .schema --indent historical_data_pricehistory
CREATE TABLE IF NOT EXISTS "historical_data_pricehistory" (
  "id" integer NOT NULL PRIMARY KEY AUTOINCREMENT,
  "date" datetime NOT NULL,
  "price" decimal NOT NULL,
  "volume" decimal NOT NULL
);
If you compare the new schema with the schema you saw earlier, you will notice that the type of the volume column has changed from integer to decimal to reflect the change of the volume field in the model from PositiveIntegerField to DecimalField.
Listing Out Migrations
If you want to know what migrations exist in a Django project, you don’t have to dig trough the migrations directories of your installed apps. You can use the showmigrations command:
$ ./manage.py showmigrations
admin
 [X] 0001_initial
 [X] 0002_logentry_remove_auto_add
 [X] 0003_logentry_add_action_flag_choices
auth
 [X] 0001_initial
 [X] 0002_alter_permission_name_max_length
 [X] 0003_alter_user_email_max_length
 [X] 0004_alter_user_username_opts
 [X] 0005_alter_user_last_login_null
 [X] 0006_require_contenttypes_0002
 [X] 0007_alter_validators_add_error_messages
 [X] 0008_alter_user_username_max_length
 [X] 0009_alter_user_last_name_max_length
contenttypes
 [X] 0001_initial
 [X] 0002_remove_content_type_name
historical_data
 [X] 0001_initial
 [X] 0002_auto_20181112_1950
sessions
 [X] 0001_initial
This lists all apps in the project and the migrations associated with each app. Also, it will put a big X next to the migrations that have already been applied.
For our little example, the showmigrations command is not particularly exciting, but it comes in handy when you start working on an existing code base or work in a team where you are not the only person adding migrations.
Unapplying Migrations
Now you know how to make changes to your database schema by creating and applying migrations. At some point, you might want to undo changes and switch back to an earlier database schema because you:
- Want to test a migration a colleague wrote
- Realize that a change you made was a bad idea
- Work on multiple features with different database changes in parallel
- Want to restore a backup that was created when the database still had an older schema
Luckily, migrations don’t have to be a one-way street. In many cases, the effects of a migration can be undone by unapplying a migration. To unapply a migration, you have to call migrate with the name of the app and the name of the migration before the migration you want to unapply.
If you want to revert the migration 0002_auto_20181112_1950 in your historical_data app, you have to pass 0001_initial as an argument to the migrate command:
$ python manage.py migrate historical_data 0001_initial
Operations to perform:
  Target specific migration: 0001_initial, from historical_data
Running migrations:
  Rendering model states... DONE
  Unapplying historical_data.0002_auto_20181112_1950... OK
The migration has been unapplied, meaning that the changes to the database have been reversed.
Unapplying a migration does not remove its migration file. The next time you run the migrate command, the migration will be applied again.
Caution: Don’t confuse unapplying migrations with the undo operation you are used to from your favorite text editor.
Not all database operations can be completely reverted. If you remove a field from a model, create a migration, and apply it, Django will remove the respective column from the database.
Unapplying that migration will re-create the column, but it won’t bring back the data that was stored in that column!
When you’re dealing with migration names, Django saves you a few keystrokes by not forcing you to spell out the whole name of the migration. It needs just enough of the name to identify it uniquely.
In the previous example, it would have been enough to run python manage.py migrate historical_data 0001.
Naming Migrations
In the above example, Django came up with a name for the migration based on the timestamp—something like *0002_auto_20181112_1950. If you’re not happy with that, then you can use the --name parameter to provide a custom name (without the .py extension).
To try that out, you first have to remove the old migration. You have already unapplied it, so you can safely delete the file:
$ rm historical_data/migrations/0002_auto_20181112_1950.py
Now you can recreate it with a more descriptive name:
$ ./manage.py makemigrations historical_data --name switch_to_decimals
This will create the same migration as before except with the new name of 0002_switch_to_decimals.
Conclusion
You covered quite a bit of ground in this tutorial and learned the fundamentals of Django migrations.
To recap, the basic steps to use Django migrations look like this:
- Create or update a model
- Run
./manage.py makemigrations <app_name> - Run
./manage.py migrateto migrate everything or./manage.py migrate <app_name>to migrate an individual app - Repeat as necessary
That’s it! This workflow will work the majority of the time, but if things don’t work out as expected, you also know how to list and unapply migrations.
If you previously created and modified your database tables with hand-written SQL, you have now become much more efficient by delegating this work to Django migrations.
In the next tutorial in this series, you will dig deeper into the topic and learn how Django Migrations work under the hood.
Free Bonus: Click here to get access to a free Django Learning Resources Guide (PDF) that shows you tips and tricks as well as common pitfalls to avoid when building Python + Django web applications.
Cheers!
Video
Watch Now This tutorial has a related video course created by the Real Python team. Watch it together with the written tutorial to deepen your understanding: Django Migrations 101