PyScript is a brand-new framework that caused a lot of excitement when Peter Wang, the CEO and co-founder of Anaconda, Inc., revealed it during his keynote speech at PyCon US 2022. Although this project is just an experiment in an early phase of development, people on social media seem to have already fallen in love with it. This tutorial will get you up to speed with PyScript, while the official documentation is still in the making.
In this tutorial, you’ll learn how to:
- Build interactive front-end apps using Python and JavaScript
- Run existing Python code in the web browser
- Reuse the same code on the back-end and the front-end
- Call Python functions from JavaScript and the other way around
- Distribute Python programs with zero dependencies
To get the most out of this tutorial, you should ideally have some experience with JavaScript and front-end programming in general. At the same time, you’ll be able to follow along just fine even if you’ve never done any web development before. After all, that’s the whole idea behind PyScript!
Free Download: Get a sample chapter from CPython Internals: Your Guide to the Python 3 Interpreter showing you how to unlock the inner workings of the Python language, compile the Python interpreter from source code, and participate in the development of CPython.
Disclaimer: PyScript Is an Experimental Project!
This tutorial is coming to you only a few weeks after the official announcement of PyScript. At the time of writing, you could find the following warning prominently displayed on the framework’s home page:
Please be advised that PyScript is very alpha and under heavy development. There are many known issues, from usability to loading times, and you should expect things to change often. We encourage people to play and explore with PyScript, but at this time we do not recommend using it for production. (Source)
This can’t be stressed enough. Before you get started, be prepared for things not to work as presented in this tutorial. Some things may not work at all by the time you read this, while some problems might have already been addressed in one way or another.
That’s not surprising, given PyScript’s relatively short history. Because it’s open-source software, you can take a peek at its Git commit history on GitHub. When you do, you’ll find that Fabio Pliger from Anaconda, who’s the creator and technical lead of PyScript, made the initial commit on February 21, 2022. That’s just over two months before it was publicly announced to the world on April 30!
That’s where things stand with PyScript. If you’re ready to take the risk and would like to give this framework a try, then keep reading.
Getting Started With PyScript
By the end of this section, you’ll have a bird’s-eye view of the framework and its building blocks, including how they work together to bring Python into your browser. You’ll know how to cherry-pick the needed files and host PyScript locally without depending on an Internet connection.
Wrap Your Head Around PyScript
You might be asking yourself what exactly PyScript is. The name is probably a clever attempt at marketing it as a replacement for JavaScript in the browser, but such an interpretation wouldn’t give you the complete picture. Here’s how PyScript is currently being advertised on its Twitter profile:
PyScript - programming for the 99% (Source)
One of the goals of PyScript is to make the Web a friendly place for anyone wanting to learn to code, including kids. The framework achieves that goal by not requiring any installation or configuration process beyond your existing text editor and a browser. A side effect is that PyScript simplifies sharing your work with others.
When you look at PyScript’s README file, you’ll find the following summary and a longer description:
PyScript is a Pythonic alternative to Scratch, JSFiddle, and other “easy to use” programming frameworks, with the goal of making the web a friendly, hackable place where anyone can author interesting and interactive applications.
(…)
PyScript is a meta project that aims to combine multiple open technologies into a framework that allows users to create sophisticated browser applications with Python. It integrates seamlessly with the way the DOM works in the browser and allows users to add Python logic in a way that feels natural both to web and Python developers (Source)
Scratch is a relatively straightforward visual programming language that children learn at school to build simple games and funny animations. JSFiddle is JavaScript’s online editor commonly used to demonstrate a given problem’s solution on forums like StackOverflow.
Furthermore, PyScript’s home page contains this tagline:
PyScript is a framework that allows users to create rich Python applications in the browser using HTML’s interface and the power of Pyodide, WASM, and modern web technologies. The PyScript framework provides users at every experience level with access to an expressive, easy-to-learn programming language with countless applications. (Source)
In other words, PyScript allows you to use Python, with or without JavaScript, to build interactive websites that don’t necessarily have to communicate with a server. The main benefit here is that you can leverage your existing knowledge of Python to enter the world of front-end development, lowering the entry barrier and making it more accessible. But there are many other benefits of using PyScript that you’ll learn about later.
On a slightly more technical level, PyScript is a single-page application (SPA) written in TypeScript using the Svelte framework, styled with Tailwind CSS, and bundled with rollup.js. According to one of the comments in an early Git commit, the project was based on a template mentioned in a blog post by Sascha Aeppli, which combines those tools.
PyScript wouldn’t be possible without building on top of a recent version of Pyodide—a CPython interpreter compiled with emscripten to WebAssembly, enabling Python to run in the browser. PyScript provides a thin abstraction layer over Pyodide by encapsulating the required boilerplate code, which you’d otherwise have to type yourself using JavaScript.
If you’re not familiar with Pyodide and WebAssembly, then click to expand the collapsible section below:
There have been many attempts at running Python code in the browser, with varying levels of success. The primary challenge was that, until recently, JavaScript has been the only programming language that web browsers could understand.
There were a few extra hoops to jump through to run Python code in the browser. For example, Transcrypt transpiles a piece of Python code to an analogous snippet of JavaScript code, whereas Brython is a streamlined Python interpreter implemented in JavaScript. These and similar tools are less than ideal because they rely on something that’s pretending to be a genuine Python runtime.
Pyodide is different as it takes advantage of WebAssembly, a fairly new standard supported by modern web browsers and meant for enabling near-native code execution speed. You can think of WebAssembly as the second “programming language” that browsers now understand.
Note: For a deep dive into WebAssembly, check out The Real Python Podcast - Episode 154 with Brett Cannon.
WebAssembly is a full-fledged virtual machine capable of running a portable bytecode that you can target by compiling the source code of almost any programming language. However, when you look at the list of languages compatible with WebAssembly, then you won’t find Python there. Can you guess why?
Python is an interpreted language, which doesn’t come with a standard compiler that could target WebAssembly. What Pyodide did instead was to compile the entire CPython interpreter into WebAssembly, letting it sit in the browser and interpret Python code just as if it were your regular Python interpreter.
When you forget about certain limitations of the browser’s sandbox and its security policies, there should be no functional difference between running the code through CPython or Pyodide and only a modest difference in performance. Pyodide and WebAssembly make the web browser an excellent place to distribute your Python programs.
To make the integration between Python and the web browser even more straightforward, PyScript defines several Web Components and custom elements, such as <py-script> and <py-button>, that you can embed directly into your HTML. If you’re bothered by the hyphen in these custom tag names, then don’t blame PyScript. The HTML specification enforces it to avoid name conflicts between Web Components and future HTML elements.
Without further ado, it’s time to write your first Hello, World! in PyScript!
Write Your First “Hello, World!” in PyScript
The quickest way to get started with PyScript is by creating a minimal HTML5 document, saving it in a local file such as hello.html, and leveraging the two required files hosted on PyScript’s home page:
<!DOCTYPE html>
<html lang="en">
<head>
  <meta charset="utf-8">
  <meta name="viewport" content="width=device-width, initial-scale=1">
  <title>Hello, World!</title>
  <link rel="stylesheet" href="https://pyscript.net/alpha/pyscript.css" />
  <script defer src="https://pyscript.net/alpha/pyscript.js"></script>
</head>
<body>
  <py-script>print("Hello, World!")</py-script>
</body>
</html>
The first file, pyscript.css, provides default styling for PyScript’s visual components that you’ll explore later, as well as the loader splash screen. The second file, pyscript.js, contains JavaScript that bootstraps the Python runtime and adds custom elements like <py-script>, which can hold Python instructions such as a call to the print() function.
With this setup, you don’t need to start a web server to access your HTML content. See for yourself! Go ahead, save that HTML document to a local file, and open it directly in your favorite web browser:

Congratulations! You’ve just made your first PyScript application, which will work on any modern web browser, even on an early Chromebook, without the need for installing a Python interpreter. You can literally copy your HTML file onto a USB thumb drive and hand it over to a friend, and they’ll be able to run your code even if they don’t have Python installed on their machine.
Note: PyScript was only tested on Google Chrome. Unfortunately, this means there might be small differences in your code’s behavior across various web browsers, which has never been a thing in traditional Python development.
Next up, you’ll learn what just happened when you opened that file in the web browser.
Fetch the Python Runtime From the Internet
When you open your HTML file in a web browser, it’ll take a few seconds to load before showing Hello, World! in the window. PyScript must fetch a dozen additional resources from jsDelivr CDN, JavaScript’s free Content Delivery Network for open-source projects. Those resources comprise the Pyodide runtime, which weighs over twenty megabytes in total when uncompressed.
Fortunately, your browser will cache most of those resources in memory or on disk so that, in the future, the load time will be noticeably faster. You’ll also be able to work offline without depending on your Internet connection as long as you’ve opened your HTML file at least once.
Relying on a CDN to deliver your dependencies is undoubtedly convenient, but it can be brittle at times. There were known cases of CDNs going down in the past, which caused outages of big online businesses. Because PyScript is on the bleeding edge, the CDN always serves the latest alpha build, which can sometimes bring a breaking change. Conversely, a CDN may occasionally need time to keep up with GitHub, so it might be serving outdated code.
Wouldn’t it be better to always request a specific version of PyScript?
Download PyScript for Offline Development
If you don’t want to rely on PyScript’s hosting service, then you’ll need to download all the files required to run Python in the browser and host them yourself. For development purposes, you can start a local HTTP server built right into Python by issuing the following command in a directory with your files to host:
By default, it’ll start a server listening for HTTP requests on all network interfaces, including the localhost, and the port number 8000. You can tweak both the address and the port number with optional arguments if needed. This will let you access your PyScript application at http://localhost:8000/hello.html, for example.
However, before you can do that, you’ll need to download pyscript.css, pyscript.js, and pyscript.py to a folder where your HTML document is located. To do so, you can use the Wget command-line tool, which has its equivalent in PowerShell on Windows, or download the files manually:
This will download all three files in one go. The helper Python module contains the necessary glue code for PyScript and Pyodide. You need to download pyscript.py because the bootstrap script will try to fetch it from its own domain address, which is going to be your localhost address.
Note: Alternatively, you could grab the minified version of the bootstrap script with an optional source map to reduce the download size even further. A source map can let you restore the source code from its minified form, which is helpful during debugging.
Don’t forget to update the CSS and JavaScript paths in your HTML so that they point to the local files instead of the ones hosted online:
<!DOCTYPE html>
<html lang="en">
<head>
  <meta charset="utf-8">
  <meta name="viewport" content="width=device-width, initial-scale=1">
  <title>Hello, World!</title>
  <link rel="stylesheet" href="/pyscript.css" />
  <script defer src="/pyscript.js"></script>
</head>
<body>
  <py-script>print("Hello, World!")</py-script>
</body>
</html>
Here, you assume the placement of those resource files next to your HTML file, but you could also create one or more subfolders for those assets to keep things organized.
You’re almost there. But, if you navigate your browser to your local server now, then it’ll still try to fetch some resources from the CDN and not your local HTTP server. You’ll fix that in the next section.
Download a Specific Pyodide Release
Now that you’ve made PyScript work offline, it’s time to follow similar steps for Pyodide. In the earliest days of PyScript, the URL with Pyodide was hard-coded, but the developers recently introduced another custom element called <py-config>, which allows you to specify a URL with the desired version of Pyodide:
<!DOCTYPE html>
<html lang="en">
<head>
  <meta charset="utf-8">
  <meta name="viewport" content="width=device-width, initial-scale=1">
  <title>Hello, World!</title>
  <link rel="stylesheet" href="/pyscript.css" />
  <script defer src="/pyscript.js"></script>
  <py-config>
    - autoclose_loader: true
    - runtimes:
      -
        src: "/pyodide.js"
        name: pyodide-0.20
        lang: python
  </py-config>
</head>
<body>
  <py-script>print("Hello, World!")</py-script>
</body>
</html>
The content inside of this optional tag is a piece of YAML configuration. You can use the src attribute to provide either a URL with a concrete Pyodide version hosted online or a local file that you’ll download in a bit. In the code block above, "/pyodide.js" indicates a path relative to your local HTTP server’s root address, which would expand to http://localhost:8000/pyodide.js, for example.
To obtain an up-to-date list of the remaining files that your browser would download from the CDN or load from its cache, you can head over to the web development tools and switch to the Network tab before refreshing the page. However, chances are that you’ll eventually need a few more files, or their names might change in the future, so checking the network traffic would quickly become a nuisance.
For the purposes of development, it’s probably more convenient to download all the files of a Pyodide release and decide later which of those your application really needs. So, if you don’t mind downloading a few hundred megabytes, then grab the release tarball from GitHub and extract it into your Hello, World! application’s folder:
Don’t worry if the commands above don’t work on your operating system. You can download the archive and extract the contents of its pyodide/ subfolder manually.
Note: Pyodide’s release tarball is so large because it bundles many popular third-party libraries, especially useful in data science, that were pre-compiled for WebAssembly.
As long as everything goes fine, you should have at least these fourteen files in your application’s folder:
hello-world/
│
├── distutils.tar
├── hello.html
├── micropip-0.1-py3-none-any.whl
├── packages.json
├── packaging-21.3-py3-none-any.whl
├── pyodide.asm.data
├── pyodide.asm.js
├── pyodide.asm.wasm
├── pyodide.js
├── pyodide_py.tar
├── pyparsing-3.0.7-py3-none-any.whl
├── pyscript.css
├── pyscript.js
└── pyscript.py
As you can see, PyScript is an amalgam of Python, JavaScript, WebAssembly, CSS, and HTML. In practice, you’ll be doing the bulk of your PyScript programming using Python.
The approach you’ve taken in this section gives you much more granular control over the versions of Pyodide and the underlying Python interpreter. To check which Python versions are available through Pyodide, you can see the changelog. For example, Pyodide 0.20.0, used in this tutorial, was built on top of CPython 3.10.2.
When in doubt, you can always verify the Python version running in your browser yourself, as you’ll learn next.
Verify Your Pyodide and Python Versions
To check your Pyodide version, all you need is a single line of code. Head back to your code editor and replace the Hello, World! code with the following snippet:
<!DOCTYPE html>
<html lang="en">
<head>
  <meta charset="utf-8">
  <meta name="viewport" content="width=device-width, initial-scale=1">
  <title>Hello, World!</title>
  <link rel="stylesheet" href="/pyscript.css" />
  <script defer src="/pyscript.js"></script>
  <py-config>
    - autoclose_loader: true
    - runtimes:
      -
        src: "/pyodide.js"
        name: pyodide-0.20
        lang: python
  </py-config>
</head>
<body>
  <py-script>import pyodide_js; print(pyodide_js.version)</py-script>
</body>
</html>
It relies on the pyodide_js module, which gets automatically injected into PyScript. You can use it to access Pyodide’s JavaScript API directly from Python in case PyScript doesn’t provide its own abstraction layer for a given feature.
Checking your Python version in PyScript looks the same as in the standard CPython interpreter:
<py-script>import sys; print(f"Python {sys.version}")</py-script>
You import the sys module from the standard library to check the sys.version constant and then print it with an f-string. When you refresh the page in the web browser and let it reload, then it should produce a string that starts with something like this:
Python 3.10.2 (main, Apr 9 2022, 20:52:01) […]
That’s what you’d typically see when you run an interactive Python interpreter in the command line. In this case, Pyodide was not that far behind the latest CPython release, which was 3.10.4 at the time of writing this tutorial.
By the way, have you noticed the semicolon (;) in the examples above? In Python, a semicolon separates multiple statements that appear on a single line, which can be useful when you write a one-liner script or when you’re constrained, for example, by the timeit module’s setup string.
The use of semicolons in Python code is rare and generally frowned upon by seasoned Pythonistas. However, this unpopular symbol helps sidestep a problem with Python’s significant whitespace, which can sometimes get messy in PyScript. In the next section, you’ll learn how to deal with block indentation and Python code formatting embedded in HTML.
Dealing With Python Code Formatting
When you embed a piece of CSS, JavaScript, or even an SVG image in an HTML document, there’s no risk of the web browser misinterpreting their associated code, because they’re all examples of free-form languages, which ignore extra whitespace. You can format your code however you like in those languages—for example, by removing line breaks—without losing any information. That’s what makes JavaScript’s minification possible.
Unfortunately, this isn’t true for Python, which follows the off-side rule for its syntax, where every space character counts. Because PyScript is such a novel technology, most of today’s automatic code formatters will likely make the wrong assumptions and destroy your Python code contained within the <py-script> tag by collapsing the significant whitespace. If that happens, you might end up with an error similar to this one:
Traceback (most recent call last):
  ...
  File "<exec>", line 2
    print(f"Python {sys.version}")
IndentationError: unexpected indent
In this case, Pyodide fails to parse your Python code snippet, which was embedded in HTML, due to a broken indentation. You’ll see this exception and the associated traceback in the document’s body as well as in the web developer’s console.
But that’s not all. If you declare a string literal in your Python code that happens to look like an HTML tag, then the browser will recognize it as an HTMLUnknownElement and strip it away, leaving only the text inside. Consider parsing XML as an example:
<py-script>
import xml.etree.ElementTree as ET
ET.fromstring("<person>John Doe</person>")
</py-script>
The code above uses the ElementTree API from Python’s standard library to parse a string containing an XML-formatted data record about a person. However, the actual parameter passed into the function will only be "John Doe" without the surrounding tags.
Notice that from the web browser’s perspective, <person> looks like another HTML tag nested under the <py-script> parent element. To avoid such ambiguity, you can replace the angle brackets (< and >) with their encoded counterparts known as HTML entities:
<py-script>
import xml.etree.ElementTree as ET
ET.fromstring("<person>John Doe</person>")
</py-script>
The < entity stands for the “less than” (<) character, whereas > replaces the “greater than” (>) character. Character entities allow browsers to render text literally, when it would otherwise be interpreted as HTML elements. This works in PyScript, but it doesn’t solve the indentation problem.
Note: In XML documents, you can wrap your content in a pair of character data (CDATA) markers as an alternative to using HTML entities. Unfortunately, most HTML parsers ignore CDATA.
Unless you’re only playing around with PyScript, then you’re usually better off extracting your Python code to a separate file instead of mixing it with HTML. You can do so by specifying the optional src attribute on the <py-script> element, which looks similar to the standard <script> tag meant for JavaScript:
<py-script src="/custom_script.py"></py-script>
This will load and immediately run your Python script as soon as the page is ready. If you only wish to load a custom module into the PyScript runtime in order to make it available for importing, then check out dependency management with <py-env> in the next section.
Note: Due to the cross-origin resource sharing (CORS) policy enforced by web browsers, you won’t be able to load a Python script from an external file when you’ve opened the page as a local file. You’ll need to host the HTML with the associated resources through a web server, such as Python’s built-in http.server mentioned earlier.
You can have multiple <py-script> tags on your page as long as they appear in the page’s <head> or <body>. PyScript will put them on a queue and run them in sequence.
Now you know how to run your Python code in the browser with PyScript. However, most practical applications require one or more dependencies. In the next section, you’ll find out how to leverage Python’s existing “batteries,” third-party libraries published on PyPI or elsewhere, and your own Python modules.
Managing Python Dependencies in PyScript
So far, you’ve seen the <py-script> and <py-config> custom tags provided by the framework. Another element that you’ll often want to use is <py-env>, which helps manage your project dependencies, similar to Python’s pip tool.
Modules Missing From the Python Standard Library
Python comes with batteries included, which means that many of its standard library modules already solve common problems that you might face during software development. You’ll find that most of these modules are available in Pyodide and PyScript out of the box, letting you import and use them right away. For instance, you’ve seen a code snippet that took advantage of the xml.etree package to parse an XML document.
However, there are a few notable exceptions due to the constraints of a web browser and an effort to reduce the download size. Anything irrelevant to a browser environment was removed from the current Pyodide release. In particular, these include but are not limited to the following modules and packages:
idlelib(Integrated Development and Learning Environment)tkinter(GUI programming)turtle(Turtle Graphics)- venv (Virtual Environments)
You can check the full list of removed packages on Pyodide’s documentation page.
Apart from that, a few packages were kept as placeholders, which might eventually get proper support once WebAssembly evolves in the future. Today, you can import them, as well as modules like urllib.request that depend on them, but they won’t work:
In general, you can’t start new processes, threads, or open low-level network connections. That being said, you’ll learn about some mitigations later in this tutorial.
What about using external libraries in PyScript that you’d typically install with pip into your virtual environment?
Third-Party Libraries Bundled With Pyodide
Pyodide is a spin-off project of the now discontinued Iodide parent project kicked off by Mozilla. Its goal was to provide the tools for doing scientific computing in the web browser in a way similar to Jupyter Notebooks but without the need for communicating with the server to run Python code. As a result, researchers would be able to share and reuse their work more easily for the price of limited computational power.
Because PyScript is a wrapper around Pyodide, you can access a number of popular third-party libraries that were compiled for WebAssembly with Pyodide, even those with parts written in C and Fortran. For instance, you’ll find the following packages there:
The actual list is much longer and isn’t limited to libraries designed strictly for data science. There were close to a hundred libraries bundled with Pyodide at the time of writing this tutorial. You can check Pyodide’s official documentation for the complete list or head over to the packages/ folder in the corresponding GitHub repository to see the latest status.
Even though these external libraries are part of a Pyodide release, they’re not automatically loaded into your Python runtime. Remember that each individual Python module must be fetched over the network into your web browser, which takes valuable time and resources. When PyScript starts, your environment has only the bare minimum necessary to interpret Python code.
To import modules that aren’t present in the Python standard library, you must explicitly request them by declaring their names in a <py-env> element:
<!DOCTYPE html>
<html lang="en">
<head>
  <meta charset="utf-8">
  <meta name="viewport" content="width=device-width, initial-scale=1">
  <title>Sine Wave</title>
  <link rel="stylesheet" href="https://pyscript.net/alpha/pyscript.css" />
  <script defer src="https://pyscript.net/alpha/pyscript.js"></script>
</head>
<body>
  <py-env>
    - matplotlib
    - numpy
  </py-env>
  <py-script>
import matplotlib.pyplot as plt
import numpy as np

time = np.linspace(0, 2 * np.pi, 100)
plt.plot(time, np.sin(time))
plt
  </py-script>
</body>
</html>
The <py-env> element contains a YAML list with the names of libraries to fetch on demand. When you look at the Network tab in your web development tools, you’ll notice that the browser downloads NumPy and Matplotlib from the CDN server or your local HTTP server hosting Pyodide. It also pulls several transitive dependencies required by Matplotlib, amounting to over twelve megabytes in size!
Note: You can place the <py-env> element in either your document’s header or body. Although some examples included in PyScript put this custom element between the header and the body, it doesn’t seem correct and may not work in all web browsers.
Alternatively, you can install dependencies programmatically in Python, as PyScript exposes Pyodide’s micropip tool, which is a streamlined version of pip:
<py-script>
# Run this using "asyncio"

async def main():
    await micropip.install(["matplotlib", "numpy"])

await loop.run_until_complete(main())

import matplotlib.pyplot as plt
import numpy as np

x = np.linspace(0, 2 * np.pi, 100)
plt.plot(x, np.sin(x))
plt
</py-script>
The micropip module and the implicit loop variable, which represents the default asynchronous event loop, are available in the global namespace in PyScript without the need for importing them.
Note that you must call the module’s .install() method asynchronously through Python’s asyncio package to hook into the web browser’s Fetch API leveraged by micropip. Also, while the imports style guide recommends putting your import statements at the top of the file, they have to come after the await statement here to make sure that the required libraries have been fetched and installed by micropip first.
Note: If the word asyncio appears anywhere in your code, including in a comment, then PyScript will run Python asynchronously using Pyodide’s .runPythonAsync() method. Otherwise, it’ll call the synchronous .runPython() counterpart, which doesn’t let you use the await keyword.
If Pyodide doesn’t find the required library in its bundled packages, then it’ll make an attempt to download it from the Python Package Index (PyPI). However, not all libraries will work that way due to certain runtime constraints.
Pure-Python Wheels Downloaded From PyPI
Say you wanted to create a PyScript application that parses XML using the untangle library, which is neither bundled with Pyodide nor distributed with the standard library. You add the following declaration to the <py-env> element and reload your page in the browser:
<py-env>
  - untangle
</py-env>
Pyodide contacts PyPI to fetch the associated JSON metadata and concludes that the library wasn’t built and uploaded with the expected Python wheel format. It’s only available as a source distribution (sdist), which might require an additional compilation step. It doesn’t matter if the library contains only pure Python code. In this case, Pyodide expects a wheel archive, which it can extract and start using immediately.
Slightly disappointed, you try your luck with another XML-parsing library called xmltodict, which converts documents to Python dictionaries rather than objects:
<py-env>
  - xmltodict
</py-env>
This time, the library’s metadata indicates that a pure-Python wheel archive is available, so Pyodide goes ahead and fetches it. If the library had its own dependencies, then Pyodide would try to fetch them too. However, the dependency resolution mechanism implemented in micropip is extremely rudimentary. From now on, the xmltodict library becomes importable in your PyScript application.
However, if you tried fetching a non-pure-Python library, such as a binary driver for the PostgreSQL database, then Pyodide would refuse to load it into your runtime. Even if it was built as Python wheels for various platforms, none of them would be suitable for WebAssembly. You can view the wheels uploaded to PyPI for any given library by clicking Download files on the corresponding page.
Note: You can optionally request packages from remote servers other than PyPI by providing their URLs in the <py-env> element as long as they’re pure-Python wheels:
<py-env>
  - http://local-pypi.org:8001/xmltodict-0.13.0-py2.py3-none-any.whl
</py-env>
The server hosting such wheels must be configured to return the CORS headers, such as Access-Control-Allow-Origin. Otherwise, the browser will refuse to fetch data from a different origin (protocol, domain, port number) and block the connection due to its security policy.
Also, the dependency resolution mechanism won’t work for custom URLs like the one above.
To sum up, a third-party library listed in <py-env> must be a pure-Python one and be distributed using the wheel format to be picked up, unless it’s already been built for WebAssembly and bundled with Pyodide. Getting a custom non-pure-Python library into PyScript is tricky.
C Extension Modules Compiled for WebAssembly
Many Python libraries contain bits of code written in C or other languages for performance gains and to leverage specific system calls unavailable in pure Python. There are a few ways to interface with such code, but it’s a common practice to wrap it in a Python C extension module that can be compiled to the native code of your platform and loaded dynamically at runtime.
Using the emscripten compiler lets you target WebAssembly instead of particular computer architecture and operating system. However, doing so is not an easy feat. Even if you know how to build a Python wheel for the Pyodide runtime and you’re not intimidated by the process, PyScript’s <py-env> tag always expects either a pure-Python wheel or a package bundled with Pyodide.
To install a wheel containing WebAssembly code, you can call Pyodide’s loadPackage() function using its Python interface, pyodide_js, mentioned earlier. You could also use Pyodide’s API in JavaScript directly, but it would start an independent runtime instead of hooking up to one already created by PyScript. As a result, your custom module with WebAssembly code wouldn’t be visible in PyScript.
Loading custom C extension modules may eventually become more straightforward. Until then, your best bet seems to be patiently waiting for Pyodide to ship with the desired library. Alternatively, you could build your own Pyodide runtime from source code with the extra cross-compiled libraries. There’s a command-line tool called pyodide-build, which automates some of the steps involved.
For now, you may want to stick with custom Python modules written by hand.
Custom Python Modules and Data Files
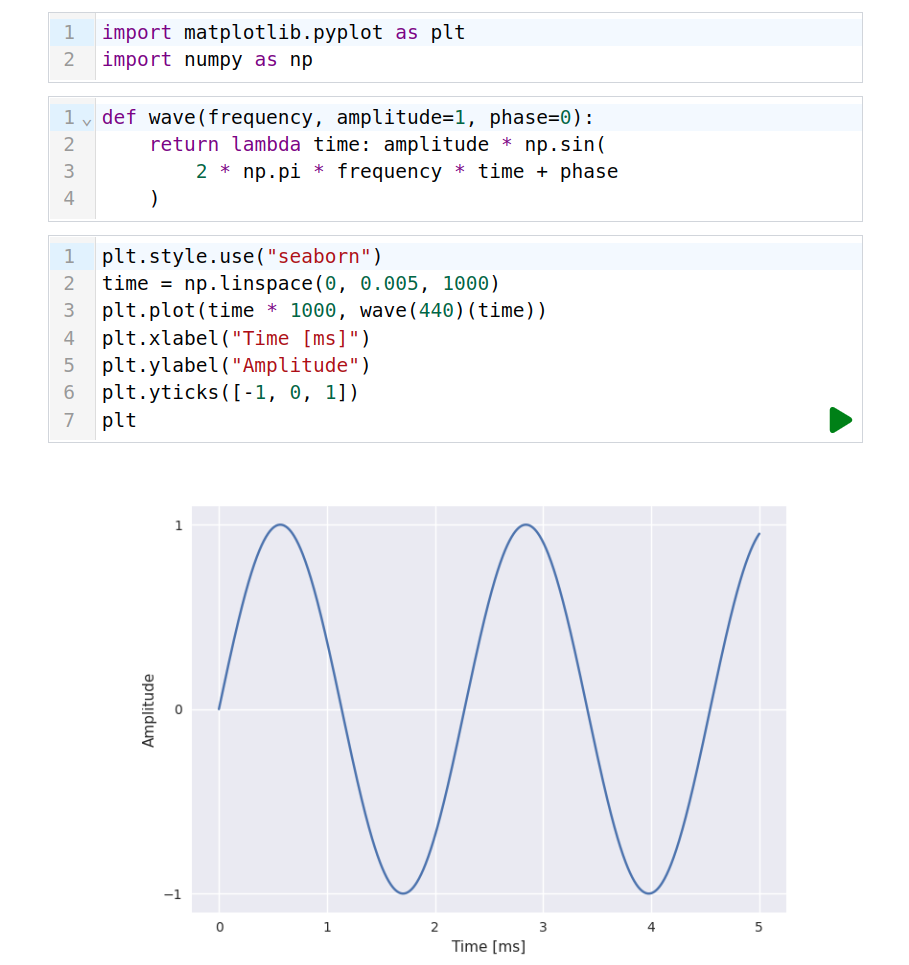
You can use <py-env> or micropip to make your custom modules importable in PyScript applications. Suppose you made a helper module called waves.py, which is sitting in an src/ subfolder:
# src/waves.py

import numpy as np

def wave(frequency, amplitude=1, phase=0):
    def _wave(time):
        return amplitude * np.sin(2 * np.pi * frequency * time + phase)

    return _wave
The name of your module uses a plural form to avoid clashing with the wave module in the standard library, which is used for reading and writing Waveform Audio File Format (WAV). Your module defines a single function called wave(), which returns a closure. The inner function _wave(), on which the closure is based, uses NumPy to generate a pure sine wave with the given frequency, amplitude, and phase.
Before you can import your module in a <py-script> tag, from either an inline or sourced script, you’ll need to fetch it into your web browser with <py-env> by specifying a special paths attribute in YAML:
<!DOCTYPE html>
<html lang="en">
<head>
  <meta charset="utf-8">
  <meta name="viewport" content="width=device-width, initial-scale=1">
  <title>Sine Wave</title>
  <link rel="stylesheet" href="https://pyscript.net/alpha/pyscript.css" />
  <script defer src="https://pyscript.net/alpha/pyscript.js"></script>
</head>
<body>
  <py-env>
    - matplotlib
    - numpy
    - paths:
        - src/waves.py
  </py-env>
  <py-script>
import matplotlib.pyplot as plt
import numpy as np
import waves

time = np.linspace(0, 2 * np.pi, 100)
plt.plot(time, waves.wave(440)(time))
plt
  </py-script>
</body>
</html>
The file path is relative to your HTML page. As before, you must host your files through a web server due to the CORS policy, which doesn’t allow getting additional files through the file:// protocol.
Note: You can’t load Python packages using paths, only modules. If you have a pure-Python package, then build a wheel distribution and host it with your other files or upload it to PyPI.
On the upside, it’s worth noting that while you can’t load a directory into PyScript, you can abuse the paths attribute to load virtually any file into it. That includes data files like textual CSV files or a binary SQLite database:
<!DOCTYPE html>
<html lang="en">
<head>
  <meta charset="utf-8">
  <meta name="viewport" content="width=device-width, initial-scale=1">
  <title>Loading Data</title>
  <link rel="stylesheet" href="https://pyscript.net/alpha/pyscript.css" />
  <script defer src="https://pyscript.net/alpha/pyscript.js"></script>
</head>
<body>
  <py-env>
    - paths:
        - data/people.csv
        - data/people.sql
  </py-env>
  <py-script>
with open("people.csv") as file:
    print(file.read())
  </py-script>
  <py-script>
import sqlite3

with sqlite3.connect("people.sql") as connection:
    cursor = connection.cursor()
    cursor.execute("SELECT * FROM people")
    for row in cursor.fetchall():
        print(row)
  </py-script>
</body>
</html>
Notice that when you fetch your files with <py-env>, then you lose information about their original directory structure, as all the files end up in a single target directory. When you open a file, you only specify its name without a path, which means that your files must be uniquely named. You’ll learn how to mitigate that problem later by writing to a virtual file system in Pyodide.
All right. Now that you know how to get your Python code or someone else’s into PyScript, you should learn to work with the framework more effectively.
Emulating Python REPL and Jupyter Notebook
A quick and fun way to learn Python or any of its underlying libraries is by trying them out in a live interpreter session, also known as the Read-Eval-Print-Loop (REPL). By interacting with the code, you can explore what functions and classes are available and how you’re supposed to use them. It’s no different with PyScript.
Because PyScript’s environment takes a while to load, refreshing the page every time you’ve edited your code isn’t going to cut it. Fortunately, the framework comes with yet another custom element called <py-repl>, which allows you to execute small snippets of code without reloading the page. You can have as many of those as you like in your HTML, leaving them empty or prepopulating them with some initial Python code:
<!DOCTYPE html>
<html lang="en">
<head>
  <meta charset="utf-8">
  <meta name="viewport" content="width=device-width, initial-scale=1">
  <title>PyScript REPL</title>
  <link rel="stylesheet" href="https://pyscript.net/alpha/pyscript.css" />
  <script defer src="https://pyscript.net/alpha/pyscript.js"></script>
  <py-env>
    - matplotlib
    - numpy
  </py-env>
</head>
<body>
  <py-repl>
import matplotlib.pyplot as plt
import numpy as np
  </py-repl>
  <py-repl>
def wave(frequency, amplitude=1, phase=0):
    def _wave(time):
        return amplitude * np.sin(2 * np.pi * frequency * time + phase)

    return _wave
  </py-repl>
  <py-repl></py-repl>
</body>
</html>
Unlike the elements that you’ve already explored, <py-repl> has a visual representation that builds on top of the CodeMirror editor, which supports themeable syntax highlighting, autocompletion, code folding, and more. As long as you’ve included the default CSS stylesheet provided by PyScript, this new element should look something like this when rendered in the browser:
Each instance of <py-repl> resembles a cell in a Jupyter Notebook. You can type multiple lines of Python code into a cell and click the green play button in its bottom-right corner to have your code executed. You may also use the Shift+Enter key combination to achieve a similar effect. Below are a few additional keyboard shortcuts provided by CodeMirror:
| Action | macOS | Windows and Linux |
|---|---|---|
| Search | Cmd+F | Ctrl+F |
| Select scope | Cmd+I | Ctrl+I |
| Select line | Ctrl+L | Alt+L |
| Delete line | Cmd+Shift+K | Ctrl+Shift+K |
| Insert line below | Cmd+Enter | Ctrl+Enter |
| Move selection up | Alt+Up | Alt+Up |
| Move selection down | Alt+Down | Alt+Down |
| Go to matching bracket | Cmd+Shift+\ | Ctrl+Shift+\ |
| Indent | Cmd+] | Ctrl+] |
| Dedent | Cmd+[ | Ctrl+[ |
The table above illustrates the default keymap, which can be tweaked to mimic Emacs, Vim, or Sublime Text.
If the last line in your cell contains a valid Python expression, then PyScript will append its representation just below the cell. For example, it may render a graph plotted with Matplotlib. When you view such a web page in the browser, it does start to look like a Jupyter Notebook.
However, unlike in a Jupyter Notebook, executing a <py-repl> won’t insert a new cell by default. If you’d like to enable such behavior, then set the element’s auto-generate attribute to true:
<py-repl auto-generate="true"></py-repl>
Now, when you run the code in such a cell for the first time, it’ll insert another one at the bottom of the page. The subsequent runs won’t, though. This new cell will have the auto-generate attribute itself.
Another default behavior of the <py-repl> element is appending new <div> containers for the Python output and tracebacks. You can optionally redirect the standard output and standard error streams to separate, custom elements on the page, letting you design an IDE-like environment in the browser:
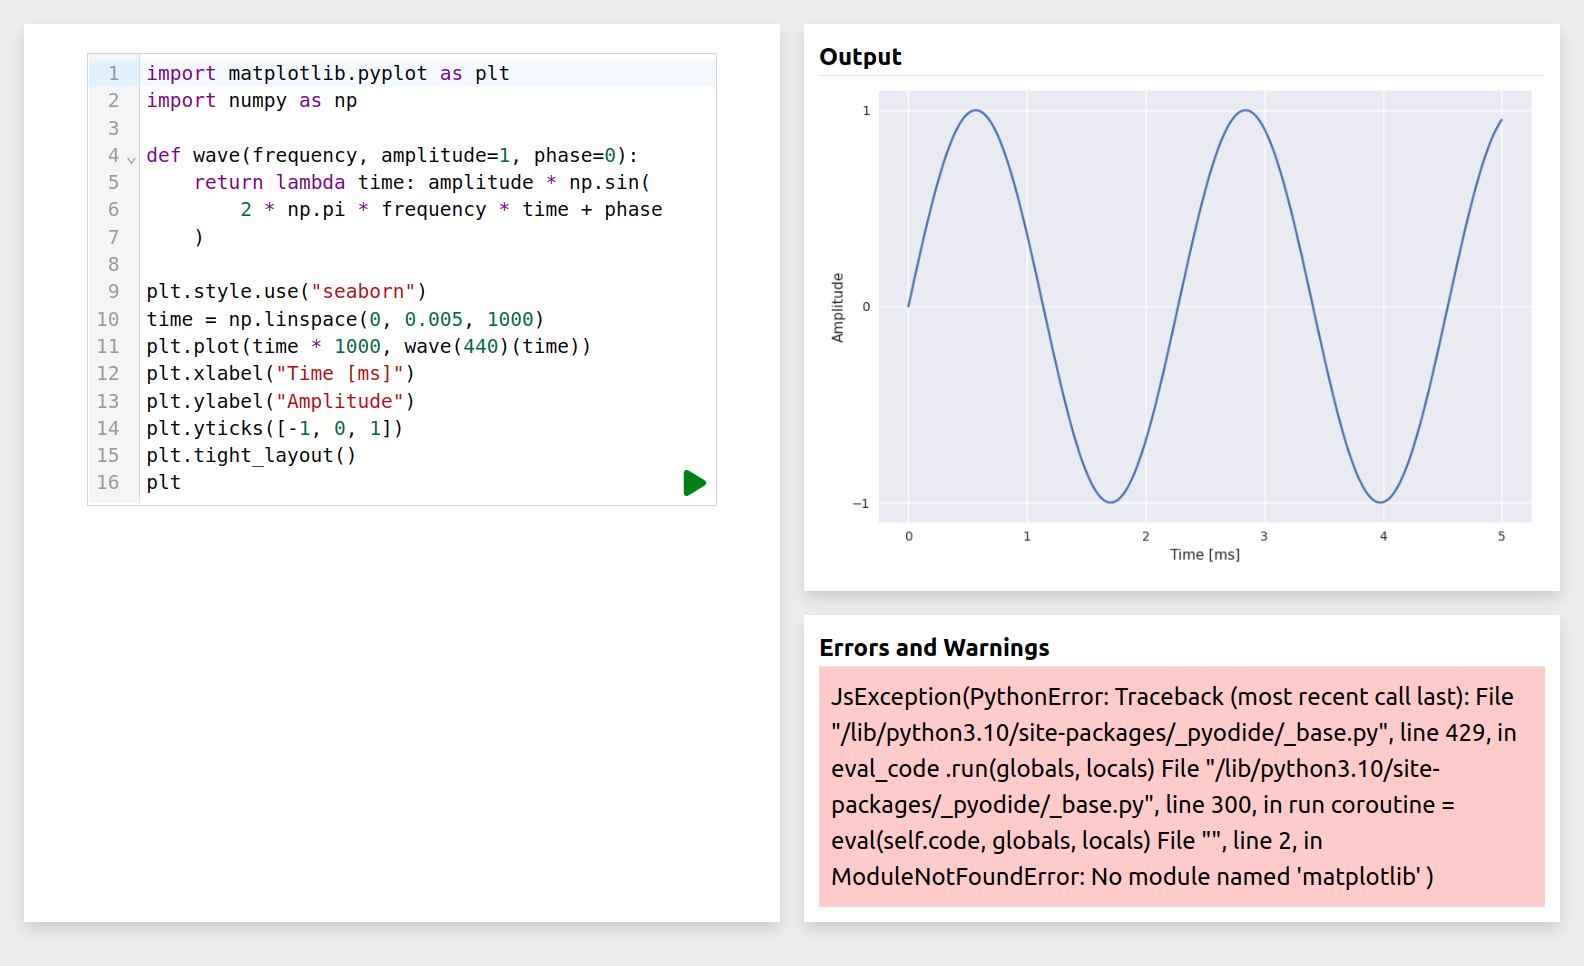
Here’s the code of the web page depicted in the screenshot above:
<!DOCTYPE html>
<html>
<head>
  <meta charset="utf-8">
  <meta name="viewport" content="width=device-width, initial-scale=1">
  <title>PyScript Playground</title>
  <link rel="stylesheet" href="https://pyscript.net/alpha/pyscript.css" />
  <script defer src="https://pyscript.net/alpha/pyscript.js"></script>
  <style>
    body {
      background-color: #eee;
    }
    .container {
      display: grid;
      grid-template-columns: 1fr 1fr;
      grid-auto-rows: minmax(200px, auto);
      grid-gap: 1em;
      margin-top: 1em;
    }
    .container > div:first-child {
      grid-row: 1/3;
    }
    .container > div {
      background-color: #fff;
      box-shadow: 0px 5px 10px #ccc;
      padding: 10px;
    }
  </style>
  <py-env>
    - matplotlib
    - numpy
  </py-env>
</head>
<body>
  <div class="container">
    <div>
      <py-repl std-out="output" std-err="errors"></py-repl>
    </div>
    <div>
      <b>Output</b><hr>
      <div id="output"></div>
    </div>
    <div>
      <b>Errors and Warnings</b><hr>
      <div id="errors"></div>
    </div>
  </div>
</body>
</html>
Use the std-out and std-err attributes to specify the corresponding target element IDs. If you’d like to combine both streams and dump them into a single element, then you can use the output attribute instead. The same attributes apply to the <py-script> element that you saw earlier.
The remaining elements currently supplied by PyScript are visual components, also known as widgets, which simplify working with HTML and Python. You’ll explore them now.
Exploring PyScript’s Visual Components
The visual components that PyScript provides are convenient wrappers for HTML elements, which might be helpful for beginners who don’t have much experience with web development, especially on the client side. However, those widgets are highly experimental, have limited functionality, and could be removed in the future. Sometimes, they load too quickly, before Pyodide is fully initialized, which causes errors. Use them at your own risk!
PyTitle
With the PyTitle element, you can quickly add a textual header to your web page, which will appear in uppercase letters and be centered horizontally, provided that you linked the default CSS stylesheet that comes with PyScript. Here’s how you can use this widget in your HTML code:
<py-title>PyScript Playground</py-title>
It’s a purely visual component with no additional attributes or behaviors, and it’ll only accept plain text content between its opening and closing tags.
PyBox
PyBox is a container element that can arrange its children using the CSS Flexbox layout model in the horizontal direction. It currently uses Tailwind CSS width classes, such as w-1, w-1/2, or w-full, to define the column widths.
Note: By the time you read this, it’s very likely that Tailwind will have been replaced by pure CSS in PyScript, so the code below might not work or may need a few tweaks. The primary motivation for this step is to reduce the download size of various resources.
You can specify the individual widths of your child elements through the optional widths attribute of the <py-box> parent:
<py-box widths="2/3;1/6;1/6">
  <div>Wide Column</div>
  <div>Narrow Column</div>
  <div>Narrow Column</div>
</py-box>
Notice that you only provide the part of a CSS class name that comes after the w- prefix, and you delimit the widths using a semicolon (;). In the example above, the first <div> would take up two-thirds of the available space in the row (⅔), while the other two elements together would account for one-third (⅙ + ⅙ = ⅓). If you skip the widths attribute, then all children will be stretched equally to have the same size.
PyButton
PyButton is the first interactive widget in PyScript that lets you call a Python function in response to a user action, like clicking a mouse button. To handle JavaScript’s click event, define an inline function named on_click() inside of your <py-button> element:
<py-button label="Click me" styles="btn big">
def on_click(event):
    print(event)
</py-button>
The function is a callback that takes a PointerEvent object and returns nothing. While it’s not possible to attach a callback defined elsewhere, you can always delegate to some helper function. If you don’t like the default look and feel of a PyButton, then you can overwrite it with one or more CSS classes through the styles attribute.
Another event that a PyButton supports is the focus event, which you can listen to by defining the on_focus() function. It’ll receive the FocusEvent object as an argument.
Sadly, due to the fast pace of development of PyScript and Pyodide, the latter introduced a breaking change in version 0.19 by fixing a memory leak, which unexpectedly made PyButton stop working. The same problem applies to PyInputBox, which you’ll learn about next. Hopefully, both widgets will have been repaired by the time you read this.
PyInputBox
PyInputBox is the last widget currently available in PyScript, and it wraps the HTML’s input element and lets you listen to the keypress event on it:
<py-inputbox>
def on_keypress(event):
    print(event)
</py-inputbox>
Note that the keypress event was deprecated in favor of the keydown event, which PyInputBox doesn’t support yet. Therefore, you might find it less cumbersome to access and manipulate standard HTML elements directly from PyScript without the extra abstraction layers that might break.
Using PyScript to Find and Manipulate HTML Elements
WebAssembly doesn’t currently allow direct interaction with the Document Object Model (DOM), which would typically give you access to the HTML’s underlying elements. Instead, you must use JavaScript to query and traverse the DOM tree. Accessing JavaScript objects in Python is possible thanks to Pyodide’s proxy objects, which facilitate the translation between both languages. There are two ways to use them for DOM manipulation in PyScript.
PyScript’s Adapter for JavaScript Proxy
For trivial use cases, when you’re in a hurry and don’t mind the lack of extra bells and whistles, you might give PyScript’s Element class a try. It’s already in your global namespace, meaning that you don’t have to import it. The class lets you find HTML elements only by ID and modify their content to a limited extent.
Consider the following sample HTML document:
<!DOCTYPE html>
<html>
<head>
  <meta charset="utf-8">
  <meta name="viewport" content="width=device-width, initial-scale=1">
  <title>DOM API in PyScript</title>
  <link rel="stylesheet" href="https://pyscript.net/alpha/pyscript.css" />
  <script defer src="https://pyscript.net/alpha/pyscript.js"></script>
  <style>
    .crossed {
      text-decoration: line-through;
    }
  </style>
</head>
<body>
  <div id="shopping-list">
    <p>Shopping List</p>
    <ul>
      <li class="crossed">milk</li>
      <li class="crossed">eggs</li>
      <li>bread</li>
    </ul>
    <input id="new-item" type="text" placeholder="Add new item">
    <button>Add</button>
  </div>
  <py-repl></py-repl>
</body>
</html>
It’s a shopping list with some crossed-off items and an input box at the bottom for adding new items to buy. The <py-repl> element will let you test and play around with the PyScript API interactively when you open this page in your web browser.
Say you want to determine which new shopping item a user has typed into that input box, and then you want to clear it. Here’s a piece of Python code that does just that when placed in either a <py-script> or <py-repl> tag:
input_new_item = Element("new-item")
print(input_new_item.value)
input_new_item.clear()
First, you grab a reference to the <input> element by calling the Element() class constructor with the HTML id attribute "new-item" as an argument. Then, you print the element’s .value property, and call .clear() to reset its value. You’ll need to type something into the input box before seeing any result.
The Element class has other valuable attributes, which are read-only, and a few methods that you can call to change the element’s style or state:
| Member | Description |
|---|---|
.element |
A proxy object for JavaScript’s HTML element |
.id |
The string value of an HTML element’s id attribute if it exists |
.value |
The string value of an HTML element’s .value property if it exists |
.add_class() |
Add one or more CSS classes |
.remove_class() |
Remove one or more CSS classes |
.write() |
Update the .innerHTML property or add a brand new <div> element |
.clear() |
Clear the .value or .innerHTML property |
.clone() |
Clone the element and insert its deep copy into the DOM tree |
.select() |
Find a descendant Element using a CSS selector |
At any time, you can drill down to the actual HTMLElement proxy wrapped by PyScript through the .element attribute. The .select() method is an interesting one because it lets you find a descendant element nested in your container element using any CSS selector and not just a plain ID. For example, you can find the first crossed-off list item and remove the crossed CSS class from it while adding it to the last element on that list:
shopping_list = Element("shopping-list")
shopping_list.select("ul > li.crossed").remove_class("crossed")
shopping_list.select("ul > li:last-child").add_class("crossed")
When you run this code snippet through your PyScript REPL, then the milk will no longer be crossed off, but the bread will be. The next time you run it, the eggs will become uncrossed too.
Note: Learning the CSS selector syntax can sometimes be frustrating, but it doesn’t have to! The best way to master it is by practicing and getting quick visual feedback. There are a ton of fun and interactive games that take you through the process in small incremental steps. One favorite is CSS Diner, which keeps to the culinary theme.
That’s about everything you can do with PyScript’s Element class. For the ultimate control over the DOM tree and your device, you’ll want to reach for the proxy object itself.
Pyodide’s JavaScript Proxy
Start by importing the js module provided by Pyodide in your PyScript code:
import js

print(js.window.innerWidth)
print(js.document.title)
js.console.log("Hello from Python!")
This module opens JavaScript’s global namespace up, revealing your functions and variables, as well as objects implicitly provided by the web browser. These include the window and document objects, as well as the HTMLElement data type, which you’ll be most interested in when manipulating the DOM.
Note that PyScript already imports a few things from the js module into the global namespace in Python for your convenience. In particular, the console and document objects are already there:
<py-script>
console.log("This looks like JavaScript, but it's Python!")
console.log(document.title)
</py-script>
You don’t have to import them yourself or prefix their names with the js module anymore, which makes Python look a lot like JavaScript when you squint your eyes.
Okay, what about adding new items to the shopping list from the previous section, based on the value of the input box? Here’s how you can do this by leveraging the DOM API in PyScript:
input_new_item = document.querySelector("#new-item")

if input_new_item.value:
    child = document.createElement("li")
    child.innerText = input_new_item.value

    parent = document.querySelector("#shopping-list ul")
    parent.appendChild(child)

    input_new_item.value = ""
This should look familiar to anyone who’s built web user interfaces using pure JavaScript before. You query the entire HTML document for the <input> element using a CSS selector. If the user has typed some value into that input box, then you create a new list item element (<li>) and populate it using the .innerText property. Next, you find the parent <ul> element and append the child. Finally, you clear the input box.
Note: People often refer to pure JavaScript as vanilla JavaScript. The term was coined by Eric Wastl, the creator of the Advent of Code, who started the Vanilla JS website as a joke to stress that you don’t need a framework like React to create front-end applications.
You can go even crazier with using the document object in PyScript. For instance, it’s possible to write code that looks like a hybrid of Python and JavaScript by combining the APIs of both:
from random import choice, randint

colors = ["azure", "beige", "khaki", "linen", "skyblue"]
for li in document.querySelectorAll("#shopping-list li"):
    if not li.hasAttribute("data-price"):
        li.dataset.price = randint(1, 15)
    li.classList.toggle("crossed")
    li.style.backgroundColor = choice(colors)
In this case, you import a few functions from the Python standard library to generate random values, and you also take advantage of the Python syntax, for example, to iterate over a JavaScript array wrapped in a proxy object. The loop goes through the shopping list items, conditionally assigns a random price to each, toggles their CSS class, and picks a random background color.
The DOM API exposed by the web browser is way too rich to fit in this tutorial, but feel free to expand the collapsible section below for a quick reference of the most important attributes and methods of the HTMLElement class:
Each HTML element has the following attributes in JavaScript:
| Attribute | Description |
|---|---|
.classList |
A list-like object with element’s CSS class names |
.className |
A string with the element’s class attribute value |
.dataset |
A dictionary-like object with custom key-value pairs |
.innerHTML |
A string with the HTML content between the opening and closing tags |
.innerText |
A string with the textual content between the opening and closing tags |
.style |
An object containing CSS style declarations |
.tagName |
An uppercase name of the HTML element tag |
Most of these attributes support reading and writing. In addition to them, you’ll also find attributes related to the DOM tree traversal relative to the current element:
| Attribute | Description |
|---|---|
.parentElement |
The parent of this element |
.children |
A list-like object of the immediate child elements |
.firstElementChild |
The first child element |
.lastElementChild |
The last child element |
.nextElementSibling |
The next element on the same tree level |
.previousElementSibling |
The previous element on the same tree level |
To manipulate generic attributes not listed here, you can call the following methods on an element:
| Method | Description |
|---|---|
.hasAttribute() |
Check if the element has a given attribute |
.getAttribute() |
Return the value of a given attribute |
.setAttribute() |
Assign or overwrite the value of an attribute |
.removeAttribute() |
Delete an attribute from the element |
Once you have an object reference to an element, you may want to narrow down the search space by looking up its descendants with a CSS selector while ignoring the rest of the branches in the document:
| Method | Description |
|---|---|
.querySelector() |
Return a nested element matching a given CSS selector |
.querySelectorAll() |
Return a list-like object of nested elements matching a given CSS selector |
These two methods work the same way as their counterparts in the document object. Additionally, you’ll be able to modify the structure of your DOM tree with the following handy methods:
| Method | Description |
|---|---|
.cloneNode() |
Create a shallow or deep copy of the element |
.appendChild() |
Add a new element as the last child |
.insertBefore() |
Insert a new element before the specified child |
.removeChild() |
Remove a given child element |
.replaceChild() |
Replace a given child with another element |
Finally, you’ll want to add behaviors to your element by making it respond to DOM events, usually caused by user actions:
| Method | Description |
|---|---|
.addEventListener() |
Register a callback for a given event type |
.removeEventListener() |
Unregister a callback for a given event type |
To use those, you’ll need to know about creating callback functions in PyScript, which you’ll learn about next.
To make the shopping list usable, it needs to become interactive. But how do you handle DOM events, such as mouse clicks, in PyScript? The answer is that you register a callback function!
Python Event Callback Proxy
You’ve already written the code that creates a new list item based on a value from the input box. However, it’s not tied to any visual component on the page, as you have to manually run it through the <py-repl> element. It would be nice if clicking on the Add button triggered that code for you.
First, you’ll need to encapsulate your existing code in a function that takes a DOM event as an argument. In JavaScript, you can skip arguments that you don’t need, but since you’re writing a Python function, its signature must be more explicit:
def on_add_click(event):
    # ...
The event argument will be unused and ignored, but that’s okay. Assuming you have your function in place, it’s time to tell the browser when to call it. You do that by adding an event listener to an element that should trigger an action. In this case, that element is the button, which you can find with an appropriate CSS selector, and the event name is "click":
button = document.querySelector("button")
button.addEventListener("click", on_add_click)
The second line in the code block above adds the listener, which will seemingly work without emitting any errors. However, as soon as you try clicking your button in the browser, nothing will happen.
Note: Whenever the browser doesn’t perform as expected, chances are that you’ll find errors with more details in the developer tools console, so it’s a good idea to keep it open while you’re developing.
The web browser expects a JavaScript callback, but you give it a Python function. To fix this, you can create a proxy object out of your Python callable by using a relevant function from the pyodide module:
from pyodide import create_proxy

button = document.querySelector("button")
button.addEventListener("click", create_proxy(on_add_click))
That’s it! You can now replace your <py-repl> tag with a <py-script> one that has the complete Python code, and you can start enjoying your first interactive PyScript application. Here’s the resulting HTML document structure:
<!DOCTYPE html>
<html>
<head>
  <meta charset="utf-8">
  <meta name="viewport" content="width=device-width, initial-scale=1">
  <title>DOM API in PyScript</title>
  <link rel="stylesheet" href="https://pyscript.net/alpha/pyscript.css" />
  <script defer src="https://pyscript.net/alpha/pyscript.js"></script>
  <style>
    .crossed {
      text-decoration: line-through;
    }
  </style>
</head>
<body>
  <div id="shopping-list">
    <p>Shopping List</p>
    <ul>
      <li class="crossed">milk</li>
      <li class="crossed">eggs</li>
      <li>bread</li>
    </ul>
    <input id="new-item" type="text" placeholder="Add new item">
    <button>Add</button>
  </div>
  <py-script>
from pyodide import create_proxy

def on_add_click(event):
    input_new_item = document.querySelector("#new-item")

    if input_new_item.value:
        child = document.createElement("li")
        child.innerText = input_new_item.value

        parent = document.querySelector("#shopping-list ul")
        parent.appendChild(child)

        input_new_item.value = ""

button = document.querySelector("button")
button.addEventListener("click", create_proxy(on_add_click))
  </py-script>
</body>
</html>
The equivalent JavaScript code would take about the same space due to calling the same API. On the one hand, using the proxy objects adds more characters, but on the other hand, Python doesn’t need curly brackets like JavaScript to delimit every code block.
Note: As a rule of thumb, you should prefer sourcing Python code from a separate file hosted on a web server to avoid indentation problems. If not, remember to correctly indent your inline code inside a <py-script> tag. As long as you keep such code aligned with the beginning of the line and don’t run any code formatting tools, then PyScript should have no trouble parsing it.
Apart from finding and manipulating HTML elements with the DOM API, you can do more cool stuff related to the web browser in PyScript. In the next section, you’ll take a closer look at a few remaining elements of the front-end programming that you’d typically have to code in JavaScript.
Interfacing With the Web Browser From Python
In traditional front-end development, you rely on the JavaScript engine as much as on the set of APIs provided by your execution environment, which are two separate parts of the equation. While the core of JavaScript is relatively small and behaves rather consistently across various vendors, the landscape of APIs can be vastly different depending on the target platform.
You can use JavaScript for the server-side code running in Node.js, client-side code executed in the web browser, or even code powering mobile apps. By the way, it’s technically possible to run PyScript in Node.js on the back-end, leveraging some of its distinctive APIs. However, in this section, you’ll focus on the browser APIs.
Cookies
Working with HTTP cookies in vanilla JavaScript without the aid of any external library can get clunky because it forces you to parse a long string containing the complete information of all cookies for a given domain. Conversely, defining a new cookie in JavaScript requires concatenating a string with the desired attributes manually. Fortunately, PyScript lets you use Python, which comes with batteries included.
One of the batteries at your fingertips is the http.cookies module, which can do the cookie string parsing and encoding for you. To parse the JavaScript’s document.cookie attribute, use the SimpleCookie class available in Python:
from http.cookies import SimpleCookie

for cookie in SimpleCookie(document.cookie).values():
    print(f"🍪 {cookie.key} = {cookie.value}")
The Python helper class is capable of parsing the entire string with cookie attributes that a server would typically send to the browser. However, in JavaScript, you only get to see the names and the corresponding values of non-HttpOnly cookies without their attributes.
Use the code snippet below to specify a new cookie that will expire in a year for the current domain. As a good citizen, you should also explicitly set the SameSite attribute to avoid relying on the default behavior, which varies across browsers and their versions:
from datetime import timedelta
from http.cookies import SimpleCookie

cookies = SimpleCookie()
cookies["dark_theme"] = "true"
cookies["dark_theme"] |= {
    "expires": int(timedelta(days=365).total_seconds()),
    "samesite": "Lax"
}

document.cookie = cookies["dark_theme"].OutputString()
Admittedly, the interface of this module looks quite dated and doesn’t conform to a Pythonic style, but it gets the job done. When you run this code and check your browser cookies, you’ll see a new dark_theme cookie set to true. You can fiddle with the number of seconds to see if your browser removes the cookie after a specified time.
You can optionally generate a Set-Cookie header string with additional attributes, some of which aren’t allowed in JavaScript:
from http.cookies import SimpleCookie

cookies = SimpleCookie()
cookies["session_id"] = "1ddb897c43fc5f1b773cc5af6cfbe4cf"
cookies["session_id"] |= {
    "httponly": True,
    "secure": True,
    "samesite": "Strict",
    "domain": "your-domain.org",
    "path": "/",
    "max-age": str(int(timedelta(hours=8).total_seconds())),
}

print(cookies["session_id"])
The above code would produce the following long line of text representing an HTTP header, which has been divided to fit on your screen and avoid horizontal scrolling:
Set-Cookie: session_id=1ddb897c43fc5f1b773cc5af6cfbe4cf;
⮑ Domain=your-domain.org;
⮑ HttpOnly;
⮑ Max-Age=28800;
⮑ Path=/;
⮑ SameSite=Strict;
⮑ Secure
You can’t set such a cookie yourself because it specifies certain attributes that aren’t allowed in JavaScript, but it may be possible to receive one from a web server when fetching some data.
Fetch API
When making HTTP requests from the web browser in JavaScript, you’re constrained to several security policies, which don’t give you as much freedom as you might be used to as a back-end developer. Furthermore, JavaScript’s inherently asynchronous model doesn’t play well with Python’s synchronous functions for making network connections. As a result, modules like urllib.request or socket are of no use in PyScript.
Pyodide recommends writing HTTP clients in terms of web APIs such as the promise-based Fetch API. To make calling that API from Python more straightforward, Pyodide provides the pyfetch() wrapper function, which works in an asynchronous context.
If you’re looking to make a REST API request, for example, to authenticate yourself with a username and a password, then you can call pyfetch(), which has a signature similar to JavaScript’s fetch() function:
 1# Run this using "asyncio"
 2
 3import json
 4
 5from pyodide.http import pyfetch
 6from pyodide import JsException
 7
 8async def login(email, password):
 9    try:
10        response = await pyfetch(
11            url="https://reqres.in/api/login",
12            method="POST",
13            headers={"Content-Type": "application/json"},
14            body=json.dumps({"email": email, "password": password})
15        )
16        if response.ok:
17            data = await response.json()
18            return data.get("token")
19    except JsException:
20        return None
21
22token = await loop.run_until_complete(
23    login("eve.holt@reqres.in", "cityslicka")
24)
25print(token)
The word asyncio, which appears in a comment at the top of the code fragment above, tells PyScript to run this code asynchronously so that you can await the event loop at the bottom. Remember that you can put this magic word anywhere in your code to trigger the same action, which is currently like casting a spell. Perhaps there will eventually be a more explicit way to toggle this behavior—for example, through an attribute on the <py-script> tag.
When you call the login() coroutine with an email address and a password, you make an HTTP POST request to a fake API hosted online. Notice that you serialize the payload to JSON in Python using the json module instead of JavaScript’s JSON object.
You can also use pyfetch() to download files and then save them to the virtual file system provided by emscripten in Pyodide. Note that these files will only be visible in your current browser session through the I/O interface, but you won’t find them in the Downloads/ folder on your disk:
# Run this using "asyncio"

from pathlib import Path

from pyodide.http import pyfetch
from pyodide import JsException

async def download(url, filename=None):
    filename = filename or Path(url).name
    try:
        response = await pyfetch(url)
        if response.ok:
            with open(filename, mode="wb") as file:
                file.write(await response.bytes())
    except JsException:
        return None
    else:
        return filename

filename = await loop.run_until_complete(
    download("https://placekitten.com/500/900", "cats.jpg")
)
Unless you want to save the file under a different name, you use the pathlib module to extract the filename from a URL that your function will return. The response object returned by pyfetch() has an awaitable .bytes() method, which you use to save the binary content to a new file.
Note: The server that you’re trying to download the files from must be configured to return the appropriate CORS headers, or else the browser will block your fetch request.
Later, you can read the downloaded file from the virtual file system and display it on an <img> element in HTML:
import base64

data = base64.b64encode(open(filename, "rb").read()).decode("utf-8")
src = f"data:image/jpeg;charset=utf-8;base64,{data}"
document.querySelector("img").setAttribute("src", src)
You’ll need to transform the raw bytes into text using Base64 encoding, and then format the resulting string as a data URL before assigning it to the src attribute of the image element.
As an alternative, you can use a completely synchronous function in PyScript to fetch data over the network. The only catch is that open_url() can’t read binary data:
from pyodide.http import open_url

pep8_url = "https://raw.githubusercontent.com/python/peps/main/pep-0008.txt"
pep8_text = open_url(pep8_url).getvalue()

import json
user = json.load(open_url("https://jsonplaceholder.typicode.com/users/2"))

svg = open_url("https://www.w3.org/Icons/SVG/svg-logo-v.svg")
print(svg.getvalue())
This first call to open_url() fetches the original text of the PEP 8 document, which you store in a variable. The second call communicates with a REST API endpoint that returns a user object in the JSON format, which you then deserialize to a Python dictionary. The third call downloads the official SVG logo, which you can render in your browser since SVG is a text-based format.
When you fetch data from the Internet, you usually want to store it for later access. Browsers offer a few web storage areas to choose from, depending on your information’s desired scope and lifetime. Local storage is your best option if you want to store data persistently.
Local Storage
In the following code snippet, you greet the user with a welcome message shown in an alert box, addressing them by the name that was previously saved in the browser’s local storage. If the user is visiting your page for the first time, then you display a prompt dialog asking for the user’s name:
from js import alert, prompt, localStorage, window

if not (name := localStorage.getItem("name")):
    name = prompt("What's your name?", "Anonymous")
    localStorage.setItem("name", name)

alert(f"Welcome to {window.location}, {name}!")
To get a hold of the local storage, you import the localStorage reference from JavaScript and use its .getItem() and .setItem() methods to persist key-value pairs. You also take advantage of the Walrus operator (:=), introduced in Python 3.8, to make the code more concise, and you display the URL address of the browser window.
Okay, how about something more exciting?
Sensor API
Web browsers running on mobile devices like tablets or smartphones expose the Sensor API, which gives JavaScript programmers access to the device’s accelerometer, ambient light sensor, gyroscope, or magnetometer if it’s equipped with one. Additionally, some sensors can be emulated in software by combining the signals from multiple physical sensors, reducing noise. A gravity sensor is a good example.
You can check out a live demo illustrating the use of the gravity sensor in PyScript. Make sure to open the link on a mobile device. As soon as you change the orientation of your phone or tablet, you’ll see one of these messages displayed on the screen:
- Horizontal counterclockwise
- Horizontal clockwise
- Vertical upright
- Vertical upside down
- Screen up
- Screen down
- Tilted
In case your device doesn’t come with a gravity sensor or you’re accessing the site over an unencrypted connection, you’ll get notified about that through a pop-up window. Alternatively, you might just see a blank screen.
Note: Make sure to host your HTML file through the secure HTTPS protocol to use the Sensor API. Web browsers will block this JavaScript API for content served over plain HTTP. You can check out how to publish your PyScript application for more details on that.
To hook into a sensor on your device, you’re going to need to write a bit of a JavaScript glue code because PyScript doesn’t currently export the Pyodide instance that it creates into the JavaScript’s global namespace. If it did, then you could grab one and access the Python proxy objects in JavaScript with slightly less hassle. For now, you’ll go the other way around by calling a JavaScript function from Python.
Create a new index.html file and keep adding content to it. First, define a <script> tag in your HTML web page and fill it in with the following JavaScript code:
<!DOCTYPE html>
<html>
<head>
  <meta charset="utf-8">
  <meta name="viewport" content="width=device-width, initial-scale=1">
  <title>PyScript Gravity Sensor</title>
  <link rel="stylesheet" href="https://pyscript.net/alpha/pyscript.css" />
  <script defer src="https://pyscript.net/alpha/pyscript.js"></script>
</head>
<body>
  <script>
    function addGravityListener(callback) {
      if ("GravitySensor" in window) {
        const sensor = new GravitySensor({frequency: 60})
        sensor.addEventListener("reading",
          () => callback(sensor.x, sensor.y, sensor.z)
        )
        sensor.start()
      } else {
        alert("Gravity sensor unavailable")
      }
    }
  </script>
</body>
</html>
The function takes a callback, which will be a JavaScript proxy for your Python function. It then checks if your browser supports the GravitySensor interface and creates a new sensor instance with a sampling frequency of sixty times per second. A single sensor reading is a three-dimensional vector representing the direction and magnitude of gravity.
Next up, implement and register the Python callback in the browser using PyScript:
<!DOCTYPE html>
<html>
<head>
  <meta charset="utf-8">
  <meta name="viewport" content="width=device-width, initial-scale=1">
  <title>PyScript Gravity Sensor</title>
  <link rel="stylesheet" href="https://pyscript.net/alpha/pyscript.css" />
  <script defer src="https://pyscript.net/alpha/pyscript.js"></script>
</head>
<body>
  <span></span>
  <script>
    function addGravityListener(callback) {
      if ("GravitySensor" in window) {
        const sensor = new GravitySensor({frequency: 60})
        sensor.addEventListener("reading",
          () => callback(sensor.x, sensor.y, sensor.z)
        )
        sensor.start()
      } else {
        alert("Gravity sensor unavailable")
      }
    }
  </script>
  <py-script>
from js import addGravityListener
from pyodide import create_proxy

span = document.querySelector("span")

def callback(x, y, z):
    span.innerText = f"{x:.1f}, {y:.1f}, {z:.1f}"

addGravityListener(create_proxy(callback))
  </py-script>
</body>
</html>
Assuming there’s a <span> element somewhere on your page, you find its reference using a CSS selector and then write a formatted string with the three components of the gravity vector into it after taking a sensor reading. Note the need for wrapping your Python callback in a JavaScript proxy before registering it as a listener.
Note: Testing a web page on a mobile device becomes difficult because you don’t have access to the usual web development tools and the console. To help yourself, you can enable USB debugging on your Android device and take advantage of remote debugging in Google Chrome. This feature isn’t supported for iOS devices.
Knowing the direction of the gravity vector will tell you something about your phone’s orientation, which can be useful when you want to take a level picture or to detect when you picked up the device from the desk, for example. The magnitude of the gravity vector is the Earth’s acceleration, which you might use as a rough estimate of altitude.
To make this example more interesting, go ahead and use NumPy to detect various orientations of the device:
<!DOCTYPE html>
<html>
<head>
  <meta charset="utf-8">
  <meta name="viewport" content="width=device-width, initial-scale=1">
  <title>PyScript Gravity Sensor</title>
  <link rel="stylesheet" href="https://pyscript.net/alpha/pyscript.css" />
  <script defer src="https://pyscript.net/alpha/pyscript.js"></script>
  <py-env>
    - numpy
  </py-env>
</head>
<body>
  <span></span>
  <script>
    function addGravityListener(callback) {
      if ("GravitySensor" in window) {
        const sensor = new GravitySensor({frequency: 60})
        sensor.addEventListener("reading",
          () => callback(sensor.x, sensor.y, sensor.z)
        )
        sensor.start()
      } else {
        alert("Gravity sensor unavailable")
      }
    }
  </script>
  <py-script>
from js import addGravityListener
from pyodide import create_proxy
import numpy as np

span = document.querySelector("span")

def callback(x, y, z):
    span.innerText = orientation(x, y, z)

def orientation(x, y, z):
    gravity = np.array([x, y, z])
    v = list(np.round(gravity / np.linalg.norm(gravity)).astype(int))
    if v == [ 1,  0,  0]: return "Horizontal counterclockwise"
    if v == [-1,  0,  0]: return "Horizontal clockwise"
    if v == [ 0,  1,  0]: return "Vertical upright"
    if v == [ 0, -1,  0]: return "Vertical upside down"
    if v == [ 0,  0,  1]: return "Screen up"
    if v == [ 0,  0, -1]: return "Screen down"
    return "Tilted"

addGravityListener(create_proxy(callback))
  </py-script>
</body>
</html>
You add the <py-env> declaration to fetch NumPy into your PyScript environment. Then, you import the library at the top of your existing <py-script> tag and make the callback delegate the processing to a helper function. The new orientation() function normalizes and rounds your gravity vector to compare it against a few unit vectors along the axes in the device coordinate system.
If your device doesn’t support the gravity sensor, then try to identify other sensors that work, then think of an idea for another application and adapt the code shown in this example accordingly. You can share your cool idea in the comments section below!
Timer Functions
JavaScript often uses so-called timer functions to schedule a callback to run once in the future or periodically every specified number of milliseconds. The latter can be useful for animating content on the page or polling the server for the latest snapshot of rapidly changing data.
If you intend to delay the execution of a one-off function—for example, to display a reminder notification or a pop-up window after a specific time—then consider using create_once_callable() to create a proxy object. Pyodide will automatically dispose of it when done:
from js import alert, setTimeout
from pyodide import create_once_callable

setTimeout(
  create_once_callable(
    lambda: alert("Reminder: Meeting in 10 minutes")
  ),
  3000  # Delay in milliseconds
)
You use the setTimeout() function from JavaScript, which expects a callable object, such as a Python lambda function wrapped in a proxy, and the number of milliseconds to wait before running your callable. Here, you display an alert box with a reminder after three seconds.
You’ll notice that PyScript prints a numeric value onto the HTML document after running the code above. It’s the return value of the setTimeout() function, which provides a unique identifier of the timeout, which you can optionally cancel with the corresponding clearTimeout() function:
from js import alert, setTimeout, clearTimeout
from pyodide import create_once_callable

timeout_id = setTimeout(
  create_once_callable(
    lambda: alert("Reminder: Meeting in 10 minutes")
  ),
  3000  # Delay in milliseconds
)

clearTimeout(timeout_id)
In this case, you cancel the timeout using its unique identifier immediately after scheduling your callback, so it never runs.
There’s an analogous pair of JavaScript functions named setInterval() and clearInterval() that work largely the same. However, the calls to your callback will be made repeatedly at intervals—for example, every three seconds minus the execution time of your function. If your function takes longer to execute, then it’ll run as soon as possible next time, without delay.
To use setInterval() in PyScript, you’ll need to remember to wrap your callback function with a call to create_proxy() instead of create_once_callable() to prevent Pyodide from disposing of it after the first run:
from random import randint

from js import alert, setInterval, setTimeout, clearInterval
from pyodide import create_once_callable, create_proxy

def callback():
    r, g, b = randint(0, 255), randint(0, 255), randint(0, 255)
    document.body.style.backgroundColor = f"rgb({r}, {b}, {b})"

interval_id = setInterval(create_proxy(callback), 1000)

_ = setTimeout(
    create_once_callable(
        lambda: clearInterval(interval_id)
    ),
    10_000
)
A few things are going on here. You register a callback to run every second, which sets the document’s background to a random color. Then, after ten seconds, you stop it by clearing the respective interval. Finally, to prevent PyScript from showing the timeout’s identifier, you assign the return value of setTimeout() to a placeholder variable denoted with an underscore (_), which is a standard convention in Python.
All right. These were the essential parts of the web browser interface that you could use in JavaScript, which are now available to you in Python, thanks to PyScript. Next up, you’ll have a chance to use some of the web browser’s capabilities to enhance your hands-on PyScript project.
Combining the Power of Python and JavaScript Libraries
One of the strengths of PyScript is the ability to combine existing libraries written in Python and JavaScript. Python has numerous fantastic data science libraries but not so many JavaScript equivalents. On the other hand, JavaScript has always naturally lent itself to building attractive user interfaces in the browser.
In this section, you’ll build a PyScript application that ties Python and JavaScript libraries together to make an interactive user interface in the browser. More specifically, you’ll simulate a sine wave interference of two slightly different frequencies, known as a beat in acoustics. By the end, you’ll have the following client-side application:
There are two sliders, which let you fine-tune the frequencies, and a <canvas> element depicting the plot of the waveform, which results from superimposing the two signals. Moving the sliders causes the plot to update in real-time.
You’ll perform the calculations in Python’s NumPy library, and you’ll draw the result using JavaScript’s open-source Chart.js library. It’s worth noting that Chart.js isn’t as fast as some of its paid competitors, but it’s free and fairly straightforward to use, so you’ll stick with it for now.
HTML and CSS
As the first step, you’ll need to scaffold your HTML document structure, style it with CSS, and include some necessary boilerplate code. Because this example is slightly more involved than the ones that you saw earlier in this tutorial, it makes sense to keep Python, JavaScript, and CSS code in separate files and link them in HTML. Save the following code in a new file named index.html:
<!DOCTYPE html>
<html>
<head>
    <meta charset="utf-8">
    <meta name="viewport" content="width=device-width, initial-scale=1">
    <title>Sine Wave Interference</title>
    <link rel="stylesheet" href="https://pyscript.net/alpha/pyscript.css" />
    <script defer src="https://pyscript.net/alpha/pyscript.js"></script>
    <script src="https://cdn.jsdelivr.net/npm/chart.js"></script>
    <link rel="stylesheet" href="theme.css" />
    <py-env>
      - numpy
      - paths:
        - src/waves.py
    </py-env>
</head>
<body>
  <fieldset>
    <legend>Frequency<sub>1</sub></legend>
    <input id="range1"
      type="range" min="440" max="442" step="0.1" value="440">
    <label for="range1">440</label> Hz
  </fieldset>
  <fieldset>
    <legend>Frequency<sub>2</sub></legend>
    <input id="range2"
      type="range" min="440" max="442" step="0.1" value="441">
    <label for="range2">441</label> Hz
  </fieldset>
  <canvas id="chart"></canvas>
  <py-script src="src/controls.py"></py-script>
  <script src="src/plotting.js"></script>
</body>
</html>
You include the usual PyScript files in your HTML header, the Chart.js library served from the jsDelivr CDN, and a custom CSS stylesheet that you’ll host locally. You also list NumPy and a custom helper module, which you built previously, as your dependencies in a <py-env> tag. At the bottom of the document, you source the core Python module and the plotting code in JavaScript.
Your custom CSS stylesheet ensures a bit of padding around the document’s body and gives the canvas a fixed size:
/* theme.css */

body {
  padding: 10px;
}
canvas {
  max-width: 800px;
  max-height: 400px;
}
Remember to place your custom style rules after the PyScript stylesheet in HTML to have an effect. Because the browser reads the document from top to bottom, whatever comes next might override the previous rules.
With the presentation layer out of the way, it’s time to turn your attention to the plotting code for a second.
JavaScript Code
To use Chart.js, you need to create a Chart instance and pass your data to it at some point. While you only need to make the chart once, you’ll be updating your data many times over, so you can define a callback function to reuse that logic:
// src/plotting.js

const chart = new Chart("chart", {
  type: "line",
  data: {
    datasets: [{
        borderColor: "#007cfb",
        backgroundColor: "#0062c5",
      }
    ]
  },
  options: {
    plugins: {
      legend: {display: false},
      tooltip: {enabled: false},
    },
    scales: {
      x: {display: false},
      y: {display: false}
    },
  }
})

function updateChart(xValues, yValues) {
  chart.data.labels = xValues
  chart.data.datasets[0].data = yValues
  chart.update()
}
The chart’s constructor function expects the id attribute of a <canvas> element where your plot will appear and a configuration object describing the look and feel of the chart. Your callback function also takes two arguments—that is, the x and y values of the data series to plot. These data points come from your Python code, which you’ll check out now.
Python Code
There are two files with Python source code in this application. One is a utility module with a helper function that can generate wave functions having the desired frequency, amplitude, and phase. At the same time, the other Python file is the controller layer of your application, which imports the former.
Here’s the utility module depicted for your convenience again:
# src/waves.py

import numpy as np

def wave(frequency, amplitude=1, phase=0):
    def _wave(time):
        return amplitude * np.sin(2 * np.pi * frequency * time + phase)

    return _wave
While you’ve already used this function before, the controller module might need a few words of explanation, as it contains a fair amount of code:
 1# src/controls.py
 2
 3import numpy as np
 4from pyodide import create_proxy, to_js
 5
 6from js import updateChart
 7from waves import wave
 8
 9range1 = document.querySelector("#range1")
10range2 = document.querySelector("#range2")
11
12sampling_frequency = 800
13seconds = 1.5
14time = np.linspace(0, seconds, int(seconds * sampling_frequency))
15
16def on_range_update(event):
17    label = event.currentTarget.nextElementSibling
18    label.innerText = event.currentTarget.value
19    plot_waveform()
20
21def plot_waveform():
22    frequency1 = float(range1.value)
23    frequency2 = float(range2.value)
24
25    waveform = wave(frequency1)(time) + wave(frequency2)(time)
26    updateChart(to_js(time), to_js(waveform))
27
28proxy = create_proxy(on_range_update)
29range1.addEventListener("input", proxy)
30range2.addEventListener("input", proxy)
31
32plot_waveform()
Here’s a breakdown of what this code does line by line:
- Lines 3 and 4 import code from the required third-party libraries.
- Lines 6 and 7 import your custom functions from Python and JavaScript utility modules that you linked in HTML before.
- Lines 9 and 10 query the HTML document with CSS selectors to find the two slider elements and save them in variables for later use.
- Lines 12 to 14 compute the x values of your time series, which has a duration of one and a half seconds sampled eight hundred times per second.
- Lines 16 to 19 define a callback function responding to value changes of one of your sliders, which represent wave frequencies. The function updates the corresponding label in HTML and calls another function to recalculate the waveform and update the plot.
- Lines 21 to 26 define a helper function, which reads the current frequency values from the sliders, generates new wave functions, and adds them together for the specified time duration. Next, the helper function converts the resulting x and y values to JavaScript proxies with Pyodide’s
to_js(), and passes them to a callback defined in your JavaScript module. - Lines 28 to 30 wrap your
on_range_update()event listener in a JavaScript proxy and register it as a callback in both sliders so that the web browser will call it when you change the sliders’ values. - Line 32 calls the
plot_waveform()helper function to show the initial plot of the waveform when the page loads.
Alternatively, if you wish to use Matplotlib for plotting to eliminate JavaScript from your code, then you could create a figure and use PyScript’s Element.write() method like this:
import matplotlib.pyplot as plt

fig, _ = plt.subplots()
# ...
Element("panel").write(fig)
The Element() class constructor takes the id attribute of an HTML element, which is usually a <div>.
Feel free to enhance this project—for example, by turning the generated acoustic wave into an audio stream and playing it in your browser. It has a peculiar sound! On the other hand, if you’re satisfied with the project in its current form, then you’ll learn how to share it for free with anyone in the world, even if they don’t have a Python interpreter installed on their computer.
Publishing Your PyScript Application on GitHub Pages
Because PyScript allows you to run code entirely in your client’s web browser, you don’t need a back-end server to have that code executed for you. Therefore, distributing PyScript applications boils down to hosting a bunch of static files for the browser to consume. GitHub Pages are a quick and straightforward way to turn any of your Git repositories into a website for free.
You’re going to reuse your code from the previous section, so before going any further, make sure that you have the following directory structure in place:
sine-wave-interference/
│
├── src/
│   ├── controls.py
│   ├── plotting.js
│   └── waves.py
│
├── index.html
└── theme.css
To start using GitHub Pages, log in to your GitHub account and create a new public repository named sine-wave-interference, leaving all the default options. You don’t want GitHub to create any files for you at this stage, because they would conflict with the code you already have on your computer. Take note of your unique repository URL afterward. It should look something like this:
git@github.com:your-username/sine-wave-interference.git
Now, open the terminal and change your working directory to the project root folder. Then, initialize a new local Git repository, make your first commit, and push the files to the remote repository on GitHub using your unique URL:
$ cd sine-wave-interference/
$ git init
$ git add .
$ git commit -m "Initial commit"
$ git remote add origin git@github.com:your-username/sine-wave-interference.git
$ git push -u origin master
You can now go to your GitHub repository settings and enable GitHub Pages by choosing the branch and folder to host. Since you only have the master branch, you want to select it from the dropdown menu. You should also leave the root folder / selected, and click the Save button to confirm. When you do, GitHub will need a few minutes until you can view your live website.
The public URL address of your repository will be similar to this:
https://your-username.github.io/sine-wave-interference/
Congratulations! You can now share this URL with anyone who has a modern web browser, and they’ll be able to play with your PyScript application online. The next step for you after reaching this point would be to include the minified resources in your repository and update the relative paths in the HTML document to make the load time somewhat faster.
Contributing to PyScript
Getting involved in an open-source project can be intimidating. However, because PyScript is such a young framework, tapping into its source code and fiddling with it isn’t actually that difficult. All you need is a Git client, a recent version of Node.js, and the npm package manager.
Note: You can install Node.js through the Node Version Manager, which is similar to pyenv in Python.
Once you have those three tools configured, start by cloning the PyScript repository from GitHub and installing the required dependencies into a local node_modules/ folder:
$ git clone git@github.com:pyscript/pyscript.git
$ cd pyscript/pyscriptjs/
$ npm install --global rollup
$ npm install
You’ll run these commands only once because you won’t be adding any new dependencies to the project. Next, find the file named main.ts in the src/ subfolder, open it in your favorite code editor, and rename the custom <py-script> HTML tag associated with the PyScript class to, for instance, <real-python>:
- const xPyScript = customElements.define('py-script', PyScript);
+ const xPyScript = customElements.define('real-python', PyScript);
Remember that custom tag names must contain a hyphen to differentiate them from regular ones. Then, in your terminal, change the current working directory to the pyscriptjs/ subfolder in the cloned project, and run the build command:
$ npm run build
This will produce a new pyscript.js file, among a few others, which you can host locally instead of linking to the official build on CDN. When you do, you’ll be able to embed Python code in your new shiny tag:
<!DOCTYPE html>
<html lang="en">
<head>
  <meta charset="utf-8">
  <meta name="viewport" content="width=device-width, initial-scale=1">
  <title>Hello, World!</title>
  <link rel="stylesheet" href="/pyscript.css" />
  <script defer src="/pyscript.js"></script>
</head>
<body>
  <real-python>print("Hello, World!")</real-python>
</body>
</html>
Awesome! Now, you can fork this on GitHub and open a pull request. Just kidding! It was a toy example, but it nicely demonstrated a few basic steps of working with PyScript on a slightly lower level. Even if you don’t intend to make any contributions to PyScript, browsing its source code might give you a better understanding of its inner workings.
Conclusion
Now you have a pretty good idea of what PyScript is, how it works, and what it has to offer. You can mitigate some of its current shortcomings and even customize it to your liking. Additionally, you’ve seen several hands-on examples demonstrating the framework’s features and practical applications.
In this tutorial, you learned how to:
- Build interactive front-end apps using Python and JavaScript
- Run existing Python code in the web browser
- Reuse the same code on the back-end and the front-end
- Call Python functions from JavaScript and the other way around
- Distribute Python programs with zero dependencies
PyScript is undoubtedly an exciting new technology that allows you to run Python code in the web browser thanks to Pyodide and WebAssembly. While there have been earlier attempts at this, PyScript is the first framework that runs a genuine CPython interpreter in the browser, making it possible to reuse existing Python programs with few to no modifications.
Free Download: Get a sample chapter from CPython Internals: Your Guide to the Python 3 Interpreter showing you how to unlock the inner workings of the Python language, compile the Python interpreter from source code, and participate in the development of CPython.
What do you think of PyScript? Will it ever truly replace JavaScript in the browser? Are you going to give it a try in your next project? Leave a comment below!