
In this article, you’ll learn how to make your own Twitter Bot in Python with Tweepy, a package that provides a very convenient way to use the Twitter API.
Twitter is one of the most widely used social networks. For many organizations and people, having a great Twitter presence is a key factor to keeping their audience engaged.
Part of having a great Twitter presence involves keeping your account active with new tweets and retweets, following interesting accounts, and quickly replying to your followers’ messages. You can do all this work manually, but that can take a lot of time. Instead, you can rely on a Twitter Bot, a program that automates all or part of your Twitter activity.
In this article, you’ll learn how to:
- Improve and automate your interactions with your Twitter audience
- Install Tweepy
- Sign up as a Twitter developer to use its API
- Use Tweepy to invoke the Twitter API
- Build Twitter Bots
- Deploy the bots to a server using Docker and AWS
Free Bonus: 5 Thoughts On Python Mastery, a free course for Python developers that shows you the roadmap and the mindset you’ll need to take your Python skills to the next level.
Hello Tweepy
To start, here’s how you can use Tweepy to create a tweet saying Hello Tweepy:
import tweepy

# Authenticate to Twitter
auth = tweepy.OAuthHandler("CONSUMER_KEY", "CONSUMER_SECRET")
auth.set_access_token("ACCESS_TOKEN", "ACCESS_TOKEN_SECRET")

# Create API object
api = tweepy.API(auth)

# Create a tweet
api.update_status("Hello Tweepy")
This is a short example, but it shows the four steps common to all Tweepy programs:
- Import the
tweepypackage - Set the authentication credentials
- Create a new
tweepy.APIobject - Use the
apiobject to call the Twitter API
Objects belonging to the tweepy.API class offer a vast set of methods that you can use to access almost all Twitter functionality. In the code snippet, we used update_status() to create a new Tweet.
We will see later in this article how the authentication works and how you can create the required authentication key, token, and secrets.
This is just a little example of what you can do with Tweepy. Through this article, you’ll learn how to build programs that interact with Twitter in much more interesting and complex ways.
Twitter API
The Twitter API gives developers access to most of Twitter’s functionality. You can use the API to read and write information related to Twitter entities such as tweets, users, and trends.
Technically, the API exposes dozens of HTTP endpoints related to:
- Tweets
- Retweets
- Likes
- Direct messages
- Favorites
- Trends
- Media
Tweepy, as we’ll see later, provides a way to invoke those HTTP endpoints without dealing with low-level details.
The Twitter API uses OAuth, a widely used open authorization protocol, to authenticate all the requests. Before making any call to the Twitter API, you need to create and configure your authentication credentials. Later in this article, you’ll find detailed instructions for this.
You can leverage the Twitter API to build different kinds of automations, such as bots, analytics, and other tools. Keep in mind that Twitter imposes certain restrictions and policies about what you can and cannot build using its API. This is done to guarantee users a good experience. The development of tools to spam, mislead users, and so on is forbidden.
The Twitter API also imposes rate limits about how frequently you’re allowed to invoke API methods. If you exceed these limits, you’ll have to wait between 5 and 15 minutes to be able to use the API again. You must consider this while designing and implementing bots to avoid unnecessary waits.
You can find more information about the Twitter API’s policies and limits in its official documentation:
What Is Tweepy?
Tweepy is an open source Python package that gives you a very convenient way to access the Twitter API with Python. Tweepy includes a set of classes and methods that represent Twitter’s models and API endpoints, and it transparently handles various implementation details, such as:
- Data encoding and decoding
- HTTP requests
- Results pagination
- OAuth authentication
- Rate limits
- Streams
If you weren’t using Tweepy, then you would have to deal with low-level details having to do with HTTP requests, data serialization, authentication, and rate limits. This could be time consuming and prone to error. Instead, thanks to Tweepy, you can focus on the functionality you want to build.
Almost all the functionality provided by Twitter API can be used through Tweepy. The only current limitation, as of version 3.7.0, is that Direct Messages don’t work properly due to some recent changes in the Twitter API.
Using Tweepy
In this section, you’ll learn how to install Tweepy for development, configure authentication credentials, and interact with the Twitter API.
Installation
Tweepy can be installed using pip, a Python package manager. In this article, we’re going to use a virtual environment (virtualenv) for the projects to avoid depending on system-wide packages. For more information on virtual environments and pip, check out Python Virtual Environments: A Primer and What Is Pip? A Guide for New Pythonistas.
You can get started by creating a project called tweepy-bots. The first step is to create a directory and a virtual environment:
$ mkdir tweepy-bots
$ cd tweepy-bots
$ python3 -m venv venv
The commands above create the virtual environment inside the project directory.
Then you can install the Tweepy package. First, you need to activate the newly created virtual environment and then use pip to do the installation:
$ source ./venv/bin/activate
$ pip install tweepy
Now that Tweepy is installed, let’s create a requirements.txt file containing the names of your dependencies. You can use the pip command freeze for this task:
$ pip freeze > requirements.txt
You’ll use this requirements.txt file when you’re deploying the project.
Note: The method used to activate the virtual environment may be different, depending on your operating system and shell. You can learn more about this in the venv documentation.
Creating Twitter API Authentication Credentials
As we have previously seen, the Twitter API requires that all requests use OAuth to authenticate. So you need to create the required authentication credentials to be able to use the API. These credentials are four text strings:
- Consumer key
- Consumer secret
- Access token
- Access secret
If you already have a Twitter user account, then follow these steps to create the key, token, and secrets. Otherwise, you have to sign up as a Twitter user before proceeding.
Step 1: Apply for a Twitter Developer Account
Go to the Twitter developer site to apply for a developer account. Here, you have to select the Twitter user responsible for this account. It should probably be you or your organization. Here’s what this page looks like:
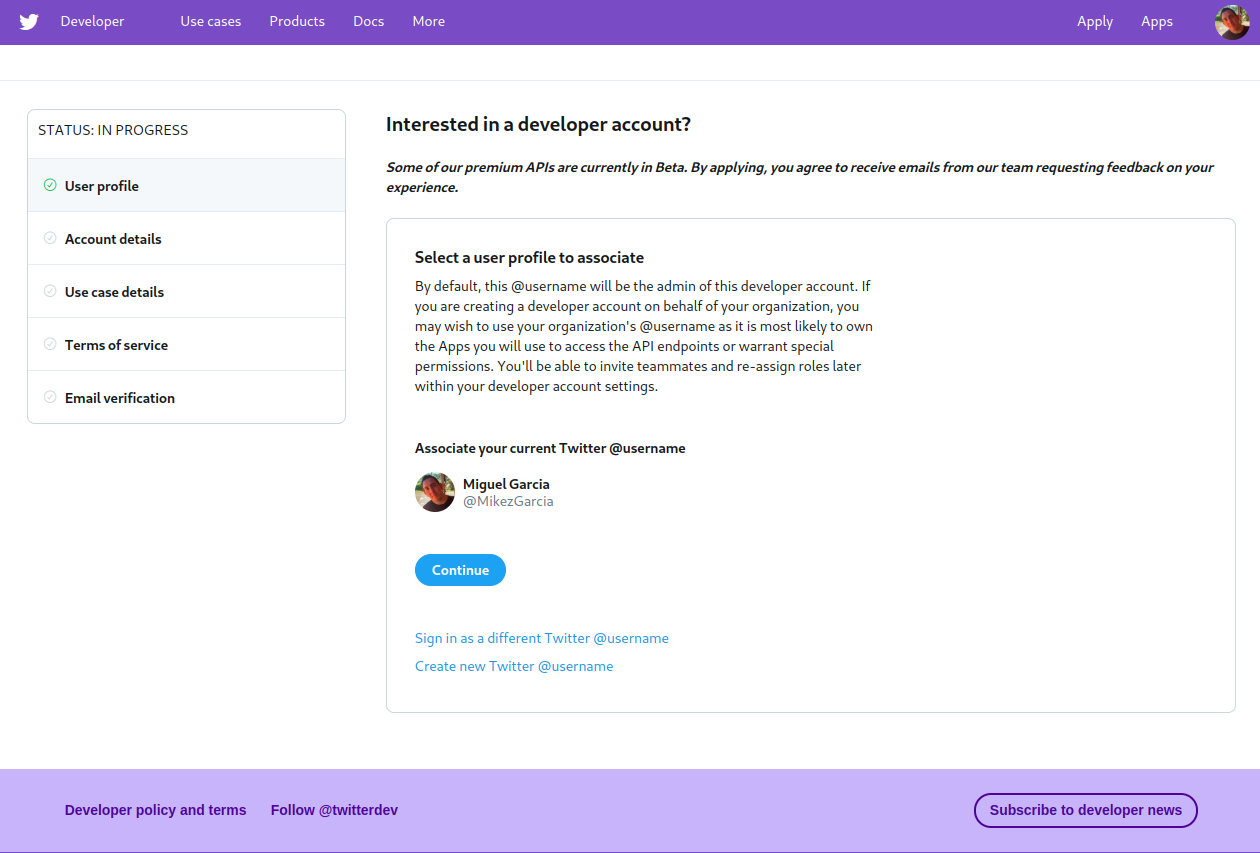
In this case, I chose to use my own account, @MikezGarcia.
Twitter then requests some information about how you plan to use the developer account, as showed below:
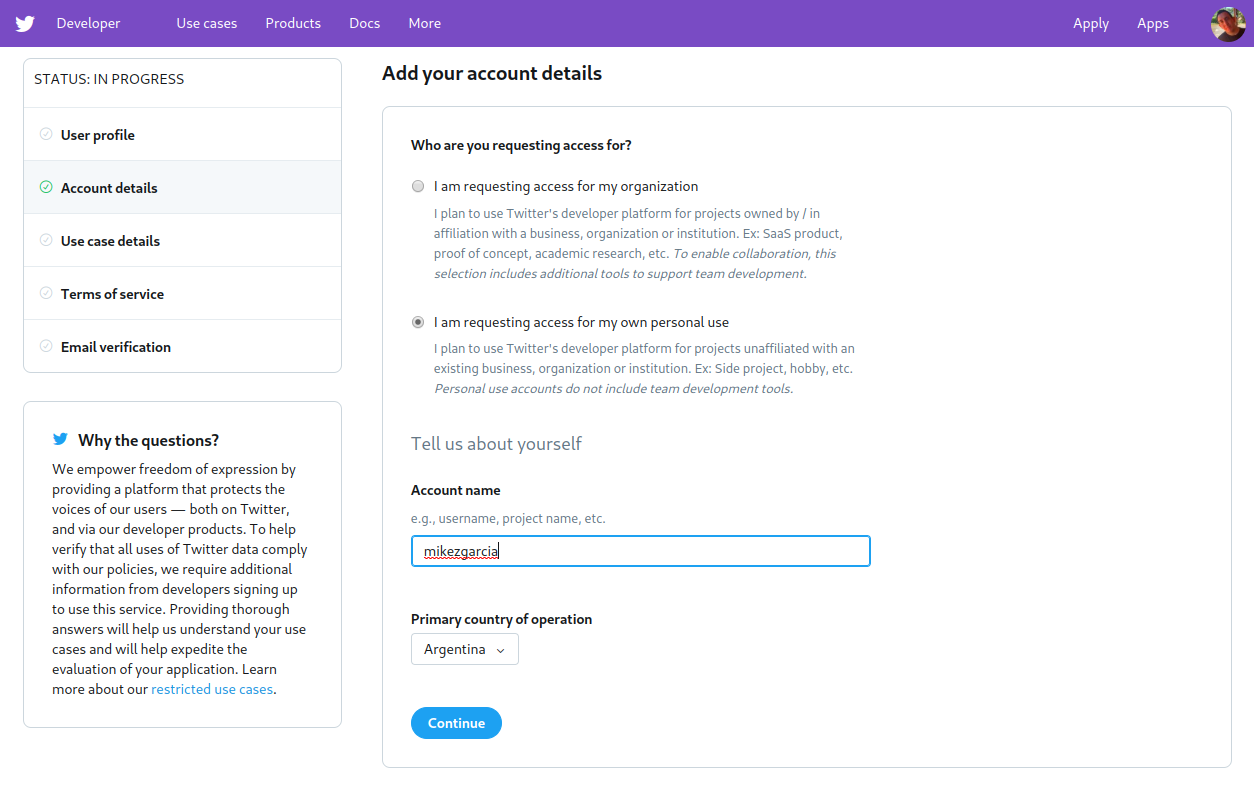
You have to specify the developer account name and whether you are planning to use it for personal purpose or for your organization.
Step 2: Create an Application
Twitter grants authentication credentials to apps, not accounts. An app can be any tool or bot that uses the Twitter API. So you need to register your an app to be able to make API calls.
To register your app, go to your Twitter apps page and select the Create an app option.
You need to provide the following information about your app and its purpose:
- App name: a name to identify your application (such as examplebot)
- Application description: the purpose of your application (such as An example bot for a Real Python article)
- Your or your application’s website URL: required, but can be your personal site’s URL since bots don’t need a URL to work
- Use of the app: how users will use your app (such as This app is a bot that will automatically respond to users)
Step 3: Create the Authentication Credentials
To create the authentication credentials, go to your Twitter apps page. Here’s what the Apps page looks like:

Here you’ll find the Details button of your app. Clicking this button takes you to the next page, where you can generate the credentials.
By selecting the Keys and tokens tab, you can generate and copy the key, token, and secrets to use them in your code:
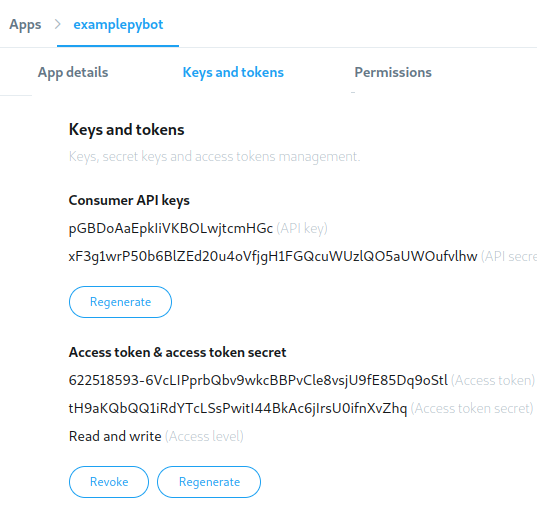
After generating the credentials, save them to later use them in your code.
You can test the credentials using the following snippet:
import tweepy

# Authenticate to Twitter
auth = tweepy.OAuthHandler("pGBDoAaEpkliVKBOLwjtcmHGc",
    "xF3g1wrP50b6BlZEd20u4oVfjgH1FGQcuWUzlQO5aUWOufvlhw")
auth.set_access_token("622518493-6VcLIPprbQbv9wkcBBPvCle8vsjU9fE85Dq9oStl",
    "tH9aKQbQQ1iRdYTcLSsPwitl44BkAc6jilrsU0ifnXvZhq")

api = tweepy.API(auth)

try:
    api.verify_credentials()
    print("Authentication OK")
except:
    print("Error during authentication")
In this snippet, credentials are tested using verify_credentials(). If all goes well, you should see a message saying Authentication OK.
Note: All of the credentials used in this article are only examples and will not work. You have to generate and use your own credentials.
Review of Tweepy Functionality
Tweepy gives you an interface to access the Twitter API from Python. It does so by encapsulating much of the Twitter API’s complexity and adding a model layer and other useful functionalities on top of it.
Since, over time, the names of various Twitter concepts have evolved, some old names are still used in Tweepy. So keep in mind that, in the context of this article, these equivalences hold:
- A status is a tweet .
- A friendship is a follow-follower relationship.
- A favorite is a like.
Now that you know how Tweepy names things, let’s see how it works.
Tweepy’s functionality can be divided into the following groups:
- OAuth
- The API class
- Models
- Cursors
- Streams
Now you’re going to look into these groups to learn about the functionality each one provides.
OAuth
Tweepy takes care of all the details for using OAuth required by the Twitter API to authenticate each request. It provides an OAuthHandler class that you can use to set the credentials to be used in all API calls.
This code snippet shows how you can create an OAuthHandler object that can later be used for API calls:
import tweepy

# Authenticate to Twitter
auth = tweepy.OAuthHandler("CONSUMER_KEY", "CONSUMER_SECRET")
auth.set_access_token("ACCESS_TOKEN", "ACCESS_TOKEN_SECRET")
Here you’re telling Tweepy to use the credentials that you created in Step 3: Create the Authentication Credentials. You must replace CONSUMER_KEY, CONSUMER_SECRET, ACCESS_TOKEN, and ACCESS_TOKEN_SECRET with the values you previously generated.
The API Class
The API class has many methods that provide access to Twitter API endpoints. Using these methods, you can access the Twitter API’s functionality.
The following code snippet creates an API object that you can use to invoke Twitter API methods. Setting wait_on_rate_limit and wait_on_rate_limit_notify to True makes the API object print a message and wait if the rate limit is exceeded:
import tweepy

# Authenticate to Twitter
auth = tweepy.OAuthHandler("CONSUMER_KEY", "CONSUMER_SECRET")
auth.set_access_token("ACCESS_TOKEN", "ACCESS_TOKEN_SECRET")

# Create API object
api = tweepy.API(auth, wait_on_rate_limit=True,
    wait_on_rate_limit_notify=True)
In the code above, we’ve set the authentication credentials and created an api object. You can invoke this object’s methods to do any API call.
The API methods can be grouped into the following categories:
- Methods for user timelines
- Methods for tweets
- Methods for users
- Methods for followers
- Methods for your account
- Methods for likes
- Methods for blocking users
- Methods for searches
- Methods for trends
- Methods for streaming
In the following subsections, you’re going to review different groups of API methods. You can visit the API Class Documentation for a detailed list of all API methods.
Methods for User Timelines
These methods deal with reading tweets, mentions, and retweets from your timeline or any other user’s timeline, as long as it’s public.
This code snippet prints the author and text of the last tweets in your home timeline:
timeline = api.home_timeline()
for tweet in timeline:
    print(f"{tweet.user.name} said {tweet.text}")
home_timeline(), a Tweepy API method, is used to get the last 20 entries in your timeline. 20 is the default value in Tweepy. You’ll see later how to get more than 20 results and work with paginated results.
Methods for Tweets
These methods have to do with creating, fetching, and retweeting tweets.
The following code uses Tweepy to create a tweet with some text:
api.update_status("Test tweet from Tweepy Python")
We’ve used update_status() to create a new tweet from a Python string.
Methods for Users
Methods in this group enable you to search users with a filter criteria, fetch user details, and list the followers of any user, as long as that user account is public.
The snippet below fetches my user, @MikezGarcia, and then prints its details as well as its 20 most recent followers:
user = api.get_user("MikezGarcia")

print("User details:")
print(user.name)
print(user.description)
print(user.location)

print("Last 20 Followers:")
for follower in user.followers():
    print(follower.name)
get_user() returns an object containing the user details. This returned object also has methods to access information related to the user. You used the followers attribute to get the list of followers.
Methods for Followers
This group of methods deals with following and unfollowing users, querying a user’s followers, and listing the accounts any user is following.
This code shows how you can use Tweepy to start following @realpython:
api.create_friendship("realpython")
create_friendship() adds @realpython to the list of accounts that you follow.
Methods for Your Account
These methods allow you to read and write your own profile details.
For example, you can use this code snippet to update your profile description:
api.update_profile(description="I like Python")
The keyword argument description is passed to update_profile() to change your profile description to "I like Python".
Methods for Likes
Using these API methods, you can mark any tweet as Liked or remove the Like mark if it was already added.
You can mark the most recent tweet in your home timeline as Liked as follows:
tweets = api.home_timeline(count=1)
tweet = tweets[0]
print(f"Liking tweet {tweet.id} of {tweet.author.name}")
api.create_favorite(tweet.id)
This code uses home_timeline() to get the most recent tweet. Then, the tweet.id is passed to create_favorite() to mark the tweet as Liked.
Methods for Blocking Users
This group of methods deals with blocking and unblocking users, as well as listing blocked users.
Here’s how you can see the users that you have blocked:
for block in api.blocks():
    print(block.name)
This code iterates through the list of accounts that you have blocked. You can get this list using blocks().
Methods for Searches
Using these methods, you can search tweets using text, language, and other filters.
For example, you can try this code to get the 10 most recent public tweets that are in English and contain the word "Python":
for tweet in api.search(q="Python", lang="en", rpp=10):
    print(f"{tweet.user.name}:{tweet.text}")
You used search() to filter tweets that match the desired criteria. This will search in any public tweet, not just in tweets from people you are following.
Methods for Trends
This group of methods allows you to list the current trends for any geographical location.
For example, here’s how to list the world-wide trending topics:
trends_result = api.trends_place(1)
for trend in trends_result[0]["trends"]:
    print(trend["name"])
Using trends_place(), you get the list of trends for any place, passing as the only argument the place id. Here, 1 means world-wide. You can see the full list of available locations using api.trends_available().
Methods for Streaming
Streaming allows you to actively watch for tweets that match certain criteria in real time. This means that when there aren’t any new tweet matching the criteria, then the program will wait until a new tweet is created and then process it.
To use streaming you have to create two objects:
- The stream object uses the Twitter API to get tweets that match some criteria. This object is the source of tweets that are then processed by a stream listener.
- The stream listener receives tweets from the stream.
Here’s how you do that:
import json
import tweepy

class MyStreamListener(tweepy.StreamListener):
    def __init__(self, api):
        self.api = api
        self.me = api.me()

    def on_status(self, tweet):
        print(f"{tweet.user.name}:{tweet.text}")

    def on_error(self, status):
        print("Error detected")

# Authenticate to Twitter
auth = tweepy.OAuthHandler("CONSUMER_KEY", "CONSUMER_SECRET")
auth.set_access_token("ACCESS_TOKEN", "ACCESS_TOKEN_SECRET")

# Create API object
api = tweepy.API(auth, wait_on_rate_limit=True,
    wait_on_rate_limit_notify=True)

tweets_listener = MyStreamListener(api)
stream = tweepy.Stream(api.auth, tweets_listener)
stream.filter(track=["Python", "Django", "Tweepy"], languages=["en"])
You declared a new class, MyStreamListener. This class is used for the stream listener tweets_listener. By extending Tweepy’s StreamLister, we reused code that is common to all stream listeners. Tweets from the stream are processed by on_status().
We created the stream using tweepy.Stream, passing the authentication credentials and our stream listener. To start getting tweets from the stream, you have to call the stream’s filter(), passing the criteria to use to filter tweets. Then, for each new tweet that matches the criteria, the stream object invokes the stream listener’s on_status().
Models
Tweepy uses its own model classes to encapsulate the responses from various Twitter API methods. This gives you a convenient way to use the results from API operations.
The model classes are:
UserStatusFriendshipSearchResults
Suppose you want to fetch every tweet in which you are mentioned, and then mark each tweet as Liked and follow its author. You can do that like this:
tweets = api.mentions_timeline()
for tweet in tweets:
    tweet.favorite()
    tweet.user.follow()
Since each tweet object returned by mentions_timeline() belongs to the Status class, you can use:
favorite()to mark it as Likeduserto get its author
This user attribute, tweet.user, is also an object that belongs to User, so you can use follow() to add the tweet’s author to the list of people you follow.
Leveraging Tweepy models enables you to create concise and understandable code.
Cursors
A lot of Twitter API endpoints use pagination to return their results. By default, each method returns the first page, which usually contains a few dozen items.
Tweepy cursors take away part of the complexity of working with paginated results. Cursors are implemented as a Tweepy class named Cursor. To use a cursor, you select the API method to use to fetch items and the number of items you want. The Cursor object takes care of fetching the various result pages transparently.
This code shows how, by using a cursor, you can get not only the first page from your timeline, but also the last 100 tweets:
for tweet in tweepy.Cursor(api.home_timeline).items(100):
    print(f"{tweet.user.name} said: {tweet.text}")
A cursor object is created using tweepy.Cursor. The class constructor receives an API method to use as the source for results. In the example, we used home_timeline() as the source since we wanted tweets from the timeline. The Cursor object has an items() method that returns an iterable you can use to iterate over the results. You can pass items() the number of result items that you want to get.
How to Make a Twitter Bot in Python With Tweepy
Now that you know how Tweepy works, let’s see how you can make a Twitter bot in Python with Tweepy. Bots work by continuously watching for some Twitter activity and automatically reacting to it.
Watching for Twitter Activity
There are two ways to continuously watch for Twitter activity:
- Using streams: to be notified when new content, such as tweets, that matches certain criteria is created
- Using polling: to periodically make Tweepy API calls and then check their results to see if they contain something new
Which option to choose depends on your use case. Using streams is the most efficient option, but then you can only watch activity related to tweets, so it’s less flexible. In this section, both options are used to build different bots.
Presenting the Example Bots
In this article, you’ll learn how to build three different bots that perform automatic actions to react to some Twitter events:
- The Follow Followers Bot automatically follows anyone who follows you.
- The Fav & Retweet Bot automatically likes and retweets tweets that match certain criteria.
- The Reply to Mentions Bot automatically replies to tweets mentioning you that contain the words
helporsupport.
We are going to use a directory named bots to store all the Python files of the project as shown below:
tweepy-bots/
│
├── bots/
│   ├── config.py
│   └── followfollowers.py
│   └── favretweet.py
│   └── autoreply.py
│
└── requirements.txt
The next section explains the config module.
The Config Module
All the bots we are building have some functionality in common. For example, they need to authenticate to the Twitter API.
You can create a reusable Python module containing the logic common to all bots. We named this module config.
This module reads the authentication credentials from environment variables and creates the Tweepy API object. By reading the credentials from environment variables, you avoid hard coding them into the source code, making it much more secure.
The bots will read the credentials from these environment variables:
CONSUMER_KEYCONSUMER_SECRETACCESS_TOKENACCESS_TOKEN_SECRET
Later, you’ll see how to set these variables to match the credentials you have previously generated for your Twitter app.
Below is the complete source code for the config module. It contains create_api(), a function that reads authentication credentials from environment variables and creates the Tweepy API object:
# tweepy-bots/bots/config.py
import tweepy
import logging
import os

logger = logging.getLogger()

def create_api():
    consumer_key = os.getenv("CONSUMER_KEY")
    consumer_secret = os.getenv("CONSUMER_SECRET")
    access_token = os.getenv("ACCESS_TOKEN")
    access_token_secret = os.getenv("ACCESS_TOKEN_SECRET")

    auth = tweepy.OAuthHandler(consumer_key, consumer_secret)
    auth.set_access_token(access_token, access_token_secret)
    api = tweepy.API(auth, wait_on_rate_limit=True,
        wait_on_rate_limit_notify=True)
    try:
        api.verify_credentials()
    except Exception as e:
        logger.error("Error creating API", exc_info=True)
        raise e
    logger.info("API created")
    return api
This code uses os.getenv() to read environment variables and then creates the Tweepy auth object. Then the API object is created.
Passing wait_on_rate_limit and wait_on_rate_limit_notify in the creation of the tweepy.API object makes Tweepy wait and print a message when the rate limit is exceeded.
Before returning the API object, create_api() calls verify_credentials() to check that the credentials are valid.
This module and, as you will see later, the bot’s source code, use the logging Python module to inform errors and info messages that help you debug them if any issue arise. You can read more about it in Logging in Python.
The Follow Followers Bot
This bot gets your list of followers from Twitter every minute and then iterates through it to follow each user that you’re not already following.
Bot Source Code
Here’s the full source code of this bot. It uses the previously created config module, the Tweepy API, and cursors:
#!/usr/bin/env python
# tweepy-bots/bots/followfollowers.py

import tweepy
import logging
from config import create_api
import time

logging.basicConfig(level=logging.INFO)
logger = logging.getLogger()

def follow_followers(api):
    logger.info("Retrieving and following followers")
    for follower in tweepy.Cursor(api.followers).items():
        if not follower.following:
            logger.info(f"Following {follower.name}")
            follower.follow()

def main():
    api = create_api()
    while True:
        follow_followers(api)
        logger.info("Waiting...")
        time.sleep(60)

if __name__ == "__main__":
    main()
main() creates a Tweepy API object using create_api() from the config module you previously created. Then, inside a loop, follow_followers() is called once every minute.
follow_followers() uses a Tweepy cursor and the Tweepy API method followers() to get your list of followers. This list contains a Tweepy user model for each user that is following you.
Then the bot iterates through the list and uses following to check if you are already following each user. Users that are not already being followed are followed using follow().
Running the Bot
To run the bot, you must first create the environment variables for the authentication credentials. You can do this by running this commands from a terminal and replacing the values with your actual credentials:
$ export CONSUMER_KEY="pGBDoAaEpkliVKBOLwjtcmHGc"
$ export CONSUMER_SECRET="xF3g1wrP50b6BlZEd20u4oVfjgH1FGQcuWUzlQO5aUWOufvlhw"
$ export ACCESS_TOKEN="622518493-6VcLIPprbQbv9wkcBBPvCle8vsjU9fE85Dq9oStl"
$ export ACCESS_TOKEN_SECRET="tH9aKQbQQ1iRdYTcLSsPwitl44BkAc6jilrsU0ifnXvZhq"
Note: This assumes that you’re using Linux or macOS. If you’re using Windows, then the steps might be a little different.
After you run the commands, your environment variables will contain the credentials needed to use the Twitter API.
Next, you have to activate your virtual environment and run the bot’s main file, bots/followfollowers.py:
$ source ./venv/bin/activate
$ python bots/followfollowers.py
While it’s running, the bot will follow anybody who follows you. You can test that it works by unfollowing someone that is following you. After a minute, they will be followed again. You can stop the bot using Ctrl-C.
The Fav & Retweet Bot
This bot uses the previously introduced Tweepy stream to actively watch for tweets that contain certain keywords. For each tweet, if you’re not the tweet author, it will mark the tweet as Liked and then retweet it.
You can use this bot to feed your account with content that is relevant to your interests.
Bot Source Code
Below, you can see the full source code of this bot. It uses a stream to filter tweets that contain the words "Python" or "Tweepy". Each tweet from the stream is marked as Liked and retweeted:
#!/usr/bin/env python
# tweepy-bots/bots/favretweet.py

import tweepy
import logging
from config import create_api
import json

logging.basicConfig(level=logging.INFO)
logger = logging.getLogger()

class FavRetweetListener(tweepy.StreamListener):
    def __init__(self, api):
        self.api = api
        self.me = api.me()

    def on_status(self, tweet):
        logger.info(f"Processing tweet id {tweet.id}")
        if tweet.in_reply_to_status_id is not None or \
            tweet.user.id == self.me.id:
            # This tweet is a reply or I'm its author so, ignore it
            return
        if not tweet.favorited:
            # Mark it as Liked, since we have not done it yet
            try:
                tweet.favorite()
            except Exception as e:
                logger.error("Error on fav", exc_info=True)
        if not tweet.retweeted:
            # Retweet, since we have not retweeted it yet
            try:
                tweet.retweet()
            except Exception as e:
                logger.error("Error on fav and retweet", exc_info=True)

    def on_error(self, status):
        logger.error(status)

def main(keywords):
    api = create_api()
    tweets_listener = FavRetweetListener(api)
    stream = tweepy.Stream(api.auth, tweets_listener)
    stream.filter(track=keywords, languages=["en"])

if __name__ == "__main__":
    main(["Python", "Tweepy"])
As with the previous bot, the main function uses create_api() from the config module to create a Tweepy API object.
A Tweepy stream is created to filter tweets that are in the English language and include some of the keywords specified in the main function argument, "Python" or "Tweepy" in this case.
The on_status() of FavRetweetListener processes tweets from the stream. This method receives a status object and uses favorite() and retweet() to mark the tweet as Liked and retweet.
To avoid retweeting and liking tweets that are replies to other tweets, on_status() uses an if to see if in_reply_to_status_id is not None. Also, the code checks if you’re the tweet author to avoid retweeting and liking your own content.
You can run this bot using the same instructions used for the previous bot, changing the Python program to favretweet.py.
The Reply to Mentions Bot
This bot periodically fetches tweets in which you are mentioned. If the tweet is not a reply to another tweet, and it contains the words "help" or "support", then the tweet author will be followed, and the tweet will be replied to with another tweet saying "Please reach us via DM".
You can use this bot to automate the initial process of answering your followers’ questions.
Bot Source Code
Here’s the full source code for this bot. It uses a cursor to fetch your mentions:
#!/usr/bin/env python
# tweepy-bots/bots/autoreply.py

import tweepy
import logging
from config import create_api
import time

logging.basicConfig(level=logging.INFO)
logger = logging.getLogger()

def check_mentions(api, keywords, since_id):
    logger.info("Retrieving mentions")
    new_since_id = since_id
    for tweet in tweepy.Cursor(api.mentions_timeline,
        since_id=since_id).items():
        new_since_id = max(tweet.id, new_since_id)
        if tweet.in_reply_to_status_id is not None:
            continue
        if any(keyword in tweet.text.lower() for keyword in keywords):
            logger.info(f"Answering to {tweet.user.name}")

            if not tweet.user.following:
                tweet.user.follow()

            api.update_status(
                status="Please reach us via DM",
                in_reply_to_status_id=tweet.id,
            )
    return new_since_id

def main():
    api = create_api()
    since_id = 1
    while True:
        since_id = check_mentions(api, ["help", "support"], since_id)
        logger.info("Waiting...")
        time.sleep(60)

if __name__ == "__main__":
    main()
As with the others bots, the main function creates a Tweepy API object. After that, it initializes the variable since_id with the value 1. This variable is used to only fetch mentions created after those already processed.
Inside a loop, check_mentions() is called once every minute.
This function uses a Tweepy cursor and mentions_timeline() to get all the tweets mentioning you that have an id greater than the since_id variable.
For each tweet mentioning you, its author is followed using tweet.user.follow() if you are not already following them.
Then a reply to the tweet is created using update_status(), passing the id of the original tweet as in_reply_to_status_id.
check_mentions() returns the greatest processed tweet id. This information will be used as the since_id in the next call to look only for tweets more recent than the ones already fetched.
You can run the bot using the same instructions used previously. Just change the Python program to autoreply.py.
Deploying Bots to a Server Using Docker
Being able to run your Twitter bots in your local machine is fine for development, but for production you’ll probably need to run your bots in a server. This section details how you can package your bot and its dependencies using Docker and then deploy it to a server.
Note: This is just one of the ways you can deploy a Twitter bot to a server.
Docker provides a way to package any app in a Docker image containing not only the app itself, but all its dependencies too. You can learn more about Docker and its setup in Build Robust Continuous Integration With Docker and Friends.
Building the Docker Image
To package your bot or application, you have to create a Dockerfile in the project’s root directory. This file contains a set of instructions used to create the Docker image containing your app.
This is how your project structure should look:
tweepy-bots/
│
├── bots/
│   ├── config.py
│   └── followfollowers.py
│   └── favretweet.py
│   └── autoreply.py
│
├── requirements.txt
└── Dockerfile
As you can see, the Dockerfile and requirements.txt live inside your project top directory.
You can use the following Dockerfile to create the image for the Fav & Retweet bot. It uses Python:3.7-alpine as the base image. We chose this image as the base since it’s very small and contains Python3.7 and pip. This Dockerfile then copies the bot code and the requirements.txt file to the image. Finally, the dependencies are installed inside the image using pip3:
FROM python:3.7-alpine

COPY bots/config.py /bots/
COPY bots/favretweet.py /bots/
COPY requirements.txt /tmp
RUN pip3 install -r /tmp/requirements.txt

WORKDIR /bots
CMD ["python3", "favretweet.py"]
The final line says what command must be run when this image is used.
Now you can build the image using this command:
$ docker build . -t fav-retweet-bot
Then, using the docker images command, you can see the details of the newly generated image.
Finally, you can use the docker run command to test the image, passing it the environment variables holding the authentication credentials:
$ docker run -it -e CONSUMER_KEY="uDRNy31oWfoiKV9AvPoNavy0I" \
 -e CONSUMER_SECRET="lnAL5VAgZLWNspQVpd3X6tEo47PRCmsPEwuxpvLCLSR08DMa4O" \
 -e ACCESS_TOKEN="622518593-j7gWSqzQO31ju7Bf7idB47NlZeSENsuADGU9B69I" \
 -e ACCESS_TOKEN_SECRET="iutFsxvP5IglRckJ1I1why6017xMNkzxqBID48Azw0GvT" \
 fav-retweet-bot
While it’s running, you’ll see the bot’s logs output on the screen.
This same procedure can be used to create the Docker image for other bots.
Example: Deploying a Twitter Bot to Amazon AWS
Now that the Docker image is ready, there are a lot of ways to deploy it to run in any server. In this section, you’ll see one method you can use to deploy a bot to a server in Amazon AWS. This setup uses an Amazon AWS EC2 instance, like a virtual server, to run the Docker image.
Note: You need an Amazon AWS account to follow these steps. All the resources used in this article are eligible for the AWS free tier, so if you are new to AWS, then you won’t be charged.
Step 1: Export The Docker Image
From the computer where you have created the Docker image, run these commands to export it to a file and compress it. You’re going to use this file later to upload the image to your EC2 instance:
$ docker image save fav-retweet-bot:latest -o fav-retweet-bot.tar
$ gzip fav-retweet-bot.tar
Now the image has been compressed into fav-retweet-bot.tar.gz.
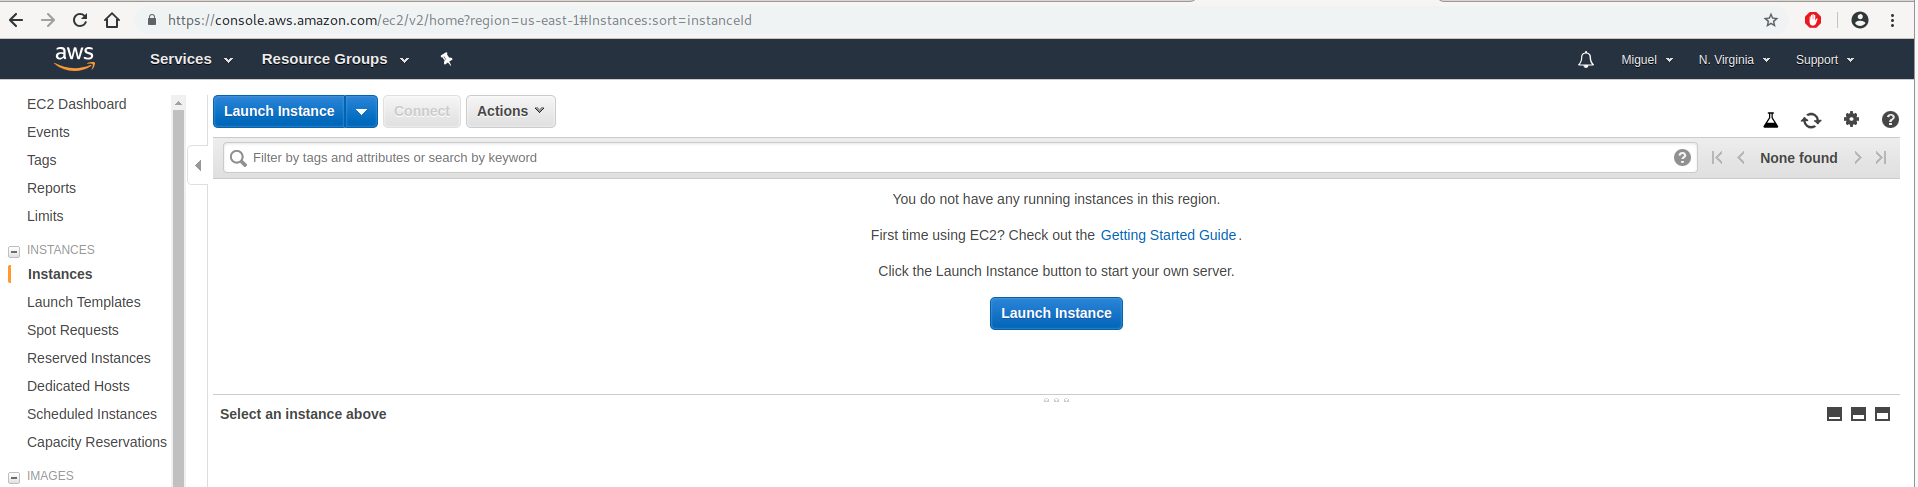
Step 2: Create an Amazon EC2 Instance
The first step in AWS is to create a new EC2 instance. The bot will run inside this instance. Log in to your AWS console, choose the EC2 service, and select Instances. You’ll see something like this:
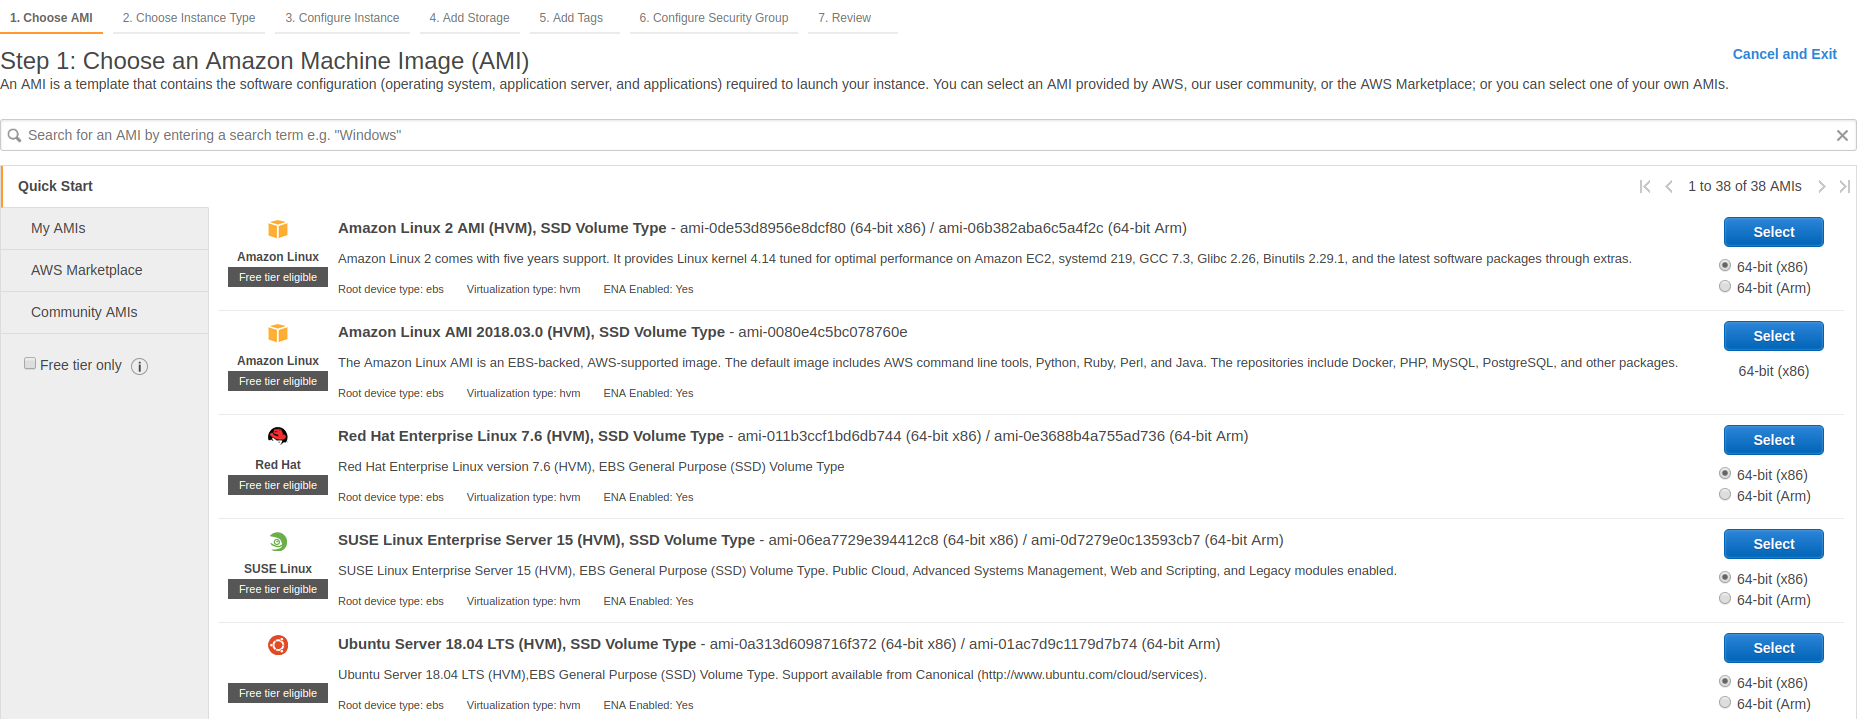
Click the Launch instance button and select Ubuntu Server 18.04 as the base image:
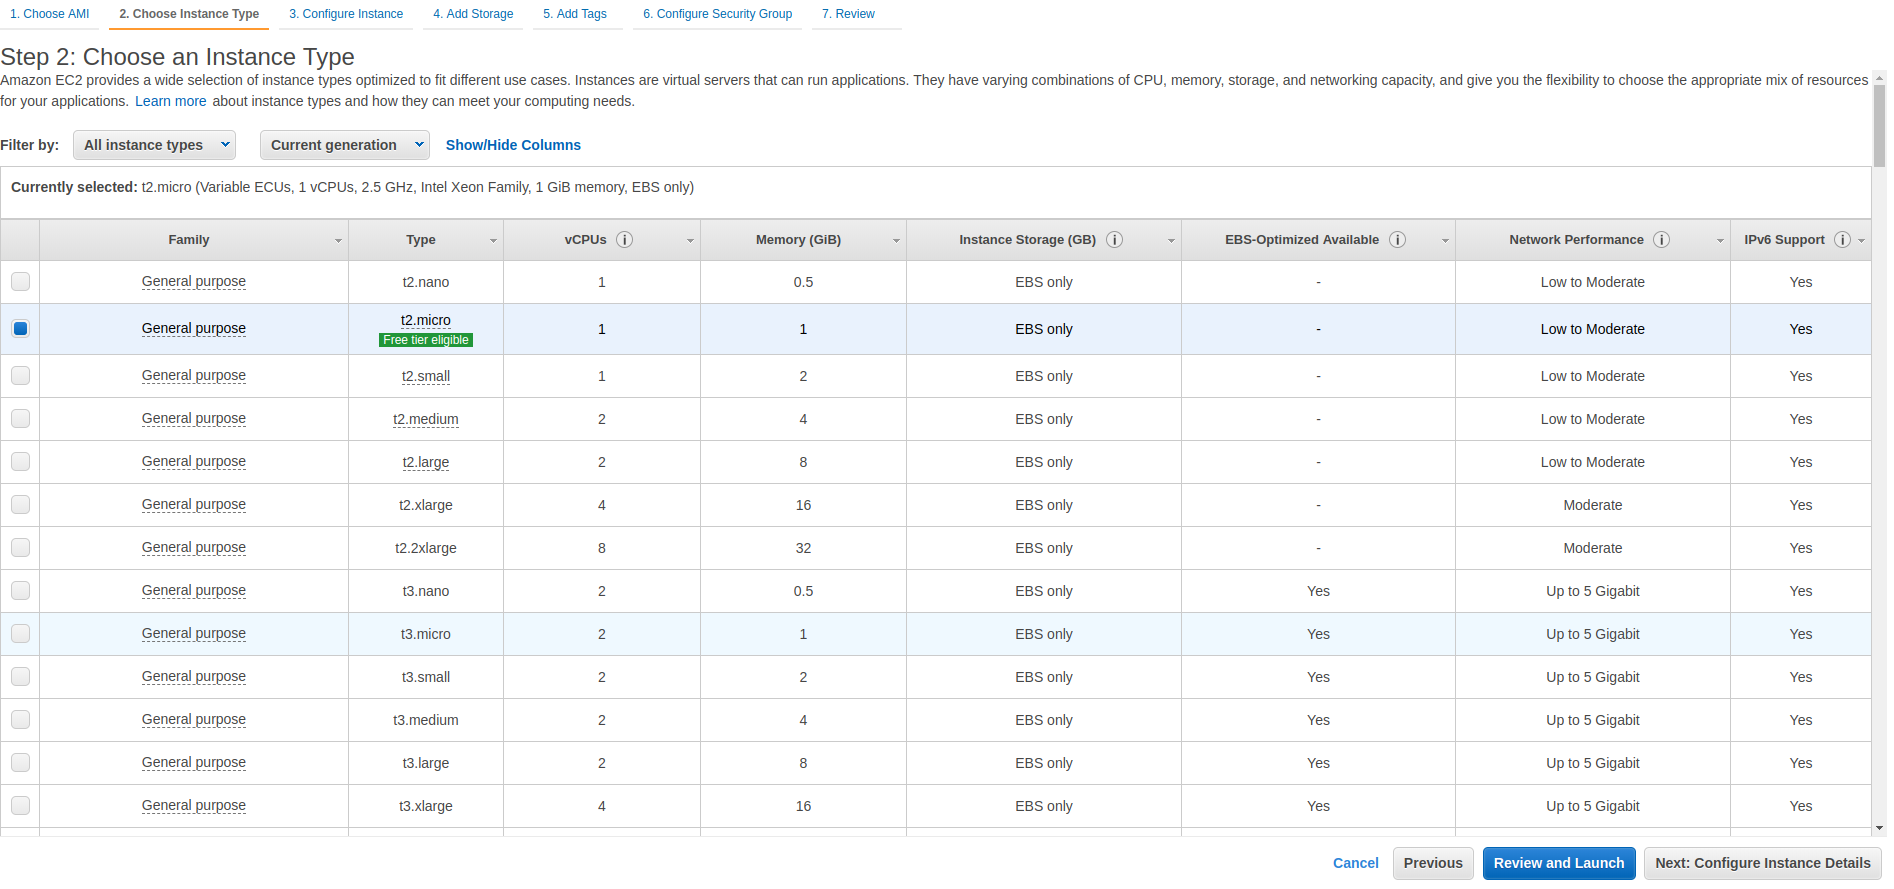
Now you can choose the instance type. This depends on the computing resources needed by your bot. For the bots described in this article, the t2.micro instance type is a good starting point. Select it and click Review and Launch:
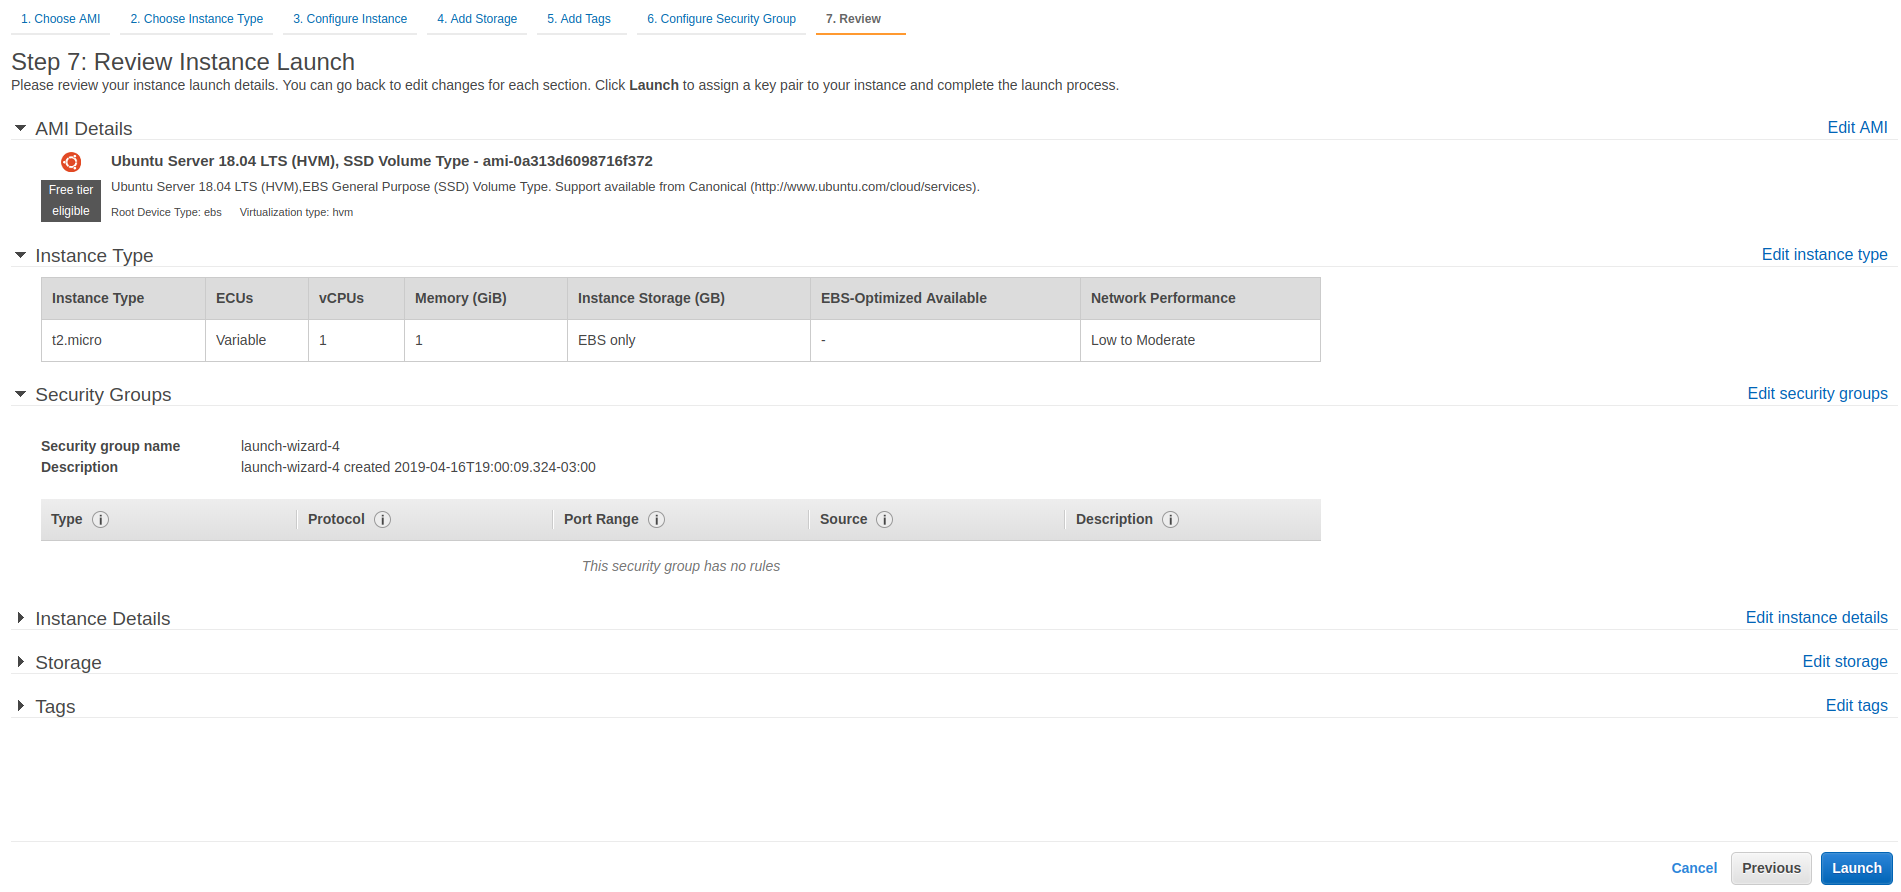
On the next page, you can review and check your configuration. Then click the Launch button to begin the creation of your EC2 instance:
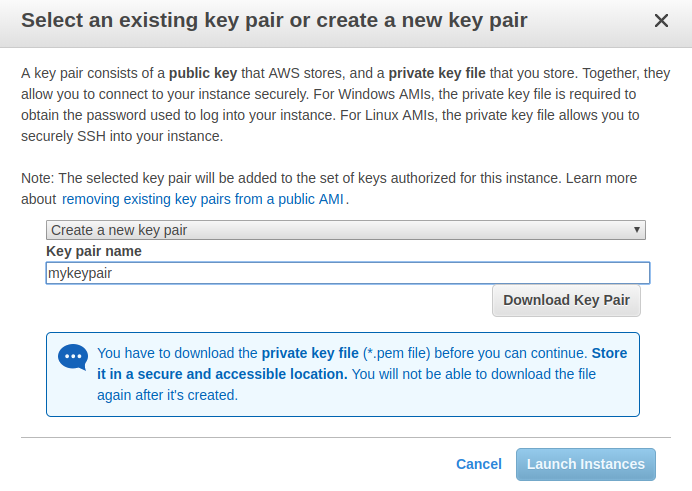
After you’ve clicked Launch, you’ll be asked to create a key pair. It’s used to allow you to connect to your instance and deploy the bot Docker image. Select Create a new key pair, enter a key pair name, and download the key pair.
Remember where you’re downloading the key pair. You’ll need it later.
Then click the Launch instances button to proceed:
You will see a page saying that your instance is being created. Click the View instances button to see the status of your instance:
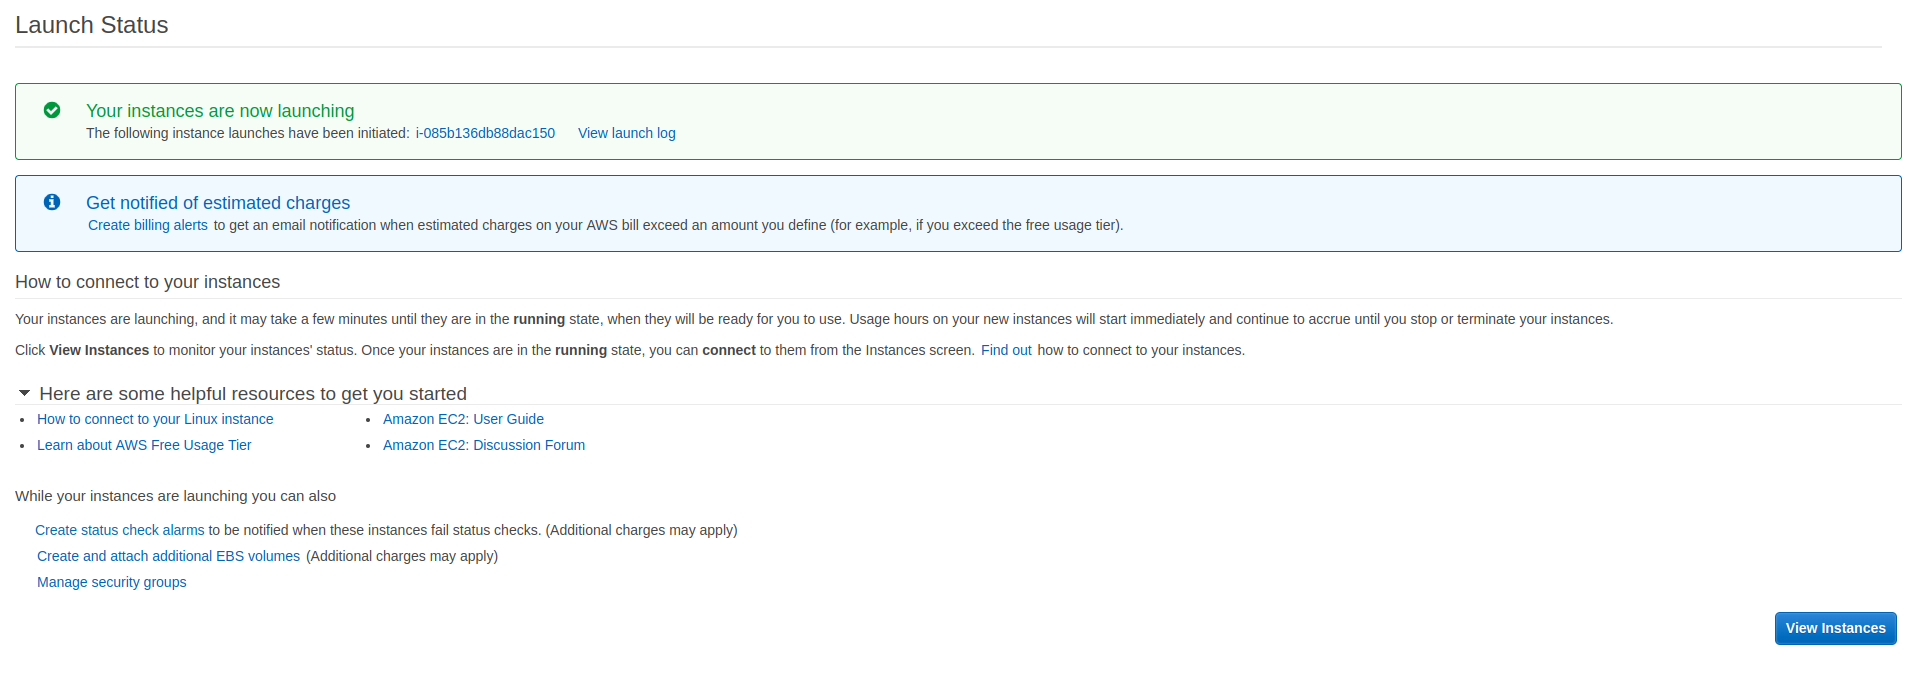
At first, your instance state will be pending. You have to wait until it transitions to running:


Step 3: Install Docker in Your EC2 Instance
Now you have to connect to your instance using SSH to install Docker on it.
If, in the previous screen, you right click on your instance, you’ll find a context menu. Select the Connect option to see how to connect using SSH:
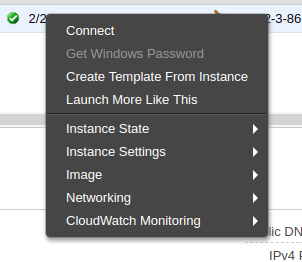
This dialog shows how to connect to your instance:
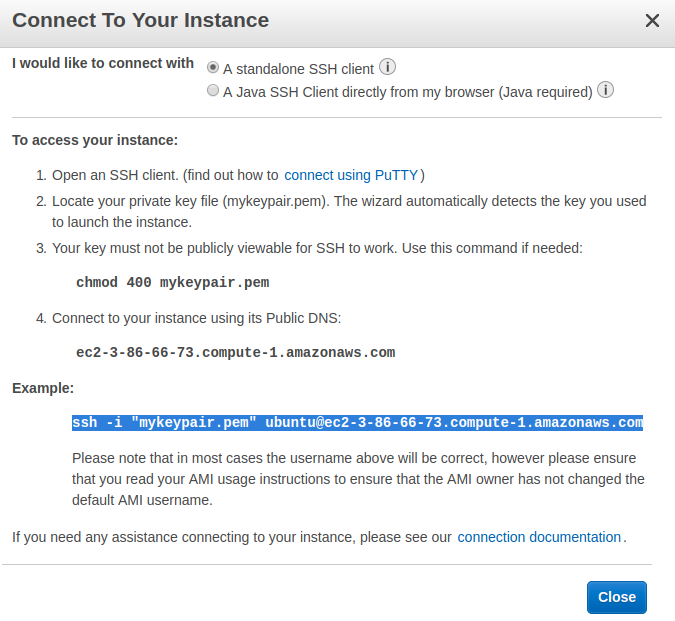
Note: ec2-3-86-66-73.compute-1.amazonaws.com is the address that AWS assigned to the instance used in this article, but it will probably be different for you.
First, change the permissions of your key pair file using the following command. Otherwise, you won’t be able to connect to your EC2 instance using this key pair:
$ chmod 400 mykeypair.pem
Then connect to your instance using SSH. You can copy the command you need to execute from the Connect To Your Instance dialog:
$ ssh -i "mykeypair.pem" ubuntu@ec2-3-86-66-73.compute-1.amazonaws.com
Once you’re connected, run the following commands to install Docker in the instance:
ubuntu@ip-172-31-44-227:~$ sudo apt-get update
ubuntu@ip-172-31-44-227:~$ sudo apt install docker.io
ubuntu@ip-172-31-44-227:~$ sudo adduser ubuntu docker
ubuntu@ip-172-31-44-227:~$ exit
It’s important that you exit the SSH session after the installation, so that in the next login your user permissions will be reloaded.
Step 4: Upload Your Bot’s Docker Image
From your local computer, upload the bot Docker image to your instance using scp. This can take some time depending on your internet connection:
$ scp -i "mykeypair.pem" fav-retweet-bot.tar.gz \
    ubuntu@ec2-3-86-66-73.compute-1.amazonaws.com:/tmp
When the image upload finishes, log in again to your instance using SSH:
$ ssh -i "mykeypair.pem" ubuntu@ec2-3-86-66-73.compute-1.amazonaws.com
Run these commands in your instance to decompress and import the Docker image:
ubuntu@ip-172-31-44-227:~$ gunzip /tmp/fav-retweet-bot.tar.gz
ubuntu@ip-172-31-44-227:~$ docker image load -i /tmp/fav-retweet-bot.tar
Step 5: Run Your Bot’s Docker Image
The final step to deploy the bot is to run the Docker image in your EC2 instance, passing it the authentication credentials.
You can do this using the docker command. Passing the flags -d and --restart-always assures that the bot will keep running if you disconnect from the SSH session or if the instance is restarted:
ubuntu@ip-172-31-44-227:~$ docker run -d --restart always \
-e CONSUMER_KEY="uDRNy31oWfoiKV9AvPoNavy0I" \
-e CONSUMER_SECRET="lnAL5VAgZLWNspQVpd3X6tEo47PRCmsPEwuxpvLCLSR08DMa4O" \
-e ACCESS_TOKEN="622518593-j7gWSqzQO31ju7Bf7idB47NlZeSENsuADGU9B69I" \
-e ACCESS_TOKEN_SECRET="iutFsxvP5IglRckJ1I1why6017xMNkzxqBID48Azw0GvT" \
fav-retweet-bot
Using docker ps, you can check that the bot is running and find its container id. Finally, using the docker logs command and the container id, you can check the output from the bot to see if it works properly:
$ ubuntu@ip-172-31-44-227:~$ docker logs e6aefe73a885
INFO:root:API created
INFO:root:Processing tweet id 1118276911262785538
INFO:root:Processing tweet id 1118276942162214918
INFO:root:Processing tweet id 1118276990853951488
INFO:root:Processing tweet id 1118277032360722433
INFO:root:Processing tweet id 1118277034466324480
Now, even if you disconnect from the SSH session or turn off your computer, the bot will continue to run on your AWS EC2 instance.
Free AWS Resources
To save resources and money (if your AWS free tier period has ended), you can stop or terminate your EC2 instance:
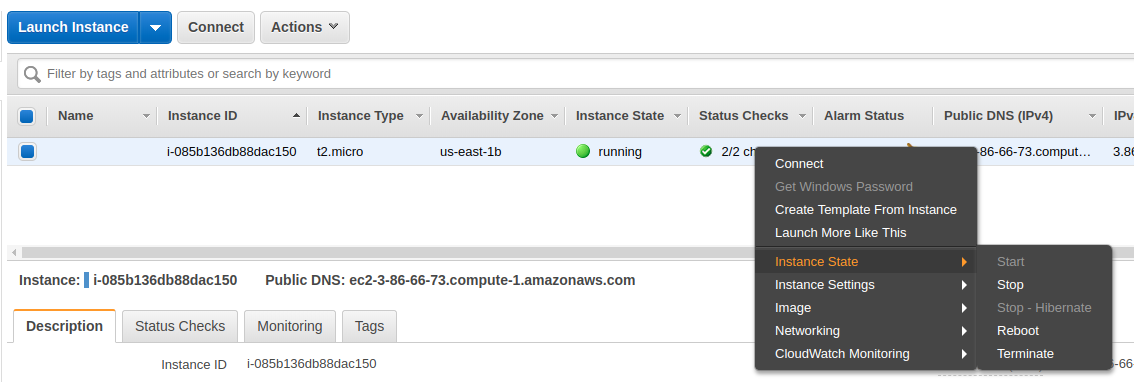
Stopping it will allow you to restart it in the future, but it will still consume some resources related to your instance storage. By contrast, if you Terminate an EC2 instance, then all its resources will be released, but you won’t be able to restart it.
There’s a lot more to using AWS, like creating an AWS image of your instance, but that goes beyond the scope of this article.
Wrapping Up
Building your own Twitter bots allows you to take your Twitter presence to the next level. By using bots, you can automate content creation and other Twitter activities. This can save you a lot of time and give your audience a better experience.
The Tweepy package hides many low level details of the Twitter API, allowing you to focus on the logic of your Twitter bots.
In this article, you learned how to:
- Improve and automate your interactions with your Twitter audience
- Install Tweepy
- Sign up as a Twitter developer to use its API
- Use Tweepy to invoke the Twitter API
- Build Twitter bots
- Deploy the bots to a server using Docker and AWS
You can use the bots in this article as a starting point to automate part of your Twitter activity. Don’t forget to take a look at the whole Tweepy API documentation and use your imagination to make more complex bots that are meaningful to your use case.
You can also explore the possibilities of ChatterBot, InstaPy, Discord, and Alexa Skills to learn more about how you can make bots for different platforms using Python.