Django user management allows you to integrate user authentication and management into your web applications. By using Django, you can leverage the framework’s built-in authentication system to manage user registration, login, and logout. With just a few additional templates, you can enable users to reset and change their passwords independently.
This tutorial guides you through setting up a basic user management system with Django that you can extend later. You’ll learn how to create a dashboard, implement user registration, and connect authentication URLs, as well as customize templates for login, logout, and password management.
By the end of this tutorial, you’ll understand that:
- Django’s user authentication is a built-in authentication system that comes with pre-configured URLs and views.
- Authentication verifies user identity, while authorization determines user permissions within Django.
- Registering as a user in Django requires setting up views, templates, and URLs.
- Creating a login system in Django involves built-in authentication views and creating custom templates.
- Resetting passwords in Django involves configuring email backends for sending reset links.
This tutorial focuses on user authentication and user management. If you want to learn more about permissions and groups, then you can check out the tutorial about managing users in Django’s admin site.
Get Your Code: Click here to download the free sample code you’ll use to set up a basic user management system with Django .
Start With the Basics
For bigger projects, you may consider creating a custom user model. In this tutorial, you’ll be using Django’s built-in user model. This is a great place to start to familiarize yourself with user authentication in general.
In this section of the tutorial, you’ll first create a small Django project with a users app. Then, you’ll make some adjustments to Django’s password validator to make your development more convenient. Finally, you’ll create an admin user to verify your setup.
Set Up the Django Project
It’s a good idea to use a virtual environment when working with Python projects. That way, you can always be sure that the python command points to the right version of Python and that the modules required by your project have the correct versions. To read more about creating virtual environments, check out Python Virtual Environments: A Primer.
Select your operating system below and use your platform-specific command to set up a virtual environment:
With the above commands, you create and activate a virtual environment named venv by using Python’s built-in venv module.
The parenthesized (venv) in front of the prompt indicate that you’ve successfully activated the virtual environment.
Now that the environment is ready, you can install Django, start a new project, and create an application to store all your user management code:
(venv) $ python -m pip install Django
(venv) $ django-admin startproject user_auth_intro
(venv) $ cd user_auth_intro
(venv) $ python manage.py startapp users
In this example, you name your project user_auth_intro and your application users. To include the users app in your Django project, you need to add a reference to the app’s configuration class at the beginning of the INSTALLED_APPS list in settings.py:
user_auth_intro/settings.py
 1# ...
 2
 3INSTALLED_APPS = [
 4    "users.apps.UsersConfig",
 5    "django.contrib.admin",
 6    "django.contrib.auth",
 7    "django.contrib.contenttypes",
 8    "django.contrib.sessions",
 9    "django.contrib.messages",
10    "django.contrib.staticfiles",
11]
12
13# ...
By adding users.apps.UsersConfig, you let Django know that the users app you just created exists. If you have a look at the INSTALLED_APPS list, then you’ll spot Django’s default authentication system on line 6. In django.contrib.auth, Django stores the core of its authentication framework and the default models that you’ll build on later.
Next, apply the migrations and run the Django development server:
(venv) $ python manage.py migrate
(venv) $ python manage.py runserver
These commands create all default models in the database and start the Django development server.
Deactivate the Password Validator
By default, Django enforces strong passwords to make user accounts less prone to attacks. Since you’ll need to change passwords often throughout this tutorial, figuring out a strong password each time would be inconvenient.
To address this issue, you can disable password validators in the settings. Just comment them out, leaving an empty list:
user_auth_intro/settings.py
# ...

AUTH_PASSWORD_VALIDATORS = [
    # {
    #     "NAME": "django.contrib.auth.password_validation.UserAttributeSimilarityValidator",
    # },
    # {
    #     "NAME": "django.contrib.auth.password_validation.MinimumLengthValidator",
    # },
    # {
    #     "NAME": "django.contrib.auth.password_validation.CommonPasswordValidator",
    # },
    # {
    #     "NAME": "django.contrib.auth.password_validation.NumericPasswordValidator",
    # },
]

# ...
Now Django will allow you to set passwords like pass or even 1234, making your work with the user management system much quicker. Just remember to enable the validators in your actual application!
Create a Django Admin User
For this tutorial, it would also be useful to have access to the admin site so you can track newly created users and their passwords. Go ahead and create an admin user:
(venv) $ python manage.py createsuperuser
Username: admin
Email address: admin@example.com
Password: 1234
Password (again): 1234
Superuser created successfully.
Adjusting Django’s password validators like this makes exploring the authentication system more convenient. For example, you can use any password you like for your admin user. As mentioned earlier, you’ll need to remember to enable the password validators later.
If you want, you can head over to http://127.0.0.1:8000/admin/ to verify that you can log in to Django’s admin site. When doing so, pay attention to the forms and the buttons you encounter during the login process. You’ll re-create a similar flow in your users application.
Set Up the Django User Management System
Most user management systems have some sort of main page, usually referred to as the dashboard. On this dashboard, you’ll find the links to sign up, log in, or log out as a user.
In addition to the dashboard, you’ll have more pages later. That’s why you’ll start by creating a base template from which the other pages can inherit a consistent structure with their child templates.
Create the Base Template Structure
You’ll place all the templates you use in this tutorial in the users/templates/ directory. The users/templates/ directory doesn’t exist by default, so you’ll have to create it first. Then, create base.html with the following content:
users/templates/base.html
<!DOCTYPE html>
<html lang="en">
<head>
    <meta charset="UTF-8">
    <title>User Management Intro</title>
</head>
<body>
    <h1>Welcome!</h1>
    {% block content %}
    {% endblock content %}
</body>
</html>
The base template contains the basic structure of a typical HTML document. The headline shows a Welcome! message, and you define a block named content. The block is empty for now, but other templates are going to use it to include their own content.
To organize your templates properly so Django can find them, create two folders for your child templates:
users/templates/users/users/templates/registration/
This template folder naming scheme organizes your templates neatly. Nesting template folders like this may look a bit redundant, but it allows you to create templates with the same names in the subfolders. In this tutorial you’ll only work with one base template file, so it’s okay to keep base.html directly in the templates/ folder.
Add a Dashboard Page
When you create new pages in Django, you typically need a template, a view that renders the template, and a URL that uses the view. Your dashboard page follows this three-step build process as well. Since you haven’t defined any URLs for the users app yet, there’s also a fourth step to connect the URLs from users to your Django project. You’ll tackle these steps one by one!
Start by creating the template for the dashboard. As this template is specific for the users/ app, you save it in the users/template/users/ folder. The name of the template should be dashboard.html, and it should extend the base template:
users/templates/users/dashboard.html
{% extends "base.html" %}
{% block content %}
    Hello, {{ user.username|default:"Guest" }}!
{% endblock content %}
For now, the template only shows the welcome message with the current user’s username. If the user isn’t logged in, then Django will still set the user variable using an AnonymousUser object. An anonymous user always has an empty username, so the dashboard will show Hello, Guest!
Next, create a dashboard view in users/views.py that renders the dashboard.html template:
users/views.py
from django.shortcuts import render

def dashboard(request):
    return render(request, "users/dashboard.html")
One interesting detail about the dashboard view is that you’re rendering the template just by providing the request object. Still, Django will be able to work with the user variable you use in dashboard.html because the user information is stored in RequestContext. You’ll verify this behavior in a moment.
For now, continue by creating a users/urls.py file and add a path for the dashboard view:
users/urls.py
from django.urls import path
from . import views

urlpatterns = [
    path("dashboard/", views.dashboard, name="dashboard"),
]
Finally, add your application’s URLs to your project’s URLs:
user_auth_intro/urls.py
from django.contrib import admin
from django.urls import include, path

urlpatterns = [
    path("", include("users.urls")),
    path("admin/", admin.site.urls),
]
Now you can test the dashboard view. Open http://127.0.0.1:8000/dashboard/ in your browser. You should see a screen similar to this one:
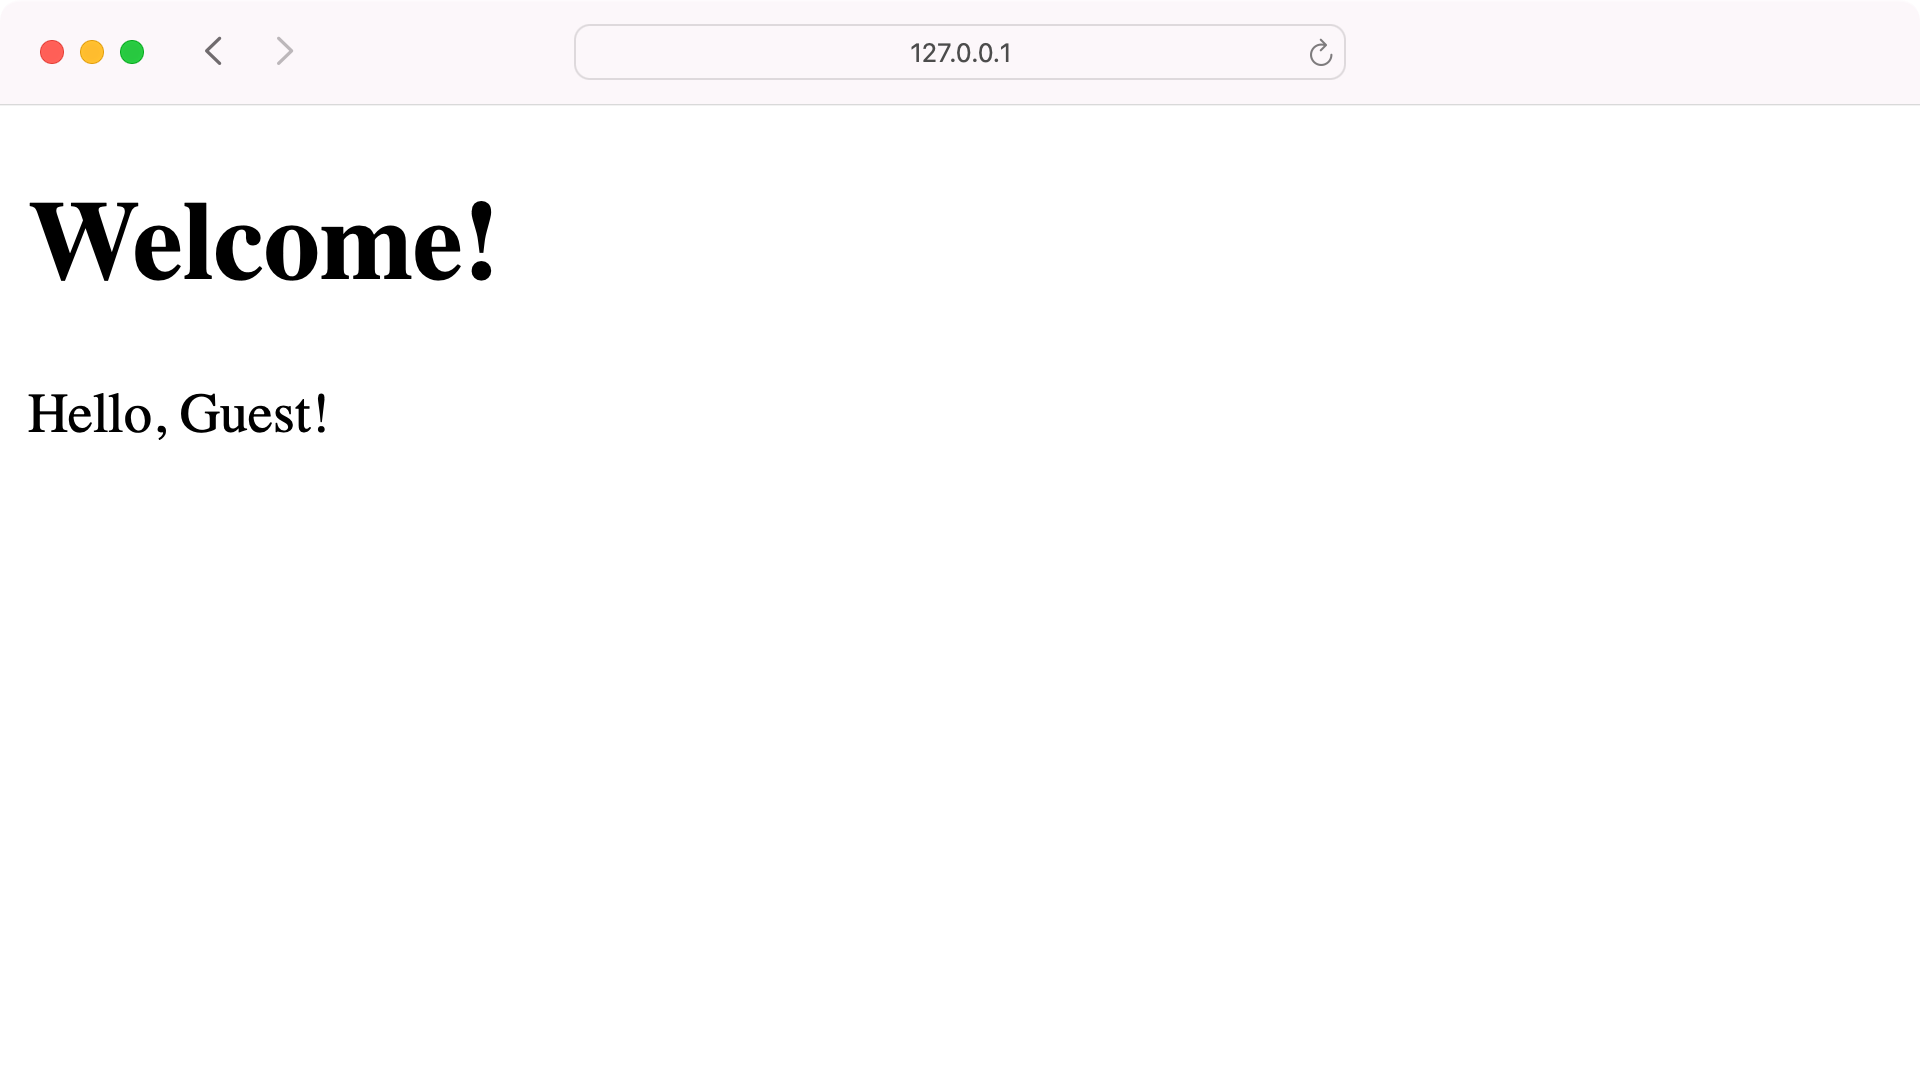
This means that Django successfully worked with the user template variable. In this case, the user is an anonymous user, which doesn’t have a .username property, so Hello, Guest! is shown.
Note: If the dashboard shows a Hello, admin! message, then you can log out from the admin site and visit the dashboard again to see the Hello, Guest! message.
If you’re not logged in, then the dashboard page greets you as a guest. When you open the admin site at http://127.0.0.1:8000/admin/ and log in as the admin user, your dashboard should now look a bit different when you go back to it:

As you can see, your new template correctly displays the name of the currently logged-in user. In this case, the dashboard greets you as an admin. That’s a great start!
Implement User Registration
Currently, you’re the admin of the project, and you can log in through the login form on the admin site. If you want to add new users to your project, then you need to create them yourself. That’s not very practical. Instead, you’ll build a registration page where users can sign up on their own.
To create this page, you’ll follow the same steps as for any other page in a Django project. Begin by registering a URL that connects to a view, which in turn renders a template. Start by adding a “sign_up” URL to the urls.py file in your users app:
users/urls.py
from django.urls import path
from . import views

urlpatterns = [
    path("dashboard/", views.dashboard, name="dashboard"),
    path("sign_up/", views.sign_up, name="sign_up"),
]
Next, add a sign_up view that adds a user to the database when you send the registration form with a "POST" request:
users/views.py
 1from django.contrib.auth import login
 2from django.contrib.auth.forms import UserCreationForm
 3from django.shortcuts import redirect, render
 4from django.urls import reverse
 5
 6def dashboard(request):
 7    return render(request, "users/dashboard.html")
 8
 9def sign_up(request):
10    if request.method == "POST":
11        form = UserCreationForm(request.POST)
12        if form.is_valid():
13            user = form.save()
14            login(request, user)
15            return redirect(reverse("dashboard"))
16    else:
17        form = UserCreationForm()
18    return render(request, "registration/sign_up.html", {"form": form})
The view is very typical for a view that works with forms. When you access the sign_up page with a "GET" request, you’ll see an empty form that you can fill out to sign up. After you send a valid form with the request, you save the form data to your database. In this case, it creates a new user. Then, you redirect the request to the dashboard page.
There’s one important detail to note after saving the form. In line 14, you use Django’s login() function to additionally log the user in. If you removed this line, then you’d register the user but the user would stay logged out after signing up. Using login() saves your users a step and streamlines the registration process.
In line 18, you’re serving the sign_up.html template from within a registration/ subfolder. Go ahead and create sign_up.html with this content:
users/templates/registration/sign_up.html
{% extends "base.html" %}
{% block content %}
    <h2>Sign Up</h2>
    <form method="post">
        {% csrf_token %}
        {{ form.as_p }}
        <input type="submit" value="Sign Up" />
    </form>
    <p>
        <a href="{% url 'dashboard' %}">Back to dashboard</a>
    </p>
{% endblock content %}
This will display a Sign Up heading, followed by a login form. Django uses a dictionary, also known as a context, to pass data to a template while rendering it. In this case, a variable called form will already be included in the context—all you need to do is display it. Using {{ form.as_p }} will render the form as a series of HTML paragraphs.
The {% csrf_token %} line inserts a Cross-Site Request Forgery (CSRF) token, which is required by every Django form. There’s also a button for submitting the form and, at the end of the template, a link that will take your users back to the dashboard.
Note: This tutorial focuses on the structure of your user management system and works with unstyled templates. Feel free to pause anytime and add some CSS to the project to make it look nicer.
To check if your sign-up page works, head over to http://127.0.0.1:8000/sign_up and create a new user:
After sending the registration form, the user logs in automatically and is greeted personally on the dashboard page. Congratulations—you can now register new users! Next, you’ll add functionality for logging in and out.
Work With Django Auth
A complete website needs a bit more than just a dashboard to handle user management. Luckily, Django comes with an authentication system and an authorization system, which are commonly shortened as Django auth to cover both terms:
- Authentication: Is the verification process to identify a user, for example, a login.
- Authorization: Is the process of determining what a user is allowed to do, for example, after logging in.
Django auth has a lot of user management-related URLs and views that’ll take care of the most important processes, including login, logout, password change, and password reset. However, you’ll need to create the templates to accompany these processes.
In this section of the tutorial, you’ll first add the URLs for logging in and logging out to your project. Then, you’ll take care of all the templates to make the authorization process for your users smooth.
Connect the Auth URLs and Views
To make use of Django’s built-in authentication and authorization systems, you need to work with django.contrib.auth. The entryway is the module’s URLConf, which is short for URL configuration. The first step is to add django.contrib.auth.urls to your application’s urls.py:
users/urls.py
from django.urls import include, path
from . import views

urlpatterns = [
    path("accounts/", include("django.contrib.auth.urls")),
    path("dashboard/", views.dashboard, name="dashboard"),
    path("sign_up/", views.sign_up, name="sign_up"),
]
By including Django’s django.contrib.auth.urls URLConf to your user application’s URL, you automatically add a bunch of URLs to your project, such as URLs for logging users in and out. Each URL comes with a name that you can later use in your templates, and the views that are connected to the URLs enable you to perform an authentication task:
| URL | Task | Name |
|---|---|---|
accounts/login/ |
Log a user into your application | "login" |
accounts/logout/ |
Log a user out of your application | "logout" |
Additionally, django.contrib.auth.urls provides URLs for more advanced tasks, such as changing and resetting passwords. You’ll explore these later in this tutorial.
Now that the accounts/ URLs exist in your app and they’re already connected to corresponding views in django.contrib.auth.views, take the plunge and visit http://127.0.0.1:8000/accounts/login/:
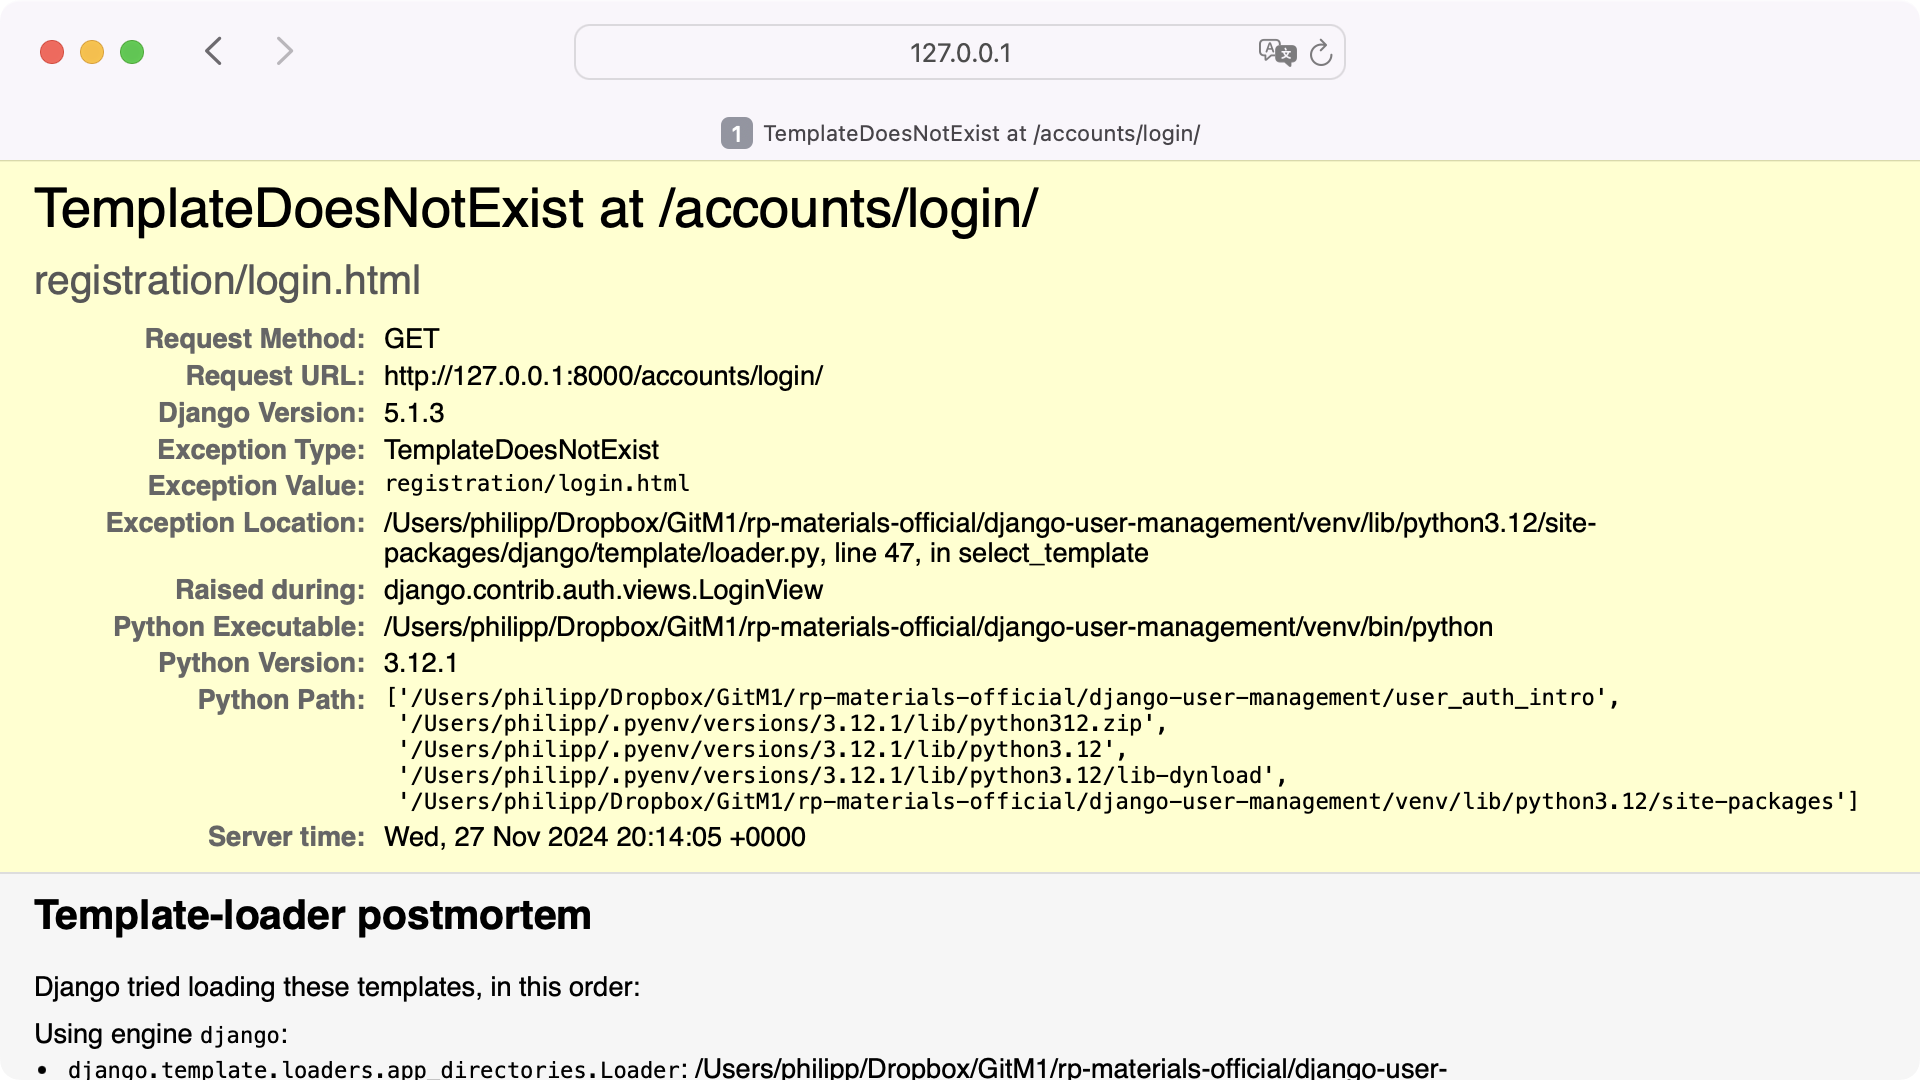
The TemplateDoesNotExist error is expected because you need to create the templates yourself. But like other Python exceptions, the error message is actually quite helpful and gives you two important bits of information:
- The
"login"URL finds theLoginView. - The
LoginViewlooks for a template inregistration/namedlogin.html.
You can visit the other URLs, and you’ll see similar error messages for most of them. To get rid of the errors, you must create the templates that the views expect.
If you scroll down the page with the error message, then you can have a look at the template-loader postmortem section. There, you can see that Django particularly tries to load templates from the path users/templates/registration/ first. This is where you’ll create your user management templates.
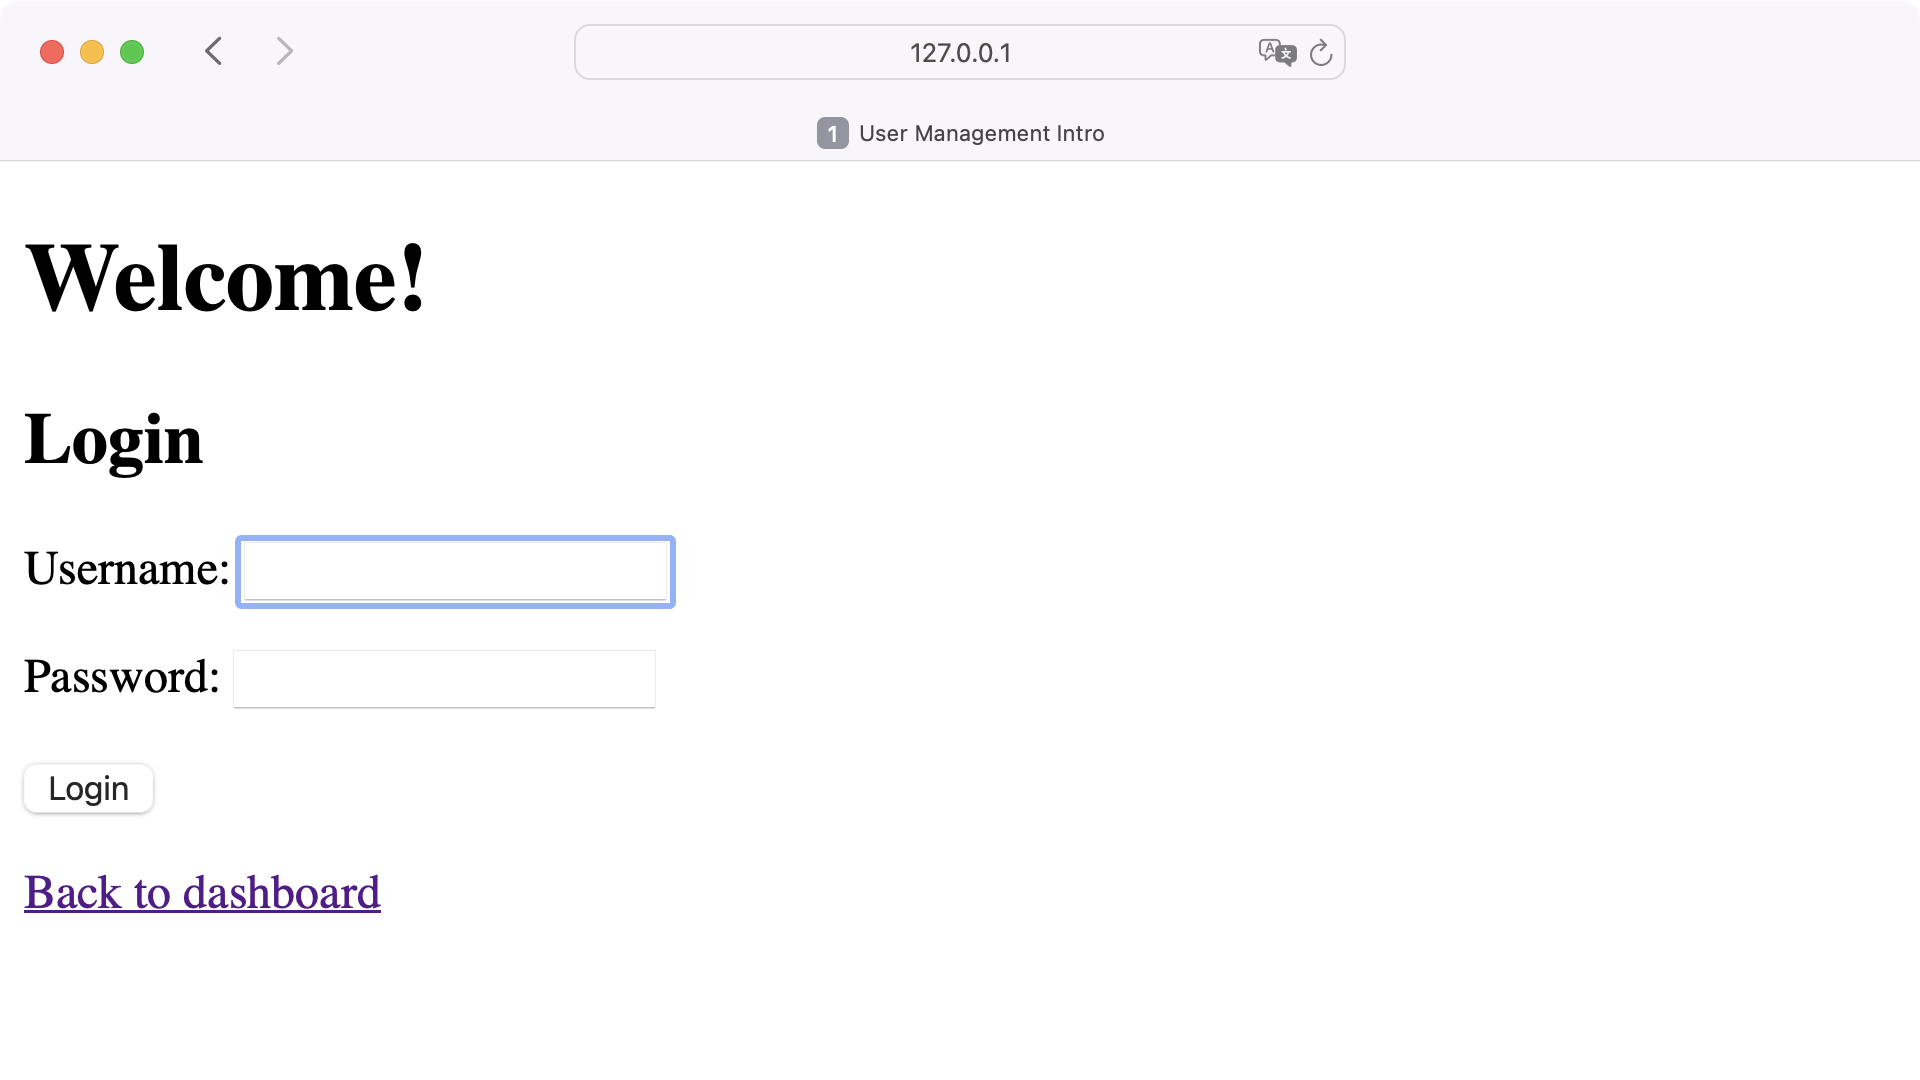
Create a Login Page
For the login page, Django will try to use a template called login.html that lives inside users/templates/registration/. Inside registration/, add a login.html file with this content:
users/templates/registration/login.html
{% extends "base.html" %}
{% block content %}
    <h2>Login</h2>
    <form method="post">
        {% csrf_token %}
        {{ form.as_p }}
        <input type="submit" value="Login" />
    </form>
    <p>
        <a href="{% url 'dashboard' %}">Back to dashboard</a>
    </p>
{% endblock content %}
The template for your login page looks very similar to your sign up template. The only difference is the headline and the value of the button. Also, the form will only show one password entry field compared to the sign up form where you have to repeat the password you set.
When you visit http://127.0.0.1:8000/accounts/login/ again, then you can see that Django has now successfully rendered your login page with the new template:
Use your admin user credentials and select Login. Don’t be alarmed if you see an error screen again. Just like before, the error message gives you helpful information about what went wrong:
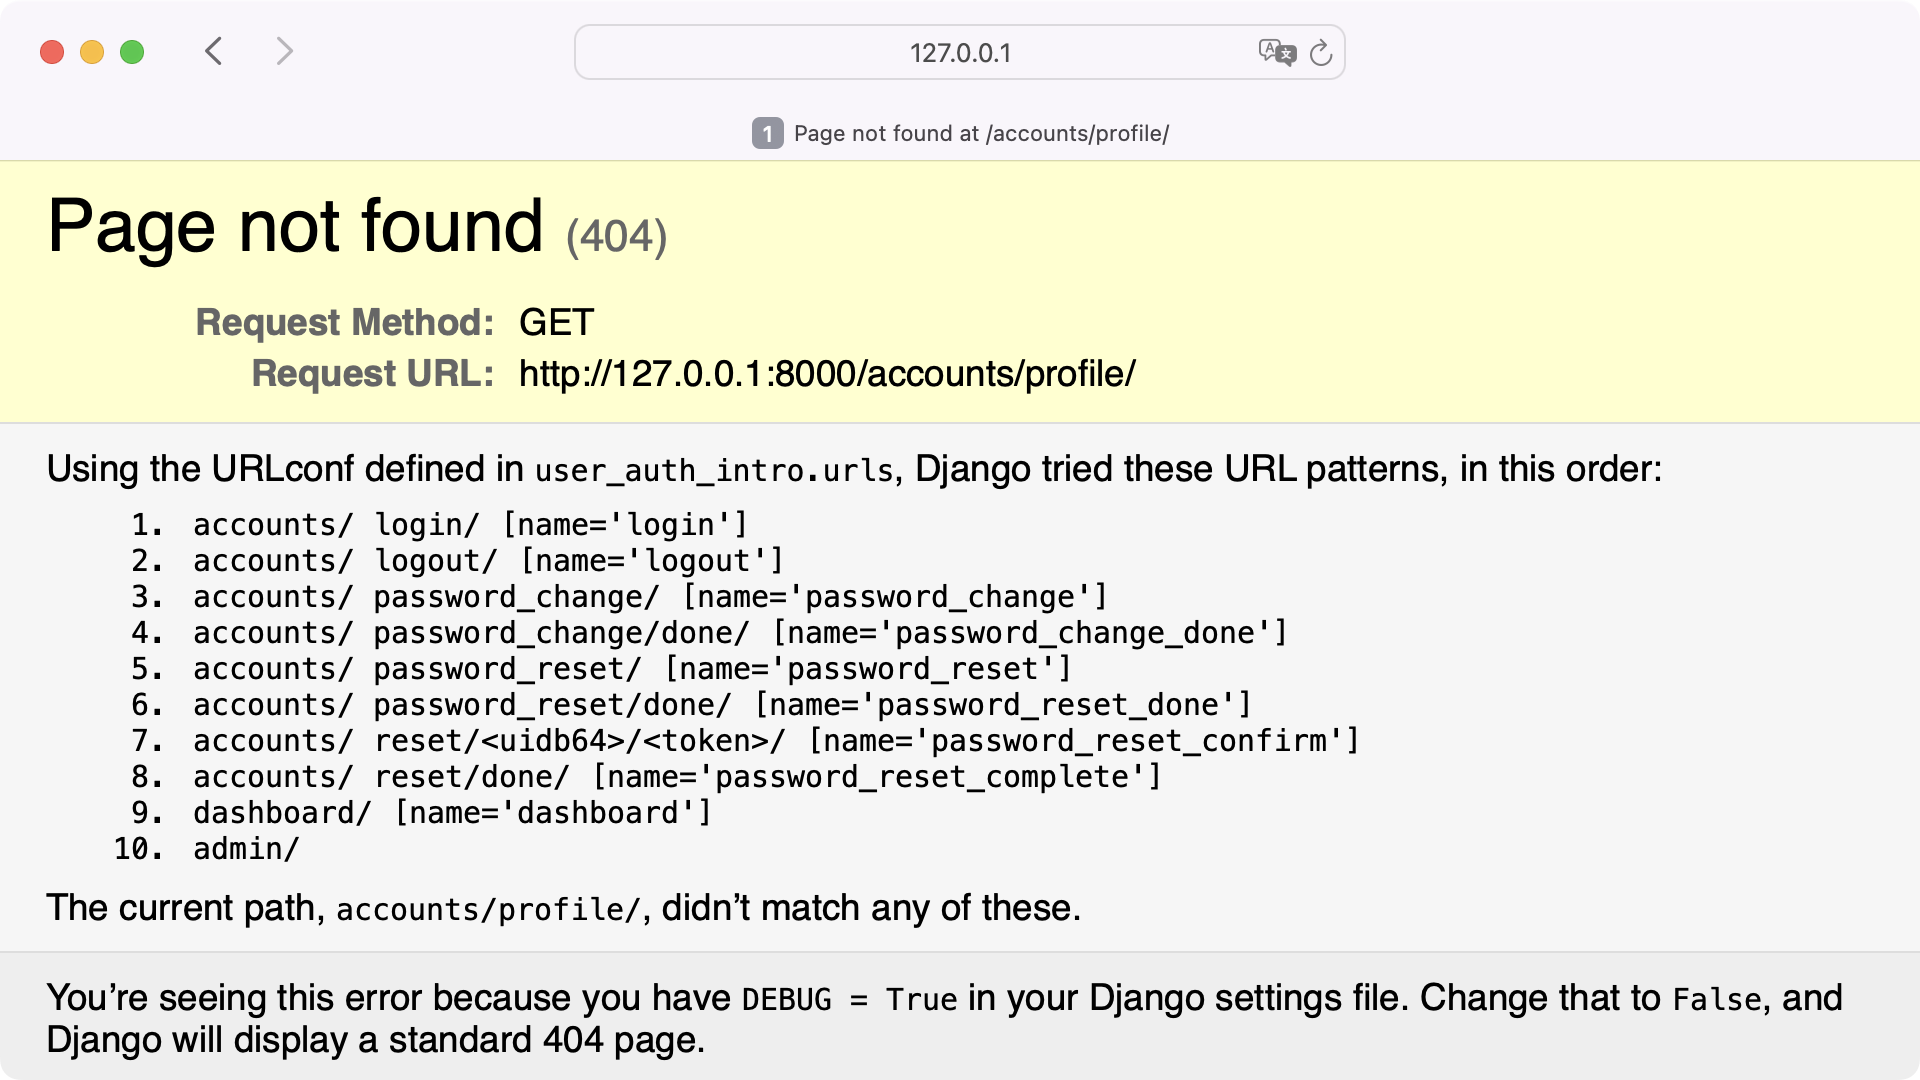
According to the error message, Django can’t find a path for accounts/profile/, which is the default destination for your users after a successful login. Apparently, Django doesn’t come equipped with a profile view. But that’s not a problem because you already have the dashboard view that you can reuse instead.
Redirect Logins
Django gives you two options for changing the default redirection after a successful login. The first option is to set the LOGIN_REDIRECT_URL in your settings.py file to the preferred URL your request should be redirected to. The second option is to adjust the form of your login.html template.
Generally, adjusting LOGIN_REDIRECT_URL is a valid strategy. But since you want to redirect to your dashboard page, you’d reference the URL from another app in your project’s settings. If you ever decide to remove your users app from your Django project sometime in the future, then you’ll also need to remember to remove or update LOGIN_REDIRECT_URL.
Note: If you want to try out adjusting the settings file, then you must add LOGIN_REDIRECT_URL = "dashboard" to settings.py.
Adjusting the form of login.html gives you granular control about where you want to redirect the request after a successful login. All you need to do is adjust the next parameter that you send with the form.
Open login.html and add the next parameter with the help of a hidden input field:
users/templates/registration/login.html
{% extends "base.html" %}
{% block content %}
    <h2>Login</h2>
    <form method="post">
        {% csrf_token %}
        {{ form.as_p }}
        <input type="submit" value="Login" />
        <input type="hidden" name="next" value="{% url 'dashboard' %}" />
    </form>
    <p>
        <a href="{% url 'dashboard' %}">Back to dashboard</a>
    </p>
{% endblock content %}
Now try to log in again. You’ll be redirected to the dashboard page where you’re greeted with your username.
Enable Logging Out
Now your users can log in, but they should also be able to log out. This process is a bit different from logging in. If you have a look at the URLs that Django auth provides, you’ll spot an accounts/logout/ URL. However, you’re not supposed to visit this URL in the browser like you did with the the login page.
Note: In earlier versions of Django, you were able to log out with a GET request by accessing accounts/logout/. With the release of Django 5.0, the view behind accounts/logout/ only accepts POST requests.
Instead of creating a template for the logout view, you must create a form that sends a post request to the accounts/logout/. Then, you can include this form anywhere you want to provide the logout functionality.
To indicate that the logout template is supposed to be included by other templates, you can prefix the filename with an underscore _ and name it _logout.html. Store the template next to login.html and follow a similar pattern with the hidden field:
users/templates/registration/_logout.html
 1<form method="post" action="{% url 'logout' %}">
 2    {% csrf_token %}
 3    {{ form.as_p }}
 4    <input type="submit" value="Logout" />
 5    <input type="hidden" name="next" value="{% url 'dashboard' %}" />
 6</form>
Since the template is supposed to be included by other templates and isn’t to be rendered independently, you don’t need to extend any other templates. Instead, you just add the code for the form.
In line 1, you’re also adding the action attribute to tell the browser where the request should be sent to. It’s important to add the "logout" page here. Otherwise, the form would send the POST request to the same URL you’re on right now and not log you out.
Open dashboard.html and include the _logout.html form:
users/templates/users/dashboard.html
{% extends "base.html" %}
{% block content %}
    Hello, {{ user.username|default:"Guest" }}!
    <hr />
    {% include "registration/_logout.html" %}
{% endblock content %}
When you visit http://127.0.0.1:8000/dashboard/, you’ll see the button that logs your user out:
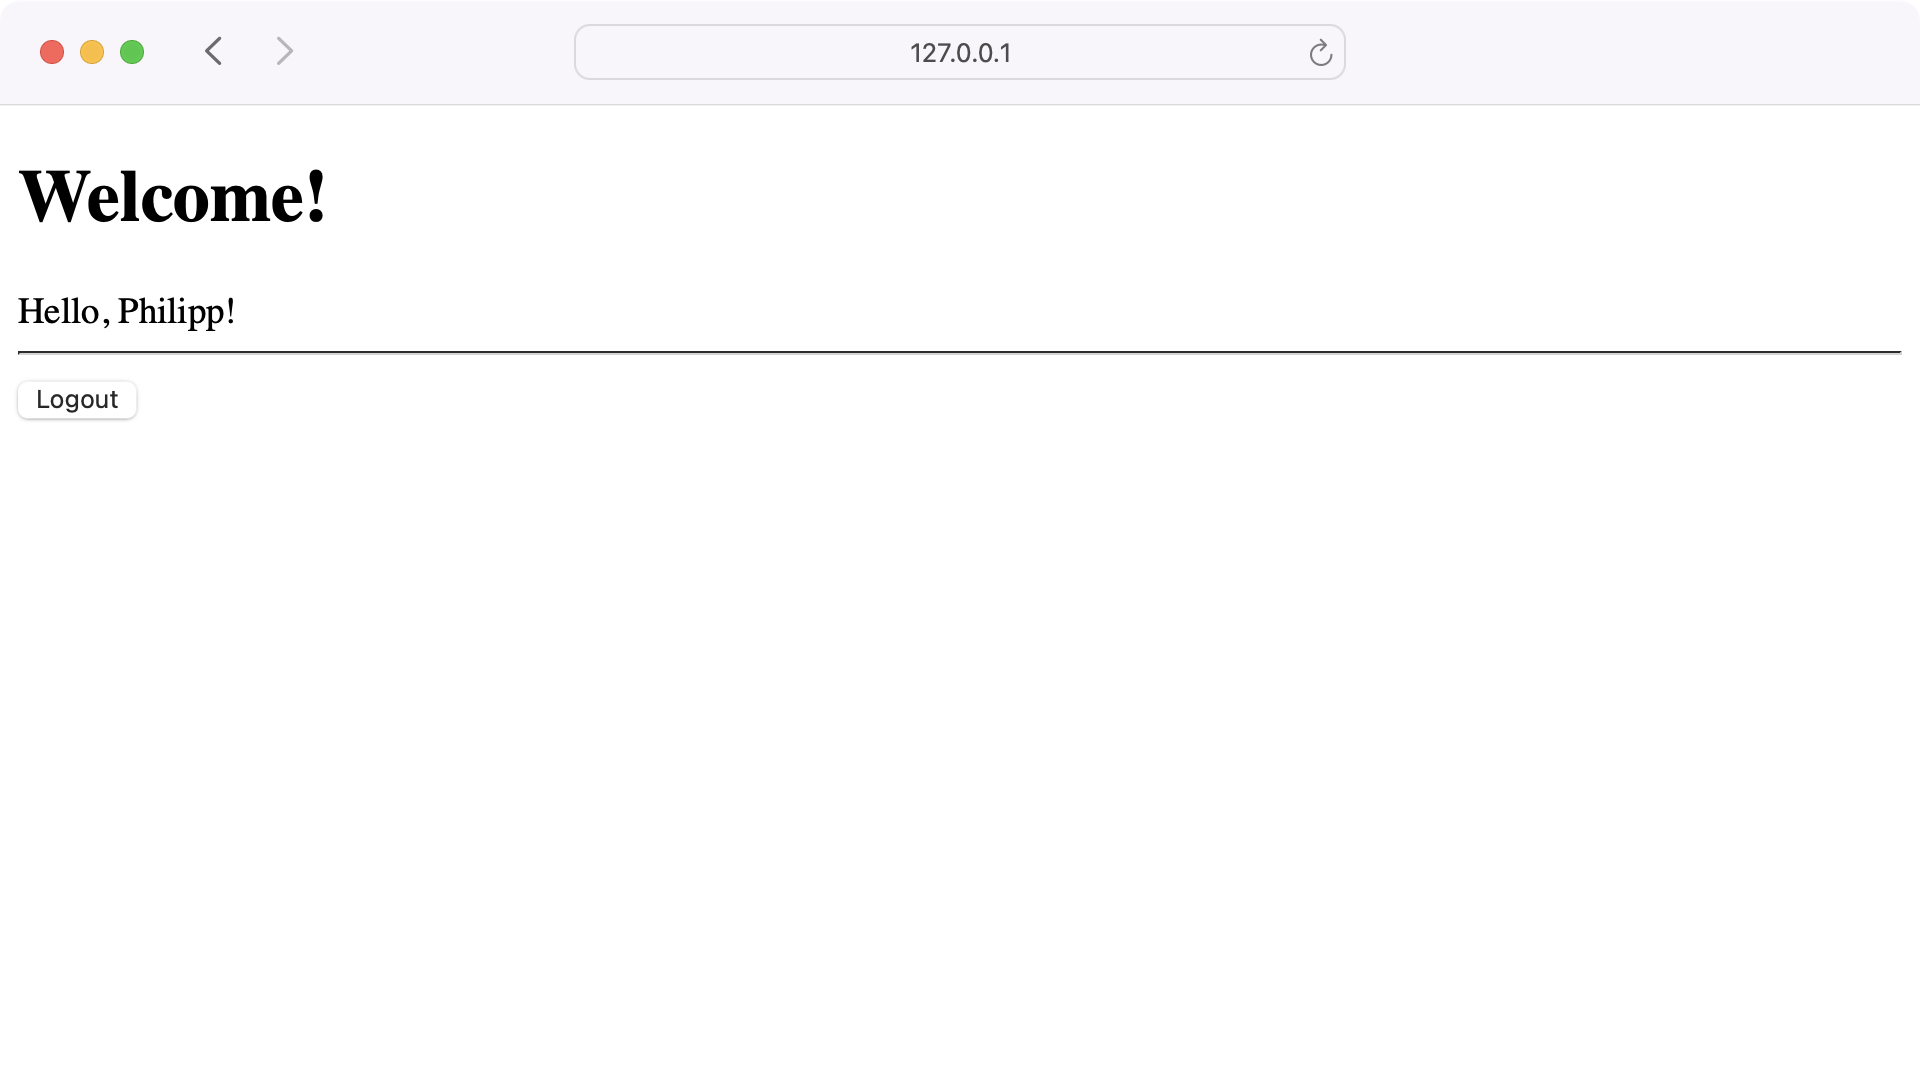
Currently, the logout process is very subtle. When you click the button, then you see your username switch to “Guest” in the dashboard’s greeting message. But the logout button is still displayed even after you’ve logged out. So before wrapping up this section, it’s time to update the dashboard to reflect the current state of your user management system.
Update the Dashboard
Your dashboard is quite basic at the moment. The logout button is present at all times, even when users are already logged out. If you want to sign up or log in, then you must visit the URLs by typing them into the browser’s address bar. You can fix these inconveniences by updating the dashboard template:
users/templates/users/dashboard.html
{% extends "base.html" %}
{% block content %}
    Hello, {{ user.username|default:"Guest" }}!
    <hr />
    {% if user.is_authenticated %}
        {% include "registration/_logout.html" %}
    {% else %}
        <a href="{% url 'login' %}">Login</a>
        <a href="{% url 'sign_up' %}">Sign up</a>
    {% endif %}
{% endblock content %}
To conditionally show the logout button or the login and signup links, you’re making use of user.is_authenticated. If the user is authenticated, you show the logout button. Otherwise, you render the links to your login page and the sign-up page.
You can visit http://127.0.0.1:8000/dashboard/ and see how the updated dashboard works:
When a user is logged out, they have the option to log in or sign up. If they already have an account, then they can click Login and enter their credentials on the login page.
For users who don’t have an account, you provide the option for them to sign up. In both situations, the user is logged in afterward, which is when your dashboard shows the logout button.
That’s perfect! It looks like you now have a functioning user management system. As long as the users remember their passwords, everything will be fine.
Handle Passwords
Currently, your user management system is missing two important features for handling passwords:
- Changing Your Password: You want to be able to change your password now and then to keep your account secure.
- Resetting Your Password: In case you forget your password, you want to be able to reset it.
Building upon Django auth for your user management gives you a head start in implementing functionality for changing and resetting passwords in your project.
Remember how when you included Django’s django.contrib.auth.urls URLConf to your user application’s URL, you automatically added a bunch of URLs to your project? For example, it added URLs for logging users in and out. Well, it also added these URLs for changing and resetting passwords:
| URL | Task | Name |
|---|---|---|
accounts/password_change/ |
Change a password | "password_change" |
accounts/password_change/done/ |
Show a confirmation that a password was changed | "password_change_done" |
accounts/password_reset/ |
Request an email with a password reset link | "password_reset" |
accounts/password_reset/done/ |
Show a confirmation that a password reset email was sent | "password_reset_done" |
accounts/reset/<uidb64>/<token>/ |
Set a new password using a password reset link | "password_reset_confirm" |
accounts/reset/done/ |
Show a confirmation that a password was reset | "password_reset_complete" |
Just like before, each URL comes with a name that you can later use in your templates, and the views that are connected to the URL enable you to perform an authentication task. Let’s start with changing passwords!
Change Passwords
At some point, your users might want to change their passwords. Instead of making them ask the admin to do it for them, you can add a password change form to your application. Django needs two templates to make this work:
registration/password_change_form.htmlto display the password change form.registration/password_change_done.htmlto show a confirmation that the password was successfully changed.
Start with registration/password_change_form.html:
users/templates/registration/password_change_form.html
{% extends "base.html" %}
{% block content %}
    <h2>Change password</h2>
    <form method="post">
        {% csrf_token %}
        {{ form.as_p }}
        <input type="submit" value="Change" />
    </form>
    <a href="{% url 'dashboard' %}">Back to dashboard</a>
{% endblock content %}
This template looks almost the same as the login template you created earlier. But this time, Django will put a password change form here, not a login form, so the browser will display it differently.
The other template you need to create is registration/password_change_done.html:
users/templates/registration/password_change_done.html
{% extends "base.html" %}
{% block content %}
    <h2>Password changed</h2>
    <a href="{% url 'dashboard' %}">Back to dashboard</a>
{% endblock content %}
After changing the password, the user will see the "password_change_done" page to verify that the password change was successful. Just like with other pages, it’s a good idea to add a link to the dashboard.
To make the password change conveniently accessible, add a link on the dashboard to your newly created password change form. You just have to make sure that it’s only shown to users who are logged in:
users/templates/users/dashboard.html
{% extends "base.html" %}
{% block content %}
    Hello, {{ user.username|default:"Guest" }}!
    <hr />
    {% if user.is_authenticated %}
        {% include "registration/_logout.html" %}
        <a href="{% url 'password_change' %}">Change password</a>
    {% else %}
        <a href="{% url 'login' %}">Login</a>
        <a href="{% url 'sign_up' %}">Sign up</a>
    {% endif %}
{% endblock content %}
If you follow the link in your browser, then you should see the following form:
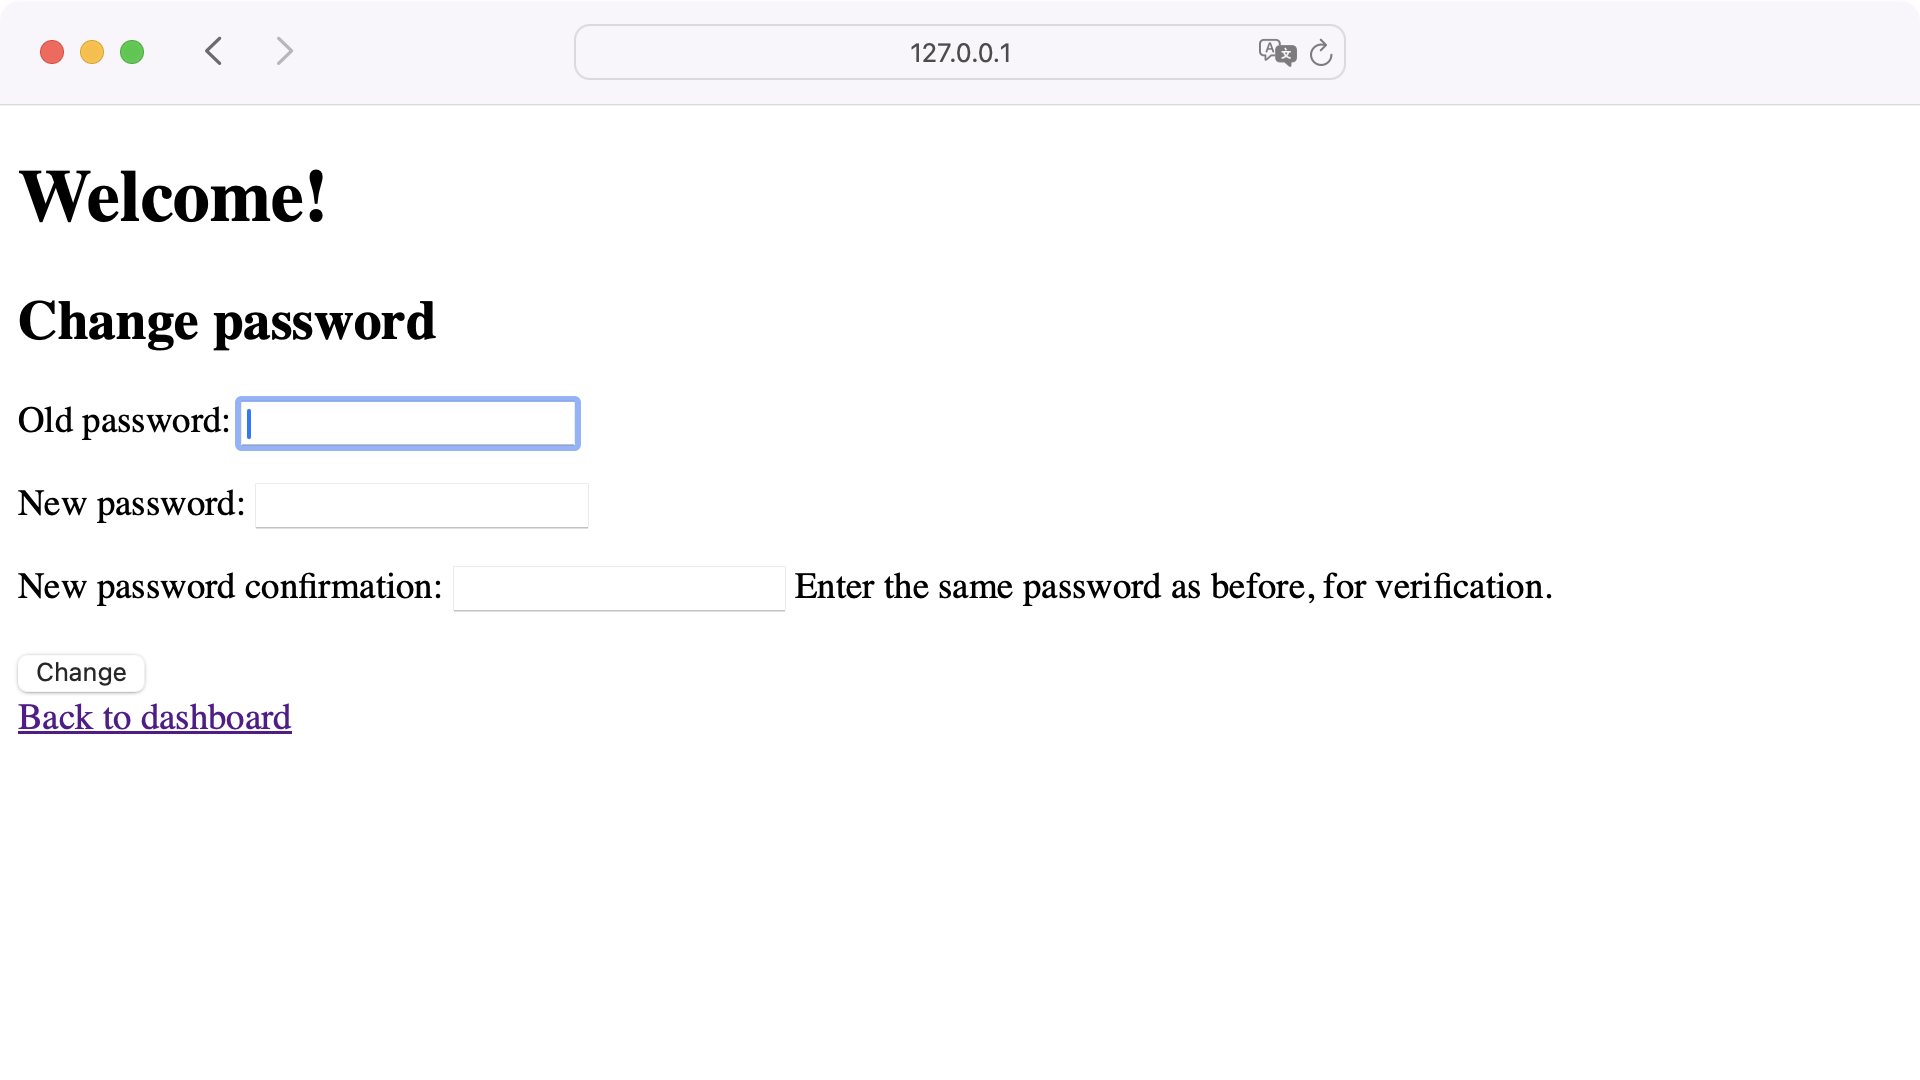
Go ahead and test it. Change the password, log out, and log in again. You can also try to access the password change page without logging in by accessing the URL http://127.0.0.1:8000/accounts/password_change/ directly in your browser. Django is clever enough to detect that you should log in first and will automatically redirect you to the login page.
Request Password Reset Links
Mistakes happen to the best of us, and every now and then, someone might forget a password. Your Django user management system should handle that situation, too. This functionality is a bit more complicated because, in order to work with password reset links, there are three requirements:
- Your users must provide an email address when they sign up.
- You must have an email template to send.
- Your application must be able to send emails.
So far, a user only needs a username and a password to sign up for your application. That’s a good start. However, when they want to reset their password, just asking them for their username is risky. Instead, you’ll want to send an email to the email address they provide. This approach ensures that users can reset passwords themselves.
To request an email address during registration, you’ll need to adjust the registration form. To do so, create a new Python file called users/forms.py and add a custom form:
users/forms.py
from django.contrib.auth.forms import UserCreationForm

class CustomUserCreationForm(UserCreationForm):
    class Meta(UserCreationForm.Meta):
        fields = UserCreationForm.Meta.fields + ("email",)
In your newly created forms.py file, you’re creating a CustomUserCreationForm that extends Django’s UserCreationForm. The inner class Meta keeps additional information about the form and, in this case, extends UserCreationForm.Meta, so almost everything from Django’s form will be reused.
The key difference is the .fields attribute, which determines the fields that will be included in the form. Your custom form will use all the fields from UserCreationForm and will add the email field.
Now that the form is ready, update the sign_up view in users/views.py to work with CustomUserCreationForm:
users/views.py
from django.contrib.auth import login
# Remove: from django.contrib.auth.forms import UserCreationForm
from django.shortcuts import redirect, render
from django.urls import reverse

from .forms import CustomUserCreationForm

def dashboard(request):
    return render(request, "users/dashboard.html")

def sign_up(request):
    if request.method == "POST":
        form = CustomUserCreationForm(request.POST)
        if form.is_valid():
            user = form.save()
            login(request, user)
            return redirect(reverse("dashboard"))
    else:
        form = CustomUserCreationForm()
    return render(request, "registration/sign_up.html", {"form": form})
Instead of using UserCreationForm, you’re now working with CustomUserCreationForm that you import from forms.py. Inside sign_up(), you need to update the values of form to use CustomUserCreationForm. The rest of the sign_up stays the same.
Create a new user to check out the updated registration process:
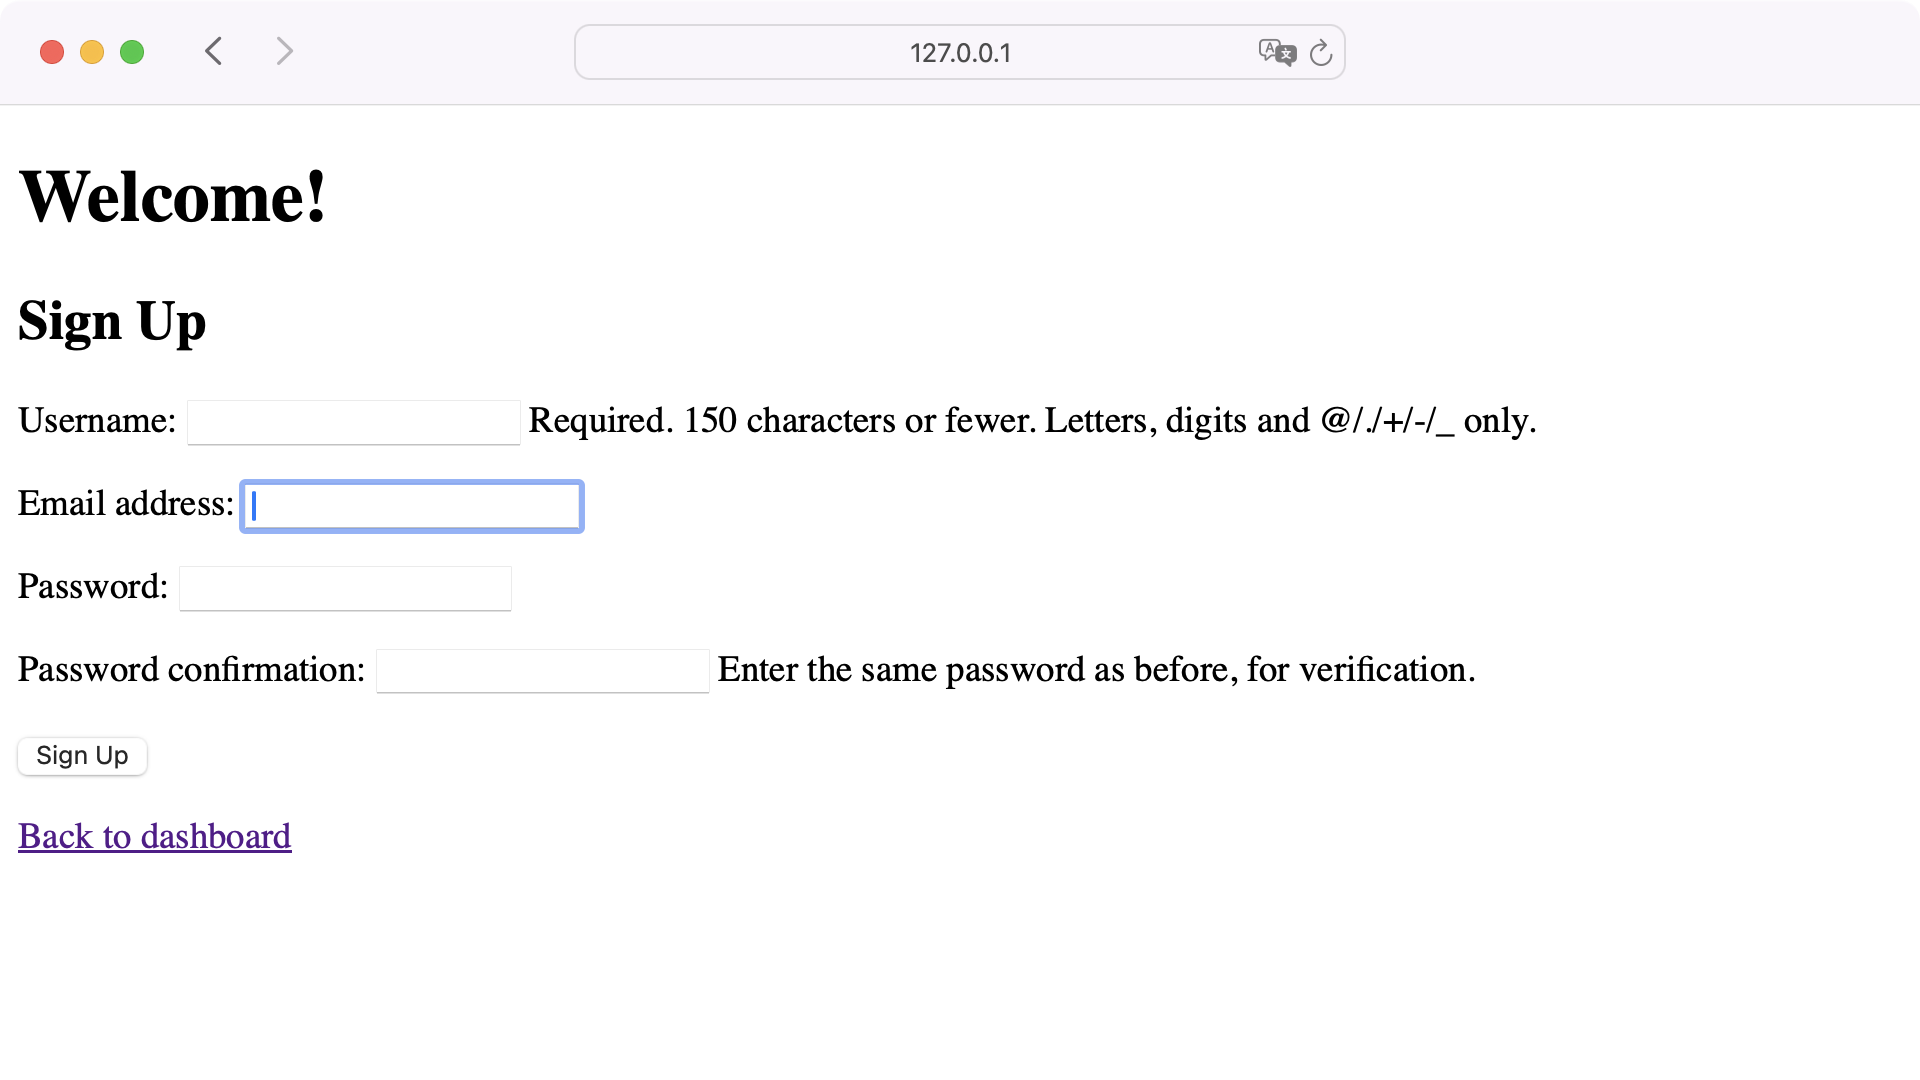
Perfect. Now that you require email addresses for new users, you can continue and create a template named password_reset_form.html in registration/:
users/templates/registration/password_reset_form.html
{% extends "base.html" %}
{% block content %}
    <h2>Send password reset link</h2>
    <form method="post">
        {% csrf_token %}
        {{ form.as_p }}
        <input type="submit" value="Send Reset Link" />
    </form>
    <p>
        <a href="{% url 'dashboard' %}">Back to dashboard</a>
    </p>
{% endblock content %}
This template will be served when you visit http://127.0.0.1:8000/accounts/password_reset/. It’s also a good idea to link to this page on your login page:
users/templates/registration/login.html
{% extends "base.html" %}
{% block content %}
    <h2>Login</h2>
    <form method="post">
        {% csrf_token %}
        {{ form.as_p }}
        <input type="submit" value="Login" />
        <input type="hidden" name="next" value="{% url 'dashboard' %}" />
    </form>
    <p>
        <a href="{% url 'password_reset' %}">Forgot your password?</a>
        <a href="{% url 'dashboard' %}">Back to dashboard</a>
    </p>
{% endblock content %}
Now when the user’s on the login page and forgets the password, they can click the link to the "password_reset" page. After they request a reset link, Django sends a reset link to the provided email address and redirects the user to the "password_reset_done" page. For this page, you also need to create a template:
users/templates/registration/password_reset_done.html
{% extends "base.html" %}
{% block content %}
    <h2>Password reset link sent</h2>
    <a href="{% url 'dashboard' %}">Back to dashboard</a>
{% endblock content %}
The "password_reset_done" name is a bit misleading. At this point, Django hasn’t reset the password yet. The password reset will only take place once the user clicks the link in the password reset email that Django sends.
Send Password Reset Emails
Go ahead and try out requesting the password reset. In the browser, everything seems to work as expected. But Django actually doesn’t send any emails at this point. To do so, you’ll have to set up an email backend for your project.
There are different kinds of email backends in Django. During development, it’s often most convenient to just output any emails to your terminal by using the console email backend. Open settings.py and add this line of code to the file:
settings.py
# ...

EMAIL_BACKEND = "django.core.mail.backends.console.EmailBackend"

# ...
In production, you’ll probably want to define a custom email backend. For now, setting EMAIL_BACKEND to "django.core.mail.backends.console.EmailBackend" will allow you to copy and paste the password reset link from the terminal.
Note: If you want to adjust the reset email template, then you can add your own template at registration/password_reset_email.html.
Try out requesting the password reset again. While doing so, have a look at the output in the terminal window where your Django development server is running. After clicking the Send Reset Link button, you’ll see the content of the reset email in the output of your terminal:
Content-Type: text/plain; charset="utf-8"
MIME-Version: 1.0
Content-Transfer-Encoding: 8bit
Subject: Password reset on 127.0.0.1:8000
From: webmaster@localhost
To: philipp@realpython.com
Date: Wed, 18 Dec 2024 10:08:34 -0000
Message-ID: <173287491425.58492.16858044530563413153@philipp>

You're receiving this email because you requested a password reset
for your user account at 127.0.0.1:8000.

Please go to the following page and choose a new password:

http://127.0.0.1:8000/accounts/reset/Nw/ch906a-de23fda8df503bf8567b6485a/

Your username, in case you've forgotten: Philipp

Thanks for using our site!

The 127.0.0.1:8000 team
Some of the content may look a bit weird because you’re on your local development server. The important part of this output is the reset link. That’s the link the user must click to trigger the password reset.
Reset Passwords
Before the link can be used, you need to create two other templates that’ll be displayed during the password reset process:
registration/password_reset_confirm.htmlregistration/password_reset_complete.html
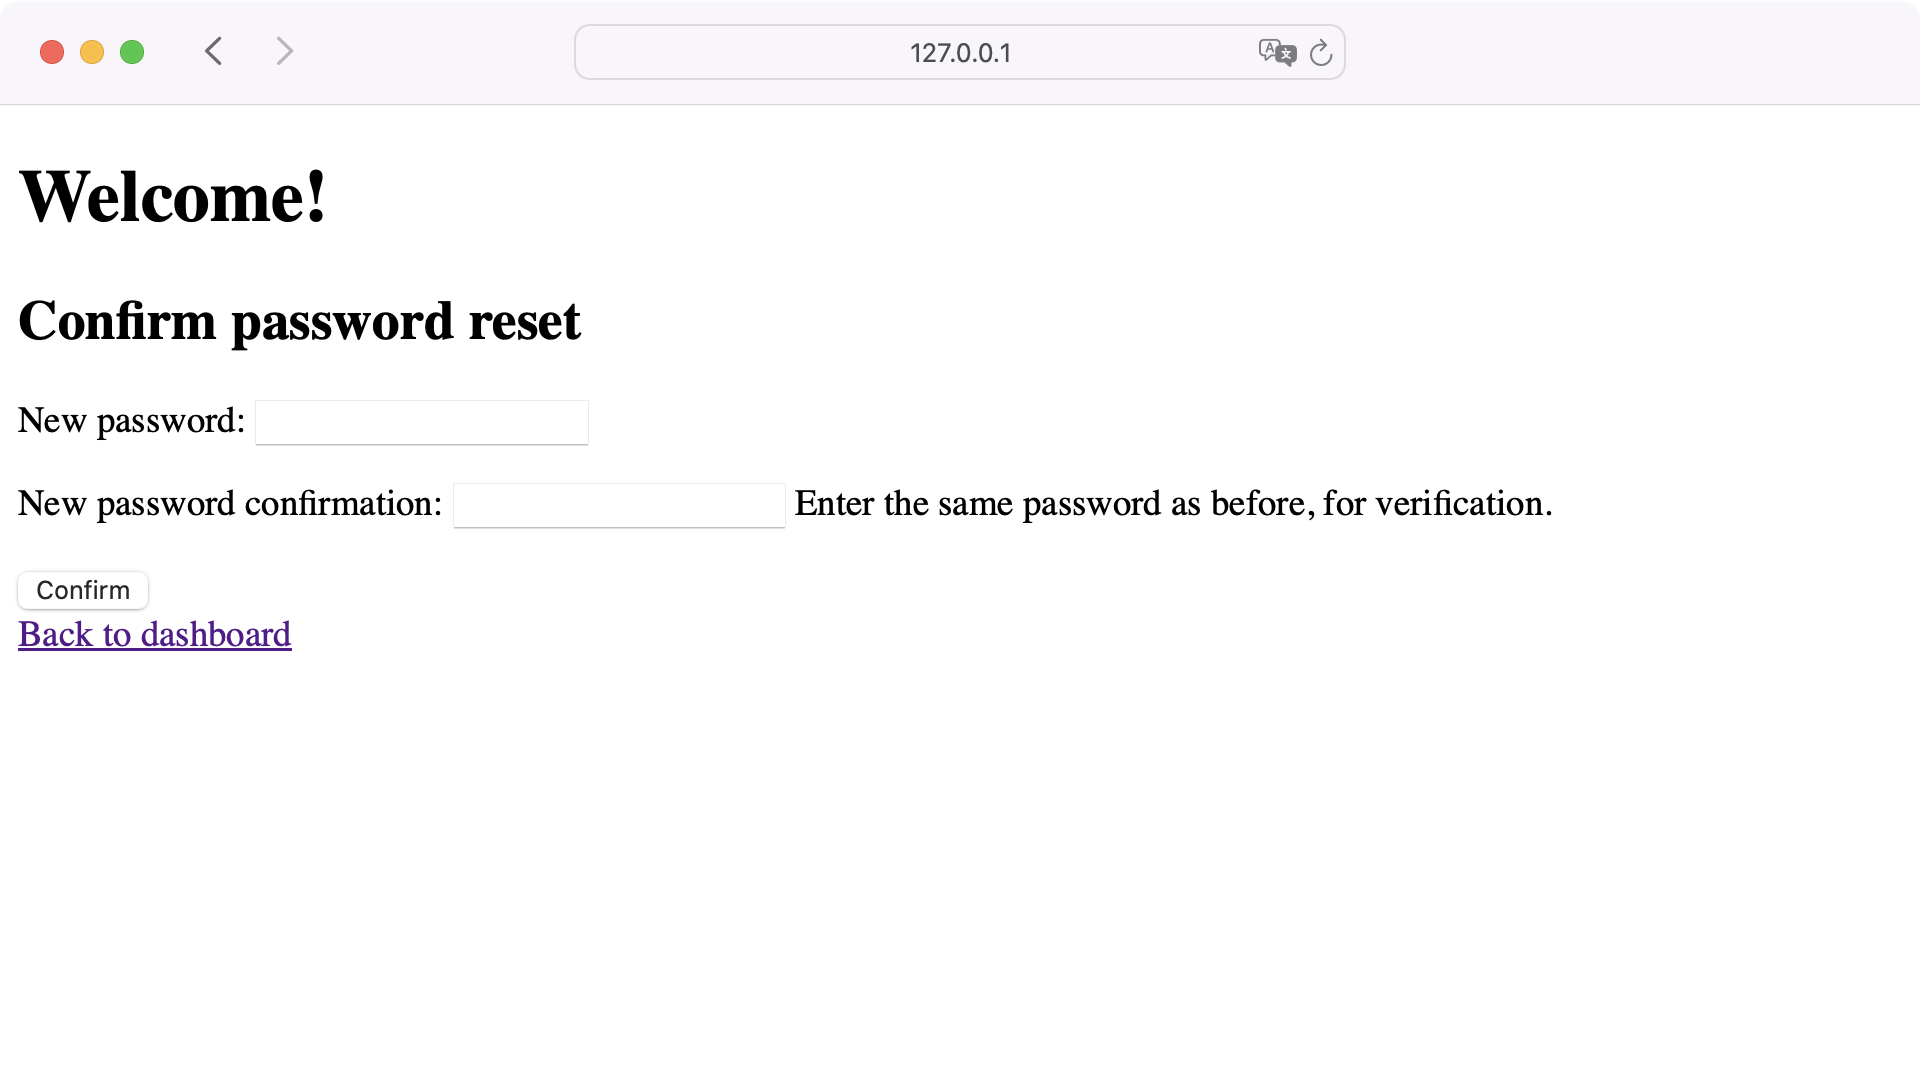
Start with password_reset_confirm.html, which will display a password reset form:
users/templates/registration/password_reset_confirm.html
{% extends "base.html" %}
{% block content %}
    <h2>Confirm password reset</h2>
    <form method="post">
        {% csrf_token %}
        {{ form.as_p }}
        <input type="submit" value="Confirm" />
    </form>
    <a href="{% url 'dashboard' %}">Back to dashboard</a>
{% endblock content %}
After sending this form, Django will redirect you to a success page. The template for this page is password_reset_complete.html:
users/templates/registration/password_reset_complete.html
{% extends "base.html" %}
{% block content %}
    <h2>Password reset completed</h2>
    <a href="{% url 'login' %}">Login</a>
{% endblock content %}
Now that you have all templates present, copy the password reset link from the email and paste it into your browser. The link should have a pattern like accounts/reset/<uidb64>/<token>/. The page you’ll see after visiting the page reset link contains your password reset form:
Once you enter a new password and click Confirm, you’re redirected to the "password_reset_complete" page. Afterward, you can log in with your new password.
Reactivate the Password Validator
At the beginning of this tutorial, you disabled the password validators in your project’s settings to make your development workflow more convenient. Now that your user management system is complete, it’s a good time to reactivate the password validators again:
user_auth_intro/settings.py
# ...

AUTH_PASSWORD_VALIDATORS = [
    {
        "NAME": "django.contrib.auth.password_validation.UserAttributeSimilarityValidator",
    },
    {
        "NAME": "django.contrib.auth.password_validation.MinimumLengthValidator",
    },
    {
        "NAME": "django.contrib.auth.password_validation.CommonPasswordValidator",
    },
    {
        "NAME": "django.contrib.auth.password_validation.NumericPasswordValidator",
    },
]

# ...
Now Django will enforce strong passwords for new users. You can have a look at the rules when you visit http://127.0.0.1:8000/accounts/password_change/ with a logged-in user:

In addition to other rules, new passwords must now contain at least eight characters and can’t be entirely numeric. Now you not only have a working user management system but one that ensures secure passwords for your users.
Conclusion
Congratulations! You’ve added a user management system to your Django web app by using Django’s built-in authentication system. To improve the user experience, you can now extend some of Django’s base functionality to your liking.
In this tutorial, you learned how to:
- Leverage Django’s user authentication implementation
- Make development more convenient by adjusting Django’s password validators
- Create an application where users can register, log in, and log out
- Provide users with tools to reset and change passwords on their own
- Edit the default Django templates responsible for user management
- Work with password reset links
Now you’re all set to invite users to your web application. If you want to dive even deeper into user management in Django, then you can check out the tutorial about managing users in Django’s admin site.
Get Your Code: Click here to download the free sample code you’ll use to set up a basic user management system with Django .
Frequently Asked Questions
Now that you have some experience with Django user management in Python, you can use the questions and answers below to check your understanding and recap what you’ve learned.
These FAQs are related to the most important concepts you’ve covered in this tutorial. Click the Show/Hide toggle beside each question to reveal the answer.
You set up user authentication in Django by utilizing Django’s built-in authentication system, which includes URLs and views. Then you need to create the templates for login, logout, and password management.
Authentication verifies the identity of a user, like logging in, while authorization determines what actions a user is allowed to perform once authenticated.
No. Since Django version 5, you must log users out by sending a POST request to the "logout" view.
You create a login system by including path("accounts/", include("django.contrib.auth.urls")) to the urlpatterns list in your urls.py file. Then you must create a login.html file in a registration/ template folder.
You reset a password by using Django’s password reset views and setting up templates, sending a reset link to the user’s email, and allowing the user to set a new password via the link.