When working with Python objects, you’ll often need to make copies rather than modify the originals. In this tutorial, you’ll explore various ways to copy objects in Python, including using the built-in copy module. You’ll also learn the key differences between shallow and deep copies, with practical examples so you can safely duplicate objects in your own code.
By the end of this tutorial, you’ll understand that:
- Shallow copying creates a new object but references the same nested objects, leading to shared changes.
- Deep copying recursively duplicates all objects, ensuring full independence from the original.
- Python’s
copymodule provides thecopy()function for shallow copies anddeepcopy()for deep copies. - Custom classes can implement
.__copy__()and.__deepcopy__()for specific copying behavior. - Assignment in Python binds variable names to objects without copying, unlike some lower-level languages.
Explore the nuances of copying objects in Python and learn how to apply these techniques to manage mutable data structures effectively.
Get Your Code: Click here to download the free sample code that you’ll use to learn about shallow vs deep copying in Python.
Take the Quiz: Test your knowledge with our interactive “Shallow vs Deep Copying of Python Objects” quiz. You’ll receive a score upon completion to help you track your learning progress:
Interactive Quiz
Shallow vs Deep Copying of Python ObjectsIn this quiz, you'll test your understanding of Python's copy module, which provides tools for creating shallow and deep copies of objects. This knowledge is crucial for managing complex, mutable data structures safely and effectively.
Getting the Big Picture of Object Copying
Copying an object means creating its exact duplicate in memory. While there are many good reasons for doing so, at the end of the day, it allows you to modify the cloned objects independently of each other.
For example, a getter method may return sensitive information like the balance of someone’s bank account. To prevent unauthorized modifications of the bank account’s state, whether accidental or intentional, you’ll typically return a copy of the original data as a defensive programming measure. That way, you’ll have two separate objects safely representing the same piece of information.
Sometimes, you may need to work with multiple snapshots of the same data. In 3D computer graphics, transformations like rotation and scaling rely on matrix multiplication to update a model’s vertices. Rather than permanently changing the original model, you can duplicate its vertices and apply transformations to the copy. This will allow you to animate the model in a non-destructive way.
The following section provides an overview of the fundamental concepts and challenges associated with object copying in general. If you’d like to jump straight to copying objects in Python, then feel free to skip ahead.
Scalar vs Composite Types
In programming, objects can be classified into two broad categories of data types:
- Scalar
- Composite
Scalar data types represent simple, indivisible values that can’t be decomposed into smaller parts, much like atoms were once thought to be. Examples of scalars in Python include numbers, dates, and UUID-type identifiers:
>>> from datetime import date
>>> from uuid import uuid4
>>> numbers = 42, 3.14, 3 + 2j
>>> dates = date.today(), date(1991, 2, 20)
>>> ids = uuid4(), uuid4(), uuid4()
Each of these objects holds a single value representing a basic unit of data. By combining these fundamental building blocks, you can create more complex data structures.
Composite data types, on the other hand, are containers made up of other elements. Some of them are merely collections of scalar values, while others contain other composites or both, forming a complex hierarchy of objects:
>>> import array
>>> audio_frames = array.array("h", [2644, 2814, 3001])
>>> audio_data = (
...     ("PCM", 2, 44100, 16),
...     [
...         (15975, 28928),
...         (-86, 15858),
...         (31999, -3),
...     ]
... )
In this case, the "h" argument in the array.array() call specifies that the array will store numbers as two-byte signed integers. As you can see, a Python array aggregates scalar numbers into a flat sequence, whereas a list and tuple can contain deeply nested structures arranged in a particular way.
Note: Python types can sometimes fall into a gray area. For example, strings have a dual nature, as they’re technically sequences of characters. At the same time, they behave like scalars in specific contexts because they don’t allow element-wise operations—you must treat them as a whole.
These two categories of data types are closely related to the concept of object mutability, which you’ll learn more about now.
Mutable vs Immutable Objects
In high-level programming languages like Java and JavaScript, scalar types typically represent read-only values that can’t change over time. Such objects don’t allow in-place state mutation during their lifetime. So, if you want to modify a scalar value, then your only option is to disregard it and create another instance with a different value. In contrast, composite types can be either mutable or immutable, depending on their implementation.
Note: Immutable types have several advantages, including thread safety and improved memory efficiency, as they let you reuse objects without copying. On the other hand, when performance is vital, mutable types can reduce the overhead associated with object creation, especially when you tend to modify your objects frequently.
This correlation largely holds true in Python, as all scalar types built into the language are immutable, while compound types can be either mutable or immutable. For example, a Boolean value like True or False is read-only, but you’ll find both mutable and immutable sequences in Python:
- A Python list represents a mutable sequence of arbitrary elements.
- A Python string is an immutable sequence of characters.
That being said, you can define your own mutable scalar types in Python if you really want to. Here’s an example of a custom class that leverages a property to allow in-place state mutation:
>>> import unicodedata

>>> class Emoji:
...     def __init__(self, name):
...         self.name = name
...
...     def __repr__(self):
...         return self._glyph
...
...     @property
...     def name(self):
...         return unicodedata.name(self._glyph).title()
...
...     @name.setter
...     def name(self, value):
...         self._glyph = unicodedata.lookup(value)
...
>>> emoji = Emoji("tangerine")
>>> emoji
🍊
>>> emoji.name = "clown face"
>>> emoji
🤡
The Emoji class above encapsulates a single Unicode character that can change dynamically at runtime. Notice how you modify the object’s appearance by setting the .name attribute with a valid symbol name from the Unicode Character Database.
One surprising edge case involving immutable types in Python has to do with immutable container types like tuples. While you can’t add or remove elements from such immutable containers after creation, if they include a mutable item, then you can still modify that item. Here’s an example:
>>> row = (42, "John Doe", {"Python", "Data Science"})
>>> row[-1].add("Machine Learning")
>>> row
(42, 'John Doe', {'Machine Learning', 'Python', 'Data Science'})
You define a tuple of three elements representing a row fetched from a database table or another tabular data source like a CSV file. The first element in the tuple is a numeric ID of the data record. The second element is a textual name of an individual associated with that record. Finally, the third element is a Python set containing the skills of the individual.
Even though the tuple itself is immutable, meaning you can’t change its structure or replace its elements, you can still modify the mutable set within that tuple, for example, by adding a new skill. This has implications for copying, as you’ll discover later.
Although it doesn’t always guarantee it, hashability is often a good indicator of immutability. In general, most immutable objects in Python are inherently hashable, while mutable objects typically aren’t. As a result, you can take advantage of the built-in hash() function as a quick proxy to test whether an object is likely immutable:
>>> hash((42, "John Doe", frozenset({"Python", "Data Science"})))
-6716780242542814007

>>> hash((42, "John Doe", {"Python", "Data Science"}))
Traceback (most recent call last):
  ...
TypeError: unhashable type: 'set'
The first tuple contains only immutable elements, including a frozenset, so the hash() function successfully calculates a hash value based on the tuple’s contents. This strongly suggests that the tuple is indeed read-only. Conversely, calling hash() on the tuple with a set as an element raises an error because regular sets are mutable and therefore unhashable. This indicates that the second tuple, although immutable itself, can be modified in place.
Understanding the difference between mutable and immutable types becomes essential when you copy an object, whether intentional or not. Before exploring how Python handles this, you’ll step back to see the traditional distinction between copying values and references. This comparison will shed light on key differences that often surprise Python developers.
Value vs Reference Copying
Before you dive in, here’s a quick word of caution. This section touches on advanced topics beyond Python to give you a broader perspective and clarify common misconceptions about object copying. Unless you’re interested in these details, you might prefer to move directly to the next section, which focuses on Python. However, learning about these concepts may help you better understand the difference between shallow and deep copying later on.
If you’re familiar with lower-level languages like C or C++, then you might expect Python’s assignment statement and variables to behave similarly. However, nothing could be further from the truth! To see why, take a look at the following interactive session in the Cling interpreter, which is the C/C++ equivalent of the Python REPL—and don’t worry if you don’t fully understand the syntax:
 1[cling]$ int a = 42; &a
 2(int *) 0x7f1e53694000
 3
 4[cling]$ int b = a; &b
 5(int *) 0x7f1e52f34000
 6
 7[cling]$ a = 43
 8(int) 43
 9
10[cling]$ b
11(int) 42
12
13[cling]$ &a
14(int *) 0x7f1e53694000
15
16[cling]$ &b
17(int *) 0x7f1e52f34000
You declare two integer variables named a and b, initializing a to 42 and making b a copy of a. The assignment statement on line 4 effectively creates a clone of a at another memory location. Despite storing the same value, both variables reside at distinct memory addresses, as indicated by the hexadecimal numbers on lines 2 and 5.
Note: Every statement in C and C++ must end with a semicolon (;). However, Cling allows you to skip the semicolon, in which case it’ll evaluate the last expression that appears on the same line. Here, you place the semicolon after your assignment statements to evaluate expressions &a and &b, which reveal the memory addresses of variables a and b.
Later, when you assign a new value to a on line 7, b remains unchanged on line 10, still holding 42. On lines 13 and 16, you verify that a and b continue to exist at the same memory locations as before, demonstrating that scalar types like int in C and C++ are mutable by default—although you could make them immutable with the const keyword.
Now, consider a slightly different example involving pointers in C/C++:
 1[cling]$ int a = 42; &a
 2(int *) 0x7d0bafbfb000
 3
 4[cling]$ int* b = &a
 5(int *) 0x7d0bafbfb000
 6
 7[cling]$ a = 43
 8(int) 43
 9
10[cling]$ *b
11(int) 43
You define an integer variable a with the value 42, just like before. But then, instead of creating another regular variable, you declare b as a pointer to an integer value (int*) and use the ampersand operator (&) to store the address of a in b. This means that b holds the memory address of a, effectively referencing the same memory location.
As a result, when you change the value of a on line 7, dereferencing the pointer with an asterisk (*) on line 10 also reflects this updated value, showing 43.
The addresses printed on lines 2 and 5 confirm that both variables refer to a single entity. However, notice a tiny detail distinguishing the two assignments. On line 1, you explicitly evaluate the address of variable a using the ampersand operator (&a), but later, you evaluate the whole of line 4, showing the value stored in b. This time, the assignment statement didn’t copy the value—it copied the address of the assigned variable!
In C and C++, the assignment statement behaves differently depending on whether you’re working with a value type or a reference type, particularly when aliasing a variable. For primitive types like int, the assignment creates a copy of the assigned value. However, when assigning a variable of a reference type—such as a C pointer or a C++ reference—the assignment copies the reference itself rather than duplicating the underlying value.
Now, it’s time to explore how the assignment statement and variables in C/C++ compare to their Python counterparts.
Python’s Reference Binding
Unlike in C and C++, Python’s assignment statement never creates a copy of the object specified on the right side of the equals operator (=). That’s particularly true when you alias a variable like in this example:
>>> a = 42
>>> b = a
>>> a is b
True
Assignments are best understood when you read them from right to left. So, the first assignment, a = 42, starts by allocating memory for an object representing an integer and populates it with the specified value 42. Python then associates the newly created object’s address with your variable a, effectively making that variable an implicit reference.
Note: The description above is intentionally simplified for illustrative purposes. In reality, the number 42 already exists in memory even before your first assignment statement due to Python’s caching mechanism, which you’ll touch upon later.
The second assignment, b = a, behaves like the reference copying you saw earlier. Since a and b share the same identity, as indicated by the is operator, they both point to the same object in memory. To better understand this, you’ll peek under the surface to see how variables work.
In C/C++, variables can be thought of as boxes with a fixed shape and size determined by their underlying data type. The type is inherently tied to the variable itself, which means that you can only fit values of a certain type in such variables. Moreover, these variables take space regardless of whether they’re actually holding any value or not:

For example, declaring a variable as unsigned short in C/C++ allocates a memory block capable of storing only integers within a specific range of values. Because such a variable is designed for short integers, you won’t be able to assign values of other types to it. This would be just like trying to fit a cube into a circular slot in a shape-sorting toy.
In contrast, Python variables resemble sticky labels that can be put on any object because the type information is tied to the object, not the variable. Consequently, a Python variable serves as a flexible and lightweight nickname that you can give to arbitrary objects:

Multiple variables are allowed to reference the same Python object without copying it, but a single variable always references exactly one object at a time. That said, you may reassign your variables freely throughout their lifetime. The process of associating variables with objects is known as name binding.
Note: In C/C++, you can declare an uninitialized variable without assigning any value during its definition, essentially leaving your metaphorical box empty. This can lead to unpredictable behavior when you attempt to use such a variable before explicitly assigning a value.
On the other hand, Python variables can’t exist on their own without referencing some value:
>>> age: int
>>> type(age)
Traceback (most recent call last):
  ...
NameError: name 'age' is not defined

>>> age: int | None
>>> age = None
>>> type(age)
<class 'NoneType'>
Although you can make a forward declaration using type hints, you’ll need to explicitly assign a value to a Python variable at some point, even if it’s just None.
By now, you know that Python variables are references rather than value containers. Additionally, the assignment statement in Python binds the variable on the left to the object on the right without copying it. However, there are nuances to this behavior that you should understand.
More on Assignments
While the plain assignment doesn’t create a copy of a Python object, this isn’t necessarily true for the augmented assignment operators, such as Python’s increment operator (+=). To demonstrate this, you’ll define the following helper function:
>>> def reveal_vars(*names):
...     print(f"{'Variable':>10}{'Value':>10}{'Address':>20}")
...     print("-" * 40)
...     for name in names:
...         value = globals().get(name, None)
...         print(f"{name:>10}{value!s:>10}{hex(id(value)):>20}")
...     print()
...
This function prints the names of the specified global variables, along with values and memory addresses of the objects they’re bound to. The output will be neatly formatted thanks to Python’s f-string literals.
You’ll now reproduce the code example from the previous section, and call your new function to display information about the variables before and after using the increment operator:
>>> a = 42
>>> b = a
>>> reveal_vars("a", "b")
  Variable     Value             Address
----------------------------------------
         a        42      0x7eab3cd4a0d0
         b        42      0x7eab3cd4a0d0

>>> a += 1
>>> reveal_vars("a", "b")
  Variable     Value             Address
----------------------------------------
         a        43      0x7eab3cd4a0f0
         b        42      0x7eab3cd4a0d0
Initially, both a and b point to the same memory address because they reference the same object. However, after incrementing a by one, the variable a is suddenly bound to a new object with a different memory address, while b remains unchanged. This seems to contradict the claim that assignment statements never create copies.
The expression a += 1 is shorthand for a = a + 1, so Python first retrieves the current value of a, which is 42, and adds 1 to it. Since integers in Python are immutable, this produces a new integer instance rather than modifying the existing one. Finally, the resulting value gets reassigned to the same variable, detaching a from the original object and binding it to the newly created integer.
In this case, the augmented assignment operator didn’t exactly clone your original object but instead produced a new one with an updated value. Such behavior is typical for immutable data types.
Keep in mind that an operator’s behavior depends on how the underlying data type implements it. You could very well define a custom mutable integer type with a special method that overloads the operator to modify the same instance in place, rather than returning a new copy. The following class is a highly simplified integer implementation that demonstrates this concept:
>>> class MutableInt:
...     def __init__(self, value):
...         self.value = value
...
...     def __iadd__(self, other):
...         self.value += other
...         return self
...
...     def __str__(self):
...         return str(self.value)
...
The MutableInt class above wraps a standard integer value, storing it as an instance attribute. The class also implements the .__iadd__() method, which gets called when you use the += operator on the corresponding object. This method is implemented such that it updates the object’s .value attribute directly and returns the same object, which can be reassigned to a variable.
Note: Unlike its augmented counterparts, you can’t overload the plain assignment operator (=), which is a core part of Python’s syntax. This restriction helps ensure predictable variable assignment, which would otherwise become confusing and error-prone.
Repeat your last example, replacing the immutable int value with a MutableInt instance. When you do, an identical expression, a += 1, will update the object in place, affecting both a and b:
>>> a = MutableInt(42)
>>> b = a
>>> reveal_vars("a", "b")
  Variable     Value             Address
----------------------------------------
         a        42      0x79ac59320ec0
         b        42      0x79ac59320ec0

>>> a += 1
>>> reveal_vars("a", "b")
  Variable     Value             Address
----------------------------------------
         a        43      0x79ac59320ec0
         b        43      0x79ac59320ec0
Notice how both variables mirror the updated value of 43 after incrementing a, which means that no new objects have been created as a result of the assignment this time.
This goes to show that mutability plays an important role in how objects are copied and shared in memory. Without further ado, it’s time to dive into copying objects in Python!
Understanding Shallow and Deep Copying
Now that you understand how Python handles assignment and reference binding, you’ll explore the actual process of copying objects. Immutable objects don’t typically need explicit copying since you can’t modify them in place. However, mutable objects require more careful handling.
If a mutable object is referenced by many variables, then changes made through one reference will affect all others. Copying can, therefore, prevent such unintended side effects during state mutation.
Python provides two primary ways to copy an object:
- Shallow copy
- Deep copy
A shallow copy creates a new object but doesn’t fully duplicate its contents, so any nested objects inside are still shared between the original and the copy. In contrast, a deep copy recursively duplicates everything, ensuring that even deeply nested objects are cloned, effectively breaking all links to the original structure.
The distinction between these two approaches matters when working with complex data structures like lists of lists, dictionaries containing other dictionaries, or custom objects with deeply nested attributes. In the following sections, you’ll see how to create both shallow and deep copies, when to use each approach, and potential pitfalls to watch out for.
Shallow Copy: Duplicating Object References
To grasp the difference between shallow and deep copying, it’s a good idea to choose a mutable data type that can contain elements or nested objects. Consider the following Python dict, which represents the inventory of a local grocery store:
>>> inventory = {
...     "fruits": {
...         "apple": 50,
...         "banana": 30,
...     },
...     "dairy": {
...         "cheese": 15,
...         "milk": 20,
...     }
... }
This dictionary holds two key-value pairs: one for fruits and one for dairy products, both of which are dictionaries themselves. Each of the nested dictionaries contains the product names and their respective quantities.
There are a few ways to get a copy of such an object in Python, but you’ll learn about them later. For now, you can stick with the most universal copy.copy() function from Python’s standard library. However, because the function’s name can be ambiguous, you’ll rename it to the more descriptive shallow_copy() using the as keyword for clarity:
>>> from copy import copy as shallow_copy
Now, you can call this function to back up your inventory and assign the newly created object to another variable. Later, you’ll run a few sanity checks to verify that you’ve successfully made a copy. If the resulting dictionary becomes too large to display comfortably on the screen, then you can pretty print it for a clearer view:
>>> from pprint import pp

>>> backup = shallow_copy(inventory)

>>> pp(backup, width=50)
{'fruits': {'apple': 50, 'banana': 30},
 'dairy': {'cheese': 15, 'milk': 20}}

>>> pp(inventory, width=50)
{'fruits': {'apple': 50, 'banana': 30},
 'dairy': {'cheese': 15, 'milk': 20}}

>>> type(backup)
<class 'dict'>

>>> backup == inventory
True

>>> backup is inventory
False
The resulting object looks like your original inventory when you print them side by side. Still, it could be a mapping other than a Python dict, so you check if the backup has the same type() as the cloned object. Both dictionaries compare equal (==), which means they currently have the same value. To confirm that backup and inventory don’t actually reference the same object in memory, you check their identities, which turn out to be different.
To further illustrate that your backup is an independent copy of the store’s inventory, try modifying the primary stock by adding a new category of products:
>>> inventory["seafood"] = {
...     "shrimp": 12,
...     "salmon": 10,
...     "tuna": 8,
... }

>>> pp(inventory, depth=1)
{'fruits': {...}, 'dairy': {...}, 'seafood': {...}}

>>> pp(backup, depth=1)
{'fruits': {...}, 'dairy': {...}}
First, you add a third key-value pair into the inventory by putting another nested dictionary with seafood items under the aptly named "seafood" key. Then, you pretty print both dictionaries with the depth=1 parameter to limit the level of detail displayed, showing only the top-level keys. Since both objects have now diverged, this proves that modifying one instance has no effect on the copy.
Depending on the business rules, this might be the desired behavior. For example, when a backup represents a snapshot of data taken at a specific time, you want to continue mutating your inventory without affecting any of the past copies. So far, things appear to be working as expected. However, because you’ve made a shallow copy, you may run into surprising issues, which you’ll explore next.
Exposing the Pitfalls of Shallow Copying
Introducing a new category of products to the store’s inventory didn’t affect the backup you created earlier. Now, try something different by adding oranges to the existing collection of fruits in the inventory. This will show you why a shallow copy isn’t the best choice in this scenario:
>>> pp(inventory["fruits"])
{'apple': 50, 'banana': 30}

>>> pp(backup["fruits"])
{'apple': 50, 'banana': 30}

>>> inventory["fruits"]["orange"] = 40

>>> pp(inventory["fruits"])
{'apple': 50, 'banana': 30, 'orange': 40}

>>> pp(backup["fruits"])
{'apple': 50, 'banana': 30, 'orange': 40}
Notice that oranges have been added to both the inventory and its backup, even though you’ve only modified one of them. But how is this possible?
The difference between adding or removing a whole product category and modifying an existing category lies in the concept of value vs reference copying discussed earlier. When you make a shallow copy of an object, only the parent object is cloned as a distinct entity, while its descendants remain the same objects, shared between copies through duplicated references. In other words, a shallow copy is only one level deep:
>>> backup is inventory
False
>>> backup["fruits"] is inventory["fruits"]
True
>>> backup["dairy"] is inventory["dairy"]
True
The top-level container objects referenced by the backup and inventory variables are separate instances of the Python dictionary. However, their common children stored under the keys "fruits" and "dairy" are bound to the same two nested dictionaries. As a result, any in-place changes made to those children in the original dictionary are also reflected in the shallow copy.
To help visualize this concept, have a look at the diagram below, which depicts the graph of references and the Python objects they point to:
On the far left, you can see the original dictionary, referenced by your inventory variable, with three product categories inside. Each category is bound to a sub-dictionary with the corresponding product quantities.
Note: Although dictionaries conceptually store key-value pairs, they’re implemented as hash tables in Python, where each key is hashed to a specific location in memory. That location holds a reference to the corresponding value. So, in practice, you can think of a dictionary as a collection of named pointers.
When you took a snapshot of the store’s inventory, only two categories were present: "fruits" and "dairy". That’s why the backup dictionary on the far right is missing the "seafood" category, which you added later to the main dictionary.
The inventory and backup share some of the same nested dictionaries, shown in the middle of the diagram. This explains why adding oranges to the store’s inventory also updated the copy, as they both reference the same underlying object.
When you create a shallow copy, Python duplicates only the top-level container—in this case, a dict object with its keys—leaving the nested elements alone. Instead of copying their values, Python copies the references that point to them.
Such behavior can lead to unintended consequences if you expect the copy to remain unchanged. To ensure that mutations of an object’s descendants don’t affect its copy, consider deep copying, which clones the complete hierarchy of objects rooted in the top-level prototype.
Deep Copy: Creating Independent Clones
While you can make shallow copies in various ways, Python provides only one generic method for creating a deep copy, which is the copy.deepcopy() function. Go ahead and import this function now, along with the pretty printer you used before, and revisit the initial grocery store example from the previous section:
>>> from copy import deepcopy
>>> from pprint import pp
>>> inventory = {
...     "fruits": {
...         "apple": 50,
...         "banana": 30,
...     },
...     "dairy": {
...         "cheese": 15,
...         "milk": 20,
...     }
... }
Your inventory is a freshly made Python dict with two nested dictionaries as elements. To demonstrate that deep copying produces fully independent clones of the original objects, call deepcopy() on the top-level dictionary and then modify it the same way as you did before:
>>> backup = deepcopy(inventory)
>>> inventory["fruits"]["orange"] = 40
>>> inventory["seafood"] = {
...     "shrimp": 12,
...     "salmon": 10,
...     "tuna": 8,
... }
After creating a backup copy, you put a new "orange" entry into the "fruits" category and add an entirely new "seafood" category to your inventory. Now, compare the original inventory dictionary with its deep copy, backup, to see how they differ:
>>> pp(inventory, width=50)
{'fruits': {'apple': 50,
            'banana': 30,
            'orange': 40},
 'dairy': {'cheese': 15, 'milk': 20},
 'seafood': {'shrimp': 12,
             'salmon': 10,
             'tuna': 8}}

>>> pp(backup, width=50)
{'fruits': {'apple': 50, 'banana': 30},
 'dairy': {'cheese': 15, 'milk': 20}}
The inventory dictionary now includes a new entry under "fruits" and has a brand new product category. However, the backup remains unchanged, which shows that the deep copy is indeed independent of the original.
To drive the point home, here’s what the corresponding graph of Python references looks like this time:
Notice how you ended up with two separate hierarchies of objects that no longer share their children. This can be attributed to recursion, which allows Python to systematically duplicate each object and its descendants. As a result, you may safely modify any object within one reference tree without affecting the other. On the flip side, you now have nearly twice as many new objects as before, which takes up extra space in memory.
Having explored the concepts of shallow and deep copying in Python, it’s good to know their pros and cons. Up next, you’ll compare these two methods, looking at scenarios where each works best, and decide when to pick one over the other.
Comparing Shallow and Deep Copying
As long as your top-level composite object consists of only immutable descendants, then shallow copying should be your default choice. Copying an object shallowly is faster and takes much less memory compared to a deep copy since you don’t duplicate the object’s internal structure. Take this shopping cart as an example:
>>> from copy import copy as shallow_copy

>>> shopping_cart = ["milk", "eggs", "banana", "banana"]
>>> discounted_shopping_cart = shallow_copy(shopping_cart)

>>> shopping_cart.append("sardines")
>>> shopping_cart[0] += " chocolate"

>>> print(shopping_cart)
['milk chocolate', 'eggs', 'banana', 'banana', 'sardines']
>>> print(discounted_shopping_cart)
['milk', 'eggs', 'banana', 'banana']
The shopping cart above is a list of immutable strings representing product names. While you can add or remove items from the cart, you can’t alter any of its elements in place. Any attempt to change an element directly will result in replacing it with a new string, so the original string in the copy remains unchanged. That’s why a shallow copy is sufficient in this case, as it creates a new list that references the same immutable string objects.
Note: If your composite object is immutable itself, then copying it becomes generally unnecessary because all references to it will always point to the same fixed data. However, you might still need to copy a read-only container if some of its children are mutable. Recall the earlier example of a tuple containing a Python set as an element.
Aside from mutable descendants inside containers, recursive data types with circular references, such as a linked list, are another use case where shallow copies fall apart. To illustrate this, consider an example where a Python list contains itself as an element:
>>> continued_fraction = [1]
>>> continued_fraction.append(continued_fraction)

>>> print(continued_fraction)
[1, [...]]

>>> from pprint import pp
>>> pp(continued_fraction)
[1, <Recursion on list with id=126201036952640>]

>>> id(continued_fraction)
126201036952640

>>> id(continued_fraction[1])
126201036952640
This particular list represents a simple continued fraction that repeats itself infinitely, approximating the irrational constant known as the golden ratio according to this formula:

The first element in the list is an integer equal to one, corresponding to the first term of the equation above. The second element is a reference to the list itself, creating a recursive cycle. Such a structure doesn’t exactly reflect the formula, but it still captures its recursive nature.
Note that outputting the list using the standard print() function displays a simplified representation to prevent an infinite recursion error during printing. However, the pprint module provides a more detailed output, revealing the identity of the recursive list. By calling id(), you confirm that both the parent and its child are the same object.
Just for fun, you can try evaluating the continued fraction to approximate the golden ratio and compare your solution with the one in the next collapsible section.
The code below takes advantage of the Fraction data type and uses a recursive function to evaluate the approximation up to the specified depth:
>>> from fractions import Fraction

>>> cf = [1]
>>> cf.append(cf)

>>> def evaluate(depth):
...     if depth > 0:
...         return cf[0] + Fraction(1, evaluate(depth - 1))
...     return cf[0]
...
>>> golden_ratio = (1 + 5 ** 0.5) / 2
>>> for n in range(21):
...     fraction = evaluate(n)
...     approximation = float(fraction)
...     error = abs(golden_ratio - approximation)
...     print(
...         f"n={n:<3}",
...         f"{fraction:>11}",
...         "\N{almost equal to}",
...         f"{approximation:.15f}",
...         f"(\N{greek capital letter delta} = {error:<11.10f})",
...     )
...
n=0             1 ≈ 1.000000000000000 (Δ = 0.6180339887)
n=1             2 ≈ 2.000000000000000 (Δ = 0.3819660113)
n=2           3/2 ≈ 1.500000000000000 (Δ = 0.1180339887)
n=3           5/3 ≈ 1.666666666666667 (Δ = 0.0486326779)
n=4           8/5 ≈ 1.600000000000000 (Δ = 0.0180339887)
n=5          13/8 ≈ 1.625000000000000 (Δ = 0.0069660113)
n=6         21/13 ≈ 1.615384615384615 (Δ = 0.0026493734)
n=7         34/21 ≈ 1.619047619047619 (Δ = 0.0010136303)
n=8         55/34 ≈ 1.617647058823529 (Δ = 0.0003869299)
n=9         89/55 ≈ 1.618181818181818 (Δ = 0.0001478294)
n=10       144/89 ≈ 1.617977528089888 (Δ = 0.0000564607)
n=11      233/144 ≈ 1.618055555555556 (Δ = 0.0000215668)
n=12      377/233 ≈ 1.618025751072961 (Δ = 0.0000082377)
n=13      610/377 ≈ 1.618037135278515 (Δ = 0.0000031465)
n=14      987/610 ≈ 1.618032786885246 (Δ = 0.0000012019)
n=15     1597/987 ≈ 1.618034447821682 (Δ = 0.0000004591)
n=16    2584/1597 ≈ 1.618033813400125 (Δ = 0.0000001753)
n=17    4181/2584 ≈ 1.618034055727554 (Δ = 0.0000000670)
n=18    6765/4181 ≈ 1.618033963166706 (Δ = 0.0000000256)
n=19   10946/6765 ≈ 1.618033998521803 (Δ = 0.0000000098)
n=20  17711/10946 ≈ 1.618033985017358 (Δ = 0.0000000037)
When you compare the last result (n=20) with the actual golden ratio, you’ll find that this solution approximates it correctly up to eight decimal places.
Now, watch closely what happens when you create both a shallow and a deep copy of your recursive data structure:
>>> from copy import copy as shallow_copy, deepcopy

>>> broken_copy = shallow_copy(continued_fraction)
>>> deep_copy = deepcopy(continued_fraction)

>>> pp(continued_fraction)
[1, <Recursion on list with id=126201036952640>]

>>> pp(broken_copy)
[1, [1, <Recursion on list with id=126201036952640>]]

>>> pp(deep_copy)
[1, <Recursion on list with id=126201037321536>]
The string representation of the shallow copy differs from the other two, as it’s a new list referencing both elements of its prototype. The first element of the shallowly copied list points to an integer, but the second element points to a different list rather than its immediate parent. On the other hand, deep copying cleverly duplicated the nested list, preserving the recursive relationship between the copy and its own child element.
Check out the diagram below to get an idea of how the references are structured in both cases:
The broken_copy depicted in the bottom right corner is a shallow copy of the continued_fraction on the left. Although it’s a separate entity occupying a distinct memory region, the shallow copy only contains duplicates of the references from its prototype. So, the shallow copy isn’t cyclic itself because its second element—located at index one—points to the original list.
Conversely, the deep_copy at the top of the diagram is a fully independent clone, with most of its descendants duplicated recursively. But why is the integer shared between all three lists? It’s an optimization technique to conserve memory. Since integers are immutable, Python can reuse the same object across multiple referents that need to access the same value for reading.
Note: Due to integer interning, most integers typed into the Python REPL are usually copied despite their immutability. Only fairly small values are cached while larger integers typically aren’t:
>>> x = 256
>>> y = 256
>>> x is y
True

>>> a = 1024
>>> b = 1024
>>> a is b
False
In this case, variables x and y refer to the same shared instance, whereas a and b are distinct objects with the same value. There are exceptions to these rules. However, they’re implementation details of CPython that have no practical effect on your code’s behavior.
In summary, choose shallow copying for efficiency when dealing with immutable elements, and opt for deep copying when you need to ensure complete independence between the original and copied objects. This is especially true when your container object has mutable elements or when you work with recursive data structures.
Exploring the Techniques of Copying in Python
In this section, you’ll get a summary of four different approaches to copying Python objects, covering both shallow and deep copies. Along the way, you’ll gain insight into how each method works and how it impacts performance, helping you choose the most suitable option for your specific use case.
Calling the Class Constructor
Many built-in types in Python provide an overloaded class constructor that accepts another instance of the same data type. These include scalars like Boolean values and numbers, as well as mutable and immutable composites:
| Constructor | Type | Mutability | Behavior |
|---|---|---|---|
bool() |
Scalar | Immutable | No copy |
int(), float(), complex() |
Scalar | Immutable | No copy |
str() |
Scalar/Composite | Immutable | No copy |
bytes() |
Composite | Immutable | No copy |
frozenset() |
Composite | Immutable | No copy |
tuple() |
Composite | Immutable | No copy |
bytearray() |
Composite | Mutable | Shallow copy |
dict() |
Composite | Mutable | Shallow copy |
list() |
Composite | Mutable | Shallow copy |
set() |
Composite | Mutable | Shallow copy |
Notice that only mutable containers, such as byte arrays, dictionaries, lists, and sets, have constructors that actually return a copy of the supplied argument:
>>> fruits = ["apple", "banana", "orange"]
>>> dairy = {"cheese": 15, "milk": 20}
>>> seafood = {"shrimp", "salmon", "tuna"}

>>> fruits_copy = list(fruits)
>>> dairy_copy = dict(dairy)
>>> seafood_copy = set(seafood)

>>> fruits_copy is fruits, fruits_copy == fruits
(False, True)
>>> dairy_copy is dairy, dairy_copy == dairy
(False, True)
>>> seafood_copy is seafood, seafood_copy == seafood
(False, True)
These constructors act as factory functions that build a shallow copy of the prototype passed as their only argument—with the same elements as the original. This is conceptually similar to a default copy constructor generated by the C++ compiler. In each case, the copy is a separate object, which compares equal to the original.
Note: To make a deep copy of these mutable containers, you’ll still need to call the deepcopy() function from the copy module, which is covered later.
In contrast, read-only composites like bytes, frozen sets, and tuples never clone the parent object, retaining its original identity:
>>> veggies = ("carrot", ["spinach", "kale"], "beans")
>>> veggies_copy = tuple(veggies)
>>> print(veggies_copy)
('carrot', ['spinach', 'kale'], 'beans')
>>> veggies_copy is veggies
True
Calling tuple() with an existing tuple as an argument returns the same tuple, even though it contains a reference to a mutable object. This is different from calling list(), which always creates a new list instance.
In most situations, shallow copying of an immutable container is unnecessary because you can usually reuse such objects safely—unless they contain mutable elements like in the example above. If that’s the case, then you should create a deep copy anyway.
For scalar objects, which are predominantly immutable in Python, the behavior of their copy constructors is analogous. They always return the same object, regardless of whether the underlying data type allows distinct copies to exist at different memory locations. Take strings as an example:
>>> text = "Hello, World!"
>>> copy = "Hello, World!"

>>> copy is text
False

>>> str(text) is text
True

>>> str(copy) is copy
True
When you initialize two variables using sufficiently long but identical string literals, Python might allocate separate objects for both of them. Simultaneously, calling str() on one of those variables will instead return a reference to the corresponding object without making a copy.
Note: If you run this code from a Python script rather than an interactive REPL session, then you may observe a different behavior. That’s because Python cuts corners by caching repeated string literals when it finds them in your source code. On the other hand, the interpreter can’t make any assumptions upfront when you’re typing code interactively in the REPL.
That said, strings that are valid Python identifiers—consisting of only ASCII letters, digits, and underscores (_)—still get interned in the REPL to boost performance of dictionary lookups for common keys. Anyway, these are technical details of the CPython interpreter, which you should never rely on!
It’s worth noting that the class constructors discussed in this section are actually more flexible. They allow you to create a new object not just from another instance of their own kind but, in fact, from any iterable object. This could be a completely different container or even a generator:
>>> set("Hello, World!")
{'H', ',', 'o', 'l', 'r', '!', ' ', 'W', 'e', 'd'}

>>> set(reversed("Hello, World!"))
{'H', 'o', ',', 'e', 'l', 'r', '!', ' ', 'W', 'd'}

>>> set(character.upper() for character in "Hello, World")
{'H', 'D', ',', 'R', 'O', ' ', 'L', 'E', 'W'}
These examples show you how to create a set of characters from a string literal, a reversed string, and a generator expression. Because sets may only contain unique elements, calling the set() constructor on an iterable is a common idiom for removing duplicates in Python.
Okay. You’ve seen some built-in mutable containers with a shallow copy constructor, but what about other composite data types that don’t have one? In the next section, you’ll take a closer look at one such type, which supports its own syntax for copying.
Slicing a Python Sequence
Python comes with numerous data types and offers dedicated syntax to manipulate them. Among the most commonly used container types are sequences, which include basic sequence types, character sequences, and binary sequences, all built into the core language. Beyond these, standard and third-party libraries provide higher-level sequences, such as the Python array. Lastly, you can build your own sequence types from scratch!
Regardless of which sequence type you’re working with, it’ll most likely support a powerful feature known as slicing. This feature allows you to carve out a subsequence from any object that implements the sequence protocol. You slice a sequence by using the square bracket syntax and passing a slice object as a parameter.
To define a slice, you can either call the slice() function explicitly, or use a more common approach and delimit its start, stop, and step values with colons (:) as a shorthand notation:
>>> fruits = ["apple", "banana", "fig", "kiwi", "mango", "orange", "plum"]

>>> fruits[slice(1, 6, 2)]
['banana', 'kiwi', 'orange']

>>> fruits[1:6:2]
['banana', 'kiwi', 'orange']
The first number represents the starting index, so a value of 1 means that slicing begins at the second element, "banana". The next number is the ending index, which is exclusive. Therefore, a value of 6 stops the slicing right before the seventh element, at "orange". The third number is the step, indicating how many elements to advance at a time. A value of 2 means that every second element should be selected, skipping over "fig" and "mango".
Note that when you specify all three values, you define what’s known as an extended slice, whereas standard slicing only requires the start and end indices:
>>> fruits[slice(1, 6)]
['banana', 'fig', 'kiwi', 'mango', 'orange']

>>> fruits[1:6]
['banana', 'fig', 'kiwi', 'mango', 'orange']
In fact, all three numbers are optional, defaulting to the first element’s index, the last element’s index, and a step of one, respectively. You can omit any combination of these numbers to achieve different slicing behaviors. However, from the object copying perspective, the following two variants are the most interesting:
>>> fruits[::]
['apple', 'banana', 'fig', 'kiwi', 'mango', 'orange', 'plum']

>>> fruits[:]
['apple', 'banana', 'fig', 'kiwi', 'mango', 'orange', 'plum']
Although both approaches are equivalent, the highlighted line represents the most idiomatic way to create a shallow copy of a Python sequence. When you omit all three numbers, you’re slicing the entire sequence, effectively creating its copy. However, whether you’ll actually end up with a true clone or just another reference to the same object depends on the underlying sequence type. For example, compare mutable lists with immutable tuples:
>>> fruits[:] is fruits
False

>>> fixed_fruits = tuple(fruits)
>>> fixed_fruits[:] is fixed_fruits
True
A shallow copy of a list is a separate object that references the original elements, but a copy of an equivalent tuple with identical items isn’t. Just as with the class constructor discussed in the previous section, only mutable sequences lead to the creation of a new parent when you slice them with square brackets ([:]).
Moreover, each slice is a sequence of a concrete type. This means that when you slice a list, you’ll get another list. However, slicing a byte array won’t give you a list—instead, you’ll create a new byte array. When it comes to immutable sequences, such as strings, you’ll always get exactly the same object:
>>> text = "Hello, World!"
>>> text[:] is text
True
This behavior is consistent with the str() constructor. However, what about sequence types that don’t have an equivalent copy constructor? This is where using the slicing syntax comes in handy.
For example, the Python range object is a lazily evaluated immutable sequence of numbers, which supports nearly all the common sequence operations, including slicing. Unfortunately, unlike other built-in sequence types, its constructor doesn’t accept another instance of its own type. Instead, the range() constructor resembles that of a slice(), taking between one and three integer arguments:
>>> range(10)
range(0, 10)

>>> range(1, 10)
range(1, 10)

>>> range(1, 10, 2)
range(1, 10, 2)
The most common way of evaluating a range object involves looping through it by hand. Alternatively, you can turn it into a sequence of your choice by letting Python iterate over it for you behind the scenes:
>>> for i in range(1, 10, 2):
...     print(i)
...
1
3
5
7
9

>>> tuple(range(1, 10, 2))
(1, 3, 5, 7, 9)

>>> bytearray(range(1, 10, 2))
bytearray(b'\x01\x03\x05\x07\t')
When you slice an entire range object, it doesn’t short-circuit to return the original object like other immutable sequences do. Instead, it creates a new, equivalent copy:
>>> signed_byte = range(-128, 128)
>>> signed_byte[:] is signed_byte
False
That’s irrelevant, though, as the sequence of numbers generated by a range object remains fixed until you potentially wrap it in a different container. Note that slicing one range object may sometimes produce another one with marginally different attribute values:
>>> range(0, 3, 2)[:]
range(0, 4, 2)

>>> range(0, 3, 2) == range(0, 4, 2)
True

>>> list(range(0, 3, 2))
[0, 2]

>>> list(range(0, 4, 2))
[0, 2]
In this case, the resulting range object has a slightly different stop value computed by Python. Still, both objects are considered equal because they generate the same sequence of numbers.
Note: If you don’t like slicing and want to be more explicit, then consider using a list comprehension or a generator expression to make a shallow copy of any iterable object:
>>> veggies = ("carrot", ["spinach", "kale"], "beans")
>>> veggies_copy = tuple(item for item in veggies)
>>> veggies_copy is veggies, veggies_copy == veggies
(False, True)
Unlike list comprehensions, a generator expression doesn’t create an intermediate container, saving memory. Notice that you can even use this approach to enforce a shallow copy of a tuple, which wasn’t possible with the tuple() constructor alone.
While slicing offers a quick and straightforward way to copy a Python sequence, the .copy() method is often preferred for containers that support it, particularly mutable ones like lists and dictionaries. In the next section, you’ll explore how this method works and compares to other copying techniques.
Calling the .copy() Method
In addition to the copy constructor and slicing for sequences, many of Python’s container types provide a convenient .copy() method, which you can call to create a shallow copy of an existing instance. This method is mainly available for mutable containers, such as lists, dictionaries, sets, byte arrays, and deques. Here’s how you’d call it on a list, for example:
>>> fruits = ["apple", "banana", "orange"]
>>> fruits.copy()
['apple', 'banana', 'orange']
>>> fruits.copy() is fruits
False
The .copy() method delivers on the promise implied by its name—it returns a copy of the object. However, while it achieves the same result as the other two techniques, it does so differently.
Note: You’ll also find the .copy() method in the read-only frozen set. Calling this method just returns a new reference to the same object without actually making a copy:
>>> fruits = frozenset({"apple", "banana", "orange"})
>>> fruits.copy() is fruits
True
This makes sense given that frozen sets are immutable and can only contain hashable values, which you already know are a good proxy for immutability. Although this may seem useless, it ensures interface consistency, allowing a frozen set to serve as a drop-in replacement for a regular set.
Because .copy() is designed only for copying, it should outperform its more versatile competitors. To test this theory, you can benchmark the performance of those different copying tools using Python’s timeit module and see how they stack up:
>>> from copy import copy
>>> from random import choices, randint
>>> from string import ascii_letters
>>> from timeit import timeit

>>> random_strings = [
...     "".join(choices(ascii_letters, k=randint(3, 15)))
...     for _ in range(10)
... ]

>>> timeit(lambda: random_strings.copy())
0.10630368399870349

>>> timeit(lambda: list(random_strings))
0.13554470200142532

>>> timeit(lambda: random_strings[:])
0.1418512300006114

>>> timeit(lambda: copy(random_strings))
0.19122224100101448
First, you populate a Python list with ten randomly generated strings of variable length. You then measure the time it takes to create a shallow copy of this list using four different methods wrapped in a lambda expression. The .copy() method is indeed an outright winner, although not by a large enough margin to make a real difference in practice.
Note: You might be getting different results on your machine due to various factors like system noise. To reduce the variability, try increasing the number of executions, which is equal to one million by default:
>>> timeit(lambda: random_strings.copy(), number=10_000_000)
0.9921009059980861
For even more consistent results, you can call timeit.repeat(), which runs each benchmark a few times and returns a list of measurements. You can then take the smallest measurement to account for any fluctuations:
>>> from timeit import repeat
>>> repeat(lambda: random_strings.copy(), repeat=10, number=10_000_000)
[1.0349072919998434, 1.0297772740013897, 1.0266390329998103, (...)]
>>> min(_)
0.9754441199984285
Here, you use the min() function on the implicit underscore (_) variable, which stores the value of the last expression in the REPL. The fastest execution has the least amount of noise.
But that was just a small sample. Since the performance of algorithms can vary based on the size of the input data, you should zoom out to see the bigger picture and try to identify trends:
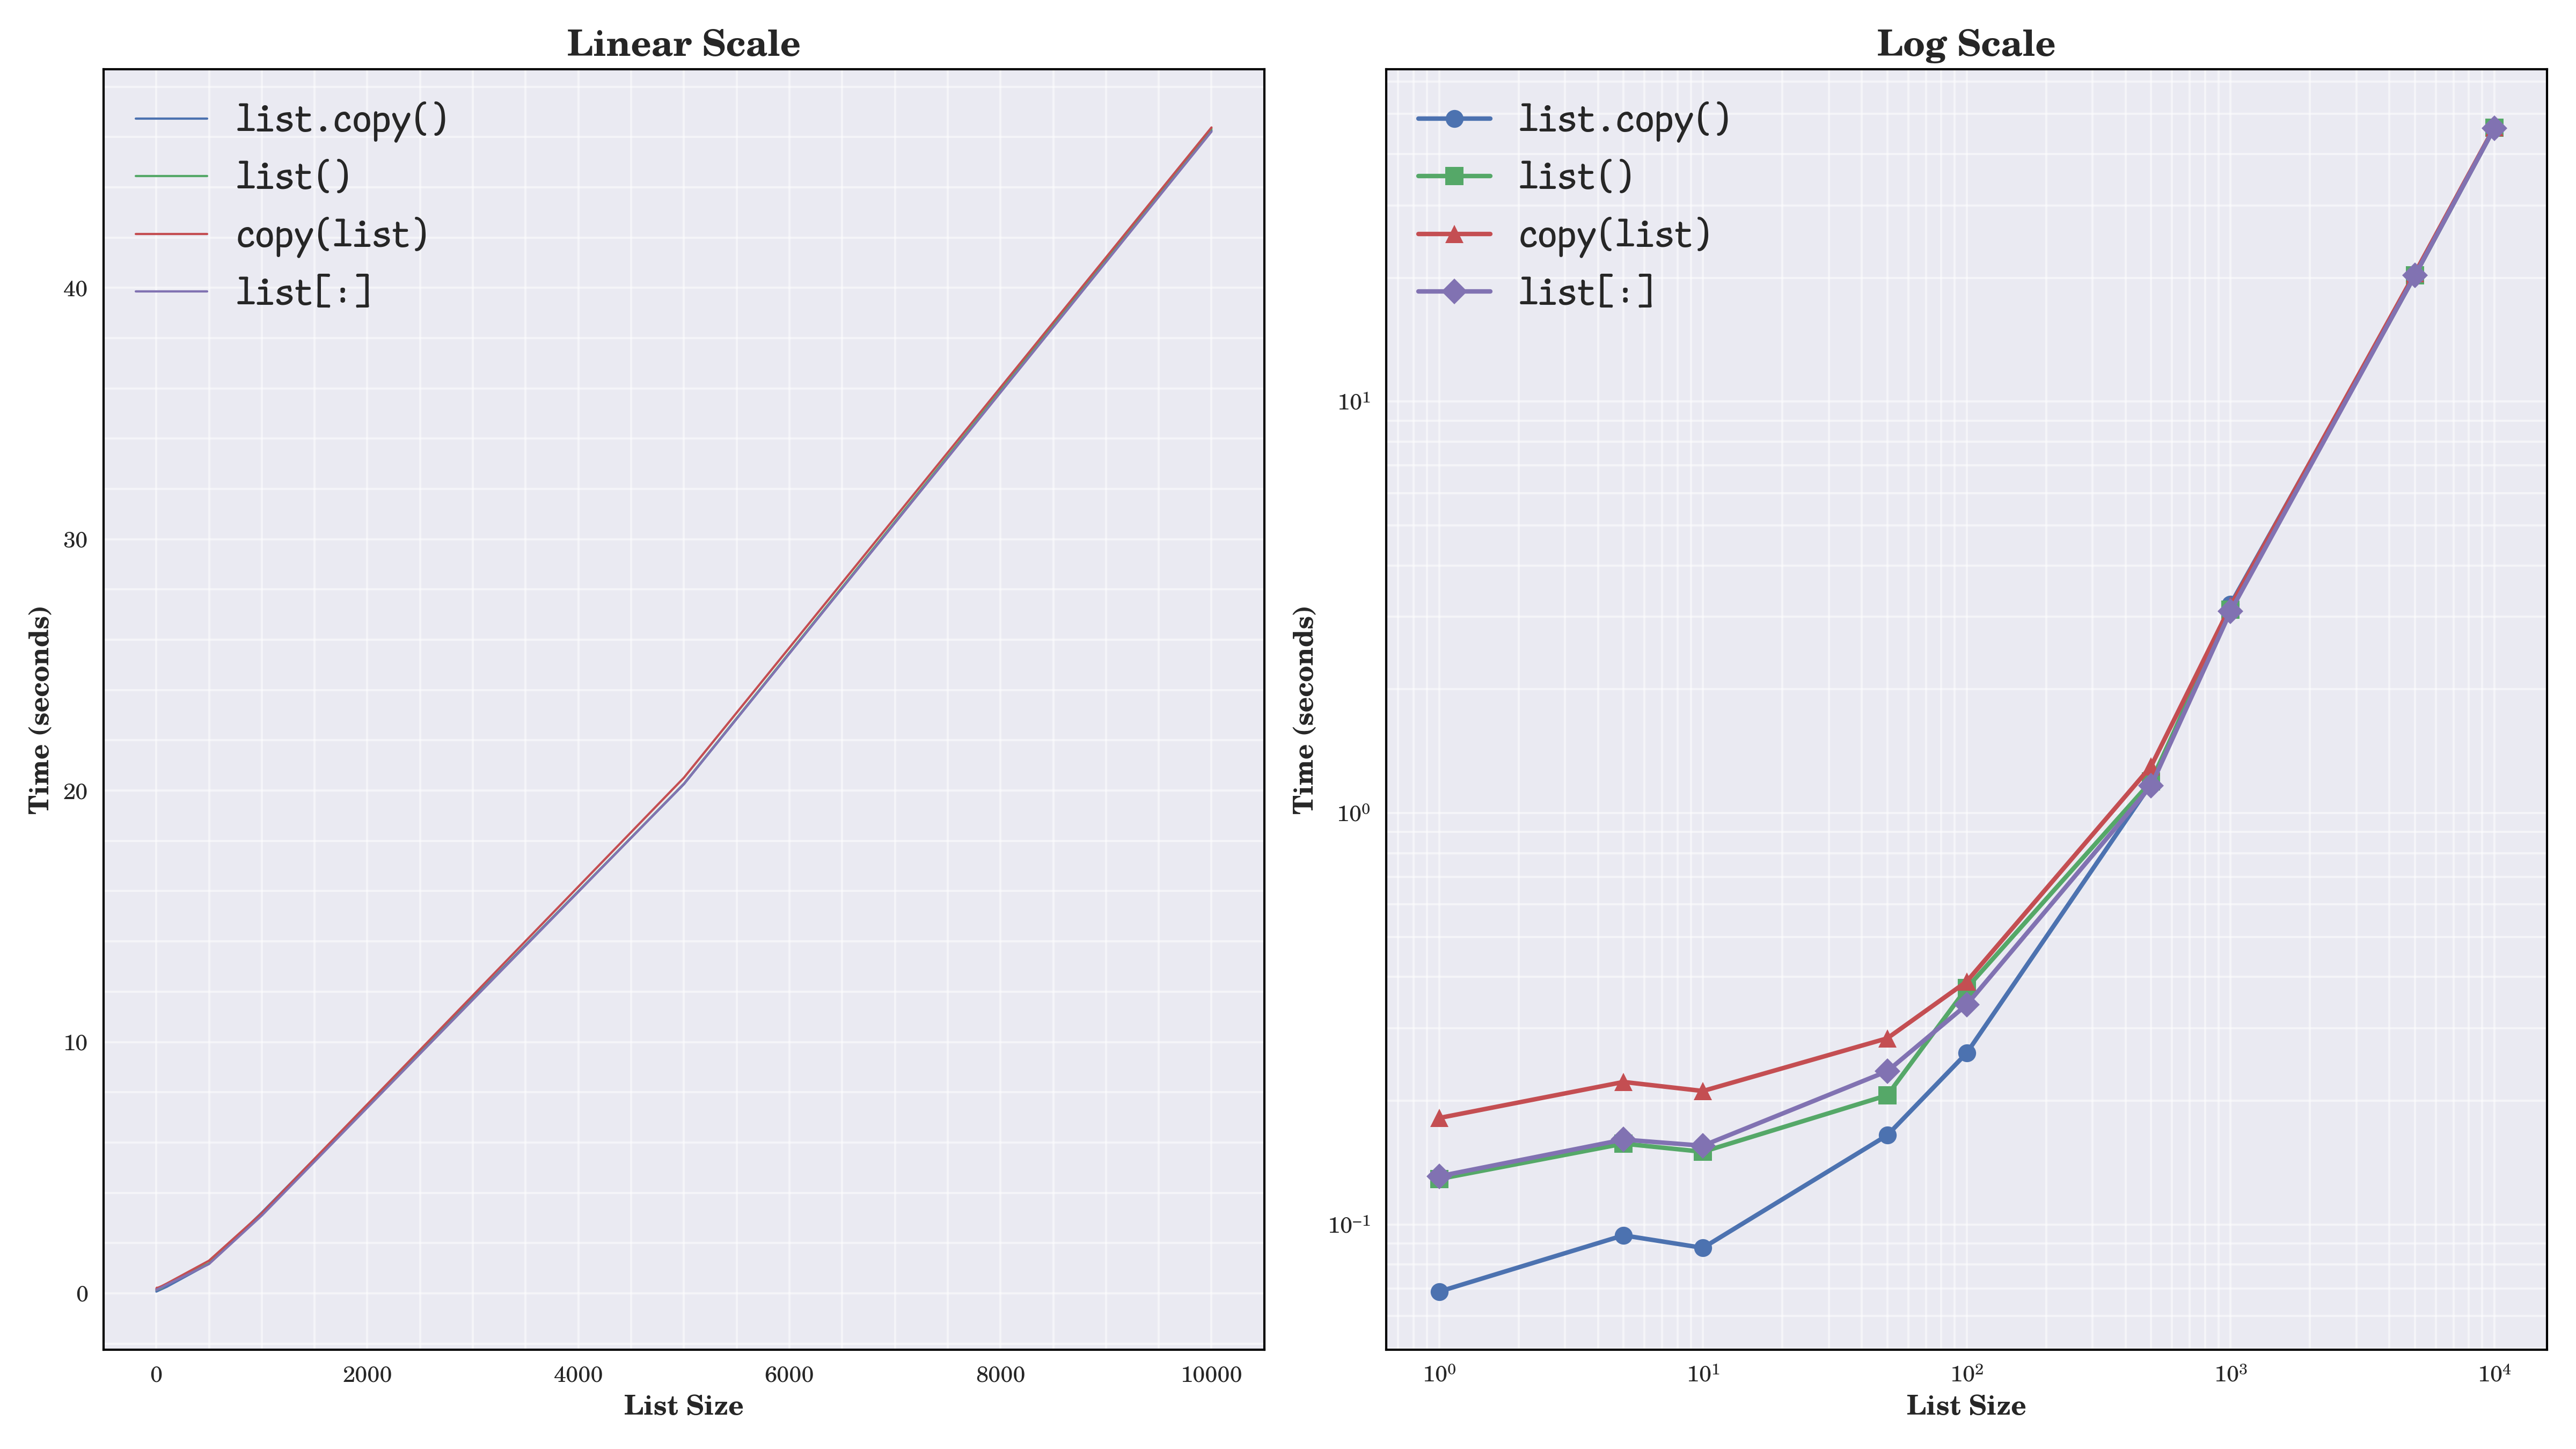
The chart on the left shows almost perfectly straight lines that overlap with each other. This tells you that all list copying methods run in linear time, with execution time increasing proportionally to the list length. The chart on the right uses a logarithmic scale on both axes to highlight performance differences for smaller inputs.
Overall, the .copy() method is the fastest approach, which tends to come first in most of the benchmarks for small and medium-sized lists. That said, differences in execution time of the various methods are pretty narrow and roughly uniform throughout the spectrum, becoming less significant as the list grows.
You can repeat the same experiment for other mutable containers yourself. Remember that only sequences, such as lists and byte arrays, support the slicing syntax, so you’ll need to take this limitation into account.
Here’s a benchmarking script that evaluates the performance of different methods for copying containers in Python. It measures the time taken to copy dictionaries, sets, and lists using various techniques, including the .copy() method, the constructor, the copy.copy() function, and slicing where applicable:
benchmark.py
from copy import copy
from random import choices, randint
from string import ascii_letters
from timeit import timeit

EXECUTIONS = 10_000
SIZE = 1_000

def main():
    print(f" Size={SIZE:,} ({EXECUTIONS:,}x) ".center(50, "="))
    for container_type in random_dict, random_set, random_list:
        container = container_type(size=SIZE)
        for method, seconds in benchmark(container, EXECUTIONS).items():
            print(f"{seconds:.5f} {method}")
        print()

def benchmark(container, executions):
    type_ = type(container)
    name = type_.__name__
    results = {
        f"{name}.copy()": timeit(container.copy, number=executions),
        f"{name}()": timeit(lambda: type_(container), number=executions),
        f"copy({name})": timeit(lambda: copy(container), number=executions),
    }
    if sliceable(container):
        results[f"{name}[:]"] = timeit(lambda: container[:], number=executions)
    return results

def sliceable(instance):
    try:
        instance[0:1]
    except (TypeError, KeyError):
        return False
    else:
        return True

def random_dict(size):
    keys = random_set(size)
    values = random_set(size)
    return dict(zip(keys, values))

def random_set(size):
    return set(random_list(size))

def random_list(size, shortest=3, longest=15):
    return [
        "".join(choices(ascii_letters, k=randint(shortest, longest)))
        for _ in range(size)
    ]

if __name__ == "__main__":
    main()
When you run this script, you’ll notice that the .copy() method in the other containers behaves similarly to its counterpart in a Python list.
If you need a fast shallow copy in Python, then the .copy() method is your best option. But for larger containers, where you spend most of your time copying the elements anyway, the performance difference between the available techniques is negligible. Ultimately, it won’t make much difference which one you choose.
It’s also worth noting that the copy() function from the copy module is consistently the slowest, as it carries more overhead due to its universal applicability. You’ll take a closer look at this module now.
Using copy() and deepcopy()
The copy module, which belongs to Python’s standard library, is the most versatile tool for copying almost any object. With the exception of a few data types, such as files, network sockets, and modules, you can use it to make both shallow and deep copies of arbitrary Python objects.
You’ll typically want to call one of the functions from the copy module in these scenarios:
- Shallow Copy: To create a shallow copy of a Python object that lacks its own copy functionality, unlike sequences and other standard containers.
- Deep Copy: When you need a deep copy of an object, as no other built-in mechanism in Python provides this capability.
- Replace: If you want to shallowly copy a compatible type—for example, a named tuple, data class, or date and time—with only specific attributes replaced.
Consider a StringIO instance as an example. It’s a mutable file-like object, which doesn’t provide a copy constructor, nor is it a Python sequence, meaning that you can’t slice it. Coincidentally, this object also doesn’t have the .copy() method, so you’re left with the copy module as your only option to clone it:
>>> import copy
>>> from io import StringIO
>>> from contextlib import redirect_stdout

>>> with redirect_stdout(StringIO()) as stdout:
...     print("Before")
...     shallow_copy = copy.copy(stdout)
...     deep_copy = copy.deepcopy(stdout)
...     print("Shallow copy modified", file=shallow_copy)
...     print("Deep copy modified", file=deep_copy)
...     print("After")
...

>>> stdout.getvalue()
'Before\nAfter\n'

>>> shallow_copy.getvalue()
'Before\nShallow copy modified\n'

>>> deep_copy.getvalue()
'Before\nDeep copy modified\n'
In this example, you use a context manager to redirect the standard output (stdout) to a new StringIO instance, capturing the printed text that would otherwise appear on the screen. Next, you create shallow and deep copies of the captured stream while printing additional messages to each copy.
Although a StringIO object is mutable, as a scalar type, it has no children of its own. Thus, calling copy.deepcopy() has the same effect as calling copy.copy() on it, making each replica independent. To observe an actual difference between the two functions, you’ll need to use a mutable composite, such as a SimpleNamespace object:
>>> import copy
>>> from pprint import pp
>>> from types import SimpleNamespace
>>> settings = SimpleNamespace(
...     debug=True,
...     urls=[
...         "https://192.168.1.200:8000",
...         "https://192.168.1.201:8000",
...     ],
... )
It’s a lightweight collection of attributes that can be added or removed dynamically, much like key-value pairs in a dictionary. However, rather than using the square bracket syntax to access them, you use the dot notation:
>>> settings.debug
True
The following example illustrates the difference between shallow and deep copies of such mutable composites:
>>> shallow_copy = copy.copy(settings)
>>> deep_copy = copy.deepcopy(settings)

>>> settings.urls.append("https://10.0.0.3:8000")
>>> settings.debug = False

>>> pp(deep_copy, width=50)
namespace(debug=True,
          urls=['https://192.168.1.200:8000',
                'https://192.168.1.201:8000'])

>>> pp(shallow_copy, width=50)
namespace(debug=True,
          urls=['https://192.168.1.200:8000',
                'https://192.168.1.201:8000',
                'https://10.0.0.3:8000'])

>>> pp(settings, width=50)
namespace(debug=False,
          urls=['https://192.168.1.200:8000',
                'https://192.168.1.201:8000',
                'https://10.0.0.3:8000'])
When you create a shallow copy of the settings object using copy.copy(), the new object references the same nested list of URLs as the original. Therefore, any changes to the list in settings, such as appending a new URL, are also reflected in the shallow_copy. However, when you create a deep copy with copy.deepcopy(), the list of URLs is duplicated, so changes to the original list don’t affect the deep_copy.
This is evident when you modify the settings object by appending a new URL and toggling the debug attribute. The deep_copy retains the original state of the settings object, while the shallow_copy reflects the changes made to the list. Notice, however, that the debug attribute remains unchanged in both the shallow_copy and the deep_copy since it’s a simple, immutable value.
That brings you to the third and final use case for the copy module. As of Python 3.13, the module introduces a new function that lets you replace specific elements within a cloned object. Below is an example demonstrating how copy.replace() can be used to determine a hotel’s breakfast time based on the day of the week:
>>> import copy
>>> from calendar import Day
>>> from datetime import date, time

>>> def breakfast_today():
...     day = Day(date.today().weekday())
...     return breakfast(day, time(hour=7))
...

>>> def breakfast(day, weekday_time):
...     match day:
...         case Day.SATURDAY:
...             return copy.replace(weekday_time, minute=30)
...         case Day.SUNDAY:
...             return copy.replace(weekday_time, hour=8, minute=30)
...         case _:
...             return weekday_time
...

>>> print(breakfast_today())
07:00:00

>>> print(breakfast(Day.SATURDAY, time(10)))
10:30:00

>>> print(breakfast(Day.SUNDAY, time(10, 45)))
08:30:00
Depending on when you run the breakfast_today() function, it may return different breakfast times. In this case, it’s a weekday, so the breakfast starts at 7:00 am. However, you can simulate other days of the week by explicitly calling the other function, breakfast(), which may adjust the baseline breakfast time for the specified day.
If it’s a Saturday, then the function only adjusts the .minute attribute of the datetime.time instance, leaving other attributes unchanged. On a Sunday, however, it modifies both the .hour and .minute attributes.
Like copy() and deepcopy(), replace() takes an object to copy as the first argument. However, this function also accepts a variable number of optional keyword arguments, which are used to override the corresponding attributes of the object. Regardless of whether you specify them or not, replace() will return a shallow copy of your original object.
The copy.replace() function works with mutable types, such as data classes, and immutable ones, like named tuples. In the next section, you’ll even learn how to define custom classes that support this feature. However, be aware that when you replace certain attributes, others might still refer to shared objects, which can lead to unintended side effects!
Customizing the Copy Behavior of Python Objects
When copying instances of custom classes, you often want control beyond what Python provides by default. In this section, you’ll explore several practical techniques for fine-tuning how shallow and deep copying from the copy module interacts with your own Python classes.
Relying on the Default Behavior
In most cases, you don’t need to take extra steps to make your Python classes copyable. As long as they consist of built-in types that already handle copying correctly, Python’s copy module will be clever enough to make both shallow and deep copies of your custom objects straight away.
Note: Python’s behavior differs from that of other programming languages, where objects don’t support copying by default. For example, in Java, classes must explicitly implement the Cloneable interface and override the .clone() method to allow copying.
To prove this claim, consider a Rectangle class defined by two corner points, which are represented as instances of a Point class:
>>> class Rectangle:
...     def __init__(self, top_left, bottom_right):
...         self.top_left = top_left
...         self.bottom_right = bottom_right
...
...     def __repr__(self):
...         return f"Rectangle({self.top_left}, {self.bottom_right})"
...
>>> class Point:
...     def __init__(self, x, y):
...         self.x = x
...         self.y = y
...
...     def __repr__(self):
...         return f"Point(x={self.x}, y={self.y})"
...
>>> bounding_box = Rectangle(
...     original_top_left := Point(10, 20),
...     original_bottom_right := Point(30, 40)
... )
>>> print(bounding_box)
Rectangle(Point(x=10, y=20), Point(x=30, y=40))
This code combines simpler objects into more complex ones through composition, which is a key principle in object-oriented programming. Specifically, the Rectangle class is a composite of two points, and a Point is a composite of two integers.
Note the use of an assignment expression (:=) to retain the two Point instances created at the bottom in the current scope. This will allow you to modify them later.
Now, use the copy module to create both a shallow and a deep copy of the bounding_box you just defined, and then try modifying its constituents:
>>> import copy

>>> shallow_copy = copy.copy(bounding_box)
>>> deep_copy = copy.deepcopy(bounding_box)

>>> bounding_box.bottom_right = Point(500, 700)

>>> bounding_box
Rectangle(Point(x=10, y=20), Point(x=500, y=700))
>>> shallow_copy
Rectangle(Point(x=10, y=20), Point(x=30, y=40))
>>> deep_copy
Rectangle(Point(x=10, y=20), Point(x=30, y=40))

>>> original_bottom_right.x += 100

>>> bounding_box
Rectangle(Point(x=10, y=20), Point(x=500, y=700))
>>> shallow_copy
Rectangle(Point(x=10, y=20), Point(x=130, y=40))
>>> deep_copy
Rectangle(Point(x=10, y=20), Point(x=30, y=40))
In the highlighted lines, you perform two modifications:
- First, you replace the bottom-right corner of the original rectangle with a new
Point(500, 700)object. At this stage, onlybounding_boxis affected while its shallow copy still references the corner atPoint(30, 40). - Next, you change the horizontal coordinate of the
original_bottom_rightpoint. Sinceshallow_copystill references the original corner objects, this change is reflected there as well. Meanwhile,deep_copyremains unchanged, maintaining independence from the underlying parent and child objects.
As you can see, the copy.copy() and copy.deepcopy() functions generally work as expected out of the box. However, if performance is a concern or you need custom copying behavior for specific objects, then you might consider implementing additional special methods in your classes. Up next, you’ll learn how to customize copying in Python.
Managing Resources in Copies
When you use the copy module, Python creates a field-for-field copy of an object, bypassing the standard construction mechanism, which normally involves calling the .__init__() method. Instead, Python creates a blank instance of the same type and copies attributes from the original object’s .__dict__ or .__slots__. This applies to both shallow and deep copies, which duplicate references or recurse into nested objects, respectively.
Skipping the initializer method can become problematic when your class relies on it for crucial setup. For instance, have a look at the class below, which opens a file for reading within the initializer:
>>> import json

>>> class DataFile:
...     def __init__(self, path):
...         self.file = open(path, mode="r", encoding="utf-8")
...
...     def __enter__(self):
...         return self
...
...     def __exit__(self, exc_type, exc_val, exc_tb):
...         self.file.close()
...
...     def read_json(self):
...         self.file.seek(0)
...         return json.load(self.file)
...
This class accepts a file path as an argument and uses it to create a new file object stored in an instance attribute. The .read_json() method moves the open file’s position to the beginning, reads its entire content, and parses the resulting text as JSON. Finally, the .__enter__() and .__exit__() methods turn the class into a context manager, ensuring that the underlying file is properly closed when needed.
Now, watch what happens when you create a shallow copy of a DataFile object and attempt to use it after the original context manager block has exited:
>>> import copy
>>> from pprint import pp

>>> with DataFile("person.json") as data_file:
...     shallow_copy = copy.copy(data_file)
...     pp(data_file.read_json())
...
{'name': 'John Doe',
 'age': 42,
 'email': 'johndoe@example.com',
 'is_subscribed': True,
 'hobbies': ['reading', 'cycling', 'traveling'],
 'address': {'street': '123 Main St', 'city': 'New York', 'zip': '10001'}}

>>> shallow_copy.read_json()
Traceback (most recent call last):
  ...
ValueError: I/O operation on closed file.
Shallow copying merely duplicates the reference to the file handle created by the original object. In this case, the file was opened in the initializer method, which the copy module didn’t call again. As a result, the shallow copy points to a file handle already closed by the context manager.
You can remedy the situation by taking control over shallow copying of DataFile objects. To do so, implement the .__copy__() method in your class to properly manage the internal resource:
>>> class DataFile:
...     def __init__(self, path):
...         self.file = open(path, mode="r", encoding="utf-8")
...
...     def __copy__(self):
...         return type(self)(self.file.name)
...
...     def __enter__(self):
...         return self
...
...     def __exit__(self, exc_type, exc_val, exc_tb):
...         self.file.close()
...
...     def read_json(self):
...         self.file.seek(0)
...         return json.load(self.file)
...
This method returns a new DataFile instance with the same file path, effectively opening a new file handle. When you call copy.copy() on instances of your updated class, Python will invoke this special method instead of relying on the generic implementation from the copy module:
>>> with DataFile("person.json") as data_file:
...     shallow_copy = copy.copy(data_file)
...     pp(data_file.read_json())
...
{'name': 'John Doe',
 'age': 42,
 'email': 'johndoe@example.com',
 'is_subscribed': True,
 'hobbies': ['reading', 'cycling', 'traveling'],
 'address': {'street': '123 Main St', 'city': 'New York', 'zip': '10001'}}

>>> pp(shallow_copy.read_json())
{'name': 'John Doe',
 'age': 42,
 'email': 'johndoe@example.com',
 'is_subscribed': True,
 'hobbies': ['reading', 'cycling', 'traveling'],
 'address': {'street': '123 Main St', 'city': 'New York', 'zip': '10001'}}

>>> shallow_copy.file.close()
Now, both the original and the shallow copy can read from the same file without interfering with each other. Don’t forget to manually close the file when you’re done working with the shallow copy in order to avoid potential data loss!
Have you noticed that you essentially implemented the logic for creating a deep copy of the DataFile? Wouldn’t it be more straightforward to directly call copy.deepcopy() and let Python handle the details? Well, why don’t you find out:
>>> with DataFile("person.json") as data_file:
...     deep_copy = copy.deepcopy(data_file)
...
Traceback (most recent call last):
  ...
TypeError: cannot pickle 'TextIOWrapper' instances
Alas, deep copying also doesn’t work as expected with DataFile objects, but for other reasons. The error message suggests that Python did try to recursively duplicate the file handle, but failed due to lack of support for such objects.
Note: Python’s field-for-field copying shares some similarities with how the pickle module handles object serialization behind the scenes. Both rely on a common set of special methods for their customization. That’s why you’re seeing the error message related to pickling when you attempt to clone a file object.
If you need to customize the deep copy creation process, then implement the corresponding special method, .__deepcopy__(), in your class:
>>> class DataFile:
...     def __init__(self, path):
...         self.file = open(path, mode="r", encoding="utf-8")
...
...     def __copy__(self):
...         return type(self)(self.file.name)
...
...     def __deepcopy__(self, memo):
...         return self.__copy__()
...
...     def __enter__(self):
...         return self
...
...     def __exit__(self, exc_type, exc_val, exc_tb):
...         self.file.close()
...
...     def read_json(self):
...         self.file.seek(0)
...         return json.load(self.file)
...
You’ll notice two things. First, unlike .__copy__(), this method takes an argument, which must be a Python dictionary. It’s used internally by Python to avoid infinite loops when it recursively traverses reference cycles. Secondly, this particular .__deepcopy__() implementation delegates to .__copy__() since both methods use the same underlying logic to produce a deep copy. However, that won’t always be the case.
In the next section, you’ll explore a different scenario for customizing shallow and deep copying of your own classes in Python.
Copying Attributes Selectively
Suppose you want to model the graphical window of a Unix terminal or a Windows console as a Python class:
>>> from datetime import UTC, datetime

>>> class ConsoleWindow:
...     def __init__(self, tabs):
...         self.tabs = tabs
...         self.history = []
...         self.created_at = datetime.now(UTC)
...
...     def run_command(self, command):
...         self.history.append(command)
...
This class accepts a collection of the currently open tabs, which is a global registry of ConsoleWindow instances shared among all tabs and windows. Each window keeps track of the commands executed within it using the .run_command() method. Also, the initializer method records the exact time a window was created.
Here’s a short example demonstrating how you might use this class in action:
>>> from pprint import pp

>>> shared_registry = set()

>>> window = ConsoleWindow(shared_registry)
>>> window.run_command("pwd")
>>> window.run_command("ls -l")

>>> pp(vars(window))
{'tabs': set(),
 'history': ['pwd', 'ls -l'],
 'created_at': datetime.datetime(2025, (...), tzinfo=datetime.timezone.utc)}
First, you create an empty set of window tabs that you’ll open in the future, passing it to the new window instance. Then, you run two Unix commands, pwd and ls, which get recorded in the window’s local history. When you pretty print the vars() of your window object, you get to see its current state, including the empty set of tabs, the two historical commands, and the creation timestamp.
Making a shallow copy of a window should correspond to opening a split view, where both instances share the same history. So, typing commands into the copy should be reflected in the original window and the other way around. Conversely, a deep copy should duplicate the original commands into an independent list object. At the same time, you want all copies to share the same global tab registry.
Unfortunately, the default copy behavior won’t follow these rules. First of all, Python won’t automatically update the tab registry or the timestamp when creating a new copy. Secondly, making a deep copy will overwrite the tab registry in each new instance.
To fix these issues, you can update your class by implementing the two special methods, .__copy__() and .__deepcopy__(), in the following way:
>>> class ConsoleWindow:
...     def __init__(self, tabs):
...         self.tabs = tabs
...         self.history = []
...         self.created_at = datetime.now(UTC)
...
...     def __copy__(self):
...         instance = type(self)(self.tabs)
...         instance.history = self.history
...         self.tabs.add(instance)
...         return instance
...
...     def __deepcopy__(self, memo):
...         instance = type(self)(self.tabs)
...         instance.history = copy.deepcopy(self.history, memo)
...         self.tabs.add(instance)
...         return instance
...
...     def run_command(self, command):
...         self.history.append(command)
...
They look nearly identical except for a small detail visible in the highlighted lines. The key difference lies in how the .history attribute is handled.
Both methods start by constructing a new ConsoleWindow instance and initializing it with the same global registry of tabs. For the shallow copy, this is almost equivalent to the default implementation provided by Python, as the copy will reference a shared mutable object. But your deep copy implementation becomes more selective, as it no longer recursively clones the mutable set of tabs, retaining the global instance.
Note: At this point, the default shallow copy would also preserve the original timestamp, whereas your custom .__copy__() method updates the timestamp, reflecting the creation of the new instance.
Next, in the .__copy__() method, you assign the .history field directly from the original instance so it shares the same list object. Again, that’s expected of a shallow copy. However, in the .__deepcopy__() method, you create a new, independent copy of .history by explicitly calling copy.deepcopy() on the original one with the memo argument. Python would’ve done the same by default.
Finally, you add the newly created window tab to the global registry and return the new instance from both special methods. This allows you to give your class a final test drive:
>>> import copy
>>> window = ConsoleWindow(set())
>>> window.run_command("cd ~/Projects")
>>> tab1 = copy.deepcopy(window)
>>> tab1.run_command("git clone git@github.com:python/cpython.git")
>>> tab2 = copy.copy(tab1)
>>> tab2.run_command("cd python/")
>>> window.run_command("ls -l")
>>> tab1.run_command("git checkout 3.13")
By first creating a deep copy of the main window, you ensure that window and tab1 maintain independent histories. However, note that you later shallowly copy the tab, making both tab1 and tab2 share history with each other:
>>> pp(vars(window))
{'tabs': {<__main__.ConsoleWindow object at 0x7db2dd9aae90>,
          <__main__.ConsoleWindow object at 0x7db2dd9ab4d0>},
 'history': ['cd ~/Projects', 'ls -l'],
 'created_at': datetime.datetime((...), 721600, (...))}

>>> pp(vars(tab1))
{'tabs': {<__main__.ConsoleWindow object at 0x7db2dd9aae90>,
          <__main__.ConsoleWindow object at 0x7db2dd9ab4d0>},
 'history': ['cd ~/Projects',
             'git clone git@github.com:python/cpython.git',
             'cd python/',
             'git checkout 3.13'],
 'created_at': datetime.datetime((...), 723718, (...))}

>>> pp(vars(tab2))
{'tabs': {<__main__.ConsoleWindow object at 0x7db2dd9aae90>,
          <__main__.ConsoleWindow object at 0x7db2dd9ab4d0>},
 'history': ['cd ~/Projects',
             'git clone git@github.com:python/cpython.git',
             'cd python/',
             'git checkout 3.13'],
 'created_at': datetime.datetime((...), 726256, (...))}
All three ConsoleWindow instances share the same set of tabs with identical elements. Their .created_at timestamps correctly reflect the order in which they were opened. Finally, the two tabs—tab1 and tab2—have mirrored local history, as they share the same list object under the hood.
Ultimately, how you implement shallow and deep copying in custom classes is entirely up to you. Additionally, if you’re using Python 3.13 or later, then you might also tweak the implementation of copy.replace(), as shown in next section.
Supporting Attribute Replacement
By default, only a handful of Python types support copy.replace(). To use this function on your own classes, you must implement the third special method related to copying, .__replace__(), which Python triggers for you:
object.__replace__(self, /, **changes)
This method takes no positional arguments—because self already references the object to copy—and a variable number of optional keyword arguments that’ll overwrite the corresponding instance attributes.
A straightforward way to implement this method in your class would be to modify the instance in place without returning anything:
>>> class Person:
...     def __init__(self, name, age):
...         self.name = name
...         self.age = age
...
...     def __replace__(self, **changes):
...         if unknown := changes.keys() - self.__dict__.keys():
...             raise AttributeError(", ".join(unknown))
...         self.__dict__.update(**changes)
...
In this case, you update the object’s internal .__dict__ attribute by overwriting its key-value pairs with their counterparts from the changes dictionary.
To prevent adding new attributes that the original object never defined, you check if changes contains unknown keys. You determine this by computing the set difference of the corresponding dictionary keys and storing them in a local variable. If the resulting unknown set has any items, then you raise an AttributeError accordingly.
This allows you to apply in-place modifications to Person instances:
>>> import copy

>>> person = Person("John Doe", 42)

>>> copy.replace(person, age=24, name="Alice Smith")
>>> vars(person)
{'name': 'Alice Smith', 'age': 24}

>>> copy.replace(person, name="Bob Brown", email="bob.brown@example.com")
Traceback (most recent call last):
  ...
AttributeError: email
As you can see, it’s possible to change multiple attributes at once, passing them in arbitrary order. Simultaneously, you can’t set a non-existent attribute, such as .email in the example above.
Note that your current implementation is rather odd and could be surprising, given that it breaks the promise made by the copy.replace() function’s docstring:
Creates a new object of the same type as obj, replacing fields with values from changes. (Source)
A more correct implementation would, therefore, return a shallow copy of the original object without making any in-place changes. Here’s how you can provide such a behavior in your Person class:
>>> class Person:
...     def __init__(self, name, age):
...         self.name = name
...         self.age = age
...
...     def __replace__(self, **changes):
...         return type(self)(**self.__dict__ | changes)
...
>>> person = Person("John Doe", 42)
>>> person_copy = copy.replace(person, age=24, name="Alice Smith")

>>> vars(person)
{'name': 'John Doe', 'age': 42}

>>> vars(person_copy)
{'name': 'Alice Smith', 'age': 24}

>>> copy.replace(person, email="bob.brown@example.com")
Traceback (most recent call last):
  ...
TypeError: Person.__init__() got an unexpected keyword argument 'email'
This version looks even simpler, as it returns a new instance supplied by your class constructor, which receives a union of two dictionaries: .__dict__ and changes. If there are any overlapping keys, then the dictionary on the right of the union operator (|) overrides the corresponding key-value pairs from the dictionary on the left.
Because the object’s internal state depends solely on the input arguments, you don’t have to manually check if the attributes being replaced are valid. Also, had this class defined any mutable members, copy.replace() would’ve reused them across the copies.
However, this implementation will only work as long as your objects have a special .__dict__ attribute. On the other hand, if your class defines .__slots__ instead of the dictionary, then you’ll need to adjust for that accordingly:
>>> class Person:
...     __slots__ = ("name", "age")
...
...     def __init__(self, name, age):
...         self.name = name
...         self.age = age
...
...     def __replace__(self, **changes):
...         instance = type(self)(self.name, self.age)
...         for name, value in changes.items():
...             if hasattr(self, name):
...                 setattr(instance, name, value)
...         return instance
...
>>> person = Person("John Doe", 42)
>>> person_copy = copy.replace(person, age=24, name="Alice Smith")

>>> vars_slots = lambda obj: {
...     name: getattr(obj, name)
...     for name in obj.__slots__
... }

>>> vars_slots(person)
{'name': 'John Doe', 'age': 42}

>>> vars_slots(person_copy)
{'name': 'Alice Smith', 'age': 24}
Because instances of the Person class no longer come with a dictionary to update, you must rely on the hasattr() and setattr() global functions to replace attributes. Also, since the built-in vars() function won’t work against objects with .__slots__, you devise a helper lambda expression as a substitute.
Finally, your objects might contain derived attributes or properties, such as a person’s age calculated from their date of birth and the current date. If you’d like to keep those properties immutable while still being able to replace them in copies, then you might take the following approach:
>>> from datetime import date

>>> class Person:
...     def __init__(self, name, date_of_birth):
...         self.name = name
...         self.date_of_birth = date_of_birth
...
...     @property
...     def age(self):
...         return (date.today() - self.date_of_birth).days // 365
...
...     def __replace__(self, **changes):
...         age = changes.pop("age", None)
...         dob = changes.pop("date_of_birth", None)
...
...         instance = copy.copy(self)
...         for name, value in changes.items():
...             if hasattr(self, name):
...                 setattr(instance, name, value)
...
...         if age and dob:
...             raise AttributeError("can't set both 'age' and 'date_of_birth'")
...         elif age:
...             dob = copy.replace(date.today(), year=date.today().year - age)
...             instance.date_of_birth = dob
...         elif dob:
...             instance.date_of_birth = dob
...
...         return instance
...
The .age property is calculated dynamically—based on another attribute—within a getter method. Since it has no companion setter method, the person’s age is effectively read-only.
The .__replace__() method above creates a shallow copy of the current instance by calling copy.copy(). It then uses setattr() to overwrite the specific attributes using values from the changes dictionary. Finally, it includes logic to update the .date_of_birth field based on the provided age or date of birth.
The code example below demonstrates how this implementation works in practice:
>>> person = Person("John Doe", date(1983, 3, 14))

>>> vars(copy.replace(person, age=24))
{'name': 'John Doe', 'date_of_birth': datetime.date(2001, 3, 26)}

>>> vars(copy.replace(person, date_of_birth=date(1999, 6, 15)))
{'name': 'John Doe', 'date_of_birth': datetime.date(1999, 6, 15)}

>>> vars(copy.replace(person, date_of_birth=date(1999, 6, 15), age=12))
Traceback (most recent call last):
  ...
AttributeError: can't set both 'age' and 'date_of_birth'
Notice how your .__replace__() method allows for updating either the .age or the .date_of_birth attribute, but not both at the same time. Also, even though .age is a read-only property derived from the date of birth, you can still update the person’s age indirectly.
Python’s attribute replacement mechanism gives you a lot of flexibility to customize it. However, it works best when you use it to create modified shallow copies of an object while keeping certain properties immutable.
Conclusion
By now, you’ve explored various techniques for copying Python objects, including constructors, slicing, the .copy() method, and the copy module. Along the way, you’ve learned about shallow vs deep copies and how Python’s assignment statements create bindings rather than copies. You also delved into the mechanics of scalar and composite types, mutable and immutable objects, and how these characteristics influence copying behavior.
In this tutorial, you’ve learned how to:
- Differentiate between shallow and deep copies
- Use Python’s
copymodule for versatile object copying - Implement custom copying behavior in your own classes
- Apply various techniques to copy different types of objects efficiently
With these skills, you can now confidently manage object copying in Python. This will ensure that your programs handle data efficiently without unexpected modifications to the shared state.
Get Your Code: Click here to download the free sample code that you’ll use to learn about shallow vs deep copying in Python.
Frequently Asked Questions
Now that you have some experience with copying objects in Python, you can use the questions and answers below to check your understanding and recap what you’ve learned.
These FAQs are related to the most important concepts you’ve covered in this tutorial. Click the Show/Hide toggle beside each question to reveal the answer.
A shallow copy creates a new object but shares references to the nested objects with the original, while a deep copy recursively duplicates all objects, including nested ones, ensuring complete independence from the original.
You can perform a shallow copy of a list using slicing (list[:]), the list() constructor, or the .copy() method.
You can make a deep copy of an object in Python using the copy.deepcopy() function from the copy module.
You need to use a deep copy when you want to ensure that the copied object and the original don’t share any mutable descendants, preventing changes in one from affecting the other.
You can customize the copy behavior by implementing the .__copy__() and .__deepcopy__() methods in your class to control how shallow and deep copies are made.
Take the Quiz: Test your knowledge with our interactive “Shallow vs Deep Copying of Python Objects” quiz. You’ll receive a score upon completion to help you track your learning progress:
Interactive Quiz
Shallow vs Deep Copying of Python ObjectsIn this quiz, you'll test your understanding of Python's copy module, which provides tools for creating shallow and deep copies of objects. This knowledge is crucial for managing complex, mutable data structures safely and effectively.