Python’s openai library provides the tools you need to integrate the ChatGPT API into your Python applications. With it, you can send text prompts to the API and receive AI-generated responses. You can also guide the AI’s behavior with developer role messages and handle both simple text generation and more complex code creation tasks. Here’s an example:
After reading this tutorial, you’ll understand how examples like this work under the hood. You’ll learn the fundamentals of using the ChatGPT API from Python and have code examples you can adapt for your own projects.
Get Your Code: Click here to download the free sample code that you’ll use to integrate ChatGPT’s API with Python projects.
Take the Quiz: Test your knowledge with our interactive “How to Integrate ChatGPT's API With Python Projects” quiz. You’ll receive a score upon completion to help you track your learning progress:
Interactive Quiz
How to Integrate ChatGPT's API With Python ProjectsTest your knowledge of the ChatGPT API in Python. Practice sending prompts with openai and handling text and code responses in this quick quiz.
Prerequisites
To follow along with this tutorial, you’ll need the following:
- Python Knowledge: You should be familiar with Python concepts like functions, executing Python scripts, and Python virtual environments.
- Python Installation: You’ll need Python installed on your system. If you haven’t already, install Python on your machine.
- OpenAI Account: An OpenAI account with API access and available credits is required to use the ChatGPT API. You’ll obtain your API key from the OpenAI platform in Step 1.
Don’t worry if you’re new to working with APIs. This tutorial will guide you through everything you need to know to get started with the ChatGPT API and implement AI features in your applications.
Step 1: Obtain Your API Key and Install the OpenAI Package
Before you can start making calls to the ChatGPT Python API, you need to obtain an API key and install the OpenAI Python library. You’ll start by getting your API key from the OpenAI platform, then install the required package and verify that everything works.
Obtain Your API Key
You can obtain an API key from the OpenAI platform by following these steps:
- Navigate to platform.openai.com and sign in to your account or create a new one if you don’t have an account yet.
- Click on the settings icon in the top-right corner and select API keys from the left-hand menu.
- Click the Create new secret key button to generate a new API key.
- In the dialog that appears, give your key a descriptive name like “Python Tutorial Key” to help you identify it later.
- For the Project field, select your preferred project.
- Under Permissions, select All to give your key full access to the API for development purposes.
- Click Create secret key to generate your API key.
- Copy the generated key immediately, as you won’t be able to see it again after closing the dialog.
Now that you have your API key, you need to store it securely.
Warning: Never hard-code your API key directly in your Python scripts or commit it to version control. Always use environment variables or secure key management services to keep your credentials safe.
The OpenAI Python library automatically looks for an environment variable named OPENAI_API_KEY when creating a client connection. By setting this variable in your terminal session, you’ll authenticate your API requests without exposing your key in your code.
Set the OPENAI_API_KEY environment variable in your terminal session:
Replace your-api-key-here with the actual API key you copied from the OpenAI platform.
Install the OpenAI Package
With your API key configured, you can now install the OpenAI Python library. The openai package is available on the Python Package Index (PyPI), and you can install it with pip.
Open a terminal or command prompt, create a new virtual environment, and then install the library:
This command will install the latest version of the openai library from PyPI onto your machine. The library includes everything you need to authenticate with OpenAI’s API and make requests to ChatGPT.
Verify Your Setup
Now that you have both your API key and the openai library installed, you can verify that everything works correctly. Create a new Python file called verify_setup.py and add the following code:
verify_setup.py
from openai import OpenAI

client = OpenAI()
print("OpenAI client created successfully!")
print(f"Using API key: {client.api_key[:8]}...")
Run this file from your terminal:
(venv) $ python verify_setup.py
If everything is set up correctly, you’ll see output confirming the client was created:
(venv) $ python verify_setup.py
OpenAI client created successfully!
Using API key: sk-proj-...
This verification confirms that the openai package is properly installed and your API key is being read from the environment variable. If you see an error about a missing API key, then double-check that you’ve set the OPENAI_API_KEY environment variable correctly in your current terminal session.
With the openai library installed and your API key configured, you’re ready to start making your first API calls to ChatGPT. In the next step, you’ll learn how to send prompts and receive AI-generated responses.
Step 2: Call the ChatGPT Python API to Generate an AI Text Response
Now that you have the openai library installed and your API key configured, you can start to make API calls to OpenAI models that power ChatGPT. The most basic operation is sending a text prompt and receiving a generated response.
Create an OpenAI Client
Start by creating a new Python file called basic_chatgpt_call.py and import the necessary module:
basic_chatgpt_call.py
from openai import OpenAI

client = OpenAI()
In this code, you import the OpenAI class from the openai module and create a client instance. The client automatically reads your API key from the OPENAI_API_KEY environment variable, so you don’t need to pass it explicitly.
Note: If you didn’t set up the environment variable and want to pass the API key directly, then you can do so with client = OpenAI(api_key="your-api-key-here"). However, this approach is less secure and isn’t recommended for production code.
Now that you have a working client instance, you’re ready to make your first request. In the next subsection, you’ll call the ChatGPT API with a simple text prompt and print the model’s response to your terminal.
Send a Basic Text Prompt
Now you can send your first prompt to ChatGPT using the .responses.create() method:
basic_chatgpt_call.py
from openai import OpenAI

client = OpenAI()

text_response = client.responses.create(
    model="gpt-5",
    input="Tell me a joke about Python programming"
)

print(f"Joke:\n{text_response.output_text}")
In this example, you create a response request with two key parameters. The model parameter specifies which ChatGPT model to use. Here, you use OpenAI’s gpt-5 model. The input parameter contains your prompt as a string.
To see how calling the ChatGPT API works, you can execute this script in your terminal:
(venv) $ python basic_chatgpt_call.py
You’ll see ChatGPT’s response printed to your terminal:
(venv) $ python basic_chatgpt_call.py
Joke:
Why do Python programmers prefer dark mode?

Because light attracts bugs!
The response object contains the AI-generated text in the .output_text attribute. This direct access allows you to work with the response in your code without needing to navigate through nested data structures.
Note: AI language models such as those behind ChatGPT are non-deterministic by nature. This means you’ll likely see a different joke than the one shown above. Each time you run the script, the model may generate a completely different response, even with identical input. This variability is a fundamental characteristic of large language models.
On models such as GPT-4o, this randomness can be influenced using a temperature setting, where lower values make responses more predictable and higher values encourage more creative variation.
You can also guide the AI’s behavior by providing both developer instructions and user input. In the previous example, you passed a simple string to the input parameter. For more complex interactions, the input parameter also accepts a list of messages—represented as dictionaries—which lets you provide system-level instructions alongside user prompts.
Control Behavior With Role-Based Messages
For example, you can create an interactive Python coding assistant that only accepts Python-related questions.
Using a list of messages instead of a simple string allows you to separate the AI’s behavioral instructions from the user’s actual request. This separation gives you more control over the AI’s tone, style, and response format, making it ideal for building specialized tools or maintaining consistent behavior across multiple requests.
To demonstrate this, create a new file called coding_assistant.py and add the following code to it:
coding_assistant.py
from openai import OpenAI

user_input = input("How can I help you? ")

client = OpenAI()

code_response = client.responses.create(
    model="gpt-5",
    input=[
        {
            "role": "developer",
            "content": (
                "You are a Python coding assistant. "
                "Only accept Python-related questions."
            ),
        },
        {
            "role": "user",
            "content": f"{user_input}",
        },
    ],
)

print(f"\n{code_response.output_text}")
This example shows how to structure your input with role-based messages. The developer role sets system-level instructions that guide the AI’s behavior throughout the interaction, in this case by limiting responses to Python-related questions. The user role contains the actual request, which you capture interactively using Python’s input() function.
Understanding these roles is crucial for effective prompt engineering. The OpenAI documentation describes how models give different levels of priority to messages with different roles:
| Role | Purpose | Priority |
|---|---|---|
developer |
Instructions provided by the application developer | Prioritized ahead of user messages |
user |
Instructions provided by an end user | Prioritized behind developer messages |
assistant |
Messages generated by the model | No inherent priority |
The developer role takes precedence over user instructions, which is why it’s effective for creating guardrails. Even if a user asks the assistant to ignore its instructions, the developer-level constraints remain in effect. This hierarchy makes role-based messages essential for building reliable, specialized AI tools that maintain consistent behavior.
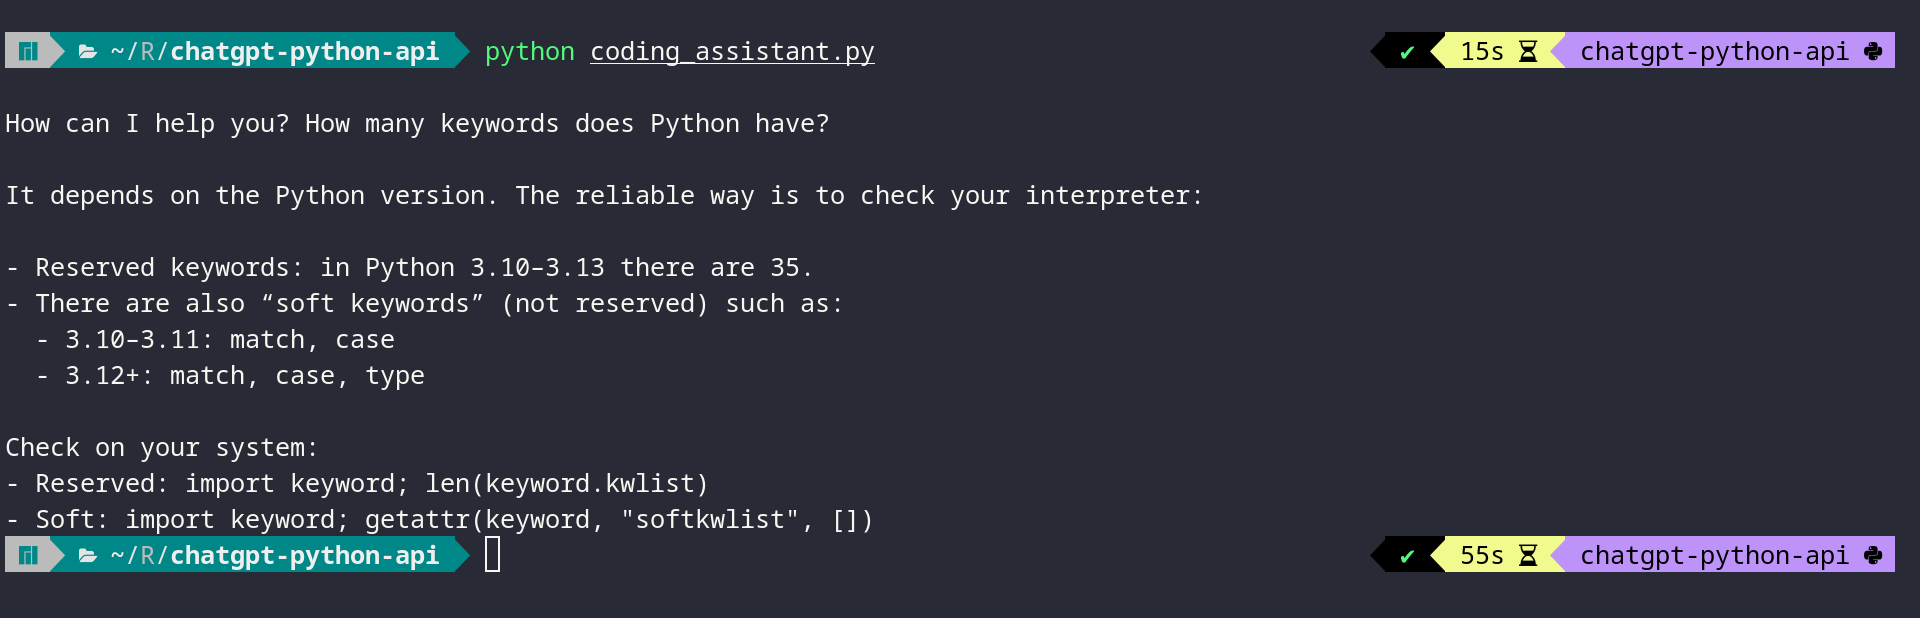
When you execute coding_assistant.py, the script prompts you for input. You can experiment with different Python-related requests to see how the developer role guides the responses. For example, try asking about Python keywords:
(venv) $ python coding_assistant.py

How can I help you? How many keywords does Python have?

It depends on the Python version. The reliable way is to check your interpreter:

- Reserved keywords: in Python 3.10–3.13 there are 35.
- There are also "soft keywords" (not reserved) such as:
  - 3.10–3.11: match, case
  - 3.12+: match, case, type

Check on your system:
- Reserved: import keyword; len(keyword.kwlist)
- Soft: import keyword; getattr(keyword, "softkwlist", [])
The developer role also acts as a safeguard. If you ask about non-Python topics, the assistant will politely decline:
(venv) $ python coding_assistant.py
How can I help you? How can I reverse a string in JavaScript?

I'm a Python coding assistant and can only help with Python-related questions.
However, if you'd like to know how to reverse a string in Python,
I'd be happy to help with that!
This example demonstrates how the developer message creates boundaries for your AI assistant. By setting clear instructions in the developer role, you ensure consistent behavior and prevent the assistant from straying outside its intended purpose. This pattern is useful when you need consistent formatting or want to maintain a specific tone across multiple API calls.
Understanding these basic API calls gives you the foundation you need to integrate ChatGPT into your applications. However, when you need responses in a specific format, working with plain text can be challenging. In the next step, you’ll learn how to use structured outputs to get consistently structured responses.
Step 3: Get Structured Outputs With Pydantic Models
While text responses are useful, many applications need data in a specific structure. The ChatGPT API supports structured outputs using Pydantic models, ensuring responses match your expected format.
For example, when generating code, you might want the function name, the code itself, an explanation, and example usage as separate fields.
Define a Pydantic Output Model
To define this kind of structure, you can use Pydantic, a data validation library that lets you define data models using Python classes. The OpenAI Python library includes Pydantic as a dependency in most environments. However, if it isn’t available, you can install it manually with the following command:
Once you’ve made sure Pydantic is available, you can define a Pydantic model that represents the structure you expect from ChatGPT’s response. Create a new file called structured_output.py:
structured_output.py
from openai import OpenAI
from pydantic import BaseModel

client = OpenAI()

class CodeOutput(BaseModel):
    function_name: str
    code: str
    explanation: str
    example_usage: str
In this code, you create a CodeOutput class that inherits from Pydantic’s BaseModel and defines four string attributes that represent the structure you expect in the response.
Parse Structured Responses From the API
When you use this model with the API, each attribute becomes a field that ChatGPT will populate:
| Field | Content |
|---|---|
function_name |
The name of the generated function |
code |
The actual Python code |
explanation |
A description of how the code works |
example_usage |
A description of how to use the function |
To use this model with the API, you call the .responses.parse() method instead of .responses.create():
structured_output.py
from openai import OpenAI
from pydantic import BaseModel

client = OpenAI()

class CodeOutput(BaseModel):
    function_name: str
    code: str
    explanation: str
    example_usage: str

code_response = client.responses.parse(
    model="gpt-5",
    input=[
        {
            "role": "developer",
            "content": ("You are a coding assistant. Generate clean,"
                        "well-documented Python code."
                       )
        },
        {
            "role": "user",
            "content": "Write a simple Python function to add two numbers."
        }
    ],
    text_format=CodeOutput,
)

code_result = code_response.output_parsed

print(f"Function Name: {code_result.function_name}")
print("\nCode:")
print(code_result.code)
print(f"\nExplanation: {code_result.explanation}")
print(f"\nExample Usage:\n{code_result.example_usage}")
Notice that this script doesn’t prompt the user for input. This shows that you can interact with the OpenAI API programmatically without requiring any user input at runtime.
Besides using .responses.parse(), the other key difference here is the text_format parameter, which tells the API to structure its response according to your Pydantic model. You pass the CodeOutput class directly, and the API ensures the response matches this structure.
Work With Validated Structured Data
Instead of accessing .output_text, you use .output_parsed to retrieve a Pydantic object with all your defined fields. This object has attributes corresponding to each field in your model, making it possible to access individual pieces of information.
When you run structured_output.py, you’ll see structured output with clearly defined fields:
(venv) $ python structured_output.py
Function Name: add_numbers
Code:
from typing import Union

Number = Union[int, float]

def add_numbers(a: Number, b: Number) -> Number:
    """Add two numbers.

    Args:
        a: First number (int or float).
        b: Second number (int or float).

    Returns:
        The sum of a and b. If both inputs are ints, the result is an int;
        otherwise, it's a float.
    """
    return a + b

Explanation: A minimal, well-typed function that accepts integers or floats,
             and returns the sum.
             It relies on Python's built-in addition,
             and preserves integer type when both inputs are integers.
Example Usage: print(add_numbers(2, 3))       # 5
print(add_numbers(2.5, 1.75))  # 4.25
print(add_numbers(2, 3.5))     # 5.5
The structured output allows you to work with the response in your code. You can access individual fields as attributes, and Pydantic handles validation automatically. If the API returns data that doesn’t match your model’s structure, you’ll get a validation error instead of silently processing incorrect data.
This approach is particularly useful when building applications that need to process AI-generated content programmatically. Instead of parsing text with regular expressions or manually manipulating strings, you get ready-to-use data structures that integrate seamlessly with the rest of your Python code. You can use the structured data in templates, databases, or pass it to other functions without additional processing.
Next Steps
You’ve learned how to integrate the ChatGPT API into your Python projects. You can now install the openai library, authenticate with your API key, send prompts, and work with both plain text and structured responses.
Here are a few directions you can explore to build on what you’ve learned:
-
Security Considerations: Always keep your API keys secure. Use environment variables or secure key management services in production applications. Never commit API keys to version control, and rotate them regularly if they might have been exposed. Consider implementing rate limiting in your applications to prevent unexpected API costs.
-
Error Handling: Add proper error handling to your API calls. The OpenAI library can raise exceptions for many reasons, including network issues, invalid API keys, or rate limit errors. Wrap your API calls in
tryandexceptblocks and handle common exceptions gracefully. -
Cost Management: Monitor your API usage through the OpenAI dashboard. Different models have different pricing, and costs accumulate based on the number of tokens processed. Consider the trade-offs between model capabilities and cost when choosing which model to use for your application. During development, you can test your integration logic against free mock endpoints like Beeceptor’s OpenAI mock API to avoid costs while working on your app.
-
Conversation Context: For chatbot applications, maintain conversation history by including previous messages in the
inputlist. This allows the AI to maintain context across multiple exchanges. Be mindful that longer conversations consume more tokens and increase costs.
For more advanced topics, you might want to explore prompt engineering techniques to get better results from your AI interactions. You can also learn how to use ChatGPT to document your code to automate documentation tasks, or explore API business opportunities if you’re interested in the commercial side of API development.
Get Your Code: Click here to download the free sample code that you’ll use to integrate ChatGPT’s API with Python projects.
Frequently Asked Questions
Now that you have some experience using Python with the ChatGPT API, you can use the questions and answers below to check your understanding and recap what you’ve learned.
These FAQs are related to the most important concepts you’ve covered in this tutorial. Click the Show/Hide toggle beside each question to reveal the answer.
The ChatGPT API uses a pay-as-you-go pricing model based on the number of tokens processed. Different models have different prices per token. You can check current pricing on the OpenAI pricing page. To manage costs, monitor your usage through the OpenAI dashboard and choose the most appropriate model for your use case.
The ChatGPT web interface at chat.openai.com is designed for direct human interaction and includes features like conversation history, file uploads, and web browsing. The API is designed for programmatic access, allowing you to integrate ChatGPT into your own applications. The API requires you to manage conversation context yourself, but it offers more flexibility and control over the AI’s behavior through parameters and system messages.
Yes, you can use the ChatGPT API for commercial applications. The API is governed by OpenAI’s Services Agreement, which explicitly allows commercial use. The agreement permits you to integrate the Services into your own applications and make them available to end users. You should review the Services Agreement and Usage Policies to ensure compliance.
Take the Quiz: Test your knowledge with our interactive “How to Integrate ChatGPT's API With Python Projects” quiz. You’ll receive a score upon completion to help you track your learning progress:
Interactive Quiz
How to Integrate ChatGPT's API With Python ProjectsTest your knowledge of the ChatGPT API in Python. Practice sending prompts with openai and handling text and code responses in this quick quiz.