You’ve probably asked ChatGPT for a picture and watched one appear a few seconds later. The same models also sit behind OpenAI’s GPT Image API, so you can generate images from your own Python code instead of a chat window. You send a prompt, and image data comes back for your script to work with.
By the end of this tutorial, you’ll understand that:
- You generate images from a text prompt by calling
client.images.generate()with a GPT Image model likegpt-image-2.5-flare. - Image data always arrives Base64-encoded in
.b64_json, so you save it as a file withb64decode(). - You choose your image’s dimensions and detail with
sizeandquality, which also drive its token cost. - Saving the whole JSON response keeps the metadata and lets you decode several images at once.
- You edit an image you already have by passing it back to
.edit()with a new prompt.
You’ll need some experience with Python, JSON, and file operations to breeze through this tutorial. You can also study up on these topics while you go along, as you’ll find relevant links throughout the text.
Note: If you came here looking for DALL·E, then you’re in the right place, but the model is gone. OpenAI retired DALL·E 2 and DALL·E 3 on May 12, 2026, and removed the image variations endpoint along with them. The GPT Image models that you’ll use in this tutorial are their replacement.
Get Your Code: Click here to download the free sample code that you’ll use to generate stunning images with the OpenAI API.
Take the Quiz: Test your knowledge with our interactive “Generate Images in Python With OpenAI's GPT Image API” quiz. You’ll receive a score upon completion to help you track your learning progress:
Interactive Quiz
Generate Images in Python With OpenAI's GPT Image APITest your understanding of generating images in Python with OpenAI's GPT Image models, from text prompts and Base64 decoding to size, quality, and edits.
Complete the Setup Requirements
If you’ve seen what GPT Image can do and you’re eager to use it in your Python applications, then you’re in the right spot! In this section, you’ll walk through the setup steps to start creating images with OpenAI in your own code.
Install the OpenAI Python Library
Confirm that you’re running Python version 3.10 or higher, create and activate a virtual environment, and install the OpenAI Python library:
The openai package gives you access to the full OpenAI API. In this tutorial, you’ll focus on image generation, which lets you interact with the GPT Image models to create and edit images from text prompts. For text generation using OpenAI’s API, see How to Integrate ChatGPT’s API With Python Projects.
Get Your OpenAI API Key
You need an API key to make successful API calls. Sign up with OpenAI, then open the API keys page in your account dashboard. From there, you can create new secret keys and manage or delete the ones that you already have.
A key on its own isn’t enough, though. Image generation is a paid API service, so your organization also needs a payment method and available credit before any of the requests in this tutorial will go through. Set that up on the billing page. If you skip it, then your first call returns a quota or billing error rather than an image.
Create a new secret key and copy the value shown in the pop-up window.
Note: OpenAI tracks your API usage through unique key values, so keep your API key private. The company bills image generation by tokens rather than per image, and the number of tokens a request uses depends on the model, size, and quality that you choose.
Keep in mind that OpenAI’s API services and pricing policies may change. Be sure to check their website for up-to-date information about pricing and offers.
Always keep this key secret! You’ll only see the key value once, so store it somewhere safe before you close the window. You’ll use it in your project in a moment.
Save Your API Key as an Environment Variable
A quick way to make your API key available to your Python scripts is to store it as an environment variable. Select your operating system to learn how:
With this command, you make the API key accessible under the environment variable OPENAI_API_KEY in your current terminal session. Keep in mind that you’ll lose it if you close your terminal.
You can give your variable any name, but using OPENAI_API_KEY, as suggested by the OpenAI documentation, lets you run the provided code examples without additional setup.
One more thing may stand between you and your first image: Depending on your account, OpenAI may require organization verification before you can use the GPT Image models, so a valid key doesn’t guarantee access. If your requests come back with a model-access error that points to verification, then complete the verification step in your account settings and try again.
With the logistics out of the way and your API key safely stored, you’re now ready to create some images from text prompts.
Generate Images From a Text Prompt With the GPT Image API
Start by confirming that you’re set up and ready to go. Open your favorite code editor and write a short script that creates an image from a text prompt:
create.py
 1from openai import OpenAI
 2
 3client = OpenAI()
 4
 5PROMPT = "A vaporwave computer"
 6
 7response = client.images.generate(
 8    model="gpt-image-2.5-flare",
 9    prompt=PROMPT,
10)
11
12print(response.data[0].b64_json[:50])
This code sends an authenticated request to the API to generate a single image based on the text in PROMPT:
-
Line 3 creates an instance of
OpenAIand saves it asclient. This object has authentication built in because you’ve named the environment variableOPENAI_API_KEY. If you follow that naming convention, then it automatically accesses the API key value from your environment. Alternatively, you can pass the key throughapi_keywhen instantiating the object. -
Line 5 defines the text prompt as a constant. Putting this text in a constant at the top of your script makes the value easy to find and edit. It also lets you quickly refactor your code—for example, to collect the text from user input instead.
-
Line 7 calls
.images.generate()on theclient. The next couple of lines pass keyword arguments to some of the parameters that the method accepts. -
Line 8 sets the model to
"gpt-image-2.5-flare", the faster of OpenAI’s two current image models. Its sibling,"gpt-image-2.5-sunburst", is tuned for precise edits, and you’ll meet it later in this tutorial. Note thatmodelis a required parameter, so you’ll get an error if you leave it out. -
Line 9 passes the value of
PROMPTto the fittingly namedpromptparameter. With that, you give the model the text that it’ll use to create the image.
Finally, line 12 digs the image out of the response. The response that .generate() returns is an object from the OpenAI library, and its .data attribute is a list with one entry per image that you asked for. You only asked for one, so [0] selects it, and .b64_json holds that image’s encoded data. That string is very long, so you print only its first fifty characters. When you run this script, you’ll get output that looks like a mistake:
(venv) $ python create.py
iVBORw0KGgoAAAANSUhEUgAABOYAAATmCAIAAAAKnjl9AABcQW
That gibberish is your image. The API sends you the picture itself, encoded as a Base64 string in the .b64_json attribute so that the image bytes fit inside a JSON response. That’s good news, because the data is yours to keep and never expires. It does mean that you have to decode it before you can look at it.
Time to decode that gibberish so you can feast your eyes. Add two lines to your script to write the image data straight to a PNG file:
create.py
 1from base64 import b64decode
 2
 3from openai import OpenAI
 4
 5client = OpenAI()
 6
 7PROMPT = "A vaporwave computer"
 8
 9response = client.images.generate(
10    model="gpt-image-2.5-flare",
11    prompt=PROMPT,
12)
13
14with open("vaporwave.png", mode="wb") as png:
15    png.write(b64decode(response.data[0].b64_json))
You import b64decode() in line 1, then use it in line 15 to turn the Base64 string back into the bytes of a PNG file. Run the script again, open vaporwave.png, and take a look at what the model dreamed up:
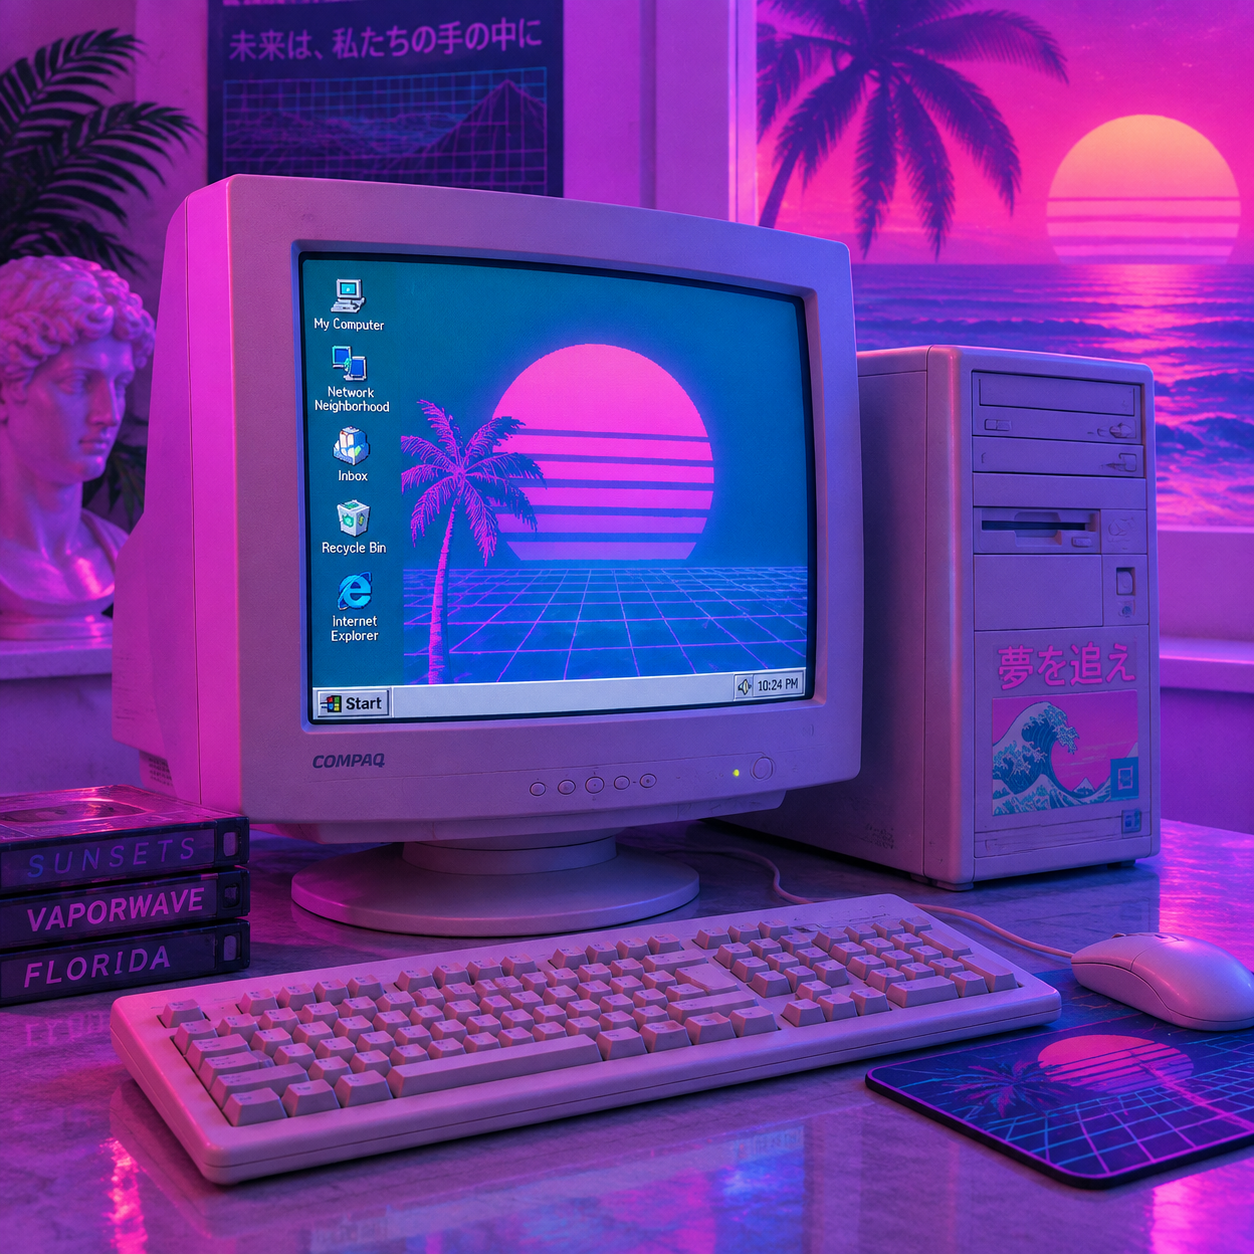
Your image will look different. That’s because the model creates each of these images only when you submit the request, and the API doesn’t accept a seed, so you can’t ask for the same picture twice.
Note: When you submit an API request, you must follow OpenAI’s usage policy. If you send text prompts that conflict with the usage policy, then you’ll receive an error and you might get blocked after repeated violations.
Take a look at the dimensions of that image, too. You never told the API what size you wanted, so it picked one for you. In the next section, you’ll control both the size and the amount of detail the model puts into the picture.
Set the Size and Quality of Your Image
Both size and quality default to "auto", which lets the model decide. The image above came back at 1254 by 1254 pixels, which is a perfectly reasonable choice, but probably not what you want if you’re building the result into an application.
Edit your script and pass a few more keyword arguments to customize the result:
create.py
 1from base64 import b64decode
 2
 3from openai import OpenAI
 4
 5client = OpenAI()
 6
 7PROMPT = "A vaporwave computer"
 8
 9response = client.images.generate(
10    model="gpt-image-2.5-flare",
11    prompt=PROMPT,
12    n=1,
13    size="1024x1024",
14    quality="low",
15)
16
17with open("vaporwave.png", mode="wb") as png:
18    png.write(b64decode(response.data[0].b64_json))
Here’s what the three new keyword arguments do:
-
Line 12 passes the integer
1to the parametern. This parameter lets you define how many new images you want to create with the prompt. The value ofnneeds to be between one and ten and defaults to1. -
Line 13 sets a value for
size, which defines the image dimensions as a"widthxheight"string."1024x1024"is a safe choice for a square image, while"1536x1024"gives you a landscape image and"1024x1536"gives you a portrait image. If you’d rather not decide, then"auto"lets the model choose. -
Line 14 sets
quality, which accepts"low","medium","high","xhigh","max", or"auto". Lower quality uses fewer tokens and produces results faster, so it’s a good choice during development.
Note: If you want a size other than the common ones, then it has to follow the rules for GPT Image 2 and 2.5: both dimensions must be divisible by sixteen, the aspect ratio must be between 1:3 and 3:1, no edge may exceed 3840 pixels, and the total pixel count must be between 655,360 and 8,294,400. That last requirement excludes both "3840x3840" and very small sizes. OpenAI also marks anything above 2560 by 1440 pixels as experimental.
The model doesn’t have to choose dimensions divisible by sixteen when it picks the size itself, which is how you got 1254 by 1254 earlier. Ask for "1254x1254" explicitly, and the API rejects it.
The effect of quality is supposed to show up in the fine detail rather than in the overall look. Here’s "A vaporwave computer" at "low" and at "high", zoomed in on the monitor:
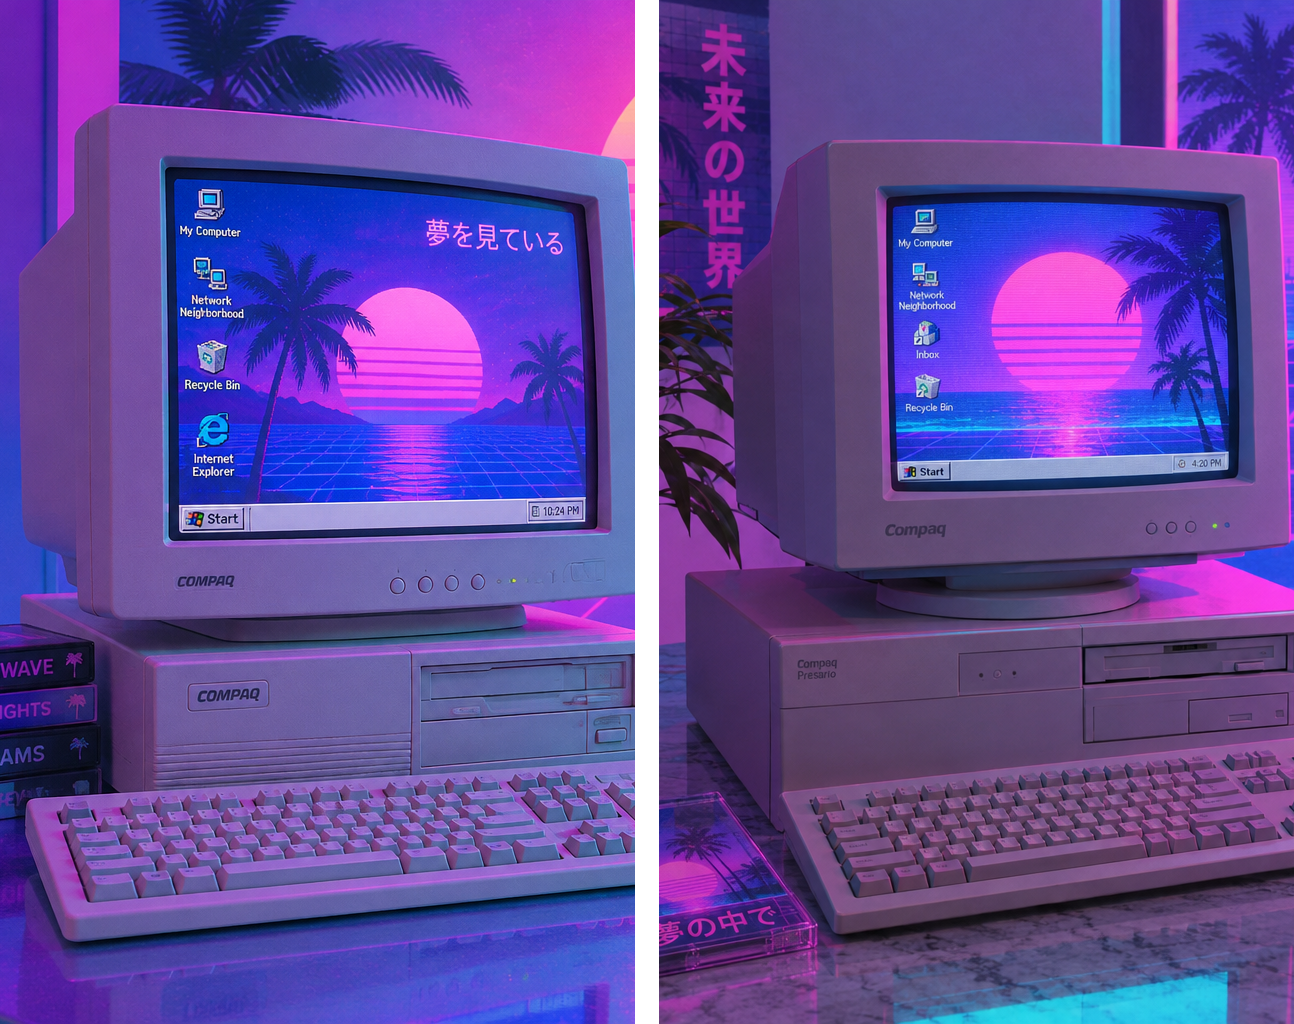
Can you tell which one cost more than eight times as many tokens? Neither can I. Both monitors show readable icon labels, crisp grid lines, and a sunset with palm trees. Higher quality settings give the model a bigger budget for textures and small text, but at this size, you’d need a magnifying glass to find where it went.
Note: The composition differs between the two runs because each request creates a fresh image.
So for a scene like this one, "low" is all you need. Whether a higher setting pays off depends on your image, and you’d expect to see the difference first in fine details like small text or intricate textures. Rather than paying for higher quality by default, run your own prompt once at "low" and once at "high", and step up only if you can see the difference.
What you can compare exactly is what the model spent. These are counts from single runs of this one prompt, so treat them as a rough scale rather than a price list. At 1024 by 1024 pixels, the low-quality request used 206 tokens in total, while the high-quality one used 1,766. Climbing further up the ladder gets expensive quickly: the same prompt cost 3,132 tokens at "xhigh" and 7,034 at "max".
Tokens only become money once you apply the rate for the kind of token you spent, and the three kinds bill differently. As of September 2026, OpenAI charges $5 per million text input tokens, $8 per million image input tokens, and $30 per million image output tokens.
Generating an image from a text prompt uses nearly all the tokens for image output. You can check the breakdown yourself because every response has a .usage attribute. Add these lines to the end of create.py and run it:
usage = response.usage
print(usage.input_tokens, usage.output_tokens, usage.total_tokens)
For the low-quality request above, that printed 10 196 206. The input_tokens are what reading your text prompt cost, and the output_tokens are what drawing the image cost. In each of these runs, only ten tokens went to the text prompt, and the rest were image output tokens.
Now you can put a price on it. At the rates above, the 196 image output tokens cost 196 × $30 / 1,000,000, or about $0.006, and the ten text input tokens add a negligible $0.00005. So the whole low-quality image costs well under a cent. The same calculation for the 7,034-token "max" request lands at around twenty cents. Check the pricing page for current rates before you build a budget on them.
Because lower-quality images are so much less expensive, you just saved some money by using "low" during development. As a successful saver, maybe you’d like to save something else—your image data.
Save the Whole Response as JSON
Writing the image straight to a PNG works nicely for a single picture. But the response holds more than the image—it also includes the size, quality, and token usage for the request. If you ask for several images at once with n, then it holds all of them.
To keep all of that around, store the whole JSON response in a file instead. And while you’re at it, why not also add a bit more detail to your prompt:
create.py
 1import json
 2from pathlib import Path
 3
 4from openai import OpenAI
 5
 6client = OpenAI()
 7
 8PROMPT = "An eco-friendly computer from the 90s in the style of vaporwave"
 9DATA_DIR = Path.cwd() / "responses"
10
11DATA_DIR.mkdir(exist_ok=True)
12
13response = client.images.generate(
14    model="gpt-image-2.5-flare",
15    prompt=PROMPT,
16    n=1,
17    size="1024x1024",
18    quality="low",
19)
20
21file_name = DATA_DIR / f"{PROMPT[:5]}-{response.created}.json"
22
23with open(file_name, mode="w", encoding="utf-8") as file:
24    json.dump(response.to_dict(), file)
With a few additional lines of code, you’ve added file handling to your Python script using pathlib and json:
-
Lines 9 and 11 define and create a data directory called
"responses/"that’ll hold the API responses as JSON files. -
Line 21 defines a variable for the file path where you want to save the data. You use the first five characters of the prompt and the timestamp from the response to build the filename, which is distinctive enough while you’re experimenting. If your prompt starts with characters that aren’t allowed in filenames, like
/or:, then swap the prompt fragment for a fixed prefix. -
Lines 23 and 24 create a new JSON file in the data directory and write the API response to it. The response is an object from the OpenAI library, which
json.dump()can’t serialize directly, so you first call.to_dict()to turn it into a plain Python dictionary.
With these additions, you can now run your script and generate images, and the image data will stick around in a dedicated file within your data directory:
(venv) $ python create.py
(venv) $ ls responses/
An ec-1789379975.json
Did you run the script and inspect the generated JSON file? Looks like gibberish again, doesn’t it? That’s the same Base64-encoded data as before, just wrapped in the rest of the response. With the long Base64 string shortened and some fields left out, the file’s structure looks like this:
{
  "created": 1789379975,
  "data": [
    {"b64_json": "iVBORw0KGgoAAAANSUhEUgAA..."}
  ],
  "quality": "low",
  "size": "1024x1024",
  "usage": {"input_tokens": 10, "output_tokens": 196, "total_tokens": 206, ...}
}
The keys mirror the attributes that you used before: response.data[0].b64_json on the object becomes ["data"][0]["b64_json"] in the dictionary. In the next section, you’ll write a small script that turns any of these saved responses into PNG files that you can look at.
Convert Saved Responses to PNG Files
You just saved a PNG image as a Base64-encoded string in a JSON file, together with the metadata that came with it. To look at the image, you need to decode that string again, just like you did in create.py. This time, though, you’ll write a separate script that can convert any saved PNG response, no matter how many images it holds:
convert.py
 1import json
 2from base64 import b64decode
 3from pathlib import Path
 4
 5DATA_DIR = Path.cwd() / "responses"
 6JSON_FILE = DATA_DIR / "An ec-1789379975.json"
 7IMAGE_DIR = Path.cwd() / "images" / JSON_FILE.stem
 8
 9IMAGE_DIR.mkdir(parents=True, exist_ok=True)
10
11with open(JSON_FILE, mode="r", encoding="utf-8") as file:
12    response = json.load(file)
13
14for index, image_dict in enumerate(response["data"]):
15    image_data = b64decode(image_dict["b64_json"])
16    image_file = IMAGE_DIR / f"{JSON_FILE.stem}-{index}.png"
17    with open(image_file, mode="wb") as png:
18        png.write(image_data)
The script convert.py will read a JSON file with the filename that you defined in JSON_FILE. Remember that you’ll need to adapt the value of JSON_FILE to match the filename of your JSON file, which will be different.
Reading the file with json.load() gives you back a plain dictionary rather than the library’s response object, so you use square brackets instead of dot notation to get to the data. The script then fetches each Base64-encoded string from the "data" list, decodes it, and saves the resulting image data as a PNG file in a directory. Python will even create that directory for you, if necessary.
Note that this script will also work if you’re fetching more than one image at a time. The for loop will decode each image and save it as a new file.
Note: You can generate JSON files containing Base64-encoded data for multiple images by passing a value higher than 1 to the n parameter and running create.py.
Most of the code in this script handles reading and writing files in the correct directories. You already met the star of the snippet, b64decode(). You import the function in line 2 and put it to work in line 15, where it decodes each Base64-encoded string so that you can save the image data as a PNG file.
Note: A few more .generate() parameters are worth knowing about. You can set output_format to "png", "webp", or "jpeg" to change the file type that you get back, and background to "transparent", "opaque", or "auto" if you need a cutout rather than a full scene. If you pick "webp" or "jpeg", then output_compression takes a value from 0 to 100 to trade file size for detail.
You can’t freely combine output_format and background. A transparent background needs an alpha channel, which JPEG can’t store, so background="transparent" only works with output_format="png" or "webp".
Note that the .png suffix is hard-coded, so the script is designed for responses in the default PNG format. Decoding gives you whatever bytes OpenAI produced, and it doesn’t convert between formats. If you generated the images with output_format set to "webp" or "jpeg", then change the suffix to match.
After running the script, you can head into the newly created folder structure and open the PNG file to see what your more detailed prompt produced:
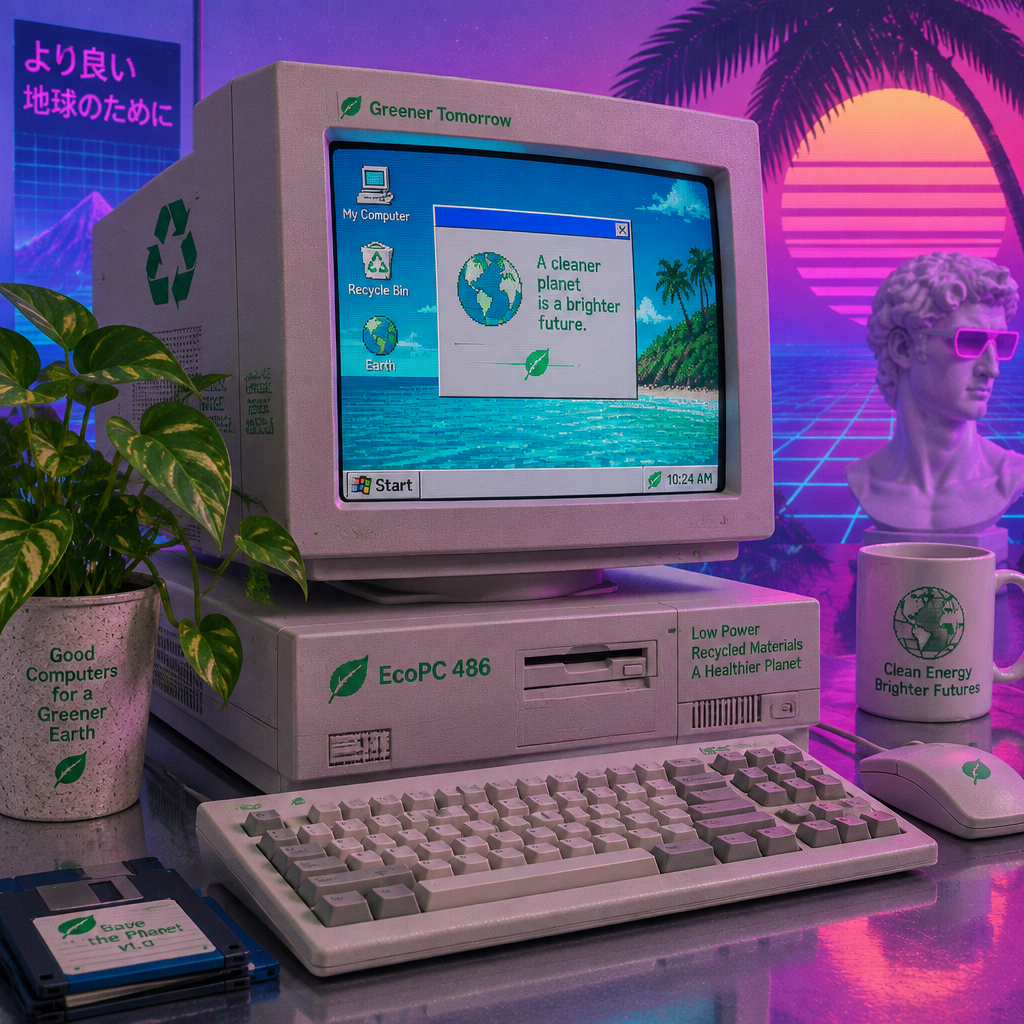
Is it everything you’ve ever hoped for? If so, then rejoice! However, if the image you got looks kind of like what you’re looking for but not quite, then you can make another call to the API where you pass your image back in and ask the model to change it.
Edit Your Image With a Follow-Up Prompt
If you have an image—whether it’s a machine-generated image or not—that’s similar to what you’re looking for but doesn’t quite fit the bill, then you can hand it back to the model along with a description of what you want changed.
Based on the code that you wrote earlier in this tutorial, you can create a new file that you’ll call edit.py:
edit.py
 1import json
 2from base64 import b64decode
 3from pathlib import Path
 4
 5from openai import OpenAI
 6
 7client = OpenAI()
 8
 9DATA_DIR = Path.cwd() / "responses"
10SOURCE_FILE = DATA_DIR / "An ec-1789379975.json"
11EDIT_PROMPT = "Add a large potted plant growing out of the computer"
12
13with open(SOURCE_FILE, mode="r", encoding="utf-8") as json_file:
14    saved_response = json.load(json_file)
15    image_data = b64decode(saved_response["data"][0]["b64_json"])
16
17response = client.images.edit(
18    model="gpt-image-2.5-flare",
19    image=("image.png", image_data),
20    prompt=EDIT_PROMPT,
21    n=3,
22    size="1024x1024",
23    quality="low",
24)
25
26new_file_name = f"edit-{SOURCE_FILE.stem[:5]}-{response.created}.json"
27
28with open(DATA_DIR / new_file_name, mode="w", encoding="utf-8") as file:
29    json.dump(response.to_dict(), file)
In this script, you decode the Base64 data from the previous JSON response and send the resulting image bytes back to the Images API with a prompt. You request three edited versions of the image and save the data for all three in a new JSON file in your data directory:
-
Line 10 defines a constant that holds the name of the JSON file containing the Base64-encoded data for the image that you want to edit. The filename shown here comes from the author’s run, so set it to the same name that you used for
JSON_FILEinconvert.pybefore you run the script for the first time—otherwise, you’ll get aFileNotFoundError. Later, point it at another file whenever you want to edit a different image. -
Line 11 holds the instruction that you want the model to follow. Unlike the prompt that you use for generating an image from scratch, this one describes a change to an image that already exists.
-
Line 15 decodes the image data using
b64decode()in the same way you did inconvert.pyand saves it toimage_data. Note that the code picks the first image from your JSON file withsaved_response["data"][0]. If your saved response contains multiple images and you want to edit another one, then you’ll need to adapt the index accordingly. -
Line 19 passes the image to
.edit()as a(filename, data)tuple. The API needs to know the file type it’s receiving, and it works that out from the filename, so passing the raw bytes on their own won’t do. -
Line 21 defines how many edited versions of the original image you want to receive. In this case, you set
nto3, which means that you’ll get three new images back.
Once you’ve set SOURCE_FILE, run the script:
(venv) $ python edit.py
Then take a look in your responses/ directory, and you’ll see a new JSON file whose name starts with edit-. This file holds the image data from your three edits. Copy the filename, set it as JSON_FILE in convert.py, run the conversion script, and look at the results.
Editing costs more than generating because the image that you send along counts as input tokens. Three low-quality edits of a 1024 by 1024 image used 3,739 tokens, and most of those went into reading the source image rather than drawing the new ones.
Note: You don’t need to use Base64-encoded image data as a source. Instead, you can open a PNG, WebP, or JPEG file in binary mode and pass the file object directly. Each image that you send has to be smaller than 50 MB, which is worth checking when the source is a file of your own rather than something the API just made for you:
IMAGE_PATH = "images/An ec-1789379975/An ec-1789379975-0.png"

with open(IMAGE_PATH, mode="rb") as image_file:
    response = client.images.edit(
        model="gpt-image-2.5-flare",
        image=image_file,
        prompt=EDIT_PROMPT,
        n=3,
        size="1024x1024",
        quality="low",
    )
That path points at one of the PNG files that convert.py wrote, so swap in a filename from your own images/ directory. A file object carries its filename with it, which is why you don’t need the tuple in this case.
However, if you’re planning to include this functionality in a Python app, then you may want to avoid saving a PNG file only to load it again later. That’s why it’s useful to know how to handle image data without reading it from an image file.
How do your edits look? They all keep the computer that you started with and add the plant that you asked for, but each reflects a slightly different interpretation of the request:
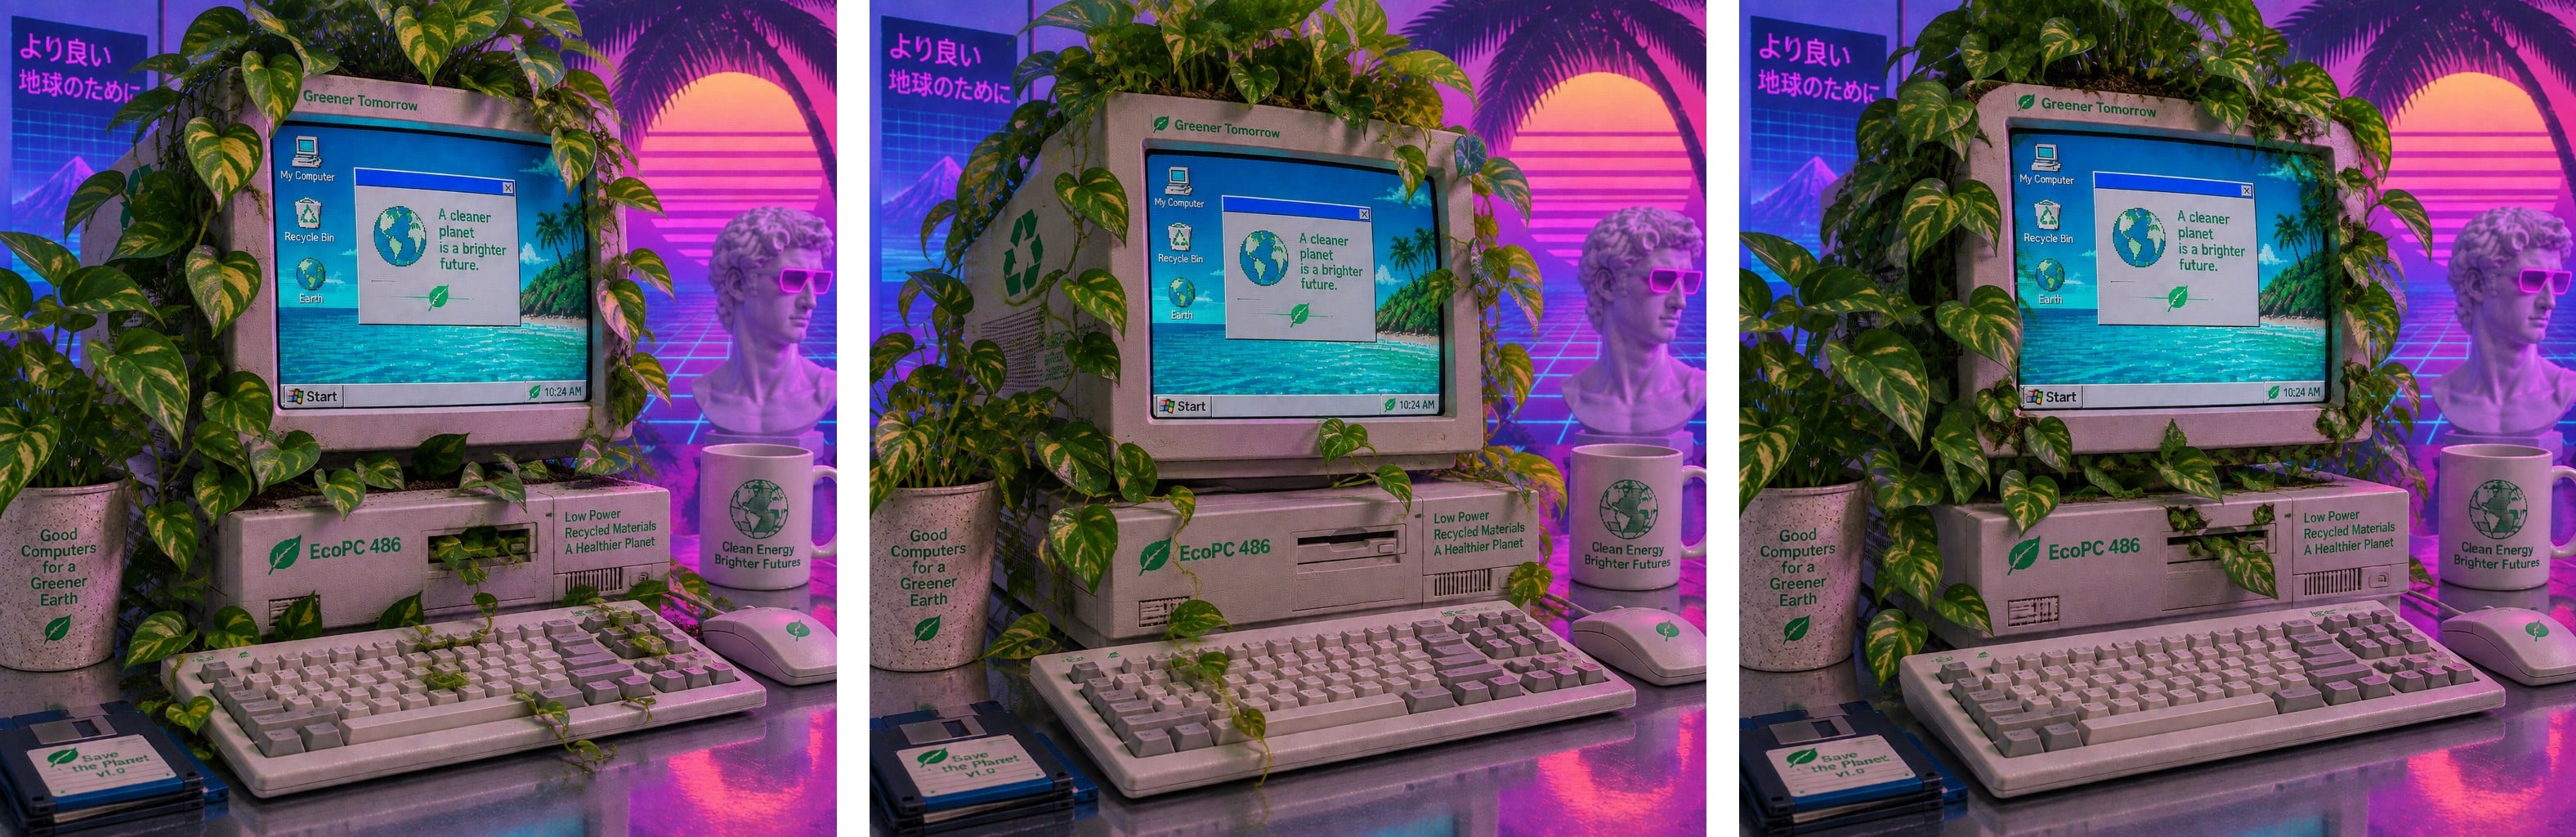
If none of the edits work for you, then change the value of EDIT_PROMPT and run edit.py again. As long as SOURCE_FILE stays the same, every run starts over from your original image.
If you like one of the edits but want to refine it further, then you need to point the script at that edit instead. Change two things in edit.py:
- Set
SOURCE_FILEto theedit-JSON file that holds your three edits. - Change the index in
saved_response["data"][0]to the number at the end of the filename for the PNG image that you liked. For example, if you liked the image whose filename ends in-2.png, then usesaved_response["data"][2].
Then update EDIT_PROMPT with your next change and run the script again to keep building on that result.
Note: OpenAI recommends "gpt-image-2.5-sunburst" for workflows where editing precision matters most. It accepts the same parameters as "gpt-image-2.5-flare", so trying it out only means changing the model name in edit.py. Sunburst takes a little longer to respond, and in a test run with the same source image and prompt, both models used the same number of tokens.
Conclusion
It’s fun to dream of eco-friendly computers with great AESTHETICS—but it’s even better to create these images with Python and OpenAI’s Images API!
In this tutorial, you’ve learned how to:
- Set up the OpenAI Python library locally
- Use the image generation capabilities of the OpenAI API
- Create images from text prompts using Python
- Tune the size and quality of your results
- Edit an image with a follow-up prompt
- Convert Base64 JSON responses to PNG image files
You also gained practical experience incorporating GPT Image API calls into your Python scripts, so you can create stunning images in your own applications.
Next Steps
The .edit() method has another trick that you can explore next. Along with your source image, you can pass a mask—a second image that marks the region you want the model to work on. That’s how you implement inpainting from your Python scripts, so you can replace one object in a scene while the rest stays close to what it was.
A mask uses transparency to identify the region. It’s a PNG with an alpha channel whose fully transparent pixels cover the region you want changed. It also has to match the dimensions of the image you’re editing. A plain black-and-white picture won’t do. A mask steers the model rather than locking the other pixels down, so don’t count on the untouched area coming back identical, byte for byte. The OpenAI guide has an example.
You might want to do further post-processing of your images with Python. For that, you could read up on image processing with Pillow.
To improve the handling and organization of the code that you wrote in this tutorial, you could replace the script constants with entries in a TOML settings file. Alternatively, you could create a command-line interface with argparse that allows you to pass the variables directly from your CLI.
If you’re building an interactive app, then you can also look into streaming. Passing stream=True together with partial_images to .generate() or .edit() hands you up to three preview images while the final one is still rendering, so your users get to watch the picture take shape.
Streaming changes what you get back, though. Instead of an ImagesResponse with a .data list, you iterate over a stream of events, handling the partial images and the completed one as they arrive. So this tutorial’s response handling doesn’t carry over unchanged. Each preview also costs an extra 100 image output tokens.
Keep an eye on the model that you’re calling, too. OpenAI retires image models on a regular schedule—gpt-image-1-mini and gpt-image-1.5 are due to retire on December 1, 2026, and the 2.5 models will eventually get successors of their own. Keeping the model name in a constant at the top of your script, rather than scattering it through your code, makes that swap a one-line change.
Or you could just continue to create beautiful and weird images with your Python scripts and the OpenAI API! Which interesting text prompt did you try? What strange or beautiful image did the model generate for you? Share your experience in the comments below, and keep dreaming!
Frequently Asked Questions
Now that you have some experience generating images through the OpenAI API in Python, you can use the questions and answers below to check your understanding and review what you’ve learned.
These FAQs are related to the most important concepts you’ve covered in this tutorial. Click the Show/Hide toggle beside each question to reveal the answer.
No. OpenAI retired DALL·E 2 and DALL·E 3 on May 12, 2026, and requests that name those models now fail with an error. The GPT Image models handle image generation instead, with gpt-image-2.5-flare for fast everyday images and gpt-image-2.5-sunburst for precise edits.
The GPT Image models always send the image itself rather than a link to a hosted copy, so there’s no response_format parameter to switch. Decoding the string in .b64_json gives you the bytes of an image file—a PNG unless you asked for a different output_format—and your image never expires.
OpenAI bills image requests by tokens, so cost depends on the model, size, and quality. In single test runs of one prompt at 1024 by 1024 pixels, a low-quality image used about two hundred tokens, a high-quality image used more than eight times that, and an image at max used more than thirty times that.
At the September 2026 rate of $30 per million image output tokens, that’s under a cent for low quality versus roughly twenty cents for max. OpenAI bills input tokens separately.
Token usage will vary with your prompts, so check response.usage and OpenAI’s current rates when you estimate a budget.
When you request a size with GPT Image 2 and 2.5, both dimensions must be divisible by sixteen, the aspect ratio must stay between 1:3 and 3:1, no edge may exceed 3840 pixels, and the total pixel count must stay between 655,360 and 8,294,400. That last requirement excludes both very small images and a square like 3840x3840, and OpenAI considers anything above 2560x1440 experimental.
So 1024x1024 is a safe default, and auto lets the model choose, sometimes landing on sizes like 1254x1254 that you couldn’t request yourself.
The Images API no longer has a variations endpoint, so there’s no direct replacement. Passing your image and a follow-up prompt to .edit() produces new versions of a picture that you already have.
Get Your Code: Click here to download the free sample code that you’ll use to generate stunning images with the OpenAI API.
Take the Quiz: Test your knowledge with our interactive “Generate Images in Python With OpenAI's GPT Image API” quiz. You’ll receive a score upon completion to help you track your learning progress:
Interactive Quiz
Generate Images in Python With OpenAI's GPT Image APITest your understanding of generating images in Python with OpenAI's GPT Image models, from text prompts and Base64 decoding to size, quality, and edits.