Most modern web applications are powered by a REST API under the hood. That way, developers can separate JavaScript front-end code from the back-end logic that a web framework like Flask provides.
Following this step-by-step project, you’ll create an interactive single-page application with HTML, CSS, and JavaScript. The foundation is an existing Flask project with a REST API and a connected SQLite database, which you’ll grab in just a moment.
In this tutorial, you’ll learn how to:
- Navigate a full-stack web development workflow
- Structure an HTML file to act as the template for a single-page web application
- Leverage the Jinja templating engine to render dynamic HTML
- Use CSS to style the presentation of an application
- Write JavaScript to add interactivity to an application
- Leverage Ajax to make HTTP requests to the REST API
As a Python developer, you’re probably more comfortable working on the back end of an application. This tutorial will guide you through a full-stack experience from the back end to the front end. You may write less Python code than usual, but you’ll learn a whole bunch about HTML, CSS, and JavaScript.
In the JavaScript world, it’s very common to reach for one of many frameworks and libraries. However, you won’t be using any frameworks in this tutorial. That way, you’ll get to know core JavaScript before using tools that build on top of that foundation in your future projects.
You can download the final code for this project by clicking the link below:
Free Source Code: Click here to download the free source code that you’ll use to build a front end for your Flask REST API single-page web application.
Demo
In this tutorial, you’ll fix some back-end shortcomings and move on to build the front end on top of an existing REST API that you’ll download in a moment. The API already provides several API endpoints to keep track of notes for people who may visit you throughout the year. You’ll initiate the database with people like the Tooth Fairy, the Easter Bunny, and Knecht Ruprecht.
Ideally, you want to be on good terms with all three of them. That’s why you’ll send them notes, to increase your chances of getting valuable gifts from them.
At the end of this tutorial, you’ll be able to interact with your API from the convenience of your application’s front end:
At the end of this tutorial, you can put your earned knowledge into action and continue to build a fully functional single-page application that works seamlessly with the REST API that you’ll get to know over the following few sections.
Throughout the tutorial, you’ll adjust everything from the data model of the database all the way to the client-side experience. This will give you a good idea of what full-stack web development means for you as a Python developer.
Project Overview
In this tutorial, you’ll build upon an existing Flask REST API with several endpoints. You’ll start by grabbing the materials for the Flask project and making sure that the API connects to the database.
Note: The tutorial you’re currently reading will guide you through all the steps that you need to create a JavaScript front end for a Flask REST API. However, if you’re curious, you can follow the Python REST APIs With Flask, Connexion, and SQLAlchemy tutorial series to build the Flask REST API that you’ll use in this tutorial.
Part 1 of this series guides you through building a REST API, and Part 2 shows you how to connect that REST API to a database. In Part 3, you add relationships to the REST API and the supporting database.
If you’re interested in Python back-end development, then it’s a good idea to check out these three parts first. Either way, before you continue with this tutorial, follow the steps below to collect all the prerequisites.
After you’ve verified that the Flask project works, you’ll get to know the back end by investigating some shortcomings that the REST API currently has. This part will give you a good impression of the app’s back-end structure before you move on to the front end.
For most of this step-by-step project, you’ll be iterating over HTML, CSS, and JavaScript code. Piece by piece, you’ll make your single-page web application more maintainable and better looking.
In the end, you’ll be able to communicate with your Flask back end from the convenience of your JavaScript-powered front end.
Prerequisites
In this project, you’ll focus on writing the front-end code. Still, you need a back end to work with. In this case, it’s a Flask project that provides a REST API with several endpoints.
Read on and download the code that you need to create the Flask project. Additionally, you’ll use a bootstrap script to build the database with some sample datasets.
Grab the Back-End Code
This tutorial builds upon the final code of the third part of the Flask REST API series. If you’re curious about building the back end yourself first, then it’s a good idea to start with the first part of the series and work your way through.
Before continuing with this tutorial, make sure to grab the source code by clicking the link below:
Free Source Code: Click here to download the free source code that you’ll use to build a front end for your Flask REST API single-page web application.
Even if you’ve followed the Flask REST API tutorial series up to this point, please compare your code with the code that you downloaded above. That way, you can work through this tutorial without making individual adjustments for any customized code in your previous project.
Note: The source code that you can download above contains a file named init_database.py that wasn’t part of the earlier tutorial series. Before continuing, ensure that you grabbed this file from the materials.
Before you continue with the tutorial, verify that your folder structure looks like this:
./
│
├── templates/
│   └── home.html
│
├── app.py
├── init_database.py
├── config.py
├── models.py
├── notes.py
├── people.py
└── swagger.yml
Once you’ve got the Flask REST API folder structure in place, you can read on to create the database.
Install the Requirements
Before you continue working on your Flask project, it’s a good idea to create and activate a virtual environment. That way, you’re installing project dependencies not system-wide but only in your project’s virtual environment.
Select your operating system below and use your platform-specific command to set up a virtual environment:
With the above commands, you create and activate a virtual environment named venv by using Python’s built-in venv module. The parenthesized (venv) in front of the prompt indicates that you’ve successfully activated the virtual environment.
Next, you need to install the requirements that the project needs.
For this, you can either use the requirements.txt file from the source code that you downloaded above, or copy the contents from the collapsible section below:
Copy the contents into a file named requirements.txt:
attrs==22.1.0
certifi==2022.9.24
charset-normalizer==2.1.1
click==8.1.3
clickclick==20.10.2
connexion==2.14.1
Flask==2.2.2
flask-marshmallow==0.14.0
Flask-SQLAlchemy==3.0.2
idna==3.4
inflection==0.5.1
itsdangerous==2.1.2
Jinja2==3.1.2
jsonschema==4.16.0
MarkupSafe==2.1.1
marshmallow==3.18.0
marshmallow-sqlalchemy==0.28.1
packaging==21.3
pyparsing==3.0.9
pyrsistent==0.19.1
PyYAML==6.0
requests==2.28.1
six==1.16.0
SQLAlchemy==1.4.42
swagger-ui-bundle==0.0.9
urllib3==1.26.12
Werkzeug==2.2.2
If you’re curious about the packages that you’re installing, then you can check out Part 1, Part 2, and Part 3 of the tutorial series on how to build a Flask REST API.
Make sure that your virtual environment is still activated. Then, install the project’s dependencies with the command below:
(venv) $ python -m pip install -r requirements.txt
Now your development environment is prepared to work with the Flask project. However, before you check the Flask app, you need to take care of the database.
Create the Database
In the source code that you downloaded above, you also find a file named init_database.py.
The init_database.py file contains code to create and populate the database with example data.
Note: If you’ve followed Part 1, Part 2, and Part 3 of the tutorial series on how to build a Flask REST API, you may have a file named build_database.py in your project. But to continue, you must use the init_database.py file from materials you downloaded in the “Grab the Back-End Code” section.
Run the code below to get your database ready for use with the web application:
(venv) $ python init_database.py
Created new database
Running init_database.py will create a new database named people.db in your project’s root directory. If you already have a database with this name, then you’ll receive the output “Updated existing database” instead of “Created new database”. Both messages indicate that the script ran successfully.
Once your project contains a working database, you can continue to check if your Flask project works.
Check Your Flask Project
Now you can verify that your Flask application is running without errors. Execute the following command in the directory containing the app.py file:
(venv) $ python app.py
When you run this application, a web server will start on port 8000. If you open a browser and navigate to http://localhost:8000, then you should see a list of people with their notes displayed:
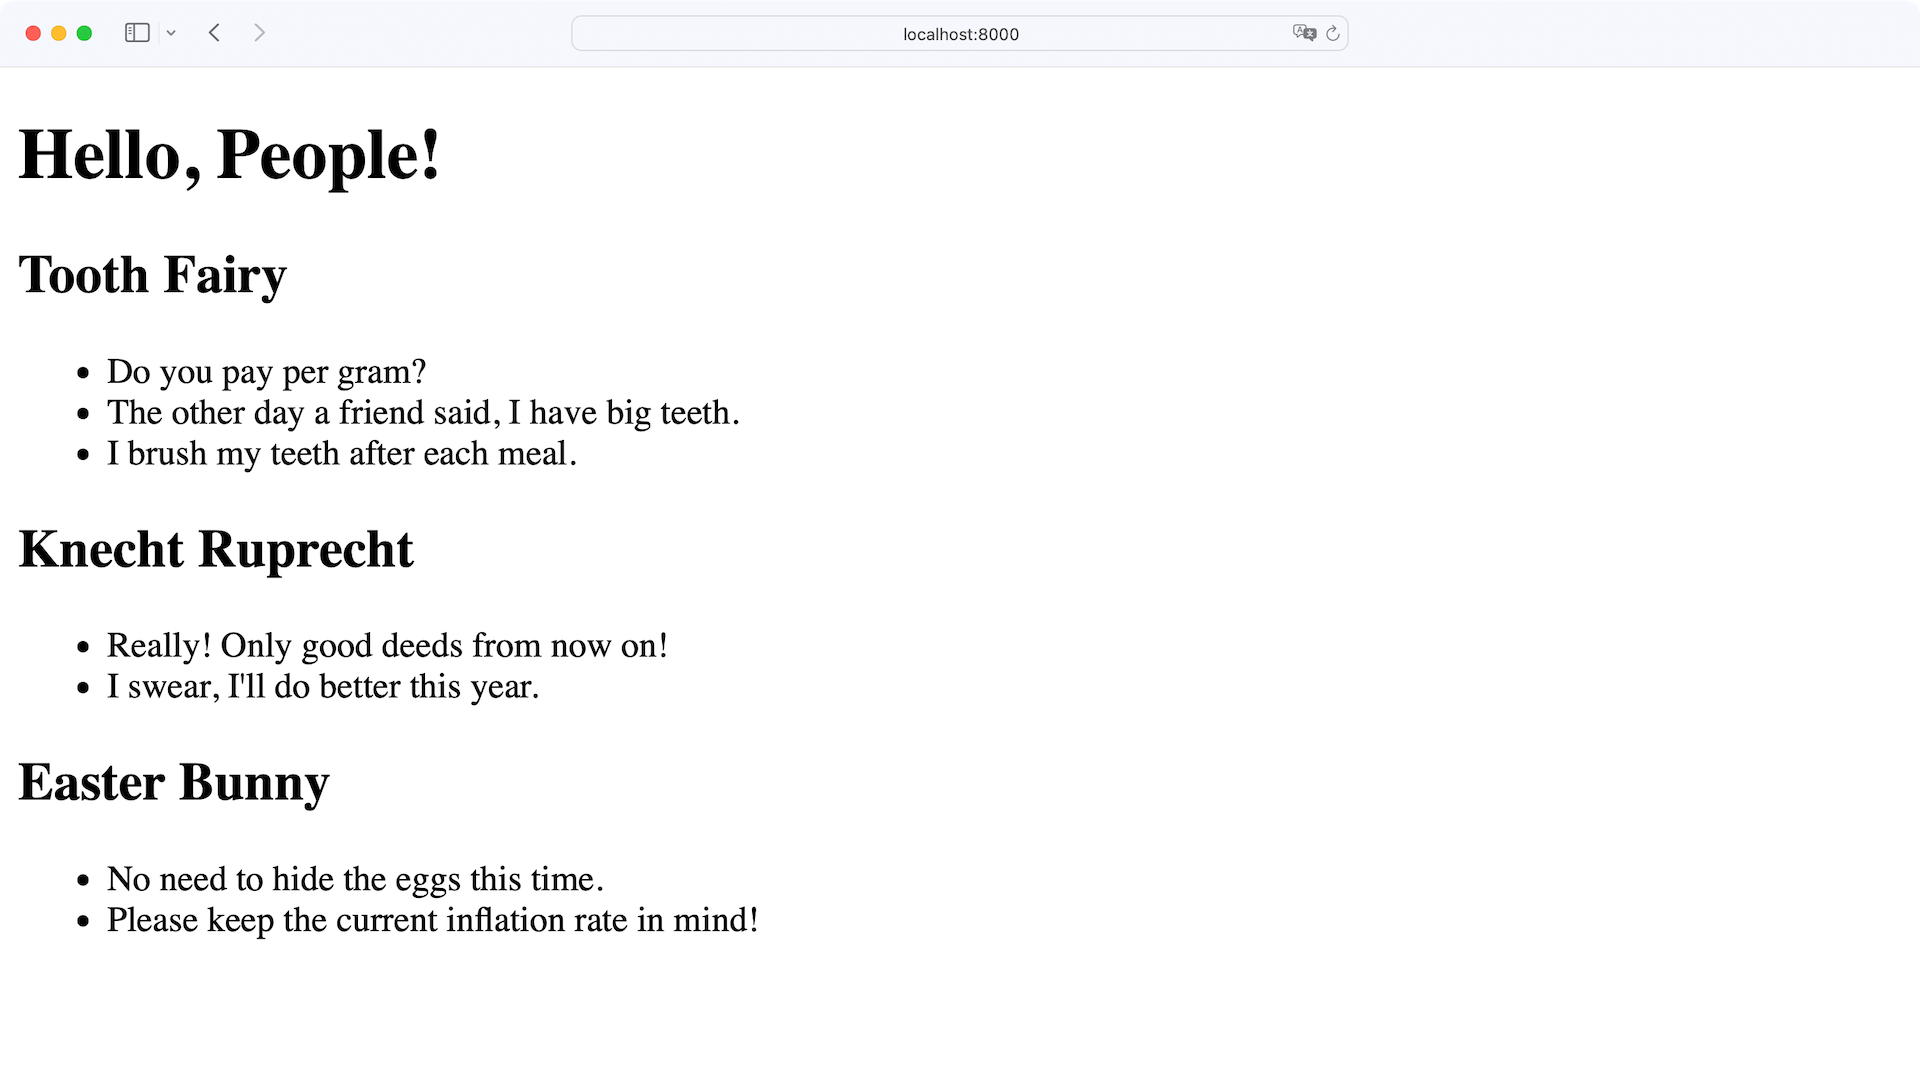
Perfect, your app is running flawlessly! Granted, it looks a bit old-school. But that’s why you’re following this tutorial. Before you start to style your front end, have a look at the back end first.
Step 1: Address Some Shortcomings
The Flask project that you’re working with has a significant shortcoming. Currently, you can’t have two people with the same last name. In this section, you’ll first investigate which parts of your code you need to change and then implement updates. With this procedure, you’ll get a good understanding of how the back end works in general.
Explore Your API
Your Flask project comes with an automatically created Swagger UI documentation. The documentation helps you to explore your API and play around with the API’s endpoints.
Visit your Swagger UI at http://localhost:8000/api/ui and inspect the current state of your API:
At first glance, everything seems fine—unless you try to add another fairy to the database:
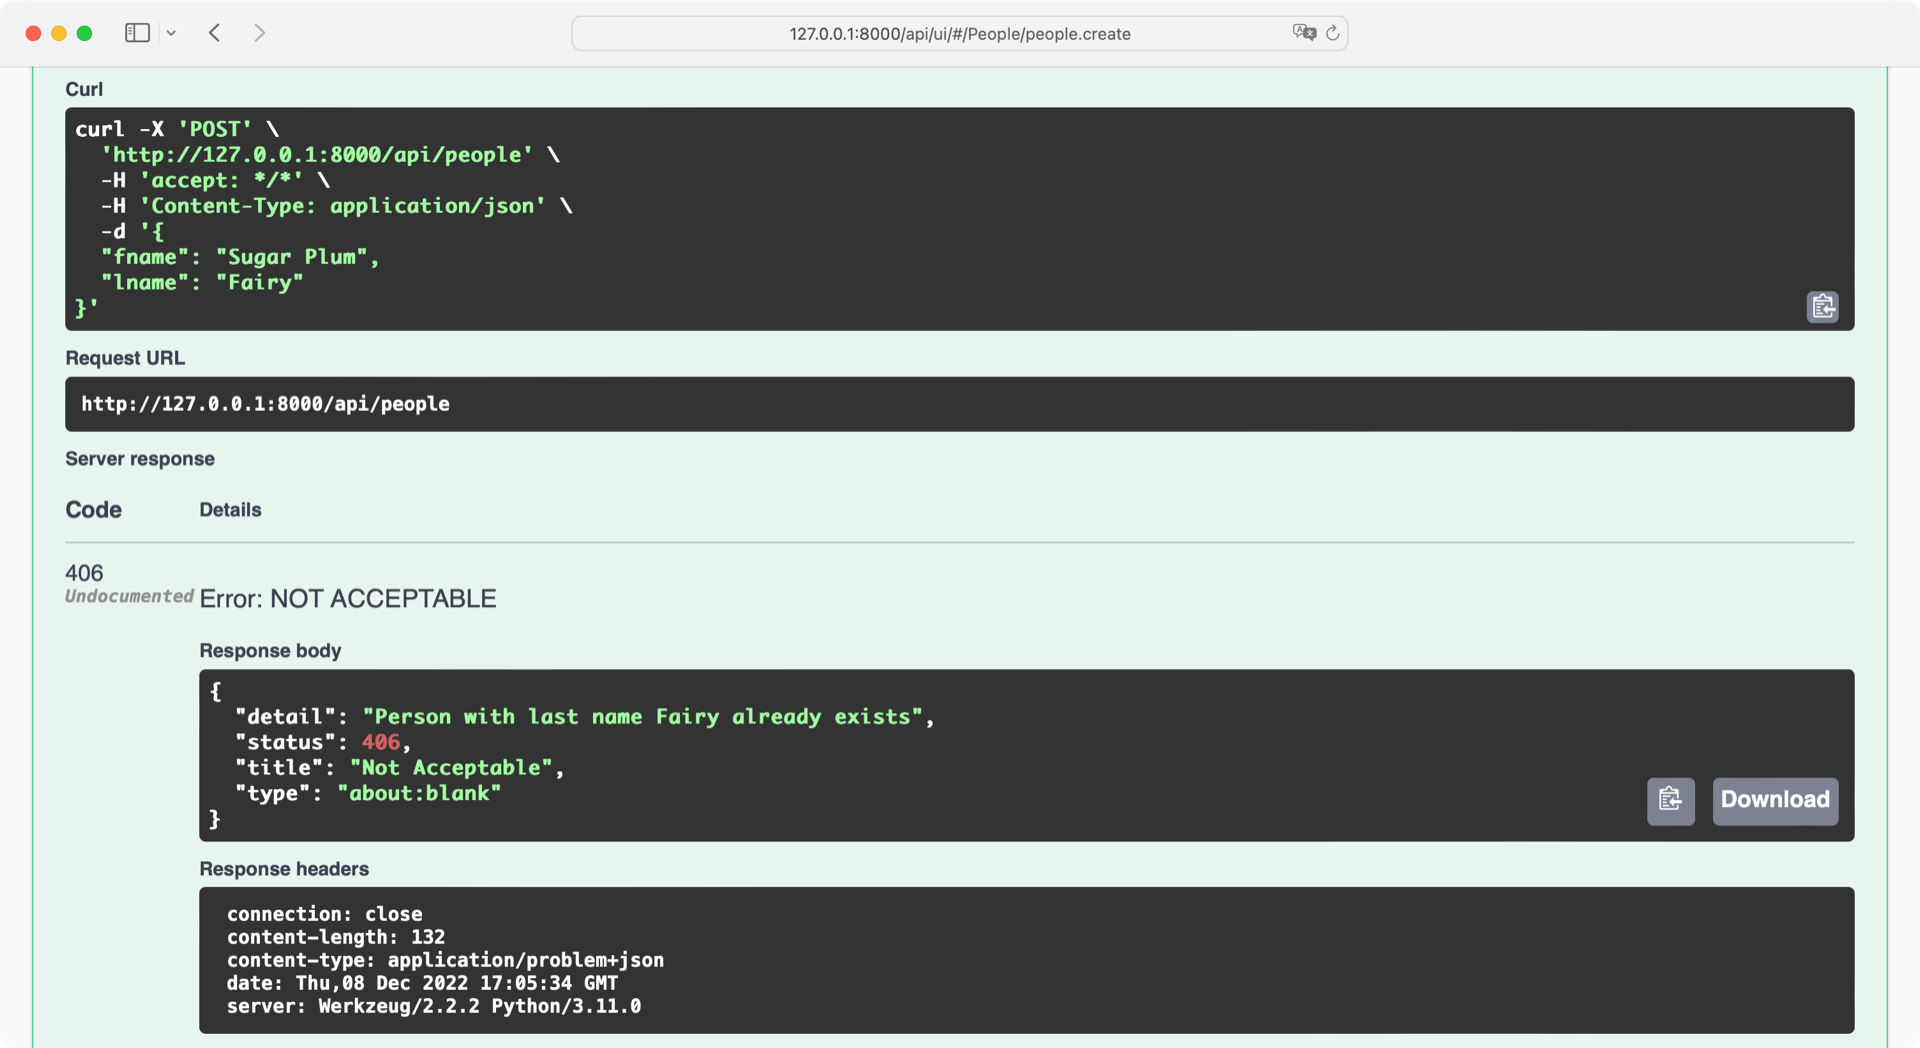
Apparently, you can’t have two people with the same last name in your database. When you try adding “Sugar Plum Fairy” to the list of people, you get an error because there’s already a person with “Fairy” as a last name. That’s a significant shortcoming worth fixing!
Investigate the Project Structure
Before you get to work, have a look at some files of your project. You have app.py, which starts your Flask app, and init_database.py, which you can run to re-create people.db. Besides those, there are six other files in your Flask project:
| File | Description |
|---|---|
config.py |
Creates and initializes the project’s configuration |
models.py |
Defines the database structure |
notes.py |
Handles API requests for notes |
people.py |
Handles API requests for people |
swagger.yml |
Defines your REST API |
templates/home.html |
Contains your front-end markup |
If you have a look at models.py, then you may notice a significant difference in how Person and Note are defined:
 1# models.py
 2
 3# ...
 4
 5class Note(db.Model):
 6    __tablename__ = "note"
 7    id = db.Column(db.Integer, primary_key=True)
 8    person_id = db.Column(db.Integer, db.ForeignKey("person.id"))
 9    content = db.Column(db.String, nullable=False)
10    timestamp = db.Column(
11        db.DateTime, default=datetime.utcnow, onupdate=datetime.utcnow
12    )
13
14# ...
15
16class Person(db.Model):
17    __tablename__ = "person"
18    id = db.Column(db.Integer, primary_key=True)
19    lname = db.Column(db.String(32), unique=True)
20    fname = db.Column(db.String(32))
21    timestamp = db.Column(
22        db.DateTime, default=datetime.utcnow, onupdate=datetime.utcnow
23    )
24
25    notes = db.relationship(
26        Note,
27        backref="person",
28        cascade="all, delete, delete-orphan",
29        single_parent=True,
30        order_by="desc(Note.timestamp)",
31    )
32
33# ...
A Note object contains an ID, some content, a timestamp, and a connection to a person.
Each Person object has an ID, a first name, a last name, a timestamp, and a relationship to the notes that are connected to them.
What looks a bit unusual is that the last name of a person must be unique because you set lname in line 19 to unique=True. That means you can’t have two people with the same last name in your database. Not ideal!
Next, have a look at people.py:
# people.py

# ...

def create(person):
    lname = person.get("lname")
    existing_person = Person.query.filter(Person.lname == lname).one_or_none()

    if existing_person is None:
        new_person = person_schema.load(person, session=db.session)
        db.session.add(new_person)
        db.session.commit()
        return person_schema.dump(new_person), 201
    else:
        abort(406, f"Person with last name {lname} already exists")

# ...
The create() function checks for the last name of the person object. It’ll only create a new person if there’s no other person with the same last name in the database already.
The other functions in people.py contain lname as a parameter:
# people.py

# ...

def read_one(lname):
    # ...

def update(lname, person):
    # ...

def delete(lname):
    # ...
Using lname to find people in the database works because lname is the unique identifier for a person. That’s in tune with the current state of the Person model. However, this code architecture prevents you from having a Sugar Plum Fairy along with the Tooth Fairy in your database.
Fix Your Model
The models.py file defines the design of your database. To allow multiple entries with the same last name, you need to remove the unique constraint from Person and set the nullable property to False:
 1# models.py
 2
 3# ...
 4
 5class Person(db.Model):
 6    __tablename__ = "person"
 7    id = db.Column(db.Integer, primary_key=True)
 8    lname = db.Column(db.String(32), nullable=False) # Remove: unique=True
 9    fname = db.Column(db.String(32))
10    timestamp = db.Column(
11        db.DateTime, default=datetime.utcnow, onupdate=datetime.utcnow
12    )
13
14    notes = db.relationship(
15        Note,
16        backref="person",
17        cascade="all, delete, delete-orphan",
18        single_parent=True,
19        order_by="desc(Note.timestamp)",
20    )
21
22# ...
Without the unique constraint of lname entries, you allow the database to store people with the same last name. By adding nullable=False as a property to lname, you state that each person must have a last name. If you didn’t set the nullable property to False, then it’d be possible to store people without any last names.
To reflect the change in the database, stop your Flask development server with Ctrl+C and run init_database.py afterward:
(venv) $ python init_database.py
Updated existing database
When init_database.py finds a database named people.db, then the script backs up its contents and re-creates the database with the rules that you define in models.py. Here, you create a new database where lname doesn’t contain a unique constraint anymore and then populate the database with the existing data again.
Now that your database can store people with the same last name, hop over to the next section to make the required changes in your Flask functions that interact with the database.
Adjust Your Flask Functions
Even though your database now accepts identical last names, some functions in people.py still abort the process if the last name isn’t unique. Also, because you still need a unique identifier for each person, you need to come up with an alternative to using the last name.
If you look at notes.py, then you’ll see that all the CRUD functions except create are working with note_id. You’ll adjust people.py to work with a person’s ID to read, update, and delete database entries accordingly.
Here are the changes that you’ll perform on those functions:
- Rename the
lnameparameter toperson_id - Adjust the queries for an existing person
- Adapt the abort messages
Open people.py and start implementing the changes.
You can keep people.py open and tackle the changes function by function.
Start by updating create():
# people.py

# ...

def create(person):
    new_person = person_schema.load(person, session=db.session)
    db.session.add(new_person)
    db.session.commit()
    return person_schema.dump(new_person), 201

# ...
Now that the ID of a person is the only attribute that must be unique, so there’s no need to check for any existing people anymore.
You can take the content of the conditional if block and use it as the function body of create().
Formerly, you needed to make sure that there was no person with the same last name. But now, your database will make sure that the ID of a person is unique. Therefore, you don’t need to check for uniqueness in your code.
Next, take care of the read_one() function:
# people.py

# ...

def read_one(person_id):
    person = Person.query.get(person_id)

    if person is not None:
        return person_schema.dump(person)
    else:
        abort(404, f"Person with ID {person_id} not found")

# ...
In read_one() you must update the function’s parameter to person_id and adjust the query for person accordingly.
Also, you need to update the error message when no person is found with the ID.
The changes in update() look similar:
# people.py

# ...

def update(person_id, person):
    existing_person = Person.query.get(person_id)

    if existing_person:
        update_person = person_schema.load(person, session=db.session)
        existing_person.fname = update_person.fname
        db.session.merge(existing_person)
        db.session.commit()
        return person_schema.dump(existing_person), 201
    else:
        abort(404, f"Person with ID {person_id} not found")

# ...
Again, you adjust the parameter, the query to look for an existing person, and the error message.
Do the same for delete():
# people.py

# ...
def delete(person_id):
    existing_person = Person.query.get(person_id)

    if existing_person:
        db.session.delete(existing_person)
        db.session.commit()
        return make_response(f"{person_id} successfully deleted", 200)
    else:
        abort(404, f"Person with ID {person_id} not found")
Don’t forget to also adjust the string you pass into make_response() to use person_id instead of lname.
The changes in create(), read_one(), update(), and delete() were very similar.
For update(), you can take the changes one step even further.
If you have a look at update() in people.py, then you can see that you currently only update the first name. Formerly, fname was the only attribute of a person that you were allowed to change. The last name was the unique identifier for a person, and therefore you weren’t allowed to change it.
Now that you work with person_id, you can allow updating lname in update() of people.py:
# people.py

# ...

def update(person_id, person):
    existing_person = Person.query.get(person_id)

    if existing_person:
        update_person = person_schema.load(person, session=db.session)
        existing_person.fname = update_person.fname
        existing_person.lname = update_person.lname
        db.session.merge(existing_person)
        db.session.commit()
        return person_schema.dump(existing_person), 201
    else:
        abort(404, f"Person with ID {person_id} not found")

# ...
Now you can update the first and the last name of a person. So if the Easter Bunny wants to go by Easter Rabbit, that’s allowed.
With the changes in models.py, your database, and people.py in place, go on and look at your API documentation. For this, start your Flask development server with the python app.py command and visit http://localhost:8000/api/ui.
You can create people with the same last name. That’s good news! However, the documentation shows you that there’s still some work to do:
Although your Flask functions in people.py work with people_id, it seems that the API hasn’t heard the news yet. The API documentation still shows that it expects lname for the endpoints as part of the request parameters.
Update API Endpoints
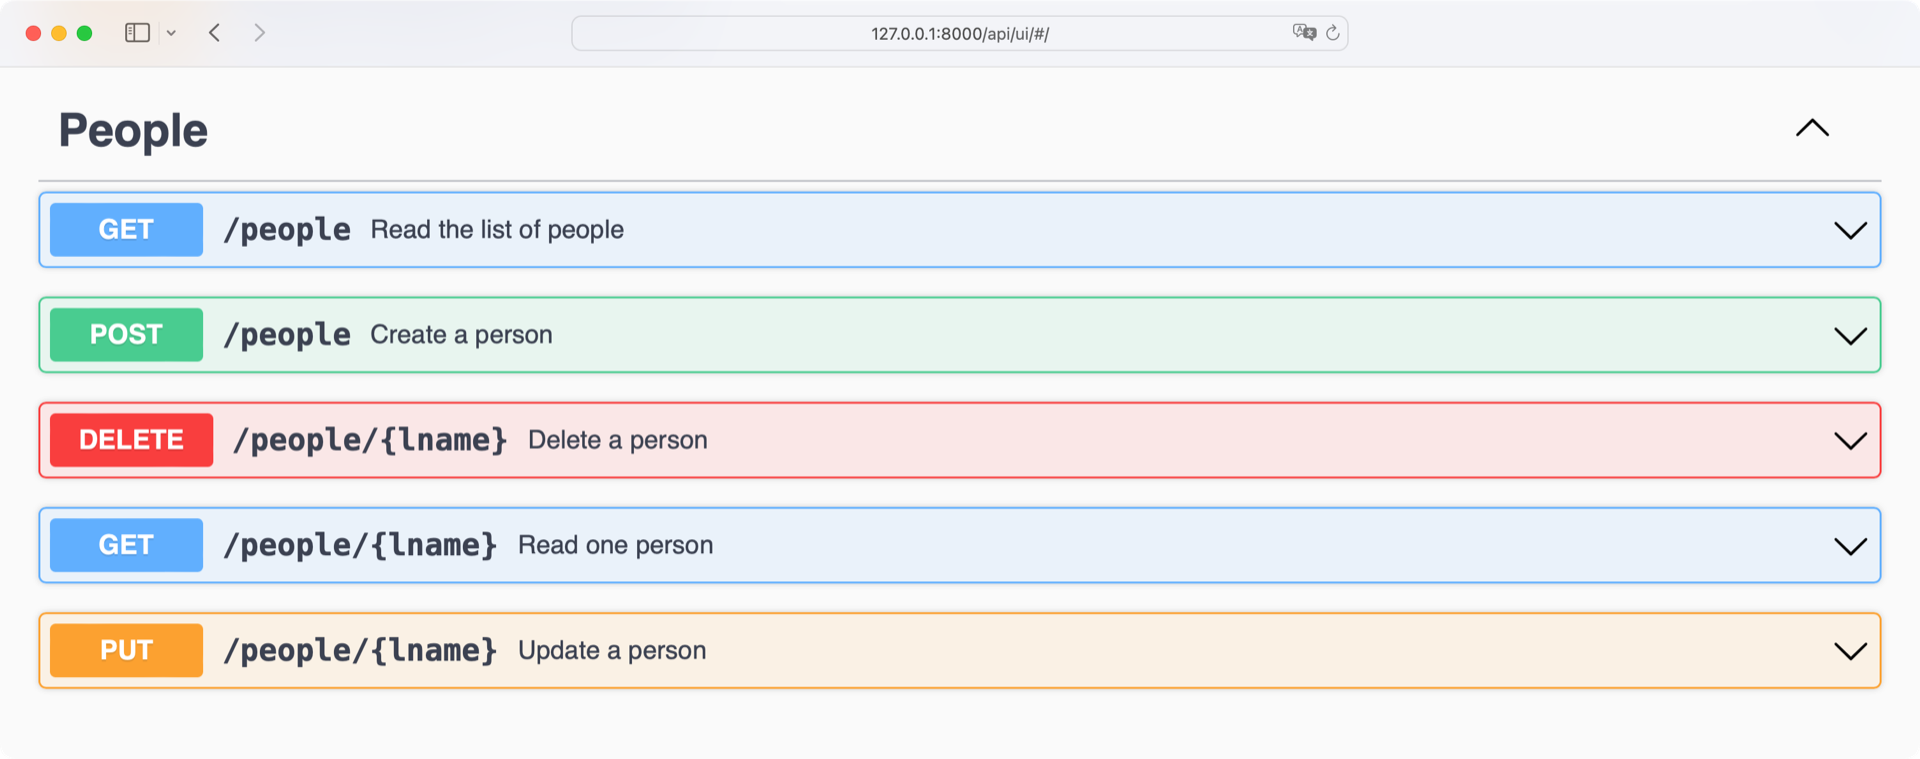
Before you dive back into your back-end code, have a look at the current People-API endpoints first:
| Action | HTTP Verb | URL Path | Description |
|---|---|---|---|
| Read | GET |
/api/people |
Reads a collection of people |
| Create | POST |
/api/people |
Creates a new person |
| Read | GET |
/api/people/{lname} |
Reads a particular person |
| Update | PUT |
/api/people/{lname} |
Updates an existing person |
| Delete | DELETE |
/api/people/{lname} |
Deletes an existing person |
The URL paths for the read, update and delete actions require lname as a request parameter. To change lname to person_id, you need to adjust your API specification.
You can find the specification of your API in the swagger.yml file. First, have a look at where you use lname at the moment:
 1# swagger.yml
 2
 3# ...
 4components:
 5  schemas:
 6    Person:
 7      type: "object"
 8      required:
 9        - lname
10      properties:
11        fname:
12          type: "string"
13        lname:
14          type: "string"
15  parameters:
16    lname:
17      name: "lname"
18      description: "Last name of the person to get"
19      in: path
20      required: True
21      schema:
22        type: "string"
23    # ...
24
25paths:
26  # ...
27  /people/{lname}:
28    get:
29      operationId: "people.read_one"
30      tags:
31        - People
32      summary: "Read one person"
33      parameters:
34        - $ref: "#/components/parameters/lname"
35      responses:
36        "200":
37          description: "Successfully read person"
38    put:
39      tags:
40        - People
41      operationId: "people.update"
42      summary: "Update a person"
43      parameters:
44        - $ref: "#/components/parameters/lname"
45      responses:
46        "200":
47          description: "Successfully updated person"
48      requestBody:
49        content:
50          application/json:
51            schema:
52              x-body-name: "person"
53              $ref: "#/components/schemas/Person"
54    delete:
55      tags:
56        - People
57      operationId: "people.delete"
58      summary: "Delete a person"
59      parameters:
60        - $ref: "#/components/parameters/lname"
61      responses:
62        "204":
63          description: "Successfully deleted person"
64  # ...
Remember that you set the nullable property to False in the model for a person? Line 9 reflects that and can therefore stay the same. Also, you still want to keep the lname property in the Person object in line 13.
Other than that, you can replace all remaining occurrences of lname with person_id.
Keep your swagger.yml file open and start by changing the lname parameter in components:
 1# swagger.yml
 2
 3# ...
 4components:
 5  schemas:
 6    Person:
 7      type: "object"
 8      required:
 9        - lname # Don't change
10      properties:
11        fname:
12          type: "string"
13        lname: # Don't change
14          type: "string"
15  parameters:
16    person_id:
17      name: "person_id"
18      description: "ID of the person to get"
19      in: path
20      required: True
21      schema:
22        type: "string"
23    # ...
24# ...
Then, update the /people/ endpoint to include the references to the parameter components:
 1# swagger.yml
 2
 3# ...
 4paths:
 5  # ...
 6  /people/{person_id}:
 7    get:
 8      operationId: "people.read_one"
 9      tags:
10        - People
11      summary: "Read one person"
12      parameters:
13        - $ref: "#/components/parameters/person_id"
14      responses:
15        "200":
16          description: "Successfully read person"
17    put:
18      tags:
19        - People
20      operationId: "people.update"
21      summary: "Update a person"
22      parameters:
23        - $ref: "#/components/parameters/person_id"
24      responses:
25        "200":
26          description: "Successfully updated person"
27      requestBody:
28        content:
29          application/json:
30            schema:
31              x-body-name: "person"
32              $ref: "#/components/schemas/Person"
33    delete:
34      tags:
35        - People
36      operationId: "people.delete"
37      summary: "Delete a person"
38      parameters:
39        - $ref: "#/components/parameters/person_id"
40      responses:
41        "204":
42          description: "Successfully deleted person"
43  # ...
Good work! Now your API specification works with person_id instead of lname.
Still, keep swagger.yml open for a moment.
There’s another detail that you need to address.
Prevent a Type Error
There’s another update that you need to perform on swagger.yml. It may not be obvious at this moment, but if you go back and check the type of the person_id parameter in your updated lname, then you’ll get a hint. Although IDs are commonly number types, you kept it as "string". And that’s actually a good idea for two reasons:
- You won’t perform any math operations on an ID. Therefore, it doesn’t need to be an integer.
- Your form fields will arrive as strings in your JavaScript code. Keeping them as strings saves you a conversion step.
If you specified type as "integer", then you’d run into a type error when your API receives a string instead of the expected integer. It saves you some headache to prevent this error by adjusting your API specification up front.
Note: Changing the API specification to save you work on the front end is an advantage when you work alone as a full-stack developer. After all, you can decide what’s best for your workflow.
If you’re working in a team, then situations like this are a great starting point for a discussion of where to make changes. There are usually arguments on both sides for either implementing a change in the back end or letting the front end take care of it.
Here, you make the change on the back end in the API specification.
There are two instances where an ID has an integer type in your swagger.yml file, which you need to adjust. The first one is the note_id parameter, which you fix below:
# swagger.yml

# ...
components:
  # ...
  parameters:
    person_id:
      name: "person_id"
      description: "ID of the person to get"
      in: path
      required: True
      schema:
        type: "string"
    note_id:
      name: "note_id"
      description: "ID of the note"
      in: path
      required: True
      schema:
        type: "string"
  # ...
Once you’ve changed the type of the note_id parameter to "string", scroll down to the post path for your notes:
# swagger.yml

# ...
paths:
  # ...
  /notes:
    post:
      operationId: "notes.create"
      tags:
        - Notes
      summary: "Create a note associated with a person"
      requestBody:
          description: "Note to create"
          required: True
          content:
            application/json:
              schema:
                x-body-name: "note"
                type: "object"
                properties:
                  person_id:
                    type: "string"
                  content:
                    type: "string"
    # ...
After you changed the type of person_id in the schema of your POST request content from "integer" to "string", head over to your Swagger UI API documentation at http://localhost:8000/api/ui and check how your API works.
Instead of showing lname, the documentation should now show person_id for your API endpoints.
That means you’ve completed all the necessary fixes in the back end. Now it’s time to continue the full-stack experience and get some work done on the front end.
Step 2: Build the Front-End Components
There are three major components to the front end of a modern single-page web application:
- HTML provides the content and structure of a web page.
- CSS provides a web page’s presentation or style. It defines how the page’s content should look when your browser renders it.
- JavaScript provides the interactivity of a web page. It usually handles communication with the back-end server.
For now, you’ll add and connect the components to your web project in a rather basic form. In the upcoming sections, you’ll expand the HTML, CSS, and JavaScript components of your Flask project separately.
Nest Your HTML Templates
In this section, you’ll extend your home.html template with a component so that you can see debugging information. For this, you’ll leverage the configuration object that Flask loads into your templates. With the config variable, you can access your Flask configuration, such as debug information.
Note: You’re currently running your Flask server in debug mode by default. That’s okay while developing your app, as it helps you to find debug application errors. If you want to change the running mode, then you need to adjust the debug parameter in app.py:
# app.py

# ...

if __name__ == "__main__":
    app.run(host="0.0.0.0", port=8000, debug=True)
Before you deploy your Flask app, it’s important to set debug to False.
Open templates/home.html and add a conditional statement at the end of <body> to check if your app is running in DEBUG mode:
<!-- templates/home.html -->

<!DOCTYPE html>
<html lang="en">
<head>
    <meta charset="UTF-8">
    <title>RP Flask REST API</title>
</head>
<body>
    <!-- .... -->

    {% if config['DEBUG'] %}
        <pre>
            <code>
                {{ config }}
            </code>
        </pre>

        <style>
            pre {
                white-space: pre-wrap;
            }
        </style>
    {% endif %}
</body>
</html>
Besides showing config, you’re also adding your first CSS styling. With white-space: pre-wrap, you’re enabling your browser to wrap the code instead of just displaying one long line of code.
When you run your app in debug mode, then you’ll see the contents of config at the bottom of your home page. Visit http://localhost:8000 and check it out:
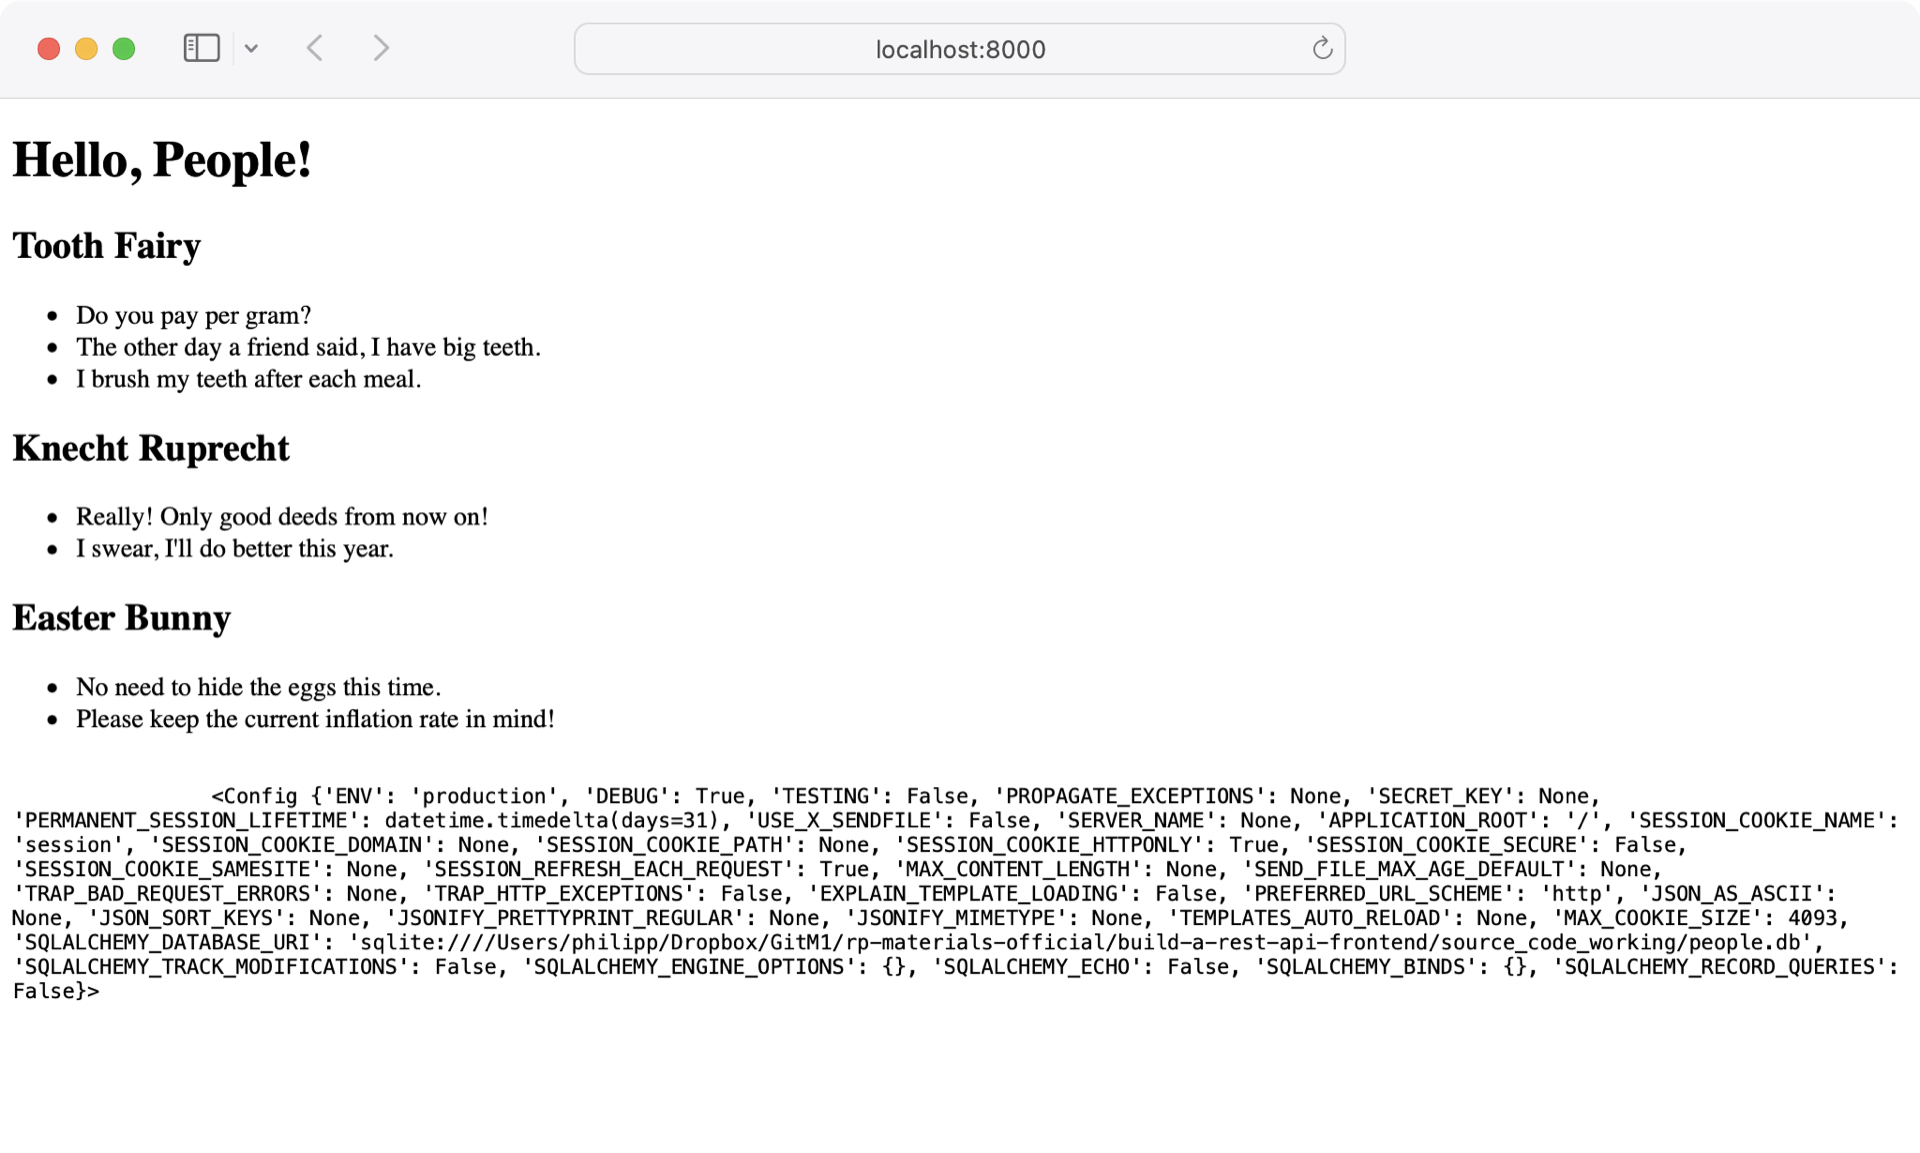
Showing debug information on the front end can be handy for getting a glance at the data that your browser is working with.
Admittedly, the debug area fulfills yet another purpose. By working with this segment of your website, you’ll get a feel for the front-end creation workflow that you’ll perform later. One key characteristic for this workflow is to modularize logical pieces of your project’s source code.
Instead of having one big file with HTML, CSS, and JavaScript code, you’ll create singular modules that you can link. That way, a file has one role that you can spot through its filename, so you can reference it wherever you need it in other files.
Following this logic, the code to show debug content deserves its own file.
Go on and create a new template named _debug.html in your templates/ directory:
<!-- templates/_debug.html -->

<div class="debug-card">
    <form class="debug-form">
        <input type="text" name="endpoint" value="/api/people" />
        <button data-action="read">Get Data</button>
        <button data-action="clear">Clear</button>
    </form>
    <pre>
        <code>{{ config }}</code>
    </pre>
</div>

<style>
    pre {
        white-space: pre-wrap;
    }
</style>
This code shows HTML elements and HTML attributes that you may have seen before. You’ll use them multiple times when building your single-page web application, so it’s worthwhile to have a closer look at them.
These are the significant HTML elements from the code above:
<div>wraps content units that belong together.<form>creates a form that contains interactive controls for submitting data.<input>stores the values of a form.<button>creates a button element, which you’ll link up with events.
You’re also using HTML attributes, which provide contextual information to the HTML elements:
classclassifies elements for programmatical CSS styling.typedefines the type of an input field.nameidentifies the input field for better back-end access.valueholds the content of an input field.data-actionis a custom attribute to indicate the intended action to your application.
HTML attributes with the data prefix are custom HTML attributes that you define yourself. Using data attributes allows you to store arbitrary information on the HTML. Also, data attributes are handy when selecting HTML elements in your JavaScript code. You’ll use data attributes quite a lot in the following sections to store key information on the front end.
Note that this HTML file doesn’t contain an <html> tag. That’s okay because _debug.html is a template partial, which means that you don’t intend to use _debug.html on its own.
Template partials exist to be included into other templates and only contain a fraction of the complete HTML code.
You may prefix a template’s name with an underscore (_) to indicate that the content is meant to be included. This is a common convention to keep your templates organized.
To show the HTML code of _debug.html in your app, include it to connect it with home.html:
<!-- templates/home.html -->

<!DOCTYPE html>
<html lang="en">
<head>
    <meta charset="UTF-8">
    <title>RP Flask REST API</title>
</head>
<body>
    <!-- .... -->

    {% if config['DEBUG'] %}
        <!-- Remove div and style blocks -->
        {% include "_debug.html" %}
    {% endif %}
</body>
</html>
Replace the body of your conditional statement with a Jinja include tag that references _debug.html.
Visit http://localhost:8000 again, and have a look at the connected templates:
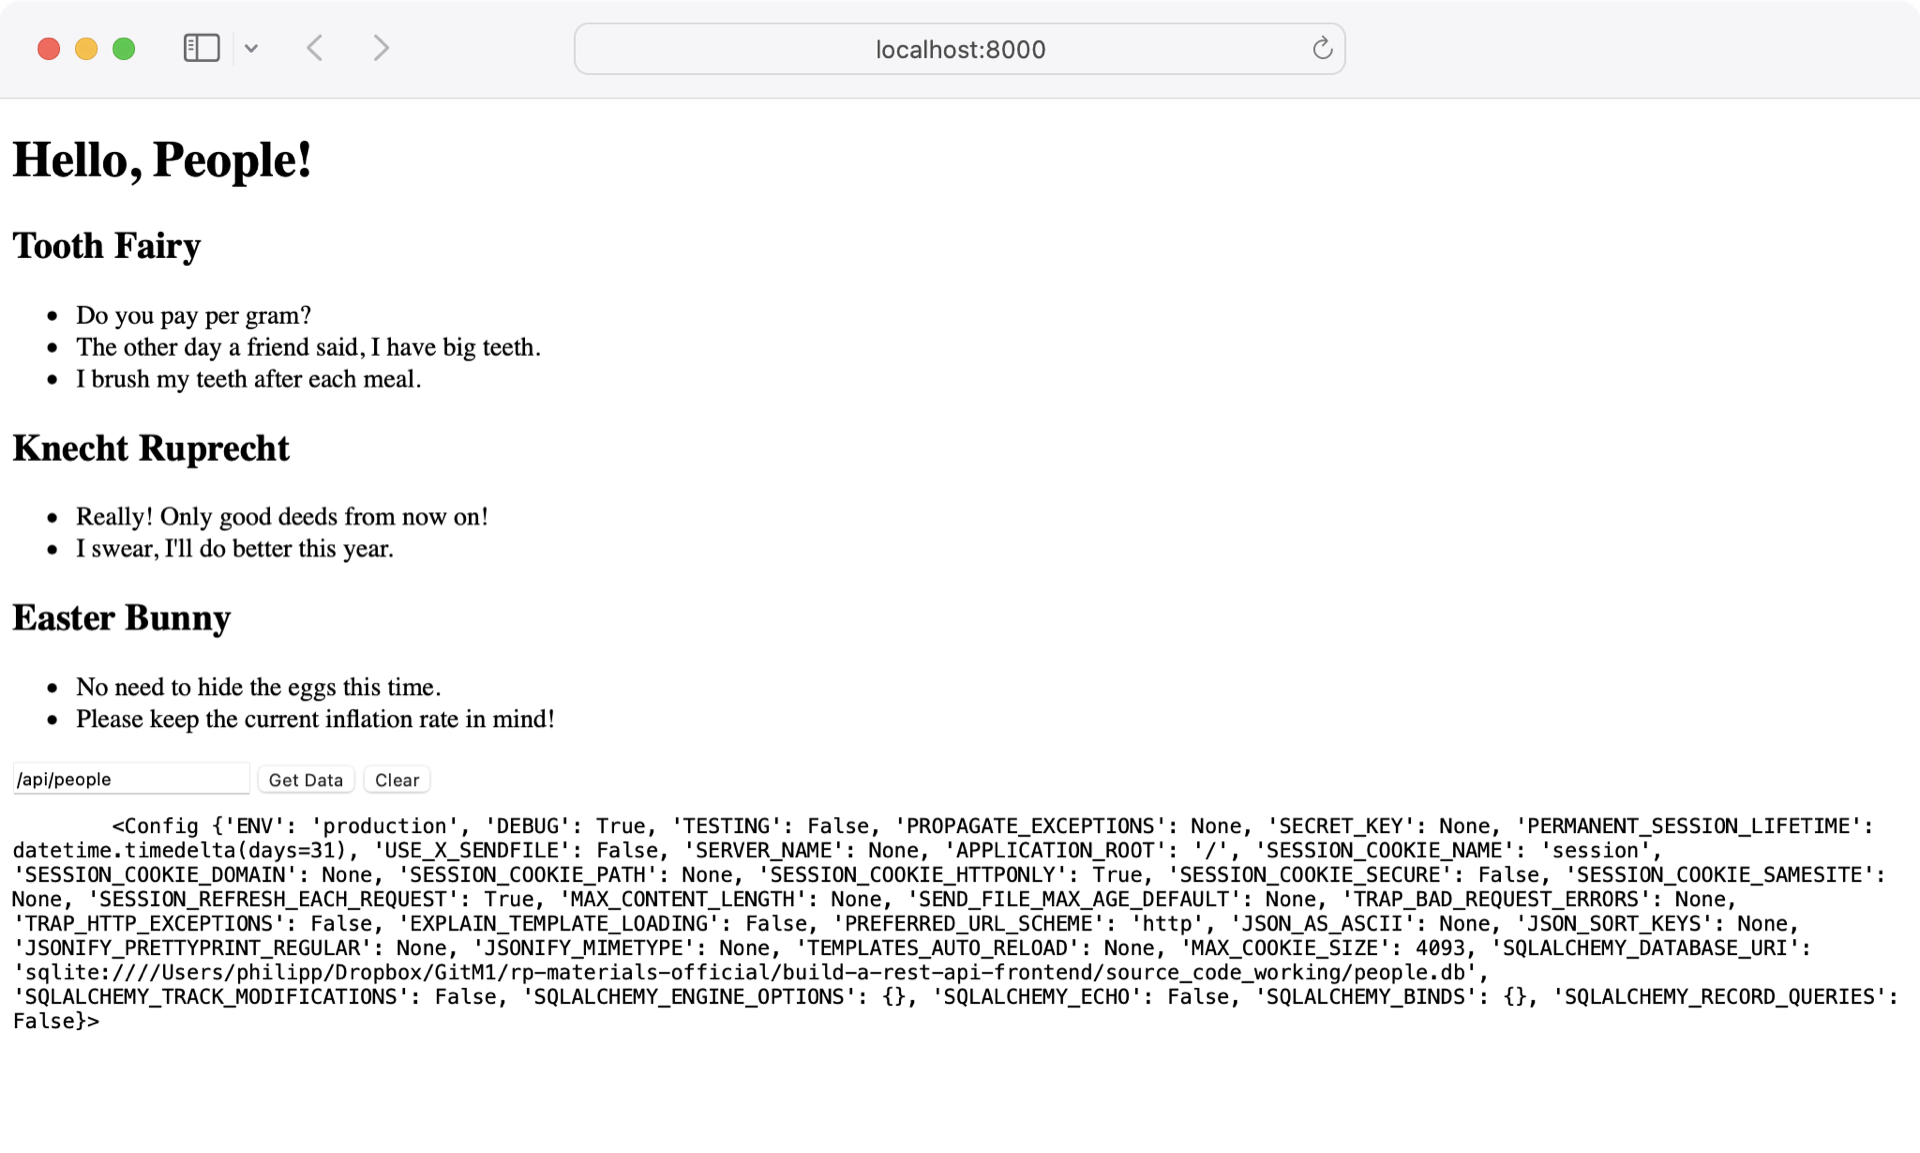
The content of the debug area looks very similar. That makes sense, as your Flask merges home.html with _debug.html before the browser serves the website. The only difference is the buttons that you added to _debug.html.
When you click the buttons, the page reloads. This is due to some default HTML form behavior. Apart from this, there’s no action connected to the buttons. For this, you’ll use JavaScript.
Sprinkle in Some JavaScript
With JavaScript, you can make Flask websites more interactive. For example, you can send API requests with the push of a button.
Enhance your _debug.html template to clear the <code> element when you click the button with the data-action='clear' attribute:
<!-- templates/_debug.html -->

<!-- ... -->

<script>
class DebugForm {
  constructor() {
    this.debugCard = document.querySelector(".debug-card");
    this.form = this.debugCard.querySelector(".debug-form");
    this.clearButton = this.form.querySelector("button[data-action='clear']");
    this.clearButton.addEventListener(
      "click",
      this.handleClearClick.bind(this)
    );
  }

  handleClearClick(event) {
    event.preventDefault();
    let code = this.debugCard.querySelector("code");
    code.innerText = "";
  }
}

new DebugForm();
</script>
With a <script> element, you can add JavaScript directly into your Flask template files. Here, you’re adding functionality to your form inside of the .debug-card element.
The JavaScript code inside this <script> element demonstrates the pattern that you’ll use for the JavaScript in this project. Namely, you have a JavaScript class that acts as a controller for the corresponding HTML element. In this example, the DebugForm class controls the debug <div> element.
You’ll typically be using class constructors to select the target HTML elements with the .querySelector() method of the Document global object. You’ll also be setting up any event listeners that you may need.
You’ll note the call to .bind() when referencing the event handler handleClearClick() in the .addEventListener() method. This allows the event handler to call the this keyword as if it were an instance of the DebugForm. Binding allows the handler to have access to all the properties defined in the constructor, like this.debugCard.
If you want to learn more about JavaScript’s this keyword, then check out the scope of this section of Python vs JavaScript for Pythonistas.
The result of the code above is that every time you press the Clear button, you trigger the .onHandleClick() method of DebugForm.
Note: As you noticed before, clicking a button triggers a page reload by default. With event.preventDefault(), you prevent the default behavior of an element. For event listeners, this line of code suppresses the page reload.
Clicking Clear removes the config data from the <code> element. But the Get Data button isn’t connected to any event handlers yet.
Update _debug.html to trigger an API request when clicking the button with the data-action='get' attribute:
 1<!-- templates/_debug.html -->
 2
 3<!-- ... -->
 4
 5<script>
 6class DebugForm {
 7  constructor() {
 8    this.debugCard = document.querySelector(".debug-card");
 9    this.form = this.debugCard.querySelector(".debug-form");
10    this.clearButton = this.form.querySelector("button[data-action='clear']");
11    this.clearButton.addEventListener(
12      "click",
13      this.handleClearClick.bind(this)
14    );
15    this.sendButton = this.form.querySelector("button[data-action='read']");
16    this.sendButton.addEventListener("click", this.handleSendClick.bind(this));
17  }
18
19  handleClearClick(event) {
20    event.preventDefault();
21    let code = this.debugCard.querySelector("code");
22    code.innerText = "";
23  }
24
25  handleSendClick(event) {
26    event.preventDefault();
27    const input = document.querySelector(".debug-card input");
28    const endpoint = input.value;
29    getData(endpoint, this.showResponse);
30  }
31
32  showResponse(data) {
33    const debugCard = document.querySelector(".debug-card");
34    let code = debugCard.querySelector("code");
35    code.innerText = data;
36  }
37}
38
39new DebugForm();
40</script>
The .handleSendClick() method that you’re connecting to the sendButton event calls a function in line 29 that doesn’t exist yet. You’ll create the getData() function in a moment. Before you do, look at .showResponse() on line 32.
You’ll use .showResponse() as a callback function that’s executed once getData() runs successfully. Instead of clearing the content of your <code> element like you do in .handleClearClick(), you’re showing the data that .showResponse() receives.
Go on and add getData() right before DebugForm:
 1<!-- templates/_debug.html -->
 2
 3<!-- ... -->
 4
 5<script>
 6function getData(endpoint, callback) {
 7  const request = new XMLHttpRequest();
 8  request.onreadystatechange = () => {
 9    if (request.readyState === 4) {
10      callback(request.response);
11    }
12  };
13  request.open("GET", endpoint);
14  request.send();
15}
16
17class DebugForm {
18    // ...
19}
20</script>
21
22<!-- ... -->
With getData(), you’re introducing the first Ajax function to your Flask project. Ajax stands for Asynchronous JavaScript and XML. It perfectly describes what you’re doing in getData():
- Line 6 defines the
getData()function with the parametersendpointandcallback. - Line 7 creates a new
XMLHttpRequestobject that you use to make requests. - Line 8 binds the
.onreadystatechange()event torequest. It triggers when you change.readyState()by sending the request in line 14. - Line 9 checks for the value
4of.readyState. The value4indicates theDONEstate. - Line 10 calls the provided callback function with
request.responsewhen therequestoperation is complete. - Line 13 initializes your request with a GET HTTP action and the provided endpoint URL.
- Line 14 sends the request and triggers
.onreadystatechange()when done.
In short, this function makes a GET HTTP request with your API when you call getData(), as you do in DebugForm.onSendClick().
Note: You’re using XMLHTTPRequest objects to interact with the server. Another approach would be to use the Fetch API.
Now that you’ve connected your Flask debug form with some JavaScript events, hop over to http://localhost:8000 and try it out:
Awesome! You can use the input field of your debug form to request data from your database.
Granted, you already have this functionality in your Swagger UI API documentation at http://localhost:8000/api/ui. But you’ve equipped yourself with the building blocks to evolve your front end into a full-fledged single-page application.
Over the next few sections, you’ll continue to spend your time in the front end. Therefore, it makes sense to make it an attractive place to be. Read on and introduce some style to your single-page web application.
Style Your Front End
You style your websites with Cascading Style Sheets, in short CSS. You already added a bit of CSS in _debug.html to wrap the text. That was fine for the minimal styling of your debug form. But for more extensive styling changes, it makes sense to have a central place to store your styling declarations.
In Flask projects, you commonly use a static/ folder for local external resources. Inside of static/, it helps to create a subfolder for each type of resource. Consequently, you save CSS files inside your static/ directory within a css/ subdirectory.
Create style.css and add the CSS declarations below:
/* static/css/style.css */

:root {
    --bg-color: white;
    --main-color: coral;
    --secondary-color: lavenderblush;
}

* {
    box-sizing: border-box;
}

body {
    color: var(--main-color);
    font-size: 1.3em;
    font-family: sans-serif;
    display: grid;
    justify-content: center;
}

h2 {
    margin: 0;
    padding-bottom: 0.3em;
}

hr {
    border: 1px solid var(--main-color);
    border-bottom: none;
}

label {
    display: block;
}

label span {
    min-width: 9ch;
    display: inline-block;
}

input {
    border: 1px solid var(--main-color);
    color: inherit;
    padding: 0.3em;
}

.hidden {
    display: none;
}

.editing {
    background-color: var(--secondary-color) !important;
}

button,
.button {
    background-color: var(--main-color);
    border: 1px solid var(--main-color);
    color: var(--bg-color);
    cursor: pointer;
    font-size: 0.6em;
    font-weight: bold;
    margin: 0.3em 0;
    padding: 0.3em 1.3em;
    text-transform: uppercase;
    min-width: 23ch;
}

button:hover {
    background-color: var(--bg-color);
    color: var(--main-color);
}

.button {
    background-color: transparent;
    color: var(--main-color);
    cursor: pointer;
}

.button:hover {
    background-color: var(--main-color);
    color: var(--bg-color);
}
With the CSS declarations above, you’re centering the content and changing the colors and fonts of your single-page web application. You’re also adjusting the look of your input fields, buttons, and button-like elements to make them more recognizable.
Note: You’re using CSS variables for your colors. That way, you can play around with different color styles by changing only --bg-color, --main-color, and --secondary-color. Otherwise, you’d have to change the color value of every relevant element whenever you made changes to the design of your website.
You’ll use the CSS class .hidden later to hide elements with JavaScript. With .button, you’ll transform text elements to look more like clickable buttons.
Next, adjust home.html to load style.css:
<!-- home.html -->

<!DOCTYPE html>
<html lang="en">
<head>
    <meta charset="UTF-8">
    <title>RP Flask REST API</title>
    <link rel="stylesheet" href="{{ url_for('static', filename='css/style.css') }}">
</head>

<!-- ... -->
With Flask’s {{ url_for() }} template tag, you’re creating the full URL to style.css under the hood.
Navigate to http://localhost:8000 to get a first impression:
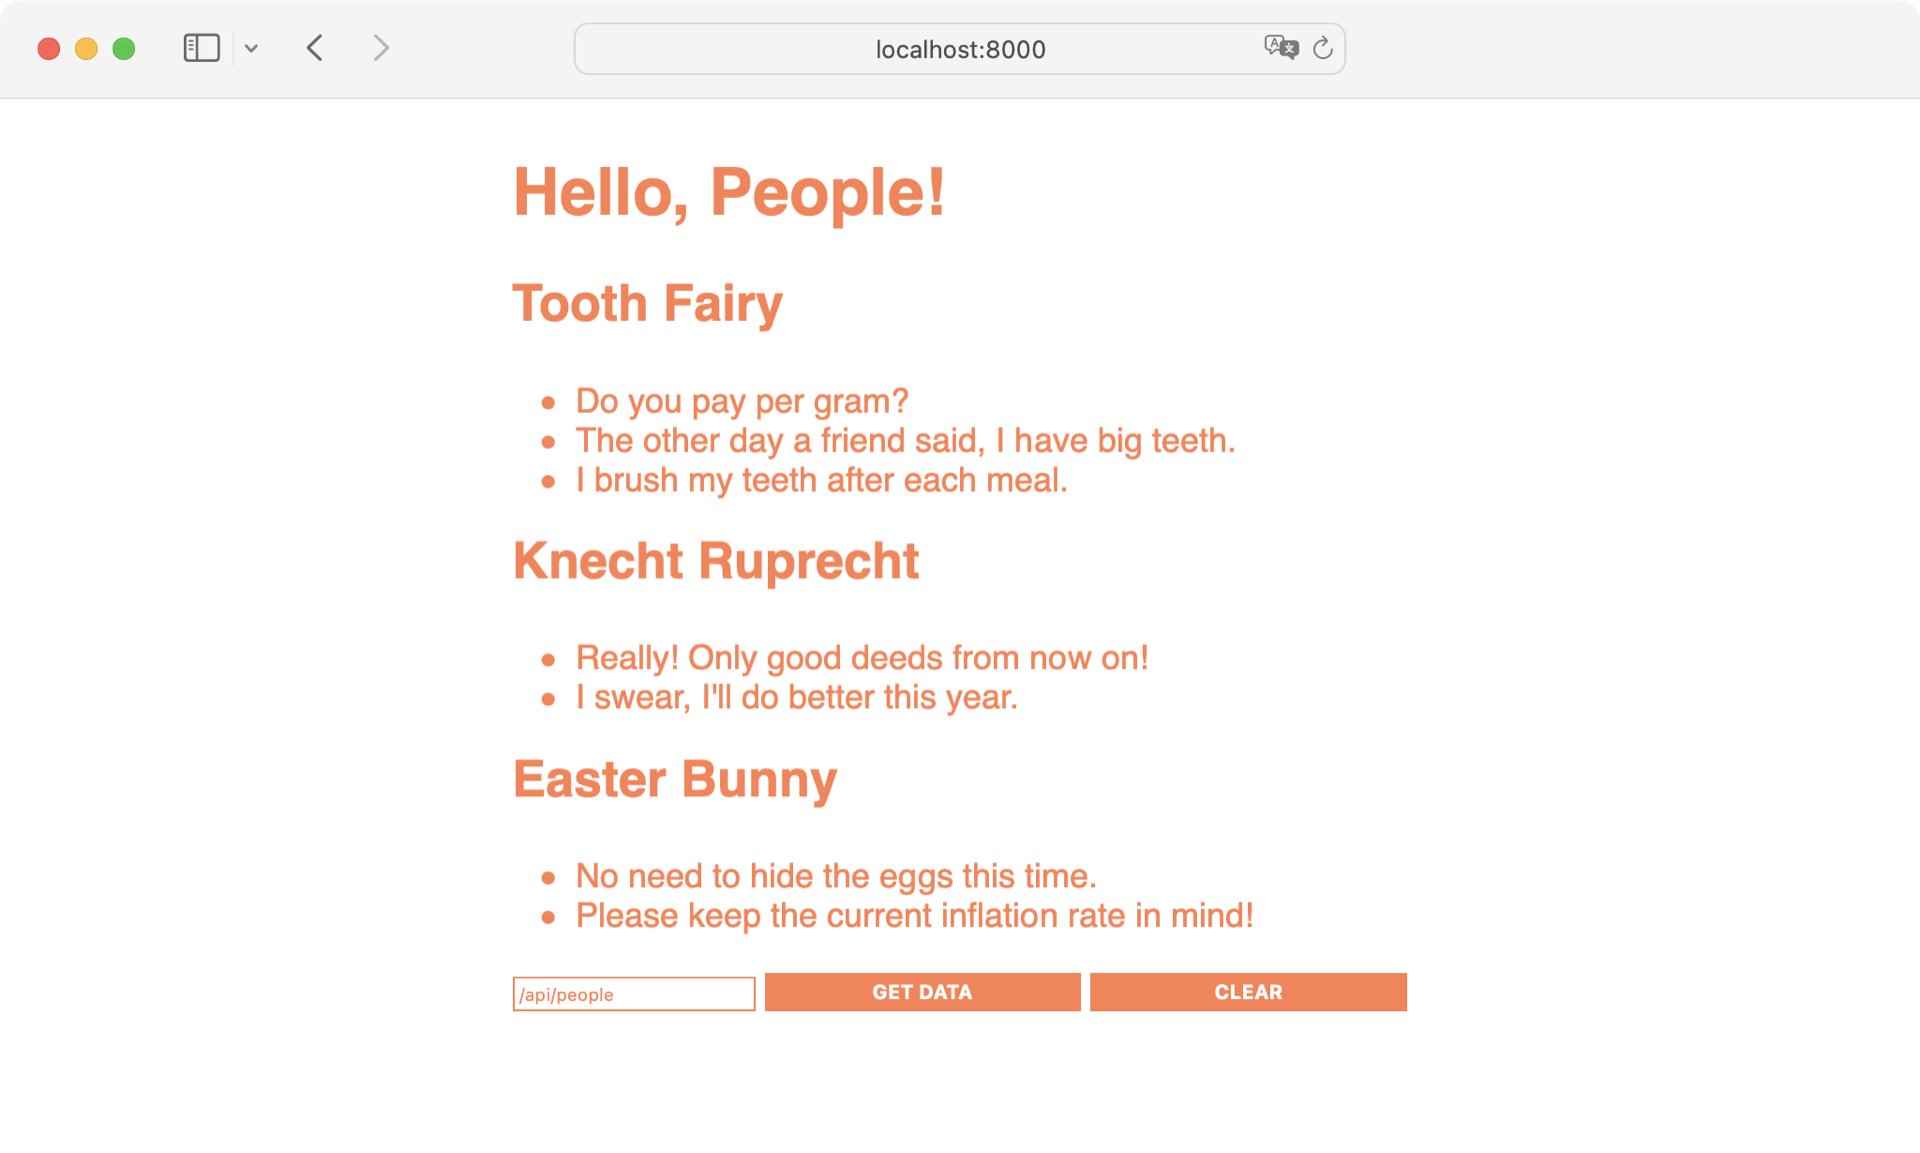
What a difference! Your home page is starting to look like a proper single-page web application. With your debug form, you’ve already got a user interface (UI) element that communicates with your REST API.
In the next section, you’ll restructure your Flask project’s JavaScript code a bit. These changes will make it more convenient to improve your website further in the upcoming sections.
Step 3: Modularize Your Flask Project’s JavaScript Code
In the previous step, you added JavaScript code directly into _debug.html. It’s good to know that you can add JavaScript to your Flask template files that way. However, it can get complicated to maintain JavaScript code that’s hidden in HTML code. In this step, you’ll split the JavaScript code of your Flask project into modules.
Create Your First External JavaScript File
Like the home.html file, which you import other templates into, you can create a JavaScript home file. This file is commonly named index.js. It’ll be the hub for any other JavaScript files that you create for your Flask project.
As you learned before, you use a static/ folder for local external resources. In parallel to the css/ folder, create a js/ folder inside of static/ to store your Flask project’s JavaScript files. Then, create a file named index.js:
// static/js/index.js

import { DebugForm } from "./debug.js";

function main() {
  if (document.querySelector(".debug-card")) {
    const debug = new DebugForm();
    debug.showResponse("");
  }
}

main();
The structure of index.js is comparable to a Python script. You have an import statement at the beginning of the file, where you reference another module. In JavaScript, this import is known as an import declaration. Below the import declaration, you create a main() function that you call at the bottom of your script.
The only time you’ll see a debug form on your page is when you’re running your Flask app in debug mode.
Consequentially, you’re conditionally instantiating DebugForm only if there’s a .debug-card element on the page inside of main().
Otherwise, there’s no need to have the debug functionality present.
Currently, DebugForm is still hard-coded into _debug.html. To make the code in index.js work, move the JavaScript code from _debug.html into a JavaScript file.
Start by removing the JavaScript code and the script tags in _debug.html:
<!-- templates/_debug.html -->

<div class="debug-card">
    <form class="debug-form">
        <input type="text" name="endpoint" value="/api/people" />
        <button data-action="read">Get Data</button>
        <button data-action="clear">Clear</button>
    </form>
    <pre>
        <code></code>
    </pre>
</div>

<style>
    pre {
        white-space: pre-wrap;
    }
</style>

<!-- Remove the script block -->
The JavaScript code that you removed from _debug.html contained getData() and DebugForm. Currently, your debug form is the only place in your single-page application where you make a request to the REST API. You may already anticipate making requests in other places, too. So, it makes sense to put the logic of making requests into its own file.
Distribute Some JavaScript Logic
Now that _debug.html doesn’t contain any JavaScript code anymore, you need to re-create the JavaScript code in other files. To match their respective purposes, you’ll name them request.js and debug.js.
Start by creating a new JavaScript file named request.js inside the js/ folder of your Flask project and paste the getData() function into it:
 1// static/js/request.js
 2
 3export function getData(endpoint, callback) {
 4  const request = new XMLHttpRequest();
 5  request.onreadystatechange = () => {
 6    if (request.readyState === 4) {
 7      callback(request.response);
 8    }
 9  };
10  request.open("GET", endpoint);
11  request.send();
12}
Note that you customize the code in line 3 by prepending the getData() function definition with an export declaration. You use export declarations to make values available in other JavaScript modules. You can think of them as the counterpart to import declarations in other JavaScript files.
Thanks to the export declaration for getData(), you can import the function in other JavaScript files. For example, you’ll do this in a file containing your debug form’s JavaScript logic.
Create a new file named debug.js in the js/ folder:
 1// static/js/debug.js
 2
 3import { getData } from "./request.js";
 4
 5export class DebugForm {
 6  constructor() {
 7    this.debugCard = document.querySelector(".debug-card");
 8    this.form = this.debugCard.querySelector(".debug-form");
 9    this.clearButton = this.form.querySelector("button[data-action='clear']");
10    this.clearButton.addEventListener(
11      "click",
12      this.handleClearClick.bind(this)
13    );
14    this.sendButton = this.form.querySelector("button[data-action='read']");
15    this.sendButton.addEventListener("click", this.handleSendClick.bind(this));
16  }
17
18  handleClearClick(event) {
19    event.preventDefault();
20    let code = this.debugCard.querySelector("code");
21    code.innerText = "";
22  }
23
24  handleSendClick(event) {
25    event.preventDefault();
26    const input = document.querySelector(".debug-card input");
27    const endpoint = input.value;
28    getData(endpoint, this.showResponse);
29  }
30
31  showResponse(data) {
32    const debugCard = document.querySelector(".debug-card");
33    let code = debugCard.querySelector("code");
34    code.innerText = data;
35  }
36}
37
38// Don't include new DebugForm();
In line 3, you’re importing getData() from request.js. After the import it, getData() is available the same way as before. Therefore, you don’t need to make any adjustments in line 28.
Like before, you use an export declaration in line 5 to make DebugForm importable in other files. You import DebugForm in index.js, where you also instantiate DebugForm(). That’s why you don’t include new DebugForm(); in line 38.
When you removed the JavaScript code from _debug.html, you disconnected your JavaScript logic from your HTML files. In the next section, you’ll reconnect them again.
Connect JavaScript With HTML
If you visited http://localhost:8000 now, you’d notice that the JavaScript functionality in your Flask app is gone. To load the external JavaScript files into the HTML, you import them in a way that’s similar to how you imported your external CSS file.
Open home.html and add a reference to index.js right before the closing </head> tag:
<!-- home.html -->

<!DOCTYPE html>
<html lang="en">
<head>
    <meta charset="UTF-8">
    <title>RP Flask REST API</title>
    <link rel="stylesheet" href="{{ url_for('static', filename='css/style.css') }}">
    <script
        src="{{ url_for('static', filename='js/index.js') }}"
        type="module"
    ></script>
</head>

<!-- ... -->
To load external JavaScript files, you use the <script> tag. Inside it, you reference index.js with a Flask {{ url_for() }} template tag, just like you did for the CSS file. That way, you dynamically create the full URL to index.js.
Hop over to http://localhost:8000 and check if your debug form works again:
Perfect, your debug form works like a charm! You can enter API endpoints into the form field and make API requests by pushing the Get Data button. That means you’ve successfully connected your external JavaScript files with your Flask templates.
Adjusting JavaScript code for your debug form gave you a first impression of how you can dynamically load content into your front end. In the next sections, you’ll use this knowledge to create people from within the comfort of your front end.
Step 4: Create People
In the previous sections, you learned how to use HTML forms and Ajax requests to interact with your API over your front end. In this section, you’ll build on what you already know and create the components to communicate with your REST API.
You’ll focus on one building block at a time. That’s very typical when you’re building a single-page web application. First, you’ll take care of the HTML structure and add new elements to your home page. Then, you’ll extend your CSS code to style the elements. Finally, you’re adding JavaScript to interact with the Flask back end.
In the end, you’ll be able to add people to or remove them from your database while staying on the same page.
The HTML
When you’re interacting with your back end, you’re sending forms in an HTTP request and getting some data back as a response. Instead of adding these forms to home.html directly, you’ll create template partials for this purpose and include them.
Before you create your new templates, adjust home.html to understand the context of these included templates:
 1<!-- templates/home.html -->
 2
 3<!DOCTYPE html>
 4<html lang="en">
 5<head>
 6    <meta charset="UTF-8">
 7    <title>RP Flask REST API</title>
 8    <link rel="stylesheet" href="{{ url_for('static', filename='css/style.css') }}">
 9    <script
10        src="{{ url_for('static', filename='js/index.js') }}"
11        type="module"
12    ></script>
13</head>
14<body>
15    <h1>
16        Hello, People!
17    </h1>
18    <!-- Replace person in people for loop with this content -->
19    <div class="person-create-card">
20        {% include "_person_create_form.html" %}
21    </div>
22    <div class="people-list">
23        {% for person in people %}
24             {% include "_person_content.html" %}
25        {% endfor %}
26    </div>
27
28    {% if config['DEBUG'] %}
29        {% include "_debug.html" %}
30    {% endif %}
31</body>
32</html>
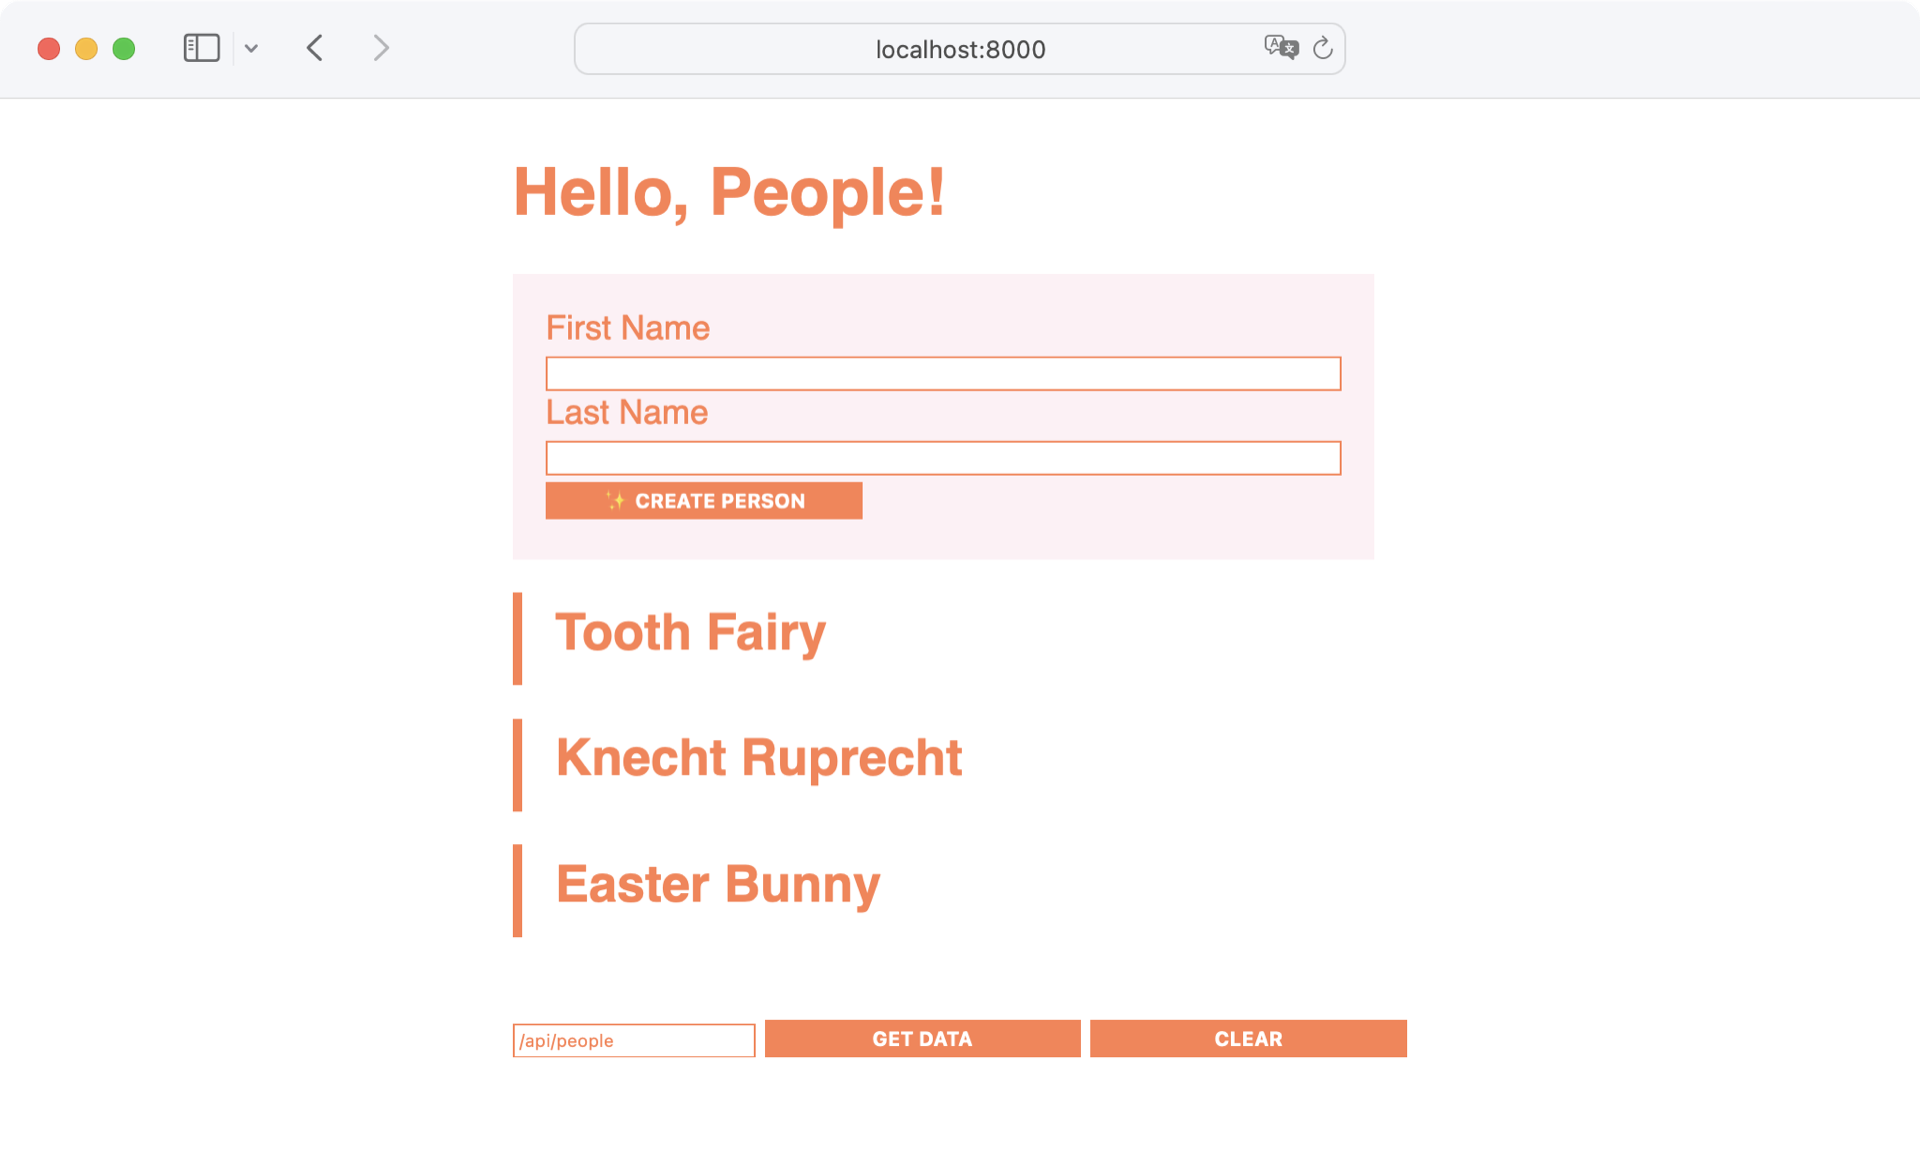
You include _person_create_form.html in line 20. You’ll use this form to create new people, as the name suggests. You show this form once after your Hello, People! headline within a <div> containing a person-create-card class attribute. This class attribute will come in handy to address the <form> element in the JavaScript code later.
The other included template is _person_content.html. You reference the template partial in line 24 within your people loop. The HTML code within _person_content.html will show up for every person in the list. The template will be capable of inheriting the particular person object for every loop step.
Now that you know where the template partials are placed, go on and create them. Start with _person_create_form.html:
<!-- templates/_person_create_form.html -->

<form>
    <label>
        <span>First Name</span>
        <input name="fname" type="text" value="" />
    </label>
    <label>
        <span>Last Name</span>
        <input name="lname" type="text" value="" />
    </label>
    <button data-action="create">✨ Create Person</button>
</form>
The form in the code above may look similar to the one you created in _debug.html because you’re following the same pattern. In the HTML, you create a form that contains the data fields you need. Later, you’ll use Ajax to send the data over.
There’s one thing that’s different from the form in _debug.html, though. Your input fields contain labels this time, so you know what data the field expects.
Note: The name attributes of the <input> elements contain the values lname and fname. The name attribute within form elements will help you to serialize your form’s data for the API request.
The button contains a create value for the data-action attribute. This allows you to address the button directly within your JavaScript code later.
Next, create _person_content.html:
<!-- templates/_person_content.html -->

<div class="person-card" data-person-id="{{ person.id }}">
    <div class="person-content">
        <h2>
            <span data-person-fname="{{ person.fname }}">{{ person.fname }}</span>
            <span data-person-lname="{{ person.lname }}">{{ person.lname }}</span>
        </h2>
    </div>
</div>
For now, only show the first and the last name of a person and no notes. Removing the notes will make it more comfortable for you to verify that the code works. No worries, you’ll add the notes later again!
Inside of <h2>, you show a person’s name just like you did before, when you displayed the people data in home.html. In _person_content.html, you’re further improving the markup around <h2>.
You use data attributes to connect your HTML elements to the data that your API expects. You could name the attributes almost any way you like. But naming them data-person-id, data-person-fname, and data-person-lname makes the connection obvious and helps you with your JavaScript code later. Additionally, you can target and style the elements in CSS with the HTML class attributes.
The CSS
Now that you have updated your HTML markup, it’s time to take care of the CSS. You’ll use the HTML class attributes to give your HTML elements specific styling.
Before you move on to add some CSS, investigate how your website looks right now:
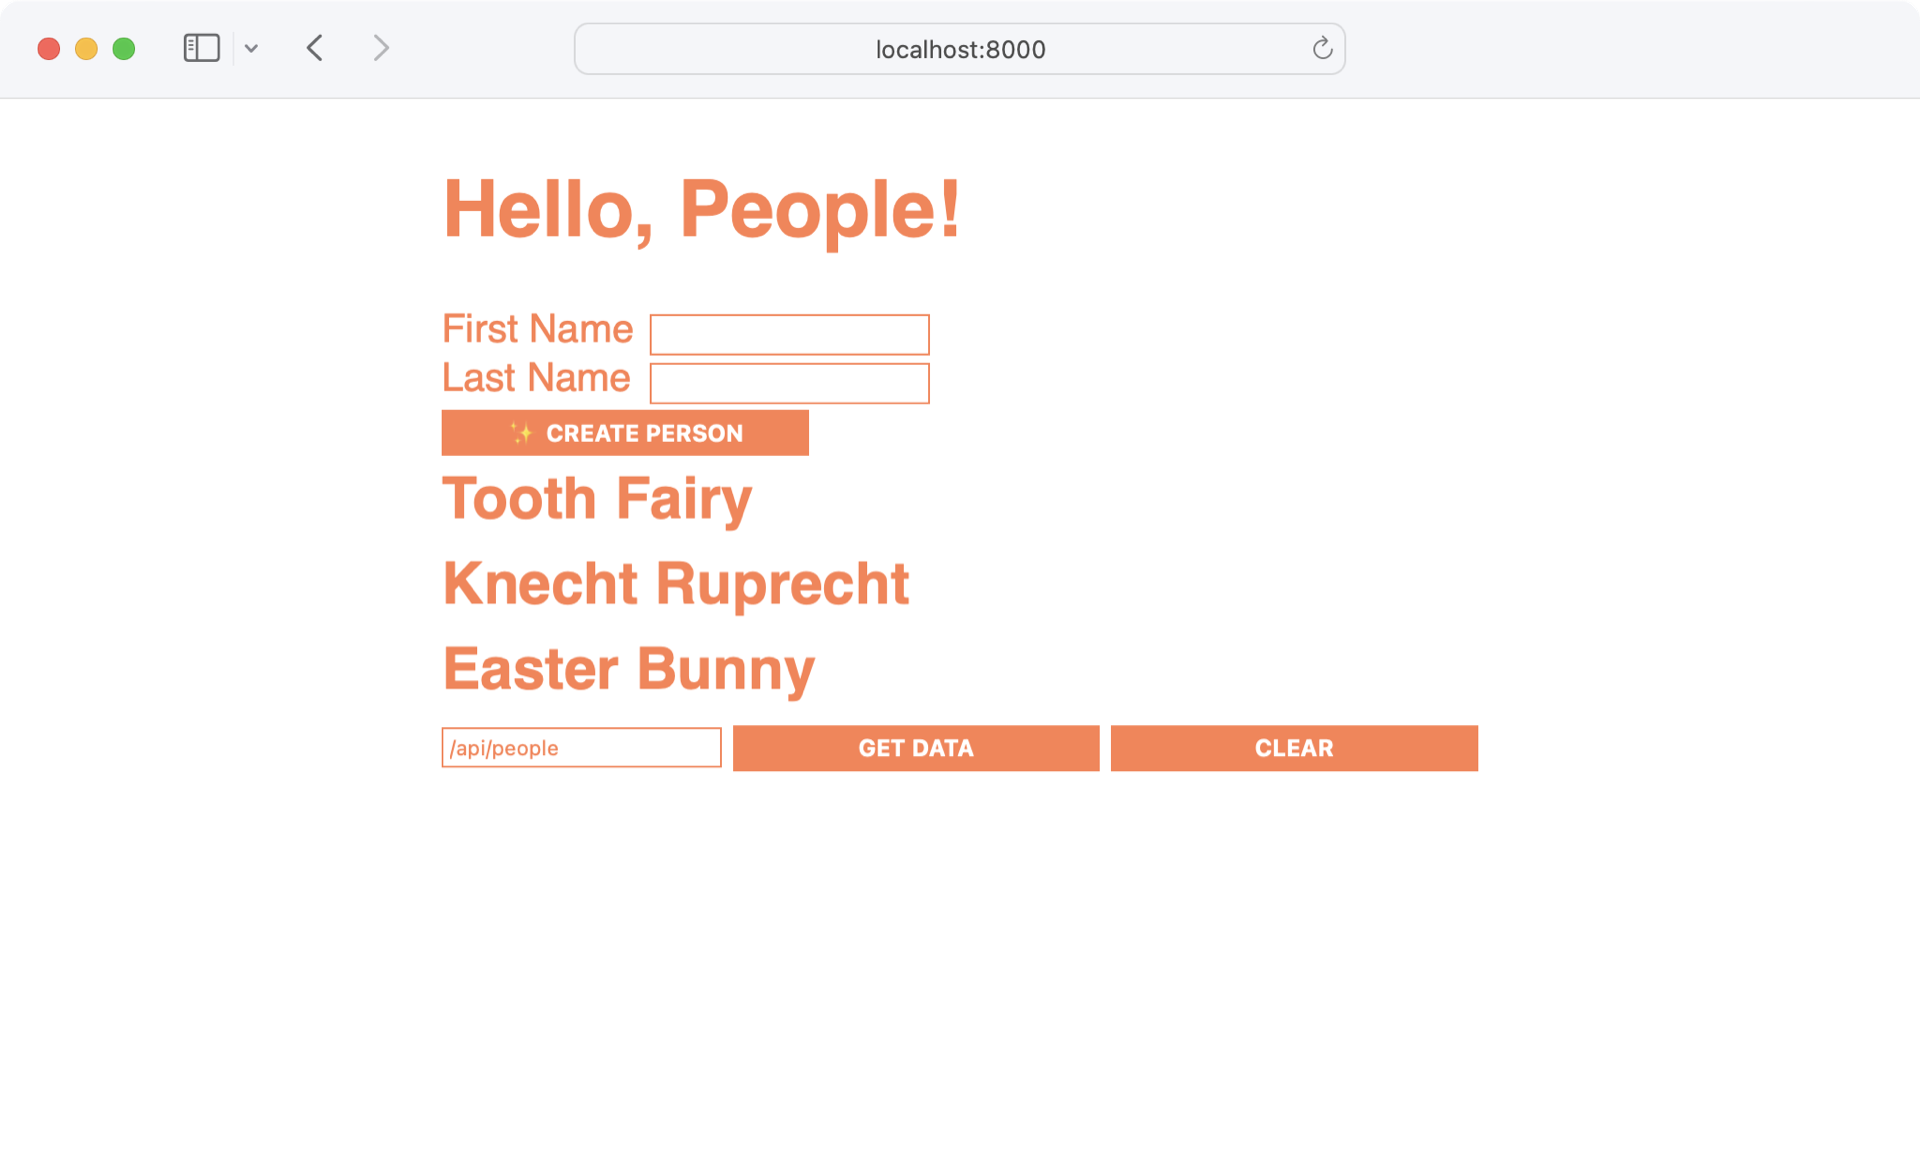
As expected, you can spot the form at the top of the page, and you don’t show the notes. Your new form element doesn’t look unstyled. That’s a good indicator that your existing CSS code is solid. However, there’s always room for improvement.
Create a new CSS file in static/css/ named people.css. This file will contain all your people-specific styles:
/* static/css/people.css */

.person-create-card {
    margin-right: 1em;
}

.person-create-card {
    background-color: var(--secondary-color);
    padding: 1em;
}

.person-create-card input {
    width: 100%;
}

.people-list {
    margin-bottom: 1.3em;
}

.person-card {
    border-left: 0.3em solid var(--main-color);
    padding: 0.3em 1em;
    margin: 1em 0;
}
To load people.css, you have to add a reference to people.css to the <head> element in home.html right below your link to style.css:
<!-- templates/home.html -->

<!DOCTYPE html>
<html lang="en">
<head>
    <meta charset="UTF-8">
    <title>RP Flask REST API</title>
    <link rel="stylesheet" href="{{ url_for('static', filename='css/style.css') }}">
    <link rel="stylesheet" href="{{ url_for('static', filename='css/people.css') }}">
    <script
        src="{{ url_for('static', filename='js/index.js') }}"
        type="module"
    ></script>
</head>

<!-- ... --->
When you load people.css after the main CSS file, then you can work with the CSS variables that you defined in style.css. To see if the styles work, open http://localhost:8000 and have a look:
Sweet! The form area is now distinguishable from the list of your people, and each person’s list element got a bit more space.
Next, you’ll add some functionality to the creation form.
The JavaScript
In your debug form, you make GET requests with the getData() function in request.js. In other words, you’re only triggering a response from a specific API endpoint. To create a new person, you must send data with your Ajax request. Commonly you do this with POST requests.
So that you can also send a POST request to the API, open request.js and add another Ajax function to it:
 1// static/js/request.js
 2
 3// ...
 4
 5export function sendForm(form, action, endpoint, callback) {
 6  const formData = new FormData(form);
 7  const dataJSON = JSON.stringify(Object.fromEntries(formData));
 8
 9  const request = new XMLHttpRequest();
10  request.onreadystatechange = () => {
11    if (request.readyState === 4) {
12      callback(request.response, form);
13    }
14  };
15  request.open(action, endpoint);
16  request.setRequestHeader("Content-Type", "application/json");
17  request.send(dataJSON);
18}
When you compare sendForm() with getData(), which you defined in the Sprinkle in Some JavaScript section, then you can spot four differences:
- Besides
endpointandcallback,sendForm()accepts the parametersformandactionin line 5. - In lines 6 and 7, you create a JSON object by serializing your form data.
- You set the request’s content type to JSON in line 16.
- In line 17, you hand over
dataJSONtorequest.send().
With sendForm(), your project contains a flexible Ajax function that can work with any endpoints that accept JSON data.
Create a new file named people.js to build the controller classes for the people-related elements. These classes will manage the people lists and the creation form, as well as dispatching requests to your REST API:
 1// static/js/people.js
 2
 3import { sendForm } from "./request.js";
 4
 5export class People {
 6  constructor() {
 7    this.allPeopleCards = document.querySelectorAll(".person-card");
 8    this.activateCreateForm();
 9  }
10
11  activateCreateForm() {
12    const peopleForm = document.querySelector(".person-create-card form");
13    new CreatePersonForm(peopleForm);
14  }
15}
16
17class CreatePersonForm {
18  constructor(el) {
19    this.form = el;
20    this.createButton = el.querySelector("button[data-action='create']");
21    this.createButton.addEventListener(
22      "click",
23      this.handleCreateClick.bind(this)
24    );
25  }
26
27  handleCreateClick(event) {
28    event.preventDefault();
29    sendForm(this.form, "POST", "/api/people", this.addPersonToList);
30    this.form.reset();
31  }
32
33  addPersonToList(rawData) {
34    const data = JSON.parse(rawData);
35
36    const personCard = document.querySelector(".person-card").cloneNode(true);
37    const personContent = personCard.querySelector(".person-content");
38
39    const personFirstName = personContent.querySelector("[data-person-fname]");
40    personFirstName.textContent = data.fname;
41    personFirstName.setAttribute("data-person-fname", data.fname);
42
43    const personLastName = personContent.querySelector("[data-person-lname]");
44    personLastName.textContent = data.lname;
45    personLastName.setAttribute("data-person-lname", data.lname);
46
47    personCard.setAttribute("data-person-id", data.id);
48    document.querySelector(".people-list").appendChild(personCard);
49  }
50}
In people.js, you’re working with the classes People and CreatePersonForm. You’ll extend People later. For now, its only purpose is to activate the creation form. You do so by calling .activateCreateForm() in line 8.
In .activateCreateForm(), you’re looking for the form within .person-create-card and setting it to peopleForm in line 12. In line 13, you’re instantiating CreatePersonForm with peopleForm as an argument.
In CreatePersonForm, you’re connecting createButton to handleCreateClick(). When you click the button, then you make a POST request to the API in line 29.
After the API request is done, you clear the form input fields with .reset() in line 30.
The callback function of sendForm() in line 29 is .addPersonToList(), which you define in line 33. When .addPersonToList() executes, you clone the first .person-card as a personCard template and add the new person’s data. In line 48, you add personCard to your list of people.
To use people.js, you must add it to index.js and instantiate People:
// static/js/index.js

import { People } from "./people.js";
import { DebugForm } from "./debug.js";

function main() {
  new People();
  if (document.querySelector(".debug-card")) {
    const debug = new DebugForm();
    debug.showResponse("");
  }
}

main();
The index.js file is the hub for all your JavaScript files in the Flask project. By importing People from people.js and instantiating it inside of main(), you’ve done all the work to connect your website with the functionality to create a new person.
Open http://localhost:8000 and try out your new functionality:
Awesome, you can now add a new person to your database from within the comfort of your front end. When you click the Create Person button, you call the REST API. With the data you get back, you’re adding a new person card to the list of people.
Still, the notes for your people are missing. In the next section, you’ll follow a similar path to show the notes in the front end.
Step 5: Create Notes
In the previous section, you removed the notes to focus on creating new people. In this section, you’ll show the notes for each person. You’ll also add the functionality of creating new notes in the front end.
The HTML
In this section, you’ll create two new template partials. The first template contains a form to create new notes. The second template will display the content of a note.
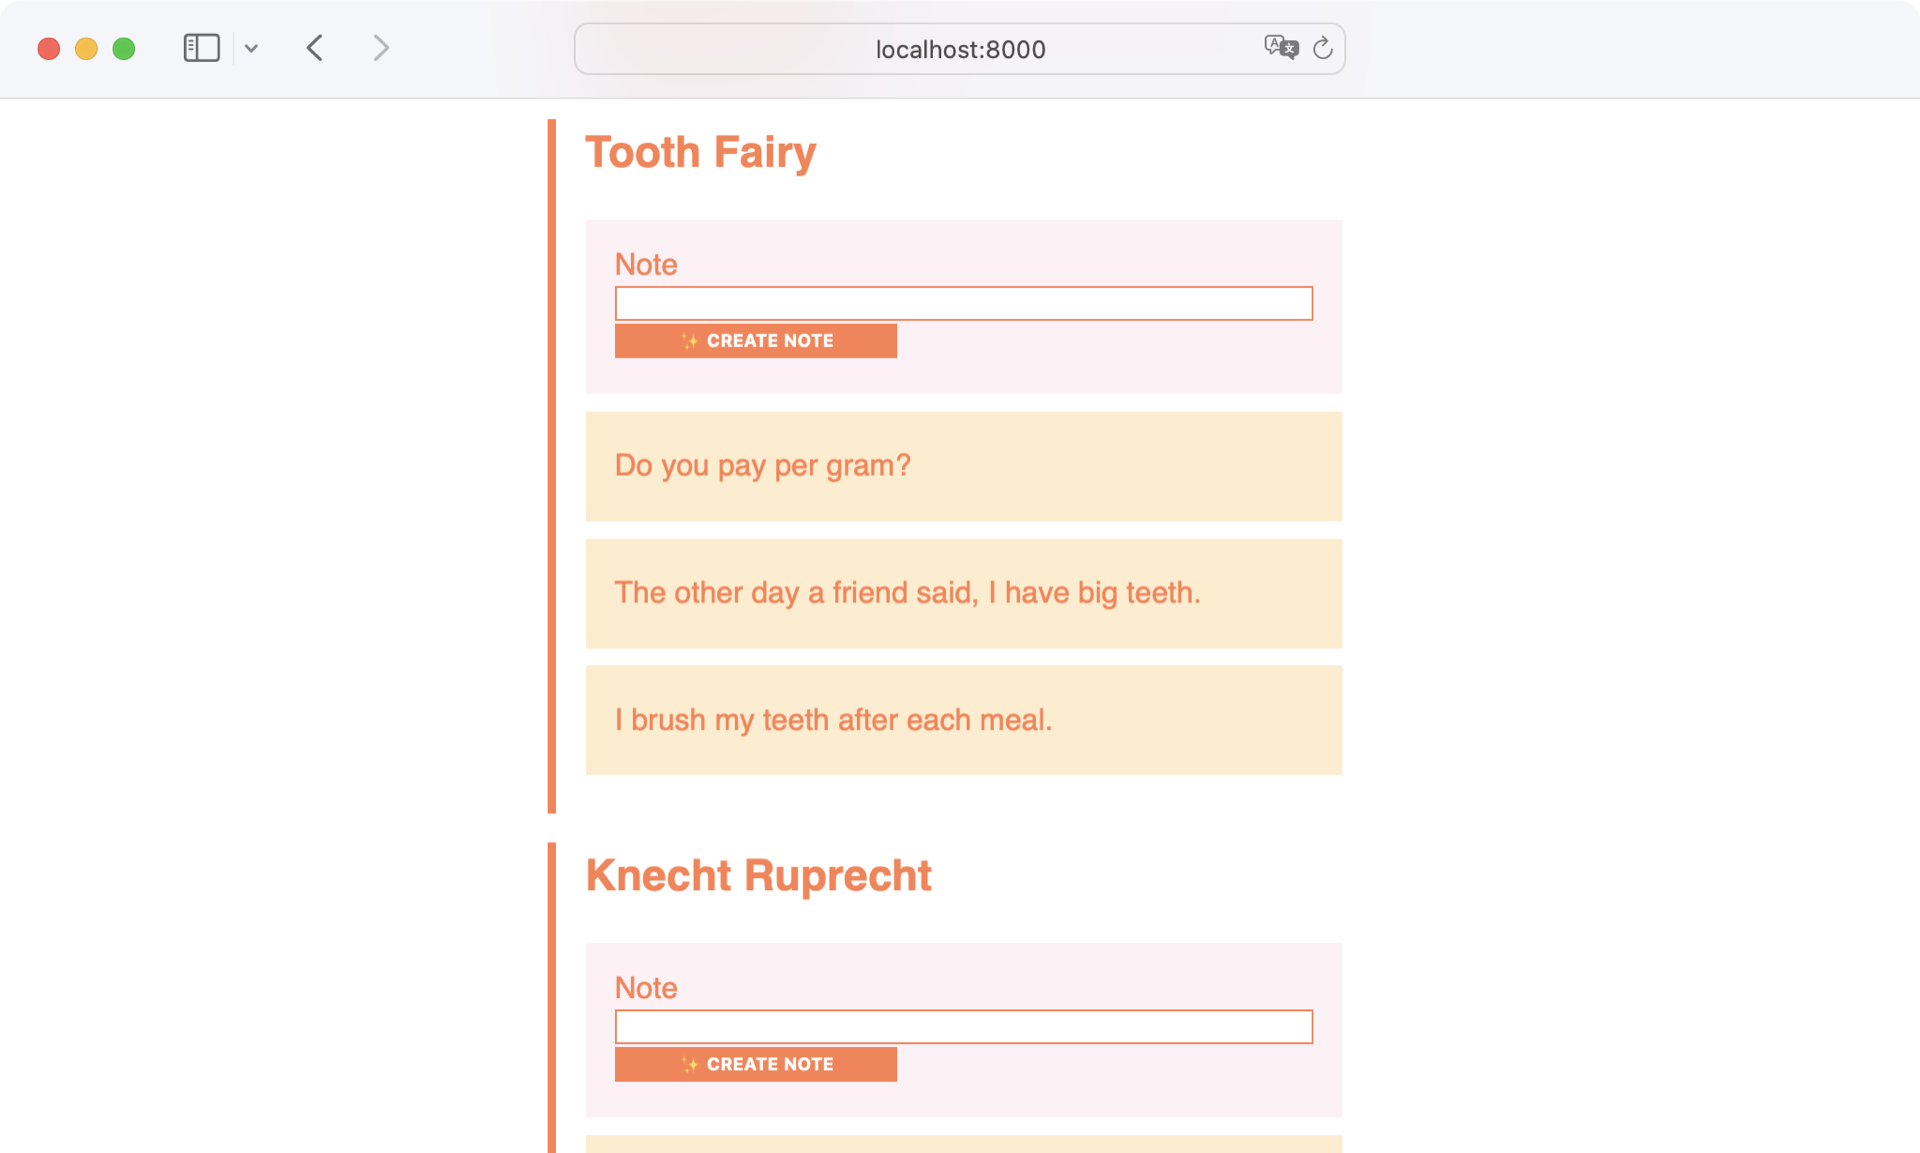
Before you create the new templates, start by extending _person_content.html:
 1<!-- templates/_person_content.html -->
 2
 3<div class="person-card" data-person-id="{{ person.id }}">
 4    <div class="person-content">
 5        <h2>
 6            <span data-person-fname="{{ person.fname }}">{{ person.fname }}</span>
 7            <span data-person-lname="{{ person.lname }}">{{ person.lname }}</span>
 8        </h2>
 9    </div>
10    <ul class="note-list">
11        <li class="note-create-card">
12            {% include "_note_create_form.html" %}
13        </li>
14        {% for note in person.notes %}
15            {% include "_note_content.html" %}
16        {% endfor %}
17    </ul>
18</div>
In line 10, you add the <ul> element that’ll contain your notes. The first item of the notes list is the form to create new notes. You’ll define the form in _note_create_form.html, which you include in line 12.
In line 14, you loop through all the notes that a person contains. For each note, you include the _note_content.html template partial in line 15.
Next, create _note_create_form.html in your templates/ directory:
 1<!-- templates/_note_create_form.html -->
 2
 3<form>
 4    <input name="person_id" type="hidden" value="{{ person.id }}" />
 5    <label>
 6        <span>Note</span>
 7        <input name="content" type="text" value="" />
 8    </label>
 9    <button data-action="create">✨ Create Note</button>
10</form>
Since you’re including _note_create_form.html in _person_content.html, you can work with the person object in line 4.
The ID of a person is important for connecting the note to the right person in the database. That’s why you need it in the form. But you don’t need to see this information in the front end. That’s why you set the input type to "hidden".
Other than that, the form looks similar to the form that you use to create people. You have an input field that stores the data that you’ll send over to the API with the push of a button.
Next, create the _note_content.html template:
<!-- templates/_note_content.html -->

<li class="note-card" data-note-id="{{ note.id }}">
    <div class="note-content">{{ note.content }}</div>
</li>
With both templates finished, check out http://localhost:8000 to see the notes:

Both templates inherit the data from the parent template and render under each person. Still, you can improve the style of the notes a bit.
The CSS
At the moment, the form to create notes looks lost between a person’s name and the list of notes. Just like you did with people.css, create a separate CSS file named notes.css in static/css/:
/* static/css/notes.css */

.note-create-card {
    background-color: var(--secondary-color);
    padding: 1em;
}

.note-create-card input {
    width: 100%;
}

.note-list {
    list-style: none;
    padding-left: 0;
}

.note-card {
    background-color: blanchedalmond;
    padding: 1em;
    margin: 0.6em 0;
}

.note-content {
    padding: 0.3em 0;
}
After you create the CSS file, you need to reference it in home.html:
<!-- templates/home.html -->

<!DOCTYPE html>
<html lang="en">
<head>
    <meta charset="UTF-8">
    <title>RP Flask REST API</title>
    <link rel="stylesheet" href="{{ url_for('static', filename='css/style.css') }}">
    <link rel="stylesheet" href="{{ url_for('static', filename='css/people.css') }}">
    <link rel="stylesheet" href="{{ url_for('static', filename='css/notes.css') }}">
    <script
        src="{{ url_for('static', filename='js/index.js') }}"
        type="module"
    ></script>
</head>

<!-- ... --->
With the updated styles in place and the reference in home.html, hop over to the browser and open http://localhost:8000:
Your notes look good! The form to create new notes is visually distinguishable from the existing notes. Read on to enhance your good-looking notes display with some JavaScript functionality.
The JavaScript
Just like you did for people, it makes sense to create a new JavaScript file in your Flask project to contain the functionality for handling your notes.
Name it notes.js and store it with the content below in static/js/:
 1// static/js/notes.js
 2
 3import { sendForm } from "./request.js";
 4
 5export class Notes {
 6  constructor() {
 7    this.allNoteLists = document.querySelectorAll(".note-list");
 8    this.allNotes = document.querySelectorAll(".note-card");
 9    this.activateAllCreateForms();
10  }
11
12  activateAllCreateForms() {
13    this.allNoteLists.forEach((noteList) => {
14      const personCard = noteList.closest(".person-card");
15      const personID = personCard.getAttribute("data-person-id");
16      new NoteCreateForm(noteList, personID);
17    });
18  }
19}
20
21export class NoteCreateForm {
22  constructor(noteList, personID) {
23    this.noteList = noteList;
24    this.personID = personID;
25    this.form = this.noteList.querySelector(".note-create-card form");
26    this.createButton = this.form.querySelector(
27      "button[data-action='create']"
28    );
29    this.createButton.addEventListener(
30      "click",
31      this.handleCreateClick.bind(this)
32    );
33    this.connectPerson();
34  }
35
36  connectPerson() {
37    let fieldPersonID = this.form.querySelector("input[name='person_id']");
38    fieldPersonID.setAttribute("value", this.personID);
39  }
40
41  handleCreateClick(event) {
42    event.preventDefault();
43    sendForm(this.form, "POST", "/api/notes", this.addNoteToList);
44    this.form.reset();
45  }
46
47  addNoteToList(rawData) {
48    const data = JSON.parse(rawData);
49    const noteList = document
50      .querySelector("[data-person-id= '" + data.person_id + "']")
51      .querySelector(".note-list");
52    const newNoteCard = document.querySelector(".note-card").cloneNode(true);
53    newNoteCard.querySelector(".note-content").textContent = data.content;
54    newNoteCard.setAttribute("data-note-id", data.id);
55    noteList.insertBefore(newNoteCard, noteList.children[1]);
56  }
57}
The structure of notes.js is similar to people.js. Again, you’re working with two classes:
NotesNoteCreateForm
The purpose of Notes is to activate the creation form. You do so by calling .activateAllCreateForms() in line 9.
In .activateAllCreateForms(), you’re looping through all the note lists. For each note list that you find, you’re selecting the .person-card element that the note list is in and getting the corresponding personID.
In line 16, you’re instantiating NoteCreateForm with noteList and personID as arguments.
In NoteCreateForm, you’re connecting createButton to .handleCreateClick() in line 31. In line 33, you call .connectPerson() to make sure that the ID of the creation form matches the targeted person.
When you click the Create button, then you make a POST request to the API in line 43. If the API request is done, then you clear the form input fields with .reset() in line 44.
The callback function of sendForm() in line 43 is .addNoteToList(), which you define in line 47. When .addNoteToList() executes, then you select the first .note-card of your document in line 52. This is the note card of another person. That’s why you need to adjust its contents and attributes after cloning it in lines 53 and 54.
Finally, you add noteCard to noteList in line 55. However, you don’t append it to the end of the list, as you did with personCard in personList. Instead, you’re using .children[1] to add noteCard at index 1. That’s right after the note creation form, which is at the first position, index 0, of your noteList.
Before you can check if creating notes now works, you must add notes.js to index.js:
// static/js/index.js

import { People } from "./people.js";
import { Notes } from "./notes.js";
import { DebugForm } from "./debug.js";

function main() {
  new People();
  new Notes();
  if (document.querySelector(".debug-card")) {
    const debug = new DebugForm();
    debug.showResponse("");
  }
}

main();
You add the link to notes.js right after the link to the people.js file. Once the changes are in place, check out how your single-page web application works:
Fantastic, you can now create people and notes! Before you read on, play around with your front end a bit more. Showing the notes of people unveiled a bug that your code contains. Can you spot it?
Step 6: Edit a Person
In this step of the tutorial, you’ll enhance your front end to make people editable. So if you mistype a person’s name, then you can edit it afterward. You’ll also add the functionality to remove a person if you don’t want one on your list anymore.
However, before you add more functionality to your single-page web application, you need to address a bug first.
The Bug
You may have added a new person successfully when you weren’t displaying the notes yet. At that point, everything looked fine. But now that you’re also showing the notes, you’ve unveiled an interesting bug. Visit http://localhost:8000, create a new person, and see what happens:
When creating a new person, you’re currently copying the notes from an existing person with it. Instead, you want an empty note list.
To fix this bug, head over to people.js and adjust .addPersonToList():
 1// static/js/people.js
 2
 3import { sendForm } from "./request.js";
 4import { NoteCreateForm } from "./notes.js";
 5
 6// ...
 7
 8class CreatePersonForm {
 9
10  //...
11
12  addPersonToList(rawData) {
13    const data = JSON.parse(rawData);
14
15    const personCard = document.querySelector(".person-card").cloneNode(true);
16    const personContent = personCard.querySelector(".person-content");
17
18    const personFirstName = personContent.querySelector("[data-person-fname]");
19    personFirstName.textContent = data.fname;
20    personFirstName.setAttribute("data-person-fname", data.fname);
21
22    const personLastName = personContent.querySelector("[data-person-lname]");
23    personLastName.textContent = data.lname;
24    personLastName.setAttribute("data-person-lname", data.lname);
25
26    personCard.setAttribute("data-person-id", data.id);
27    personCard
28      .querySelectorAll(".note-card")
29      .forEach((noteCard) => noteCard.remove());
30    new NoteCreateForm(personCard.querySelector(".note-list"), data.id);
31    document.querySelector(".people-list").appendChild(personCard);
32  }
33}
When you create a new person, you copy the data of an existing person in line 12. To avoid copying the existing notes along with the person, you delete them in lines 27 to 29.
Finally, you’re instantiating a new NoteCreateForm in line 30, which you import in line 4. That way, you ensure that the note-creation form connects to the right person.
Visit http://localhost:8000 to see if everything works as expected:
What a relief! When you create a new person, there are no notes that belong to another person. Instead, you can now create new notes for the new person without problems.
Now that the bug is out of the way, you can focus on adding features to your single-page web application. You start with the HTML to add edit controls to a person.
The HTML
To edit a person, you need to have a control element for each person. Before you create the HTML for the control element, open the existing _person_content.html file and create a reference to your new file:
<!-- templates/_person_content.html -->

<div class="person-card" data-person-id="{{ person.id }}">
    {% include "_person_control.html" %}
    <div class="person-content">
        <!-- ... -->
    </div>
    <ul class="note-list">
        <!-- ... -->
    </ul>
</div>
You want to show the controls to edit a person inside of each person’s card. Like before, you’re referencing another partial. This nesting pattern enables you to separate concerns. This dedicated file is named _person_control.html. Go on and create it with the content below:
<!-- templates/_person_control.html -->

<div class="person-control-card">
    <a class="button toggle-control">✍️ Edit</a>
    <div class="person-control hidden">
        <form class="person-form">
            <input name="id" type="hidden" value="" />
            <label>
                <span>First Name</span>
                <input name="fname" type="text" value="" />
            </label>
            <label>
                <span>Last Name</span>
                <input name="lname" type="text" value="" />
            </label>

            <button data-action="update">💫 Update Person</button>
            <hr />
            <button data-action="cancel">👈 Cancel</button>
            <button data-action="delete">❌ Delete Person</button>
        </form>
    </div>
</div>
The form looks similar to the form that you use to create a person. However, the data-action attributes now refer to update and delete actions that you’ll create within your JavaScript code in a bit.
You’ll also use JavaScript to populate input fields to see a person’s current first and last name. For now, it’s okay to instantiate them empty.
Note: If you visit your REST API front end right now, then you won’t see the control form. The reason for this is the hidden class that you’ve added to the person-control element. Later, you’ll use the hidden class to toggle the visibility of your form with JavaScript.
The two other buttons will help you to toggle the control form. Later, only the Edit button will show. Pressing it will toggle the control form. When you click Cancel, you’ll hide the form again without performing any actions.
The CSS
Once the HTML code is in place, it’s time to adjust some CSS code. Your HTML markup introduced a person-control-card element that inherits some styling. To make it look even better, enhance your CSS in people.css:
 1/* static/css/people.css */
 2
 3.person-control-card {
 4    text-align: right;
 5}
 6
 7.person-control {
 8    text-align: left;
 9}
10
11.person-create-card {
12    margin-right: 1em;
13}
14
15.person-create-card,
16.person-control-card.editing {
17    background-color: var(--secondary-color);
18    padding: 1em;
19}
20
21.person-create-card input,
22.person-control-card input {
23    width: 100%;
24}
25
26.people-list {
27    margin-bottom: 1.3em;
28}
29
30.person-card {
31    border-left: 0.3em solid var(--main-color);
32    padding: 0.3em 1em;
33    margin: 1em 0;
34}
Some of the stylings that you introduce won’t be visible right away. For example, the editing class in line 16 will be a dynamic class that you toggle with JavaScript when you click the Edit button. Only then does the control card receive the secondary-color background.
The JavaScript
The JavaScript that you’re about to write will add and remove some CSS classes. Other than that, you’ll also connect the control form with your API.
Open people.js and create a new PersonControl class:
// static/js/people.js

// ...

class PersonControl {
  constructor(personCard) {
    this.personCard = personCard;
    this.personElement = this.personCard.querySelector(".person-content");
    this.personControl = this.personCard.querySelector(".person-control");
    this.personID = this.personCard.getAttribute("data-person-id");
    this.form = this.personCard.querySelector("form");

    this.editBtn = this.personCard.querySelector(".toggle-control");
    this.editBtn.addEventListener("click", this.handleEditClick.bind(this));
    this.cancelBtn = this.personCard.querySelector("[data-action='cancel']");
    this.cancelBtn.addEventListener(
      "click",
      this.handleCancelClick.bind(this)
    );
    this.deleteBtn = this.personCard.querySelector("[data-action='delete']");
    this.deleteBtn.addEventListener(
      "click",
      this.handleDeleteClick.bind(this)
    );
    this.updateBtn = this.personCard.querySelector("[data-action='update']");
    this.updateBtn.addEventListener(
      "click",
      this.handleUpdateClick.bind(this)
    );

    this.fillControlForm();
  }

  handleEditClick(event) {
    event.preventDefault();
    this.personCard
      .querySelector(".person-control-card")
      .classList.add("editing");
    this.personElement.classList.add("hidden");
    this.editBtn.classList.add("hidden");
    this.personControl.classList.remove("hidden");
  }

  handleCancelClick(event) {
    event.preventDefault();
    this.personCard
      .querySelector(".person-control-card")
      .classList.remove("editing");
    this.personElement.classList.remove("hidden");
    this.editBtn.classList.remove("hidden");
    this.personControl.classList.add("hidden");
  }

  handleDeleteClick(event) {
    event.preventDefault();
    const endpoint = "/api/people/" + this.personID;
    sendForm(this.form, "DELETE", endpoint, (data, inputForm) => {
      let personCard = inputForm.closest(".person-card");
      if (window.confirm("Do you really want to remove this person?")) {
        personCard.remove();
      }
    });
  }

  handleUpdateClick(event) {
    event.preventDefault();
    const endpoint = "/api/people/" + this.personID;
    sendForm(this.form, "PUT", endpoint, this.updatePersonInList);
    this.cancelBtn.click();
  }

  updatePersonInList(rawData, inputForm) {
    const data = JSON.parse(rawData);
    const personCard = inputForm.closest(".person-card");

    const personFirstName = personCard.querySelector("[data-person-fname]");
    personFirstName.textContent = data.fname;
    personFirstName.setAttribute("data-person-fname", data.fname);

    const personLastName = personCard.querySelector("[data-person-lname]");
    personLastName.textContent = data.lname;
    personLastName.setAttribute("data-person-lname", data.lname);
  }

  fillControlForm() {
    const personFirstName = this.personElement.querySelector(
      "[data-person-fname]"
    ).textContent;
    const personLastName = this.personElement.querySelector(
      "[data-person-lname]"
    ).textContent;
    this.form
      .querySelector("[name='id']")
      .setAttribute("value", this.personID);
    this.form
      .querySelector("[name='fname']")
      .setAttribute("value", personFirstName);
    this.form
      .querySelector("[name='lname']")
      .setAttribute("value", personLastName);
  }
}
To activate PersonControl, you need to instantiate it in your People class when you create a new person:
 1// static/js/people.js
 2
 3export class People {
 4  constructor() {
 5    this.allPeopleCards = document.querySelectorAll(".person-card");
 6    this.activateCreateForm();
 7    this.activateAllControls();
 8  }
 9
10  activateCreateForm() {
11    const peopleForm = document.querySelector(".person-create-card form");
12    new CreatePersonForm(peopleForm);
13  }
14
15  activateAllControls() {
16    this.allPeopleCards.forEach((personCard) => {
17      new PersonControl(personCard);
18    });
19  }
20}
21
22class CreatePersonForm {
23  // ...
24
25  addPersonToList(rawData) {
26    const data = JSON.parse(rawData);
27
28    const personCard = document.querySelector(".person-card").cloneNode(true);
29    const personContent = personCard.querySelector(".person-content");
30
31    const personFirstName = personContent.querySelector("[data-person-fname]");
32    personFirstName.textContent = data.fname;
33    personFirstName.setAttribute("data-person-fname", data.fname);
34
35    const personLastName = personContent.querySelector("[data-person-lname]");
36    personLastName.textContent = data.lname;
37    personLastName.setAttribute("data-person-lname", data.lname);
38
39    personCard.setAttribute("data-person-id", data.id);
40    personCard
41      .querySelectorAll(".note-card")
42      .forEach((noteCard) => noteCard.remove());
43    new PersonControl(personCard);
44    new NoteCreateForm(personCard.querySelector(".note-list"), data.id);
45    document.querySelector(".people-list").appendChild(personCard);
46  }
47}
48
49// ...
With the JavaScript code for the control form in place, it’s time to check out the final state of your Flask REST API front end. Open the browser and visit http://localhost:8000/:
Fantastic, you have a functional and good-looking single-page web application! You can create, edit, and delete people and add notes to each person. All your UI updates appear conveniently in place without a page reload.
Conclusion
You’ve covered a great deal of new ground and should be proud of what you’ve learned! It can be tricky to jump back and forth between Python and JavaScript to create a complete Flask single-page application.
In this tutorial, you’ve learned how to:
- Navigate a full-stack web development workflow
- Structure an HTML file to act as the template of a single-page web application
- Leverage the Jinja templating engine to render dynamic content
- Use CSS to style the presentation of an application
- Write JavaScript to add interactivity to an application
- Leverage Ajax to make HTTP requests to the REST API
As a Python developer, you usually take care of the back-end parts of an application. But it may still be valuable to know your way around HTML, CSS, and JavaScript when you create Flask apps.
Free Source Code: Click here to download the free source code that you’ll use to build a front end for your Flask REST API single-page web application.
Next Steps
It’s impressive what your JavaScript-powered Flask REST API front end can already do. Of course, there are always opportunities for improvement. If you want to continue to work on your single-page web application, then here are some enhancement ideas:
- Add a control form to update or delete notes
- Restyle the CSS to your own taste
- Show creation and modification dates for people and notes
- Implement pagination for your front end
If you’ve enhanced your single-page web application, then make sure to let the Real Python community know in the comments below!