In part 1 of this series, you learned the fundamentals of Django models and views. In part 2, you learned about user management. In this tutorial, you’ll see how to combine these concepts to do Django view authorization and restrict what users can see and do in your views based on their roles.
Allowing users to log in to your website solves two problems: authentication and authorization. Authentication is the act of verifying a user’s identity, confirming they are who they say they are. Authorization is deciding whether a user is allowed to perform an action. The two concepts go hand in hand: if a page on your website is restricted to logged-in users, then users have to authenticate before they can be authorized to view the page.
Django provides tools for both authentication and authorization. Django view authorization is typically done with decorators. This tutorial will show you how to use these view decorators to enforce authorized viewing of pages in your Django site.
By the end of this tutorial you’ll know how to:
- Use
HttpRequestandHttpRequest.userobjects - Authenticate and authorize users
- Differentiate between regular, staff, and admin users
- Secure a view with the
@login_requireddecorator - Restrict a view to different roles with the
@user_passes_testdecorator - Use the Django messages framework to notify your users
Getting Started
To better understand authorization, you’ll need a project to experiment with. The code in this tutorial is very similar to that shown in part 1 and part 2. You can follow along by downloading the sample code from the link below:
Get the Source Code: Click here to get the source code you’ll use to learn about Django view authorization in this tutorial.
All the demonstration code was tested with Python 3.8 and Django 3.0.7. It should work with other versions, but there may be subtle differences.
Creating a Project
First, you’ll need to create a new Django project. Since Django isn’t part of the standard library, it’s considered best practice to use a virtual environment. Once you have the virtual environment, you’ll need to take the following steps:
- Install Django.
- Create a new project.
- Create an app inside the project.
- Add a templates directory to the project.
- Create a site superuser.
To accomplish all that, use the following commands:
$ python -m pip install django==3.0.7
$ django-admin startproject Blog
$ cd Blog
$ python manage.py startapp core
$ mkdir templates
$ python manage.py migrate
$ python manage.py createsuperuser
Username: superuser
Email address: superuser@example.com
Password:
Password (again):
You now have a Blog project, but you still need to tell Django about the app you created and the new directory you added for templates. You can do this by modifying the Blog/settings.py file, first by changing INSTALLED_APPS:
INSTALLED_APPS = [
    "django.contrib.admin",
    "django.contrib.auth",
    "django.contrib.contenttypes",
    "django.contrib.sessions",
    "django.contrib.messages",
    "django.contrib.staticfiles",
    "core",
]
The highlighted line indicates the addition of the core app to the list of installed apps. Once you’ve added the app, you need to modify the TEMPLATES declaration:
TEMPLATES = [
    {
        "BACKEND": "django.template.backends.django.DjangoTemplates",
        "DIRS": [os.path.join(BASE_DIR, "templates")],
        "APP_DIRS": True,
        "OPTIONS": {
            "context_processors": [
                "django.template.context_processors.debug",
                "django.template.context_processors.request",
                "django.contrib.auth.context_processors.auth",
                "django.contrib.messages.context_processors.messages",
            ],
        },
    },
]
The highlighted line indicates the change you need to make. It modifies the DIRS list to include your templates folder. This tells Django where to look for your templates.
Note: Django 3.1 has moved from using the os library to pathlib and no longer imports os by default. If you’re using Django 3.1, then you need to either add import os above the TEMPLATES declaration or convert the "DIRS" entry to use pathlib instead.
The sample site you’ll be working with is a basic blogging application. The core app needs a models.py file to contain the models that store the blog content in the database. Edit core/models.py and add the following:
from django.db import models

class Blog(models.Model):
    title = models.CharField(max_length=50)
    content = models.TextField()
Now for some web pages. Create two views, one for listing all the blogs and one for viewing a blog. The code for your views goes in core/views.py:
from django.http import HttpResponse
from django.shortcuts import render, get_object_or_404
from core.models import Blog

def listing(request):
    data = {
        "blogs": Blog.objects.all(),
    }

    return render(request, "listing.html", data)

def view_blog(request, blog_id):
    blog = get_object_or_404(Blog, id=blog_id)
    data = {
        "blog": blog,
    }

    return render(request, "view_blog.html", data)
The listing() view does a query looking for all the Blog objects and passes that to the render() shortcut function. render() takes the request object that provides context to the view, the name of a template to render (listing.html), and the data object containing the query set of Blog objects.
The view_blog() view takes a blog_id as a parameter and uses it to look up the corresponding Blog object. This object is passed as context to the view_blog.html template through the render() shortcut.
There are three template files that go with the two views. The first is a base template that contains common HTML elements. The other two extend this base and correspond to views themselves. Create templates/base.html as follows:
<html>
<body>

{% block content %}
{% endblock content %}

</body>
</html>
This file is then extended by the templates used by the views. The listing() view uses a file called templates/listing.html that looks like this:
{% extends "base.html" %}

{% block content %}
<h1>Blog Listing</h1>
<ul>
{% for blog in blogs %}
  <li> <a href="{% url 'view_blog' blog.id %}">{{blog.title}}</a> </li>
{% endfor %}
</ul>
{% endblock content %}
Notice how it uses the blogs query set sent in by the view. The query set is looped through, printing out the title attribute of each of the Blog objects found. Finally, to view an actual blog, create templates/view_blog.html:
{% extends "base.html" %}

{% block content %}
<h1>{{blog.title}}</h1>

{{blog.content|safe}}

<hr/>

<a href="{% url 'listing' %}">All Blogs</a>
{% endblock content %}
The templates/listing.html and templates/view_blog.html files use the {% url %} tag to look up the URLs associated with the listing() and view_blog() views. These URLs need to be registered in Blog/urls.py. Modify that file as follows:
from django.contrib import admin
from django.urls import path, include
from core import views as core_views

urlpatterns = [
    path("admin/", admin.site.urls),
    path("", core_views.listing, name="listing"),
    path("view_blog/<int:blog_id>/", core_views.view_blog, name="view_blog"),
]
The default urls.py file doesn’t import include(), so note the change to the second line. The rest of the highlighted lines import core/views.py and create the URL patterns for the listing() and view_blog() view functions.
So far, you have no way to create content. The Django admin provides a quick way to modify model objects. Modify core/admin.py to register the Blog object:
from django.contrib import admin
from core.models import Blog

@admin.register(Blog)
class BlogAdmin(admin.ModelAdmin):
    pass
Everything is now in place. Use the following Django management commands to make and migrate the database models and run the server:
$ python manage.py makemigrations core
$ python manage.py migrate
$ python manage.py runserver
The last command runs your Django development server. While it’s running, you can use a browser to visit http://127.0.0.1:8000/. You should see your listing page, but without any data.
Adding Some Data
Since you haven’t created anything yet, the page will show only the title. Visit the Django admin at http://127.0.0.1:8000/admin/ and log in using the superuser credentials you created.
Once inside, you can click the Add link next to the Blogs object to create some test data. Alternatively, the sample code has a fixture containing example data. You can load the example data with the loaddata management command:
$ python manage.py loaddata core.json
The fixture file contains two example blog entries. If you visit the site’s home page, then it should now show some content.
Detecting Logged-In Users and Their Roles in a View
Every Django view takes at least one argument, an HttpRequest. The request contains state information about the user and the page they’re visiting. Here are some key pieces of information in the request:
| Attribute | Description | Examples |
|---|---|---|
scheme |
URL scheme | "http" or "https" |
path |
Path portion of the URL | "/music/bands/" |
method |
HTTP method used | "GET" or "POST" |
GET |
Query string parameters | <QueryDict: {'band_id':['123']}> |
POST |
Fields from an HTTP POST | <QueryDict: {'name':['Bob']}> |
user |
Object describing the user |
Django has the ability to run code on every single request through a plugin mechanism called middleware. The user attribute is added to the HttpRequest object by the AuthenticationMiddleware plugin. This middleware is enabled by default when you create a new project, so you don’t have to do anything special to take advantage of it. If you’re interested in middleware, then the article Building a Django Middleware introduces the concepts.
To see some of the HttpRequest attributes in action, add the following view to core/views.py:
def see_request(request):
    text = f"""
        Some attributes of the HttpRequest object:

        scheme: {request.scheme}
        path:   {request.path}
        method: {request.method}
        GET:    {request.GET}
        user:   {request.user}
    """

    return HttpResponse(text, content_type="text/plain")
Now add the new view to Blog/urls.py:
from django.contrib import admin
from django.urls import path, include
from core import views as core_views

urlpatterns = [
    path("admin/", admin.site.urls),
    path("", core_views.listing, name="listing"),
    path("view_blog/<int:blog_id>/", core_views.view_blog, name="view_blog"),
    path("see_request/", core_views.see_request),
]
With that in place, you can visit http://127.0.0.1:8000/see_request/ and see some of the request parameters. If you add a query string to the end of the URL, then you can also see how GET works. For example, http://127.0.0.1:8000/see_request/?breakfast=spam&lunch=spam results in the following:
Some attributes of the HttpRequest object:

scheme: http
path:   /see_request/
method: GET
GET:    <QueryDict: {"breakfast": ["spam"], "lunch": ["spam"]}>
user:   AnonymousUser
Who is AnonymousUser, you ask? The HttpRequest.user object is always populated with something. If the visitor to your website hasn’t authenticated, then HttpRequest.user will contain an AnonymousUser object. If you had logged in earlier to create some data, then you might see superuser instead. If you are logged in, visit http://127.0.0.1:8000/admin/logout/, then revisit the page to see the difference.
All user objects, including AnonymousUser, have some attributes that give you more information about the user. To see how these work, add the following code to core/views.py:
def user_info(request):
    text = f"""
        Selected HttpRequest.user attributes:

        username:     {request.user.username}
        is_anonymous: {request.user.is_anonymous}
        is_staff:     {request.user.is_staff}
        is_superuser: {request.user.is_superuser}
        is_active:    {request.user.is_active}
    """

    return HttpResponse(text, content_type="text/plain")
Add this view to Blog/urls.py:
from django.contrib import admin
from django.urls import path, include
from core import views as core_views

urlpatterns = [
    path("admin/", admin.site.urls),
    path("", core_views.listing, name="listing"),
    path("view_blog/<int:blog_id>/", core_views.view_blog, name="view_blog"),
    path("see_request/", core_views.see_request),
    path("user_info/", core_views.user_info),
]
With the URL added, you can visit http://127.0.0.1:8000/user_info/ to see what HttpRequest.user contains. If you’re not logged in, then you’ll see the following result:
Selected HttpRequest.user attributes:

username:
is_anonymous: True
is_staff:     False
is_superuser: False
is_active:    False
Log in to the admin area using the superuser credentials you created by visiting http://127.0.0.1:8000/admin/. Once you’re signed in, go back to /user_info/ and notice the difference:
Selected HttpRequest.user attributes:

username:     superuser
is_anonymous: False
is_staff:     True
is_superuser: True
is_active:    True
With a logged-in user, is_anonymous changes from True to False. The username attribute tells you who the user is. In this case, you’re logged in with the superuser account you created using the manage.py createsuperuser command. The is_staff, is_superuser, and is_active attributes are now all True.
Django uses sessions to manage the state of a user. Sessions are managed through middleware. You can read more about these concepts in the Django documentation on sessions and middleware.
Implementing Django View Authorization
Creating a Django view with authorization is a matter of inspecting the HttpRequest.user object and seeing if the user is allowed to visit your page. What do you do if the user isn’t logged in or doesn’t have access?
If the user isn’t logged in, then it would be nice to send them to the login page, and when they’re done logging in, bring them back to where they were. Doing so involves a fair amount of logic, but luckily Django comes with some tools to help you do it quickly.
Restricting Views to Logged-In Users
Django supports different ways of controlling what users can see and do. It includes a full mechanism for groups and permissions and a lighter-weight system based on users’ accounts. This tutorial will focus on the latter.
Python has a feature called decorators. A decorator is a way of wrapping a function with another function. Django uses these decorators to help enforce authentication. For more about how decorators work, check out the Primer on Python Decorators.
In Django, you use decorators to wrap your view. The decorator then gets called before your view and can stop your view from being called if necessary. This is useful for authentication as it checks whether to let a user actually visit the view. Here’s the syntax:
from django.contrib.auth.decorators import login_required

@login_required
def private_place(request):
    return HttpResponse("Shhh, members only!", content_type="text/plain")
The above code shows the use of the @login_required decorator. When the private_place() view function is called, the Django login_required() wrapper function is called first. The decorator checks whether a user is authenticated and if they aren’t, then it sends them to the login page. The login page URL is parameterized with the current URL so it can return the visitor to the initial page.
To see @login_required in action, add the above code to core/views.py and register the associated URL in Blog/urls.py:
from django.contrib import admin
from django.urls import path, include
from core import views as core_views

urlpatterns = [
    path("admin/", admin.site.urls),
    path("", core_views.listing, name="listing"),
    path("view_blog/<int:blog_id>/", core_views.view_blog, name="view_blog"),
    path("see_request/", core_views.see_request),
    path("user_info/", core_views.user_info),
    path("private_place/", core_views.private_place),
]
The above examples show how to restrict a function-based view. If you’re using class-based views, then Django provides a LoginRequired mixin to achieve the same result.
Until now, you’ve been using the admin site’s authentication mechanism. This only works if you’re going to the admin site. If you go there and log in, then you’ll be able to visit http://127.0.0.1:8000/private_place/. However, if you go straight to the private_place() without logging in, then you’ll get an error.
Django comes with tools for authenticating, but it doesn’t know what your website looks like, so it doesn’t ship with a regular login page. In part 2 of this series, you learned how to create a login template. You’ll have to do this for the blog project as well.
First, add the authentication URLs to Blog/urls.py:
from django.contrib import admin
from django.urls import path, include
from core import views as core_views

urlpatterns = [
    path("admin/", admin.site.urls),
    path("", core_views.listing, name="listing"),
    path("view_blog/<int:blog_id>/", core_views.view_blog, name="view_blog"),
    path("see_request/", core_views.see_request),
    path("user_info/", core_views.user_info),
    path("private_place/", core_views.private_place),
    path("accounts/", include("django.contrib.auth.urls")),
]
This allows you to take advantage of all of Django’s built-in authentication views. You’ll also need a corresponding login template. Create a registration/ subfolder in templates/ and then create login.html inside it:
{% extends 'base.html' %}

{% block content %}
<h1>Login</h1>

<form method="post">
    {% csrf_token %}
    {{ form.as_p }}
    <input type="submit" value="Login">
</form>

<a href="{% url 'listing' %}">All Blogs</a>
{% endblock %}
The login redirect will now work correctly when you visit http://127.0.0.1:8000/private_place/. Additionally, by adding django.contrib.auth.urls, you now have /accounts/logout/ available as well.
Restricting Views to Admin and Staff
You’ve now written a Django view with authorization. But authorization can be more complicated than simply checking whether a user is authenticated. Django has three roles out of the box:
- User
- Staff
- Superuser
The private_place() view above uses the @login_required decorator to see if the user is authenticated and if their account is active. You can also authorize based on the three roles.
To play with this feature, you’re going to need a few more user accounts. Go to the admin area by visiting http://127.0.0.1:8000/admin/. Click the Add button next to the Users object link. Use this screen to add a new user with the username bob:
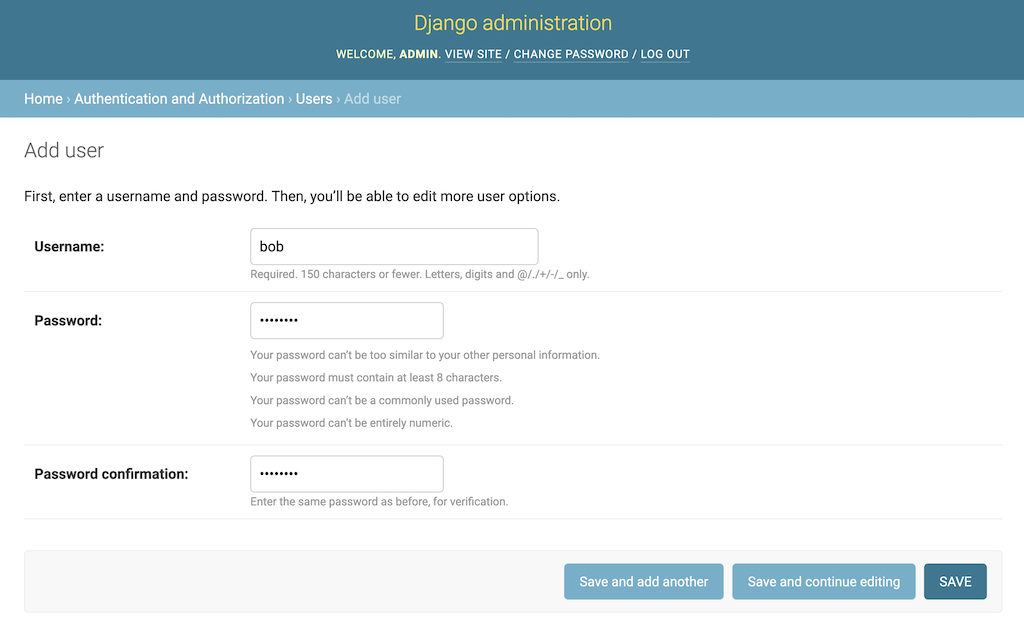
Out-of-the-box Django now enforces password requirements. You’ll need to use both letters and numbers in any password you create. For example, you could use tops3cret as your password.
Once you create the user, you’ll automatically be sent to the edit user page, where you can specify further details. The defaults are good enough for bob. Scroll to the bottom and click Save and add another. Once again, you’ll be prompted to create a user. This time, create silvia. When prompted for more of Silvia’s details, scroll down to the Permissions section and check the Staff status checkbox:
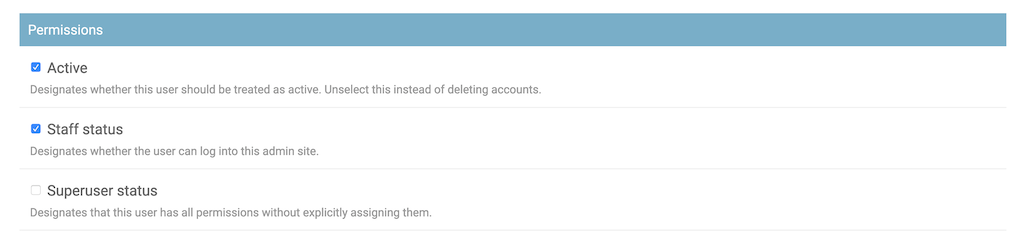
With the staff attribute set, you can scroll down and save this account. You should be able to log in to the administrative area using either the superuser or silvia accounts. As staff, you can get into the admin area, but you won’t be able to see anything by default. You don’t have permission.
You now have a regular user, a staff member, and a superuser. Using these three accounts, try visiting /admin/, /private_place/, and /user_info/ to see the differences.
The @login_required decorator is all or nothing: you’re either logged in or you’re not. Django also has the @user_passes_test decorator. This decorator allows you to specify a check that allows the user in if passed.
Try adding this view to core/views.py:
from django.contrib.auth.decorators import user_passes_test

@user_passes_test(lambda user: user.is_staff)
def staff_place(request):
    return HttpResponse("Employees must wash hands", content_type="text/plain")
The @user_passes_test decorator takes at least one parameter, the test to be passed. This test is either a function or, more commonly, a lambda. If you haven’t seen a lambda before, then think of it as a miniature, anonymous function. After the lambda keyword is the named parameter for the lambda, which in this case is user. To the right of the colon (:) is the test.
This test looks at the HttpRequest.user.is_staff attribute. If it’s True, then the test passes. For more information about lambda functions and how they work, check out How to Use Python Lambda Functions.
With the new view in place, update your Blog/urls.py file to register it:
from django.contrib import admin
from django.urls import path, include
from core import views as core_views

urlpatterns = [
    path("admin/", admin.site.urls),
    path("", core_views.listing, name="listing"),
    path("view_blog/<int:blog_id>/", core_views.view_blog, name="view_blog"),
    path("see_request/", core_views.see_request),
    path("user_info/", core_views.user_info),
    path("private_place/", core_views.private_place),
    path("accounts/", include("django.contrib.auth.urls")),
    path("staff_place/", core_views.staff_place),
]
Try visiting http://127.0.0.1:8000/staff_place/ signed in with different accounts and see what happens. Don’t forget that you can always go to /accounts/logout/ to sign out from your current user account. Here are the results:
bobisn’t staff, so he’s sent back to the login page.silviais a staff member, so she can see the view.superuseris both staff and a superuser and can also get in.
The manage.py createsuperuser command that you used to create the superuser automatically sets superuser accounts to also be staff.
Under the covers, the @login_required decorator actually calls the @user_passes_test decorator and uses the following test:
lambda user: user.is_authenticated
All the @login_required decorator is doing is checking that the user’s is_authenticated value is True, which will be the case for any authenticated account.
Try to experiment a bit yourself. Add other views, or change the test given to the @user_passes_test decorator to see how it affects the code.
Messaging a Logged-In User
Django includes a mechanism for notifying your users. This is tied to their authentication and can be used inside any authorized Django view. The messages framework uses middleware to make any outstanding notifications for the user available in any view. By default, messages support five levels:
DEBUGINFOSUCCESSWARNINGERROR
The messages framework is used primarily for asynchronous communication with the user. For example, if a background job goes wrong, then you can inform the user by sending a message with the ERROR level.
Unfortunately, there’s no area in the admin for creating messages—they have to be created in code. To demonstrate this, add the following code to your core/views.py:
from django.contrib import messages

@login_required
def add_messages(request):
    username = request.user.username
    messages.add_message(request, messages.INFO, f"Hello {username}")
    messages.add_message(request, messages.WARNING, "DANGER WILL ROBINSON")

    return HttpResponse("Messages added", content_type="text/plain")
This view adds two messages to the logged-in user’s session, a greeting with the INFO level and an alert with the WARNING level. messages.add_message() takes three parameters:
HttpRequestobject- Message level
- Message
To use messages.add_message(), you need to register the view as a URL:
from django.contrib import admin
from django.urls import path, include
from core import views as core_views

urlpatterns = [
    path("admin/", admin.site.urls),
    path("", core_views.listing, name="listing"),
    path("view_blog/<int:blog_id>/", core_views.view_blog, name="view_blog"),
    path("see_request/", core_views.see_request),
    path("user_info/", core_views.user_info),
    path("private_place/", core_views.private_place),
    path("accounts/", include("django.contrib.auth.urls")),
    path("staff_place/", core_views.staff_place),
    path("add_messages/", core_views.add_messages),
]
You can access messages in your code using get_messages() or directly within a template using the messages value in the template context. Add the following code to templates/listing.html to display any messages to the user on the blog listing page:
{% extends "base.html" %}

{% block content %}
<h1>Blog Listing</h1>

{% if messages %}
<ul class="messages" style="background-color:#ccc">
  {% for message in messages %}
    <li {% if message.tags %} class="{{ message.tags }}" {% endif %}>
      {{ message }}
    </li>
  {% endfor %}
</ul>
{% endif %}

<ul>
{% for blog in blogs %}
  <li> <a href="{% url 'view_blog' blog.id %}">{{blog.title}}</a> </li>
{% endfor %}
</ul>
{% endblock content %}
The highlighted code above uses the list of messages in the template context that is put there by the middleware. If there are messages, then an HTML unordered list is created showing each of them.
Visit http://127.0.0.1:8000/add_messages/ to create some messages, then go to the blog listing page at http://127.0.0.1:8000/ to see them. Refresh the page and you’ll notice that the messages are gone. Django automatically recognizes the fact that the notifications have been viewed and removes them from the session.
Conclusion
Most complex websites require user accounts. Once you have user accounts, you need to limit where they can and can’t go. Django provides role-based authentication to help you with these restrictions.
In this tutorial, you learned how to:
- Use
HttpRequestandHttpRequest.userobjects - Authenticate and authorize users
- Differentiate between regular, staff, and admin users
- Secure a view with the
@login_requireddecorator - Restrict a view to different roles with the
@user_passes_testdecorator - Use the Django messages framework to notify your users
To recreate the examples you saw above, you can download the sample code at the link below:
Get the Source Code: Click here to get the source code you’ll use to learn about Django view authorization in this tutorial.
If three user roles aren’t enough for your needs, then Django also comes with groups and permissions. Using these features, you can go even further with the granularity of your authorization. Happy coding!


