GitHub offers several AI tools under the Copilot umbrella that cover your entire development workflow. Copilot can provide an AI-powered code review shortly after you open a pull request on GitHub. Rather than waiting for a teammate, you can add Copilot as a reviewer to receive context-aware feedback. With access to your entire codebase, it delivers actionable suggestions that you can apply in just a few clicks:
Pull requests are the standard collaborative workflow provided by GitHub and similar services like GitLab to facilitate code review for projects managed with Git. A pull request, or a PR for short, is a formal request to merge code from one branch—or fork—into another, and it’s where code review typically happens.
In practice, code review isn’t always timely or consistent. Some reviewers approve pull requests immediately without much scrutiny, while others leave long lists of minor nitpicks. It can also be difficult to find someone with the right level of experience or enough context about a specific part of the codebase. These issues are common in open-source projects as well, where reviews depend on the limited time of volunteer maintainers.
In this tutorial, you’ll learn how to leverage GitHub Copilot for AI-assisted code review in pull requests and how to integrate it into your workflow to get faster, more structured feedback. Whether you’re working on a commercial project or contributing to an open-source one, Copilot can help you catch issues early and improve your code before it’s merged.
Think of Copilot’s review as a fast first pass. It can reliably flag correctness mistakes and regressions to documented behavior, often before a human reviewer has even opened the PR.
Prerequisites
Before you get started with AI-assisted code reviews, make sure you have the following in place:
- Git and GitHub Knowledge: You should have a basic familiarity with Git and GitHub, including how to create branches, commit changes, and open pull requests.
- Git Client and GitHub CLI: You should have the
gitclient configured in your command line. Additionally, you’ll need the GitHub CLI tool, as it simplifies common GitHub-related tasks. Make sure you’re running v2.88.0 or later, which introduced support for requesting Copilot code reviews from the command line. - GitHub Account: You need a GitHub account with a paid Copilot plan (Pro, Pro+, Business, or Enterprise). To check your subscription status, visit GitHub Copilot settings.
Depending on how you use GitHub, you may already have access to GitHub Copilot through your organization. Sometimes, you may qualify for Copilot under special conditions.
For example, if you’re a student or a teacher, or if you regularly contribute to a popular open-source project, then you might be eligible for free access to GitHub Copilot Pro. Check out GitHub Education to learn more. Keep in mind that GitHub reassesses whether you qualify for free access on a monthly basis.
But even on the free plan, you can still try out Copilot’s code review feature for 30 days at no cost. Just subscribe to GitHub Copilot Pro and cancel before the first billing cycle begins. The trial period is a one-time offer per account, so you won’t be able to start another one after the first one ends.
Note: At the time of writing, GitHub has temporarily paused new paid subscriptions for Copilot due to exceptionally high demand and the associated infrastructure costs. You can read the official announcement on GitHub’s blog to learn more.
To follow along with this tutorial, you’ll also need a GitHub repository where you can freely create branches and pull requests. Although you can create a new repository from scratch or import one from another Git-based hosting service, the quickest option is to download the provided supporting materials. They include a small, hands-on project you’ll be working on:
Get Your Code: Click here to download the free sample code you’ll use to practice AI-assisted code review on a sample FastAPI pull request with GitHub Copilot.
Take the Quiz: Test your knowledge with our interactive “How to Use GitHub Copilot Code Review in Pull Requests” quiz. You’ll receive a score upon completion to help you track your learning progress:
Interactive Quiz
How to Use GitHub Copilot Code Review in Pull RequestsTest your knowledge of GitHub Copilot code review in pull requests, including custom instructions and automatic reviews.
The sample project is a real-time quiz application inspired by Kahoot! and Mentimeter, featuring a FastAPI backend and a mobile-first JavaScript, HTML, and CSS frontend. It allows you to make your own quizzes from scratch—and store them in the human-readable YAML format—or generate a random quiz on the fly using ChatGPT’s API:
Each player is assigned a randomly generated name with an emoji, such as 🐯 Grumpy Tiger, 🦨 Gentle Skunk, or 🐮 Lazy Cow, to keep things light and fun. You can start the server on a local network and have your friends or family connect from their mobile devices using a QR code or a PIN.
Are you ready to dive in?
Step 1: Request a Code Review From GitHub Copilot
If you haven’t already, go ahead and grab the supporting materials. The sample Git repository includes a feature branch with intentional code issues that GitHub Copilot can catch when you request a review. For reference, you’ll also find another branch with the completed code to explore at your own pace:
Get Your Code: Click here to download the free sample code you’ll use to practice AI-assisted code review on a sample FastAPI pull request with GitHub Copilot.
After downloading the materials, upload the local pop-quiz repository—including all branches—to your GitHub account. This will create a remote copy of the repository for your own experimentation. There are several ways to accomplish this. Although you can handle most tasks through the GitHub web interface, the GitHub CLI is often faster and more convenient.
One straightforward approach is to use the GitHub CLI (gh) alongside standard git commands. This allows you to create the repository and push all branches in just two steps once you’re in the downloaded pop-quiz/ directory:
$ gh repo create pop-quiz --source=. --remote=origin --public --push
$ git push --all origin
The gh repo create command creates a remote repository named pop-quiz on your GitHub account and pushes the currently checked-out branch, which defaults to the main branch. The git push --all command then ensures that all remaining local branches are uploaded as well.
Note: If you’ve just installed the GitHub CLI on your computer, then you’ll need to authenticate with gh auth login before you can use the tool.
Alternatively, if you’re on macOS or Windows, then you can take advantage of GitHub Desktop by dragging and dropping a folder containing a local Git repository into the main window:
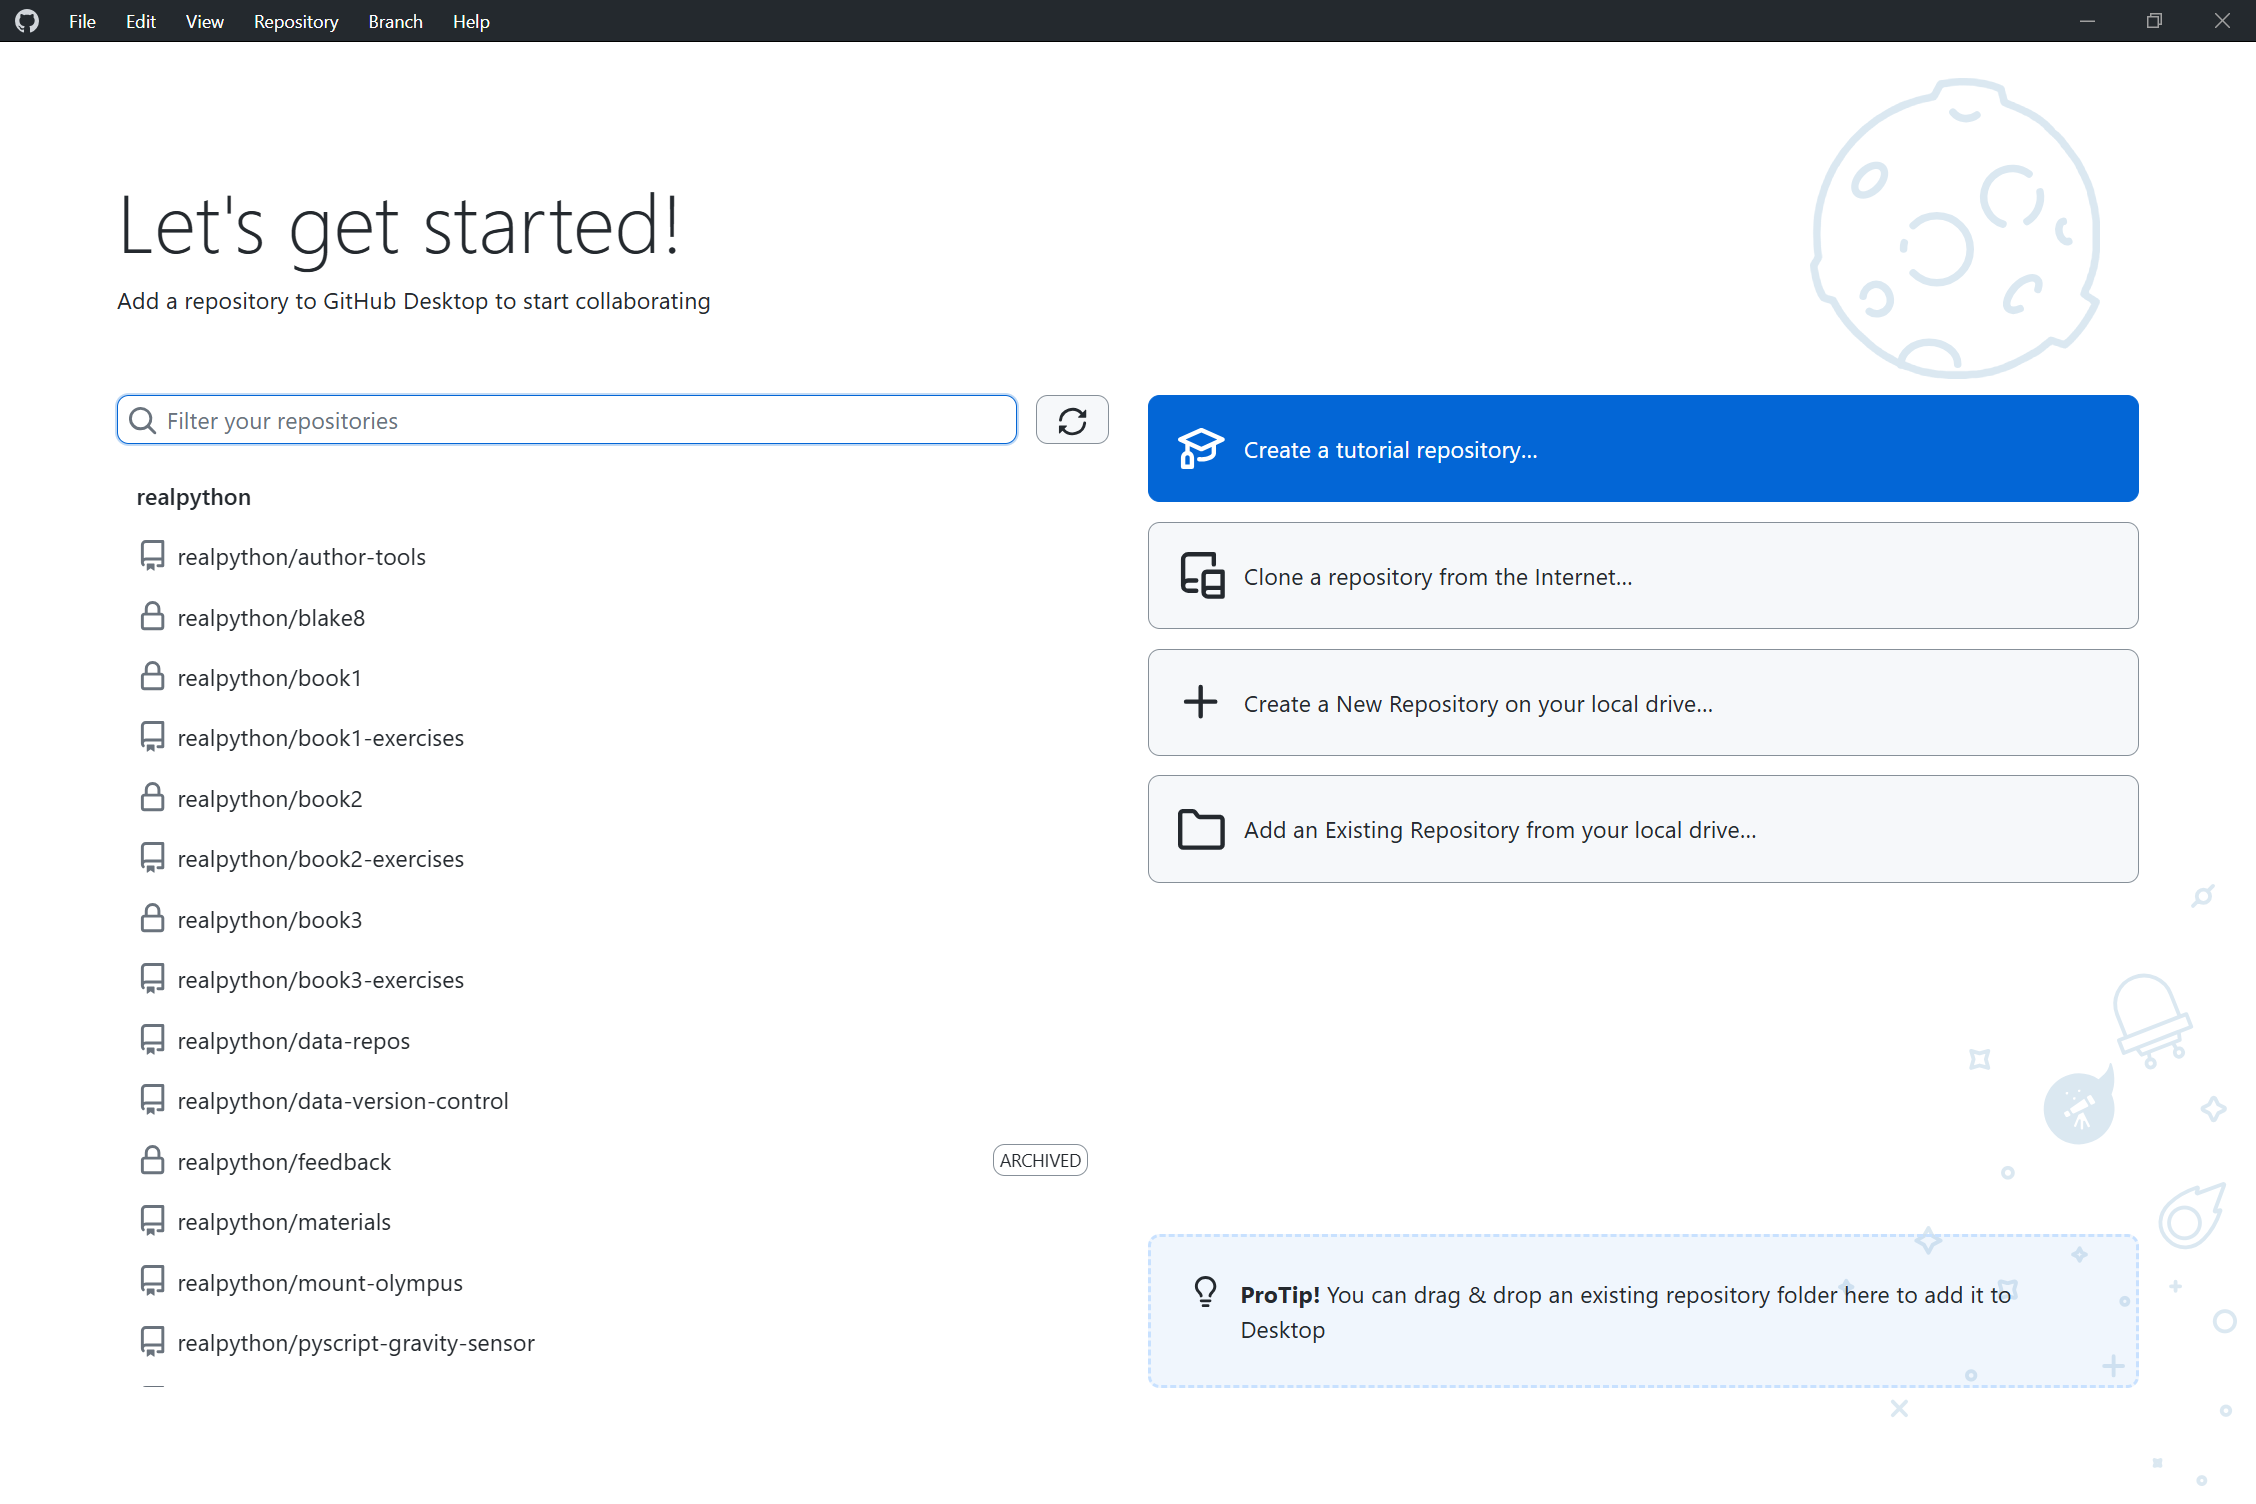
However, unlike the command-line interface, GitHub Desktop doesn’t currently offer a quick way to push all branches at once. So, you’ll need to select the individual branches and push them one by one if you go this route.
You can view your repository on GitHub by using the GitHub CLI again:
$ gh browse
Running gh browse from within the local repository folder automatically opens the correct GitHub page in your default browser.
Now, to see GitHub Copilot code review in action, you’ll open a pull request from a feature branch into the main branch and assign Copilot as the reviewer. Start by switching to a local branch, and then use the GitHub CLI to open a PR and set the reviewer. For this demonstration, you’ll use the feature/player-names branch, which contains code that randomly assigns fun names to the quiz players:
$ git switch feature/player-names
Switched to branch 'feature/player-names'
Your branch is up to date with 'origin/feature/player-names'.

$ gh pr create --fill --reviewer @copilot

Creating pull request for feature/player-names into main in realpython/pop-quiz

https://github.com/realpython/pop-quiz/pull/1
The --fill flag automatically populates your pull request’s title and body based on the commit history. The --reviewer flag lets you request a code review from one or more GitHub users by specifying their handles, separated by a comma. As of version 2.88.0, you can also summon the special @copilot agent for the AI-assisted code review.
Note: Because earlier GitHub CLI versions didn’t natively support Copilot as a reviewer, your only option was to add the agent manually through the GitHub web interface.
Once the second command succeeds, you’ll be presented with a link to your pull request in GitHub. Follow that link, and you’ll notice that a review has been requested with Copilot as your reviewer:
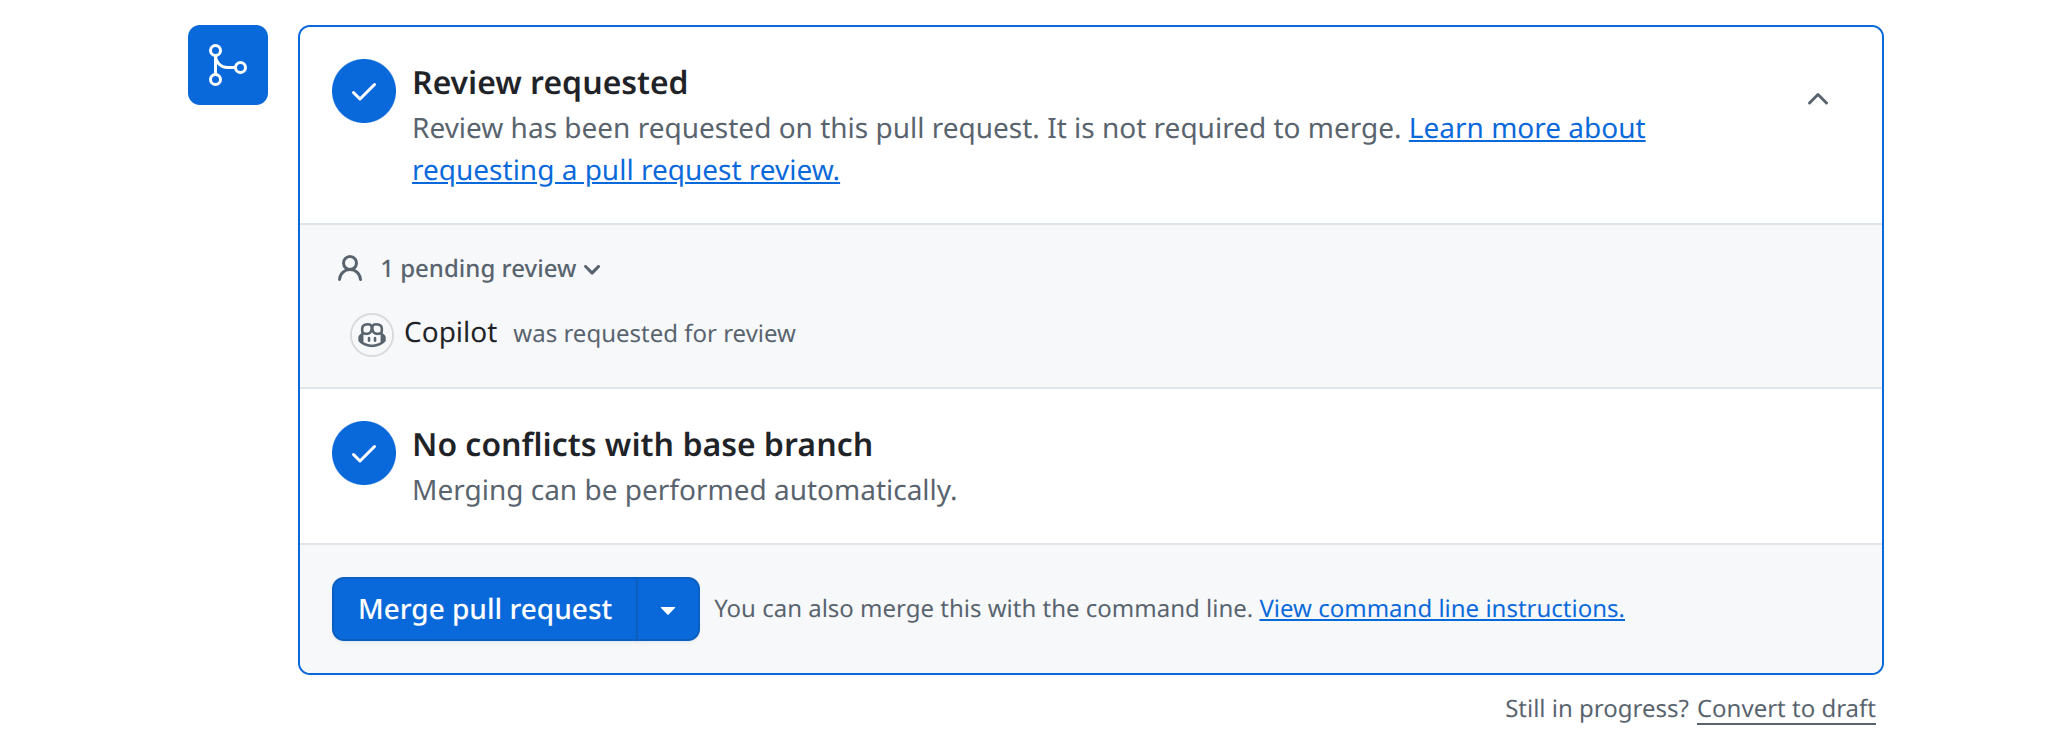
Copilot will get to work automatically. You can track its progress in the GitHub Actions section of your repository. Once the review completes, you’ll see Copilot’s comments with optional suggestions on your pull request.
Note: You can also add Copilot as a reviewer after you’ve created a pull request, which works just fine.
Unlike a human reviewer, the agent can’t prevent you from merging your pull request even if it finds some problems. If you have branch protection rules configured for your repository or at the organization level, then you might need to collect additional approvals before you’re able to merge. Copilot only leaves comments, never approving or requesting changes.
It’s worth noting that Copilot reviews consume your monthly premium request allowance. Once you’ve used it up, you’ll need to upgrade your plan or wait for the quota to reset on the first day of the next month.
Note: Starting on June 1, 2026, Copilot reviews on private repositories will also draw from your GitHub Actions entitlement on GitHub-hosted runners. Public repositories remain free, and self-hosted or larger runners are billed at their standard rates.
By now, Copilot should’ve left some feedback on your pull request. You have a few options. You can ignore its feedback altogether, address the comments yourself, or let Copilot fix them for you. In the next section, you’ll take that last approach.
Step 2: Review and Apply Copilot’s Suggestions
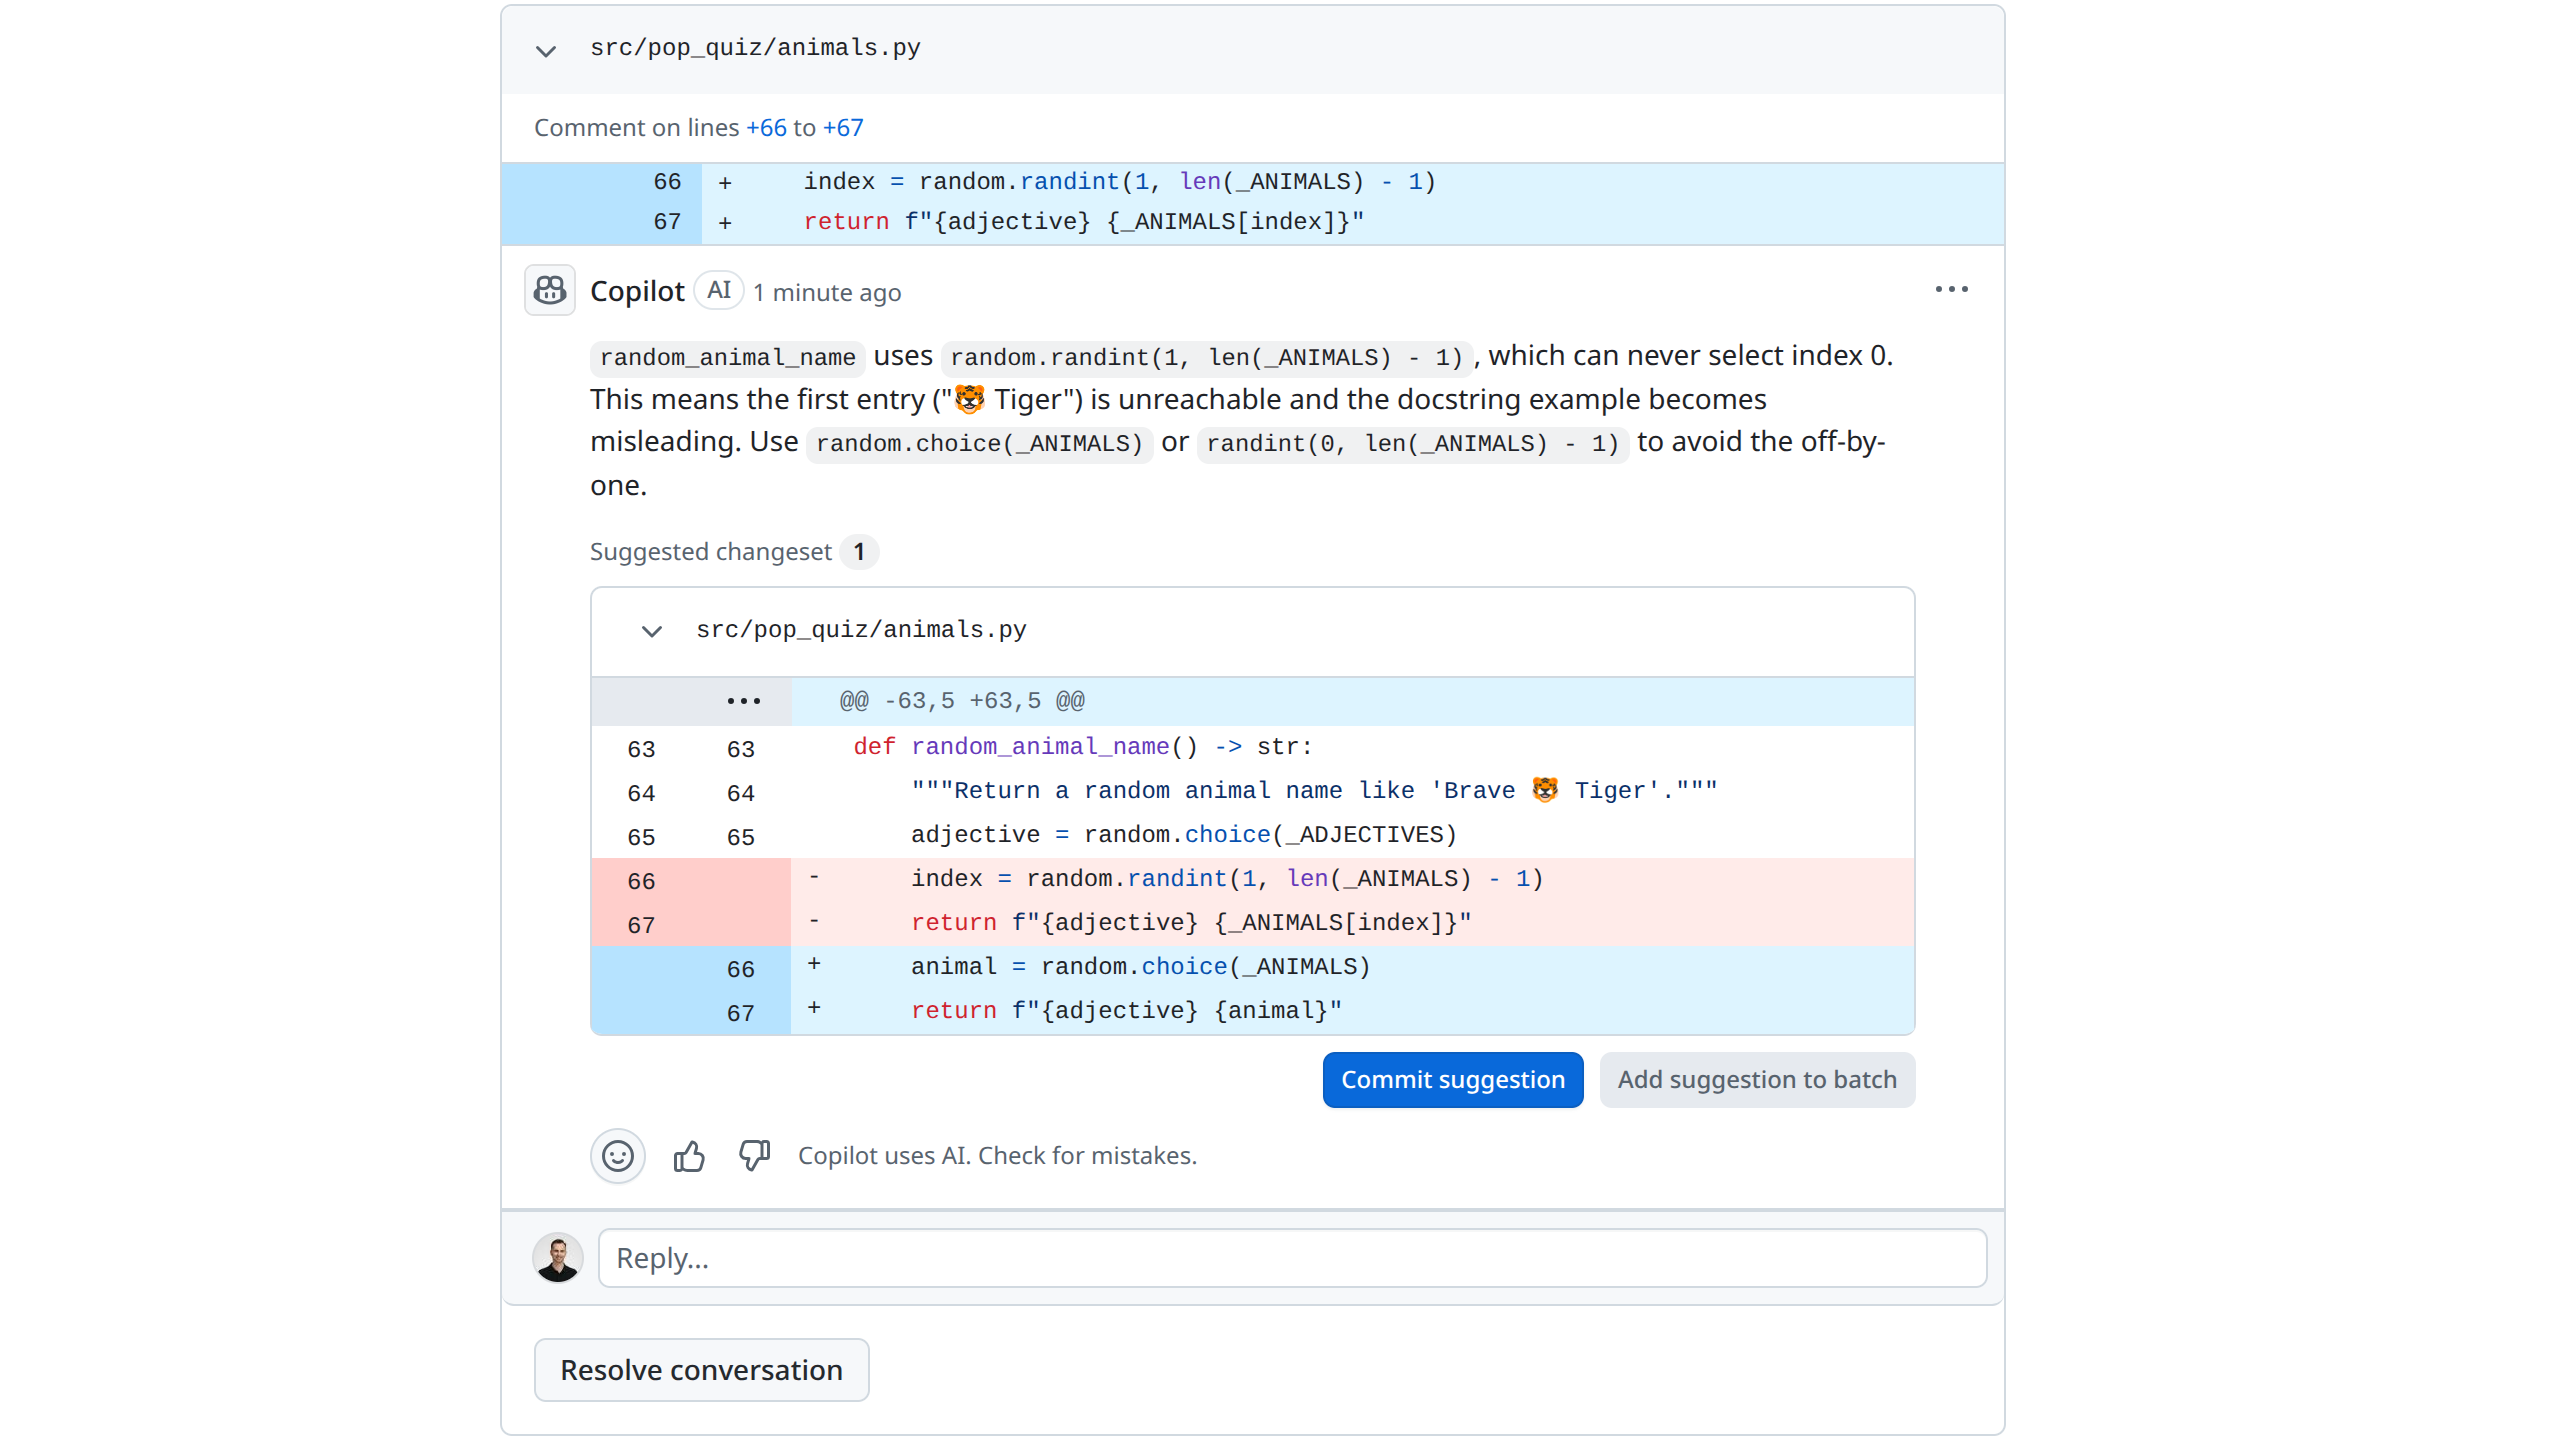
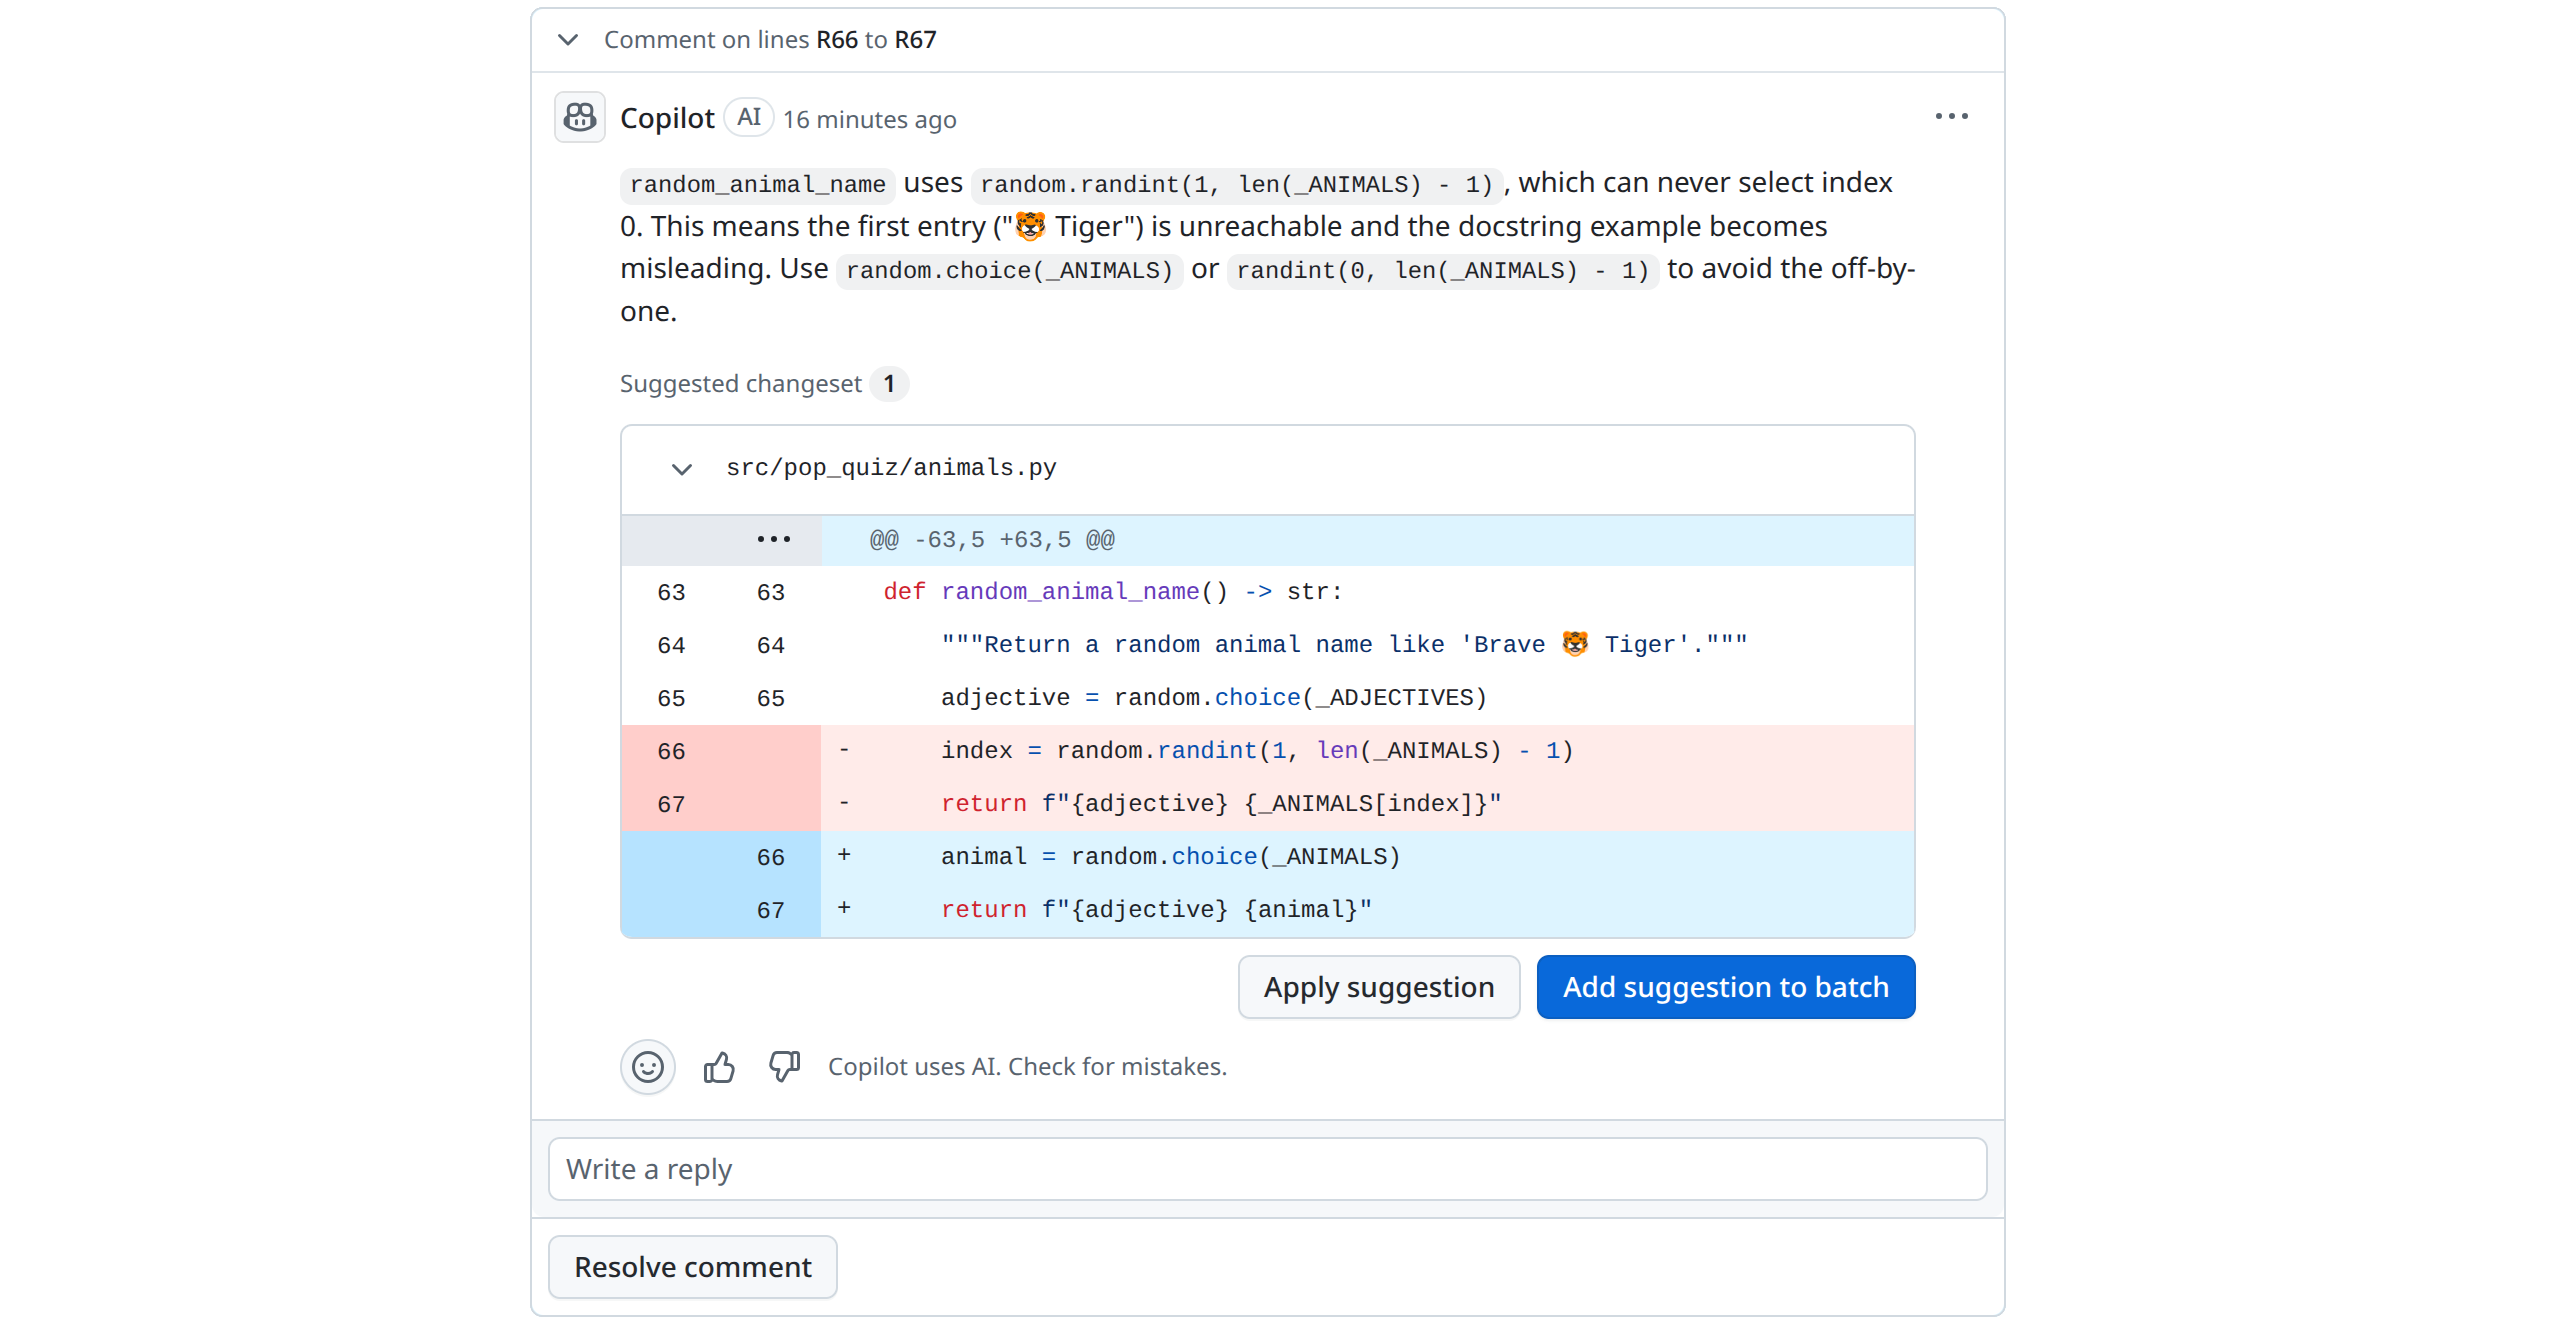
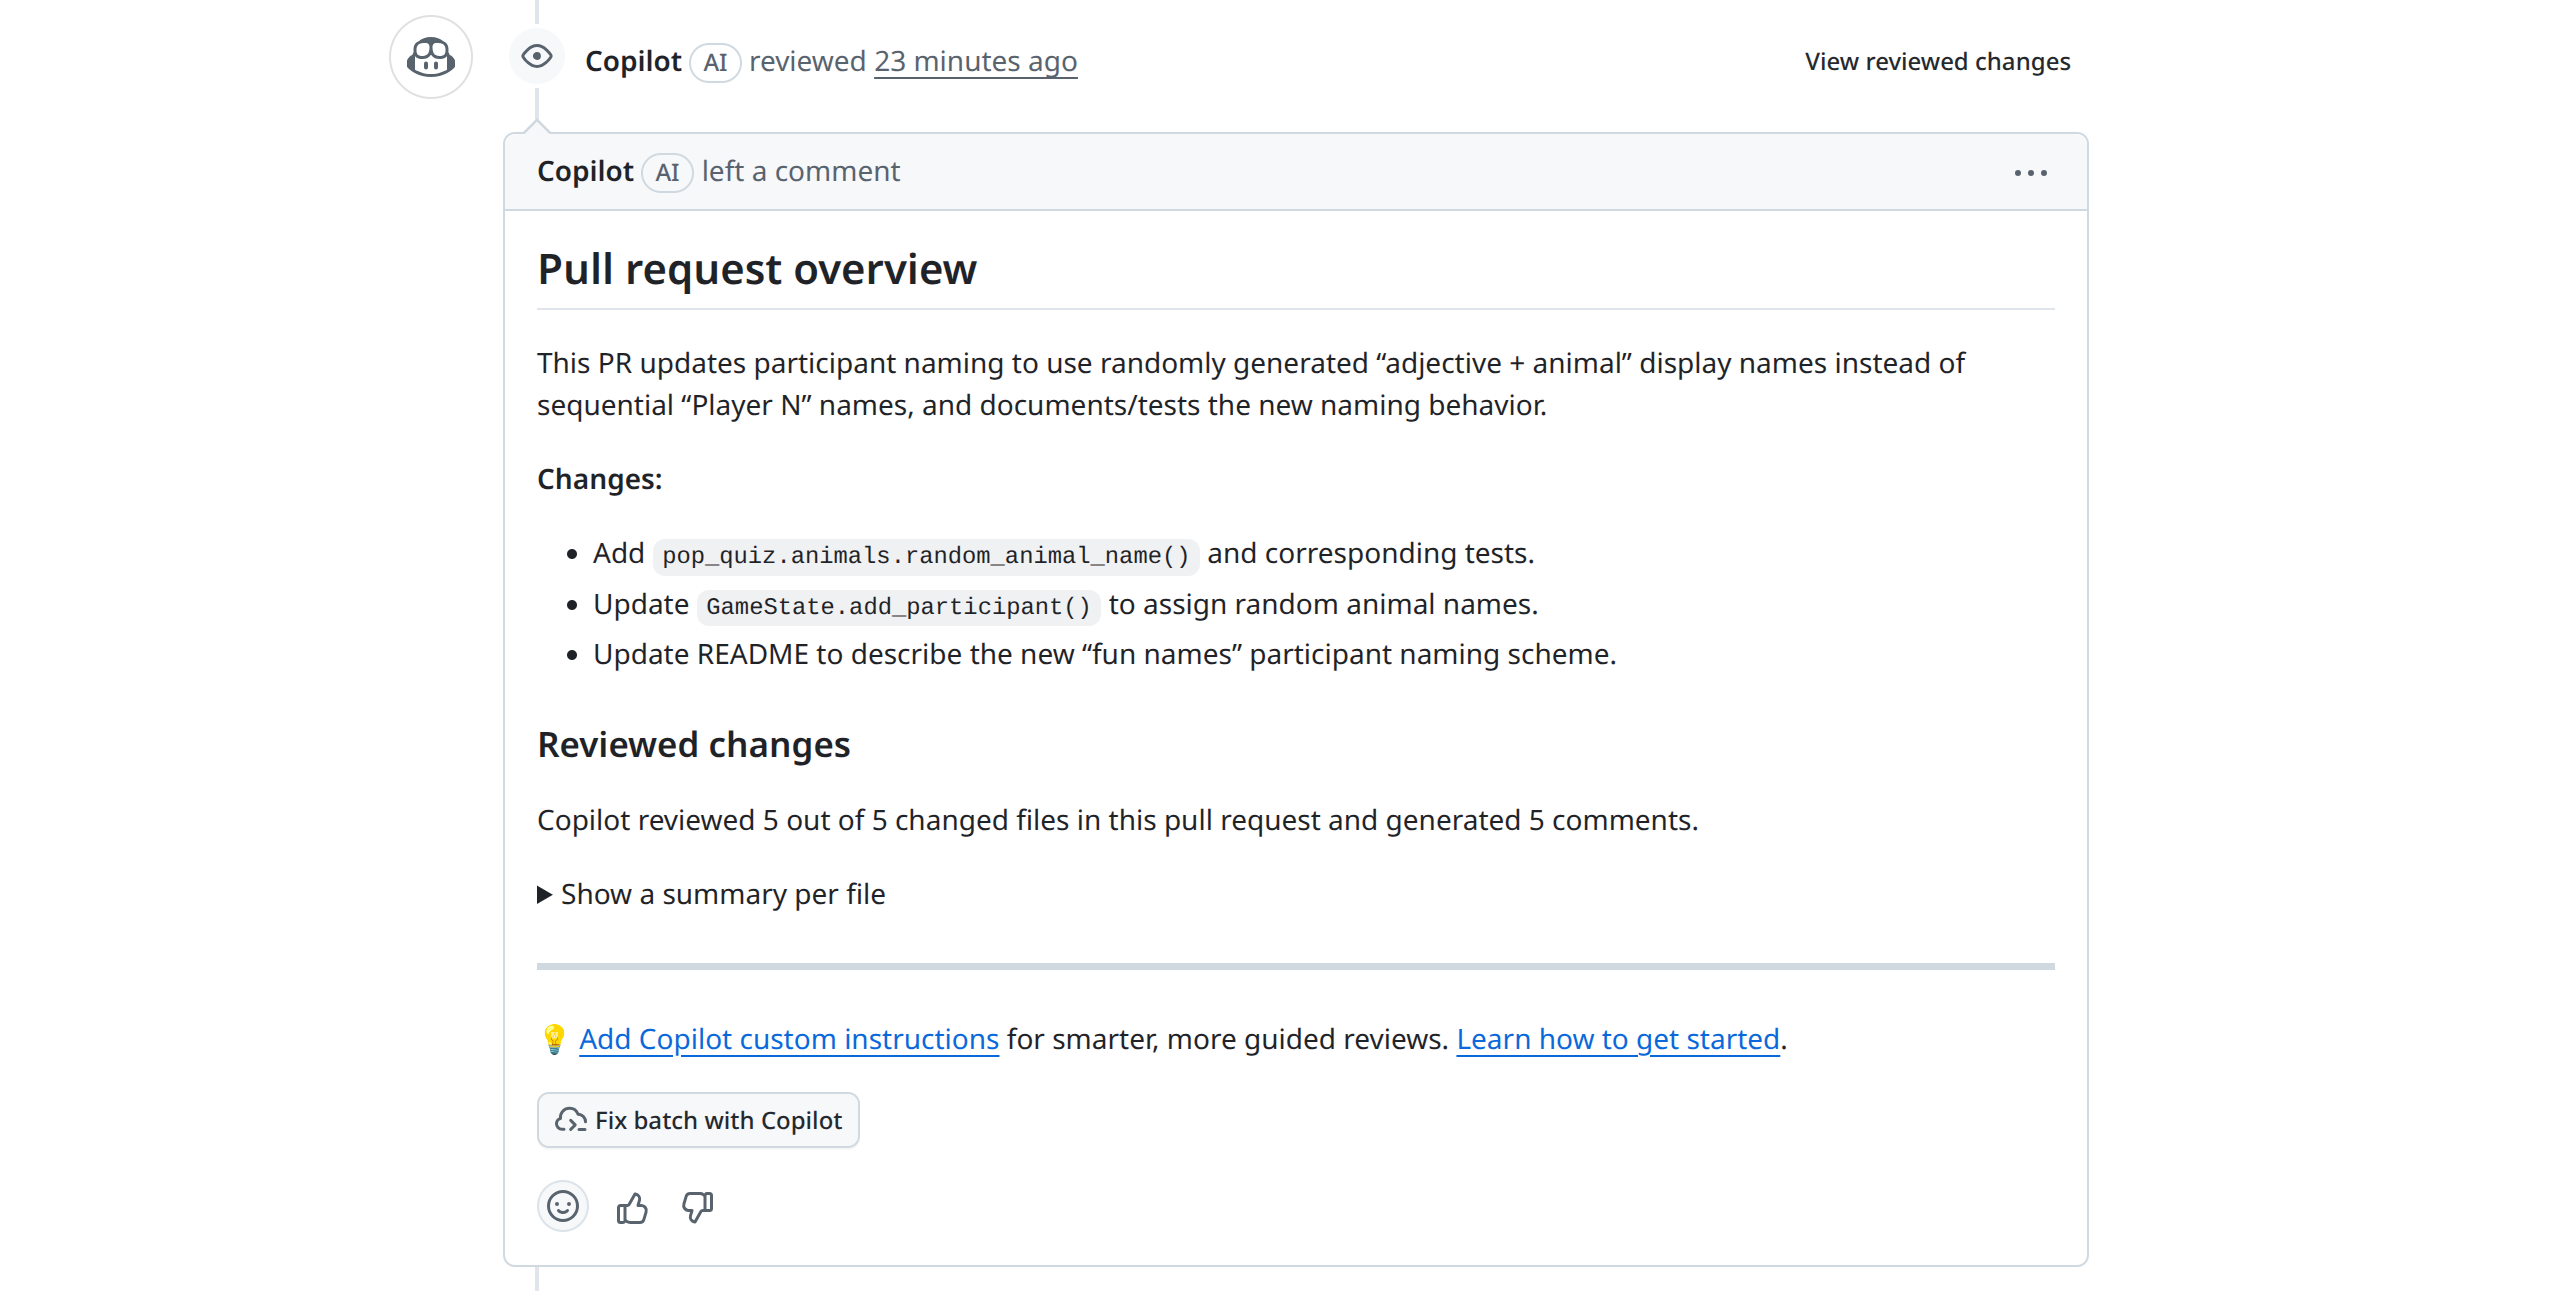
When the review action finishes, GitHub adds Copilot’s feedback to the Conversation tab of your pull request. You’ll see a top-level summary of the changes in your PR written by the agent, followed by inline comments anchored to specific lines in the diff. Each comment explains what Copilot noticed, and many include a ready-to-apply code suggestion in a fenced block:
Keep in mind that GitHub tweaks its interface frequently and often rolls out changes gradually through A/B testing, so the buttons, labels, or layout you see in your own pull request may differ slightly from the screenshots throughout this tutorial. The underlying workflow is essentially the same, though, so you should still be able to follow along regardless of which variant of the UI you’ve been served.
This pull request is small on purpose, but it has four planted issues a careful reviewer should catch:
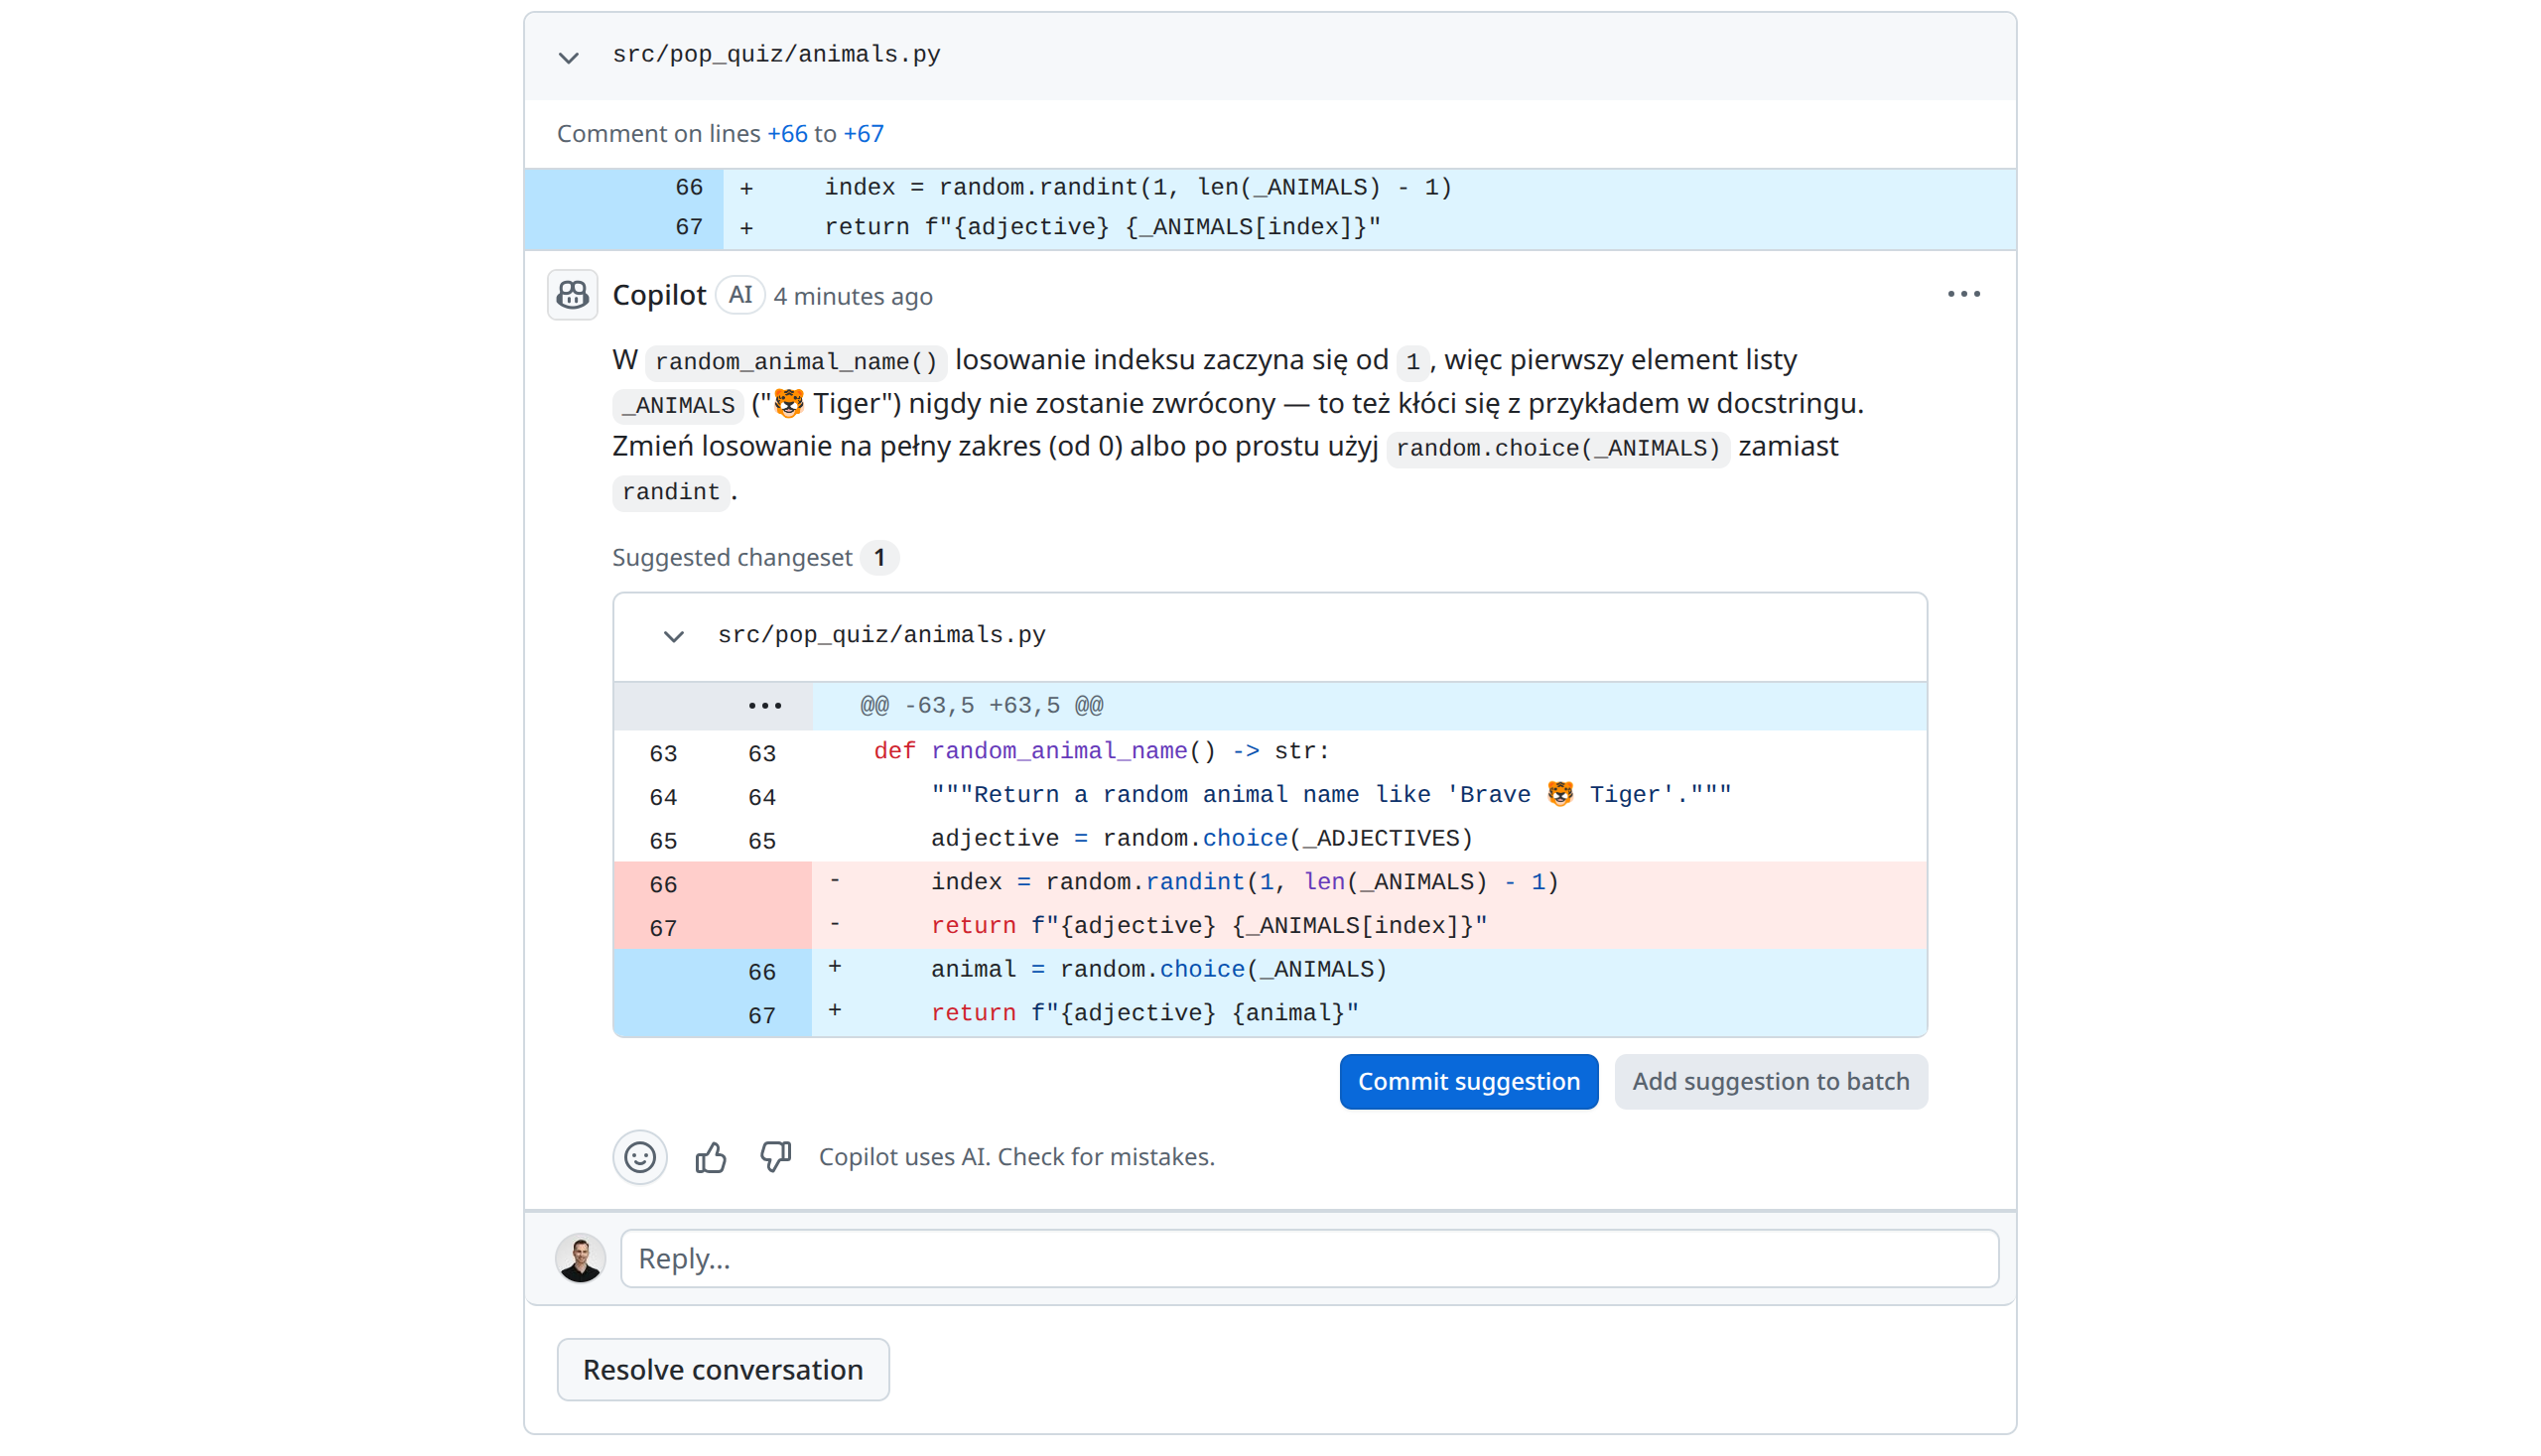
- An off-by-one error in
random.randint()that silently excludes the first animal from the pool. - A name-collision risk, because two participants who join at the same moment can be assigned the exact same
display_name. - A hardcoded emoji list, including a zero-width joiner sequence that doesn’t render consistently across older clients.
- A regression on reconnection, where refreshing the page now overwrites a participant’s name instead of preserving it.
Notice that none of these are issues your linter, type checker, or test suite caught. The tests continue to pass on your branch, and Ruff reports no problems either. That’s the gap Copilot is meant to fill. It catches the kind of issues that a thoughtful reviewer would spot but that automated tooling misses.
Like all AI agents, Copilot is non-deterministic in its reviews, and GitHub retains full control over the underlying models. As a result, your run may flag only a subset of the issues above or surface entirely different ones.
What Copilot doesn’t do is replace the people you collaborate with. Architectural decisions, design tradeoffs, and the judgment calls that make a codebase coherent over time still need a human in the loop. Use Copilot to clear the routine stuff out of the way so your teammates can focus where it matters.
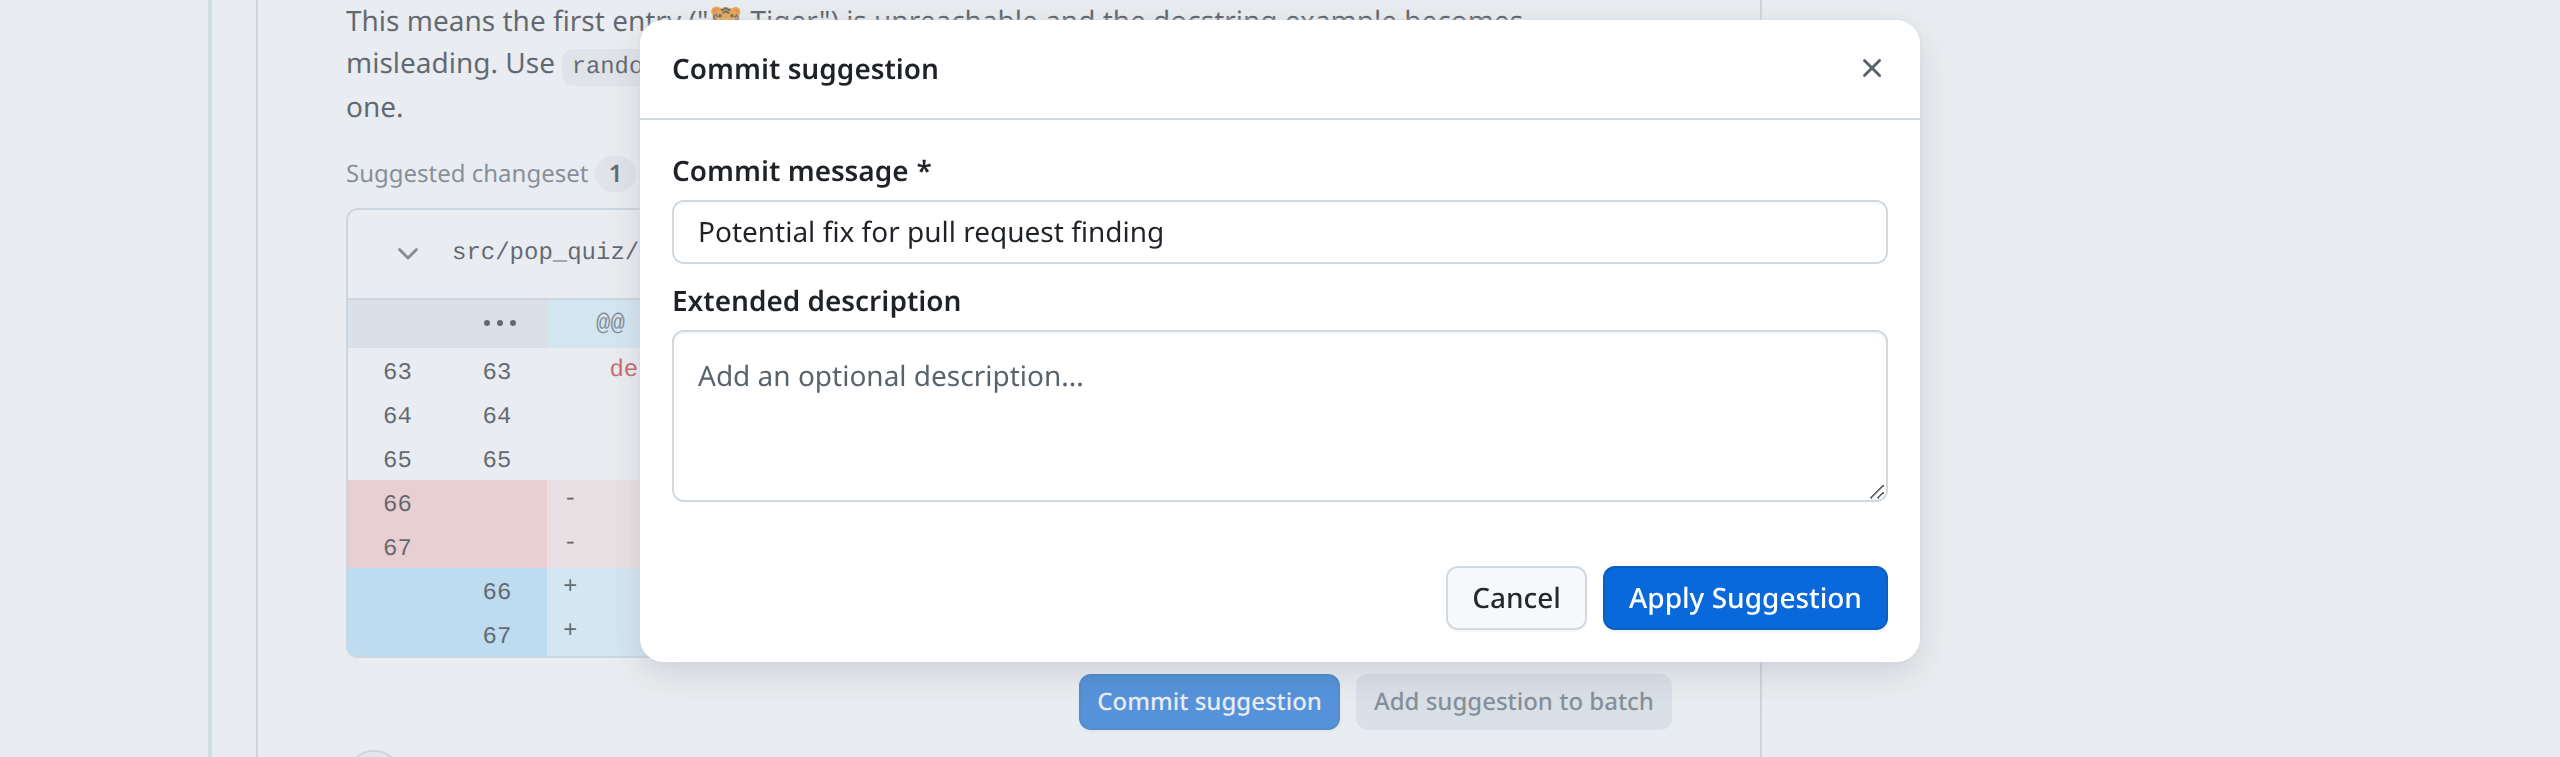
When a Copilot comment includes a suggested change, you’ll see a Commit suggestion button right under the diff. Clicking it stages the change and lets you write a commit message before pushing. By default, GitHub uses a generic message like Potential fix for pull request finding, but you can rewrite it to be more descriptive:
Once you commit, GitHub pushes a new commit to your feature/player-names branch on your behalf. The pull request updates automatically, the resolved conversation collapses, and Copilot’s earlier comment is marked Outdated.
Applying suggestions one at a time produces a noisy commit history. If you want to accept several Copilot suggestions in one go, then switch to the Files changed tab. From there, you can cherry-pick the suggestions by clicking Add suggestion to batch instead of Apply suggestion:
GitHub queues the change without committing. Once you’ve batched everything you want to apply, click Commit suggestions at the top of the view to bundle them into a single commit.
Alternatively, if you don’t want to make the changes yourself, then you can hand the review off to the Copilot coding agent. Return to the Conversation tab, find the summary comment at the beginning of the thread, and click the Fix batch with Copilot button to let the agent do its work in the cloud:
This delegates the heavy lifting to the coding agent, which writes the changes server-side and pushes them to your pull request a few minutes later. Unlike Commit suggestions, which only bundles code blocks that Copilot already proposed, this flow can address comments that lack a ready-to-apply suggestion or that need changes spanning multiple files.
Sometimes, Copilot’s first take isn’t quite right. Maybe the suggestion solves the wrong problem, or you want to discuss a tradeoff. You can reply to any Copilot comment by mentioning @copilot directly in the thread. The agent will acknowledge your comment by reacting to it with the eyes emoji and immediately get to work:
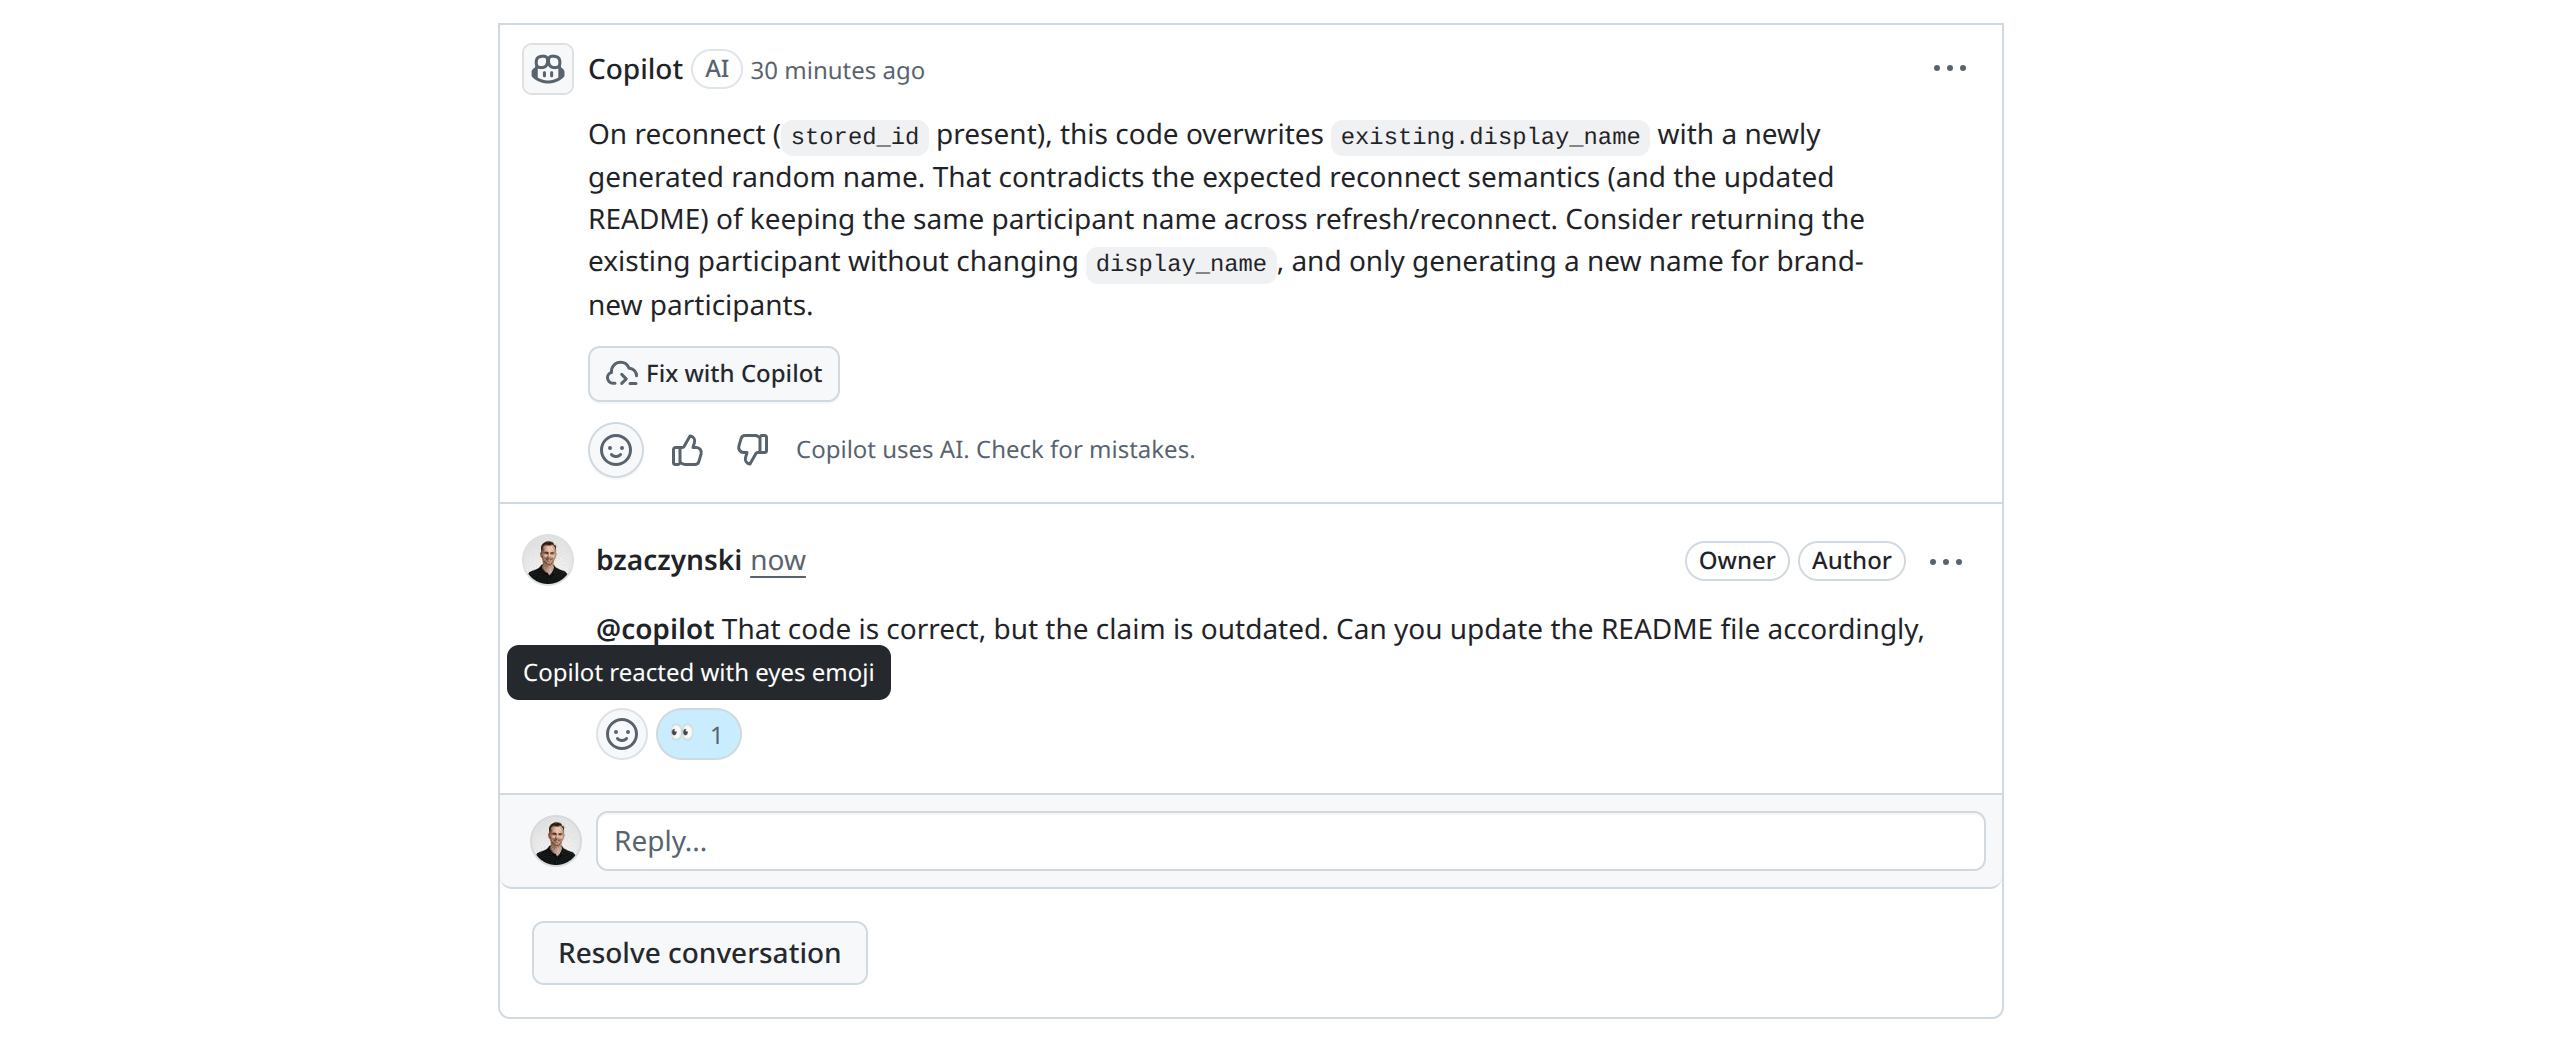
After a minute or two, Copilot will post a follow-up reply, just like a human reviewer:
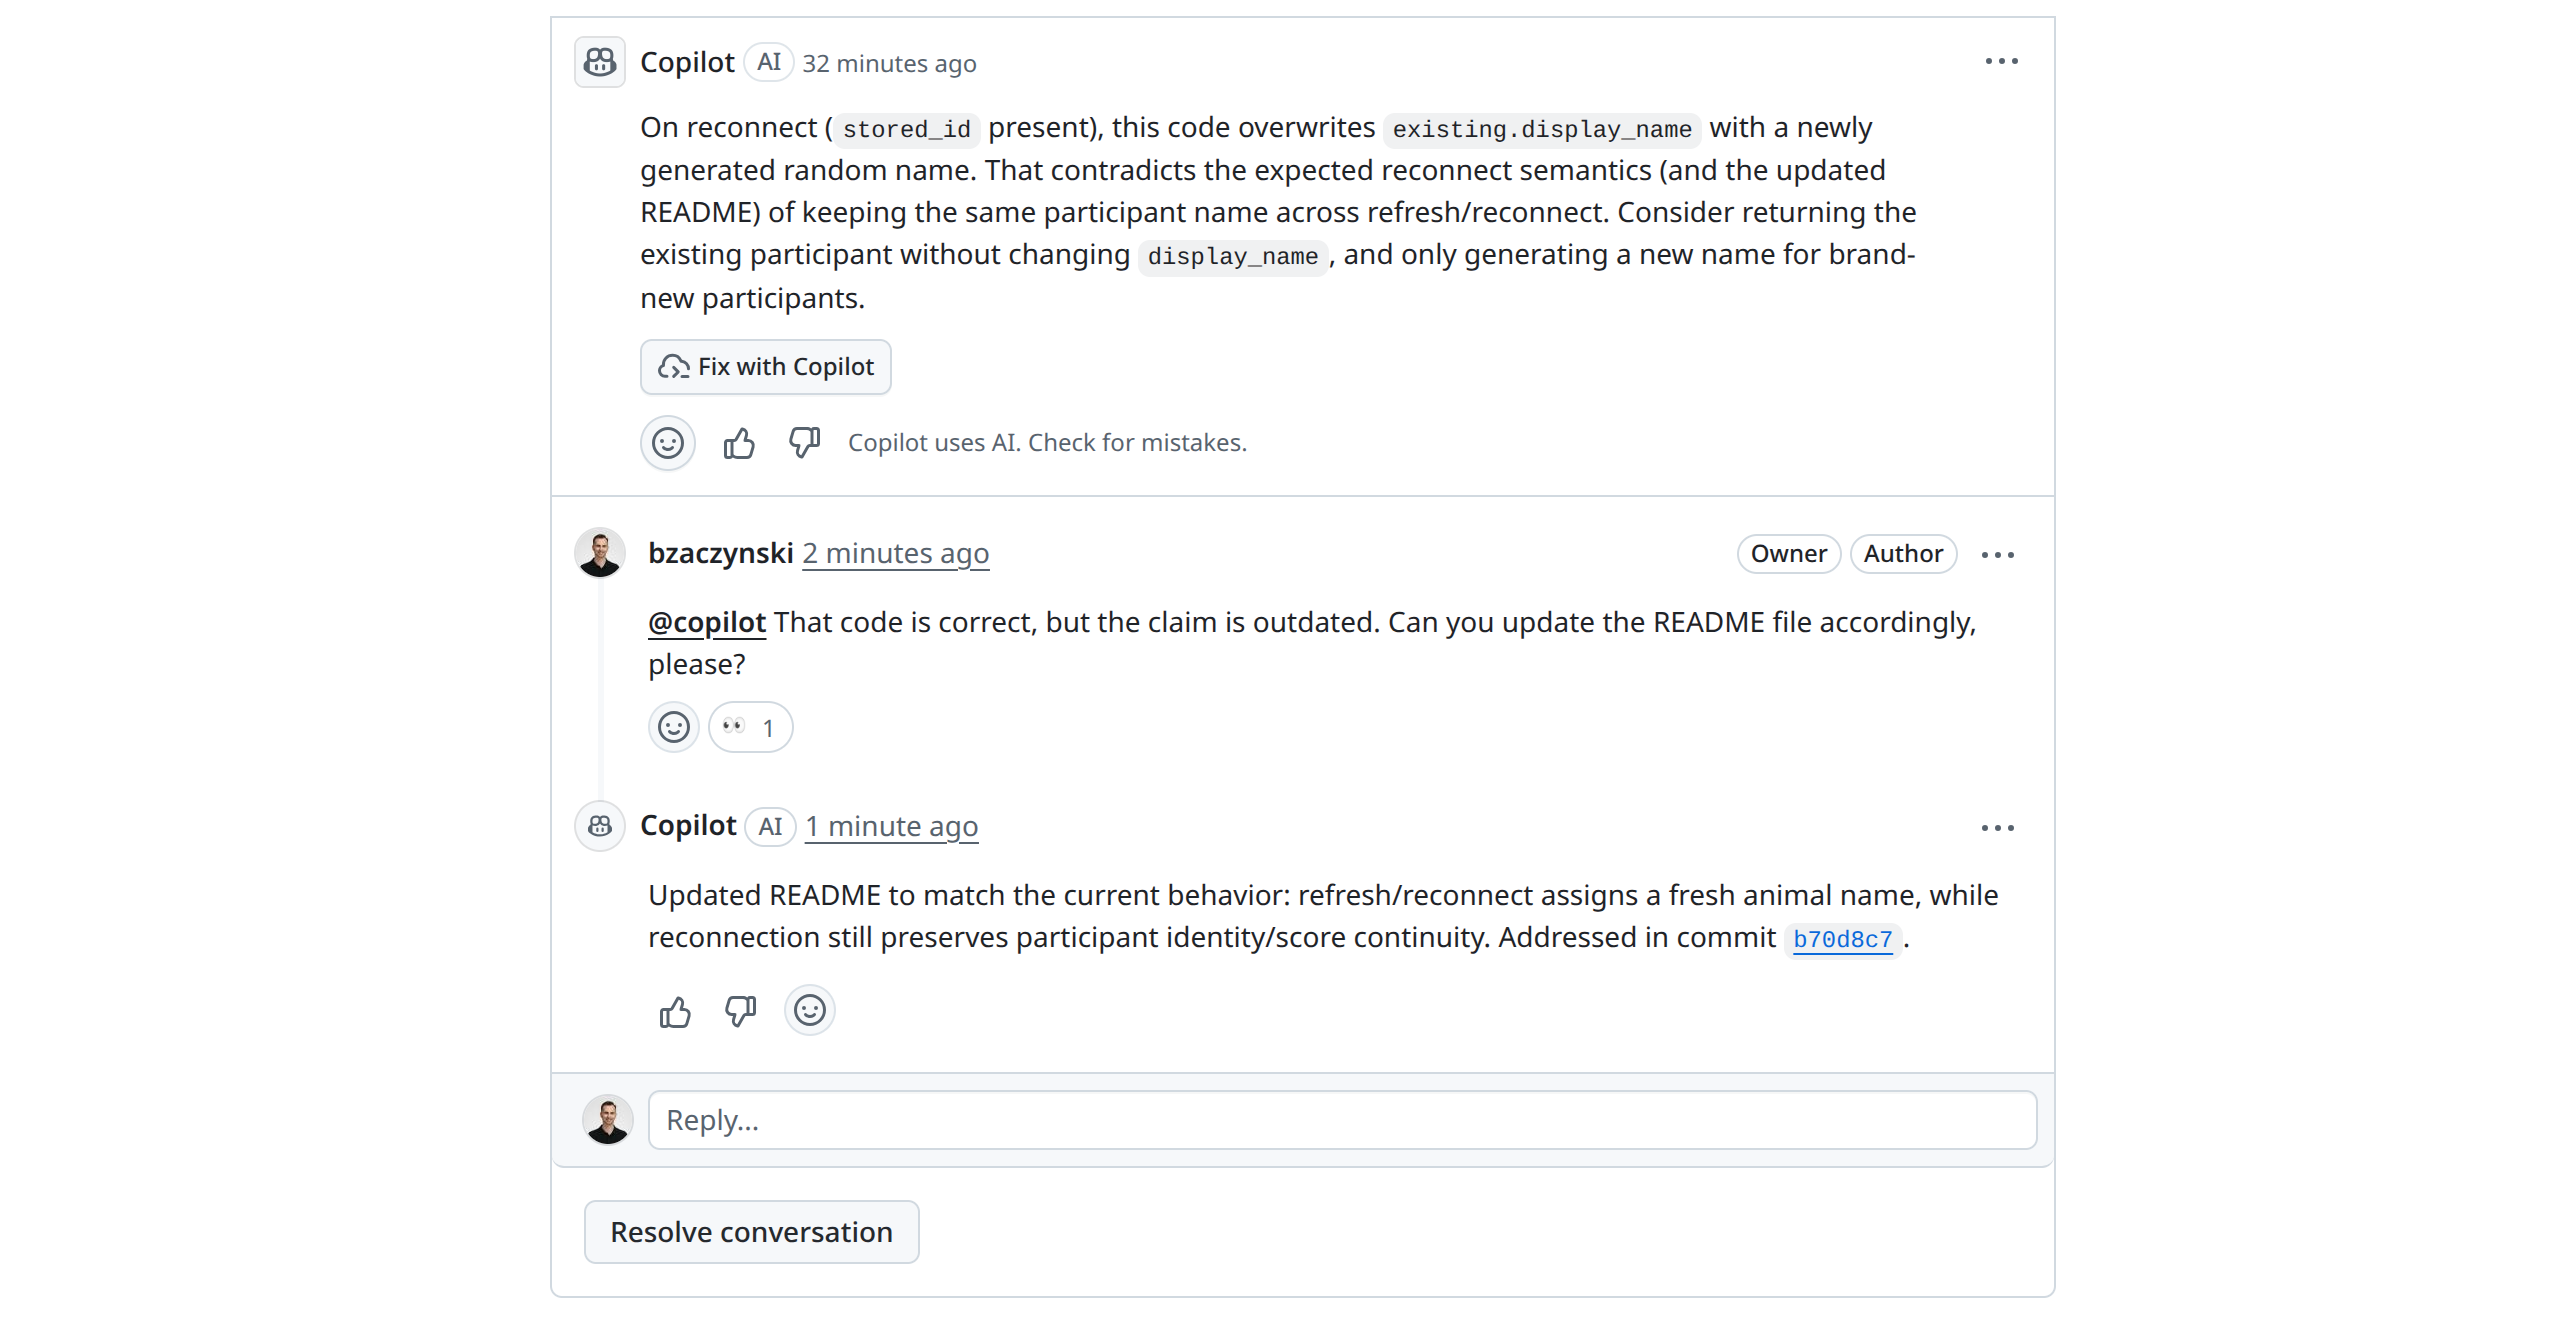
This back-and-forth works well because the agent reads the whole conversation context, including the original review summary, any prior replies, and the documentation in your repository. Use it when you want to push back on a suggestion you disagree with, ask why a comment matters, or request an alternative approach.
Copilot is useful, but it’s not infallible. It tends to err on the side of more comments rather than fewer, and some of those comments might be:
- Stylistic preferences that don’t match your project’s conventions
- False positives caused by missing context, such as a function called only in tests
- Defensive suggestions that make your code more verbose without making it more correct
Treat Copilot’s review as advice from a thoughtful but unfamiliar collaborator. If a suggestion doesn’t make sense, click Resolve conversation without applying it, optionally adding a short reply explaining why. The conversation collapses, and the thread no longer blocks your attention.
When you’ve worked through the comments—accepting some, rejecting others, and asking for clarification on the rest—you’re ready to move on. In the next step, you’ll configure Copilot to review every pull request automatically, with project-specific guidance baked in.
Step 3: Configure Copilot for Your Project
Requesting a review by hand is fine when you remember to do it. For everyday work, you’ll want Copilot to run automatically on every pull request, and you’ll want it to follow your team’s conventions instead of generic best practices. GitHub supports both through repository settings and custom instructions in the special .github/ folder inside your project.
Automatic Code Reviews
You can configure automatic code reviews at different levels on GitHub. To minimize the use of your premium requests, you’ll often want to set it up on specific repositories only.
Open the pop-quiz repository on GitHub and click the Settings tab. Next, in the left sidebar, under Code and automation, expand Rules and click Rulesets. Click New ruleset and choose New branch ruleset. Give the ruleset a name, such as “Copilot Auto Review,” and set Enforcement Status to Active. Under Target branches, add the branches you want to cover, like the default branch:
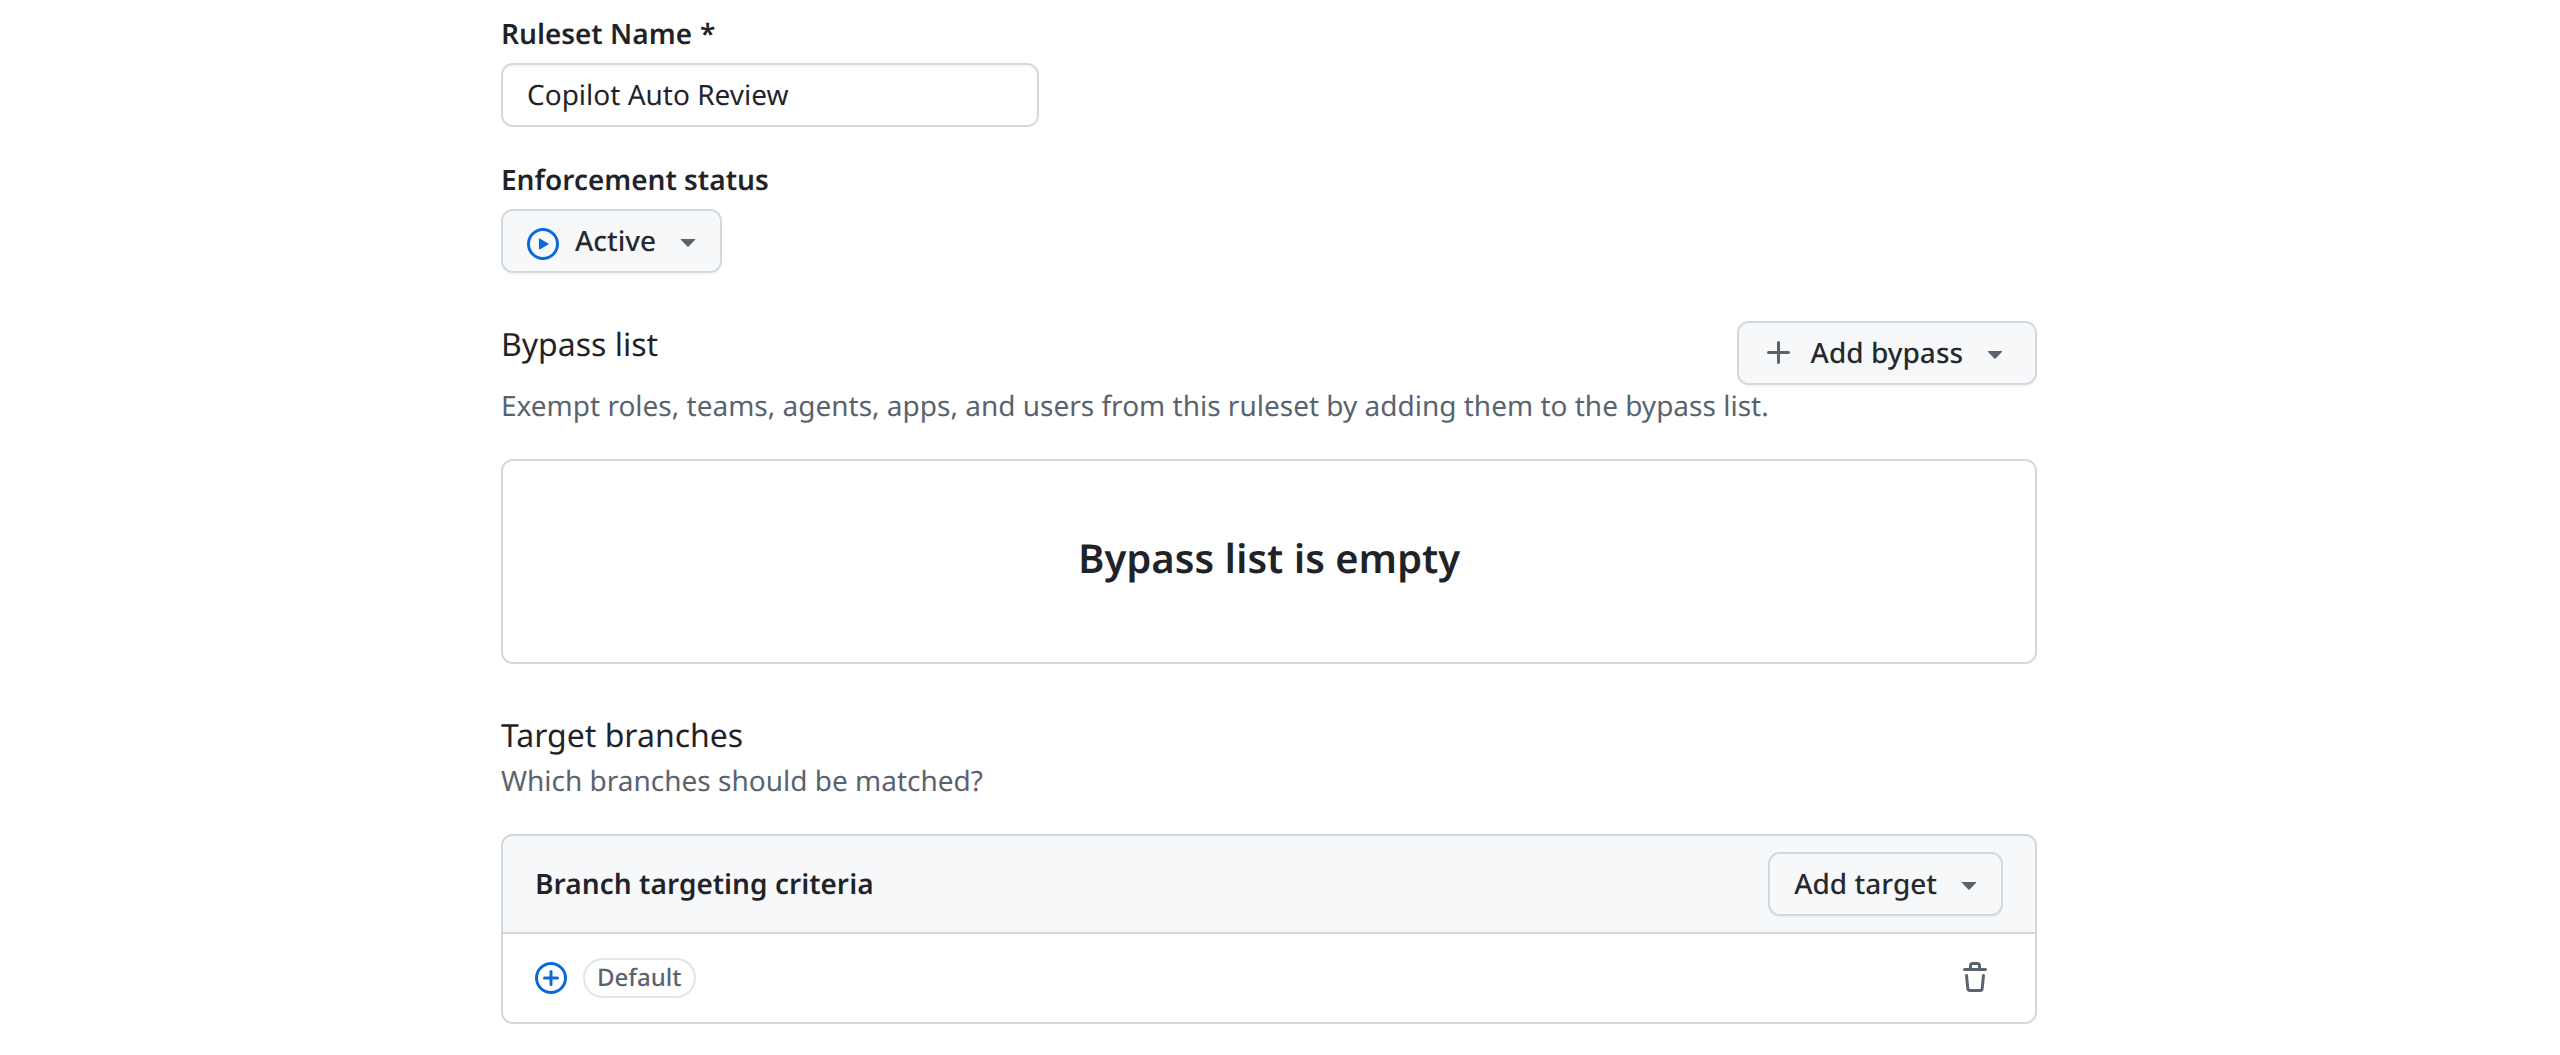
Scroll down to the bottom of Branch rules and select the Automatically request Copilot code review option. Then, configure the optional sub-settings and click Create. Note that since this is a sensitive action, you might be prompted to verify your identity again:

The first sub-setting makes Copilot run automatically when you push new commits to the PR, while the second one can be useful for catching errors early, before requesting a human review.
From now on, every pull request opened against the matching branches will be reviewed by Copilot without anyone needing to add it as a reviewer. If you want to test this, go ahead and create a new PR without explicitly specifying Copilot as the reviewer.
Outside of repository rulesets, Copilot can be controlled at two other levels. At the organization level, an administrator can toggle Copilot code review under Policies to decide whether the feature is available to everyone in the organization. If your administrator has it switched off, then no individual developer or repository owner can opt in until the policy is re-enabled.
At the personal level, you can also have Copilot automatically review every pull request you open. Go to your GitHub Copilot settings and toggle the Automatic Copilot code review option:

Note that this applies to your personal GitHub account. If your account is managed by an organization, then the organization-level policy takes precedence and may prevent you from changing this setting.
Custom Instructions
Out of the box, Copilot reviews using a generic notion of good code. You can sharpen its feedback by writing a .github/copilot-instructions.md file at the root of your repository. The agent reads this file before every review and treats its contents as project-wide guidance:
pop-quiz/.github/copilot-instructions.md
# Pop Quiz – Copilot Review Instructions

This project is maintained by a Polish-speaking team.
To keep code reviews accessible to everyone, please
follow the guidelines below.

## Language

- Write **all review comments in Polish**, including the summary comment.
- Keep code identifiers, log messages, and docstrings in English.
- Use the informal register rather than the formal one.
Each instruction is a hint, not a hard rule. Copilot will weigh your instructions against the diff and surface comments where the gap is largest. For a project the size of Pop Quiz, three to five focused bullets are plenty. Long instructions risk being ignored when they exceed the agent’s context budget.
In this case, Copilot acknowledged your custom instructions and replied with its comments in Polish:
For larger codebases, project-wide guidance can dilute the signal. GitHub also supports path-specific instructions via files under .github/instructions/, each named with an .instructions.md suffix and a glob in the front matter:
pop-quiz/.github/instructions/frontend.instructions.md
---
applyTo: "src/pop_quiz/static/*.js"
---

The frontend supports browsers from the last two major versions of
Safari, Chrome, and Firefox. Avoid suggestions that depend on
features without broad support, such as top-level await or class
private methods.
Copilot loads the matching files for any pull request that touches paths covered by their applyTo glob. For Pop Quiz, you might keep one file for backend Python, another for the WebSocket layer, and a third for the static frontend assets.
Note: Path-specific instructions stack on top of .github/copilot-instructions.md for files matching their applyTo glob and override the project-wide guidance on conflicts.
With automatic reviews enabled and custom instructions in place, you’ve moved from running Copilot on demand to having it as a default part of your pull request workflow. Every PR gets a baseline review within minutes, and the feedback follows your team’s conventions instead of generic ones.
Next Steps and Troubleshooting
Now that you’ve integrated the GitHub Copilot code review agent into your workflow, here are a few practical tips for getting the most out of it day to day:
- Keep PRs small and focused: Copilot’s reviews work best on small pull requests when the diff fits the model’s effective context window. If a PR touches more than a few hundred lines or spans many unrelated files, split it into smaller pieces. As a side benefit, smaller PRs are easier for human reviewers, too.
- Re-request the review after pushing changes: When you address Copilot’s comments and push new commits, the agent doesn’t automatically re-run on the updated diff. Click Re-request review next to Copilot’s name in the Reviewers sidebar to ask for a fresh pass.
- Watch your usage: Each review consumes one premium request, and starting on June 1, 2026, reviews on private repositories will additionally consume GitHub Actions minutes on GitHub-hosted runners. Most teams won’t come close to their monthly allotment, but if you’ve enabled automatic reviews on a repository with many bot-driven PRs from tools like Dependabot, then it’s worth watching the billing page to keep an eye on usage.
- Keep humans in the loop: Copilot can’t satisfy a
CODEOWNERSrequirement or a “required reviewers” branch protection rule. It comments only, never approving or requesting changes. Treat it as an extra pair of eyes on top of your usual human review process.
When the review fails to appear, check the Actions tab. The run is named Copilot code review and shows the same logs as any other GitHub Actions workflow. Here are a few common causes of failures:
- Your PR is too large or contains binary files that Copilot can’t analyze. Try removing generated assets from the diff.
- Your premium request quota for the month is exhausted. Wait for the reset on the first of the month, or upgrade your plan.
- There’s an active outage. Check the GitHub status page before opening an issue.
Open a PR on your own project. The fastest way to internalize the workflow is to use it on something you actually care about. Pick a small change in one of your repositories, request a Copilot review, and see what it catches.
Conclusion
You now have a working loop for AI-assisted code review on your pull requests. You’ve requested a review on demand, walked through Copilot’s comments, and applied the ones that made sense. You’ve also set up automatic reviews so every PR gets the same treatment, and tailored the agent’s feedback with project-wide and path-specific instructions.
In this tutorial, you’ve learned how to:
- Add Copilot as a reviewer on a pull request from the GitHub CLI or the web interface
- Read Copilot’s inline comments, apply suggestions individually or in batches, and iterate with the agent
- Decide when not to apply a suggestion and close the conversation
- Enable automatic reviews at the repository or organization level
- Write
.github/copilot-instructions.mdand path-specific instructions to tune the agent’s output - Diagnose common issues that prevent reviews from appearing
If you want to keep going from here, take a look at related Real Python tutorials on Git and GitHub fundamentals, continuous integration with GitHub Actions, and building APIs with FastAPI. All three pair naturally with the workflow you’ve just set up.
Real Python’s Python Coding With AI learning path takes you further, with tutorials and video courses on LLM development, prompt engineering, and the broader landscape of AI tools for Python developers.
Get Your Code: Click here to download the free sample code you’ll use to practice AI-assisted code review on a sample FastAPI pull request with GitHub Copilot.
Frequently Asked Questions
Now that you understand how to use GitHub Copilot to review your pull requests, you can use the questions and answers below to check your understanding and recap what you’ve learned.
These FAQs are related to the most important concepts you’ve covered in this tutorial. Click the Show/Hide toggle beside each question to reveal the answer.
No, and you shouldn’t treat it that way. Copilot is good at catching common patterns—off-by-one errors, missing edge cases, regressions to documented behavior—but it lacks the architectural context, domain knowledge, and merge-decision authority of a human reviewer. Use it as a first pass, not a substitute.
No. The agent only leaves comments. It never marks a review as approved or requests changes, and it can’t satisfy required-reviewer rules in branch protection settings.
Copilot reviews any text-based source code GitHub can render, with stronger results for popular languages like Python, JavaScript, TypeScript, Go, Java, C#, Rust, and Ruby.
Yes, for 30 days. Subscribing to Copilot Pro starts a one-time free trial that includes the review feature. Cancel before the first billing cycle to avoid charges. Students, teachers, and maintainers of popular open-source projects may also qualify for permanent free access through GitHub Education.
Copilot’s review is non-deterministic, so two runs on the same pull request can surface different comments, and GitHub upgrades the models over time. If a comment you expected didn’t appear, re-request the review or shrink the diff. Custom instructions help by encoding what your project considers important, but no review—human or AI—catches everything.
Take the Quiz: Test your knowledge with our interactive “How to Use GitHub Copilot Code Review in Pull Requests” quiz. You’ll receive a score upon completion to help you track your learning progress:
Interactive Quiz
How to Use GitHub Copilot Code Review in Pull RequestsTest your knowledge of GitHub Copilot code review in pull requests, including custom instructions and automatic reviews.


