When you work on a local Python project, tracking your changes with Git is a great way to maintain a history of your code. However, keeping your repository only on your computer leaves your work vulnerable to hardware failures and makes collaboration difficult. By learning how to use GitHub, you can back up your work, share your code with the public, and work alongside other developers.
By following this guide, you’ll learn how to create a GitHub repository, connect it to your local project, and collaborate with others online.
Here’s a preview of what a successfully connected and active GitHub repository looks like:
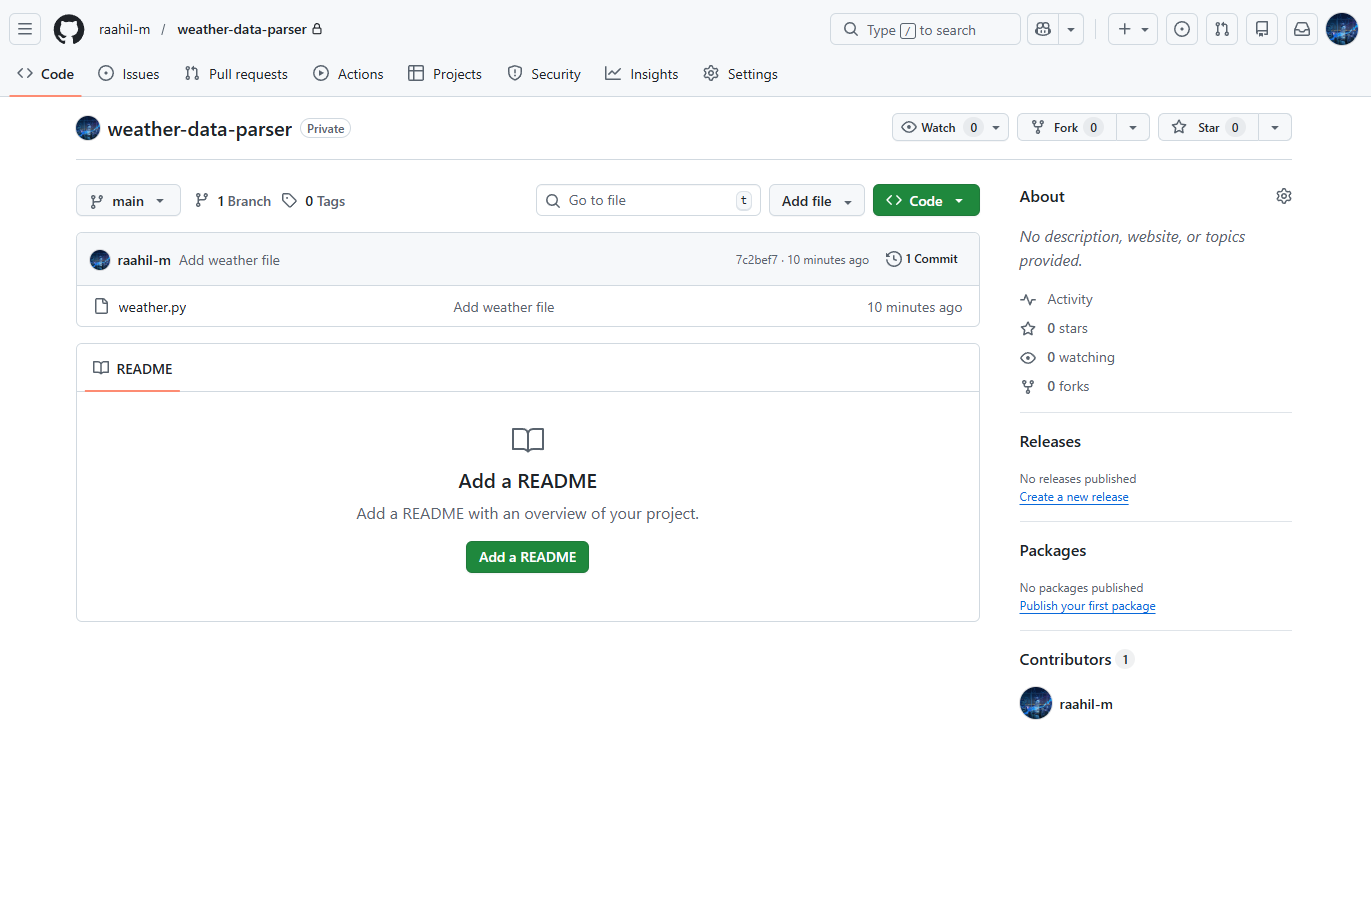
The screenshot above is your destination. In the rest of this tutorial, you’ll build that result one step at a time, starting from your local project.
Get Your Code: Click here to download the free sample code you’ll use to follow along as you put a weather CLI app on GitHub and practice core workflows like commits, branches, pull requests, and issues.
Take the Quiz: Test your knowledge with our interactive “How to Use GitHub” quiz. You’ll receive a score upon completion to help you track your learning progress:
Interactive Quiz
How to Use GitHubPractice putting a Python project on GitHub by creating a remote repository, pushing your local code, and collaborating with others.
Prerequisites
This guide is designed for developers who already have a basic understanding of the command line and local version control. To follow along with the steps, you’ll need:
- A GitHub account: A free account registered on GitHub.
- Git installed: The Git command-line tools installed on your operating system.
- A local Git repository: A folder on your computer that contains some files and has been initialized with
git init. You should also have at least one saved commit in this local repository.
If you need help setting up your local environment before moving forward, you can review the How to Use Git: A Beginner’s Guide tutorial to get your local repository ready.
If you prefer to learn by watching, Real Python’s Introduction to Git and GitHub for Python video course walks through both tools from the ground up and pairs well with the hands-on steps in this guide.
To work through the steps that follow, you can set up a sample Python project locally. Open your terminal, create a new folder called weather-data-parser, and navigate inside it:
$ mkdir weather-data-parser
$ cd weather-data-parser
Create a new file named weather.py and paste the Python code below into it. This weather app is adapted from Real Python’s Raining Outside? Build a Weather CLI App With Python tutorial, which provides additional background and a full step-by-step walkthrough of the original project.
weather.py
import argparse
import json
import sys
from configparser import ConfigParser
from urllib import error, parse, request

# =========================
# Styling / Colors
# =========================
PADDING = 20
RED = "\033[1;31m"
BLUE = "\033[1;34m"
CYAN = "\033[1;36m"
GREEN = "\033[0;32m"
YELLOW = "\033[33m"
WHITE = "\033[37m"
REVERSE = "\033[;7m"
RESET = "\033[0m"

def change_color(color):
    print(color, end="")

# =========================
# Weather Config
# =========================
BASE_WEATHER_API_URL = "http://api.openweathermap.org/data/2.5/weather"
# Weather Condition Codes
# https://openweathermap.org/weather-conditions#Weather-Condition-Codes-2
THUNDERSTORM = range(200, 300)
DRIZZLE = range(300, 400)
RAIN = range(500, 600)
SNOW = range(600, 700)
ATMOSPHERE = range(700, 800)
CLEAR = range(800, 801)
CLOUDY = range(801, 900)

def read_user_cli_args():
    """Handles the CLI user interactions.

    Returns:
        argparse.Namespace: Populated namespace object
    """
    parser = argparse.ArgumentParser(
        description="gets weather and temperature information for a city"
    )
    parser.add_argument(
        "city", nargs="+", type=str, help="enter the city name"
    )
    parser.add_argument(
        "-i",
        "--imperial",
        action="store_true",
        help="display the temperature in imperial units",
    )
    return parser.parse_args()

def build_weather_query(city_input, imperial=False):
    """Builds the URL for an API request to OpenWeather's Weather API.

    Args:
        city_input (List[str]): Name of a city as collected by argparse
        imperial (bool): Whether or not to use imperial units for temperature

    Returns:
        str: URL formatted for a call to OpenWeather's city name endpoint
    """
    api_key = _get_api_key()
    city_name = " ".join(city_input)
    url_encoded_city_name = parse.quote_plus(city_name)
    units = "imperial" if imperial else "metric"
    url = (
        f"{BASE_WEATHER_API_URL}?q={url_encoded_city_name}"
        f"&units={units}&appid={api_key}"
    )
    return url

def _get_api_key():
    """Fetch the API key from your configuration file.

    Expects a configuration file named "secrets.ini" with structure:

        [openweather]
        api_key=<YOUR-OPENWEATHER-API-KEY>
    """
    config = ConfigParser()
    config.read("secrets.ini")
    return config["openweather"]["api_key"]

def get_weather_data(query_url):
    """Makes an API request to a URL and returns the data as a Python object.

    Args:
        query_url (str): URL formatted for OpenWeather's city name endpoint

    Returns:
        dict: Weather information for a specific city
    """
    try:
        response = request.urlopen(query_url)
    except error.HTTPError as http_error:
        if http_error.code == 401:  # 401 - Unauthorized
            sys.exit("Access denied. Check your API key.")
        elif http_error.code == 404:  # 404 - Not Found
            sys.exit("Can't find weather data for this city.")
        else:
            sys.exit(f"Something went wrong... ({http_error.code})")
    data = response.read()
    try:
        return json.loads(data)
    except json.JSONDecodeError:
        sys.exit("Couldn't read the server response.")

def display_weather_info(weather_data, imperial=False):
    """Prints formatted weather information about a city.

    Args:
        weather_data (dict): API response from OpenWeather by city name
        imperial (bool): Whether or not to use imperial units for temperature

    More information at https://openweathermap.org/current#name
    """
    city = weather_data["name"]
    weather_id = weather_data["weather"][0]["id"]
    weather_description = weather_data["weather"][0]["description"]
    temperature = weather_data["main"]["temp"]
    change_color(REVERSE)
    print(f"{city:^{PADDING}}", end="")
    change_color(RESET)
    weather_symbol, color = _select_weather_display_params(weather_id)
    change_color(color)
    print(f"\t{weather_symbol}", end=" ")
    print(
        f"\t{weather_description.capitalize():^{PADDING}}",
        end=" ",
    )
    change_color(RESET)
    print(f"({temperature}°{'F' if imperial else 'C'})")

def _select_weather_display_params(weather_id):
    """Selects a weather symbol and a display color for a weather state.

    Args:
        weather_id (int): Weather condition code from the OpenWeather API

    Returns:
        tuple[str]: Contains a weather symbol and a display color
    """
    if weather_id in THUNDERSTORM:
        display_params = ("💥", RED)
    elif weather_id in DRIZZLE:
        display_params = ("💧", CYAN)
    elif weather_id in RAIN:
        display_params = ("💦", BLUE)
    elif weather_id in SNOW:
        display_params = ("⛄️", WHITE)
    elif weather_id in ATMOSPHERE:
        display_params = ("🌀", BLUE)
    elif weather_id in CLEAR:
        display_params = ("🔆", YELLOW)
    elif weather_id in CLOUDY:
        display_params = ("💨", WHITE)
    else:  # In case the API adds new weather codes
        display_params = ("🌈", RESET)
    return display_params

if __name__ == "__main__":
    user_args = read_user_cli_args()
    query_url = build_weather_query(user_args.city, user_args.imperial)
    weather_data = get_weather_data(query_url)
    display_weather_info(weather_data, user_args.imperial)
Because this is a Python project, it’s best practice to include a .gitignore file to avoid accidentally uploading sensitive information like API keys or unnecessary files like __pycache__ directories to GitHub. Create a file named .gitignore and add the following lines:
.gitignore
__pycache__/
secrets.ini
Now initialize the Git repository:
$ git init
Before making your first commit, it’s often helpful to check what files Git is tracking and what changes will be included. You can do this with the git status command:
$ git status
This command shows the current state of your working directory, including any new or modified files that will be part of the next commit. At this point, you should see your project files, including weather.py and .gitignore, listed as untracked files:
Output
On branch master

No commits yet

Untracked files:
  (use "git add <file>..." to include in what will be committed)
        .gitignore
        weather.py

nothing added to commit but untracked files present (use "git add" to track)
You can now stage your files and create the initial commit:
$ git add .
$ git commit -m "Initial commit"
With your local repository prepared, you’re ready to create a remote destination for it.
Step 1: Create a New Repository on GitHub
Before you can push your local code to the internet, you need to create a destination for it. GitHub refers to these destinations as repositories, or repos for short. Your first step is to create a brand-new, empty repository on your GitHub account.
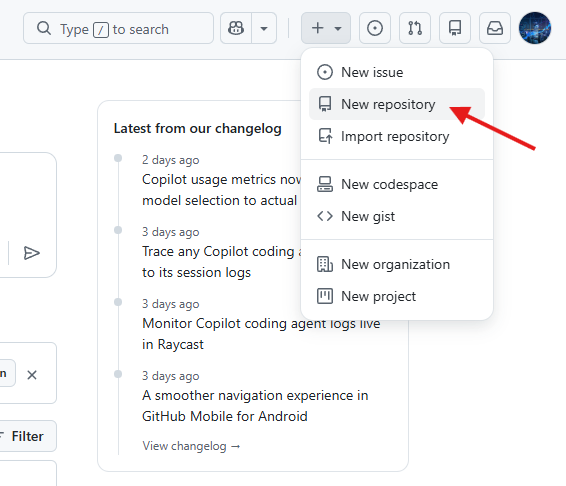
To navigate to the creation page, log in to your GitHub account in your web browser. In the upper-right corner of any page, locate the plus icon (+) next to your profile picture. Click this icon and select New repository from the dropdown menu. This action takes you to the repository creation page, which looks something like this:
The first required field on this page is the repository name. GitHub allows uppercase letters, lowercase letters, hyphens, underscores, dots, and digits in repository names. However, many developers commonly use lowercase letters with hyphens because the names are readable and consistent with many open-source projects.
For this tutorial, type in weather-data-parser. GitHub will check whether the repository name is available under your account and display a green checkmark if it is.
Next, you’ll see the Description field. While this is optional, providing a short summary helps other developers quickly understand your work. You can write a short description like “A Python command-line tool to fetch and display weather data.”
You must then decide whether your repository will be Public or Private. Both options work well for personal projects. The practical difference is whether anyone on the internet can view your source code or only the people you explicitly invite. In either case, you retain full control over who can commit changes.
GitHub offers unlimited public and private repositories with any number of collaborators on its free tier, and you can always change a repository’s visibility later in your settings. For this tutorial, select Public so you can access the repository and follow along with the rest of the steps:
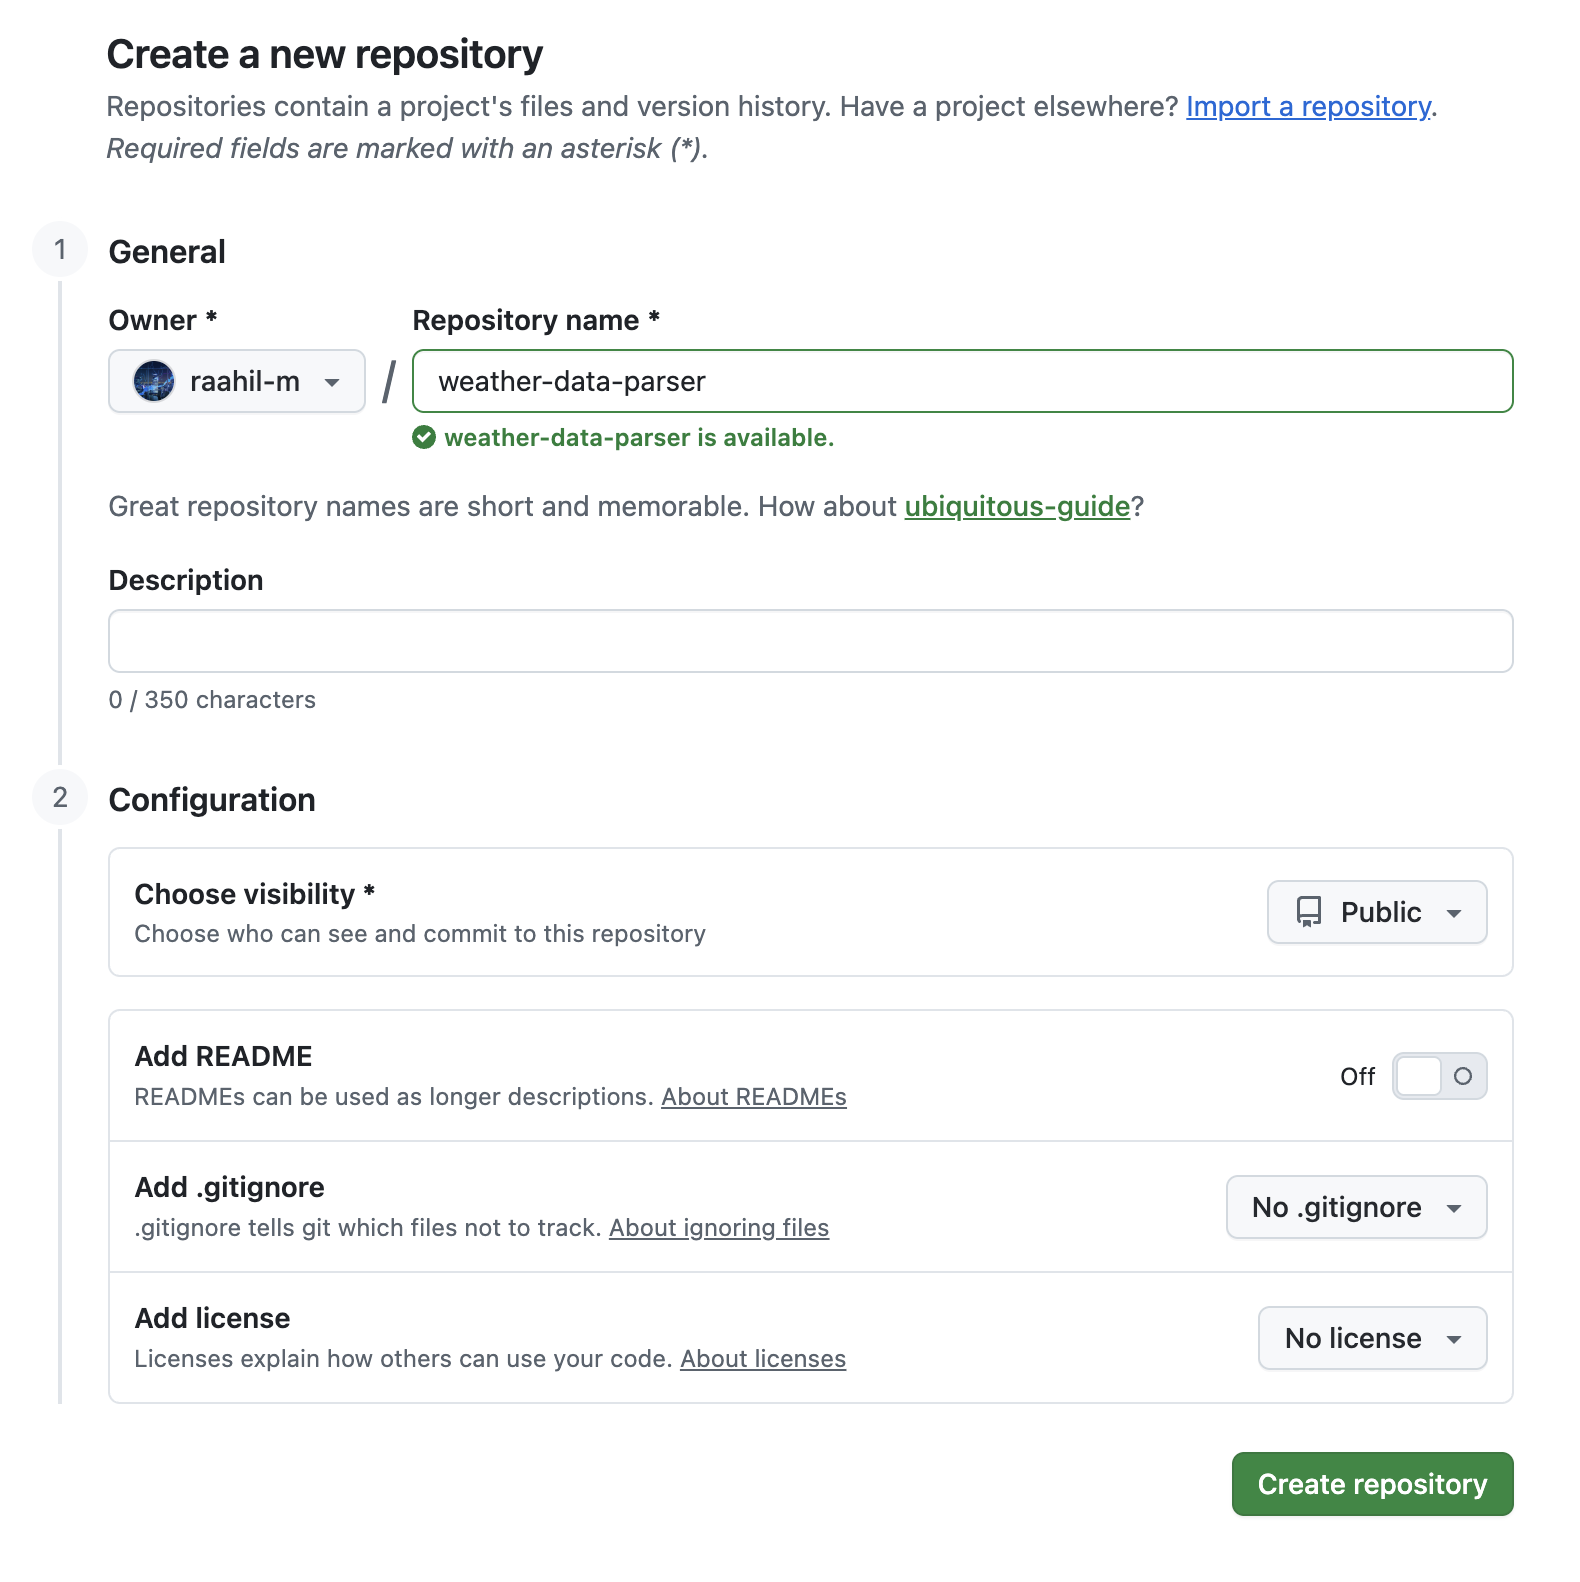
The most important part of this step is the Configuration section. Because you already have a local Git repository on your computer, you must create an empty remote repository on GitHub so it can be properly connected to your existing commit history.
When creating a new repository on GitHub, you’ll see optional checkboxes to initialize it with a README, a .gitignore file, or a license:
- A
READMEfile is useful when starting a project directly on GitHub, since it provides an overview of the repository. - A
.gitignorefile helps prevent unwanted files from being tracked by Git. - A license is important if you intend to share your project as open source.
These are all good practices when you’re creating a brand-new project on GitHub. However, in this tutorial, you already have a local repository with its own existing commit history. If GitHub also creates an initial commit by adding any of these files, then the remote repository will no longer match your local history, and GitHub will reject your first push.
For this reason, you should leave all of these options unchecked so that GitHub creates an empty repository. Don’t check the box to add a README file. Don’t add a .gitignore file. Don’t choose a license. This ensures your local project can be connected cleanly without any conflicting initial commits.
Scroll to the bottom of the page and click the green Create repository button. GitHub will immediately generate your empty repository and redirect you to a quick setup page displaying several command-line instructions. Keep this page open, as you’ll need the provided URL in the next step:
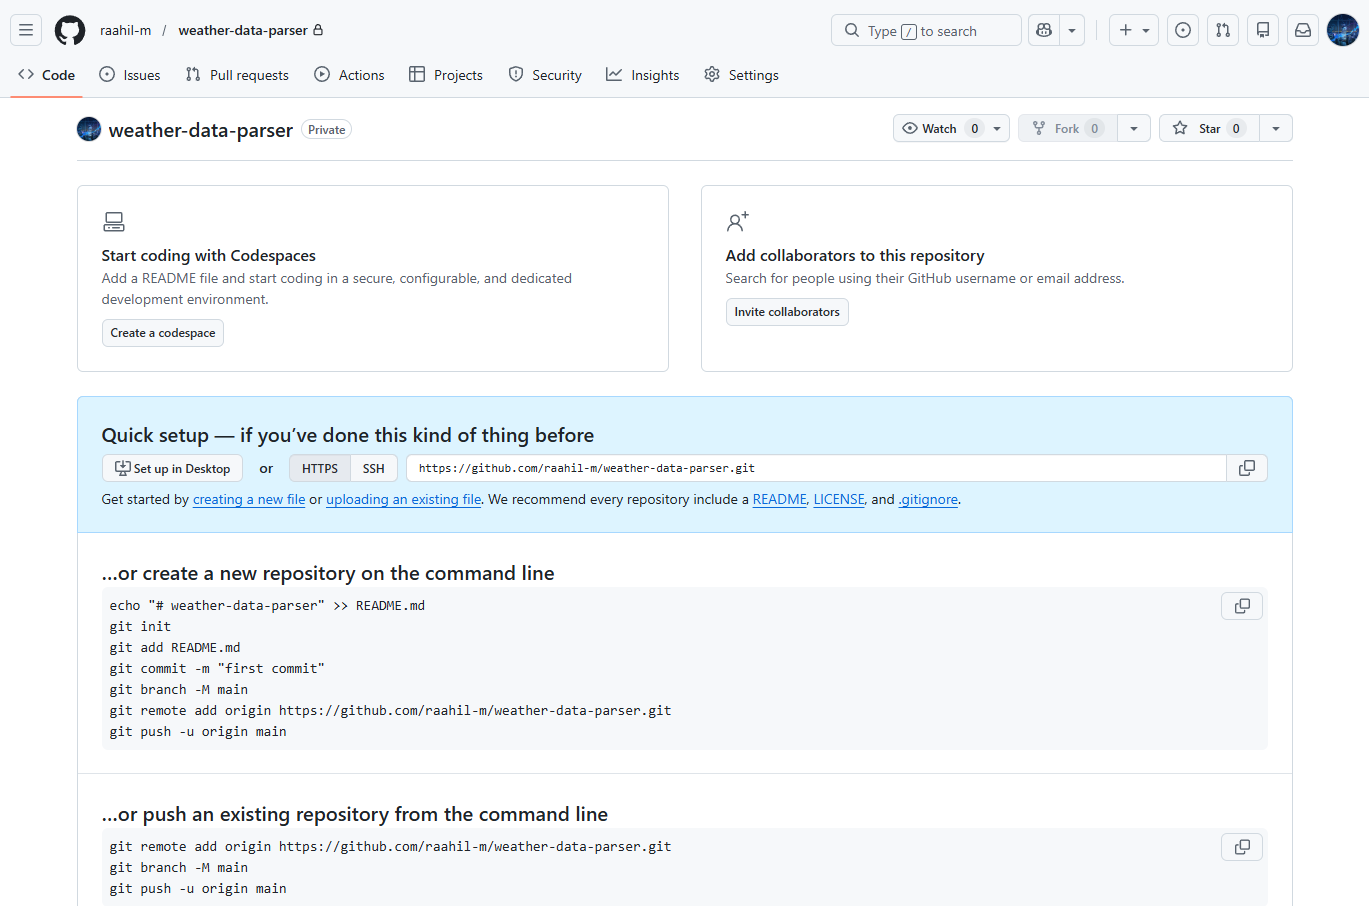
This setup screen gives you the exact commands required to push an existing repository from the command line.
Step 2: Connect Your Local Repository With GitHub
Your local repository on your computer and your new remote repository on GitHub currently have no knowledge of each other. You need to link them together using the Git command-line interface.
On the empty repository page on GitHub, locate the Quick Setup section. Ensure that the HTTPS button is selected, and copy the provided web URL. It’ll look similar to https://github.com/your-username/weather-data-parser.git.
Open your terminal or command prompt and navigate to the root directory of your local project. To tell your local Git repository about GitHub, you’ll run the git remote add command followed by the name you want to give the remote and the URL you copied:
$ git remote add origin https://github.com/your-username/weather-data-parser.git
In this command, origin is a convention. It’s the default, standard name given to the primary remote repository. You’re effectively telling Git, “Whenever I mention origin, I am referring to this specific URL on GitHub.”
With the connection established, you can send your local code to GitHub. This process is called pushing.
First, ensure your default local branch is named main. Git itself has historically used master as the default branch name, while GitHub uses main by default for new repositories. This mismatch can cause confusion when connecting a local repository to a new GitHub repository. To align your local branch with GitHub’s default naming, you can rename your current branch to main:
$ git branch -M main
The -M flag is shorthand for --move --force. It tells Git to rename your current branch to main, overwriting it if necessary.
Next, run the git push command to send your code to GitHub:
$ git push -u origin main
The -u flag is shorthand for --set-upstream. By using this flag, you tie your local main branch to the remote main branch on origin. For all future updates, you can type git push without needing to specify the remote name or branch.
When you run this command, Git will securely transfer your files. First, it’ll prompt you to authenticate. GitHub no longer accepts standard account passwords for command-line operations. Either a web browser window pops up so Git Credential Manager can authorize the connection for you, or your terminal prompts you to paste a Personal Access Token (PAT) instead of a password.
Once authenticated, you’ll see output detailing the compression and transfer of your objects:
Output
Enumerating objects: 3, done.
Counting objects: 100% (3/3), done.
Writing objects: 100% (3/3), 214 bytes | 214.00 KiB/s, done.
Total 3 (delta 0), reused 0 (delta 0), pack-reused 0
To https://github.com/your-username/weather-data-parser.git
 * [new branch]      main -> main
branch 'main' set up to track 'origin/main'.
Return to your web browser and refresh the GitHub repository page. The setup instructions will disappear, replaced by your project’s files and folders:
If your local project included a file named README.md, GitHub will automatically process the Markdown and render it as a formatted document directly beneath your file list. The README.md file acts as the landing page for your project. A well-written README explains the project’s purpose, how to install its dependencies, and how to run or use the code.
GitHub also offers a powerful tool for making quick edits directly from your browser. While viewing your repository page, press the period key (.) on your keyboard. This keyboard shortcut immediately opens your repository in vscode.dev (formerly github.dev), a web-based version of Visual Studio Code. The old github.dev address now redirects to vscode.dev/github, so that’s the URL you’ll see in your browser:
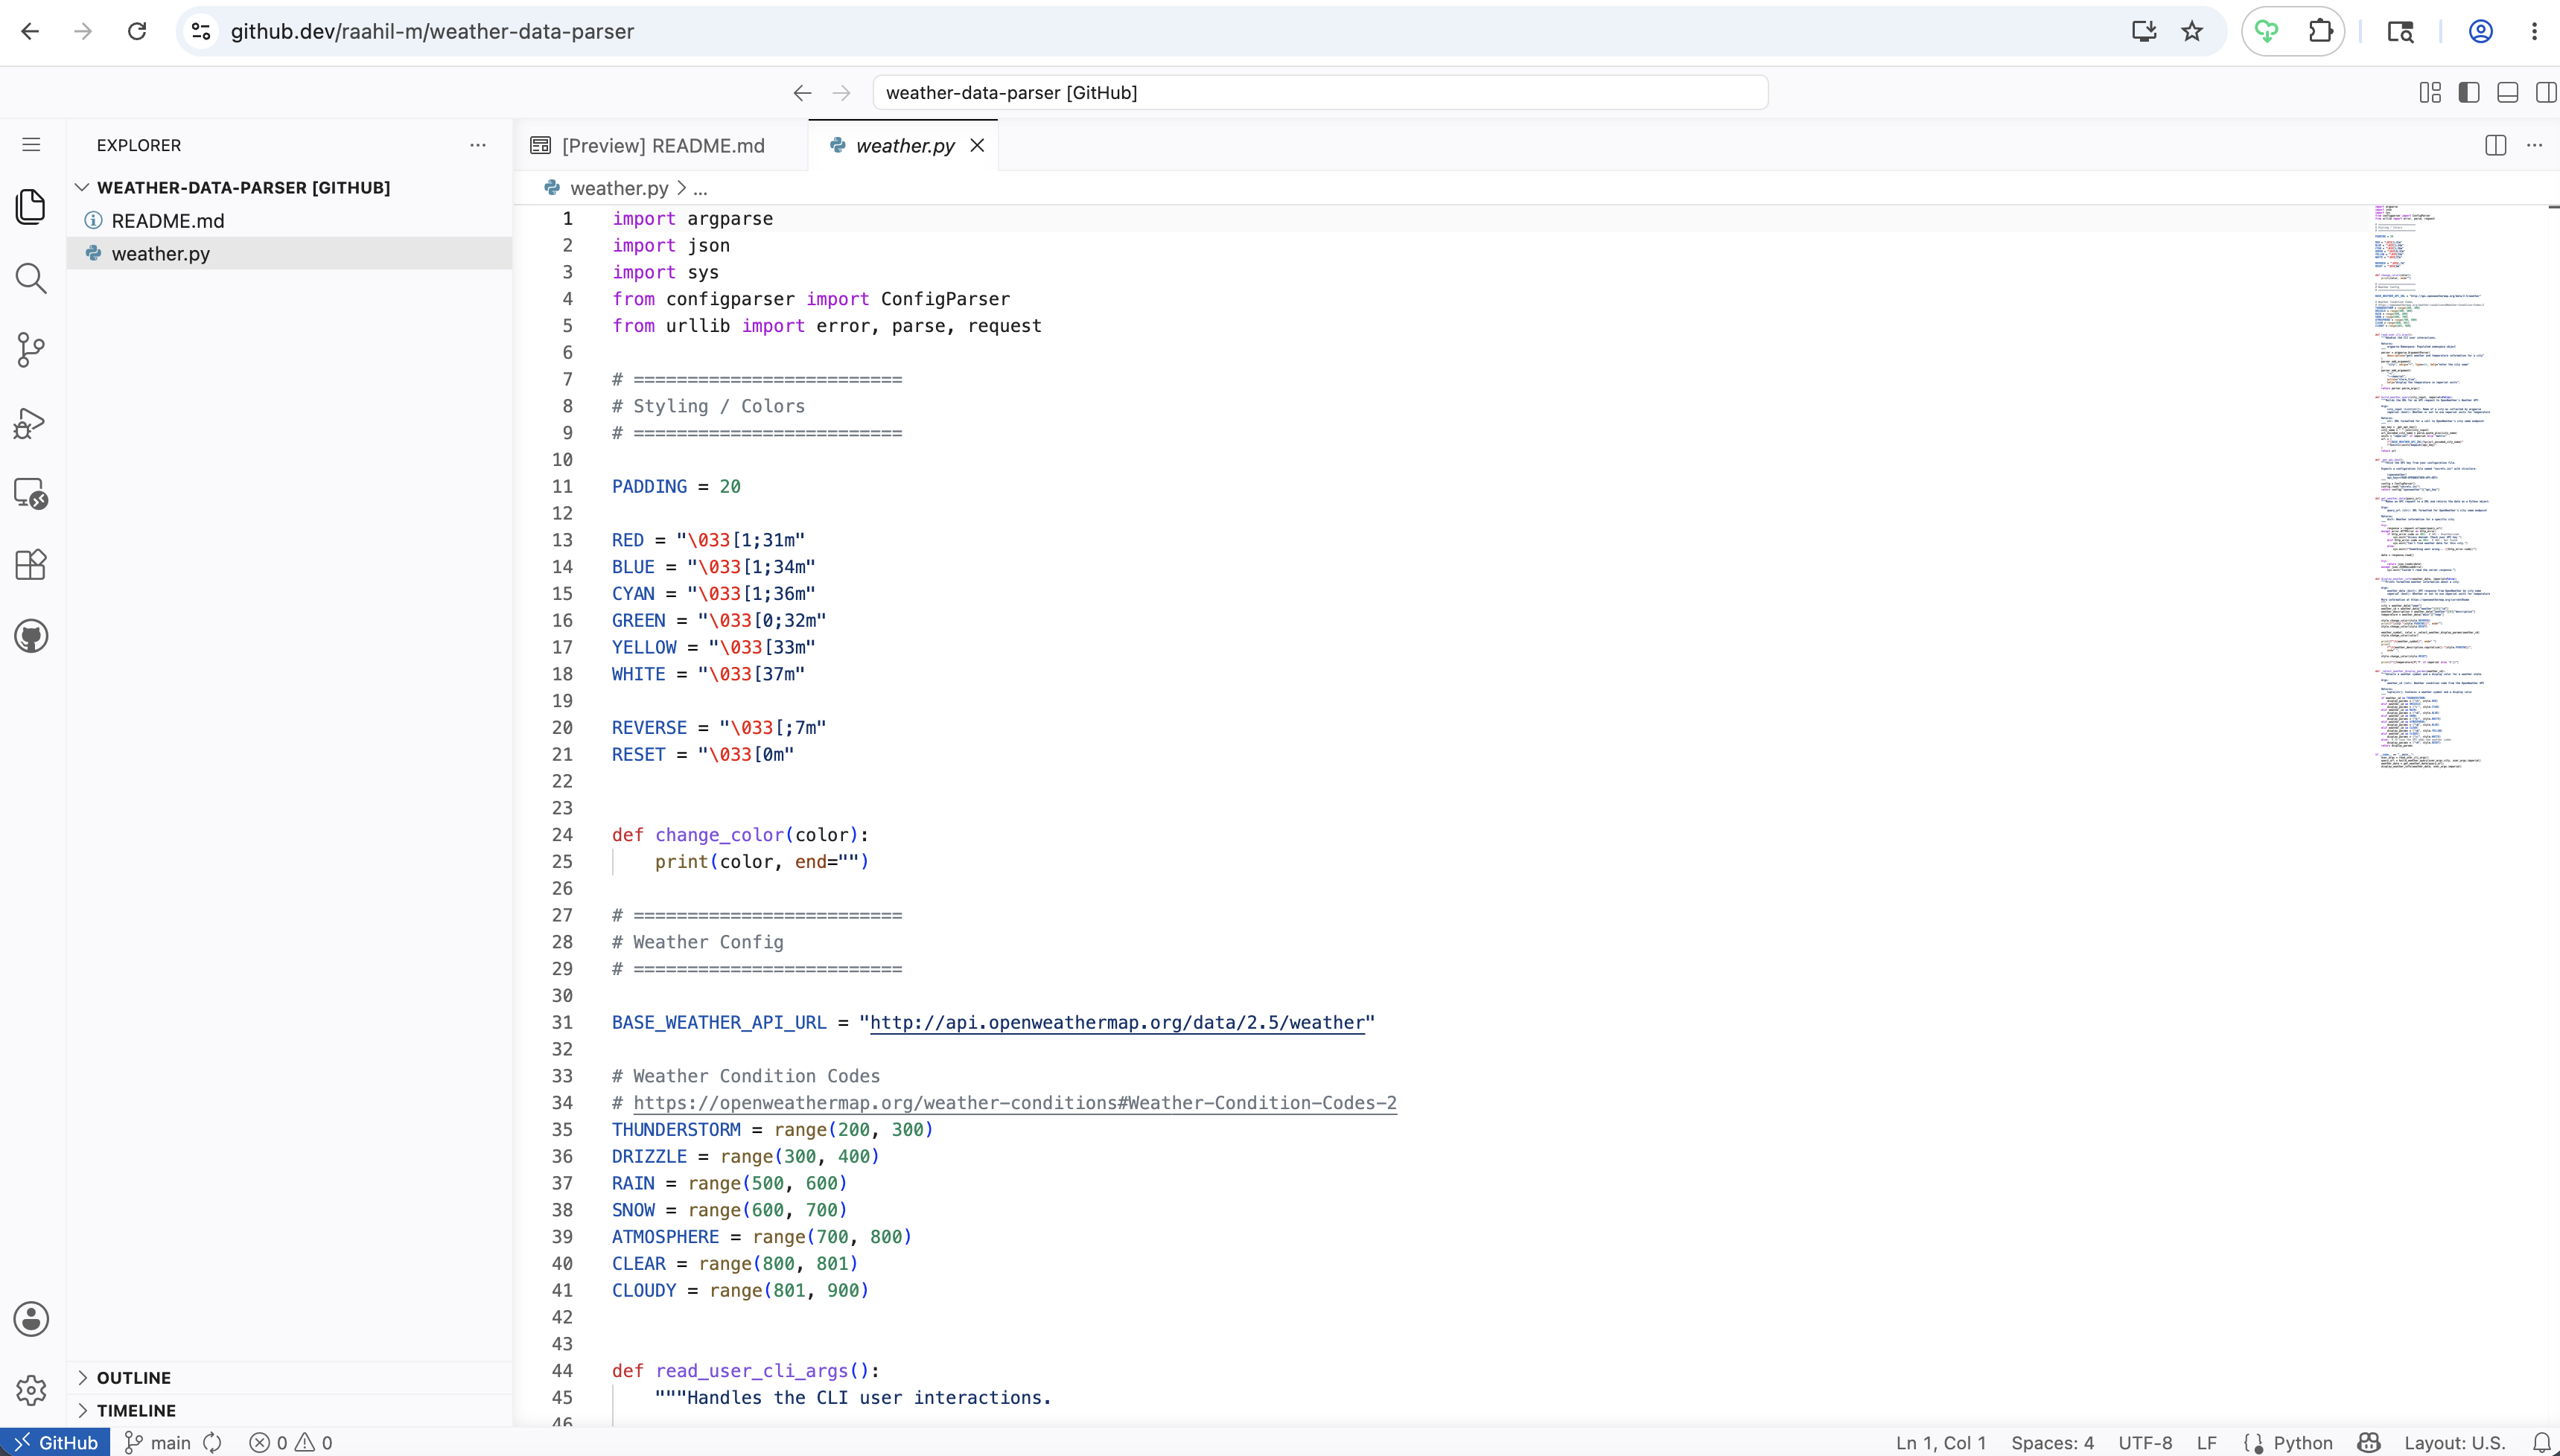
While you’ll normally do your heavy development work in a local IDE like PyCharm or VS Code, this web editor is incredibly useful for fixing quick typos or updating documentation without needing to open your local terminal.
Step 3: Collaborate With Others on Your GitHub Repository
Version control is valuable even for solo developers, but GitHub becomes far more useful when you work alongside others. Even if you’re the only person writing code, you can use GitHub’s collaboration tools to organize your own workflow.
Much of the collaboration on GitHub happens through open-source projects that rely on pull requests (PRs). A PR is a formal proposal asking you to review someone’s code and merge it into your project. In this workflow, anyone can fork your public repository, create a new branch, make changes, and open a PR. You can then leave line-by-line comments, suggest changes, and ultimately approve or reject the contribution.
The fork-and-pull-request flow suits outside contributors who don’t have write access to your repository. If you instead want someone to push directly to your repository, then you invite them as a collaborator.
From your main repository page, click the Settings tab located near the top of the screen. In the left-hand sidebar, click on Collaborators. You may need to confirm your GitHub password to access this area. Click the green Add people button and search for your teammate using their GitHub username or email address:
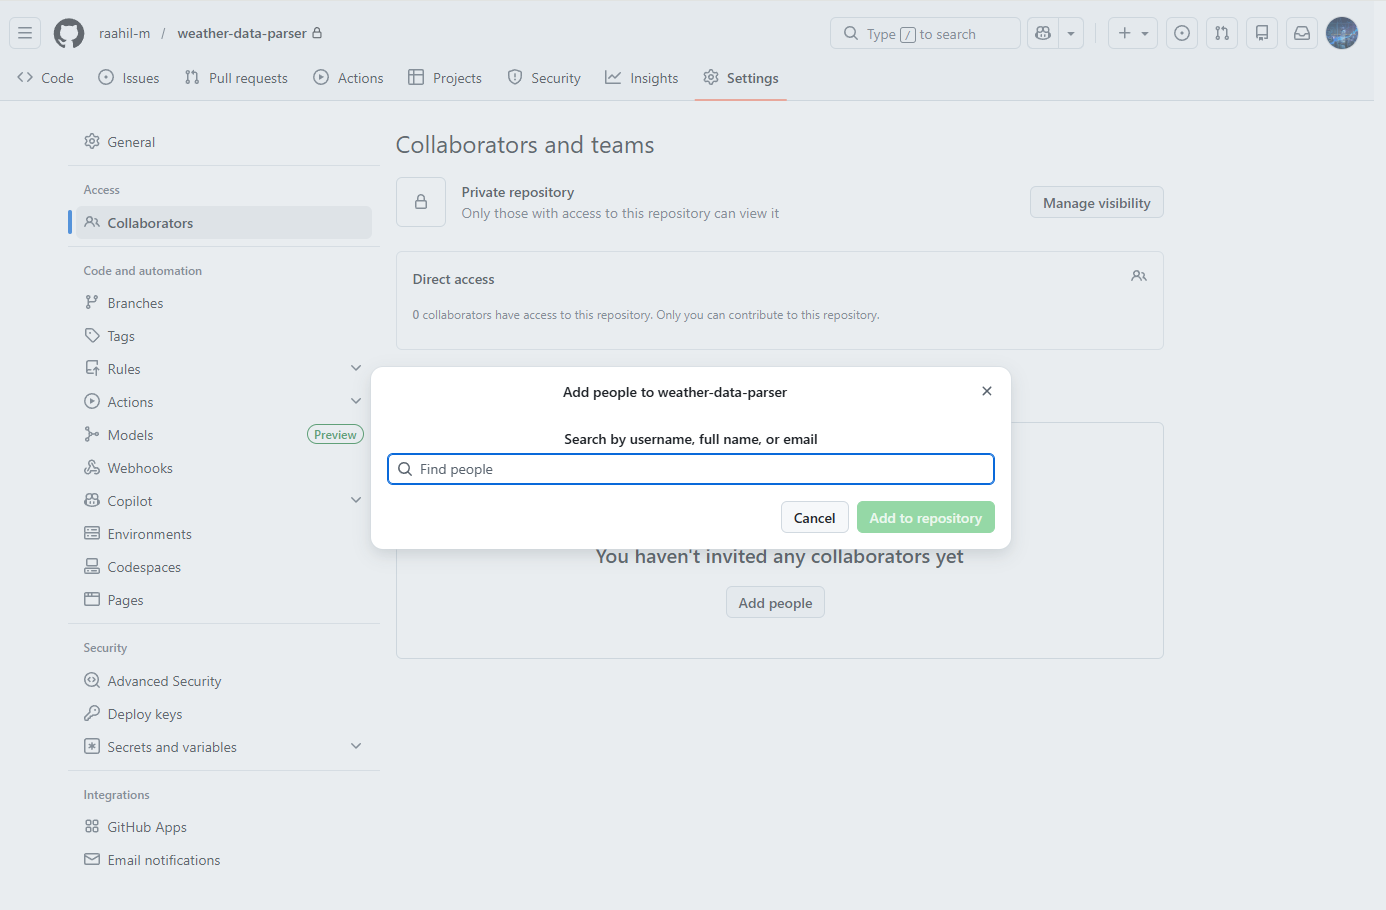
Once you select them, they’ll receive an email invitation. After they accept, they can clone your repository to their own computer and push their changes directly to your project.
During software development, you’re constantly identifying bugs and thinking of new features, so having a reliable way to track everything is important. Instead of relying on scattered notes or disorganized files, GitHub Issues provides a structured way to keep it all in one place.
Click the Issues tab near the top of your repository page. Click the green New issue button. Give your issue a descriptive title, such as “weather.py crashes when run from a different directory”, and use the comment box to provide detailed context, error tracebacks, or feature requirements:
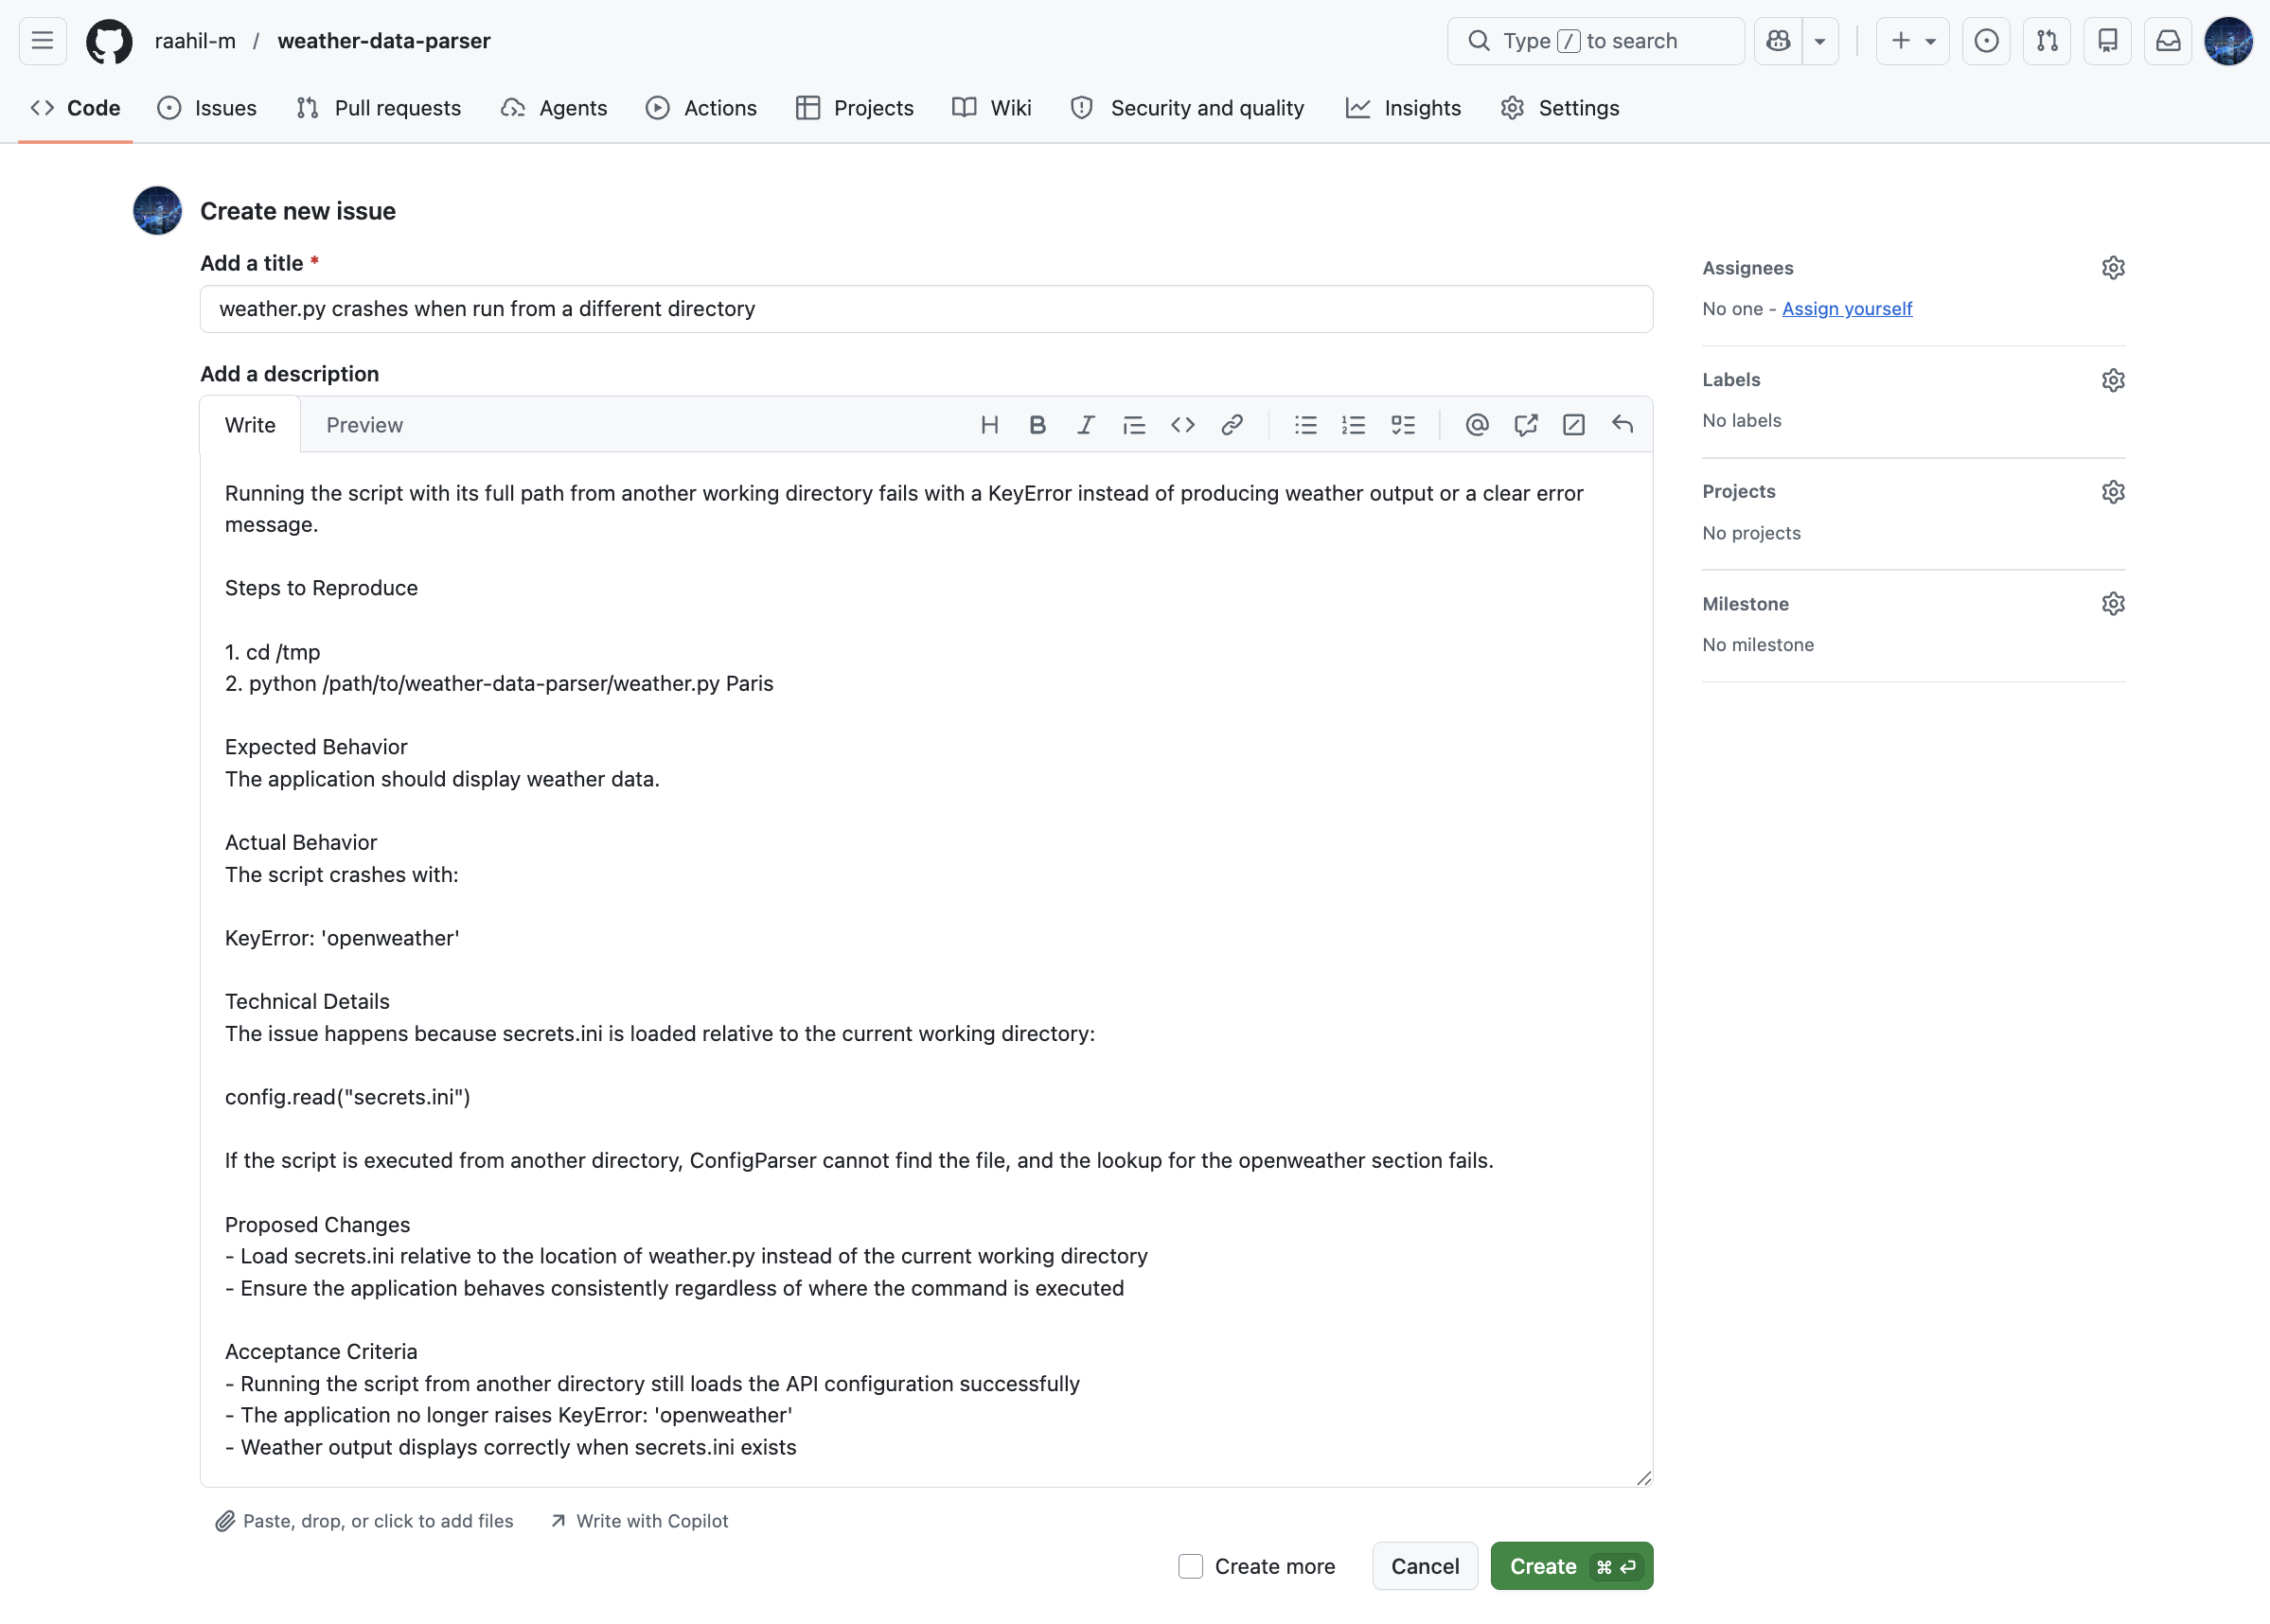
In the example above, the title summarizes the bug, while the comment box captures the full description. Expand the section below to read the full description used for this issue:
Running the script with its full path from another working directory
fails with a KeyError instead of producing weather output or a clear
error message.

Steps to Reproduce

1. cd /tmp
2. python /path/to/weather-data-parser/weather.py Paris

Expected Behavior
The application should display weather data.

Actual Behavior
The script crashes with:

KeyError: 'openweather'

Technical Details

The issue happens because secrets.ini is loaded relative to the current
working directory:

config.read("secrets.ini")

If the script is executed from another directory, ConfigParser cannot
find the file, and the lookup for the openweather section fails.

Proposed Changes
- Load secrets.ini relative to the location of weather.py instead of
  the current working directory
- Ensure the application behaves consistently regardless of where the
  command is executed

Acceptance Criteria
- Running the script from another directory still loads the API
  configuration successfully
- The application no longer raises KeyError: 'openweather'
- Weather output displays correctly when secrets.ini exists
Once you submit the issue, GitHub assigns it a unique sequence number, such as #2. Issues and pull requests share the same numbering sequence within a repository, so each number refers to either an issue or a pull request, but never both. You can assign the issue to a specific collaborator, apply color-coded labels like bug or enhancement, and track its progress:
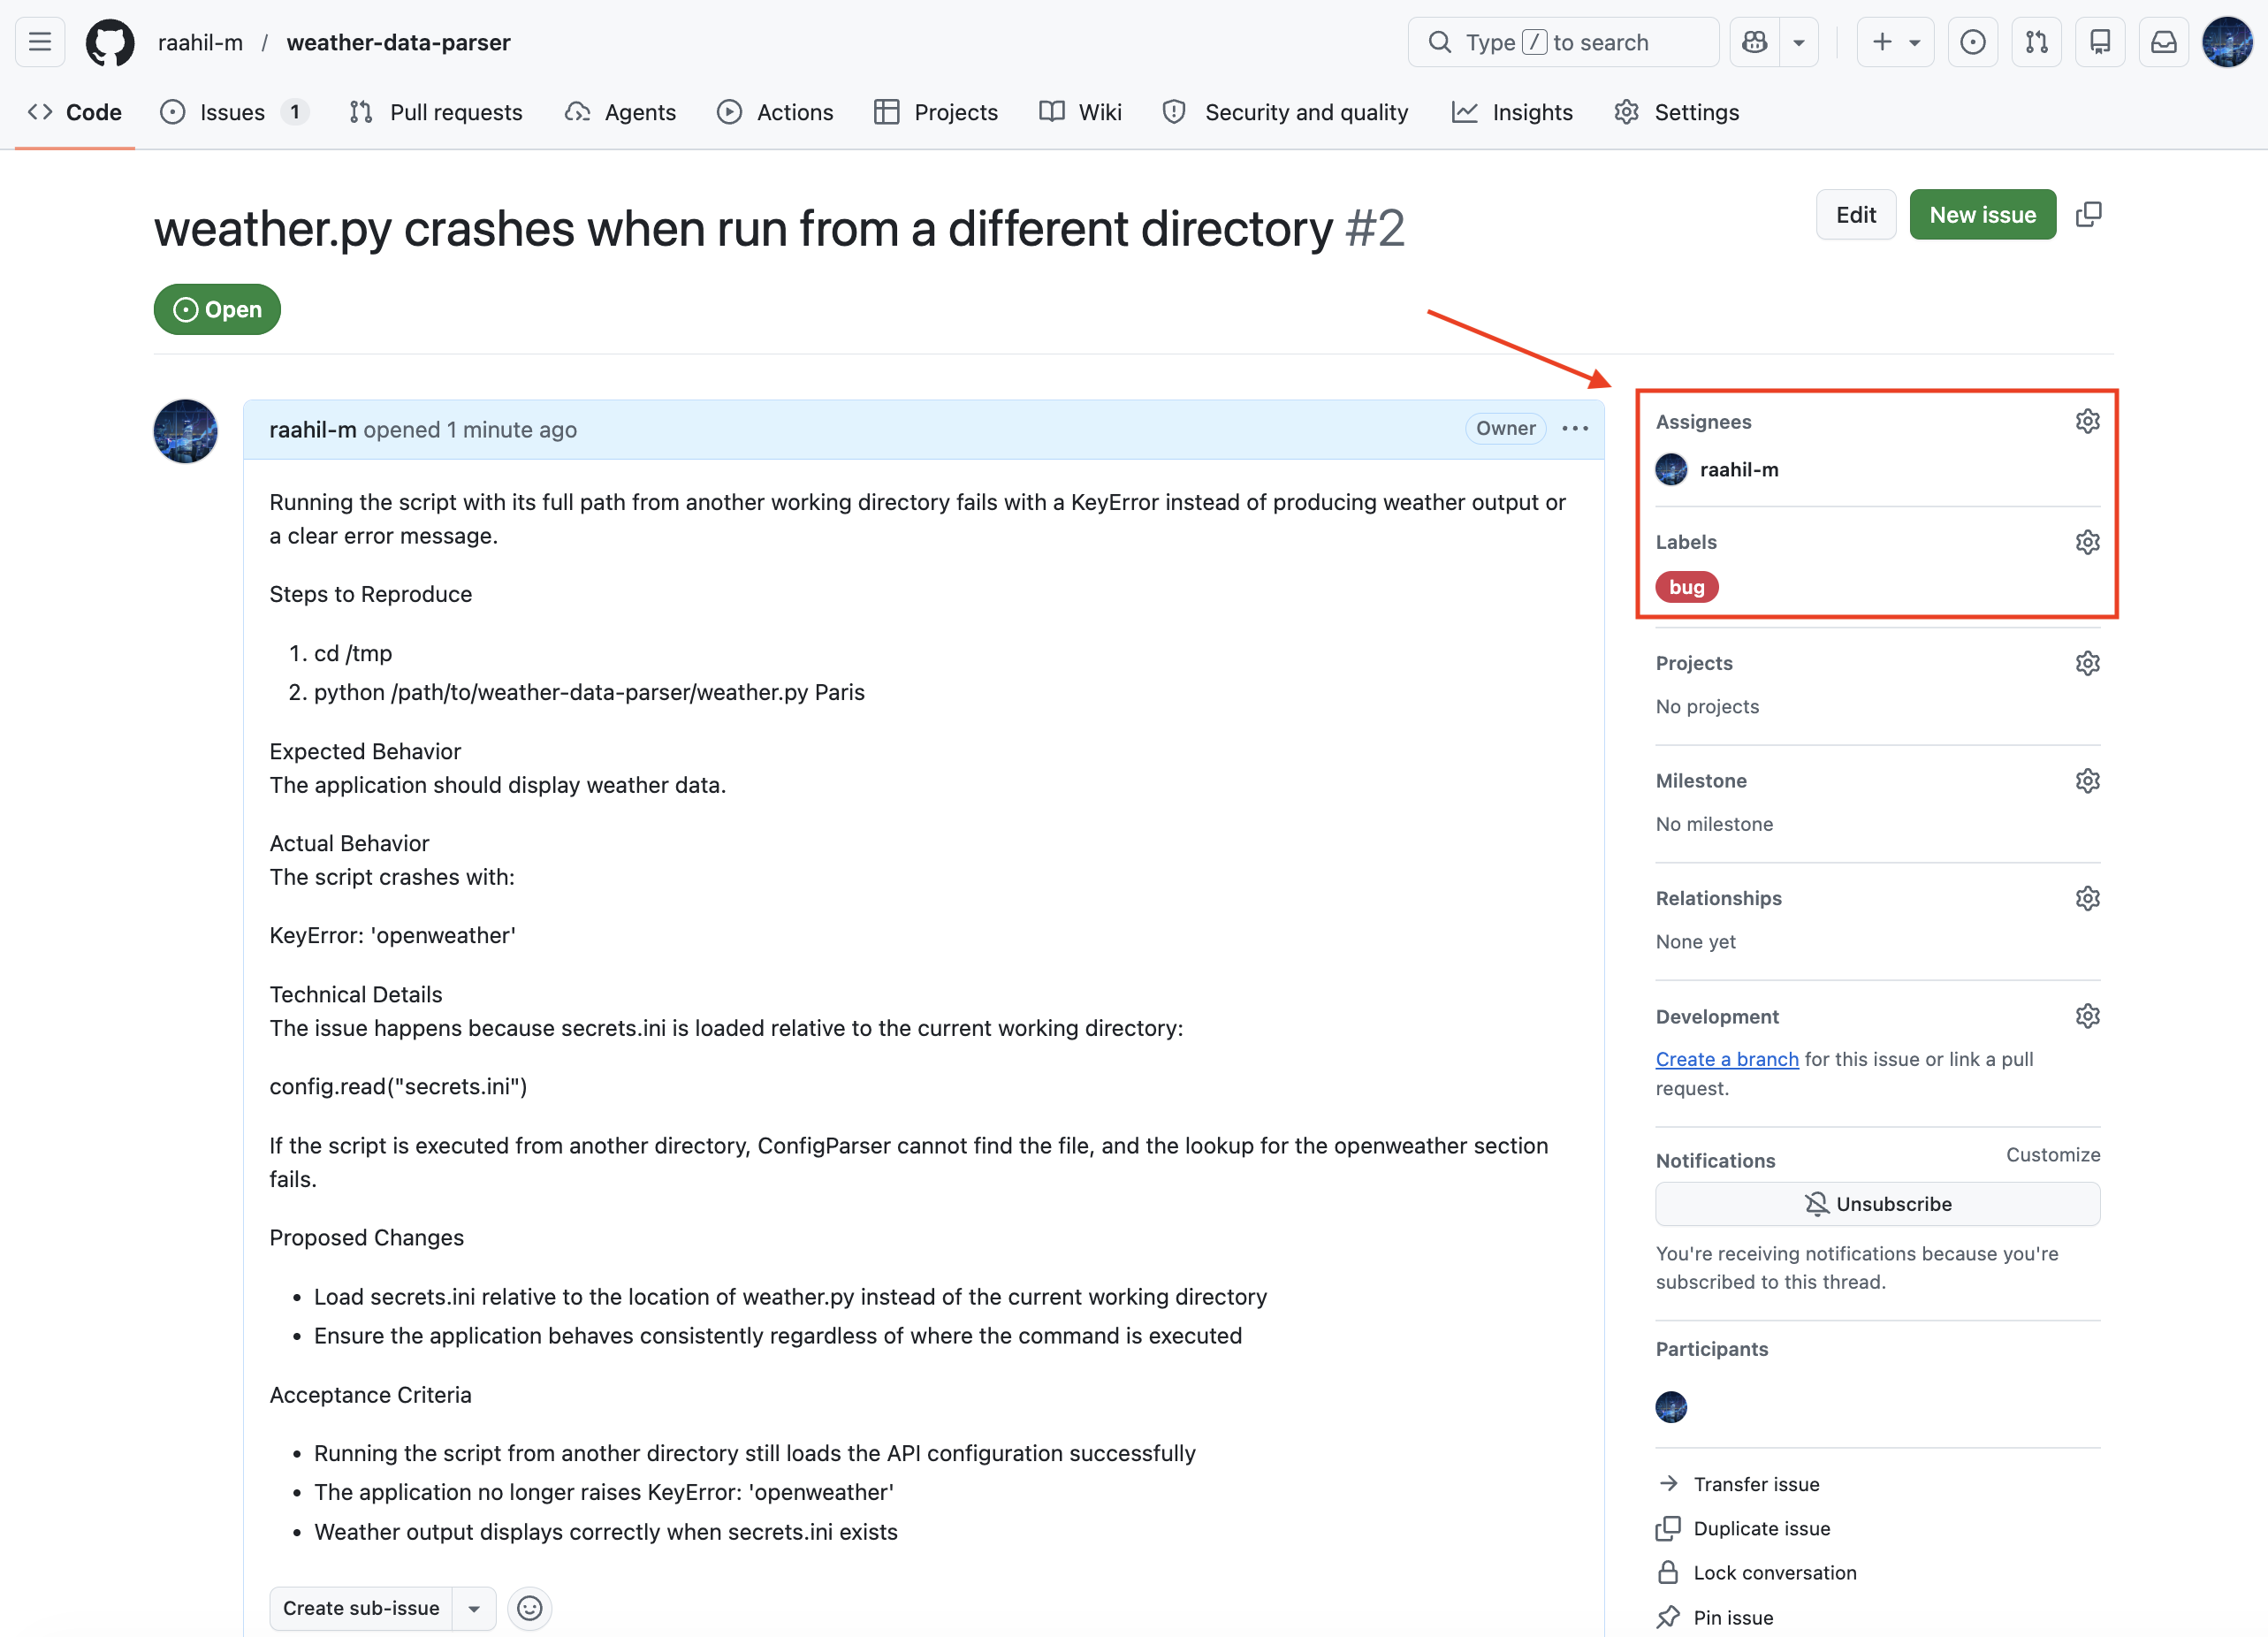
GitHub connects your code and your project management by linking commit messages to these issues. When you fix a problem locally, you can use specific keywords in your commit message to update the issue automatically. GitHub accepts keywords like close, closes, closed, fix, fixes, fixed, resolve, resolves, or resolved.
To fix this issue, update the configuration loading logic so the script always loads secrets.ini relative to the location of weather.py instead of the current working directory. First, add the following import near the top of the file:
weather.py
import argparse
import json
import sys
from configparser import ConfigParser
from pathlib import Path
from urllib import error, parse, request

# ...
Next, locate the line in _get_api_key() that currently reads the configuration file using a hardcoded string:
weather.py
# ...

def _get_api_key():
    """Fetch the API key from your configuration file.

    Expects a configuration file named "secrets.ini" with structure:

        [openweather]
        api_key=<YOUR-OPENWEATHER-API-KEY>
    """
    config = ConfigParser()
    config.read("secrets.ini")
    return config["openweather"]["api_key"]

# ...
Replace this configuration call to use the Path object to dynamically build the absolute path to your file:
weather.py
# ...

def _get_api_key():
    """Fetch the API key from your configuration file.

    Expects a configuration file named "secrets.ini" with structure:

        [openweather]
        api_key=<YOUR-OPENWEATHER-API-KEY>
    """
    config = ConfigParser()
    config.read(Path(__file__).parent / "secrets.ini")
    return config["openweather"]["api_key"]

# ...
This change ensures the script can locate the configuration file even when it’s executed from another directory. After making the changes, open your local terminal and stage them. When you write your commit message, include the word “closes” followed by the issue number:
$ git add weather.py
$ git commit -m "Load secrets.ini from project directory, not CWD (closes #2)"
When you push your code, GitHub scans your commit message, recognizes the keyword, and links the commit to the issue for full traceability. If you push or merge this commit into your default branch, GitHub will automatically change the issue’s status from Open to Closed. This creates a professional, automated workflow that keeps your project organized.
Next Steps After Learning How to Use GitHub
You now have a fully functional GitHub repository connected to your local one. As you continue to develop your Python project, you’ll rarely push directly to main. Instead, you’ll typically create a feature branch, make your edits, push the branch to GitHub, and open a pull request to review the changes before merging them.
Sometimes, a push will fail. Beginners most commonly hit this error:
Output
! [rejected]        main -> main (fetch first)
error: failed to push some refs to
⮑ 'https://github.com/your-username/weather-data-parser.git'
This error happens when the remote GitHub repository contains commits that don’t exist on your local machine. For example, if you made a quick edit using the web-based VS Code editor, your local machine doesn’t have that update yet. To fix this, you must download the new data from GitHub before you can upload your own changes. You can download the remote changes by running the following:
$ git pull origin main
This command merges the remote changes into your local files. Once the pull completes, you can successfully run git push. Note that running git pull generates an automatic “merge commit” in your history. If you prefer to keep your history entirely linear without merge commits, then you can use git pull --rebase origin main instead.
Walk through that push-pull cycle below:
As your projects grow, you’ll eventually want to propose changes to other people’s repositories. You do this by opening a pull request, just as outside contributors might do for your project. Learning how to navigate pull requests is an essential skill for contributing to open-source Python libraries.
Once you’re comfortable collaborating through pull requests, you can automate the checks that run on them. Real Python’s Python Continuous Integration and Deployment Using GitHub Actions course shows you how to build workflows that test your code automatically whenever you push to GitHub.
When you’re ready to release software of your own, the tutorial on publishing a Python package to PyPI walks you through packaging, versioning, and uploading your code so anyone can install it.
Finally, while the GitHub website provides a rich graphical interface, many developers prefer to stay entirely within their terminal. You can explore the GitHub CLI, a command-line tool that lets you create repositories, manage issues, and review pull requests directly from your console environment.
To keep building out your toolkit beyond version control, Real Python’s Perfect Your Python Development Setup learning path covers Git, code editors, and virtual environments along with the other tools of a productive Python workflow.
Get Your Code: Click here to download the free sample code you’ll use to follow along as you put a weather CLI app on GitHub and practice core workflows like commits, branches, pull requests, and issues.
Frequently Asked Questions
Now that you have some experience working with remote repositories, you can browse the questions and answers below to resolve common concerns and clarify how Git and GitHub interact.
No. Git is the underlying version control software installed on your local computer. It manages the history of your files offline. GitHub is a remote hosting service and web platform owned by Microsoft. It provides a destination to upload your Git repositories so you can view them online and share them with others. Git works on its own without GitHub, but GitHub always relies on Git.
No. GitHub offers a free tier that’s perfectly sufficient for personal projects, portfolios, and even small professional teams. You can create unlimited public and private repositories, and you can invite outside collaborators to your private repositories without needing a paid subscription.
Yes. You can change the visibility of your repository at any time. Navigate to your repository on GitHub, click the Settings tab, and scroll down to the Danger Zone section. Click the button to Change repository visibility and select your preferred setting. Note that if your repository was public, other users might have already downloaded a copy of your code before you made it private.
If you checked the box to initialize the repository with a README, GitHub created a commit. When you attempt to run git push from your local machine, the terminal will reject the push because the remote repository has a history that doesn’t match your local history.
The safest fix for a beginner is to delete the GitHub repository entirely. Go to the repository Settings, scroll to the very bottom to Danger Zone, and click Delete this repository. Create a new repository from scratch, ensuring you leave the initialization checkboxes blank, and then try pushing your local code again.
GitHub removed standard password authentication for security reasons. When your terminal asks for a password during git push, you can’t use the password you use to log in to the website.
Instead, you must generate a Personal Access Token (PAT). Under your GitHub Settings, go to Developer settings, then Personal access tokens. GitHub offers two options. Fine-grained tokens are highly recommended, since you can restrict them to specific repositories. Tokens (classic) apply broadly across your account. Generate a token, copy the resulting string, and paste it into your terminal when prompted for a password.
Alternatively, you can install the Git Credential Manager, which securely handles authentication via a pop-up so you never have to copy and paste tokens.
GitHub issue numbers are unique identifiers that continuously increase over time. When you create an issue, GitHub permanently reserves that number for the repository, even if the issue is later deleted or closed. For example, if you create issue #1 and then delete it, the next issue you create will still become #2 rather than reusing #1.
Take the Quiz: Test your knowledge with our interactive “How to Use GitHub” quiz. You’ll receive a score upon completion to help you track your learning progress:
Interactive Quiz
How to Use GitHubPractice putting a Python project on GitHub by creating a remote repository, pushing your local code, and collaborating with others.