The final release of Python 3.12 is scheduled for October 2023, which is growing closer. In the meantime, you can download and install its preview version to get a sneak peek at the upcoming features. One of the biggest changes announced is support for the Linux perf profiler, which is a powerful performance profiling tool.
In this tutorial, you’ll:
- Install and use the Linux
perfprofiler with Python 3.12 - Get a holistic view of your application’s performance
- Explore a case study of profiling Python code with
perf - Visualize the collected metrics with flame graphs and more
To fully benefit from using the perf profiler in Python 3.12, you should have a fairly good understanding of how the underlying hardware and the operating system work. In addition to that, you need to be comfortable using a Linux distribution and the build tools for compiling Python from source code.
There are many other new features and improvements coming in Python 3.12. The highlights include the following:
- Ever better error messages
- More powerful f-strings
- Better support for subinterpreters
- Improved static typing features
Check out what’s new in the changelog for more details on these features or listen to our comprehensive podcast episode.
Free Bonus: Click here to download your sample code for a sneak peek at Python 3.12, coming in October 2023.
Seeing the Big Picture Through the Lens of perf
The Linux perf profiler is a truly versatile performance analysis tool. At the very least, you can use it as a statistical profiler to find hot spots in your own code, library code, and even the operating system’s code. In fact, you can hook it up to any running process, such as your web browser, and obtain its live profile, as long as you have sufficient permissions and the program was compiled with debug symbols.
The tool can also work as an event counter by measuring the exact number of low-level events occurring in both hardware and software. For example, it’s capable of counting the number of CPU cycles, instructions executed by the processor, or context switches during a program’s execution. The specific types of events may vary depending on your hardware architecture and the Linux kernel version.
Another useful feature of perf is the ability to retain the call graph of functions, which can help you understand which of potentially many calls to the same function is an actual bottleneck. With a bit of effort, you can even visualize your code paths in the form of a mathematical graph consisting of nodes and edges.
In this short section, you’ll get a basic understanding of the Linux perf profiler and its advantages over other profiling tools. If you’re already familiar with this tool, then you can jump ahead to a later section to get your hands dirty and see it in action.
What’s the Linux perf Profiler?
If you search online for information about the Linux perf profiler, then you may get confused by the plethora of names that people use to talk about it. To make matters worse, the profiler seems to be poorly documented. You really need to dig deep, as the corresponding article on Wikipedia and the official Wiki page don’t provide a lot of help.
The Linux perf profiler actually consists of two high-level components:
-
perf_events, or performance counters for Linux (PCL): A subsystem in the Linux kernel with an API that provides an abstraction layer over a hardware-specific performance monitoring unit (PMU) present in modern architectures. The PMU consists of special CPU registers or counters for collecting metrics about events such as the number of cache misses, CPU cycles, or executed instructions. This information is invaluable during performance analysis. -
perfcommand-line tool: A user-space utility tool built on top of theperf_eventsAPI from the Linux kernel, which can help you collect and make sense of the data. It follows the same philosophy as Git by offering several specialized subcommands. You can list them all by typingperfat your command prompt.
The first component is baked right into the Linux kernel, meaning that recent versions of mainstream Linux distributions will usually have it shipped and enabled. On the other hand, you’ll most likely need to install an additional package to start using the perf command, as it’s not essential for regular users.
Note: Each processor and operating system combination supports a different set of event types. Therefore, you may sometimes need to reinstall perf to match your current kernel version after an upgrade.
While the Linux perf profiler came into existence primarily as an interface to hardware-level performance counters, it also covers numerous software performance counters. For example, you can use it to track the number of context switches made by your operating system’s task scheduler or the number of times a running thread has migrated from one CPU core to another.
Okay, but are there any other benefits of using the Linux perf profiler aside from its hardware capabilities?
How Can Python Benefit From perf?
For several reasons, adding support for the Linux perf profiler will greatly impact your ability to profile Python applications. There’s no better source to refer to than Pablo Galindo Salgado, who’s the primary contributor behind this new feature. In a Twitter announcement, he thoroughly explains the benefits of the Python and perf integration:
Python 3.12 will add support for the Linux perf profiler! 🔥🔥 Perf is one of the most powerful and performant profilers for Linux that allows getting a ridiculous amount of information such as CPU counters, cache misses, context switching, and much more. (Source)
The lengthy tweet thread gives examples of several new capabilities:
-
Python function call recognition: The interpreter’s support will allow
perfto recognize Python function calls in the call stack, so the profile report will show Python code alongside code written in languages like C++ or Rust. -
Isolation of performance bottlenecks: Many Python libraries, such as NumPy and pandas, call functions in foreign languages. Now, you’ll be able to identify whether your Python code is the actual performance bottleneck, which will help you decide whether to improve your Python code or change how you use external libraries.
-
Access to low-level system and hardware events: This will enable you to find out, for example, how much Python’s global interprer lock (GIL) is affecting your code’s performance.
-
Vast ecosystem of
perftools: This includes performance visualization tools, which you’ll explore later in this tutorial.
In short, perf will give you holistic insight into the performance of the entire stack, from hardware and the operating system to the user-level code, while inflicting minimal overhead. That’s an incredibly powerful development for you as a Python developer, allowing you to quickly find and address critical bottlenecks that affect the performance of your applications.
Additionally, the Linux perf profiler will bring the following benefits into the Python world:
-
Much less overhead: Compared to other profilers, it’ll have a noticeably smaller memory and CPU footprint, letting you squeeze a lot more out of your profiled programs.
-
Exposure of hardware events: Access to events like CPU cache misses can sometimes be invaluable in optimizing low-level code interactions with your hardware.
-
View of the kernel-level code: The ability to profile at the system level will let you identify performance bottlenecks outside the Python code, such as input and output operations, system calls, or third-party libraries used within your program.
-
Easier concurrency: Profiling multithreaded or multiprocess Python applications, including those that run on more than one CPU core at a time, will become easier.
-
Better integration with existing tools: You’ll gain access to a rich ecosystem of tools for profiling and optimizing performance across different languages and environments. This can lead to a more consistent workflow and a reduced learning curve.
All that sounds great. Unfortunately, things get tricky when you try to profile an interpreted language like Python because perf was designed to work with compiled languages. In the next section, you’ll find out exactly how to make perf work with your Python code.
Getting perf to Work With Python 3.12 on Ubuntu Linux
Now that you understand what perf is and appreciate its advantages over the existing profiling tools, you might wonder how to get it running on your computer with Python 3.12 or later. In this section, you’ll find instructions on setting it up on Ubuntu Linux, which is a popular Linux distribution.
In general, here are the prerequisites that you’ll need to meet in order to run perf:
-
A Linux distribution: As the name implies, the Linux
perfprofiler is designed to run on a Linux-based operating system. Unfortunately, it won’t work on Windows or macOS. Even if you somehow managed to get it running on those systems through virtualization, that setup wouldn’t provide accurate profiling results because of vastly excessive overhead. -
The
perfcommand-line tool: While the low-level API is built into the Linux kernel, you’ll probably need to install theperftool separately using your distribution’s package manager. That said, some Linux distributions may already ship with it. -
Root privileges: By default, you’ll need to run the
perfcommand as the root user to collect metrics. That’s because you may be potentially accessing hardware counters and kernel-space events with sensitive data or profiling an arbitrary system process. -
Python 3.12 or later: The support for the
perfprofiler was implemented in Python 3.12, which you can install with pyenv, for example. However, you should build Python from source code with a few extra flags turned on to get the best results withperf. -
An enabled trampoline: Because profiling requires generating small bits of code at runtime through just-in-time compilation (JIT), support for
perfis disabled by default. You’ll need to enable a special trampoline instrumentation mode when running your Python interpreter.
As long as none of the points above are stumbling blocks for you, then read on to get perf up and running.
Install the Linux Tools Package
If you’re on a Debian-based distribution, such as Ubuntu, then open your terminal with Ctrl+Alt+T and update your package information using APT:
$ sudo apt update
After you provide your administrator password, this command will update your local package index by downloading the latest metadata about the packages available in remote sources. Afterward, you’ll be ready to install the most recent version of perf, which is bundled with a few other utility tools in a virtual package called linux-tools on distributions derived from Debian.
Canonical, the company behind Ubuntu, provides a few flavors of the Linux kernel optimized for different scenarios, such as a client computer, a server, an IoT device, or the cloud. If you’re running Ubuntu Desktop, then your Linux kernel is probably called generic, which you can verify by running the following command:
$ cat /proc/version_signature
Ubuntu 5.19.0-43.44-generic 5.19.17
In this case, the mainline kernel version is 5.19.17, and the kernel flavor is generic. That’s important because you must install a specific variant of the linux-tools package tailored to your Linux kernel, like so:
$ sudo apt install linux-tools-generic
Installing the linux-tools-generic package will automatically pull dependencies suitable to your system at that moment. For example, it may download and install the linux-tools-5.19.0-43 package with the perf executable compiled against that particular kernel release, bringing additional features, bug fixes, and optimizations.
Note: Other package variants include linux-tools-aws, linux-tools-azure, linux-tools-gcp, linux-tools-lowlatency, linux-tools-virtual, and many more.
In the future, you may need to reinstall the corresponding package—for example, after a system update automatically upgrades your Linux kernel. In such a case, the perf command will likely stop working. When this happens, you can find your current kernel release with the uname -r command and append its output to the package name:
$ uname -r
5.19.0-43-generic

$ sudo apt install linux-tools-`uname -r`
You can do so manually, or you can enclose the command uname -r in backticks for the shell to evaluate it. For instance, the command above would install the linux-tools-5.19.0-43-generic package, which depends on linux-tools-5.19.0-43.
After the installation is complete, you’ll have the perf tool available at your fingertips. You can verify this by running the following executable:
$ perf

 usage: perf [--version] [--help] [OPTIONS] COMMAND [ARGS]

 The most commonly used perf commands are:
   (...)

 See 'perf help COMMAND' for more information on a specific command.
Running perf without any arguments will list the available subcommands. Remember that you may need to run some of them with sudo for superuser access, which is required for accessing kernel-level events and function calls. In some cases, you can use a suitable command-line option to filter out those privileged resources.
The remaining ingredient for using perf with Python is the Python 3.12 interpreter, which you’ll install now.
Install Python 3.12 Using pyenv
Unless you already have Python 3.12 or newer installed on your computer, you can quickly and painlessly get the desired version with pyenv. At the time of writing, the third beta preview of Python 3.12 was the latest release of Python:
$ pyenv install --list | grep 3.12
  3.12.0b3
  3.12-dev
You’ll soon use the version specifier, such as 3.12.0b3, to download and install the corresponding Python interpreter with pyenv. However, you need to specify some build flags first.
For best results with perf, you should make sure to build your Python interpreter using a set of extra compiler flags (CFLAGS), which disable certain optimizations. Otherwise, perf might not be able to capture the entire stack trace, failing to show some of your Python functions in the report. For any Python installation, you can check if it was compiled with those flags by issuing these commands:
$ python -m sysconfig | grep no-omit-frame-pointer
$ python -m sysconfig | grep no-omit-leaf-frame-pointer
If there’s no output, then it means that Python has been compiled without those flags. While you can still get some results with perf, the profiler won’t know about many of your Python function calls. Additionally, it might report those that it does capture as unknown, making it difficult to read the performance profile:
Samples: 65K of event 'cycles', Event count (approx.): 22620504399
  Children      Self  Command      Shared Object      Symbol
-   32.47%     0.00%  python3      [unknown]          [.] 0x00007fa5ae88fea0
   - 0x7fa5ae88fea0
      + 6.98% 0x7ffc2f6a7e40
      + 6.18% 0x7ffc2f6a7bc0
      + 5.06% 0x7ffc2f6a7990
      + 3.47% 0x7ffc2f6a8370
      + 3.23% 0x7ffc2f6a8070
      + 2.23% 0
      + 2.11% 0x7ffc2f6a80f0
      + 1.43% 0x7ffc2f6a7c10
      + 0.90% 0x7fa5ae3252f8
(...)
That doesn’t look very helpful, does it?
In order to get more information into the profile, you need to specify the necessary compiler flags before running pyenv install:
$ export PYTHON_CFLAGS='-fno-omit-frame-pointer -mno-omit-leaf-frame-pointer'
$ pyenv install 3.12.0b3
Downloading Python-3.12.0b3.tar.xz...
-> https://www.python.org/ftp/python/3.12.0/Python-3.12.0b3.tar.xz
Installing Python-3.12.0b3...
Installed Python-3.12.0b3 to /home/realpython/.pyenv/versions/3.12.0b3
The tool downloads Python source code, which means that you must have build dependencies like the C compiler in place to proceed. When the installation is finished, you’ll be able to set the global hash shortcut to python in your shell so that it points to the newly installed interpreter:
$ pyenv global 3.12.0b3
$ python --version
Python 3.12.0b3
This will make the python command run whatever Python version you requested.
You get both convenience and flexibility when installing Python with pyenv. However, there are alternatives. If you have the know-how and a few extra minutes on your hands, then you may compile Python yourself with the necessary flags for perf profiling. You’ll find detailed instructions on how to do it in the next section.
Install Python 3.12 From Source Code
To make a custom Python build, you can clone the desired branch straight from the CPython repository on GitHub. You may experiment with the bleeding edge on the main branch or grab one of the tagged releases, such as this one:
$ git clone --branch v3.12.0b3 https://github.com/python/cpython.git
Because you’re cloning a specific Git tag, you’ll see a warning message afterward telling you that you’re in a so-called detached HEAD state. This means that you’re not currently on a branch, so any potential commits won’t be associated with any branch. However, there’s nothing to worry about because you’re not going to make any changes.
Alternatively, if you don’t have a Git client available in your terminal, then you can browse the repository tags using your web browser and download the corresponding version in the form of an archive file to extract.
Once you navigate to the folder where you’ve downloaded the Python source code, you can compile and install it:
$ cd cpython/
$ export CFLAGS='-fno-omit-frame-pointer -mno-omit-leaf-frame-pointer'
$ ./configure --prefix="$HOME/python-custom-build"
$ make -j $(nproc)
$ make install
You start by setting the CFLAGS environment variable, instructing the compiler to retain debugging information related to frame pointers in the function call stack. That’s the crucial step missing from the default installation using pyenv.
Next, you run the configuration script to generate a Makefile, while specifying the target directory for Python’s installation. In this case, you install your custom Python build into the python-custom-build/ folder in your home directory.
Finally, you compile and install Python using the generated Makefile with make. The compilation step can take a few long minutes. Therefore, it’s common to speed up this process by running a few threads in parallel. The nproc command determines the number of processors available on your computer, and the -j flag tells make to use that many threads.
While the Python interpreter is compiling, you’ll see a lot of cryptic output in your terminal. You might even glimpse a few ominous warnings, which are usually safe to ignore. Only get worried if there’s an actual error preventing the compilation from completing successfully. But, if that happens, then you’ll usually see a helpful message pointing to the root cause of the problem.
At this point, you should be able to run your shiny new Python interpreter by specifying the path to the respective python3 executable:
$ $HOME/python-custom-build/bin/python3
Python 3.12.0b3 (tags/v3.12.0b3:f992a60014, Jun 29 2023, 14:24:02) [GCC 12.2.0] on linux
Type "help", "copyright", "credits" or "license" for more information.
>>>
The Python REPL’s output reveals your interpreter version, including the abbreviated Git commit hash that you cloned, your compiler version, and even the date and time of the compilation!
However, typing the whole path to your Python executable each time you want to run it is rather inconvenient. To make your life easier, you could add the corresponding bin/ folder’s path to your $PATH variable or create a temporary alias in your shell as needed:
$ alias custom-python=$HOME/python-custom-build/bin/python3
With that, you’ll be able to type custom-python at your command prompt to run Python 3.12. In particular, you can now check if you indeed built the Python interpreter with the frame pointer optimizations disabled:
$ custom-python -m sysconfig | grep 'no-omit-frame-pointer'
    CFLAGS = "(...) -fno-omit-frame-pointer -mno-omit-leaf-frame-pointer"
    CONFIGURE_CFLAGS = "-fno-omit-frame-pointer -mno-omit-leaf-frame-pointer"
    CONFIG_ARGS = "'--prefix=/home/realpython/python-custom-build...
    LIBEXPAT_CFLAGS = "-I./Modules/expat -fno-strict-overflow -DNDEBUG...
    LIBHACL_CFLAGS = "-I./Modules/_hacl/include -D_BSD_SOURCE...
    LIBMPDEC_CFLAGS = "-I./Modules/_decimal/libmpdec -DCONFIG_64=1...
    PY_BUILTIN_MODULE_CFLAGS = "-fno-strict-overflow -DNDEBUG -g -O3...
    PY_CFLAGS = "-fno-strict-overflow -DNDEBUG -g -O3 -Wall...
    PY_CORE_CFLAGS = "-fno-strict-overflow -DNDEBUG -g -O3 -Wall...
    PY_STDMODULE_CFLAGS = "-fno-strict-overflow -DNDEBUG -g -O3 -Wall...
Excellent! Both the -fno-omit-frame-pointer and -mno-omit-leaf-frame-pointer flags appear in CFLAGS and a few related variables. This means you can start using perf with Python without restrictions!
Note: When you build the Python interpreter by hand, especially from a development branch, it may prevent you from installing third-party packages that rely on C extension modules. Unlike pure-Python packages like requests, native code must be compiled against your specific version of Python.
While Python 3.12 was still undergoing alpha and beta testing, a few notable libraries, including Pillow, provided Python wheels with early builds for the upcoming Python release. Such a practice helps developers test their applications and uncover library defects. Thanks to that, those libraries can become available the minute the next Python version gets released, without having to wait to catch up with new features and API changes.
On the other hand, you need to compile packages that don’t ship with pre-built wheels yourself, a process that might fail for various reasons. For example, Python 3.12 removed distutils from the standard library, which some native code packages still depend on at the time of writing.
Now that you have perf and Python 3.12 installed, you must learn how to enable a special mode in which to run the interpreter. Otherwise, your Python functions will remain invisible to perf, which can only understand native code compiled from languages like C, C++, Go, and Rust. You’ll fix that now!
Run Python With Trampoline Mode Enabled
If you now profiled a script using perf and Python 3.12 without taking extra steps, then you wouldn’t see any of your functions in the report. Instead, the deepest frame in the call stack exhibiting a significant cost would show a native wrapper function from the CPython interpreter:
Samples: 10K of event 'cycles', Event count (approx.): 34386234823

-  100.00%     10680
   -   99.77%     /home/realpython/python-custom-build/bin/python3.12
        __libc_start_main
      - Py_BytesMain
         - 99.89% pymain_run_python.constprop.0
              _PyRun_AnyFileObject
              _PyRun_SimpleFileObject
              run_mod
              run_eval_code_obj
            - PyEval_EvalCode
               + 92.95% _PyEval_EvalFrameDefault
                 2.27% _PyObject_Free
                 2.18% long_dealloc
                 1.34% PyObject_Free
                 0.80% PyLong_FromLong
   +    0.23%     /proc/kcore
That wrapper function, _PyEval_EvalFrameDefault(), is implemented in C and is responsible for evaluating the underlying Python bytecode at runtime. Unfortunately, it renders the profiler’s report unhelpful because the same C function evaluates all the Python functions. So, you won’t know exactly which Python function is taking the longest to execute.
To associate each call to that evaluation function with a corresponding Python counterpart, you must enable trampoline instrumentation, which is disabled by default. In trampoline mode, the Python interpreter will insert a dynamically generated trampoline frame into the native call stack, acting as glue code between C and Python. This, in turn, will allow for displaying non-native function names on the call stack:
Samples: 10K of event 'cycles', Event count (approx.): 34217160648

-  100.00%     10432
   -   99.16%     /home/realpython/python-custom-build/bin/python3.12
        __libc_start_main
      - Py_BytesMain
         - 99.89% pymain_run_python.constprop.0
              _PyRun_AnyFileObject
              _PyRun_SimpleFileObject
              run_mod
              run_eval_code_obj
              PyEval_EvalCode
              py::<module>:/home/realpython/project/script.py
              _PyEval_EvalFrameDefault
              PyObject_Vectorcall
              py::main:/home/realpython/project/script.py
              _PyEval_EvalFrameDefault
            - PyObject_Vectorcall
               + 66.61% py::slow_function:/home/realpython/project/script.py
               + 33.39% py::fast_function:/home/realpython/project/script.py
   +    0.84%     /proc/kcore
Now, each call to the evaluation function is accompanied by a clearly named trampoline call, which intercepts a Python function just before delegating the execution to _PyEval_EvalFrameDefault(). You can see that Python evaluates a module named script. It then enters the main() function in that module and calls slow_function() and fast_function() in some unknown order. The former takes roughly twice as much time to finish as the latter.
Note: The trampoline mechanism in Python 3.12 leverages a mapping interface in perf, which was designed with dynamically compiled code in mind. Other interpreted programming languages, like JavaScript, as well as those based on a virtual machine (VM) as their runtime environment, such as Java, also use this feature.
Before moving forward, it’s worthwhile to double-check if your Python interpreter supports perf profiling in the first place. To do so, you can inspect the following configuration variable, assuming you still have that custom-python alias defined in your shell:
$ custom-python -m sysconfig | grep PY_HAVE_PERF_TRAMPOLINE
        PY_HAVE_PERF_TRAMPOLINE = "1"
If not, then you can always provide the full path to the python executable. If you don’t see any output from the command above, or the PY_HAVE_PERF_TRAMPOLINE variable has a value of zero, then it means your Python interpreter won’t be able to enable trampoline mode on your platform. Otherwise, you’re ready to continue.
There are three ways to enable trampoline instrumentation in Python 3.12:
- Environment variable: Set the
PYTHONPERFSUPPORT=1environment variable. - Interpreter option: Use the
python -X perfoption. - Python API: Call
sys.activate_stack_trampoline("perf").
The first two ways allow you to enable perf profiling support for the entire Python interpreter. On the other hand, with the last one, you can temporarily enable or disable the trampoline at runtime. This can be useful for isolating bits of code to profile from the rest of your program.
Note: As with other Python options, the above list represents the order of precedence, which means that options closer to the bottom override those above them. In other words, even with PYTHONPERFSUPPORT=1 set or the -X perf option passed to the interpreter, you can still turn trampoline instrumentation off by calling the appropriate Python API at runtime.
Here are the first two ways of activating the stack trampoline in action:
$ CODE='import sys; print(sys.is_stack_trampoline_active())'

$ custom-python -c "$CODE"
False

$ PYTHONPERFSUPPORT=1 custom-python -c "$CODE"
True

$ custom-python -X perf -c "$CODE"
True
For convenience, you define a one-line Python snippet in a helper environment variable called CODE, which you reference in the subsequent commands. As you can see, Python has the trampoline instrumentation disabled by default because it incurs unnecessary overhead and adds an extra hoop in the call stack.
If you need to turn the trampoline on or off at runtime, potentially more than once, then you can instead use the new Python API in the sys module:
>>> import sys

>>> sys.is_stack_trampoline_active()
False

>>> sys.activate_stack_trampoline("perf")
>>> sys.is_stack_trampoline_active()
True

>>> sys.deactivate_stack_trampoline()
>>> sys.is_stack_trampoline_active()
False
To activate the trampoline using this method, you have to pass a required positional-only parameter with the name of a profiler back end. At the moment, "perf" is the only supported back end.
Okay, now that you have perf installed and Python 3.12 compiled with frame pointer optimization disabled, you can start analyzing complete stack traces in your Python scripts. Next up, you’ll learn how to take advantage of perf to monitor how your Python programs execute.
Exploring a Use Case for the Linux perf Profiler in Python 3.12
There are numerous ways to use the Linux perf profiler. However, in most cases, they boil down to sampling events, such as the number of CPU cycles, recording them into a binary file, and then displaying an interactive report within your terminal. You’ll use two subcommands, perf record and perf report, to do so. But first, you’ll need to prepare a small benchmark to profile.
Prepare a Benchmark Script
The Linux perf profiler lets you scrutinize your application as if you were looking at it under a microscope. To showcase the full potential and advantages of perf over other profiling tools, you’ll import a third-party Python library with a C extension module. As you learned earlier, Pillow provides pre-built Python wheels for Python 3.12, so you’ll use that image processing library as an example in this tutorial.
Go ahead and install Pillow into a virtual environment based on Python 3.12. You can switch to the right interpreter version using pyenv or the shell alias that you defined before:
$ pyenv shell 3.12.0b3
$ python -m venv venv/ --prompt benchmark
$ source venv/bin/activate
(benchmark) $ python -m pip install Pillow
The pyenv shell command makes the specified Python interpreter active in your current shell session. From now on, python will point to that version of Python, as long as you installed it before with pyenv. But, once you open another terminal window, the command will return to its default value.
Remember that pyenv enables compiler optimizations that erase the frame pointer from Python, making the profiler’s report look much less helpful. To create a virtual environment using your custom build of Python, you must specify the full path to the corresponding python3 executable or use a shell alias:
$ alias custom-python=$HOME/python-custom-build/bin/python3
$ custom-python -m venv venv/ --prompt benchmark
$ source venv/bin/activate
(benchmark) $ python -m pip install Pillow
If you don’t have Python 3.12 installed yet, then jump back to the setup instructions in the previous section for more information.
Now, it’s too easy to forget about enabling the trampoline mode in Python 3.12 or to accidentally run the benchmark through the wrong interpreter by specifying an incorrect virtual environment. To save yourself from these troubles, you can write a few safety checks. Create a new Python script named benchmark.py and type the following code in it:
 1# benchmark.py
 2
 3import sys
 4import sysconfig
 5
 6def check_perf_support():
 7    if sys.version_info < (3, 12):
 8        version = sysconfig.get_python_version()
 9        raise RuntimeError(f"This is Python {version}, not 3.12 or later")
10
11    if not sysconfig.get_config_var("PY_HAVE_PERF_TRAMPOLINE"):
12        raise RuntimeError("Python doesn't support perf on this platform")
13
14    if not sys.is_stack_trampoline_active():
15        raise RuntimeError("Did you forget the '-X perf' option?")
16
17    cflags = sysconfig.get_config_var("CONFIGURE_CFLAGS")
18    if "-fno-omit-frame-pointer" not in cflags:
19        print("Python compiled without the frame pointer", file=sys.stderr)
20
21def main():
22    ...
23
24if __name__ == "__main__":
25    try:
26        check_perf_support()
27    except RuntimeError as error:
28        print(error, file=sys.stderr)
29    else:
30        main()
Here’s a line-by-line breakdown of the above benchmarking script:
- Lines 3 and 4 import two standard library modules to query the Python interpreter about its version and various other configuration flags.
- Line 6 defines a function that may raise an exception if one of the preconditions to running the benchmark isn’t met.
- Lines 7 to 9 check if you’re running Python 3.12 or higher because that’s when the Linux
perfprofiler’s support was added to Python. - Lines 11 and 12 check if Python supports
perfon your operating system or hardware architecture. - Lines 14 and 15 prevent you from starting the benchmark without the trampoline instrumentation mode enabled. In that case,
perfwouldn’t be able to see your Python function calls. - Lines 17 to 19 display a warning message if Python was compiled with an optimization that erases the frame pointer from the call stack. While this won’t abort the benchmark, it may degrade your profiling experience with
perf. - Lines 21 and 22 use the
Ellipsisto define a placeholder for themain()function. - Lines 24 to 30 call the safety checks before entering the
main()function, all wrapped in the name-main idiom.
Now it’s time to give perf something to benchmark. For that, you’ll use Pillow to load an image from a local file and then calculate the log-average of its relative luminance in Python:
# benchmark.py

import sys
import sysconfig
from math import exp, log
from statistics import mean

from PIL import Image

# ...

def main():
    image = Image.open("image.jpg")
    print("luminance =", get_average_luminance(image.getdata()))

def get_average_luminance(pixels):
    return exp(mean(log(luminance(pixel) + 1e-9) for pixel in pixels))

def luminance(pixel):
    red, green, blue = tuple(linearize(c) for c in pixel)
    return 0.2126 * red + 0.7152 * green + 0.0722 * blue

def linearize(channel, gamma=2.2):
    return (channel / 255) ** gamma

# ...
The implementation details and the underlying logic are unimportant for this exercise, so feel free to ignore them. The functions that you just defined are only there to give you an idea of how to profile Python computations with perf.
That’s it! You can give your benchmark a spin to make sure that everything is working as expected. Here are a few test runs using different Python interpreters:
(py3.11) $ python benchmark.py
This is Python 3.11, not 3.12 or later

(py3.12) $ python benchmark.py
Did you forget the '-X perf' option?

(py3.12) $ python -X perf benchmark.py
Python compiled without the frame pointer
luminance = 0.1512812948302813

(py3.12-pyenv) $ python -X perf benchmark.py
luminance = 0.1512812948302813

(py3.12-custom) $ python -X perf benchmark.py
luminance = 0.1512812948302813
All the virtual environments in the examples above must have Pillow installed, or else you’ll get a ModuleNotFoundError exception. In the same folder, you should also have a file named image.jpg, which comes with the supporting materials:
Free Bonus: Click here to download your sample code for a sneak peek at Python 3.12, coming in October 2023.
Out of curiosity, you can temporarily comment out the trampoline check in check_perf_support() and time the benchmark’s execution in both modes to determine the instrumentation overhead:
(py312-custom) $ time python benchmark.py
luminance = 0.1512812948302813

real    0m4.729s
user    0m4.716s
sys     0m0.013s

(py312-custom) $ time python -X perf benchmark.py
luminance = 0.1512812948302813

real    0m5.592s
user    0m5.568s
sys     0m0.020s
As you can see, there’s a noticeable overhead. It took almost an extra second to compile and run the instrumented code at runtime. Don’t forget to uncomment the trampoline check afterward!
Okay, now it’s time to profile your Python benchmark with perf.
Record a Performance Profile
The perf command comes with several subcommands that let you measure the performance of a given program through sampling, tracing, real-time monitoring, and more. In the most basic case, you can use the perf record subcommand followed by your Python script invocation in order to capture performance samples:
$ perf record /path/to/python3 script.py
In this mode of operation, perf acts as an event-based statistical profiler, periodically interrupting your program to collect metrics. The period is expressed in terms of the number of occurrences of a specified event type. By default, perf counts the number of CPU cycles, trying to maintain an average rate of about one thousand samples per second, or one kilohertz (kHz).
If you’d like to specify a different event type or narrow it down to only user-space or kernel-space instructions, then use the --event option like so:
$ perf record --event cpu-cycles:u (...)
You can call the perf list command to list all of the events that your kernel and hardware support.
With the help of the --freq option, you can request a different sampling frequency expressed in hertz or even bump the frequency to the maximum possible value:
$ perf record --freq 99 (...)
$ perf record --freq max (...)
When you specify a concrete number for the frequency, it might get throttled down to limit the overhead. If you want to explicitly request the maximum frequency allowed at a given time, then use the max constant. Note that it’s generally best to use frequency values that aren’t exact multiples of ten to avoid unintentional interference with some periodic activity that could distort your data.
Note: Instead of specifying the average rate at which to collect samples, which is the basis of timed profiling, you can directly define the period or the fixed number of event occurrences:
$ perf record --count 10000 (...)
This mode is more useful in event profiling, though, which can help you collect low-level metrics from the bare metal with less overhead.
In most cases, you’ll also want to analyze function call stacks in your programs to understand which functions are taking longer than expected and are worth optimizing. To reveal the hierarchy of function calls in the resulting report, you must first enable the call graph recording with yet another option:
$ perf record --call-graph fp (...)
The profiler has three different methods for unwinding the call stack. The default one uses the frame pointer denoted with fp, while the other two include the DWARF debugging format and Intel’s last branch record (LBR). DWARF isn’t available for the just-in-time compiled trampoline code, and LBR hardware registers might not be available either. That’s why it’s essential to compile the Python interpreter with frame pointer removal disabled.
With that, you can finally run your benchmark script through Python 3.12 and profile it with perf. By default, perf records user-level as well as kernel-level events, so it requires superuser access. You can either run perf record with sudo or filter only unrestricted events:
$ sudo perf record --event cpu-cycles (...)
$ perf record --event cpu-cycles:u (...)
The downside of the second approach is that you won’t see any of the low-level system calls in the report. One way or another, you must also remember a few other important details:
$ sudo perf record --freq max \
                   --call-graph fp \
                   venv/bin/python -X perf benchmark.py
The --freq option lets you override the default sampling rate. In this case, you request the maximum possible frequency. The --call-graph fp option, which is equivalent to the lowercase -g switch, enables the stack trace recording using the frame pointer method.
Note that you specify the path to the python executable in your virtual environment where you previously installed Pillow. This is necessary when you run commands as the superuser with sudo because it makes the shell forget about your regular user’s aliases, such as custom-python, and environment variables like PYENV_VERSION.
Finally, you activate the stack trampoline by using the -X perf interpreter option, followed by a path to your Python script.
Recording samples at the maximum frequency will add a few extra seconds on top of the trampoline overhead. When the perf record command finishes its job, you’ll find a binary file named perf.data in your current working directory. This file may grow quite big depending on your sampling frequency, the execution duration, and the number of function calls.
In the next section, you’ll learn how to make sense of this data and draw meaningful conclusions from the analysis.
Analyze the Interactive Reports
Analyzing a performance profile is all about looking at the recorded samples from different angles, and perf lets you do just that. The perf report subcommand offers numerous ways to display the underlying data, including a few interactive text-based user interfaces (TUI) built with the ncurses library.
You can get a bird’s-eye view of your performance profile by showing a hierarchical view first. While you’re still in the same folder where you saved the perf.data file, run the following command:
$ sudo perf report --hierarchy
Note that if you recorded the profile as the superuser, then you’ll have to run the perf report subcommand with sudo as well to access the data. Alternatively, you can change the file owner to your current user, as you’ll explore later, to avoid having to use sudo every time.
With the command above, you open an interactive text-based browser in your terminal, showing the data samples loaded from a local perf.data binary file:
Samples: 211K of event 'cycles', Event count (approx.): 15558048762

-  100.00%        python
   +   92.14%        python3.12
   +    3.96%        libm-2.31.so
   +    1.06%        _imaging.cpython-312-x86_64-linux-gnu.so
   +    0.73%        libc-2.31.so
   +    0.58%        libjpeg.so.8.2.2
   +    0.58%        math.cpython-312-x86_64-linux-gnu.so
   +    0.51%        [JIT] tid 48553
   +    0.35%        [kernel.kallsyms]
   +    0.04%        libpthread-2.31.so
   +    0.03%        ld-2.31.so
   +    0.00%        libcrypto.so.1.1
   +    0.00%        libdl-2.31.so
   +    0.00%        _random.cpython-312-x86_64-linux-gnu.so
   +    0.00%        select.cpython-312-x86_64-linux-gnu.so
   +    0.00%        _bz2.cpython-312-x86_64-linux-gnu.so
   +    0.00%        _struct.cpython-312-x86_64-linux-gnu.so
+    0.00%        perf
You can use the Up and Down arrow keys to navigate the tree and hit Enter or E to expand a given branch indicated by a plus sign (+). Conversely, use Enter again or the C key to collapse an expanded branch, denoted with a minus sign (-). You can also use the / key to apply a filter on the visible symbols.
Note: Some versions of perf may support only a subset of these keyboard shortcuts, so try a few to find which ones work for you.
At the top level, you’ll find the list of executable commands that perf has profiled. Here, you only see python and perf itself, but you can sometimes encounter more commands. For example, when you call Pillow’s image.show(), the report may show a few more subprocesses like xdg-open, which the library uses internally on some systems to display the image.
Expanding python in the report will show the nested list of dynamically-linked shared objects (DSO) that this command accessed at runtime. You can reveal their full file paths by appending the --verbose flag to the perf report subcommand if you want to.
Here’s a high-level breakdown of some of these executable objects, which Python invoked while your benchmark script was running. Note that they’re grouped by type in the table below, but perf will usually display them in a different order, which you’ll learn how to change in a bit:
| Executable Object | Type |
|---|---|
python3.12 |
Executable File |
_bz2.cpython-312-x86_64-linux-gnu.so |
Python Standard Library |
_random.cpython-312-x86_64-linux-gnu.so |
Python Standard Library |
_struct.cpython-312-x86_64-linux-gnu.so |
Python Standard Library |
math.cpython-312-x86_64-linux-gnu.so |
Python Standard Library |
select.cpython-312-x86_64-linux-gnu.so |
Python Standard Library |
_imaging.cpython-312-x86_64-linux-gnu.so |
Python Library (Pillow) |
ld-2.31.so |
Dynamic Linker |
libc-2.31.so |
C Standard Library |
libdl-2.31.so |
C Standard Library |
libm-2.31.so |
C Standard Library |
libpthread-2.31.so |
C Standard Library |
[kernel.kallsyms] |
Linux Kernel |
[JIT] tid 48553 |
Just-In-Time Compiled Code |
libcrypto.so.1.1 |
C Library (OpenSSL) |
libjpeg.so.8.2.2 |
C Library (JPEG) |
Wow! Who knew there was so much going on under the surface?
For example, your call to Image.open() triggers a call to a C function in a compiled binary extension module that comes with Pillow. In turn, it calls several other functions in a third-party C library for manipulating JPEG images. Those functions call other functions from the C standard library, which make system calls to functions defined in the Linux kernel, ultimately accessing the hard drive to retrieve meaningful bits of the image file.
Note: You may see fewer or more items in the report depending on the sampling rate. By tweaking your sampling frequency, you’ll get a more coarse or granular report.
When you drill down to a selected shared object in the hierarchy view, then you’ll see a list of symbols or functions called from that library, along with their respective percentage of samples:
-  100.00%        211264        python
   +   92.14%        194646        python3.12
   +    3.96%          8346        libm-2.31.so
   -    1.06%          2230        _imaging.cpython-312-x86_64-linux-gnu.so
      +    0.67%          1424        [.] image_item
           0.34%           712        [.] get_pixel_32
           0.04%            90        [.] 0x0000000000014754
           0.00%             2        [.] 0x0000000000014750
           0.00%             1        [.] ImagingJpegDecode
           0.00%             1        [.] 0x0000000000014170
In case of missing debug information for a particular symbol, you’ll only see its memory address in hexadecimal format. On request, you can also view the nominal sample values by appending the --show-nr-samples flag or the equivalent -n alias.
Note: Sometimes, you may prefer to display relative percentages with each branch considered separately. For that, you can use the --call-graph fractal option.
The report presents histogram entries ordered by the command, shared object, and symbol, which might dilute the bigger picture because of a poor signal-to-noise ratio (SNR):
-  100.00%        python
   -   92.14%        python3.12
      +   26.97%        [.] _PyEval_EvalFrameDefault
      +    6.58%        [.] float_as_integer_ratio
      +    3.48%        [.] initialize_locals
      +    2.73%        [.] py_trampoline_evaluator
      +    2.55%        [.] _Py_dict_lookup
      +    2.36%        [.] _PyObject_Free
      +    2.11%        [.] float_pow
      +    1.90%        [.] _PyFrame_ClearExceptCode
      +    1.87%        [.] _PyEvalFramePushAndInit
      +    1.69%        [.] _PyObject_Malloc
      +    1.66%        [.] _Py_NewReference
      +    1.44%        [.] PyFloat_FromDouble
      +    1.42%        [.] tupledealloc
      ⋮     ⋮           ⋮
At a glance, you can see that interpreting Python code is the hottest in terms of burning the CPU cycles. The familiar _PyEval_EvalFrameDefault() function was present in over a quarter of samples. You don’t need to know where your program spent a fraction of a percent of the total samples because that’s insignificant in the grand scheme of things. You’re better off focusing on code that you have control over.
Next up, you’ll tweak the report so that it only shows relevant information, allowing you to find actionable bottlenecks.
Customize the Report
To change the default order of entries in the report, specify the --sort parameter followed by a list of one or more comma-delimited criteria:
$ sudo perf report --hierarchy --sort sample
Sorting the entries by the number of samples while disregarding the low-level symbols makes the report look much leaner! Now, it’ll only show a few function calls, letting you focus on what’s really important. When you climb down the stack trace and look at the adjusted percentages, you might get an idea of what your CPU is doing:
- 97.74% py::get_average_luminance:/home/realpython/benchmark.py
    _PyEval_EvalFrameDefault
    PyObject_Vectorcall
    py::mean:/home/realpython/python-custom-build/lib/python3.12/statistics.py
    _PyEval_EvalFrameDefault
    PyObject_Vectorcall
    - py::_sum:/home/realpython/python-custom-build/lib/python3.12/statistics.py
    + 97.15% _PyEval_EvalFrameDefault
In this case, the standard library function statistics.mean() calls the pure-Python utility function _sum(), which gets evaluated by _PyEval_EvalFrameDefault(). Even though this may come as a surprise, it’s by design because the statistics module favors correctness over speed. See PEP 450 for more details.
Replacing statistics.mean() with a do-it-yourself Python function will let you leverage sum() and len(), which are both built-in functions implemented in C:
def mean(numbers):
    return sum(numbers) / len(numbers)
Because C is faster than Python, the function defined above will run a few dozen times quicker than its standard-library counterpart. When you run the perf profiler again on your modified benchmark, then you’ll see that the cost distribution has shifted:
- 96.56% py::get_average_luminance:/home/realpython/benchmark.py
   - 96.31% _PyEval_EvalFrameDefault
      - 82.92% PyObject_Vectorcall
         + 80.16% py::luminance:/home/realpython/benchmark.py
         + 1.36% _PyEval_Vector
         + 0.58% py::mean:/home/realpython/benchmark.py
Now, calculating the mean amounts to only 0.58 percent of the samples, while 80 percent of the samples are spent elsewhere.
You’ve only scratched the surface when it comes to analyzing data collected by perf. When you call the perf report subcommand with the --stdio flag, it’ll print the call stack as a colorful tree onto the standard output. Without any arguments, the command will run an interactive navigator. Still, there are even better ways to visualize the performance profile, which you’ll explore now.
Visualizing Profile Data Recorded With perf
Sifting through hundreds of thousands of lines of recorded samples using a text-based browser built into perf is arduous work. There’s often too much information to meaningfully digest in this way. Fortunately, you can choose from numerous tools that understand the data from perf and produce intuitive graphical visualizations. You’ll get a taste of some of them in this section.
Flame Graphs
Originally invented by Brendan Gregg, flame graphs are a popular and powerful technique for visualizing hot spots in your application. They come in different flavors, but the most common one is, by far, the CPU flame graph, which illustrates how your software consumes the available computational resources. This kind of graph depicts function call stacks recorded by a profiler like perf:
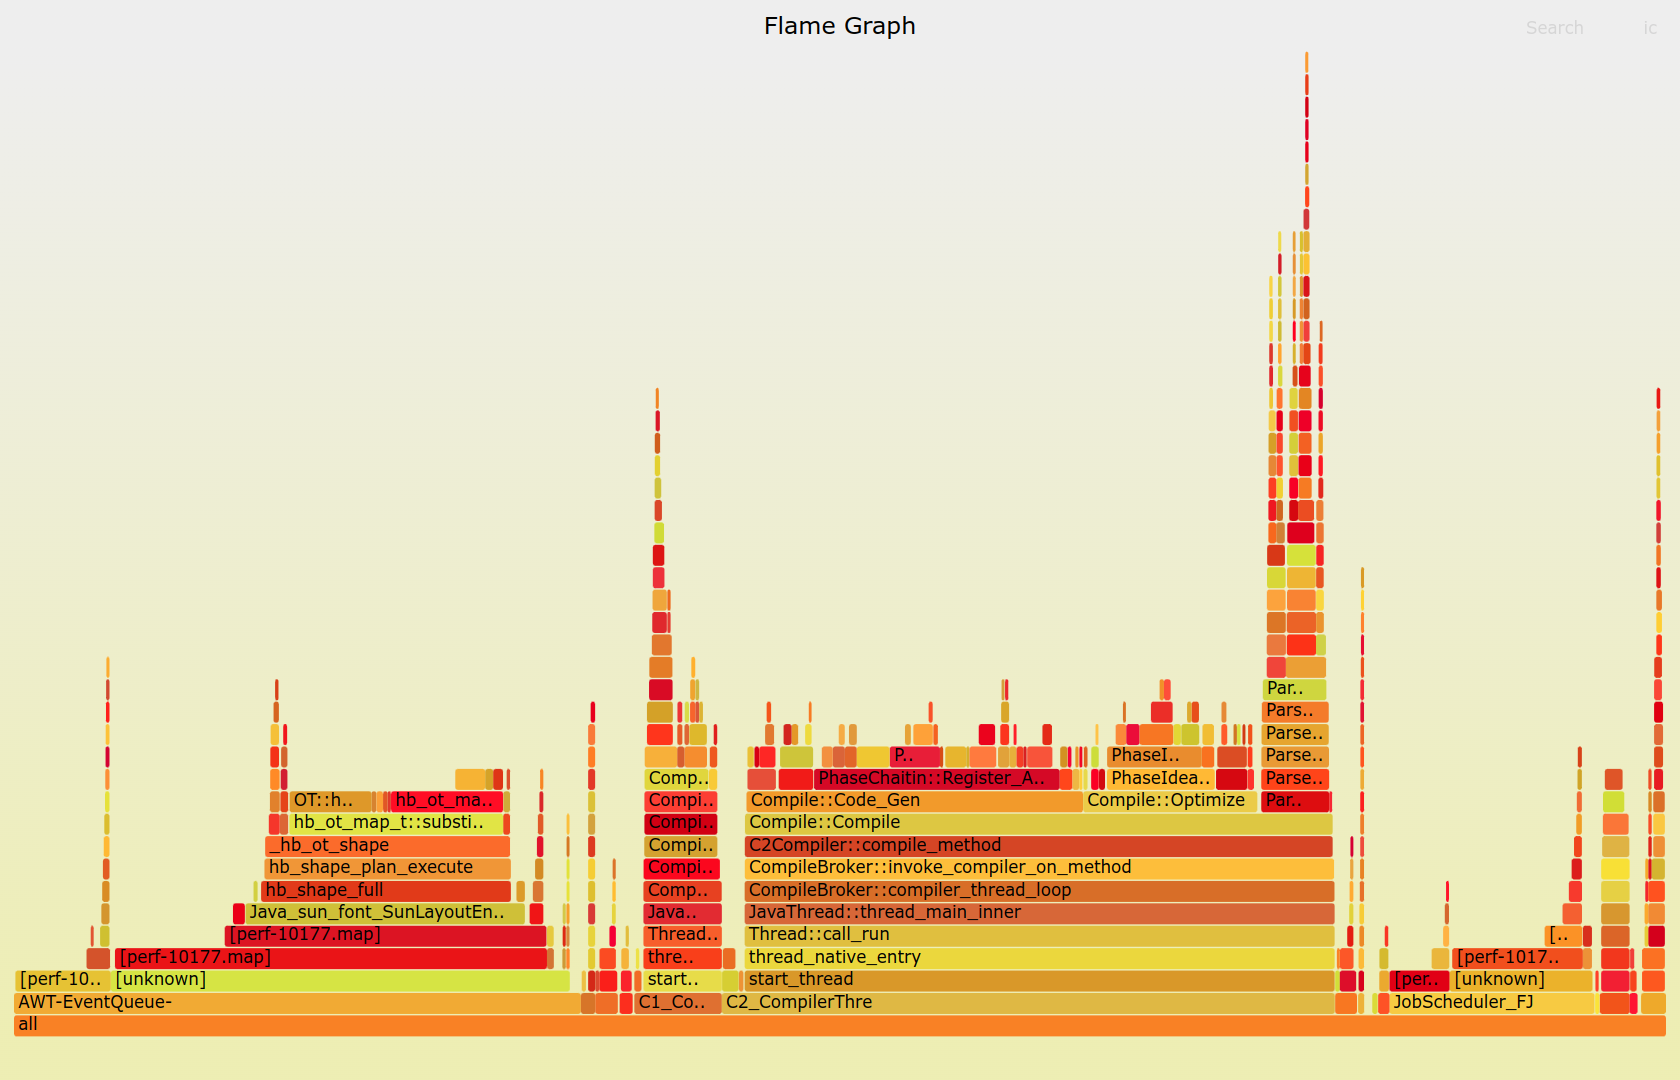
The shape of a typical flame graph resembles fire, and the choice of a warm color palette makes this metaphor even stronger. The colors are usually picked at random to distinguish the adjacent rectangles from each other. However, you can color-code them using an arbitrary key to add another dimension by, for example, showing Python code in a different hue.
How do you read such a graph? A flame graph consists of horizontal layers of rectangles stacked on top of each other. Each rectangle represents an individual stack frame or a function call. The wider the rectangle, the more times the profiler observed it in the recorded samples. Because rectangle widths are proportional to the execution time of their corresponding functions, you can make visual comparisons between them.
However, you must also consider where a rectangle is located in the graph. That’s because the time reflected by a rectangle doesn’t always equate to the actual time spent on the CPU. In particular, functions that don’t do much computing themselves but merely delegate execution to other functions are a good example.
To understand a flame graph, you must remember that the horizontal axis doesn’t represent a time series. Instead, the rectangles in each layer are sorted alphabetically so that similar function calls can merge to form a larger rectangle. Otherwise, the graph would become too cluttered due to rapid context switching between different functions.
The vertical axis represents the call stack’s depth. The higher a rectangle is in the graph, the deeper it is in the call stack. The lowest rectangle is your program’s entry point, which also happens to be the common ancestor in every sampled call stack. Rectangles directly above another rectangle are its immediate children, revealing how your code branches off.
Note: If you prefer an inverted order for your function calls in the stack, then you can present the same flame graph upside down, creating a so-called icicle graph.
You can draw a vertical line through the flame graph to obtain a complete stack trace for one particular sample. By looking at the graph from top to bottom, you’ll follow the ancestry in function call hierarchy. Conversely, by starting at the bottom and looking upward, you’ll trace the unique code paths that were observed in a running program.
The leaf functions executing directly on the CPU during sampling correspond to the parts of the peak rectangles without any children directly above them. Therefore, to identify bottlenecks burning your CPU cycles, you should look for plateaus at the top of the graph. They might be uninteresting low-level functions from the standard library, in which case you can follow the call hierarchy below to understand the code paths that led to them.
To generate a flame graph for one of your Python programs, you can grab the original scripts, which were written in Perl. As most Linux releases ship with Perl, these scripts should work out of the box. After downloading them, add their containing folder to your $PATH environment variable so that you can call them without specifying the full path:
$ git clone git@github.com:brendangregg/FlameGraph.git
$ export PATH="$(pwd)/FlameGraph:$PATH"
This will clone the remote repository into a local FlameGraph/ folder, which you add to the $PATH variable.
Then, you can follow these five steps:
- Record a binary profile using
perf record. - Extract stack traces into a text format using
perf script. - Collapse stack traces into single lines using
stackcollapse-perf.pl. - Generate a scalable vector graphics (SVG) image using
flamegraph.pl. - Open the flame graph in your web browser to interact with it.
Assuming you have a perf.data file in the current working directory and the downloaded Perl scripts on your $PATH variable, you can generate a flame graph with this command:
$ sudo perf script | stackcollapse-perf.pl | flamegraph.pl > flamegraph.svg
You combine a few scripts through a Unix pipeline (|) and then redirect (>) its output to a local file named flamegraph.svg. When you open it in your web browser, you’ll notice that the resulting flame graph is interactive. It’ll let you hover the mouse over rectangles to see their details or zoom in on a particular part of the graph as needed.
While you can interactively search and highlight function names that match a given pattern, you may find it easier to filter out the noise up front. To do so, use the grep command on the collapsed stack traces:
$ sudo perf script | stackcollapse-perf.pl | grep 'py::' | flamegraph.pl
$ sudo perf script | stackcollapse-perf.pl | grep -v 'py::' | flamegraph.pl
In the first case, you only keep those stack traces that contain at least one invocation to a Python function. You do that by taking advantage of the fact that the trampoline mode in Python 3.12 marks pure-Python calls with the py:: prefix. In the second case, you suppress those functions, ending up with only native function calls.
Note: If the resulting flame graph still depicts too much information, which is often the case, then you can filter out function calls below a certain cost threshold. For instance, you can pass the --minsize parameter to the flamegraph.pl script in order to specify the minimum width of a rectangle in pixels. Rectangles smaller than this threshold won’t show up in the graph anymore.
To produce a pure-Python flame graph, you can modify the collapsed stack traces returned by stackcollapse-perf.py before pushing them further through the pipeline:
$ (...) | stackcollapse-perf.pl | python censor.py -m benchmark,PIL,re | (...)
In the supporting materials, you’ll find a Python script named censor.py, which lets you remove symbols without the py:: prefix from the collapsed stack traces. Also, it can optionally keep stack traces originating in the specified Python modules and packages. Go ahead and download these materials if you haven’t already:
Free Bonus: Click here to download your sample code for a sneak peek at Python 3.12, coming in October 2023.
If you don’t want to install another utility in order to get a profile visualization, then consider using an online tool compatible with perf. One such tool is the Firefox Profiler, which you’ll learn about now.
Firefox Profiler
The Firefox web browser has a profiler integrated with its developer tools, which you’ll find under the Performance tab. It can help you identify and fix performance issues in client-side web applications. However, you don’t need to use Firefox or JavaScript to take advantage of the accompanying web interface for visualizing a performance profile.
The Firefox Profiler is an online tool that supports many profilers, including perf, and provides instructions on how to import the recorded data. To load a profile recorded with perf into it, you must first convert your binary data into a textual format using the perf script command:
$ sudo perf script > stack_traces.txt
Then, navigate to the Firefox Profiler, click the button labeled Load a profile from file, and browse to the text file you just created. As soon as you do, you’ll see a highly interactive dashboard with a timeline at the top of the screen and a few tabs with different kinds of visualizations, including a flame graph:
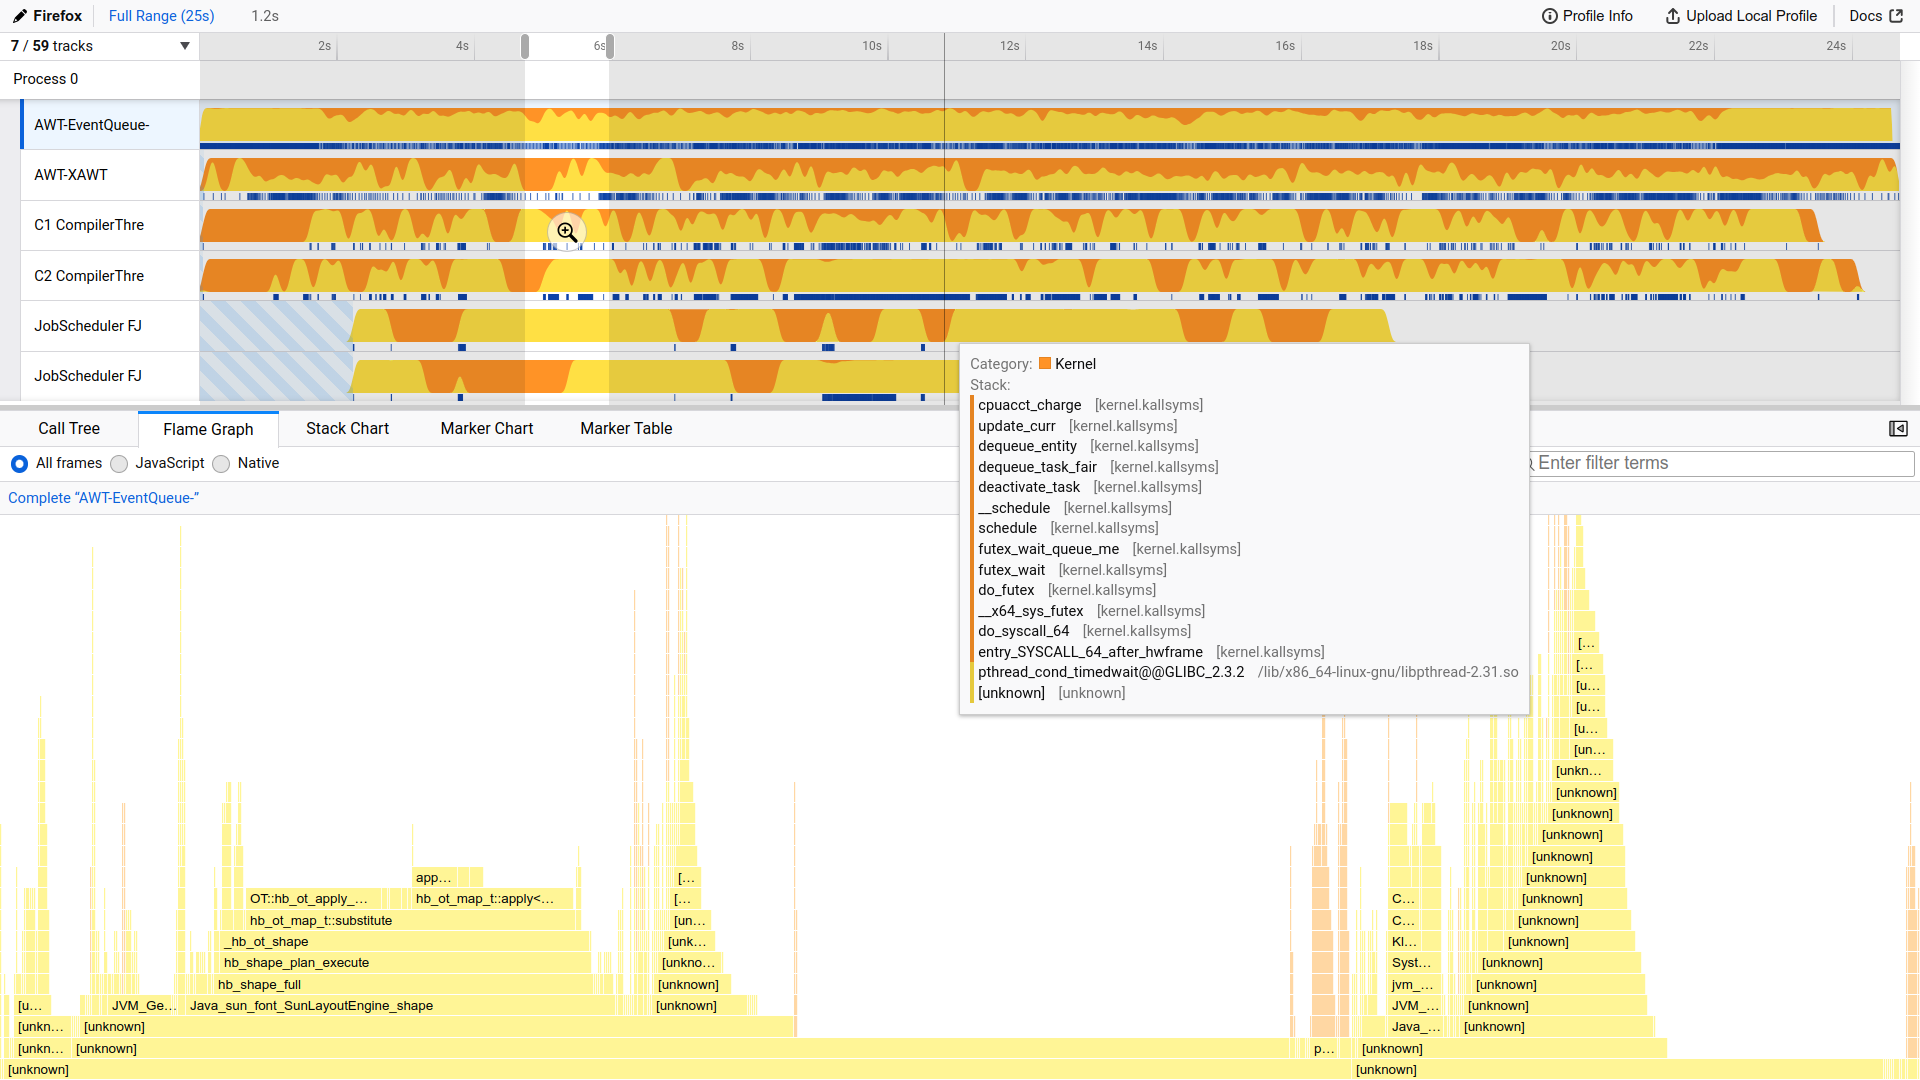
You can narrow down the view to a specific time range. However, keep in mind that, by default, perf collects samples only when a thread is executing on the CPU. So, there might be gaps between samples, which indicate when a thread was sleeping.
Another option for you to visualize perf data is with the help of a desktop application that provides a graphical user interface (GUI). This might be more intuitive than using a command-line interface and less restrictive than a web interface. In the next section, you’ll explore the hotspot application.
Hotspot
Hotspot is an open-source application implemented in C++. It uses the cross-platform Qt graphical framework. The application is a wrapper around perf, although many advanced features are missing from it, and you’ll only find them in the original Linux perf profiler. That said, hotspot understands the underlying binary file format and can visualize the recorded samples directly.
To install hotspot on Ubuntu, type the following in your terminal:
$ sudo apt install hotspot
The corresponding package is already available in the official Ubuntu repositories, so no additional steps are required. Once the application is installed, you can run it by typing hotspot at your command prompt or by finding the corresponding icon in your installed applications.
Note that you may need to change the owner of the perf.data file before opening it with hotspot if you recorded it as the root user. For example, to change the file’s owner to a user named realpython, use the chown command and then load the file into hotspot:
$ sudo chown realpython:realpython perf.data
$ hotspot perf.data
While you could try starting hotspot with sudo or as the root user, it’s considered insecure and bad practice, so don’t do it!
One advantage of hotspot is that it has a user interface that provides lots of information and several tabs without feeling too cluttered:
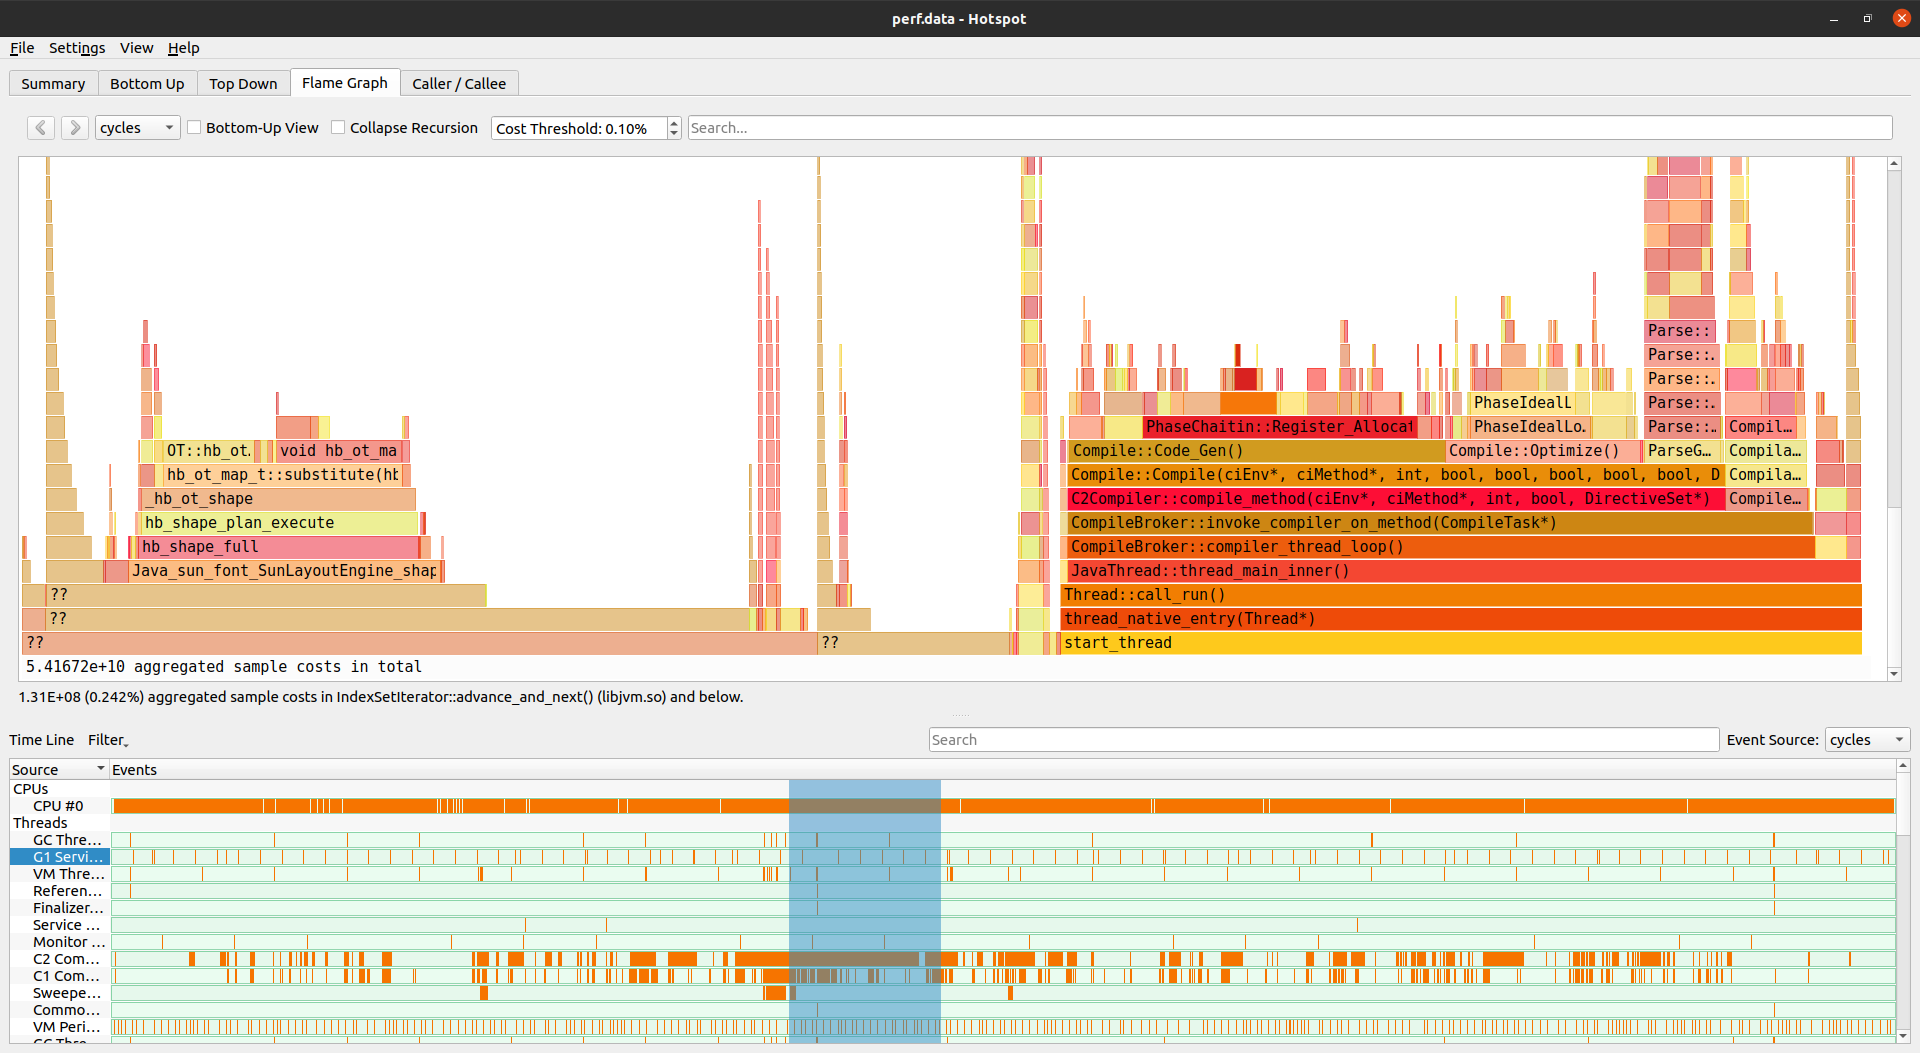
One of the views provides the familiar flame graph, which again highlights the importance of this type of visualization in analyzing a performance profile. Other tabs include searchable top-down and bottom-up call stack trees, a summary page listing top hot spots, and more. Check out an overview video, which shows a naive implementation of the Mandelbrot set as an example, for a quick tour of the user interface.
You have several options for visualizing your data from perf. In fact, there are many that you haven’t even touched in this tutorial! At this point, you’re equipped to use perf with the upcoming Python 3.12 release and visualize its data in a way that works for you.
Conclusion
While the final release of Python 3.12 is scheduled for October 2023, you can already download its beta preview to try out the new features. Here, you’ve explored Python’s support for the Linux perf profiler, obtaining a system-wide view of your application’s performance. Along the way, you played around with powerful visual inspection capabilities in the perf ecosystem.
In this tutorial, you’ve done the following:
- Installed and used the Linux perf profiler with Python 3.12
- Gotten a holistic view of your application’s performance
- Explored a case study of profiling Python code with
perf - Visualized the collected metrics with flame graphs and more
Many other improvements and features are coming to Python 3.12. Keep track of what’s new in the changelog for an up-to-date list. Have you used the Linux perf profiler with other programming languages before? What was your experience like? Are you excited about the ability to profile your Python programs with it?
Free Bonus: Click here to download your sample code for a sneak peek at Python 3.12, coming in October 2023.


