Most software projects benefit from having a piece of documentation that provides a quick start guide for setting up, using, and contributing to the project. This is especially true in open-source projects where you typically want to attract users and contributors. This type of document is commonly known as a README file, and you should add one to each Python project you create.
In this tutorial, you’ll learn:
- What a
READMEfile is - How to organize a
READMEfile - What document format to use for
READMEfiles - How to prepare a
READMEfile for platforms like PyPI and GitHub - What tools and templates to use to create
READMEfiles
You won’t need special knowledge to read through this tutorial. However, to start creating your own README files, you should familiarize yourself with markup languages, such as Markdown and reStructuredText.
Get Your Template: Click here to download the free template you can use to create your own great README files.
Take the Quiz: Test your knowledge with our interactive “Creating Great README Files for Your Python Projects” quiz. You’ll receive a score upon completion to help you track your learning progress:

Interactive Quiz
Creating Great README Files for Your Python ProjectsTake this quiz to test your understanding of how a great README file can make your Python project stand out and how to create your own README files.
What Is a README File?
A README file is a document that you typically add to the root directory of a software project. It’s often a short guide that provides essential information about the project. The README file aims to help users and developers understand the project’s purpose, how to use it, and how to contribute to it. It’s also a way to communicate with potential users, collaborators, and contributors.
README files are typically plain text files that are the most visible piece of documentation and often the landing page for many software projects, including open-source projects.
In most cases, the file name is written in uppercase letters to draw the user’s attention and ensure it’s the first thing they read.
A README should contain only the necessary information for users, collaborators, and developers to get started using and contributing to your project. For more extended documentation, wikis or dedicated documentation pages are more appropriate and recommended.
Why Do You Need a README in Your Python Projects?
README files have a long history in free and open-source software. The GNU Coding Standards encourage you to include a README to provide a general overview of the package’s contents. However, this type of file isn’t limited to free and open-source projects. You can add a README to any project you like.
Why should you spend time writing a README file for your Python projects? Here are a few general reasons:
READMEfiles are kind of a standard in the software industry.- The
READMEfile is frequently the first thing your users will notice or search for when they find your project. - A good
READMEfile helps your project stand out from other projects. - A high-quality
READMEfile differentiates a good project from a bad one. READMEfiles are often displayed as the project’s landing page on software development platforms like GitHub and GitLab.
From a more specialized point of view, a good README file can help you:
- Introduce the project by providing an overview of what the project is about, its purpose, and its main features.
- Provide guidance by offering instructions on how to set up the project for use and contributions.
- Attract contributors by providing clear guidelines on how to contribute to the project.
- Provide documentation by working as the primary source of documentation for the project.
- Supply support and contact Information by providing details on how to get help or contact the project maintainers.
- Include license information by specifying the terms for using and contributing to the project.
These are just a few of the benefits of adding a README file to your Python projects. So, what do you think? Is it worth it to add them?
What Is the Usual Structure of a Great README File?
First, you should know that there isn’t one right way to structure a high-quality README file. In practice, the content and sections you include in this file will depend on your specific project. However, you’ll find that most README files have common sections, such as the project’s name, the instructions on how to set up and use the project, guidelines for contributing to the project, and similar topics.
In the following sections, you’ll learn about the most commonly used sections in README files and their content.
Common Sections in Great README Files
Before discussing how to organize a README file in a well-structured document with pertinent sections, you’ll briefly consider the general content that most README files contain. To approach this topic for a given Python project, you try to answer the following questions:
- What was your motivation to build the project?
- What problem does the project solve?
- What technologies does the project use and why?
- What are the project’s most relevant features?
- How can users get started with the project?
- Where can users get help with your project?
Once you’ve considered these questions, you’ll have enough background information to start writing your project’s README. First, you should have a reasonable, readable, and engaging name for your project. This is often a surprisingly challenging step!
Once you have a name, you can start thinking of what content to include in the project’s README. Here’s a quick and non-exhaustive list of common topics. Note that some of these sections are only relevant to open-source projects:
- Project description: A short description of what your project does. A good way to do this right is to provide:
- A concise paragraph describing your project
- A representative screenshot or an animated GIF showing your project in action
- Installation: A series of steps that describe how to install the project. If your project is cross-platform, then make sure you list the steps for all the supported platforms.
- Execution and usage: The instructions for executing the project if it’s an executable Python application. If the project is a Python library, then you can provide some code examples of using the library. Ideally, you should provide examples that showcase the project’s most relevant features.
- Used technologies: A list of used technologies, including third-party Python libraries and frameworks. You can provide a short description of each technology and, optionally, the reasons behind using it.
- Current features: A list of current features. You can take advantage of this section to do some marketing around your project by highlighting its most relevant features.
- Contributing: A series of steps for contributing to the project. Alternatively, you can create a dedicated contributor’s guide in a separate file, which is common practice in large projects.
- Contributors: The list of people who have somehow contributed to your Python project. Crediting contributors is an excellent way to make open-source contributors feel like they’re part of a team effort.
- Author’s info: The author’s name and contact information, such as social media accounts and email. This information will be handy for people who want to collaborate with you.
- Change log: A condensed change log listing the changes made to the project compared to the previous version.
- License: A quick statement about the license the software is under. You can include a
LICENSE.txtfile under your project’s root folder and then link to that file. For an open-source Python project, you could go to opensource.org and get the license that meets your needs.
Again, this list of sections isn’t exhaustive. It only identifies the most commonly used sections in a typical README file.
For README files that are on the long side, you should include a table of contents at the beginning of the file to facilitate navigation through the file’s content.
Useful Badges for README Files
If you use a platform like GitHub to host your project’s source code, then you can include some cool badges in your README file. Badges are little pictures that you can use in GitHub or GitLab README files. For example, you can add some of the following badges to provide additional information about your project in a visual fashion:
- Code coverage:
- Stable version:
- Python:
- SQLite:

- License:

You can add these and several other badges to your project’s README as a way to visually showcase essential details about the project.
You can use badges from several online services. Some of these services include:
For a list of badges to use in your project’s README, take a look at the Awesome Badges repository on GitHub.
Finally, if you use GitLab to host your project’s source code, you should check out their badge-related page in their official documentation. On this page, you’ll find detailed instructions on how to set up badges for a given project.
Which Document Format Can You Use for a README?
To write a README file for a Python project, you’ll use a plain text file. You can structure the file’s content using different markup languages. The two most commonly used languages are the following:
- Markdown: A lightweight markup language that allows you to style a plain text file using formatting techniques like headings, emphasis, lists, images, and links. It’s one of the most popular markup languages nowadays.
- reStructuredText: An easy-to-read, what-you-see-is-what-you-get (WYSIWYG) plain text markup language that uses intuitive constructs to indicate a document’s structure. It allows you to define constructs, such as section headings, bullet lists, and emphasis.
Here’s a quick comparison of both languages:
| Feature | Markdown | reStructuredText |
|---|---|---|
| Syntax | Simple and minimal | More elaborate and comprehensive |
| File extension | .md |
.rst |
| Headers | #, ##, ###, … |
====, ----, ~~~~, … |
| Lists | Ordered and unordered | Ordered and unordered |
| Links | [text](url) |
text <url> |
| Images |  |
.. image:: url |
| Emphasis | **bold**, *italic* |
**bold**, *italic* |
| Code blocks | Indented with 4 spaces or backticks | Indented with 4 spaces, :: |
| Tables | Basic table support | More advanced table support |
| Footnotes | Limited support | More complete support |
| Table of contents generation | Limited | Built-in support |
| Extensions and plugins | Various extensions available | Rich built-in directives and roles |
| Use cases | Blog posts, documentation, notes | Comprehensive documentation, books |
| Rendering | Widely supported | Supported through specific tools |
| Learning curve | Low | Medium to high |
Both languages have their pros and cons. Markdown is often preferred for README files because, in most cases, this type of file doesn’t require complex formatting. In contrast, if your README file requires advanced formatting features, then reStructuredText can be a better option.
Popular online software development platforms, such as GitHub and GitLab, provide support for both markup languages. When it comes to Markdown, both platforms have their own flavors. If your project’s source code is hosted in one of these platforms, then you should check out the corresponding flavored Markdown specification.
How Can You Prepare Your README for PyPI or GitHub?
When you publish your projects to the Python Package Index (PyPI) or host the project’s source code in a platform like GitHub, you may need to follow some requirements or guidelines to build your README files.
In the following sections, you’ll learn about these requirements and guidelines, focusing on PyPI and GitHub.
README Files for PyPI
Having a great README file for your Python project hosted in PyPI can help it stand out from similar projects on the platform. A well-crafted README creates a good first impression about the quality of your project.
For your README to display nicely on PyPI, you can use either Markdown or reStructuredText markup language. You can also use plain text, but by doing so, you’ll have limited formatting options.
If you choose Markdown language, then you should use the GitHub-flavored Markdown. On the other hand, if you go with reStructuredText, then you can use the standard syntax without Sphinx extensions.
Finally, it’s customary to save your README file in the project’s root folder. This way, PyPI will automatically detect the README and display it as the project’s landing page.
README Files for GitHub
When you host your project’s code on GitHub as an open-source project, then you should use the GitHub-flavored Markdown and save the README file in your project’s root folder or the repository’s .github/ or docs/ directories.
If you place the README in one of these folders, GitHub will recognize it and automatically surface the file to visitors who find your repository.
To dive deeper into GitHub’s features related to README files, check out the About READMEs page. Among other topics, you’ll find the following:
- Auto-generated table of contents for
READMEfiles - Section links in
READMEfiles and blob pages - Relative links and image paths in
READMEfiles
With these guidelines, you’ll be able to quickly create a README file for a new project or customize an existing README.
What Tools Can You Use to Automate README Creation?
Because README files are so popular and useful for software projects, you’ll find many tools on the Internet that allow you to automate the README creation process.
Note: You can create your project’s README file using any plain text editor. You don’t have to use a dedicated tool for this task.
In the following sections, you’ll be pointed to some online tools for README creation. You’ll also get to know some other tools that you can use to create your README files, including Markdown and reStructuredText online editors.
README Generators
A quick search for README creation tools will give you a list of amazing tools that you can use to automate the creation of these files in your Python projects. Here’s a quick list of some useful ones:
| Tool | Description |
|---|---|
| readme.so | An editor that allows you to quickly add and customize all the sections you need for your project’s README. |
Make a README |
An online editable README template with live Markdown rendering. |
readme-md-generator |
A command-line interface (CLI) app that generates README.md files. It suggests default answers by reading your package.json and git configuration. |
The readme.so online README editor is a cool tool for README creation. The editor looks something like this:
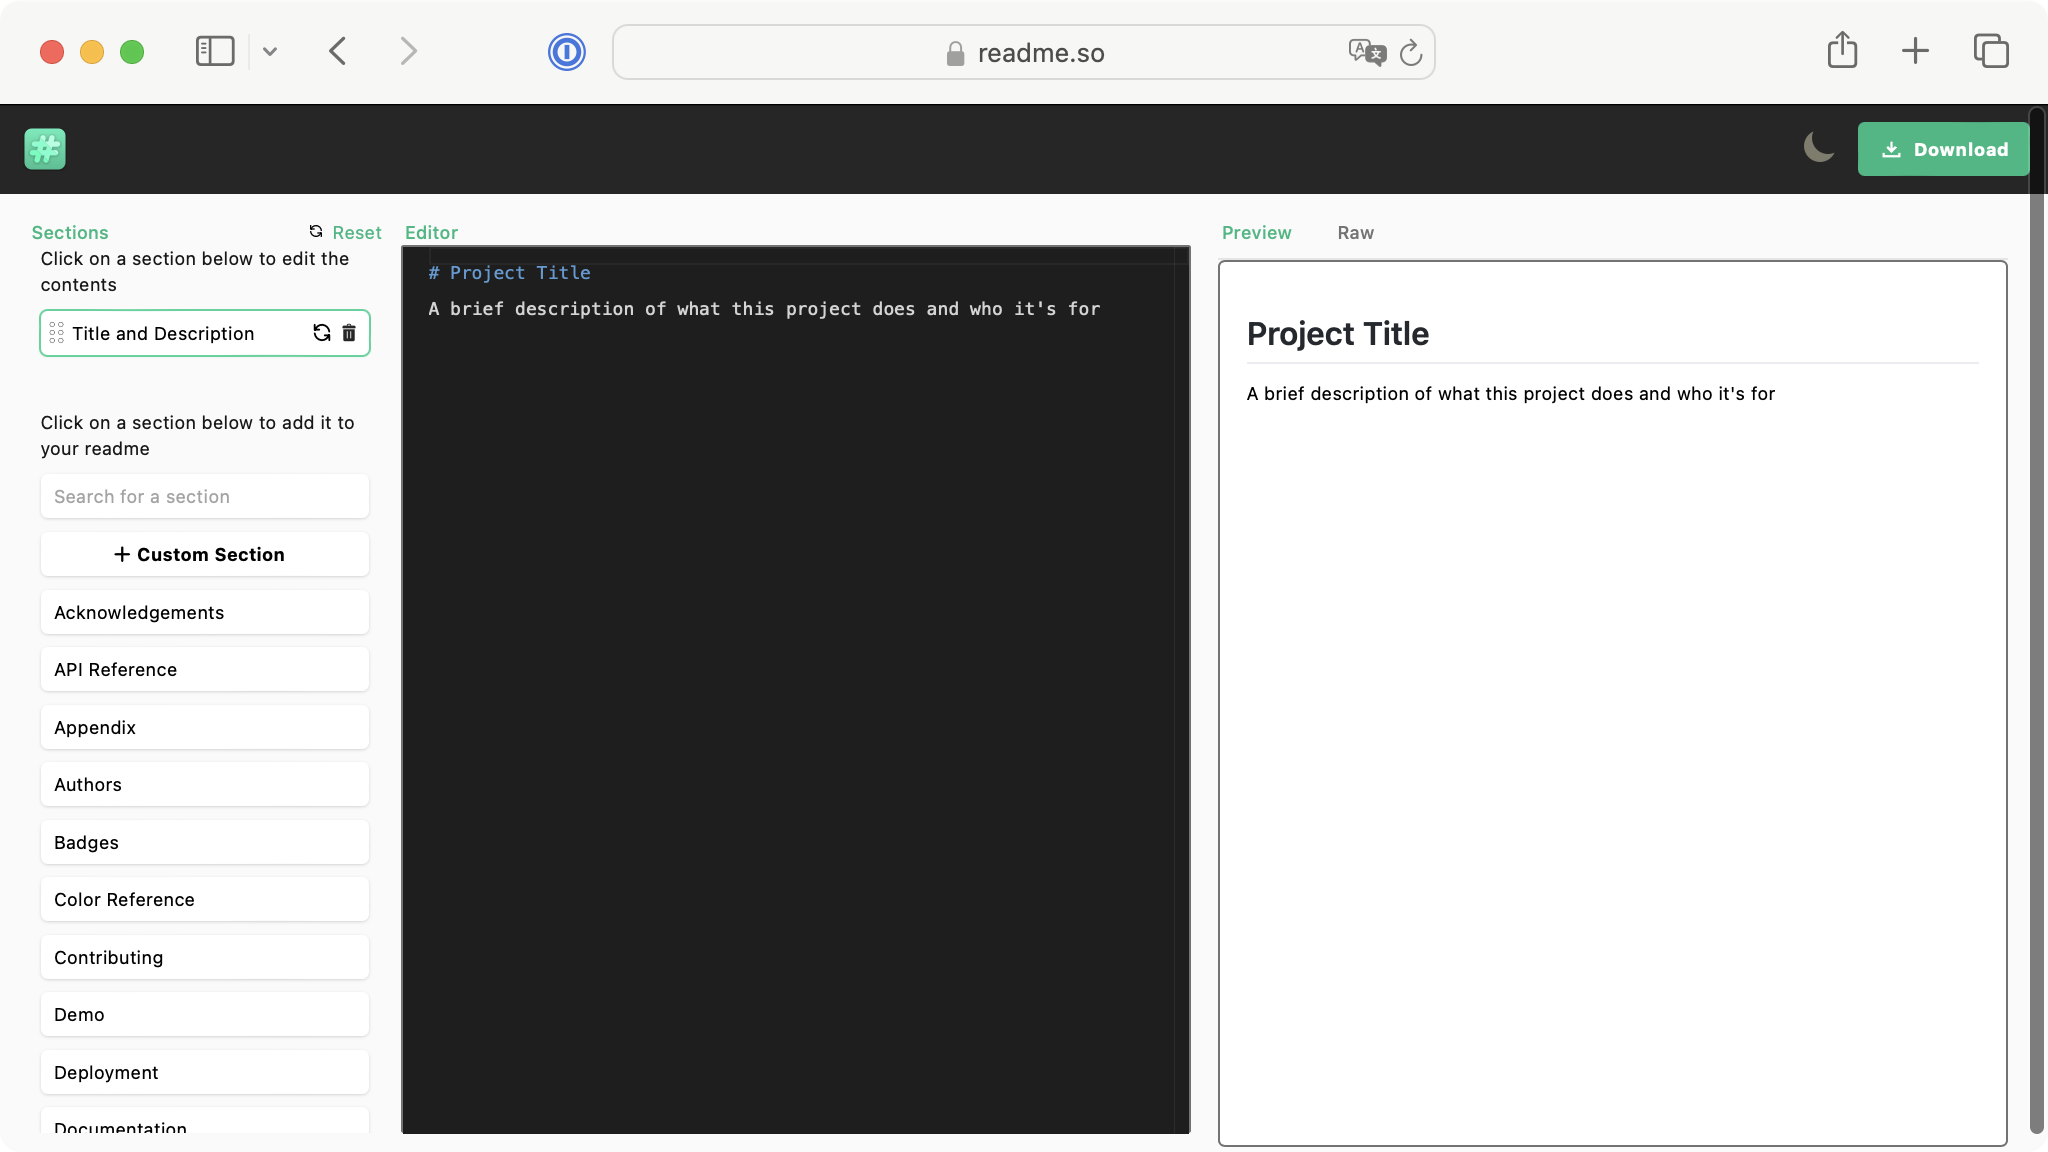
On the left-side panel, you have a list of common sections for README files. You can click the desired section to add it to your README. You can also create custom sections. Once you select a section, its content will be displayed in the editor in the middle. The right-side panel shows the preview.
When you finish creating the file with all the desired sections, you can click the Download button on the top-right corner of the screen to save the file to your local drive.
The Make a README tool provides a README template and a Markdown editor with a preview. Finally, the readme-md-generator tool is a command-line interface app that guides you through the process of creating a README file using a series of quick questions. After you answer the questions, you’ll have the README file in your working directory.
Online Markdown Editors
You can also use a regular Markdown editor to create your Python projects’ README files. Here’s a quick list of online Markdown editors that you can use for this purpose:
| Editor | Description |
|---|---|
| StackEdit | A full-featured, open-source Markdown editor based on PageDown, the Markdown library used by Stack Overflow and the other Stack Exchange sites. |
| Dillinger | A cloud-enabled, mobile-ready, offline-storage compatible, and AngularJS-powered Markdown editor. |
| Online Markdown Editor | An online Markdown editor powered by CKEditor. A powerful WYSIWYG framework that provides a fully customizable editing experience. |
With these online tools, you can create, edit, and format your README files using Markdown language.
Online reStructuredText Editors
If you prefer the reStructuredText markup language for writing your README files, then you can use one of the following online editors:
| Editor | Description |
|---|---|
| Online reStructure Editor | An online reStructuredText editor that allows you to edit, run, compile, and share your restructured code directly from your browser. |
| Documatt | A web application for writing and reading books and documentation based on tools like Sphinx and Markdown. It has a stunning editor with a preview and powerful building and publication tools. |
| Online reStructuredText editor | An online reStructuredText editor with editing capabilities and a preview. |
These tools can help you write your README files without installing a reStructuredText editor on your local machine.
Where Can You Find Great README Templates?
To create README files for your Python projects, a predefined template can be of great help. In the collapsible section below, you’ll find a template based on the guidelines discussed in this tutorial:
# Project's Name


[](https://choosealicense.com/licenses/mit/)
< A short description of what your project does >
< Add an optional screenshot of your project below >
![]()
**Table of Contents**
- [Installation](#installation)
- [Execution / Usage](#execution--usage)
- [Technologies](#technologies)
- [Features](#features)
- [Contributing](#contributing)
- [Contributors](#contributors)
- [Author](#author)
- [Change log](#change-log)
- [License](#license)
## Installation
On macOS and Linux:
```sh
$ python -m pip install <project-name>
```
On Windows:
```sh
PS> python -m pip install <project-name>
```
## Execution / Usage
To run < project's name >, fire up a terminal window and run the following command:
```sh
$ <project>
```
Here are a few examples of using the < project's name > library in your code:
```python
from project import Project
...
```
For more examples, please refer to the project's [Wiki](wiki) or [documentation page](docs).
## Technologies
< Project's name > uses the following technologies and tools:
- [Python](https://www.python.org/): 
- [SQLite](https://sqlite.org/): 
- ...
## Features
< Project's name > currently has the following set of features:
- Support for...
- ...
## Contributing
To contribute to the development of < project's name >, follow the steps below:
1. Fork < project's name > from <https://github.com/yourusername/yourproject/fork>
2. Create your feature branch (`git checkout -b feature-new`)
3. Make your changes
4. Commit your changes (`git commit -am 'Add some new feature'`)
5. Push to the branch (`git push origin feature-new`)
6. Create a new pull request
## Contributors
Here's the list of people who have contributed to < project's name >:
- John Doe – [@JohnDoeTwitter](https://twitter.com/< username >) – john@example.com
- Jane Doe – [@JaneDoeTwitter](https://twitter.com/< username >) – jane@example.com
The < project's name > development team really appreciates and thanks the time and effort that all these fellows have put into the project's growth and improvement.
## Author
< Author's name > – [@AuthorTwitter](https://twitter.com/< username >) – author@example.com
## Change log
- 0.0.2
- Polish the user interface
- 0.0.1
- First working version
- ...
## License
< project's name > is distributed under the < license > license. See [`LICENSE`](LICENSE.md) for more details.
You can download this template by clicking one of the download links provided in this tutorial. Here are some other cool README templates:
The first template is by Dan Bader, the owner and editor-in-chief of Real Python and the leading developer of the realpython.com learning platform. The last two templates are from individual repositories on GitHub.
Alternatively, you can check out the GitHub README Templates site, which groups several README templates from different authors. The site allows you to preview the template, copy its content as Markdown code, and browse its repository on GitHub.
Finally, if you want to inspire yourself by looking at some well-crafted README files from real-world projects, check out the Awesome README repository on GitHub.
Conclusion
You’ve learned to create, organize, and format high-quality README files for your Python projects. This type of file is a short piece of documentation that typically provides an overview of a project, including instructions on installing, using, and contributing to the project. README files are especially handy for open-source Python projects.
In this tutorial, you’ve learned:
- What a
READMEfile is - How to organize a
READMEfile - What document format to use for
READMEfiles - How to prepare a
READMEfile for platforms like PyPI and GitHub - What tools and templates to use to create
READMEfiles
With this knowledge, you’re now prepared to start adding high-quality and well-crafted README files to your Python projects.
Get Your Template: Click here to download the free template you can use to create your own great README files.
Take the Quiz: Test your knowledge with our interactive “Creating Great README Files for Your Python Projects” quiz. You’ll receive a score upon completion to help you track your learning progress:
Interactive Quiz
Creating Great README Files for Your Python ProjectsTake this quiz to test your understanding of how a great README file can make your Python project stand out and how to create your own README files.


