Smart home speakers were a novel idea just a couple of years ago. Today, they’ve become a central part of many people’s homes and offices and their adoption is only expected to grow. Among the most popular of these devices are those controlled by Amazon Alexa. In this tutorial, you’ll become an Alexa Python developer by deploying your own Alexa skill, an application that users will interact with using voice commands to Amazon Alexa devices.
In this tutorial, you’ll learn:
- What the main components of an Alexa skill are
- How to set up an Alexa skill and create Intents
- What the
ask_sdk_coreAlexa Python package is - How to use
ask_sdk_coreto create the business logic of your Alexa Python skill - How to build, deploy, and test your Alexa Python skill using the online developer console
Free Bonus: Click here to download a Python speech recognition sample project with full source code that you can use as a basis for your own speech recognition apps.
Getting Started With Alexa Python Development
To follow this tutorial, you’ll need to make a free Alexa developer account. On that page, you’ll take the following steps:
- Click the Get Started button.
- Click the Sign-Up button on the subsequent page.
- Click Create your Amazon Account.
- Fill out the form with the required details.
- Click Submit to complete the sign-up process.
You’ll also need to be familiar with concepts such as lists and dictionaries in Python, as well as JavaScript Object Notation (JSON). If you’re new to JSON, then check out Working With JSON Data in Python.
Let’s get started!
Understanding Alexa Skills
An Alexa Python developer must be familiar with a number of different Alexa skill components, but the two most important components are the interface and the service:
- The skill interface processes the user’s speech inputs and maps it to an intent.
- The skill service contains all the business logic that determines the response for a given user input and returns it as a JSON object.
The skill interface will be the frontend of your Alexa skill. This is where you’ll define the intents and the invocation phrases that will perform a certain function. Essentially, this is the part of the skill that’s responsible for interacting with the users.
The skill service will be the backend of your Alexa skill. When a specific intent is triggered by the user, it will send that information as a request to the skill service. This will contain the business logic to be returned along with valuable information to the frontend, which will finally be relayed back to the user.
Setting Up Your Environment
It’s time to start building your first Alexa Python skill! Sign in to the Alexa developer console and click on the Create Skill button to get started. On the next page, enter the Skill name, which will be Joke Bot:
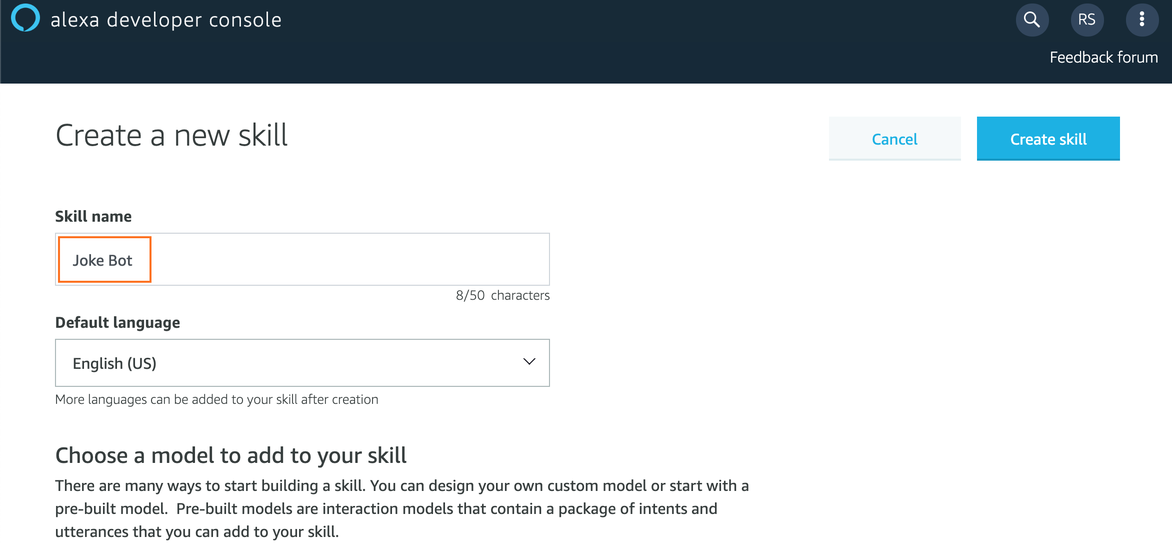
This will be the invocation phrase of your skill. It’s the phrase a user will speak to start using your Alexa skill. You can change this to something else later on if you’d like. Also, note that Alexa skills can interact in many languages, which you can see from the Default Language dropdown menu. For now, just set it to English (US).
Next, you’ll need to choose a model to add to your skill. These models are like templates that have been pre-designed by the Amazon team to help you get started with Alexa Python development, based on some common use cases. For this tutorial, you should select the Custom model.
Finally, you need to select a method to host the backend of your Alexa skill. This service will contain the business logic of your application.
Note: If you select the Provision your own option, then you’ll have to host your own backend for your Alexa Python projects. This can be an API built and hosted on a platform of your choice. The other option is to create a separate AWS Lambda function and link it to your Alexa skill. You can learn more about AWS Lambda pricing on their pricing page.
For now, select Alexa-Hosted (Python) as the backend for your Alexa skill. This will automatically provide you with a hosted backend within the AWS free tier so you don’t have to pay anything up front or set up a complicated backend right now.
Finally, click the Create Skill button to proceed. You might be asked to fill out a CAPTCHA here, so complete that as well. After a minute or so, you should be redirected to the Build section of the developer console.
Understanding the Alexa Skill Model
Once you’ve logged into the Alexa developer console and selected or created a skill, you’ll be greeted with the Build section. This section provides you with a lot of options and controls to set up the interaction model of the skill. The components of this interaction model allow you to define how the users will interact with your skill. These properties can be accessed through the left-side panel, which looks something like this:
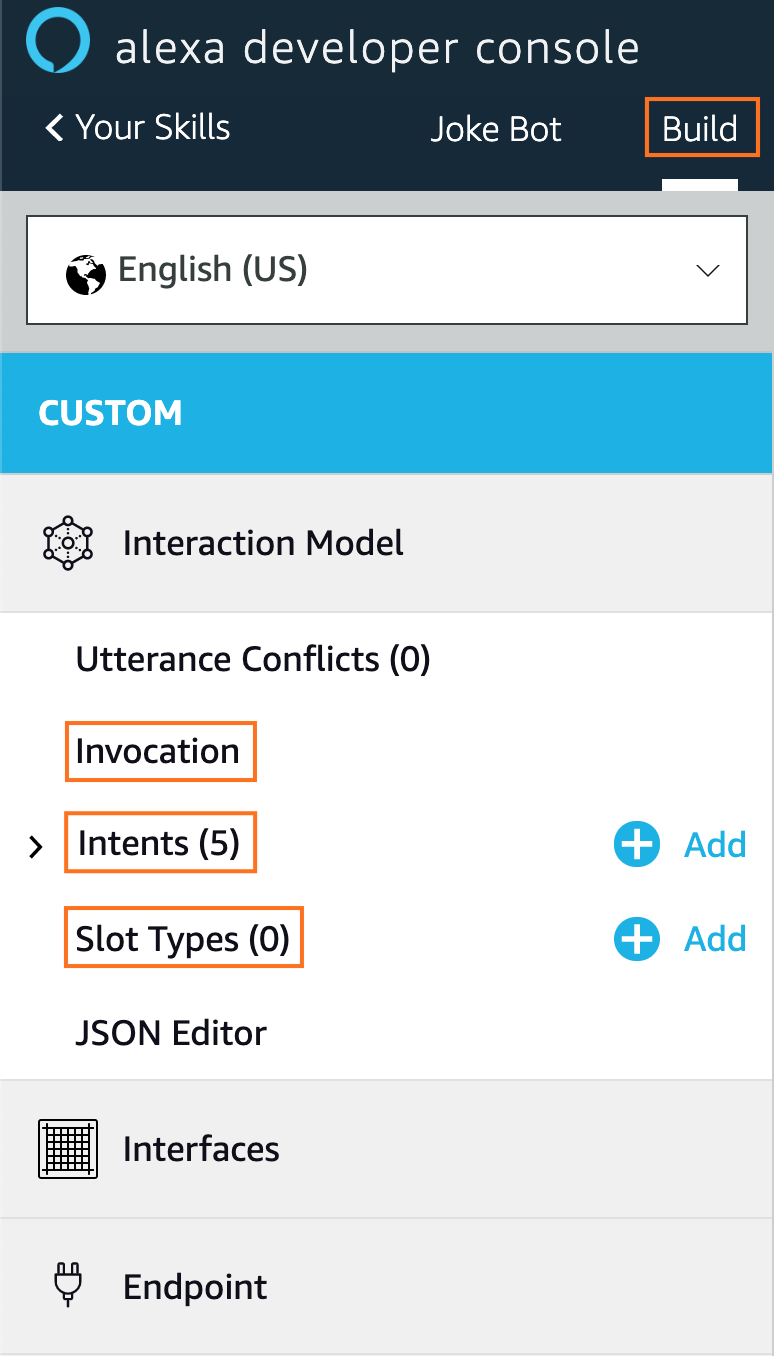
As an Alexa Python developer, there are a few components of an Alexa skill interaction model that you’ll need to know about. The first is the invocation. This is what users will say to begin interacting with your Alexa skill. For example, the user will say, “Joke Bot,” to invoke the Alexa skill you’ll build in this tutorial. You can change this from the Invocation section at any time.
Another component is the intent, which represents the core functionality of your application. Your app will have a set of intents that will represent what kinds of actions your skill can perform. To provide contextual information for a given intent, you’ll use a slot, which is a variable in an utterance phrase.
Consider the following example. A sample utterance to invoke the weather intent could be, “Tell me about the weather.” To make the skill more useful, you can set the intent to be, “Tell me about the weather in Chicago,” where the word “Chicago” will be passed as a slot variable, which improves the user experience.
Lastly, there are slot types, which define how data in a slot is handled and recognized. For example, the AMAZON.DATE slot type easily converts words that indicate a date—like “today, “tomorrow”, and others—into a standard date format (such as “2019-07-05”). You can check out the official slot type reference page to learn more.
Note: To learn more about the Alexa skill interaction model, check out the official documentation.
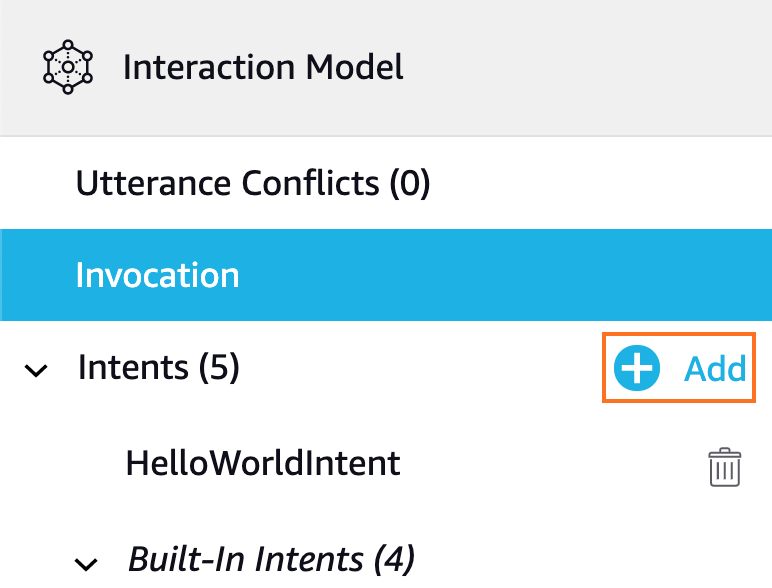
At this point, the Intents panel should be open. If it’s not, then you can open it by selecting Intents from the sidebar on the left. You’ll notice that there are five intents already set up by default:
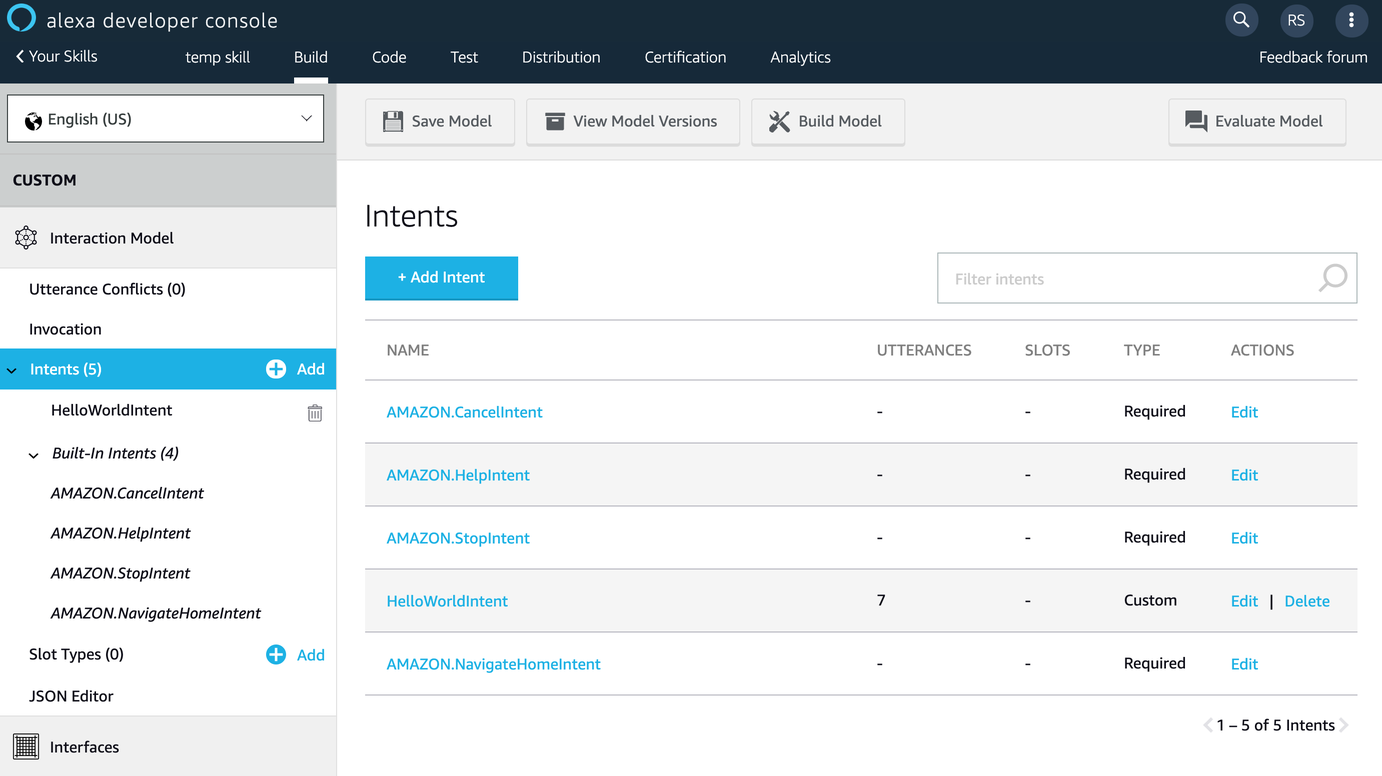
The Intents panel includes a HelloWorldIntent and five Built-in Intents. The built-in intents are there to remind you to account for some common cases that are important to making a user-friendly bot. Here’s a brief overview:
- AMAZON.CancelIntent lets the user cancel a transaction or task. Examples include, “Never mind,” “Forget it,” “Exit,” and “Cancel,” though there are others.
- AMAZON.HelpIntent provides help about how to use the skill. This could be used to return a sentence that serves as a manual for the user on how to interact with your skill.
- AMAZON.StopIntent allows the user to exit the skill.
- AMAZON.NavigateHomeIntent navigates the user to the device home screen (if a screen is being used) and ends the skill session.
By default, there are no sample utterances assigned to trigger these intents, so you’ll have to add those as well. Consider it part of your training as an Alexa Python developer. You can learn more about these built-in intents in the official documentation.
Viewing a Sample Intent
Later in this tutorial, you’ll learn how to make a new intent, but for now, it’s a good idea to take a look at some existing intents that are part of every new skill you create. To start, click the HelloWorldIntent to see its properties:
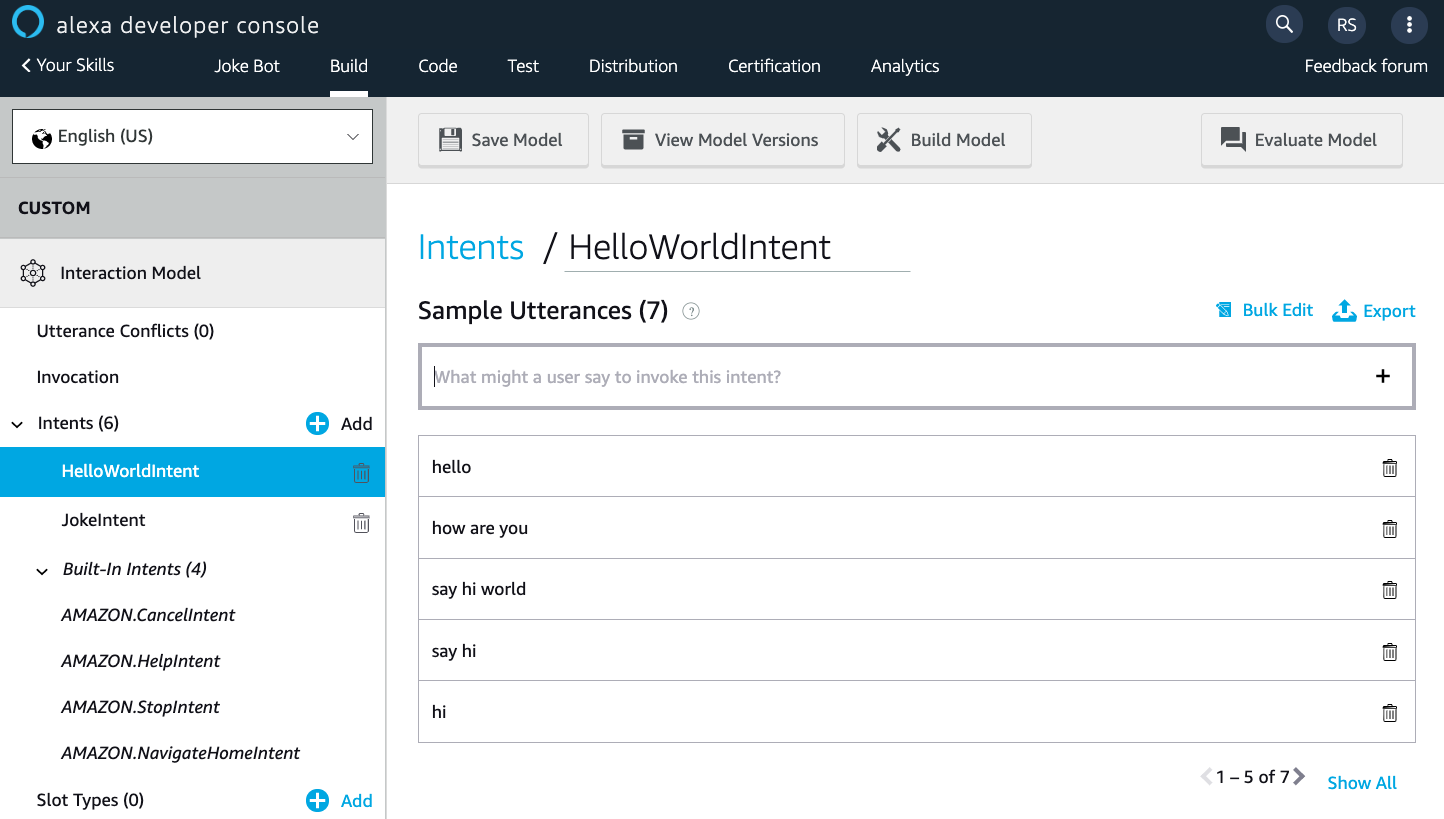
You can see the sample utterances that a user can speak to invoke this intent. When this intent is invoked, this information is sent to the backend service of your Alexa skill, which will then execute the required business logic and return a response.
Below this, you have the option to set up the Dialog Delegation Strategy, which allows you to delegate a specific dialog that you define to a particular intent. While you won’t cover this in this tutorial, you can read more about it in the official documentation.
Next, you have the option to define slots for some particular data that your intent is supposed to collect. For example, if you were to create an intent that tells the weather for a given day, then you’d have a Date slot here that would collect the date information and send it to your backend service.
Note: In addition, the Intent Confirmation option can be useful in a case when you’re collecting a number of different data points from your user in a single intent and you want to prompt the user before sending it on for further processing.
Whenever you make changes to an intent, you need to click the Save Model button to save it. Then, you can click the Build Model button to go ahead and test your Alexa Python skill.
It’s helpful to know that the interaction model of a skill can be completely represented in a JSON format. To see the current structure of your Alexa skill, click the JSON Editor option from the left side panel of the console:
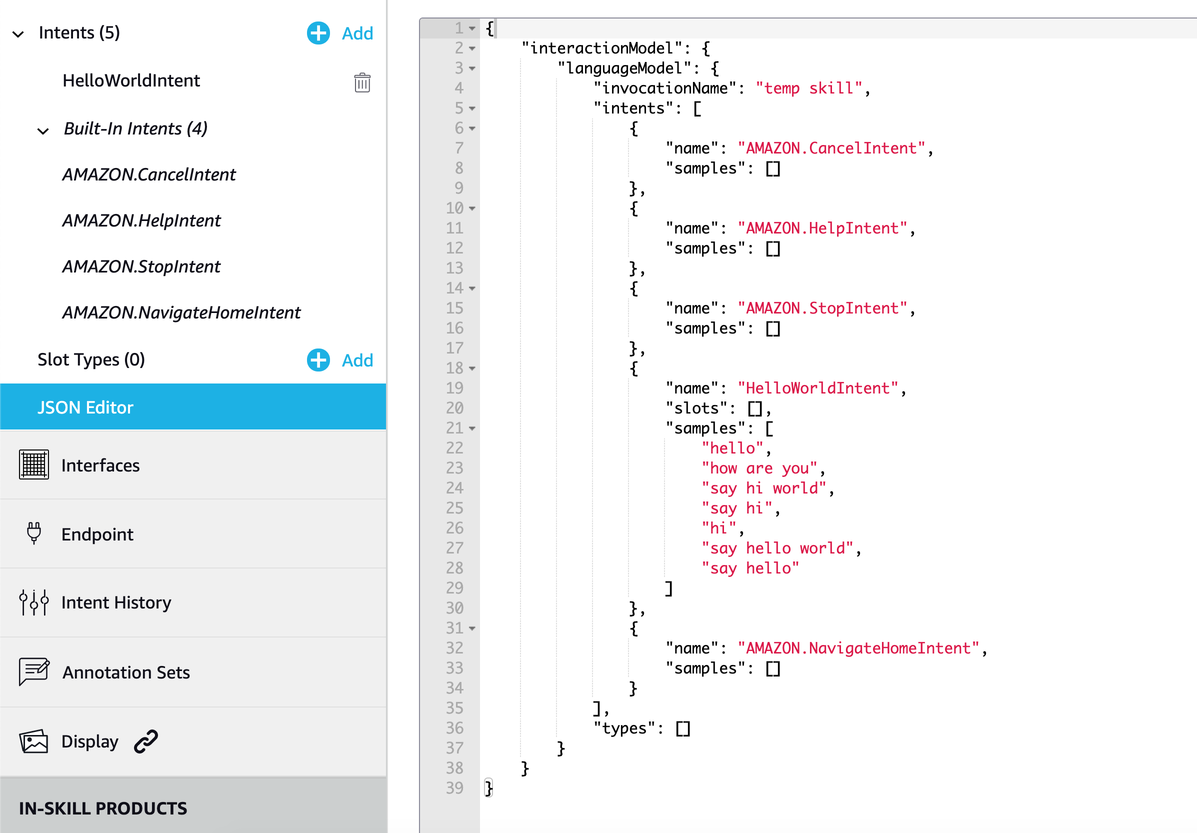
If you make a change directly using the JSON editor, then the changes are also reflected in the developer console UI. To test this behavior, add a new intent and click Save Model.
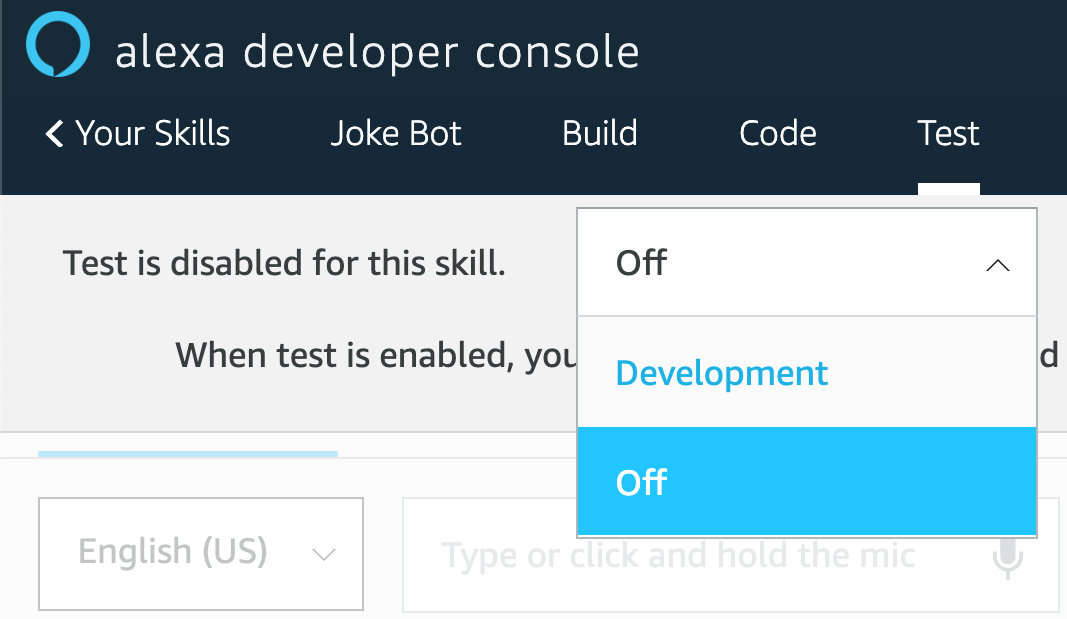
Once you’ve made all the necessary changes to the interaction model of your skill, you can open the Test section of the developer console to test out your skill. Testing is an important part of becoming an Alexa Python developer, so be sure not to skip this step! Click the Test button from the top navigation bar on the developer console. By default, testing will be disabled. From the drop-down menu, select Development to start testing:
Here, you have a number of ways that you can test out your Alexa Python skill. Let’s do a quick test so that you can get an idea of how your Alexa skill will respond to an utterance.
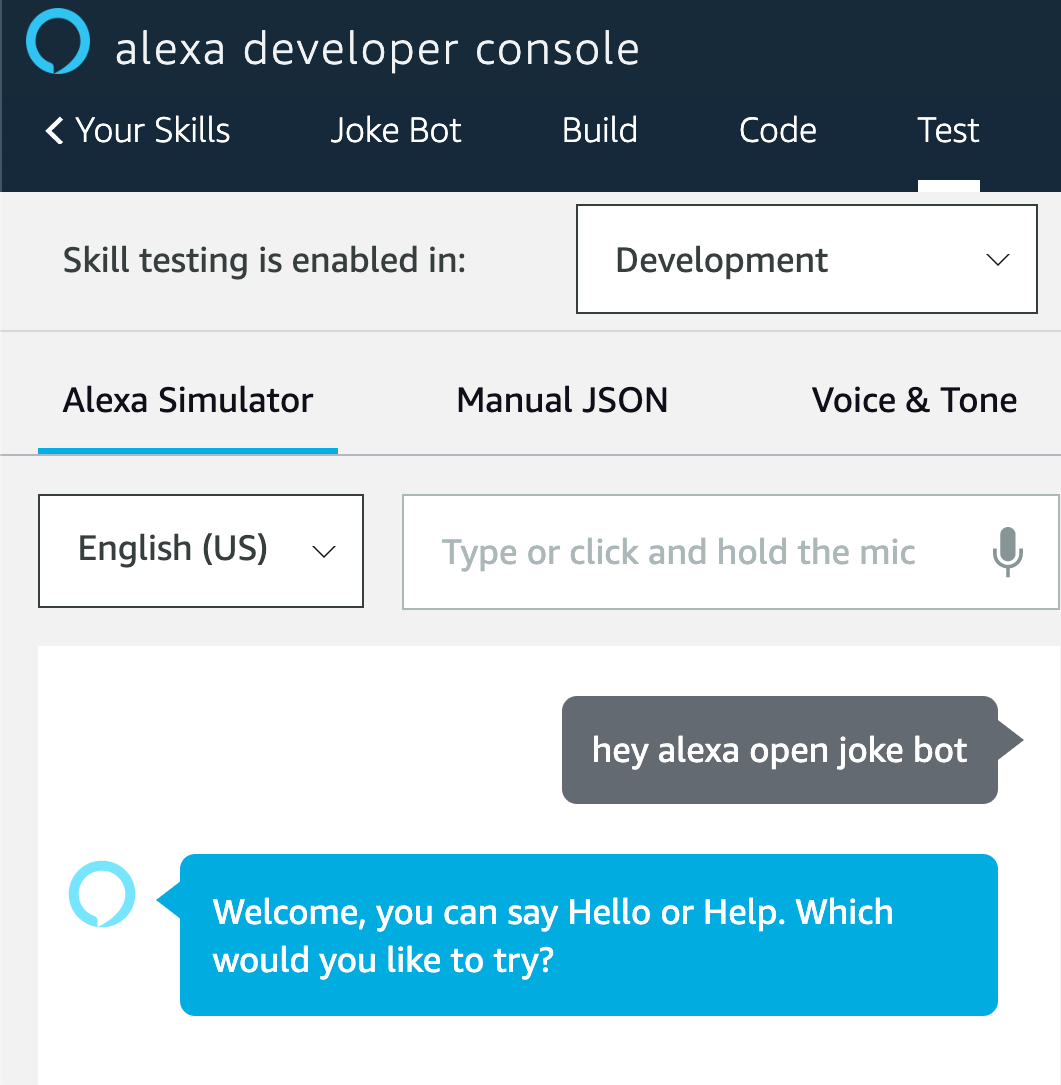
Select the Alexa Simulator option from the left side panel, then enter the phrase, “Hey Alexa, open Joke Bot.” You can do this either by typing it in the input box or by using the Mic option. After a couple of seconds, a response will be returned back to you:
In addition to the voice response, you can also see the JSON Input that was sent to the backend service of your Alexa skill, as well as the JSON Output that was received back to the console:
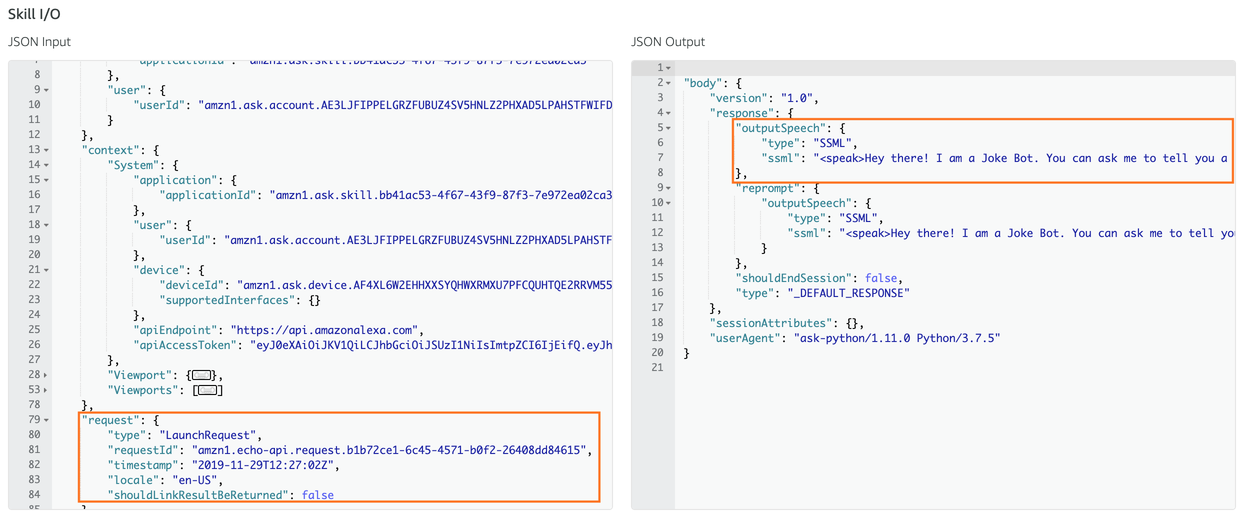
Here’s what’s happened so far:
- The JSON input object was constructed from input data that the user entered through voice or text.
- The Alexa simulator packaged up the input along with other relevant metadata and sent it to the backend service. You can see this in the JSON Input box.
- The backend service received the input JSON object and parsed it to check the type of the request. Then, it passed the JSON to the relevant intent handler function.
- The intent handler function processed the input and gathered the required response, which is sent back as a JSON response to the Alexa simulator. You can see this in the JSON Output box.
- The Alexa simulator parsed this JSON and read the speech response back to you.
Note: You can read about the JSON request-response mechanism for Alexa skills in the official docs.
Now that you have an overview of the different components of an Alexa skill and how information flows from one part to the other, it’s time to start building your Joke Bot! In the next section, you’ll put your Alexa Python developer skills to the test by creating a new intent.
Creating New Intents
Let’s start by creating the JokeIntent, which will return a random joke from a list to the user. Open the Build section of your Alexa developer console. Then, click the Add button next to the Intents option from the left side panel:
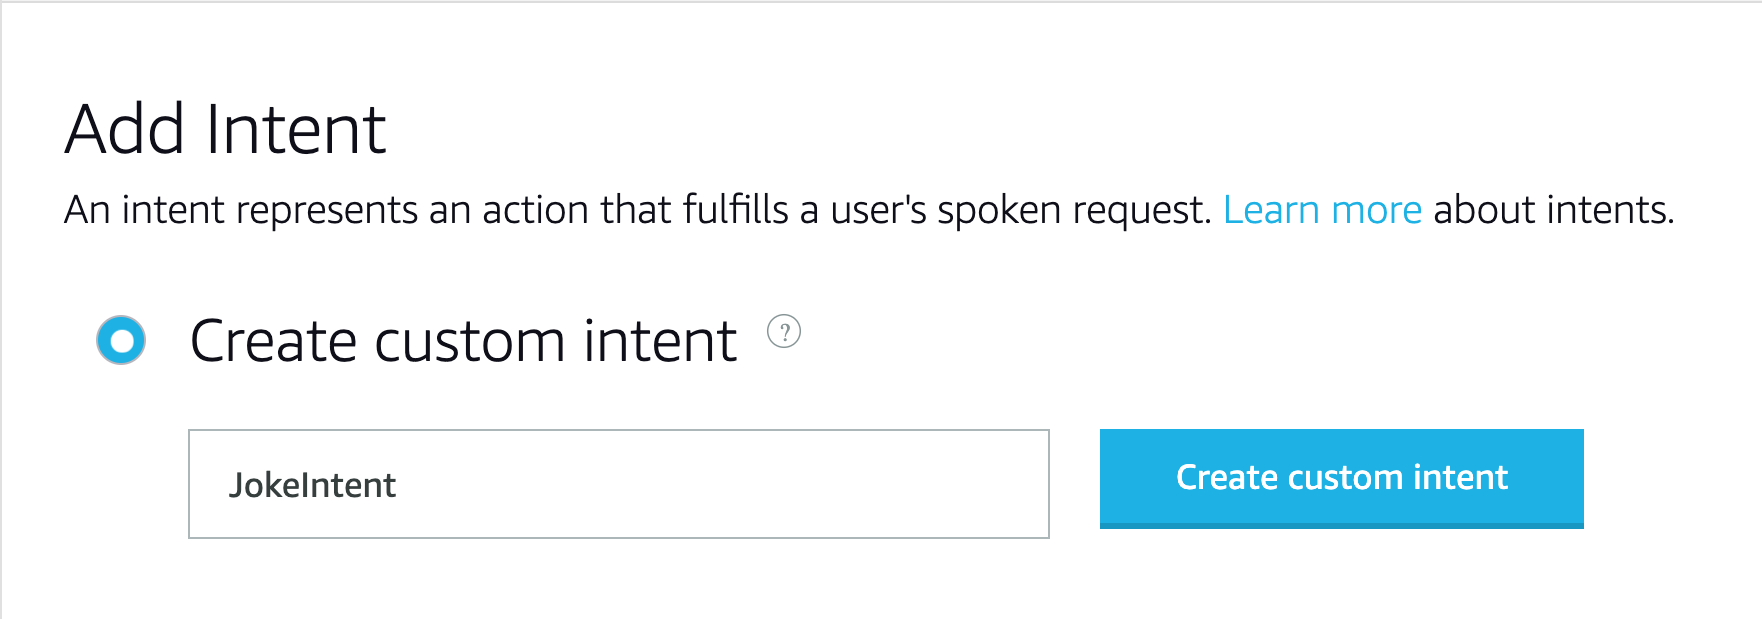
With the Create custom intent option selected, set the name to JokeIntent and then click the Create custom intent button:
Next, you need to add sample utterances that the user will speak to invoke this intent. These can be phrases like “Tell me a joke” or “I want to hear a joke.” Type in a phrase and click the plus sign (+) to add it as a sample utterance. Here’s what that should look like:
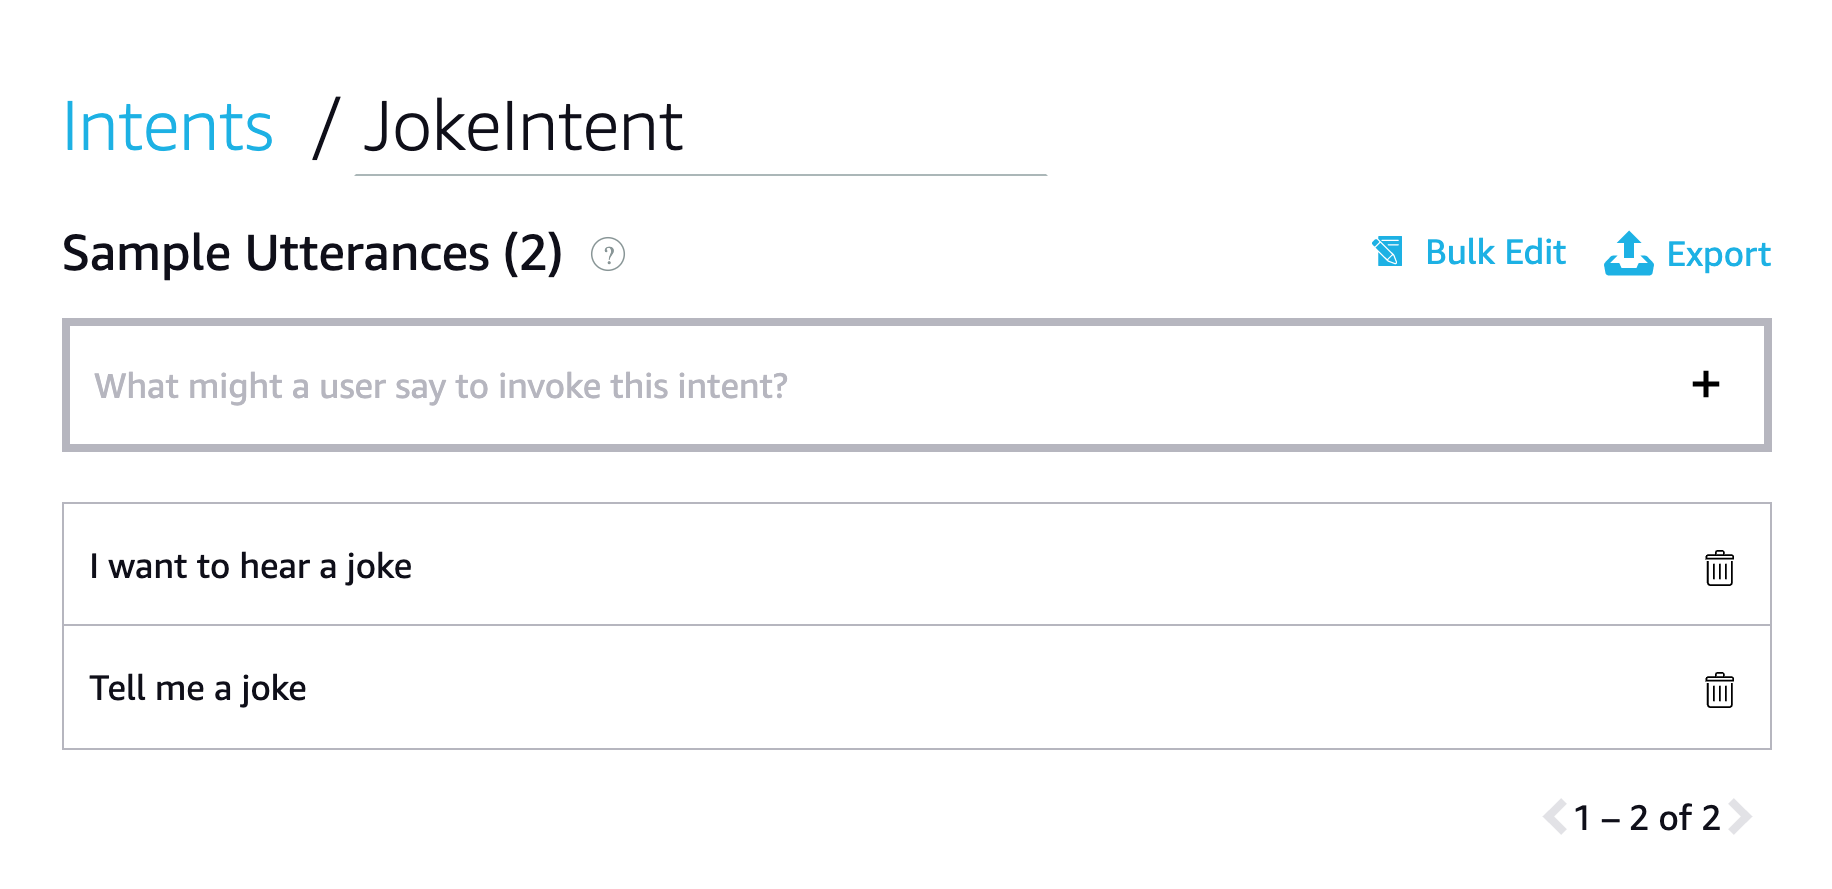
You can add more sample utterances, but for now, these will do just fine. Lastly, click the Save Model button in the top-left corner of the window to save these changes.
Remember, you’ll need to build your model before you can test it out. Click the Build Model button to re-build the interaction model of your Alexa Python skill. You’ll see a progress notification on the bottom-right of your browser window. Once the build process is successful, you should see another pop-up notification indicating the status of the build process.
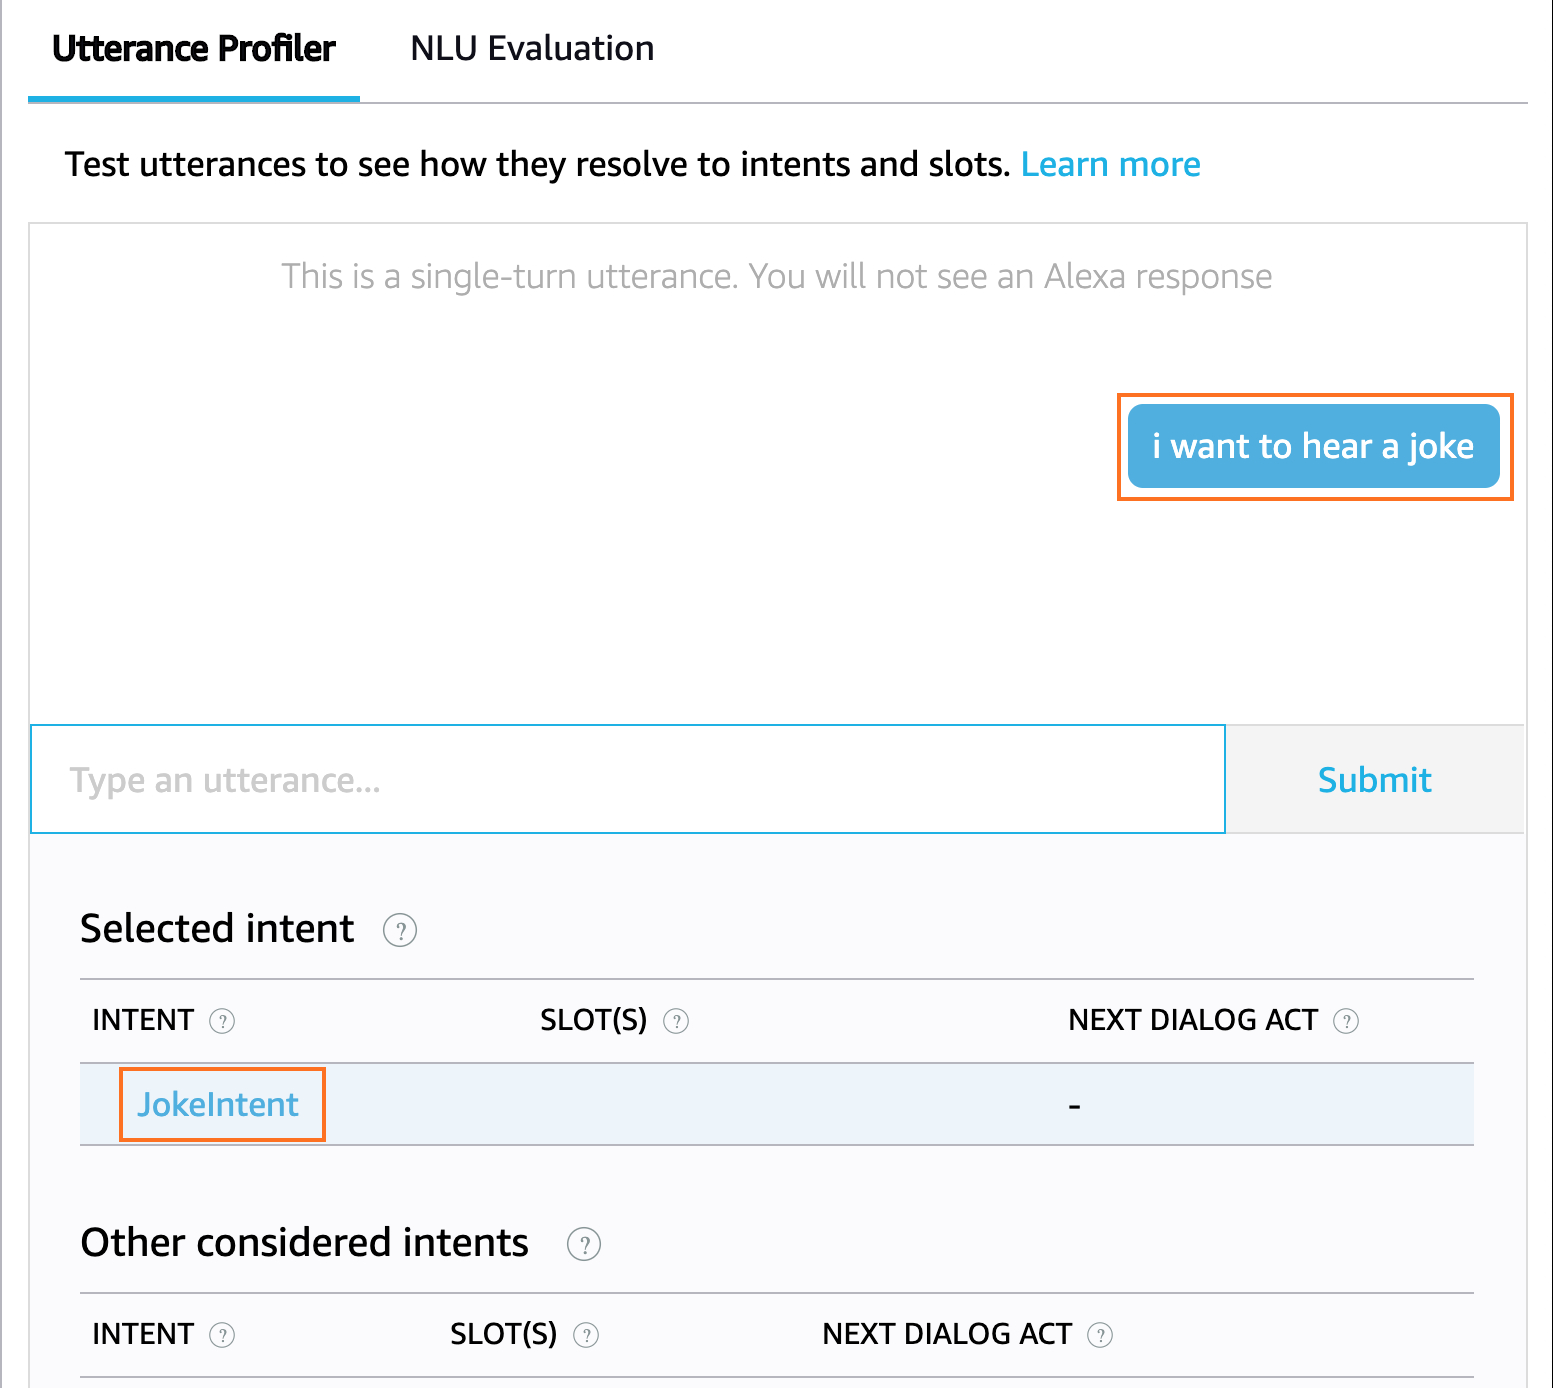
You can check to see if the JokeIntent is successfully triggered or not. Click the Evaluate Model button in the top-right corner of the developer console. A small window will pop in from the side allowing you to check what intent will be triggered by a given input utterance. Type in any of the sample utterances to make sure that the JokeIntent is being invoked successfully.
To get rid of the evaluate pop-up window, click the Evaluate Model button again.
Note: A key thing to remember here is that the model is very flexible in terms of the keywords that are part of the sample utterance phrases. For example, take the phrase, “Is this some kind of a joke?” Even this phrase will trigger the JokeIntent. As an Alexa Python developer, it’s important to select utterances that have a low probability of executing other intents in your skill.
Now that you’ve successfully created an intent, it’s time to write the Python code that will handle this intent and return back a joke as a response.
Building the Skill Backend
Now that you have an intent created that can be triggered by the user, you need to add functionality in the skill backend to handle this intent and return useful information. Open the Code section of the Alexa developer console to get started.
Note: Since you selected the Alexa-Hosted Python option during the setup process, you’re provided with a complete online code editor where you can write, test, build, and deploy the backend of your Alexa skill, all within the developer console.
When you open the Code section of the developer console, you can see an online code editor with some files already set up for you to get started. In particular, you’ll see the following three files in the lambda sub-directory:
- lambda_function.py: This is the main entry point of the backend service. All the request data from the Alexa intent is received here and is supposed to be returned from this file only.
- requirements.txt: This file contains the list of Python packages that are being used in this project. This is especially useful if you’re choosing to set up your own backend service instead of using what’s provided by Amazon. To learn more about requirements files, check out Using Requirements Files.
- utils.py: This file contains some utility functions required for the lambda function to interact with the Amazon S3 service. It contains some sample code on how to fetch data from an Amazon S3 bucket, which you might find useful later on. Right now, this file is not being used in
lambda_function.py.
For now, you’ll only be making changes in lambda_function.py, so let’s take a closer look at the structure of the file:
 7import logging
 8import ask_sdk_core.utils as ask_utils
 9
10from ask_sdk_core.skill_builder import SkillBuilder
11from ask_sdk_core.dispatch_components import AbstractRequestHandler
12from ask_sdk_core.dispatch_components import AbstractExceptionHandler
13from ask_sdk_core.handler_input import HandlerInput
14
15from ask_sdk_model import Response
16
17logger = logging.getLogger(__name__)
18logger.setLevel(logging.INFO)
19
20
21class LaunchRequestHandler(AbstractRequestHandler):
22    """Handler for Skill Launch."""
23    def can_handle(self, handler_input):
24        # type: (HandlerInput) -> bool
25
26        return ask_utils.is_request_type("LaunchRequest")(handler_input)
27
28    def handle(self, handler_input):
29        # type: (HandlerInput) -> Response
30        speak_output = "Welcome, you can say Hello or Help. " \
31                       "Which would you like to try?"
32
33        return (
34            handler_input.response_builder
35                .speak(speak_output)
36                .ask(speak_output)
37                .response
38        )
39...
First, you import the necessary utilities that were provided in the ask_sdk_core Alexa Python package. Then, there are three main tasks you need to perform in lambda_function.py to handle a request from an intent received from the front-end of the Alexa skill:
- Create an intent handler class, which inherits from the
AbstractRequestHandlerclass, with functionscan_handle()andhandle(). There are already a couple of handler classes defined inlambda_function.py, such asLaunchRequestHandler,HelpIntentHandler, and so on. These handle the fundamental intents of an Alexa skill. An important point to note here is that you need to create a new intent handler class for each of the intents you define. - Create a
SkillBuilderobject, which acts as the entry point for your Alexa Python skill. This routes all the incoming request and response payloads to the intent handlers that you define. - Pass the intent handler class as an argument to
.add_request_handler()so that they’re called in order whenever a new request is received. TheSkillBuilderis a singleton, so only one instance of it is needed to handle the routing of all incoming requests.
This is a good time for you to go through lambda_function.py. You’ll notice that the same pattern is followed over and over again to handle different intents that can be triggered by your Alexa Python skill.
Now that you have a broad overview of all the different things you need to do to handle an intent in your backend, it’s time to write the code that will handle the JokeIntent that you built in the previous section.
Creating the JokeIntent Handler
Since the important utilities from the ask_sdk_core Alexa Python package have already been imported, you don’t need to import them again. If you want to learn more about these in-depth, then you can check out the official documentation.
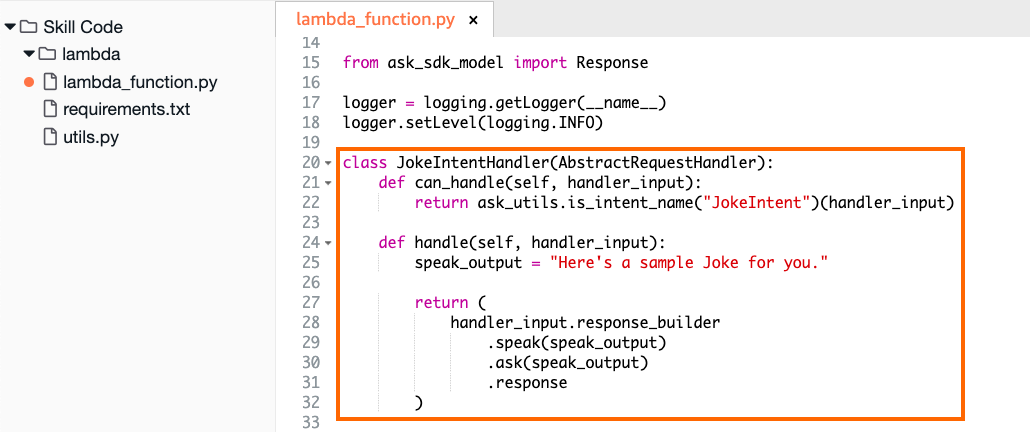
Next, you’ll create a new intent handler that will handle the request received from the JokeIntent. In the code snippet below, the intent handler will simply return with a sample phrase. This indicates that the response to the JokeIntent was received from the backend. Add the following code to lambda_function.py above the class definition of LaunchRequestHandler():
20class JokeIntentHandler(AbstractRequestHandler):
21    def can_handle(self, handler_input):
22        return ask_utils.is_intent_name("JokeIntent")(handler_input)
23
24    def handle(self, handler_input):
25        speak_output = "Here's a sample joke for you."
26
27        return (
28            handler_input.response_builder
29                .speak(speak_output)
30                .ask(speak_output)
31                .response
32        )
Let’s take a look at what each section does. In line 20 you create a new intent handler class for the JokeIntent, which is a child class of the AbstractRequestHandler class. When you create an intent in the frontend, you need to create an intent handler class in the backend that can handle requests from Alexa. The code you write for this needs to do two things:
JokeIntentHandler.can_handle()recognizes each incoming request that Alexa sends.JokeIntentHandler.handle()returns an appropriate response.
In line 21 you define .can_handle(). It takes in handler_input as a parameter, which is an object of type dict() that contains all the input request information. Then, it uses ask_utils.is_intent_name() or ask_utils.is_request_type() to check whether the JSON input it received can be handled by this intent handler function or not.
You use .is_intent_name() and pass in the name of the intent. This returns a predicate, which is a function object that returns True if the given handler_input originates from the indicated intent. If this is true, then the SkillBuilder object will call JokeIntentHandler.handle().
Note: If the JokeIntent is triggered from the Alexa skill frontend, then it will send a JSON object containing a key type in the body of request that indicates that the intent named JokeIntent was received as input.
This statement subsequently calls .handle(), which you define in line 24. This method receives the input request along with any other important information that might be needed. It contains the business logic that’s required to successfully handle a particular intent. In the case of the JokeIntent, this method is required to send a response containing a joke back to the Alexa frontend.
The speak_ouput variable contains the sentence which will be spoken back to the user by the Alexa skill frontend. speak(speak_output) indicates what the Alexa frontend will play to the user as speech. ask("Question to ask...") can be used to ask a follow-up question. In this method, an object of class response_builder returns the response back to the Alexa skill.
Note: A default response message (Sorry, I had trouble doing what you asked. Please try again.) will be sent back if .handle() does not exist.
Notice that the value of speak_output is set to a fixed response right now. You’ll change this later on to return a random joke from a list of jokes.
Here’s what your code looks like in an editor:
Once you’ve created an intent handler class, you need to pass it as an argument to SkillBuilder.add_request_handler. Scroll to the bottom of lambda_function.py and add the following line:
sb.add_request_handler(JokeIntentHandler())
An important thing to note here is that the placement of this line is important, as the code is processed from top to bottom. So, make sure that the call for your custom intent handler is above the call for the InstantReflectHandler() class. This is how it should look:
171sb = SkillBuilder()
172
173sb.add_request_handler(LaunchRequestHandler())
174sb.add_request_handler(JokeIntentHandler())
175sb.add_request_handler(HelloWorldIntentHandler())
176sb.add_request_handler(HelpIntentHandler())
177sb.add_request_handler(CancelOrStopIntentHandler())
178sb.add_request_handler(SessionEndedRequestHandler())
179
180# Make sure IntentReflectorHandler is last so it
181# Doesn't override your custom intent handlers
182sb.add_request_handler(IntentReflectorHandler())
183
184sb.add_exception_handler(CatchAllExceptionHandler())
185
186...
Alright, it’s time to test your code! Click the Deploy button to save the changes and deploy the backend service. You’ll be checking whether it’s going to work as expected from the Alexa skill frontend.
Once the Deploy process is successful, head back to the Test section of the developer console and invoke the JokeIntent. Remember, enter the utterance phrase to invoke your Alexa Python skill, then input a phrase to execute an intent:

If you get a response similar to the one in the image above, then it means you’ve successfully created an intent handler for the JokeIntent in your skill’s backend service. Congratulations! Now, all that’s left to do is to return a random joke from a list back to the skill frontend.
Adding Jokes
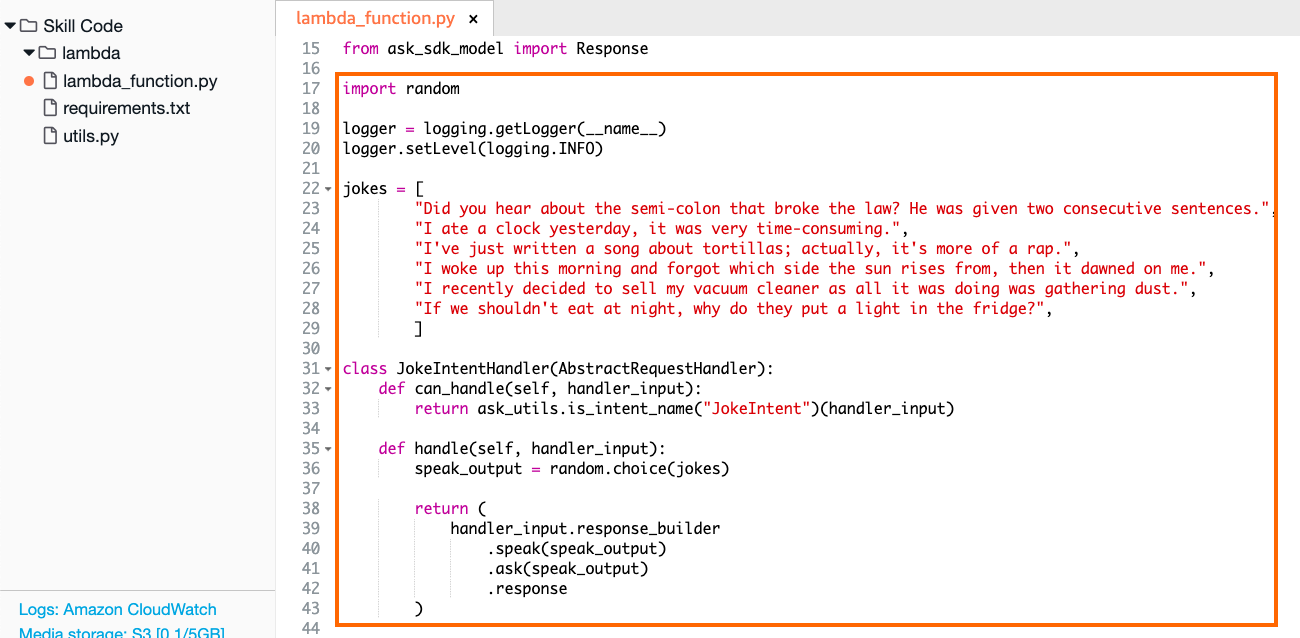
Open the Code section of the developer console. Then, add the jokes variable in lambda_function.py:
15from ask_sdk_model import Response
16
17logger = logging.getLogger(__name__)
18logger.setLevel(logging.INFO)
19
20jokes = [
21        "Did you hear about the semi-colon that broke the law? He was given two consecutive sentences.",
22        "I ate a clock yesterday, it was very time-consuming.",
23        "I've just written a song about tortillas; actually, it's more of a rap.",
24        "I woke up this morning and forgot which side the sun rises from, then it dawned on me.",
25        "I recently decided to sell my vacuum cleaner as all it was doing was gathering dust.",
26        "If you shouldn't eat at night, why do they put a light in the fridge?",
27        ]
28
29class JokeIntentHandler(AbstractRequestHandler):
30...
Here, jokes is a variable of type list containing some one-liner jokes. Make sure to add this outside of a function or class definition so that it has global scope.
Note: Since this list will only be referenced by the JokeIntentHandler() class, it doesn’t really matter if you declare this in the body of a function or not. However, doing it this way does help the function body to be free of clutter.
Next, you’ll add the functionality that .handle() needs to randomly pick one joke from the list of jokes and return it to the user. Modify the body of JokeIntentHandler.handle() with the following code:
29class JokeIntentHandler(AbstractRequestHandler):
30    def can_handle(self, handler_input):
31        return ask_utils.is_intent_name("JokeIntent")(handler_input)
32
33    def handle(self, handler_input):
34        speak_output = random.choice(jokes)
35
36        return (
37            handler_input.response_builder
38                .speak(speak_output)
39                .ask(speak_output)
40                .response
41        )
In the body of .handle(), you select a random joke from the list jokes using random.choice() and return it back as a response to the Alexa skill frontend.
Finally, import the random package by adding an import statement to the top of lambda_function.py:
15from ask_sdk_model import Response
16
17import random
18
19logger = logging.getLogger(__name__)
20logger.setLevel(logging.INFO)
21
22...
This is how the editor should look at this point:
There’s one final change to make before testing. You need to allow Alexa to give an acknowledgment that the skill has been triggered. To do this, look inside LaunchRequestHandler.handle() for the speak_output variable and set its value to the text in the highlighted line below:
45class LaunchRequestHandler(AbstractRequestHandler):
46    """Handler for Skill Launch."""
47    def can_handle(self, handler_input):
48        # type: (HandlerInput) -> bool
49
50        return ask_utils.is_request_type("LaunchRequest")(handler_input)
51
52    def handle(self, handler_input):
53        # type: (HandlerInput) -> Response
54        speak_output = "Hey there! I am a Joke Bot. You can ask me to tell you a random Joke that might just make your day better!"
55
56        return (
57            handler_input.response_builder
58                .speak(speak_output)
59                .ask(speak_output)
60                .response
61        )
62...
Your Joke Bot is ready for final testing! Click the Deploy button to save the changes and head back to the Test section of the developer console. This time, you should see a new greeting message when your skill is first invoked. Then, when you ask the bot to tell you a joke, it should give you a different joke every time:
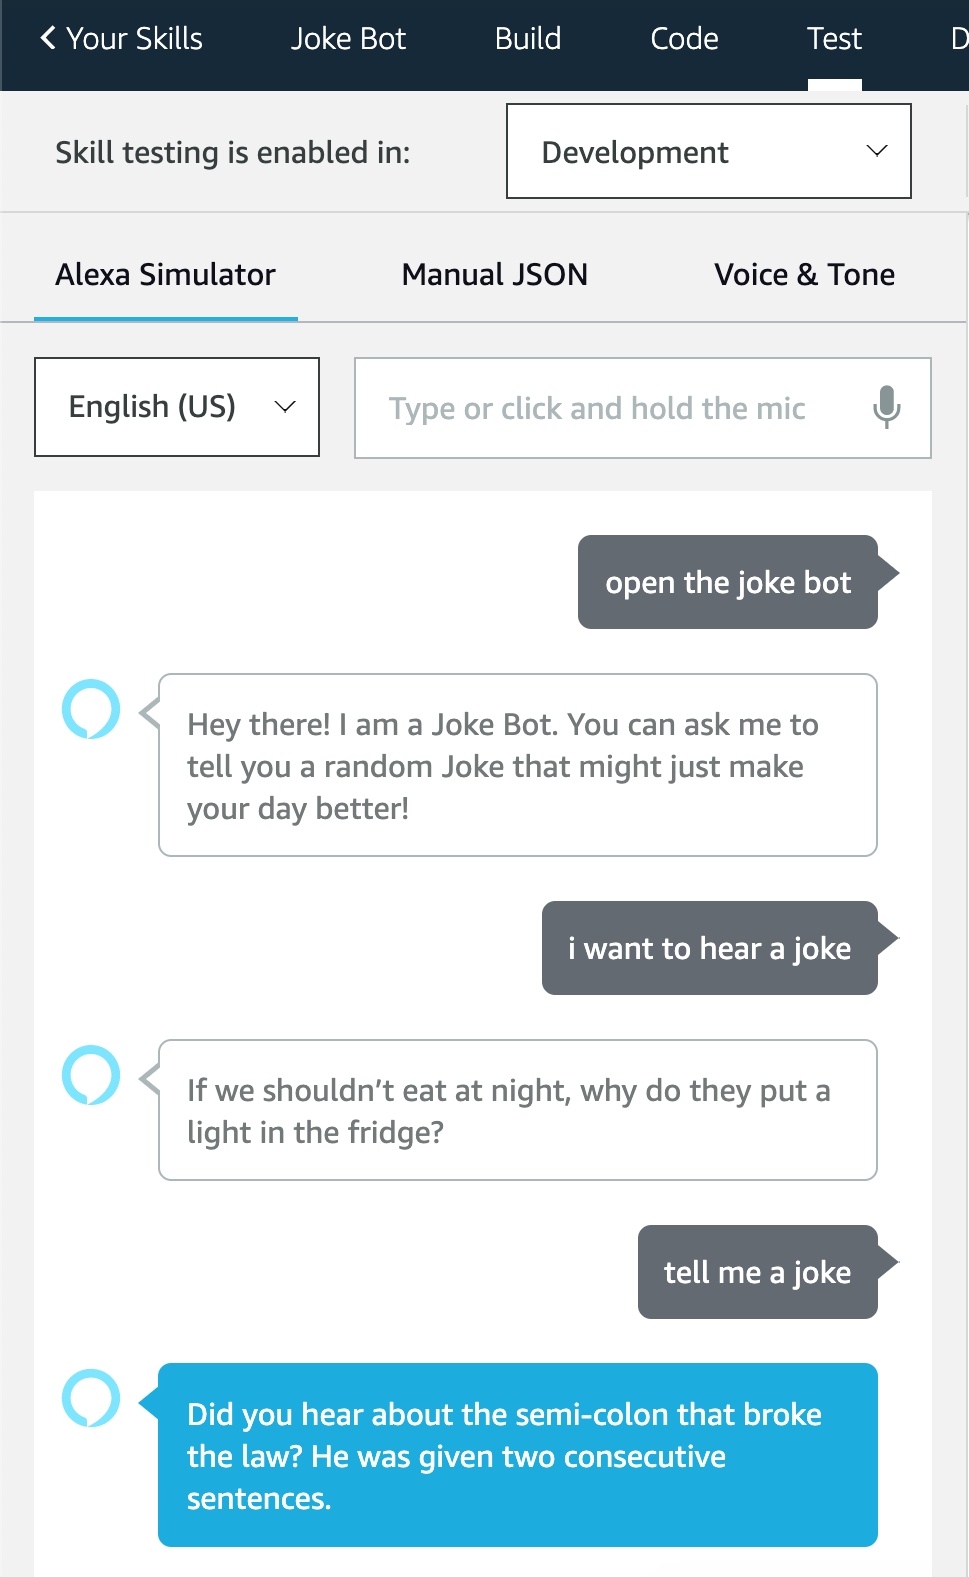
That’s it! You’ve successfully created your first skill as an Alexa Python developer!
Conclusion
Congratulations on taking your first steps into Alexa Python development! You’ve now successfully built your very own Alexa Python skill. You now know how to create a new skill, create intents, write Python code to handle those intents, and return valuable information back to the user.
Level-up your skills by trying some of the following:
- Increase the list of jokes in the backend.
- Create a new Intent named Trivia which will respond with a fun trivia fact.
- Publish your skill to the Amazon Marketplace.
The possibilities are endless, so go ahead and dive right in! To learn more about Alexa Python development, check out the official docs. You can also explore the possibilities of ChatterBot, Tweepy, InstaPy, and Discord to learn more about how you can make bots for different platforms using Python.