This tutorial shows you how to use Git to track changes in a project using just a few core commands and save clean snapshots of your work. If you’ve ever changed a file, broken something, and wished you could undo it, version control makes that possible. Git keeps a running history of your files so you can see what changed and when.
In this guide, you’ll set up Git locally and use the core workflow from the terminal to track and record changes in a Python project. By the end, you’ll have a working Git repository with a recorded commit history you can inspect and manage:
In the next sections, you’ll create your own repository and begin building that history from scratch. Before you begin, you can download a Git cheat sheet to keep the core commands handy:
Get Your Cheat Sheet: Click here to download your free Git cheat sheet and keep the core Git workflow, essential commands, and commit tips at your fingertips.
Take the Quiz: Test your knowledge with our interactive “How to Use Git: A Beginner's Guide” quiz. You’ll receive a score upon completion to help you track your learning progress:
Interactive Quiz
How to Use Git: A Beginner's GuideTest your knowledge of Git basics: initializing repos, staging files, committing snapshots, and managing your project history.
How to Use Git: Prerequisites
Before you start tracking your code with Git, make sure you have the right tools in place. This tutorial assumes that you’re comfortable working with the command line and have some basic Python knowledge.
Here’s what you’ll need to get started:
- A terminal or command prompt
- Python 3.10 or higher installed on your system
Note: Git and GitHub are often confused, but they’re not the same thing:
- Git is version control software that runs on your computer. It tracks changes to your files and manages your project’s history locally.
- GitHub is an online platform for hosting Git repositories. It provides collaboration tools that make sharing code, working with teams, and backing up your projects easier.
You don’t need a GitHub account to use Git or follow this tutorial. Later, if you want to share your code with others or back it up online, you can optionally push your Git repository to platforms like GitHub, GitLab, or Bitbucket.
To learn more about the differences between Git and GitHub, check out Introduction to Git and GitHub for Python Developers.
With these prerequisites in place, you’re ready to begin setting up Git and tracking changes in your project. In the next step, you’ll install Git, prepare your existing Python files, and initialize your first repository.
Step 1: Install Git and Prepare Your Project
To start, you’ll check whether Git is installed on your system, prepare a simple project, and initialize a Git repository so you can begin tracking changes right away.
Check Whether Git Is Already Installed
Before you can start using Git, you need to make sure it’s installed on your machine. Chances are that Git is already present on your system. To check whether Git is installed, run this command:
$ git --version
If this command displays a Git version, you’re good to go and can create a project directory. Otherwise, you need to install Git on your system before continuing.
Install Git on Your System
Luckily, Git provides installers for Windows, macOS, and Linux on its official website, offering a straightforward way to install Git on your machine. Because installation steps vary across operating systems, this guide links to the official documentation rather than reproducing those steps here.
If you prefer a graphical interface, you can install a Git client such as GitHub Desktop, Sourcetree, or GitKraken. These tools install Git automatically during setup.
Once installed, open your terminal and confirm that Git is available:
$ git --version
git version 2.24.0.windows.2
Your Git version may appear slightly different from this example, depending on your operating system and when you installed Git. That’s perfectly fine. As long as Git is installed and the command runs successfully, you’ll be able to follow along with the rest of this tutorial without any issues.
Set Up Your Git Identity
Before you create your first repository or make your first commit, you need to tell Git who you are. Git includes your name and email in every commit, which helps identify who made each change.
Run these two commands with your own name and email address:
$ git config --global user.name "Your Name"
$ git config --global user.email "your.email@example.com"
The --global flag means these settings apply to every Git repository on your machine, so you only need to run them once. If you ever want to use a different name or email for a specific project, run the same commands without --global inside that project’s directory.
Create a Project Directory
Next, prepare your project. Git works by tracking changes inside a folder, so you’ll need a project directory where Git can track your files and their history.
Start by creating a new folder for your project:
$ mkdir hello-git/
$ cd hello-git/
Add a Python file named main.py inside the hello-git/ folder you just created:
main.py
def greet(name):
    return f"Hello, {name}!"

print(greet("World"))
This project will become your Git repository. The actual content of the file doesn’t matter very much at this stage. Its purpose is simply to give Git a file to track as you begin recording changes.
Initialize a Git Repository
With your project folder ready, you can turn it into a Git repository so Git can start tracking your work. A Git repository, often called a repo, is a folder that Git is tracking. It’s where Git stores all the information it needs to remember every change you make.
Inside your project directory, run the following:
$ git init
Initialized empty Git repository in /Users/realpython/hello-git/.git/
This command initializes your repository and tells Git to start watching this folder. It creates a hidden .git/ folder that stores your project’s entire history. You won’t interact with this folder directly, but it’s the engine behind Git’s version control, storing snapshots and internal settings.
Check the Current State of Your Repository
Before making any additional changes, it’s a good idea to check the current state of your repository. This helps you confirm which files Git is tracking and whether anything is staged or ready to be committed.
To check the status of your repository, run the following command:
$ git status
On branch main

No commits yet

Untracked files:
  (use "git add <file>..." to include in what will be committed)
    main.py

nothing added to commit but untracked files present (use "git add" to track)
Git shows which files are untracked or modified, and whether they’re ready to be staged or committed. At this point, Git is flagging that your main.py file is present in your project directory.
With your repository initialized, you’re ready to start recording changes. In the next step, you’ll stage your files and make your first commit.
Step 2: Make Your First Commit
Now that your repository is set up, you can start recording snapshots of your project. In this step, you’ll stage changes and create your first commit, learning how Git saves and describes your work over time.
Add a File to the Staging Area
The staging area is like a checklist of changes you want to include in your next snapshot. Only files in this area will be committed.
To stage your changes for commit, use the git add command followed by the filename:
$ git add main.py
This prepares your changes to be included in the next commit. The command produces no output when successful. Use git status to verify your file was staged.
If you have multiple files you want to stage at once, you can use this command:
$ git add .
This stages all changes in the current directory and subdirectories, saving you from adding each file individually.
Note: While git add . is convenient, be careful with it, especially when you’re starting out. This command stages everything that’s changed, including files you might not want to commit, such as:
- Temporary files created by your editor
- Configuration files with personal settings or passwords
- Large data files or compiled code
Before running git add ., always check git status first to see which files will be staged. If you see files you don’t want to track, then you can either add files individually or create a .gitignore file to tell Git which files to ignore permanently.
Create Your First Commit
Once you’ve staged your changes, save them with a commit message:
$ git commit -m "Initial commit"
[main (root-commit) 1a1da40] Initial commit
 1 file changed, 4 insertions(+)
 create mode 100644 main.py
This output confirms that Git successfully created your first commit. It shows the branch you’re on (main), the commit’s unique identifier, and a summary of what was saved, including how many files were added and how many lines changed. Git can now refer back to this recorded state whenever you inspect your history or need to undo changes.
A commit is a saved snapshot of your project at a specific point in time. It allows you to review, roll back, or share your work safely.
Each commit includes key information such as:
- Commit hash: A unique identifier (like
1a1da40) that Git generates for each commit - Author: Your name and email address
- Date and time: The timestamp of the commit
- Commit message: A description of what changed and why
- Snapshot: The complete state of all tracked files at that moment
With your first snapshot saved, you can verify that your repository is current.
After committing, check the status again to verify the commit:
$ git status
On branch main
nothing to commit, working tree clean
This message confirms that all your changes have been committed. A “clean working tree” means there are no unstaged or uncommitted changes because everything is saved in your Git history.
Write Clear Commit Messages
A well-written commit message helps you and others understand your project’s history and why changes were made. This becomes especially important when reviewing your own work or collaborating with others.
When writing a commit message, keep the first line short (around 50 characters) and focus on what the change does. Use the imperative form, such as “Add feature” or “Fix bug”, and be specific. Messages like “Add user authentication” are far more useful than vague ones like “Update code”.
For more complex changes, you might want to write a longer commit message with additional context. Instead of using the -m flag, you can run:
$ git commit
When you run git commit without -m, you might find yourself in Vim, a powerful but unconventional text editor that runs in your terminal. Vim can be confusing if you’re not familiar with it because it works differently from typical text editors. It uses different modes for editing text and for navigating within it. Here’s how to handle it:
-
To start writing, press I to enter “insert mode”.
-
Write your commit message. Type your message normally. Multi-line commit messages typically follow this format:
**The Format of a Multi-Line Message:**

Short summary (50 characters or less)

More detailed explanation if needed. Wrap lines at 72 characters.
Explain the problem this commit solves and why you made these
changes.

You can have multiple paragraphs here.

- Bullet points are fine too
- Use them to list specific changes
The first line is a brief summary, followed by a blank line, then a more detailed explanation. Here’s what that looks like in practice:
Add greeting function to main.py Created a reusable greet() function that takes a name as input and returns a personalized greeting message. This makes the code cleaner and easier to modify in the future. -
To save and exit, press Esc, then type
:wqand press Enter:- Esc exits insert mode
:wqmeans “write and quit”
- To exit without saving, press Esc, then type
:q!and press Enter.
Understand the Default Branch
Now that you’ve made your first commit, you can explore a couple of important concepts: understanding branches, and configuring which files Git should track.
A branch is an independent line of development that lets you work on changes without affecting other versions of your project. Git creates a default branch when you make your first commit. Depending on your Git configuration, you may see “master” instead of “main”. In this tutorial, you’ll work entirely on this default branch. Branches become especially important later, when you start experimenting, fixing bugs, or collaborating with others.
To show all local branches and see which one you’re currently on, use this command:
$ git branch
* main
Git lists all local branches, and the current one is marked with an asterisk (*). This makes it easy to see at a glance which branch is active.
You can also see the current branch by running git status. Near the top of the output, Git tells you which branch you’re on. For example:
On branch main
This reinforces what you saw with git branch and gives you additional context, like the status of your staged or untracked files.
Ignore Files You Don’t Want to Track
Before you continue making changes, it’s important to tell Git which files it should ignore. Many auto-generated files don’t belong in version control, such as Python’s __pycache__ directories, virtual environments, or environment configuration files.
To see this in action, create a .env file to store a secret API key:
$ echo "SECRET_KEY=my-secret-key" > .env
Now check the status:
$ git status
On branch main
Untracked files:
  (use "git add <file>..." to include in what will be committed)
        .env

nothing added to commit but untracked files present (use "git add" to track)
Git is now flagging .env as an untracked file. Committing files like this is a common security mistake because sensitive values like API keys and passwords should never end up in your repository’s history. A .gitignore file prevents that.
Go ahead and create one in your project folder:
$ touch .gitignore
Then add some common Python ignore patterns:
__pycache__/
*.pyc
.env
venv/
The files matched by these patterns are either auto-generated, machine-specific, or sensitive, and don’t need to be shared or versioned. Tracking them can clutter your repository, cause unnecessary conflicts, and make your project harder to manage.
Note: Instead of creating your .gitignore file by hand, you can also use an existing template that matches your project type. GitHub maintains a collection of language- and tool-specific templates in the github/gitignore repository. For a more complete template, refer to the official Python .gitignore maintained by GitHub.
Now, check the repository status:
$ git status
On branch main
Untracked files:
  (use "git add <file>..." to include in what will be committed)
        .gitignore

nothing added to commit but untracked files present (use "git add" to track)
The .gitignore file itself appears as untracked because Git doesn’t automatically start tracking new files. Files matched by the patterns you added, such as .env, __pycache__/, or venv/, won’t appear in the untracked list if they exist. This confirms that Git is correctly ignoring them and focusing only on the files you actually want to track.
Go ahead and commit .gitignore so it becomes part of your project’s history:
$ git add .gitignore
$ git commit -m "Add .gitignore"
[main 3b8c941] Add .gitignore
 1 file changed, 4 insertions(+)
 create mode 100644 .gitignore
Now check the status to confirm everything is committed:
$ git status
On branch main
nothing to commit, working tree clean
You’ll notice throughout this tutorial that git status is one of the most frequently used Git commands. It shows you exactly what Git sees at any moment. As you’re learning, get in the habit of running git status often, especially before and after making changes. This helps you understand how Git responds to your actions and prevents surprises when you’re ready to commit.
At this stage, your first commit is recorded and your repository is configured. In the next section, you’ll make more changes and explore how Git tracks your project’s evolution.
Step 3: Track Changes and Manage Your Project History
With your first commit saved, you’ve created your project’s initial snapshot. Now you’ll see how Git tracks changes as your project evolves, which will help you understand one of Git’s core strengths: monitoring exactly what’s different between your current work and previous commits.
Edit a File and Add a New One
To see Git’s change-tracking in action, start by making a small edit to a file Git is already tracking. This helps you compare your current work against the last saved snapshot.
For example, open main.py and update the print() function call to use a different name:
main.py
 1def greet(name):
 2    return f"Hello, {name}!"
 3
 4print(greet("Git learner"))
This changes the greeting message displayed when you run the program.
Most projects contain multiple files. A common addition is a README.md file, which briefly explains what the project does and how to use it.
Create a README.md file to document your project:
$ echo "# Greeting Project Tutorial" > README.md
$ echo "A Python program that greets users." >> README.md
This creates the file with a simple title and description.
After creating the new file and modifying your project, you can check to see what Git detected:
$ git status
On branch main
Changes not staged for commit:
  (use "git add <file>..." to update what will be committed)
  (use "git restore <file>..." to discard changes in working directory)
        modified:   main.py

Untracked files:
  (use "git add <file>..." to include in what will be committed)
        README.md

no changes added to commit (use "git add" and/or "git commit -a")
When you run git status, Git separates modified tracked files from new, untracked files. Notice the difference: main.py shows as “modified” because Git is already tracking it, while README.md appears under “Untracked files” because it’s a new, untracked file.
Git doesn’t automatically start tracking new files. You must explicitly add them with git add.
View Your Changes
Git provides tools to see exactly what you’ve changed. The git diff command helps you review modifications before committing them.
After you modify a file, before you stage it with git add, you can see what changed:
$ git diff
diff --git a/main.py b/main.py
index da85a46..b053301 100644
--- a/main.py
+++ b/main.py
@@ -1,4 +1,4 @@
 def greet(name):
     return f"Hello, {name}!"

-print(greet("World"))
+print(greet("Git learner"))
This shows line-by-line differences between your working directory and the last commit. Lines starting with - show what was removed, and lines starting with + show what was added.
Note: Depending on your system, Git may display the diff output inside a pager, which is a scrollable viewer in your terminal. If that happens, press Q to exit the pager and return to the command line. This applies to other Git commands with long output, like git log.
Note that git diff only shows changes to tracked files. The new README.md doesn’t appear here because Git isn’t tracking it yet.
Stage the Changes
You’ll now follow the same workflow as before to stage your changes. Since both files are related to the same logical change—updating the greeting and documenting the project—you can stage them together:
$ git add main.py README.md
Or stage all changes at once:
$ git add .
This prepares both changes to be included in the next commit.
Note: After staging files with git add, you can review what’s staged and ready to commit by running:
$ git diff --staged
This lets you double-check your changes before committing.
Once you’re satisfied with the staged changes, you’re ready to record them in a new commit.
Commit the Update
With your changes staged, you can save them as a new commit. This creates another snapshot that builds on your project’s history.
Save your changes with a descriptive commit message:
$ git commit -m "Update greeting message and add README"
[main 6a2f280] Update greeting message and add README
 2 files changed, 3 insertions(+), 1 deletion(-)
 create mode 100644 README.md
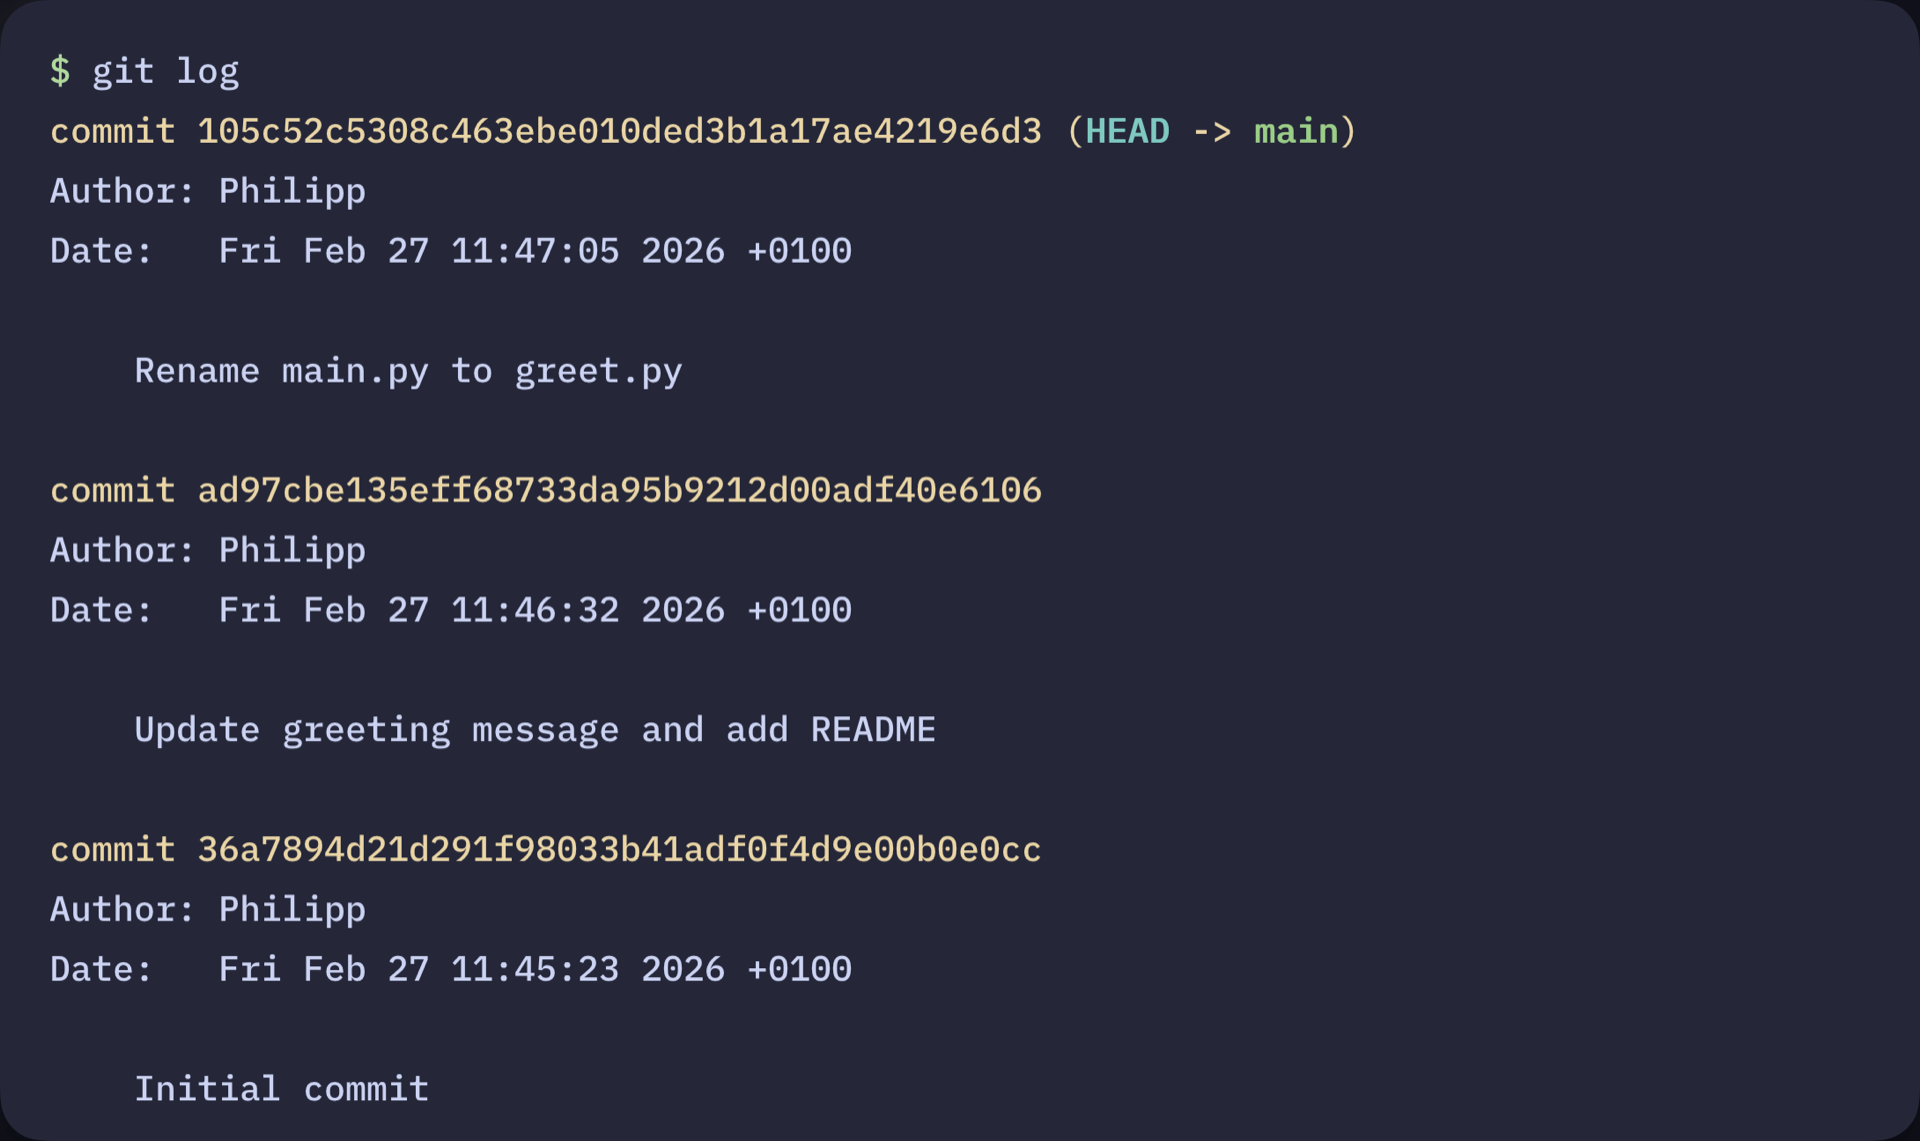
Your repository now contains multiple snapshots, showing the evolution of your project. You can always review these snapshots as shown below:
$ git log
commit 6a2f280bcea26a670d58987484ffa115673573eb
Author: Hellen Kokach
Date:   Fri Jan 9 18:05:47 2026 +0300

    Update greeting message and add README

commit 3b8c941a2d0e5f7b9c1e3d5f7a9b2d4e6f8a0c1
Author: Hellen Kokach
Date:   Fri Jan 9 18:03:30 2026 +0300

    Add .gitignore

commit 1a1da40bcea26a670d58987484ffa115673573ea
Author: Hellen Kokach
Date:   Fri Jan 9 18:02:46 2026 +0300

    Initial commit
~
~
This prints every commit along with its ID, author, timestamp, and message, allowing you to track changes, see who made them (if collaborating), and roll back if needed.
Rename a File and Commit the Change
As your project grows, you may want to rename files so their names better describe what they do. Rename main.py to better match its purpose:
$ git mv main.py greet.py
This command renames the file and automatically stages the change. Using git mv helps Git clearly understand that the file was renamed rather than deleted and recreated.
You can check the status again:
$ git status
On branch main
Changes to be committed:
  (use "git restore --staged <file>..." to unstage)
        renamed:    main.py -> greet.py
Git shows the file as renamed, confirming that it recognized the change correctly.
Now you can commit the rename:
$ git commit -m "Rename main.py to greet.py"
[main 00ac291] Rename main.py to greet.py
 1 file changed, 0 insertions(+), 0 deletions(-)
 rename main.py => greet.py (100%)
Even though the filename changed, Git still tracks this as the same file with the same history. This means you can safely reorganize your project without losing past work.
Congratulations! You now know how to track changes, stage them, commit snapshots, and inspect your history. In the next section, you’ll explore additional Git features and common recovery commands.
Next Steps and Troubleshooting
As you start using Git more regularly, you might run into a couple of common situations. For example, if you mistakenly add a file to the staging area with git add but haven’t committed it yet, you can remove it from staging like this:
$ git restore --staged <filename>
This command removes the file from the staging area but keeps your changes intact in your working directory.
If you ever want to discard changes you made to a file and go back to the last committed version, you can use this:
$ git restore <filename>
This discards any uncommitted changes you made to the file, reverting it to the version from your last commit.
Note: Any changes you haven’t staged or committed will be lost, so always double-check before restoring.
In this guide, you learned how to do the following:
- Check the status of your files with
git status - Inspect changes with
git diff - Stage updates with
git add - Create snapshots with
git commit - Review history with
git log
You can repeat this cycle as your project evolves. To continue building on this foundation, explore branching, merging, and connecting your repositories to platforms like GitHub for remote collaboration.
Get Your Cheat Sheet: Click here to download your free Git cheat sheet and keep the core Git workflow, essential commands, and commit tips at your fingertips.
Take the Quiz: Test your knowledge with our interactive “How to Use Git: A Beginner's Guide” quiz. You’ll receive a score upon completion to help you track your learning progress:
Interactive Quiz
How to Use Git: A Beginner's GuideTest your knowledge of Git basics: initializing repos, staging files, committing snapshots, and managing your project history.
Frequently Asked Questions
Now that you’ve practiced using Git, you can use the questions and answers below to recap what you’ve learned and check your understanding.
These FAQs are related to the most important concepts you’ve covered in this tutorial. Click the Show/Hide toggle beside each question to reveal the answer.
Staging is like preparing a list of changes you want to include in your next snapshot. When you run git add <filename>, Git takes note of that file’s current state and puts it in the staging area. Only files in this area will be included in the next commit. Committing is actually saving that snapshot to your project history.
No. Git works locally on your computer, meaning you can track changes without ever touching GitHub. GitHub or other remote platforms make it easy to share your code, collaborate with others, and keep a backup online.
No, not every save needs to be a commit. Think of commits as meaningful checkpoints. You should commit when you’ve completed a logical unit of work, such as finishing a new feature or function, fixing a bug, or refactoring code.
Between commits, you’ll save your files many times as you write and test your code. That’s normal. Save frequently, but only commit when you’ve reached a milestone worth recording.


