Throughout this tutorial, you’ll learn how to use Django and GeoDjango to build a location-based web application from scratch. You’ll be building a simple nearby shops application that lists the shops closest to a user’s location.
By the end of this tutorial, you’ll be able to:
-
Use Django to build a simple web application from scratch
-
Use the GeoDjango sub-framework to implement geolocation features in your Django application
-
Use a spatial database (PostgreSQL and PostGIS) to get benefits from the spatial features and easily implement location-aware web apps
Free Bonus: Click here to get free access to additional Django tutorials and resources you can use to deepen your Python web development skills.
Example App Source Code: The full source code for the app you’ll be building in this tutorial is available on the realpython/materials repository on GitHub.
The Tools You Will Be Using
You’ll be using the following tools to develop your nearby shops web application:
- The Python programming language
- The Django web framework
- The PostgreSQL database for persisting data
- The PostGIS extension for supporting spatial features in the PostgreSQL database
pipfor installing dependencies- The
venvmodule for managing a virtual environment - Docker for installing PostgreSQL and PostGIS
Before diving into practical steps, let’s first start by introducing the frameworks you’ll be using.
Django is the most popular Python framework for building web apps. It makes it easy for developers to quickly build prototypes and meet their project deadlines by providing a plethora of built-in APIs and sub-frameworks such as GeoDjango.
GeoDjango is a built-in application that is included as a contrib module in Django. It’s actually a complete framework itself that can also be used separately from Django. It provides a toolbox of utilities for building GIS web applications.
GIS stands for Geographic Information System. It’s an information system (an organized system for the collection, organization, storage, and communication of information) designed for processing and manipulating data that have geographic or spatial characteristics.
GeoDjango also provides Python bindings to popular spatial libraries such as GEOS, GDAL, and GeoIP, which can be used separately without Django in any Python application or interactively in the shell.
GeoDjango aims to provide a world-class geographic web framework. It has been refactored over the years with the goal of making it easier to work with geospatial data, in other words data that identifies the geographic location of natural or artificial features on Earth and is stored as coordinates and topologies.
GeoDjango integrates very well with the Django ORM and provides a set of geometry fields defined by the Open Geospatial Consortium (OGS) that can be used to map to different types of geometries in geospatial databases:
GeometryFieldis the base class for all geometric fields in GeoDjango.PointFieldis used for storing GEOS Point objects.PolygonFieldis used for storing GEOS Polygon objects and so on.
GeoDjango is a very powerful framework for storing and working with geographic data using the Django ORM. It provides an easy-to-use API to find the distances between two points on a map, areas of polygons, the points within a polygon, and so on.
To be able to work with GeoDjango, you’ll need to have two things: a spatial database and geospatial libraries. A spatial database is a database that is optimized for storing and querying data that represents objects defined in a geometric space.
To fully use all features of GeoDjango, you’ll need to install the following open-source geospatial libraries:
-
GEOS stands for Geometry Engine Open Source. It’s a C++ port of the JTS (Java Topology Suite) that implements the OCG Simple Feature for SQL specification.
-
GDAL stands for Geospatial Data Abstraction Library. It’s an open-source library for working with raster and vector geospatial data formats.
-
PROJ.4 is for Cartographic Projections library. It’s an open-source GIS library for easily working with spatial reference systems and projections.
-
GeoIP is a library that helps users find geographical information based on an IP address.
This tutorial makes use of an Ubuntu 18.04 system for installing prerequisites and a Unix bash for running the commands, but this shouldn’t be a problem for you if you’re using any other system, particularly Unix-based systems like macOS.
For most installation instructions, you’ll be using the aptitude package manager, so you should simply replace that with the equivalent package manager for your system.
Prerequisites
In this section, you’ll be installing the prerequisites needed before you can bootstrap your project, such as Python 3 and GeoDjango dependencies (GEOS, GDAL, and PROJ.4). You’ll also use Docker to set up a PostgreSQL and PostGIS database for your project.
Installing Python 3
There is a big chance that you already have Python 3 installed on your system. If you don’t, you can simply head to the official website and download the binaries for your operating system.
Depending on your system, you may also be able to install Python 3 or upgrade it to the latest version if it’s already installed by using the official package manager.
If you have a problem installing Python 3 or want more information, you can check the Python 3 Installation & Setup Guide, which provides different ways to install Python 3 on your system.
Finally, you can check if you have Python 3 installed by running the following command:
$ python3 --version
Python 3.6.5
Installing GeoDjango Dependencies (GEOS, GDAL, and PROJ.4)
GeoDjango requires a spatial database and a set of open-source geospatial libraries:
-
GEOS is an open-source geometry engine and a C++ port of the JTS (Java Topology Suite). It’s required by GeoDjango for performing geometric operations.
-
PROJ.4 is an open-source GIS library for easily working with spatial reference systems and projections. You need it because you’ll be using PostGIS as the spatial database.
-
GDAL is an open-source geospatial data abstraction library for working with raster and vector data formats. It’s needed for many utilities used by GeoDjango.
You can refer to the docs for more information about spatial databases and the required libraries.
GDAL 2.2 is included in Ubuntu 18.04 so you can simply run the following command to install it:
$ sudo aptitude install gdal-bin libgdal-dev
$ sudo aptitude install python3-gdal
Note: python3-gdal is the Python 3 binding for GDAL.
Next, you can install the other libraries using the following:
$ sudo aptitude install binutils libproj-dev
Note: Since you’re using a binary package for GEOS, you also need to install binutils.
Refer to the docs for detailed instructions about how to install these dependencies on macOS and Windows.
For more information about PROJ.4, you can refer to its official docs.
Setting up a Spatial Database With PostgreSQL and PostGIS
You’ll use PostgreSQL, the most commonly used database with Django. It’s not a spatial database, but thanks to PostGIS you can power up your database with powerful geospatial features.
PostGIS is a spatial database extension that needs to be installed on a PostgreSQL database, which gives it the capability to store and work with spatial data and perform spatial operations. It adds support for geographic objects allowing location queries to be run in SQL.
You can either install PostgreSQL on your system, create a database, and then add the PostGIS extension, or better yet use Docker to quickly create a database using the kartoza postgis image, which provides a container with PostgreSQL and PostGIS already installed:
$ docker run --name=postgis -d -e POSTGRES_USER=user001 -e POSTGRES_PASS=123456789 -e POSTGRES_DBNAME=gis -p 5432:5432 kartoza/postgis:9.6-2.4
After running the command, you’ll have a PostgreSQL server listening on the 5432 port with a database called gis. The database uses the user001 username and the 123456789 password.
Note: You need to have Docker installed on your system. For instructions, you can simply refer to the official docs.
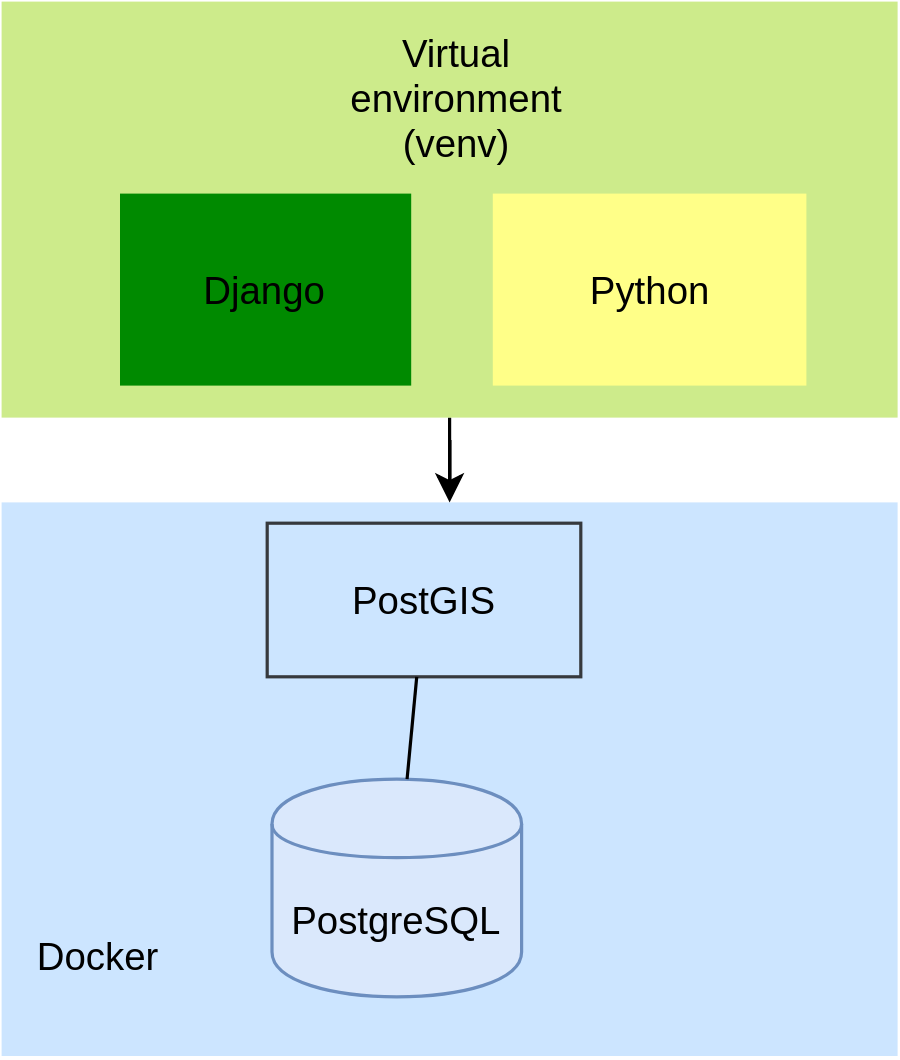
Setting up Your Project
Now that you have a spatial database set up and ready, you can go ahead and setup your Django project. In this section, you’ll use venv to create an isolated virtual environment for your project and install all the required packages such as Django.
Creating a Virtual Environment
A virtual environment allows you to create an isolated environment for the dependencies of your current project. This will allow you to avoid conflicts between the same packages that have different versions.
In Python 3, you can create virtual environments using virtualenv or the venv module.
For more information about Python virtual environments, check out Python Virtual Environments: A Primer.
Now, head over to your terminal and run the following command to create a virtual environment based on Python 3:
$ python3 -m venv env
(env) $
Next, you need to activate the following command:
$ source env/bin/activate
That’s it. You now have your virtual environment activated, and you can install the packages for your project.
Installing Django
The first step after creating and activating a virtual environment is to install Django. The Django package is available from the Python Package Index (PyPI) so you can simply use pip to install it by running the following command in your terminal:
$ pip install django
Creating a Django Project
The project you’ll be creating is a web application that lists shops sorted by distance so your users will be able to discover the shops that are close to their location.
The web application makes use of GeoDjango for easily implementing location requirements like calculating the distances of shops from the user’s location and ordering the shops by distance.
Using GeoDjango, you can get and display the nearest shops that are stored in a PostgreSQL database configured with the PostGIS extension to enable spatial operations.
Now, you’re ready to create a Django project using the django-admin.py script. Simply run the following command:
$ django-admin.py startproject nearbyshops
This will create a project named nearbyshops.
Configuring the PostgreSQL Database
Now that you’ve created a project, let’s continue by configuring the connection to the PostgreSQL and PostGIS spatial database. Open the settings.py file and add django.contrib.gis.db.backends.postgis as the engine with the credentials for the PostGIS database you configured earlier:
DATABASES = {
    'default': {
        'ENGINE': 'django.contrib.gis.db.backends.postgis',
        'NAME': 'gis',
        'USER': 'user001',
        'PASSWORD': '123456789',
        'HOST': 'localhost',
        'PORT': '5432'
    }
}
Note: You need to change the database credentials accordingly if you didn’t specify the same credentials when running the Docker container.
If you try to run your Django server at this point, you’ll get the ImportError: No module named 'psycopg2' error related to psycopg2, which is the most popular PostgreSQL adapter for Python. To solve the error, you simply need to install the psycopg2-binary in your virtual environment using the following:
$ pip install psycopg2-binary
Adding GeoDjango
GeoDjango is a framework that makes it as easy as possible to build GIS and location aware web applications. You can add it by simply including the gis contrib module in the list of installed apps.
Open the settings.py file and locate the INSTALLED_APPS array. Then add the 'django.contrib.gis' module:
INSTALLED_APPS = [
    # [...]
    'django.contrib.gis'
]
Creating a Django Application
A Django project is made up of applications. By default, it contains several core or built-in apps like django.contrib.admin, but you will usually add at least one app that contains your custom project’s code.
Note: For simple projects, you may only need one app, but once your project becomes bigger and has different requirements, you can organize your code in multiple separate apps.
Now that you have created a Django project, configured the connection with the spatial database, and added GeoDjango to the project, you need to create a Django application that you may call shops.
The shops application will contain the code for creating and displaying the shops closest to a user’s location. In the next steps, you are going to perform the following tasks:
- Create the app
- Add a
Shopmodel - Add a data migration for loading initial demo data (shops)
- Add a view function
- Add a template
First run the following command to create the app:
$ python manage.py startapp shops
Next, you need to add it to the list of installed apps in the settings.py file, which will make Django recognize it as a part of your project:
INSTALLED_APPS = [
    # [...]
    'shops'
]
Creating a Django Model
After creating the shops application, which will contain the actual code of your project, you need to add models in your app. Django uses an ORM (Object Relational Mapper), which is an abstraction layer between Django and the database that transforms Python objects (or models) into database tables.
In this case, you need one model that represents a shop in the database. You’ll create a Shop model that has the following fields:
name: the name of the shoplocation: the location of the shop in latitude and longitude coordinatesaddress: the address of the shopcity: the city the shop is in
Open the shops/models.py file and add the following code:
from django.contrib.gis.db import models

class Shop(models.Model):
    name = models.CharField(max_length=100)
    location = models.PointField()
    address = models.CharField(max_length=100)
    city = models.CharField(max_length=50)
For the location, you are using the PointField, a GeoDjango-specific geometric field for storing a GEOS Point object that represents a pair of longitude and latitude coordinates.
The other fields are normal Django fields of type CharField that can be used to store strings of small and large size.
Note: Please note that the models module is imported from django.contrib.gis.db and not the usual django.db module.
Creating the Database Tables
With Django, you don’t need to use SQL to create the database tables thanks to its ORM. Let’s create the database tables by using the makemigrations and migrate commands. Head back to your terminal and run the following:
$ python manage.py makemigrations
$ python manage.py migrate
For more information about these commands, check out Django Migrations – A Primer.
Adding a Super User
You need to create a super user so you can access the admin interface. This can be done using the following command:
$ python manage.py createsuperuser
The prompt will ask you for the username, email, and password you want to use for accessing the user account. Enter them and hit Enter.
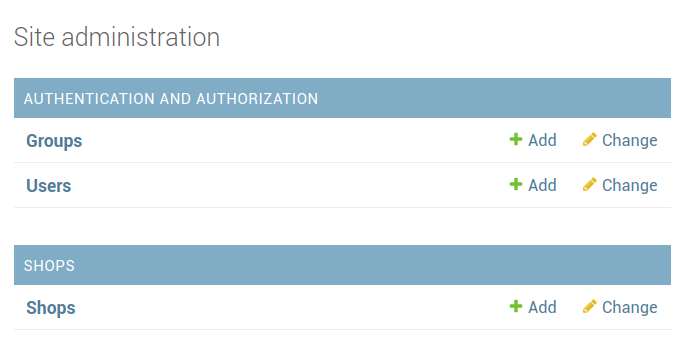
Registering the Model in the Admin Interface
Django’s admin application provides a complete CRUD interface for managing data.
GeoDjango extends the admin application to add support for working with geometry fields.
Before you can access your models from Django admin, you need to register them.
Open the shops/admin.py file and add the following code:
from django.contrib.gis.admin import OSMGeoAdmin
from .models import Shop

@admin.register(Shop)
class ShopAdmin(OSMGeoAdmin):
    list_display = ('name', 'location')
You are using the @admin.register decorator to register the Shop model in the admin application. The decorated class is a representation of the Shop model in the admin interface and allows you to customize different aspects such as the Shop fields that you want to display. (In your case, it’s the name and location.) For more information about decorators, you can read Primer on Python Decorators.
Since the Shop model includes a GeoDjango field, you need to use the special OSMGeoAdmin class that’s available from the django.contrib.gis.admin package .
You can either use GeoModelAdmin or OSMGeoAdmin, which is a subclass of GeoModelAdmin that uses an Open Street Map layer in the admin to display geometric fields. This provides more information like street and thoroughfare details than would be available with the GeoModelAdmin class, which uses Vector Map Level 0.
You can now run the Django server:
$ python manage.py runserver
You application will be running from localhost:8000, and you can access the admin interface from localhost:8000/admin.
This is a screenshot from the Add shop interface:
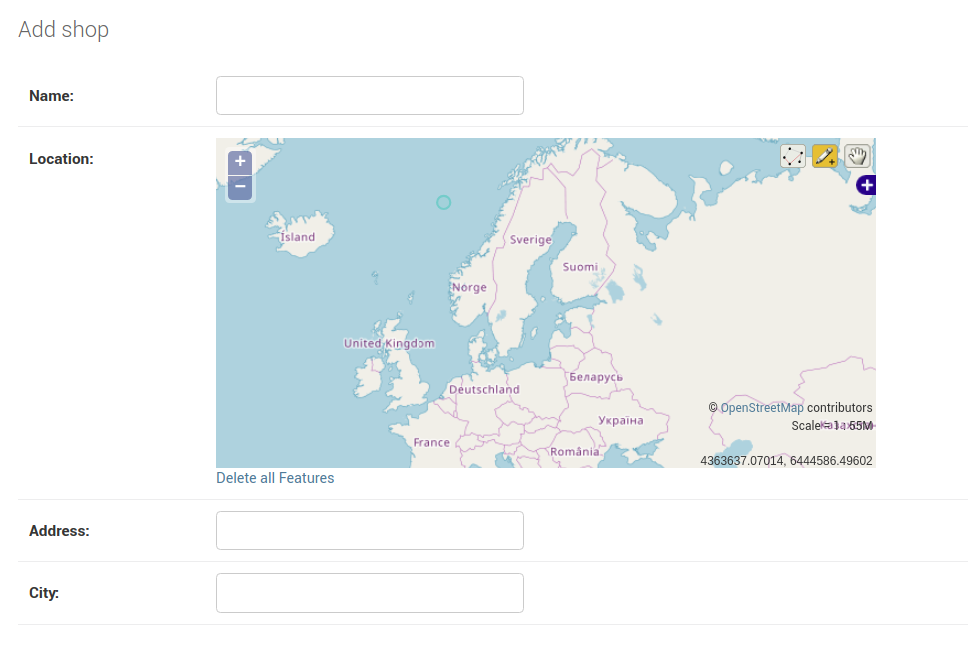
You can see that the Location geometric field is displayed as an interactive map. You can zoom the map in and out, and you can choose different selectors at the top right corner of the map to select a location, which is marked by the green circle.
Adding Initial Data
You need some initial demo data for your application, but instead of manually adding data, you can use a data migration.
Data migrations can be used for multiple scenarios, including adding initial data in your database. For more information, check out Data Migrations.
Before creating a migration, let’s first get some real-world data from OpenStreetMap using overpass turbo, a web-based data filtering tool for OpenStreetMap. You can run Overpass API queries and analyze the resulting data interactively on the map.
You can also use the integrated Wizard, which makes it easy to create queries.
In your case, you want to get all the shops in a city. Simply click on the Wizard button. A small window will pop up. In the text field, write a query like “shop in Miami” and click on build and run query.

Next, click on the export button and click on download/copy as raw OSM data to download a JSON file that contains the raw OSM data. Save the file as data.json in your project’s root folder:
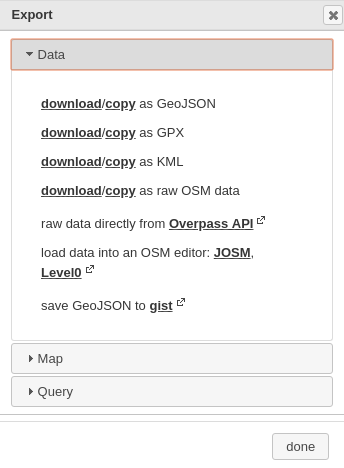
This is a screenshot of example data from the file:
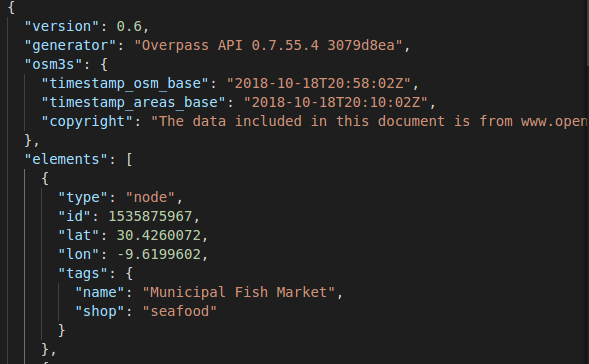
You need to get the objects in the elements array. Specifically the lat, lon, and tags (name) fields for each shop.
You can find more details on how you can write Overpass queries from this wiki.
Now, let’s create an empty migration for importing the content of the data.json file in the database, using the following command:
$ python manage.py makemigrations shops --empty
Open the migration file. It has the following code:
from django.db import migrations

class Migration(migrations.Migration):
    dependencies = [
        ('shops', '0001_initial'),
    ]
    operations = [
    ]
You next need to create load_data() to be executed by RunPython(). First, in the import area, add the following imports:
from django.db import migrations
import json
from django.contrib.gis.geos import fromstr
from pathlib import Path
You are importing the Path class from the pathlib package for accessing low-level system functions, the json package for working with JSON, the Django built-in migrations API, and fromstr(), part of the geos package.
Next, add load_data():
DATA_FILENAME = 'data.json'
def load_data(apps, schema_editor):
    Shop = apps.get_model('shops', 'Shop')
    jsonfile = Path(__file__).parents[2] / DATA_FILENAME

    with open(str(jsonfile)) as datafile:
        objects = json.load(datafile)
        for obj in objects['elements']:
            try:
                objType = obj['type']
                if objType == 'node':
                    tags = obj['tags']
                    name = tags.get('name','no-name')
                    longitude = obj.get('lon', 0)
                    latitude = obj.get('lat', 0)
                    location = fromstr(f'POINT({longitude} {latitude})', srid=4326)
                    Shop(name=name, location = location).save()
            except KeyError:
                pass
Let’s explain the code you’ve just added. You first construct the absolute path using the Path class of the pathlib library and open the data.json file. Next, you parse the JSON file into a Python object.
You loop through the elements object containing the locations and tags of shops. Inside the loop, you extract the name and the longitude and latitude coordinates. Then you use formstr() to return a valid GEOSGeometry object corresponding to the spatial data in the string that can be assigned to the location field of the Shop model. Finally, you create and save the instance of the Shop model corresponding to the extracted data.
You are using the with statement, so you don’t have to explicitly close the file, and an f-string for formatting the argument of fromstr().
fromstr() takes a srid as the second parameter. srid stands for Spatial Reference System Identifier. It’s a unique value to identify spatial reference systems (projection systems used for interpreting the data in the spatial database).
The 4326 srid is the most popular system used with PostGIS. It’s also known as WGS84, where units are specified in degrees of longitude and latitude. You can refer to spatialreference.org for a Django-powered database of spatial reference systems.
Next, add the migration class to execute the above function when you run the migrate command:
class Migration(migrations.Migration):

    dependencies = [
        ('shops', '0005_auto_20181018_2050'),
    ]

    operations = [
        migrations.RunPython(load_data)
    ]
That’s it. You can now return to your terminal and run the following:
$ python manage.py migrate
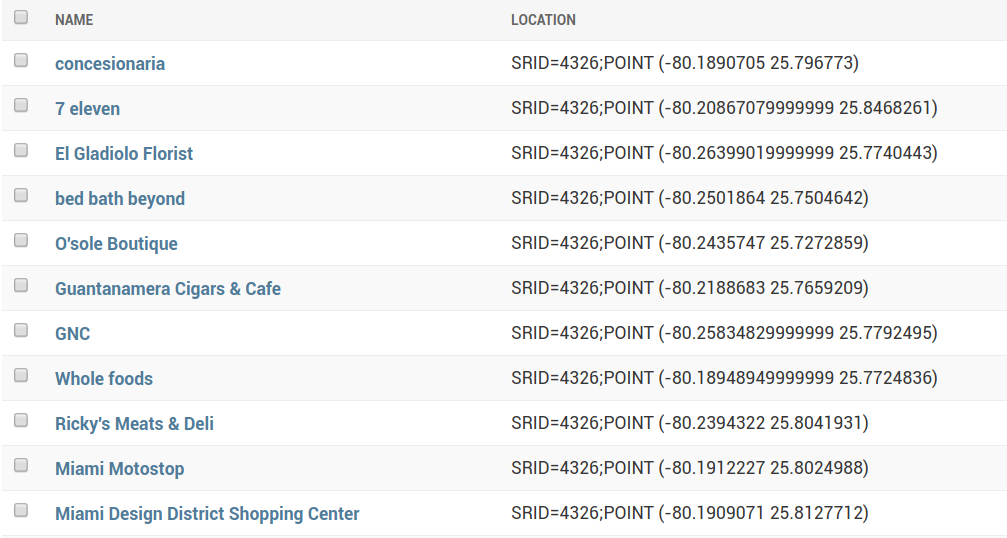
The data from the data.json file will be loaded on your database. Run your Django server and head to your admin interface. You should see your data in the table. In my case, this is a screenshot of a portion of the table:
Displaying Nearby Shops
At this point of the tutorial, you have created:
-
The
shopsapplication, which encapsulates the code for creating and getting nearby shops in your project -
The
Shopmodel and the corresponding tables in the database -
The initial admin user for accessing the admin interface
-
The initial demo data for loading real-world shops in the database that you can play with without manually entering a lot of fake data
You also registered the Shop model in the admin application so you can create, update, delete, and list shops from the admin interface.
Next, you’ll add a view function using the generic ListView class that you can use to display a list of nearby shops. You also create an HTML template that will be used by the view function to render the shops and add the URL that will be used to display the shops.
Let’s start by adding a template and a view function that will be used to display the nearby shops from a user’s location.
Open the shops/views.py file and start by importing the necessary APIs:
from django.views import generic
from django.contrib.gis.geos import fromstr
from django.contrib.gis.db.models.functions import Distance
from .models import Shop
Next add a user_location variable where you can hard code a user location:
longitude = -80.191788
latitude = 25.761681

user_location = Point(longitude, latitude, srid=4326)
In this part, you’ll simply hard code the user’s location (the coordinates of Miami in the USA), but this ideally should be specified by the user or retrieved automatically from the user’s browser with their permission using JavaScript and the HTML5 GeoLocation API. You can scroll down to the middle of that page to see a live example of implementing the Geolocation API.
Finally, add the following view class:
class Home(generic.ListView):
    model = Shop
    context_object_name = 'shops'
    queryset = Shop.objects.annotate(distance=Distance('location',
    user_location)
    ).order_by('distance')[0:6]
    template_name = 'shops/index.html'
You are using the generic class-based ListView to create a view.
Class-based views are an alternative way to implement views as Python classes instead of functions. They are used to handle common use cases in web development without re-inventing the wheel. In this example, you’ve just sub-classed the ListView generic view and overridden the model, context_object_name, queryset, and template_name attributes to create a list view that handles HTTP requests without any extra code.
Now let’s focus on the queryset attribute. To get the nearby shops, you simply use .annotate() to annotate each object on the returned queryset with a distance annotation that’s calculated using Distance(), available from GeoDjango, between the location of each shop and the user’s location. You also order the returned queryset by the distance annotation and take only the nearest six shops.
You can learn more about class-based views from the official docs.
Next let’s add the shops/index.html template with the following content:
<!DOCTYPE html>
<html lang="en">
    <head>
        <meta charset="utf-8">
        <title>Nearby Shops</title>
    </head>
<body>
    <h1>Nearby Shops</h1>
    {% if shops %}
    <ul>
    {% for shop in shops %}
        <li>
        {{ shop.name }}: {{shop.distance}}
        </li>
    {% endfor %}
    </ul>
    {% endif %}
</body>
</html>
The nearest shops are available from the shops context object that you specified as the context_object_name in the class-based view. You loop through the shops object and you display the name and distance from the user’s location for each shop.
Finally, let’s add a URL to our urls.py file:
from django.urls import path
from shops import views

urlpatterns = [
    # [...]
    path('', views.ShopList.as_view())
]
You use .as_view() to return a callable view that takes a request and returns a response, which can be passed as the second parameter for path() that maps paths to views.
Now you can run your Django server. The home page will display a simple un-styled list with the nearest shops from the hard-coded user’s location. This is an example screenshot:
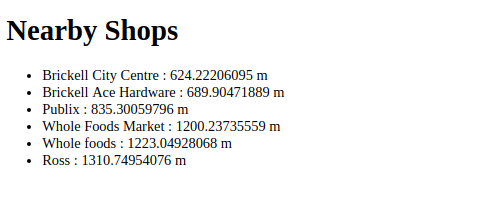
In the screenshot, each item in the list displays the name of the shop (before the colon) and the distance in meters from the user’s location (after the colon). The letter m refers to meters.
Note: The view function you used to display the results in the screenshot is just for testing the queryset annotated by Distance().
This concludes this tutorial. You now have the basic skills that you can use to either add simple geolocation stuff to your applications or create GIS apps. You can read the GeoDjango docs for a complete resource of the available APIs and what you can do with them.
You also learned to use Docker to quickly pull and launch a PostgreSQL and PostGIS server. Docker can be used for more than that. It’s a containerization tool for spinning up isolated, reproducible application environments. You can read Django Development with Docker Compose and Machine if you want to learn how to containerize your Django project.
Conclusion
Congratulations on creating your location based web application using GeoDjango, which aims to become a world-class geographic framework for implementing GIS apps. Nowadays, location aware apps (apps that know your location and help you discover nearby objects and services by offering you results based on your location) are all the rage. Using the knowledge you gained in this tutorial, you’ll be able to incorporate this modern feature in your apps developed with Django.
The only requirement, besides the dependencies of GeoDjango, is to use a spatial database (a database that’s capable of storing and manipulating spatial data). For PostgreSQL, one of the most popular database management systems used with Django, you can simply install the PostGIS extension with your database to turn it into a spatial database. Other popular databases like Oracle and MySQL have built-in support for spatial data.
In this tutorial, you’ve used:
- Django to build a web application from scratch
- The GeoDjango sub-framework to implement geolocation features in your Django application
- A spatial database, PostgreSQL and PostGIS, to get benefits from the spatial features and implement location-aware web apps
Do you have a Django app that can benefit from being more location aware? Try out GeoDjango and share your experiences in the comments below.
Example App Source Code: The full source code for the app you’ve been building in this tutorial is available on the realpython/materials repository on GitHub.
Free Bonus: Click here to get free access to additional Django tutorials and resources you can use to deepen your Python web development skills.