Choosing between Cursor and GitHub Copilot comes down to how each editor fits your Python workflow, not which one lists more features. Cursor is a standalone AI code editor, while GitHub Copilot brings AI into Visual Studio Code. You’ll build the same Markdown note manager in both and see where they diverge.
By the end of this tutorial, you’ll understand that:
- Both editors offer Agent, Plan, and Ask modes, so the differences show up in workflow rather than in feature lists.
- Cursor presents agent-generated changes as diffs and groups them in a dedicated review session, while Copilot applies the edits inline and lets you inspect them before keeping or undoing them.
- Pointing both editors at the same model is what separates editor differences from model differences.
- Project conventions live in
.cursor/rules/for Cursor and in.github/copilot-instructions.mdfor Copilot.
To see how the differences play out, you’ll set up both editors, build and debug the same application in each, and compare how they handle code completion, multi-file refactoring, and code review.
Before getting started, here’s a quick overview of which editor best fits different development workflows:
| If you want to… | Cursor | GitHub Copilot |
|---|---|---|
| Work in a dedicated AI development environment with reviewable edits | ✅ | — |
| Add AI to the VS Code workflow you already use | — | ✅ |
Choose Cursor if you want every AI edit staged for review before it touches your files. Choose GitHub Copilot if you’d rather add AI to your existing VS Code setup.
Get Your Code: Click here to download the free sample code for the Markdown note manager you’ll build with Cursor and GitHub Copilot in this tutorial.
Take the Quiz: Test your knowledge with our interactive “Cursor vs Copilot: Which AI Editor Is Better for Python?” quiz. You’ll receive a score upon completion to help you track your learning progress:
Interactive Quiz
Cursor vs Copilot: Which AI Editor Is Better for Python?Test your understanding of how Cursor and GitHub Copilot compare for Python across agent modes, code review, and project conventions.
Metrics Comparison: Cursor vs GitHub Copilot
The table below highlights some of the key differences between Cursor and GitHub Copilot before you start the hands-on comparison:
| Metric | Cursor | GitHub Copilot |
|---|---|---|
| IDE support | Standalone AI-first editor built on VS Code | Extension for VS Code |
| VS Code extension compatibility | Supports most VS Code extensions, but some Microsoft-restricted ones, such as Pylance, aren’t available | Uses the VS Code extension ecosystem, including Microsoft extensions |
| Code review workflow | Ask mode, /review, and Bugbot for reviewing code, uncommitted changes, and pull requests |
Integrated Copilot code review for selected code, uncommitted changes, and pull requests |
| Pro plan pricing | $20/month, with usage-based Bugbot pricing | $10/month |
| Best suited for | Large, multi-file codebases and developers who frequently perform AI-assisted refactoring and project-wide changes | Developers who want a lightweight AI assistant integrated into their existing VS Code workflow |
The sections that follow focus on the practical experience of using each editor to build, validate, refactor, and review the same Python project.
Getting Started: Installation
You set up Cursor and GitHub Copilot in different ways, but the starting point is the same: you’ll need Python 3.12 or later installed on your system.
Cursor is a standalone editor, while Copilot integrates directly into VS Code. Both editors offer free plans. Cursor’s free plan is limited to its latest Composer model, while GitHub Copilot’s free plan uses automatic model selection only, with no manual model picker.
To keep the comparison focused on the editors rather than differences between AI models, you’ll configure both editors to use Claude Sonnet 5. Selecting the same model requires a Pro subscription for both Cursor and Copilot. You can follow this tutorial without Pro plans, but the two editors will then use different models, which adds another variable.
Installing Cursor
Head to the Cursor download page and download the installer for your operating system. When you launch Cursor for the first time, it can import your existing VS Code settings, extensions, themes, and keybindings, letting you get started without reconfiguring your environment.
However, not every VS Code extension is available in Cursor. Microsoft’s Pylance extension, for example, is licensed for use only with Microsoft products, so it won’t run in Cursor.
If you’re new to Cursor, Real Python’s video course on Tips for Using the AI Coding Editor Cursor covers the multi-agent interface, project-aware chat, and inline edits, all of which provide useful background before you compare it with Copilot.
Enabling GitHub Copilot in VS Code
GitHub Copilot adds AI assistance directly to VS Code, letting you build projects and speed up development without switching editors. Follow these steps to activate it:
- Open VS Code.
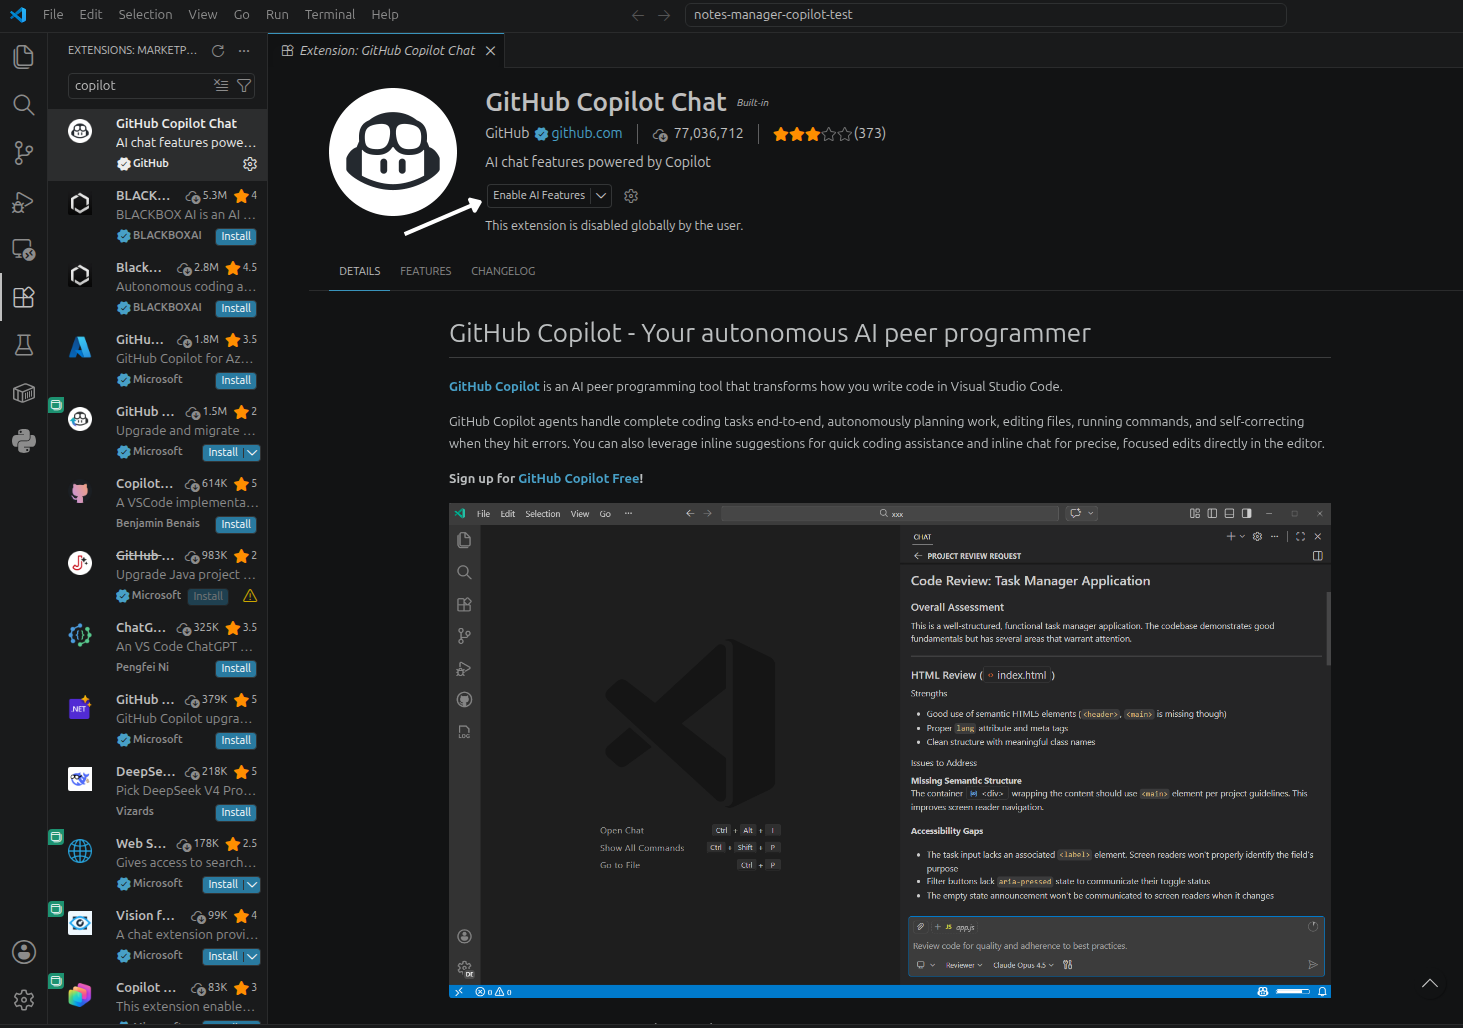
- Open the Extensions view and search for GitHub Copilot Chat.
- Select the GitHub Copilot Chat extension and click Enable AI Features.
The image below shows the extension page:
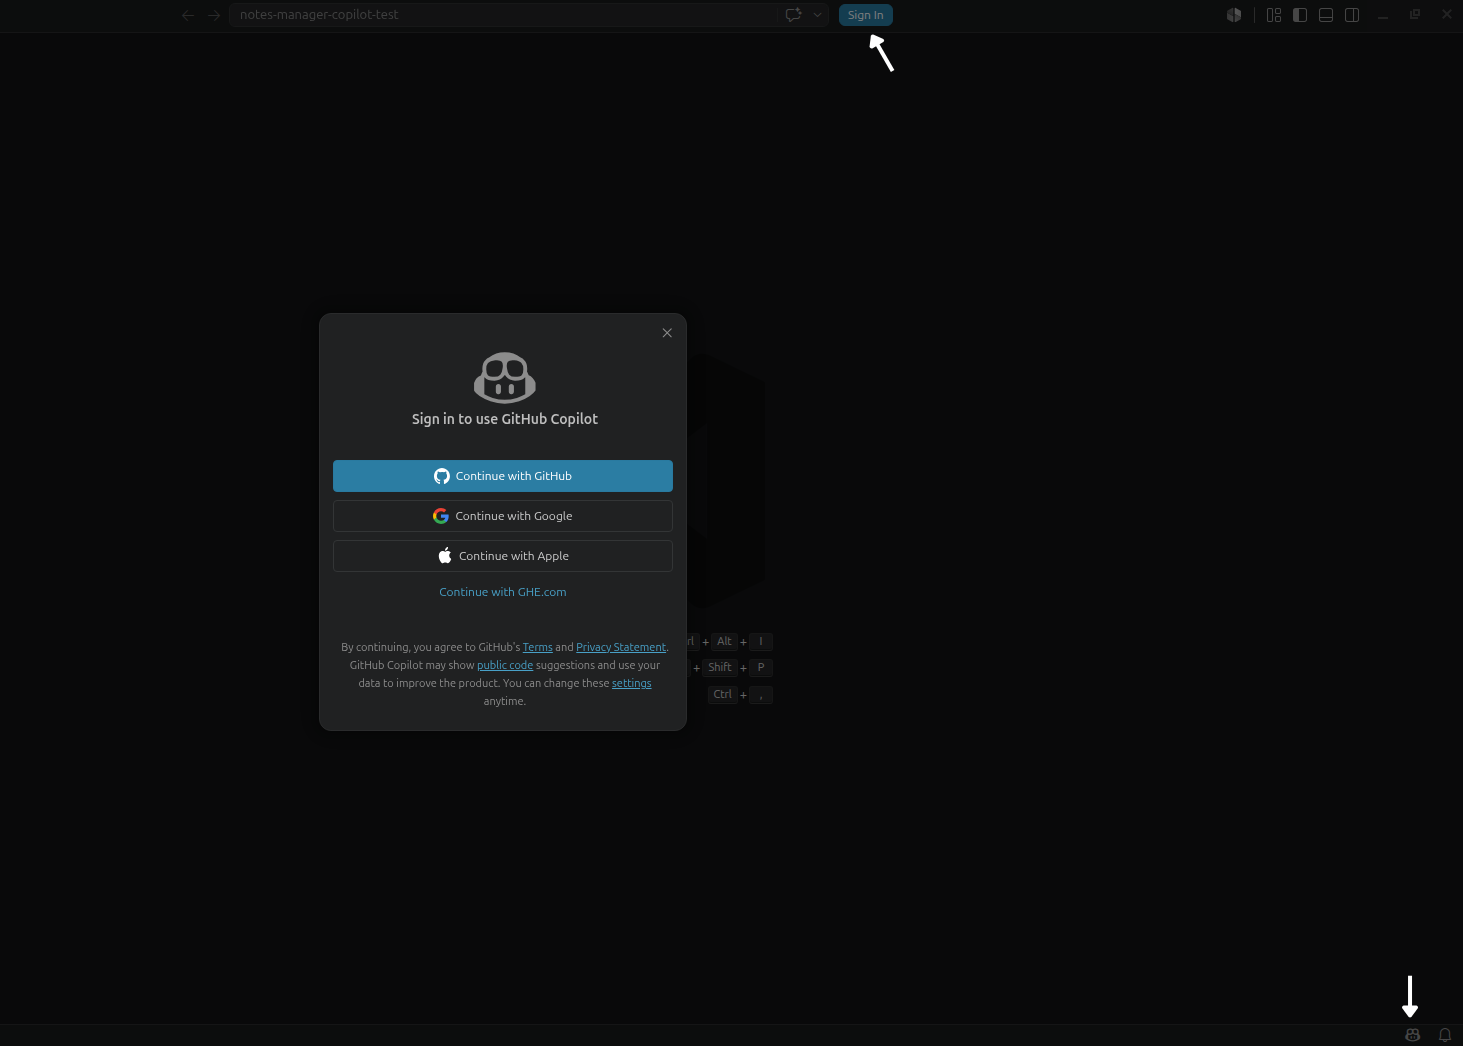
If you haven’t signed in to VS Code yet, sign in with your GitHub account to use GitHub Copilot. Click the Copilot icon in the bottom-right corner of the VS Code Status Bar and follow the prompts shown below:
Once you authenticate, GitHub Copilot becomes available in VS Code through a chat interface. Open it with Ctrl+Alt+I or Ctrl+Cmd+I, as shown below:
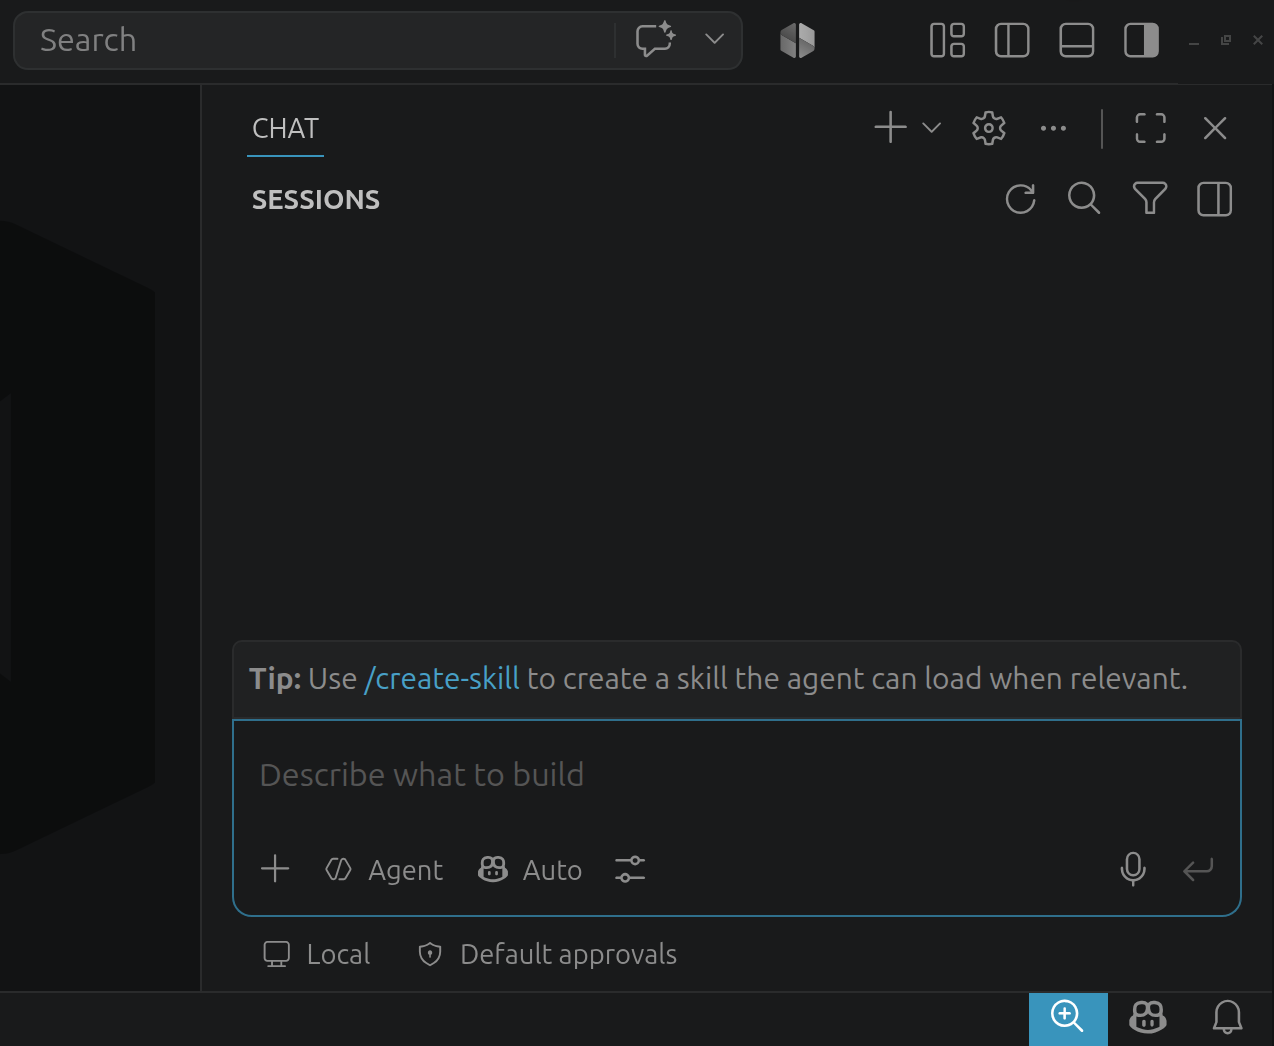
The Chat view opens with an empty session and a prompt box at the bottom. The row beneath the prompt holds the mode and model selectors, which you’ll use in the next section to put both editors on the same model.
Building a Markdown Note Manager in Python
You’ll build a command-line Markdown note manager with YAML frontmatter, SQLite, and an argparse-based CLI. You’ll use the same prompts in both editors to compare how they approach each stage of development.
Before you begin, configure both editors to use Claude Sonnet 5 as shown below:
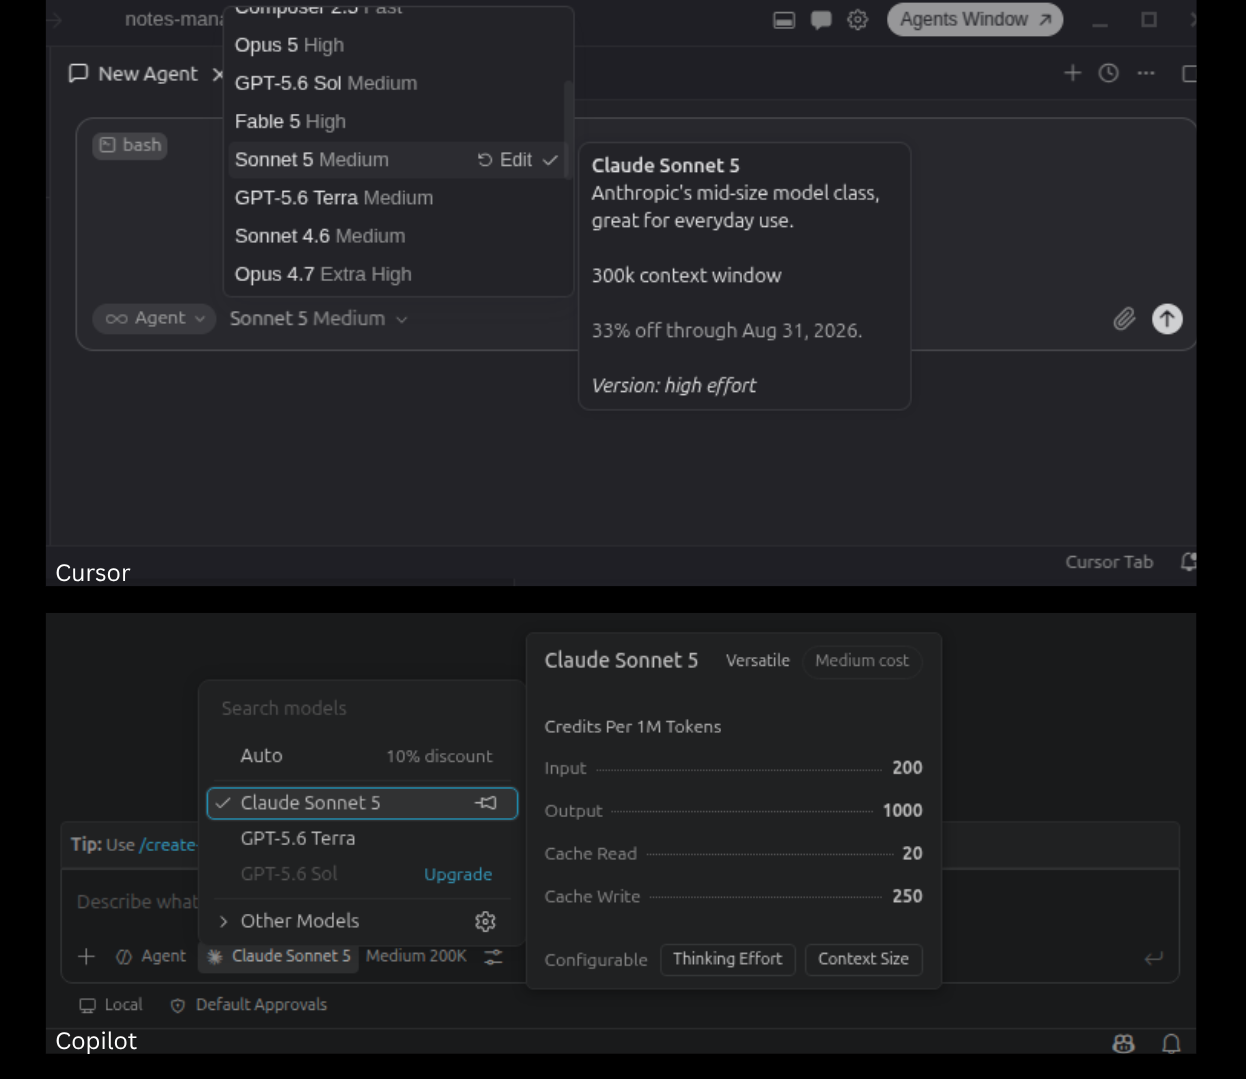
Although the model selectors display the configuration differently, both editors are set to use Claude Sonnet 5 with the Medium thinking effort setting.
Note: AI-generated responses are nondeterministic, so the same prompt won’t always produce identical results. Building a project with an AI agent is an iterative process, and you’ll often refine prompts over multiple interactions before arriving at the implementation or architecture you want.
Using the same model and thinking effort keeps the comparison fair, so you can focus on how each editor handles the tasks that follow.
Setting Up the Project
Create two empty project directories from your terminal:
$ mkdir notes-manager-cursor-test notes-manager-copilot-test
Open the first project in Cursor:
$ cursor notes-manager-cursor-test
Since the project is empty, there’s no code to index yet. As you add files, Cursor reads and indexes the codebase so it can find relevant code across the project. You can control what Cursor indexes with .cursorignore and .cursorindexingignore files.
Then open the second project in VS Code:
$ code notes-manager-copilot-test
Copilot behaves similarly. As you add files, VS Code automatically builds and maintains a semantic index that Copilot can use to find relevant code across the workspace. You can check the indexing status from the Copilot status dashboard in the VS Code Status Bar.
Once you’ve launched both projects, compare the chat modes available in each editor before sending your first prompt.
Both Cursor and Copilot provide the same three chat modes for different types of interactions. The table below summarizes them:
| Mode | Purpose |
|---|---|
| Agent | Executes development tasks by reading and editing files, running terminal commands, and iterating until the task is complete |
| Plan | Proposes an implementation before making changes |
| Ask | Explores and reviews existing code without modifying it |
GitHub Copilot also includes an Edit mode. It’s now hidden by default in favor of Agent mode, but you can re-enable it by setting chat.editMode.hidden to false in your VS Code settings.
To begin, select Agent mode in both editors.
In Cursor, press Ctrl+I or Cmd+I to open the chat panel, then press Shift+Tab until Agent mode is selected.
In VS Code, press Ctrl+Alt+I or Ctrl+Cmd+I to open the Chat view, then press Ctrl+. or Cmd+. to open the mode picker and select Agent.
With both editors ready, send the following prompt to each one:
Set up a Python project in this directory following standard Python
packaging conventions:
- Create a virtual environment
- Install pyyaml==6.0.2 and pytest==9.0.3
- Add a tests/ directory
- Use the directory name as the package name
- Only include the dependencies listed above
As each editor works, pay attention to how it interprets the prompt. Notice what project structure it creates, whether it requests approval before running terminal commands, how it presents code changes, and how it verifies the setup.
Observations: Cursor
Cursor works through the setup as a sequence of distinct steps, explaining what it’s about to do before each stage and keeping you informed of its progress throughout.
As it creates the project, Cursor presents every generated file as a reviewable diff before applying the changes. It automatically runs the required terminal commands as part of the setup, including creating the virtual environment, installing dependencies, and verifying that the project works.
The animation below shows Cursor setting up the project:
After finishing the setup, Cursor summarizes the generated project along with the verification results.
Observations: GitHub Copilot
GitHub Copilot handles the setup as a sequence of tracked tasks, updating its progress as it completes each step and reporting its status directly in the chat.
By default, Copilot asks for permission before running terminal commands. Once you approve, it runs them and displays the output inline.
The setup process is shown below:
After finishing the setup, Copilot provides a concise summary of the generated project along with the results of its validation checks.
Both editors complete the setup correctly and produce comparable project structures using the same model. The difference is in how they present their work. Cursor stages every file as a diff that you review before applying, while Copilot tracks its progress through a running task list in the chat.
Implementing the Application
With the project set up, use the following prompt to implement the application:
Build a command-line Markdown note manager for this project.

Requirements:

- Store notes as Markdown files with YAML frontmatter containing a
  title and tags.
- Represent each note as a dataclass with title, body, tags, and
  created_at fields.
- Create a SQLite-backed NoteStore that can add notes, search notes,
  list notes by tag, and retrieve notes by title.
- Build an argparse command-line interface that exposes those
  operations.
At this stage, you’re evaluating more than whether each editor produces working code. You’re comparing how each editor translates the same specification into a complete application and how readily you can inspect the generated implementation before you continue development.
As you review the generated implementation, check whether each editor:
- Implements the requested functionality
- Organizes the application into clear modules
- Explains its progress throughout the task
- Presents the generated changes for review before you accept them
Observations: Cursor
Cursor organizes the application into dedicated modules for the data model, Markdown serialization, storage, and CLI, and generates a corresponding test suite.
The generated project structure is shown below:
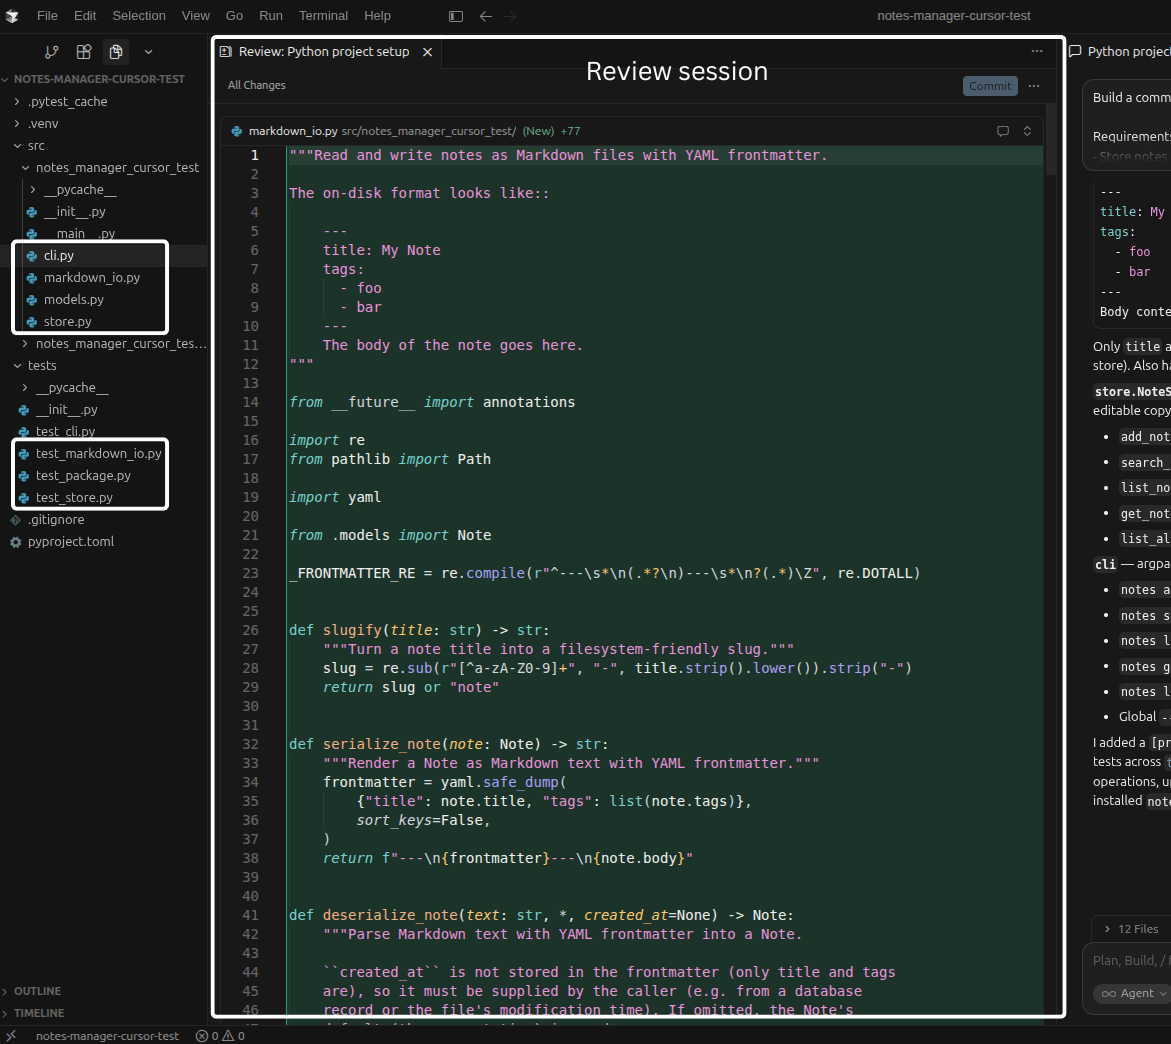
Cursor presents its changes as reviewable diffs and groups them into a single review session. Open it with the Review button to inspect the implementation across every modified file from one place.
The animation below shows Cursor building the application:
After finishing the task, Cursor keeps the changes available in that review session, so you can revisit them before you move on.
Observations: GitHub Copilot
GitHub Copilot also organizes the application into dedicated modules for the data model, Markdown serialization, storage, and CLI, and generates a corresponding test suite.
The generated project structure is shown below:
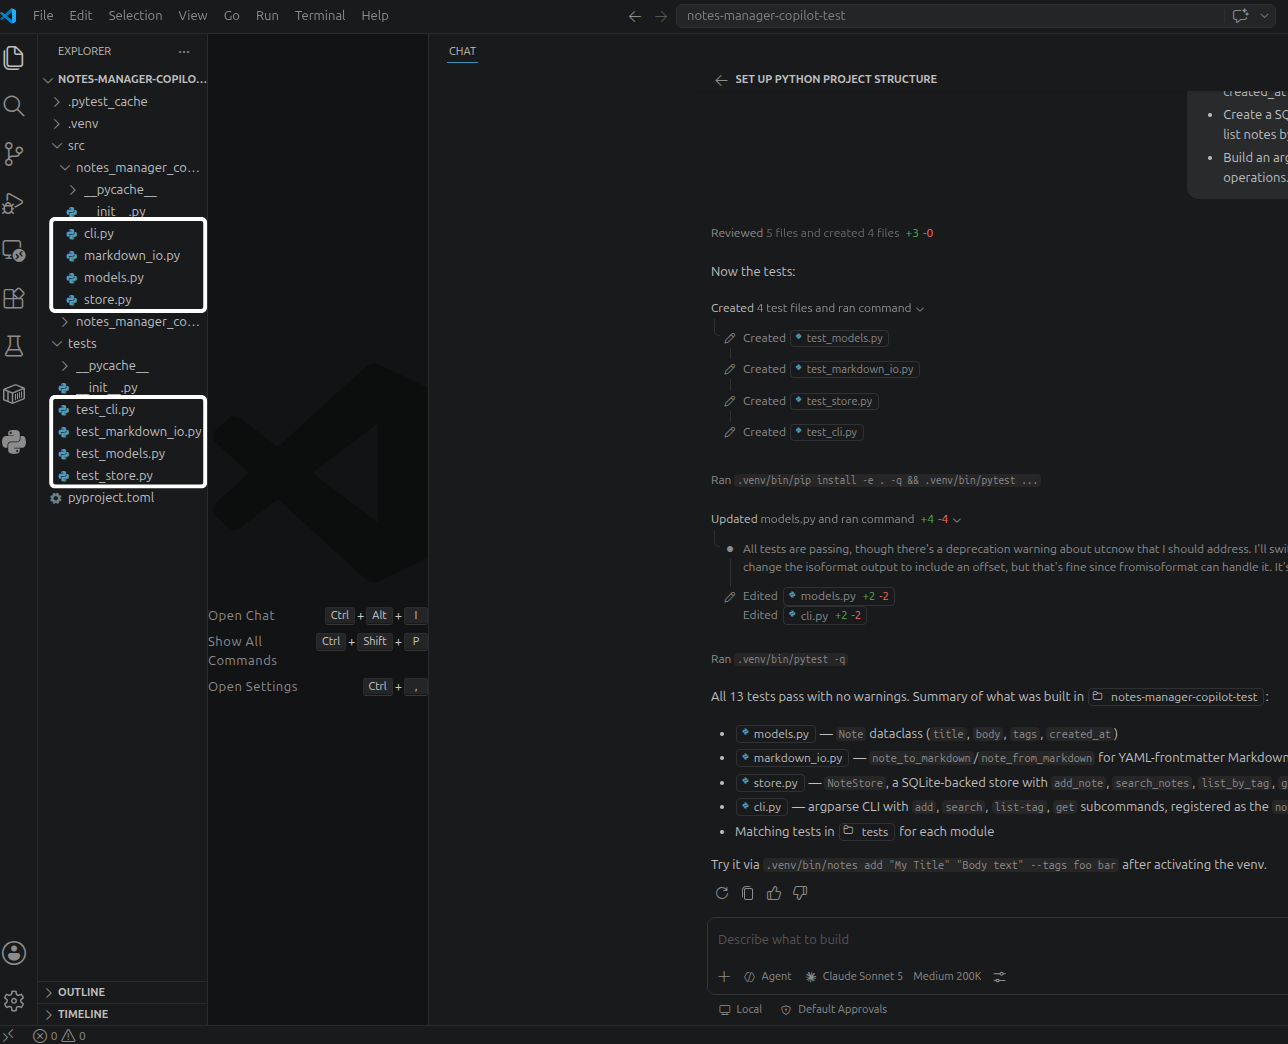
Copilot reports its progress in the chat as it works, listing the files it creates and edits, and then summarizing the generated modules once the implementation is complete.
The animation below shows Copilot building the application:
To review the implementation, you open the modified files individually, since Copilot doesn’t provide a dedicated review session like Cursor.
Both editors produce a working, similarly organized implementation from the same prompt using the same model. The exact project structure and test coverage may vary between runs, but the clearest difference is in their review workflows.
Cursor collects its edits in a single review session, so you can inspect the proposed changes before applying or discarding them. Copilot reports its progress in the chat and applies changes directly to your files as it works. You then inspect the completed implementation in the editor before keeping or undoing the edits.
To see that difference in motion, replay the same agent task in both editors below and watch exactly when each edit reaches the files on disk:
In Cursor, the edits stay staged in the review session until you apply them, while Copilot’s edits are already on disk by the time the agent finishes.
Testing and Debugging
Building an application is only part of the development process. Testing helps you verify that the application behaves as expected, while debugging helps you find and fix problems when it doesn’t.
Each editor generated a pytest test suite while implementing the application. In this section, you’ll introduce a bug, let the existing tests catch it, and then ask each editor to find the issue, fix it, and verify the repair.
To create the same debugging scenario in both projects, remove the self._conn.commit() call immediately after the SQLite insert operation in NoteStore.add_note().
The animation below shows the change in Cursor:
Make the same change in the GitHub Copilot project:
The application still runs, but without the commit, SQLite never saves the new note to disk. As a result, you can’t retrieve the note, and several tests fail.
Now ask each editor to fix the issue using the following prompt:
Run the existing pytest test suite.

If any tests fail, investigate the root cause, fix the underlying issue,
and rerun the tests until the entire suite passes.
As each editor works through the task, check whether it:
- Reproduces the failure by running the existing test suite
- Uses the failing tests to locate the faulty implementation
- Applies a focused fix without modifying the tests
- Verifies the repair by rerunning the complete test suite
Observations: Cursor
Cursor starts by running the existing test suite to reproduce the failure. It then traces the failing tests to the storage implementation, restores the missing self._conn.commit() call in NoteStore.add_note(), and reruns the full test suite to confirm that the repair resolves all the failures.
Throughout this process, Cursor’s agent carries out the task without asking for further input. It uses its available tools to read project files, run terminal commands, and edit source code. Cursor moves directly from the failing tests to the faulty implementation, then verifies the repair.
Cursor also explains why the missing database commit causes the failures. Rather than only restoring the line, it connects the failing CLI tests to SQLite transaction behavior, so you understand why newly added notes can’t be retrieved.
The animation below shows Cursor testing and debugging the application:
You may notice how Cursor reaches the faulty implementation with few intermediate steps.
Observations: GitHub Copilot
GitHub Copilot also starts by running the existing test suite to reproduce the failure. It follows the failing tests to the storage implementation, restores the missing self._conn.commit() call, and reruns the full test suite to confirm that the repair resolves the failures.
Like Cursor, Copilot’s agent can use multiple tools while working through a task, including searching the workspace, reading files, running terminal commands, and editing code. During this debugging session, though, it surfaces more of that process in the chat, walking through the possible causes it evaluates before it identifies the missing database commit.
The animation below shows GitHub Copilot testing and debugging the application:
Both editors use the existing test suite to reproduce the failure, identify the faulty implementation, fix the code, and verify the repair. What separates them is how much of that reasoning they show you.
Cursor reaches the fix with fewer intermediate steps and keeps the session focused on the relevant code, while Copilot exposes more of the debugging process, showing the potential causes it rules out before arriving at the same solution.
AI Code Completion
Once you’ve built and tested the application, most of your development time goes toward incremental changes rather than new features. AI code completion speeds up that work by predicting code as you type and identifying related edits throughout the project.
You’ll make two changes to the project. First, extend the Note dataclass with a new updated_at field. Then, rename the search_notes() method and see how each editor updates the remaining references.
Cursor: Predicting Edits With Tab
Cursor Tab predicts code as you type and can also identify related edits elsewhere in your project. When a change affects multiple files, pressing Tab jumps you to each suggested edit one at a time.
Locate the Note dataclass and start adding a new updated_at field. As you write the declaration, Cursor suggests the remaining code, including the inferred type annotation and default value. Press Tab to accept it:
Notice that Cursor completes the declaration from the surrounding context rather than from only the text immediately before your cursor. In this example, it infers that the new field should follow the same pattern as the existing timestamp field.
Next, rename the search_notes() method. After you update the method declaration, Cursor Tab automatically suggests updates for the remaining references throughout the project, and you can press Tab again to jump to each location:
Cursor presents one suggested edit at a time, so you can review each one before you accept it. This keeps you in control and eliminates the repetitive work of tracking down each call site yourself.
GitHub Copilot: Predicting Edits With Tab
GitHub Copilot predicts code as you type and extends those predictions with Next Edit Suggestions (NES).
Locate the Note dataclass and start adding a new updated_at field. As you write the declaration, GitHub Copilot suggests the remaining code, including the inferred type annotation and default value. Press Tab to accept it:
Like Cursor, GitHub Copilot uses the surrounding code as context to predict the rest of the declaration.
Next, rename the search_notes() method. After you update the method declaration, GitHub Copilot displays an indicator in the editor margin to show that an NES is available. Press Tab to move to the suggested edit, and then press Tab again to accept it. Continue until you’ve applied the remaining suggestions:
Like Cursor Tab, GitHub Copilot’s NES guides you through related edits with the Tab key instead of applying every change automatically.
Both editors extend code completion beyond the current edit by predicting related changes elsewhere in the project and guiding you through each one.
Refactoring Across Multiple Files
As a project grows, changes rarely stay isolated to a single file. A new feature, bug fix, or API change often requires coordinated updates across multiple parts of the codebase.
Making those changes involves more than generating code. You first want to review the proposed implementation before any files in your project change. You also want future implementations to follow your project’s conventions without repeating them in every conversation.
Cursor: Planning and Project Guidance
Press Shift+Tab until Plan mode is selected, then submit the following prompt:
Create a plan to add support for archiving notes.

- Archived notes shouldn't appear in normal searches or listings.
- Add an `--include-archived` option to the search and list commands
  so archived notes can be included when needed.
- Integrate the feature cleanly with the existing application without
  introducing duplicate logic.
Rather than modifying the project immediately, Cursor generates an implementation plan and saves it as an editable Markdown file. Review the plan, then approve it to begin the implementation:
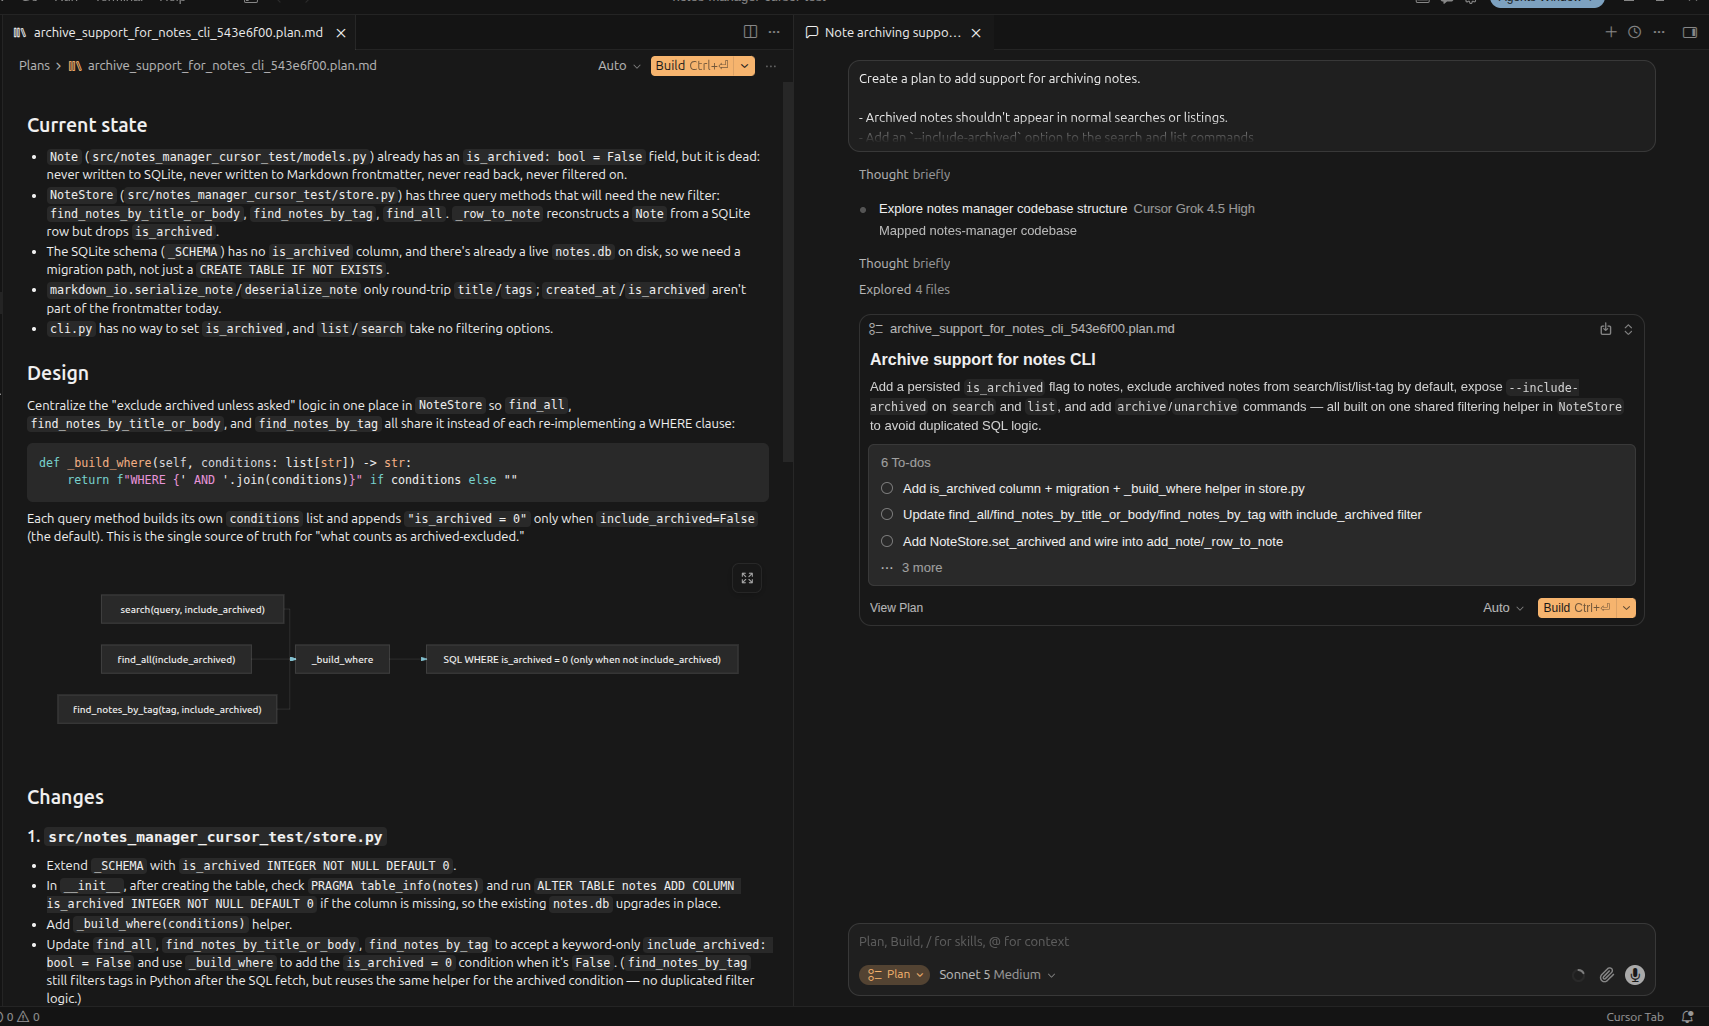
Reviewing the plan before execution gives you a chance to catch incorrect assumptions, refine the approach, or adjust the scope before Cursor writes anything to disk.
Project Rules
Project rules let you define your project’s conventions once, so future implementations automatically follow them.
Project rules are stored as version-controlled .mdc files inside the .cursor/rules/ directory. Each rule contains YAML frontmatter that controls when the rule applies, followed by the instructions you want Cursor to follow.
To create a project rule, open Cursor Settings and select Customize from the sidebar. Click the Rules tab, confirm that your active project folder appears in the scope selector, and click + New Rule. Give the rule a name, then add the following instructions:
.cursor/rules/markdown-note-manager-rules.mdc
---
globs: "**/*.py"
alwaysApply: false
---
# Instructions

- Use type hints for all functions, return values, and dataclass fields.
- Parse YAML frontmatter with `yaml.safe_load()` rather than manually.
- Use `pathlib.Path` for all file and directory operations.
- Use parameterized SQL queries for every SQLite operation.
- Represent notes as dataclasses rather than dictionaries.
After you save the rule, Cursor writes it to the project’s .cursor/rules/ directory:
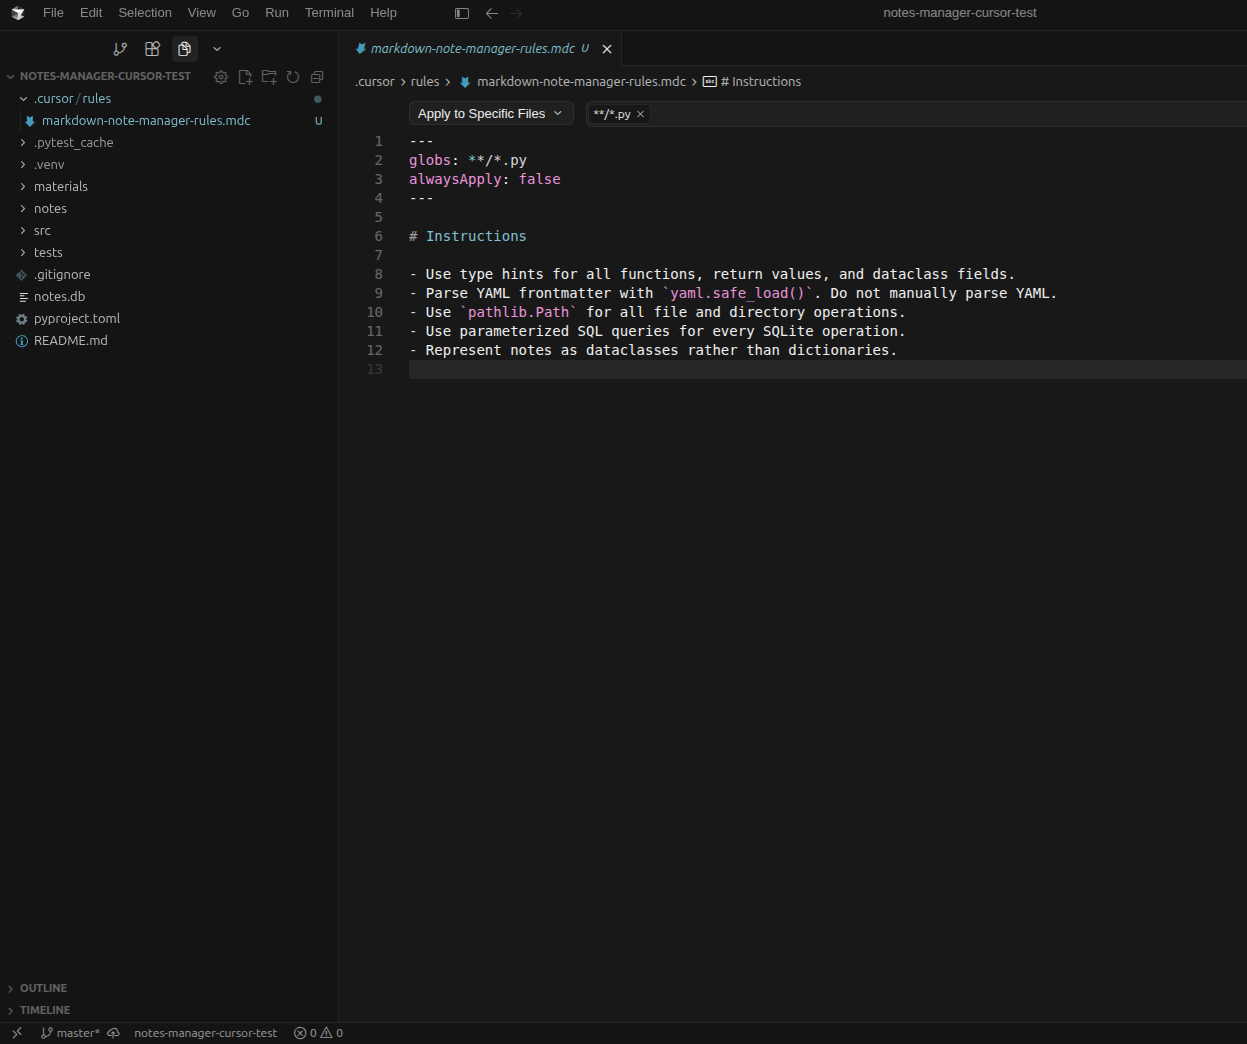
The globs field limits the rule to Python files, while alwaysApply: false lets Cursor include the rule only when it determines the instructions are relevant.
Cursor also supports rules that always apply, are selected manually, or are attached automatically through file patterns. These rule types let you organize project guidance into multiple focused rule files rather than maintain a single large instruction document.
Alternatively, type /create-rule in the Agent input and describe the rule you want. You can also press Ctrl+Shift+P or Cmd+Shift+P, search for New Cursor Rule, and select it to open the Agent panel with the command prefilled.
GitHub Copilot: Planning and Project Guidance
Select Plan from the mode selector in the GitHub Copilot Chat view, then submit the same prompt:
Create a plan to add support for archiving notes.

- Archived notes shouldn't appear in normal searches or listings.
- Add an `--include-archived` option to the search and list commands
  so archived notes can be included when needed.
- Integrate the feature cleanly with the existing application without
  introducing duplicate logic.
Like Cursor, GitHub Copilot generates an implementation plan before making changes:
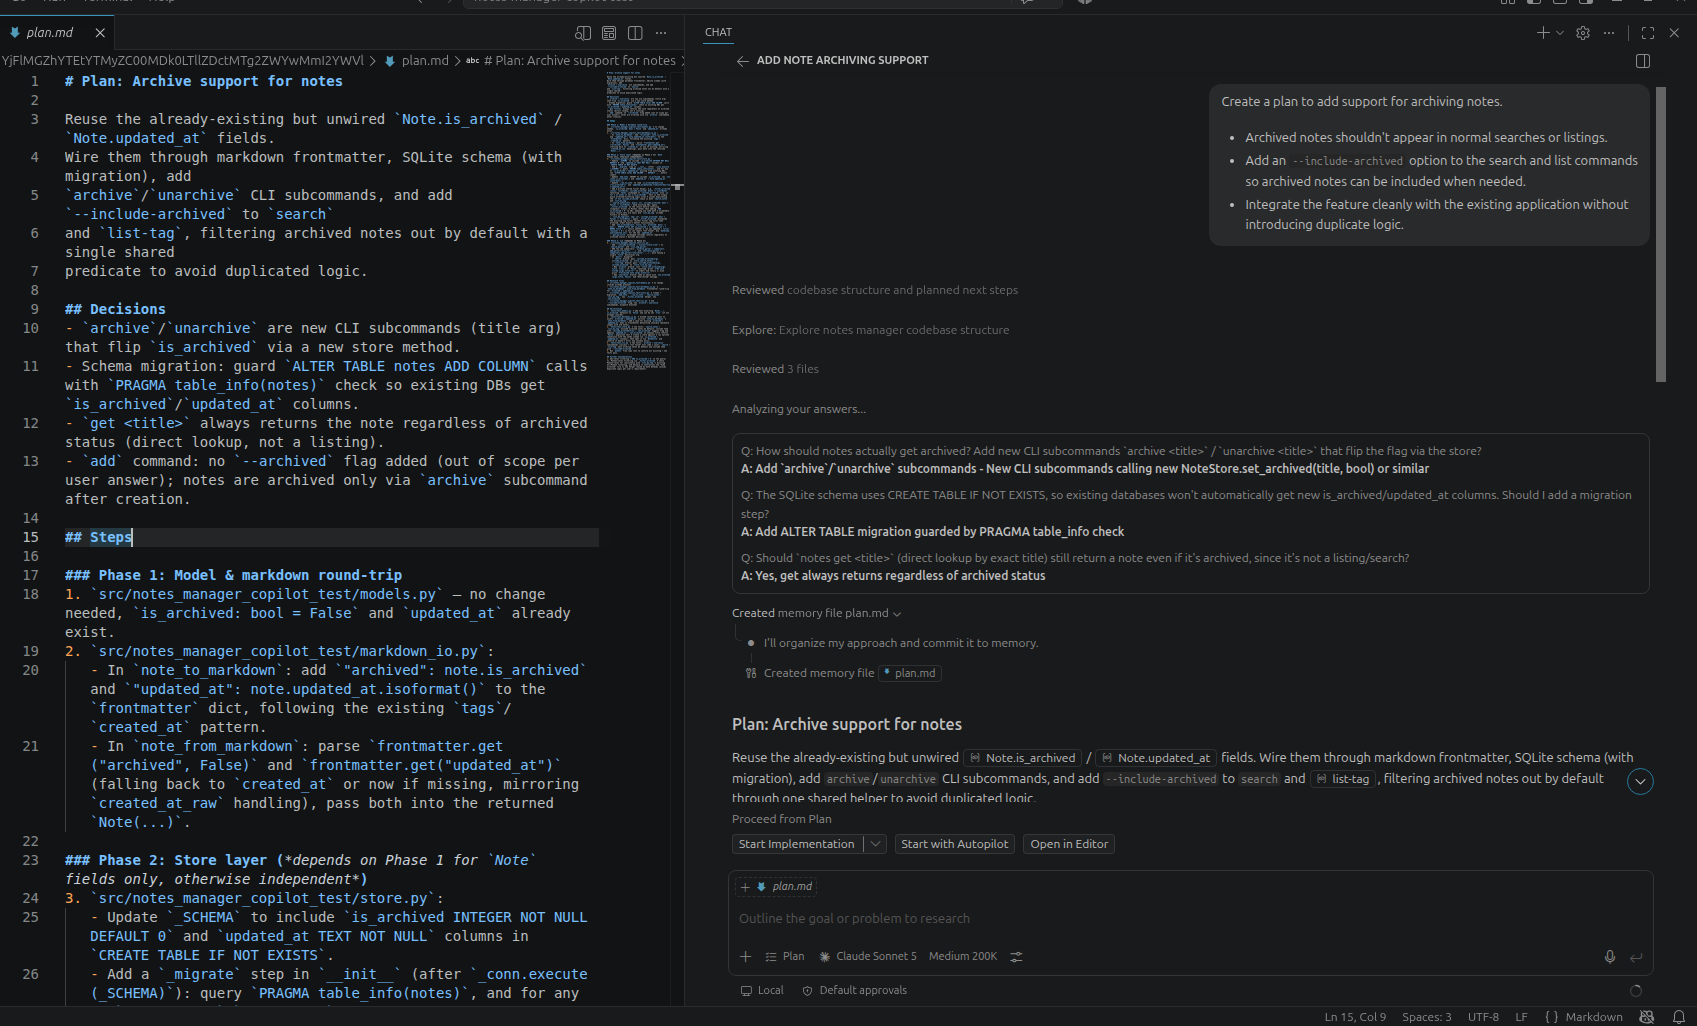
GitHub Copilot writes the proposed plan to a plan.md file that you can review and edit before handing the task over to the agent.
Repository Custom Instructions
Like Cursor’s project rules, repository custom instructions provide persistent guidance for future implementations.
Unlike Cursor, GitHub Copilot doesn’t offer a dedicated interface for creating them. Instead, create a .github/copilot-instructions.md file at the root of your repository and add instructions such as the following:
.github/copilot-instructions.md
# Repository Instructions

- Use type hints for all functions, return values, and dataclass fields.
- Parse YAML frontmatter with `yaml.safe_load()` rather than manually.
- Use `pathlib.Path` for all file and directory operations.
- Use parameterized SQL queries for every SQLite operation.
- Represent notes as dataclasses rather than dictionaries.
Once you save the file, your project structure should look like the one shown below:
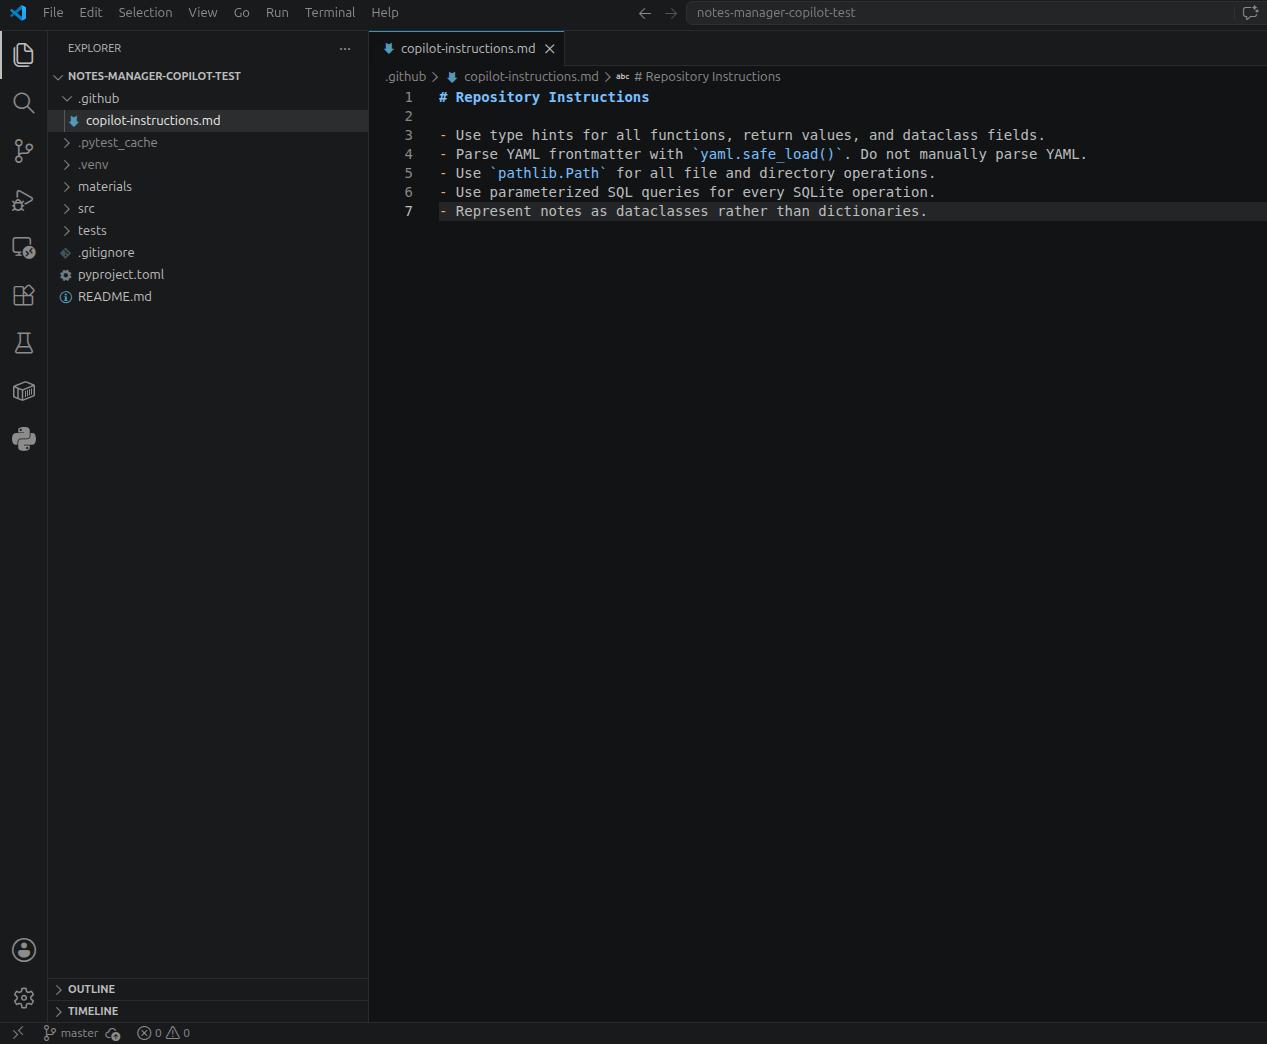
Repository instructions apply everywhere by default and become part of the project’s version-controlled files.
For larger projects, you can create path-specific instruction files with applyTo YAML frontmatter to target selected files or directories, allowing different parts of the project to follow different conventions.
Both editors let you review and refine a proposed implementation before any files change, and both provide persistent guidance for future tasks.
Cursor manages that guidance through project rules, using YAML frontmatter to control when individual rules apply. GitHub Copilot manages it through repository custom instructions, using repository-wide or path-specific Markdown instruction files to define project conventions.
AI Code Review
Passing tests doesn’t guarantee that code is free of issues. Some vulnerabilities don’t cause immediate failures and are easier to catch during code review. To compare the review workflows in Cursor and Copilot, you’ll introduce a SQL injection vulnerability into each project.
Cursor: Reviewing Code and Pull Requests
Locate the parameterized SQL query in the search_notes() method. The example below shows the code generated during this walkthrough. Use it as a reference to modify your own implementation.
The original implementation uses placeholders to keep the search value separate from the SQL statement:
def search_notes(self, query: str) -> list[Note]:
    """
    Return notes whose title or body contains `query` (case-insensitive).
    """
    pattern = f"%{query}%"
    rows = self._conn.execute(
        """
        SELECT * FROM notes
        WHERE title LIKE ? COLLATE NOCASE
           OR body LIKE ? COLLATE NOCASE
        ORDER BY created_at DESC
        """,
        (pattern, pattern),
    ).fetchall()
    return [self._row_to_note(row) for row in rows]
Modify the query so it interpolates the search value directly into the SQL statement, as shown below:
def search_notes(self, query: str) -> list[Note]:
    """
    Return notes whose title or body contains `query` (case-insensitive).
    """
    rows = self._conn.execute(
        f"""
        SELECT * FROM notes
        WHERE title LIKE '%{query}%' COLLATE NOCASE
           OR body LIKE '%{query}%' COLLATE NOCASE
        ORDER BY created_at DESC
        """
    ).fetchall()
    return [self._row_to_note(row) for row in rows]
This change introduces a SQL injection vulnerability because user input becomes part of the query text instead of a bound parameter.
Switch to Ask mode and submit the following prompt:
Review the database layer for correctness, SQL safety,
and general code quality.
Identify any issues and suggest improvements without modifying the code.
Cursor analyzes the affected file and summarizes the issues it finds:
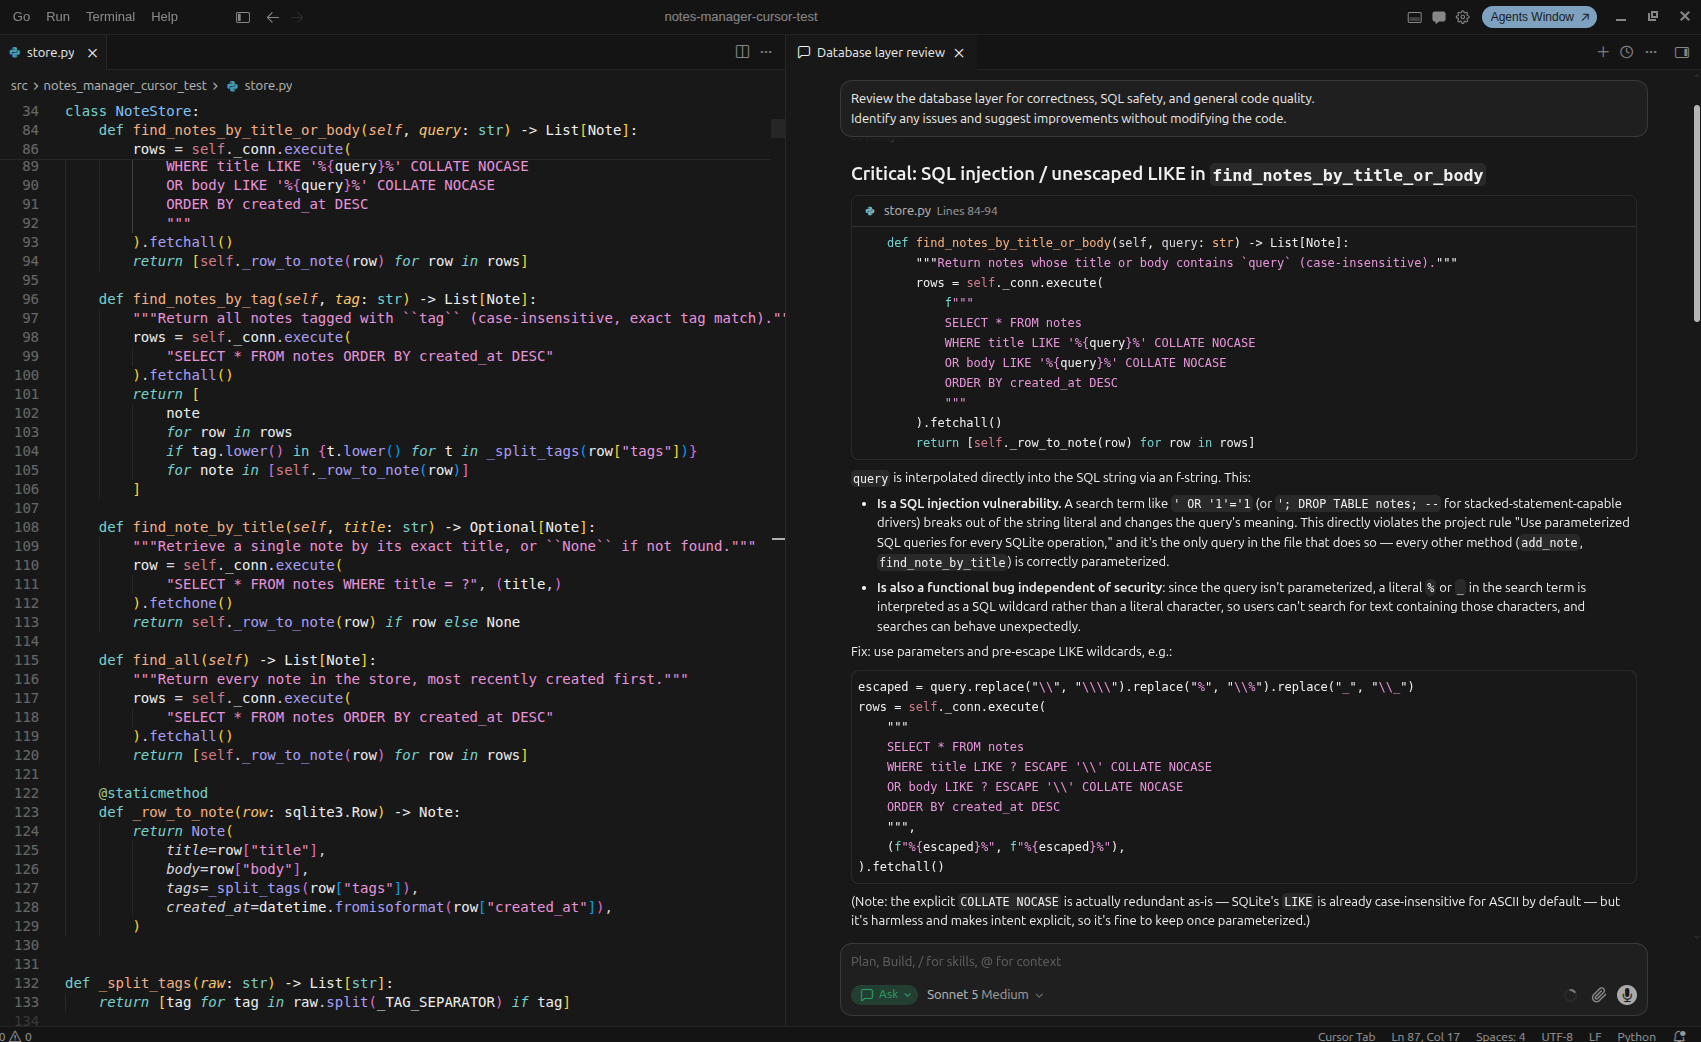
It correctly identifies the interpolated SQL query as vulnerable to SQL injection and recommends restoring a parameterized query.
Next, review the pending changes by entering the following command into the chat:
/review
The /review command analyzes your recent changes, highlighting the issues they introduce:
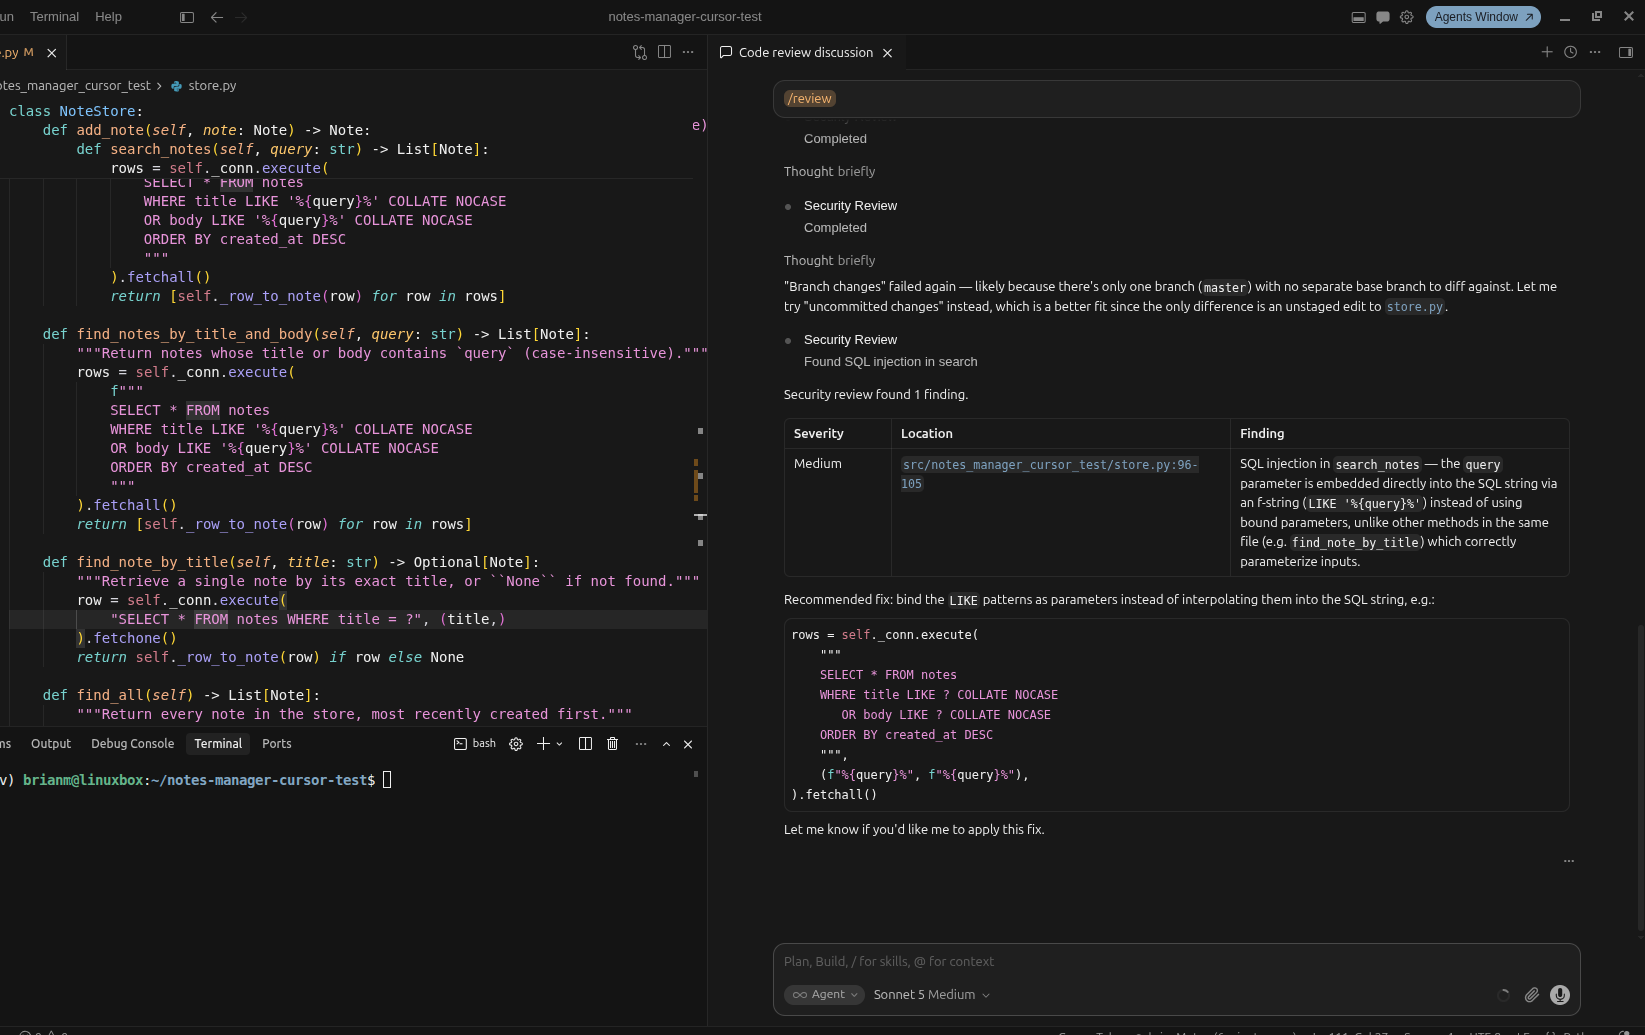
Unlike Ask mode, /review focuses specifically on your committed or uncommitted changes, pointing to the vulnerable lines and explaining why they need fixing.
If you’re collaborating through GitHub, Cursor also provides Bugbot for pull request reviews. It automatically analyzes pull requests, leaves inline comments for potential issues, and can generate tested fixes through Bugbot Autofix.
Bugbot uses a usage-based pricing model, with costs depending on the size and complexity of the diff it reviews.
GitHub Copilot: Reviewing Code and Pull Requests
Copilot generated its own version of the search_notes() method, so the code below differs slightly from the one in the Cursor project. Match the change to whatever your project produced.
The original implementation uses placeholders to separate the search value from the SQL statement:
def search_notes(self, query: str) -> list[Note]:
    """Return notes whose title or body contains the given query text."""
    rows = self._conn.execute(
        """
        SELECT * FROM notes
        WHERE title LIKE ? OR body LIKE ?
        ORDER BY created_at
        """,
        (f"%{query}%", f"%{query}%"),
    ).fetchall()
    return [self._row_to_note(row) for row in rows]
Modify the query so it interpolates the search value directly into the SQL statement, as shown below:
def search_notes(self, query: str) -> list[Note]:
    """Return notes whose title or body contains the given query text."""
    rows = self._conn.execute(
        f"""
        SELECT * FROM notes
        WHERE title LIKE '%{query}%'
           OR body LIKE '%{query}%'
        ORDER BY created_at
        """
    ).fetchall()
    return [self._row_to_note(row) for row in rows]
This introduces the same SQL injection vulnerability into the GitHub Copilot project.
Open the Source Control view using Ctrl+Shift+G, then hover over the Changes header to reveal the Code Review button, whose tooltip reads Code Review - Uncommitted Changes. Select it to check your uncommitted changes:
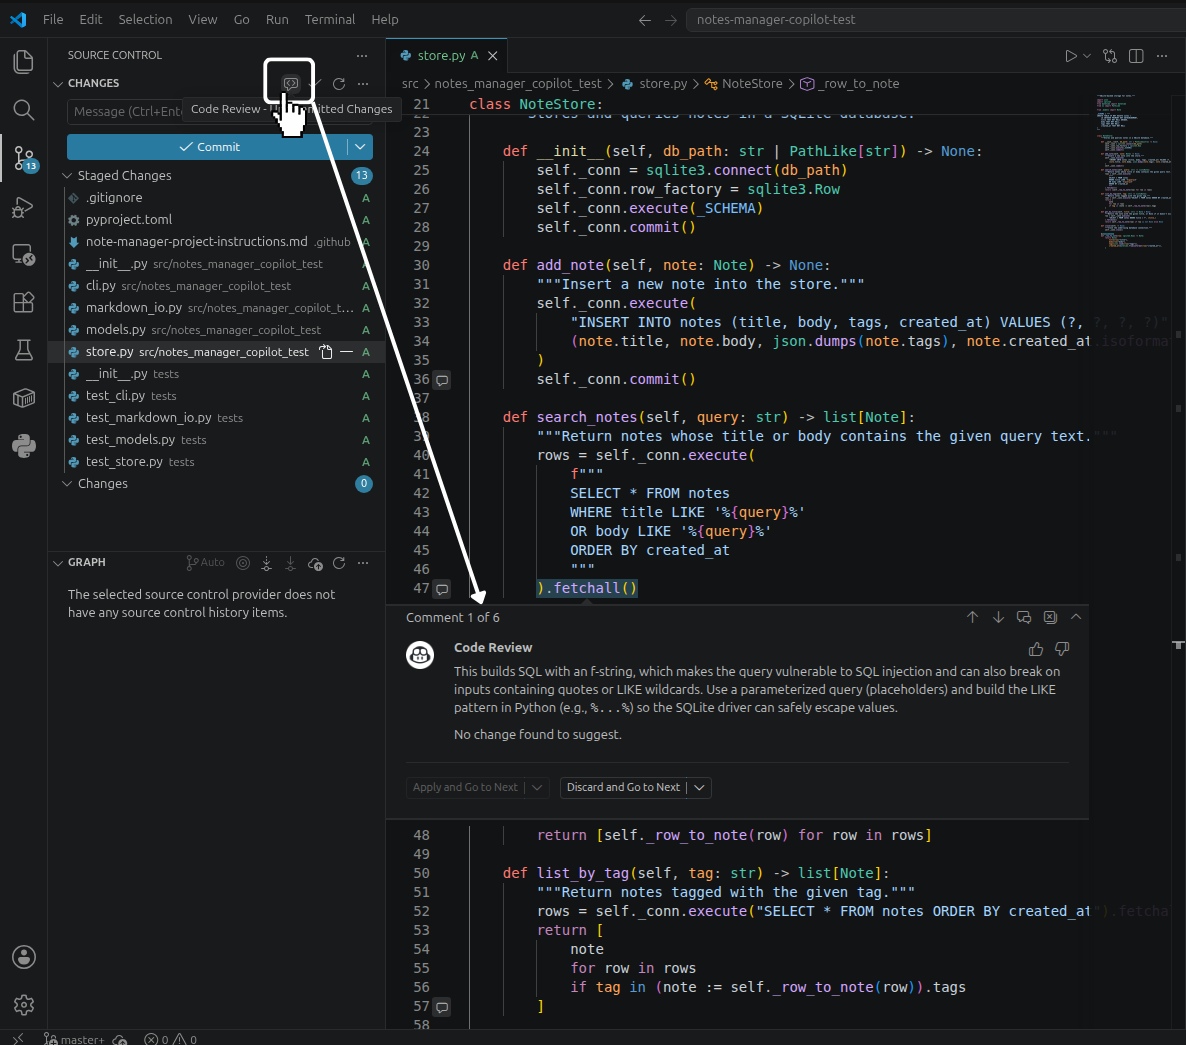
GitHub Copilot analyzes the pending changes and surfaces its findings directly in the editor. It flags the SQL injection vulnerability and adds inline review comments that you can inspect and apply before committing your changes.
Note: If Code Review doesn’t appear when you hover over the Changes header, make sure you’re signed in to both VS Code and GitHub using the same account that has GitHub Copilot access.
GitHub Copilot can also review a specific section of code instead of your entire working tree. Select the code you want to review, then either right-click and choose Review, or press Ctrl+Shift+P or Cmd+Shift+P, search for Chat: Review, and run the command:
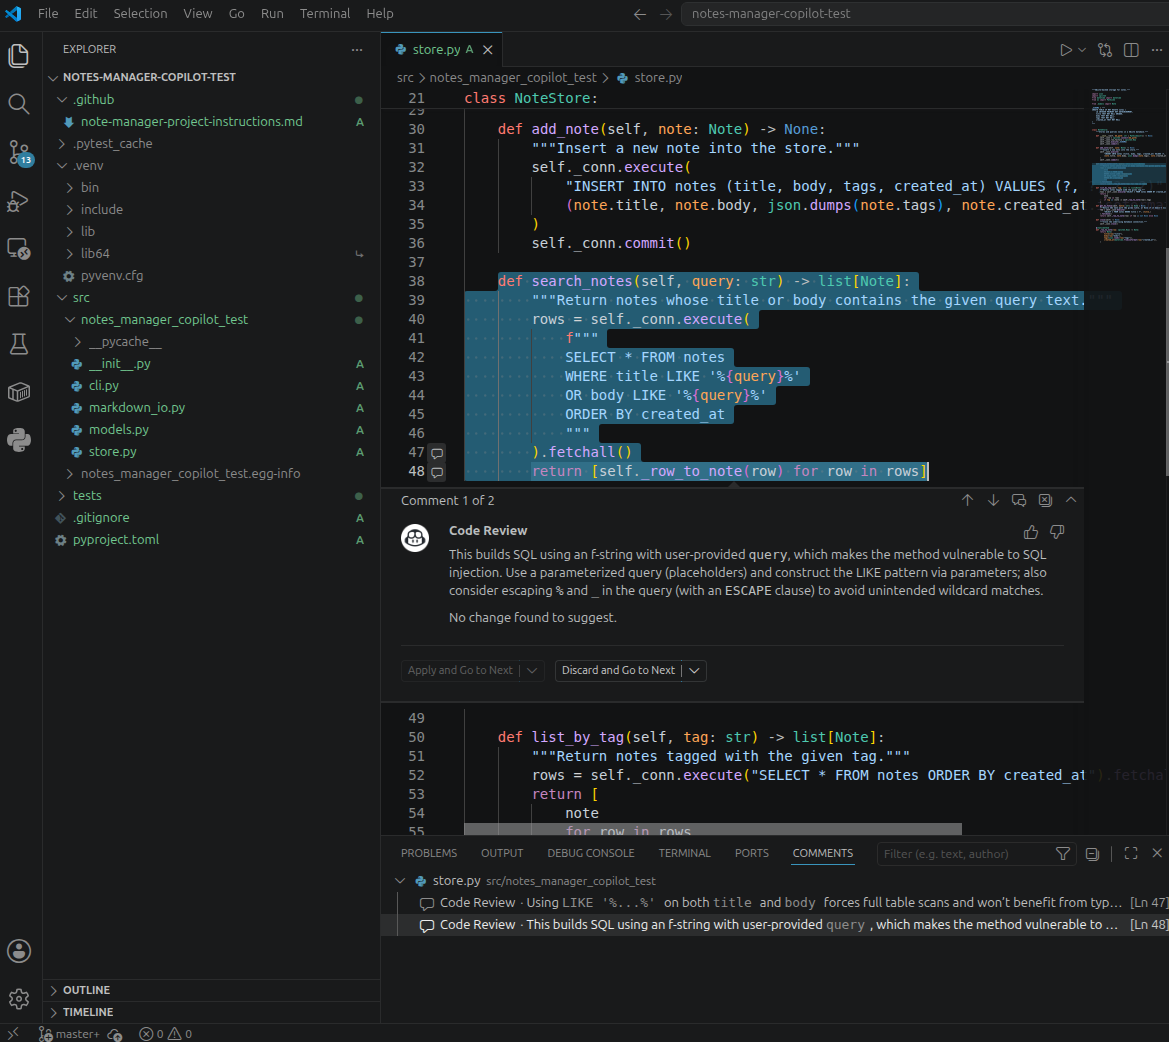
Instead of reviewing every pending change, GitHub Copilot analyzes only the selected code and returns inline comments for that region. This keeps the feedback focused when only one part of your work is ready for review.
GitHub Copilot also supports pull request reviews on GitHub. It can analyze the proposed changes, leave inline review comments where it detects potential issues, and suggest improvements before the pull request is merged.
Both editors review your uncommitted changes and your pull requests, catching the SQL injection you introduced. They differ in how the review is billed. Cursor charges for Bugbot by usage on top of your subscription, while GitHub Copilot handles local, selection-level, and pull request reviews within the subscription you already have.
Decision Table: Cursor vs GitHub Copilot
If you’re still deciding between Cursor and Copilot, the table below summarizes which editor suits common Python development workflows:
| If you… | Cursor | GitHub Copilot |
|---|---|---|
| Want AI changes shown as reviewable diffs in a dedicated session before they’re written to your files | ✅ | — |
| Prefer AI integrated directly into VS Code without a separate app | — | ✅ |
| Rely on Microsoft’s official Pylance extension for Python type checking and IntelliSense | — | ✅ |
| Want version-controlled project instructions shared across a team | ✅ .cursor/rules/*.mdc |
✅ .github/copilot-instructions.md |
| Prefer creating project instructions through a built-in settings UI | ✅ | — |
| Want to review a single block of code without reviewing your entire working tree | — | ✅ |
| Want AI review for GitHub pull requests | ✅ Bugbot | ✅ Copilot code review |
| Want the lower-priced individual Pro plan | — | ✅ |
Cursor is a stronger fit if you want an editor designed around AI-assisted development. Copilot is a stronger fit if you want AI integrated into the VS Code and GitHub workflows you already use.
Conclusion
You’ve now worked through the same Python development workflows in Cursor and GitHub Copilot and seen where their approaches differ. Cursor is a dedicated AI code editor, while GitHub Copilot adds AI capabilities to VS Code.
Those different approaches shape how you use the capabilities both editors share, from planning and multi-file editing to code completion and review. Having tried both, you can decide which editor better fits the way you develop Python applications.
In this tutorial, you’ve:
- Built the same Python Markdown note manager in both editors using identical prompts and model settings
- Compared Cursor Tab and Copilot Next Edit Suggestions for predicting and navigating related code changes
- Used Plan mode to prepare multi-file changes before implementation
- Added persistent project guidance with Cursor project rules and GitHub Copilot repository custom instructions
- Tested and debugged generated code before comparing each editor’s local and pull request review workflows
If you’d like another point of comparison before you decide, Real Python’s tutorial on Cursor vs Windsurf puts Cursor and Windsurf through the same Python project, covering setup, agent workflows, and code review the way this comparison does.
The Python Coding With AI learning path picks up from there, gathering tutorials and video courses on AI assistants like Cursor and Claude Code so you can make one of them part of your daily development work.
Get Your Code: Click here to download the free sample code for the Markdown note manager you’ll build with Cursor and GitHub Copilot in this tutorial.
Frequently Asked Questions
Now that you have some experience with Cursor and GitHub Copilot in Python, you can use the questions and answers below to check your understanding and recap what you’ve learned.
These FAQs revisit the most important concepts from this tutorial. Click the Show/Hide toggle beside each question to reveal the answer.
Neither one wins outright. Cursor suits developers who prefer a dedicated AI code editor with built-in workflows for reviewing AI-generated changes. GitHub Copilot suits those who want AI integrated directly into VS Code, with broader extension compatibility. The right choice depends on your workflow.
Not by default. Each editor ships with its own model lineup and its own default, so an out-of-the-box comparison measures the models as much as the editors. Both let you choose a common model, and this tutorial puts both on Claude Sonnet 5 for exactly that reason.
They do the same job with slightly different mechanics. Both predict code as you type and guide you through related edits with the Tab key. Cursor Tab jumps you to each suggested edit one at a time, while Copilot flags an available suggestion in the editor margin, and a second Tab accepts it.
Most will. Cursor is built on VS Code, so community extensions generally install and run unchanged. The exception is a small number of proprietary Microsoft extensions, such as Pylance, which is licensed for use only with Microsoft products.
Take the Quiz: Test your knowledge with our interactive “Cursor vs Copilot: Which AI Editor Is Better for Python?” quiz. You’ll receive a score upon completion to help you track your learning progress:
Interactive Quiz
Cursor vs Copilot: Which AI Editor Is Better for Python?Test your understanding of how Cursor and GitHub Copilot compare for Python across agent modes, code review, and project conventions.