
In this tutorial, you’ll create a Python Flask example application and deploy it using Heroku, making it publicly available on the web. Heroku removes much of the infrastructure burden related to building and running web applications, allowing you to focus on creating an awesome app.
Besides deploying the app, you’ll use Git to track changes to the code, and you’ll also configure a deployment workflow with different environments for staging and production. Using this setup, you’ll be able to test and preview the app before releasing it.
In this tutorial, you’ll learn how to:
- Create a Python Flask example web application
- Deploy the web application using Heroku
- Implement a deployment workflow using Heroku pipelines
- Manage configuration and secrets for different environments in a secure way
This tutorial assumes that you understand the basics of how web applications work and that you have some experience using Git. To get up to speed on these topics, check out Python Web Applications with Flask (Tutorial Series) and Introduction to Git and GitHub for Python Developers.
As you’ll learn through this tutorial, by combining Flask and Heroku, you can minimize the effort required to create and run web applications. You can click the link below to get the full source code for this tutorial’s application:
Sample Code: Click here to download the source code you’ll use to build a Python Flask example application in this turorial.
Creating the Python Flask Example Application
In this section, you’ll learn how to create a Python Flask example application and run it locally. You’re going to initialize the project, install Flask, create the application, and run it on your computer. You’ll also learn how to use Git to version your application’s code.
Initializing the Project
The project initialization consists of creating a directory for your application, setting up a Python virtual environment where dependencies will be installed, and initializing the Git repository. You don’t have to use a virtual environment or Git for local development, but they are very convenient and will make development and deployment to Heroku simpler.
Start by creating a new directory for the Python Flask example app. You can do it by running these commands:
$ mkdir realpython-example-app
$ cd realpython-example-app
The above commands create a realpython-example-app/ folder and change the current working directory to it.
Next, you must create a Python virtual environment. Using a virtual environment allows you to manage your project’s dependencies without messing with system-level files shared by all applications. Run the following commands to create and activate a virtual environment for your application. Remember to change the directory to realpython-example-app/ if you haven’t already:
$ python3 -m venv venv
$ source venv/bin/activate
These commands create a virtual environment named venv and activate it, so packages will be loaded and installed from this environment instead of using the system-level packages.
Installing Dependencies
The first step is to install the Flask Python package. You can run the following command to install Flask using pip:
$ python3 -m pip install Flask==1.1.2
The above command installs Flask version 1.1.2. This is the version you’ll use throughout this tutorial. Next, you need to create a requirements.txt file listing the project’s dependencies. You can use the python3 -m pip freeze command for this task:
$ python3 -m pip freeze > requirements.txt
You’ll use requirements.txt when deploying the project to tell Heroku which packages must be installed to run your application code. To learn more about how to install Flask in a virtual environment and other pip options, check out the Flask installation documentation and What Is Pip? A Guide for New Pythonistas.
Now, the application directory should look like this:
realpython-example-app/
│
├── venv/
│
└── requirements.txt
In the following sections, you’ll add more files to implement the application logic, set up Git, and then deploy it to Heroku.
Writing the Application Code
In this section, you’ll create a small Flask application with a single route, index, that returns the text Hello World! when requested. To create a Flask application, you have to create a Flask object that represents your app and then associate views to routes. Flask takes care of dispatching incoming requests to the correct view based on the request URL and the routes you’ve defined.
You can click the link below to get the full source code for this tutorial’s application:
Sample Code: Click here to download the source code you’ll use to build a Python Flask example application in this turorial.
For small applications, like the one you’re working with in this tutorial, you can write all the code in a single file, organizing your project as follows:
realpython-example-app/
│
├── venv/
│
├── app.py
└── requirements.txt
app.py contains the application’s code, where you create the app and its views. The following code block shows the application’s full source code:
from flask import Flask

app = Flask(__name__)

@app.route("/")
def index():
    return "Hello World!"
After you import flask, the code creates the object app, which belongs to the Flask class. The view function index() is linked to the main route using the app.route() decorator. When the main route is requested, Flask will serve the request by calling index() and using its return value as the response.
Running the Python Flask Example Locally
There are different ways in which you can run the application that you created in the previous section. One of the most straightforward ways to launch a Flask app for local development is using the flask run command from a terminal:
$ flask run
By default, Flask will run the application you defined in app.py on port 5000. While the application is running, go to http://localhost:5000 using your web browser. You’ll see a web page containing the message Hello World!
During development, you normally want to reload your application automatically whenever you make a change to it. You can do this by passing an environment variable, FLASK_ENV=development, to flask run:
$ FLASK_ENV=development flask run
When you set FLASK_ENV=development, Flask will monitor changes to app files and reload the server when there’s a change. This way, you don’t need to manually stop and restart the app server after each modification.
Tracking Changes Using Git
In this tutorial, you’re going to track the changes to your project’s files using Git, a very popular version control system (VCS). So, as a first step, you should create a Git repository for your project. You can achieve this by executing the following command in your project’s directory:
$ git init
The above command initializes the repository that will be used to track the project’s files. The repository metadata is stored in a hidden directory named .git/.
Note that there are some folders that you shouldn’t include in the Git repository, like venv/ and __pycache__/. You can tell Git to ignore them by creating a file named .gitignore. Use the following commands to create this file:
$ echo venv > .gitignore
$ echo __pycache__ >> .gitignore
$ git add .gitignore app.py requirements.txt
$ git commit -m "Initialize Git repository"
After running the above commands, Git will track changes to your application’s files, but it will ignore the venv/ and __pycache__/ folders. Now the project directory, realpython-example-app/, should look like this:
realpython-example-app/
│
├── .git/
│
├── venv/
│
├── .gitignore
├── app.py
└── requirements.txt
You’re now ready to deploy your app using Heroku. Check out Introduction to Git and GitHub for Python Developers to learn more about Git and how you can host your repository in GitHub.
Deploying the Application to Heroku
Heroku makes building and deploying applications really friendly for developers. It removes much of the burden related to building and running web applications, taking care of most infrastructure details and letting you focus on creating and improving the app. Some of the details handled by Heroku include:
- Provisioning HTTPS certificates
- Managing DNS records
- Running and maintaining servers
Throughout the rest of this section, you’ll learn how to deploy the previously created web application to the internet using Heroku. By the end of this section, your app will be publicly available under a nice URL and served using HTTPS.
Heroku Account Setup
Your first step is to create a Heroku account. If you don’t have one already, you can use the Free and Hobby plan. It allows you to deploy noncommercial applications, personal projects, and experiments without spending money.
If you go to the Heroku sign-up page, you’ll see the following fields on the sign-up form:
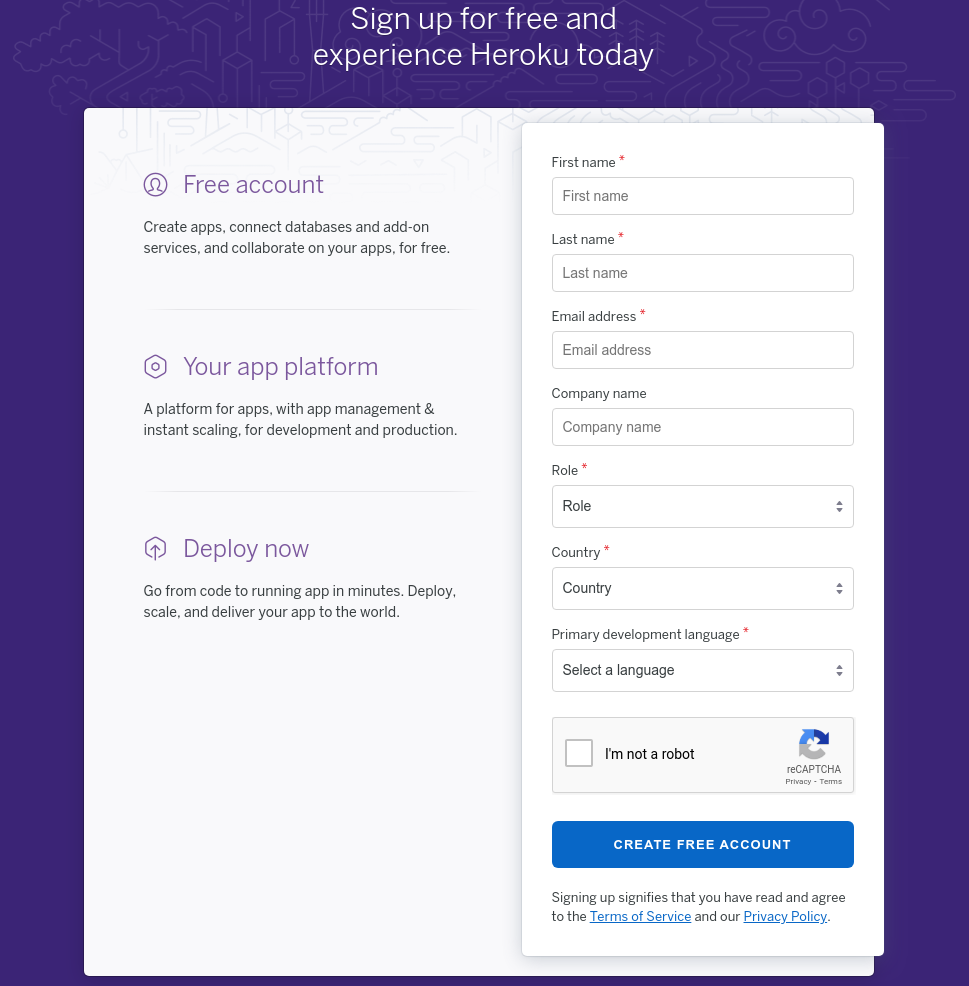
You’ll be able to start using Heroku after completing the required information and confirming your email address.
Heroku Command-Line Interface (CLI)
The Heroku command-line interface (CLI) is a tool that allows you to create and manage Heroku applications from the terminal. It’s the quickest and the most convenient way to deploy your application. You can check the developer’s documentation for installation instructions for your operating system. On most Linux distributions, you can install the Heroku CLI by running the following command:
$ curl https://cli-assets.heroku.com/install.sh | sh
The previous command downloads the Heroku CLI installer and executes it. Next, you have to log in by running the following command:
$ heroku login
This opens a website with a button to complete the login process. Click Log In to complete the authentication process and start using the Heroku CLI:

After logging in, you’re ready to start using the Heroku CLI to manage your applications and workflows.
Application Deployment to Heroku
In this section, you’ll learn how to use the Heroku CLI and Git to deploy your web application. The first step is to create a file named Procfile in the project’s root directory. This file tells Heroku how to run the app. You can create it by running the following command:
$ echo "web: gunicorn app:app" > Procfile
Note that this filename must start with a capital letter. This file tells Heroku to serve your application using Gunicorn, a Python Web Server Gateway Interface (WSGI) HTTP server compatible with various web frameworks, including Flask. Make sure to install Gunicorn and update the requirements.txt file using pip:
$ python3 -m pip install gunicorn==20.0.4
$ python3 -m pip freeze > requirements.txt
The previous commands install Gunicorn and update requirements.txt to contain the list of all dependencies. Since you added and changed files, you need to commit them to Git. You can do this by executing the following two commands:
$ git add Procfile requirements.txt
$ git commit -m "Add Heroku deployment files"
When you execute the above commands, you’ll commit the latest versions of Procfile and requirements.txt to the Git repository. Now you’re ready to deploy the application to Heroku. Start by creating a Heroku application using the Heroku CLI.
Note: This tutorial uses realpython-example-app as the application name. Since application names need to be unique on Heroku, you’ll need to choose a different name for your deployment.
You can create the application in Heroku by running the following command:
$ heroku create realpython-example-app
Running the above command initializes the Heroku application, creating a Git remote named heroku. Next, you can push the Git repository to this remote to trigger the building and deployment process:
$ git push heroku master
After pushing the master branch to the heroku remote, you’ll see that the output displays information about the building and deployment process:
 1Enumerating objects: 6, done.
 2Counting objects: 100% (6/6), done.
 3Delta compression using up to 8 threads
 4Compressing objects: 100% (4/4), done.
 5Writing objects: 100% (6/6), 558 bytes | 558.00 KiB/s, done.
 6Total 6 (delta 0), reused 0 (delta 0)
 7remote: Compressing source files... done.
 8remote: Building source:
 9remote:
10remote: -----> Building on the Heroku-18 stack
11remote: -----> Python app detected
12remote: -----> Installing python-3.6.12
13remote: -----> Installing pip 20.1.1, setuptools 47.1.1 and wheel 0.34.2
14remote: -----> Installing SQLite3
15remote: -----> Installing requirements with pip
16remote:        Collecting click==7.1.2
17remote:          Downloading click-7.1.2-py2.py3-none-any.whl (82 kB)
18remote:        Collecting Flask==1.1.2
19remote:          Downloading Flask-1.1.2-py2.py3-none-any.whl (94 kB)
20remote:        Collecting itsdangerous==1.1.0
21remote:          Downloading itsdangerous-1.1.0-py2.py3-none-any.whl (16 kB)
22remote:        Collecting Jinja2==2.11.2
23remote:          Downloading Jinja2-2.11.2-py2.py3-none-any.whl (125 kB)
24remote:        Collecting MarkupSafe==1.1.1
25remote:          Downloading MarkupSafe-1.1.1-cp36-cp36m-manylinux1_x86_64.whl
26remote:        Collecting Werkzeug==1.0.1
27remote:          Downloading Werkzeug-1.0.1-py2.py3-none-any.whl (298 kB)
28remote:        Installing collected packages: click, Werkzeug, itsdangerous,
29MarkupSafe, Jinja2, Flask
30remote:        Successfully installed Flask-1.1.2 Jinja2-2.11.2 MarkupSafe-1.1.1
31Werkzeug-1.0.1 click-7.1.2 itsdangerous-1.1.0
32remote: -----> Discovering process types
33remote:        Procfile declares types -> (none)
34remote:
35remote: -----> Compressing...
36remote:        Done: 45.1M
37remote: -----> Launching...
38remote:        Released v1
39remote:        https://realpython-example-app.herokuapp.com/ deployed to Heroku
40remote:
41remote: Verifying deploy... done.
42To https://git.heroku.com/realpython-example-app.git
43 * [new branch]      master -> master
Congratulations, the app is now online! The output shows the building process, including the installation of dependencies and the deployment. On line 39, you’ll find the URL for your application. In this case, it’s https://realpython-example-app.herokuapp.com/. You can also use the following Heroku CLI command to open your app’s URL:
$ heroku open
The above command will open your application using your default web browser.
Note: Line 12 of the output indicates that Python 3.6.12 will be used as your application’s runtime. This was the default version at the time of writing this tutorial. To learn how you can customize the Python version and other runtime settings, check out Heroku’s Python runtime documentation.
Now let’s make a small change to the app and see how you can redeploy it. Edit app.py and modify the string returned by index() as shown in the next code block:
 1from flask import Flask
 2
 3app = Flask(__name__)
 4
 5@app.route("/")
 6def index():
 7    return "Hello this is the new version!"
As you see on line 7, "Hello World!" was replaced by "Hello this is the new version!" You can deploy this version to Heroku by committing and pushing the changes to the heroku remote:
$ git add app.py
$ git commit -m "Change the welcome message"
$ git push heroku master
With these commands, you commit the changes to the local Git repository and push them to the heroku remote. This triggers the building and deployment process again. You can repeat these steps whenever you need to deploy a new version of your application. You’ll notice that subsequent deployments usually take less time because the requirements are already installed.
In this section, you learned how to create and deploy your application on Heroku using Git and the Heroku CLI. For more details about using the Heroku CLI to deploy Python applications, check out Getting Started on Heroku with Python.
Using Heroku Pipelines to Implement a Deployment Workflow
In this section, you’ll learn how to implement a workflow for your application deployment using Heroku pipelines. This particular workflow uses three separate environments called local, staging, and production. This kind of setup is widely used in professional projects since it allows testing and reviewing new versions before deploying them to production and putting them in front of real users.
Understanding the Deployment Workflow
As you saw above, when you use this workflow, you’ll run the application in three separate environments:
- Development is the local environment.
- Staging is the preproduction environment used for previews and testing.
- Production is the live site accessed by final users.
In previous sections, you saw how to run the application on your local environment and in the production environment on Heroku. Adding a staging environment can greatly benefit the development process. The main purpose of this environment is to integrate changes from all new branches and to run the integration tests against the build, which will become the next release.
Next, you’ll see how to create the staging environment in Heroku and how to create a pipeline to promote versions from staging to production. The following diagram shows this workflow:
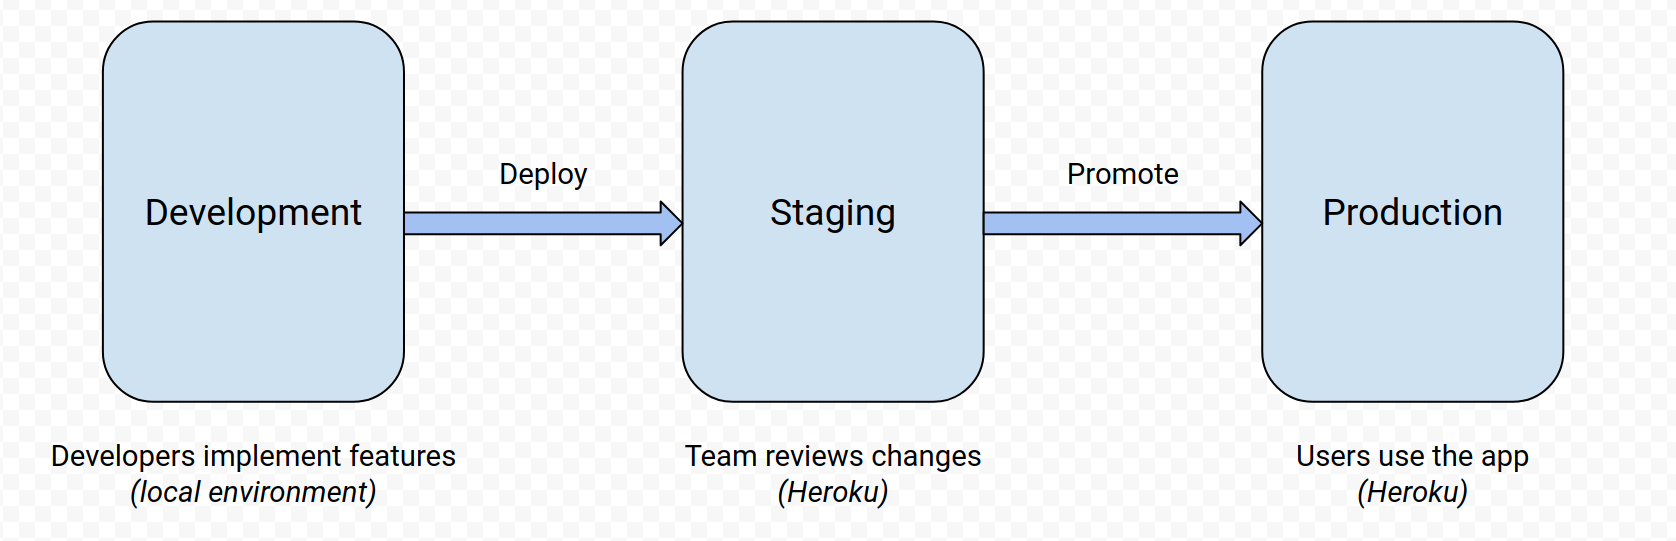
The above image shows the three environments, the activities that happen in each of them, and the deployment and promotion steps.
Implementing the Deployment Workflow in Heroku
Implementing the workflow in Heroku consists of two steps:
- Creating separate applications for staging and production
- Making both applications part of the same pipeline
A Heroku pipeline is a group of applications tied together by a workflow. Each one of these applications is an environment in the development workflow, like staging or production. Using pipelines guarantees that, after promotion, production will run the exact same code that you reviewed in staging.
In this tutorial, the previously created Heroku application realpython-example-app is used as the production environment. You should create a new Heroku app for the staging environment using these commands:
$ heroku create realpython-example-app-staging --remote staging
$ git push staging master
Running these commands creates a new Heroku app named realpython-example-app-staging and deploys the application to it using Git. You can then access the staging app at https://realpython-example-app-staging.herokuapp.com/. Note that a Git remote named staging is associated with this application.
Now that you have Heroku applications for production and staging, you’re ready to create a Heroku pipeline that links them together. You can use the Heroku CLI to create the pipeline:
$ heroku pipelines:create --app realpython-example-app \
    --stage production \
    realpython-example-app
Creating realpython-example-app pipeline... done
Adding ⬢ realpython-example-app to realpython-example-app pipeline as production
... done
The command above creates a pipeline named realpython-example-app and adds the app named realpython-example-app as the production environment. Next, run the following command to create a Git remote that points to this app, naming it prod:
$ heroku git:remote --app realpython-example-app --remote prod
From now on, you can refer to the production deployment as prod.
Next, add the staging application to the same pipeline by running the following command:
$ heroku pipelines:add realpython-example-app \
  --app realpython-example-app-staging \
  --stage staging
Adding ⬢ realpython-example-app-staging to realpython-example-app pipeline as
staging... done
This command adds the app realpython-example-app-staging to the same pipeline and specifies that this app must be used for the staging stage. This means that your pipeline now consists of two apps:
realpython-example-apprealpython-example-app-staging
The first one is used as the production environment, and the second one is used as the staging environment.
Deploying and Promoting to Staging and Production
Now that you have your applications and pipeline configured, you can use it to deploy your application to staging, review it there, and then promote it to production.
Suppose for example that you want to change the message returned by the index() view again. In that case, you have to edit app.py and change the string returned by index(). The following code block shows the new version:
 1from flask import Flask
 2
 3app = Flask(__name__)
 4
 5@app.route("/")
 6def index():
 7    return "This is yet another version!"
As you see on line 7, index() returns "This is yet another version!" You can deploy this new version to your staging environment by running the following commands:
$ git add app.py
$ git commit -m "Another change to the welcome message"
$ git push staging master
These commands commit app.py and push the changes to the staging remote, triggering the building and deployment process for this environment. You should see the new version deployed at https://realpython-example-app-staging.herokuapp.com/. Note that the production environment is still using the previous version.
When you’re happy with the changes, you can promote the new version to production using the Heroku CLI:
$ heroku pipelines:promote --remote staging
The above command deploys to production the exact same version that is currently running in staging. As you’ll notice, in this case, there’s no build step since the same build from staging is used and deployed to production. You can verify at https://realpython-example-app.herokuapp.com/ that the application was promoted and that it’s running the latest version.
In this section, you learned about the deployment workflow and implemented it in Heroku. To learn more about working with pipelines and more advanced workflows, check out the Heroku pipelines documentation.
Managing Settings and Secrets for Different Environments
Most applications require different settings for each environment to do things like enabling debugging features or pointing to other databases. Some of these settings, like authentication credentials, database passwords, and API keys, are very sensitive, so you must avoid hard-coding them into the application files.
You can create a config.py file to hold the non-sensitive configuration values and read the sensitive ones from environment variables. In the following code block, you can see the source code for config.py:
 1import os
 2
 3class Config:
 4    DEBUG = False
 5    DEVELOPMENT = False
 6    SECRET_KEY = os.getenv("SECRET_KEY", "this-is-the-default-key")
 7
 8class ProductionConfig(Config):
 9    pass
10
11class StagingConfig(Config):
12    DEBUG = True
13
14class DevelopmentConfig(Config):
15    DEBUG = True
16    DEVELOPMENT = True
This code declares a Config class used as the base for each environment’s configuration. Note that on line 6, SECRET_KEY is read from an environment variable using os.getenv(). This avoids disclosing the actual key in the source code. At the same time, you can customize any option for each environment.
Next, you have to modify app.py to use a different configuration class depending on the environment. This is the full source code of app.py:
 1import os
 2from flask import Flask
 3
 4app = Flask(__name__)
 5env_config = os.getenv("APP_SETTINGS", "config.DevelopmentConfig")
 6app.config.from_object(env_config)
 7
 8@app.route("/")
 9def index():
10    secret_key = app.config.get("SECRET_KEY")
11    return f"The configured secret key is {secret_key}."
On lines 5 and 6, the configuration is loaded from one of the previously defined classes in config.py. The specific configuration class will depend on the value stored in the APP_SETTINGS environment variable. If the variable is undefined, the configuration will fall back to DevelopmentConfig by default.
Note: For this example, the message on line 11 was modified to show the SECRET_KEY obtained by app.config.get(). You don’t typically display sensitive information as part of your responses. This is just an example to show how you can read these values.
Now you can see how this works locally by passing some environment variables when launching the app:
$ SECRET_KEY=key-read-from-env-var flask run
The above command sets the SECRET_KEY environment variable and starts the application. If you navigate to http://localhost:5000, then you should see the message The configured secret key is key-read-from-env-var.
Next, commit the changes and push them to the staging environment by running the following commands:
$ git add app.py config.py
$ git commit -m "Add config support"
$ git push staging master
These commands commit changes in app.py and the new config.py file to the local Git repository and then push them to the staging environment, which triggers a new building and deployment process. Before proceeding, you can customize the environment variables for this environment using the Heroku CLI:
$ heroku config:set --remote staging \
  SECRET_KEY=the-staging-key \
  APP_SETTINGS=config.StagingConfig
Using the config:set command, you’ve set the value of SECRET_KEY and APP_SETTINGS for staging. You can verify that the changes were deployed by going to https://realpython-example-app-staging.herokuapp.com/ and checking that the page shows the message The configured secret key is the-staging-key.
Using Heroku CLI, you can also get the values of the environment variables for any app. The following command gets all the environment variables set for the staging environment from Heroku:
$ heroku config --remote staging
=== realpython-example-app-staging Config Vars
APP_SETTINGS: config.StagingConfig
SECRET_KEY:   the-staging-key
As you can see, these values match the previously set ones.
Finally, you can promote the new version to production with different configuration values using the Heroku CLI:
$ heroku config:set --remote prod \
  SECRET_KEY=the-production-key \
  APP_SETTINGS=config.ProductionConfig
$ heroku pipelines:promote --remote staging
The first command sets the values of SECRET_KEY and APP_SETTINGS for the production environment. The second command promotes the new app version, the one that has the config.py file. Again, you can verify that the changes were deployed by going to https://realpython-example-app.herokuapp.com/ and checking that the page shows The configured secret key is the-production-key.
In this section, you learned how to use a different configuration for each environment and how to handle sensitive settings using environment variables. Remember that in real-world applications, you shouldn’t expose sensitive information like SECRET_KEY.
Conclusion
Congratulations, you now know how to create a web application using Flask and how to make it publicly available by deploying it with Heroku. You also know how to set up different environments where you, your team, and your customers can review the app before publishing it. While the example application created in this tutorial is very small, you can use it as the starting point for your next project!
In this tutorial, you learned how to:
- Create a Python Flask example web application
- Deploy the web application using Heroku
- Implement a deployment workflow using Heroku pipelines
- Manage configuration and secrets for different environments in a secure way
Heroku offers many features that weren’t covered in the previous sections, including scaling, databases, and more. Check out the Heroku Dev Center and the Heroku platform documentation to learn about other features that will help you accelerate your development. Finally, check out the tutorial series Flask by Example to see how you can create and deploy a more complex application.
You can click the link below to get the full source code for this tutorial’s application:
Sample Code: Click here to download the source code you’ll use to build a Python Flask example application in this turorial.