Most modern web applications are powered by a REST API under the hood. That way, developers can separate the front-end code from the back-end logic, and users can interact with the interface dynamically. In this three-part tutorial series, you’re building a REST API with the Flask web framework.
You’ve created a foundation with a basic Flask project and added endpoints, which you’ll connect to a SQLite database. You’re also testing your API with Swagger UI API documentation that you’re building along the way.
In the first part, you used Flask and Connexion to create a REST API providing CRUD operations to an in-memory structure called PEOPLE. By doing so, you learned how the Connexion module helps you build a nice REST API and interactive documentation.
In the second part of this tutorial series, you’ll learn how to:
- Write SQL commands in Python
- Configure a SQLite database for your Flask project
- Use SQLAlchemy to save Python objects to your database
- Leverage the Marshmallow library to serialize data
- Connect your REST API with your database
After finishing the second part of this series, you’ll move on to the third part, where you’ll extend your REST API with the functionality to add notes to a person.
You can download the code for the second part of this project by clicking the link below:
Source Code: Click here to download the free source code that you’ll use to continue building a REST API with the Flask web framework.
Demo
In this three-part tutorial series, you’re building a REST API to keep track of notes for people that may visit you throughout the year. You’ll create people like the Tooth Fairy, the Easter Bunny, and Knecht Ruprecht.
Ideally, you want to be on good terms with all three of them. That’s why you’ll send them notes, to increase the chance of getting valuable gifts from them.
You can interact with your application by leveraging the API documentation. Along the way, you’re also building a basic front end that reflects the contents of your database:
In the second part of this series, you’ll enhance the back end of your application by adding a proper database. That way, you’ll persist your data even when you restart your app:
With your Swagger UI documentation, you’ll be able to interact with your REST API and make sure that everything works as intended.
Planning Part Two
In the first part of this tutorial series, you worked with a PEOPLE dictionary to store your data. The dataset looked like this:
PEOPLE = {
    "Fairy": {
        "fname": "Tooth",
        "lname": "Fairy",
        "timestamp": "2022-10-08 09:15:10",
    },
    "Ruprecht": {
        "fname": "Knecht",
        "lname": "Ruprecht",
        "timestamp": "2022-10-08 09:15:13",
    },
    "Bunny": {
        "fname": "Easter",
        "lname": "Bunny",
        "timestamp": "2022-10-08 09:15:27",
    }
}
This data structure was handy to get your project up to speed. However, any data that you added with your REST API to PEOPLE got lost when you restarted your app.
In this part, you’ll be translating your PEOPLE data structure into a database table that’ll look like this:
| id | lname | fname | timestamp |
|---|---|---|---|
| 1 | Fairy | Tooth | 2022-10-08 09:15:10 |
| 2 | Ruprecht | Knecht | 2022-10-08 09:15:13 |
| 3 | Bunny | Easter | 2022-10-08 09:15:27 |
You won’t make any changes to your REST API endpoints in this tutorial. But the changes that you’ll make in the back end will be significant, and you’ll end up with a much more versatile codebase to help scale your Flask project up in the future.
Getting Started
In this section, you’ll check in with the Flask REST API project that you’re working on. You want to make sure that it’s ready for the next steps in this tutorial series.
To convert complex data types to and from Python data types, you’ll need a serializer. For this tutorial, you’ll use Flask-Marshmallow. Flask-Marshmallow extends the Marshmallow library and provides additional features when you work with Flask.
Grab the Prerequisites
Ideally, you followed the first part of this tutorial series before continuing with the second part, which you’re reading right now. Alternatively, you can also download the source code from part one by clicking the link below:
Source Code: Click here to download the free source code that you’ll use to build a REST API with the Flask web framework.
If you downloaded the source code from the link above, then make sure to follow the installation instructions within the provided README.md file.
Before you continue with the tutorial, verify that your folder structure looks like this:
rp_flask_api/
│
├── templates/
│   └── home.html
│
├── app.py
├── people.py
└── swagger.yml
Once you’ve got the Flask REST API folder structure in place, you can read on to install the dependencies that you’ll need in this part of the tutorial series.
Add New Dependencies
Before you continue working on your Flask project, it’s a good idea to create and activate a virtual environment. That way, you’re installing any project dependencies not system-wide but only in your project’s virtual environment.
Select your operating system below and use your platform-specific command to set up a virtual environment:
With the commands shown above, you create and activate a virtual environment named venv by using Python’s built-in venv module. The parenthesized (venv) in front of the prompt indicates that you’ve successfully activated the virtual environment.
Note: If you haven’t worked through part one of this tutorial series, then make sure to download the source code by clicking the link below:
Source Code: Click here to download the free source code that you’ll use to build a REST API with the Flask web framework.
Before continuing, install the dependencies by following the instructions listed in the provided README.md file.
Next, install flask-marshmallow with the sqlalchemy option:
(venv) $ python -m pip install "flask-marshmallow[sqlalchemy]==0.14.0"
Flask-Marshmallow also installs marshmallow, which provides functionality to serialize and deserialize Python objects as they flow in and out of your REST API, which is based on JSON. Marshmallow converts Python class instances to objects that can be converted to JSON.
By using the sqlalchemy option, you also install packages that help your Flask app leverage the powers of SQLAlchemy.
SQLAlchemy provides an object-relational model (ORM), which stores each Python object to a database representation of the object’s data. That can help you continue to think in a Pythonic way and not be concerned with how the object data will be represented in a database.
Check Your Flask Project
After following the steps above, you can verify that your Flask application is running without errors. Execute the following command in the directory containing the app.py file:
(venv) $ python app.py
When you run this application, a web server will start on port 8000, which is the default port used by Flask. If you open a browser and navigate to http://localhost:8000, you should see Hello, World! displayed:
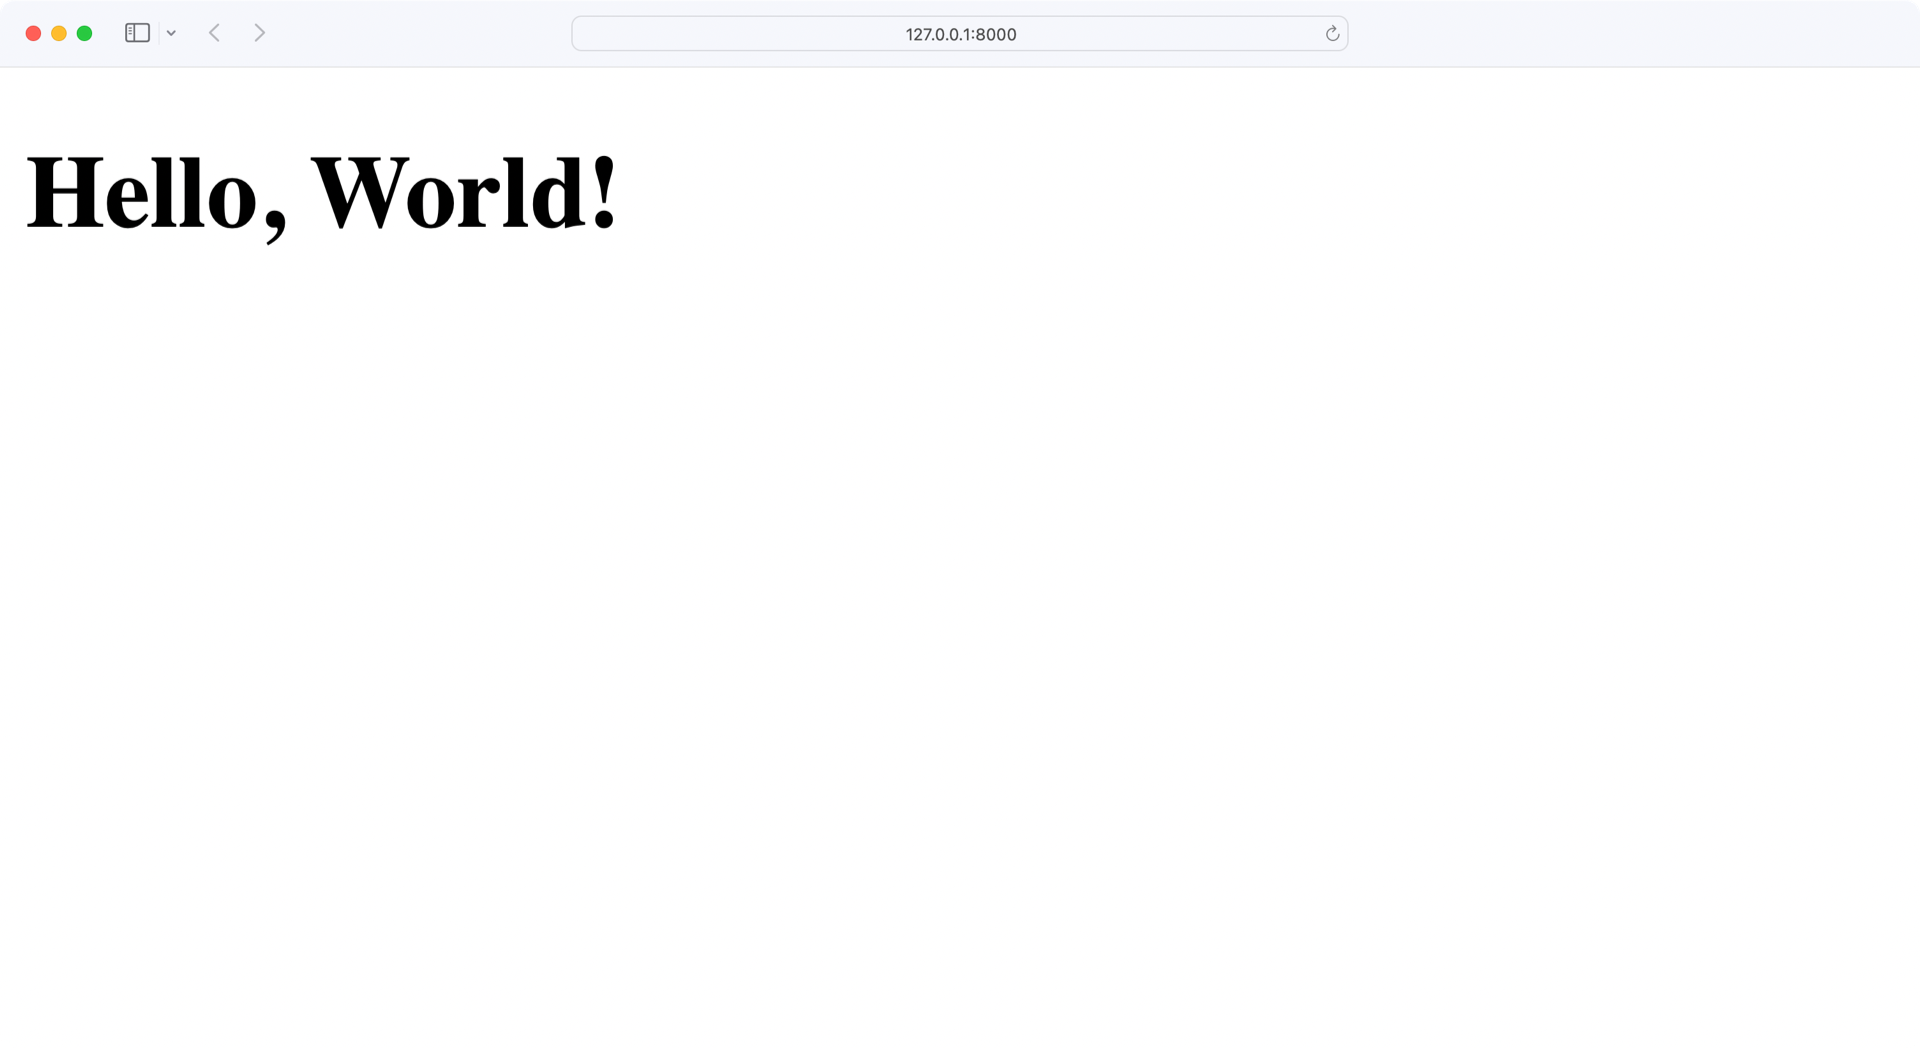
Perfect, your app is running flawlessly! Now it’s time to go into the back end and work with a proper database.
Initializing the Database
Currently, you’re storing the data of your Flask project in a dictionary. Storing data like this isn’t persistent. That means that any data changes get lost when you restart your Flask application. On top of that, the structure of your dictionary isn’t ideal.
In this section, you’ll add a proper database to your Flask project to fix these shortcomings.
Inspect Your Current Data Structure
Currently, you’re storing your data in the PEOPLE dictionary in people.py. The data structure looks like this in the code:
# people.py

# ...

PEOPLE = {
    "Fairy": {
        "fname": "Tooth",
        "lname": "Fairy",
        "timestamp": get_timestamp(),
    },
    "Ruprecht": {
        "fname": "Knecht",
        "lname": "Ruprecht",
        "timestamp": get_timestamp(),
    },
    "Bunny": {
        "fname": "Easter",
        "lname": "Bunny",
        "timestamp": get_timestamp(),
    }
}

# ...
The modifications that you’ll make to the program will move all the data to a database table. This means that the data will be saved to your disk and will exist between runs of the app.py program.
Conceptualize Your Database Table
Conceptually, you can think of a database table as a two-dimensional array where the rows are records, and the columns are fields in those records.
Database tables usually have an auto-incrementing integer value as the lookup key to rows. This is called the primary key. Each record in the table will have a primary key whose value is unique across the entire table. Having a primary key independent of the data stored in the table gives you the freedom to modify any other field in the row.
You’re going to follow a database convention of naming the table as singular, so the table will be called person.
Translating your PEOPLE structure above into a database table named person will look like this:
| id | lname | fname | timestamp |
|---|---|---|---|
| 1 | Fairy | Tooth | 2022-10-08 09:15:10 |
| 2 | Ruprecht | Knecht | 2022-10-08 09:15:13 |
| 3 | Bunny | Easter | 2022-10-08 09:15:27 |
Each column in the table has a field name as follows:
id: Primary key field for each personlname: Last name of the personfname: First name of the persontimestamp: Timestamp of the last change
With this database concept in place, it’s time to build the database.
Build Your Database
You’re going to use SQLite as the database engine to store the PEOPLE data. SQLite is a widely used relational database management system (RDBMS) that doesn’t need a SQL server to work.
In contrast to other SQL database engines, SQLite works with a single file to maintain all the database functionality. Therefore, to use the database, a program just needs to know how to read and write to a SQLite file.
Python’s built-in sqlite3 module allows you to interact with SQLite databases without any external packages. This makes SQLite particularly useful when starting new Python projects.
Start a new Python interactive shell to create the people.db SQLite database:
>>> import sqlite3
>>> conn = sqlite3.connect("people.db")
>>> columns = [
...     "id INTEGER PRIMARY KEY",
...     "lname VARCHAR UNIQUE",
...     "fname VARCHAR",
...     "timestamp DATETIME",
... ]
>>> create_table_cmd = f"CREATE TABLE person ({','.join(columns)})"
>>> conn.execute(create_table_cmd)
<sqlite3.Cursor object at 0x1063f4dc0>
After you import the sqlite3 module, you can create a new database with .connect(). If you have a look at your file system after defining the conn variable, then you’ll notice that Python created the people.db database file right away.
With conn.execute() you’re running the SQL command to create a person table with the columns id, lname, fname, and timestamp.
Note that you include a UNIQUE constraint for lname. That’s important because you use the last name in your REST API to identify a person. Therefore, your database must ensure the uniqueness of lname to prevent inconsistencies in your data.
Now that your database exists, you can add data to it:
>>> import sqlite3
>>> conn = sqlite3.connect("people.db")
>>> people = [
...     "1, 'Fairy', 'Tooth', '2022-10-08 09:15:10'",
...     "2, 'Ruprecht', 'Knecht', '2022-10-08 09:15:13'",
...     "3, 'Bunny', 'Easter', '2022-10-08 09:15:27'",
... ]
>>> for person_data in people:
...     insert_cmd = f"INSERT INTO person VALUES ({person_data})"
...     conn.execute(insert_cmd)
...
<sqlite3.Cursor object at 0x104ac4dc0>
<sqlite3.Cursor object at 0x104ac4f40>
<sqlite3.Cursor object at 0x104ac4fc0>

>>> conn.commit()
Once you’re connected to the people.db database, you declare a transaction to insert people_data into the person table. The conn.execute() command creates sqlite3.Cursor objects in memory. Only when you run conn.commit() do you make the transaction happen.
Interact With the Database
Unlike programming languages like Python, SQL doesn’t define how to get the data. SQL describes what data is desired and leaves the how up to the database engine.
A SQL query that gets all of the data in your person table would look this this:
SELECT * FROM person;
This query tells the database engine to get all the fields from the person table. In the following Python code, you use SQLite to run the above query and display the data:
 1>>> import sqlite3
 2>>> conn = sqlite3.connect("people.db")
 3>>> cur = conn.cursor()
 4>>> cur.execute("SELECT * FROM person")
 5<sqlite3.Cursor object at 0x102357a40>
 6
 7>>> people = cur.fetchall()
 8>>> for person in people:
 9...     print(person)
10...
11(1, 'Fairy', 'Tooth', '2022-10-08 09:15:10')
12(2, 'Ruprecht', 'Knecht', '2022-10-08 09:15:13')
13(3, 'Bunny', 'Easter', '2022-10-08 09:15:27')
The code above does the following:
- Line 1 imports the
sqlite3module. - Line 2 creates a connection to the database file.
- Line 3 creates a cursor from the connection.
- Line 4 uses the cursor to execute a
SQLquery expressed as a string. - Line 7 gets all the records returned by the
SQLquery and assigns them to thepeoplevariable. - Lines 8 and 9 iterate over
peopleand print out the data of each person.
In the above program, the SQL statement is a string passed directly to the database to execute. In this case, that may not be a big problem because the SQL is a string literal completely under the control of the program. However, the use case for your REST API will be taking user input from the web application and using it to create SQL queries. This can open your application to attack.
Expand the section below to learn how:
You’ll recall from part one of this tutorial series that the REST API endpoint to get a single person from the PEOPLE data looked like this:
GET /api/people/{lname}
This means your API is expecting a variable, lname, in the URL endpoint path that it uses to find a single person. Modifying the Python SQLite code from above to do this would look something like this:
 1lname = "Fairy"
 2cur.execute(f"SELECT * FROM person WHERE lname = '{lname}'")
The above code snippet does the following:
- Line 1 sets the
lnamevariable to'Fairy'. This would come from the REST API URL endpoint path. - Line 2 uses Python string formatting to create a SQL string and execute it.
To keep things simple, the above code sets the lname variable to a constant, but really it would come from the API URL endpoint path and could be anything supplied by the user. The SQL generated by the string formatting looks like this:
SELECT * FROM person WHERE lname = 'Fairy'
When this SQL is executed by the database, it searches the person table for a record where the last name is equal to 'Fairy'. This is what’s intended, but any program that accepts user input is also open to malicious users. The program above, where the lname variable is set by user-supplied input, opens you up to what’s called a SQL injection attack. You might see such an attack referred to as Little Bobby Tables:

For example, imagine that a malicious user called your REST API in this way:
GET /api/people/Fairy';DROP TABLE person;
The REST API request above sets the lname variable to 'Fairy';DROP TABLE person;', which in the code above would generate this SQL statement:
SELECT * FROM person WHERE lname = 'Fairy';DROP TABLE person;
The above SQL statement is valid, and when executed by the database, it’ll find one record where lname matches 'Fairy'. Then, it’ll find the SQL statement delimiter character ; and will go right ahead and drop the entire table. This would essentially wreck your application.
You can protect your program by sanitizing all data that you get from the users of your application. Sanitizing data in this context means having your program examine the user-supplied data to make sure that it doesn’t contain anything dangerous to the program. This can be tricky to do right and would have to be done everywhere user data interacts with the database.
It would be much better if what you got back for person was a Python object, where each of the fields is an attribute of the object. That way, you make sure that the objects contain the expected value types and not any malicious commands.
When you interact with a database in your Python code, you may think twice about whether you want to write pure SQL commands. As you learned above, writing SQL may not only feel inconvenient, but it can cause security issues. If you don’t want to worry too much about database interaction, a package like SQLAlchemy can help you out.
Connecting the SQLite Database With Your Flask Project
In this section, you’ll leverage SQLAlchemy for help in communicating with your database and connecting people.db to your Flask app.
SQLAlchemy handles many of the interactions specific to particular databases and lets you focus on the data models as well as how to use them. SQLAlchemy will sanitize user data for you before creating SQL statements. It’s another big advantage and a reason to use SQLAlchemy when working with databases.
In this section, you’ll also create two Python modules, config.py amd models.py:
config.pygets the necessary modules imported into the program and configured. This includes Flask, Connexion, SQLAlchemy, and Marshmallow.models.pyis the module where you’ll create SQLAlchemy and Marshmallow class definitions.
At the end of this section, you’ll be able to remove the former PEOPLE data structure and work with the connected database.
Configure Your Database
The config.py module is, as the name implies, where all of your configuration information is created and initialized. In this file, you’re going to configure Flask, Connexion, SQLAlchemy, and Marshmallow.
Create config.py in your rp_flask_api/ project folder:
 1# config.py
 2
 3import pathlib
 4import connexion
 5from flask_sqlalchemy import SQLAlchemy
 6from flask_marshmallow import Marshmallow
 7
 8basedir = pathlib.Path(__file__).parent.resolve()
 9connex_app = connexion.App(__name__, specification_dir=basedir)
10
11app = connex_app.app
12app.config["SQLALCHEMY_DATABASE_URI"] = f"sqlite:///{basedir / 'people.db'}"
13app.config["SQLALCHEMY_TRACK_MODIFICATIONS"] = False
14
15db = SQLAlchemy(app)
16ma = Marshmallow(app)
Here’s what the above code is doing:
-
Lines 3 to 6 import the built-in
pathlibas well as the third-party librariesconnexion,SQLAlchemy, andMarshmallow. -
Line 8 creates the variable
basedirpointing to the directory that the program is running in. -
Line 9 uses the
basedirvariable to create the Connexion app instance and give it the path to the directory that contains your specification file. -
Line 11 creates a variable,
app, which is the Flask instance initialized by Connexion. -
Line 12 tell SQLAlchemy to use SQLite as the database and a file named
people.dbin the current directory as the database file. -
Line 13 turns the SQLAlchemy event system off. The event system generates events that are useful in event-driven programs, but it adds significant overhead. Since you’re not creating an event-driven program, you turn this feature off.
-
Line 15 initializes SQLAlchemy by passing the
appconfiguration information toSQLAlchemyand assigning the result to adbvariable. -
Line 16 initializes Marshmallow and allows it to work with the SQLAlchemy components attached to the app.
If you want to learn more about the SQLAlchemy configurations that you can implement here, then you can check out the configuration keys documentation of Flask-SQLALchemy.
Model Data With SQLAlchemy
SQLAlchemy is a big project and provides a lot of functionality to work with databases using Python. One of the features that it provides is an object-relational mapper (ORM). This ORM enables you to interact with the person database table in a more Pythonic way by mapping a row of fields from the database table to a Python object.
Create a models.py file with a SQLAlchemy class definition for the data in the person database table:
 1# models.py
 2
 3from datetime import datetime
 4from config import db
 5
 6class Person(db.Model):
 7    __tablename__ = "person"
 8    id = db.Column(db.Integer, primary_key=True)
 9    lname = db.Column(db.String(32), unique=True)
10    fname = db.Column(db.String(32))
11    timestamp = db.Column(
12        db.DateTime, default=datetime.utcnow, onupdate=datetime.utcnow
13    )
Here’s what the above code is doing:
- Line 3 imports the
datetimeobject from thedatetimemodule that comes with Python. This gives you a way to create a timestamp in thePersonclass in lines 11 to 13. - Line 4 imports
db, an instance ofSQLAlchemythat you defined in theconfig.pymodule. This givesmodels.pyaccess to SQLAlchemy attributes and methods. - Line 6 defines the
Personclass. Inheriting fromdb.ModelgivesPersonthe SQLAlchemy features to connect to the database and access its tables. - Line 7 connects the class definition to the
persondatabase table. - Line 8 declares the
idcolumn containing an integer acting as the primary key for the table. - Line 9 defines the last name field with a string value. This field must be unique because you’re using
lnameas the identifier for a person in a REST API URL. - Line 10 defines the first name field with a string value.
- Lines 11 to 13 define a
timestampfield with adatetimevalue.
The default=datetime.utcnow parameter defaults the timestamp value to the current utcnow value when a record is created. The onupdate=datetime.utcnow parameter updates the timestamp with the current utcnow value when the record is updated. To learn more about UTC timestamps, expand the collapsible section below:
You might be wondering why the timestamp in the above class defaults to and is updated by the datetime.utcnow() method, which returns a UTC, or Coordinated Universal Time. This is a way of standardizing your timestamp’s source.
The source, or zero time, is a line running from Earth’s north to south pole through the UK. This is the zero time zone from which all other time zones are offset. By using this as the zero time source, your timestamps are offsets from this standard reference point.
Should your application be accessed from different time zones, you have a way to perform date and time calculations. All you need is a UTC timestamp and the destination time zone.
If you were to use local time zones as your timestamp source, then you couldn’t perform date and time calculations without information about a local time zone’s offset from zero time. Without the timestamp source information, you couldn’t do any date and time comparisons or any math at all.
Working with a timestamp based on UTC is a good standard to follow. Here’s a tool kit site to work with in order to better understand such timestamps.
Using SQLAlchemy allows you to think in terms of objects with behavior rather than dealing with raw SQL. This becomes even more beneficial when your database tables become larger and the interactions more complex.
Serialize the Modeled Data With Marshmallow
Working with SQLAlchemy’s modeled data inside your programs is very convenient. However, the REST API works with JSON data, and here you can run into an issue with the SQLAlchemy model.
Because SQLAlchemy returns data as Python class instances, Connexion can’t serialize these class instances to JSON-formatted data.
Note: In this context, serializing means converting Python objects, which can contain other Python objects and complex data types, into simpler data structures that can be parsed into JSON data types, which are listed here:
string: A string typenumber: Numbers supported by Python (integers, floats, longs)object: A JSON object, which is roughly equivalent to a Python dictionaryarray: Roughly equivalent to a Python Listboolean: Represented in JSON astrueorfalse, but in Python asTrueorFalsenull: EssentiallyNonein Python
As an example, your Person class contains a timestamp, which is a Python DateTime class. There’s no DateTime definition in JSON, so the timestamp has to be converted to a string in order to exist in a JSON structure.
You’re using a database as persistent data storage. With SQLAlchemy, you can comfortably communicate with your database from within your Python program. However, there are two challenges that you need to solve:
- Your REST API works with JSON instead of Python objects.
- You must make sure that the data that you’re adding to the database is valid.
That’s where the Marshmallow module comes into play!
Marshmallow helps you to create a PersonSchema class, which is like the SQLAlchemy Person class you just created. The PersonSchema class defines how the attributes of a class will be converted into JSON-friendly formats. Marshmallow also makes sure that all attributes are present and contain the expected data type.
Here’s the Marshmallow class definition for the data in your person table:
# models.py

from datetime import datetime
from config import db, ma

class Person(db.Model):
    __tablename__ = "person"
    id = db.Column(db.Integer, primary_key=True)
    lname = db.Column(db.String(32), unique=True)
    fname = db.Column(db.String(32))
    timestamp = db.Column(
        db.DateTime, default=datetime.utcnow, onupdate=datetime.utcnow
    )

class PersonSchema(ma.SQLAlchemyAutoSchema):
    class Meta:
        model = Person
        load_instance = True
        sqla_session = db.session

person_schema = PersonSchema()
people_schema = PersonSchema(many=True)
You import ma from config.py to enable PersonSchema to inherit from ma.SQLAlchemyAutoSchema. To find a SQLAlchemy model and a SQLALchemy session, SQLAlchemyAutoSchema looks for and then uses this internal Meta class.
For PersonSchema, the model is Person, and sqla_session is db.session. This is how Marshmallow finds attributes in the Person class and learns the types of those attributes so it knows how to serialize and deserialize them.
With load_instance, you’re able to deserialize JSON data and load Person model instances from it. Finally, you instantiate two schemas, person_schema and people_schema, that you’ll use later.
Do Some Cleanup
Now it’s time to get rid of the old PEOPLE data structure. This will make sure that any changes you’re making to people data are performed on the database rather than the obsolete PEOPLE dictionary.
Open people.py and get rid of the imports, functions, and data structures that you don’t need anymore, and use new imports to add db and data from models.py:
# people.py

# Remove: from datetime import datetime
from flask import make_response, abort

from config import db
from models import Person, people_schema, person_schema

# Remove: get_timestamp():
# Remove: PEOPLE

# ...
You remove the datetime import, the get_timestamp() function, and the PEOPLE dictionary. In exchange, you add objects from config and models that you’ll use from now on.
The moment you removed the PEOPLE dictionary, your Python code editor may have complained about the undefined PEOPLE variable in your code. In the next section, you’ll replace all PEOPLE references with database queries and make your Python editor happy again.
Connecting the Database With Your API
Your database is connected to your Flask project but not to the REST API yet. Potentially, you could use the Python interactive shell to add more people to your database. But it’ll be much more fun to enhance your REST API and utilize existing endpoints to add data!
In this section, you’ll connect your API with the database, so you use your existing endpoints with the database to manage people. If you want to recap how you built the API endpoints, then you can hop over to part one of this tutorial series.
This is how your Flask REST API looks at the moment:
| Action | HTTP Verb | URL Path | Description |
|---|---|---|---|
| Read | GET |
/api/people |
Read a collection of people. |
| Create | POST |
/api/people |
Create a new person. |
| Read | GET |
/api/people/<lname> |
Read a particular person. |
| Update | PUT |
/api/people/<lname> |
Update an existing person. |
| Delete | DELETE |
/api/people/<lname> |
Delete an existing person. |
Next up, you’ll update the existing functions connected to the endpoints listed above so that they can work with the people.db database.
Read From the Database
First, adjust the functions in people.py that read data from the database without writing anything to the database. Start with read_all():
# people.py

# ...

def read_all():
    people = Person.query.all()
    return people_schema.dump(people)

# ...
The read_all() function responds to the REST API URL endpoint GET /api/people and returns all the records in the person database table.
You’re using people_schema which is an instance of the Marshmallow PersonSchema class that was created with the parameter many=True. With this parameter you tell PersonSchema to expect an iterable to serialize. This is important because the people variable contains a list of database items.
Finally, you serialize your Python objects with .dump() and return the data of all the people as a response to the REST API call.
The other function in people.py that only receives data is read_one():
# people.py

# ...

def read_one(lname):
    person = Person.query.filter(Person.lname == lname).one_or_none()

    if person is not None:
        return person_schema.dump(person)
    else:
        abort(404, f"Person with last name {lname} not found")

# ...
The read_one() function receives an lname parameter from the REST URL path, indicating that the user is looking for a specific person.
You use lname in the query’s .filter() method. Rather than using .all(), you use the .one_or_none() method to get one person, or return None if no match is found.
If a person is found, then person contains a Person object and you return the serialized object. Otherwise, you call abort() with an error.
Write to the Database
Another modification to people.py is creating a new person in the database. This gives you an opportunity to use the Marshmallow PersonSchema to deserialize a JSON structure sent with the HTTP request to create a SQLAlchemy Person object. Here’s part of the updated people.py module showing the handler for the REST URL endpoint POST /api/people:
# people.py

# ...

def create(person):
    lname = person.get("lname")
    existing_person = Person.query.filter(Person.lname == lname).one_or_none()

    if existing_person is None:
        new_person = person_schema.load(person, session=db.session)
        db.session.add(new_person)
        db.session.commit()
        return person_schema.dump(new_person), 201
    else:
        abort(406, f"Person with last name {lname} already exists")

# ...
Instead of receiving only a last name like in read_one(), create() receives a person object. This object must contain lname, which must not exist in the database already. The lname value is your identifier for your person, so you can’t have a person with the same last name multiple times in your database.
If the last name is unique, then you deserialize the person object as new_person and add it to db.session. Once you commit new_person to the database, your database engine assigns a new primary key value and a UTC-based timestamp to the object. Later, you’ll see the created dataset in the API response.
Adjust update() and delete() similarly to how you adjusted the other functions:
# people.py

# ...

def update(lname, person):
    existing_person = Person.query.filter(Person.lname == lname).one_or_none()

    if existing_person:
        update_person = person_schema.load(person, session=db.session)
        existing_person.fname = update_person.fname
        db.session.merge(existing_person)
        db.session.commit()
        return person_schema.dump(existing_person), 201
    else:
        abort(404, f"Person with last name {lname} not found")

def delete(lname):
    existing_person = Person.query.filter(Person.lname == lname).one_or_none()

    if existing_person:
        db.session.delete(existing_person)
        db.session.commit()
        return make_response(f"{lname} successfully deleted", 200)
    else:
        abort(404, f"Person with last name {lname} not found")
With all these changes in place, it’s time to update your front-end code and leverage Swagger UI to try out if your database works as expected.
Display Data in Your Front End
Now that you’ve added the SQLite configuration and defined your Person model, your Flask project contains all the information to work with your database. Before you can display data in the front end, you need to make some adjustments to app.py:
 1# app.py
 2
 3from flask import render_template
 4# Remove: import connexion
 5import config
 6from models import Person
 7
 8app = config.connex_app
 9app.add_api(config.basedir / "swagger.yml")
10
11@app.route("/")
12def home():
13    people = Person.query.all()
14    return render_template("home.html", people=people)
15
16if __name__ == "__main__":
17    app.run(host="0.0.0.0", port=8000, debug=True)
You’re now working with config.py and models.py. So you remove the import in line 4 and add the imports for config in line 5 and Person in line 6.
The config module provides the Connexion-flavored Flask app for you. Therefore, you don’t create a new Flask app in app.py anymore, but reference config.connex_app in line 8.
In line 13 you query the Person model to get all the data from the person table and pass it on to render_template() in line 14.
To show the people data in the front end, you need to adjust the home.html template:
<!-- templates/home.html -->

<!DOCTYPE html>
<html lang="en">
<head>
    <meta charset="UTF-8">
    <title>RP Flask REST API</title>
</head>
<body>
    <h1>
        Hello, People!
    </h1>
    <ul>
        {% for person in people %}
        <li>{{ person.fname }} {{ person.lname }}</li>
        {% endfor %}
    </ul>
</body>
</html>
You can run your application with this command in the directory containing the app.py file:
(venv) $ python app.py
When you run this application, a web server will start on port 8000, which is the port that you defined in app.py. If you open a browser and navigate to http://localhost:8000, you’ll see the data from your database:

Awesome! Your home page lists all three people who are currently in your database. Finally, you can use Swagger UI to create, update, and delete people and see the changes reflected on the home page.
Explore Your API Documentation
With the above changes in place, your database is now functional and persists the data even when you restart your application:
You can leverage your API to add, update, and remove people. With the changes that you made to the front end, you’re able to see all the people who are currently stored in your database.
When you restart your Flask app, you don’t reset the data anymore. Since you now have a database attached to your Flask project, your data is saved.
Conclusion
Congratulations, you’ve covered a lot of new material in this tutorial and added useful tools to your arsenal!
In the second part of this tutorial series, you learned how to:
- Write SQL commands in Python
- Configure a SQLite database for your Flask project
- Use SQLAlchemy to save Python objects to your database
- Leverage the Marshmallow library to serialize data
- Connect your REST API with your database
The skills that you’ve learned have certainly been a step up in complexity from the REST API of part one, but that step has given you powerful tools to use when creating more complex applications. Using them will give you a great leg up to create your own web applications backed by a database.
To review the code for the second part of this tutorial series, click below:
Source Code: Click here to download the free source code that you’ll use to continue building a REST API with the Flask web framework.
In the next part of this series, you’ll extend your REST API so that you can create, read, update, and delete notes. The notes will be stored in a new database table. Every note will be connected to a person, so you’ll add relationships between notes and people to your database.
Part three will mark the last part of this tutorial series. At the end, you’ll have a full-fledged Flask REST API with related database tables in the background.