Most modern web applications are powered by a REST API under the hood. That way, developers can separate the front-end code from the back-end logic, and users can interact with the interface dynamically. In this three-part tutorial series, you’re building a REST API with the Flask web framework.
You’ve created a foundation with a basic Flask project and added endpoints, which you connected to a SQLite database. You’re also testing your API with Swagger UI API documentation that you’re building along the way.
In the third part of this tutorial series, you’ll learn how to:
- Work with multiple tables in a database
- Create one-to-many fields in your database
- Manage relationships with SQLAlchemy
- Leverage nested schemas with Marshmallow
- Display related objects in the front end
You can download the code for the third part of this project by clicking the link below:
Source Code: Click here to download the free source code that you’ll use to finish building a REST API with the Flask web framework.
Demo
In this three-part tutorial series, you’re building a REST API to keep track of notes for people who may visit you throughout the year. You’ll create people like the Tooth Fairy, the Easter Bunny, and Knecht Ruprecht.
Ideally, you want to be on good terms with all three of them. That’s why you’ll send them notes, to increase the chance of getting valuable gifts from them.
In this tutorial, you’ll expand your programming tool belt further. You’ll learn how to create hierarchical data structures represented as one-to-many relationships by SQLAlchemy. In addition, you’ll also extend the REST API that you’ve already built to create, read, update, and delete notes for a person:
It’s time to finish this three-part tutorial series by creating relationships between people and notes!
Planning Part Three
In part one of this series, you built your REST API. Working through part two, you connected your REST API to a database. That way, your Flask application can make changes to existing data and create new data that persists even when you restart your app server.
So far, you’ve added the ability to save changes made through the REST API to a database using SQLAlchemy and learned how to serialize that data for the REST API using Marshmallow.
Currently, the people.db database only contains people data. In this part of the series, you’ll add a new table to store notes. To connect notes to a person, you’ll create relationships between the entries of the person table and the note table in your database.
You’ll bootstrap people.db with a build_database.py script that contains the necessary people and notes data for you.
Here’s an excerpt of the dataset that you’ll work with:
PEOPLE_NOTES = [
    {
        "lname": "Fairy",
        "fname": "Tooth",
        "notes": [
            ("I brush my teeth after each meal.", "2022-01-06 17:10:24"),
            ("The other day a friend said I have big teeth.", "2022-03-05 22:17:54"),
            ("Do you pay per gram?", "2022-03-05 22:18:10"),
        ],
    },
   # ...
]
You’ll learn how to adjust your SQLite database to implement relationships. After that, you’ll be able to translate the PEOPLE_NOTES dictionary into data that conforms with your database structure.
Finally, you’ll show the content of your database on the home page of your app and use your Flask REST API to add, update, and delete notes that you’re writing for people.
Getting Started
Ideally, you followed the first part and the second part of this tutorial series before continuing with the third part, which you’re reading right now. Alternatively, you can also download the source code from part two by clicking the link below:
Source Code: Click here to download the free source code that you’ll use to continue building a REST API with the Flask web framework.
If you downloaded the source code from the link above, then make sure to follow the installation instructions within the provided README.md file.
Before you continue with the tutorial, verify that your folder structure looks like this:
rp_flask_api/
│
├── templates/
│   └── home.html
│
├── app.py
├── config.py
├── models.py
├── people.py
└── swagger.yml
Once you’ve got the Flask REST API folder structure in place, you can read on to check if your Flask project works as expected.
Check Your Flask Project
Before you continue working on your Flask project, it’s a good idea to create and activate a virtual environment. That way, you’re installing any project dependencies not system-wide but only in your project’s virtual environment.
Select your operating system below and use your platform-specific command to set up a virtual environment:
With the commands shown above, you create and activate a virtual environment named venv by using Python’s built-in venv module. The parenthesized (venv) in front of the prompt indicate that you’ve successfully activated the virtual environment.
Note: If you haven’t worked through part two of this tutorial series, then make sure to download the source code by clicking the link below:
Source Code: Click here to download the free source code that you’ll use to continue building a REST API with the Flask web framework.
Before continuing, install the dependencies by following the instructions listed in the provided README.md file.
Now you can verify that your Flask application is running without errors. Execute the following command in the directory containing the app.py file:
(venv) $ python app.py
When you run this application, a web server will start on port 8000. If you open a browser and navigate to http://localhost:8000, you should see a page with the heading Hello, People! displayed:

Perfect, your app is running flawlessly! Now it’s time to think about the new database structure.
Inspect the Dataset
Before starting to plan how you want to adjust your database, it’s a good idea to have a look at the data that your database currently contains and the dataset that you’ll work with.
The person table of your people.db database currently looks like this:
| id | lname | fname | timestamp |
|---|---|---|---|
| 1 | Fairy | Tooth | 2022-10-08 09:15:10 |
| 2 | Ruprecht | Knecht | 2022-10-08 09:15:13 |
| 3 | Bunny | Easter | 2022-10-08 09:15:27 |
You’ll start to extend your database with a PEOPLE_NOTES list:
PEOPLE_NOTES = [
    {
        "lname": "Fairy",
        "fname": "Tooth",
        "notes": [
            ("I brush my teeth after each meal.", "2022-01-06 17:10:24"),
            ("The other day a friend said, I have big teeth.", "2022-03-05 22:17:54"),
            ("Do you pay per gram?", "2022-03-05 22:18:10"),
        ],
    },
    {
        "lname": "Ruprecht",
        "fname": "Knecht",
        "notes": [
            ("I swear, I'll do better this year.", "2022-01-01 09:15:03"),
            ("Really! Only good deeds from now on!", "2022-02-06 13:09:21"),
        ],
    },
    {
        "lname": "Bunny",
        "fname": "Easter",
        "notes": [
            ("Please keep the current inflation rate in mind!", "2022-01-07 22:47:54"),
            ("No need to hide the eggs this time.", "2022-04-06 13:03:17"),
        ],
    },
]
Note that the lname values in PEOPLE_NOTES correspond to the contents of your lname column in the person table of your people.db database.
In the dataset above, each person includes a key called notes, which is associated with a list containing tuples of data. Each tuple in the notes list represents a single note containing the content and a timestamp.
Each single person is associated with multiple notes, and each single note is associated with only one person. This hierarchy of data is known as a one-to-many relationship, where a single parent object is related to many child objects. You’ll see how this one-to-many relationship is managed in the database with SQLAlchemy later in this tutorial.
Build Relationships With People
Instead of extending the person table and trying to represent hierarchical data in a single table, you’ll break up the data into multiple tables and connect them.
For the person table, this means there will be no changes. To represent the new note information, you’ll create a new table called note.
The note table will look like this:
id |
person_id |
content |
timestamp |
|---|---|---|---|
| 1 | 1 | I brush my teeth after each meal. | 2022-01-06 17:10:24 |
| 2 | 1 | The other day a friend said, I have big teeth. | 2022-03-05 22:17:54 |
| 3 | 1 | Do you pay per gram? | 2022-03-05 22:18:10 |
| 4 | 2 | I swear, I’ll do better this year. | 2022-01-01 09:15:03 |
| 5 | 2 | Really! Only good deeds from now on! | 2022-02-06 13:09:21 |
| 6 | 3 | Please keep the current inflation rate in mind! | 2022-01-07 22:47:54 |
| 7 | 3 | No need to hide the eggs this time. | 2022-04-06 13:03:17 |
Notice that, like the person table, the note table has a unique identifier called id, which is the primary key for the note table. The person_id column creates the relationship to the person table.
Whereas id is the primary key for the table, person_id is what’s known as a foreign key. The foreign key gives each entry in the note table the primary key of the person record that it’s associated with. Using this, SQLAlchemy can gather all the notes associated with each person by connecting the person.id primary key to the note.person_id foreign key, creating a relationship.
The database that you built stored the data in a table, and a table is a two-dimensional array of rows and columns. Can the People dictionary above be represented in a single table of rows and columns? It can be, in the following way, in your person database table:
id |
lname |
fname |
timestamp |
content |
note_timestamp |
|---|---|---|---|---|---|
| 1 | Fairy | Tooth | 2022-10-08 09:15:10 | I brush my teeth after each meal. | 2022-01-06 17:10:24 |
| 2 | Fairy | Tooth | 2022-10-08 09:15:10 | The other day a friend said, I have big teeth. | 2022-03-05 22:17:54 |
| 3 | Fairy | Tooth | 2022-10-08 09:15:10 | Do you pay per gram? | 2022-03-05 22:18:10 |
| 4 | Ruprecht | Knecht | 2022-10-08 09:15:13 | I swear, I’ll do better this year. | 2022-01-01 09:15:03 |
| 5 | Ruprecht | Knecht | 2022-10-08 09:15:13 | Really! Only good deeds from now on! | 2022-02-06 13:09:21 |
| 6 | Easter | Bunny | 2022-10-08 09:15:27 | Please keep the current inflation rate in mind! | 2022-01-07 22:47:54 |
| 7 | Easter | Bunny | 2022-10-08 09:15:27 | No need to hide the eggs this time. | 2022-04-06 13:03:17 |
The above table would actually work. All the data is represented, and a single person is associated with a collection of different notes.
Conceptually, the above table structure has the advantage of being relatively simple to understand. You could even make the case that the data could be persisted to a CSV file instead of a database.
While the above table structure would work, it has some real disadvantages. These include the following:
- Maintenance issues due to redundant data
- Awkward column names
- Difficulty presenting one-to-many relationships
In order to represent the collection of notes, all the data for each person is repeated for every unique note. The person data is therefore redundant. This isn’t such a big deal for your person data, as there aren’t that many columns. But imagine if a person had many more columns. Even with large disk drives, this could get to be a storage concern if you were dealing with millions of rows of data.
Having redundant data like this can also lead to maintenance issues as time goes by. For example, what if the Easter Bunny decided a change of name was a good idea? In order to do this, every record containing the Easter Bunny’s name would have to be updated in order to keep the data consistent. This kind of work against the database can lead to data inconsistency, particularly if the work is done by a person running a SQL query by hand.
Also, naming columns becomes awkward. In the table above, there’s a timestamp column used to track the creation and update time of a person in the table. You also want to have similar functionality for the creation and update time for a note, but because timestamp is already used, a contrived name of note_timestamp is used.
What if you wanted to add additional one-to-many relationships to the person table? For example, maybe you would decide to include a person’s children or phone numbers. Each person could have multiple children and multiple phone numbers. With the Python People dictionary above, you could do this relatively easily by adding children and phone_numbers keys with new lists containing the data.
However, representing those new one-to-many relationships in your person database table above becomes significantly more difficult. Every new one-to-many relationship dramatically increases the number of rows necessary to represent it for every single entry in the child data. In addition, the problems associated with data redundancy get bigger and more difficult to handle.
Note: The need for storing increasingly large and complex data structures boosted the popularity of NoSQL databases. These database systems allow developers to efficiently store heterogeneous data that isn’t structured in tables. If you’re curious about NoSQL databases, then check out Python and MongoDB: Connecting to NoSQL Databases.
Lastly, the data you’d get back from the above table structure would be annoying to work with, as it would just be a big list of lists.
By breaking the dataset into two tables and introducing the concept of a foreign key, you’ll make the data a little more complex to think about. But you’ll resolve the disadvantages of a single table representation.
The biggest advantage of related tables is the fact that there’s no redundant data in the database. There’s only one person entry for each person you want to store in the database.
If the Easter Bunny still wants to change names, then you’ll only have to change a single row in the person table, and anything else related to that row will immediately take advantage of the change.
Also, the column naming is more consistent and meaningful. Because person and note data exist in separate tables, the creation or update timestamp can be named consistently in both tables, as there’s no conflict for names across tables.
But enough with the theory! In the next section, you’ll create the models that represent the database table relationships you came up with.
Extending Your Database
In this section, you’ll extend your database. You’re going to modify the People data structure in models.py to give each person a list of notes associated with them. Finally, you’ll populate the database with some initial data.
Create SQLAlchemy Models
To use the two tables above and leverage the relationship between them, you’ll need to create SQLAlchemy models that are aware of both tables and the relationship between them.
Start by updating the Person model in models.py to include a relationship to a collection of notes:
 1# models.py
 2
 3from datetime import datetime
 4from config import db, ma
 5
 6class Person(db.Model):
 7    __tablename__ = "person"
 8    person_id = db.Column(db.Integer, primary_key=True)
 9    lname = db.Column(db.String(32), unique=True)
10    fname = db.Column(db.String(32))
11    timestamp = db.Column(
12        db.DateTime, default=datetime.utcnow, onupdate=datetime.utcnow
13    )
14    notes = db.relationship(
15        Note,
16        backref="person",
17        cascade="all, delete, delete-orphan",
18        single_parent=True,
19        order_by="desc(Note.timestamp)"
20    )
21
22# ...
In lines 14 to 20, you create a new attribute in the Person class called .notes. This new .notes attribute is defined in the following lines of code:
-
Line 14: Similar to what you’ve done for other attributes of the class, here you create a new attribute called
.notesand set it equal to an instance of an object calleddb.relationship. This object creates the relationship that you’re adding to thePersonclass, and it’s created with all of the parameters defined in the lines that follow. -
Line 15: The parameter
Notedefines the SQLAlchemy class that thePersonclass will be related to. TheNoteclass isn’t defined yet, so it won’t work at the moment. Sometimes it might be easier to refer to classes as strings to avoid issues with which class is defined first. For example, you could use"Note"instead ofNotehere. -
Line 16: The
backref="person"parameter creates what’s known as a backwards reference inNoteobjects. Each instance ofNotewill contain an attribute called.person. The.personattribute references the parent object that a particularNoteinstance is associated with. Having a reference to the parent object (Personin this case) in the child can be very useful if your code iterates over notes and has to include information about the parent. -
Line 17: The
cascade="all, delete, delete-orphan"parameter determines how to treatNoteinstances when changes are made to the parentPersoninstance. For example, when aPersonobject is deleted, SQLAlchemy will create the SQL necessary to delete thePersonobject from the database. This parameter tells SQLAlchemy to also delete all theNoteinstances associated with it. You can read more about these options in the SQLAlchemy documentation. -
Line 18: The
single_parent=Trueparameter is required ifdelete-orphanis part of the previouscascadeparameter. This tells SQLAlchemy not to allow an orphanedNoteinstance—that is, aNotewithout a parentPersonobject—to exist, because eachNotehas a single parent. -
Line 19: The
order_by="desc(Note.timestamp)"parameter tells SQLAlchemy how to sort theNoteinstances associated with aPersonobject. When aPersonobject is retrieved, by default thenotesattribute list will containNoteobjects in an unknown order. The SQLAlchemydesc()function will sort the notes in descending order from newest to oldest, rather than the default ascending order.
Now that your Person model has the new .notes attribute, and this represents the one-to-many relationship to Note objects, you’ll need to define a SQLAlchemy model for a Note object. Since you’re referencing Note from within Person, add the new Note class right before the Person class definition:
 1# models.py
 2
 3from datetime import datetime
 4from config import db, ma
 5
 6class Note(db.Model):
 7    __tablename__ = "note"
 8    id = db.Column(db.Integer, primary_key=True)
 9    person_id = db.Column(db.Integer, db.ForeignKey("person.id"))
10    content = db.Column(db.String, nullable=False)
11    timestamp = db.Column(
12        db.DateTime, default=datetime.utcnow, onupdate=datetime.utcnow
13    )
14
15class Person(db.Model):
16    # ...
17
18# ...
The Note class defines the attributes that make up a note, as you learned in your sample note database table above. With this code, you define the attributes:
-
Line 6 creates the
Noteclass, inheriting fromdb.Model, exactly as you did before when creating thePersonclass. -
Line 7 tells the class what database table to use to store
Noteobjects. -
Line 8 creates the
.idattribute, defining it as an integer value and as the primary key for theNoteobject. -
Line 9 creates the
.person_idattribute and defines it as the foreign key, relating theNoteclass to thePersonclass using the.person.idprimary key. This and thePerson.notesattribute are how SQLAlchemy knows what to do when interacting withPersonandNoteobjects. -
Line 10 creates the
.contentattribute, which contains the actual text of the note. Thenullable=Falseparameter indicates that new notes must contain content. -
Lines 11 to 13 create the
.timestampattribute, and exactly like in thePersonclass, this attribute contains the creation or update time for any particularNoteinstance.
Now that you’ve updated People and created the model for Note, go on to update the database.
Feed the Database
Now that you’ve updated Person and created the Note model, you’ll use them to rebuild the people.db database. To do this, create a helper Python script named build_database.py:
# build_database.py

from datetime import datetime
from config import app, db
from models import Person, Note

PEOPLE_NOTES = [
    {
        "lname": "Fairy",
        "fname": "Tooth",
        "notes": [
            ("I brush my teeth after each meal.", "2022-01-06 17:10:24"),
            ("The other day a friend said, I have big teeth.", "2022-03-05 22:17:54"),
            ("Do you pay per gram?", "2022-03-05 22:18:10"),
        ],
    },
    {
        "lname": "Ruprecht",
        "fname": "Knecht",
        "notes": [
            ("I swear, I'll do better this year.", "2022-01-01 09:15:03"),
            ("Really! Only good deeds from now on!", "2022-02-06 13:09:21"),
        ],
    },
    {
        "lname": "Bunny",
        "fname": "Easter",
        "notes": [
            ("Please keep the current inflation rate in mind!", "2022-01-07 22:47:54"),
            ("No need to hide the eggs this time.", "2022-04-06 13:03:17"),
        ],
    },
]

with app.app_context():
    db.drop_all()
    db.create_all()
    for data in PEOPLE_NOTES:
        new_person = Person(lname=data.get("lname"), fname=data.get("fname"))
        for content, timestamp in data.get("notes", []):
            new_person.notes.append(
                Note(
                    content=content,
                    timestamp=datetime.strptime(timestamp, "%Y-%m-%d %H:%M:%S"),
                )
            )
        db.session.add(new_person)
    db.session.commit()
In the code above, you’re feeding your project’s database with the content of PEOPLE_NOTES. You use db from your config module so Python knows how to handle data and commit it to the corresponding database tables and cells.
Note: When you execute build_database.py, you’ll re-create people.db. Any existing data in people.db will be lost.
Running the build_database.py program from the command line will re-create the database with the new additions, getting it ready for use with the web application:
(venv) $ python build_database.py
Once your project contains a fresh database, you can adjust your project to display the notes in the front end.
Displaying People With Their Notes
Now that your database contains data to work with, you can start displaying the data in both the front end and your REST API.
Show Notes in the Front End
In the previous section, you created the relationship between a person and their notes by adding a .notes attribute to the Person class.
Update home.html in your templates/ folder to access a person’s notes:
<!-- templates/home.html -->

<!DOCTYPE html>
<html lang="en">
<head>
    <meta charset="UTF-8">
    <title>RP Flask REST API</title>
</head>
<body>
    <h1>
        Hello, People!
    </h1>
    {% for person in people %}
    <h2>{{ person.fname }} {{ person.lname }}</h2>
    <ul>
        {% for note in person.notes %}
        <li>
            {{ note.content }}
        </li>
        {% endfor %}
    </ul>
    {% endfor %}
</body>
</html>
In the code above, you access the .notes attribute of each person. After that, you’re looping through all the notes for a particular person to access a note’s content.
Navigate to http://localhost:8000 to check if your template renders as expected:
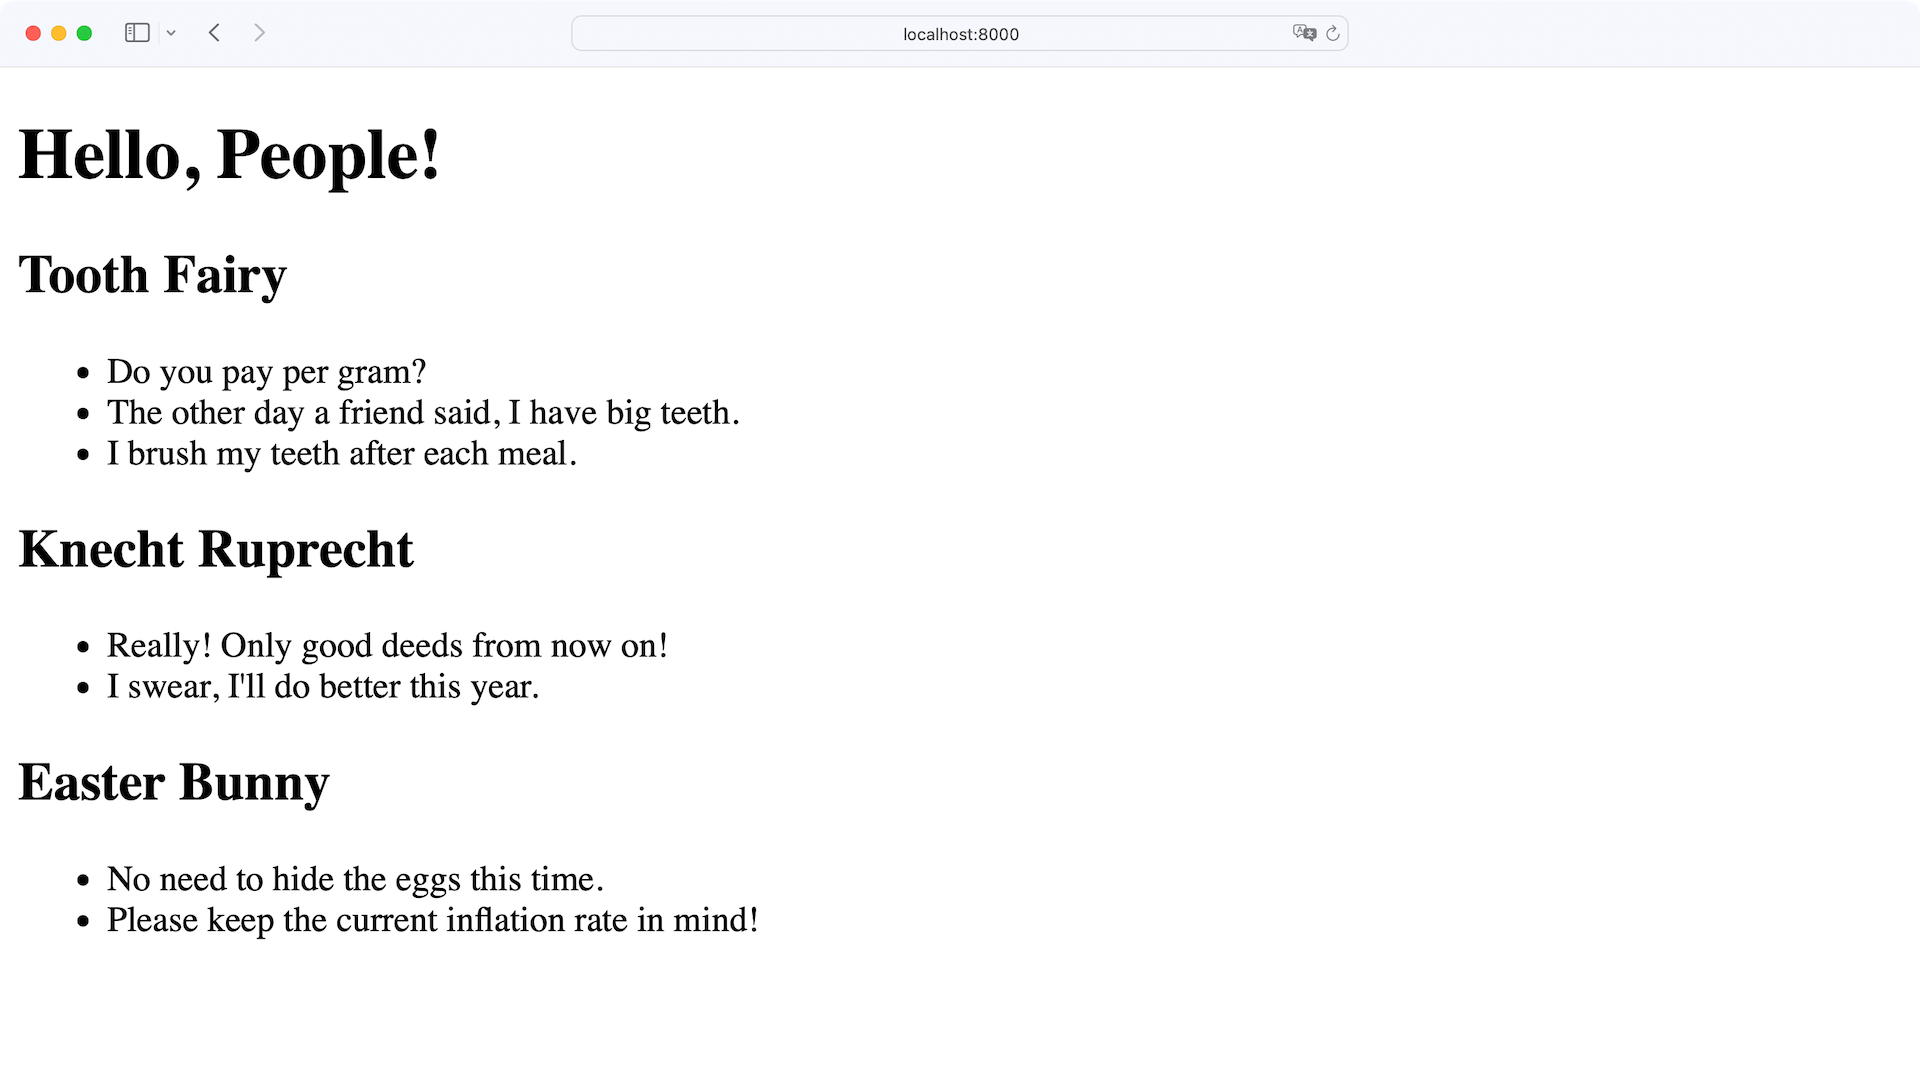
Perfect, you can see the notes from each person listed in your front end.
That means Flask successfully connects Person and Notes under the hood and serves you a people object that you can conveniently work with.
Respond With Notes
Next, check the /api/people endpoint of your API at http://localhost:8000/api/people:
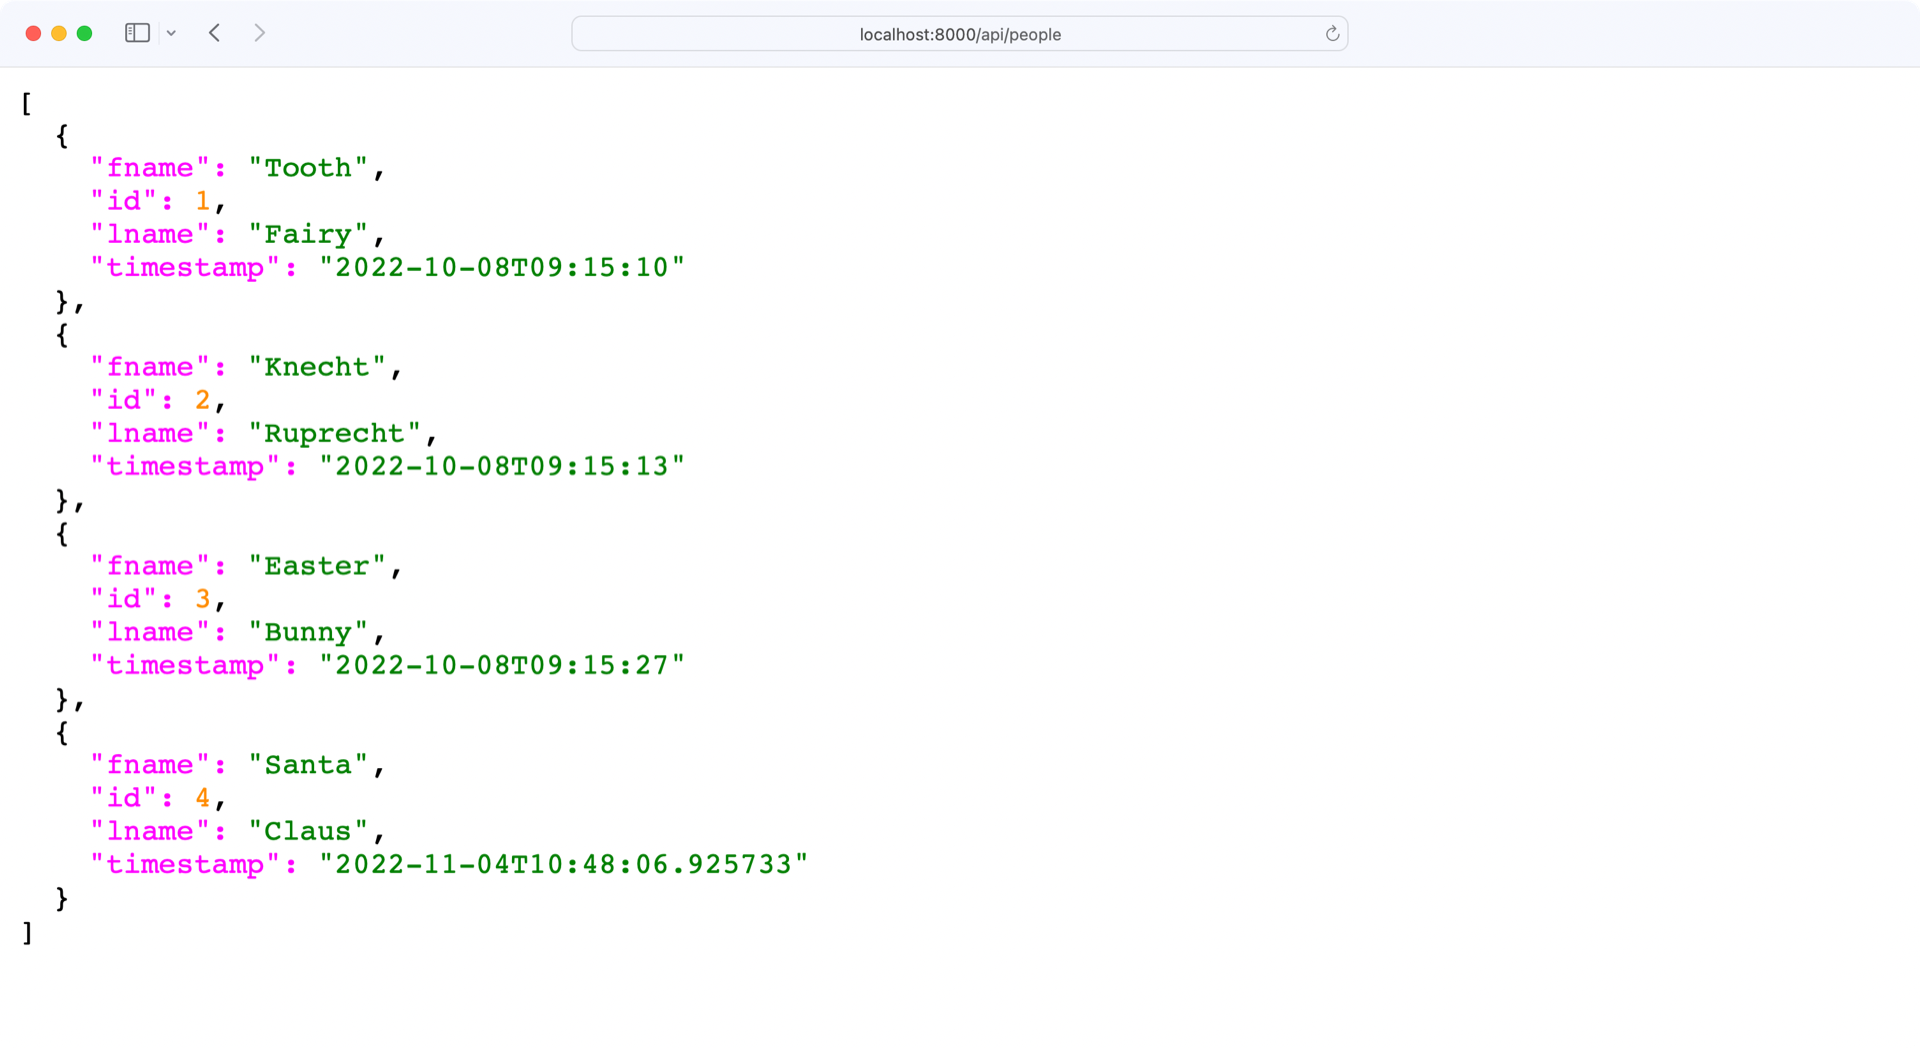
You’re receiving the people collection without any errors. However, there are no notes in the data you receive.
To investigate the issue, have a look at read_all() in people.py:
 1# people.py
 2
 3# ...
 4
 5def read_all():
 6    people = Person.query.all()
 7    person_schema = PersonSchema(many=True)
 8    return person_schema.dump(people)
 9
10# ...
The .dump() method in line 8 works with what it receives and doesn’t filter out any data. So the issue may be in the definition of either people in line 6 or person_schema in line 7.
The query call to the database to populate people is exactly the same as the one in app.py:
Person.query.all()
This call successfully worked in the front end to show the notes for each person. This singles out PersonSchema as the most likely culprit.
By default, a Marshmallow schema doesn’t traverse into related database objects. You have to explicitly tell a schema to include relationships.
Open models.py and update PersonSchema:
# models.py

# ...

class PersonSchema(ma.SQLAlchemyAutoSchema):
    class Meta:
        model = Person
        load_instance = True
        sqla_session = db.session
        include_relationships = True
With include_relationships in the Meta class of PersonSchema, you tell Marshmallow to add any related objects to the person schema. However, the result still doesn’t look as expected:
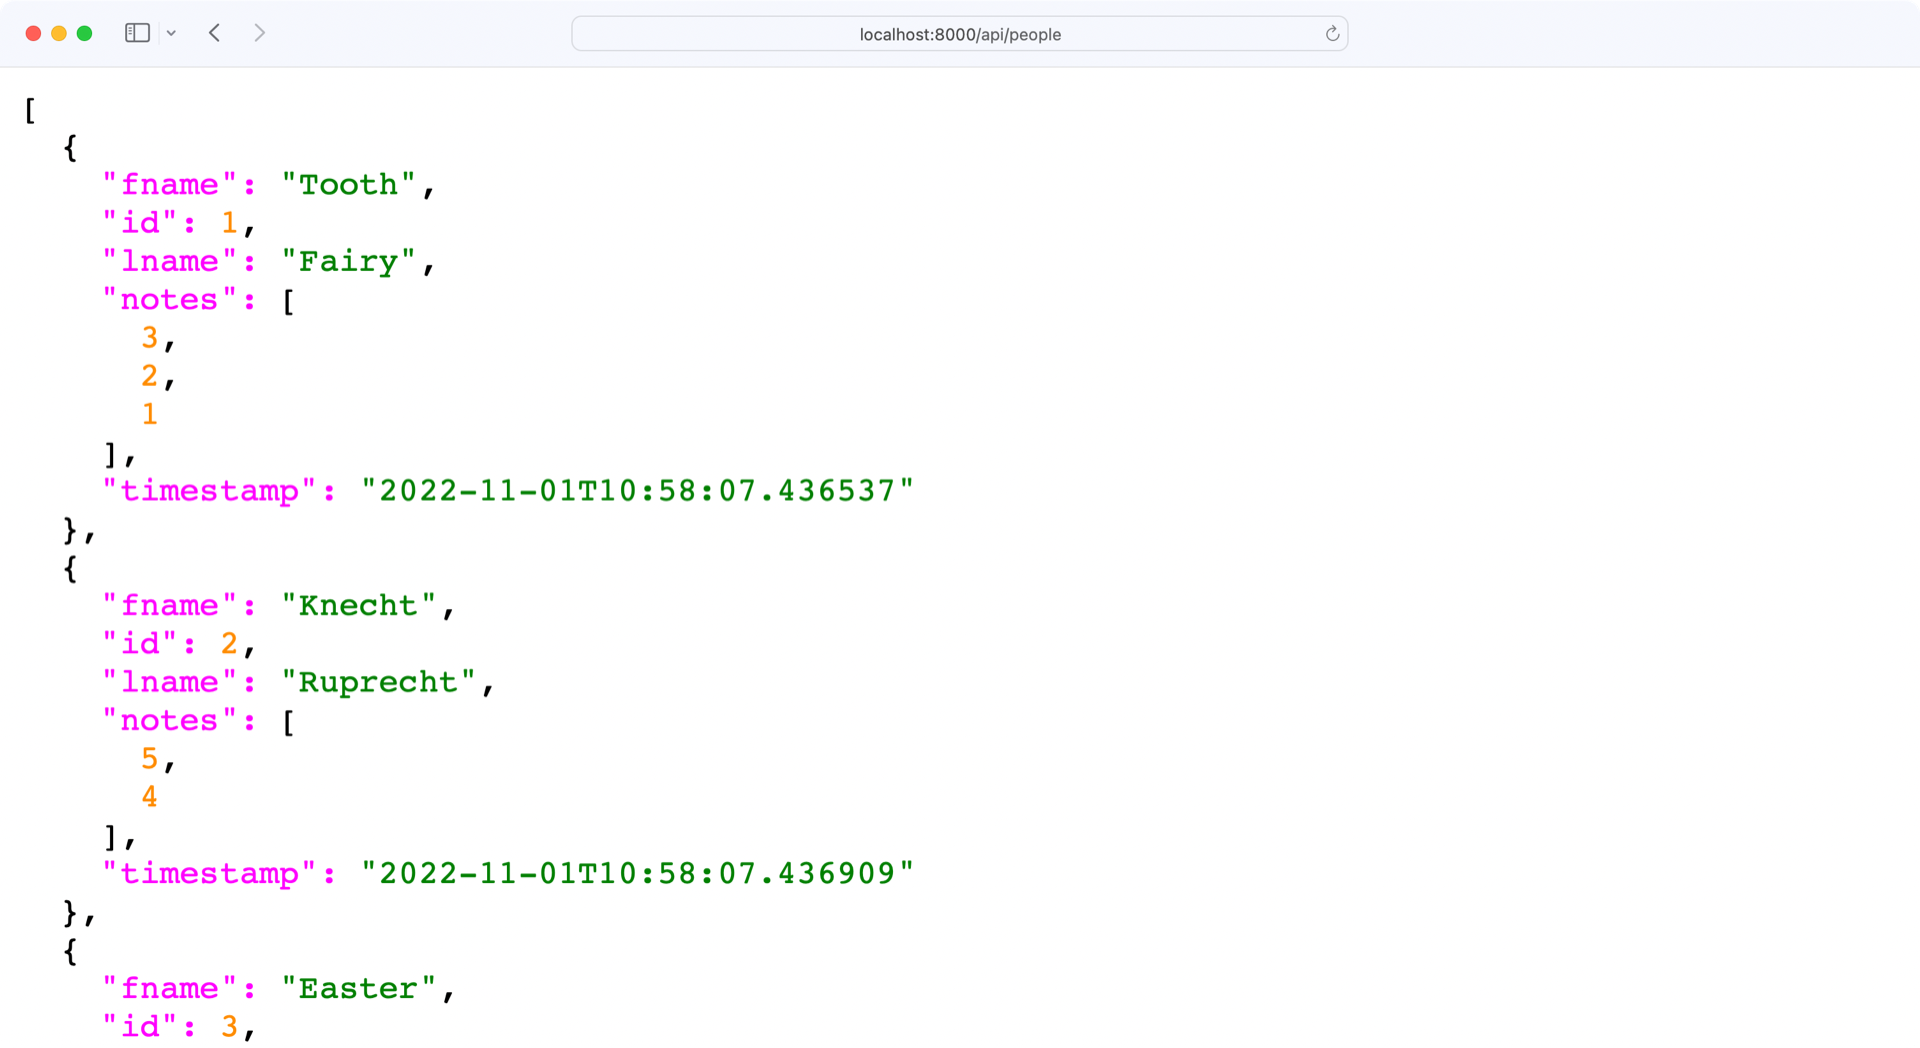
The response at http://localhost:8000/api/people now contains each person’s notes. But instead of showing all the data a note contains, the notes object only contains a list of primary keys.
Create a Notes Schema
Your API response only listed the primary keys of each person’s notes. That’s fair, because you haven’t yet declared how Marshmallow should deserialize the notes.
Help Marshmallow out by creating NoteSchema in models.py beneath Note and above Person:
# models.py

# ...

class Note(db.Model):
    # ...

class NoteSchema(ma.SQLAlchemyAutoSchema):
    class Meta:
        model = Note
        load_instance = True
        sqla_session = db.session
        include_fk = True

class Person(db.Model):
    # ...

class PersonSchema(ma.SQLAlchemyAutoSchema):
    # ...

note_schema = NoteSchema()
# ...
You’re referencing Note from within NoteSchema, so you must place NoteSchema underneath your Note class definition to prevent errors. You also instantiate NoteSchema to create an object that you’ll refer to later.
Since your Note model contains a foreign key, you must set include_fk to True. Otherwise Marshmallow wouldn’t recognize person_id during the serialization process.
With NoteSchema in place, you can reference it in PeopleSchema:
# models.py

from datetime import datetime
from marshmallow_sqlalchemy import fields

from config import db, ma

# ...

class PersonSchema(ma.SQLAlchemyAutoSchema):
    class Meta:
        model = Person
        load_instance = True
        sqla_session = db.session
        include_relationships = True

    notes = fields.Nested(NoteSchema, many=True)
After importing fields from marshmallow_sqlalchemy, you can reference the related Note object by its NoteSchema. To avoid running into errors, verify that you defined NoteSchema above PeopleSchema.
Although you’re working with SQLAlchemyAutoSchema, you have to explicitly create the notes field in PersonSchema. Otherwise Marshmallow doesn’t receive all the information it needs to work with the Notes data. For example, it won’t know that you’re expecting a list of objects using the many argument.
With the changes in place, check the endpoint of your API at http://localhost:8000/api/people:
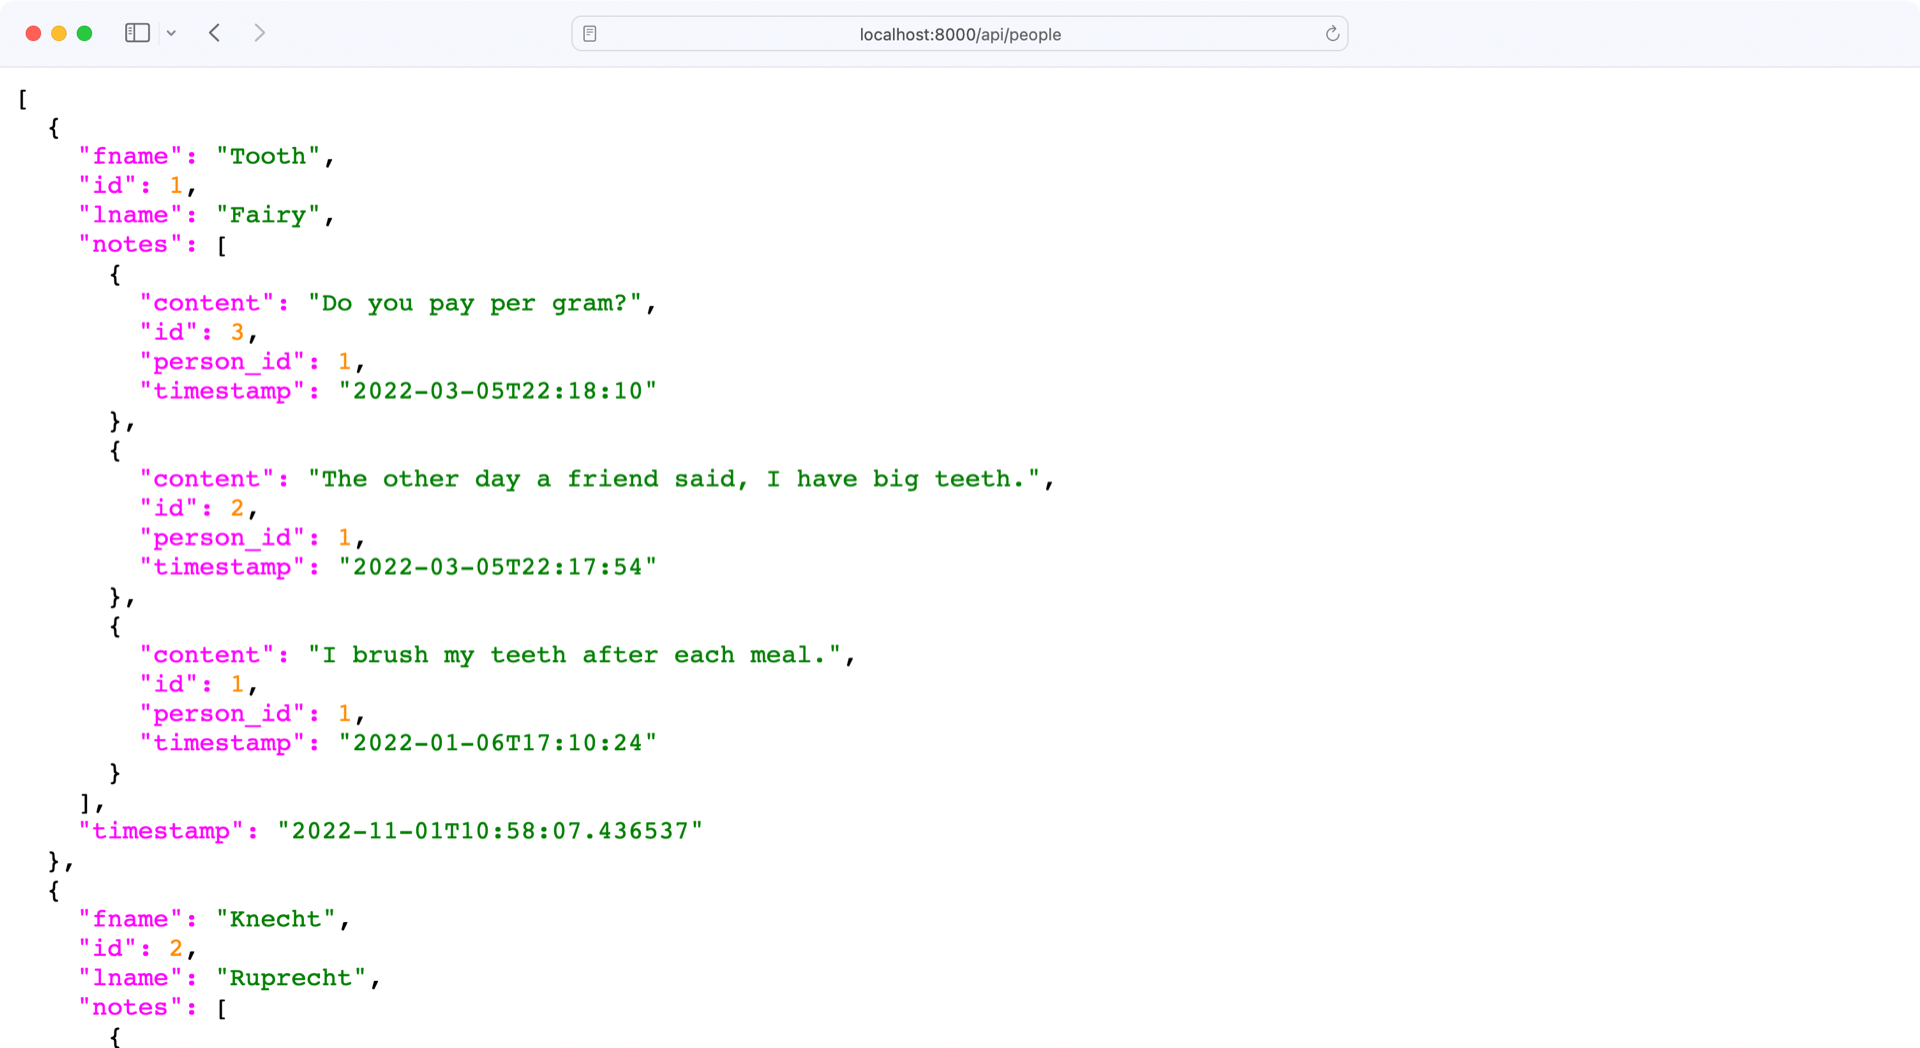
Perfect, your read_all() function not only returns all the people, but also all the notes that are attached to each person!
In the next section, you’ll extend your Flask REST API to create, read, update, and delete a single note.
Handle Notes With Your REST API
You’ve updated the SQLAlchemy models and used them to read from the people.db database. Your notes are available as a nested schema in People. You receive the list of notes when you request a collection of people or a particular person:
| Action | HTTP Verb | URL Path | Description |
|---|---|---|---|
| Read | GET |
/api/people |
Read a collection of people. |
| Read | GET |
/api/people/<lname> |
Read a particular person. |
While you can read the notes over the endpoints shown in the table above, there’s currently no way to read only one note or to manage any notes in your REST API.
Note: The URL parameters are case sensitive. For example, you must visit http://localhost:8000/api/people/Ruprecht with an uppercase R in the last name Ruprecht.
You can hop over to part one to recap how you built the existing people endpoints of your REST API. In this section of the tutorial, you’ll add additional endpoints to provide functionality to create, read, update, and delete notes:
| Action | HTTP Verb | URL Path | Description |
|---|---|---|---|
| Create | POST |
/api/notes |
URL to create a new note |
| Read | GET |
/api/notes/<note_id> |
URL to read a single note |
| Update | PUT |
api/notes/<note_id> |
URL to update a single note |
| Delete | DELETE |
api/notes/<note_id> |
URL to delete a single note |
You’ll start off by adding the functionality to read a single note. To do so, you’ll adjust your Swagger configuration file that contains your API definitions.
Read a Single Note
Currently you’re able to receive all the notes of a person when you request data from that particular person. To get information about one note, you’ll add another endpoint.
Before you add the endpoint, update your Swagger configuration by creating a note_id parameter component in the swagger.yml file:
# swagger.yml

# ...

components:
  schemas:
    # ...

  parameters:
    lname:
      # ...
    note_id:
      name: "note_id"
      description: "ID of the note"
      in: path
      required: true
      schema:
        type: "integer"
# ...
The note_id in parameters will be part of your endpoints to identify which note you want to handle.
Continue to edit swagger.yml and add the data for the endpoint to read a single note:
# swagger.yml

# ...

paths:
  /people:
    # ...
  /people/{lname}:
    # ...
  /notes/{note_id}:
    get:
      operationId: "notes.read_one"
      tags:
        - Notes
      summary: "Read one note"
      parameters:
        - $ref: "#/components/parameters/note_id"
      responses:
        "200":
          description: "Successfully read one note"
The structure of /notes/{note_id} is similar to /people/{lname}. You start with the get operation for the /notes/{note_id} path. The {note_id} substring is a placeholder for the ID of a note that you have to pass in as a URL parameter. So, for example, the URL http://localhost:8000/api/notes/1 will give you the data for the note with the primary key 1.
The operationId points to notes.read_one. That means your API expects a read_one() function in a notes.py file. Go on, create notes.py and add read_one():
# notes.py

from flask import abort, make_response

from config import db
from models import Note, note_schema

def read_one(note_id):
    note = Note.query.get(note_id)

    if note is not None:
        return note_schema.dump(note)
    else:
        abort(
            404, f"Note with ID {note_id} not found"
        )
Although you’re not using make_response() and db yet, you can go ahead and add them to your imports already. You’ll use them in a bit when you’re writing to the database.
For now, you’re only reading from the database with the note_id parameter from the REST URL path. You use note_id in the query’s .get() method to get the note with the primary key of the note_id integer.
If a note is found, then note contains a Note object and you return the serialized object. Go ahead and try it out by visiting http://localhost:8000/api/notes/1 in your browser:
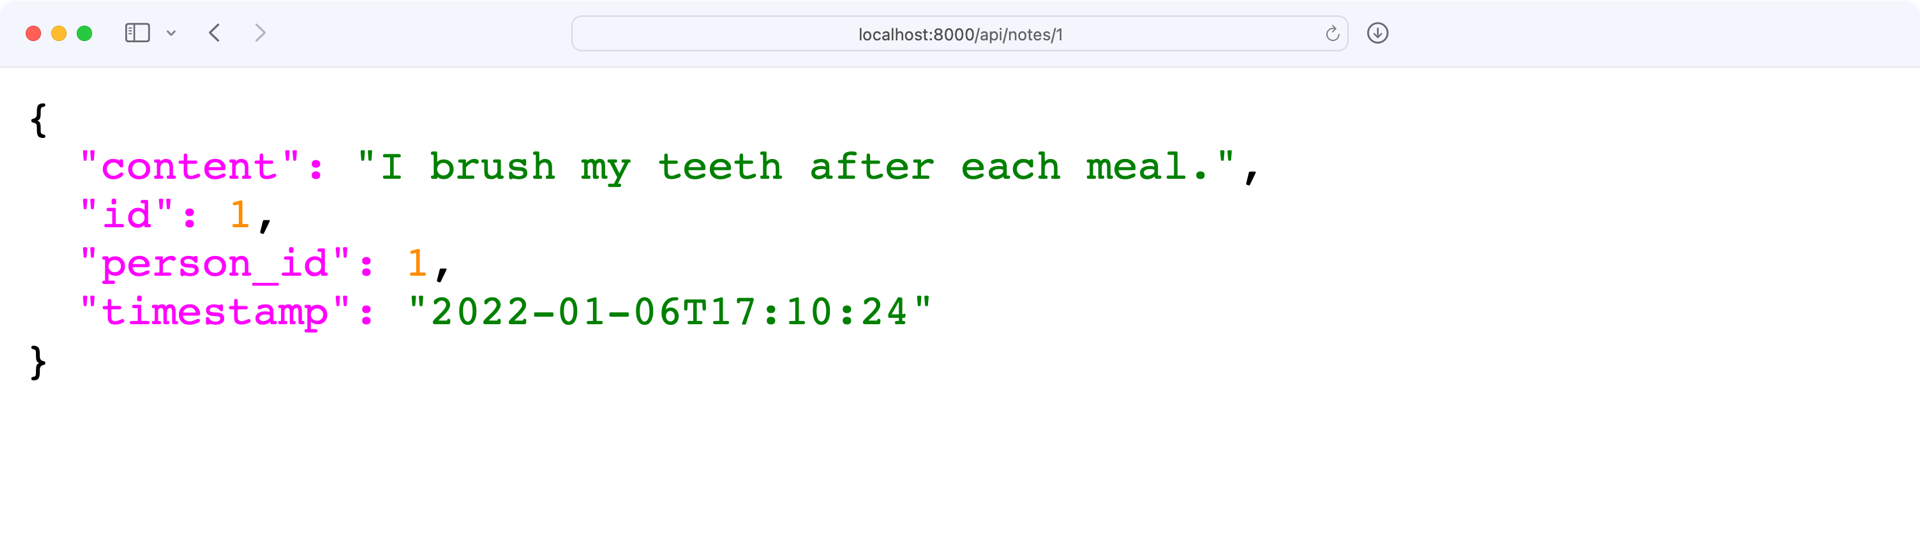
Perfect, the API response with the note dataset looks exactly as expected! Next, you’ll use the same endpoint to update and delete a note.
Update and Delete a Note
This time, you start by creating the functions in notes.py first, before creating the operations in swagger.yml.
Add update() and delete() to notes.py:
# notes.py

# ...

def update(note_id, note):
    existing_note = Note.query.get(note_id)

    if existing_note:
        update_note = note_schema.load(note, session=db.session)
        existing_note.content = update_note.content
        db.session.merge(existing_note)
        db.session.commit()
        return note_schema.dump(existing_note), 201
    else:
        abort(404, f"Note with ID {note_id} not found")

def delete(note_id):
    existing_note = Note.query.get(note_id)

    if existing_note:
        db.session.delete(existing_note)
        db.session.commit()
        return make_response(f"{note_id} successfully deleted", 204)
    else:
        abort(404, f"Note with ID {note_id} not found")
When you compare update() with delete(), they share a similar structure. Both functions look for an existing note and work with a database session.
For update() to work, you also accept a note object as an argument, which contains the .content attribute that you may update.
In contrast, you only need to know the ID of the note that you want to get rid of when calling delete().
Next, create two operations in swagger.yml that refer to notes.update and notes.delete:
# swagger.yml

# ...

paths:
  /people:
    # ...
  /people/{lname}:
    # ...
  /notes/{note_id}:
    get:
      # ...
    put:
      tags:
        - Notes
      operationId: "notes.update"
      summary: "Update a note"
      parameters:
        - $ref: "#/components/parameters/note_id"
      responses:
        "200":
          description: "Successfully updated note"
      requestBody:
        content:
          application/json:
            schema:
              x-body-name: "note"
              type: "object"
              properties:
                content:
                  type: "string"
    delete:
      tags:
        - Notes
      operationId: "notes.delete"
      summary: "Delete a note"
      parameters:
        - $ref: "#/components/parameters/note_id"
      responses:
        "204":
          description: "Successfully deleted note"
Again, the structure of put and delete are similar. The main difference is that you need to provide a requestBody that contains the note data to update the database object.
You’ve now created the endpoints to work with existing notes. Next, you’ll add the endpoint to create a note.
Create a Note for a Person
So far, you can read, update, and delete a single note. These are actions that you can perform on existing notes. Now it’s time to add the functionality to your REST API to also create a new note.
Add create() to notes.py:
# notes.py

from flask import make_response, abort

from config import db
from models import Note, Person, note_schema

# ...

def create(note):
    person_id = note.get("person_id")
    person = Person.query.get(person_id)

    if person:
        new_note = note_schema.load(note, session=db.session)
        person.notes.append(new_note)
        db.session.commit()
        return note_schema.dump(new_note), 201
    else:
        abort(
            404,
            f"Person not found for ID: {person_id}"
        )
A note always needs a person to belong to. That’s why you need to work with the Person model when you create a new note.
First, you look for the owner of the note by using person_id, which you provide with the notes argument for create(). If this person exists in the database, then you go ahead to append the new note to person.notes.
Although you’re working with the person database table in this case, SQLAlchemy will take care that the note is added to the note table.
To access notes.create with your API, hop over to swagger.yml and add another endpoint:
# swagger.yml

# ...

paths:
  /people:
    # ...
  /people/{lname}:
    # ...
  /notes:
    post:
      operationId: "notes.create"
      tags:
        - Notes
      summary: "Create a note associated with a person"
      requestBody:
          description: "Note to create"
          required: True
          content:
            application/json:
              schema:
                x-body-name: "note"
                type: "object"
                properties:
                  person_id:
                    type: "integer"
                  content:
                    type: "string"
      responses:
        "201":
          description: "Successfully created a note"
  /notes/{note_id}:
    # ...
You add the /notes endpoint right before the /notes/{noted_id} endpoint. That way, you order your notes endpoints from general to specific. This order helps you to navigate your swagger.yml file when your API grows larger.
With the data in the schema block, you provide Marshmallow the information on how to serialize a note in your API. If you compare this Note schema to the Note model in models.py, then you’ll notice that the names person_id and content match. The same goes for the fields’ types.
You may also notice that not all the note model fields are present in the component schema. That’s okay, because you’ll only use this schema to post new notes. For each note, id and timestamp will be set automatically.
With all the endpoints to handle your notes in place, it’s time to have a look at your API documentation.
Explore Your API Documentation
With the above changes in place, you can leverage your API to add, update, and remove notes. Visit your Swagger UI at http://localhost:8000/api/ui and explore your API endpoints:
Awesome, your Flask REST API endpoints work! Any changes that you perform with your API appear on your front end, too.
Conclusion
In this tutorial, you adjusted your SQLite database to implement relationships. After that, you translated the PEOPLE_NOTES dictionary into data that conforms with your database structure, and you turned your Flask REST API into a note-keeping web application.
In the third part of this tutorial series, you learned how to:
- Work with multiple tables in a database
- Create one-to-many fields in your database
- Manage relationships with SQLAlchemy
- Leverage nested schemas with Marshmallow
- Display related objects in the front end
Knowing how to build and use database relationships gives you a powerful tool to solve many difficult problems. There are other relationship besides the one-to-many example from this tutorial. Other common ones are one-to-one, many-to-many, and many-to-one. All of them have a place in your tool belt, and SQLAlchemy can help you tackle them all!
You’ve successfully built a REST API to keep track of notes for people who may visit you throughout the year. Your database contains people like the Tooth Fairy, the Easter Bunny, and Knecht Ruprecht. By adding notes, you can keep track of your good deeds and hopefully receive valuable gifts from them.
To review your code, click the link below:
Source Code: Click here to download the free source code that you’ll use to finish building a REST API with the Flask web framework.
Did you add a special person or note to your Flask REST API project? Let the Real Python community know in the comments below.