In a world where video games are so important to so many people, communication and community around games are vital. Discord offers both of those and more in one well-designed package. In this tutorial, you’ll learn how to make a Discord bot in Python so that you can make the most of this fantastic platform.
By the end of this article you’ll learn:
- What Discord is and why it’s so valuable
- How to make a Discord bot through the Developer Portal
- How to create Discord connections
- How to handle events
- How to accept commands and validate assumptions
- How to interact with various Discord APIs
You’ll begin by learning what Discord is and why it’s valuable.
What Is Discord?
Discord is a voice and text communication platform for gamers.
Players, streamers, and developers use Discord to discuss games, answer questions, chat while they play, and much more. It even has a game store, complete with critical reviews and a subscription service. It is nearly a one-stop shop for gaming communities.
While there are many things you can build using Discord’s APIs, this tutorial will focus on a particular learning outcome: how to make a Discord bot in Python.
What Is a Bot?
Discord is growing in popularity. As such, automated processes, such as banning inappropriate users and reacting to user requests are vital for a community to thrive and grow.
Automated programs that look and act like users and automatically respond to events and commands on Discord are called bot users. Discord bot users (or just bots) have nearly unlimited applications.
For example, let’s say you’re managing a new Discord guild and a user joins for the very first time. Excited, you may personally reach out to that user and welcome them to your community. You might also tell them about your channels or ask them to introduce themselves.
The user feels welcomed and enjoys the discussions that happen in your guild and they, in turn, invite friends.
Over time, your community grows so big that it’s no longer feasible to personally reach out to each new member, but you still want to send them something to recognize them as a new member of the guild.
With a bot, it’s possible to automatically react to the new member joining your guild. You can even customize its behavior based on context and control how it interacts with each new user.
This is great, but it’s only one small example of how a bot can be useful. There are so many opportunities for you to be creative with bots, once you know how to make them.
Note: Although Discord allows you to create bots that deal with voice communication, this article will stick to the text side of the service.
There are two key steps when you’re creating a bot:
- Create the bot user on Discord and register it with a guild.
- Write code that uses Discord’s APIs and implements your bot’s behaviors.
In the next section, you’ll learn how to make a Discord bot in Discord’s Developer Portal.
How to Make a Discord Bot in the Developer Portal
Before you can dive into any Python code to handle events and create exciting automations, you need to first create a few Discord components:
- An account
- An application
- A bot
- A guild
You’ll learn more about each piece in the following sections.
Once you’ve created all of these components, you’ll tie them together by registering your bot with your guild.
You can get started by heading to Discord’s Developer Portal.
Creating a Discord Account
The first thing you’ll see is a landing page where you’ll need to either login, if you have an existing account, or create a new account:
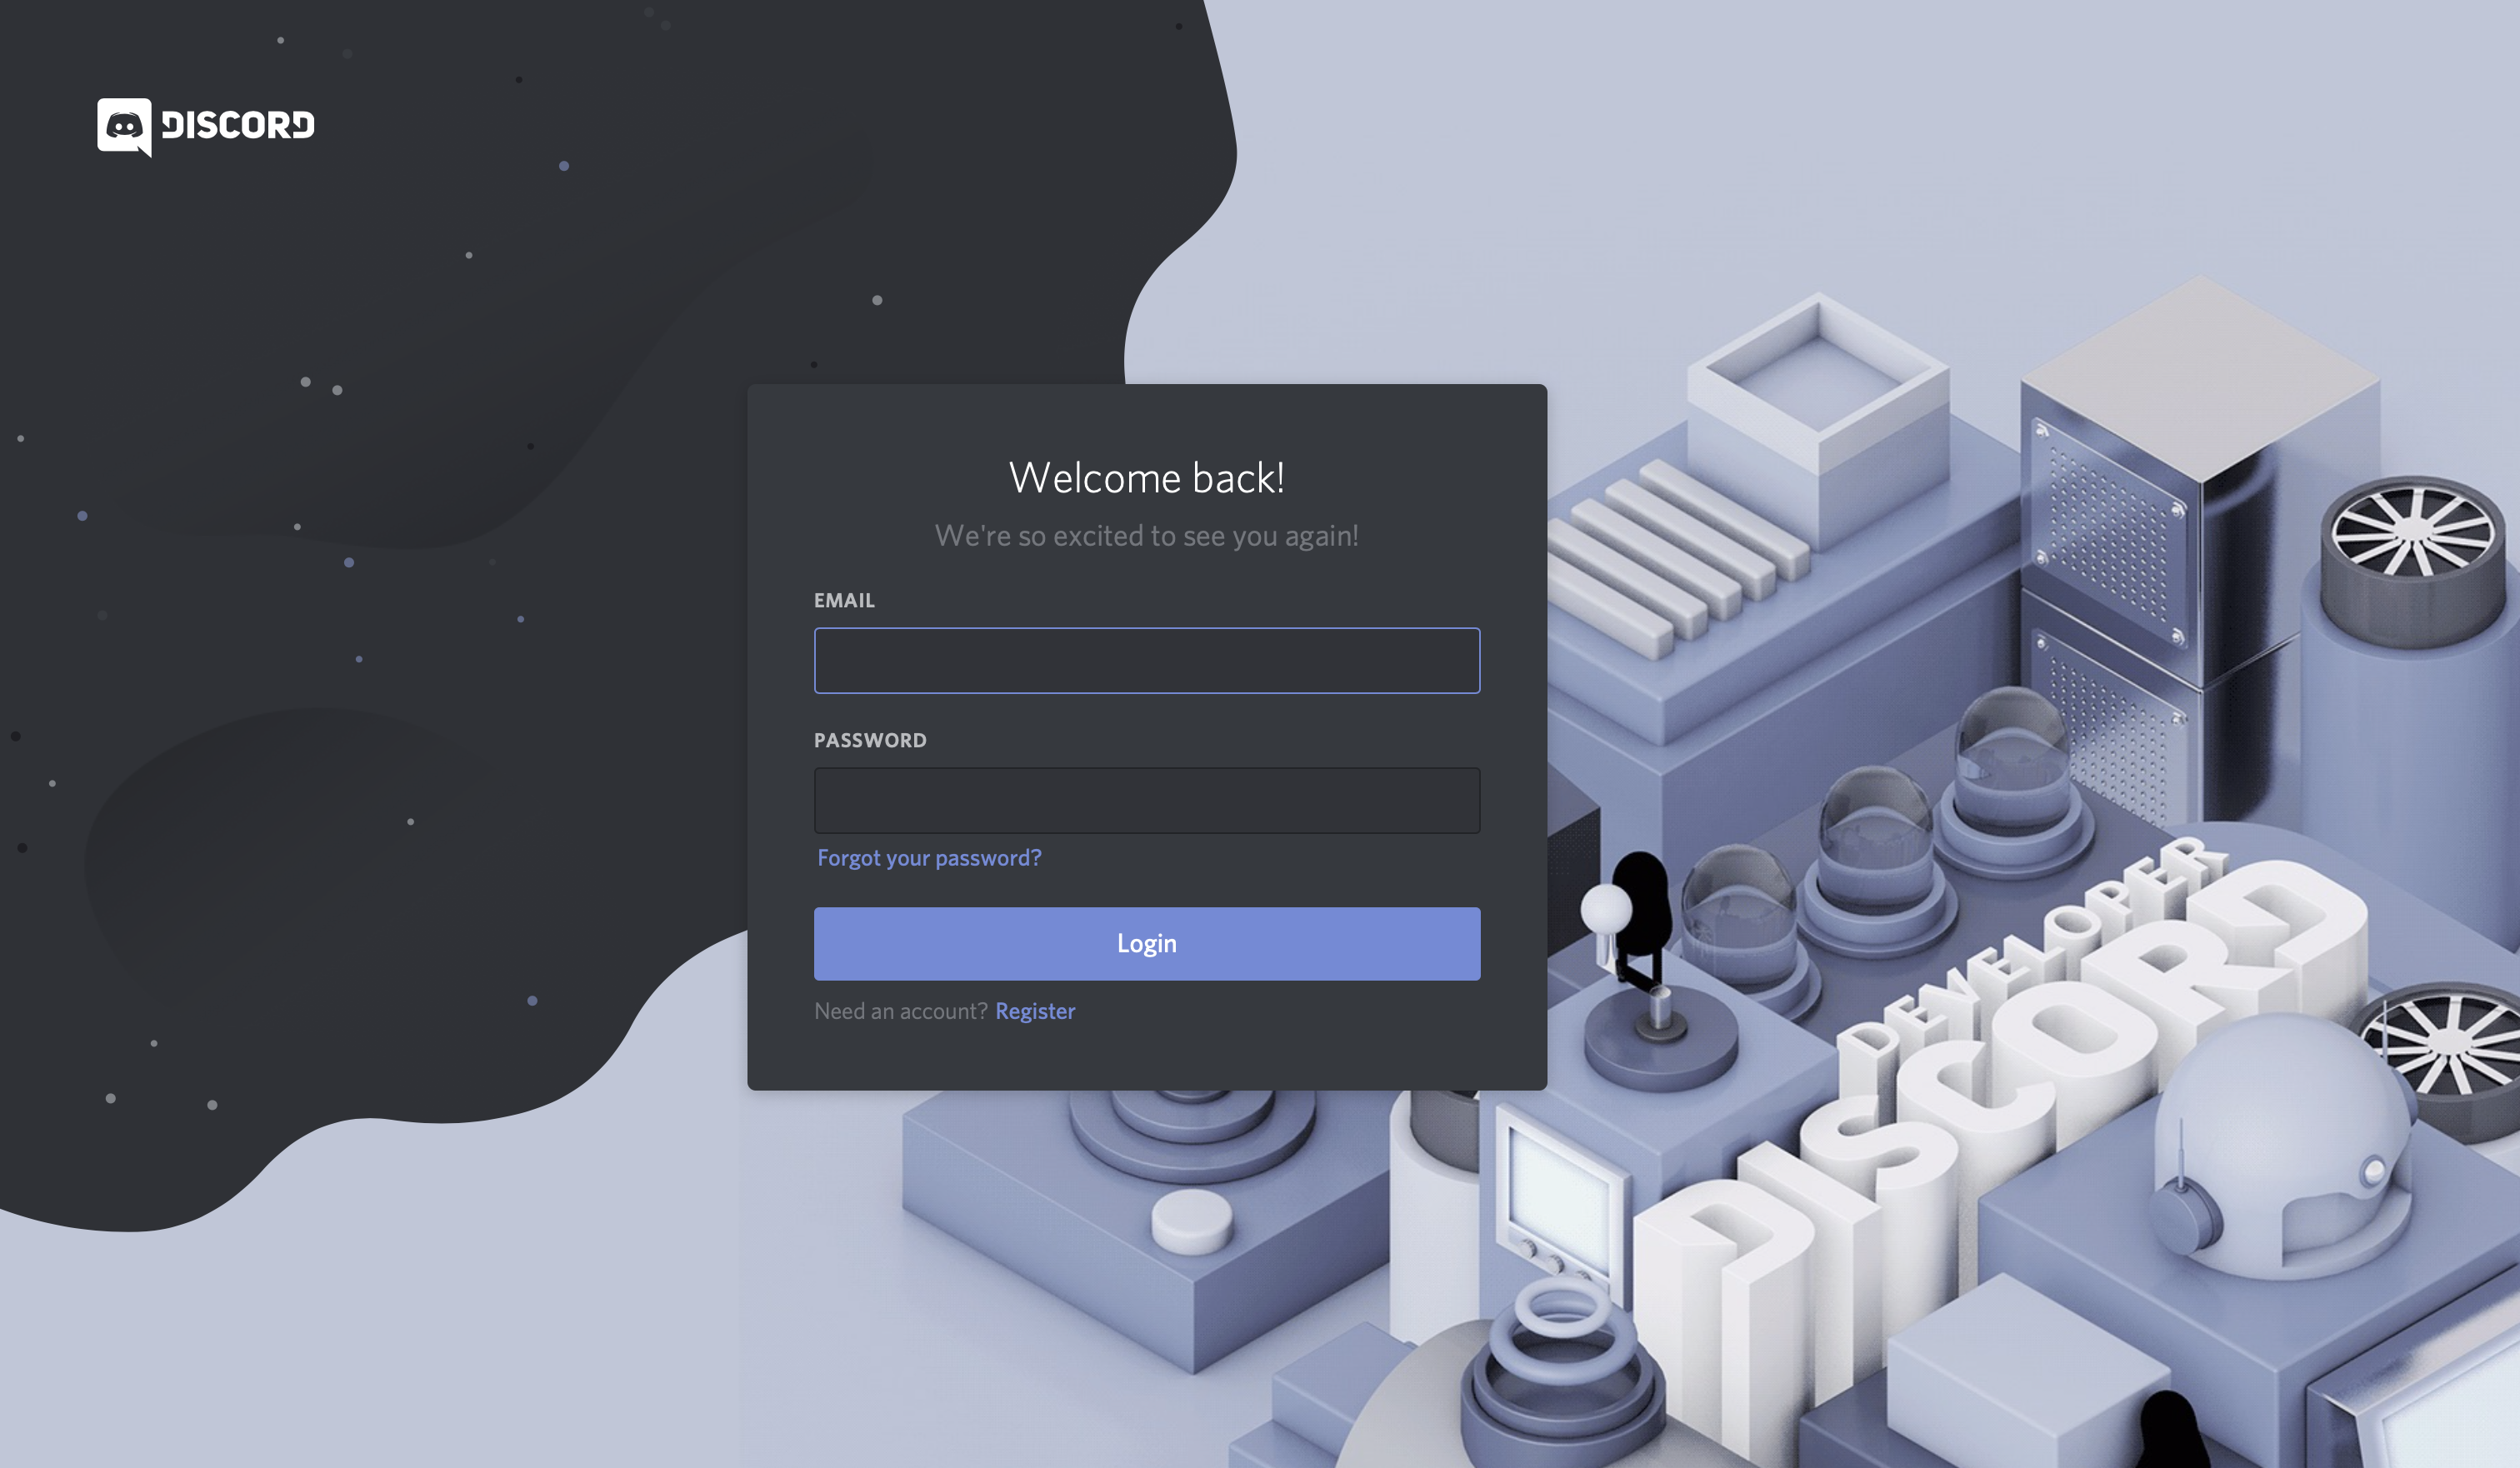
If you need to create a new account, then click on the Register button below Login and enter your account information.
Important: You’ll need to verify your email before you’re able to move on.
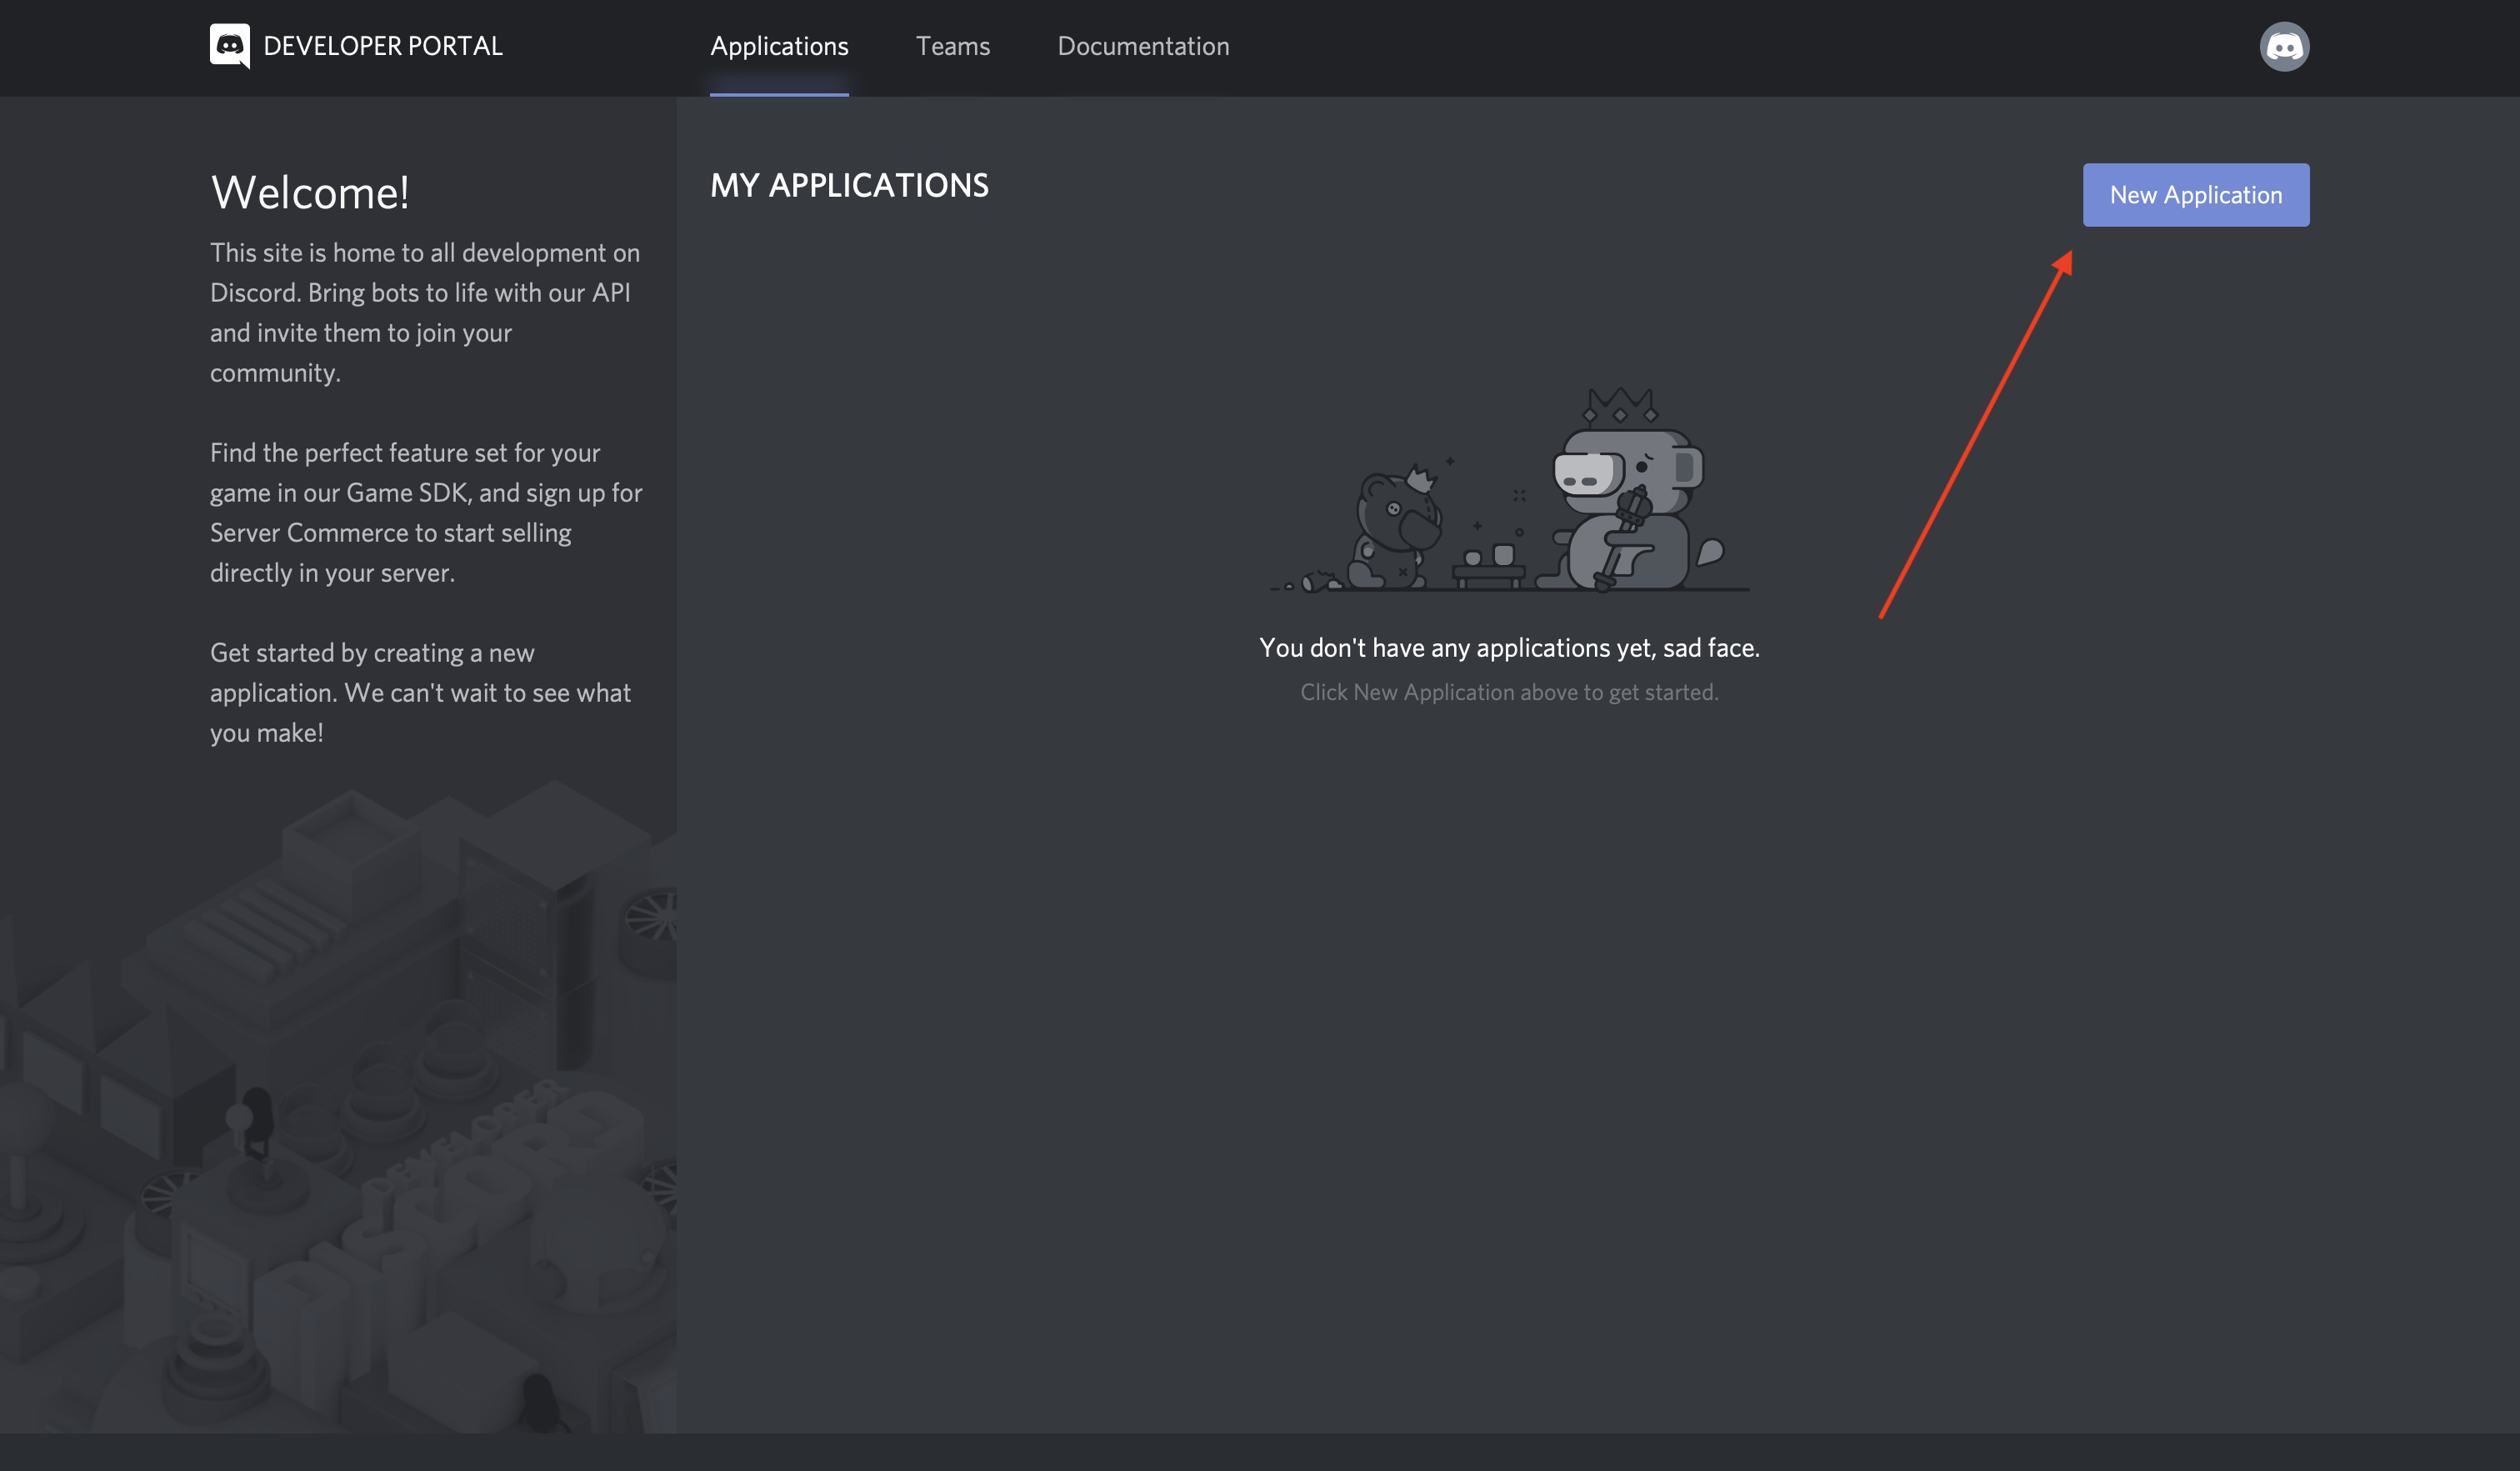
Once you’re finished, you’ll be redirected to the Developer Portal home page, where you’ll create your application.
Creating an Application
An application allows you to interact with Discord’s APIs by providing authentication tokens, designating permissions, and so on.
To create a new application, select New Application:
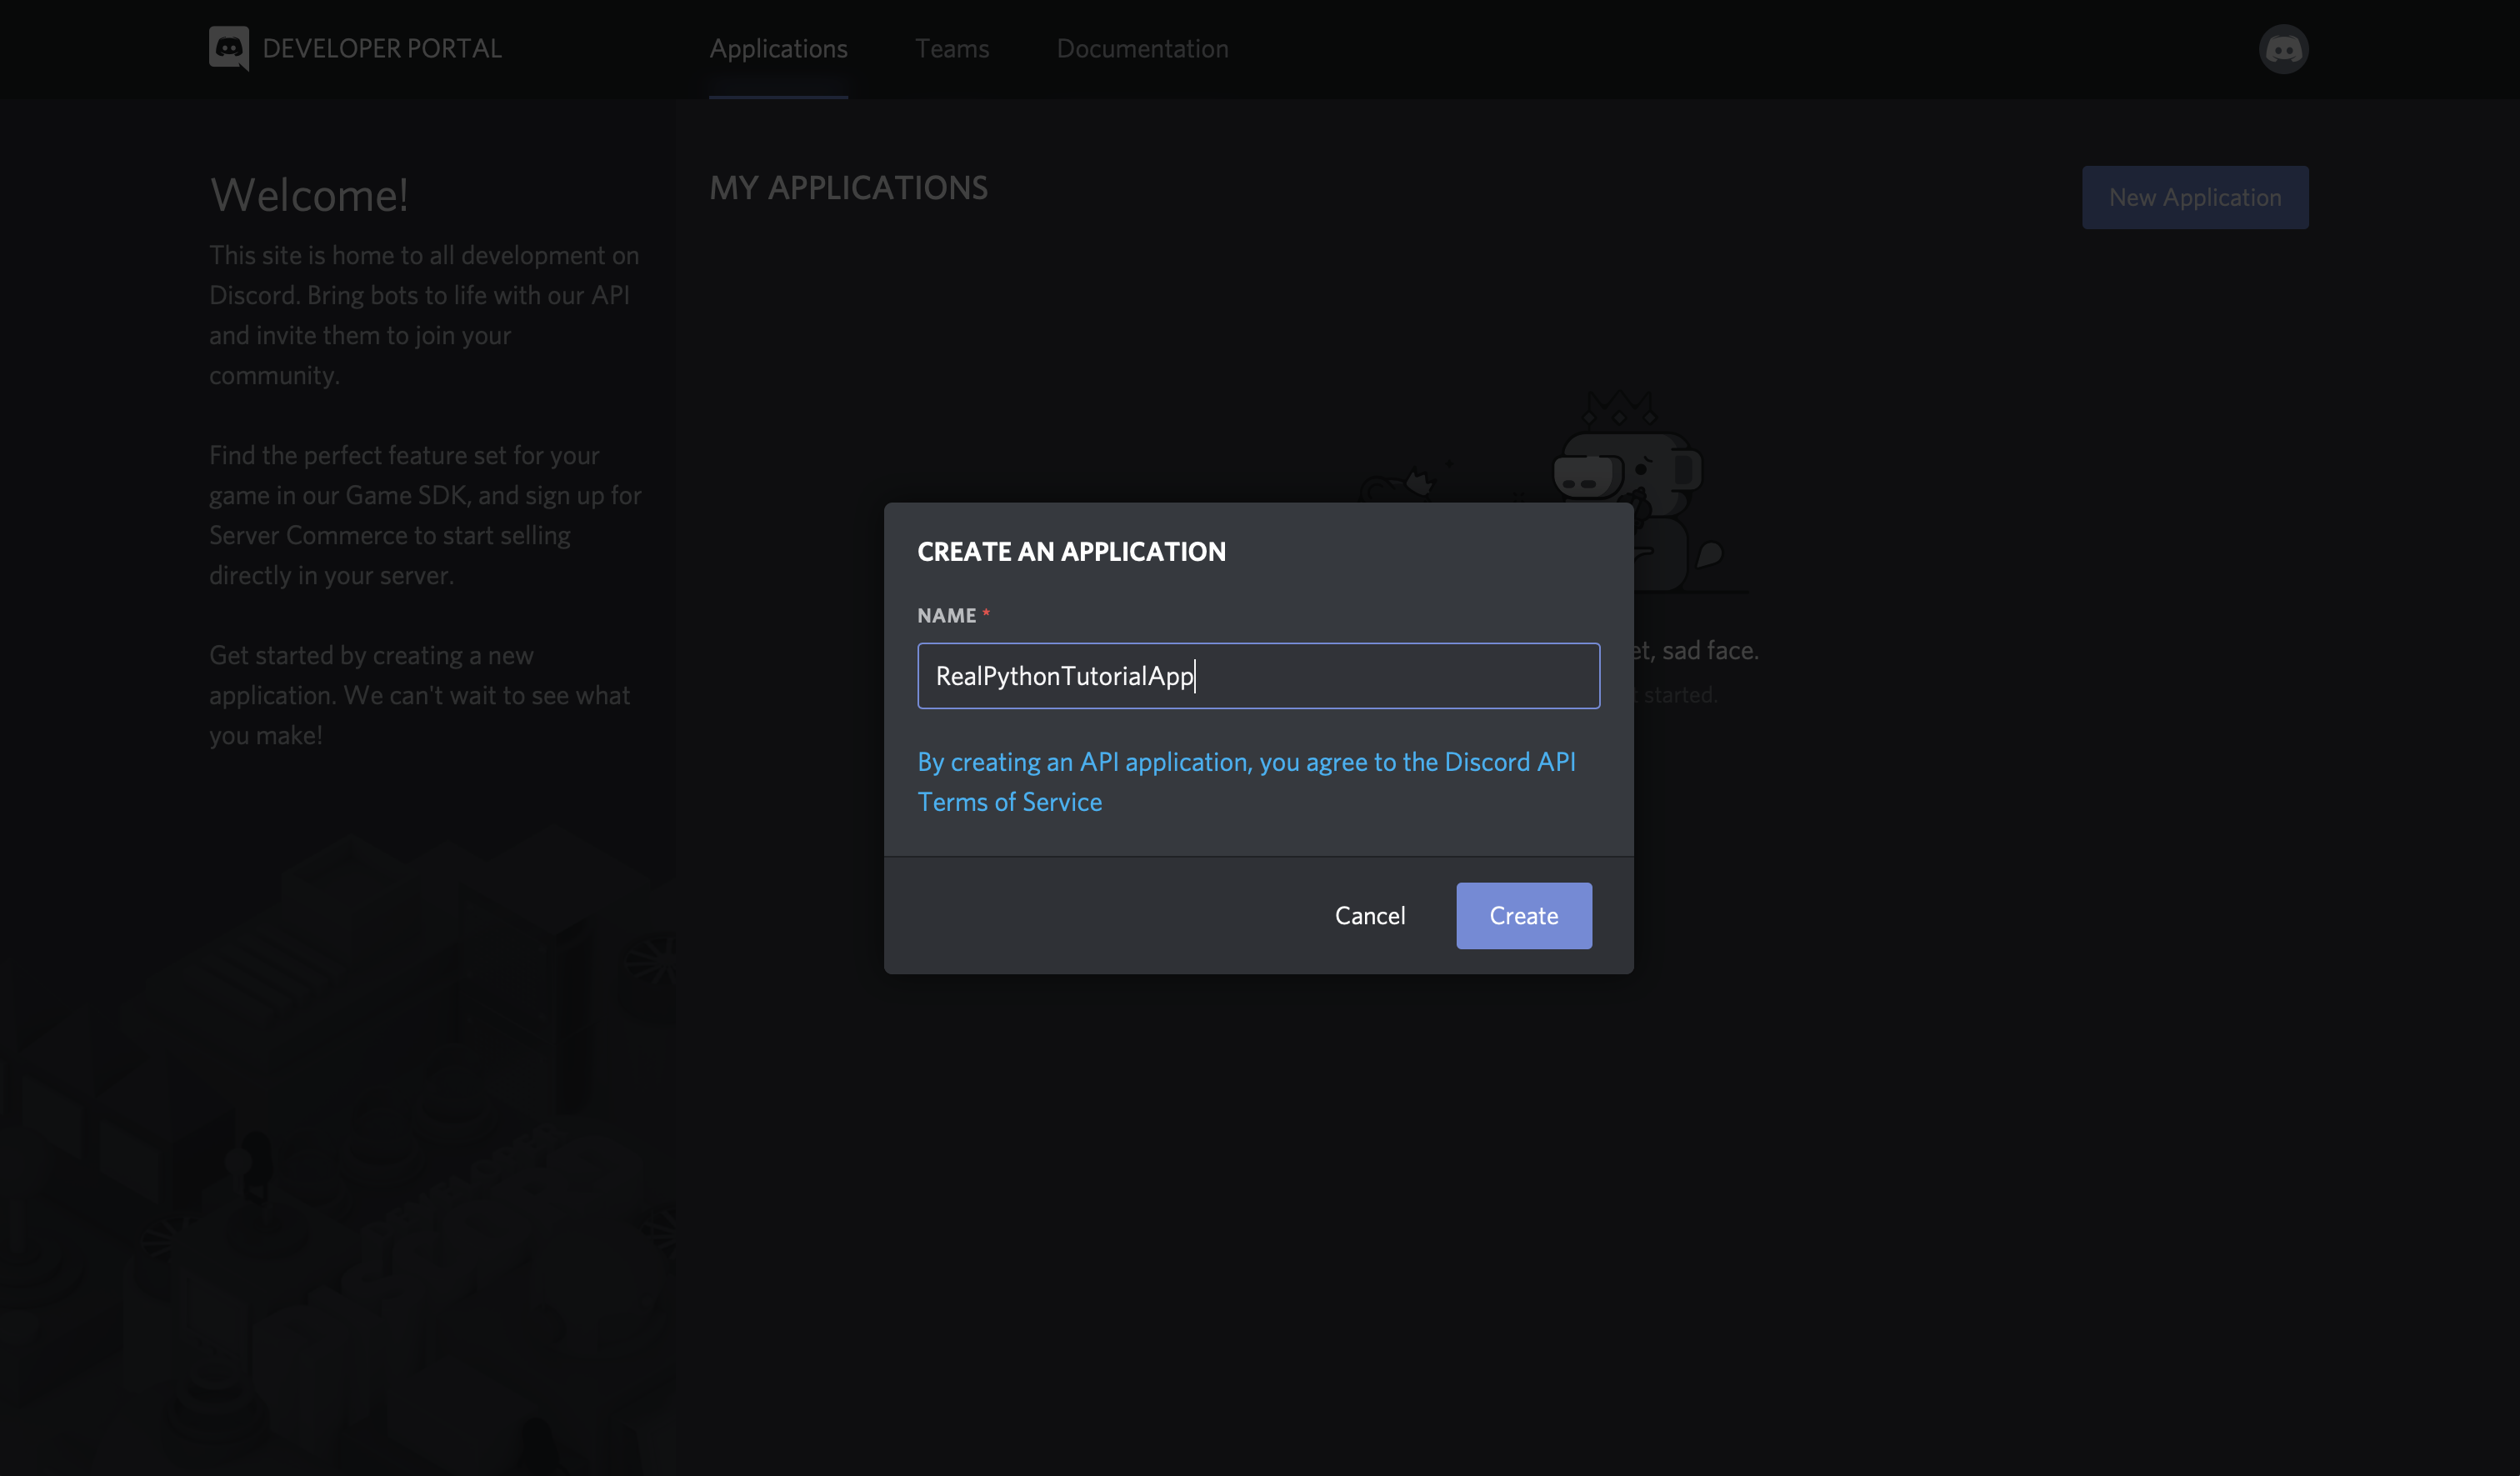
Next, you’ll be prompted to name your application. Select a name and click Create:
Congratulations! You made a Discord application. On the resulting screen, you can see information about your application:
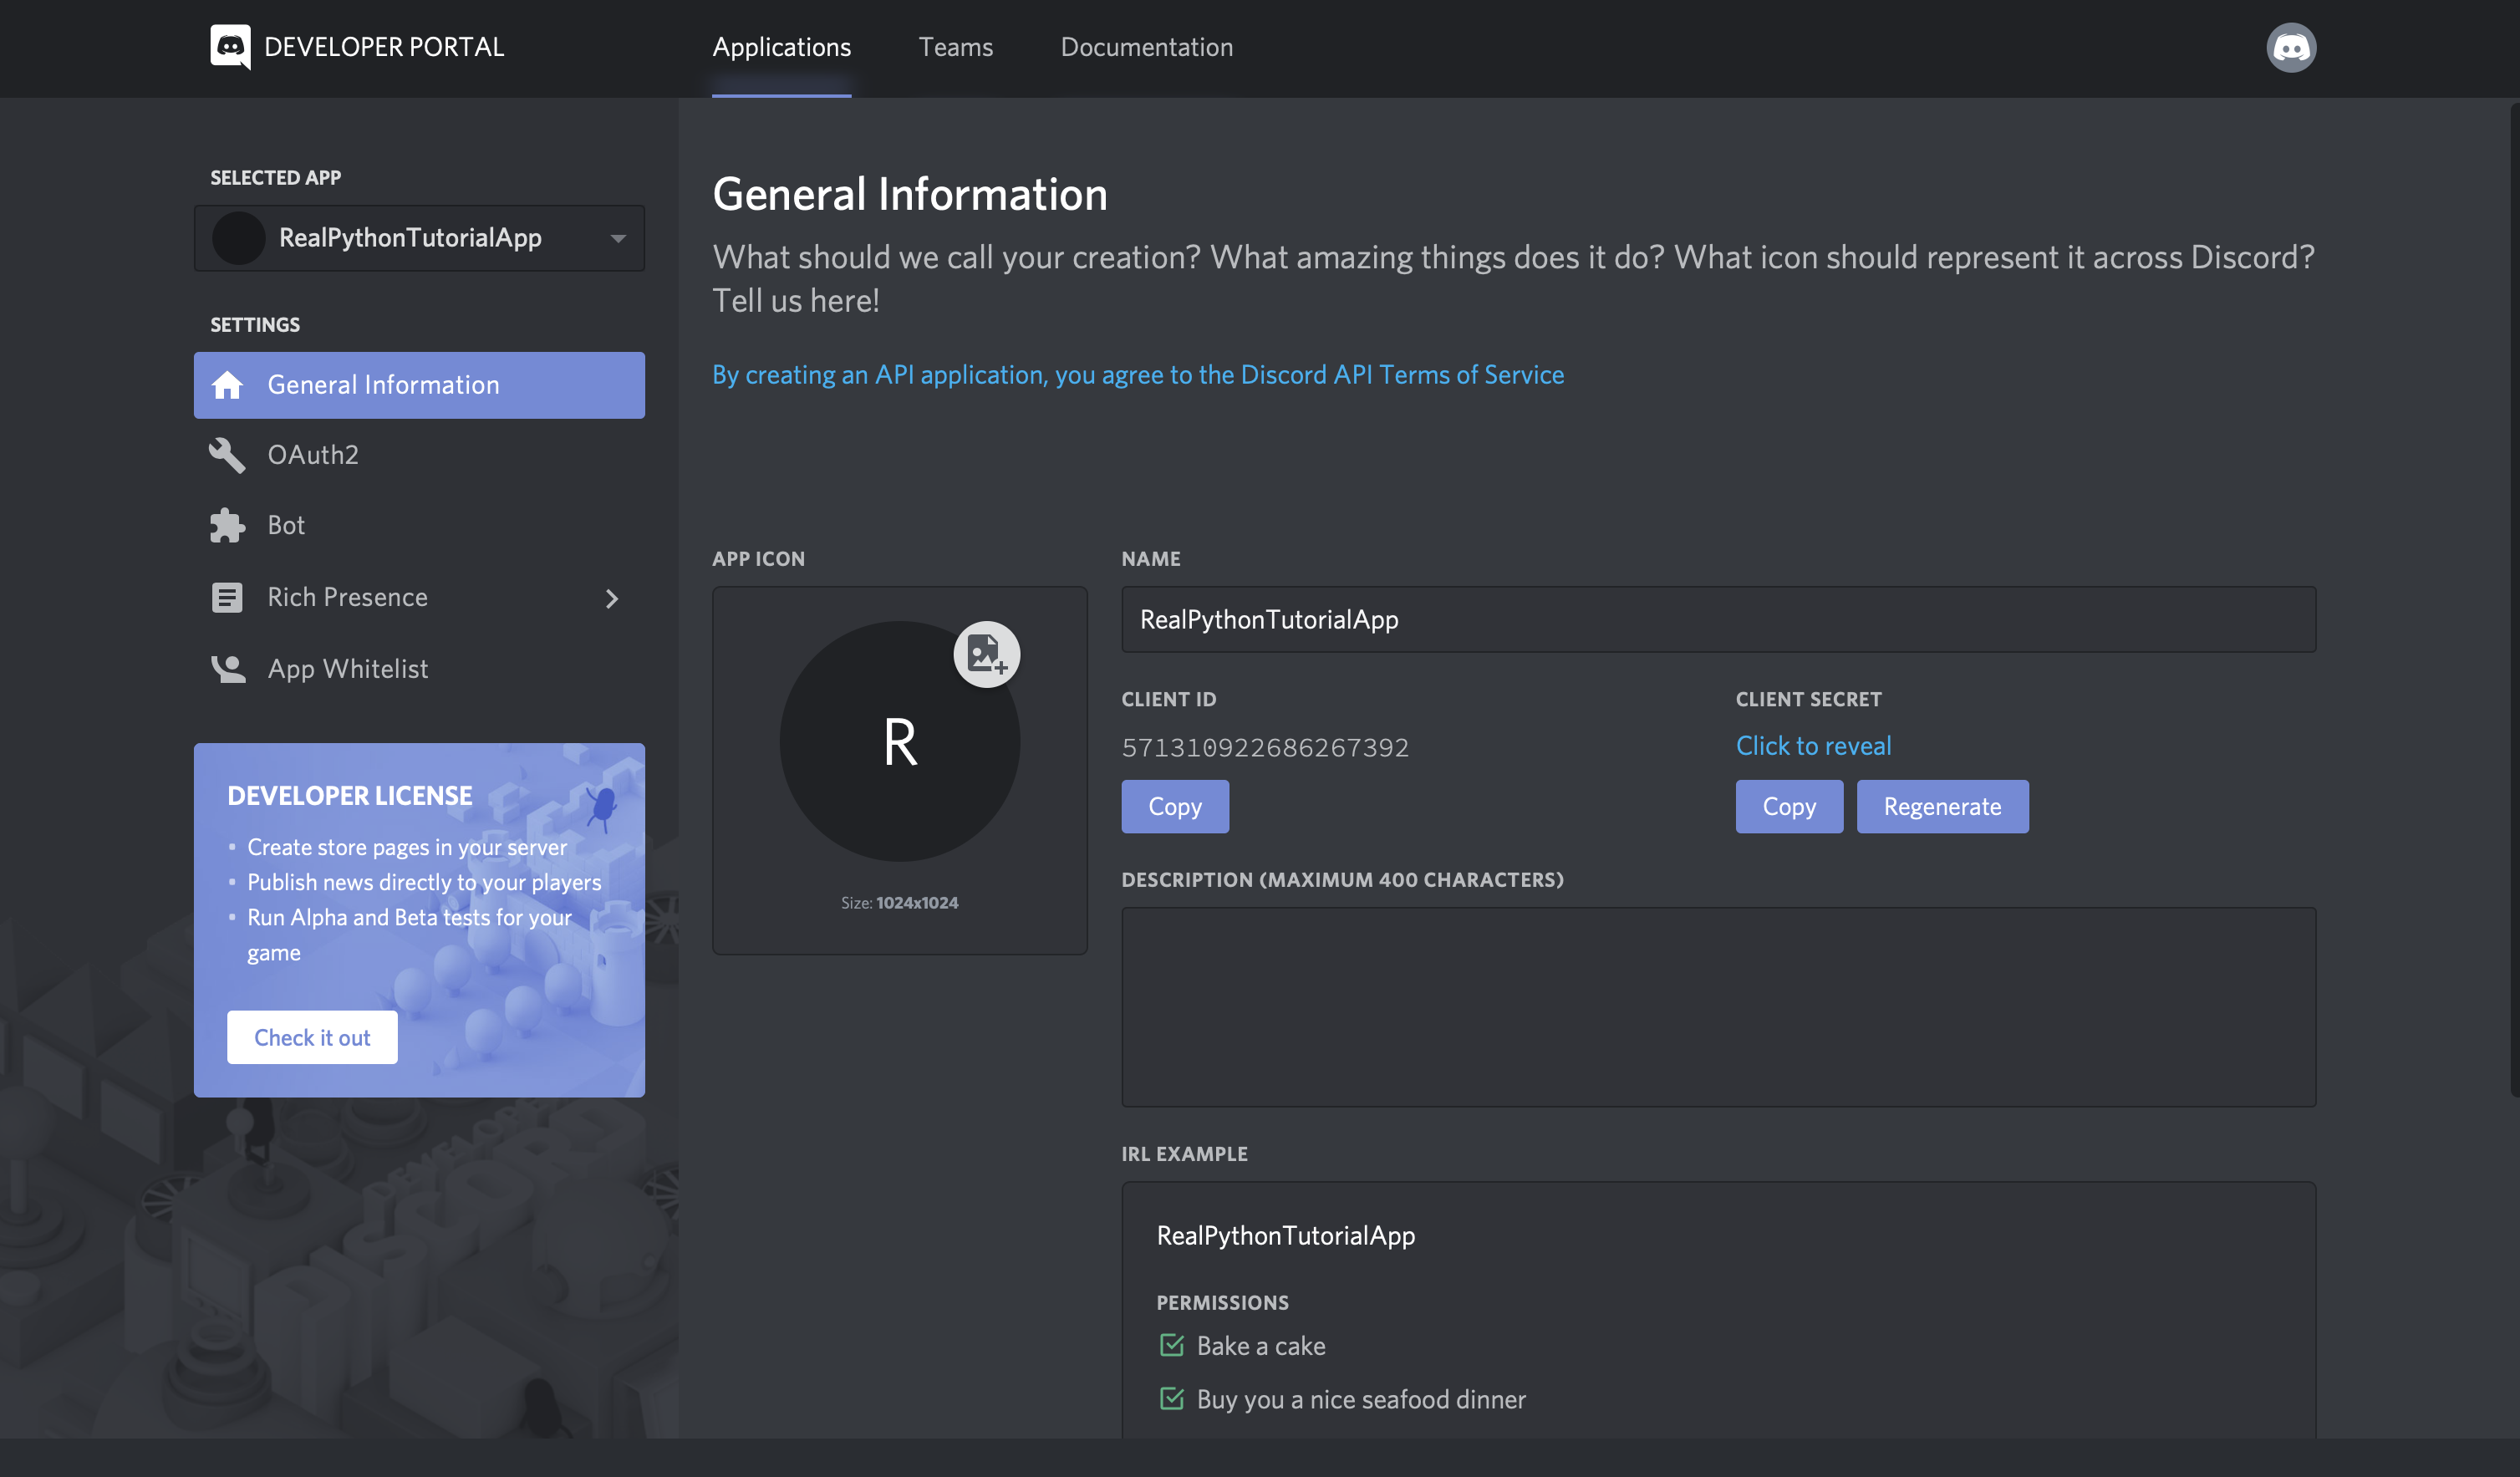
Keep in mind that any program that interacts with Discord APIs requires a Discord application, not just bots. Bot-related APIs are only a subset of Discord’s total interface.
However, since this tutorial is about how to make a Discord bot, navigate to the Bot tab on the left-hand navigation list.
Creating a Bot
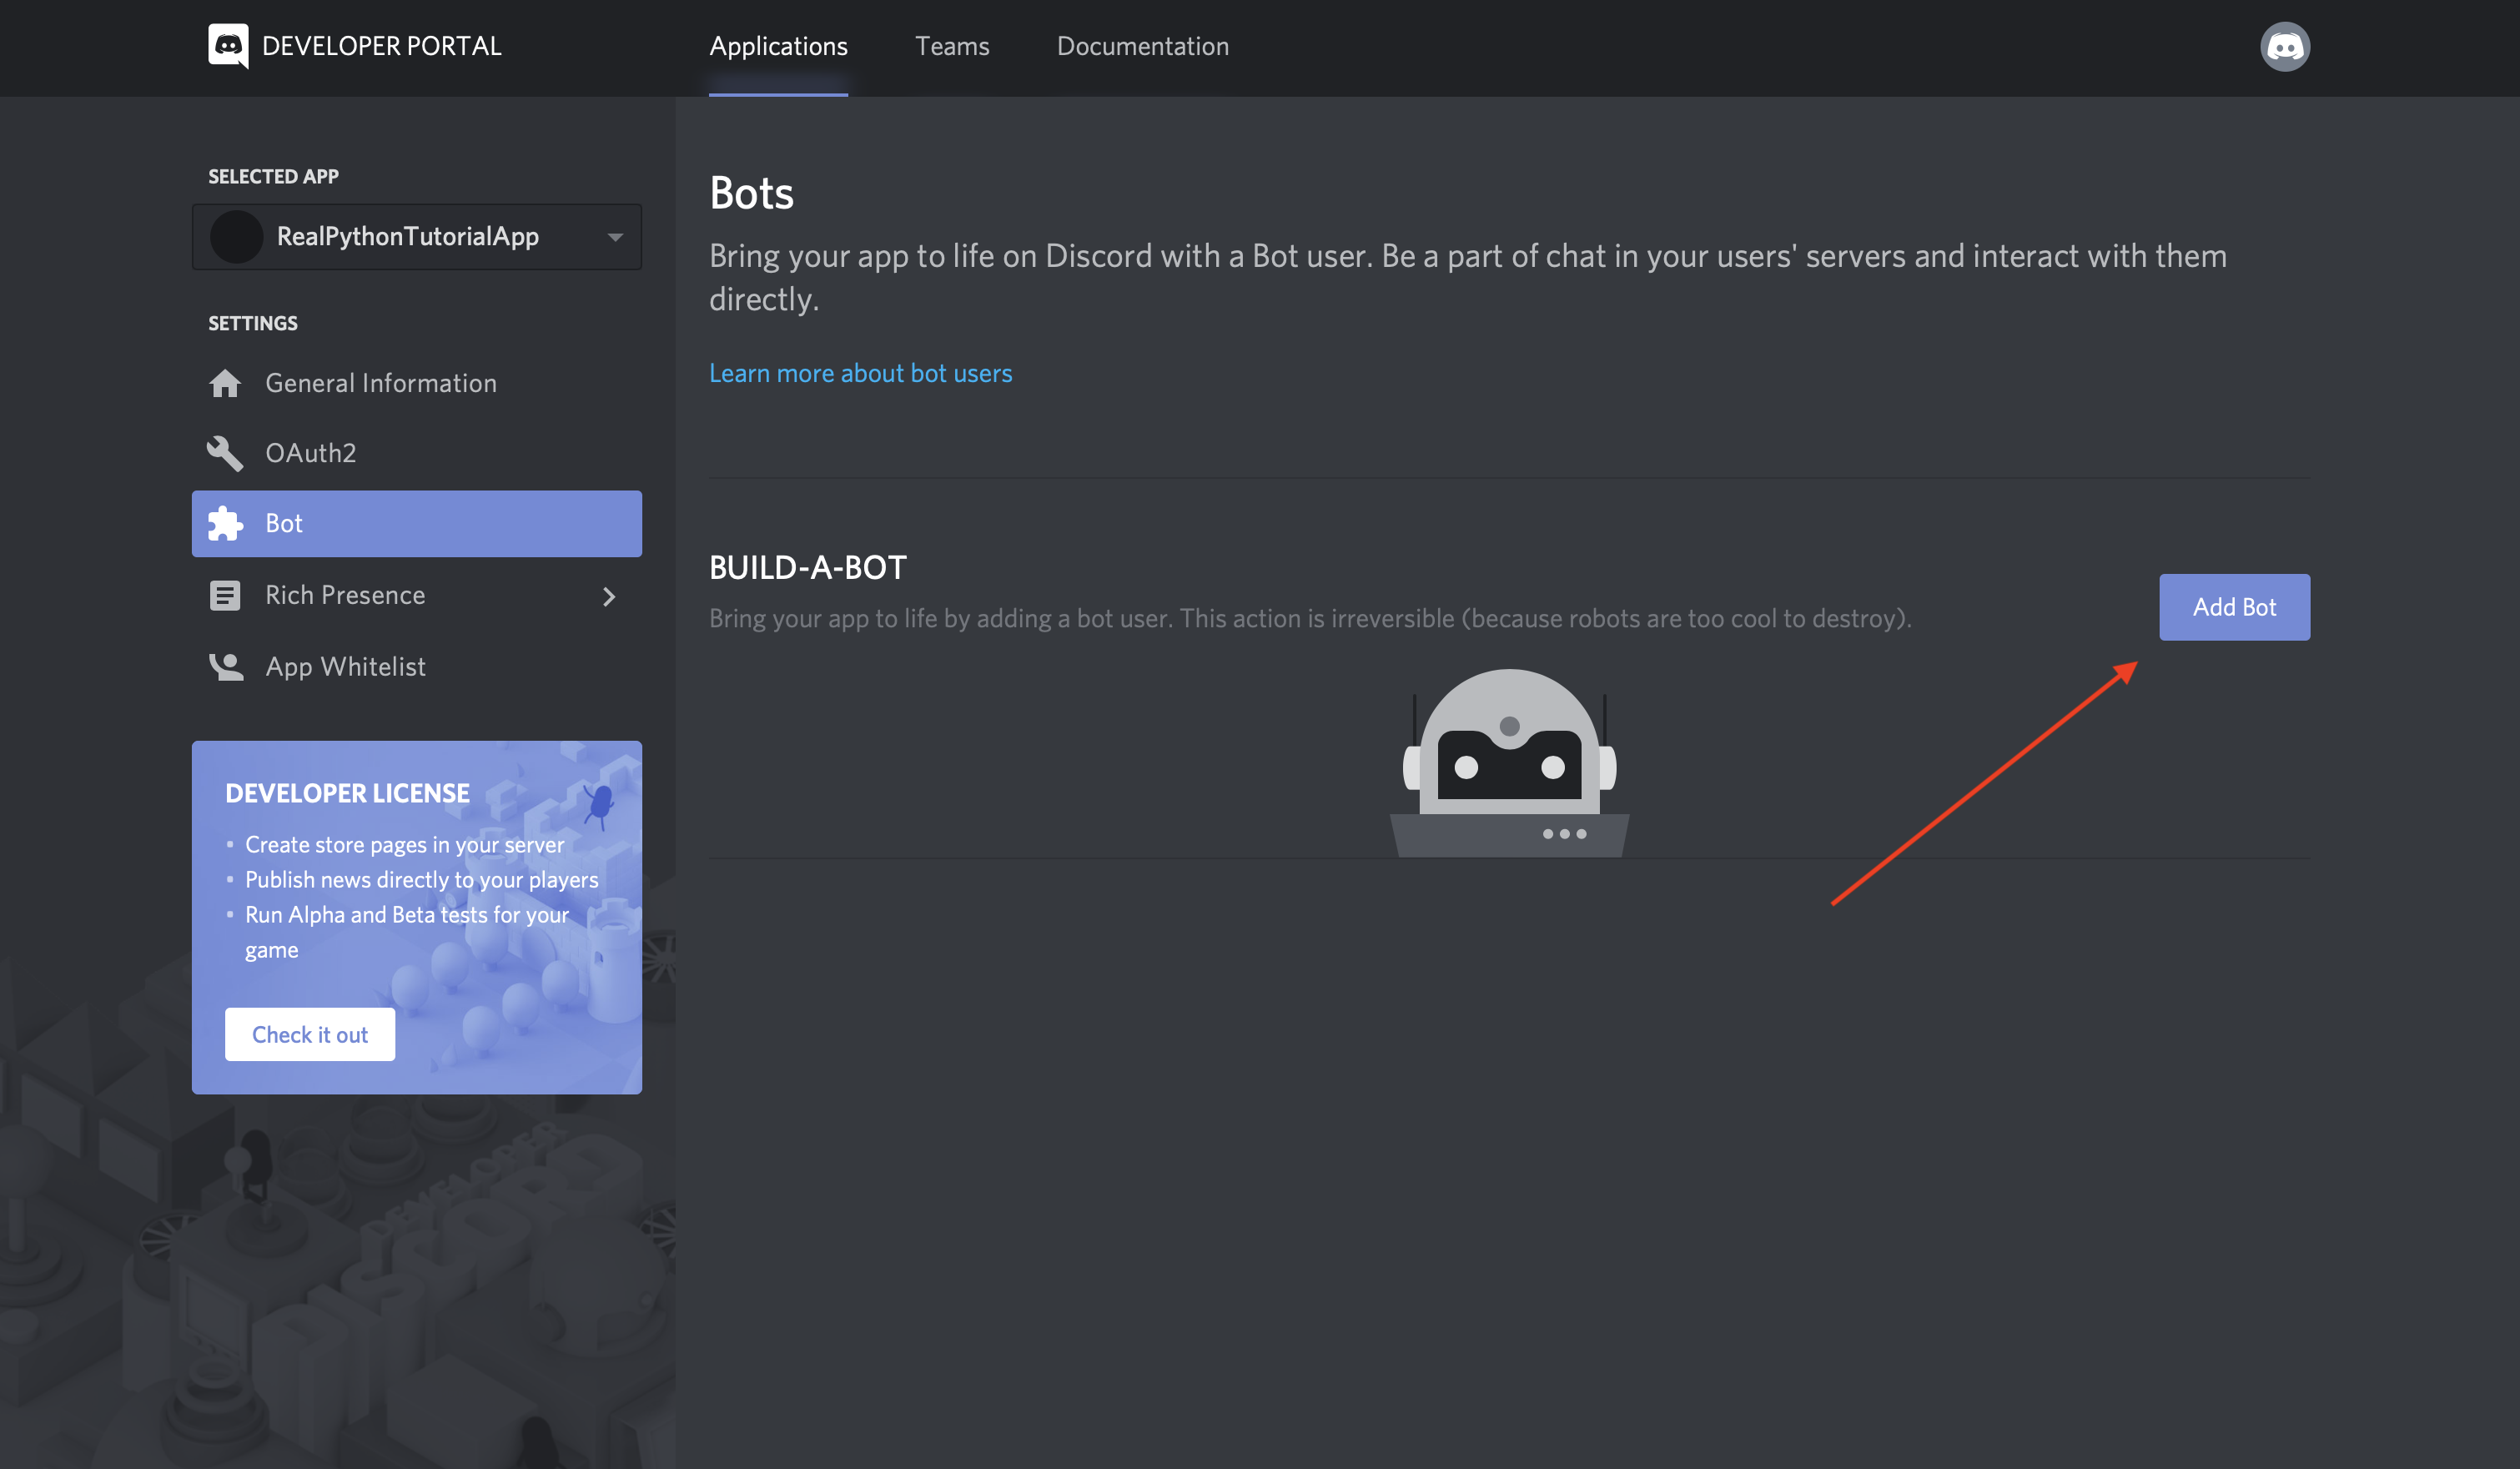
As you learned in the previous sections, a bot user is one that listens to and automatically reacts to certain events and commands on Discord.
For your code to actually be manifested on Discord, you’ll need to create a bot user. To do so, select Add Bot:
Once you confirm that you want to add the bot to your application, you’ll see the new bot user in the portal:
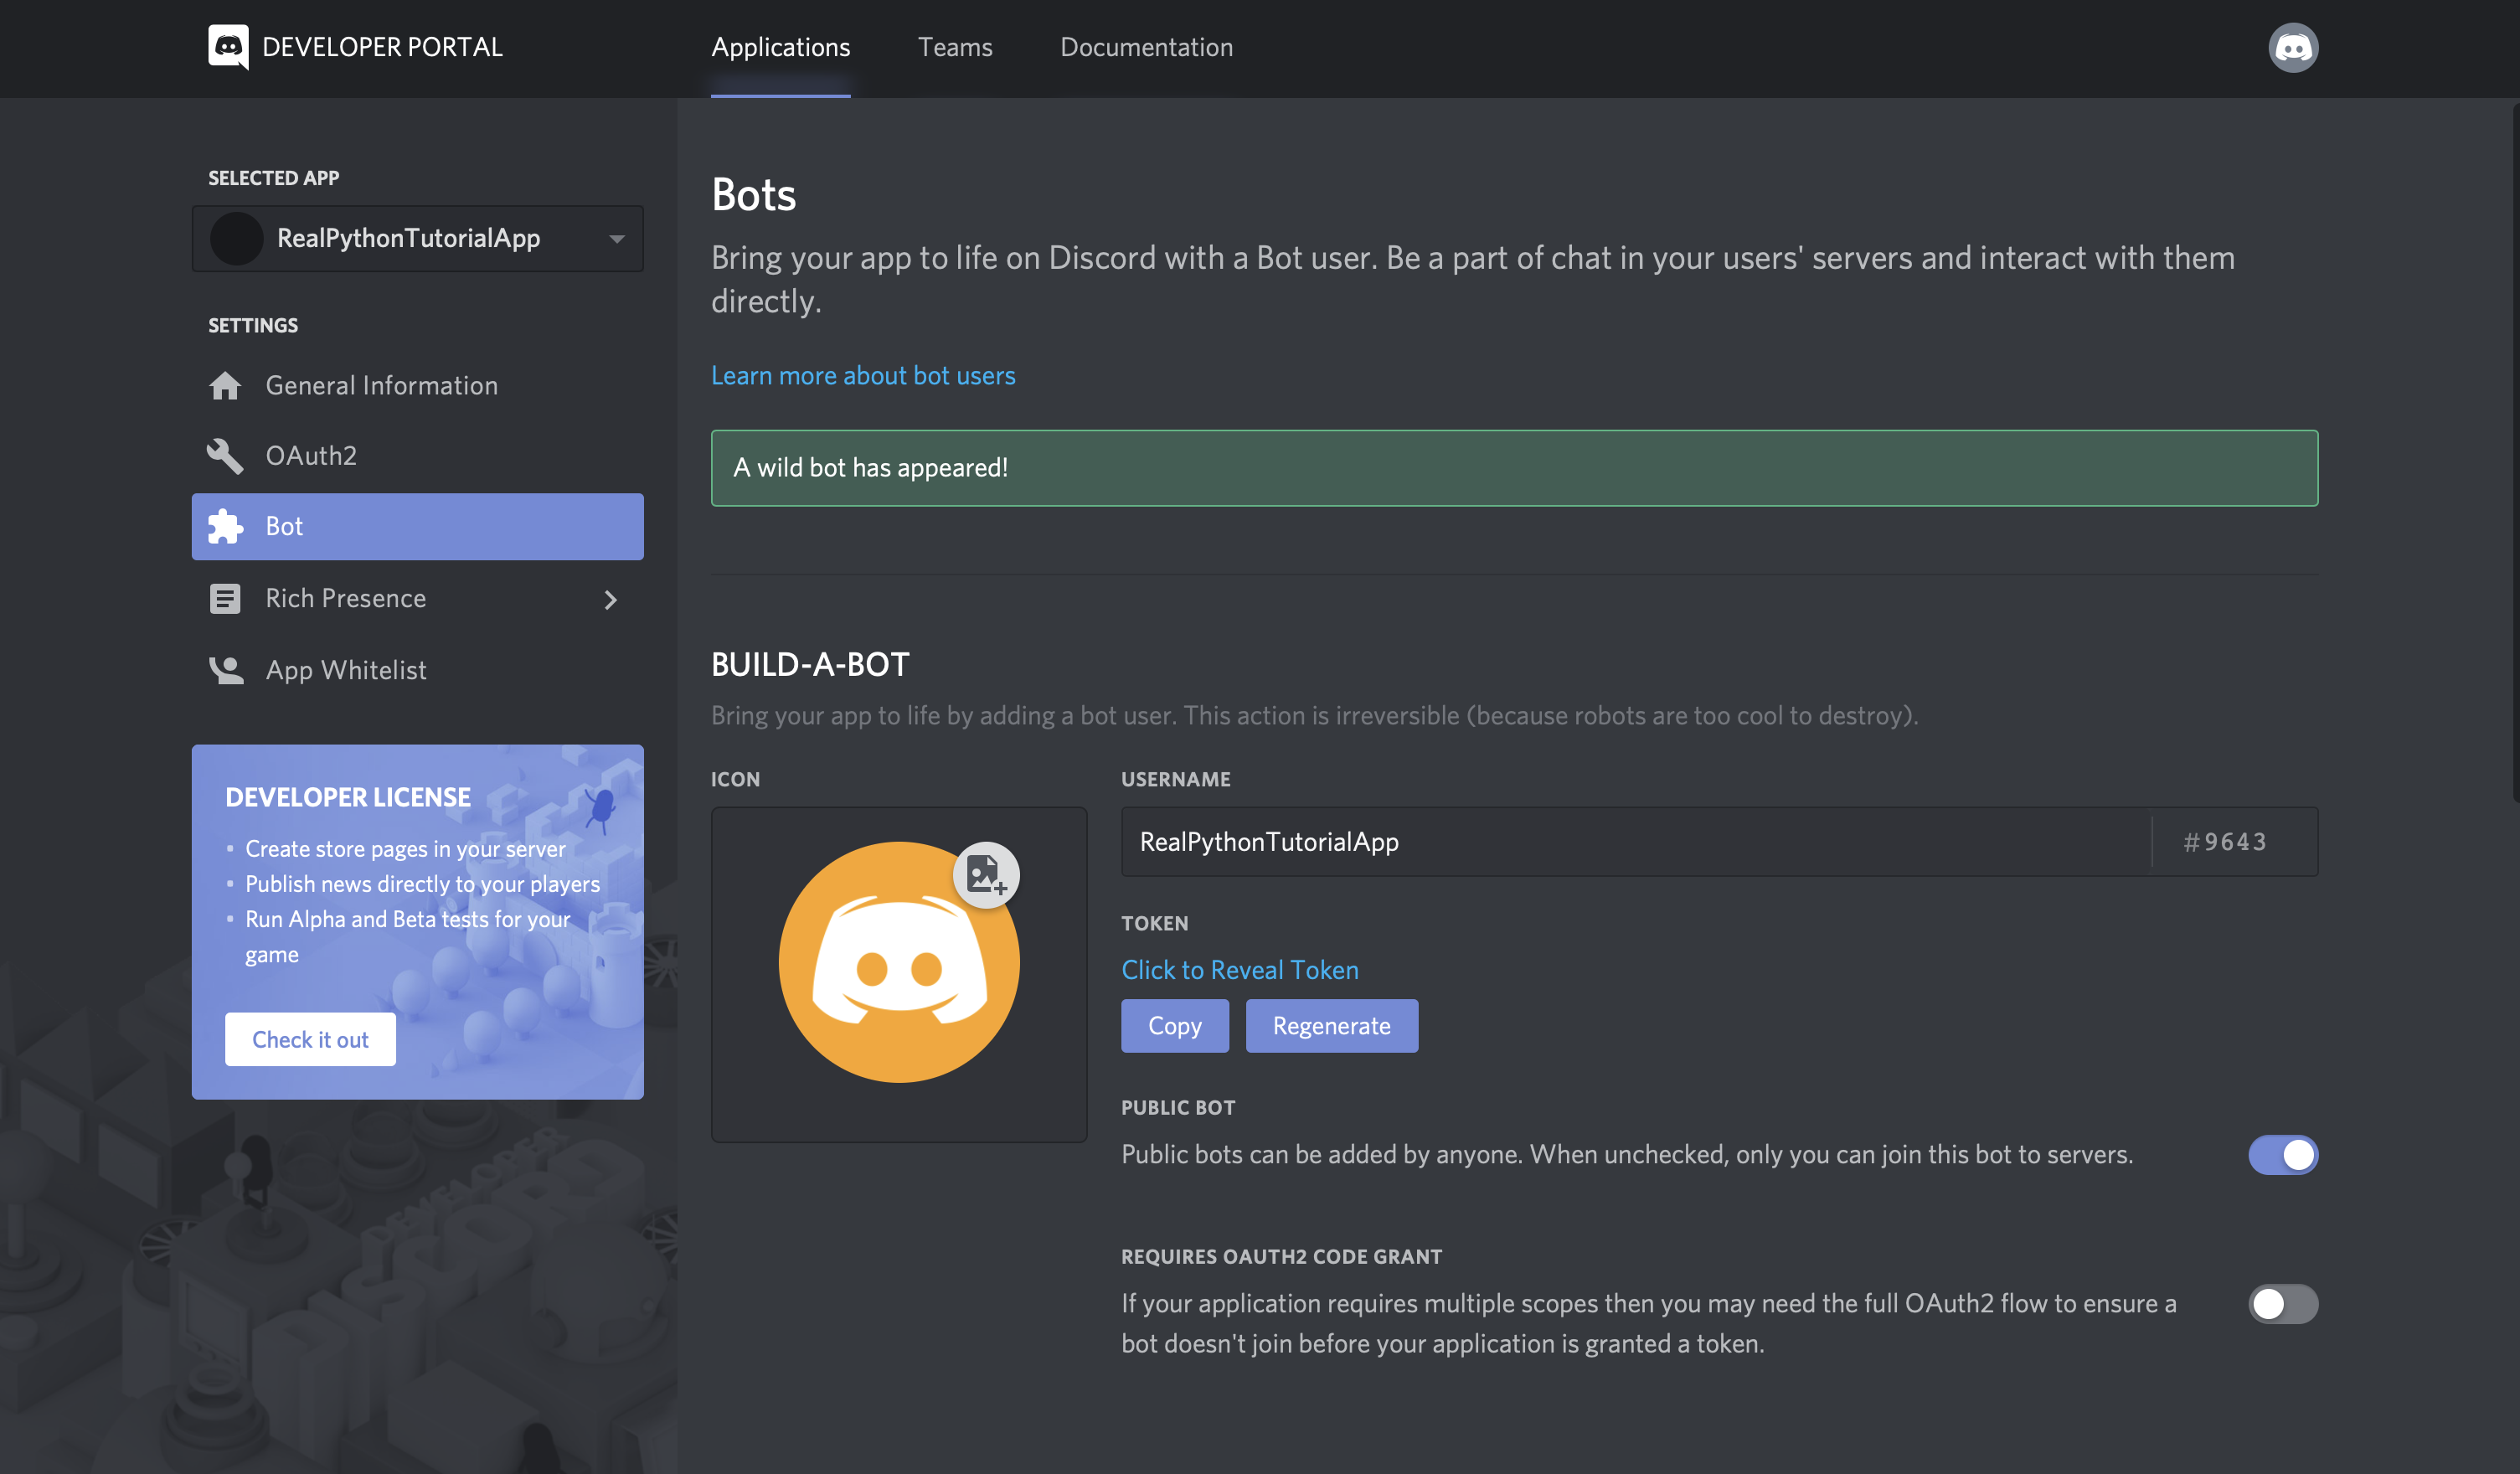
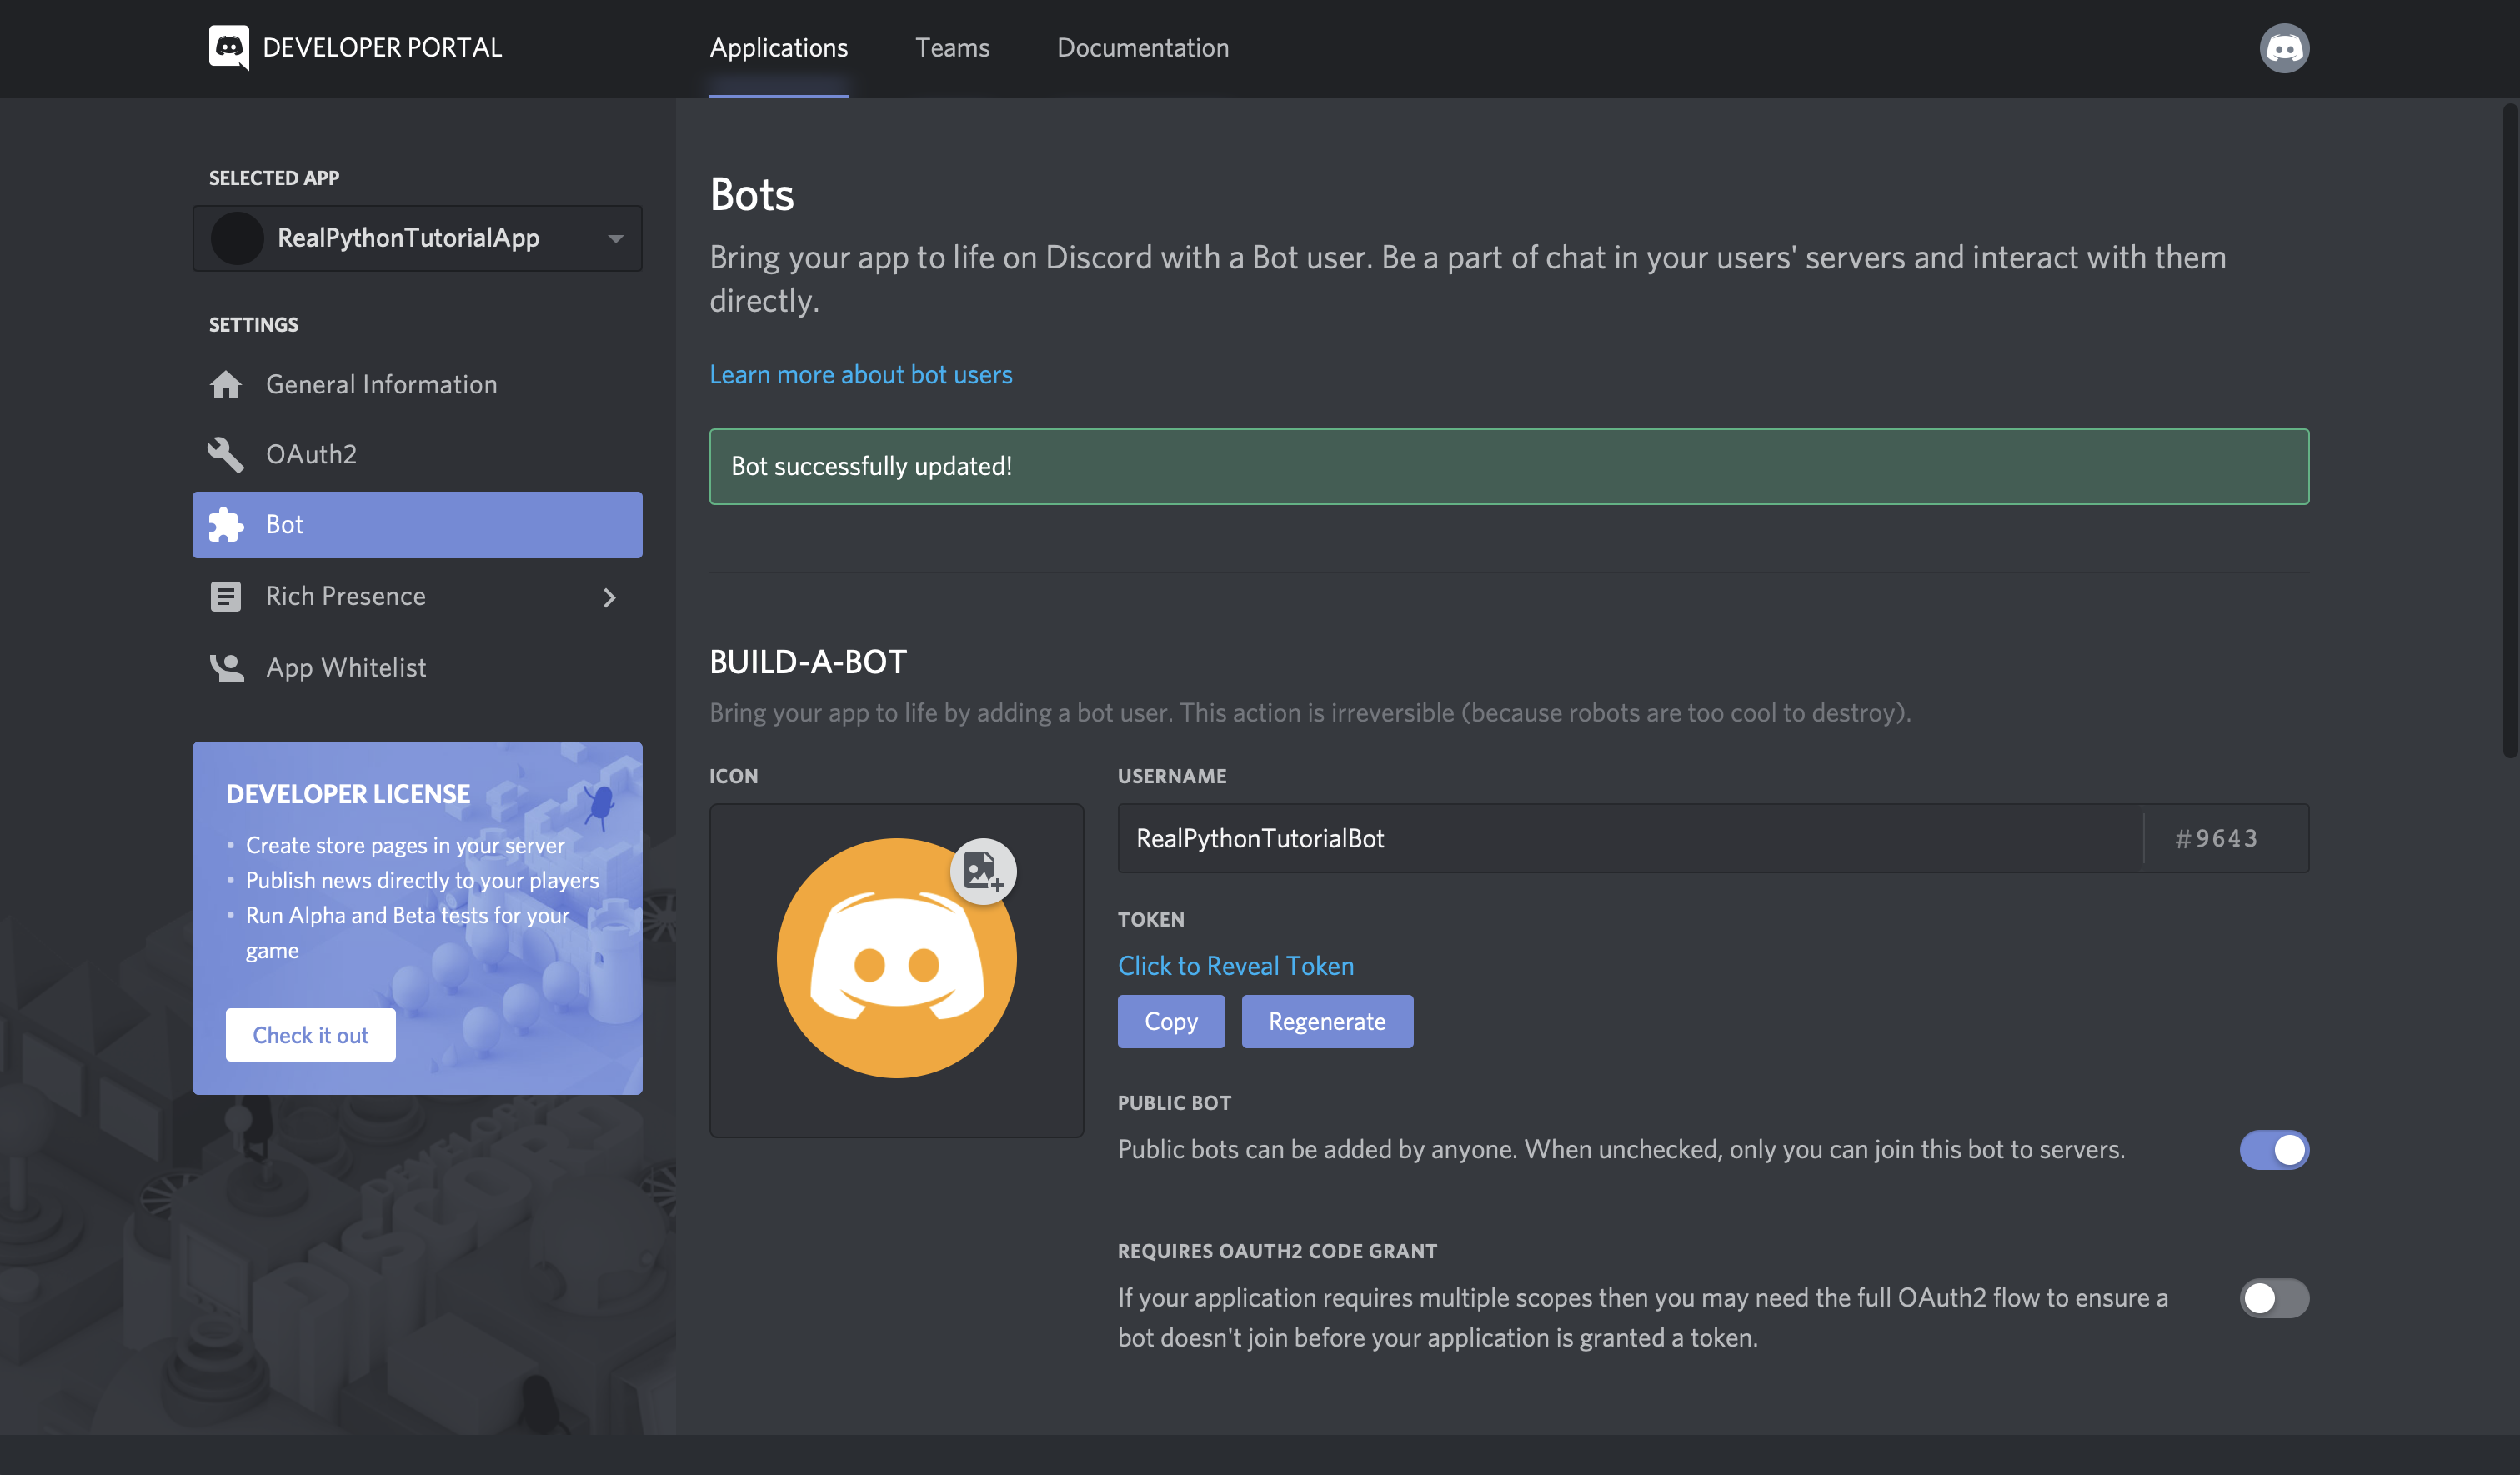
Notice that, by default, your bot user will inherit the name of your application. Instead, update the username to something more bot-like, such as RealPythonTutorialBot, and Save Changes:
Now, the bot’s all set and ready to go, but to where?
A bot user is not useful if it’s not interacting with other users. Next, you’ll create a guild so that your bot can interact with other users.
Creating a Guild
A guild (or a server, as it is often called in Discord’s user interface) is a specific group of channels where users congregate to chat.
Note: While guild and server are interchangeable, this article will use the term guild primarily because the APIs stick to the same term. The term server will only be used when referring to a guild in the graphical UI.
For example, say you want to create a space where users can come together and talk about your latest game. You’d start by creating a guild. Then, in your guild, you could have multiple channels, such as:
- General Discussion: A channel for users to talk about whatever they want
- Spoilers, Beware: A channel for users who have finished your game to talk about all the end game reveals
- Announcements: A channel for you to announce game updates and for users to discuss them
Once you’ve created your guild, you’d invite other users to populate it.
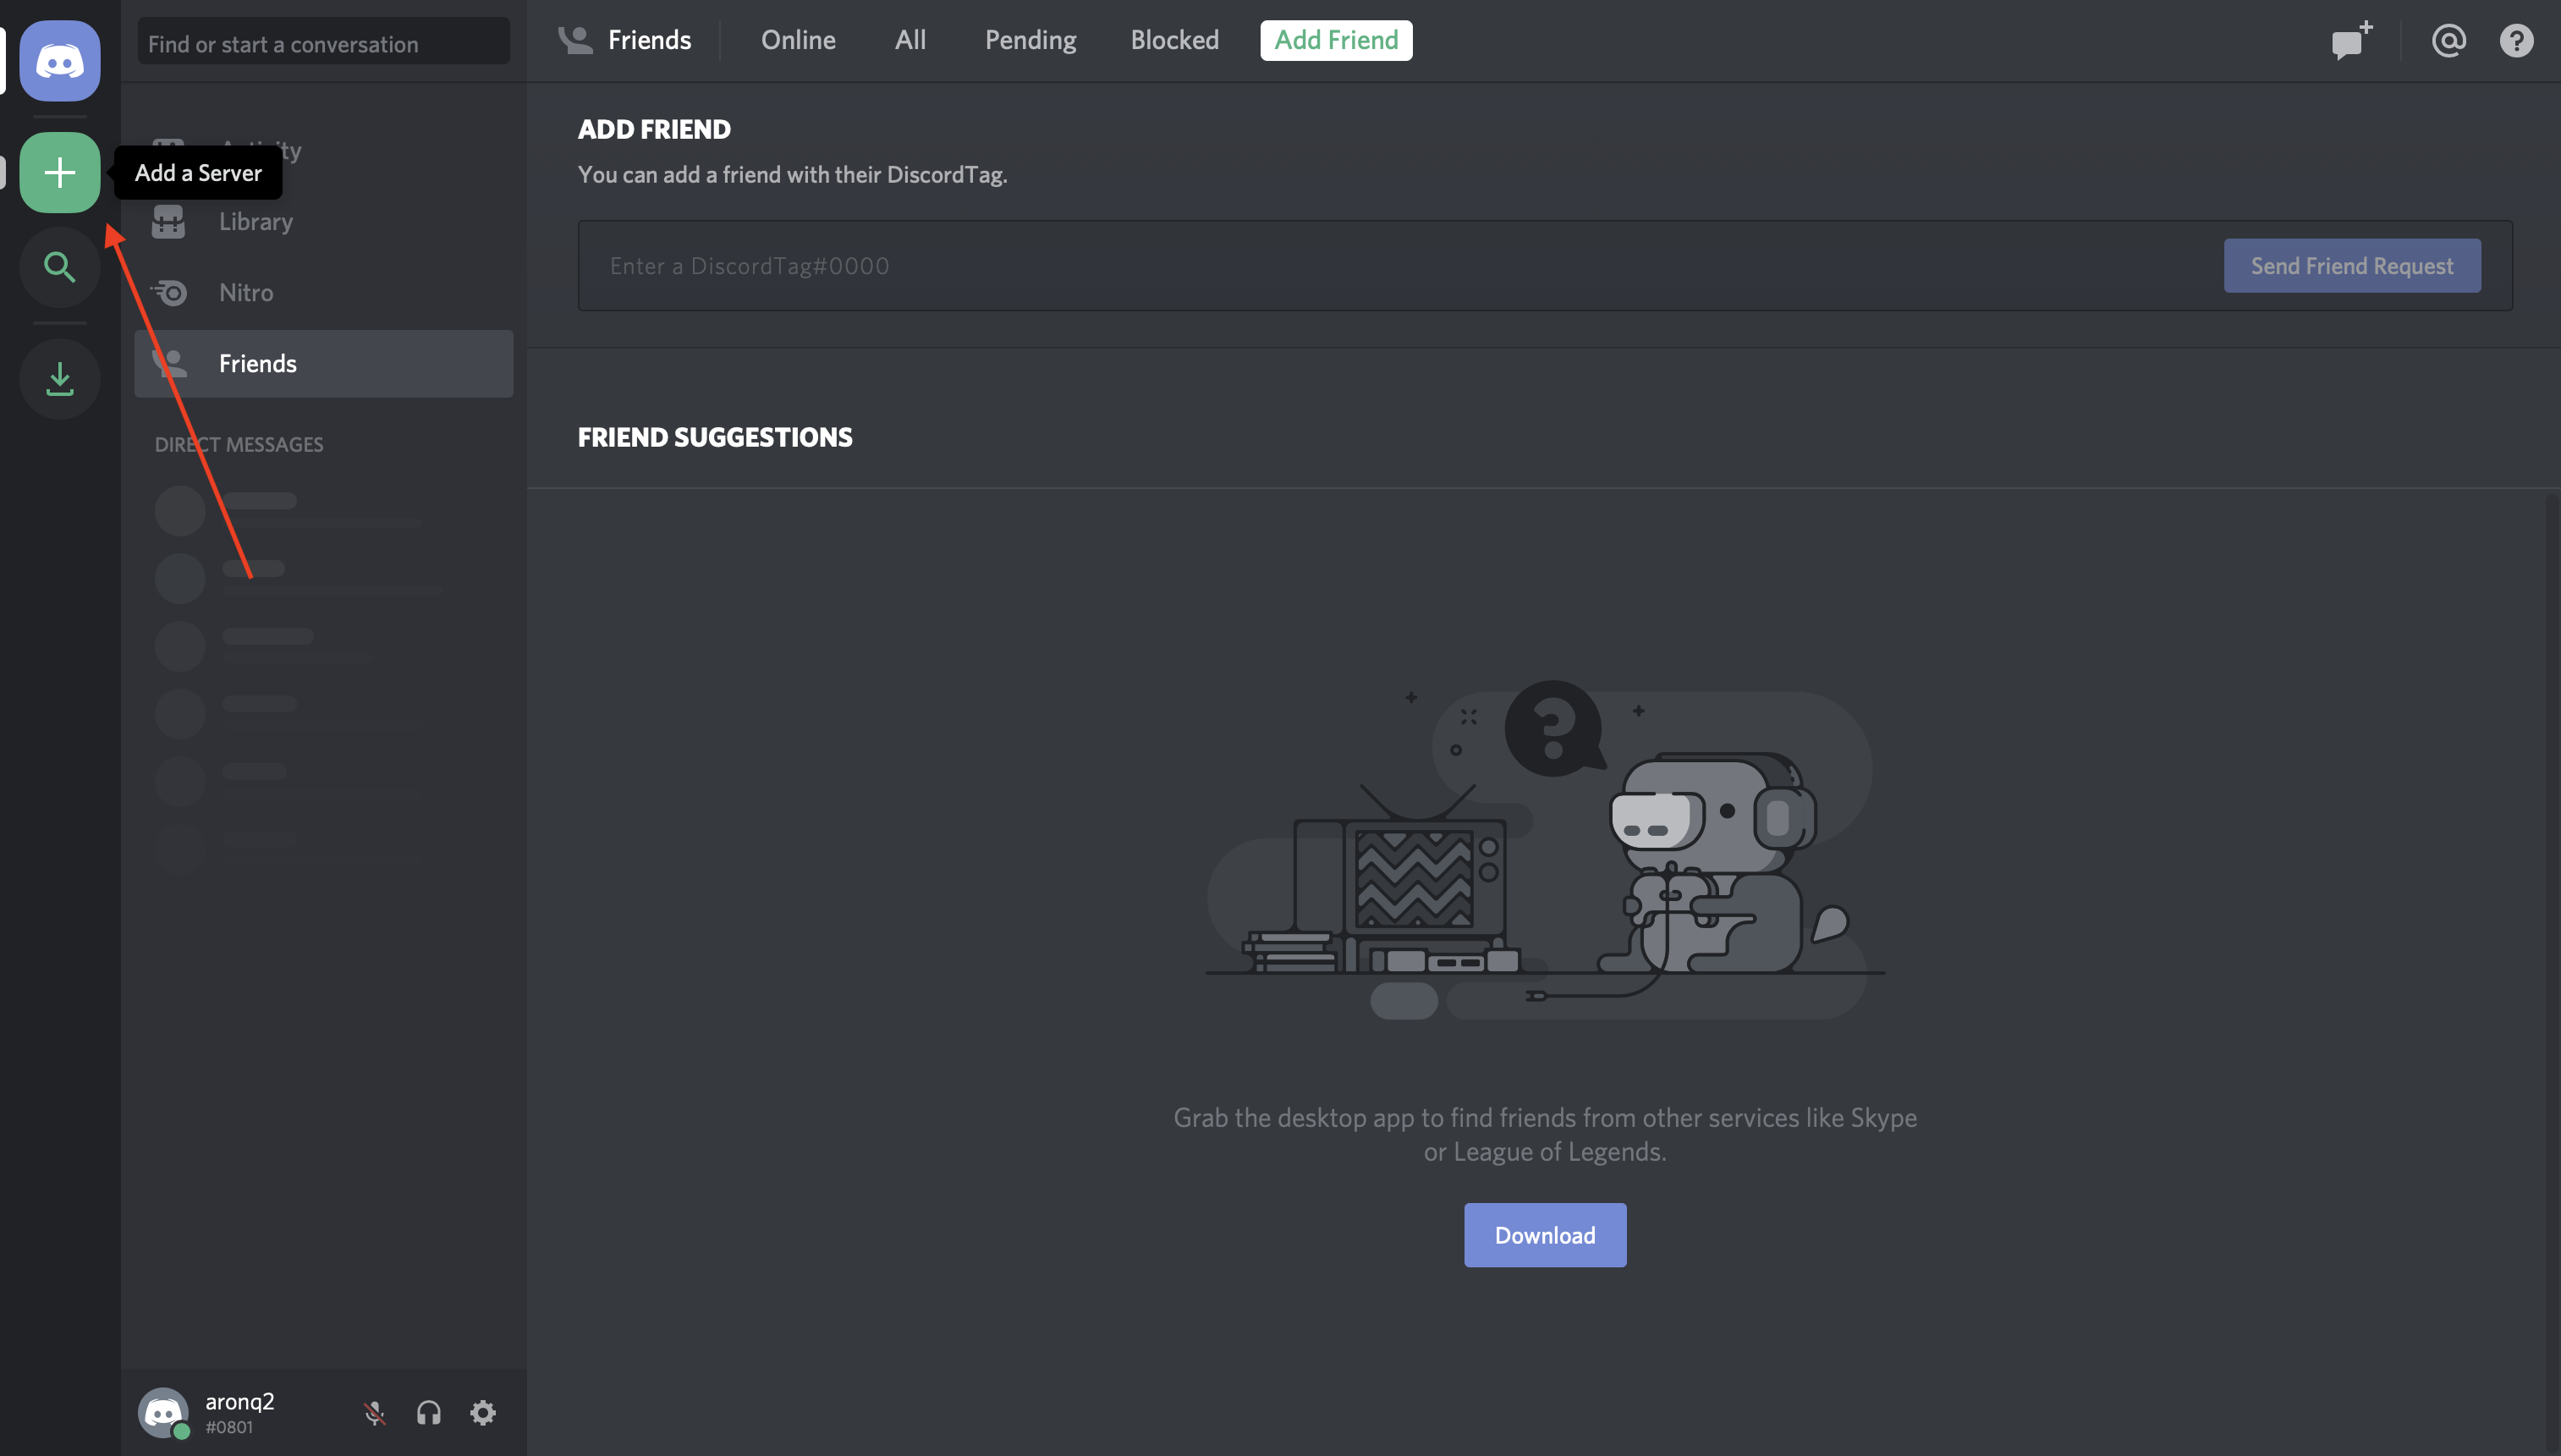
So, to create a guild, head to your Discord home page:
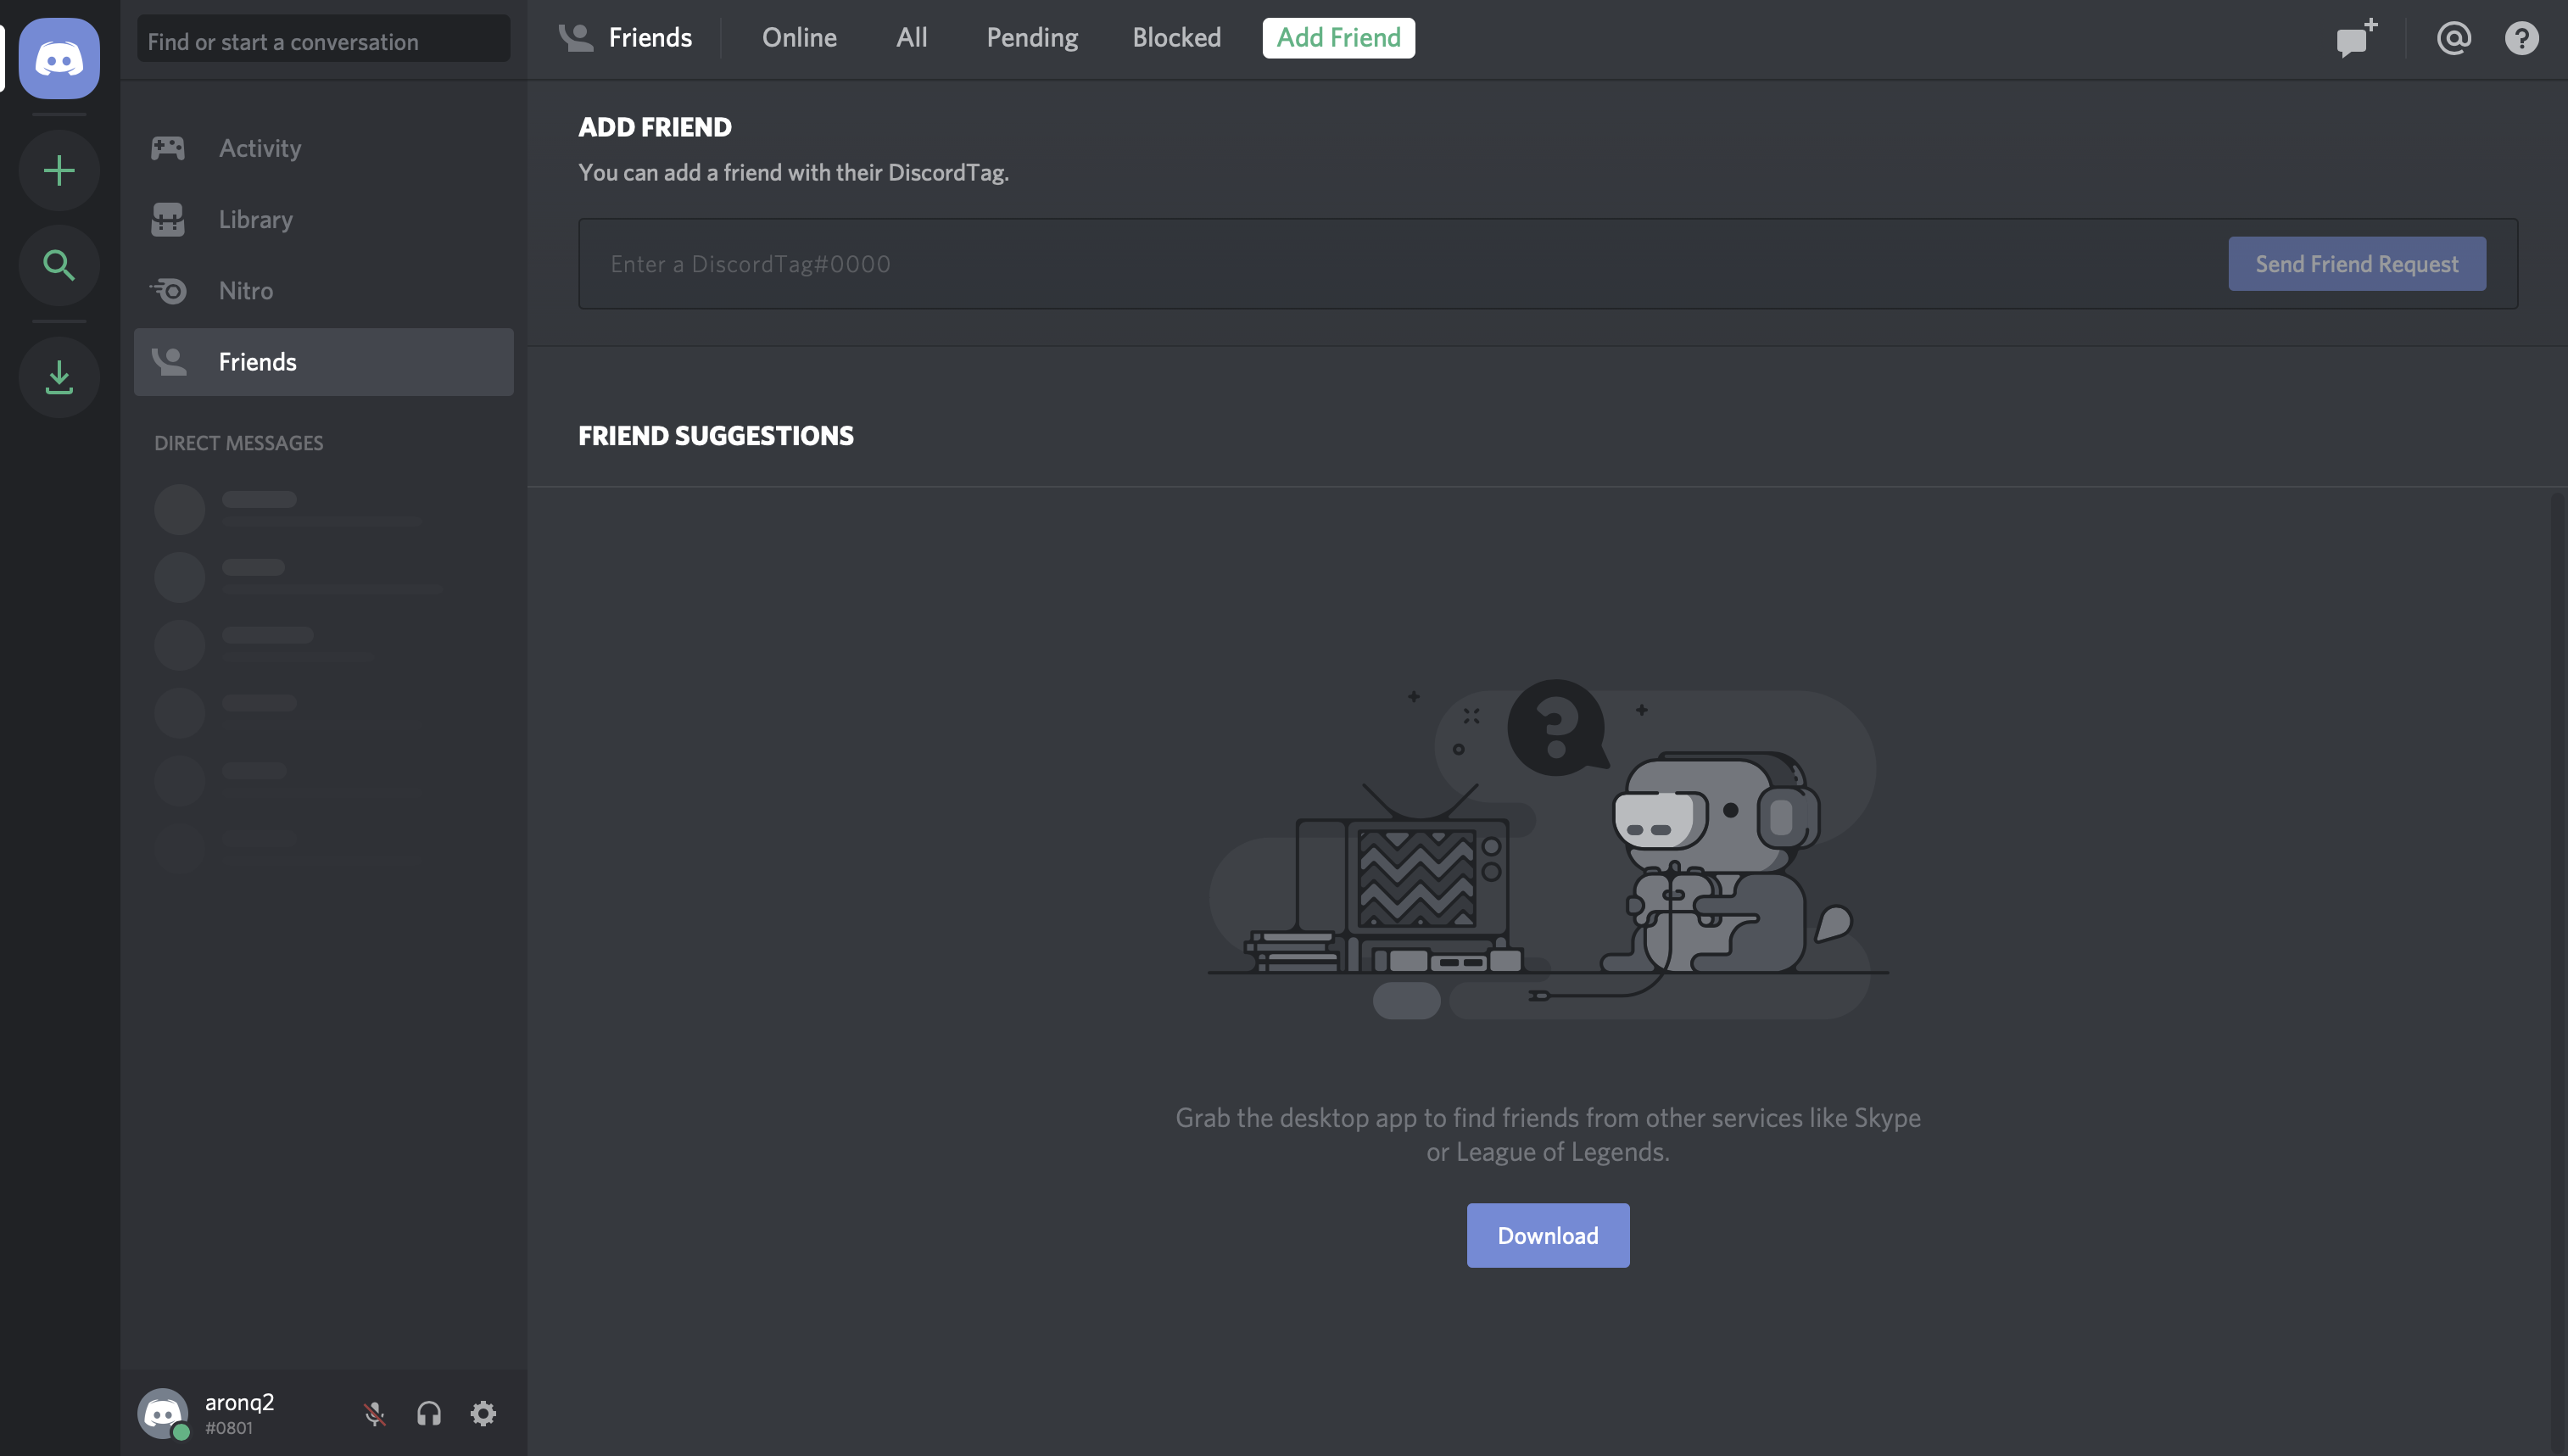
From this home page, you can view and add friends, direct messages, and guilds. From here, select the + icon on the left-hand side of the web page to Add a Server:
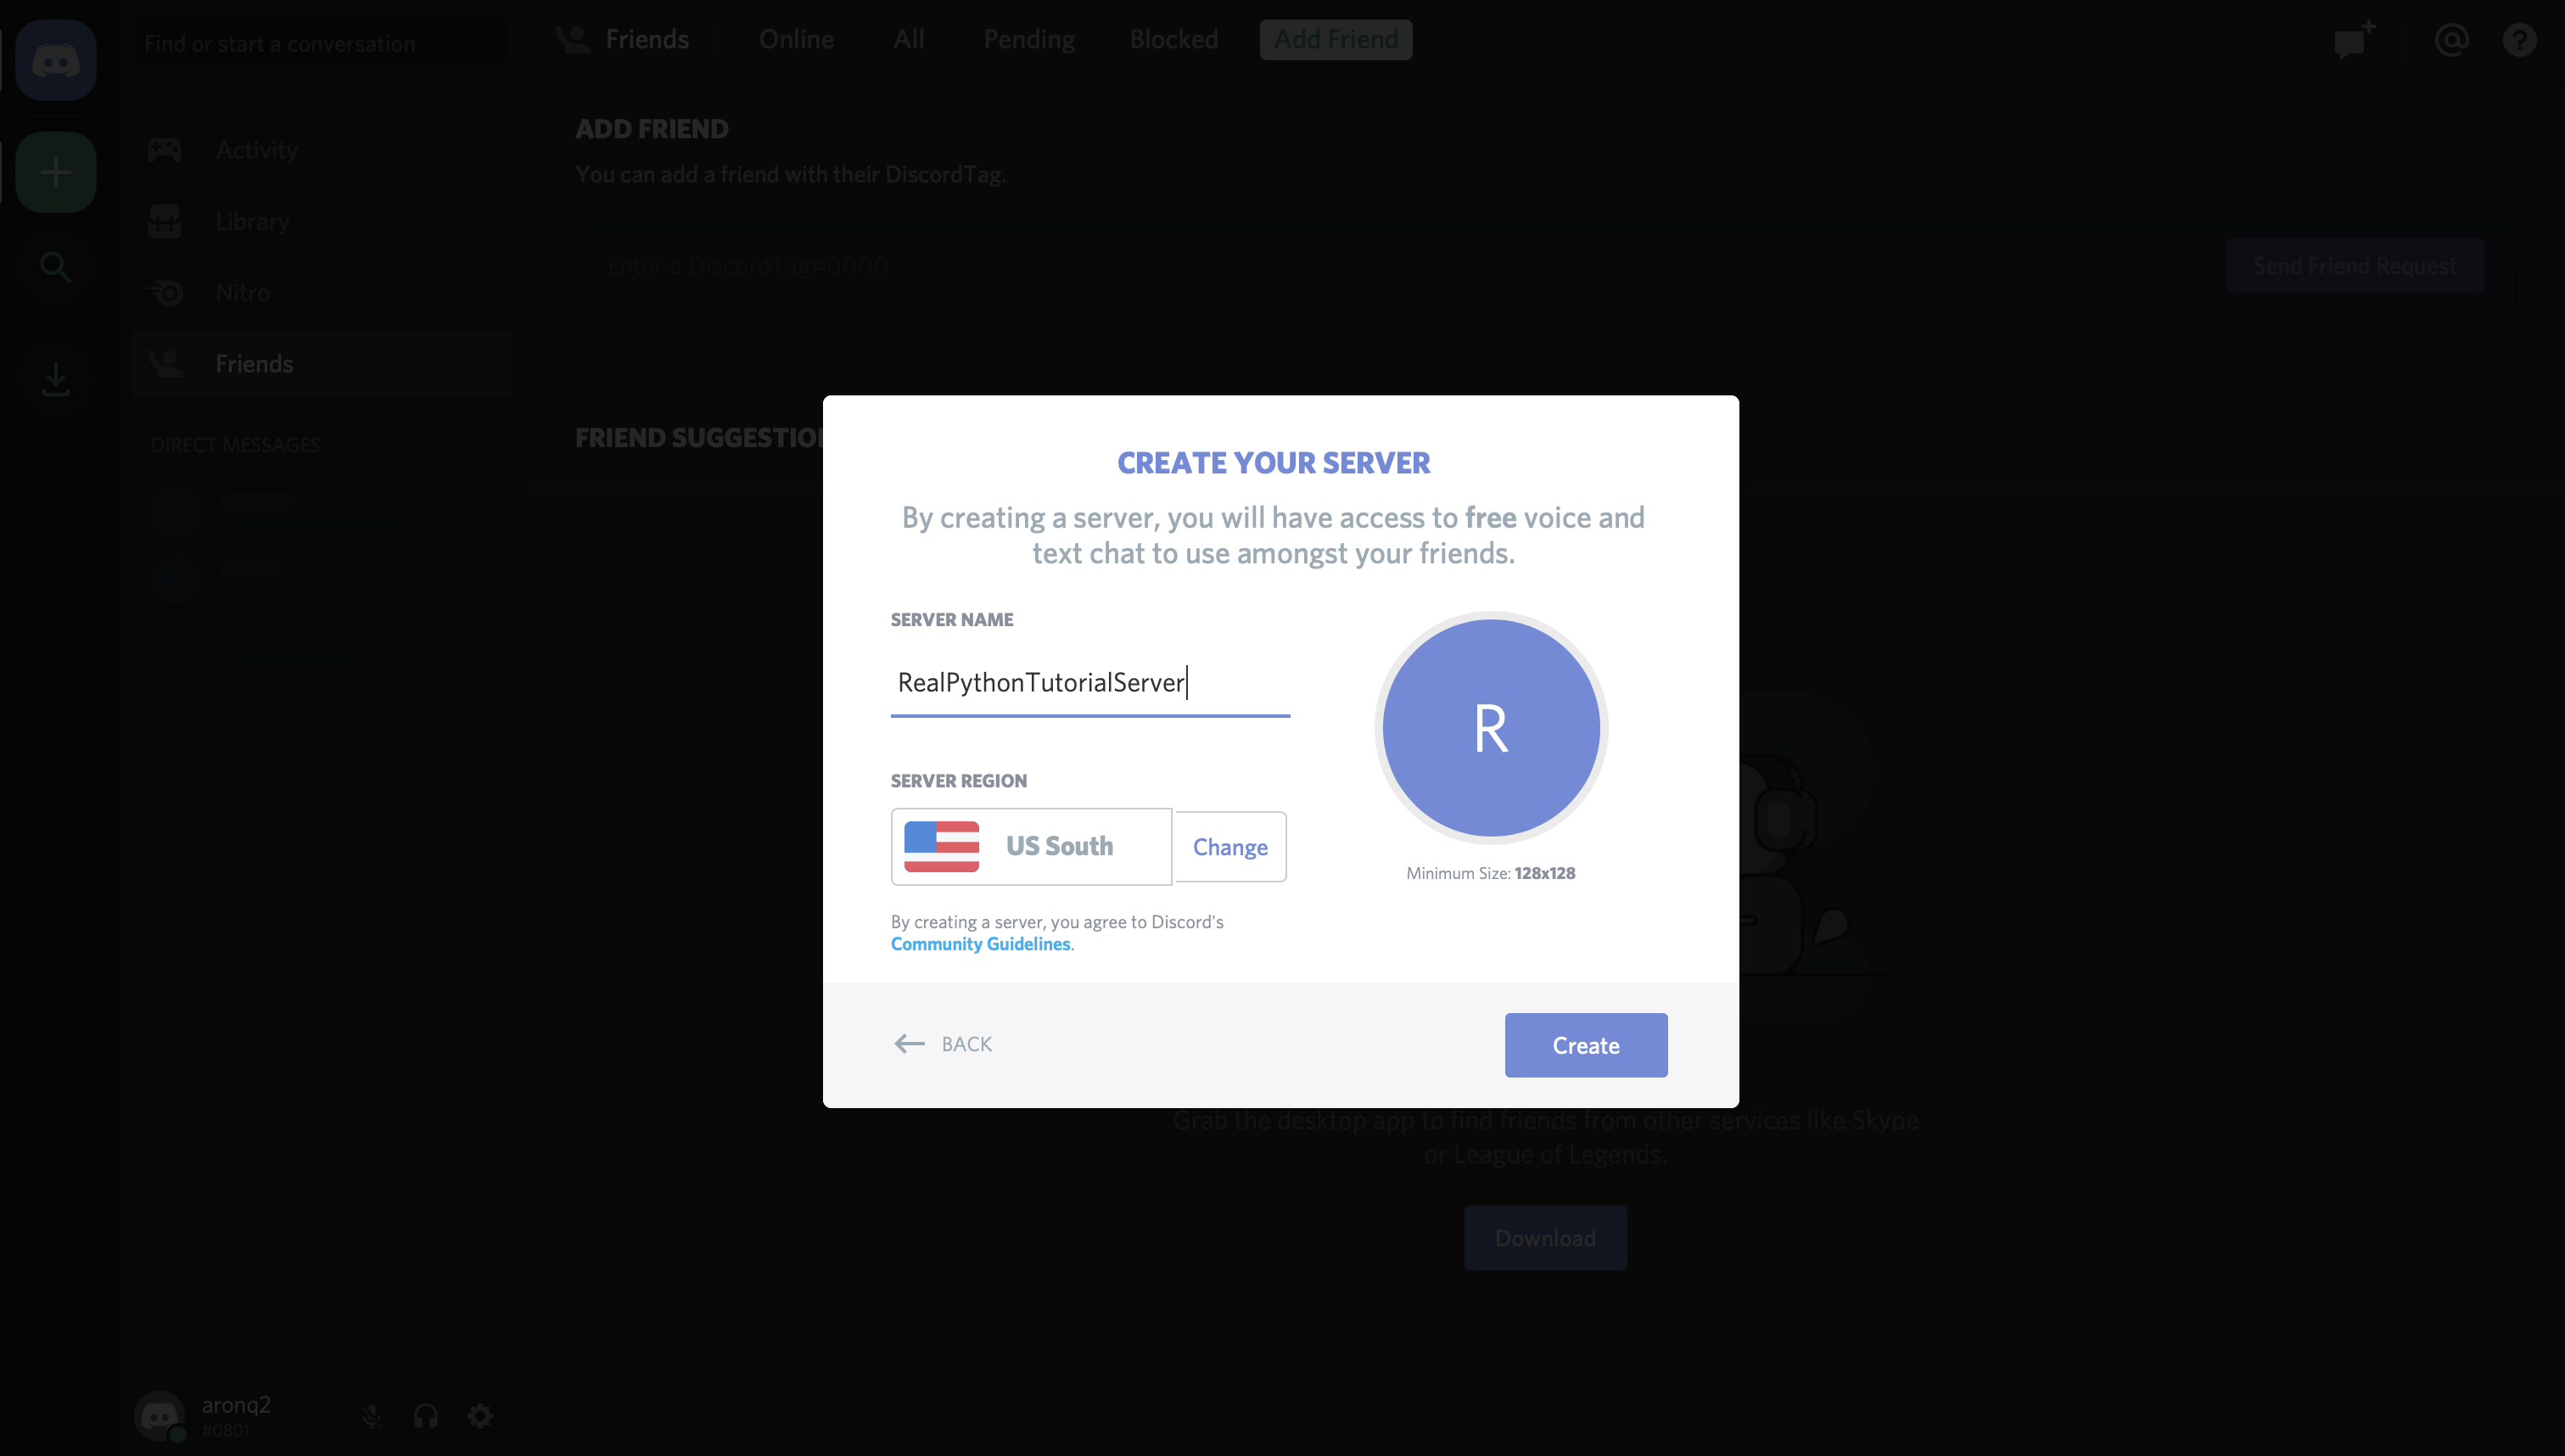
This will present two options, Create a server and Join a Server. In this case, select Create a server and enter a name for your guild:
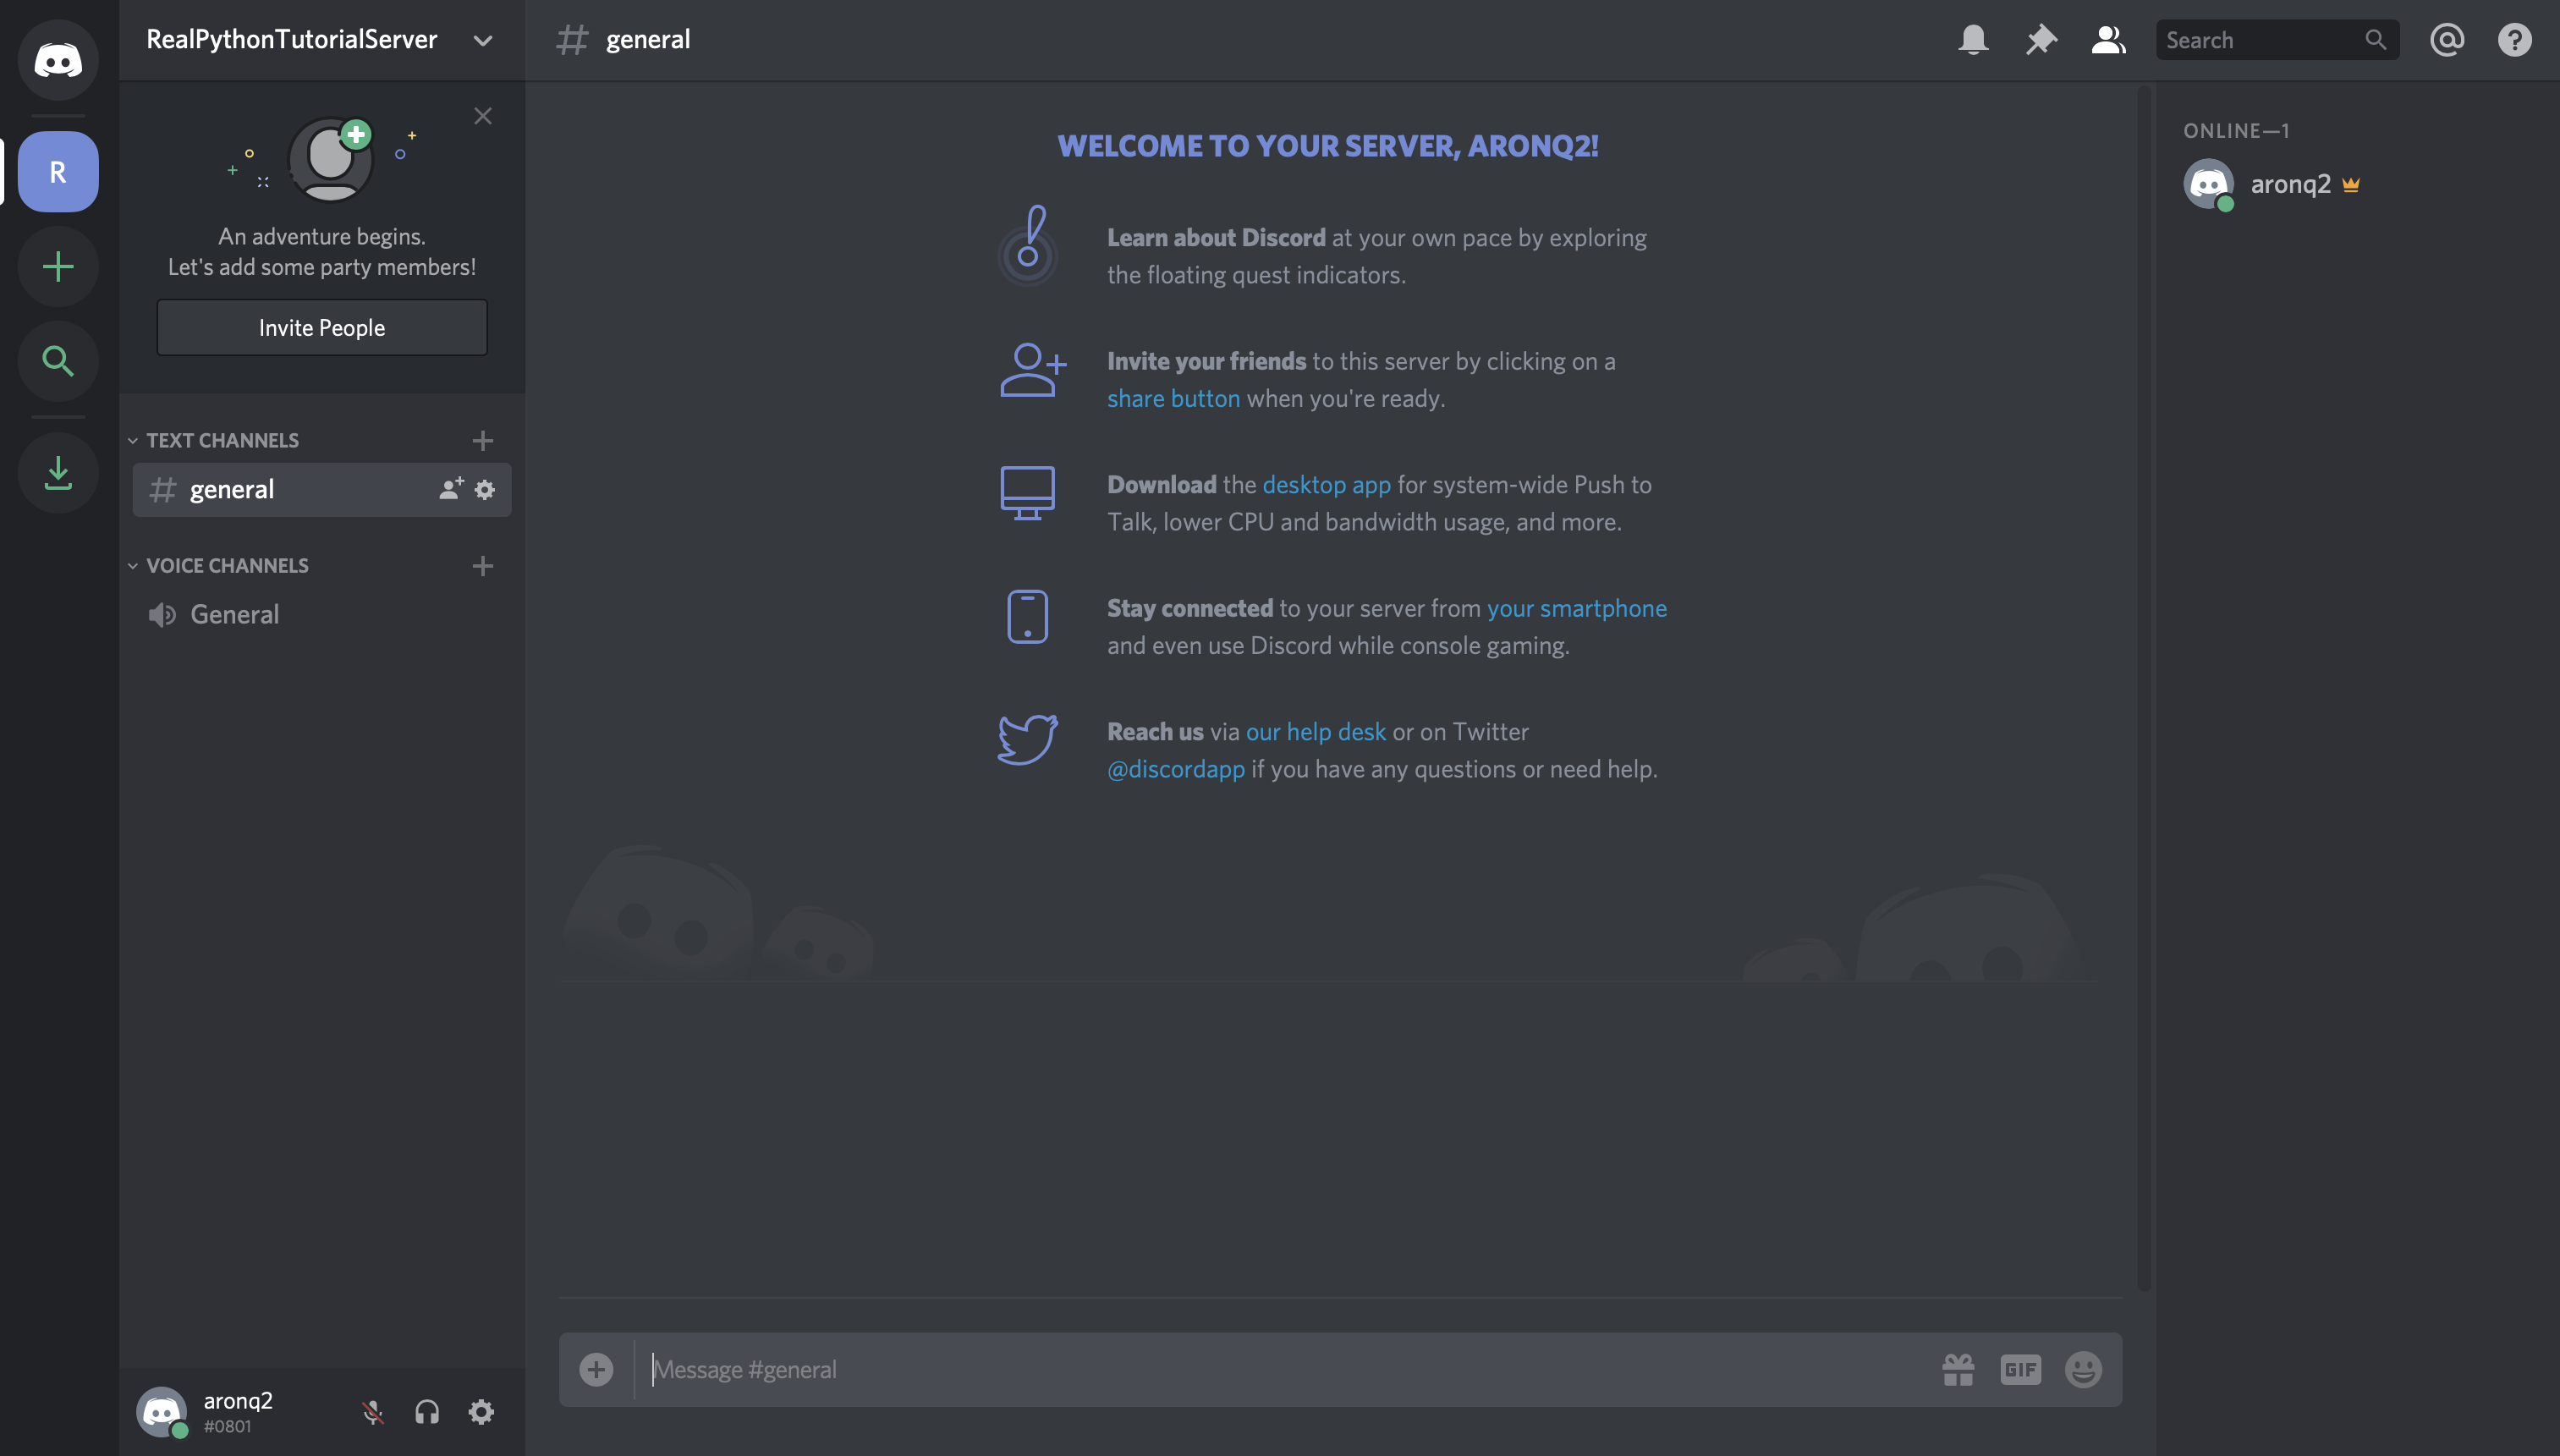
Once you’ve finished creating your guild, you’ll be able to see the users on the right-hand side and the channels on the left:
The final step on Discord is to register your bot with your new guild.
Adding a Bot to a Guild
A bot can’t accept invites like a normal user can. Instead, you’ll add your bot using the OAuth2 protocol.
Technical Detail: OAuth2 is a protocol for dealing with authorization, where a service can grant a client application limited access based on the application’s credentials and allowed scopes.
To do so, head back to the Developer Portal and select the OAuth2 page from the left-hand navigation:
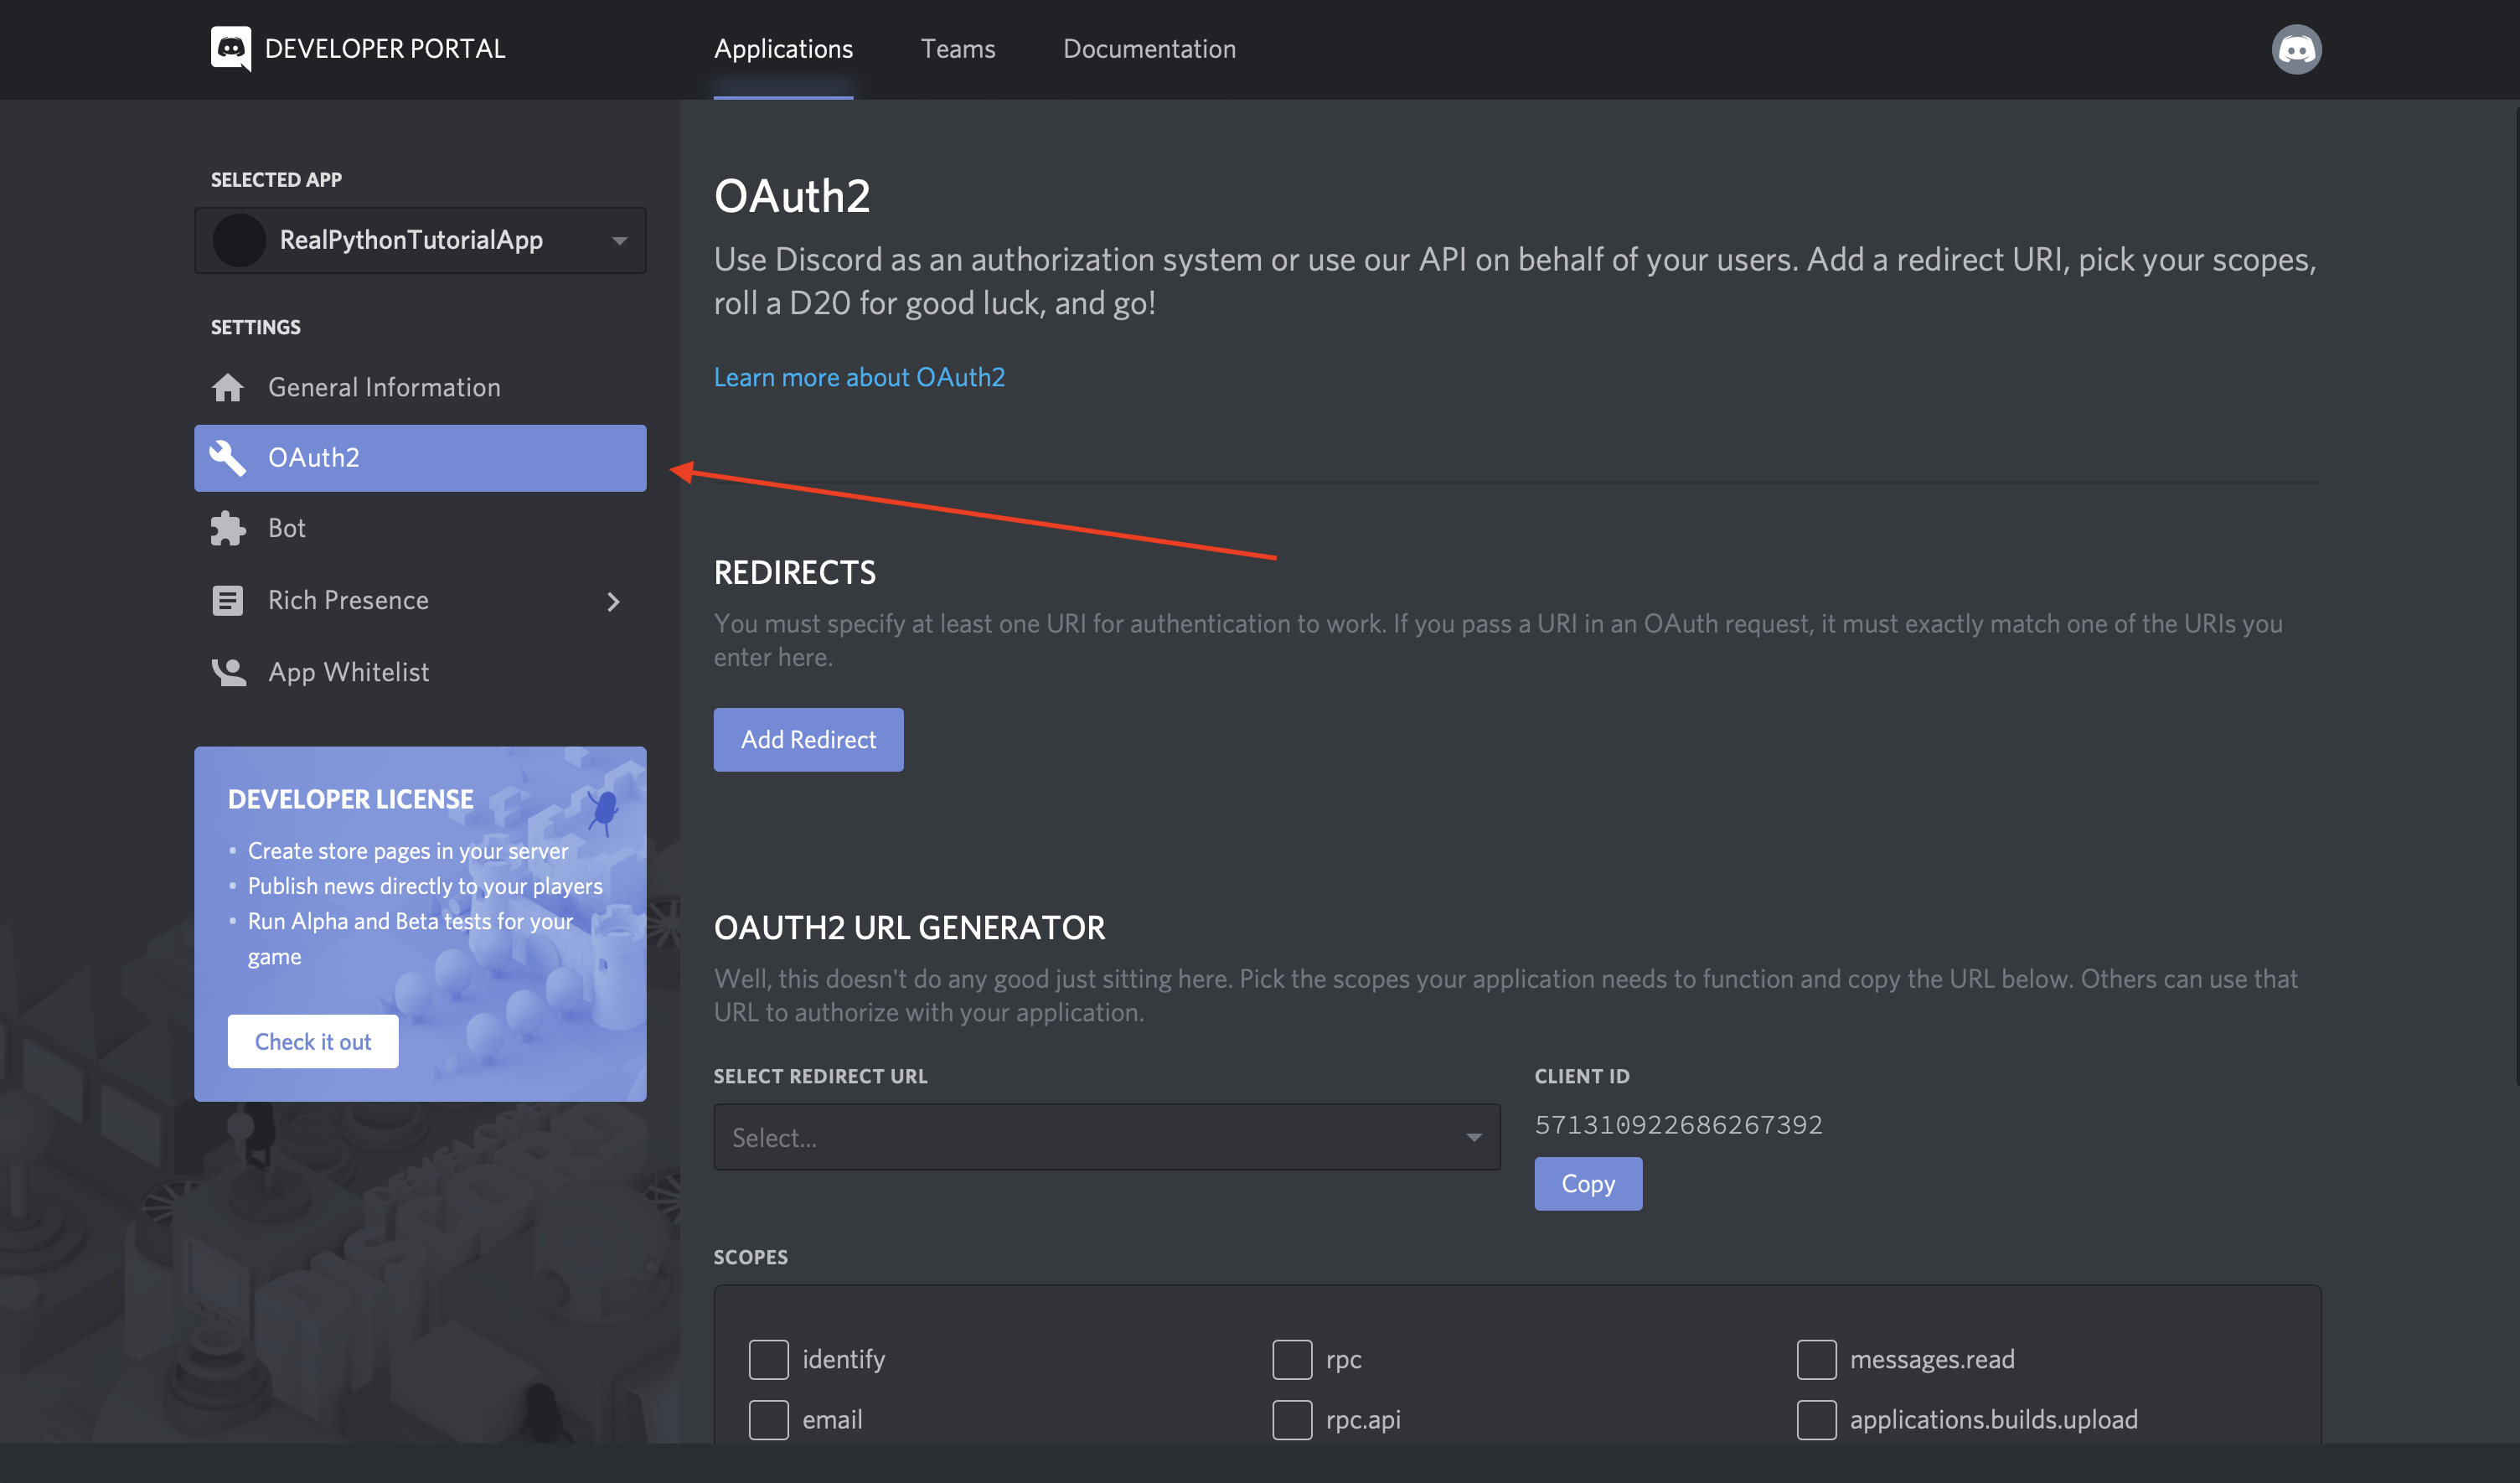
From this window, you’ll see the OAuth2 URL Generator.
This tool generates an authorization URL that hits Discord’s OAuth2 API and authorizes API access using your application’s credentials.
In this case, you’ll want to grant your application’s bot user access to Discord APIs using your application’s OAuth2 credentials.
To do this, scroll down and select bot from the SCOPES options and Administrator from BOT PERMISSIONS:
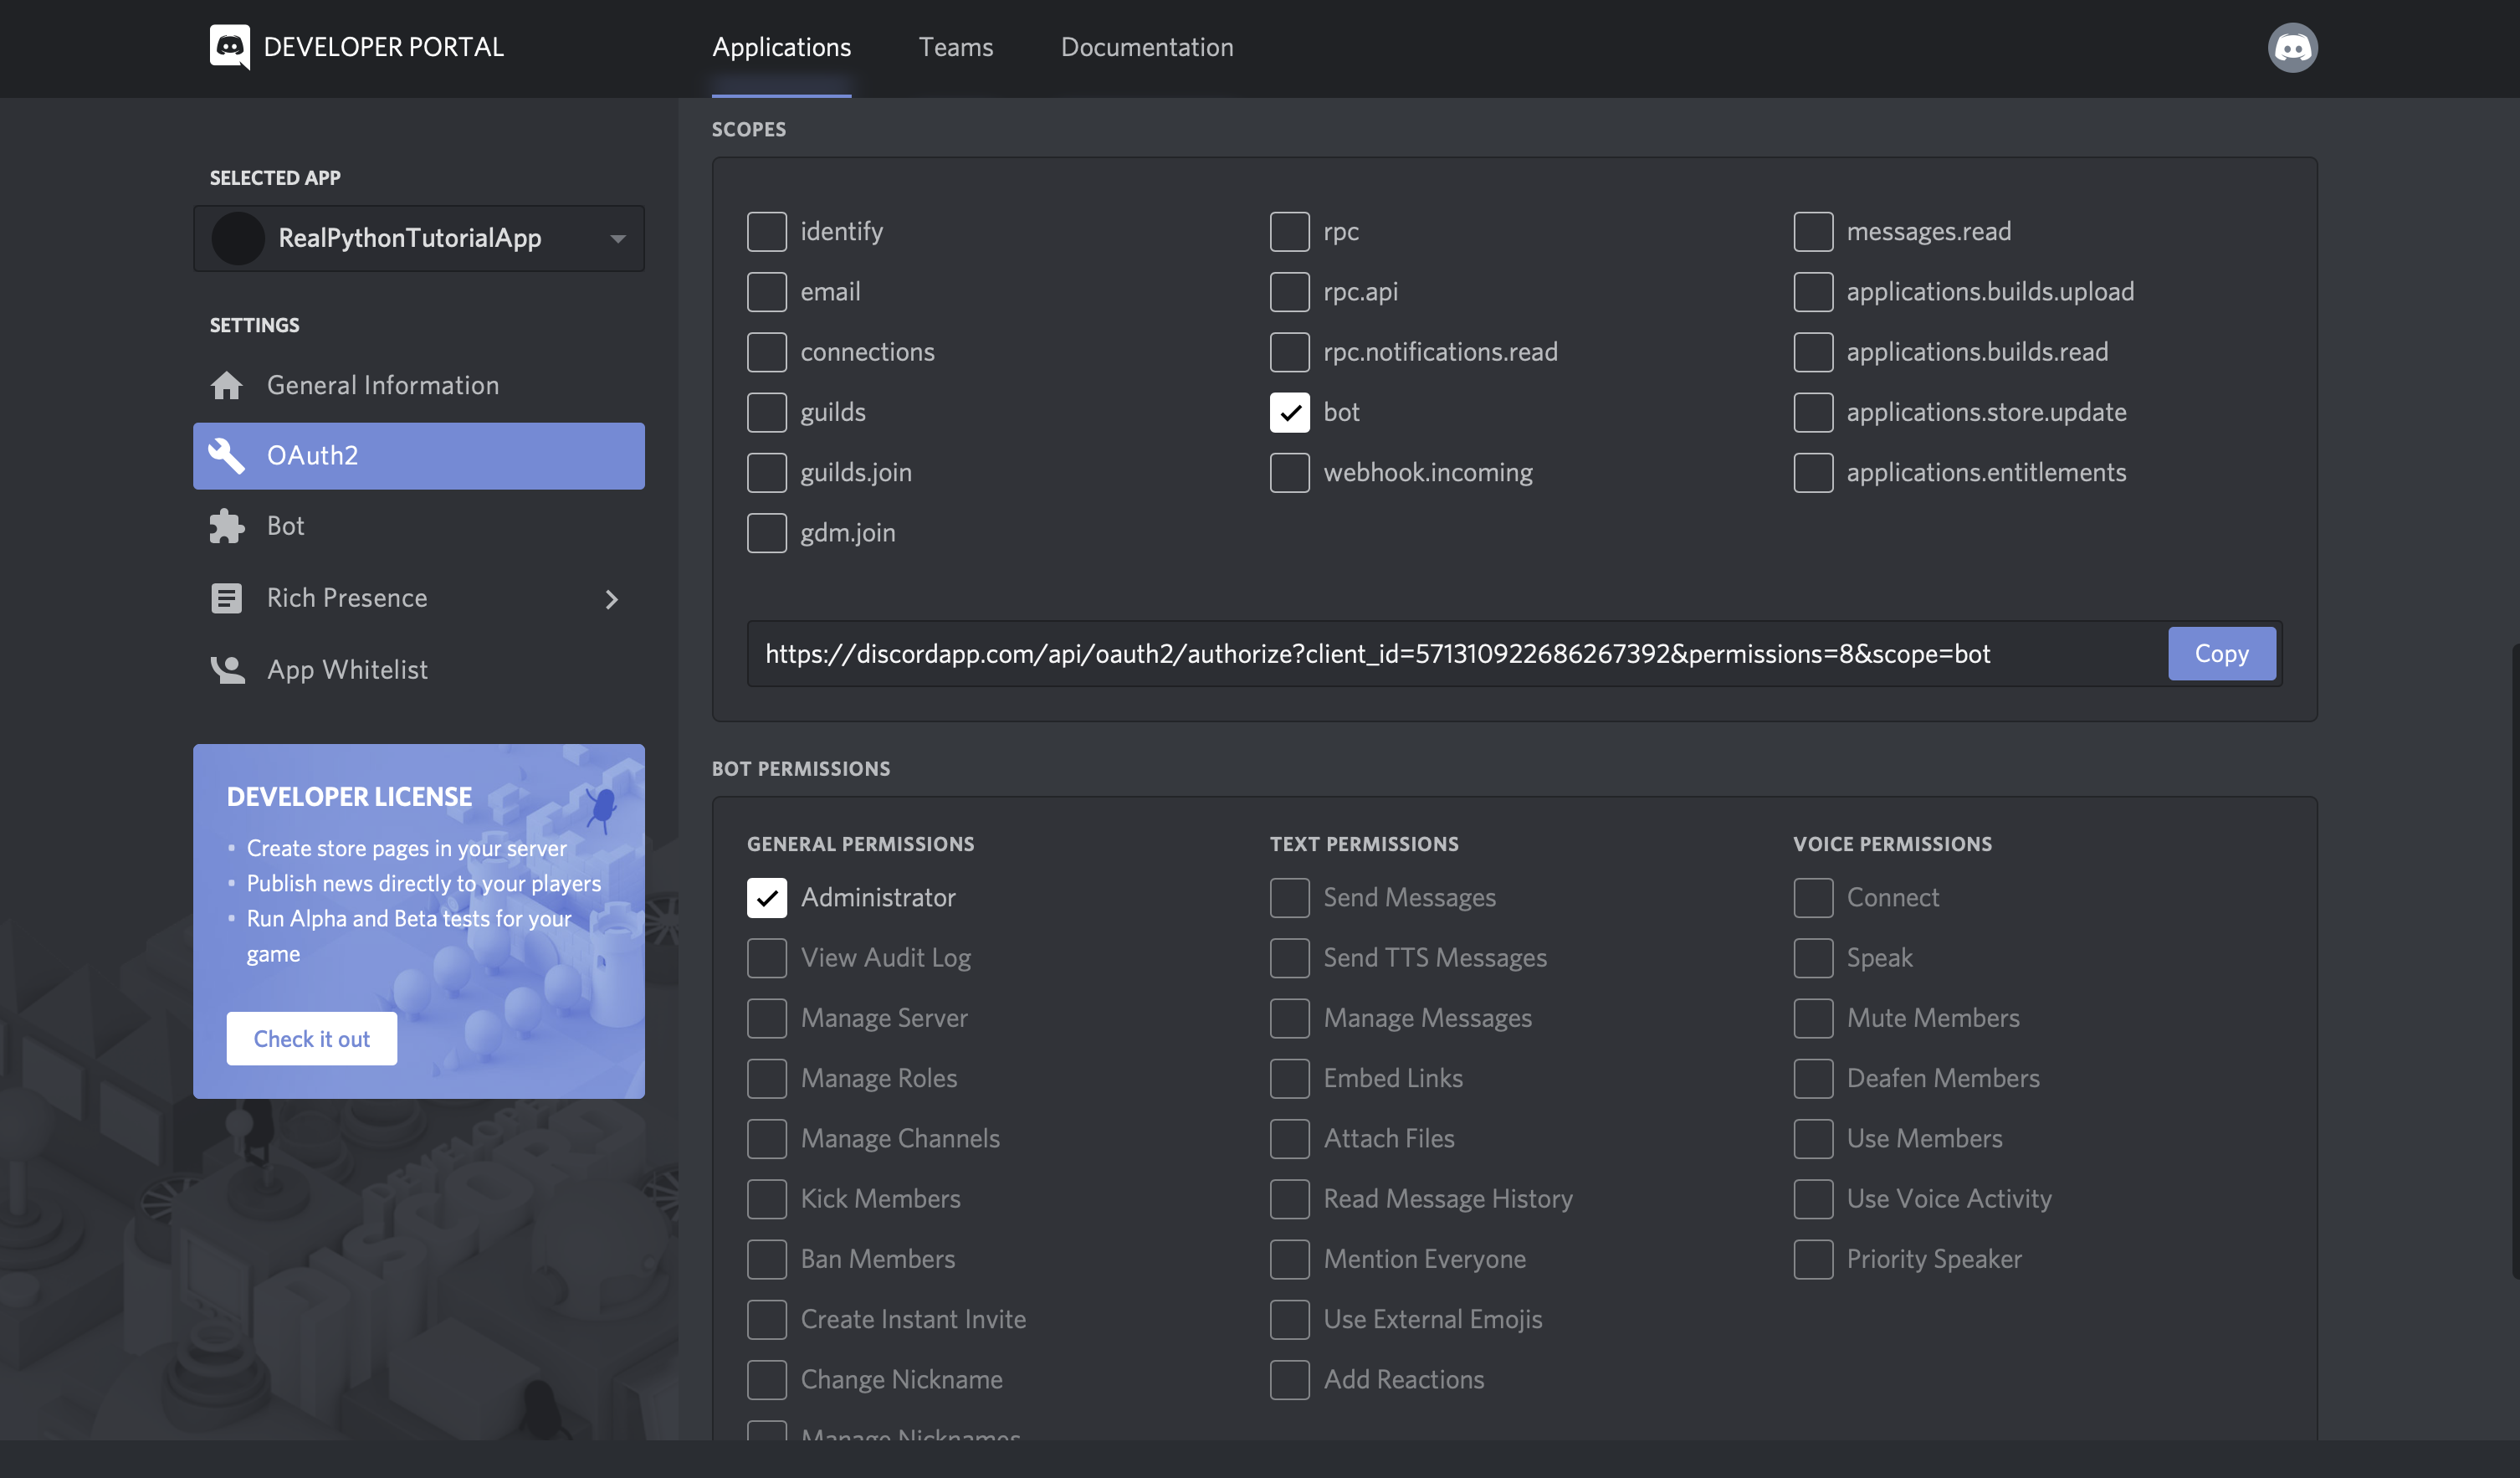
Now, Discord has generated your application’s authorization URL with the selected scope and permissions.
Disclaimer: While we’re using Administrator for the purposes of this tutorial, you should be as granular as possible when granting permissions in a real-world application.
Select Copy beside the URL that was generated for you, paste it into your browser, and select your guild from the dropdown options:
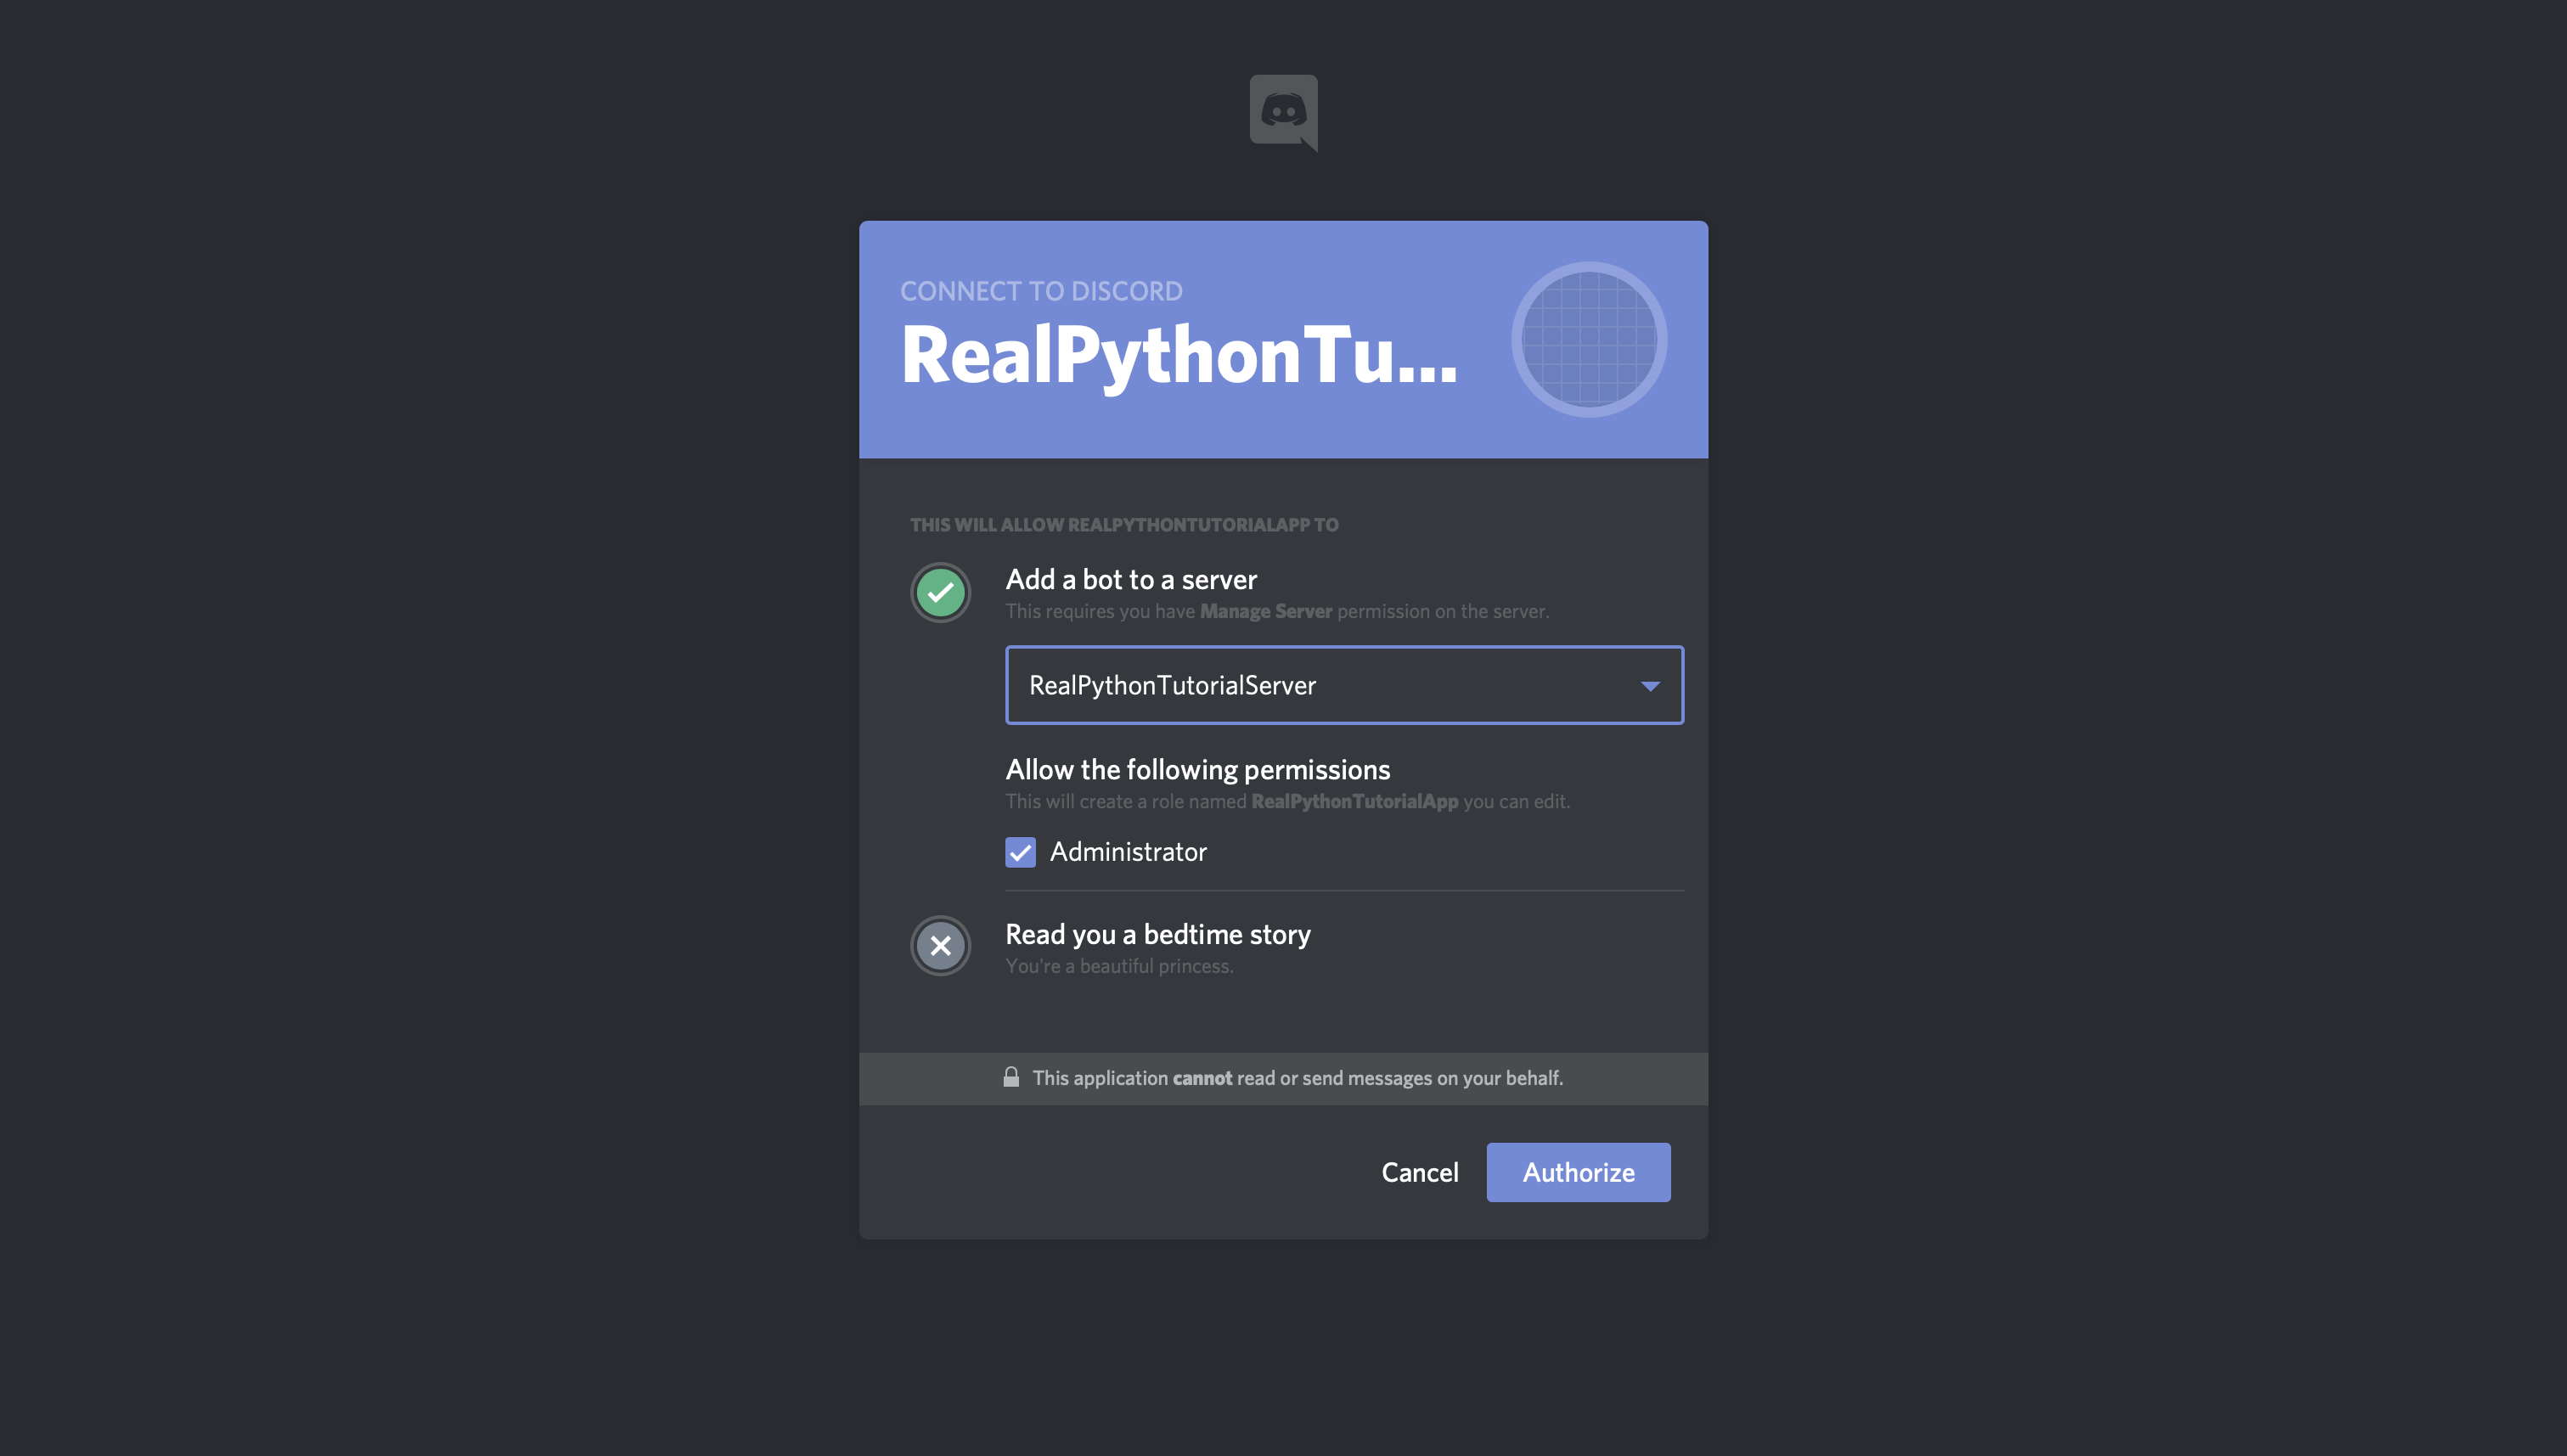
Click Authorize, and you’re done!
Note: You might get a reCAPTCHA before moving on. If so, you’ll need to prove you’re a human.
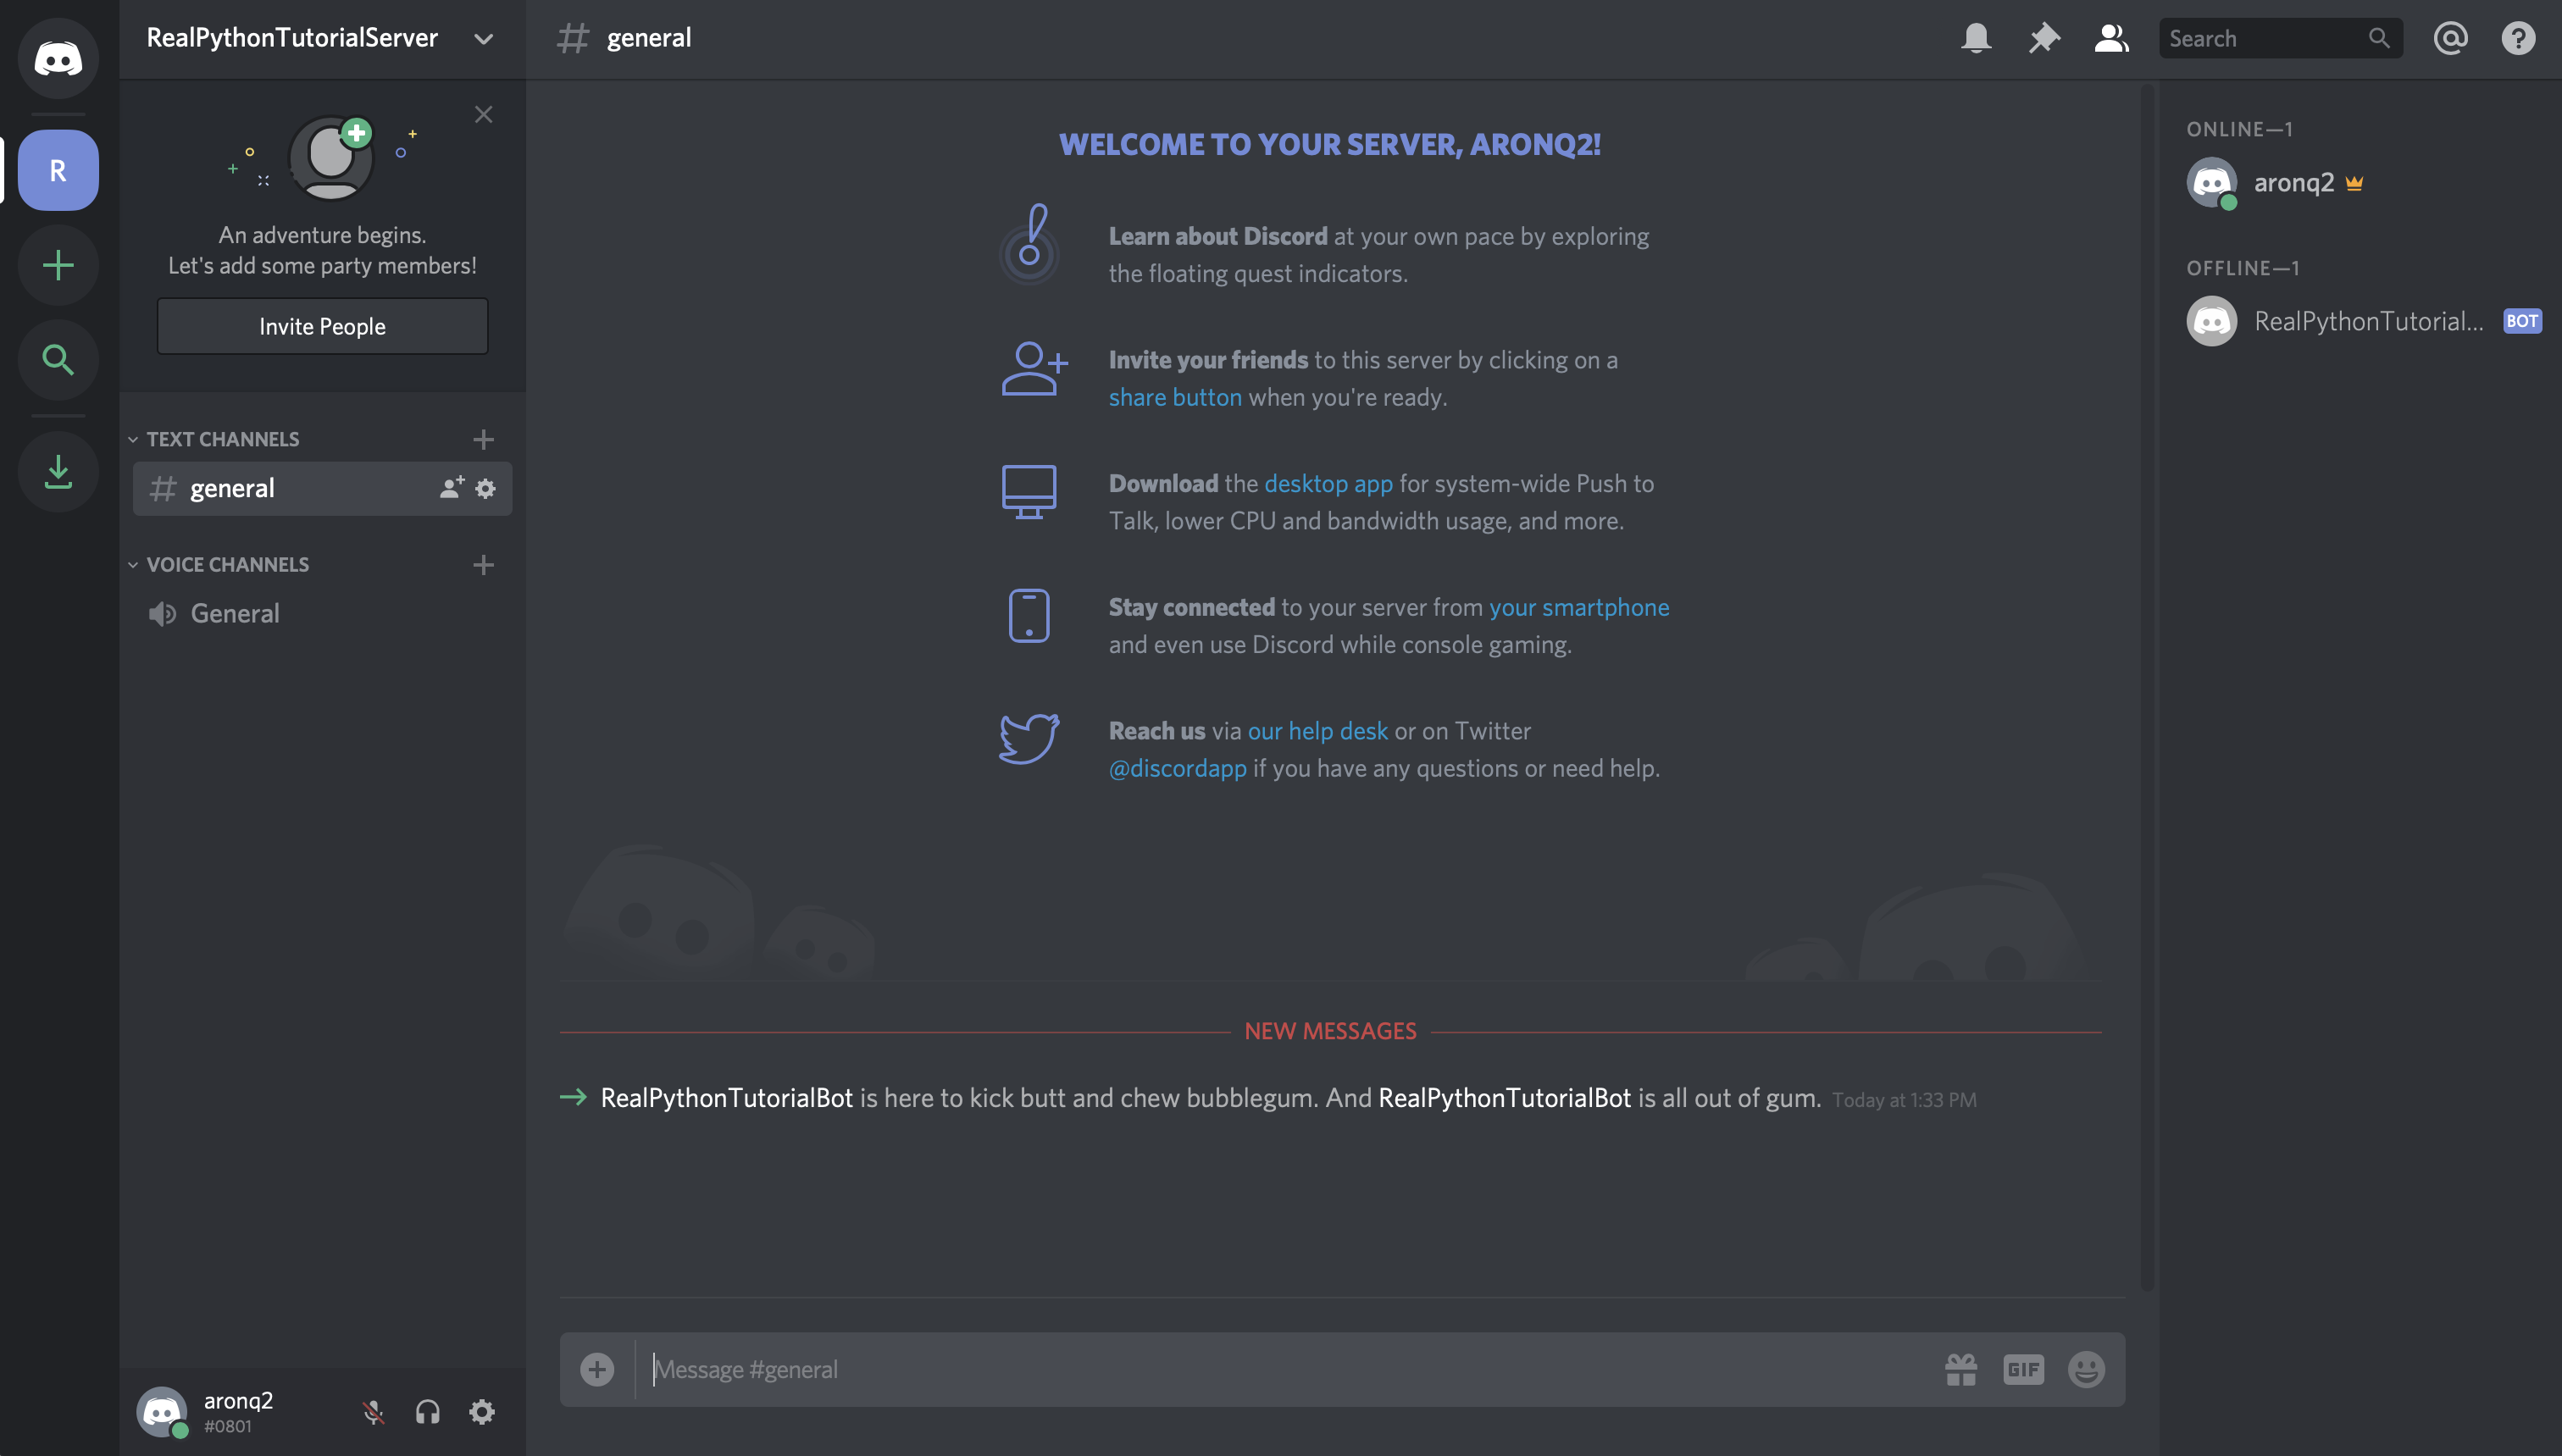
If you go back to your guild, then you’ll see that the bot has been added:
In summary, you’ve created:
- An application that your bot will use to authenticate with Discord’s APIs
- A bot user that you’ll use to interact with other users and events in your guild
- A guild in which your user account and your bot user will be active
- A Discord account with which you created everything else and that you’ll use to interact with your bot
Now, you know how to make a Discord bot using the Developer Portal. Next comes the fun stuff: implementing your bot in Python!
How to Make a Discord Bot in Python
Since you’re learning how to make a Discord bot with Python, you’ll be using discord.py.
discord.py is a Python library that exhaustively implements Discord’s APIs in an efficient and Pythonic way. This includes utilizing Python’s implementation of Async IO.
Begin by installing discord.py with pip:
$ pip install -U discord.py
Now that you’ve installed discord.py, you’ll use it to create your first connection to Discord!
Creating a Discord Connection
The first step in implementing your bot user is to create a connection to Discord. With discord.py, you do this by creating an instance of Client:
# bot.py
import os

import discord
from dotenv import load_dotenv

load_dotenv()
TOKEN = os.getenv('DISCORD_TOKEN')

client = discord.Client()

@client.event
async def on_ready():
    print(f'{client.user} has connected to Discord!')

client.run(TOKEN)
A Client is an object that represents a connection to Discord. A Client handles events, tracks state, and generally interacts with Discord APIs.
Here, you’ve created a Client and implemented its on_ready() event handler, which handles the event when the Client has established a connection to Discord and it has finished preparing the data that Discord has sent, such as login state, guild and channel data, and more.
In other words, on_ready() will be called (and your message will be printed) once client is ready for further action. You’ll learn more about event handlers later in this article.
When you’re working with secrets such as your Discord token, it’s good practice to read it into your program from an environment variable. Using environment variables helps you:
- Avoid putting the secrets into source control
- Use different variables for development and production environments without changing your code
While you could export DISCORD_TOKEN={your-bot-token}, an easier solution is to save a .env file on all machines that will be running this code. This is not only easier, since you won’t have to export your token every time you clear your shell, but it also protects you from storing your secrets in your shell’s history.
Create a file named .env in the same directory as bot.py:
# .env
DISCORD_TOKEN={your-bot-token}
You’ll need to replace {your-bot-token} with your bot’s token, which you can get by going back to the Bot page on the Developer Portal and clicking Copy under the TOKEN section:
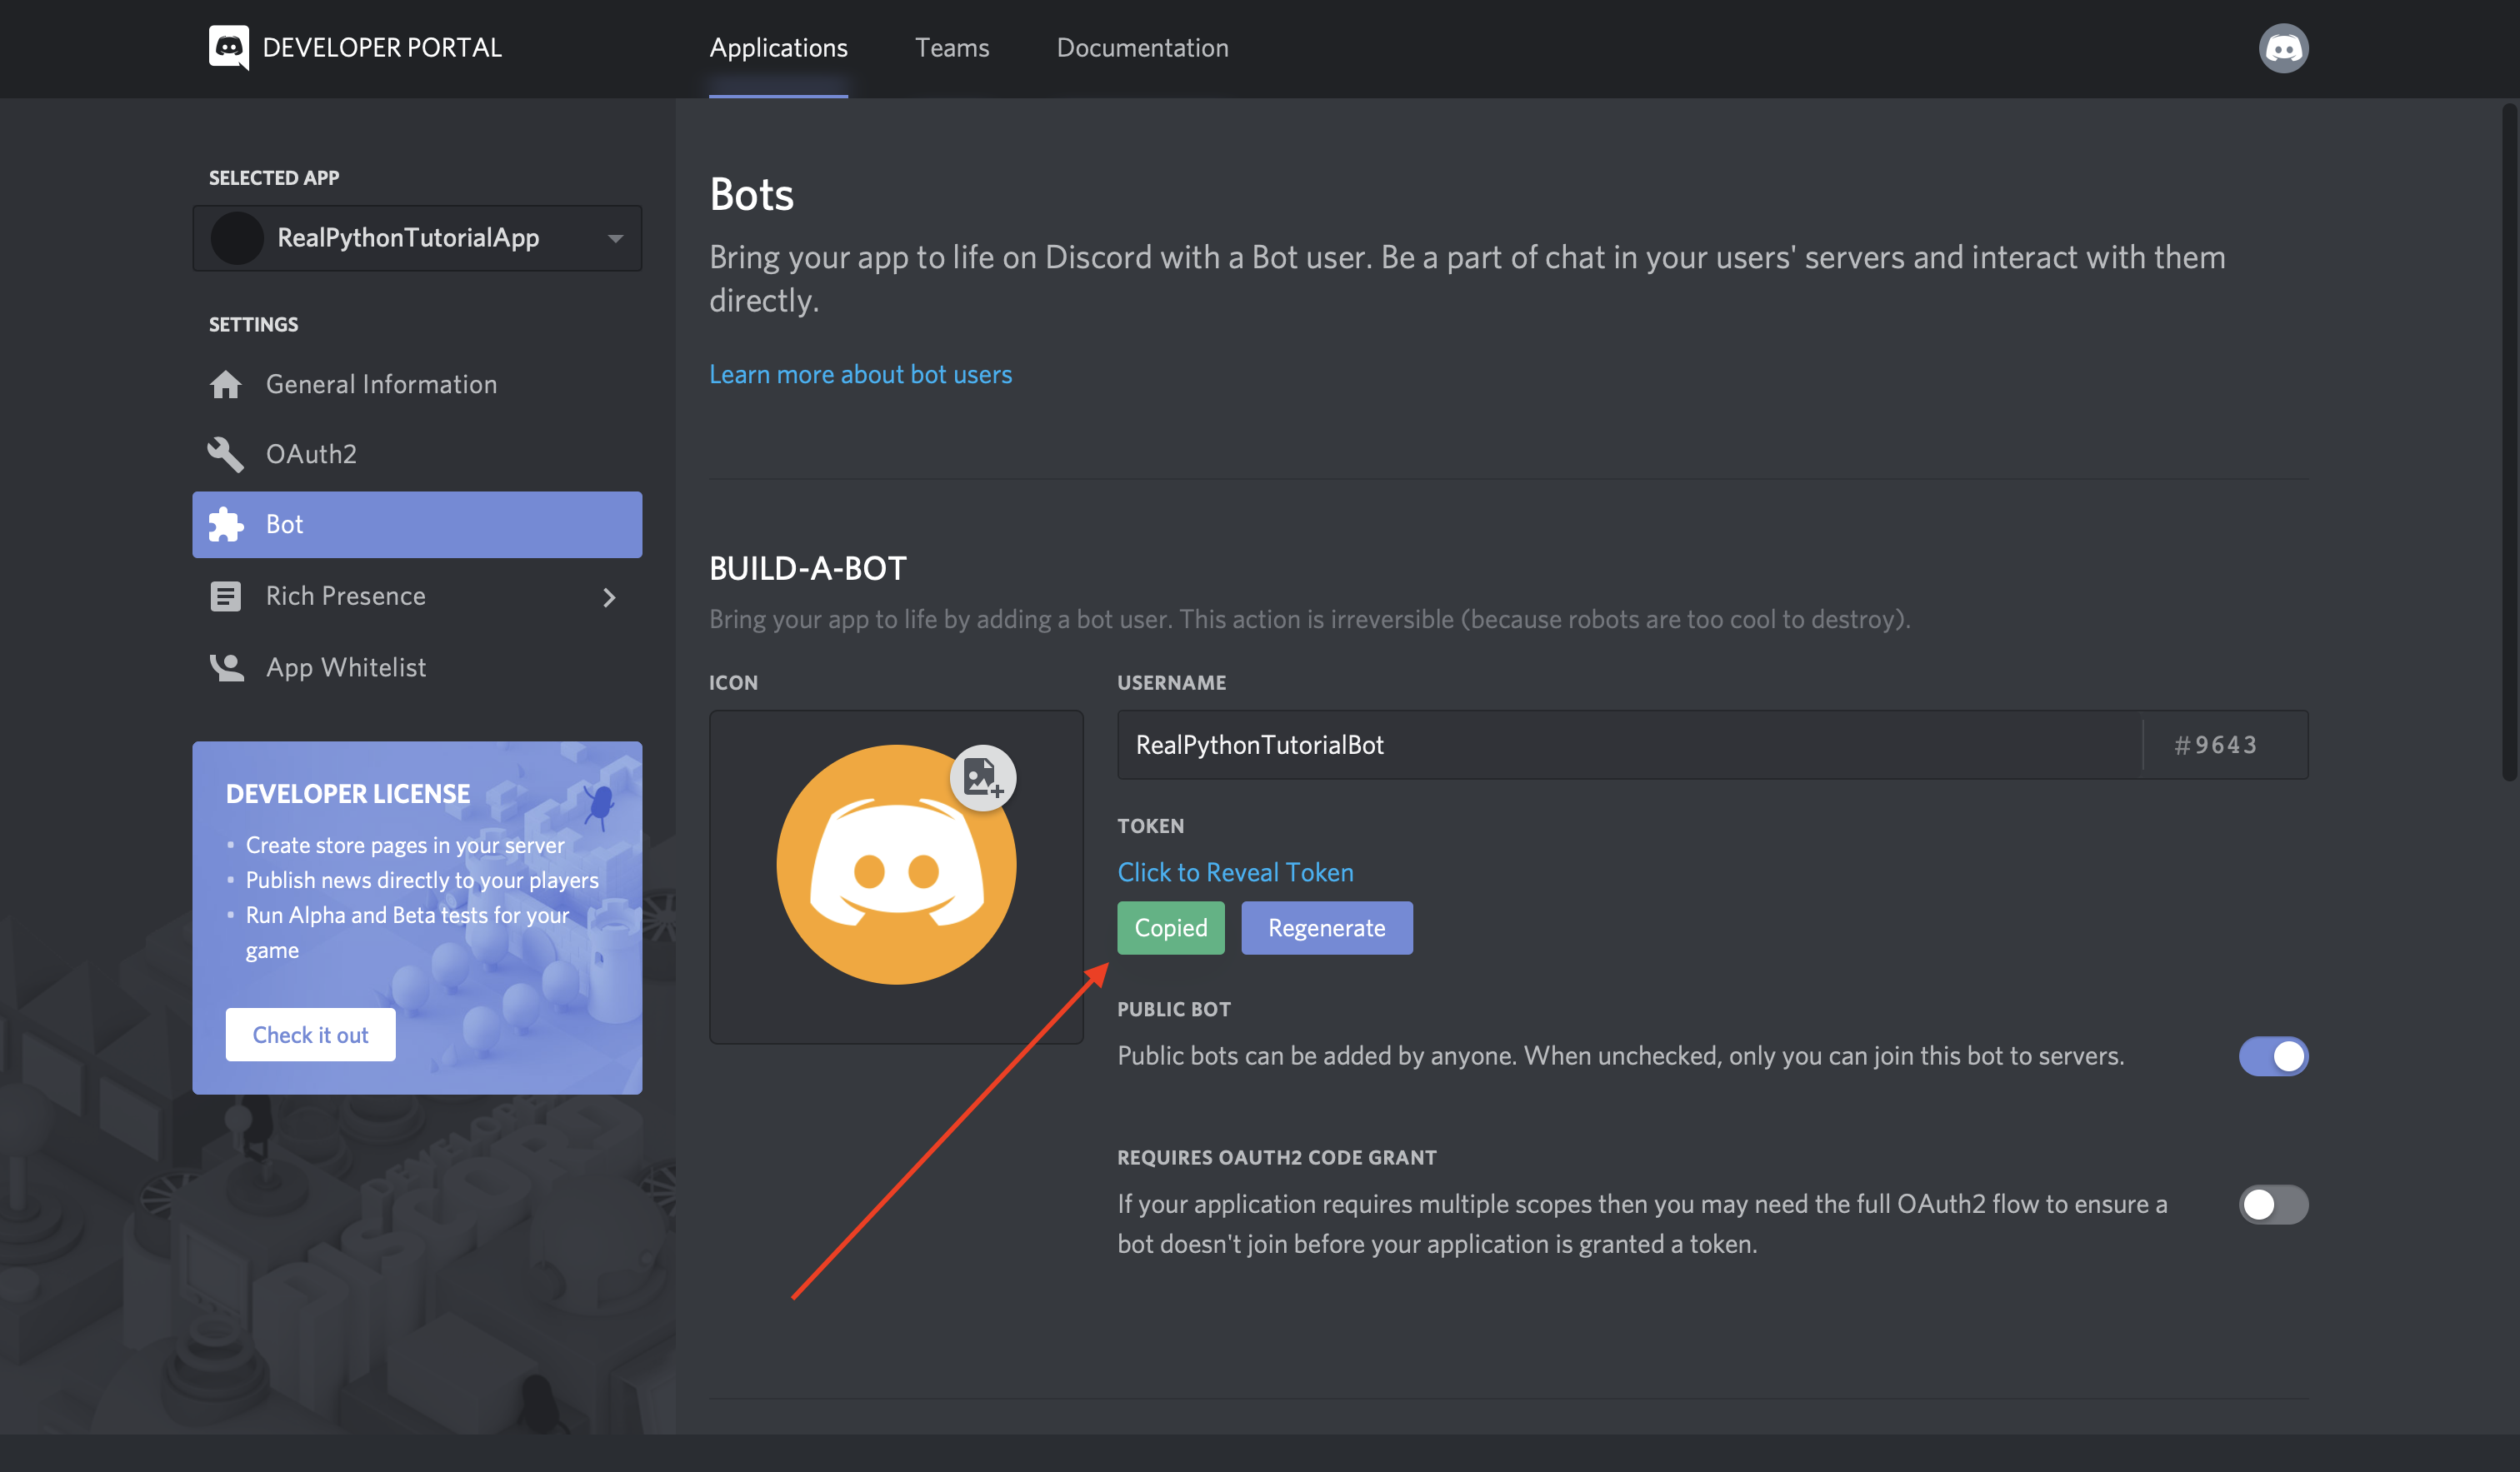
Looking back at the bot.py code, you’ll notice a library called dotenv. This library is handy for working with .env files. load_dotenv() loads environment variables from a .env file into your shell’s environment variables so that you can use them in your code.
Install dotenv with pip:
$ pip install -U python-dotenv
Finally, client.run() runs your Client using your bot’s token.
Now that you’ve set up both bot.py and .env, you can run your code:
$ python bot.py
RealPythonTutorialBot#9643 has connected to Discord!
Great! Your Client has connected to Discord using your bot’s token. In the next section, you’ll build on this Client by interacting with more Discord APIs.
Interacting With Discord APIs
Using a Client, you have access to a wide range of Discord APIs.
For example, let’s say you wanted to write the name and identifier of the guild that you registered your bot user with to the console.
First, you’ll need to add a new environment variable:
# .env
DISCORD_TOKEN={your-bot-token}
DISCORD_GUILD={your-guild-name}
Don’t forget that you’ll need to replace the two placeholders with actual values:
{your-bot-token}{your-guild-name}
Remember that Discord calls on_ready(), which you used before, once the Client has made the connection and prepared the data. So, you can rely on the guild data being available inside on_ready():
# bot.py
import os

import discord
from dotenv import load_dotenv

load_dotenv()
TOKEN = os.getenv('DISCORD_TOKEN')
GUILD = os.getenv('DISCORD_GUILD')

client = discord.Client()

@client.event
async def on_ready():
    for guild in client.guilds:
        if guild.name == GUILD:
            break

    print(
        f'{client.user} is connected to the following guild:\n'
        f'{guild.name}(id: {guild.id})'
    )

client.run(TOKEN)
Here, you looped through the guild data that Discord has sent client, namely client.guilds. Then, you found the guild with the matching name and printed a formatted string to stdout.
Note: Even though you can be pretty confident at this point in the tutorial that your bot is only connected to a single guild (so client.guilds[0] would be simpler), it’s important to realize that a bot user can be connected to many guilds.
Therefore, a more robust solution is to loop through client.guilds to find the one you’re looking for.
Run the program to see the results:
$ python bot.py
RealPythonTutorialBot#9643 is connected to the following guild:
RealPythonTutorialServer(id: 571759877328732195)
Great! You can see the name of your bot, the name of your server, and the server’s identification number.
Another interesting bit of data you can pull from a guild is the list of users who are members of the guild:
# bot.py
import os

import discord
from dotenv import load_dotenv

load_dotenv()
TOKEN = os.getenv('DISCORD_TOKEN')
GUILD = os.getenv('DISCORD_GUILD')

client = discord.Client()

@client.event
async def on_ready():
    for guild in client.guilds:
        if guild.name == GUILD:
            break

    print(
        f'{client.user} is connected to the following guild:\n'
        f'{guild.name}(id: {guild.id})\n'
    )

    members = '\n - '.join([member.name for member in guild.members])
    print(f'Guild Members:\n - {members}')

client.run(TOKEN)
By looping through guild.members, you pulled the names of all of the members of the guild and printed them with a formatted string.
When you run the program, you should see at least the name of the account you created the guild with and the name of the bot user itself:
$ python bot.py
RealPythonTutorialBot#9643 is connected to the following guild:
RealPythonTutorialServer(id: 571759877328732195)

Guild Members:
 - aronq2
 - RealPythonTutorialBot
These examples barely scratch the surface of the APIs available on Discord, be sure to check out their documentation to see all that they have to offer.
Next, you’ll learn about some utility functions and how they can simplify these examples.
Using Utility Functions
Let’s take another look at the example from the last section where you printed the name and identifier of the bot’s guild:
# bot.py
import os

import discord
from dotenv import load_dotenv

load_dotenv()
TOKEN = os.getenv('DISCORD_TOKEN')
GUILD = os.getenv('DISCORD_GUILD')

client = discord.Client()

@client.event
async def on_ready():
    for guild in client.guilds:
        if guild.name == GUILD:
            break

    print(
        f'{client.user} is connected to the following guild:\n'
        f'{guild.name}(id: {guild.id})'
    )

client.run(TOKEN)
You could clean up this code by using some of the utility functions available in discord.py.
discord.utils.find() is one utility that can improve the simplicity and readability of this code by replacing the for loop with an intuitive, abstracted function:
# bot.py
import os

import discord
from dotenv import load_dotenv

load_dotenv()
TOKEN = os.getenv('DISCORD_TOKEN')
GUILD = os.getenv('DISCORD_GUILD')

client = discord.Client()

@client.event
async def on_ready():
    guild = discord.utils.find(lambda g: g.name == GUILD, client.guilds)
    print(
        f'{client.user} is connected to the following guild:\n'
        f'{guild.name}(id: {guild.id})'
    )

client.run(TOKEN)
find() takes a function, called a predicate, which identifies some characteristic of the element in the iterable that you’re looking for. Here, you used a particular type of anonymous function, called a lambda, as the predicate.
In this case, you’re trying to find the guild with the same name as the one you stored in the DISCORD_GUILD environment variable. Once find() locates an element in the iterable that satisfies the predicate, it will return the element. This is essentially equivalent to the break statement in the previous example, but cleaner.
discord.py has even abstracted this concept one step further with the get() utility:
# bot.py
import os

import discord
from dotenv import load_dotenv

load_dotenv()
TOKEN = os.getenv('DISCORD_TOKEN')
GUILD = os.getenv('DISCORD_GUILD')

client = discord.Client()

@client.event
async def on_ready():
    guild = discord.utils.get(client.guilds, name=GUILD)
    print(
        f'{client.user} is connected to the following guild:\n'
        f'{guild.name}(id: {guild.id})'
    )

client.run(TOKEN)
get() takes the iterable and some keyword arguments. The keyword arguments represent attributes of the elements in the iterable that must all be satisfied for get() to return the element.
In this example, you’ve identified name=GUILD as the attribute that must be satisfied.
Technical Detail: Under the hood, get() actually uses the attrs keyword arguments to build a predicate, which it then uses to call find().
Now that you’ve learned the basics of interacting with APIs, you’ll dive a little deeper into the function that you’ve been using to access them: on_ready().
Responding to Events
You already learned that on_ready() is an event. In fact, you might have noticed that it is identified as such in the code by the client.event decorator.
But what is an event?
An event is something that happens on Discord that you can use to trigger a reaction in your code. Your code will listen for and then respond to events.
Using the example you’ve seen already, the on_ready() event handler handles the event that the Client has made a connection to Discord and prepared its response data.
So, when Discord fires an event, discord.py will route the event data to the corresponding event handler on your connected Client.
There are two ways in discord.py to implement an event handler:
- Using the
client.eventdecorator - Creating a subclass of
Clientand overriding its handler methods
You already saw the implementation using the decorator. Next, take a look at how to subclass Client:
# bot.py
import os

import discord
from dotenv import load_dotenv

load_dotenv()
TOKEN = os.getenv('DISCORD_TOKEN')

class CustomClient(discord.Client):
    async def on_ready(self):
        print(f'{self.user} has connected to Discord!')

client = CustomClient()
client.run(TOKEN)
Here, just like before, you’ve created a client variable and called .run() with your Discord token. The actual Client is different, however. Instead of using the normal base class, client is an instance of CustomClient, which has an overridden on_ready() function.
There is no difference between the two implementation styles of events, but this tutorial will primarily use the decorator version because it looks similar to how you implement Bot commands, which is a topic you’ll cover in a bit.
Technical Detail: Regardless of how you implement your event handler, one thing must be consistent: all event handlers in discord.py must be coroutines.
Now that you’ve learned how to create an event handler, let’s walk through some different examples of handlers you can create.
Welcoming New Members
Previously, you saw the example of responding to the event where a member joins a guild. In that example, your bot user could send them a message, welcoming them to your Discord community.
Now, you’ll implement that behavior in your Client, using event handlers, and verify its behavior in Discord:
# bot.py
import os
import discord
from dotenv import load_dotenv
load_dotenv()
TOKEN = os.getenv('DISCORD_TOKEN')
client = discord.Client()
@client.event
async def on_ready():
print(f'{client.user.name} has connected to Discord!')
@client.event
async def on_member_join(member):
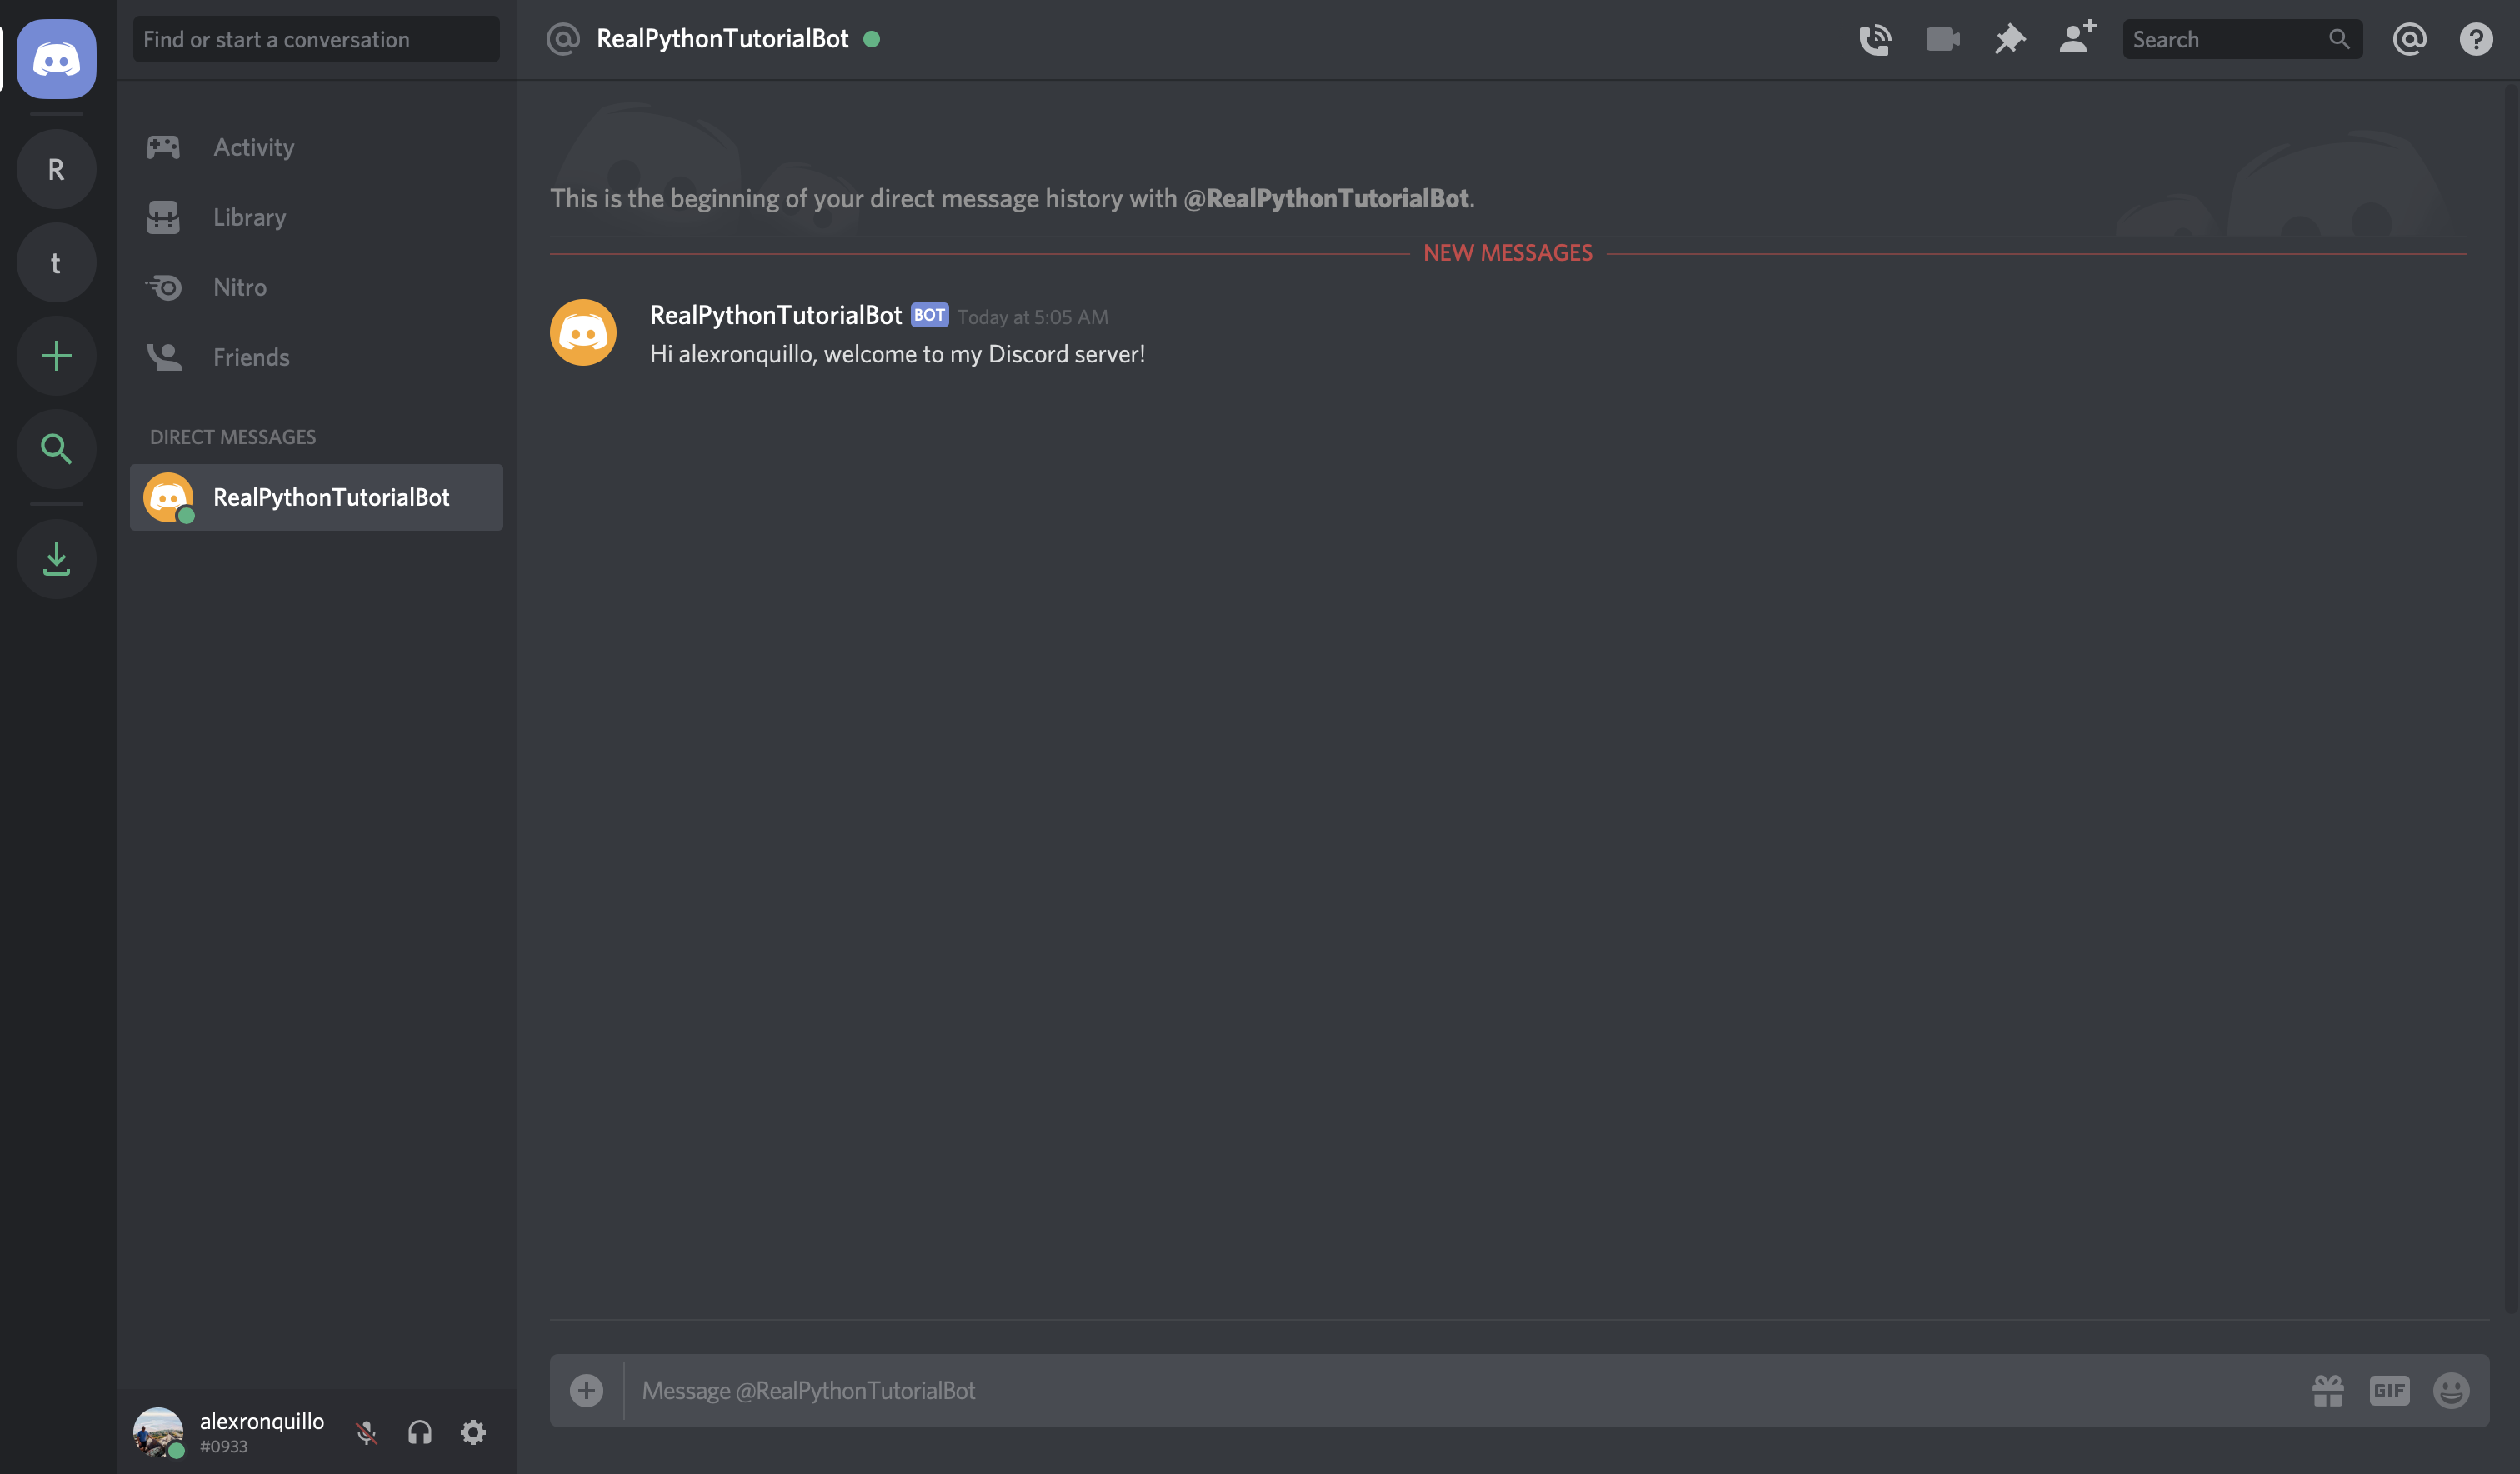
await member.create_dm()
await member.dm_channel.send(
f'Hi {member.name}, welcome to my Discord server!'
)
client.run(TOKEN)
Like before, you handled the on_ready() event by printing the bot user’s name in a formatted string. New, however, is the implementation of the on_member_join() event handler.
on_member_join(), as its name suggests, handles the event of a new member joining a guild.
In this example, you used member.create_dm() to create a direct message channel. Then, you used that channel to .send() a direct message to that new member.
Technical Detail: Notice the await keyword before member.create_dm() and member.dm_channel.send().
await suspends the execution of the surrounding coroutine until the execution of each coroutine has finished.
Now, let’s test out your bot’s new behavior.
First, run your new version of bot.py and wait for the on_ready() event to fire, logging your message to stdout:
$ python bot.py
RealPythonTutorialBot has connected to Discord!
Now, head over to Discord, log in, and navigate to your guild by selecting it from the left-hand side of the screen:
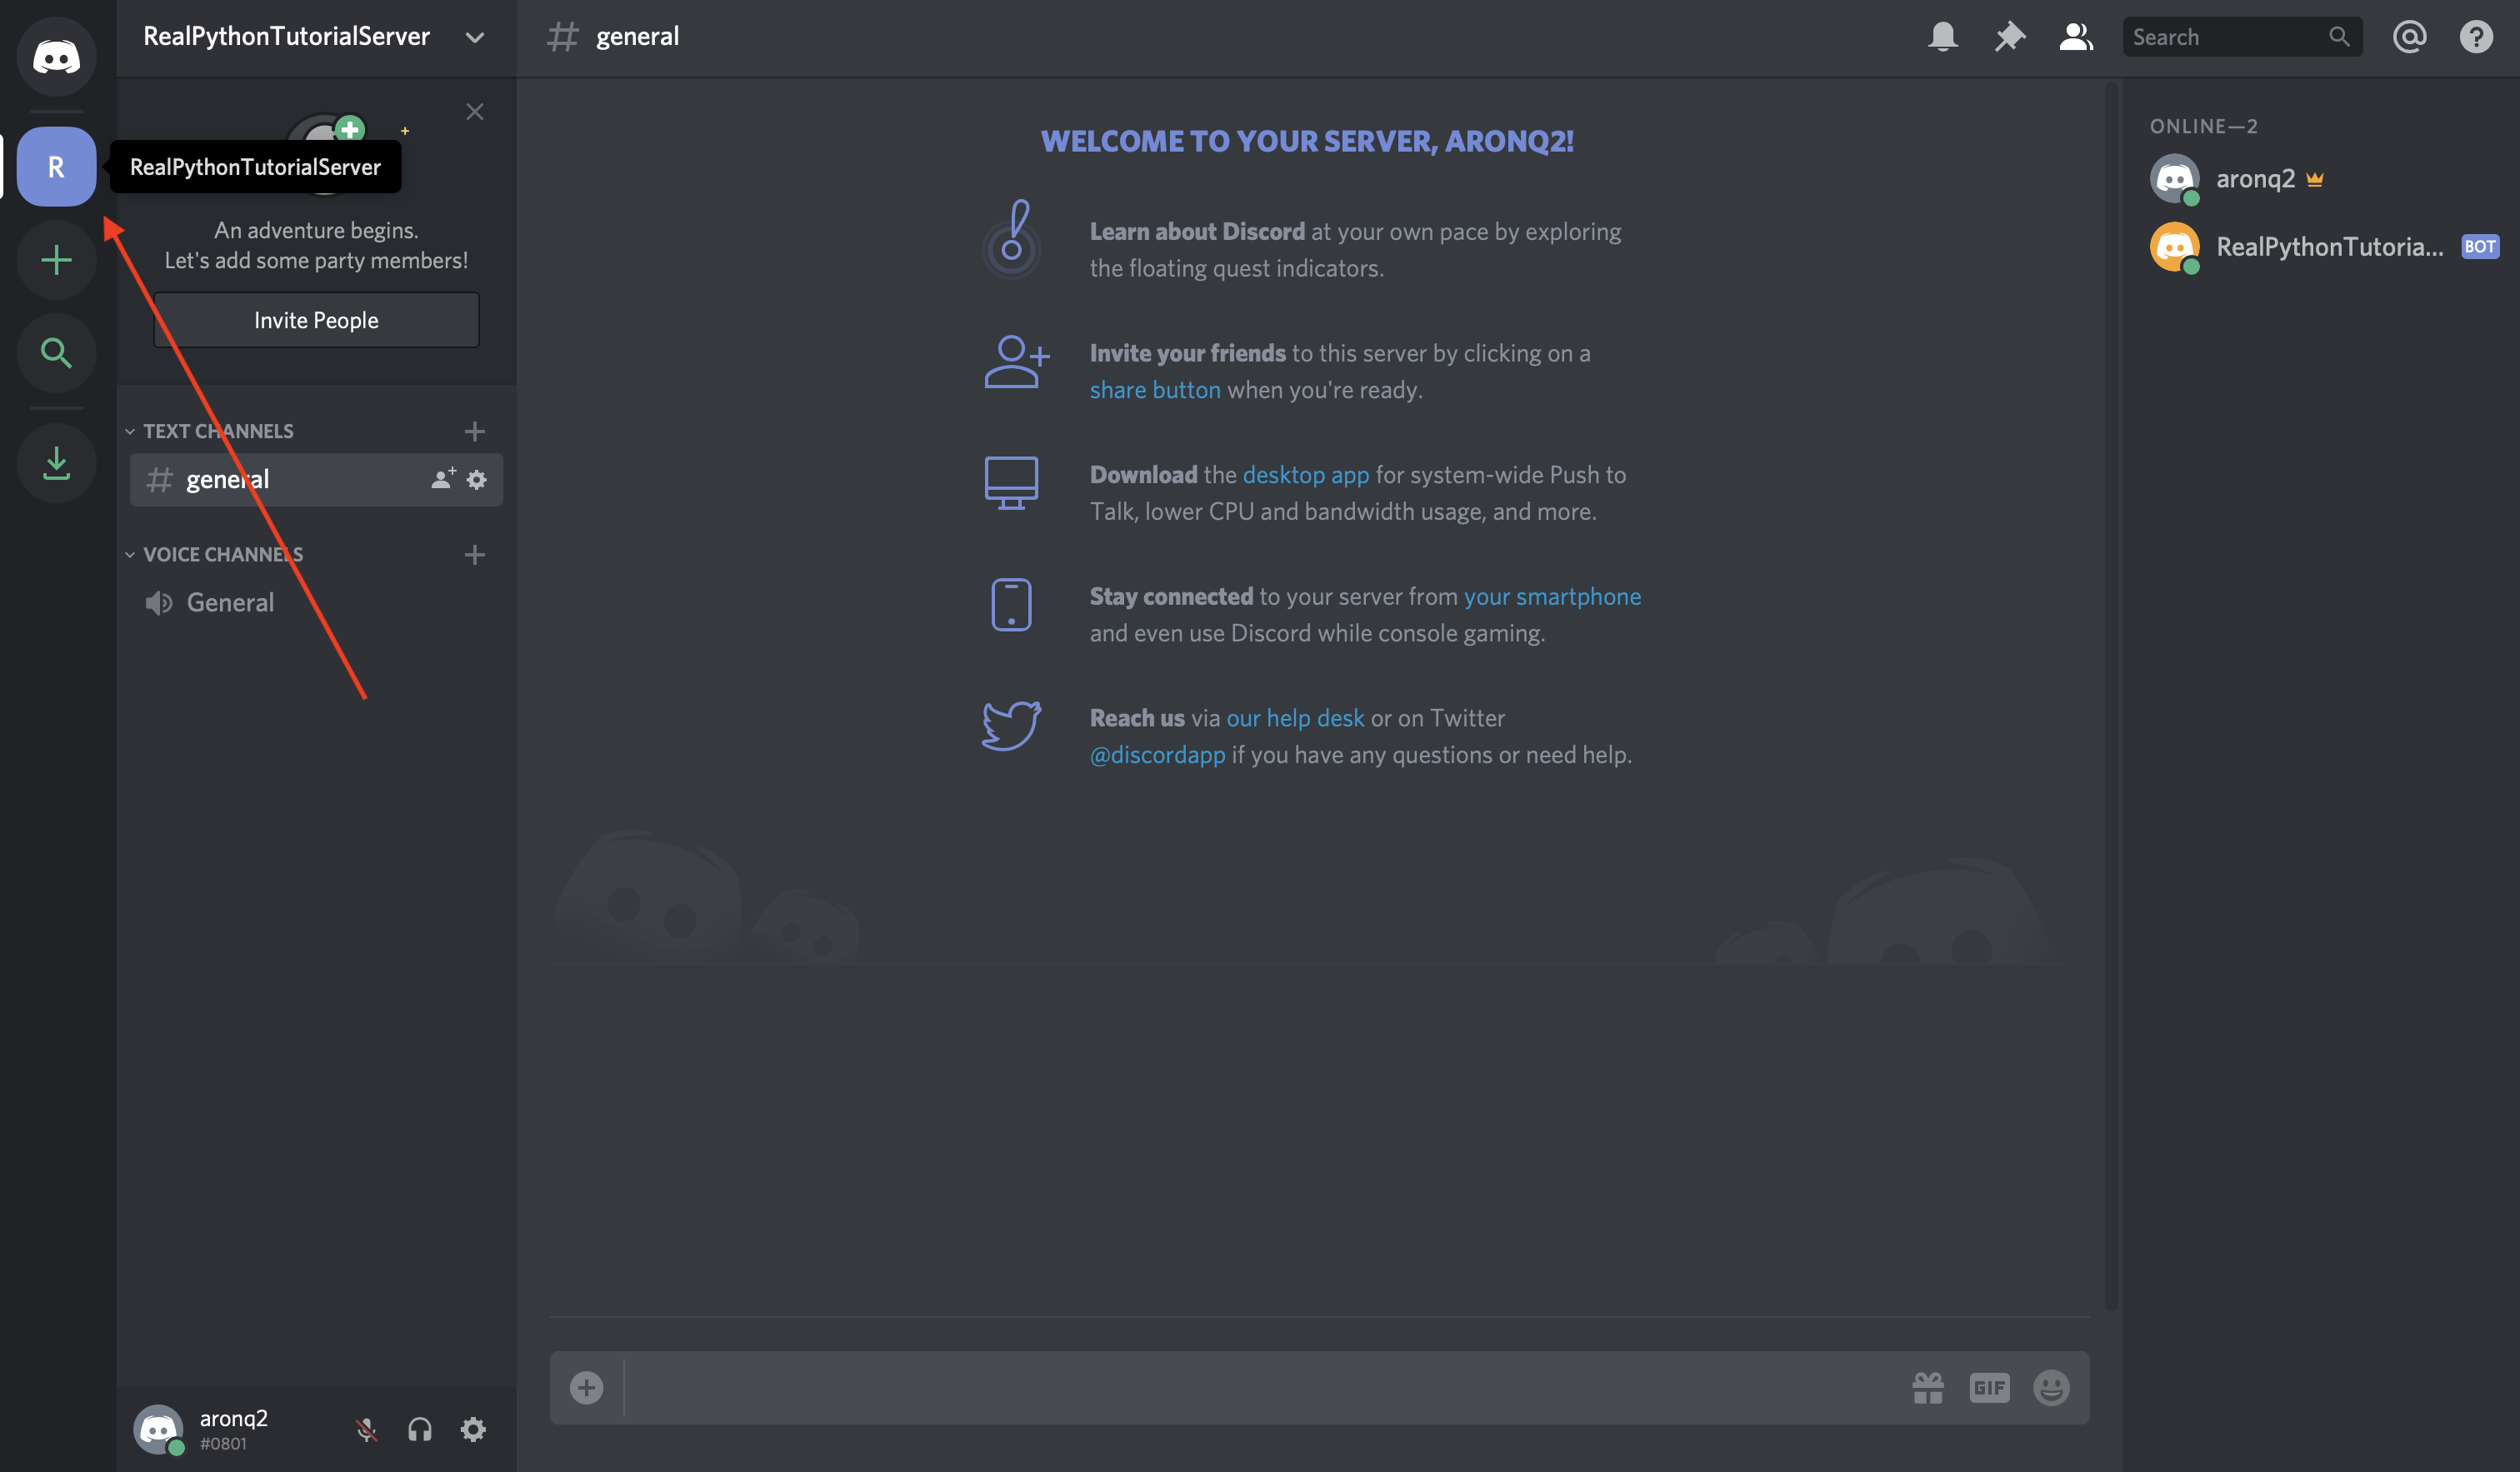
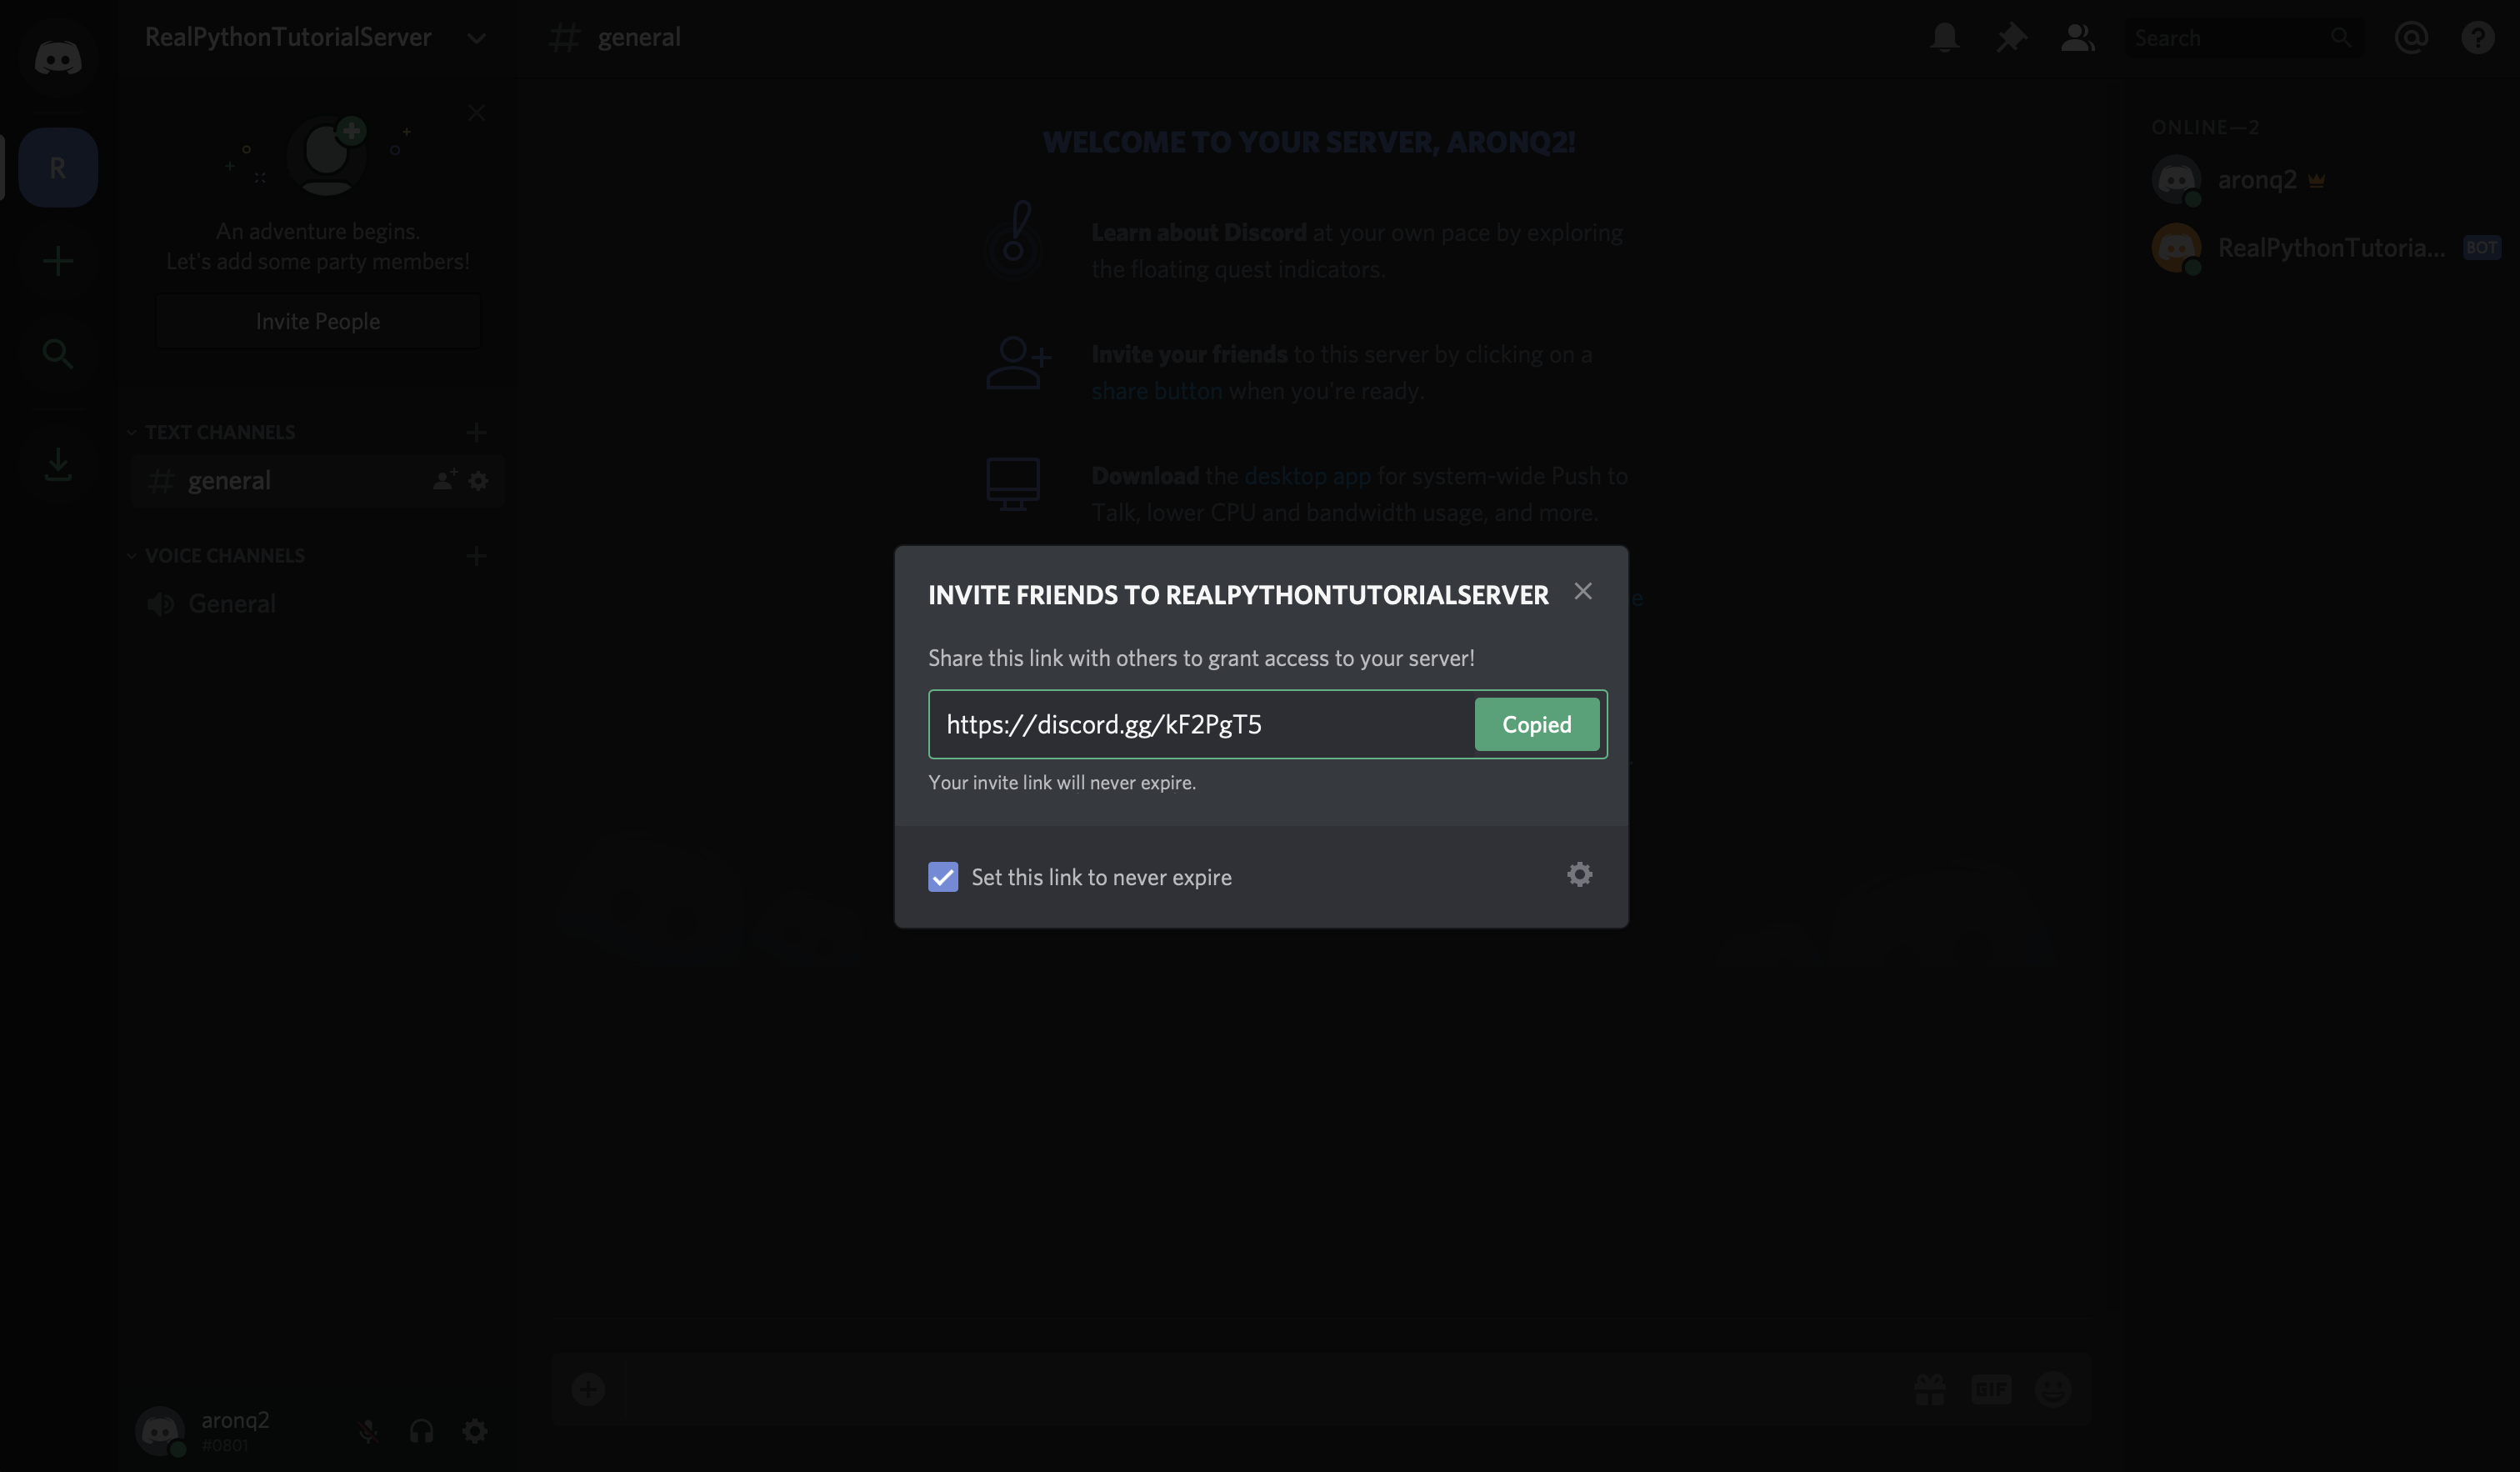
Select Invite People just beside the guild list where you selected your guild. Check the box that says Set this link to never expire and copy the link:
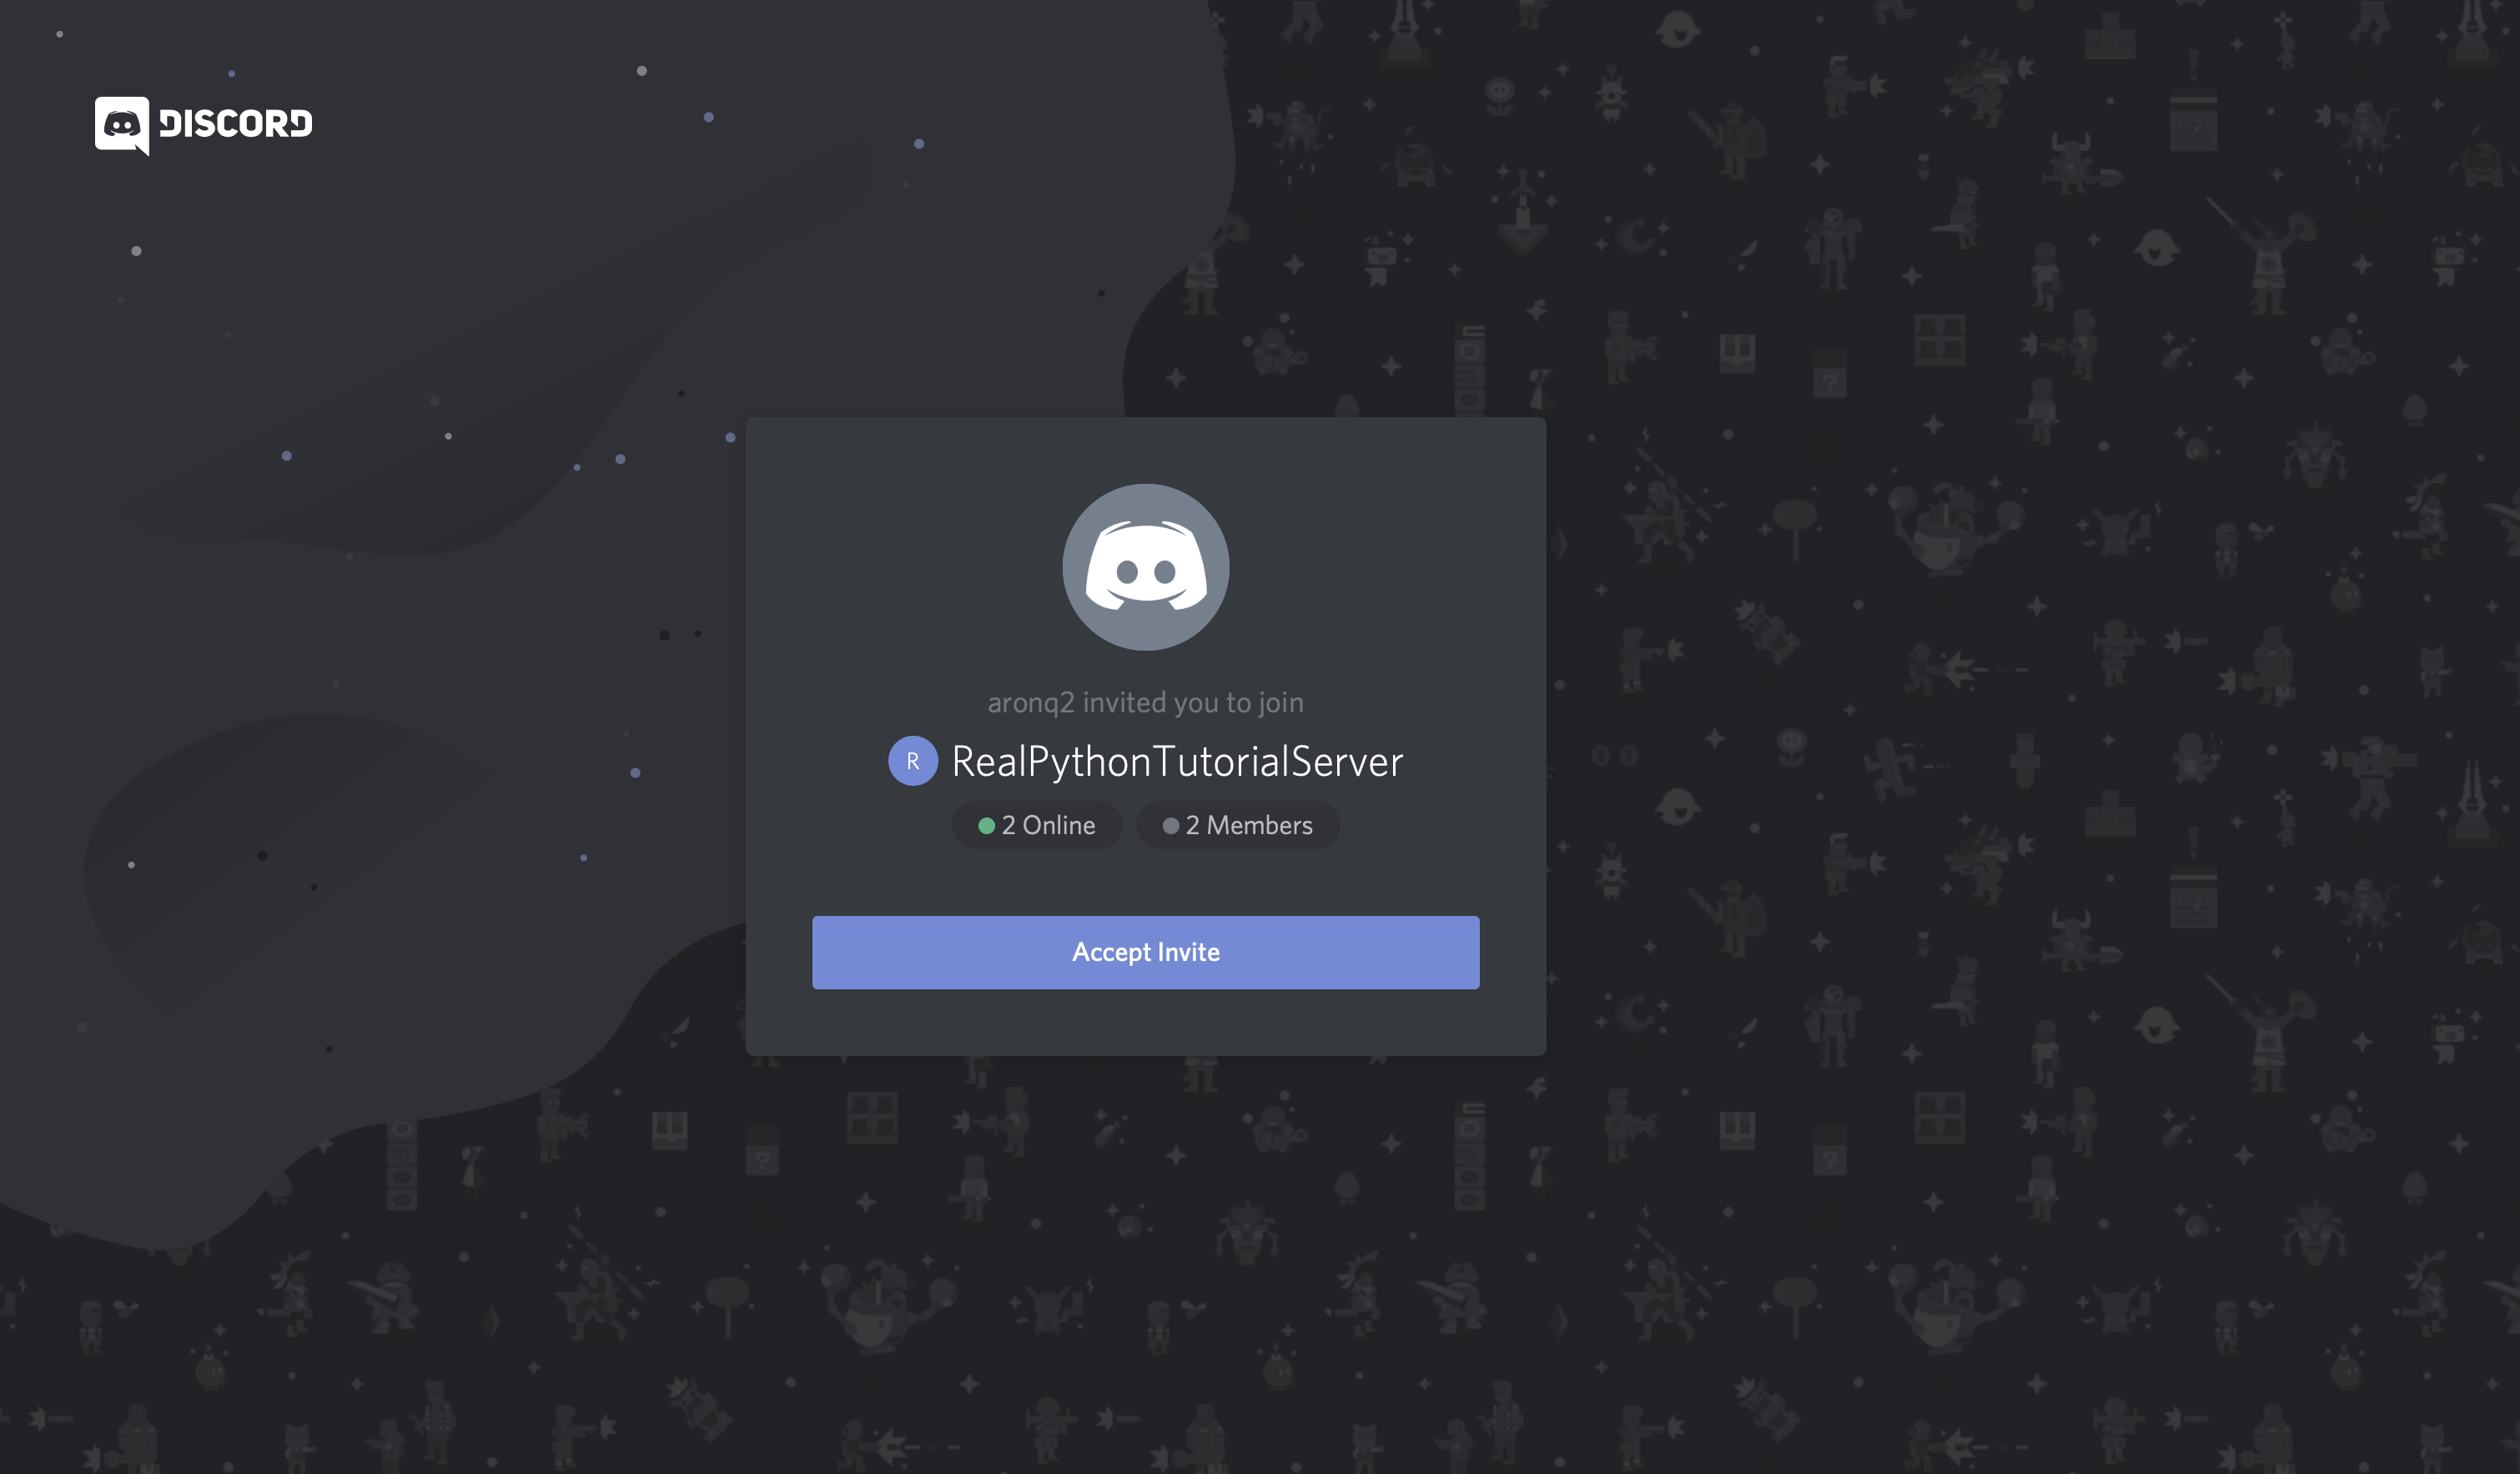
Now, with the invite link copied, create a new account and join the guild using your invite link:
First, you’ll see that Discord introduced you to the guild by default with an automated message. More importantly though, notice the badge on the left-hand side of the screen that notifies you of a new message:
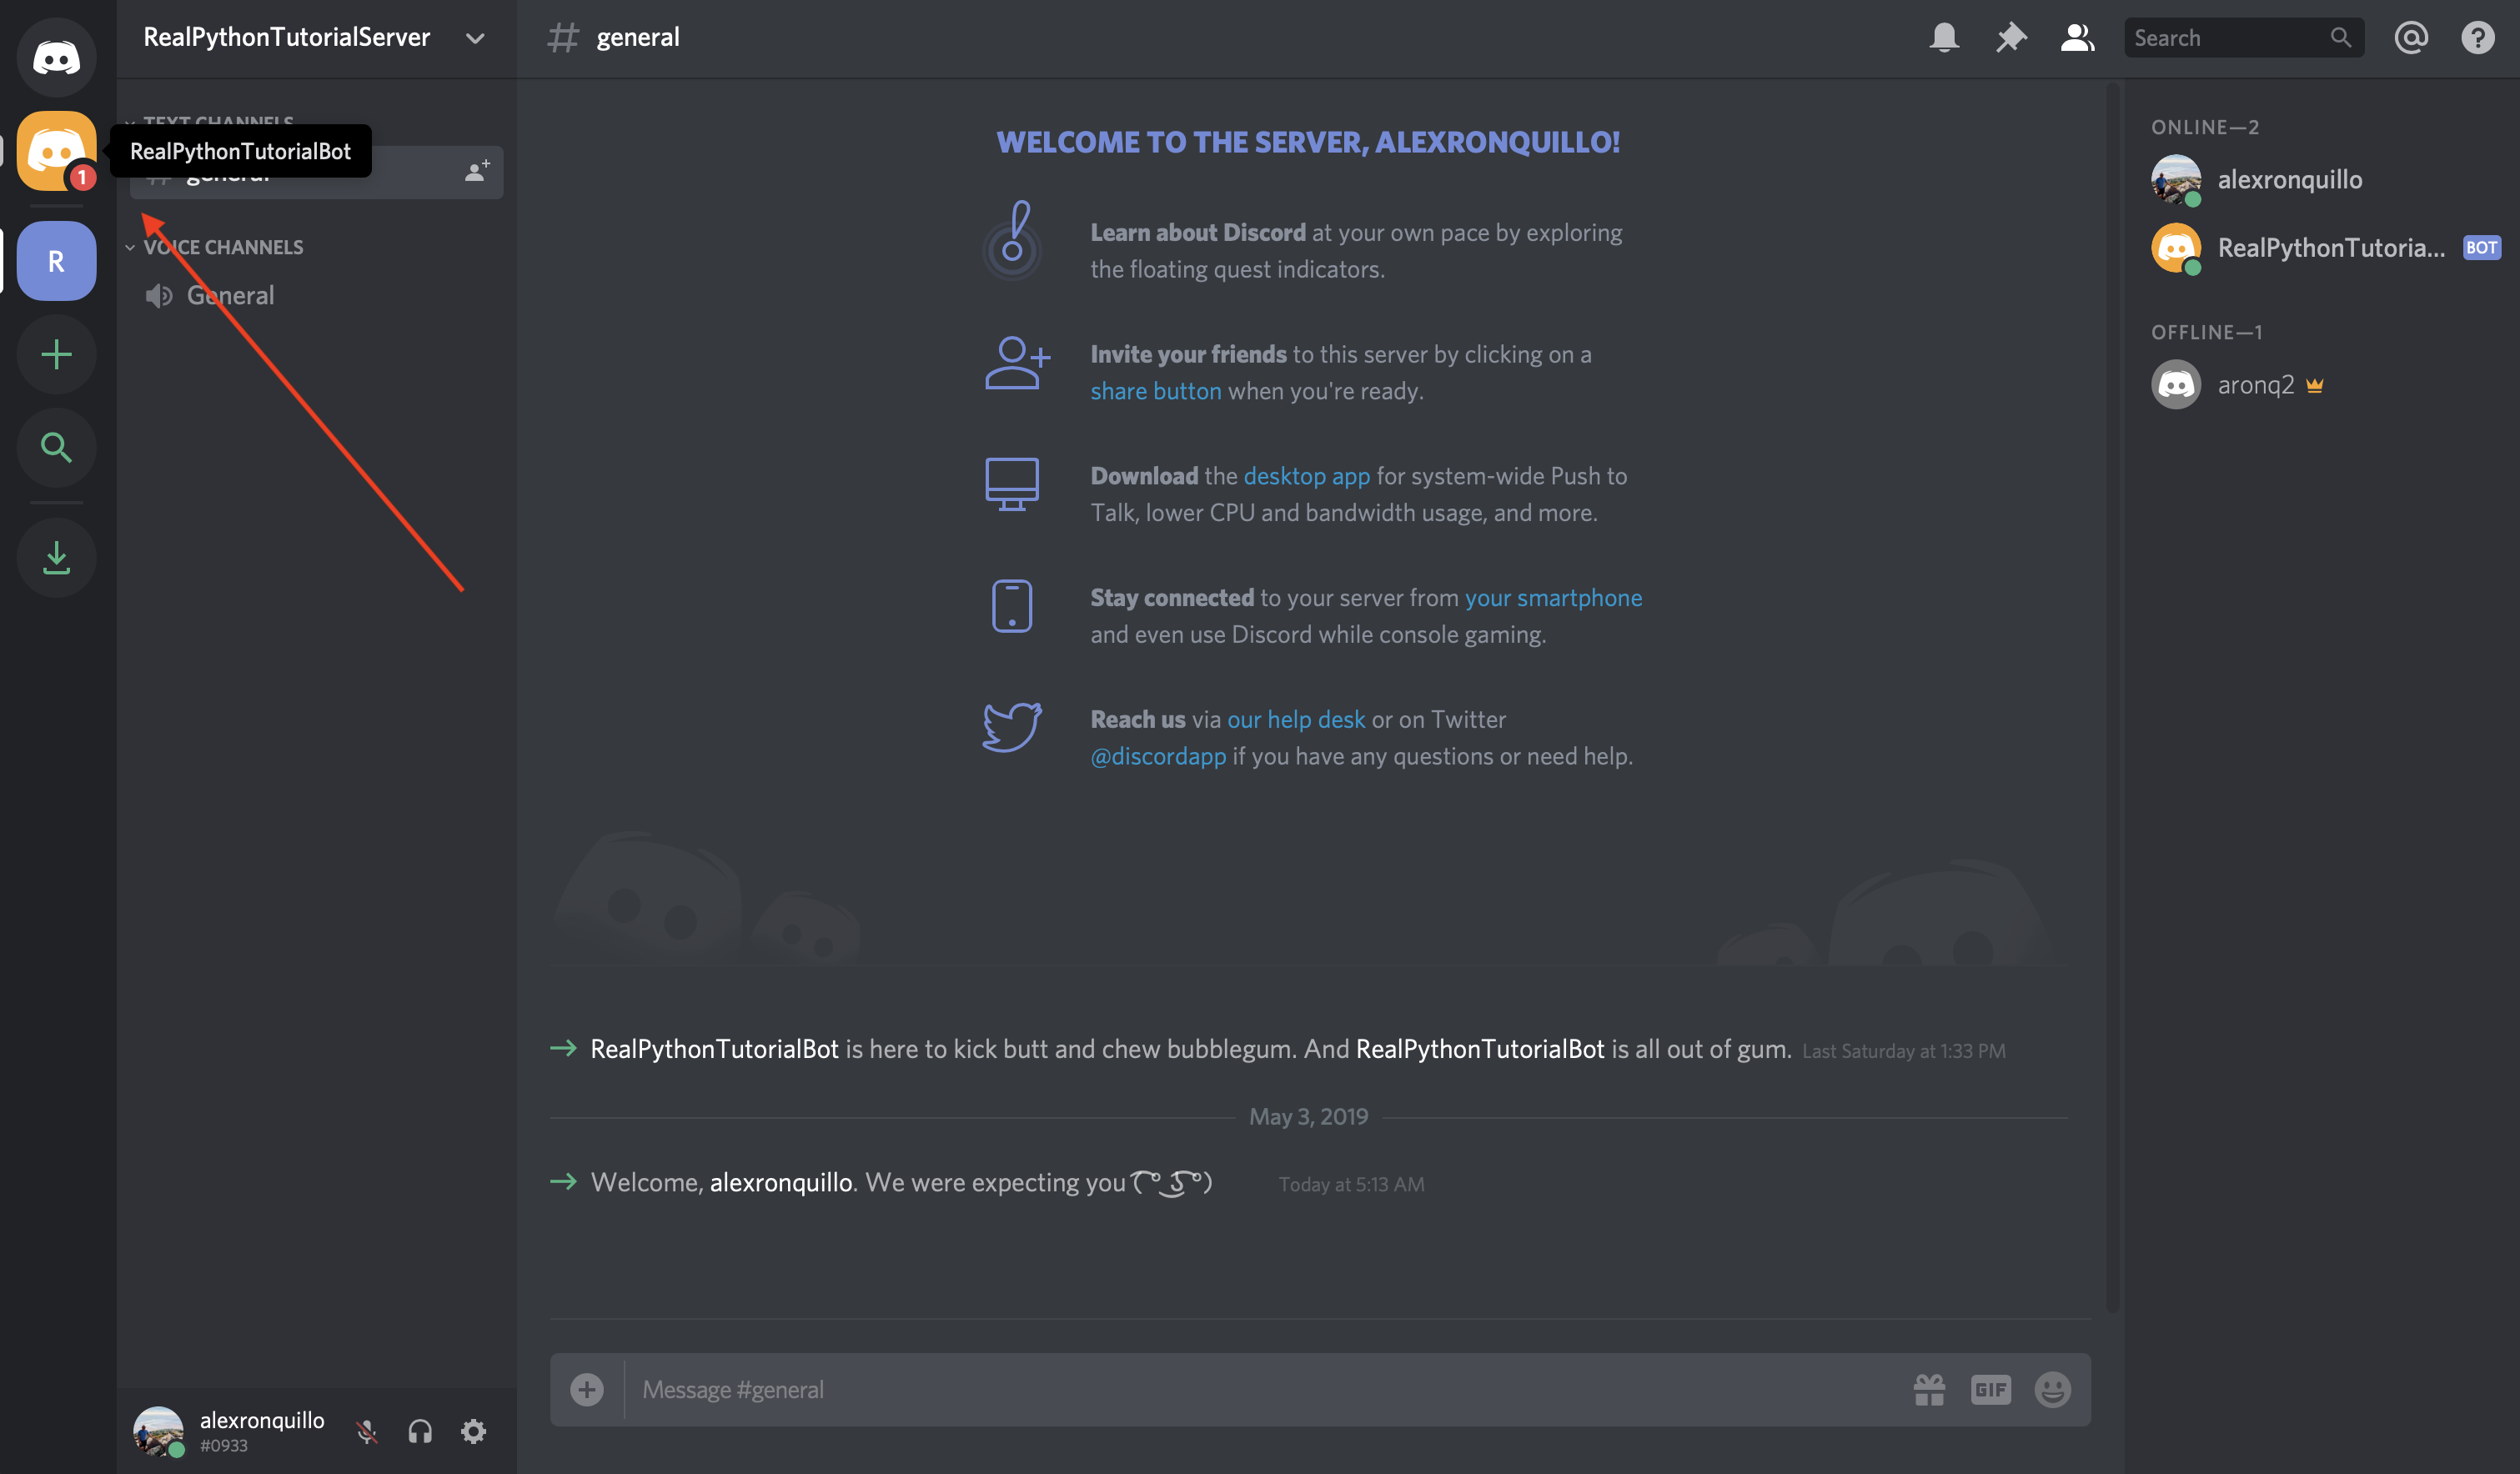
When you select it, you’ll see a private message from your bot user:
Perfect! Your bot user is now interacting with other users with minimal code.
Next, you’ll learn how to respond to specific user messages in the chat.
Responding to Messages
Let’s add on to the previous functionality of your bot by handling the on_message() event.
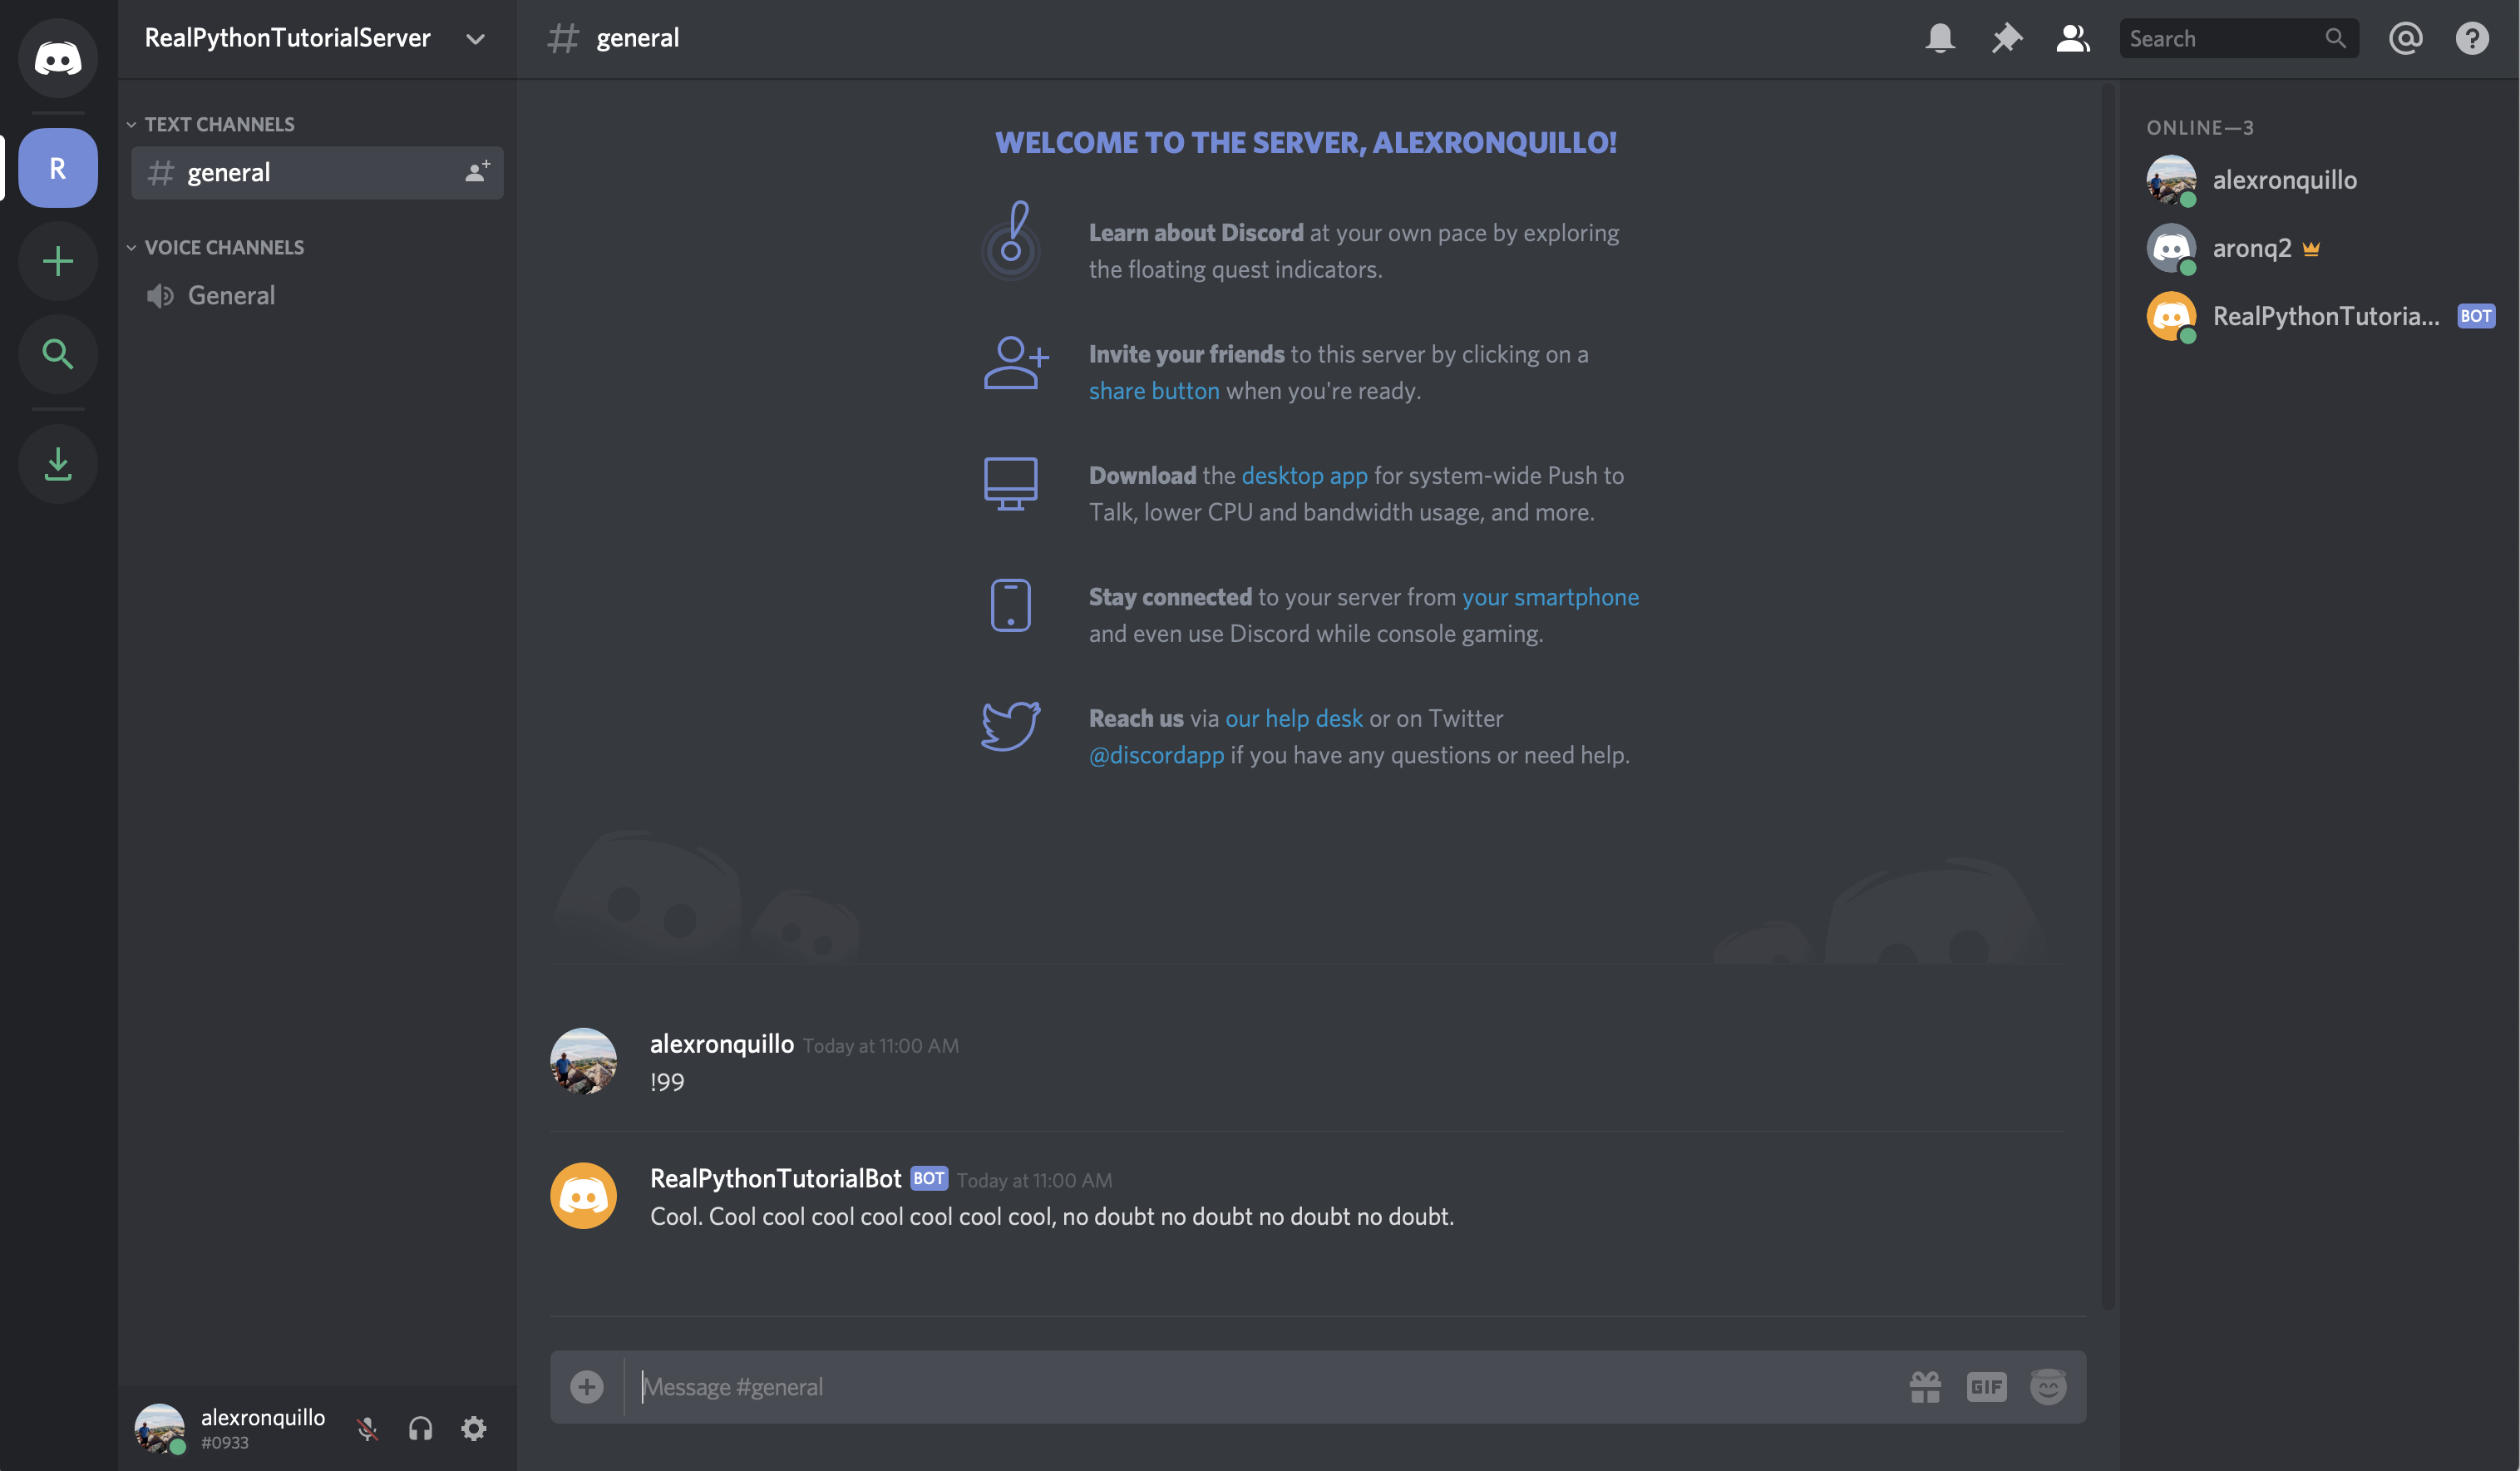
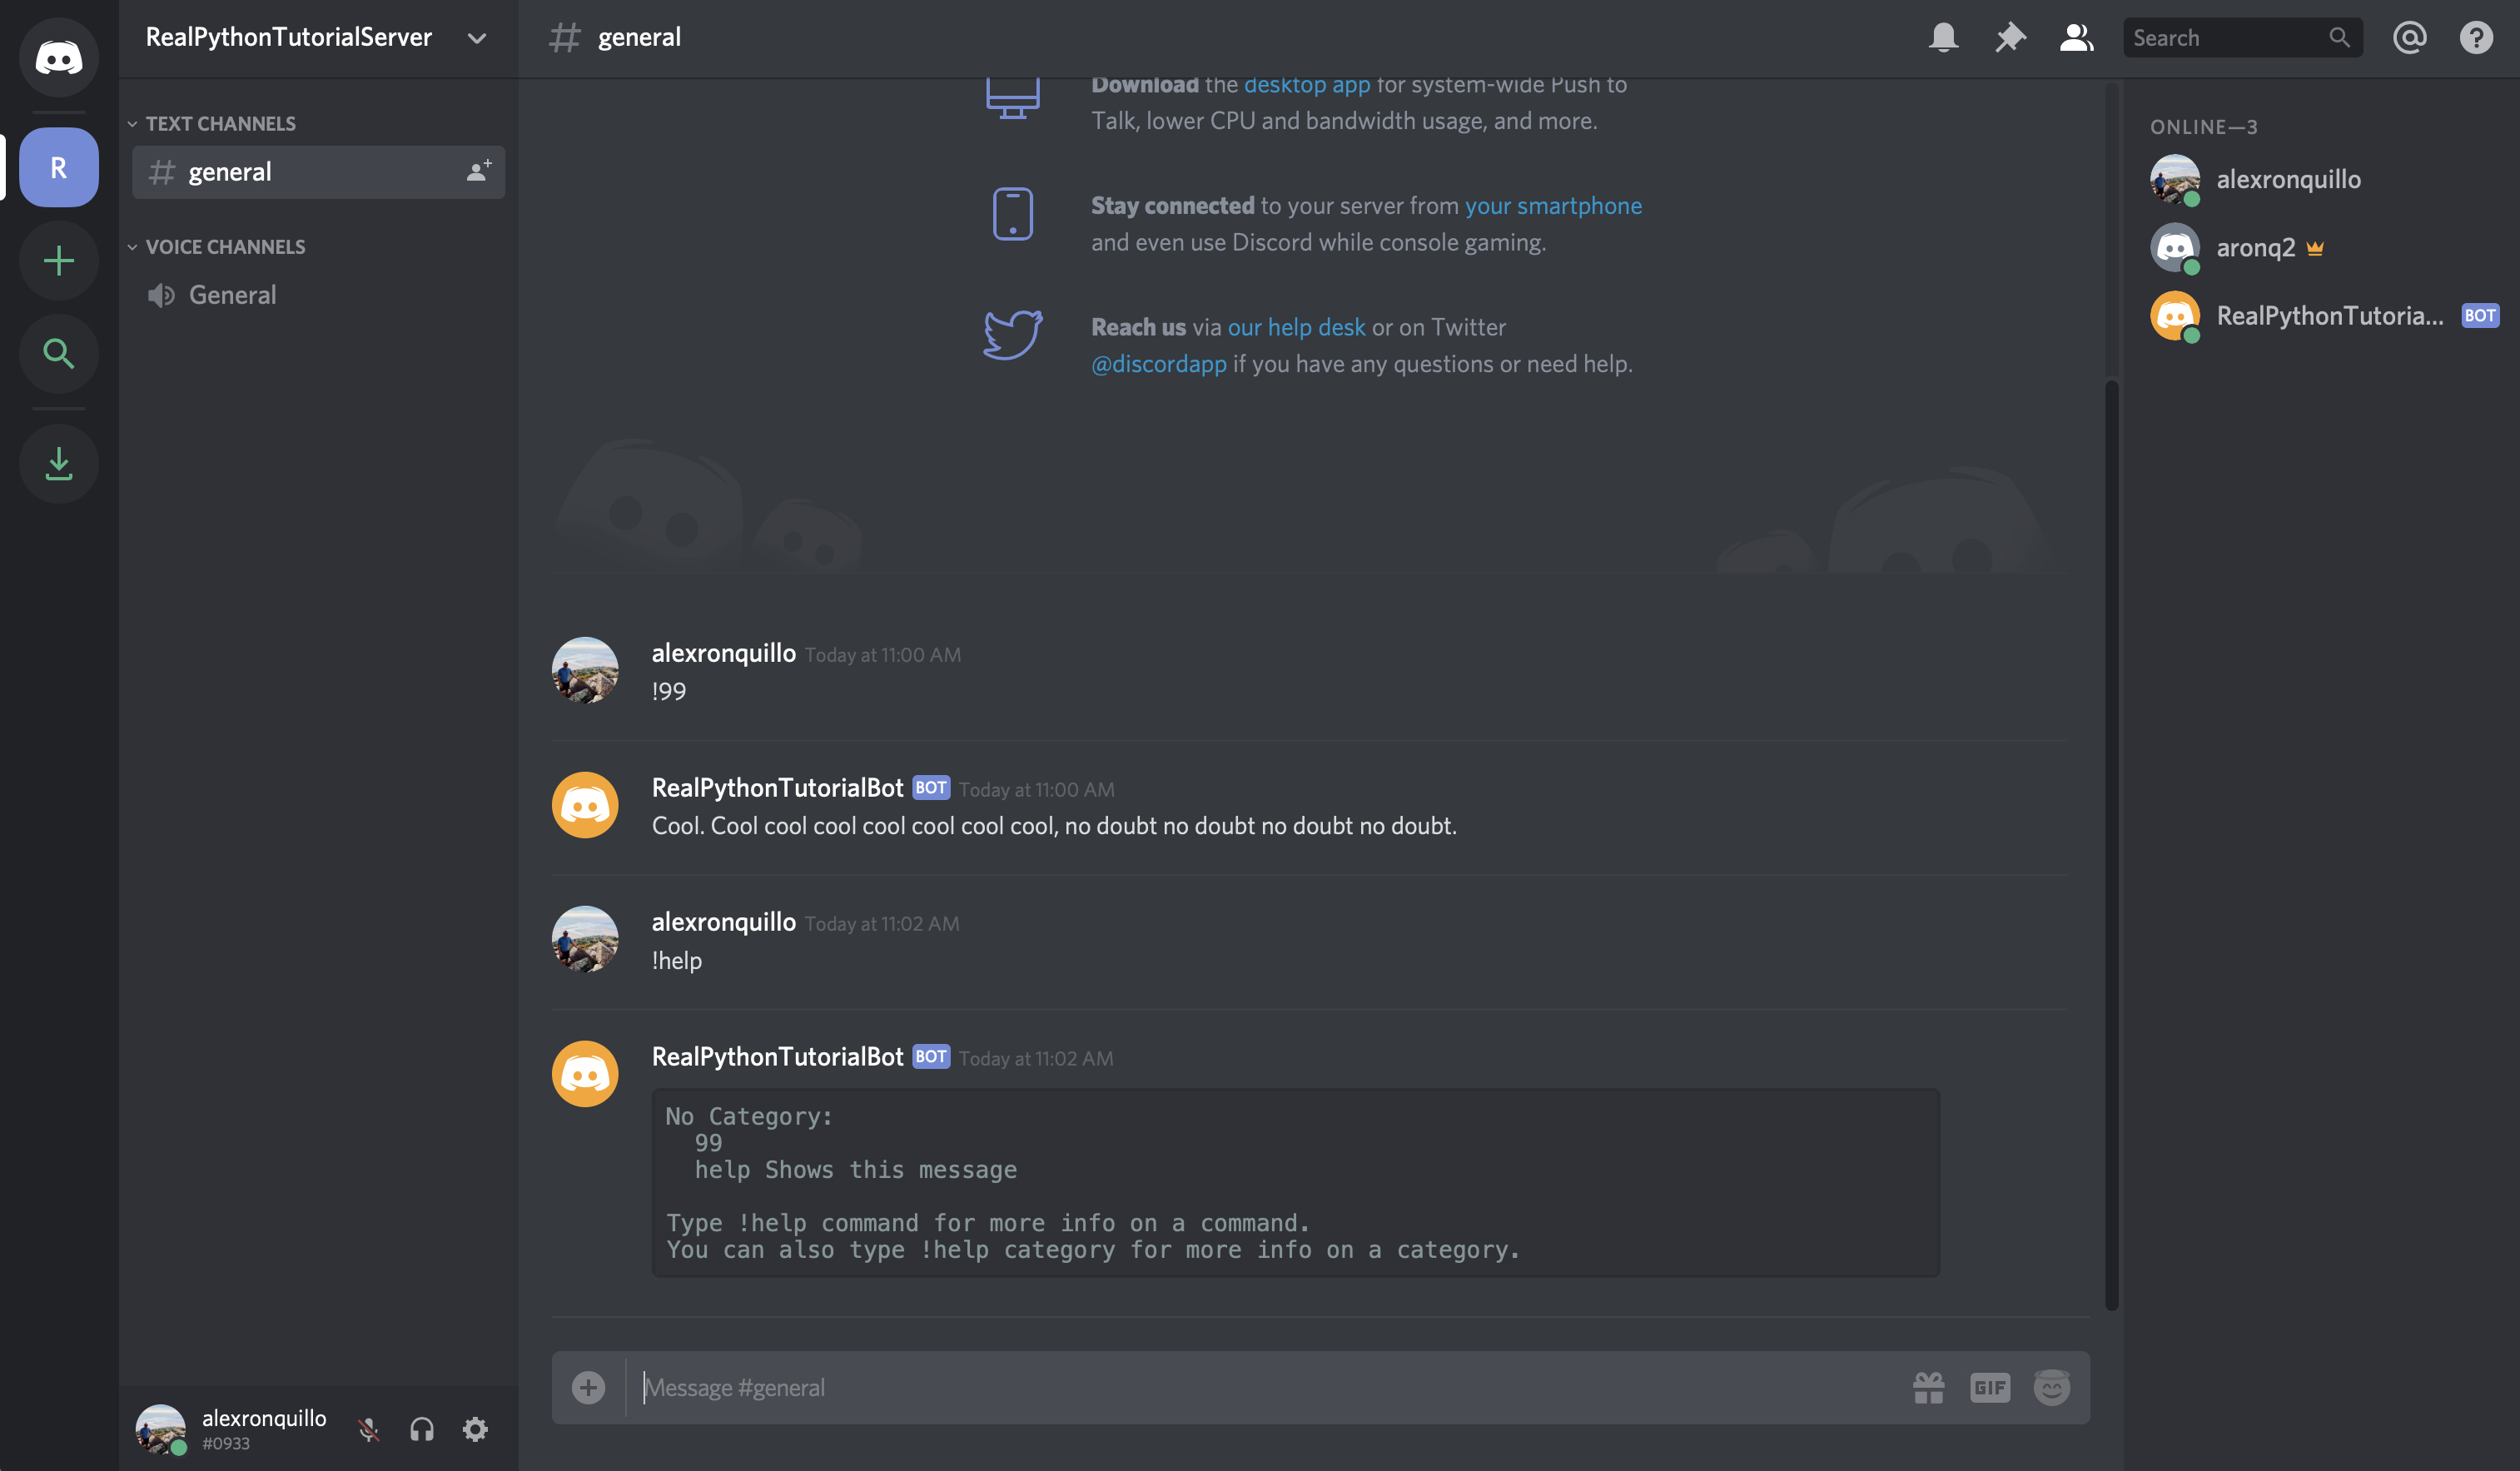
on_message() occurs when a message is posted in a channel that your bot has access to. In this example, you’ll respond to the message '99!' with a one-liner from the television show Brooklyn Nine-Nine:
@client.event
async def on_message(message):
    if message.author == client.user:
        return

    brooklyn_99_quotes = [
        'I\'m the human form of the 💯 emoji.',
        'Bingpot!',
        (
            'Cool. Cool cool cool cool cool cool cool, '
            'no doubt no doubt no doubt no doubt.'
        ),
    ]

    if message.content == '99!':
        response = random.choice(brooklyn_99_quotes)
        await message.channel.send(response)
The bulk of this event handler looks at the message.content, checks to see if it’s equal to '99!', and responds by sending a random quote to the message’s channel if it is.
The other piece is an important one:
if message.author == client.user:
    return
Because a Client can’t tell the difference between a bot user and a normal user account, your on_message() handler should protect against a potentially recursive case where the bot sends a message that it might, itself, handle.
To illustrate, let’s say you want your bot to listen for users telling each other 'Happy Birthday'. You could implement your on_message() handler like this:
@client.event
async def on_message(message):
    if 'happy birthday' in message.content.lower():
        await message.channel.send('Happy Birthday! 🎈🎉')
Aside from the potentially spammy nature of this event handler, it also has a devastating side effect. The message that the bot responds with contains the same message it’s going to handle!
So, if one person in the channel tells another “Happy Birthday,” then the bot will also chime in… again… and again… and again:

That’s why it’s important to compare the message.author to the client.user (your bot user), and ignore any of its own messages.
So, let’s fix bot.py:
# bot.py
import os
import random

import discord
from dotenv import load_dotenv

load_dotenv()
TOKEN = os.getenv('DISCORD_TOKEN')

client = discord.Client()

@client.event
async def on_ready():
    print(f'{client.user.name} has connected to Discord!')

@client.event
async def on_member_join(member):
    await member.create_dm()
    await member.dm_channel.send(
        f'Hi {member.name}, welcome to my Discord server!'
    )

@client.event
async def on_message(message):
    if message.author == client.user:
        return

    brooklyn_99_quotes = [
        'I\'m the human form of the 💯 emoji.',
        'Bingpot!',
        (
            'Cool. Cool cool cool cool cool cool cool, '
            'no doubt no doubt no doubt no doubt.'
        ),
    ]

    if message.content == '99!':
        response = random.choice(brooklyn_99_quotes)
        await message.channel.send(response)

client.run(TOKEN)
Don’t forget to import random at the top of the module, since the on_message() handler utilizes random.choice().
Run the program:
$ python bot.py
RealPythonTutorialBot has connected to Discord!
Finally, head over to Discord to test it out:

Great! Now that you’ve seen a few different ways to handle some common Discord events, you’ll learn how to deal with errors that event handlers may raise.
Handling Exceptions
As you’ve seen already, discord.py is an event-driven system. This focus on events extends even to exceptions. When one event handler raises an Exception, Discord calls on_error().
The default behavior of on_error() is to write the error message and stack trace to stderr. To test this, add a special message handler to on_message():
# bot.py
import os
import random

import discord
from dotenv import load_dotenv

load_dotenv()
TOKEN = os.getenv('DISCORD_TOKEN')

client = discord.Client()

@client.event
async def on_ready():
    print(f'{client.user.name} has connected to Discord!')

@client.event
async def on_member_join(member):
    await member.create_dm()
    await member.dm_channel.send(
        f'Hi {member.name}, welcome to my Discord server!'
    )

@client.event
async def on_message(message):
    if message.author == client.user:
        return

    brooklyn_99_quotes = [
        'I\'m the human form of the 💯 emoji.',
        'Bingpot!',
        (
            'Cool. Cool cool cool cool cool cool cool, '
            'no doubt no doubt no doubt no doubt.'
        ),
    ]

    if message.content == '99!':
        response = random.choice(brooklyn_99_quotes)
        await message.channel.send(response)
    elif message.content == 'raise-exception':
        raise discord.DiscordException

client.run(TOKEN)
The new raise-exception message handler allows you to raise a DiscordException on command.
Run the program and type raise-exception into the Discord channel:
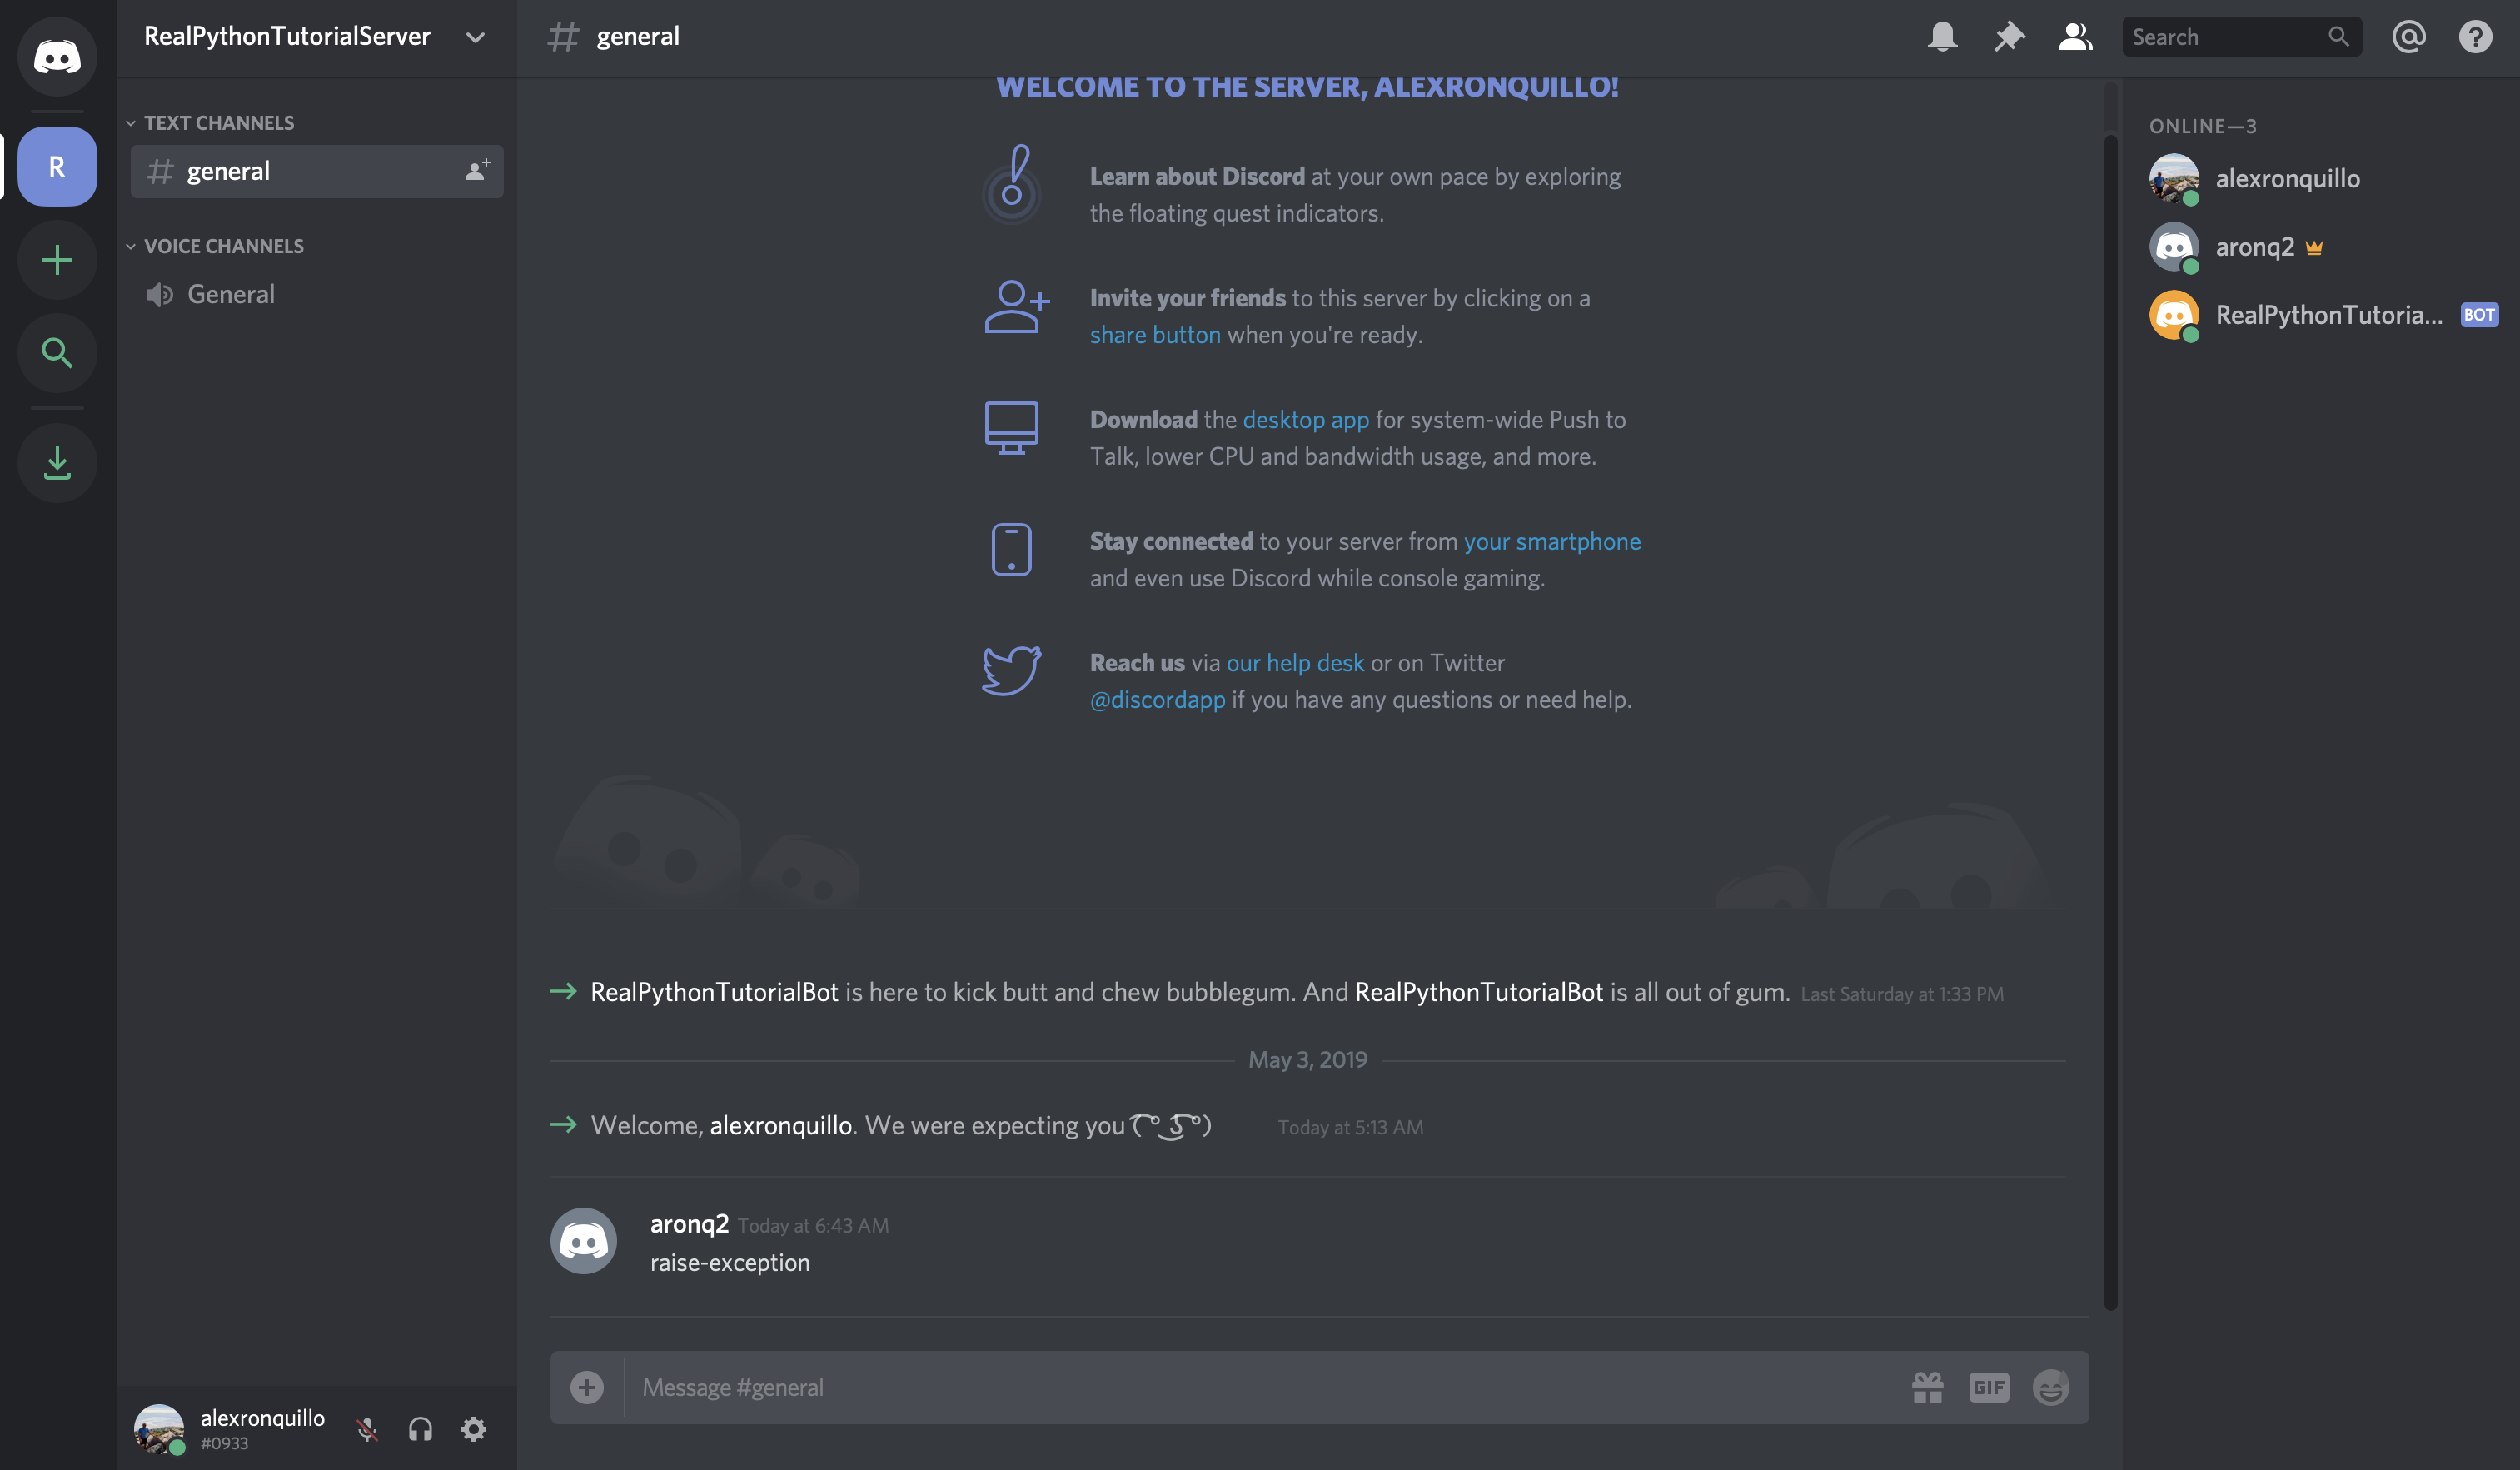
You should now see the Exception that was raised by your on_message() handler in the console:
$ python bot.py
RealPythonTutorialBot has connected to Discord!
Ignoring exception in on_message
Traceback (most recent call last):
  File "/Users/alex.ronquillo/.pyenv/versions/discord-venv/lib/python3.7/site-packages/discord/client.py", line 255, in _run_event
    await coro(*args, **kwargs)
  File "bot.py", line 42, in on_message
    raise discord.DiscordException
discord.errors.DiscordException
The exception was caught by the default error handler, so the output contains the message Ignoring exception in on_message. Let’s fix that by handling that particular error. To do so, you’ll catch the DiscordException and write it to a file instead.
The on_error() event handler takes the event as the first argument. In this case, we expect the event to be 'on_message'. It also accepts *args and **kwargs as flexible, positional and keyword arguments passed to the original event handler.
So, since on_message() takes a single argument, message, we expect args[0] to be the message that the user sent in the Discord channel:
@client.event
async def on_error(event, *args, **kwargs):
    with open('err.log', 'a') as f:
        if event == 'on_message':
            f.write(f'Unhandled message: {args[0]}\n')
        else:
            raise
If the Exception originated in the on_message() event handler, you .write() a formatted string to the file err.log. If another event raises an Exception, then we simply want our handler to re-raise the exception to invoke the default behavior.
Run bot.py and send the raise-exception message again to view the output in err.log:
$ cat err.log
Unhandled message: <Message id=573845548923224084 pinned=False author=<Member id=543612676807327754 name='alexronquillo' discriminator='0933' bot=False nick=None guild=<Guild id=571759877328732195 name='RealPythonTutorialServer' chunked=True>>>
Instead of only a stack trace, you have a more informative error, showing the message that caused on_message() to raise the DiscordException, saved to a file for longer persistence.
Technical Detail: If you want to take the actual Exception into account when you’re writing your error messages to err.log, then you can use functions from sys, such as exc_info().
Now that you have some experience handling different events and interacting with Discord APIs, you’ll learn about a subclass of Client called Bot, which implements some handy, bot-specific functionality.
Connecting a Bot
A Bot is a subclass of Client that adds a little bit of extra functionality that is useful when you’re creating bot users. For example, a Bot can handle events and commands, invoke validation checks, and more.
Before you get into the features specific to Bot, convert bot.py to use a Bot instead of a Client:
# bot.py
import os
import random
from dotenv import load_dotenv

# 1
from discord.ext import commands

load_dotenv()
TOKEN = os.getenv('DISCORD_TOKEN')

# 2
bot = commands.Bot(command_prefix='!')

@bot.event
async def on_ready():
    print(f'{bot.user.name} has connected to Discord!')

bot.run(TOKEN)
As you can see, Bot can handle events the same way that Client does. However, notice the differences between Client and Bot:
Botis imported from thediscord.ext.commandsmodule.- The
Botinitializer requires acommand_prefix, which you’ll learn more about in the next section.
The extensions library, ext, offers several interesting components to help you create a Discord Bot. One such component is the Command.
Using Bot Commands
In general terms, a command is an order that a user gives to a bot so that it will do something. Commands are different from events because they are:
- Arbitrarily defined
- Directly called by the user
- Flexible, in terms of their interface
In technical terms, a Command is an object that wraps a function that is invoked by a text command in Discord. The text command must start with the command_prefix, defined by the Bot object.
Let’s take a look at an old event to better understand what this looks like:
# bot.py
import os
import random

import discord
from dotenv import load_dotenv

load_dotenv()
TOKEN = os.getenv('DISCORD_TOKEN')

client = discord.Client()

@client.event
async def on_message(message):
    if message.author == client.user:
        return

    brooklyn_99_quotes = [
        'I\'m the human form of the 💯 emoji.',
        'Bingpot!',
        (
            'Cool. Cool cool cool cool cool cool cool, '
            'no doubt no doubt no doubt no doubt.'
        ),
    ]

    if message.content == '99!':
        response = random.choice(brooklyn_99_quotes)
        await message.channel.send(response)

client.run(TOKEN)
Here, you created an on_message() event handler, which receives the message string and compares it to a pre-defined option: '99!'.
Using a Command, you can convert this example to be more specific:
# bot.py
import os
import random

from discord.ext import commands
from dotenv import load_dotenv

load_dotenv()
TOKEN = os.getenv('DISCORD_TOKEN')

bot = commands.Bot(command_prefix='!')

@bot.command(name='99')
async def nine_nine(ctx):
    brooklyn_99_quotes = [
        'I\'m the human form of the 💯 emoji.',
        'Bingpot!',
        (
            'Cool. Cool cool cool cool cool cool cool, '
            'no doubt no doubt no doubt no doubt.'
        ),
    ]

    response = random.choice(brooklyn_99_quotes)
    await ctx.send(response)

bot.run(TOKEN)
There are several important characteristics to understand about using Command:
-
Instead of using
bot.eventlike before, you usebot.command(), passing the invocation command (name) as its argument. -
The function will now only be called when
!99is mentioned in chat. This is different than theon_message()event, which was executed any time a user sent a message, regardless of the content. -
The command must be prefixed with the exclamation point (
!) because that’s thecommand_prefixthat you defined in the initializer for yourBot. -
Any
Commandfunction (technically called acallback) must accept at least one parameter, calledctx, which is theContextsurrounding the invokedCommand.
A Context holds data such as the channel and guild that the user called the Command from.
Run the program:
$ python bot.py
With your bot running, you can now head to Discord to try out your new command:
From the user’s point of view, the practical difference is that the prefix helps formalize the command, rather than simply reacting to a particular on_message() event.
This comes with other great benefits as well. For example, you can invoke the !help command to see all the commands that your Bot handles:
If you want to add a description to your command so that the help message is more informative, simply pass a help description to the .command() decorator:
# bot.py
import os
import random

from discord.ext import commands
from dotenv import load_dotenv

load_dotenv()
TOKEN = os.getenv('DISCORD_TOKEN')

bot = commands.Bot(command_prefix='!')

@bot.command(name='99', help='Responds with a random quote from Brooklyn 99')
async def nine_nine(ctx):
    brooklyn_99_quotes = [
        'I\'m the human form of the 💯 emoji.',
        'Bingpot!',
        (
            'Cool. Cool cool cool cool cool cool cool, '
            'no doubt no doubt no doubt no doubt.'
        ),
    ]

    response = random.choice(brooklyn_99_quotes)
    await ctx.send(response)

bot.run(TOKEN)
Now, when the user invokes the !help command, your bot will present a description of your command:
Keep in mind that all of this functionality exists only for the Bot subclass, not the Client superclass.
Command has another useful functionality: the ability to use a Converter to change the types of its arguments.
Converting Parameters Automatically
Another benefit of using commands is the ability to convert parameters.
Sometimes, you require a parameter to be a certain type, but arguments to a Command function are, by default, strings. A Converter lets you convert those parameters to the type that you expect.
For example, if you want to build a Command for your bot user to simulate rolling some dice (knowing what you’ve learned so far), you might define it like this:
@bot.command(name='roll_dice', help='Simulates rolling dice.')
async def roll(ctx, number_of_dice, number_of_sides):
    dice = [
        str(random.choice(range(1, number_of_sides + 1)))
        for _ in range(number_of_dice)
    ]
    await ctx.send(', '.join(dice))
You defined roll to take two parameters:
- The number of dice to roll
- The number of sides per die
Then, you decorated it with .command() so that you can invoke it with the !roll_dice command. Finally, you .send() the results in a message back to the channel.
While this looks correct, it isn’t. Unfortunately, if you run bot.py, and invoke the !roll_dice command in your Discord channel, you’ll see the following error:
$ python bot.py
Ignoring exception in command roll_dice:
Traceback (most recent call last):
  File "/Users/alex.ronquillo/.pyenv/versions/discord-venv/lib/python3.7/site-packages/discord/ext/commands/core.py", line 63, in wrapped
    ret = await coro(*args, **kwargs)
  File "bot.py", line 40, in roll
    for _ in range(number_of_dice)
TypeError: 'str' object cannot be interpreted as an integer

The above exception was the direct cause of the following exception:

Traceback (most recent call last):
  File "/Users/alex.ronquillo/.pyenv/versions/discord-venv/lib/python3.7/site-packages/discord/ext/commands/bot.py", line 860, in invoke
    await ctx.command.invoke(ctx)
  File "/Users/alex.ronquillo/.pyenv/versions/discord-venv/lib/python3.7/site-packages/discord/ext/commands/core.py", line 698, in invoke
    await injected(*ctx.args, **ctx.kwargs)
  File "/Users/alex.ronquillo/.pyenv/versions/discord-venv/lib/python3.7/site-packages/discord/ext/commands/core.py", line 72, in wrapped
    raise CommandInvokeError(exc) from exc
discord.ext.commands.errors.CommandInvokeError: Command raised an exception: TypeError: 'str' object cannot be interpreted as an integer
In other words, range() can’t accept a str as an argument. Instead, it must be an int. While you could cast each value to an int, there is a better way: you can use a Converter .
In discord.py, a Converter is defined using Python 3’s function annotations:
@bot.command(name='roll_dice', help='Simulates rolling dice.')
async def roll(ctx, number_of_dice: int, number_of_sides: int):
    dice = [
        str(random.choice(range(1, number_of_sides + 1)))
        for _ in range(number_of_dice)
    ]
    await ctx.send(', '.join(dice))
You added : int annotations to the two parameters that you expect to be of type int. Try the command again:
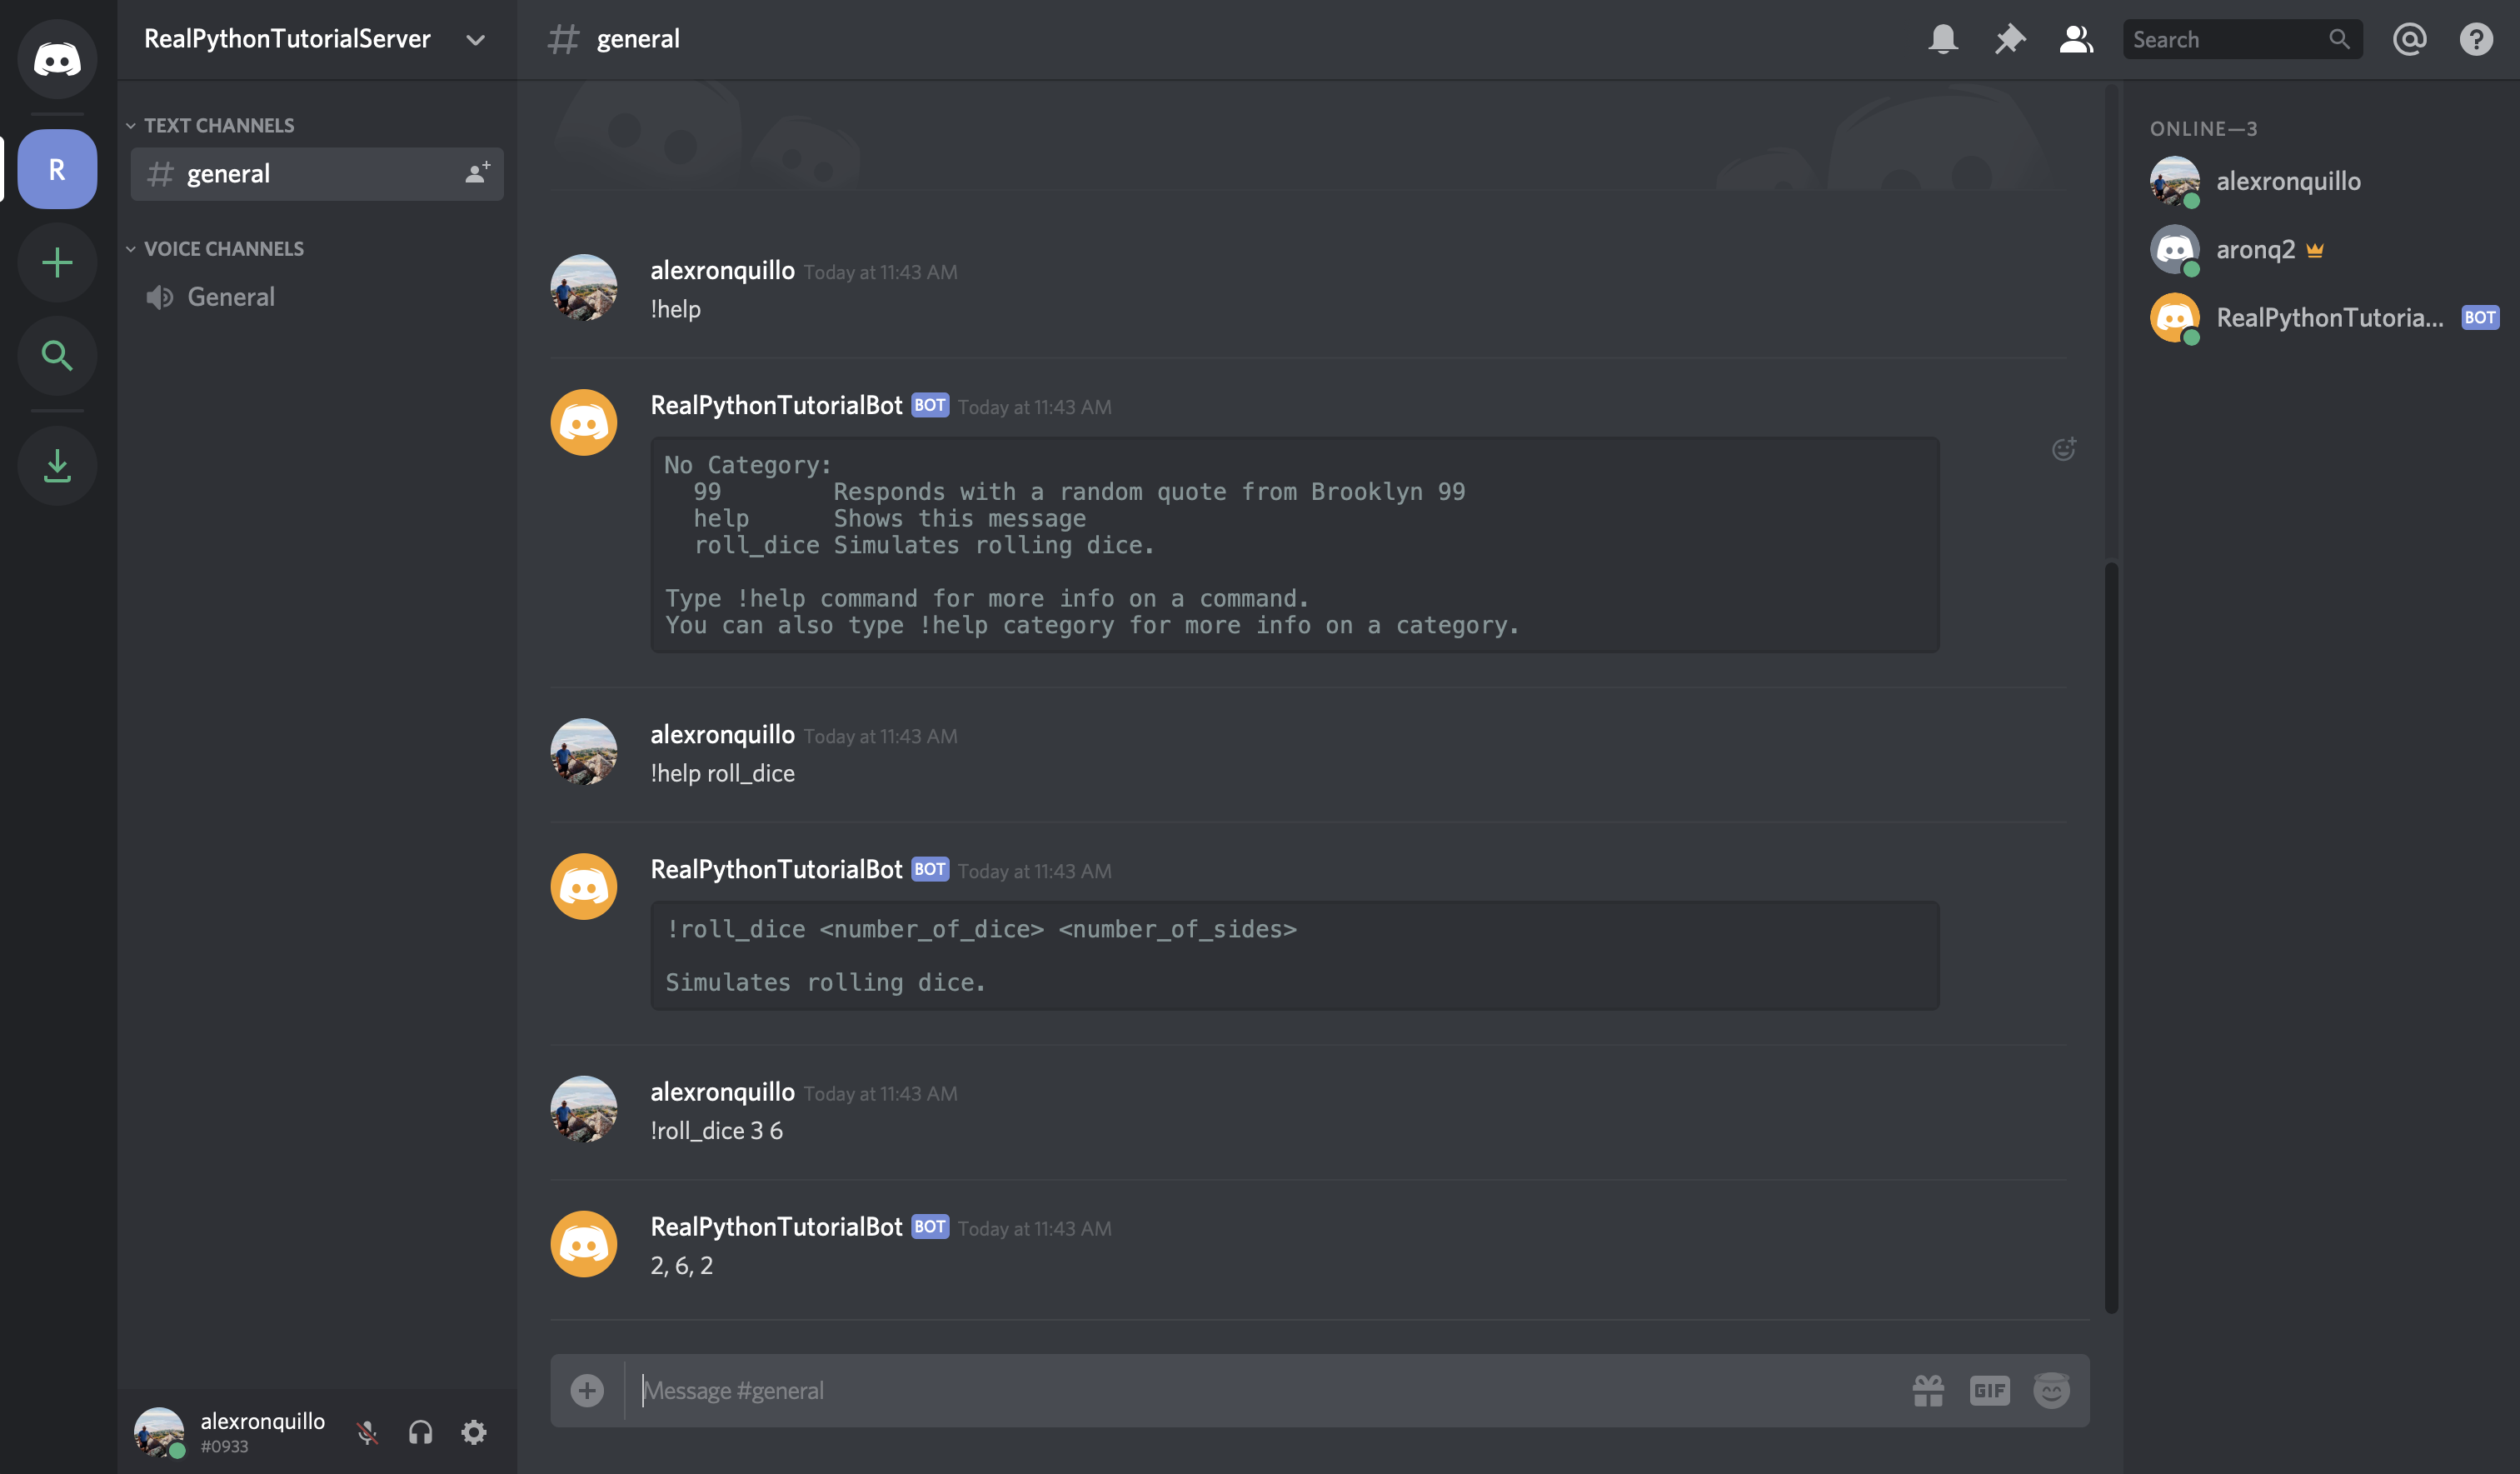
With that little change, your command works! The difference is that you’re now converting the command arguments to int, which makes them compatible with your function’s logic.
Note: A Converter can be any callable, not merely data types. The argument will be passed to the callable, and the return value will be passed into the Command.
Next, you’ll learn about the Check object and how it can improve your commands.
Checking Command Predicates
A Check is a predicate that is evaluated before a Command is executed to ensure that the Context surrounding the Command invocation is valid.
In an earlier example, you did something similar to verify that the user who sent a message that the bot handles was not the bot user, itself:
if message.author == client.user:
    return
The commands extension provides a cleaner and more usable mechanism for performing this kind of check, namely using Check objects.
To demonstrate how this works, assume you want to support a command !create-channel <channel_name> that creates a new channel. However, you only want to allow administrators the ability to create new channels with this command.
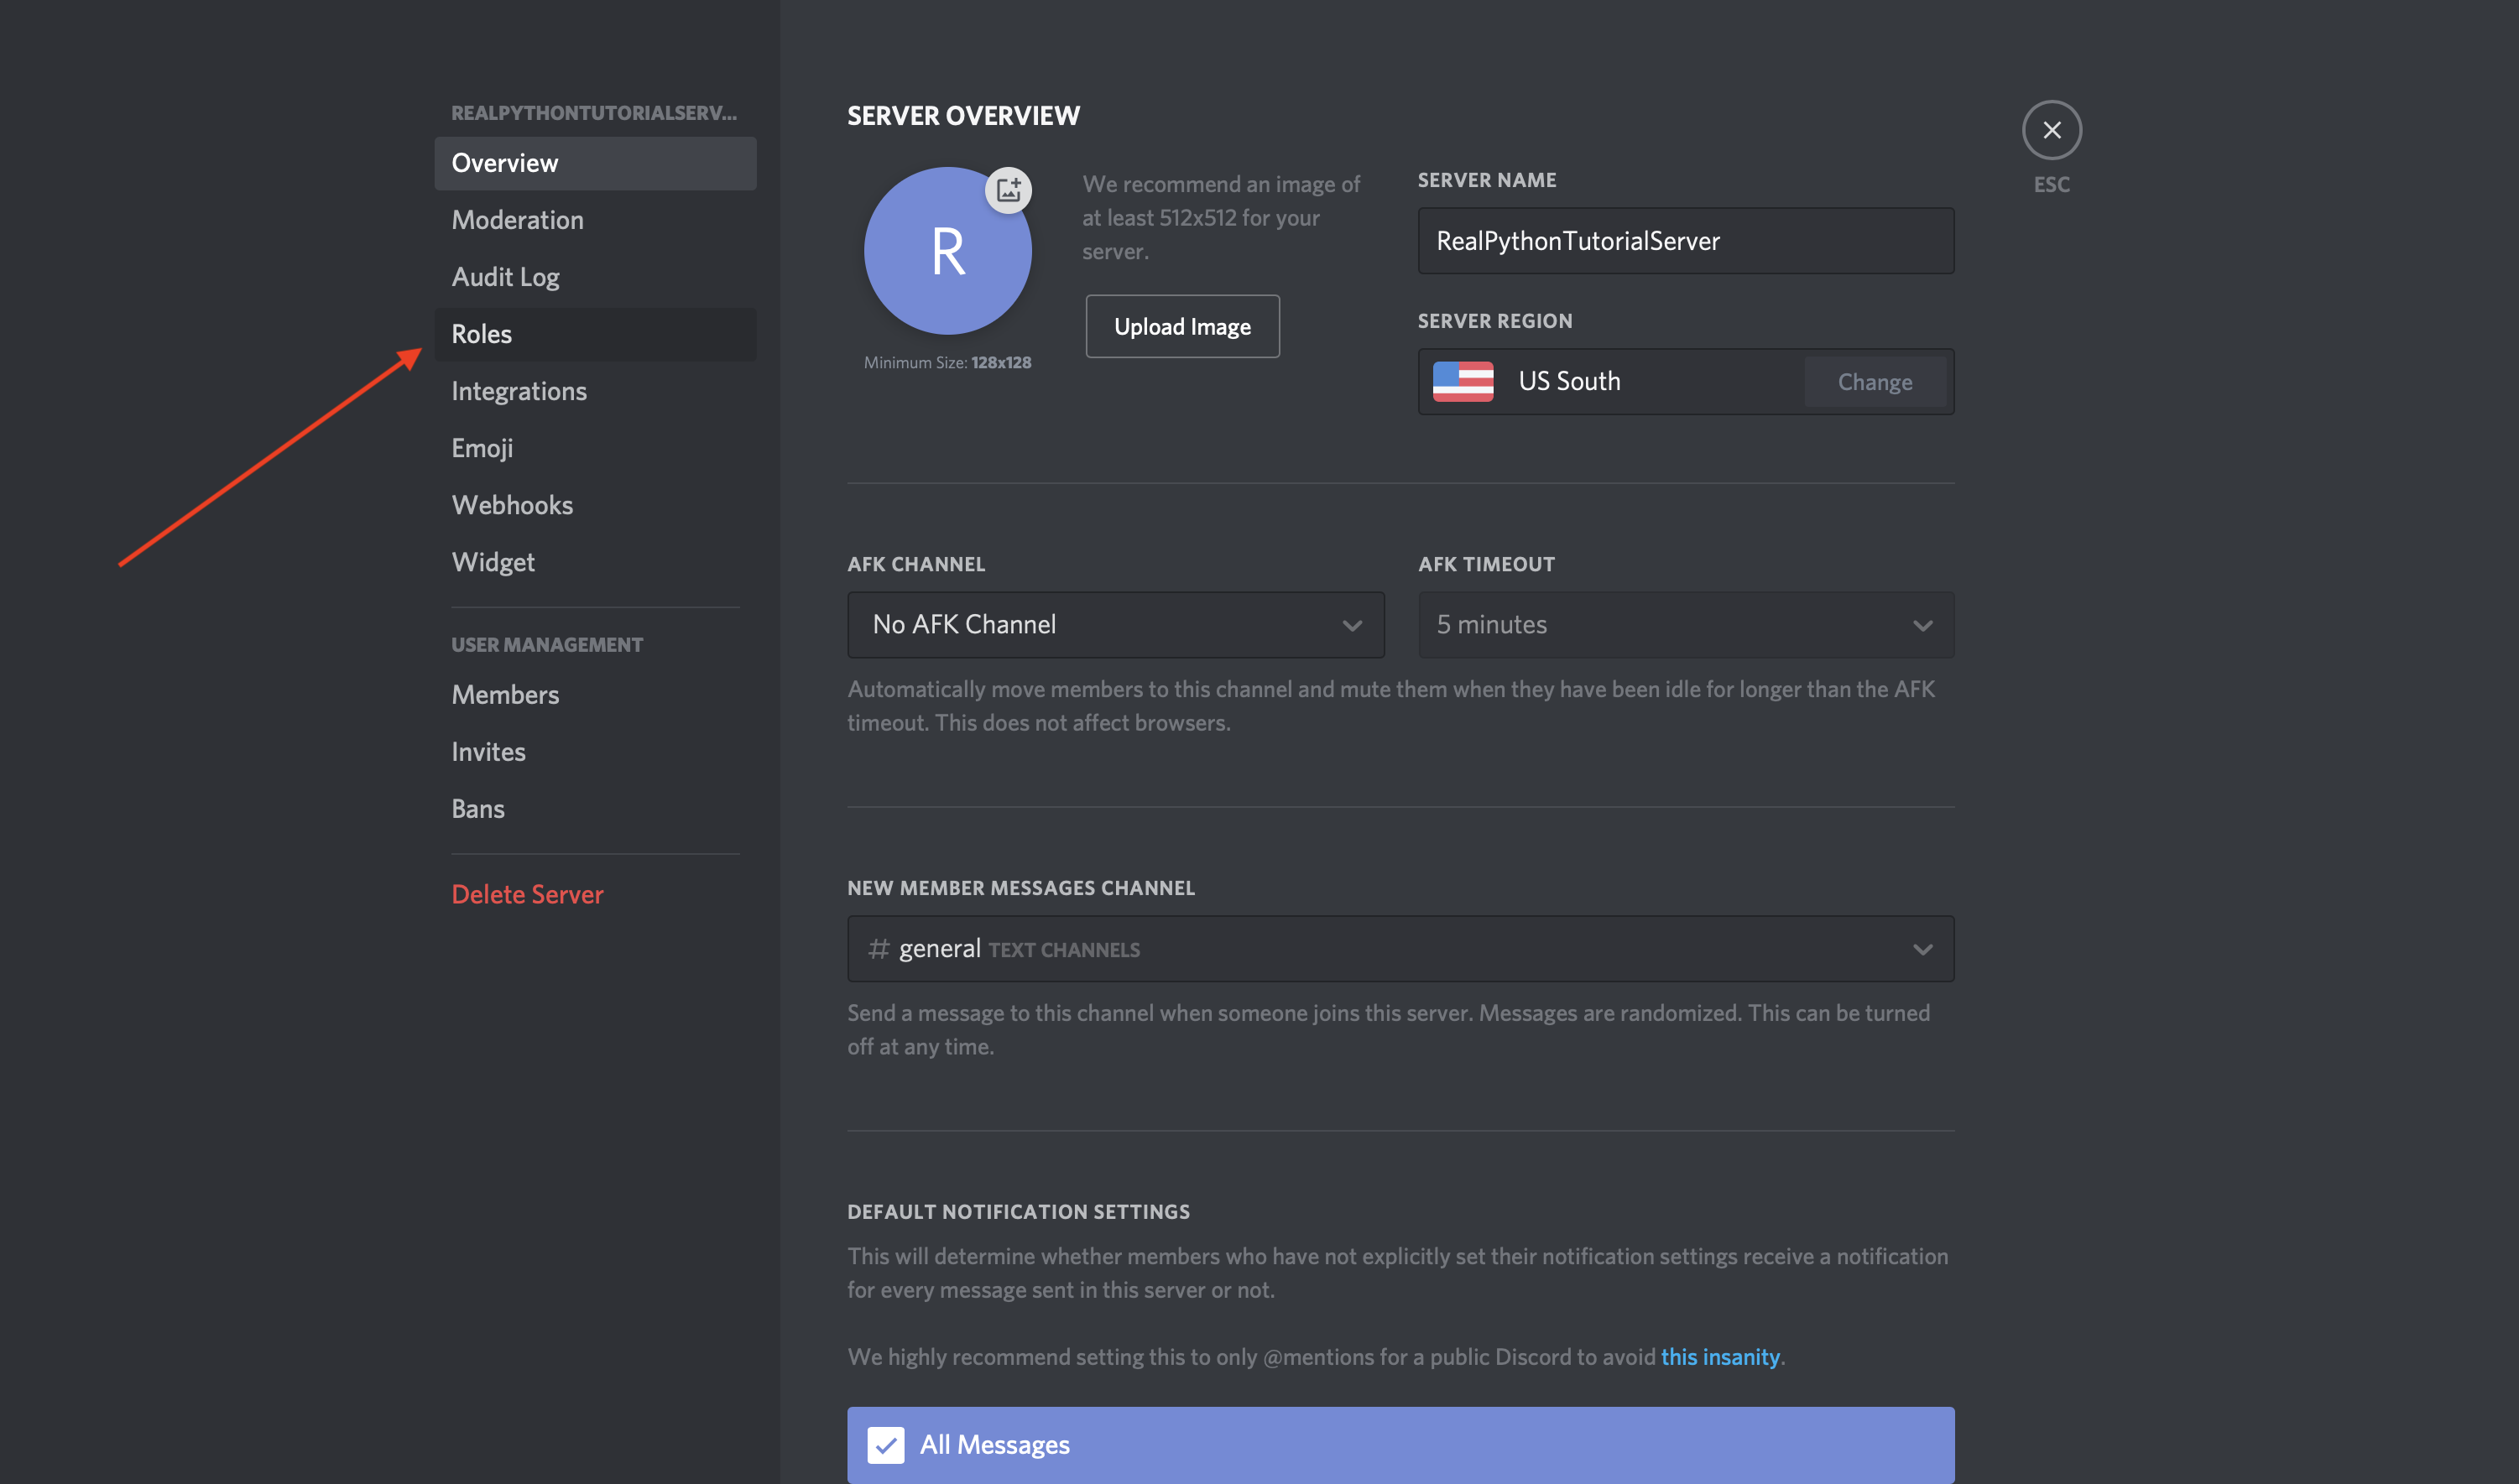
First, you’ll need to create a new member role in the admin. Go into the Discord guild and select the {Server Name} → Server Settings menu:
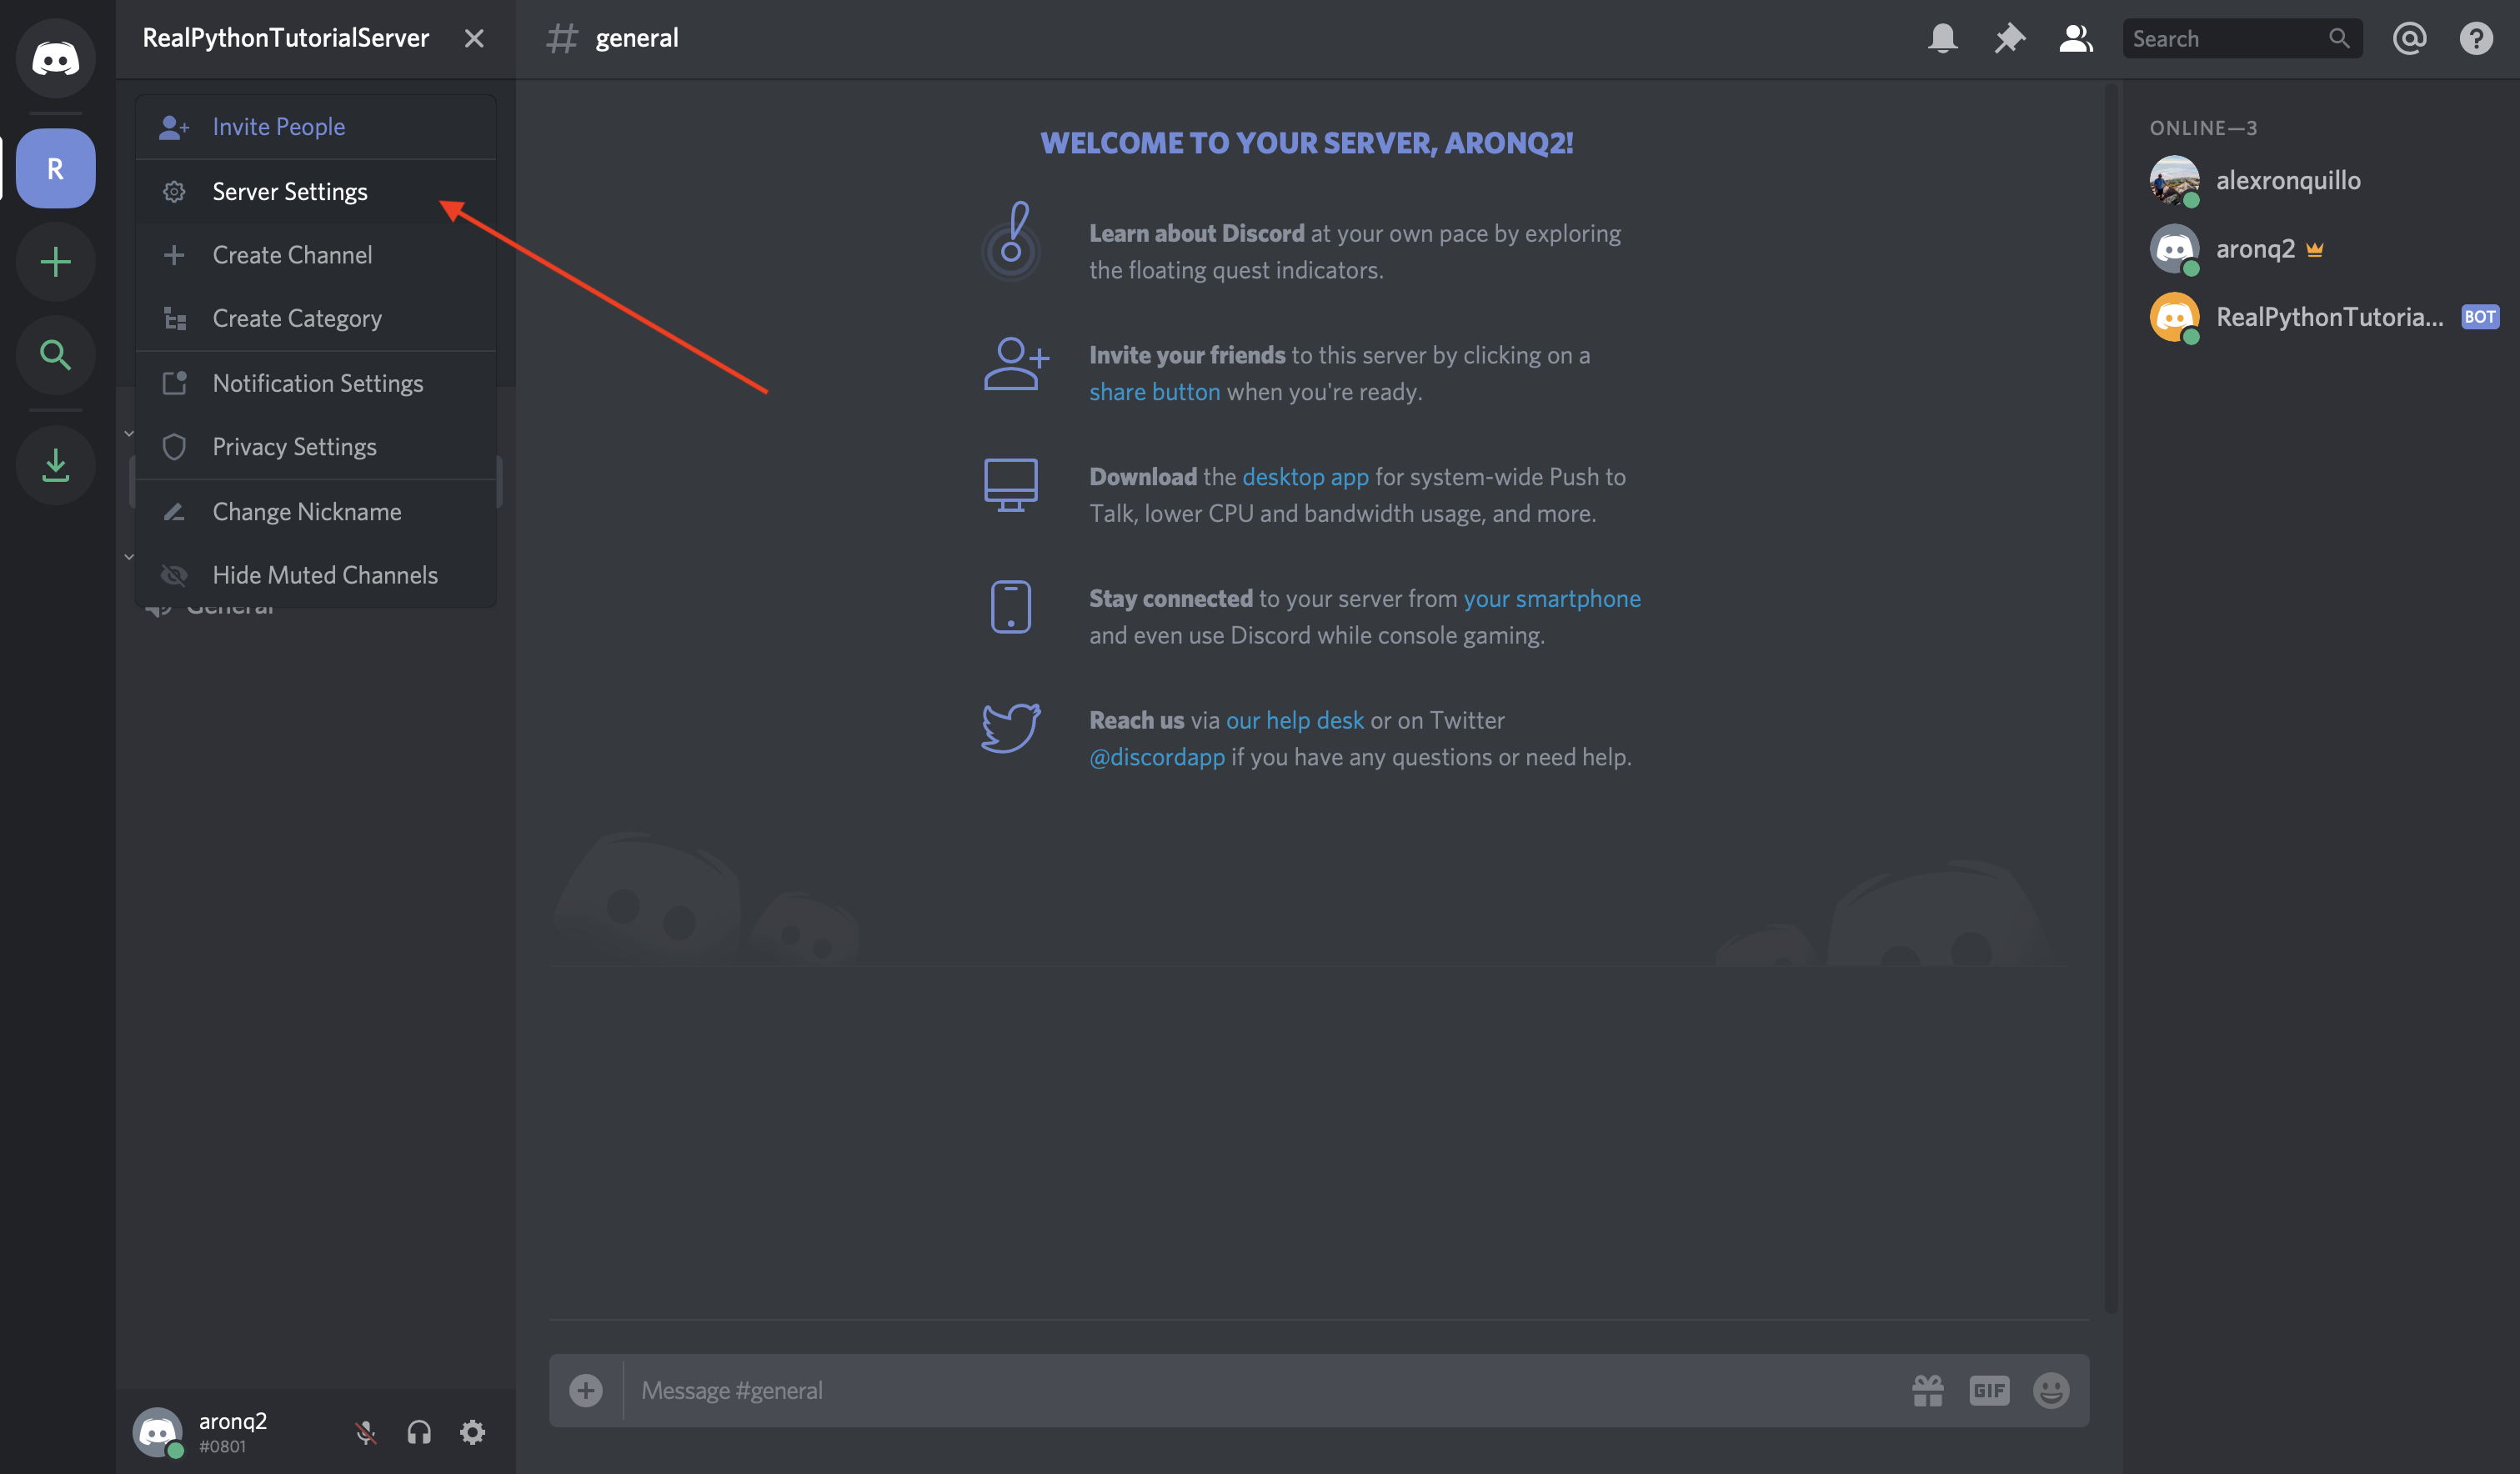
Then, select Roles from the left-hand navigation list:
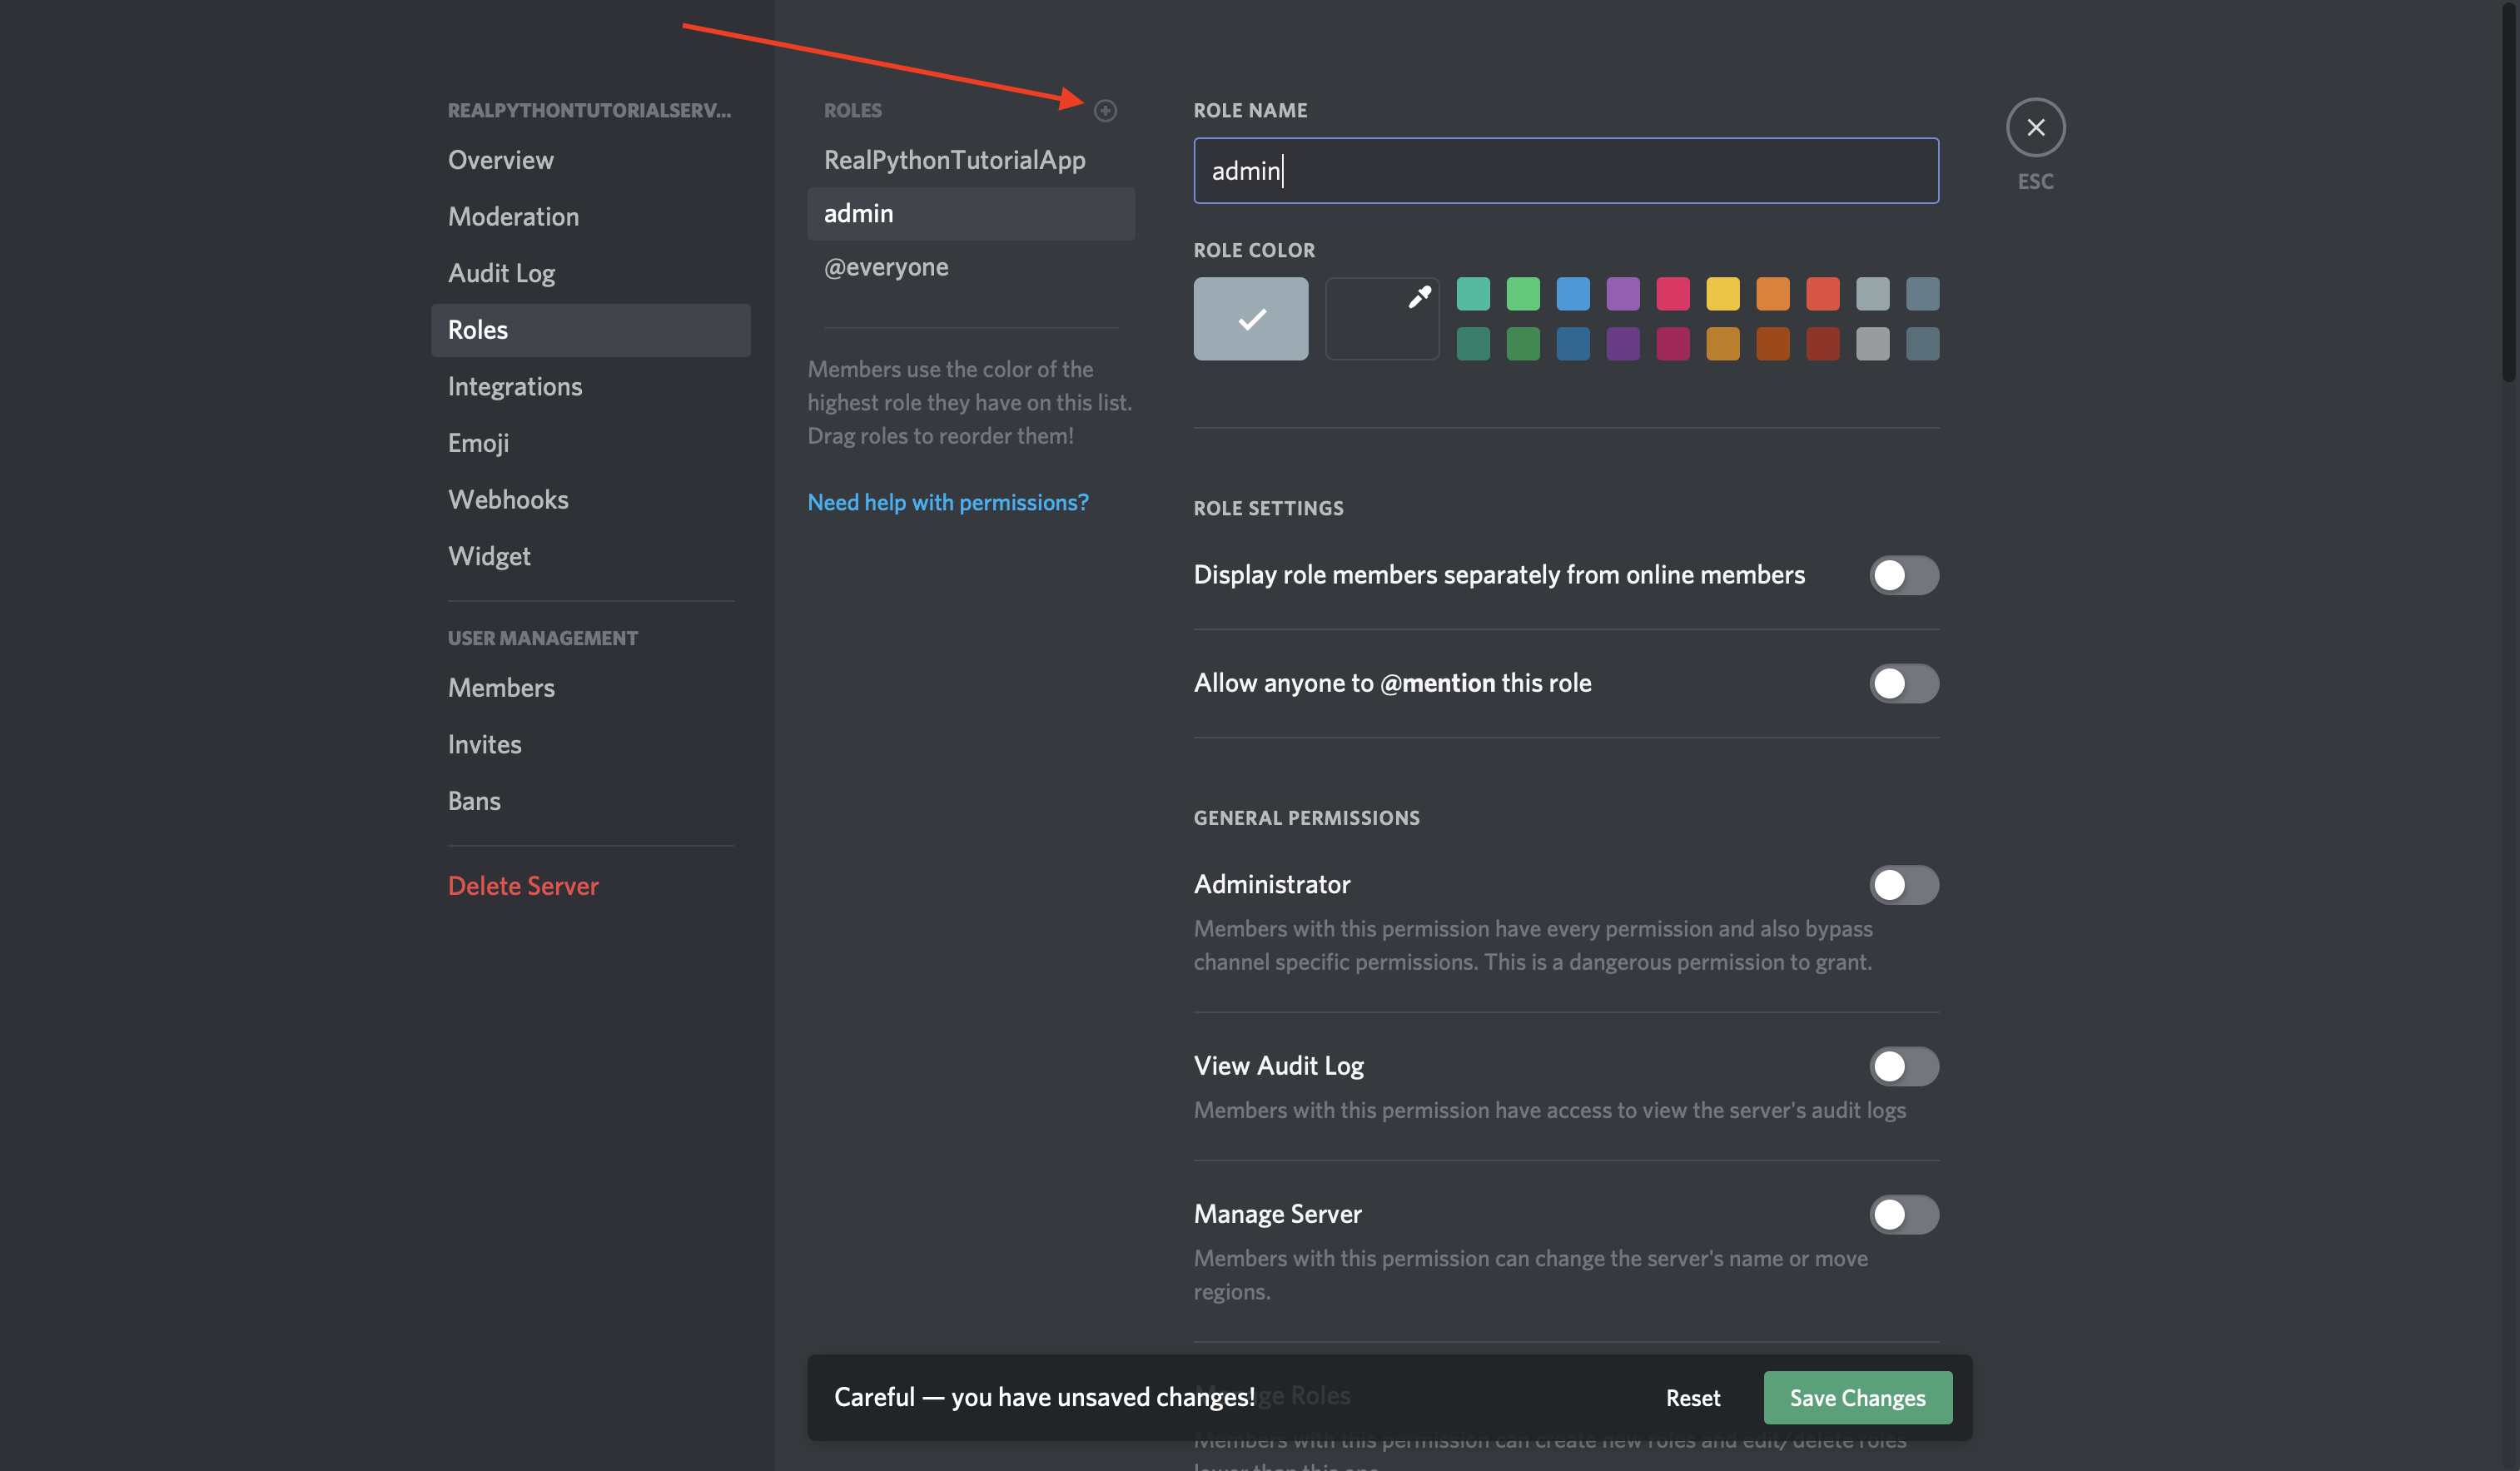
Finally select the + sign next to ROLES and enter the name admin and select Save Changes:
Now, you’ve created an admin role that you can assign to particular users. Next, you’ll update bot.py to Check the user’s role before allowing them to initiate the command:
# bot.py
import os

import discord
from discord.ext import commands
from dotenv import load_dotenv

load_dotenv()
TOKEN = os.getenv('DISCORD_TOKEN')

bot = commands.Bot(command_prefix='!')

@bot.command(name='create-channel')
@commands.has_role('admin')
async def create_channel(ctx, channel_name='real-python'):
    guild = ctx.guild
    existing_channel = discord.utils.get(guild.channels, name=channel_name)
    if not existing_channel:
        print(f'Creating a new channel: {channel_name}')
        await guild.create_text_channel(channel_name)

bot.run(TOKEN)
In bot.py, you have a new Command function, called create_channel() which takes an optional channel_name and creates that channel. create_channel() is also decorated with a Check called has_role().
You also use discord.utils.get() to ensure that you don’t create a channel with the same name as an existing channel.
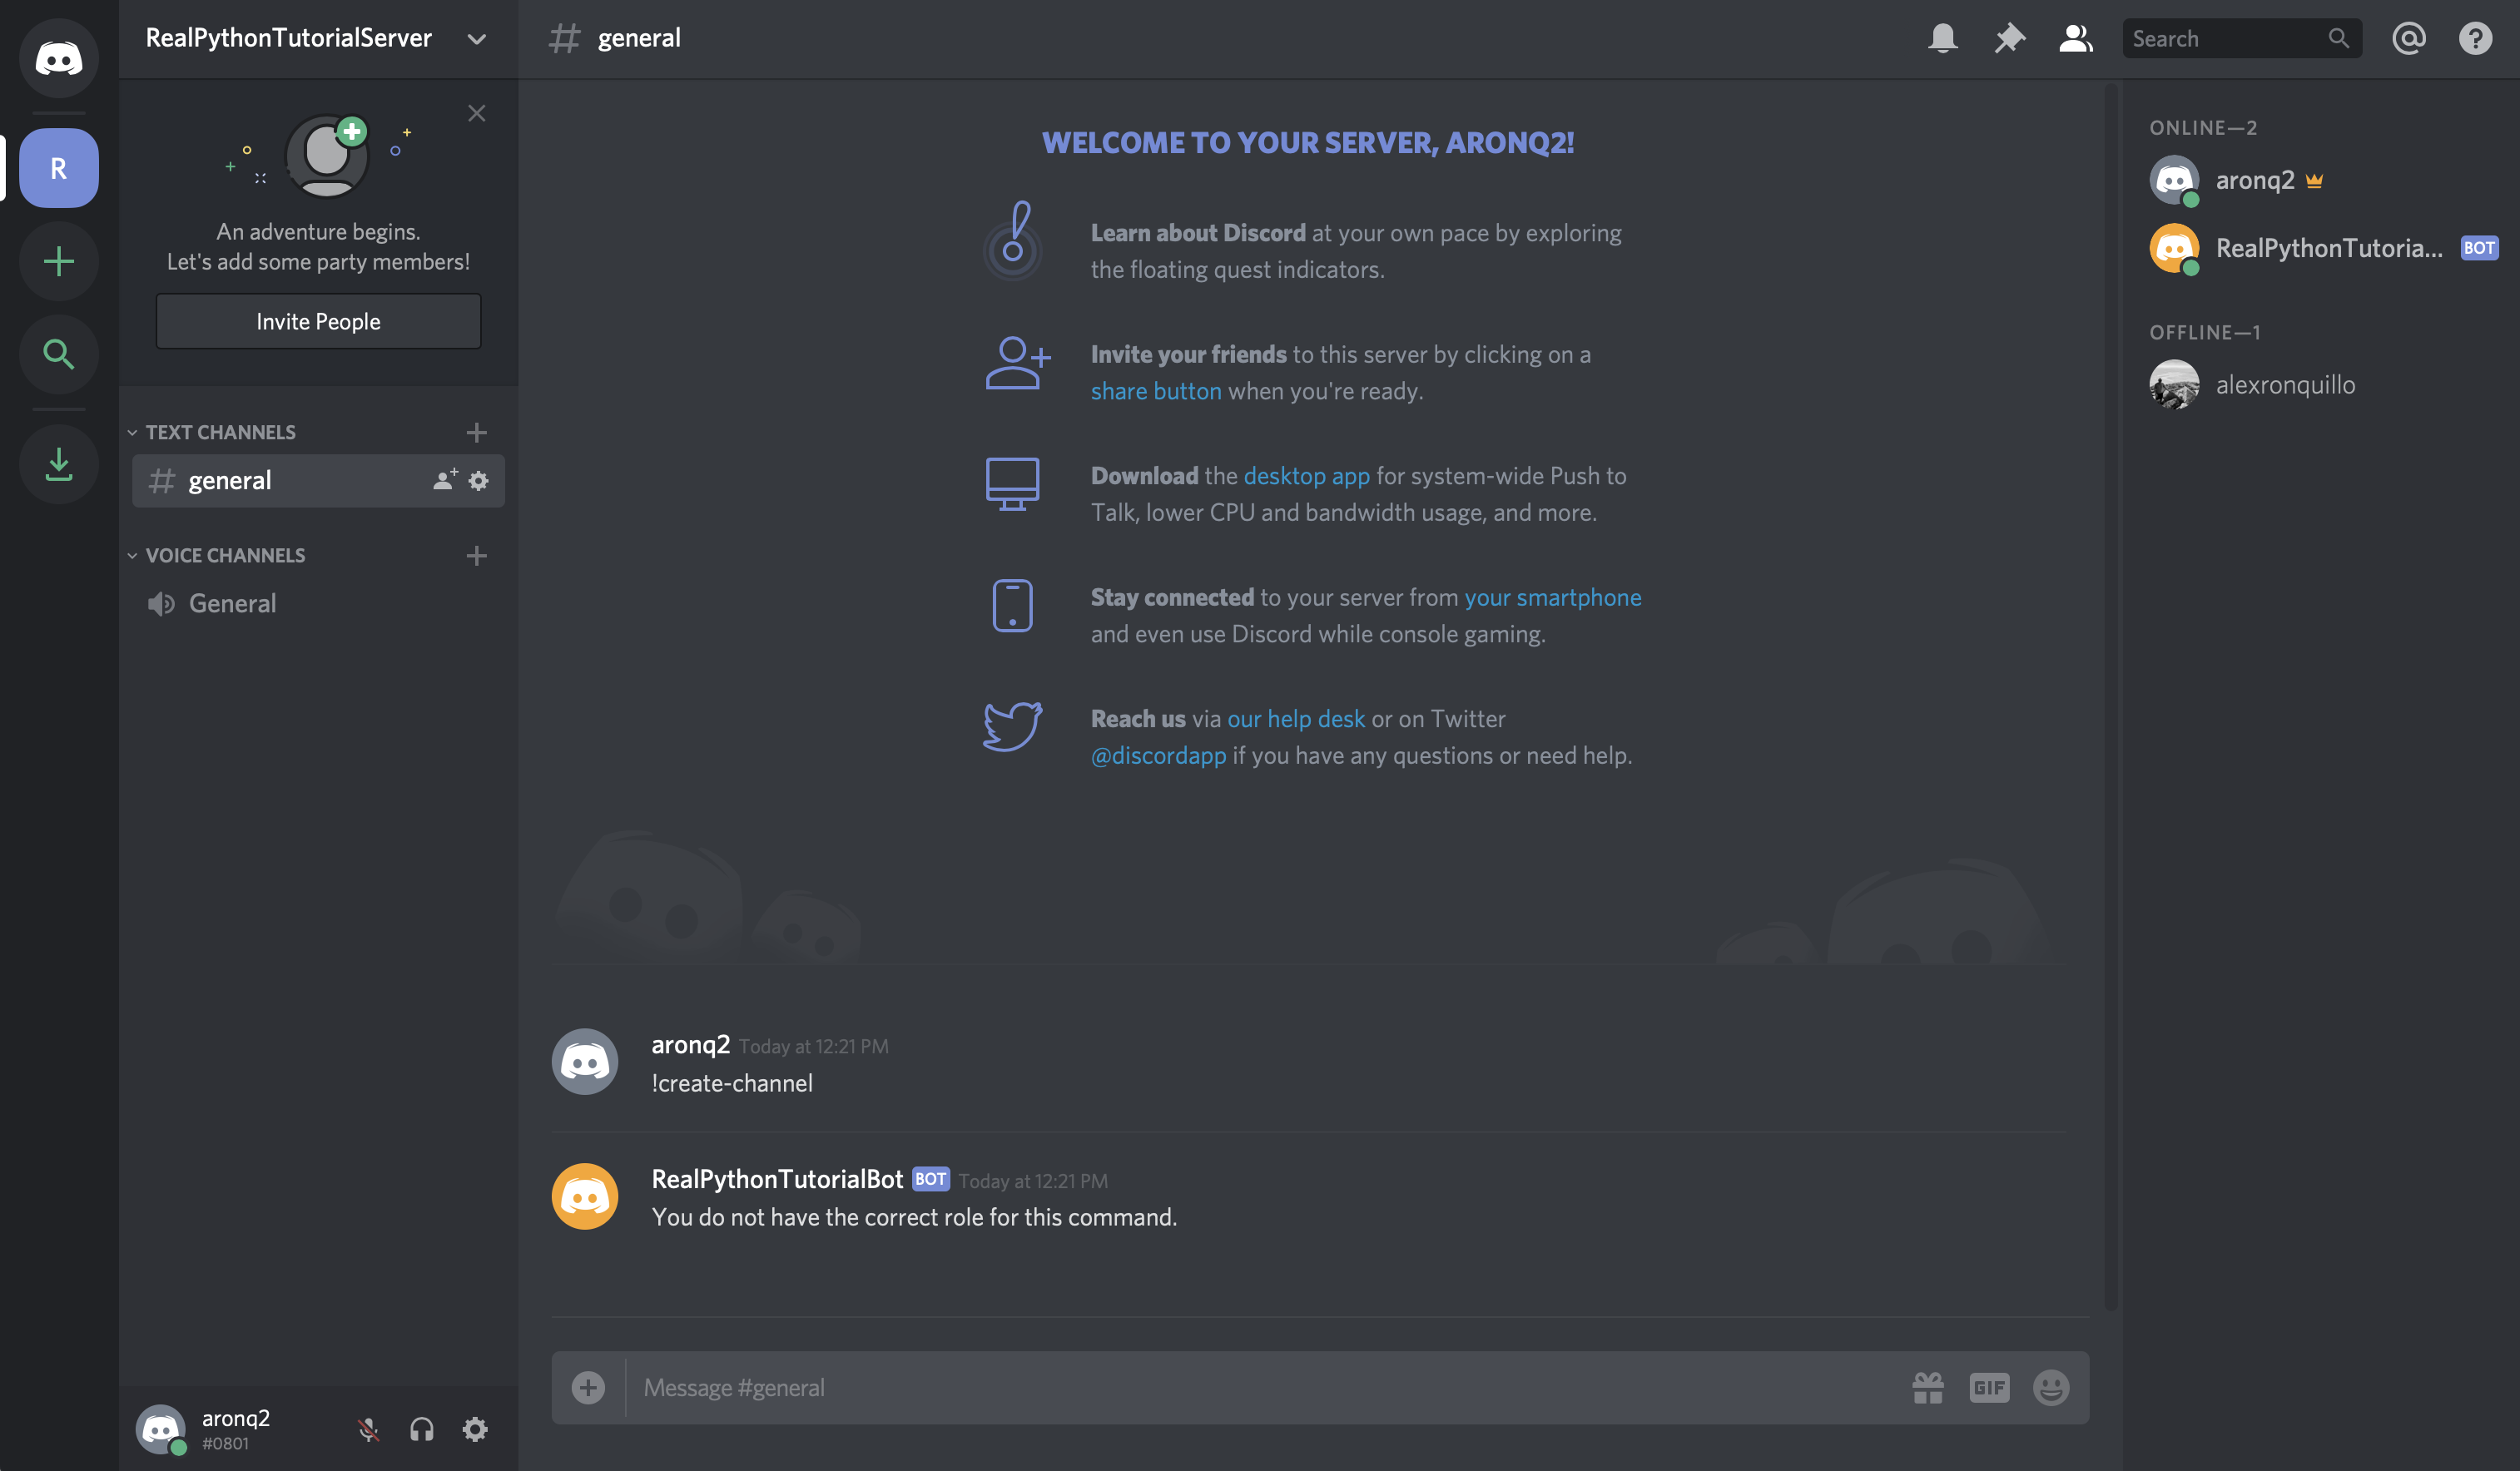
If you run this program as it is and type !create-channel into your Discord channel, then you’ll see the following error message:
$ python bot.py
Ignoring exception in command create-channel:
Traceback (most recent call last):
  File "/Users/alex.ronquillo/.pyenv/versions/discord-venv/lib/python3.7/site-packages/discord/ext/commands/bot.py", line 860, in invoke
    await ctx.command.invoke(ctx)
  File "/Users/alex.ronquillo/.pyenv/versions/discord-venv/lib/python3.7/site-packages/discord/ext/commands/core.py", line 691, in invoke
    await self.prepare(ctx)
  File "/Users/alex.ronquillo/.pyenv/versions/discord-venv/lib/python3.7/site-packages/discord/ext/commands/core.py", line 648, in prepare
    await self._verify_checks(ctx)
  File "/Users/alex.ronquillo/.pyenv/versions/discord-venv/lib/python3.7/site-packages/discord/ext/commands/core.py", line 598, in _verify_checks
    raise CheckFailure('The check functions for command {0.qualified_name} failed.'.format(self))
discord.ext.commands.errors.CheckFailure: The check functions for command create-channel failed.
This CheckFailure says that has_role('admin') failed. Unfortunately, this error only prints to stdout. It would be better to report this to the user in the channel. To do so, add the following event:
@bot.event
async def on_command_error(ctx, error):
    if isinstance(error, commands.errors.CheckFailure):
        await ctx.send('You do not have the correct role for this command.')
This event handles an error event from the command and sends an informative error message back to the original Context of the invoked Command.
Try it all again, and you should see an error in the Discord channel:
Great! Now, to resolve the issue, you’ll need to give yourself the admin role:
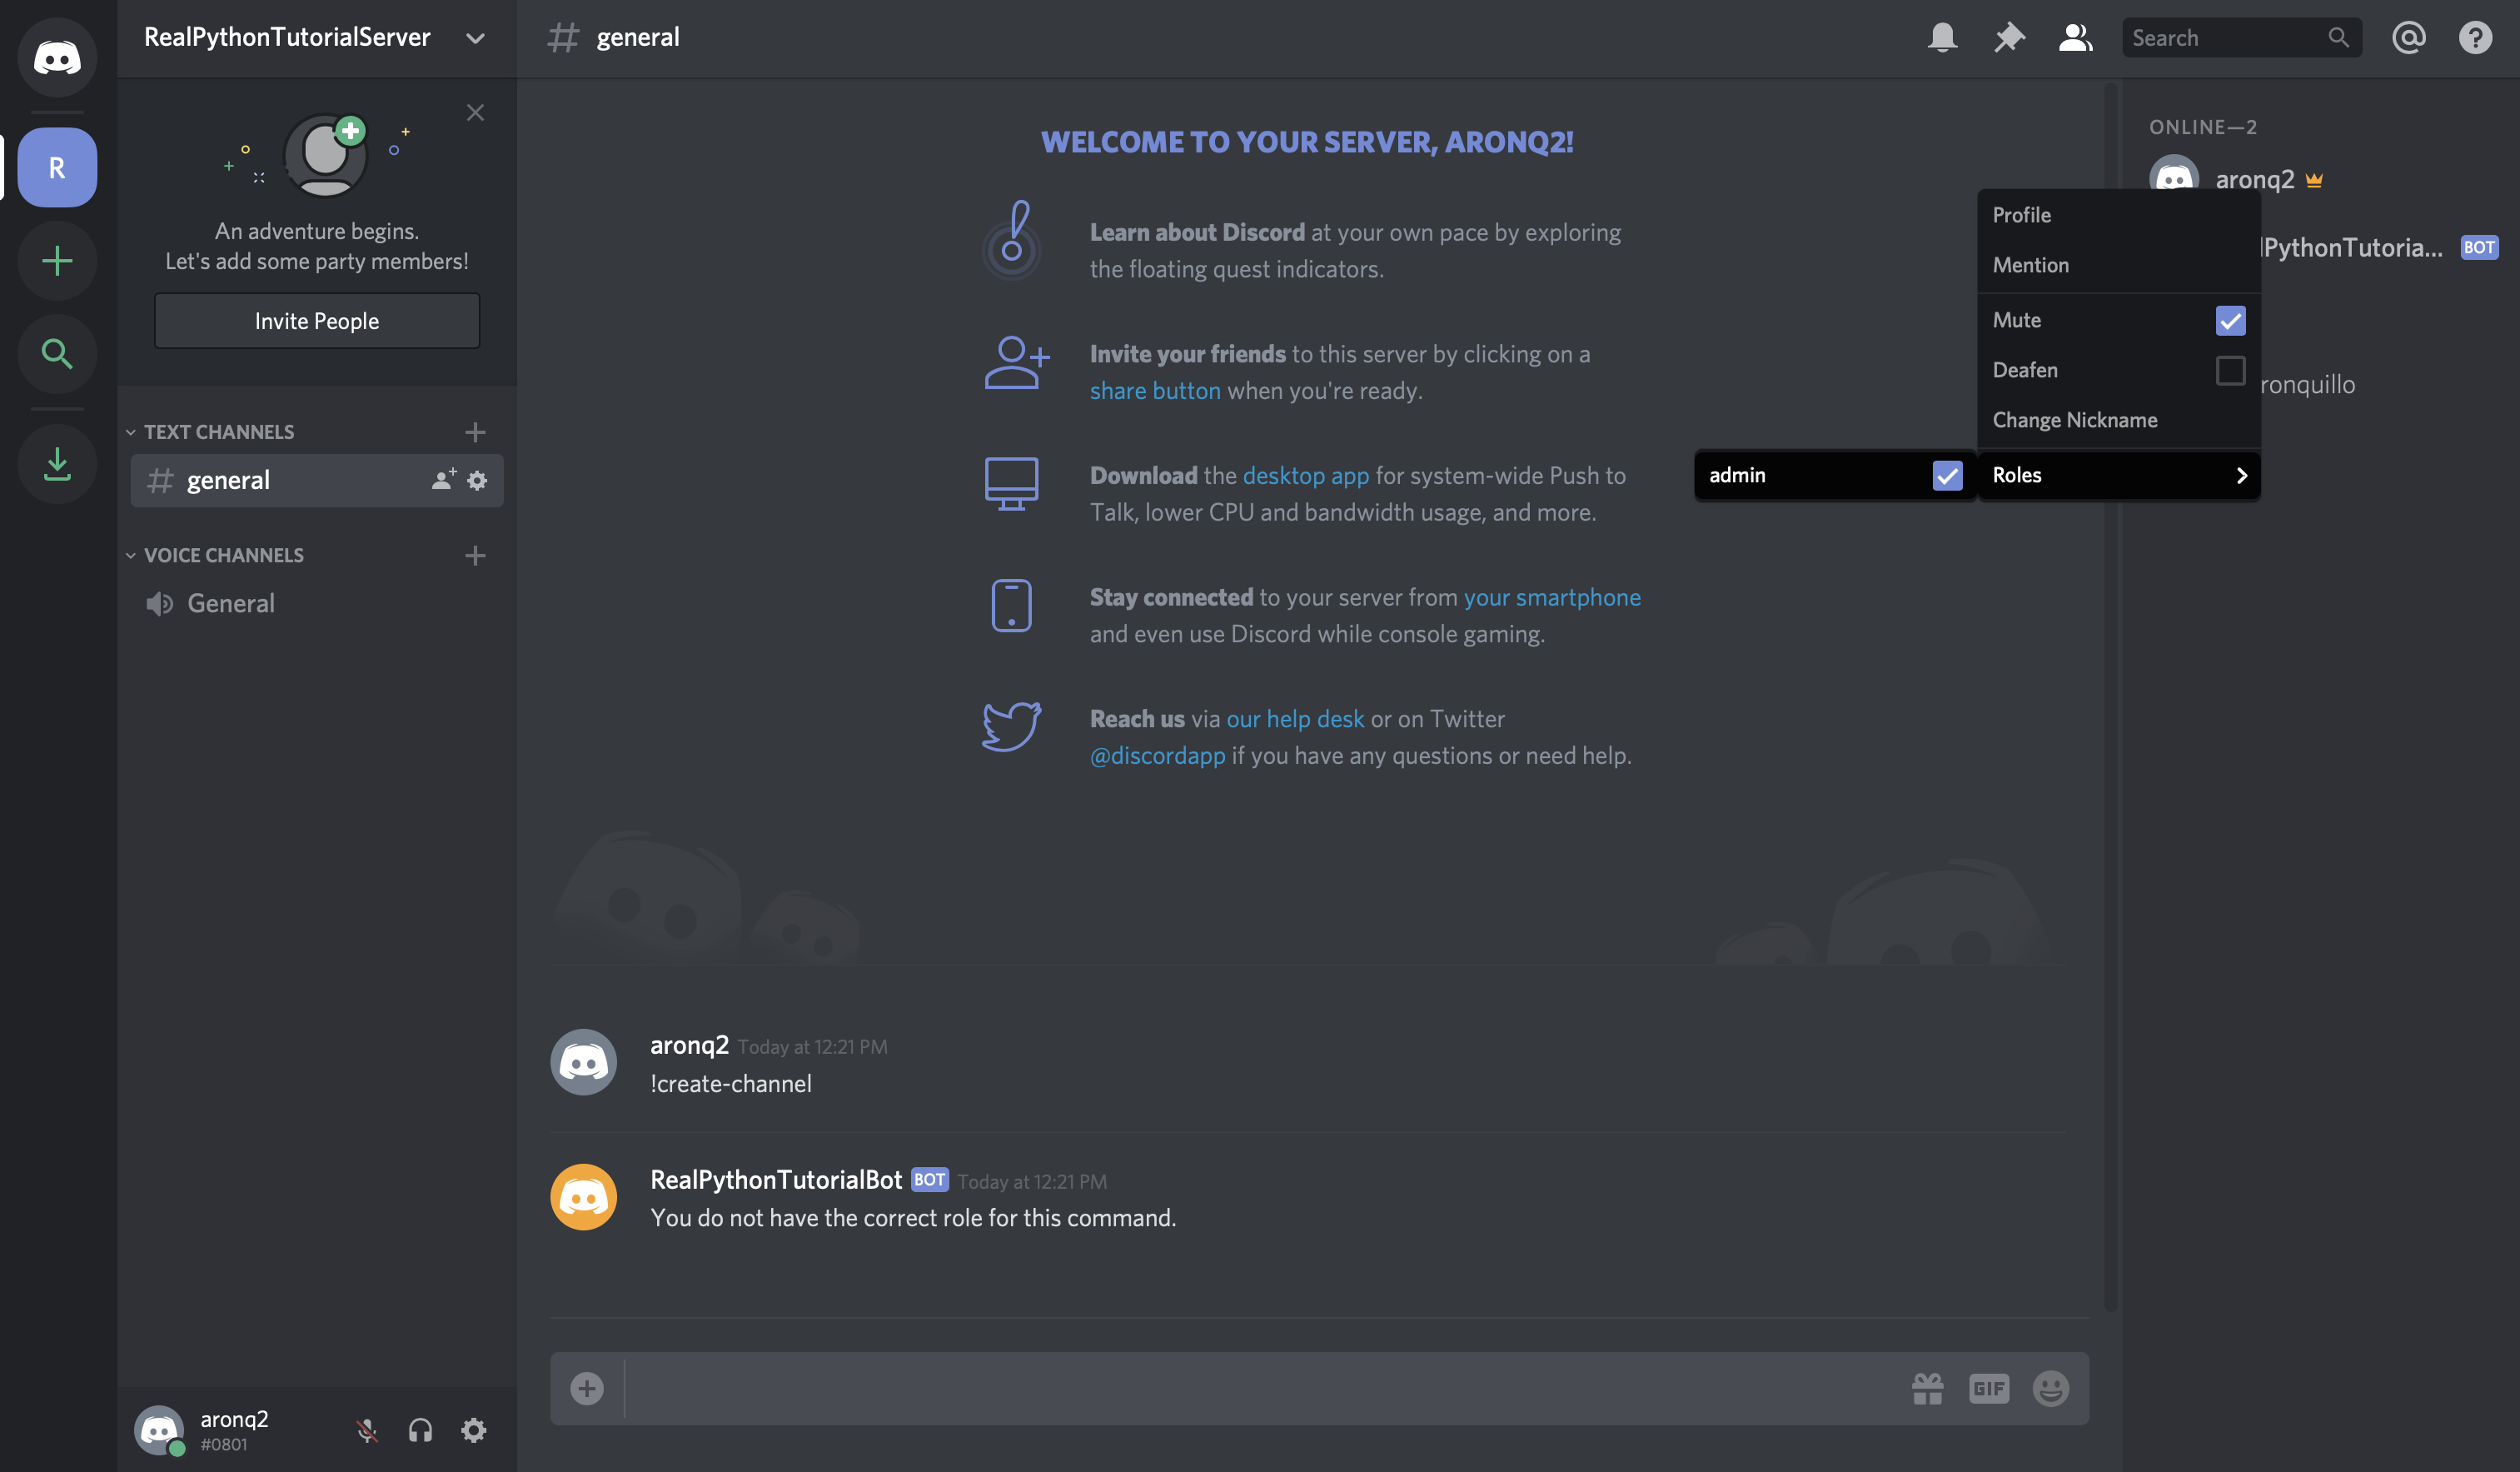
With the admin role, your user will pass the Check and will be able to create channels using the command.
Note: Keep in mind that in order to assign a role, your user will have to have the correct permissions. The easiest way to ensure this is to sign in with the user that you created the guild with.
When you type !create-channel again, you’ll successfully create the channel real-python:
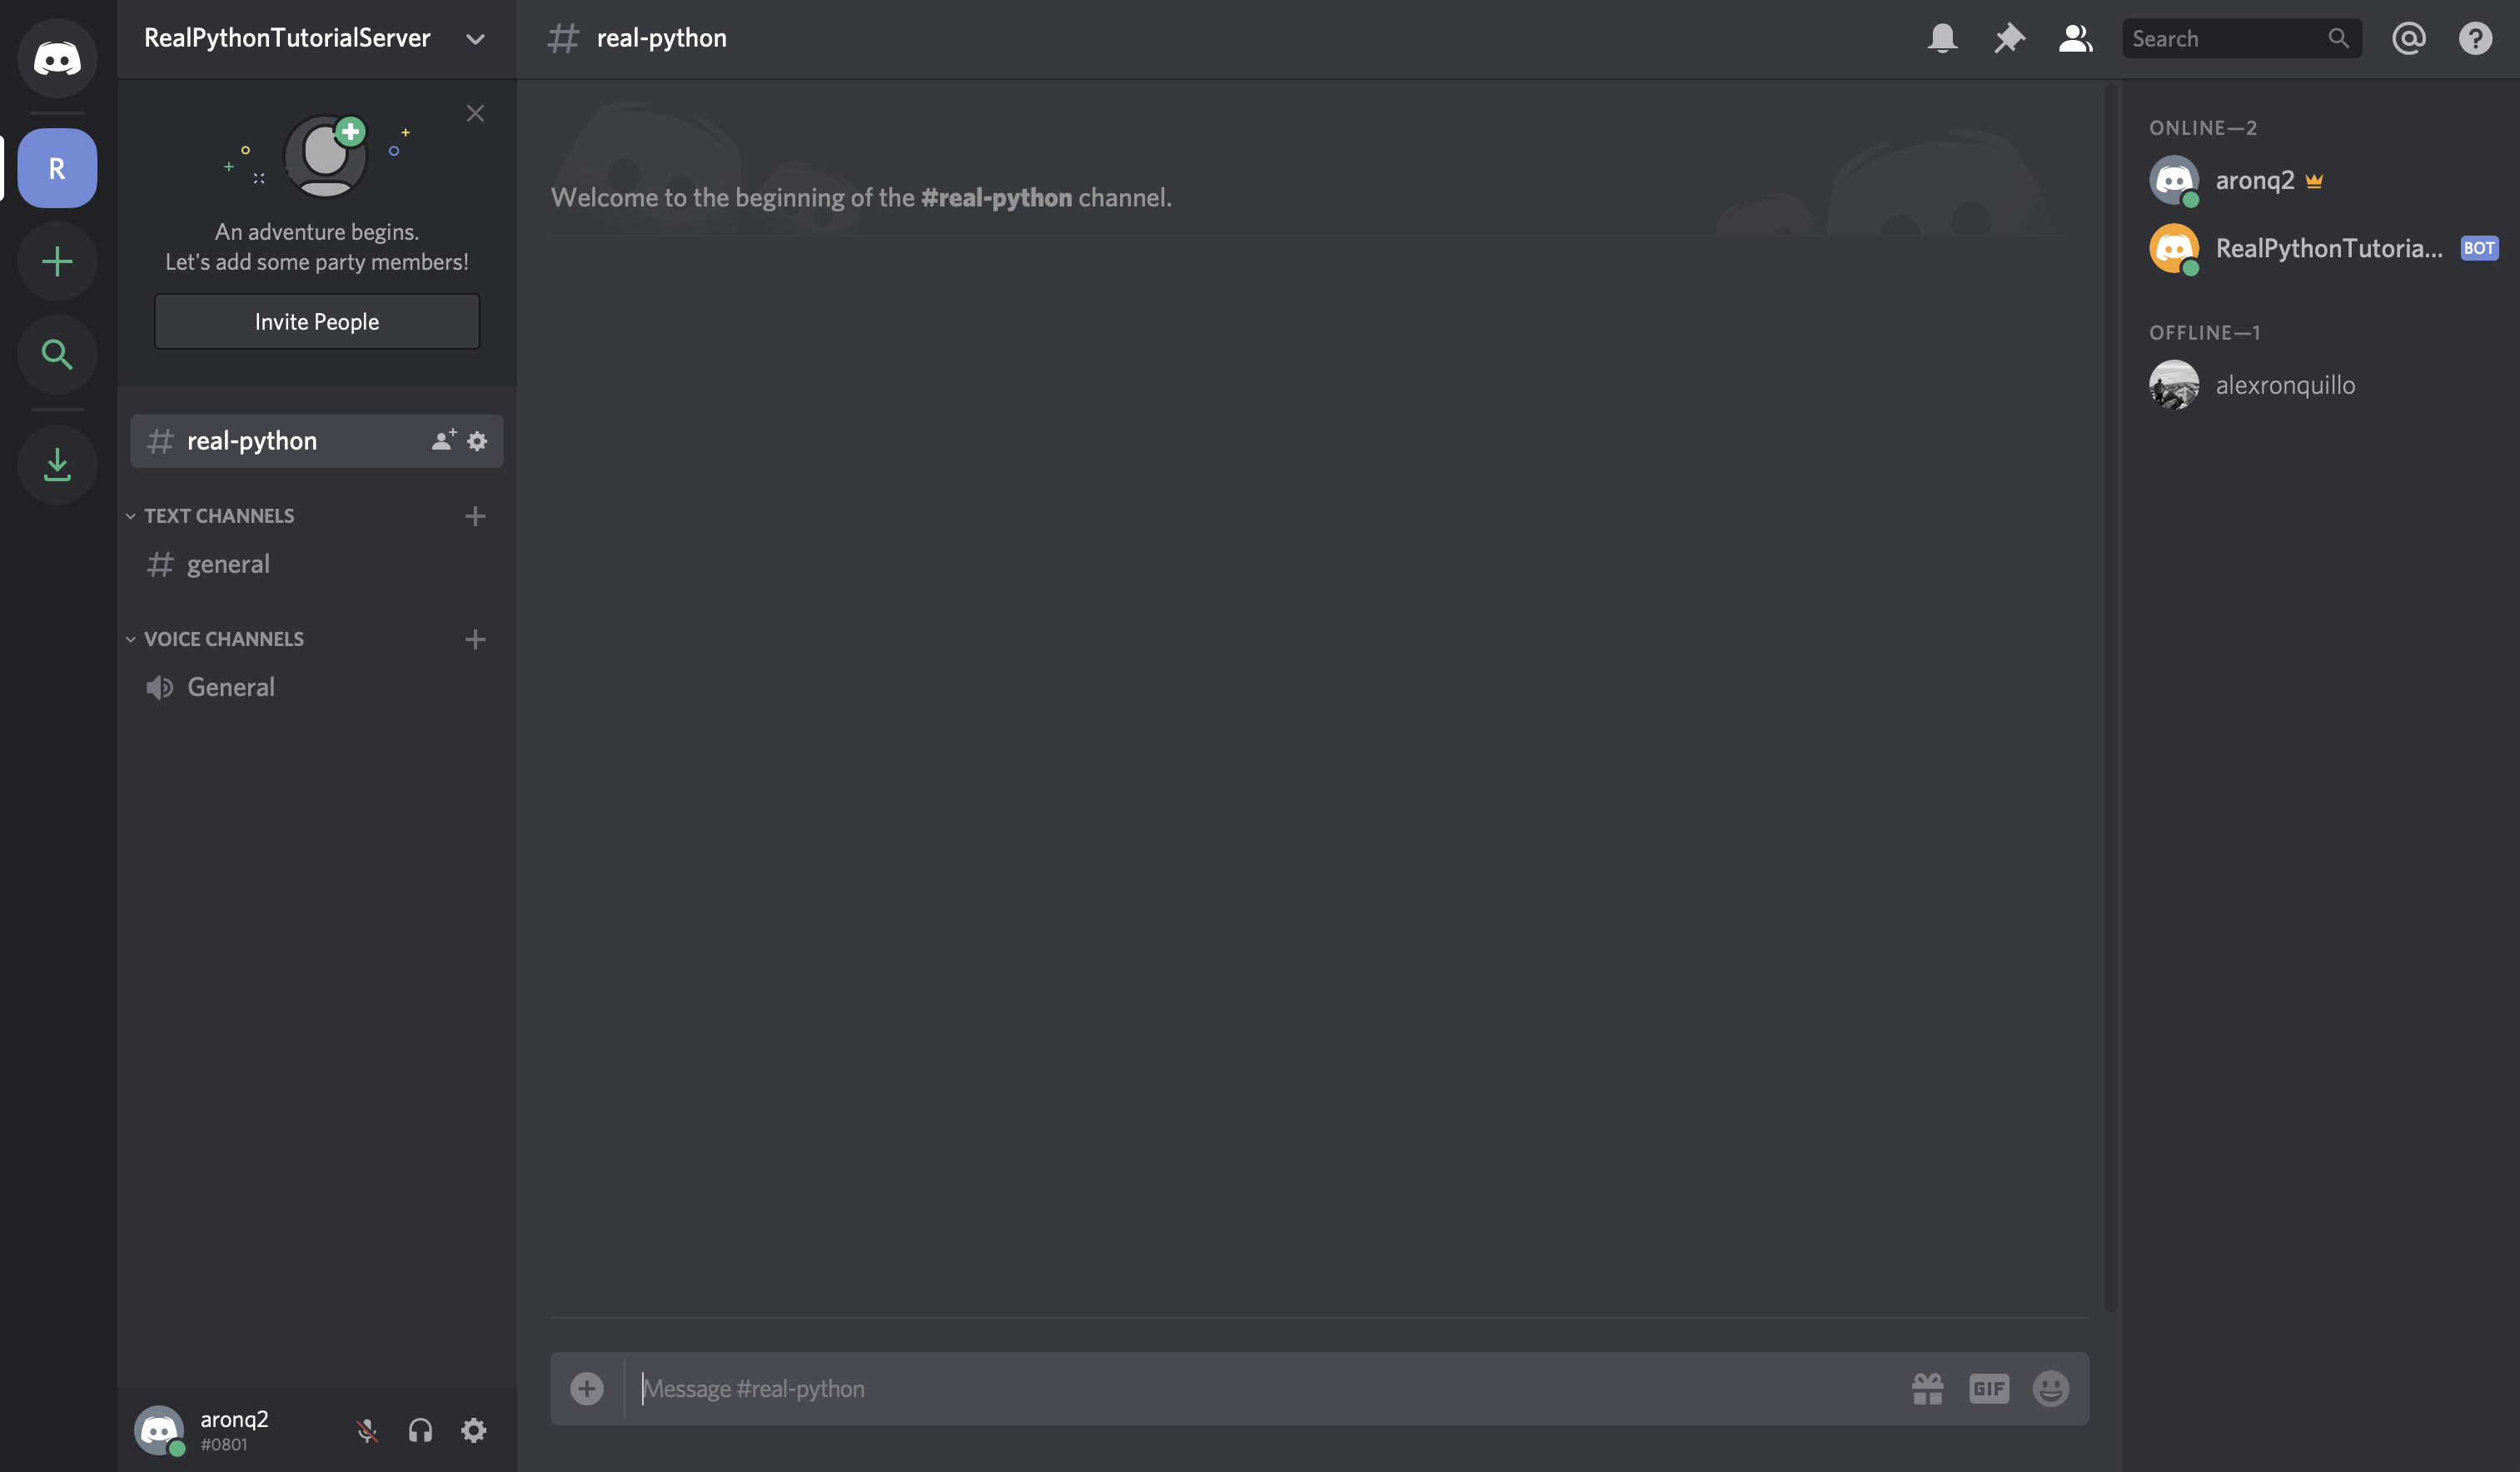
Also, note that you can pass the optional channel_name argument to name the channel to whatever you want!
With this last example, you combined a Command, an event, a Check, and even the get() utility to create a useful Discord bot!
Conclusion
Congratulations! Now, you’ve learned how to make a Discord bot in Python. You’re able to build bots for interacting with users in guilds that you create or even bots that other users can invite to interact with their communities. Your bots will be able to respond to messages and commands and numerous other events.
In this tutorial, you learned the basics of creating your own Discord bot. You now know:
- What Discord is
- Why
discord.pyis so valuable - How to make a Discord bot in the Developer Portal
- How to create a Discord connection in Python
- How to handle events
- How to create a
Botconnection - How to use bot commands, checks, and converters
To read more about the powerful discord.py library and take your bots to the next level, read through their extensive documentation. Also, now that you’re familiar with Discord APIs in general, you have a better foundation for building other types of Discord applications.
You can also explore the possibilities of ChatterBot, Tweepy, InstaPy, and Alexa Skills to learn more about how you can make bots for different platforms using Python.


