The pyenv command-line tool allows you to install and switch between multiple Python versions without interfering with your operating system’s Python installation. This enables you to test code across different interpreters and manage project-specific requirements.
In this tutorial, you’ll learn how to install and set up pyenv, manage multiple Python versions, and create virtual environments to work on your coding projects.
By the end of this tutorial, you’ll understand that:
- In Python,
pyenvis a command-line tool for managing multiple Python versions independently of your system installation. - The difference between
pyenvand thevenvmodule is thatpyenvallows you to manage multiple Python versions and virtual environments, whilevenvallows you to create virtual environments based on a single Python version. - Using
pyenvhelps you avoid conflicts with your system Python, freely install any Python version you need, and quickly switch between versions for different projects or tests.
Discover how pyenv helps you manage multiple Python versions to prevent conflicts, streamline development, and ensure version compatibility across projects.
Take the Quiz: Test your knowledge with our interactive “Managing Multiple Python Versions With pyenv” quiz. You’ll receive a score upon completion to help you track your learning progress:
Interactive Quiz
Managing Multiple Python Versions With pyenvTest your knowledge of pyenv with this quiz and see how well you can manage multiple Python versions, virtual environments, and dependencies.
Get Your Cheat Sheet: Click here to download a free cheat sheet that shows you how to use pyenv to manage multiple versions of Python.
Understanding the Benefits of Using pyenv
The pyenv tool is designed to manage multiple Python versions in a clean way. Even if you already have Python installed on your operating system, it’s worth having pyenv installed so that you can keep the system Python installation clean and, more importantly, contribute to projects that use a different version of Python.
The question arises: Why would I use pyenv if I already have Python installed on my operating system (OS)?
The system Python installation is the Python interpreter that’s installed directly on your operating system. You’ll typically have a default system Python installation on macOS or Linux. On Windows, you may need to install Python manually.
So, why not use the system’s Python installation for your day-to-day coding? One way to look at it is that this Python belongs to the operating system. In many cases, the OS relies on the preinstalled Python to operate. This means that some OS components may depend on a specific Python version to work correctly. If you change the system Python version or some of the preinstalled packages, you could break the OS itself.
In addition, you may not have much control over what version of Python you can install on your OS. If you want to use the latest features of Python, and you’re on Ubuntu, for example, then you might be out of luck. The available versions might be too old, which means you’ll have to wait for a new OS release to come out. Unfortunately, another Python version can appear in that process, and you’ll never be up to date.
Another issue appears when you install third-party packages on the system Python using the pip command or a similar tool. In this case, you’re installing the Python package globally, which can be a problem if another user—or yourself—wants to install a different version of the package to work on a different project. You can’t have multiple versions of the same package installed in a given Python environment.
For example, if you have version 1.1.0 of a given package and install version 1.2.0, you’ll be replacing the first one. This might seem harmless. However, projects that depend on the older version can stop working with the new version.
A critical issue arises when you have multiple projects requiring different Python versions. The system Python installation is often unique. If you update Python, then some projects may stop working. If you don’t update it, then more recent projects may not be able to use the new features of Python.
Finally, on most operating systems, you need administrative privileges to install a different Python version or third-party packages. This requirement can be a real obstacle in company environments with strict security rules. In short, using the system Python installation comes with some major drawbacks. It can:
- Break parts of the operating system
- Prevent you from using the latest Python versions
- Cause issues in projects that require older Python versions
- Block projects that rely on new Python features
- Require the intervention of a third person when you need to install something
Ideally, you want more flexibility and safety when you use Python for software development. For example, you might need to do some of the following:
- Install Python in your user space so you don’t depend on system administrators
- Install, manage, and uninstall multiple Python versions freely
- Specify the exact Python version you want to use in each project
- Switch between the installed versions
The good news is that pyenv lets you do all these things. It’s also a great way to install pre-release versions of Python, so you can try out new language features or test the release for bugs.
Installing pyenv
Before you install and use pyenv on Linux or macOS, you may need to fulfill some OS-specific dependencies. These dependencies are mostly development utilities written in C that pyenv uses to build Python from source. On the other hand, Windows users set things up differently, as you’ll soon discover.
For a more detailed breakdown and explanation of the build dependencies, you can check out Python Developer’s Guide. In this tutorial, you’ll learn the most common ways to install these dependencies.
Preparing Linux Systems for pyenv
On Linux systems, the build dependencies vary by platform. If you’re on Ubuntu or Debian and want to install the build dependencies, you can execute the following commands:
$ sudo apt update
$ sudo apt install make build-essential libssl-dev zlib1g-dev \
libbz2-dev libreadline-dev libsqlite3-dev curl git libncursesw5-dev \
xz-utils tk-dev libxml2-dev libxmlsec1-dev libffi-dev liblzma-dev
These commands use Apt to update the system’s repository index and install all the build dependencies. Once these commands run, you’ll be ready to go.
If you use Fedora Linux, you can use the following command to install your build dependencies:
$ sudo dnf install make gcc patch zlib-devel bzip2 bzip2-devel \
readline-devel sqlite sqlite-devel openssl-devel tk-devel \
libffi-devel xz-devel libuuid-devel gdbm-libs libnsl2
If you use openSUSE, then run the following:
$ zypper install gcc automake bzip2 libbz2-devel xz xz-devel \
openssl-devel ncurses-devel readline-devel zlib-devel tk-devel \
libffi-devel sqlite3-devel gdbm-devel make findutils patch
Once again, this command installs all the Python build dependencies for your system. If you use a different Linux distribution, then check the pyenv build environment guide to find the required commands for your OS.
Preparing macOS Systems for pyenv
If you’re a macOS user, then you can use the following command to install the build dependencies:
$ brew install openssl readline sqlite3 xz zlib tcl-tk@8 libb2 zstd
If you don’t have Homebrew installed on your system, you can visit its home page for installation instructions.
Installing pyenv on Unix-Like Systems
After you’ve installed the build dependencies, you’re ready to install pyenv itself. The documentation recommends using the automatic installer. The following command should work on Linux and macOS, although in macOS, you may need to replace bash with zsh:
$ curl -fsSL https://pyenv.run | bash
This will install pyenv on your system. However, the installation isn’t ready to use yet. You need to set up your shell environment for pyenv.
Note: You can extend the core functionality of pyenv by installing plugins. Some of the official ones include the following:
pyenv-virtualenv: Plugin for managing virtual environments withpyenvpyenv-update: Plugin for updatingpyenvpyenv-doctor: Plugin to verify thatpyenvand build dependencies are installed
If Bash is your default system shell, then you can run the following commands:
$ echo 'export PYENV_ROOT="$HOME/.pyenv"' >> ~/.bashrc
$ echo '[[ -d $PYENV_ROOT/bin ]] && export PATH="$PYENV_ROOT/bin:$PATH"' >> ~/.bashrc
$ echo 'eval "$(pyenv init - bash)"' >> ~/.bashrc
If you have ~/.profile, ~/.bash_profile, or ~/.bash_login files, run these commands on those files as well. If you have none of these files, then create a ~/.profile and run the commands on it.
If you’re on macOS, then zsh would be your default shell. In this case, you can run the commands above against the ~/.zshrc and ~/.zprofile files.
Once you’ve done this, you can reload your shell with the following command:
$ exec "$SHELL"
Alternatively, you can restart your terminal. That’s it! You now have pyenv installed and ready to use.
Installing pyenv-win on Windows
The pyenv tool itself doesn’t support Windows. However, if you’re there, then you can use pyenv-win, which is a pyenv port for Windows. The recommended way to install this tool on Windows is to run the following command in a PowerShell terminal:
PS> Invoke-WebRequest -UseBasicParsing -Uri "https://raw.githubusercontent.com/pyenv-win/pyenv-win/master/pyenv-win/install-pyenv-win.ps1" -OutFile "./install-pyenv-win.ps1"; &"./install-pyenv-win.ps1"
If you get an UnauthorizedAccess error, then start PowerShell with the Run as administrator option and run Set-ExecutionPolicy -ExecutionPolicy RemoteSigned -Scope LocalMachine. Once this command is done, go ahead and run the above installation command.
Managing Multiple Python Versions With pyenv
The pyenv tool offers several commands that you can use to install and manage multiple Python versions. You can see a complete list by running the following command:
$ pyenv commands
--version
activate
commands
...
which
This output shows all the command names available in your pyenv installation. Each command has a --help flag that will give you more detailed information. For example, if you wanted to see more information on the install command, then you could run the following:
$ pyenv install --help
Usage: pyenv install [-f] [-kvp] <version>...
       pyenv install [-f] [-kvp] <definition-file>
       pyenv install -l|--list
       pyenv install --version

  -l/--list          List all available versions
  -f/--force         Install even if the version appears to be installed already
  -s/--skip-existing Skip if the version appears to be installed already
  ...
The help message describes what the command is used for and any options you can use in conjunction with the command. In the following sections, you’ll find an overview of pyenv commands that allow you to manage multiple Python versions.
Installing Python Versions: install
Now that you’ve installed and set up pyenv on your system, the next step is to install Python. You have many versions to choose from. If you want to see them all, then run this command:
$ pyenv install --list
Available versions:
  2.1.3
  2.2.3
  2.3.7
  2.4.0
  ...
You’ll get a list of almost 1,000 distinct Python versions, and counting. It includes other Python flavors, such as ActivePython, IronPython, and Jython, as well as distributions like Anaconda.
Note: If you’ve been using pyenv for a while and don’t see the version you’re looking for, then you may need to run pyenv update to update the tool and ensure you have access to the latest versions.
To see only the available CPython versions starting from 3.10, run the following command:
$ pyenv install --list | grep -E ' 3\.([1-9][0-9]+)'
  3.10.0
  3.10-dev
  3.10.1
  ...
  3.13.5
  3.13.5t
  3.13.6
  3.13.6t
  3.13.7
  3.13.7t
  3.14.0rc2
  3.14.0rc2t
  3.14-dev
  3.14t-dev
  3.15-dev
  3.15t-dev
This output shows all the Python versions that match the specified regular expression. In this example, it lists all available CPython versions starting at 3.10.0.
You can also check other Python implementations. For example, if you wanted to see all the PyPy versions, you could do the following:
$ pyenv install --list | grep " pypy"
  pypy-c-jit-latest
  pypy-dev
  pypy-stm-2.3
  pypy-stm-2.5.1
  pypy-1.5-src
  pypy-1.6
  ...
Once you find the version you want, you can install it with a single command:
$ pyenv install 3.13.5
This command will take a while because pyenv needs to build the selected Python version from the source. Once the build is complete, you’ll have whatever version you choose installed on your local machine.
You can also list multiple versions in one command by separating them with spaces:
$ pyenv install 3.13.5 3.14.0rc2
Go ahead and install another version yourself. Note that you might not be able to follow the tutorial’s examples exactly since release candidates (RC), such as 3.14.0rc2, are published temporarily during the testing phase. Once the next release is out, the Python team typically removes older RCs from the download server to avoid confusion.
Note: If you have any issues with the build, then you can check the pyenv documentation, which has great installation notes, helpful FAQs, and common build problems.
For the rest of the tutorial, the examples assume you’ve installed 3.13.5 and 3.14.0rc2, but you can substitute these with any other Python versions you’re using.
Checking the Installed Versions: versions
As you already know, pyenv builds Python from source. Each version that you install is located under the versions/ folder in your pyenv root directory:
$ ls $PYENV_ROOT/versions/
3.13.5  3.14.0rc2
At this point, you’ll only have versions 3.13.5 and 3.14.0rc2, as you can see in this output. Now, it’s time to learn how to use your installed Python versions.
Instead of using the ls command above, you can run pyenv versions to display all currently installed Python versions:
$ pyenv versions
* system (set by /Users/realpython/.pyenv/version)
  3.13.5
  3.14.0rc2
This output shows that versions 3.13.5 and 3.14.0rc2 are installed. It also shows the system Python installation. Note that the asterisk (*) indicates that the system Python version is currently active. This means that you’re still referring to your system Python when you type the python command.
If you only care about the current active version, then you can use the following command:
$ pyenv version
system (set by /Users/realpython/.pyenv/version)
This command is similar to versions but only shows you the current active Python version. This information is crucial when you start a new project with a specific Python version.
Checking the Current Python Executable Path: which
The which command shows the full path to an executable program. It not only works with the executables in the pyenv environment but also with the system commands:
$ pyenv which python3
/Library/Frameworks/Python.framework/Versions/3.10/bin/python3

$ pyenv which ls
/bin/ls
The first command shows the path to the Python executable currently active in the pyenv environment. The second command shows that you can also get the path to system commands like ls.
Because pyenv works by using shims, this command allows you to see the full path to the executable pyenv is running. For example, if you wanted to see where pip is installed, then you could run this:
$ pyenv which pip3
/Library/Frameworks/Python.framework/Versions/3.10/bin/pip3
The output displays the full system path for pip. This can be helpful when you’ve installed command-line applications.
Uninstalling Python Versions: uninstall
At some point, you may find that you don’t need a given Python installation anymore. In that case, you can uninstall it with the following command syntax:
$ pyenv uninstall <version>
Once you press Enter, you’ll be prompted about removing the target version. If you respond Yes, then pyenv will remove the version completely.
Setting the Python Version to Use
One of the more confusing parts of pyenv is how exactly the python command gets resolved and what commands can be used. In pyenv, you have three ways to choose which Python version to use:
pyenv shell <version>pyenv local <version>pyenv global <version>
So, how do all these options interact with one another? The resolution order looks something like this:
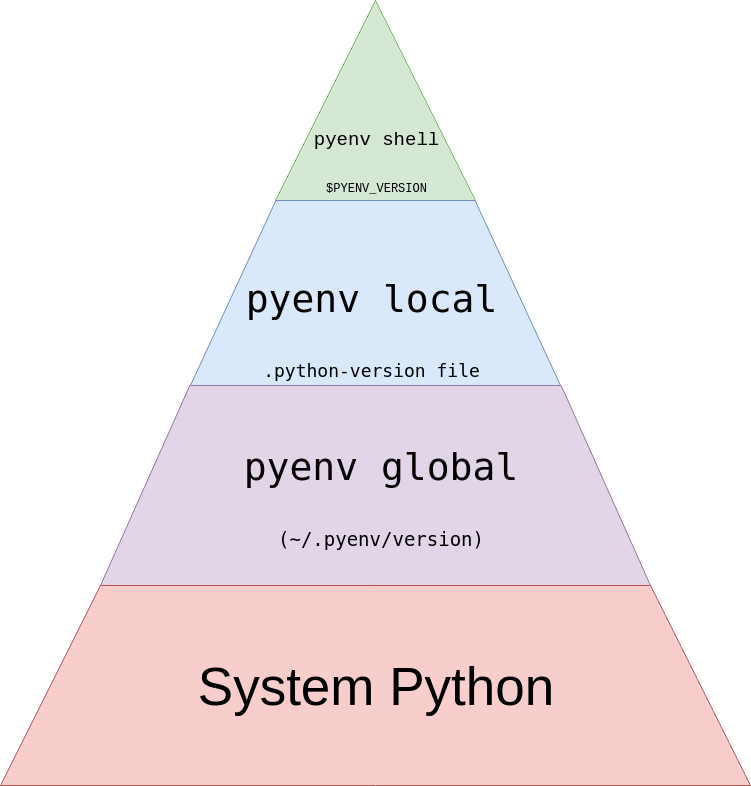
In this pyramid, the python command’s resolution order works from top to bottom, and higher levels override the ones below them. A pyenv command manages each part of this pyramid. In the following sections, you’ll learn about all these commands.
The Current Shell Session’s Python Version: shell
You can use the shell command to set or unset a shell-specific Python version. For example, if you wanted to try out the 3.14.0rc2 pre-release version, then you can run the following command in your terminal window:
$ pyenv shell 3.14.0rc2
$ pyenv version
3.14.0rc2 (set by PYENV_VERSION environment variable)
This command activates the specified version by setting the PYENV_VERSION environment variable. It overwrites any other settings you may have. Now, you can test the new features of the specified version as long as you stay in the same shell session.
To deactivate the shell’s version, you can use the --unset flag:
$ pyenv shell --unset
$ pyenv version
system (set by /Users/realpython/.pyenv/version)
As the name implies, the --unset flag unsets the specified shell version and returns you to the previous Python version. It removes the PYENV_VERSION environment variable, restoring the last setting in the resolution pyramid.
The Local or App-Specific Python Version: local
You can use the local command to set a specific Python version for a given application or project. Below is an example of how local works:
$ mkdir project/
$ cd project/

$ pyenv local 3.13.5
$ pyenv version
3.13.5 (set by /Users/realpython/Code/project/.python-version)

$ cd ../
$ pyenv version
system (set by /Users/realpython/.pyenv/version)
This command stores the intended Python version in a .python-version file in your current directory. If you have pyenv in your environment, then it’ll automatically activate that version for you—provided that it’s available—whenever you enter the project/ directory.
It’s common to keep this .python-version file in the project’s root folder and have it under version control, for example with Git. This way, pyenv can pick it up and automatically use the correct Python interpreter when you work in this folder.
Note: When using local, you don’t need to specify a full version number:
$ pyenv local 3.13
$ python --version
Python 3.13.5

$ pyenv local 3.13.4
$ python --version
Python 3.13.4

$ pyenv local 3.6
pyenv: version '3.6' not installed
Note how pyenv automatically chooses the latest release available that matches your constraint. If the target version isn’t installed, then you get an informative message.
This feature is handy for managing multiple projects with different Python versions. It prevents you from constantly checking the Python version, so you can rest assured that this specific project will use the intended Python version.
The Global Python Version: global
If you want to use a specific Python version globally on your system, then you can use the global command:
$ pyenv global 3.13.5
$ pyenv version
3.13.5 (set by /Users/realpython/.pyenv/version)
This global command sets 3.13.5 as the Python version you’ll get when you run the python command in any terminal window.
If you ever want to go back to the system version of Python, then you can run the command below:
$ pyenv global system
$ pyenv version
system (set by /Users/realpython/.pyenv/version)
You can now quickly switch between different versions of Python, which is another important capability when you need to manage multiple versions of Python in your daily work.
Managing Virtual Environments With pyenv
Virtual environments are a big part of managing Python projects, and they pair well with pyenv.
Note: If you’re new to virtual environments, then check out the Python Virtual Environments: A Primer tutorial.
In pyenv, a plugin called pyenv-virtualenv makes working with multiple Python versions and virtual environments a breeze. The good news is that if you used the automatic installer script to install pyenv, you already have pyenv-virtualenv installed and ready to go.
Note: If pyenv-virtualenv isn’t available in your current pyenv installation, follow the official installation guide to install it.
If you’re wondering about the difference between pyenv, pyenv-virtualenv, and tools like virtualenv or venv, you’re not alone. Here’s what you need to know:
pyenvmanages multiple Python versions.virtualenvandvenvmanage virtual environments for a specific Python version.pyenv-virtualenvmanages virtual environments across multiple Python versions.
In practice, pyenv-virtualenv makes it straightforward to switch between multiple environments that require different Python versions.
Creating Virtual Environments
To create a virtual environment with pyenv using a specific Python version, you can use the following command syntax:
$ pyenv virtualenv [python_version] <environment_name>
The python_version argument is optional, but it’s a good idea to specify it so you know exactly which Python version you’re using to create the environment. If you don’t provide a version, then pyenv will use the currently active one. The environment_name argument is required and represents the name of the environment’s folder.
A good practice is to name your environments after the target project. This is important because pyenv creates virtual environments under the $PYENV_ROOT/versions/<version>/envs/ directory. If you create two environments with the same name for the specific Python version, you can end up with a mess.
For example, if you were working on a project called coolapp, then you could do the following:
$ pyenv virtualenv 3.13.5 coolapp_venv

$ pyenv versions
* system (set by /Users/realpython/.pyenv/version)
  3.13.5
  3.13.5/envs/coolapp_venv
  3.14.0rc2
  coolapp_venv --> /Users/realpython/.pyenv/versions/3.13.5/envs/coolapp_venv
That’s it! You’ve created your first Python virtual environment using pyenv and the pyenv-virtualenv plugin.
Listing Virtual Environments
To see all available virtual environments, run this command:
$ pyenv virtualenvs
  3.13.5/envs/coolapp_venv (created from  /Users/realpython/.pyenv/versions/3.13.5)
  coolapp_venv (created from /Users/realpython/.pyenv/versions/3.13.5)
This command lists all the virtual environments that have been created using pyenv on your system.
Using Virtual Environments
Now that you’ve created your virtual environment, using it is the next step. Usually, you should activate your environments by running the following:
$ pyenv local coolapp_venv
You’ve seen the pyenv local command before, but this time, you specify a virtual environment instead of a Python version. This command creates a .python-version file in your current directory and automatically activates the corresponding environment.
You can verify this by running the following:
$ pyenv which python
/Users/realpython/.pyenv/versions/coolapp_venv/bin/python

$ file `pyenv which python`
/Users/realpython/.pyenv/versions/coolapp_venv/bin/python: symbolic link to
⮑ /Users/realpython/.pyenv/versions/3.13.5/bin/python
You can see a virtual environment called coolapp_venv in the output. The python executable from that environment is a symbolic link pointing to the corresponding interpreter version.
To manually activate and deactivate your Python environment, use the following commands:
$ pyenv activate <environment_name>
$ pyenv deactivate
These commands will activate or deactivate the target virtual environment in the usual way. You’ll see how the prompt changes:
$ pyenv activate coolapp_venv
(coolapp_venv) $
In this example, you activate the coolapp_venv environment. Note how the prompt changes from $ to (coolapp_venv) $ to give you a visual indicator that you’re in an active Python virtual environment.
You can create as many virtual environments as you need. Ideally, you should create a dedicated environment per project. Then, you can move from project to project and use the corresponding pyenv commands to manage the associated virtual environment.
In a sense, pyenv treats virtual environments as Python versions. That means you can use the local, global, and similar commands with virtual environments, too. To remove a virtual environment, you use the uninstall command.
Deleting Virtual Environments
Finally, you can remove a given virtual environment if you no longer need it. To do this, you can use the following command:
$ pyenv virtualenv-delete coolapp_venv
pyenv-virtualenv: remove /Users/realpython/.pyenv/versions/coolapp_venv? (y/N)
If you type y and press Enter, then pyenv will remove the target virtual environment from the $PYENV_ROOT/versions/<version>/envs/ directory.
Alternatively, you can use the pyenv uninstall <virtualenv_name> command to remove virtual environments. This command will work similarly to the one above.
Conclusion
You’ve learned how to use pyenv to manage multiple Python versions quickly and safely. You also saw why relying on the system Python installation can lead to conflicts and limitations, and how pyenv allows you to install, switch, and maintain specific Python versions for different coding projects.
You also installed pyenv and its dependencies on Unix-like systems and Windows. Then you practiced the essential commands for setting global, local, and shell-specific versions. Finally, you explored how to manage virtual environments with the pyenv-virtualenv plugin.
In this tutorial, you’ve learned how to:
- Install and set up
pyenvon Unix-like systems and Windows - Install and manage multiple Python versions independently from your system Python
- Manage global, local, and shell-specific Python versions using
pyenvcommands - Create and manage virtual environments across different Python versions and projects
Now that you have these skills, you can confidently manage Python versions and virtual environments for any project. This flexibility will help you contribute to a broader range of projects and ensure your development environment always meets your needs.
Get Your Cheat Sheet: Click here to download a free cheat sheet that shows you how to use pyenv to manage multiple versions of Python.
Frequently Asked Questions
Now that you have some experience with pyenv in Python, you can use the questions and answers below to check your understanding and recap what you’ve learned.
These FAQs are related to the most important concepts you’ve covered in this tutorial. Click the Show/Hide toggle beside each question to reveal the answer.
You use pyenv to install, manage, and switch between multiple Python versions without interfering with your operating system’s default Python installation.
Yes, you can install as many Python versions as you want with pyenv, which helps you test your code across different interpreters and manage project-specific requirements.
You use pyenv to manage different Python interpreters and virtual environments, while you use venv to create virtual environments using a single Python version. Also, pyenv is an external tool while venv ships with Python.
Use pyenv to avoid conflicts with your system Python, install any version you need, and switch quickly between versions for different projects.
You use pyenv to create and manage virtual environments across Python versions, helping you keep project dependencies and interpreters organized.
Take the Quiz: Test your knowledge with our interactive “Managing Multiple Python Versions With pyenv” quiz. You’ll receive a score upon completion to help you track your learning progress:
Interactive Quiz
Managing Multiple Python Versions With pyenvTest your knowledge of pyenv with this quiz and see how well you can manage multiple Python versions, virtual environments, and dependencies.