Ptpython is a feature-rich and user-friendly Python REPL (Read-Eval-Print Loop) that takes your interactive Python coding experience to a whole new level. Unlike the standard Python REPL, ptpython offers a host of powerful features designed to boost productivity and streamline the development process. Its intuitive interface, syntax highlighting, and robust auto-completion capabilities make writing and exploring Python code a breeze.
The interactive shell also provides the built-in ability to inspect Python objects, so you can quickly look up function references and module documentation without leaving the REPL environment. Whether you’re a beginner or an experienced Python programmer, ptpython’s interactive shell and multiline editing support will help you produce quality code.
In this tutorial, you’ll learn how to:
- Install and launch ptpython
- Initiate basic commands to enhance your coding experience
- Use typing completion and code auto-suggestion in your interactive shell
- Take advantage of input validation and error handling
- Customize the interactive experience to your liking
Once you have a better understanding of the advantages of using this enhanced Python shell, you’ll be on your way to creating a unique shell experience while elevating your Python coding workflow in an interactive environment.
Get Your Cheat Sheet: Click here to download a free cheat sheet that sums up the most useful ptpython settings.
Installing and Launching Ptpython
It’s time to install ptpython in your machine. First, ensure that you have Python installed in your machine. Then, head over to your command line and install ptpython using the pip command. If you want to isolate the ptpython installation, then you can use a virtual environment. Otherwise, you can install it universally, as you’ll see in this tutorial:
PS> python -m pip install ptpython
By hitting the Enter key, you download the library and make it available on your machine. To confirm that the library has been installed, you’ll launch the shell in the next step.
You’re now ready to explore your newly installed tool, which is a feature-rich Python REPL. But first, you have to launch it. While you’re still in your command prompt, enter the following command:
PS> ptpython
You only need this command to launch an interactive session. A new session will begin with the >>> prompt, signaling that the interactive shell is ready to accept your code. Your interface should look something like this:
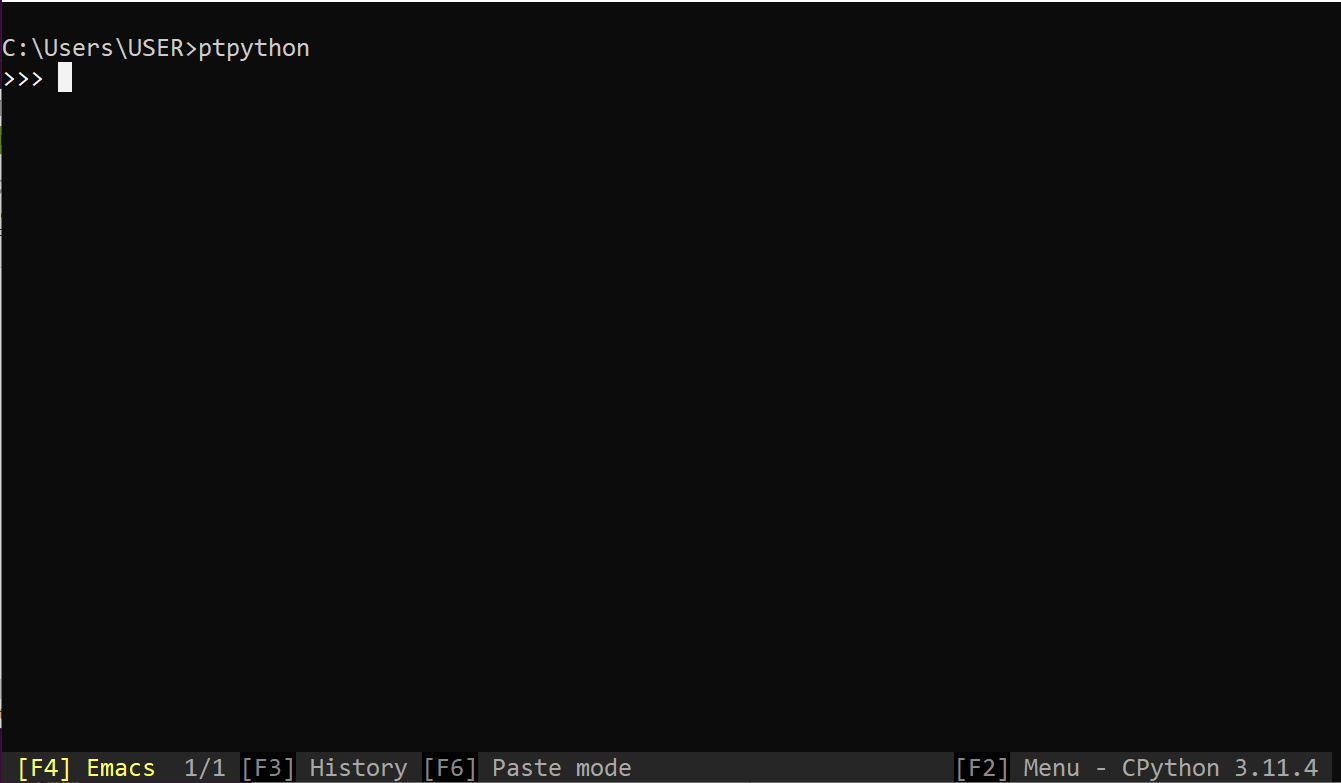
Despite sharing a lot of similarities with the Python shell, the ptpython interface adds several interesting features. For example, at the bottom of the shell window, you’ll see a menu shortcut. The menu shortcut gives you a glimpse of what you can do within the interactive shell. In later sections, you’ll get to know how the menu system is the control center of ptpython.
Note: The pt part of ptpython refers to Prompt Toolkit which is a library for building interactive command line applications that ptpython uses under the hood.
If you want to go back to the command line, then you’ll have to exit the interactive shell. There are other shortcuts that you can use to exit ptpython, but for now, you’ll use the exit() command:
>>> exit()
The exit() command is the same command that you’d find in the standard Python shell. Once you enter this command in the prompt, you’ll return to the regular command line.
In the next section, you’ll come to understand the intricacies that make ptpython an attractive alternative to the standard Python shell.
Comparing the Standard Python Shell vs Ptpython
The standard Python shell offers a way to interact with Python on your computer without using a code editor or an IDE. However, it can be a rigid tool to work with for beginners. Alternatives like IPython, bpython, and ptpython offer more functionality in the interactive shell.
With ptpython, you can gain an advantage over the standard shell by utilizing the following functionalities, which can power up your coding experience:
- Code and syntax highlighting, a functionality that you won’t find in the Python shell
- Completion capabilities that go way beyond the Python standard shell’s tab completion and reduce errors in your coding sessions
- Input validation to alert you when you’re about to execute erroneous code, in contrast to the Python standard shell’s executing and returning an error
- A powerful menu that allows you to access other functionalities
- The ability to seamlessly customize the ptpython interface by changing code color and shell behavior
These differences make ptpython a suitable alternative if you want to have a richer and more interactive experience as you code. This powerful interactive shell offers more tools, as you’ll learn in the next section.
Using Ptpython: The First Steps
Even though ptpython aims to make coding a breeze, you’ll have to learn the basic commands that you’ll frequently use in the interactive shell. By default, the shell behaves like any other shell when executing code. However, the combination of its menu system and its configuration file make it even more powerful. Getting a good grip on the menu system will allow you to command the shell’s behavior and appearance to fit your preferences.
Understanding the Menu System
Ptpython’s menu system enhances the interactive Python programming experience by providing a structured and navigable interface within the terminal. It offers an organized menu containing various options, including code history, command manipulation, and configurable settings.
The menu allows you to efficiently explore and access these features, improving your workflow and facilitating quick access to essential functionalities while working within the ptpython environment:
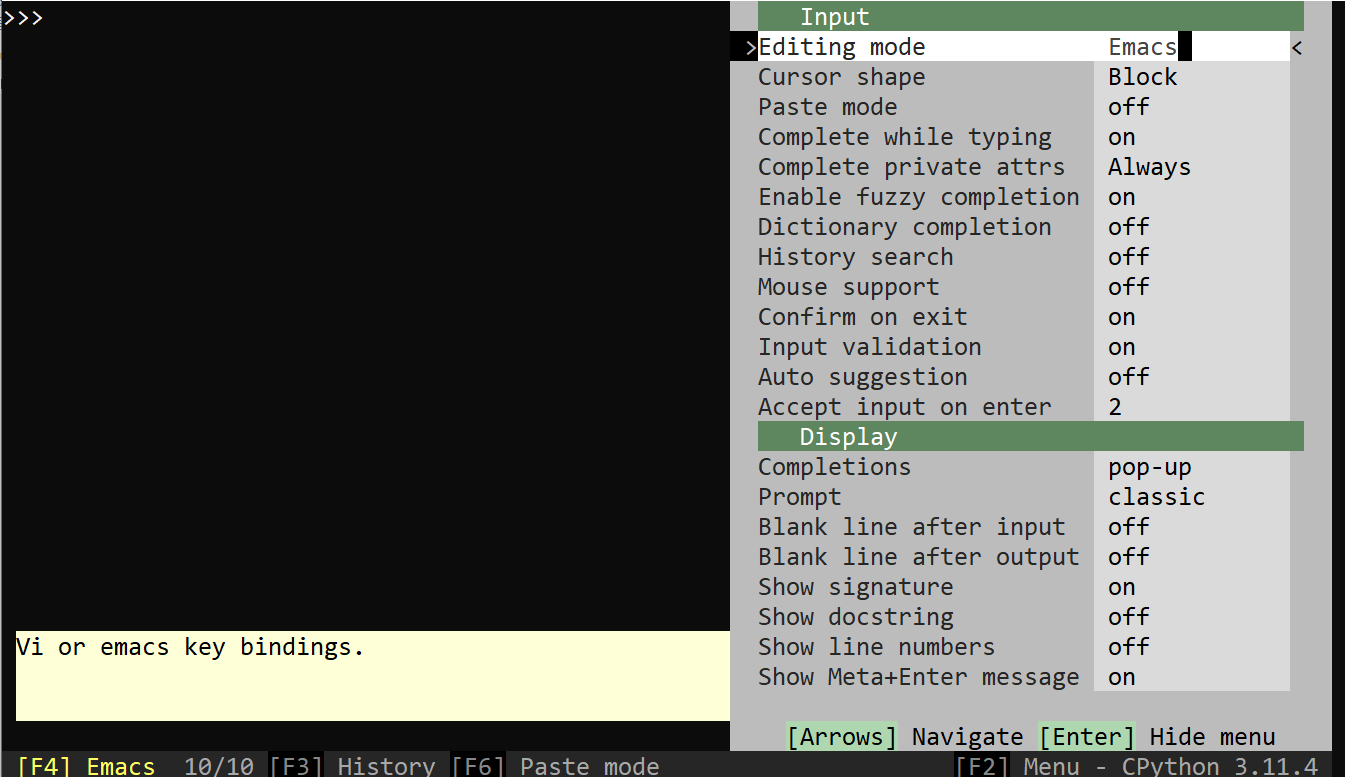
When you open the menu by typing F2, a variety of options will appear on the right side of your terminal, allowing you to manipulate how the REPL will behave.
Note: You use function keys like F2, F3, and F6 to navigate ptpython. On most keyboards you need to press and hold the Fn key while pressing a function key to activate it.
The menu system simplifies interaction by presenting options in a clear format, making it easier to navigate and execute different commands or actions. For the most part, you’ll turn functionalities on or off. To exit the menu, press the Enter key, and you’ll be back to the interactive shell.
Another feature to note is that the menu is divided into sub-menus that distinguish the types of available functionalities. You’ll find three sub-menus in total:
-
Input is where you can configure settings related to how the shell processes and handles your keyboard input. This includes options for enabling or disabling features like auto-suggestions and auto-indentation, as well as adjusting the behavior of the tab key. Fine-tuning these settings can significantly affect how you interact with the shell as you type and edit code.
-
Display allows you to configure various aspects of how the interactive shell presents output and results. This includes options related to the formatting of data, the verbosity of output, and the handling of long lines. You can customize settings to control how the shell displays information as you interact with Python code.
-
Colors provides options for customizing the syntax highlighting colors that the interface uses. You can select different color schemes to tailor the appearance of various code elements, making the code more visually distinct and easier to read. This feature contributes to a more personalized and comfortable coding environment.
In the following sections, you’ll have the opportunity to use the menu to access advanced features within the three sub-menus.
Declaring Variables in Ptpython
In the Ptpython shell, declaring variables is similar to in the native Python shell. You can simply type the variable name followed by an equal sign (=) and the value that you want to assign. With this step, there are no significant differences. Type in the following lines of code, which you’ll use to explore ptpython:
>>> title = "Jurassic Park"
>>> release_year = 1993
>>> director = "Steven Spielberg"
>>> lead_actor = "Sam Neill"
>>> budget = 63_000_000  # In USD
>>> box_office_revenue = 1_029_442_529  # In USD
>>> genres = ["Action", "Adventure", "Sci-Fi"]
>>> rating = 8.1
The above variables are statistics on the movie Jurassic Park. You’ll use this data to explore what the shell has in store. What’s exciting is that even in this step, the magic is already happening in the background.
Completing Code While Typing
The first piece of magic is a powerful completion feature that can lighten the load in accessing previously defined variables and objects. This capability also works for built-in Python functions.
As you start typing a variable, function, module, or any other valid Python identifier, ptpython will present a list of possible completions that match what you’ve typed so far. The feature called Complete while typing works right out of the box:
With the above example, the variable title is available in the dropdown, and you can access it using the Up, Down, Left, and Right keys. You can also use the Tab key to toggle between the dropdown choices. You can use the Enter key to insert your selected variable into the interactive shell.
You can turn this feature off in the menu system under the Complete while typing option in the Input sub-menu.
Using the Auto-Suggestion Feature
There’s a second way is to access earlier code using the auto-suggestion feature. Once you run any line of Python code in the ptpython shell, it’s recorded in a history file.
Once you start typing, the auto-suggestion functionality will give you a hint of a matching line of code that you ran previously. You can then complete the entry using the Right key. To turn on this functionality, open up the menu. Navigate to the Auto suggestion option and use the Right key to turn it on. Then, press Enter to save the change:
In the above example, once the Auto suggestion feature is turned on, you can see the hint of the title variable. You use the Right key to complete the variable, and you enter it into the shell using the Enter key.
You can quickly insert code that you ran earlier in this session—or even a previous session—by using auto-suggestions. Now imagine you need to recreate a boatload of variables from an earlier session. You can’t remember them all, but ptpython can. These provisions can save you a lot of time and remove errors.
In addition, there’s another way to access earlier codes and commands from your history file.
Checking Code History and Reinserting Earlier Code
Accessing command history in ptpython is intuitive. You can utilize the Up and Down arrow keys to navigate through previously entered commands, making it easy to review, modify, and re-execute past code.
Additionally, you can get a glimpse of all the code that you’ve punched into the interactive shell by pressing a menu shortcut: the F3 key. A new column listing all of your previous code will show up on the left, including code from earlier sessions:
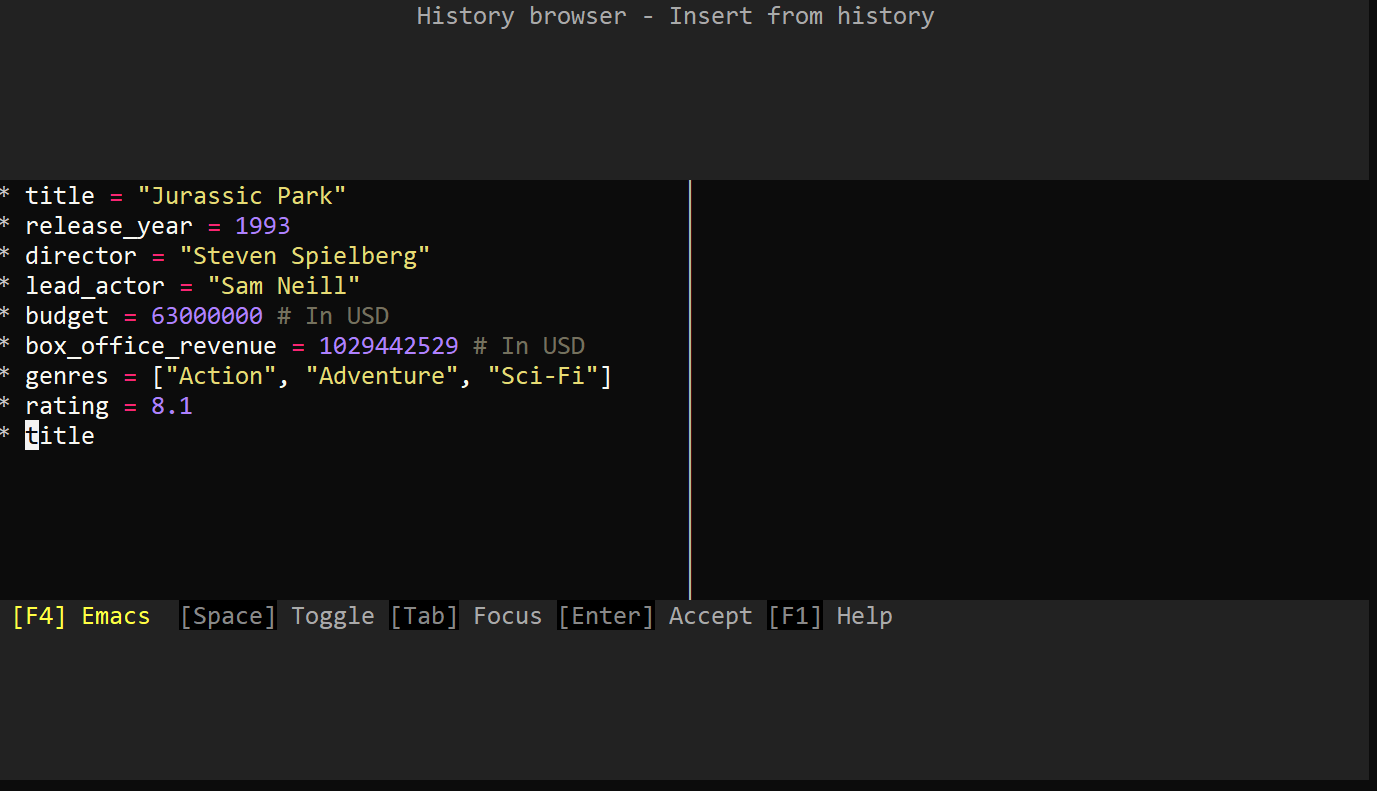
As seen in the above screenshot, the menu lists your earlier code and commands in order of execution. This view gives a useful bird’s-eye view of your workflow within the shell.
Note: With this view, you’re accessing the contents of the previously mentioned history file. The lines of code recorded in here are also what powers the Auto suggestion feature.
Utilize the Up and Down keys to navigate to the desired line of code for copying. Press the Space key to select the code for insertion. You can repeat that process, and all of your selected lines will show up in the right-hand column. Once you’ve finished selecting all the code that you want, you can press the Enter key to insert these lines into your interactive shell:
As you can see above, all the variables that you selected have been inserted into the interactive space. As a developer, you now have code history at your fingertips, and you have all the tools to avoid re-entering the same code or code blocks that you wrote earlier.
Utilizing Auto-Indentation
The requirement for code indentation in Python when working with functions and classes can present a difficulty for developers working in the standard Python shell. For such code, a manual entry of four spaces can slow down the process of creating an object or function. This enhanced Python shell offers automatic indentation for objects such as functions and classes.
To showcase this modality, create a function that calculates the budget and box office earnings of the first three Jurassic Park movies. In the ptpython shell, type in these two lists:
>>> jurassic_budgets = [63_000_000, 73_000_000, 93_000_000]
>>> jurassic_revenues = [1_029_442_529, 618_600_000, 368_800_000]
Both jurassic_budgets and jurassic_revenues include data for the first three Jurassic Park movies (Jurassic Park, The Lost World: Jurassic Park, and Jurassic Park III) in order. You’ll use the following function in the interactive shell:
def calculate_total_budget(budgets):
    return sum(budgets)
The above function takes in a list of integers and returns a sum total of all the items. The resulting number is the total budget for all the three Jurassic Park movies.
Type the calculate_total_budget() function into the ptpython shell and see automatic indentation at work:
The function works as expected and returns the total budget. As you can see, when creating multiline code such as functions, ptpython automatically uses the indentation-based syntax required in Python code. You can practice using the jurassic_revenues list:
How much total revenue did the first three Jurassic Park movies generate together? Can you use a function that’s similar to the one defined above to calculate the revenues using the jurassic_revenues list?
The process will be the same as for the first function that you wrote and called. In your shell, define calculate_total_revenue(), which takes in revenues and returns the sum of revenues:
def calculate_total_revenue(revenues):
    return sum(revenues)

calculate_total_revenue(jurassic_revenues)
When you call calculate_total_revenue() with the right list, you should get the total revenues that the three Jurassic Movies registered at the box office.
The Python indentation requirement in a shell environment can be time-consuming and prone to errors. Having auto-indentation takes away this headache, allowing you to focus on creating functions and objects effectively.
Clearing Code From the Shell
Have you ever gotten deep into a coding session and found yourself struggling with a cluttered screen? You want a clean slate, but you don’t want to lose any of your variables or functions. With ptpython, you can declutter your workspace while holding onto everything that you’ve defined.
To clear the interactive shell and remove all the previous input and output, just press and hold the Ctrl key and then press the L key while you’re in the interactive shell. This will clear the screen and give you a fresh, empty shell prompt:
Now you have a clean slate to continue with your coding session without closing the REPL. All your variables are still defined, so the Complete while typing feature works like before. You can also still access previously written lines of code using the Up and Down keys like before. The Ctrl+L command only visually tidies up your workspace.
You now have an understanding of the basic use of ptpython and these features. You can now dive in and fully utilize this tool in your workflow. You can now define variables, make use of type completion capabilities, and recap previous code through auto-suggestion and code history features. You can also define functions with the aid of auto-indentation, making your coding experience seamless.
But there’s more. There are advanced functionalities that can add more productivity to your work in the interactive shell. You’ll discover them next.
Learning Advanced Functionalities
Advanced features can further boost your capabilities in the interactive shell by employing other ways to understand your code. Most of these functionalities are hosted within the menu system, and you should definitely explore them. These features include accessing object parameters and documentation, validating input, and configuring the shell to your liking, among many others.
You can find these advanced features on ptpython’s Github page. In this section, you’ll learn about some notable features that can aid in your workflow.
Viewing Methods and Parameters in Objects
Ptpython makes it convenient to view all arguments required in any objects. This can work for both built-in Python objects and objects from external libraries. Within the shell, you can view and meet all the requirements as you type in your code. This can be helpful, as you might not recall all the requirements in a given object.
To showcase this powerful feature, you’ll use the familiar print() function, which take multiple arguments and concatenate them for output. It can also support various formatting options. In the following example, the output of print() will be separated by a hyphen using the sep argument:
As you type in the text that print() should print, ptpython can access all the optional parameters. In the above example, you select the sep parameter from the dropdown. The argument can accept any separator character to use in the concatenation of two strings.
You’ve used a hyphen in this example. The function prints the output with the hyphen between the two words as expected. Without the sep argument, a space would’ve separated the concatenated words.
Note: The typing completion feature lists all the code objects that are in scope. Not all options in the dropdown are associated with the object. Parameters that are associated with the current object are usually in a different color and appear first in the dropdown. They also have an equal sign (=) and a trailing ellipsis (...).
You can practice with more Python functions like range(), sum(), and len() to see if you can peek into some of the parameters that they require. You can also gain more understanding of Python objects by accessing the documentation, which you’ll learn how to do next.
Reading Documentation
You can view docstrings directly within the interactive shell. To enable this functionality, go to the menu by pressing F2 and scrolling down to the Show docstring option in the menu. Use the Left and Right keys to turn it on or off. Now you can view the docstrings of the code object in your interactive session:
For example, you can access the documentation of print() right within your interactive shell. You can access valuable documentation in the docstring section at the bottom of the shell window.
Note: You can always access docstrings of a code object by passing it to help() or by accessing its .__doc__ attribute. Ptpython just streamlines access to documentation, making it more convenient and straightforward.
These functionalities can give you an edge in learning and understanding libraries and objects that you’re interested in, without jumping out of your shell and perusing external documentation. However, they’re not a full replacement for official documentation for Python libraries.
Applying Input Validation
In the standard REPL, when you enter code that contains incorrect syntax in Python, the code will execute and return a SyntaxError. You then have to re-enter all the code correctly to get the desired output. In ptpython, the shell will issue a syntax error warning through the Input validation feature and won’t allow you to execute the code.
You can go back and fix the erroneous syntax, and only then can you execute your code. This option is automatically on, and you can access it in the menu under the sub-menu Input with the title Input validation.
Input validation can be helpful when you accidentally miss a piece of necessary syntax when creating for loops, Python classes, or in function definitions.
Consider a small example, where you try to call print(), but you forgot to add the closing parenthesis. With input validation, the code won’t execute, and you’ll see a syntax error warning:
The code won’t execute in the shell with incorrect Python syntax, such as a missing closing parenthesis at the end of a function call. The shell already knows that this is a requirement and issues a warning at the bottom of the shell window. But once you provide the closing parenthesis, the code executes as expected.
These notifications are quite helpful to eradicate syntax errors in your workflow, so you should probably keep this feature enabled.
Understanding the Paste Mode in Ptpython
Imagine that you have a block of code in a separate Python file that you’d like to use in your ptpython shell. The code block has hundreds of lines, and it’d take you some time to type them in. Wouldn’t it be advantageous to copy and paste them in?
You’re in luck. The ptpython paste mode makes it convenient to paste multiple lines of code into the terminal at once. This is particularly useful for copying and testing larger code snippets without the need for line-by-line input. Below is the code snippet from the first Jurassic Park movie:
title = "Jurassic Park"
release_year = 1993
director = "Steven Spielberg"
lead_actor = "Sam Neill"
budget = 63_000_000  # In USD
box_office_revenue = 1_029_442_529  # In USD
genres = ["Action", "Adventure", "Sci-Fi"]
rating = 8.1
Copy the above code chunk in readiness to paste it into the ptpython shell. But first, you have to turn on paste mode. You can access paste mode through the menu:
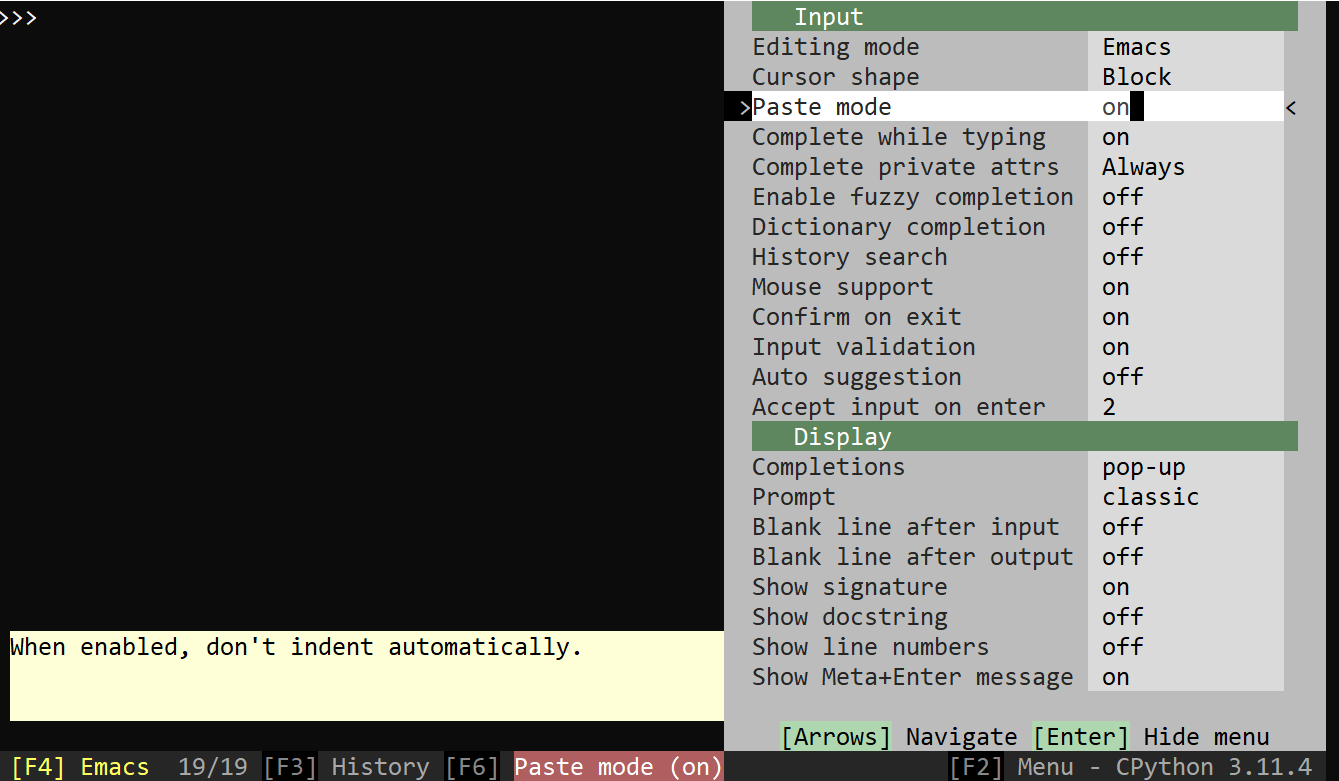
Scroll down to Paste mode and use the Right key to turn it on. Once you exit the menu, you can see a notification at the bottom confirming that paste mode is on. Now you can paste code into the interactive shell by right-clicking in Windows or clicking with Ctrl in macOS. Give it a try by copying the code above and pasting it into the interactive shell using paste mode:
Once in paste mode, you can see Paste mode (on) in your status bar. This indicates that you can paste code into the shell. Once you’re done, press F6 to turn off paste mode. Press the Enter key to execute the code you pasted.
Consequently, you can quickly turn paste mode on and off using the keyboard shortcut, F6.
Customizing Ptpython
It’s possible to customize ptpython’s features and appearance according to your preferences. While this isn’t essential for your learning experience and workflow, it can potentially enhance the whole coding experience.
To understand how to customize the shell experience, head back to the menu and turn on the Show sidebar help feature under the Display sub-menu. Even though you won’t cover every single menu functionality in this tutorial, you can now get information about the menu options as you scroll through them:
As you can see, there’s a description of the menu items at the bottom-left corner. It’s a helpful feature in understanding what type of modifications you can make to your interactive shell, without exiting the shell itself or searching the online documentation.
In the following sections, you’ll learn about a few customizations that can enhance your coding sessions.
Highlighting Code Syntax
Code syntax highlighting enhances the readability of code by applying different colors and styles to different elements of the code, such as keywords, strings, comments, and variables. This visual distinction helps you quickly identify and differentiate various components of the code, making it intuitive to read, understand, and debug.
To enter this mode, go to the menu and scroll to the sub-menu Colors. Under the sub-menu, select the Syntax highlighting option and use the arrow buttons to turn it on. Then scroll down to the Code option, where you’ll find up to thirty-two themes to choose from:
When you turn on these two menu options, your code will respond according to the theme that you have set. You’ll have to experiment until you get a theme that’s suitable for your shell. In this tutorial, the theme that you’re seeing is monokai in case you fancy it.
Highlighting Matching Parentheses
In Python, you’ll often use parentheses. In some cases, you might have several sets of parentheses nested within a code block, which means that you might end up missing a closing parenthesis. The interactive shell can help you overcome this pitfall if you turn on the Highlight parenthesis option under the Display sub-menu:
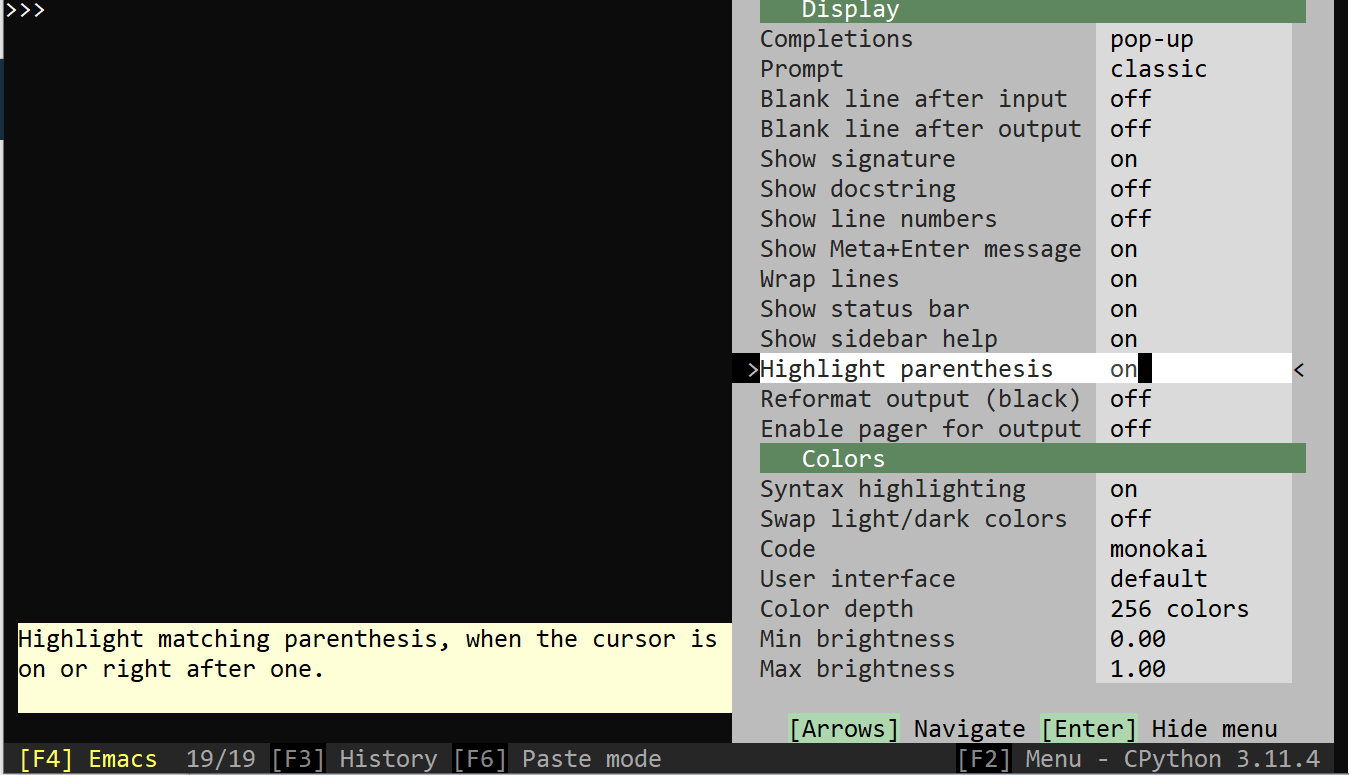
You can access the menu item responsible for highlighting parenthesis in the menus system. After you’ve turned the option for parenthesis on, the shell will highlight the matching parenthesis in all your code:
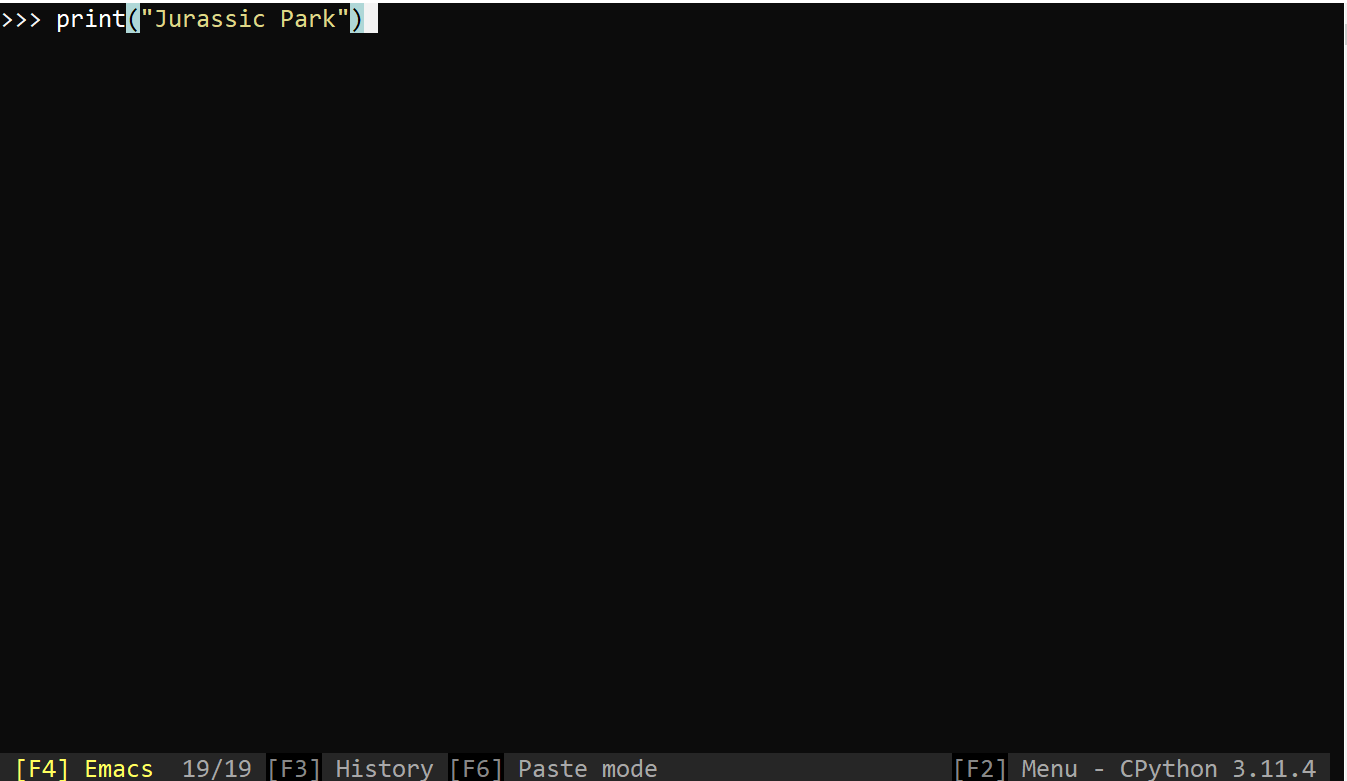
The automatic highlight of matching parenthesis gives you a visual way to know that your code has every corresponding parenthesis. So now, when you have a huge number of parenthesis pairs, you’ll know off the bat which ones belong together. Hasn’t this small tweak made your life easier?
Changing the Prompt and Cursor Style
When you’re coding, you spend a lot of time with your REPL’s prompt and cursor. The prompt is the indicator character that appears in the shell to demonstrate that the shell is ready to accept your input. It’s where you type your Python code and shell commands.
On the other hand, the cursor lets you find where you’re currently located on a line, showing precisely where your next action or modification will take place. Because you spend a lot of time with these indicators, you probably want to make sure that you enjoy looking at them.
You can quickly change the prompt style that you’d like in the interactive shell. Currently, you can choose from the classic prompt or the ipython prompt. The IPython option offers numbered prompts, helping you to visually track the code inputs and outputs:
The prompt menu item is under the Display sub-menu, and you can use the arrow keys to choose which prompt best suits your case.
For the cursor, navigate to the Input sub-menu and access the Cursor options. Here you can choose from a variety of cursor styles.
You can experiment with different cursor styles to choose what works for you. You can always change to another one using the menu item.
Changing the Configurations Permanently
There’s one problem that you’ll face with all the customizations that you’ve done so far. Once you exit the shell, you’ll lose all the custom configurations. There’s a way to ensure that your configurations are saved permanently. All menu options are stored in a config.py file. To change them permanently, you’ll have to alter this file.
Before you access the config.py file, it’s a good idea to note what preferences you’d like to change before applying the alterations. The file includes descriptions of all the configurations, giving guidance on the functionalities, so it can be a lot to wade through. Once you’ve decided which settings you want to adjust, you can access the file on your operating system as follows:
Once you’ve successfully accessed the file, open it up in your code editor.
Then, go to the official ptython GitHub page, copy the provided config.py example file, and paste it into your config.py file in the above directory.
Now you can use your power to turn configurations on and off by using True and False options to match your preferences. This will permanently save your settings. As you learned, there are a lot of configurations that you could adjust! For a handy guide, download the cheat sheet below:
Get Your Cheat Sheet: Click here to download a free cheat sheet that sums up the most useful ptpython settings.
Integrating IPython in Ptpython
There are many other interactive Python shells, including IPython. IPython is a popular interactive shell that shares some functionalities with ptpython, but it also has additional features that ptpython doesn’t have.
Depending on your needs and capabilities with both tools, you can highly customize your workspace and enjoy the benefits of both worlds. IPython offers great advantages over the Python standard shell, including magic commands, which aren’t available in ptpython.
These magic commands are denoted by % or %% prefixes, and they perform various tasks. These commands provide shortcuts for tasks like profiling code, timing execution, running system commands, debugging, and more. Magic commands streamline tasks and offer additional functionalities beyond the standard Python REPL.
IPython’s features can supplement the capabilities of ptpython’s interactive shell. It’s possible to mix the power of these two REPLs if you’re familiar with both.
Ensure first that you have IPython installed on your machine:
PS> python -m pip install ipython
Now you have the potent power of two REPLs within your grasp. You can extensively customize your experience in the interactive shell with these two ingredients.
To launch the new interactive shell, exit the ptpython shell and enter the ptipython command:
Now you have the IPython interactive shell within the ptpython shell! Neat. The combination of the power of two interactive shells is at your fingertips. The biggest difference between ptpython and IPython would be that the former has a GUI-like menu that can change the look and feel of the interactive shell while the latter has its commands baked in as magic commands.
So for example, you can check the history of your code through the F3 shortcut used in ptpython, or you can use the %history magic command found in IPython. The buffet table is now ready for your choosing. You can decide if you need to use features from both shell tools depending on your needs.
Embedding Ptpython in Python Scripts
You can also embed the powerful features of ptpython into your Python scripts. This means that in the execution of any Python script, the shell can be launched. This is quite useful if you want to debug and experiment with your code in an interactive environment.
For example, the following is a Python script that has data points from the latest Jurassic Park movie, Jurassic World: Dominion. You can title the file as jurassic_movie.py. There’s also an import of the ptpython embed() function within the script. Notice the embed(globals(), locals()) line. That’s when ptpython will launch:
jurassic_movie.py
from ptpython.repl import embed

title = "Jurassic World: Dominion"
release_year = 2022
director = "Colin Trevorrow"
lead_actor = "Chris Pratt"
budget = 200_000_000  # In USD
box_office_revenue = 1_700_000_000  # In USD
genres = ["Action", "Adventure", "Sci-Fi"]
rating = 7.5

embed(globals(), locals())

jurassic_budgets = [63_000_000, 73_000_000, 93_000_000, 200_000_000]
Once you have this, navigate to the directory where your Python script is hosted and run it using the following command:
PS> python jurassic_movie.py
When your Python script is successfully executed, the shell will launch, and you’ll have access to variables that you defined before calling the embed() function:
In this example, the script is executed successfully, and the interactive shell starts. All the variables defined before the embed() function are accessible in the interactive shell. Notice that the jurassic_budgets variable isn’t accessible. This is because the shell launched before the code containing the list was executed.
Note: Ensure that you remove the embedding when going to production, as it’ll interrupt your Python script. Of course, you can leave it if you want to use the interactive shell as a part of your program.
Ensure that you’ve defined all the code that you’d like to play around with before calling embed(). By doing that, you’ll have access to everything that you need when your interactive shell launches.
Conclusion
Impressive power lies in augmented interactive Python shells. These tools can give a big boost in your learning journey and help you understand coding concepts in a friendly environment while reducing errors.
Ptpython is a powerful companion that you can readily modify and tailor to your specific needs.
In this tutorial, you’ve learned how to:
- Download and install the ptpython interactive shell in your computer
- Use ptpython’s interactive tools, such as history, input validation, and auto-completion
- Automatically handle indentation with ptpython
- Customize the interactive shell to your liking
- Embed ptpython in your Python scripts
Congratulations on exploring this advanced Python REPL tool, which should make your Python learning journey smoother. Ptpython is a powerful addition to your tool kit, and it’ll help you effectively understand and debug your code.
Get Your Cheat Sheet: Click here to download a free cheat sheet that sums up the most useful ptpython settings.