As a programmer, you should be focused on the business logic and creating useful applications for your users. In doing that, PyCharm by JetBrains saves you a lot of time by taking care of the routine and by making a number of other tasks such as debugging and visualization easy.
In this article, you’ll learn about:
- Installing PyCharm
- Writing code in PyCharm
- Running your code in PyCharm
- Debugging and testing your code in PyCharm
- Editing an existing project in PyCharm
- Searching and navigating in PyCharm
- Using Version Control in PyCharm
- Using Plugins and External Tools in PyCharm
- Using PyCharm Professional features, such as Django support and Scientific mode
This article assumes that you’re familiar with Python development and already have some form of Python installed on your system. Python 3.6 will be used for this tutorial. Screenshots and demos provided are for macOS. Because PyCharm runs on all major platforms, you may see slightly different UI elements and may need to modify certain commands.
Note:
PyCharm comes in three editions:
- PyCharm Edu is free and for educational purposes.
- PyCharm Community is free as well and intended for pure Python development.
- PyCharm Professional is paid, has everything the Community edition has and also is very well suited for Web and Scientific development with support for such frameworks as Django and Flask, Database and SQL, and scientific tools such as Jupyter.
For more details on their differences, check out the PyCharm Editions Comparison Matrix by JetBrains. The company also has special offers for students, teachers, open source projects, and other cases.
Download Sample Project: Click here to download the sample project you’ll use to explore the project-focused features of PyCharm in this tutorial.
Installing PyCharm
This article will use PyCharm Community Edition 2019.1 as it’s free and available on every major platform. Only the section about the professional features will use PyCharm Professional Edition 2019.1.
The recommended way of installing PyCharm is with the JetBrains Toolbox App. With its help, you’ll be able to install different JetBrains products or several versions of the same product, update, rollback, and easily remove any tool when necessary. You’ll also be able to quickly open any project in the right IDE and version.
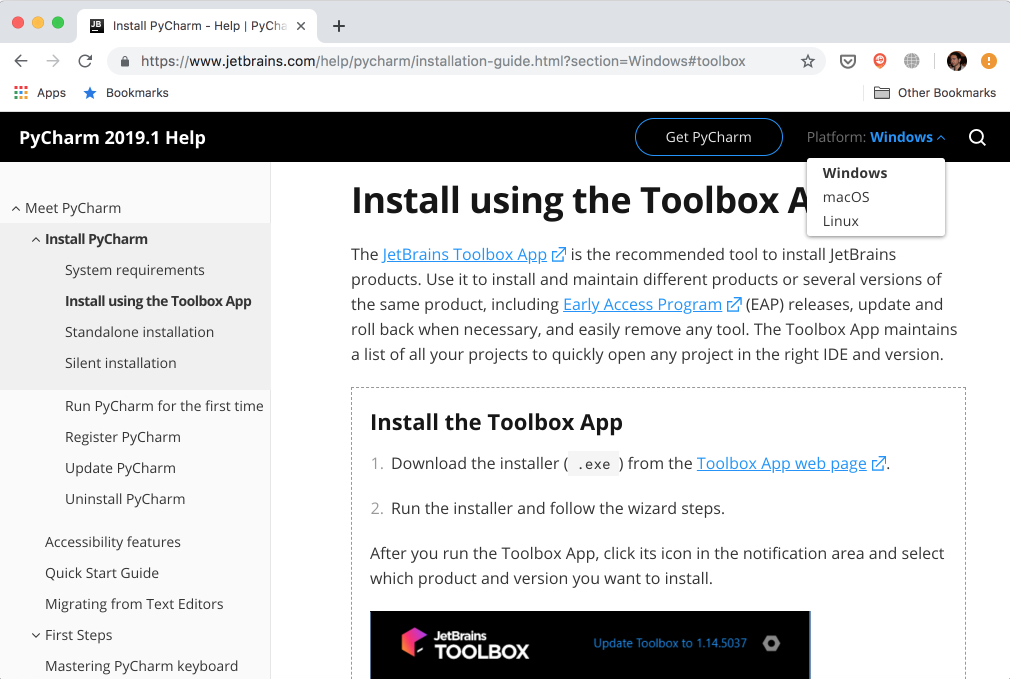
To install the Toolbox App, refer to the documentation by JetBrains. It will automatically give you the right instructions depending on your OS. In case it didn’t recognize your OS correctly, you can always find it from the drop down list on the top right section:
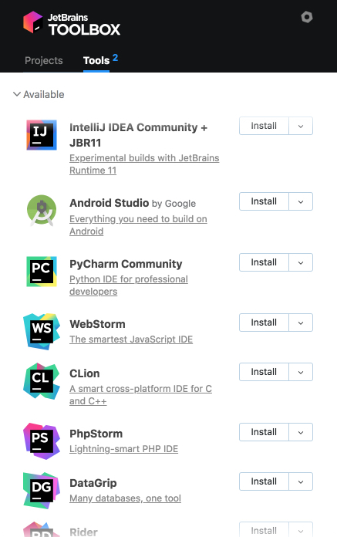
After installing, launch the app and accept the user agreement. Under the Tools tab, you’ll see a list of available products. Find PyCharm Community there and click Install:
Voilà! You have PyCharm available on your machine. If you don’t want to use the Toolbox app, then you can also do a stand-alone installation of PyCharm.
Launch PyCharm, and you’ll see the import settings popup:

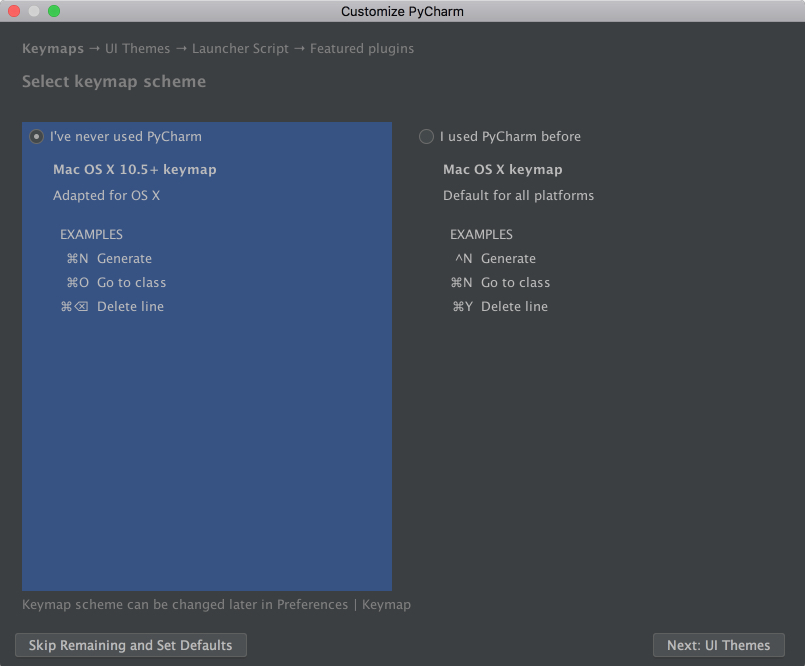
PyCharm will automatically detect that this is a fresh install and choose Do not import settings for you. Click OK, and PyCharm will ask you to select a keymap scheme. Leave the default and click Next: UI Themes on the bottom right:
PyCharm will then ask you to choose a dark theme called Darcula or a light theme. Choose whichever you prefer and click Next: Launcher Script:
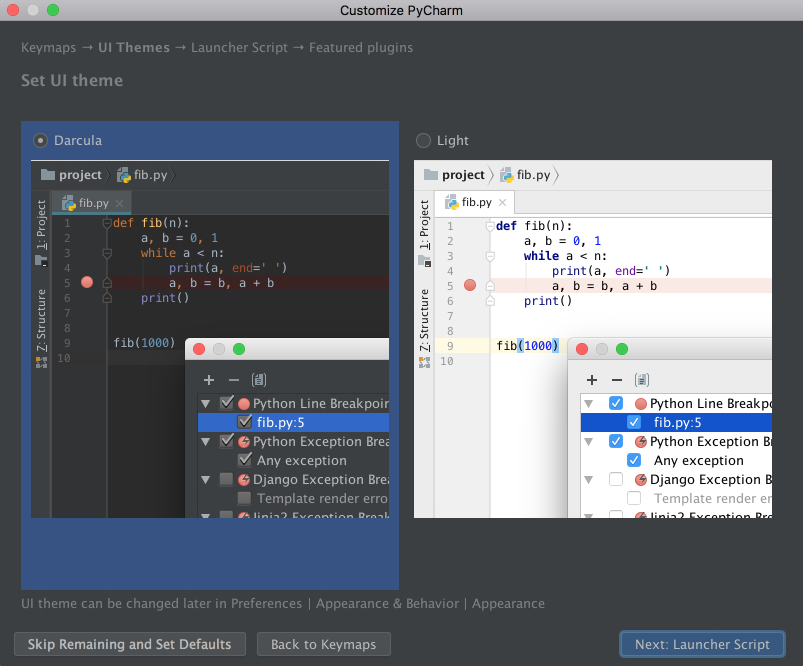
I’ll be using the dark theme Darcula throughout this tutorial. You can find and install other themes as plugins, or you can also import them.
On the next page, leave the defaults and click Next: Featured plugins. There, PyCharm will show you a list of plugins you may want to install because most users like to use them. Click Start using PyCharm, and now you are ready to write some code!
Writing Code in PyCharm
In PyCharm, you do everything in the context of a project. Thus, the first thing you need to do is create one.
After installing and opening PyCharm, you are on the welcome screen. Click Create New Project, and you’ll see the New Project popup:
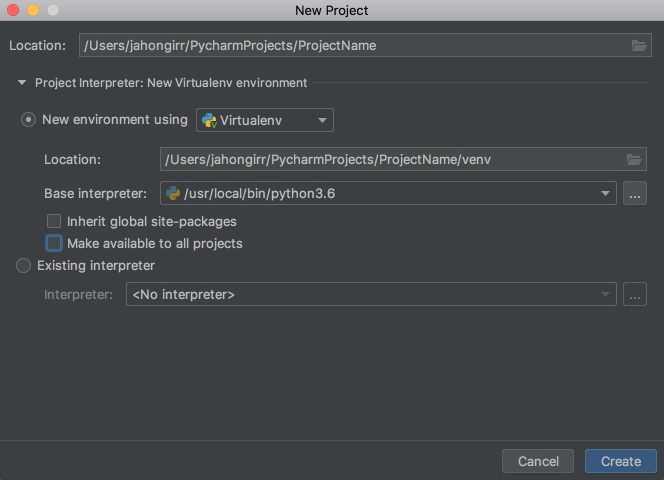
Specify the project location and expand the Project Interpreter drop down. Here, you have options to create a new project interpreter or reuse an existing one. Choose New environment using. Right next to it, you have a drop down list to select one of Virtualenv, Pipenv, or Conda, which are the tools that help to keep dependencies required by different projects separate by creating isolated Python environments for them.
You are free to select whichever you like, but Virtualenv is used for this tutorial. If you choose to, you can specify the environment location and choose the base interpreter from the list, which is a list of Python interpreters (such as Python2.7 and Python3.6) installed on your system. Usually, the defaults are fine. Then you have to select boxes to inherit global site-packages to your new environment and make it available to all other projects. Leave them unselected.
Click Create on the bottom right and you will see the new project created:
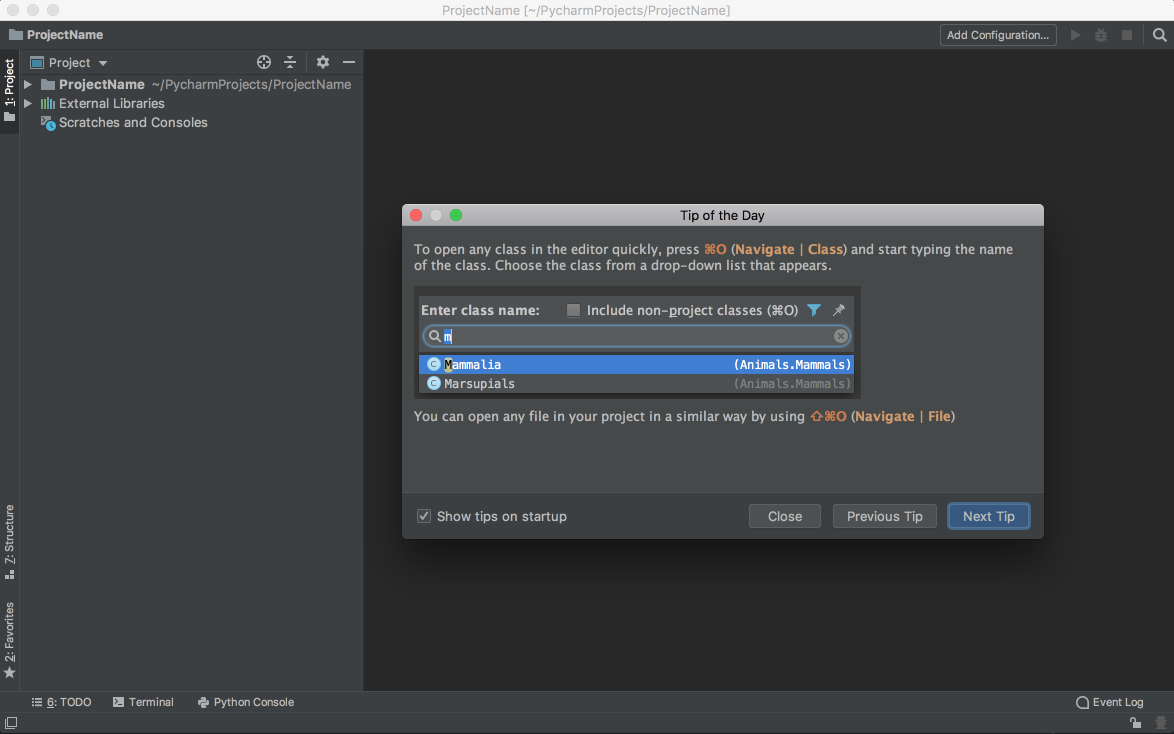
You will also see a small Tip of the Day popup where PyCharm gives you one trick to learn at each startup. Go ahead and close this popup.
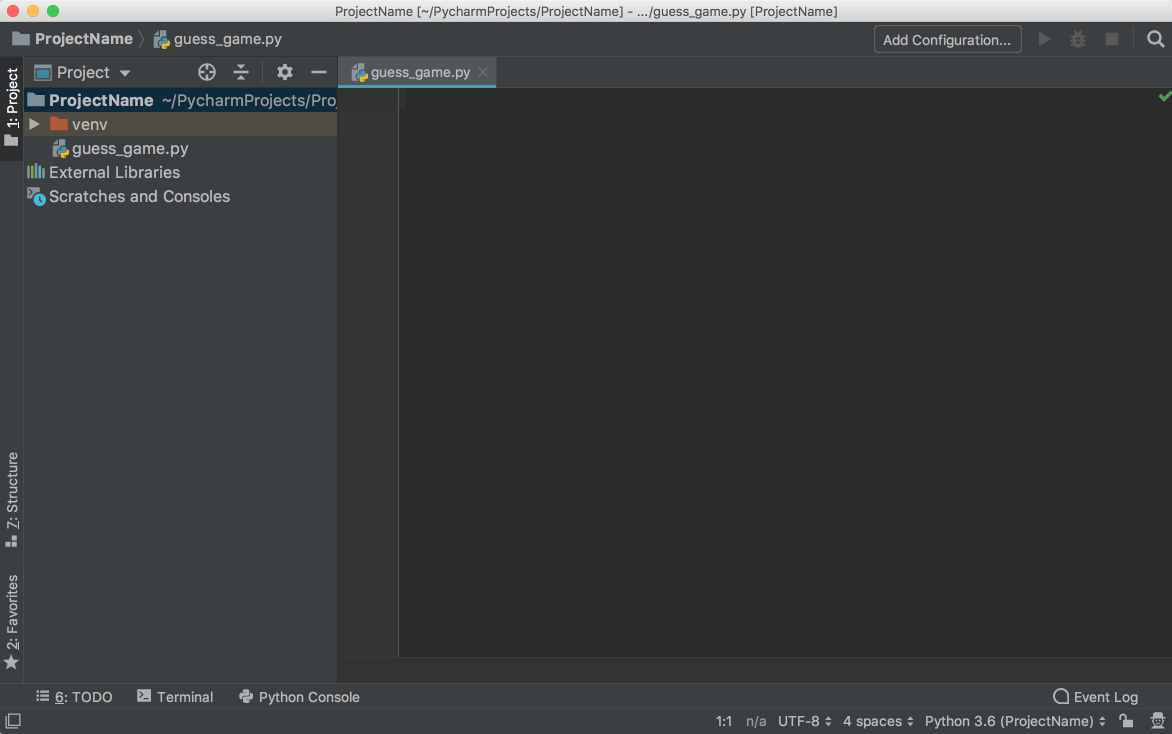
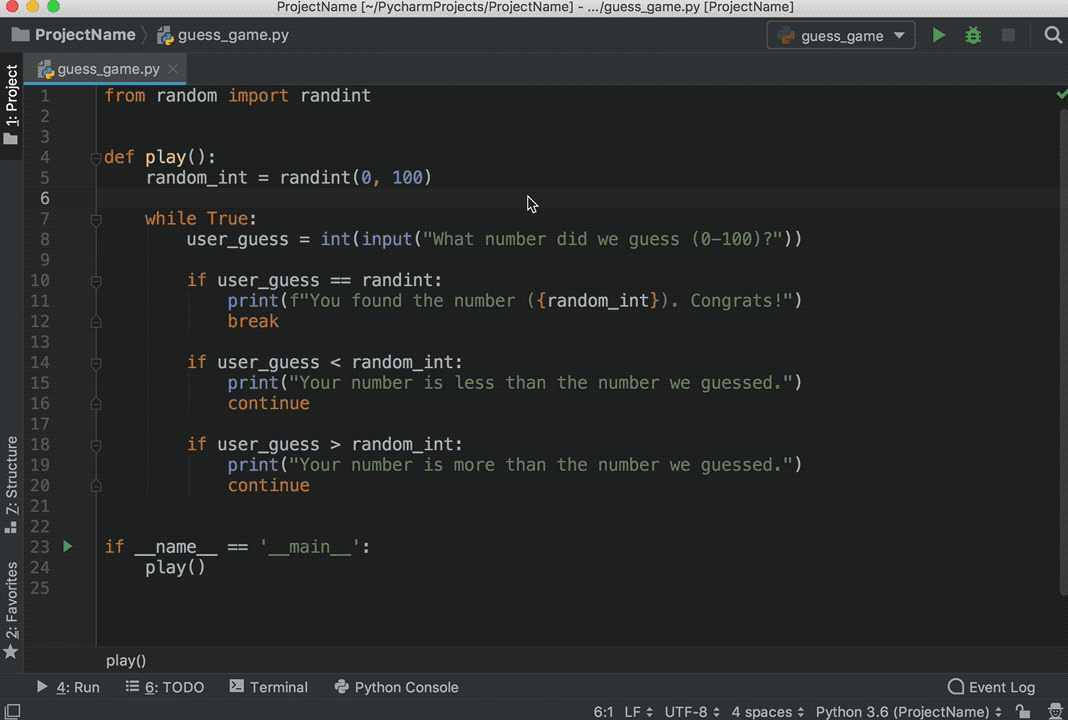
It is now time to start a new Python program. Type Cmd+N if you are on Mac or Alt+Ins if you are on Windows or Linux. Then, choose Python File. You can also select File → New from the menu. Name the new file guess_game.py and click OK. You will see a PyCharm window similar to the following:
For our test code, let’s quickly code up a simple guessing game in which the program chooses a number that the user has to guess. For every guess, the program will tell if the user’s guess was smaller or bigger than the secret number. The game ends when the user guesses the number. Here’s the code for the game:
 1from random import randint
 2
 3def play():
 4    random_int = randint(0, 100)
 5
 6    while True:
 7        user_guess = int(input("What number did we guess (0-100)?"))
 8
 9        if user_guess == random_int:
10            print(f"You found the number ({random_int}). Congrats!")
11            break
12
13        if user_guess < random_int:
14            print("Your number is less than the number we guessed.")
15            continue
16
17        if user_guess > random_int:
18            print("Your number is more than the number we guessed.")
19            continue
20
21
22if __name__ == '__main__':
23    play()
Type this code directly rather than copying and pasting. You’ll see something like this:
As you can see, PyCharm provides Intelligent Coding Assistance with code completion, code inspections, on-the-fly error highlighting, and quick-fix suggestions. In particular, note how when you typed main and then hit tab, PyCharm auto-completed the whole main clause for you.
Also note how, if you forget to type if before the condition, append .if, and then hit Tab, PyCharm fixes the if clause for you. The same is true with True.while. That’s PyCharm’s Postfix completions working for you to help reduce backward caret jumps.
Running Code in PyCharm
Now that you’ve coded up the game, it’s time for you to run it.
You have three ways of running this program:
- Use the shortcut Ctrl+Shift+R on Mac or Ctrl+Shift+F10 on Windows or Linux.
- Right-click the background and choose Run ‘guess_game’ from the menu.
- Since this program has the
__main__clause, you can click on the little green arrow to the left of the__main__clause and choose Run ‘guess_game’ from there.
Use any one of the options above to run the program, and you’ll see the Run Tool pane appear at the bottom of the window, with your code output showing:
Play the game for a little bit to see if you can find the number guessed. Pro tip: start with 50.
Debugging in PyCharm
Did you find the number? If so, you may have seen something weird after you found the number. Instead of printing the congratulations message and exiting, the program seems to start over. That’s a bug right there. To discover why the program starts over, you’ll now debug the program.
First, place a breakpoint by clicking on the blank space to the left of line number 8:
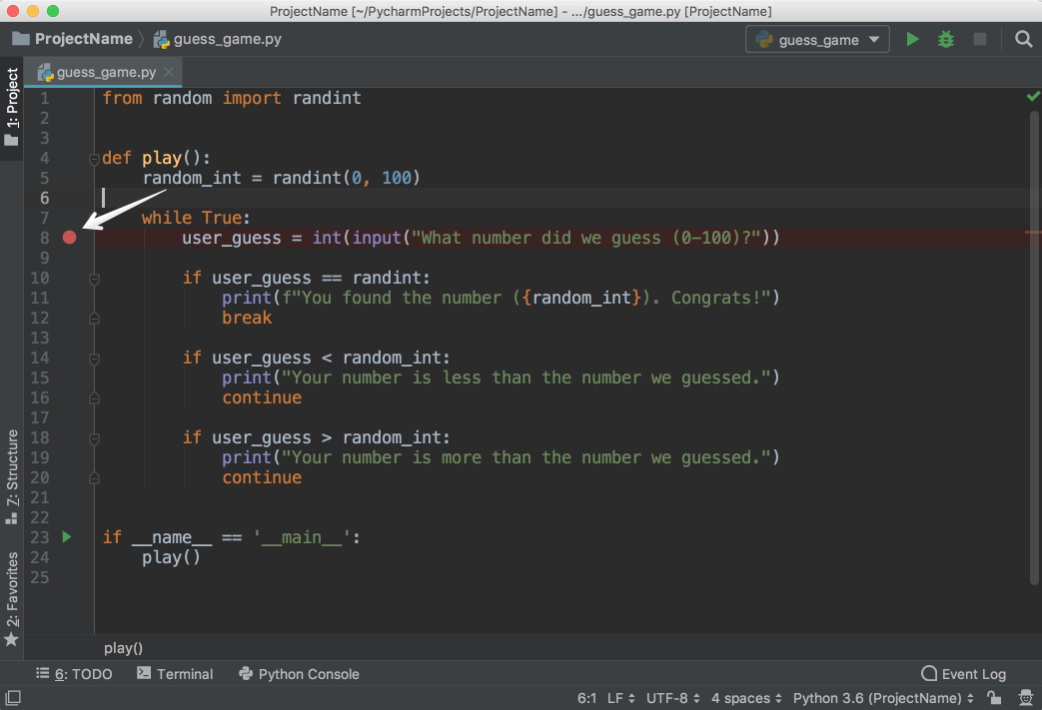
This will be the point where the program will be suspended, and you can start exploring what went wrong from there on. Next, choose one of the following three ways to start debugging:
- Press Ctrl+Shift+D on Mac or Shift+Alt+F9 on Windows or Linux.
- Right-click the background and choose Debug ‘guess_game’.
- Click on the little green arrow to the left of the
__main__clause and choose Debug ‘guess_game from there.
Afterwards, you’ll see a Debug window open at the bottom:

Follow the steps below to debug the program:
-
Notice that the current line is highlighted in blue.
-
See that
random_intand its value are listed in the Debug window. Make a note of this number. (In the picture, the number is 85.) -
Hit F8 to execute the current line and step over to the next one. You can also use F7 to step into the function in the current line, if necessary. As you continue executing the statements, the changes in the variables will be automatically reflected in the Debugger window.
-
Notice that there is the Console tab right next to the Debugger tab that opened. This Console tab and the Debugger tab are mutually exclusive. In the Console tab, you will be interacting with your program, and in the Debugger tab you will do the debugging actions.
-
Switch to the Console tab to enter your guess.
-
Type the number shown, and then hit Enter.
-
Switch back to the Debugger tab.
-
Hit F8 again to evaluate the
ifstatement. Notice that you are now on line 14. But wait a minute! Why didn’t it go to the line 11? The reason is that theifstatement on line 10 evaluated toFalse. But why did it evaluate toFalsewhen you entered the number that was chosen? -
Look carefully at line 10 and notice that we are comparing
user_guesswith the wrong thing. Instead of comparing it withrandom_int, we are comparing it withrandint, the function that was imported from therandompackage. -
Change it to
random_int, restart the debugging, and follow the same steps again. You will see that, this time, it will go to line 11, and line 10 will evaluate toTrue:
Congratulations! You fixed the bug.
Testing in PyCharm
No application is reliable without unit tests. PyCharm helps you write and run them very quickly and comfortably. By default, unittest is used as the test runner, but PyCharm also supports other testing frameworks such as pytest, nose, doctest, tox, and trial. You can, for example, enable pytest for your project like this:
- Open the Settings/Preferences → Tools → Python Integrated Tools settings dialog.
- Select
pytestin the Default test runner field. - Click OK to save the settings.
For this example, we’ll be using the default test runner unittest.
In the same project, create a file called calculator.py and put the following Calculator class in it:
 1class Calculator:
 2    def add(self, a, b):
 3        return a + b
 4
 5    def multiply(self, a, b):
 6        return a * b
PyCharm makes it very easy to create tests for your existing code. With the calculator.py file open, execute any one of the following that you like:
- Press Shift+Cmd+T on Mac or Ctrl+Shift+T on Windows or Linux.
- Right-click in the background of the class and then choose Go To and Test.
- On the main menu, choose Navigate → Test.
Choose Create New Test…, and you will see the following window:
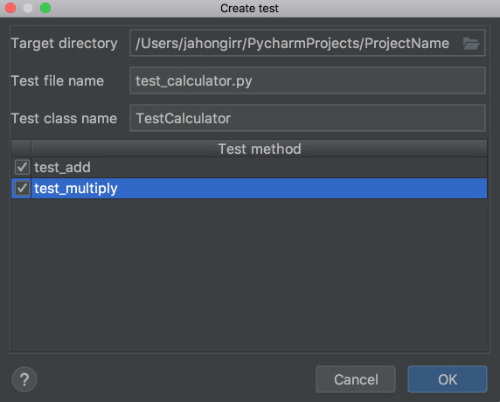
Leave the defaults of Target directory, Test file name, and Test class name. Select both of the methods and click OK. Voila! PyCharm automatically created a file called test_calculator.py and created the following stub tests for you in it:
 1from unittest import TestCase
 2
 3class TestCalculator(TestCase):
 4    def test_add(self):
 5        self.fail()
 6
 7    def test_multiply(self):
 8        self.fail()
Run the tests using one of the methods below:
- Press Ctrl+R on Mac or Shift+F10 on Windows or Linux.
- Right-click the background and choose Run ‘Unittests for test_calculator.py’.
- Click on the little green arrow to the left of the test class name and choose Run ‘Unittests for test_calculator.py’.
You’ll see the tests window open on the bottom with all the tests failing:
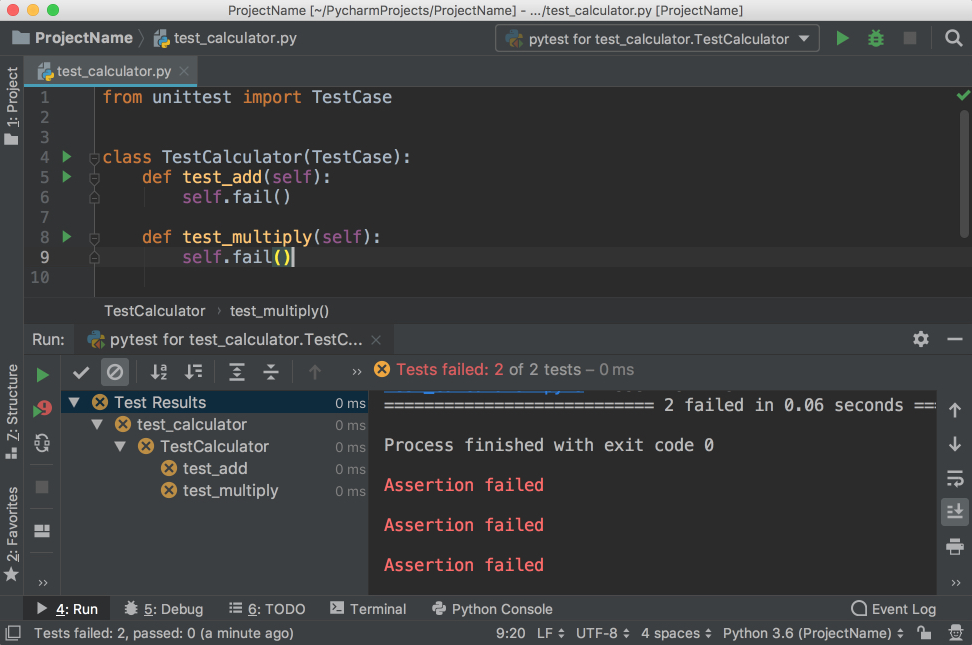
Notice that you have the hierarchy of the test results on the left and the output of the terminal on the right.
Now, implement test_add by changing the code to the following:
 1from unittest import TestCase
 2
 3from calculator import Calculator
 4
 5class TestCalculator(TestCase):
 6    def test_add(self):
 7        self.calculator = Calculator()
 8        self.assertEqual(self.calculator.add(3, 4), 7)
 9
10    def test_multiply(self):
11        self.fail()
Run the tests again, and you’ll see that one test passed and the other failed. Explore the options to show passed tests, to show ignored tests, to sort tests alphabetically, and to sort tests by duration:
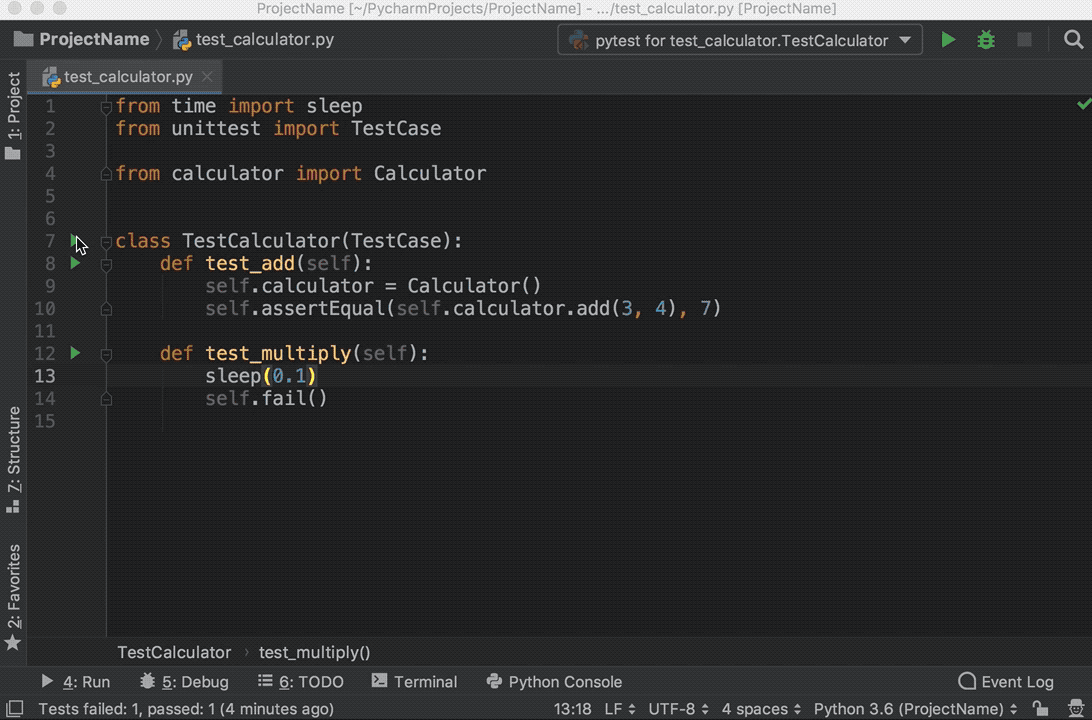
Note that the sleep(0.1) method that you see in the GIF above is intentionally used to make one of the tests slower so that sorting by duration works.
Editing an Existing Project in PyCharm
These single file projects are great for examples, but you’ll often work on much larger projects over a longer period of time. In this section, you’ll take a look at how PyCharm works with a larger project.
To explore the project-focused features of PyCharm, you’ll use the Alcazar web framework that was built for learning purposes. To continue following along, download the sample project locally:
Download Sample Project: Click here to download the sample project you’ll use to explore the project-focused features of PyCharm in this tutorial.
Once you have the project downloaded and extracted locally, open it in PyCharm using one of the following methods:
- Click File → Open on the main menu.
- Click Open on the Welcome Screen if you are there.
After either of these steps, find the folder containing the project on your computer and open it.
If this project contains a virtual environment, then PyCharm will automatically use this virtual environment and make it the project interpreter.
If you need to configure a different virtualenv, then open Preferences on Mac by pressing Cmd+, or Settings on Windows or Linux by pressing Ctrl+Alt+S and find the Project: ProjectName section. Open the drop-down and choose Project Interpreter:
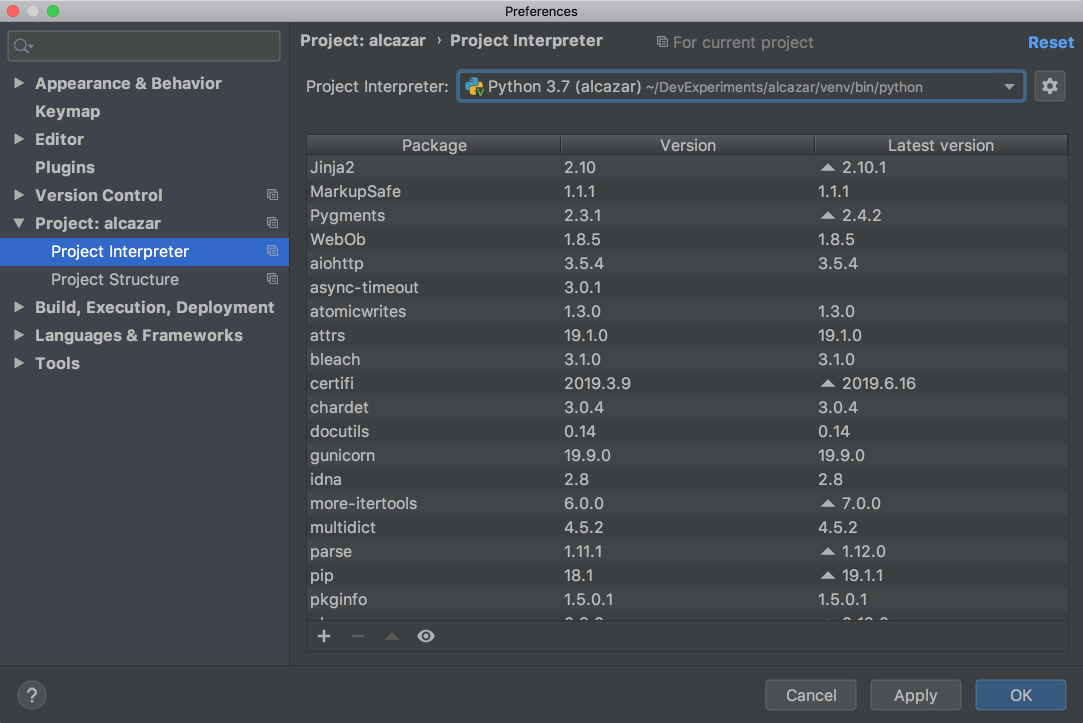
Choose the virtualenv from the drop-down list. If it’s not there, then click on the settings button to the right of the drop-down list and then choose Add…. The rest of the steps should be the same as when we were creating a new project.
Searching and Navigating in PyCharm
In a big project where it’s difficult for a single person to remember where everything is located, it’s very important to be able to quickly navigate and find what you looking for. PyCharm has you covered here as well. Use the project you opened in the section above to practice these shortcuts:
- Searching for a fragment in the current file: Press Cmd+F on Mac or Ctrl+F on Windows or Linux.
- Searching for a fragment in the entire project: Press Cmd+Shift+F on Mac or Ctrl+Shift+F on Windows or Linux.
- Searching for a class: Press Cmd+O on Mac or Ctrl+N on Windows or Linux.
- Searching for a file: Press Cmd+Shift+O on Mac or Ctrl+Shift+N on Windows or Linux.
- Searching all if you don’t know whether it’s a file, class, or a code fragment that you are looking for: Press Shift twice.
As for the navigation, the following shortcuts may save you a lot of time:
- Going to the declaration of a variable: Press Cmd on Mac or Ctrl on Windows or Linux, and click on the variable.
- Finding usages of a class, a method, or any symbol: Press Alt+F7.
- Seeing your recent changes: Press Shift+Alt+C or go to View → Recent Changes on the main menu.
- Seeing your recent files: Press Cmd+E on Mac or Ctrl+E on Windows or Linux, or go to View → Recent Files on the main menu.
- Going backward and forward through your history of navigation after you jumped around: Press Cmd+[ / Cmd+] on Mac or Ctrl+Alt+Left / Ctrl+Alt+Right on Windows or Linux.
For more details, see the official documentation.
Using Version Control in PyCharm
Version control systems such as Git and Mercurial are some of the most important tools in the modern software development world. So, it is essential for an IDE to support them. PyCharm does that very well by integrating with a lot of popular VC systems such as Git (and Github), Mercurial, Perforce and, Subversion.
Note: Git is used for the following examples.
Configuring VCS
To enable VCS integration. Go to VCS → VCS Operations Popup… from the menu on the top or press Ctrl+V on Mac or Alt+` on Windows or Linux. Choose Enable Version Control Integration…. You’ll see the following window open:
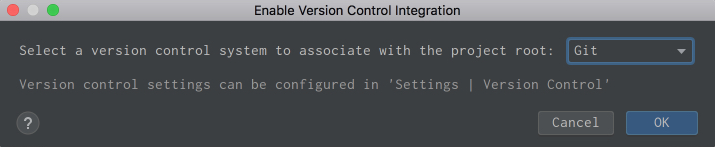
Choose Git from the drop down list, click OK, and you have VCS enabled for your project. Note that if you opened an existing project that has version control enabled, then PyCharm will see that and automatically enable it.
Now, if you go to the VCS Operations Popup…, you’ll see a different popup with the options to do git add, git stash, git branch, git commit, git push and more:

If you can’t find what you need, you can most probably find it by going to VCS from the top menu and choosing Git, where you can even create and view pull requests.
Committing and Conflict Resolution
These are two features of VCS integration in PyCharm that I personally use and enjoy a lot! Let’s say you have finished your work and want to commit it. Go to VCS → VCS Operations Popup… → Commit… or press Cmd+K on Mac or Ctrl+K on Windows or Linux. You’ll see the following window open:
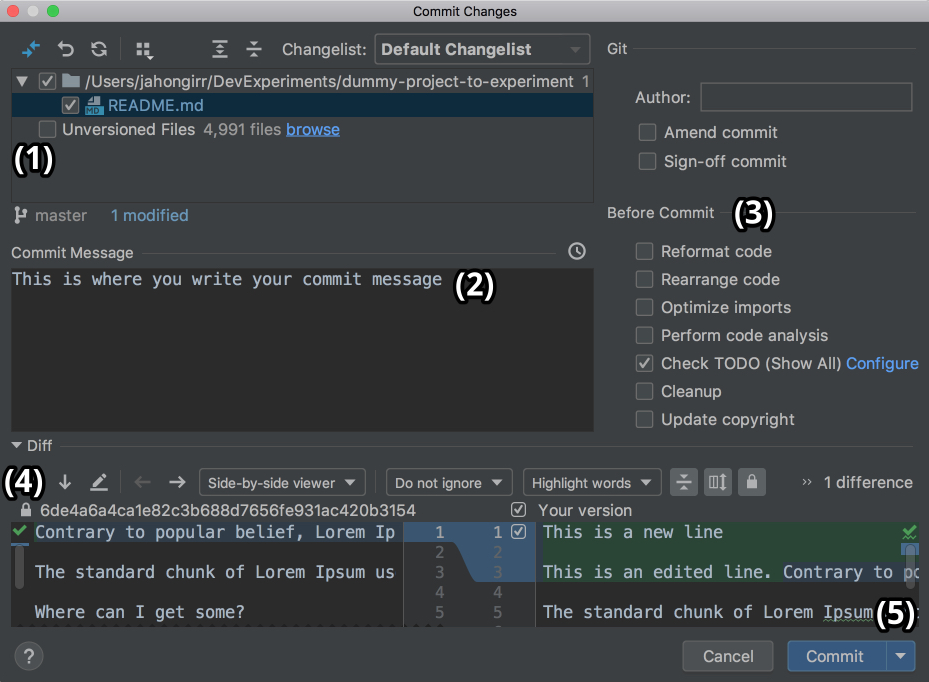
In this window, you can do the following:
- Choose which files to commit
- Write your commit message
- Do all kinds of checks and cleanup before commit
- See the difference of changes
- Commit and push at once by pressing the arrow to the right of the Commit button on the right bottom and choosing Commit and Push…
It can feel magical and fast, especially if you’re used to doing everything manually on the command line.
When you work in a team, merge conflicts do happen. When somebody commits changes to a file that you’re working on, but their changes overlap with yours because both of you changed the same lines, then VCS will not be able to figure out if it should choose your changes or those of your teammate. So you’ll get these unfortunate arrows and symbols:
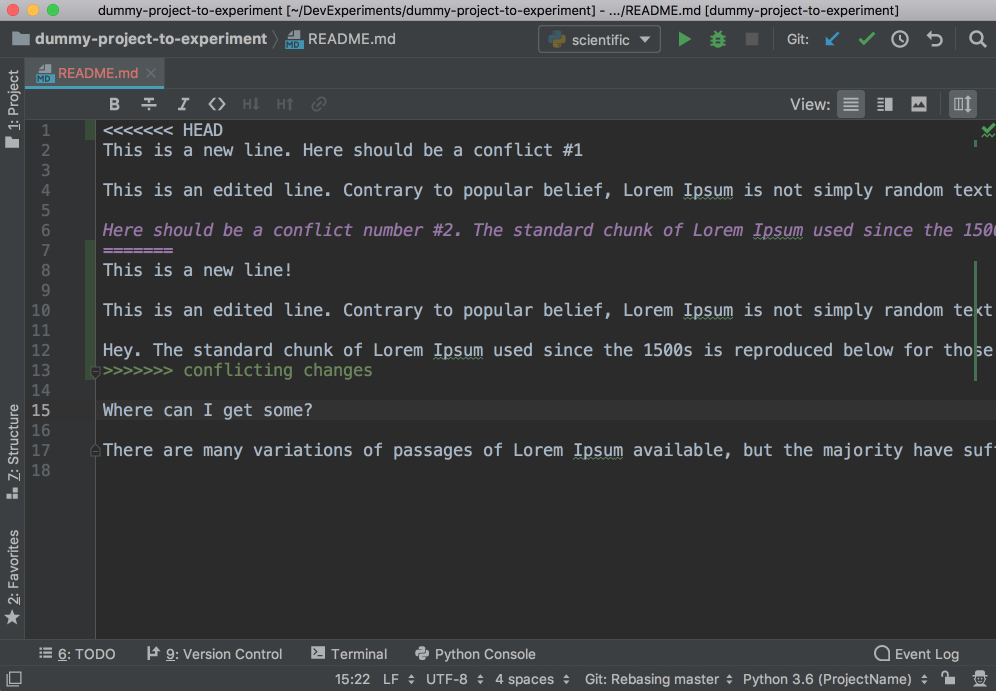
This looks strange, and it’s difficult to figure out which changes should be deleted and which ones should stay. PyCharm to the rescue! It has a much nicer and cleaner way of resolving conflicts. Go to VCS in the top menu, choose Git and then Resolve conflicts…. Choose the file whose conflicts you want to resolve and click on Merge. You will see the following window open:
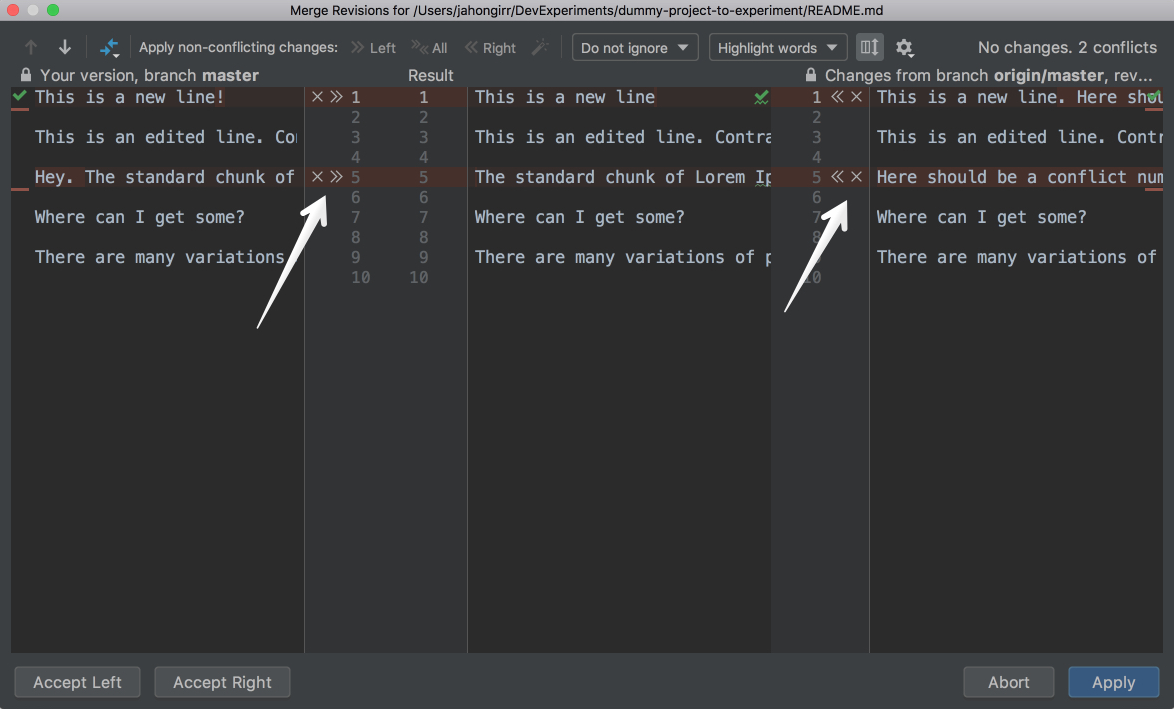
On the left column, you will see your changes. On the right one, the changes made by your teammate. Finally, in the middle column, you will see the result. The conflicting lines are highlighted, and you can see a little X and >>/<< right beside those lines. Press the arrows to accept the changes and the X to decline. After you resolve all those conflicts, click the Apply button:
In the animation above, for the first conflicting line, the author declined his own changes and accepted those of his teammates. Conversely, the author accepted his own changes and declined his teammates’ for the second conflicting line.
There’s a lot more that you can do with the VCS integration in PyCharm. For more details, see this documentation.
Using Plugins and External Tools in PyCharm
You can find almost everything you need for development in PyCharm. If you can’t, there is most probably a plugin that adds that functionality you need to PyCharm. For example, they can:
- Add support for various languages and frameworks
- Boost your productivity with shortcut hints, file watchers, and so on
- Help you learn a new programming language with coding exercises
For instance, IdeaVim adds Vim emulation to PyCharm. If you like Vim, this can be a pretty good combination.
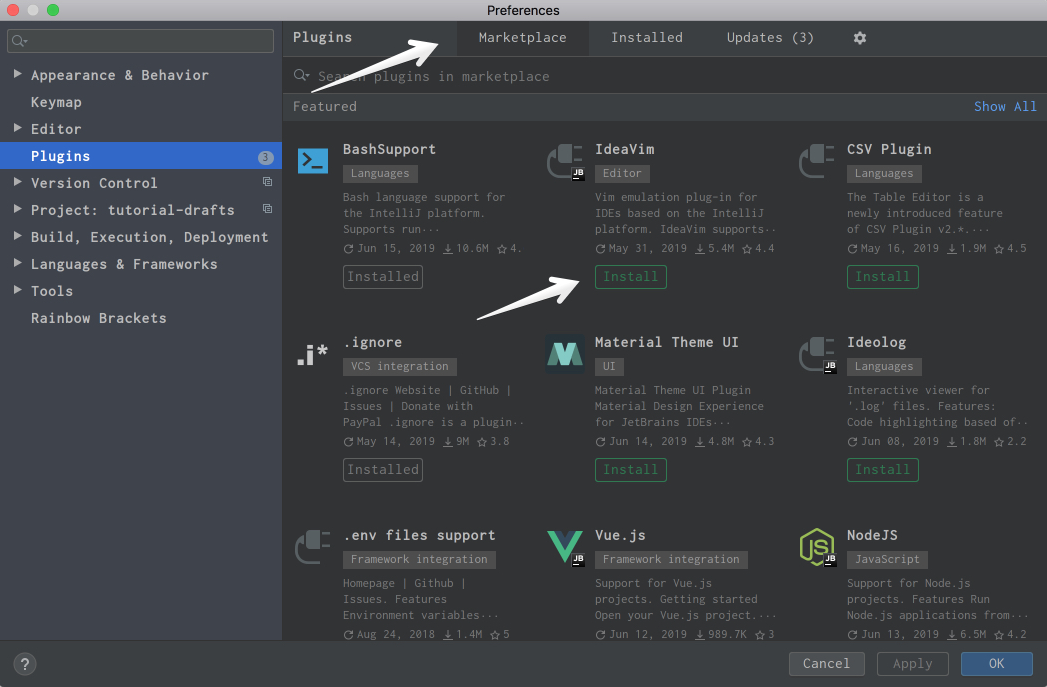
Material Theme UI changes the appearance of PyCharm to a Material Design look and feel:
Vue.js adds support for Vue.js projects. Markdown provides the capability to edit Markdown files within the IDE and see the rendered HTML in a live preview. You can find and install all of the available plugins by going to the Preferences → Plugins on Mac or Settings → Plugins on Windows or Linux, under the Marketplace tab:
If you can’t find what you need, you can even develop your own plugin.
If you can’t find the right plugin and don’t want to develop your own because there’s already a package in PyPI, then you can add it to PyCharm as an external tool. Take Flake8, the code analyzer, as an example.
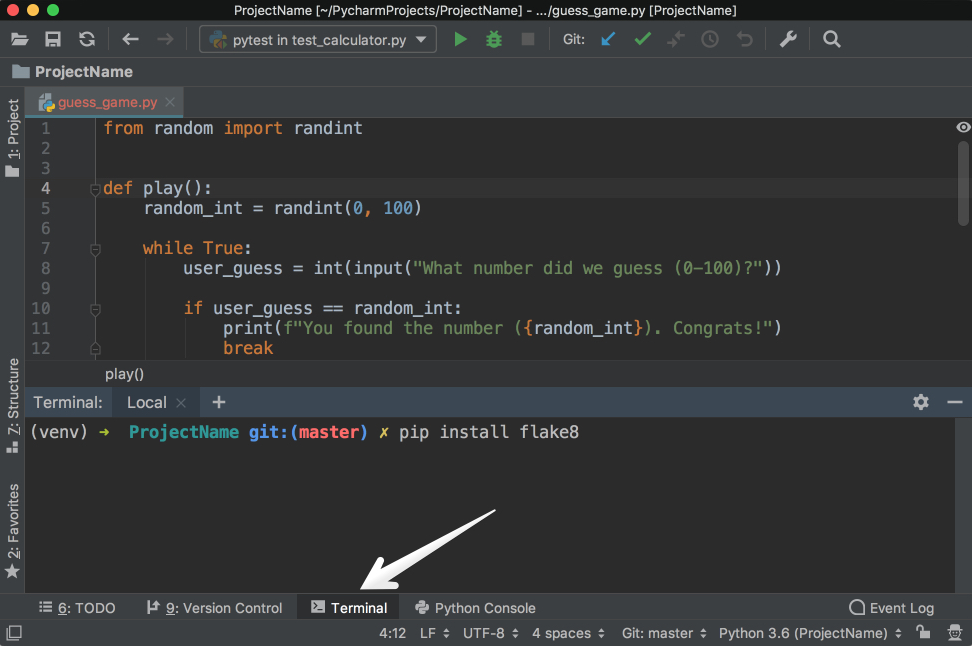
First, install flake8 in your virtualenv with pip install flake8 in the Terminal app of your choice. You can also use the one integrated into PyCharm:
Then, go to Preferences → Tools on Mac or Settings → Tools on Windows/Linux, and then choose External Tools. Then click on the little + button at the bottom (1). In the new popup window, insert the details as shown below and click OK for both windows:
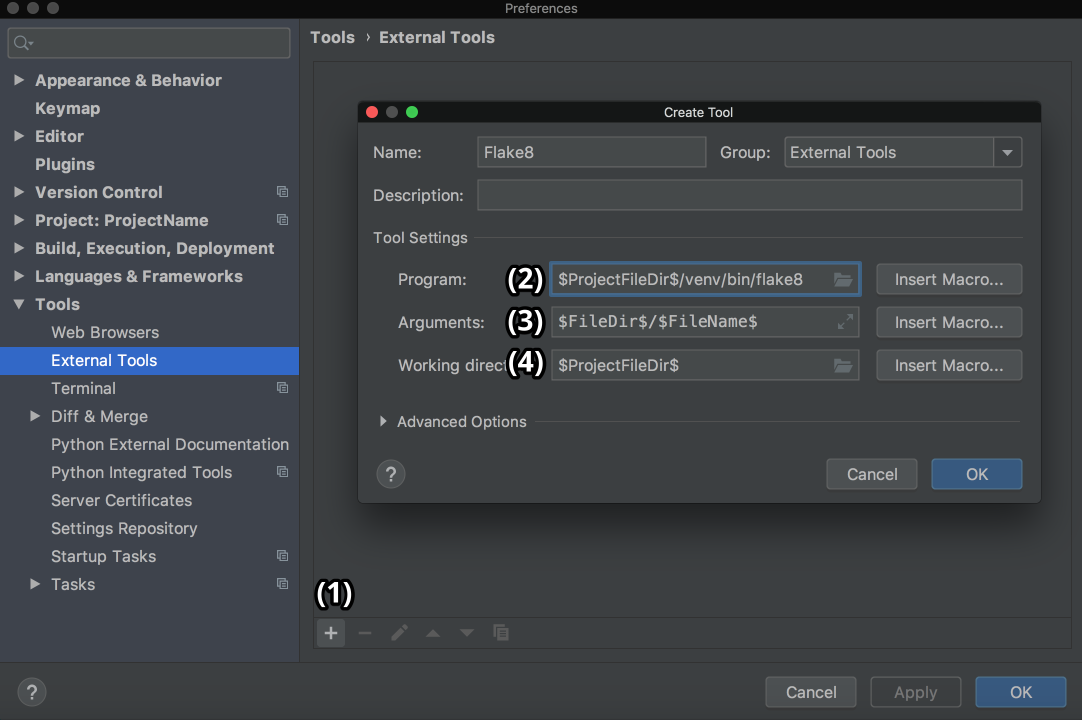
Here, Program (2) refers to the Flake8 executable that can be found in the folder /bin of your virtual environment. Arguments (3) refers to which file you want to analyze with the help of Flake8. Working directory is the directory of your project.
You could hardcode the absolute paths for everything here, but that would mean that you couldn’t use this external tool in other projects. You would be able to use it only inside one project for one file.
So you need to use something called Macros. Macros are basically variables in the format of $name$ that change according to your context. For example, $FileName$ is first.py when you’re editing first.py, and it is second.py when you’re editing second.py. You can see their list and insert any of them by clicking on the Insert Macro… buttons. Because you used macros here, the values will change according to the project you’re currently working on, and Flake8 will continue to do its job properly.
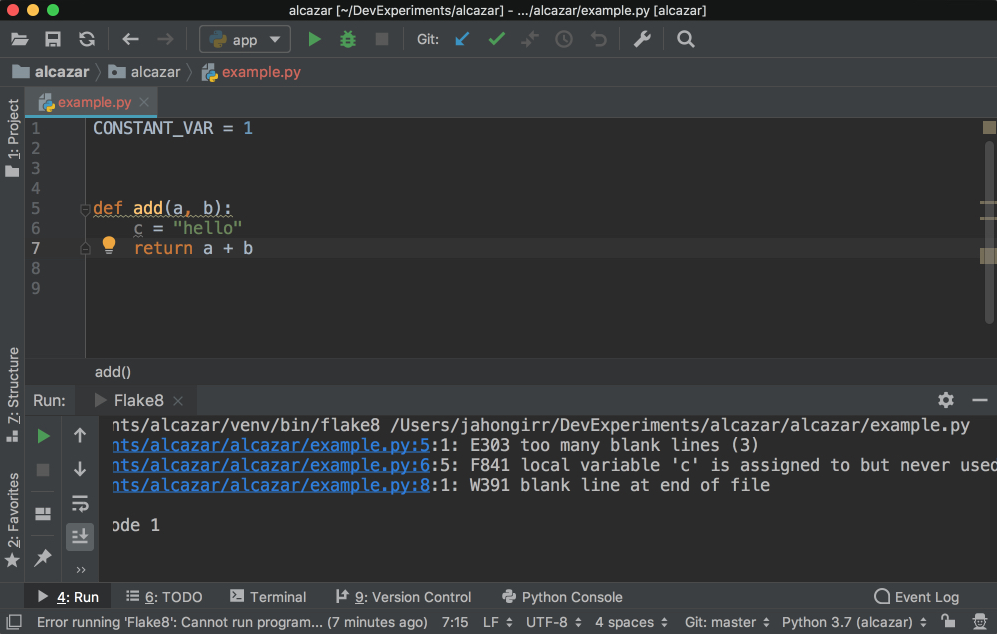
In order to use it, create a file example.py and put the following code in it:
 1CONSTANT_VAR = 1
 2
 3
 4
 5def add(a, b):
 6    c = "hello"
 7    return a + b
It deliberately breaks some of the Flake8 rules. Right-click the background of this file. Choose External Tools and then Flake8. Voilà! The output of the Flake8 analysis will appear at the bottom:
In order to make it even better, you can add a shortcut for it. Go to Preferences on Mac or to Settings on Windows or Linux. Then, go to Keymap → External Tools → External Tools. Double-click Flake8 and choose Add Keyboard Shortcut. You’ll see this window:
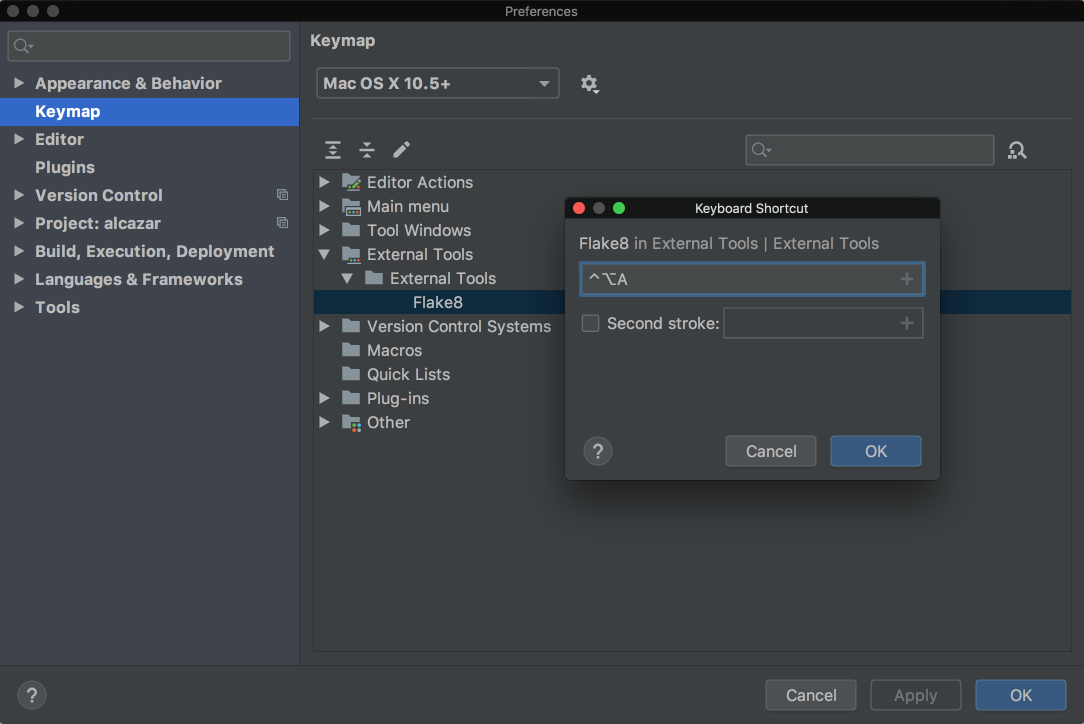
In the image above, the shortcut is Ctrl+Alt+A for this tool. Add your preferred shortcut in the textbox and click OK for both windows. Now you can now use that shortcut to analyze the file you’re currently working on with Flake8.
PyCharm Professional Features
PyCharm Professional is a paid version of PyCharm with more out-of-the-box features and integrations. In this section, you’ll mainly be presented with overviews of its main features and links to the official documentation, where each feature is discussed in detail. Remember that none of the following features is available in the Community edition.
Django Support
PyCharm has extensive support for Django, one of the most popular and beloved Python web frameworks. To make sure that it’s enabled, do the following:
- Open Preferences on Mac or Settings on Windows or Linux.
- Choose Languages and Frameworks.
- Choose Django.
- Check the checkbox Enable Django support.
- Apply changes.
Now that you’ve enabled Django support, your Django development journey will be a lot easier in PyCharm:
- When creating a project, you’ll have a dedicated Django project type. This means that, when you choose this type, you’ll have all the necessary files and settings. This is the equivalent of using
django-admin startproject mysite. - You can run
manage.pycommands directly inside PyCharm. - Django templates are supported, including:
- Syntax and error highlighting
- Code completion
- Navigation
- Completion for block names
- Completion for custom tags and filters
- Quick documentation for tags and filters
- Capability to debug them
- Code completion in all other Django parts such as views, URLs and models, and code insight support for Django ORM.
- Model dependency diagrams for Django models.
For more details on Django support, see the official documentation.
Database Support
Modern database development is a complex task with many supporting systems and workflows. That’s why JetBrains, the company behind PyCharm, developed a standalone IDE called DataGrip for that. It’s a separate product from PyCharm with a separate license.
Luckily, PyCharm supports all the features that are available in DataGrip through a plugin called Database tools and SQL, which is enabled by default. With the help of it, you can query, create and manage databases whether they’re working locally, on a server, or in the cloud. The plugin supports MySQL, PostgreSQL, Microsoft SQL Server, SQLite, MariaDB, Oracle, Apache Cassandra, and others. For more information on what you can do with this plugin, check out the comprehensive documentation on the database support.
Thread Concurrency Visualization
Django Channels, asyncio, and the recent frameworks like Starlette are examples of a growing trend in asynchronous Python programming. While it’s true that asynchronous programs do bring a lot of benefits to the table, it’s also notoriously hard to write and debug them. In such cases, Thread Concurrency Visualization can be just what the doctor ordered because it helps you take full control over your multi-threaded applications and optimize them.
Check out the comprehensive documentation of this feature for more details.
Profiler
Speaking of optimization, profiling is another technique that you can use to optimize your code. With its help, you can see which parts of your code are taking most of the execution time. A profiler runs in the following order of priority:
If you don’t have vmprof or yappi installed, then it’ll fall back to the standard cProfile. It’s well-documented, so I won’t rehash it here.
Scientific Mode
Python is not only a language for general and web programming. It also emerged as the best tool for data science and machine learning over these last years thanks to libraries and tools like NumPy, SciPy, scikit-learn, Matplotlib, Jupyter, and more. With such powerful libraries available, you need a powerful IDE to support all the functions such as graphing and analyzing those libraries have. PyCharm provides everything you need as thoroughly documented here.
Remote Development
One common cause of bugs in many applications is that development and production environments differ. Although, in most cases, it’s not possible to provide an exact copy of the production environment for development, pursuing it is a worthy goal.
With PyCharm, you can debug your application using an interpreter that is located on the other computer, such as a Linux VM. As a result, you can have the same interpreter as your production environment to fix and avoid many bugs resulting from the difference between development and production environments. Make sure to check out the official documentation to learn more.
Conclusion
PyCharm is one of best, if not the best, full-featured, dedicated, and versatile IDEs for Python development. It offers a ton of benefits, saving you a lot of time by helping you with routine tasks. Now you know how to be productive with it!
In this article, you learned about a lot, including:
- Installing PyCharm
- Writing code in PyCharm
- Running your code in PyCharm
- Debugging and testing your code in PyCharm
- Editing an existing project in PyCharm
- Searching and navigating in PyCharm
- Using Version Control in PyCharm
- Using Plugins and External Tools in PyCharm
- Using PyCharm Professional features, such as Django support and Scientific mode
If there’s anything you’d like to ask or share, please reach out in the comments below. There’s also a lot more information at the PyCharm website for you to explore.
Download Sample Project: Click here to download the sample project you’ll use to explore the project-focused features of PyCharm in this tutorial.