In this tutorial, you’ll learn how to quickly build documentation for a Python package using MkDocs and mkdocstrings. These tools allow you to generate nice-looking and modern documentation from Markdown files and your code’s docstrings.
Maintaining auto-generated documentation means less effort because you’re linking information between your code and the documentation pages. However, good documentation is more than just the technical description pulled from your code! Your project will appeal more to users if you guide them through examples and connect the dots between the docstrings.
The Material for MkDocs theme makes your documentation look good without any extra effort and is used by popular projects such as Typer CLI and FastAPI.
In this tutorial, you’ll:
- Work with MkDocs to produce static pages from Markdown
- Pull in code documentation from docstrings using mkdocstrings
- Follow best practices for project documentation
- Use the Material for MkDocs theme to make your documentation look good
- Host your documentation on GitHub Pages
If you use the auto-generation features of MkDocs together with mkdocstrings, then you can create good documentation with less effort. Start your documentation with docstrings in your code, then build it into a deployed and user-friendly online resource that documents your Python project.
Ready to go? Then click the link below to get the source code for the project:
Get Source Code: Click here to get access to the source code that you’ll use to build your documentation.
Demo
In this tutorial, you’ll build project documentation that’s partly auto-generated from docstrings in your code. The example code package is intentionally simplistic, so you can focus your attention on learning how to use MkDocs and the associated libraries.
After you set up your project documentation locally, you’ll learn how to host it on GitHub Pages, so it’ll be available for everyone to see:
You can use the example project documentation that you’ll build in this tutorial as a blueprint to create documentation for your own Python projects.
Project Overview
You’ll build project documentation for a toy package called calculator that contains only one module named calculations.py, which has a couple of example Python functions.
Note: The provided code doesn’t offer any new functionality and is only meant as a basis to learn how to use existing project code to build your documentation.
You’ll follow a guideline for project documentation called the Diátaxis documentation framework, which has widespread adoption in the Python community and is used by large projects such as Django and NumPy.
This system suggests splitting up your documentation into four different parts with different orientations:
- Tutorials: Learning-oriented
- How-To Guides: Problem-oriented
- Reference: Information-oriented
- Explanation: Understanding-oriented
Splitting your project documentation into these four different purposes with different orientations will help you create comprehensive documentation for your Python project.
From a technical perspective, you’ll build your documentation using three Python packages:
- MkDocs for building static pages from Markdown
- mkdocstrings for auto-generating documentation from docstrings in your code
- Material for MkDocs for styling your documentation
When you want to use MkDocs for auto-generating parts of your documentation from your docstrings, you’ll need to add the mkdocstrings package.
Note: Sphinx, another popular tool for Python project documentation, can auto-generate text from your docstrings without additional extensions. However, Sphinx primarily uses reStructuredText instead of Markdown and is overall less straightforward to work with than MkDocs.
You don’t absolutely need to add the Material for MkDocs theme for building your project documentation, but it’ll help to render the documentation in a user-friendly manner.
Prerequisites
To complete this tutorial, you should be comfortable with the following concepts:
- Virtual environments: Set up a Python virtual environment and work within it.
- Package management: Install Python packages with
pipand create your own modules and packages. - Code documentation: Understand what docstrings are, what structure they follow, what information they should contain, and how you should document a Python project in general.
- GitHub repositories: Create and update a repo on GitHub to host your documentation, which you can learn about in the intro to Git and GitHub.
If you don’t have all of the prerequisite knowledge before starting this tutorial, that’s okay! You might learn more by going ahead and getting started. You can always stop and review the resources linked here if you get stuck.
Step 1: Set Up Your Environment for Building Documentation
Before you start working on your project, you need a virtual environment into which you can install the packages you need.
At the end of this step, you’ll have created and activated a virtual environment and installed the necessary dependencies.
Start by creating a new folder for your project that you call mkdocs-documentation/. Navigate into the folder, and then create a virtual environment and install the necessary packages:
Wait for all downloads to finish, then confirm that the installation worked by calling pip list. The command will give you a list of all installed packages alongside their versions:
(venv) $ python -m pip list
Package                    Version
-------------------------- -------
click                      8.1.3

# ...

mkdocs                     1.3.0
mkdocs-autorefs            0.4.1
mkdocs-material            8.3.6
mkdocs-material-extensions 1.0.3
mkdocstrings               0.19.0
mkdocstrings-python        0.7.1

# ...

zipp                       3.8.0
Confirm that the packages highlighted in the output above are installed. You should see four packages that are directly related to your installation command:
mkdocsmkdocs-materialmkdocstringsmkdocstrings-python
The package called mkdocstrings-python is the Python handler for mkdocstrings that allows mkdocstrings to parse Python code. You installed it by adding the extension [python] when installing the mkdocstrings package with pip.
You’ll see some additional packages in your list, which shows that your virtual environment and the three installed packages come with additional dependencies that pip installed for you automatically. You can pin your dependencies in a requirements.txt file for reproducibility.
Step 2: Create the Sample Python Package
In this step, you’ll write a sample Python package called calculator, which is what you’ll be building documentation for.
To document a Python project, you first need a Python project. In this tutorial, you use a toy implementation of a calculator package that returns floating-point numbers.
Note: If you already have a Python project for which you want to generate your documentation, then feel free to use your project instead. In this case, you can skip this part and jump directly to Step 3: Write and Format Your Docstrings.
Your example Python project will be small and consist only of one folder with two files in it:
calculator/
│
├── __init__.py
└── calculations.py
Create this package folder and the two files right inside your project folder, then open calculations.py in your favorite code editor or IDE.
Add the example code for some mathematical calculations that you’ll use as the basis for your documentation:
# calculator/calculations.py

def add(a, b):
    return float(a + b)

def subtract(a, b):
    return float(a - b)

def multiply(a, b):
    return float(a * b)

def divide(a, b):
    if b == 0:
        raise ZeroDivisionError("division by zero")
    return float(a / b)
The code you added to calculations.py repackages some fundamental math operations into new functions that return the result as a floating-point number.
Keep the second file, __init__.py, empty for now. It’s here to help declare calculator as a package. Later you’ll add package-level docstrings in this file, which you’ll also pull into your auto-generated documentation.
In this step, you’ve created the sample Python project that you’ll use as an example project to build your documentation for. In the next step, you’ll add docstrings to your functions to set yourself up for success later on, when you go to generate documentation from these docstrings.
Step 3: Write and Format Your Docstrings
The mkdocstrings package can pull valuable information from your codebase to help auto-generate parts of your documentation. As the package name suggests, you’ll need docstrings to accomplish this.
You don’t yet have any docstrings in your functions, and it’s time to change that. You’ll write docstrings for your module, the contained functions, and your package in this step. You’ll also reformat your function signatures and docstrings to use type hints.
Understand Python Docstrings
Docstrings are your biggest help for documenting your Python code. They’re built-in strings that you can configure to hold usage instructions and information about your functions, classes, and modules.
A Python docstring consists of text in between a pair of three double quotation marks ("""). Most commonly, you’ll read and write function, class, and method docstrings. In these cases, the docstring is located right below the line that defines the class, method, or function:
>>> def greet(name):
...     """Print a greeting.
...
...     Args:
...         name (str): The name of the person to greet.
...     """
...     print(f"Hello {name}!")
...
The code snippet above shows an example docstring for a function called greet(). The docstring starts with a single-line description of the function’s purpose, followed by more in-depth information:
The docstring for a function or method should summarize its behavior and document its arguments, return value(s), side effects, exceptions raised, and restrictions on when it can be called (all if applicable). (Source)
Docstrings can help to make the code that you’re working with easier to understand. They provide information about code objects. If you write your docstrings well, then they clarify the context and use of an object.
Note: To learn more about docstrings and how to create them, check out How to Write Docstrings in Python.
You can access the information saved in a docstring using the built-in help() function:
>>> help(greet)
Help on function greet in module __main__:

greet(name)
    Print a greeting.

    Args:
        name (str): The name of the person to greet.
If you call help() on any code object, then Python will print the object’s docstring to your terminal.
An object’s docstring is saved in .__doc__, and you can also inspect it there directly:
>>> greet.__doc__
'Print a greeting.\n    \n    Args:\n        name (str):
⮑ The name of the person to greet.\n    '
This attribute contains your docstring, and you could read any docstring with .__doc__. However, you’ll usually access it through the more convenient help() function. Displaying a docstring with help() also improves the formatting.
Note: Python uses the built-in pydoc module to generate the formatted description from .__doc__ when you call help().
Other types of docstrings, for example module and package docstrings, use the same triple double-quote syntax. You place a module docstring right at the beginning of a file, and you write a package docstring at the beginning of an __init__.py file.
These docstrings provide high-level information about the module or package:
The docstring for a module should generally list the classes, exceptions and functions (and any other objects) that are exported by the module, with a one-line summary of each. (These summaries generally give less detail than the summary line in the object’s docstring.) The docstring for a package (i.e., the docstring of the package’s
__init__.pymodule) should also list the modules and subpackages exported by the package. (Source)
The basic syntax for all Python docstrings is the same, although you’ll find them in different locations based on what the docstring is documenting.
Note: In this tutorial, you’ll create function, module, and package docstrings. If your personal Python project contains classes, then you should document these as well using class docstrings.
Docstrings were formalized in PEP 257, but their structure isn’t strictly defined. Subsequently, different projects have developed different standards for Python docstrings.
MkDocs supports three common types of Python docstring formats:
The Python handler for MkDocs uses Google-style docstrings by default, which is what you’ll stick with for this tutorial.
Add Function Docstrings to Your Python Project
It’s time to add Google-style docstrings to your example functions in calculations.py. Start by writing your one-line docstring, which should concisely explain the purpose of the function:
def add(a, b):
    """Compute and return the sum of two numbers."""
    return float(a + b)
After adding the initial description of your function, you can expand the docstring to describe the function arguments and the function’s return value:
def add(a, b):
    """Compute and return the sum of two numbers.

    Args:
        a (float): A number representing the first addend in the addition.
        b (float): A number representing the second addend in the addition.

    Returns:
        float: A number representing the arithmetic sum of `a` and `b`.
    """
    return float(a + b)
You can keep inspecting your functions by using help() to peek at the automatic documentation that Python builds from the information that you add to the function docstrings.
By describing the arguments and the return value and their types, you provide helpful usage information for programmers working with your code.
Write docstrings for all functions in calculations.py:
def add(a, b):
    """Compute and return the sum of two numbers.

    Args:
        a (float): A number representing the first addend in the addition.
        b (float): A number representing the second addend in the addition.

    Returns:
        float: A number representing the arithmetic sum of `a` and `b`.
    """
    return float(a + b)

def subtract(a, b):
    """Calculate the difference of two numbers.

    Args:
        a (float): A number representing the minuend in the subtraction.
        b (float): A number representing the subtrahend in the subtraction.

    Returns:
        float: A number representing the difference between `a` and `b`.
    """
    return float(a - b)

def multiply(a, b):
    """Compute and return the product of two numbers.

    Args:
        a (float): A number representing the multiplicand in the multiplication.
        b (float): A number representing the multiplier in the multiplication.

    Returns:
        float: A number representing the product of `a` and `b`.
    """
    return float(a * b)

def divide(a, b):
    """Compute and return the quotient of two numbers.

    Args:
        a (float): A number representing the dividend in the division.
        b (float): A number representing the divisor in the division.

    Returns:
        float: A number representing the quotient of `a` and `b`.

    Raises:
        ZeroDivisionError: An error occurs when the divisor is `0`.
    """
    if b == 0:
        raise ZeroDivisionError("division by zero")
    return float(a / b)
When you’re done, you’ve successfully added the first line of defense for your project code documentation directly into your codebase.
But Python docstrings can do more than describe and document. You can even use them to include short test cases for your functions, which you can execute using one of Python’s built-in modules. You’ll add these examples in the upcoming section.
Write Examples and Test Them Using Doctest
You can add examples right in your docstrings. Doing this clarifies how to use the functions, and when you stick to a specific format, you can even test your code examples using Python’s doctest module.
Google suggests adding examples to your docstring under a headline called "Examples:", which works well for running doctests and building your documentation using MkDocs.
Head back into calculations.py and add example use cases to your function docstrings:
def add(a, b):
    """Compute and return the sum of two numbers.

    Examples:
        >>> add(4.0, 2.0)
        6.0
        >>> add(4, 2)
        6.0

    Args:
        a (float): A number representing the first addend in the addition.
        b (float): A number representing the second addend in the addition.

    Returns:
        float: A number representing the arithmetic sum of `a` and `b`.
    """
    return float(a + b)
You added another header called "Examples:" and with an extra indentation level, you added example calls to the function you’re documenting. You provided the input after the default Python REPL prompt (>>>), and you put the expected output in the next line.
These examples will render well in your auto-generated documentation and add context to your function. You can even test them! Verify that your functions work as expected by executing the file using Python’s doctest module:
If you don’t see any output, then all tests passed. Excellent work, you’ve successfully added doctests to your function!
Note: Try to change a number in one of the examples and run doctest again to explore how a failing doctest displays. Then change it back to make the test pass again.
Revisit all of your functions and add doctests in the same way as you did for add() further up:
def add(a, b):
    """Compute and return the sum of two numbers.

    Examples:
        >>> add(4.0, 2.0)
        6.0
        >>> add(4, 2)
        6.0

    Args:
        a (float): A number representing the first addend in the addition.
        b (float): A number representing the second addend in the addition.

    Returns:
        float: A number representing the arithmetic sum of `a` and `b`.
    """
    return float(a + b)

def subtract(a, b):
    """Calculate the difference of two numbers.

    Examples:
        >>> subtract(4.0, 2.0)
        2.0
        >>> subtract(4, 2)
        2.0

    Args:
        a (float): A number representing the minuend in the subtraction.
        b (float): A number representing the subtrahend in the subtraction.

    Returns:
        float: A number representing the difference between `a` and `b`.
    """
    return float(a - b)

def multiply(a, b):
    """Compute and return the product of two numbers.

    Examples:
        >>> multiply(4.0, 2.0)
        8.0
        >>> multiply(4, 2)
        8.0

    Args:
        a (float): A number representing the multiplicand in the multiplication.
        b (float): A number representing the multiplier in the multiplication.

    Returns:
        float: A number representing the product of `a` and `b`.
    """
    return float(a * b)

def divide(a, b):
    """Compute and return the quotient of two numbers.

    Examples:
        >>> divide(4.0, 2.0)
        2.0
        >>> divide(4, 2)
        2.0
        >>> divide(4, 0)
        Traceback (most recent call last):
        ...
        ZeroDivisionError: division by zero

    Args:
        a (float): A number representing the dividend in the division.
        b (float): A number representing the divisor in the division.

    Returns:
        float: A number representing the quotient of `a` and `b`.

    Raises:
        ZeroDivisionError: An error occurs when the divisor is `0`.
    """
    if b == 0:
        raise ZeroDivisionError("division by zero")
    return float(a / b)
When you finish writing doctests for all your functions, run the tests using doctest to confirm that all tests pass.
Well done, you’re expanding your docstrings to be more comprehensive and valuable! To improve your codebase, even more, you’ll next add type hints to your function definitions. Type annotations allow you to remove the type information from within your docstrings.
Use Type Hints to Provide Automatic Type Information
As you might have noticed, in the docstrings that you’ve written so far, you declared that the input variables should be of the type float. However, the functions work just as well when you use integers. You even have proof for that through the function calls that you wrote in your doctests!
You should probably update the argument types in your docstrings accordingly. But instead of doing so in your docstrings, you’ll use Python type hints to declare the argument and return types of your functions:
from typing import Union

def add(a: Union[float, int], b: Union[float, int]) -> float:
    """Compute and return the sum of two numbers.

    Examples:
        >>> add(4.0, 2.0)
        6.0
        >>> add(4, 2)
        6.0

    Args:
        a (float): A number representing the first addend in the addition.
        b (float): A number representing the second addend in the addition.

    Returns:
        float: A number representing the arithmetic sum of `a` and `b`.
    """
    return float(a + b)
You’ve imported Union from the built-in typing module, which allows you to specify multiple types for an argument. Then you changed the first line of your function definition by adding type hints to your parameters and the return value.
Note: Starting with Python 3.10, you can alternatively use the pipe operator (|) as a type union alias:
def add(a: float | int, b: float | int) -> float:
    """Compute and return the sum of two numbers.

    ...
    """
    return float(a + b)
This more succinct syntax also allows you to remove the import statement from the top of your file.
However, to keep the type hints more compatible with older versions of type-checking tools, you’ll stick with Union in this example project.
Adding type hints to your code allows you to use type checkers such as mypy to catch type-related errors that might otherwise go unnoticed.
Note: If you want to learn more about writing type hints and type-checking your Python code using third-party libraries, then you can refresh your memory in the Python Type Checking Guide.
But wait a moment, your sixth sense is tingling! Did you notice that you’ve introduced some repeated information and inconsistencies regarding the types you’re mentioning in the docstring?
Fortunately, mkdocstrings understands type hints and can infer typing from them. This means that you don’t need to add type information to the docstring. Google-style docstrings don’t have to contain type information if you use type hints in your code.
You can therefore remove the duplicated type information from your docstrings:
from typing import Union

def add(a: Union[float, int], b: Union[float, int]) -> float:
    """Compute and return the sum of two numbers.

    Examples:
        >>> add(4.0, 2.0)
        6.0
        >>> add(4, 2)
        6.0

    Args:
        a: A number representing the first addend in the addition.
        b: A number representing the second addend in the addition.

    Returns:
        A number representing the arithmetic sum of `a` and `b`.
    """
    return float(a + b)
This change gives you a clean and descriptive docstring with an accurate representation of the expected types for your arguments and the return value of your function.
Documenting the types using type hints gives you the advantage that you can now use type checker tools to assure correct usage of your functions and hedge yourself against accidental misuse. It also allows you to record type information in only one place, which keeps your codebase DRY.
Revisit calculations.py, and add type hints to all your functions:
from typing import Union

def add(a: Union[float, int], b: Union[float, int]) -> float:
    """Compute and return the sum of two numbers.

    Examples:
        >>> add(4.0, 2.0)
        6.0
        >>> add(4, 2)
        6.0

    Args:
        a: A number representing the first addend in the addition.
        b: A number representing the second addend in the addition.

    Returns:
        A number representing the arithmetic sum of `a` and `b`.
    """
    return float(a + b)

def subtract(a: Union[float, int], b: Union[float, int]) -> float:
    """Calculate the difference of two numbers.

    Examples:
        >>> subtract(4.0, 2.0)
        2.0
        >>> subtract(4, 2)
        2.0

    Args:
        a: A number representing the minuend in the subtraction.
        b: A number representing the subtrahend in the subtraction.

    Returns:
        A number representing the difference between `a` and `b`.
    """
    return float(a - b)

def multiply(a: Union[float, int], b: Union[float, int]) -> float:
    """Compute and return the product of two numbers.

    Examples:
        >>> multiply(4.0, 2.0)
        8.0
        >>> multiply(4, 2)
        8.0

    Args:
        a: A number representing the multiplicand in the multiplication.
        b: A number representing the multiplier in the multiplication.

    Returns:
        A number representing the product of `a` and `b`.
    """
    return float(a * b)

def divide(a: Union[float, int], b: Union[float, int]) -> float:
    """Compute and return the quotient of two numbers.

    Examples:
        >>> divide(4.0, 2.0)
        2.0
        >>> divide(4, 2)
        2.0
        >>> divide(4, 0)
        Traceback (most recent call last):
        ...
        ZeroDivisionError: division by zero

    Args:
        a: A number representing the dividend in the division.
        b: A number representing the divisor in the division.

    Returns:
        A number representing the quotient of `a` and `b`.

    Raises:
        ZeroDivisionError: An error occurs when the divisor is `0`.
    """
    if b == 0:
        raise ZeroDivisionError("division by zero")
    return float(a / b)
With these updates, you’ve completed writing a solid suite of docstrings for all the functions in your Python module. But what about the module itself?
Add Module Docstrings
Python docstrings aren’t restricted to functions and classes. You can also use them to document your modules and packages, and mkdocstrings will extract these types of docstrings as well.
You’ll add a module-level docstring to calculations.py and a package-level docstring to __init__.py to showcase this functionality. Later, you’ll render both as part of your auto-generated documentation.
The docstring of calculations.py should give a quick overview of the module, then list all functions that it exports, together with a one-line description of each function:
# calculator/calculations.py

"""Provide several sample math calculations.

This module allows the user to make mathematical calculations.

The module contains the following functions:

- `add(a, b)` - Returns the sum of two numbers.
- `subtract(a, b)` - Returns the difference of two numbers.
- `multiply(a, b)` - Returns the product of two numbers.
- `divide(a, b)` - Returns the quotient of two numbers.
"""

from typing import Union
# ...
Add this example module docstring to the very top of calculations.py. You’ll notice that this docstring contains Markdown formatting. MkDocs will render it to HTML for your documentation pages.
Just like for function docstrings, you can also add usage examples for your module to the docstring:
# calculator/calculations.py

"""Provide several sample math calculations.

This module allows the user to make mathematical calculations.

Examples:
    >>> from calculator import calculations
    >>> calculations.add(2, 4)
    6.0
    >>> calculations.multiply(2.0, 4.0)
    8.0
    >>> from calculator.calculations import divide
    >>> divide(4.0, 2)
    2.0

The module contains the following functions:

- `add(a, b)` - Returns the sum of two numbers.
- `subtract(a, b)` - Returns the difference of two numbers.
- `multiply(a, b)` - Returns the product of two numbers.
- `divide(a, b)` - Returns the quotient of two numbers.
"""

from typing import Union
# ...
You can test these examples as before by running doctest on the module. Try swapping one of the return values to see the doctest fail, and then fix it again to ensure your examples represent your module’s functionality.
Finally, you’ll also add a package-level docstring. You add these docstrings to the top of your package’s __init__.py file before any exports that you’d define there.
Note: In this example package, you’ll export all functions defined in calculations.py, so __init__.py won’t contain any Python code aside from the docstring.
In your Python project, you may want to define which objects your package exports, and you’d add the code below the docstring for your package.
Open your empty __init__.py file and add the docstring for your calculator package:
# calculator/__init__.py

"""Do math with your own functions.

Modules exported by this package:

- `calculations`: Provide several sample math calculations.
"""
You’ve added a short description of your package and the module it contains to the top of your __init__.py file. If your package was going to export more modules and subpackages, you’d also list them here.
After writing the docstring for your package, you completed all the docstrings that you wanted to add to your code. Your Python project’s source code is well documented using docstrings and type hints, and it even contains examples that you can run as doctests.
You’ve finished the first line of defense for your project code’s documentation, and it’ll always stick with your code. You’re now ready to raise the bar for your project’s documentation by building user-friendly documentation pages using MkDocs.
Step 4: Prepare Your Documentation With MkDocs
At this point, you should have an activated virtual environment with all the necessary packages installed. You should also have set up your toy calculator package and added docstrings to your code.
In this step, you’ll set up your mkdocs.yml file, which holds the instructions for building the documentation with MkDocs. You’ll write your additional documentation pages in Markdown, including the syntax that defines where mkdocstrings will insert the auto-generated part of your documentation.
Create Your MkDocs Project Structure
With solid docstrings in your source code, you next want to make your project more accessible to a broad user base. Your project will shine more brightly if you can provide user-friendly documentation that’s accessible online.
MkDocs is a Python package that allows you to build static pages using Markdown. The basic structure of an MkDocs project consists of three main components:
- Your project code
- All your Markdown documentation pages inside a
docs/folder - A configuration file named
mkdocs.yml
You already have your project code ready to go. Create the other two puzzle pieces next using the handy new command provided by MkDocs:
(venv) $ mkdocs new .
This command creates a default project structure for your MkDocs project in the current directory, which the dot (.) at the end of the command references.
Feel free to explore the new files and folders that it created:
mkdocs-documentation/
│
├── calculator/
│   ├── __init__.py
│   └── calculations.py
│
├── docs/
│   └── index.md
│
├── mkdocs.yml
└── requirements.txt
In just a bit, you’ll edit index.md and expand your written documentation by adding new Markdown files to the docs/ directory.
But first, you’ll explore the mkdocs.yml settings file, which tells MkDocs how to handle your project documentation.
Adapt Your Project Settings File
Mkdocs uses a YAML file for configuration. When you create a new project using new, MkDocs creates a bare-bones mkdocs.yml file for you:
# mkdocs.yml
site_name: My Docs
The default settings file only contains one element, site_name, which defines the default name My Docs for your documentation.
Of course, you don’t want your project to keep that name, so you’ll change it to Calculation Docs instead. As a connoisseur of Google’s Material Design, you also want your documentation to look great right away.
By adding a second element to your YAML settings file, you can replace the default theme with the popular Material for MkDocs theme, which you installed at the beginning of this tutorial:
# mkdocs.yml
site_name: Calculation Docs

theme:
  name: "material"
Once you’ve adapted the settings file like this, you can take a look at the current state of your boilerplate documentation by building the site:
(venv) $ mkdocs serve
INFO    -  Building documentation...
INFO    -  Cleaning site directory
INFO    -  Documentation built in 0.22 seconds
[I 220510 0:0:0 server:335] Serving on http://127.0.0.1:8000
INFO    -  Serving on http://127.0.0.1:8000
As soon as your terminal tells you that it’s serving the documentation on your localhost, as shown above, you can view it in your browser.
The information printed to your terminal tells you that MkDocs is serving your documentation at http://127.0.0.1:8000. Open a new browser tab pointing to that URL. You’ll see the MkDocs boilerplate index page with your custom title, styled with the Material for MkDocs theme:
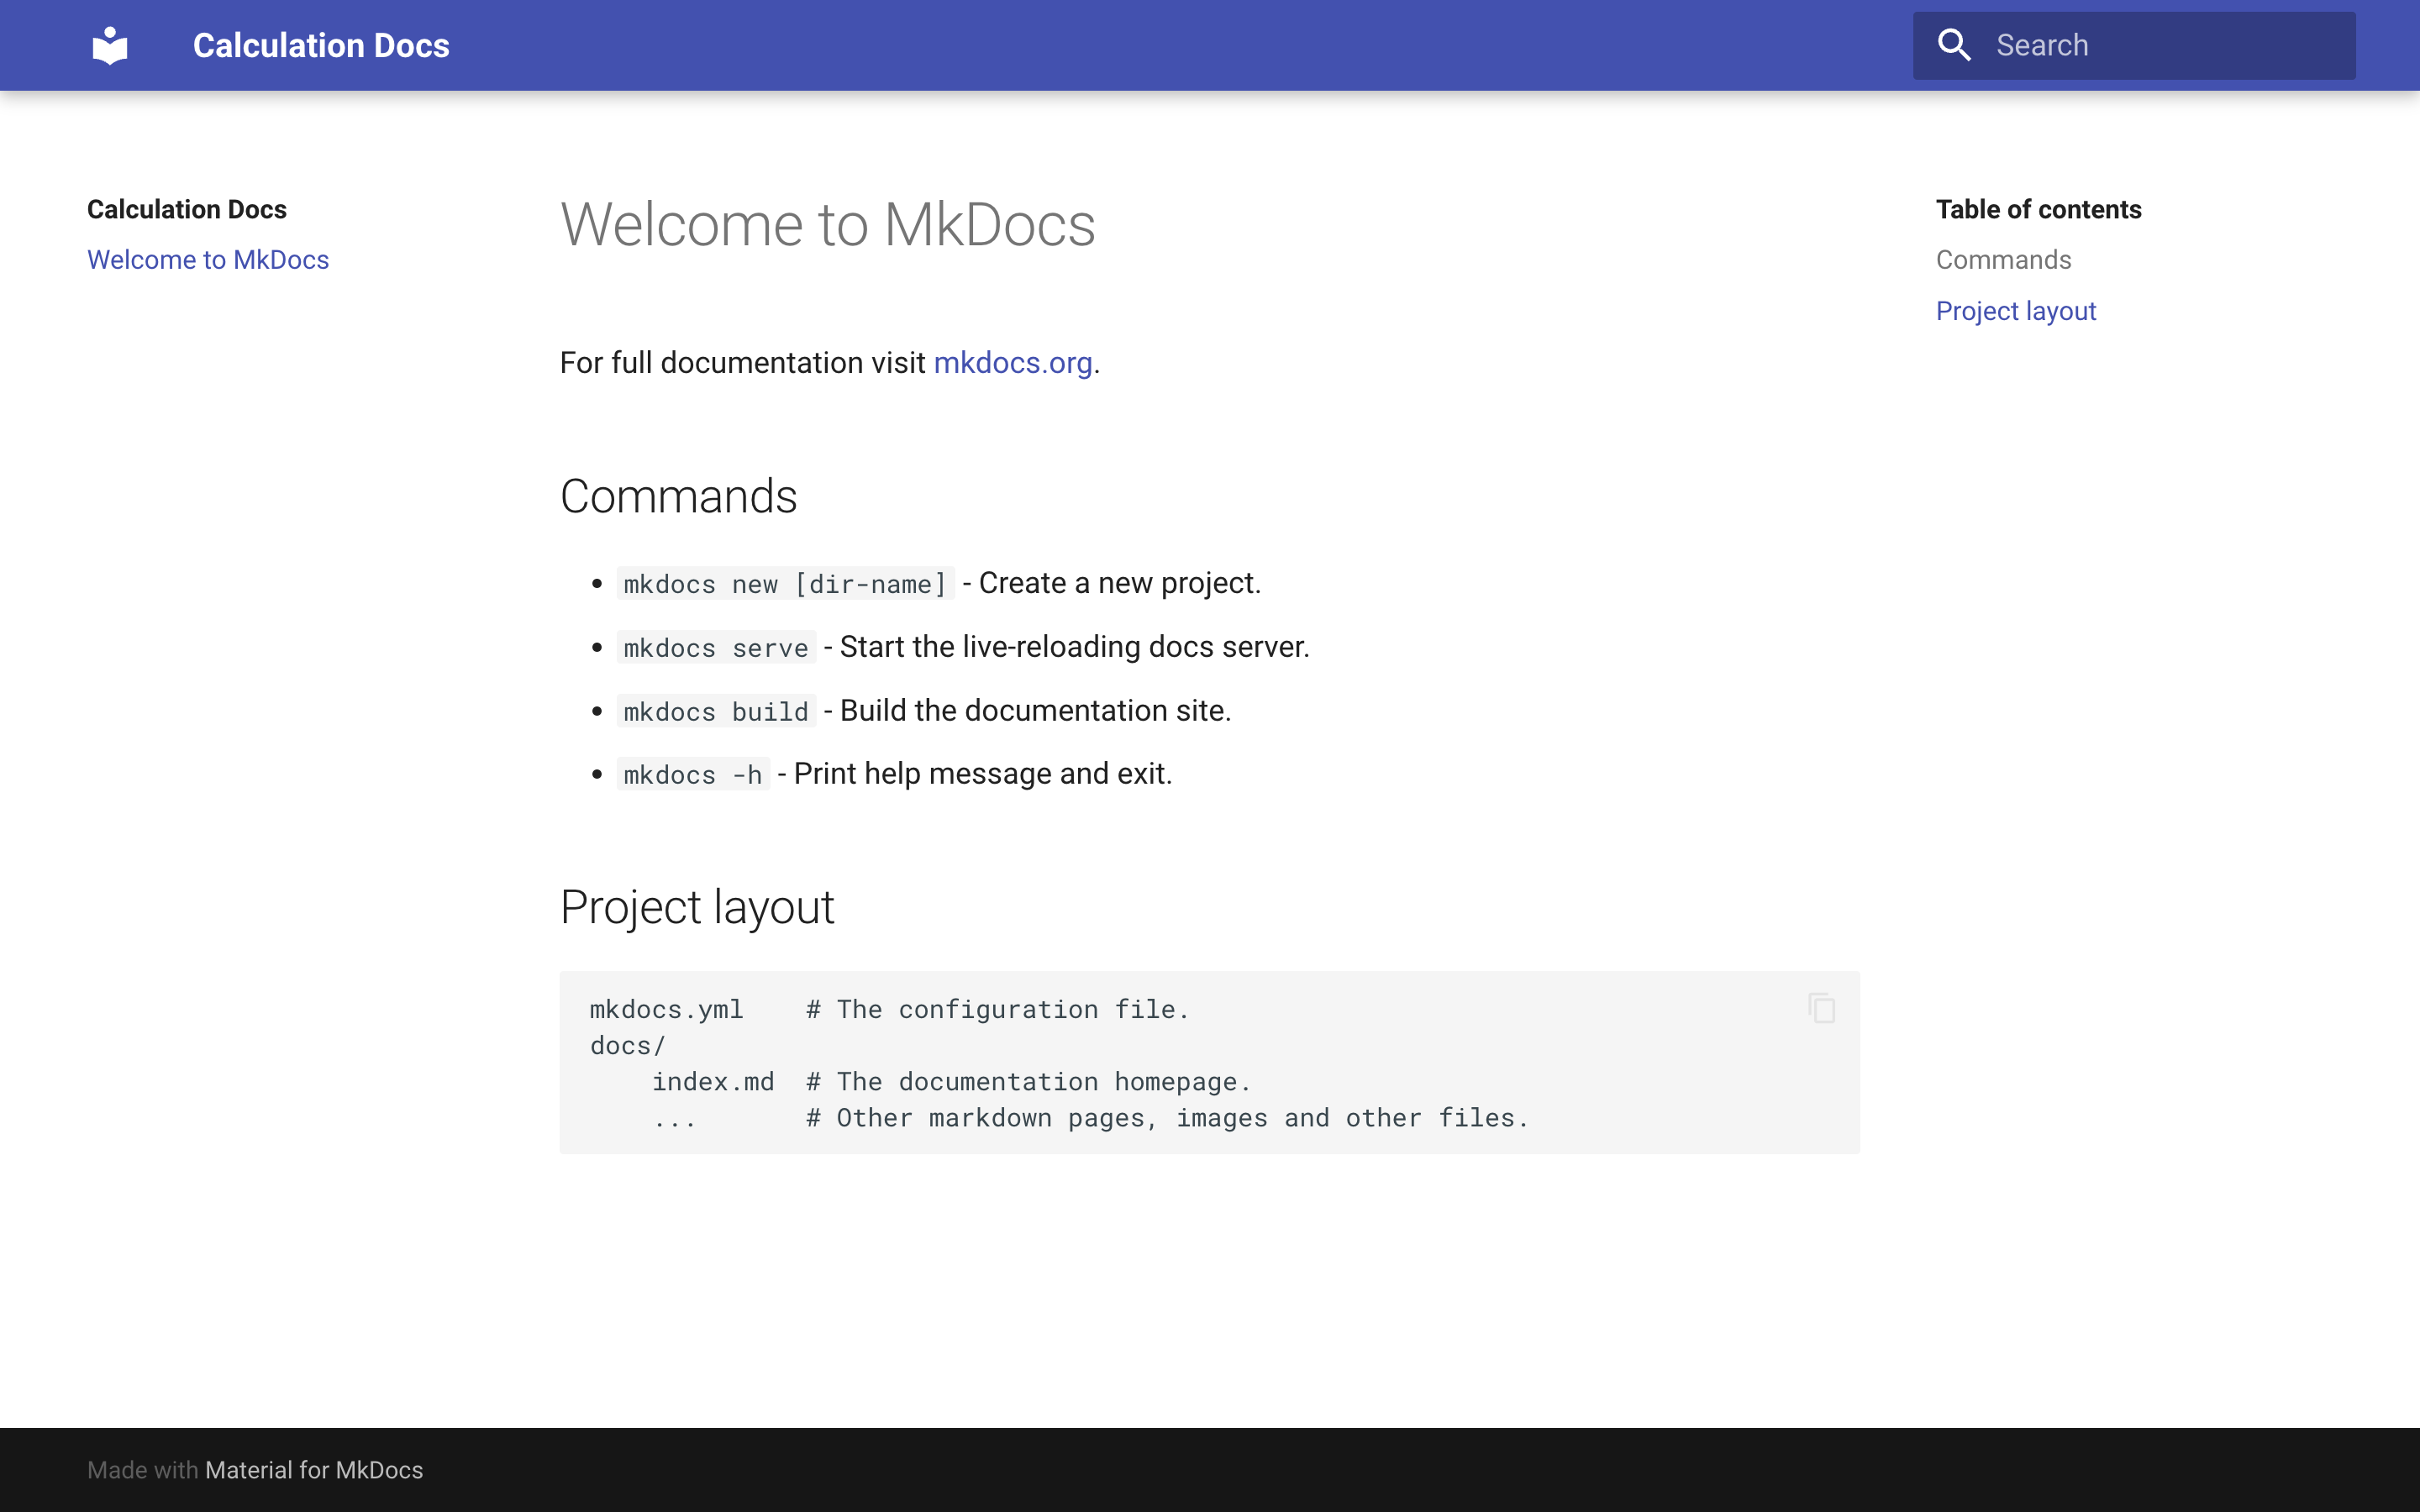
If you want to know where all the text you see is stored, you can open up index.md. You can edit this page and see the changes automatically reflected in your browser.
Note: While you keep working on your documentation, you can keep coming back to your localhost in your browser to view the changes. If you don’t see an update, then stop the server and rebuild the site using the mkdocs serve command.
You’ve made two adaptations in mkdocs.yml to change the look and feel of your documentation. However, the content of your docs is still just pre-built boilerplate text that isn’t related to your Python project. It’s time to fix that.
Create Static Pages From Markdown
Setting up a new MkDocs project creates a default index.md page in docs/. The index page is the default entry point for your project documentation, and you can edit the text in this file to fit your project landing page. You can also add more Markdown files to the docs/ folder, and each of them will render into a new page of your documentation.
As you learned in the project overview, you’ll follow the structure proposed in the Diátaxis documentation framework, which suggests splitting your documentation into four distinct parts:
Excellent project documentation doesn’t consist only of nicely rendered function docstrings!
Note: To build excellent documentation for your project, you can draw inspiration from the Diátaxis resources. You’ll create drafts for all four of the mentioned parts in the course of this tutorial.
To set up a structure for your project documentation, create four additional Markdown files representing the different parts:
docs/tutorials.mddocs/how-to-guides.mddocs/reference.mddocs/explanation.md
After adding these four files, your docs/ folder will contain five Markdown files:
docs/
├── explanation.md
├── how-to-guides.md
├── index.md
├── reference.md
└── tutorials.md
MkDocs builds every Markdown file that it finds in docs/ as a separate page. The first page that shows up is always index.md. All remaining pages show up in the order listed in docs/.
Files are listed alphabetically by default, but you’d like to preserve the order proposed by the Diátaxis documentation framework.
To determine a custom order for your documentation pages, you need to add the nav element to your settings file and list all files in the order in which you want to show them:
# mkdocs.yml
site_name: Calculation Docs

theme:
  name: "material"

nav:
  - index.md
  - tutorials.md
  - how-to-guides.md
  - reference.md
  - explanation.md
You’ve added the filenames for all your documentation pages under the nav element with appropriate indentation. You can now click through your documentation in the intended order on your localhost page.
You might have noticed that each page already has a title, which MkDocs inferred from the filenames. If you don’t like a page’s title, you can optionally add another element in front of the filename whose title you want to change:
# mkdocs.yml
site_name: Calculation Docs

theme:
  name: "material"

nav:
  - Calculation Docs: index.md
  - tutorials.md
  - How-To Guides: how-to-guides.md
  - reference.md
  - explanation.md
With the order and the titles updated in your settings file, you can now fill your documentation with information about your package.
Feel free to practice writing your own documentation pages, or copy the content of the files below to see an example of how MkDocs does a great job at rendering your Markdown text to a styled web page:
This site contains the project documentation for the
`calculator` project that is a toy module used in the
Real Python tutorial
[Build Your Python Project Documentation With MkDocs](
    https://realpython.com/python-project-documentation-with-mkdocs/).
Its aim is to give you a framework to build your
project documentation using Python, MkDocs,
mkdocstrings, and the Material for MkDocs theme.

## Table Of Contents

The documentation follows the best practice for
project documentation as described by Daniele Procida
in the [Diátaxis documentation framework](https://diataxis.fr/)
and consists of four separate parts:

1. [Tutorials](tutorials.md)
2. [How-To Guides](how-to-guides.md)
3. [Reference](reference.md)
4. [Explanation](explanation.md)

Quickly find what you're looking for depending on
your use case by looking at the different pages.

## Acknowledgements

I want to thank my house plants for providing me with
a negligible amount of oxygen each day. Also, I want
to thank the sun for providing more than half of their
nourishment free of charge.
This part of the project documentation focuses on a
**learning-oriented** approach. You'll learn how to
get started with the code in this project.

> **Note:** Expand this section by considering the
> following points:

- Help newcomers with getting started
- Teach readers about your library by making them
    write code
- Inspire confidence through examples that work for
    everyone, repeatably
- Give readers an immediate sense of achievement
- Show concrete examples, no abstractions
- Provide the minimum necessary explanation
- Avoid any distractions
This part of the project documentation focuses on a
**problem-oriented** approach. You'll tackle common
tasks that you might have, with the help of the code
provided in this project.

## How To Add Two Numbers?

You have two numbers and you need to add them together.
You're in luck! The `calculator` package can help you
get this done.

Download the code from this GitHub repository and place
the `calculator/` folder in the same directory as your
Python script:

    your_project/
    │
    ├── calculator/
    │   ├── __init__.py
    │   └── calculations.py
    │
    └── your_script.py

Inside of `your_script.py` you can now import the
`add()` function from the `calculator.calculations`
module:

    # your_script.py
    from calculator.calculations import add

After you've imported the function, you can use it
to add any two numbers that you need to add:

    # your_script.py
    from calculator.calculations import add

    print(add(20, 22))  # OUTPUT: 42.0

You're now able to add any two numbers, and you'll
always get a `float` as a result.
This part of the project documentation focuses on
an **information-oriented** approach. Use it as a
reference for the technical implementation of the
`calculator` project code.
This part of the project documentation focuses on an
**understanding-oriented** approach. You'll get a
chance to read about the background of the project,
as well as reasoning about how it was implemented.

> **Note:** Expand this section by considering the
> following points:

- Give context and background on your library
- Explain why you created it
- Provide multiple examples and approaches of how
    to work with it
- Help the reader make connections
- Avoid writing instructions or technical descriptions
    here
You built an excellent start for your Python project documentation! By using MkDocs, you can write your text in Markdown and render it nicely for the Internet.
But so far, you haven’t connected the information in your docstrings with the documentation rendered by MkDocs. You’ll integrate your docstrings into your front-end documentation as your next task.
Insert Information From Docstrings
Keeping documentation up to date can be challenging, so auto-generating at least parts of your project documentation can save you time and effort.
MkDocs is a static-site generator geared toward writing documentation. However, you can’t fetch docstring information from your code using MkDocs alone. You can make it work with an additional package called mkdocstrings.
You already installed mkdocstrings into your virtual environment at the beginning of this tutorial, so you only need to add it as a plugin to your MkDocs configuration file:
# mkdocs.yml
site_name: Calculation Docs

theme:
  name: "material"

plugins:
  - mkdocstrings

nav:
  - Calculation Docs: index.md
  - tutorials.md
  - How-To Guides: how-to-guides.md
  - reference.md
  - explanation.md
By recording mkdocstrings as a list item to the plugins element, you activated the plugin for this project.
Mkdocstrings allows you to insert docstring information right into your Markdown pages using a special syntax of three colons (:::) followed by the code identifier that you want to document:
::: identifier
Because you’ve already written your code documentation in your docstrings, you now only need to add these identifiers to your Markdown documents.
The central part of your code reference goes into reference.md, and you’ll let mkdocstrings add it for you automatically based on your docstrings:
This part of the project documentation focuses on
an **information-oriented** approach. Use it as a
reference for the technical implementation of the
`calculator` project code.

::: calculator.calculations
You’ve only added a single line to the Markdown file, but if you view the reference page on your localhost, you can see that mkdocstrings gathered all the information from your docstrings in calculator/calculations.py and rendered them:
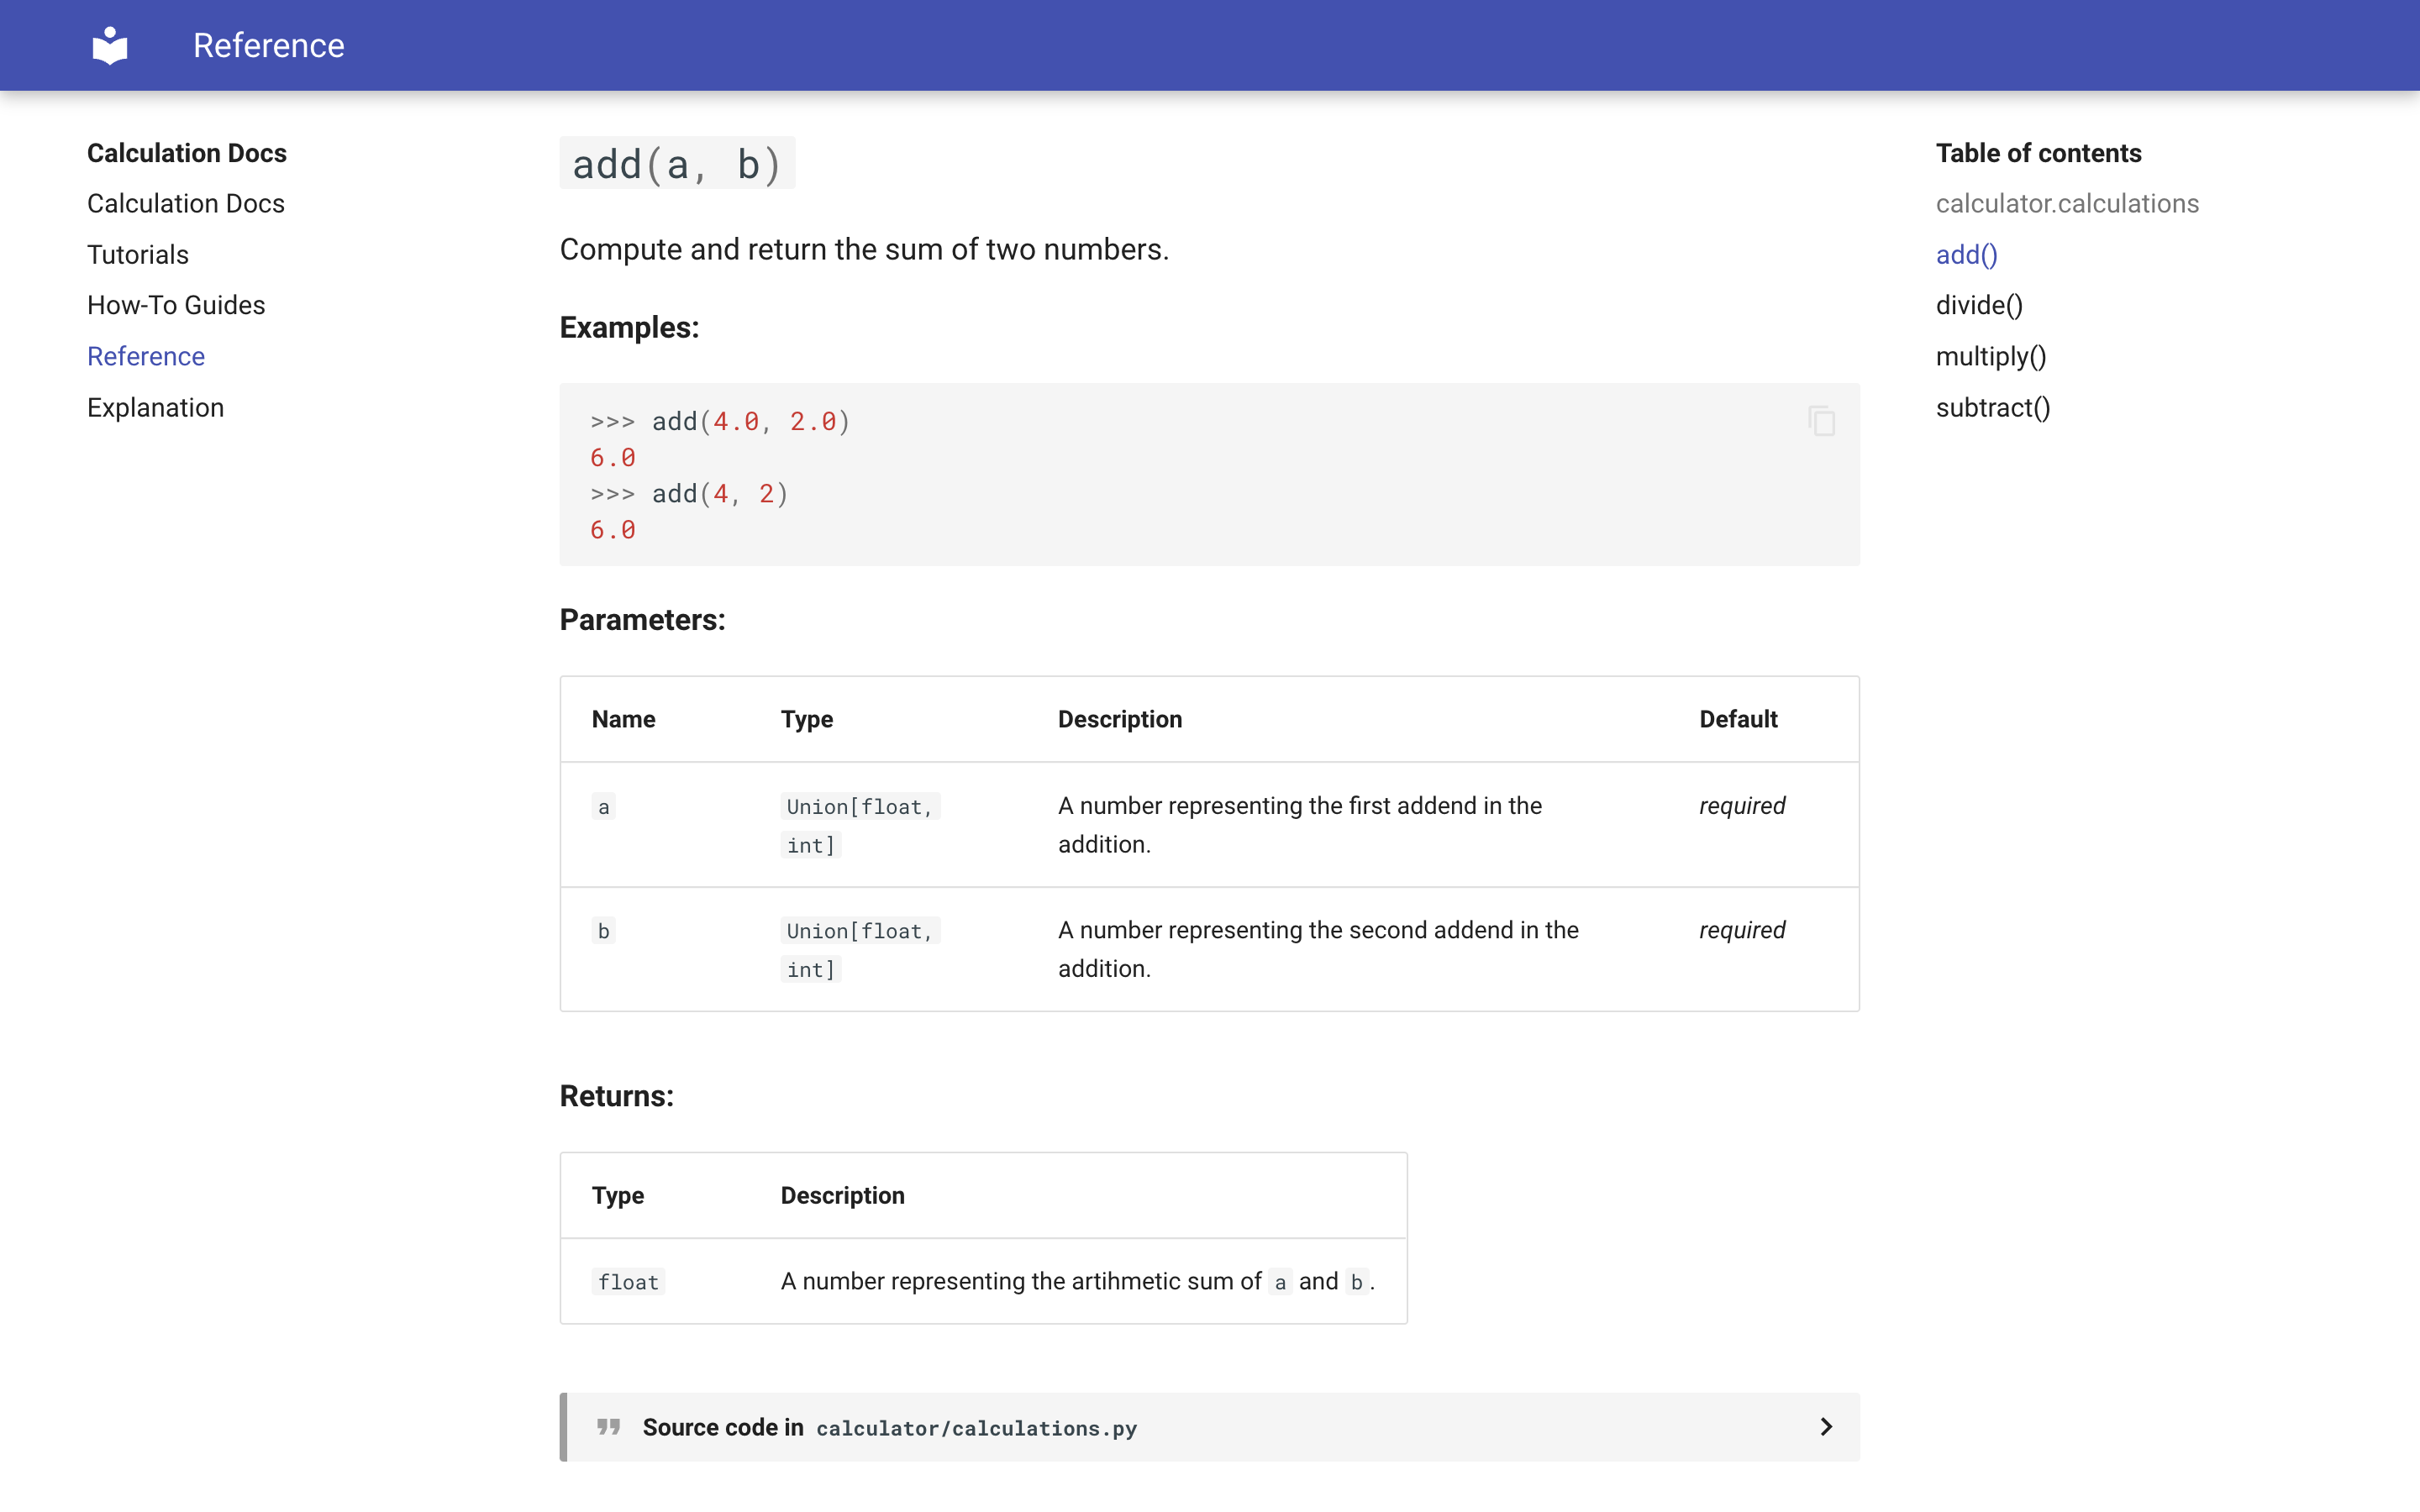
You may notice that mkdocstrings pulled information from your type hints and the function and module-level docstrings and now presents them to you in a user-friendly manner.
It also created clickable links in the navigation panel on the right to jump to any function definition with a single click. It also generated a collapsible section that contains the source code of the relevant function.
The work you did when writing your docstrings is paying off! The best part is that you’ll only need to keep the documentation right inside your codebase up to date. You can continually update the user-facing documentation that you built with MkDocs from your docstrings.
Instead of rendering all your module information on the reference page, you can also render just the package docstring that you recorded in __init__.py by noting the name of your package as the identifier:
This site contains the project documentation for the
`calculator` project that is a toy module used in the
Real Python tutorial
[Build Your Python Project Documentation With MkDocs](
    https://realpython.com/python-project-documentation-with-mkdocs/).
Its aim is to give you a framework to build your
project documentation using Python, MkDocs,
mkdocstrings, and the Material for MkDocs theme.

## Table Of Contents

The documentation follows the best practice for
project documentation as described by Daniele Procida
in the [Diátaxis documentation framework](https://diataxis.fr/)
and consists of four separate parts:

1. [Tutorials](tutorials.md)
2. [How-To Guides](how-to-guides.md)
3. [Reference](reference.md)
4. [Explanation](explanation.md)

Quickly find what you're looking for depending on
your use case by looking at the different pages.

## Project Overview

::: calculator

## Acknowledgements

I want to thank my house plants for providing me with
a negligible amount of oxygen each day. Also, I want
to thank the sun for providing more than half of their
nourishment free of charge.
If you need to update your docstrings because you changed your project code, then you just need to rebuild your documentation to propagate the updates to your user-facing documentation.
If you integrate mkdocstrings into your project documentation workflow, then you can avoid repetition and reduce the effort needed to keep your documentation updated.
Step 5: Build Your Documentation With MkDocs
At this point, you should’ve written all your documentation pages and the project structure file. At the end of this step, you’ll have built your documentation and be ready to deploy it online.
You already built your documentation using the serve command. This command builds a development version of your documentation and makes it available locally in your browser at http://127.0.0.1:8000. Serving your documentation like that is helpful during development because any changes you apply will update automatically.
However, once you’ve finished developing your documentation, you’ll want to build it without starting a server on localhost. After all, MkDocs is a static-site generator that allows you to create documentation that you can host without running a server!
To just build your documentation and create the site/ directory that’ll contain all the necessary assets and static files that’ll allow you to host your documentation online, you can use the build command:
(venv) $ mkdocs build
When you build your documentation with this command, MkDocs creates a site/ directory that contains your documentation converted to HTML pages, as well as all the static assets that are necessary to build the Material for MkDocs theme:
site/
│
├── assets/
│   │
│   ├── ...
│   │
│   └── _mkdocstrings.css
│
├── explanation/
│   └── index.html
│
├── how-to-guides/
│   └── index.html
│
├── reference/
│   └── index.html
│
├── search/
│   └── search_index.json
│
├── tutorials/
│   └── index.html
│
├── 404.html
├── index.html
├── objects.inv
├── sitemap.xml
└── sitemap.xml.gz
This folder structure is a self-contained static representation of your documentation that’ll look just like what you previously saw on your localhost during development. You can now host it on any static-site hosting service to get your documentation in front of your users.
Step 6: Host Your Documentation on GitHub
At this point, you’ve completed your toy calculator project’s documentation, which was partly auto-generated from the docstrings in your code.
In this step, you’ll deploy your documentation to GitHub and add additional files that should be part of a complete Python project documentation.
While you could host the documentation that you built using MkDocs on any static file hosting service, you’ll learn to do it using GitHub Pages. As a developer, you probably already have a GitHub account, and the platform also offers some excellent features for adding additional parts to your project documentation from boilerplate.
Create a GitHub Repository
If you’re already hosting your Python project code on GitHub, then you can skip this part and continue with deploying your documentation.
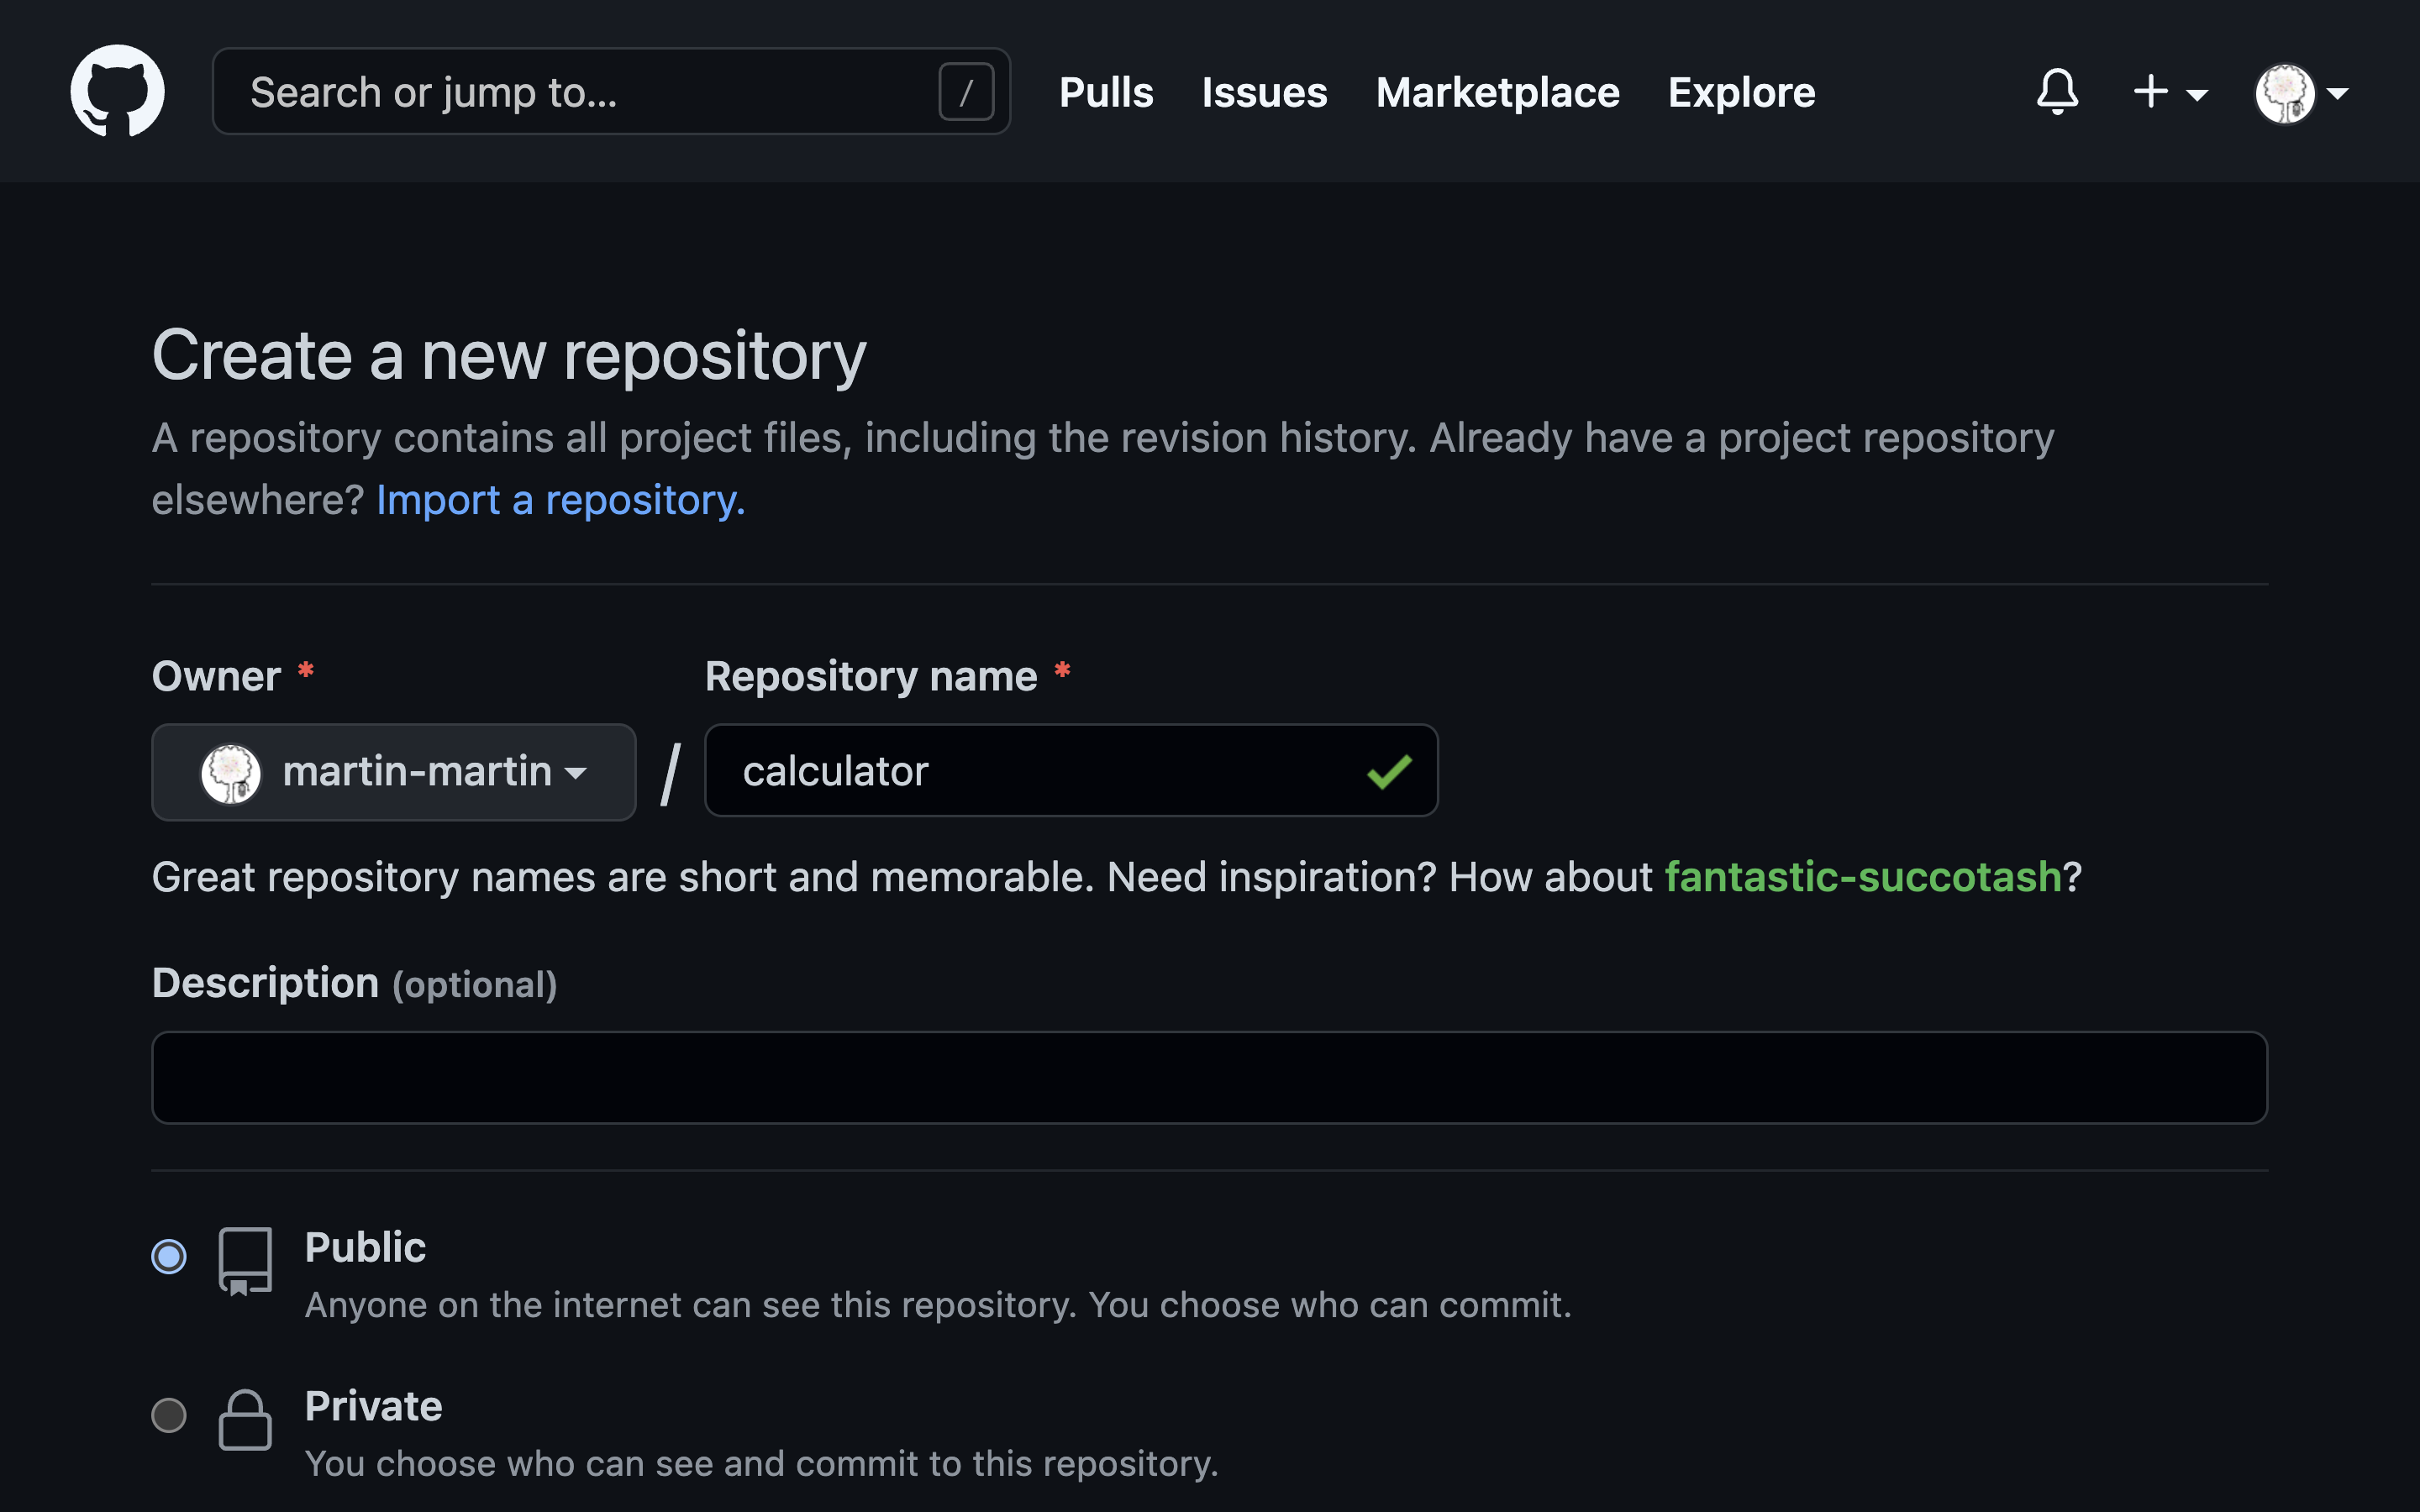
If you don’t have a GitHub repository for your project yet, then create a new repository through the GitHub web interface:
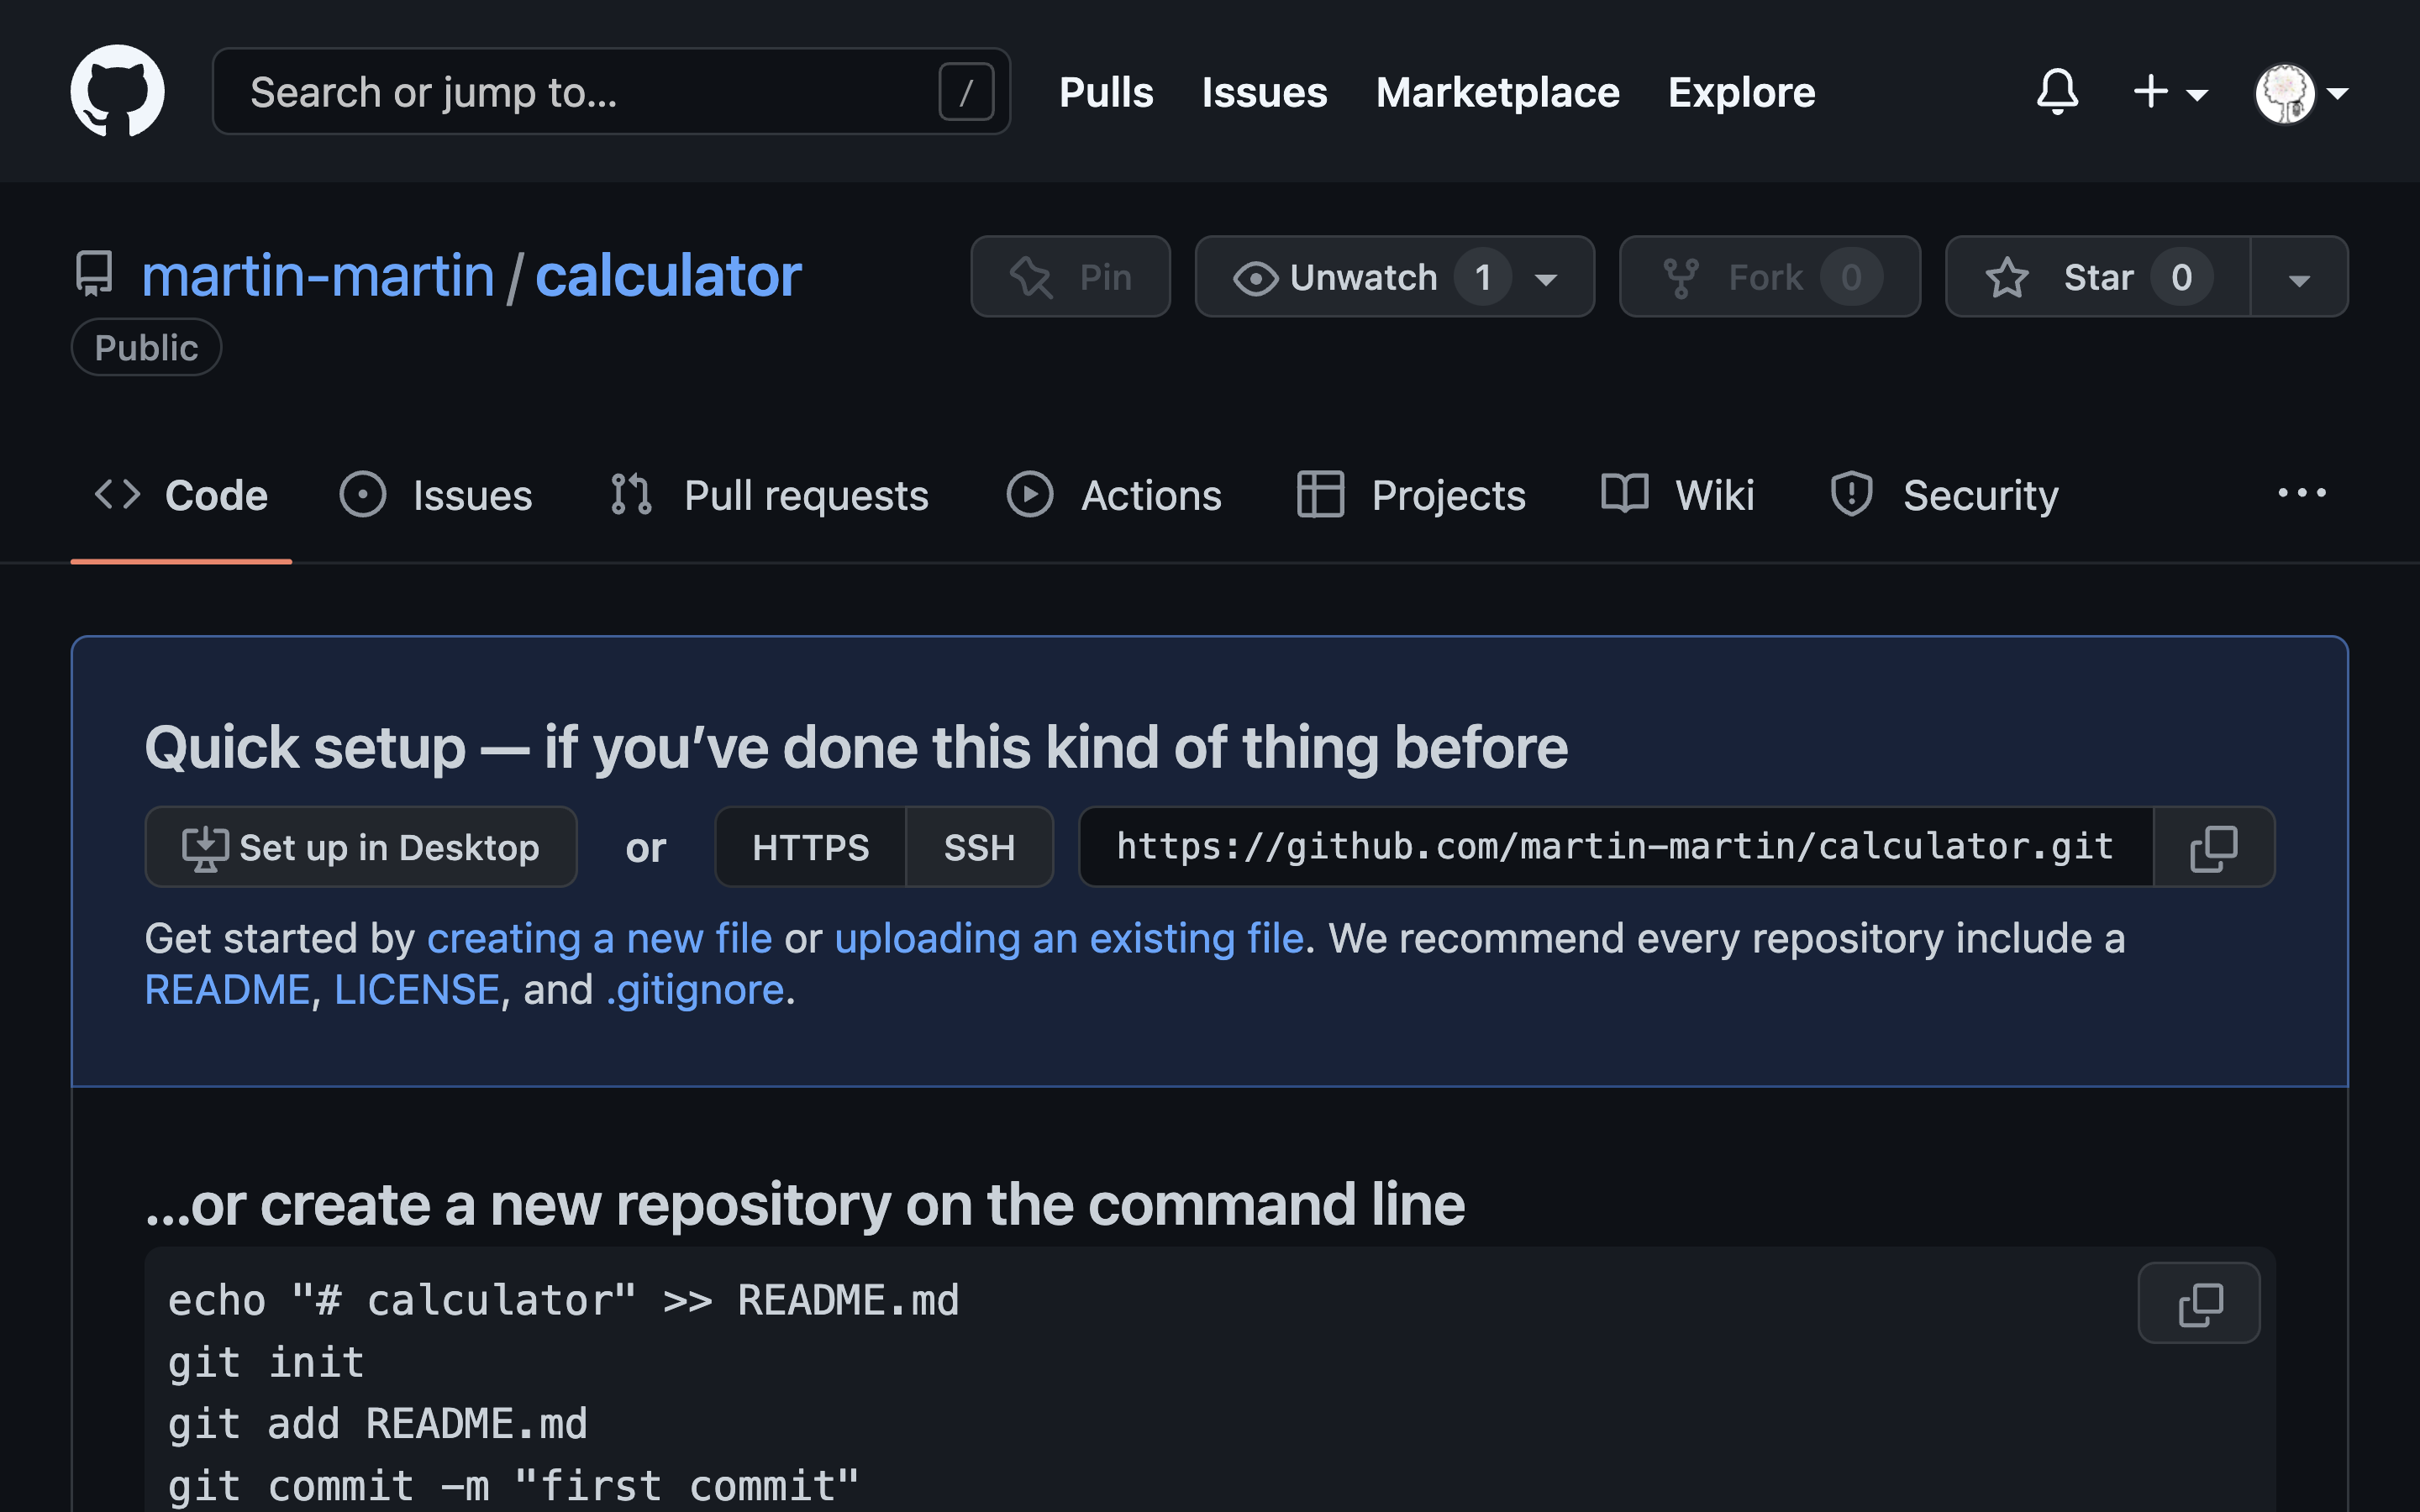
Initialize it without a README.md file so that it starts empty, then copy the URL of the repository:
Back on your terminal, initialize a local Git repository for your Python project:
(venv) $ git init
After successfully initializing an empty Git repository at your project root, you can next add the URL to your GitHub repository as a remote:
(venv) $ git remote add origin https://github.com/your-username/repo-name.git
After adding your GitHub repository as a remote to your local Git repository, you can add all project files and push everything to your remote:
(venv) $ git add .
(venv) $ git commit -m "Add project code and documentation"
(venv) $ git push origin main
These commands add all files in the current folder to Git’s staging area, commit the files to version control with a commit message, and push them to your remote GitHub repository.
Note: Your local default branch for Git might be called master instead of main. If that’s the case, then you can rename your local branch:
(venv) $ git branch -m master main
Run this command to rename your local Git branch from master to main. Then, you can run push again to send your project files to your remote GitHub repository.
Next, you can push the documentation you built using MkDocs to a particular branch on your GitHub repository, immediately making it available for your users to browse online.
Deploy Your Documentation to GitHub
GitHub repositories automatically serve static content when committed to a branch named gh-pages. MkDocs integrates with that and allows you to build and deploy your project documentation in a single step:
(venv) $ mkdocs gh-deploy
Running this command rebuilds the documentation from your Markdown files and source code and pushes it to the gh-pages branch on your remote GitHub repository.
Because of GitHub’s default configuration, that’ll make your documentation available at the URL that MkDocs shows you at the end of your terminal output:
INFO - Your documentation should shortly be available at:
       https://user-name.github.io/project-name/
To explore your project documentation online, head over to your browser and visit the URL that’s shown in your terminal output.
Note: If you get a 404 error when visiting the URL, take it as an opportunity for a quick break. It can take up to ten minutes until your documentation goes live when you create or publish your GitHub Pages site.
Once you’ve got a remote GitHub repository set up for your project code, this is a quick way to get your documentation live on the Internet.
Nice work! You now have a well-structured base for your project documentation, which is partly auto-generated from your docstrings using mkdocstrings, and built for front-end consumption with MkDocs. You even made it available online through GitHub Pages!
Conclusion
In this tutorial, you learned how to quickly build documentation for a Python package based on Markdown files and docstrings using MkDocs and mkdocstrings.
You created a partly auto-generated documentation for your Python project by linking information in your docstrings to the documentation pages. Not content to rest at this, you added additional documentation pages that made your project more appealing to users by guiding them through examples and use cases.
You styled your documentation with the Material for MkDocs theme and deployed it to the Internet through GitHub Pages.
In this tutorial, you learned how to:
- Write docstrings for your code objects
- Work with MkDocs to produce static pages from Markdown
- Pull in code documentation from docstrings using mkdocstrings
- Follow best practices for project documentation
- Customize your documentation using the Material for MkDocs theme
- Deploy your documentation on GitHub Pages
Building your project documentation using MkDocs and mkdocstrings allows you to write Markdown and auto-generate parts of the documentation directly from your docstrings. This setup means that you can create excellent documentation with less effort.
To review the source code for this project, click the link below:
Get Source Code: Click here to get access to the source code that you’ll use to build your documentation.
Next Steps
You can use the same approach outlined in this tutorial to document your own Python project. Follow the tutorial a second time, but instead of using the calculator module, write the documentation for your own package. This process will help train your understanding of how to create helpful documentation.
Additionally, here are some ideas to take your project documentation to the next level:
- Fill all four corners: Train writing all aspects of wholesome project documentation by filling the information for the Tutorials and the Explanation pages. The documentation outlined in this tutorial only creates examples for the Reference and How-to Guides pages of the Díataxis documentation system.
- Get LLM support: While MkDocs already speeds up the process of documenting your code, you might find it useful to work with an LLM like ChatGPT to make the work even more efficient.
- Add complementary documentation: Use GitHub’s templates for adding a code of conduct, a license, and contributing guidelines to build out your project documentation even more.
- Tune your configuration: Explore advanced configuration for MkDocs, such as adding support for search and multiple languages. Or install and include additional plugins. A good option is autorefs, which allows you to add relative links in your docstrings that work in your rendered documentation.
- Customize the material for MkDocs theme: Add your own CSS stylesheet or JavaScript file to adapt the Material for MkDocs theme with advanced customization
- Automate your deployment: Use GitHub Actions to automate the deployment of your documentation when you apply any edits.
- Publish as a package: Create a package from your project code and publish it to PyPI. Linking back to your professional project documentation will give it a better standing among end users.
What other ideas can you come up with to improve your project documentation and make it less effort for you to keep it up-to-date? Be creative, have fun, and leave a comment below!