In this project-based tutorial, you’ll build a content aggregator from scratch using Python and the popular framework Django.
With so much content coming out online daily, it can be time consuming to go to multiple sites and sources to consume information about your favorite subjects. This is why content aggregators are so popular and powerful, as you can use them to view all the latest news and content in one place.
Whether you’re looking for a portfolio project or ways in which to extend future projects beyond simple CRUD capabilities, this tutorial will have something for you.
In this tutorial, you’ll learn:
- How to work with RSS feeds
- How to create a Django custom management command
- How to run your custom command automatically on a schedule
- How to use unit tests to test your Django app’s functionality
Click the link below to download the code for this project and follow along as you build your own content aggregator:
Get Source Code: Click here to get the source code you’ll use to build a content aggregator with Django and Python in this tutorial.
Demo: What You’ll Build
You’ll build your own podcast content aggregator in Python named pyCasts! by following this tutorial from start to finish.
The application will be a single web page displaying the latest Python podcast episodes from The Real Python Podcast and the Talk Python to Me Podcast. After completing this tutorial, you can practice what you’ve learned by adding more podcast feeds to the application.
Here’s a quick demo video of how it will look in action:

There are many moving parts behind the scenes that make this work efficiently and effectively in an automated fashion. You’ll learn about all of them in this tutorial. Get ready to delve in.
Project Overview
In order to be able to display the content to the end user, you have several steps to follow:
- Set up the project
- Build the podcast model
- Create the homepage view
- Parse a podcast RSS feed
- Create a Django custom command
- Add additional feeds
- Schedule tasks with django-apscheduler
You’ll walk through each of these over the course of this tutorial. Now you’ll look at which technologies and frameworks you’re going to use for the above steps.
In order to fetch the podcast RSS feeds into your application and parse them, you’ll learn how to use the feedparser library. You’ll use this library to extract only the newest episode data from the feed, which you’ll marshall into an Episode model and save to the database with the Django ORM.
You could add this code to a script and manually run it periodically, but that would defeat the point of having an aggregator to save time. Instead, you’ll learn how to use a built-in Django tool called a custom management command. To parse and save the data, you’ll run your code from within Django itself.
With help from the django-apscheduler library, you’ll set a schedule for your function calls, which are also called jobs. You can then use the Django admin panel to view which jobs ran and when. This will ensure that the fetching and parsing of your feed will happen automatically without needing admin intervention.
You’ll then use the Django template engine to show the user the queried context—in other words, the latest episodes.
Prerequisites
To get the most out of this tutorial, you should be comfortable with the following concepts and technologies:
- Python basics
- Virtual environment setup and usage
- A basic level of HTML and CSS
- Django fundamentals, such as its folder structure, URL routing, migrations, and how to create a project and app
You might also find it helpful to have some experience with Bootstrap 4.
If you don’t have all the prerequisite knowledge before starting this tutorial, that’s okay! In fact, you might learn more by going ahead and just getting started. You can always stop and review the resources linked above if you get stuck.
Step 1: Setting Up Your Project
By the end of this step, you’ll have set up your environment, installed your dependencies, and finished getting Django up and running.
Begin by making your project directory and then changing directory into it:
$ mkdir pycasts
$ cd pycasts
Now that you’re inside your project directory, you should create your virtual environment and activate it. Use whatever tool makes you happiest to do this. This example uses venv:
$ python3 -m venv .venv
$ source .venv/bin/activate
(.venv) $ python -m pip install --upgrade pip
With your environment now activated and pip upgraded, you’ll need to install the required dependencies to complete the project. You can find a requirements.txt file in the downloadable source code for this tutorial:
Get Source Code: Click here to get the source code you’ll use to build a content aggregator with Django and Python in this tutorial.
Open the source_code_setup/ folder and install the pinned dependencies. Be sure to replace the <path_to_requirements.txt> with the actual path of your downloaded file:
(.venv) $ python -m pip install -r <path_to_requirements.txt>
You should now have Django, feedparser, django-apscheduler, and their sub-dependencies installed.
Now that you have all the tools you need to get up and running, you can set up Django and start building. To complete this step of the build, you need to do the following four things:
- Create your Django project in the current working directory,
/pycasts - Create a
podcastsDjango app - Run initial migrations
- Create a superuser
As you’re familiar with Django already, you won’t explore each of these steps in detail. You can go ahead and run the following commands:
(.venv) $ django-admin startproject content_aggregator .
(.venv) $ python manage.py startapp podcasts
(.venv) $ python manage.py makemigrations && python manage.py migrate
(.venv) $ python manage.py createsuperuser
If it turns out that you do need to dig a little deeper to understand any of these terminal commands, you can check out Get Started With Django Part 1.
Once you’ve followed Django’s prompts and finished creating your superuser account, you have one more change to make before testing that the app works. Although the application will run without it, don’t forget to add your new podcasts app to the settings.py file:
# content_aggregator/settings.py

# ...

INSTALLED_APPS = [
    "django.contrib.admin",
    "django.contrib.auth",
    "django.contrib.contenttypes",
    "django.contrib.sessions",
    "django.contrib.messages",
    "django.contrib.staticfiles",
    # My Apps
    "podcasts.apps.PodcastsConfig",
]
You listed your new app in INSTALLED_APPS as "podcasts.apps.PodcastsConfig".
Note: If you’re curious about why you’ve used the verbose podcasts.apps.PodcastsConfig instead of podcasts, then you can read more about configuring applications in the official Django docs.
The TLDR; version is that although using the app name, podcasts, should work fine for this small application, it’s considered best practice to use the full AppConfig name.
The time has come to take your new Django project for a spin. Start the Django server:
(.venv) $ python manage.py runserver
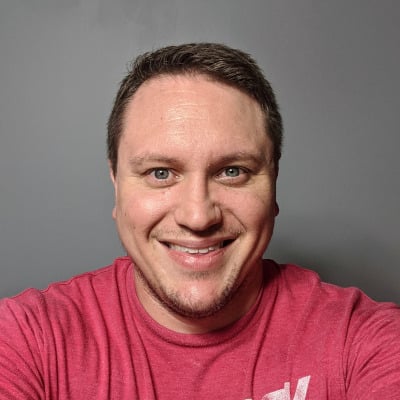
Navigate to localhost:8000 in your browser and you should see Django’s default success page:
Now that you’ve set up your project and you have Django working, continue to the next step.
Step 2: Building Your Podcast Model
At this point, you should have your environment set up, your dependencies installed, and Django successfully running. By the end of this step, you’ll have defined and tested a model for podcast episodes and migrated the model to the database.
Your Episode model shouldn’t only reflect the information you’d like to capture as the developer. It should also reflect the information that the user would like to see. It’s tempting to jump into the code and start writing your model right away, but that could be a mistake. If you do that, you might soon forget about your user’s point of view. And after all, applications are meant for users—even users such as you or other developers.
Taking out a pen and paper can be useful at this point, but you should do whatever works for you. Ask yourself, “As a user, what would I like to do?” and answer that question over and over until you’ve exhausted all your ideas. Then you can ask yourself what’s missing by thinking about what you’d like as a developer.
This can be a good tactic when writing database models, and it can save you from needing to add extra fields later and running unnecessary migrations.
Note: You might have a list that’s different from the one below, and that’s okay. As the author of this tutorial, I’m sharing what I came up with, and that’s what you’ll use for the rest of this project.
But if there’s a field or attribute you feel is missing, then feel free to extend the application to add it at the end of this tutorial. This is your project, after all. Make it your own!
List your project’s requirements from a user’s perspective as well as a developer’s perspective:
As a user, I would like to:

  - Know the title of an episode
  - Read a description of the episode
  - Know when an episode was published
  - Have a clickable URL so I can listen to the episode
  - See an image of the podcast so I can scroll to look
    for my favorite podcasts
  - See the podcast name

As a developer, I would like to:

  - Have a uniquely identifiable attribute for each episode
    so I can avoid duplicating episodes in the database
You’ll see more of this last point in step 4 of this tutorial.
Given the requirements you listed, the Episode model in your podcasts app should look like this:
# podcasts/models.py

from django.db import models

class Episode(models.Model):
    title = models.CharField(max_length=200)
    description = models.TextField()
    pub_date = models.DateTimeField()
    link = models.URLField()
    image = models.URLField()
    podcast_name = models.CharField(max_length=100)
    guid = models.CharField(max_length=50)

    def __str__(self) -> str:
        return f"{self.podcast_name}: {self.title}"
One of the most powerful parts of Django is the built-in admin area. Having the episodes stored in the database is one thing, but you’ll also want to be able to interact with them in the admin area too. You can do this by replacing the code in your podcasts/admin.py file to tell the Django admin that you want to display your episode data:
# podcasts/admin.py

from django.contrib import admin

from .models import Episode

@admin.register(Episode)
class EpisodeAdmin(admin.ModelAdmin):
    list_display = ("podcast_name", "title", "pub_date")
There’s one more thing you need to do before you migrate the model into the database. In Django 3.2, you can now customize the type of the automatically created primary key. The new default is BigAutoField as opposed to the Integer default in previous versions of Django. If you were to run the migrations now, you would see this error:
(models.W042) Auto-created primary key used when not defining
a primary key type, by default 'django.db.models.AutoField'.
HINT: Configure the DEFAULT_AUTO_FIELD setting or the
PodcastsConfig.default_auto_field attribute to point to a subclass
of AutoField, e.g. 'django.db.models.BigAutoField'.
You can ensure that you don’t see this error by adding an extra line to the PodcastsConfig class in the app.py file:
# podcasts/app.py

from django.apps import AppConfig

class PodcastsConfig(AppConfig):
    default_auto_field = "django.db.models.AutoField"
    name = "podcasts"
Now your app is configured to add a primary key to all your models automatically. You also have a picture of what your data should look like, and you have it represented in a model. You can now run the Django migrations to include your Episode table in the database:
(.venv) $ python manage.py makemigrations
(.venv) $ python manage.py migrate
Now that you have migrated the changes, it’s time to test it!
This tutorial is already covering a lot, so for simplicity, you’ll be using Django’s built-in testing framework for your unit tests. After completing the project in this tutorial, feel free to rewrite the unit tests with pytest or another testing framework if you’d prefer.
In your podcasts/tests.py file, you can add:
# podcasts/tests.py

from django.test import TestCase
from django.utils import timezone
from .models import Episode

class PodCastsTests(TestCase):
    def setUp(self):
        self.episode = Episode.objects.create(
            title="My Awesome Podcast Episode",
            description="Look mom, I made it!",
            pub_date=timezone.now(),
            link="https://myawesomeshow.com",
            image="https://image.myawesomeshow.com",
            podcast_name="My Python Podcast",
            guid="de194720-7b4c-49e2-a05f-432436d3fetr",
        )

    def test_episode_content(self):
        self.assertEqual(self.episode.description, "Look mom, I made it!")
        self.assertEqual(self.episode.link, "https://myawesomeshow.com")
        self.assertEqual(
            self.episode.guid, "de194720-7b4c-49e2-a05f-432436d3fetr"
        )

    def test_episode_str_representation(self):
        self.assertEqual(
            str(self.episode), "My Python Podcast: My Awesome Podcast Episode"
        )
In the above code, you use .setUp() to define an example Episode object.
You can now test a few of the Episode attributes to confirm that the model works as expected. It’s always a good idea to test the string representation from your models, which you defined in Episode.__str__(). The string representation is what you’ll see when debugging your code and will make debugging easier if it accurately displays the information you’d expect to see.
Now you can run your tests:
(.venv) $ python manage.py test
If your tests run successfully, congratulations! You now have a good base for your content aggregator, and you have a well-defined data model. Time for step 3.
Step 3: Creating Your Homepage View
By now, you should have a working Django application with your Episode model and passing unit tests. In this step, you’ll build the HTML template for the homepage, add the needed CSS and assets, add the homepage to your views.py file, and test that the homepage renders correctly.
Note: Writing HTML and CSS is out of scope for this tutorial, so you won’t be covering the whys and hows with regards to those. However, if there’s anything about the HTML or CSS that you don’t understand or that you have questions about, you can reach out in the comments to ask for insight from the Real Python community.
In the source_code_setup/ folder you downloaded earlier, you’ll find a folder named static and a folder named templates. You should copy these folders to your project root folder, pycasts/. Be sure to replace the <source_code_setup_path> with the actual path you saved on your local machine, and don’t forget the dot (.) to copy into the current working directory:
(.venv) $ cp -r <source_code_setup_path>/static .
(.venv) $ cp -r <source_code_setup_path>/templates .
Now that you have folders for the HTML templates and static files in your project root, it’s time to hook everything up so that Django knows they exist.
Head on over to your settings.py file in the main content_aggregator app. Scroll down until you reach the TEMPLATES section, and add the templates/ directory you created earlier to the DIRS list. This tutorial uses Django 3, which uses pathlib for file paths:
# content_aggregator/settings.py

#  ...

TEMPLATES = [
    {
        "BACKEND": "django.template.backends.django.DjangoTemplates",
        "DIRS": [
            BASE_DIR / "templates",
        ],
        "APP_DIRS": True,
        "OPTIONS": {
            "context_processors": [
                "django.template.context_processors.debug",
                "django.template.context_processors.request",
                "django.contrib.auth.context_processors.auth",
                "django.contrib.messages.context_processors.messages",
            ],
        },
    },
]
You’ll also need to add the static/ folder to your settings. You can do this by scrolling down to the STATIC section of your settings.py file and including the path to your newly created static/ folder:
# content_aggregator/settings.py

#  ...

STATIC_URL = "/static/"
STATICFILES_DIRS = [
    BASE_DIR / "static",
]
Django now knows that your static assets and template exist, but you’re not done quite yet. In order to finish connecting up what you’ve accomplished so far, you still have a few tasks to tick off the list:
- Create a homepage view in
views.py - Create URL paths
- Add more unit tests
The order in which you create your URL paths and your homepage view doesn’t really matter. Both need to be done for the application to work correctly, but you can start at the top of the list and create your view class first.
In your podcasts app, open your views.py file and replace the contents with the following code:
 1# podcasts/views.py
 2
 3from django.views.generic import ListView
 4
 5from .models import Episode
 6
 7class HomePageView(ListView):
 8    template_name = "homepage.html"
 9    model = Episode
10
11    def get_context_data(self, **kwargs):
12        context = super().get_context_data(**kwargs)
13        context["episodes"] = Episode.objects.filter().order_by("-pub_date")[:10]
14        return context
You may be familiar with function-based views in Django, but Django also has built-in class-based views. These can be very handy and reduce the amount of code that you need to write.
In the above code snippet, you make use of a class-based view to send the podcast episodes to the homepage:
- Line 7: You inherit from the
ListViewclass so that you can iterate over the episodes. By default, it will iterate over all episodes as defined bymodel = Episodeon line 9. - Lines 11 to 14: You override the
contextdata and filter by the ten most recent episodes, as determined by the published date,pub_date. You want to filter here because, otherwise, there could be hundreds—if not thousands—of episodes to pass to the homepage.
Now it’s time to give your homepage a URL. You first need to create a urls.py file within your podcasts app:
(.venv) $ touch podcasts/urls.py
Now you can add a path for the HomePageView class:
# podcasts/urls.py

from django.urls import path

from .views import HomePageView

urlpatterns = [
    path("", HomePageView.as_view(), name="homepage"),
]
In its current state, the application still won’t show your homepage because the main content_aggregator app doesn’t know about the URL paths in podcasts/urls.py. Two lines of code should fix this. In your content_aggregator/urls.py file, add the highlighted code to connect the two together:
# podcasts/urls.py

from django.contrib import admin
from django.urls import path, include

urlpatterns = [
    path("admin/", admin.site.urls),
    path("", include("podcasts.urls")),
]
Well done on getting this far! You should now be able to start your app and see the homepage. Just as before, start your app with python manage.py runserver and head to localhost:8000:
You can see the homepage works, but there’s no content. Even without it, you can still test that the content will display correctly by using unit tests.
In step 2, you created a unit test for the model. You also created .setUp(), which made an Episode object to test against. You can use this same test episode data to test that your homepage template works as expected.
In addition to testing that the homepage renders episodes correctly, it’s good practice to test both that the correct template is being used and that navigating to its URL returns a valid HTTP status code.
With a single-page application like this, it might seem like overkill—and it probably is. But, as any application grows, you want to make sure that future changes won’t break your working code. Also, if you’re using this project as a portfolio piece, then you should show that you’re aware of best practices.
The highlighted code below is the new test code to add to your podcasts/tests.py file:
# podcasts/tests.py

from django.test import TestCase
from django.utils import timezone
from django.urls.base import reverse

from datetime import datetime

from .models import Episode

class PodCastsTests(TestCase):
    def setUp(self):
        self.episode = Episode.objects.create(
            title="My Awesome Podcast Episode",
            description="Look mom, I made it!",
            pub_date=timezone.now(),
            link="https://myawesomeshow.com",
            image="https://image.myawesomeshow.com",
            podcast_name="My Python Podcast",
            guid="de194720-7b4c-49e2-a05f-432436d3fetr",
        )

    def test_episode_content(self):
        self.assertEqual(self.episode.description, "Look mom, I made it!")
        self.assertEqual(self.episode.link, "https://myawesomeshow.com")
        self.assertEqual(
            self.episode.guid, "de194720-7b4c-49e2-a05f-432436d3fetr"
        )

    def test_episode_str_representation(self):
        self.assertEqual(
            str(self.episode), "My Python Podcast: My Awesome Podcast Episode"
        )

    def test_home_page_status_code(self):
        response = self.client.get("/")
        self.assertEqual(response.status_code, 200)

    def test_home_page_uses_correct_template(self):
        response = self.client.get(reverse("homepage"))
        self.assertTemplateUsed(response, "homepage.html")

    def test_homepage_list_contents(self):
        response = self.client.get(reverse("homepage"))
        self.assertContains(response, "My Awesome Podcast Episode")
Just as before, you can run your unit tests with python manage.py test. If all your tests pass at this point, congratulations!
In this step, you successfully created your HTML template and assets, built the view class, and hooked up all your URL routing. You also wrote more passing unit tests. Now you’re ready to move on to the next step.
Step 4: Parsing Podcast RSS Feeds
At this point, your application should be looking pretty good! You have everything you need to start adding the content. By the end of this step, you should feel comfortable using the feedparser library to parse an RSS feed and extract the data you need.
Before you dive into parsing one, what exactly is an RSS feed? And why are you using it to fetch podcast data?
Firstly, all podcasts have an RSS feed. It’s the fundamental way that podcast apps fetch and show you podcast data and episodes. You can often find feed URL links on a podcast’s website.
Additionally, podcast RSS feeds need to all look alike. What that means is that when a podcast creator submits their feed to a platform such as Apple Podcasts or Google Podcasts, the feed has to adhere to RSS 2.0 specifications.
This requirement benefits you in two ways:
- All feeds will have the same attributes, so you can reuse code to pull the same data for any given podcast, making your code easier to maintain and more DRY.
- Each episode must have a
guidassigned to it, which makes each episode in that feed unique.
The first feed you’re going to parse is The Real Python Podcast feed. Navigate to https://realpython.com/podcasts/rpp/feed in your browser to see how the feed looks. If you find it hard to read, you can install one of a few browser plugins to prettify it. An example Chrome plugin for this is XML Tree, but many others are available.
To parse a feed with feedparser, you can use parse():
>>> import feedparser
>>> feed = feedparser.parse("https://realpython.com/podcasts/rpp/feed")
parse() fetches the feed and parses it automatically into a usable Python object. You can then access feed tags, such as the podcast title, with standard dot notation:
>>> podcast_title = feed.channel.title
>>> podcast_title
'The Real Python Podcast'
You can also access attributes within a tag by using bracket notation:
>>> podcast_image = feed.channel.image["href"]
>>> podcast_image
'https://files.realpython.com/media/real-python-logo-square.28474fda9228.png'
In a feed parsed with feedparser, you also have access to a special attribute called .entries. This allows for iteration through each of the <item> elements in the feed. After you’ve populated your database with podcast episodes, you’ll be able to use .entries to check the guid of each podcast episode on the feed and check to see whether it exists in your database.
Note: Don’t implement the following code snippet yet. Just read over it. You’ll write similar code in the next step when you create a Django custom command and use it for your project. For now, just skim over this code to get an idea of how you can work with feedparser.
It’s worth noting that you’ll need to convert the published date from the RSS feed into a datetime object in order to save it into the database. You’ll use the dateutil library to do this:
# Example

import feedparser
from dateutil import parser
from podcasts.models import Episode

feed = feedparser.parse("https://realpython.com/podcasts/rpp/feed")
podcast_title = feed.channel.title
podcast_image = feed.channel.image["href"]

for item in feed.entries:
    if not Episode.objects.filter(guid=item.guid).exists():
        episode = Episode(
            title=item.title,
            description=item.description,
            pub_date=parser.parse(item.published),
            link=item.link,
            image=podcast_image,
            podcast_name=podcast_title,
            guid=item.guid,
        )
        episode.save()
The reason you aren’t putting this code into a file yet is that you don’t have a good way to run it within Django. Now that you have a grasp on how to use feedparser, though, you’ll explore how you can use a custom command to run your parsing function.
Step 5: Creating a Django Custom Command
In the last step, you learned how to use feedparser but had no sensible way of running code that interacts with the Django ORM. In this step, you’re going to cover how to use a custom command to execute scripts within your project so that you can interact with it while the Django server or a production server is also running.
Custom commands utilize the manage.py file to run your code. When you run manage.py, Django registers any module that’s within a management/commands/ directory as a usable command.
Note: Head on over to the official Django docs for more information on custom management commands if you’d like to delve deeper.
Begin by creating the appropriate directories and a file to store your commands:
(.venv) $ mkdir -p podcasts/management/commands
(.venv) $ touch podcasts/management/commands/startjobs.py
You can name this file almost anything you’d like, but note that if it starts with an underscore, manage.py will not register it. Later on in step 7, you’re going to be adding jobs to this file with django-apscheduler, which is why you named the file startjobs.py.
To test your setup, you’ll create a basic command that prints "It works!" to your terminal.
Every command should have a Command class. That class needs a .handle() method, which you can think of as the main method of your class. The .handle() method holds the code that you want to execute:
# podcasts/management/commands/startjobs.py

from django.core.management.base import BaseCommand

class Command(BaseCommand):
    def handle(self, *args, **options):
        print("It works!")
Now run your new command from your terminal:
(.venv) $ python manage.py startjobs
If you saw It works! print out to the terminal, congratulations! You created your first custom command.
Now it’s time to include the RSS parsing code from the previous step and see if you can add some items to your database. Go ahead and update your startjobs.py code:
# podcasts/management/commands/startjobs.py

from django.core.management.base import BaseCommand

import feedparser
from dateutil import parser

from podcasts.models import Episode

class Command(BaseCommand):
    def handle(self, *args, **options):
        feed = feedparser.parse("https://realpython.com/podcasts/rpp/feed")
        podcast_title = feed.channel.title
        podcast_image = feed.channel.image["href"]

        for item in feed.entries:
            if not Episode.objects.filter(guid=item.guid).exists():
                episode = Episode(
                    title=item.title,
                    description=item.description,
                    pub_date=parser.parse(item.published),
                    link=item.link,
                    image=podcast_image,
                    podcast_name=podcast_title,
                    guid=item.guid,
                )
                episode.save()
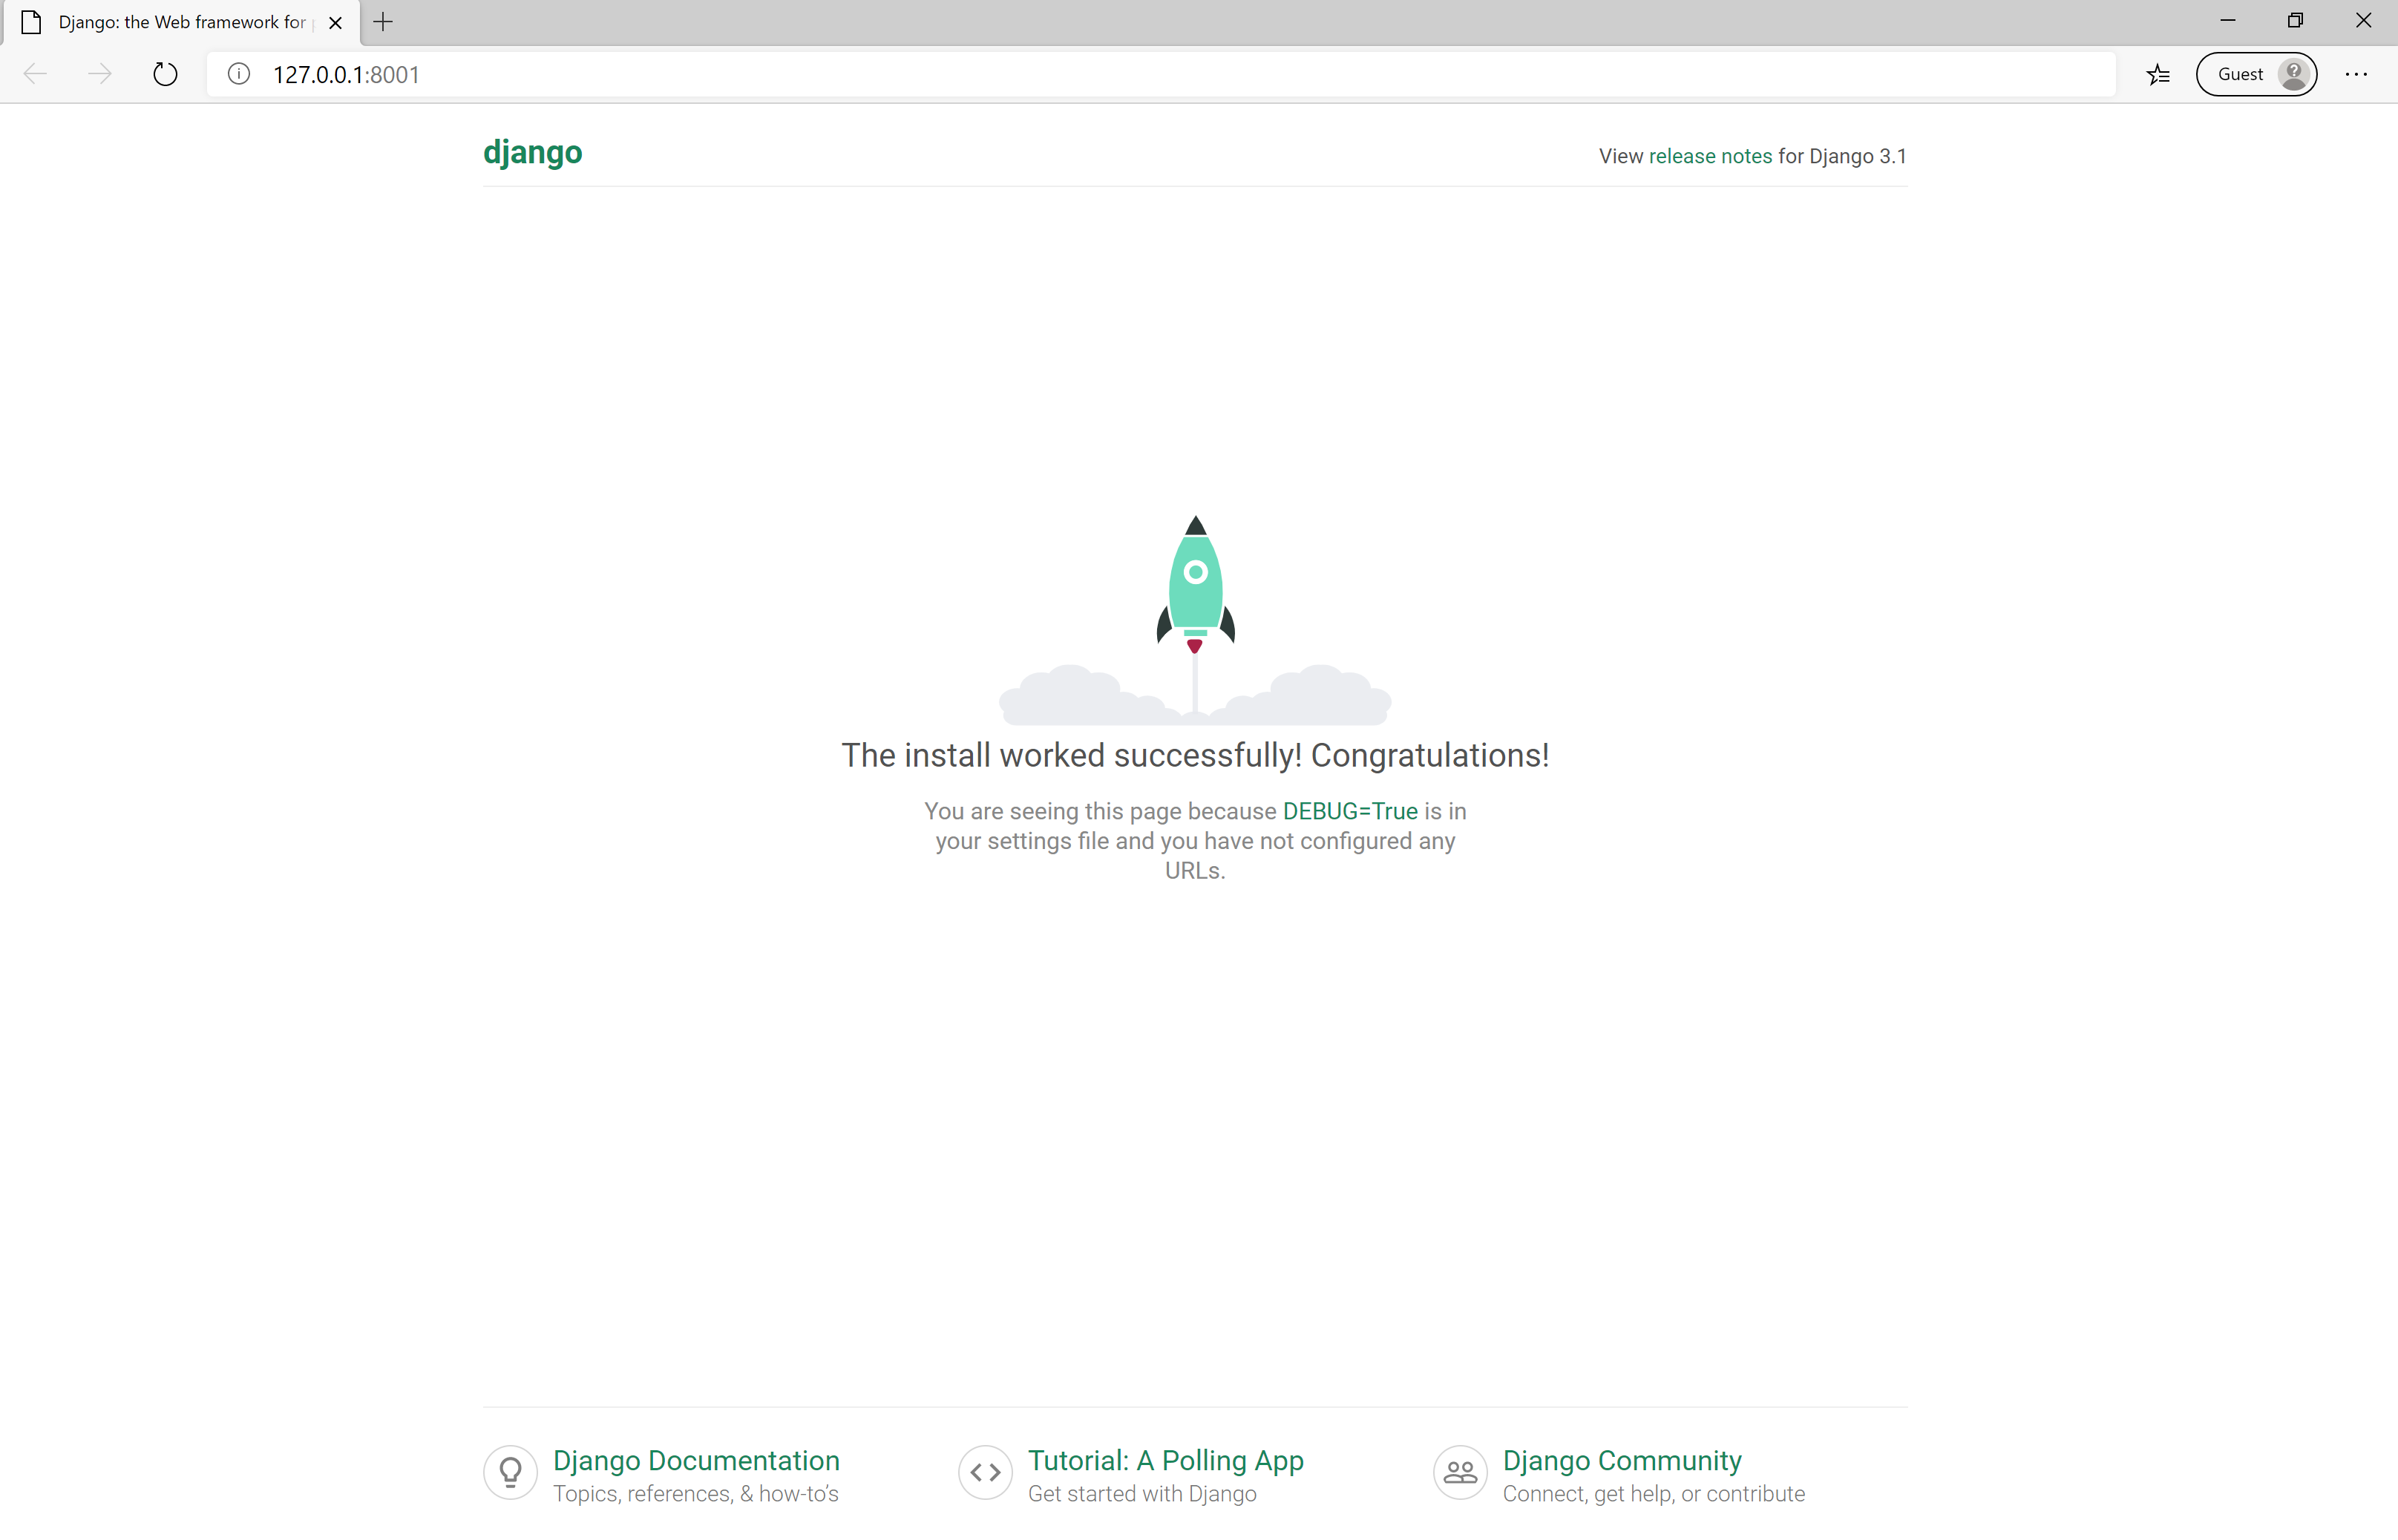
This time, when you run the custom command, nothing prints to the screen, but you should now have podcast episodes from The Real Python Podcast displaying on your homepage. Go ahead and try it.
What did you get? If you haven’t navigated there yet, now go to your homepage:

Did you get something that looks like this image? If so, congratulations. It worked.
Now that you’ve explored how to use custom commands and have the first feed set up and working, you’ll learn how to add additional feeds in the next step.
Step 6: Adding Additional Feeds to Your Python Content Aggregator
At this point, you should have a working custom command that parses The Real Python Podcast feed. At the end of this step, you’ll have learned how you can add more feeds to your custom command.
Now that you have a single podcast feed that you’re successfully parsing with your custom command, you might be tempted to repeat the same code over and over for each feed. However, that wouldn’t be good coding practice. You want DRY code that’s less effort to maintain.
You might be thinking that you can iterate over a list of feed URLs and use the parsing code on each item, and normally, that could work. Because of how django-apscheduler works, however, that isn’t a viable solution. More on that in the next step.
Instead, you need to refactor your code to have a parsing function and a separate function for each feed you need to parse. You’ll then call these methods separately, for now.
Note: As mentioned at the beginning of this tutorial, you’re focusing on just two feeds at the moment. Once you’re finished with the tutorial and you know how to add more, you can dig in and practice on your own by choosing some more RSS feeds to add.
In the meantime, Michael Kennedy from the Talk Python to Me podcast has been kind enough to grant permission for his podcast feed to be used in this tutorial. Thank you, Michael!
Now you’ll start exploring what this will look like in your code:
 1# podcasts/management/commands/startjobs.py
 2
 3from django.core.management.base import BaseCommand
 4
 5import feedparser
 6from dateutil import parser
 7
 8from podcasts.models import Episode
 9
10def save_new_episodes(feed):
11    """Saves new episodes to the database.
12
13    Checks the episode GUID against the episodes currently stored in the
14    database. If not found, then a new `Episode` is added to the database.
15
16    Args:
17        feed: requires a feedparser object
18    """
19    podcast_title = feed.channel.title
20    podcast_image = feed.channel.image["href"]
21
22    for item in feed.entries:
23        if not Episode.objects.filter(guid=item.guid).exists():
24            episode = Episode(
25                title=item.title,
26                description=item.description,
27                pub_date=parser.parse(item.published),
28                link=item.link,
29                image=podcast_image,
30                podcast_name=podcast_title,
31                guid=item.guid,
32            )
33            episode.save()
34
35def fetch_realpython_episodes():
36    """Fetches new episodes from RSS for The Real Python Podcast."""
37    _feed = feedparser.parse("https://realpython.com/podcasts/rpp/feed")
38    save_new_episodes(_feed)
39
40def fetch_talkpython_episodes():
41    """Fetches new episodes from RSS for the Talk Python to Me Podcast."""
42    _feed = feedparser.parse("https://talkpython.fm/episodes/rss")
43    save_new_episodes(_feed)
44
45class Command(BaseCommand):
46    def handle(self, *args, **options):
47        fetch_realpython_episodes()
48        fetch_talkpython_episodes()
As discussed a moment ago, you separated the parsing code from the individual feeds to make it reusable. For each additional feed you add, you need to add a new top-level function. In this example, you’ve done just that with The Real Python Podcast and the Talk Python to Me Podcast by using fetch_realpython_episodes() and fetch_talkpython_episodes(), respectively.
Now that you know how to add additional feeds to your application, you can move on to the next step, where you’ll look at how you can automate running the custom command and define a schedule for running it.
Step 7: Scheduling Tasks With django-apscheduler
At this point, you should have two or more RSS feeds lined up and ready to be parsed each time you run your new custom command.
In this last step, you’ll:
- Set up django-apscheduler
- Add a schedule for the custom command
- Add task logging to your application
- Get the chance to see your scheduled jobs in the Django admin
The django-apscheduler package is the Django implementation of the APScheduler library.
Note: For detailed information about APScheduler and all the possible settings you can use, review the official APScheduler docs. You can also read more about django-apscheduler on the project’s GitHub repo.
You already have django-apscheduler installed in your virtual environment. To install it into your application, you also need to add it to INSTALLED_APPS in your settings.py file:
# content_aggregator/settings.py

# ...

INSTALLED_APPS = [
    "django.contrib.admin",
    "django.contrib.auth",
    "django.contrib.contenttypes",
    "django.contrib.sessions",
    "django.contrib.messages",
    "django.contrib.staticfiles",
    # My Apps
    "podcasts.apps.PodcastsConfig",
    # Third Party Apps
    "django_apscheduler",
]
To create the django-apscheduler models, you need to run the database migration command:
(.venv) $ python manage.py migrate
This command applies the database migrations that are necessary for django-apscheduler to work properly.
Note: There’s no need to run makemigrations first, as the django-apscheduler package includes its own migration files.
Now that django-apscheduler is installed into your application, you’ll briefly explore how it works. For more detailed explanations, please see the official docs.
Each task you want to run in your custom command is referred to as a job. You’ll have a total of three jobs in your application: one for each podcast feed you wish to parse and a third for deleting old jobs from the database.
The django-apscheduler package will store your jobs in the database, and it will also store all successful and unsuccessful job runs. Having this history is great for you as the developer or site admin because you can monitor whether any tasks fail. But if these aren’t cleaned routinely from the database, your database will fill up quickly, so it’s good practice to clean old history from the database. This will also be done on a schedule.
Even though job history will be stored in the database, if any errors occur, it’s a good idea to log them for debugging. You can add some basic logging settings to your application by adding this code to settings.py:
# content_aggregator/settings.py

# ...

LOGGING = {
    "version": 1,
    "disable_existing_loggers": False,
    "handlers": {
        "console": {
            "class": "logging.StreamHandler",
        },
    },
    "root": {
        "handlers": ["console"],
        "level": "INFO",
    },
}
Now that you have added the settings for logging, you need to instantiate it in the startjobs.py file. You’ll now include some imports in startjobs.py that you’ll walk through in detail afterward. Add the logging and some other import statements that you’re going to need for the scheduler:
 1# podcasts/management/commands/startjobs.py
 2
 3# Standard Library
 4import logging
 5
 6# Django
 7from django.conf import settings
 8from django.core.management.base import BaseCommand
 9
10# Third Party
11import feedparser
12from dateutil import parser
13from apscheduler.schedulers.blocking import BlockingScheduler
14from apscheduler.triggers.cron import CronTrigger
15from django_apscheduler.jobstores import DjangoJobStore
16from django_apscheduler.models import DjangoJobExecution
17
18# Models
19from podcasts.models import Episode
20
21logger = logging.getLogger(__name__)
That might be an overwhelming amount of import statements to add at once, so let’s pick out the classes that need some explanation:
- Line 13:
BlockingScheduleris the scheduler that will run your jobs. It is blocking, so it will be the only thing running on the process. - Line 14:
CronTriggeris the type of trigger that you will use for the scheduling. - Line 15:
DjangoJobStorewill determine how the jobs are stored. In this situation, you want them in the database. - Line 16: You’ll use
DjangoJobExecutionto run the cleanup function mentioned a moment ago.
Next, you need to make use of all your import statements and set up the scheduler, trigger, and job store.
You already have two of your three job functions written, so now it’s time to add the third. Above your Command class, add in your job function:
# podcasts/management/commands/startjobs.py

# ...

def delete_old_job_executions(max_age=604_800):
    """Deletes all apscheduler job execution logs older than `max_age`."""
    DjangoJobExecution.objects.delete_old_job_executions(max_age)
The max_age parameter is an amount of seconds represented as an integer. Note that 604,800 seconds is equal to 1 week.
The next step is to create your job store and scheduler instance in the custom command’s .handle() function. You can also add in your first job:
 1# podcasts/management/commands/startjobs.py
 2
 3# ...
 4
 5def handle(self, *args, **options):
 6    scheduler = BlockingScheduler(timezone=settings.TIME_ZONE)
 7    scheduler.add_jobstore(DjangoJobStore(), "default")
 8
 9    scheduler.add_job(
10        fetch_realpython_episodes,
11        trigger="interval",
12        minutes=2,
13        id="The Real Python Podcast",
14        max_instances=1,
15        replace_existing=True,
16    )
17    logger.info("Added job: The Real Python Podcast.")
You’ll see above that you’ve successfully created your scheduler instance and added the job store. You then created your first job—The Real Python Podcast.
The .add_job() method requires a few arguments in order to successfully create a job:
- Line 10: The first argument requires a function, so you pass it the
fetch_realpython_episodesfunction object that you created earlier. Note how it doesn’t have calling parentheses when being passed. - Lines 11 and 12: You must set a trigger. For this tutorial, you are setting the interval between executions to be two minutes. This is only so you can test and see it working for yourself. However, it should definitely not be used this frequently in a production environment. You can also pass
secondsandhoursas arguments, so you can set a more realistic interval to update if you host this application in a live environment. - Line 13: All jobs must have an ID. The Django admin will also use the ID, so choose a name that’s readable and makes sense.
- Line 15: The
replace_existingkeyword argument replaces existing jobs and prevents duplicates when you restart the app.
You can check out the official APScheduler docs for a full list of all the accepted parameters that .add_job() takes.
Now that you have your first job scheduled, you can go ahead and add the last two jobs to .handle() and add in the calls to scheduler.start() and scheduler.shutdown(). Oh, and let’s sprinkle in some of that logging, too.
Your custom command class should now look like this:
# podcasts/management/commands/startjobs.py

# ...

class Command(BaseCommand):
    help = "Runs apscheduler."

    def handle(self, *args, **options):
        scheduler = BlockingScheduler(timezone=settings.TIME_ZONE)
        scheduler.add_jobstore(DjangoJobStore(), "default")

        scheduler.add_job(
            fetch_realpython_episodes,
            trigger="interval",
            minutes=2,
            id="The Real Python Podcast",
            max_instances=1,
            replace_existing=True,
        )
        logger.info("Added job: The Real Python Podcast.")

        scheduler.add_job(
            fetch_talkpython_episodes,
            trigger="interval",
            minutes=2,
            id="Talk Python Feed",
            max_instances=1,
            replace_existing=True,
        )
        logger.info("Added job: Talk Python Feed.")

        scheduler.add_job(
            delete_old_job_executions,
            trigger=CronTrigger(
                day_of_week="mon", hour="00", minute="00"
            ),  # Midnight on Monday, before start of the next work week.
            id="Delete Old Job Executions",
            max_instances=1,
            replace_existing=True,
        )
        logger.info("Added weekly job: Delete Old Job Executions.")

        try:
            logger.info("Starting scheduler...")
            scheduler.start()
        except KeyboardInterrupt:
            logger.info("Stopping scheduler...")
            scheduler.shutdown()
            logger.info("Scheduler shut down successfully!")
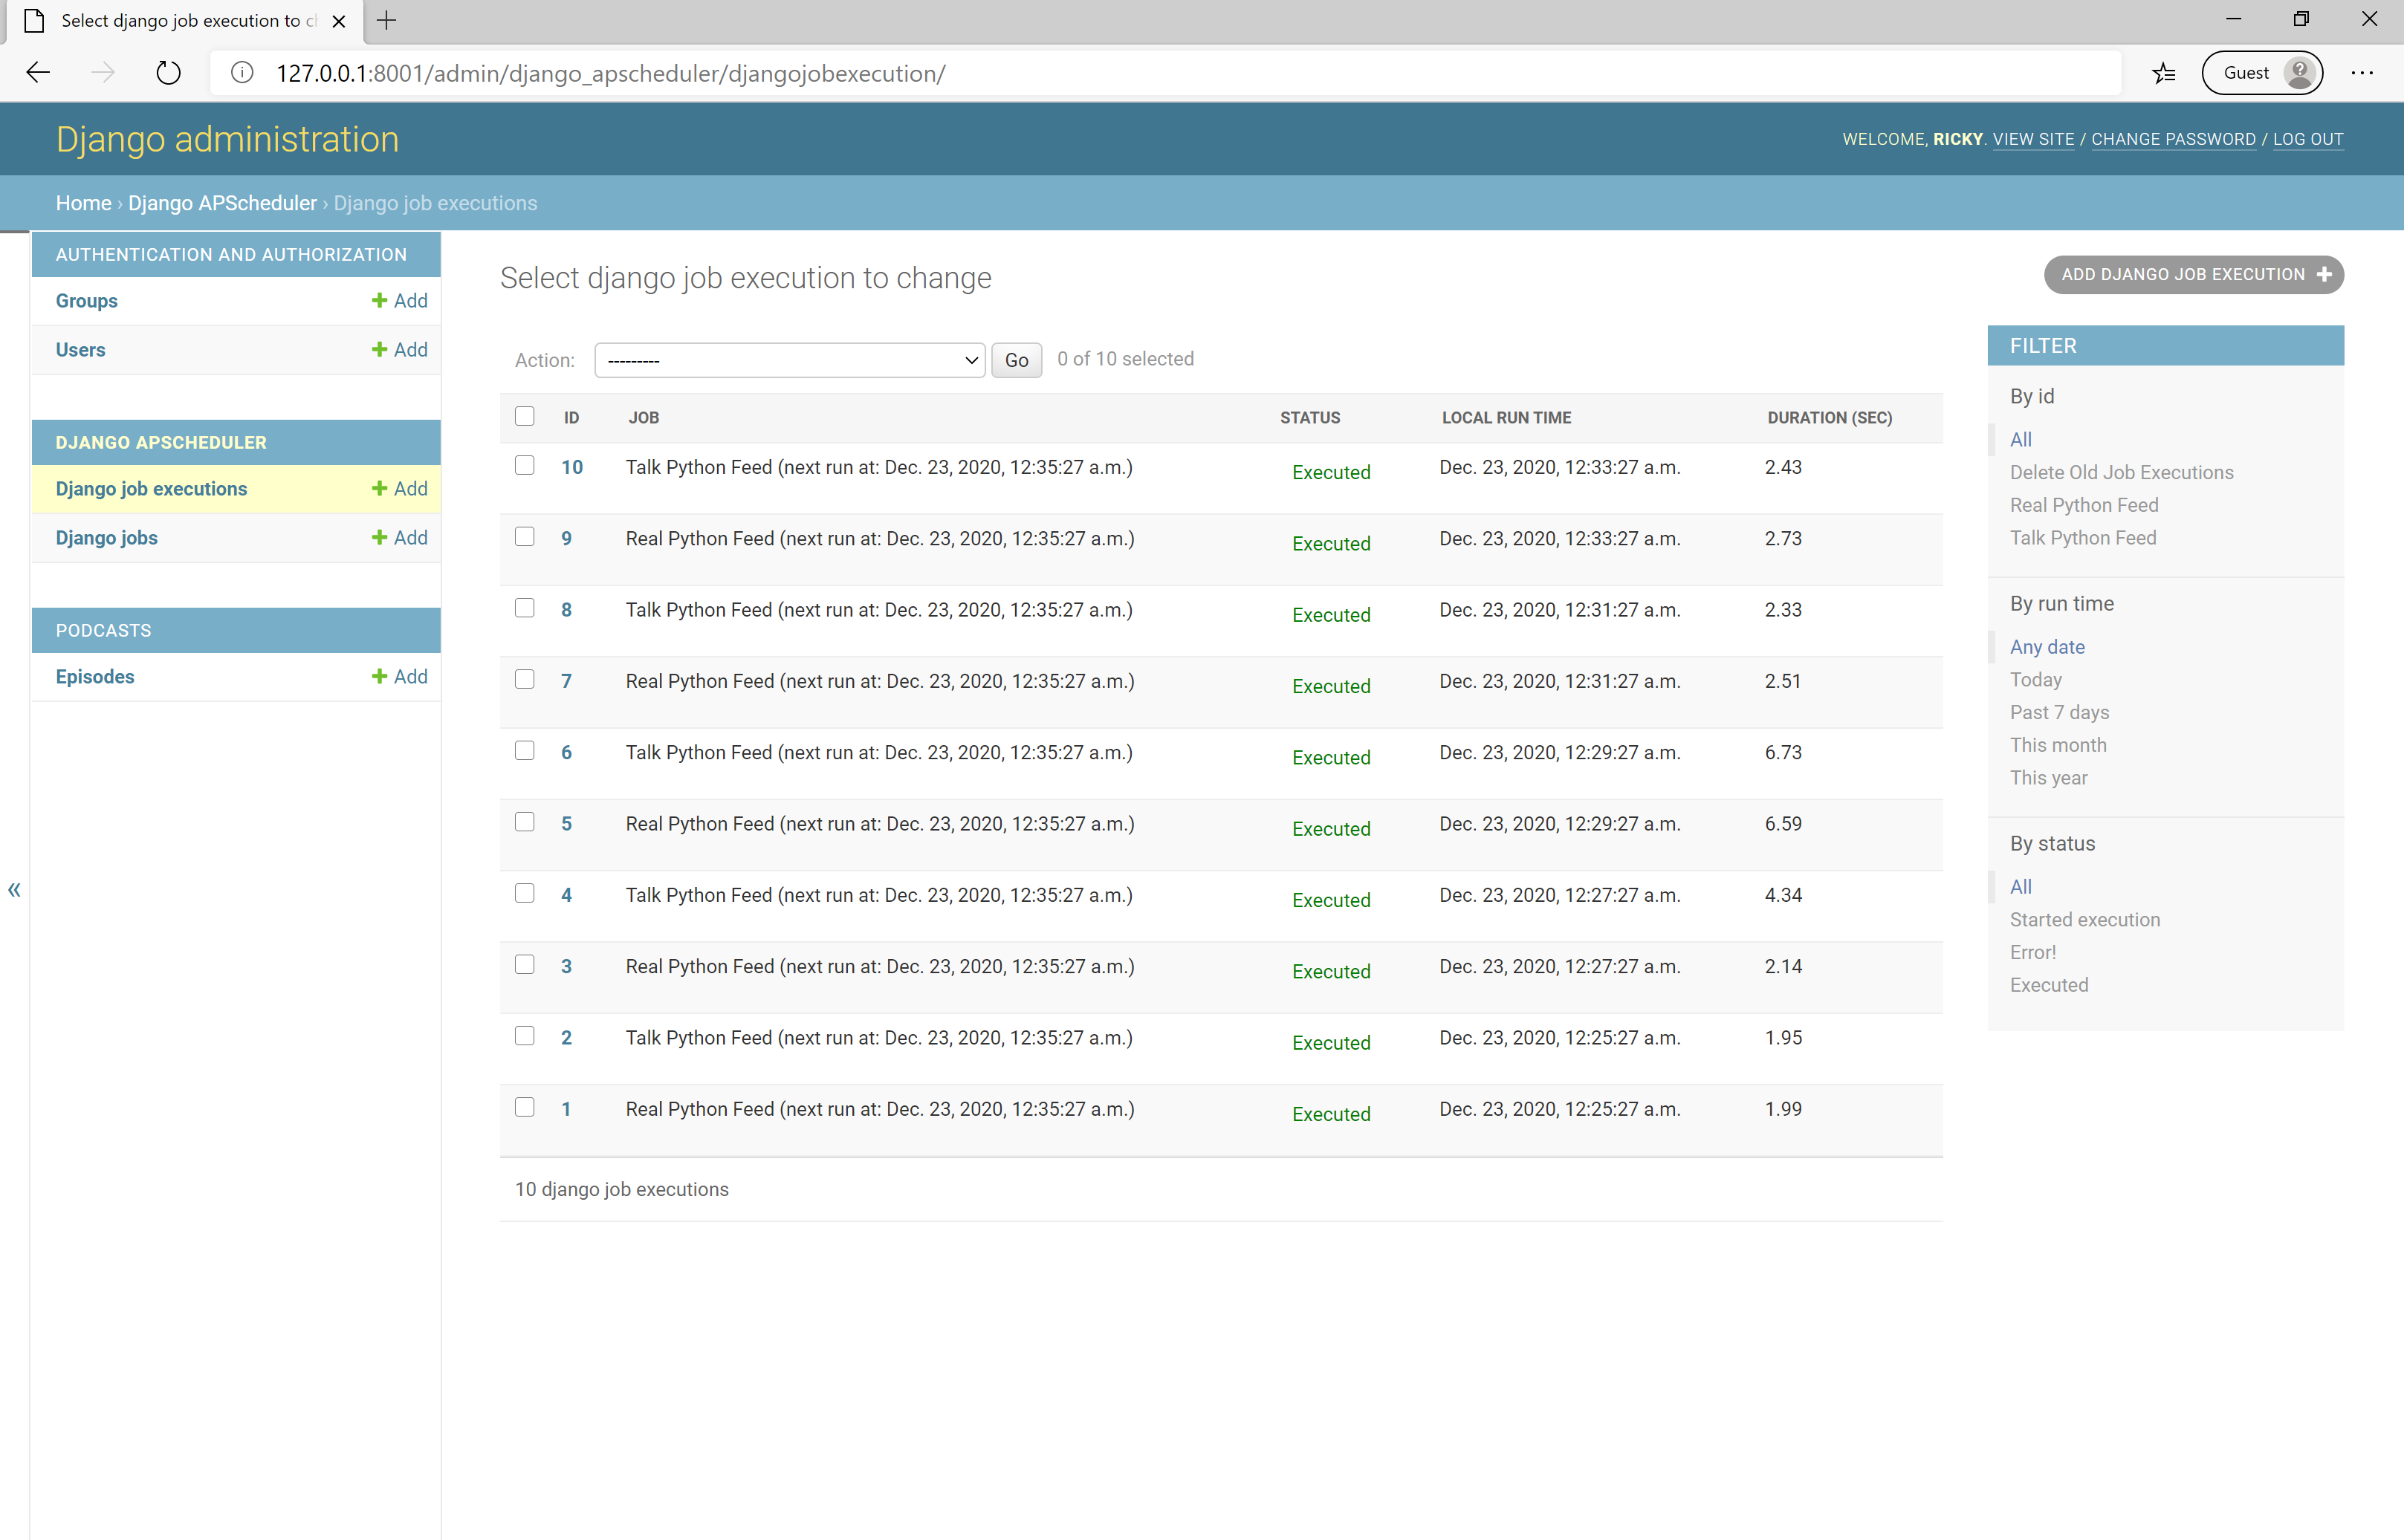
As you may recall from earlier, this scheduler runs in its own process using BlockingScheduler. In one terminal, you can run the custom command as before with python manage.py startjobs. In a separate terminal process, start your Django server. When you look at your admin dashboard, you now see that your jobs have been registered, and you can view the history:
A lot was going on in this last step, but you’ve made it to the end with a functioning app! You’ve successfully navigated how to use django-apscheduler to run your custom command automatically on a defined schedule. No small feat. Well done!
Building a project such as a content aggregator from scratch is never a quick or simple task, and you should be proud that you’ve managed to see this through to the end. Doing something that’s new and pushes you a little will only help you grow as a developer, no matter how senior you get.
Conclusion
You covered a lot in this project-based tutorial. Great job!
In this tutorial, you’ve learned:
- How to use feedparser to work with RSS feeds
- How to create and use a custom management command
- How to use django-apscheduler to automate your custom command on a personalized schedule
- How to add basic unit tests to your Django application
If you haven’t already done so, click the link below to download the code for this tutorial so you can build your own content aggregator with Python:
Get Source Code: Click here to get the source code you’ll use to build a content aggregator with Django and Python in this tutorial.
Next Steps
There are many ways that you can customize and alter this application to express yourself as a developer, especially if you plan to use it as a portfolio piece. Taking this project to the next level will help you stand out from the crowd in future job applications.
Here are some ideas to take your project to the next level:
- Add more feeds! Interested in data science? Check out The Ultimate List of Data Science Podcasts.
- Change the type of content. If podcasts aren’t your thing, maybe football news is? Or maybe you like to listen to finance podcasts instead? Whatever your interest, use this project as a stepping stone to create an aggregator for one of your passions.
- Add user accounts so that users can subscribe to the feeds that interest them. Then at the end of the day, send them an email with the new content from their subscriptions. Check out the tutorial on Django view authorization for help with this.
- Add an
is_publishedBoolean flag to theEpisodemodel so that admins can manually curate and confirm the episodes shown on the homepage. - Add a
featuredfield to theEpisodemodel so that you can highlight selected podcasts on the homepage. - Restyle the app to make it your own. Customize the CSS or rip out Bootstrap 4 in favor of Tailwind CSS. The world’s your oyster.
- Deploy the app to a production environment—for example, by hosting your Django app on Heroku.
- Customize the Django admin and supercharge your Django admin experience.
Whether you use one of the above ideas or customize the app in your own way, please share! Post a comment below to tell other readers how you made it your own. And if you push it to production, drop a link!