Watch Now This tutorial has a related video course created by the Real Python team. Watch it together with the written tutorial to deepen your understanding: Building Lists With Python's .append()
Adding items to a list is a fairly common task in Python, so the language provides a bunch of methods and operators that can help you out with this operation. One of those methods is .append(). With .append(), you can add items to the end of an existing list object. You can also use .append() in a for loop to populate lists programmatically.
In this tutorial, you’ll learn how to:
- Work with
.append() - Populate lists using
.append()and aforloop - Replace
.append()with list comprehensions - Work with
.append()inarray.array()andcollections.deque()
You’ll also code some examples of how to use .append() in practice. With this knowledge, you’ll be able to effectively use .append() in your programs.
Free Download: Get a sample chapter from Python Basics: A Practical Introduction to Python 3 to see how you can go from beginner to intermediate in Python with a complete curriculum, up-to-date for Python 3.8.
Adding Items to a List With Python’s .append()
Python’s .append() takes an object as an argument and adds it to the end of an existing list, right after its last element:
>>> numbers = [1, 2, 3]
>>> numbers.append(4)
>>> numbers
[1, 2, 3, 4]
Every time you call .append() on an existing list, the method adds a new item to the end, or right side, of the list. The following diagram illustrates the process:
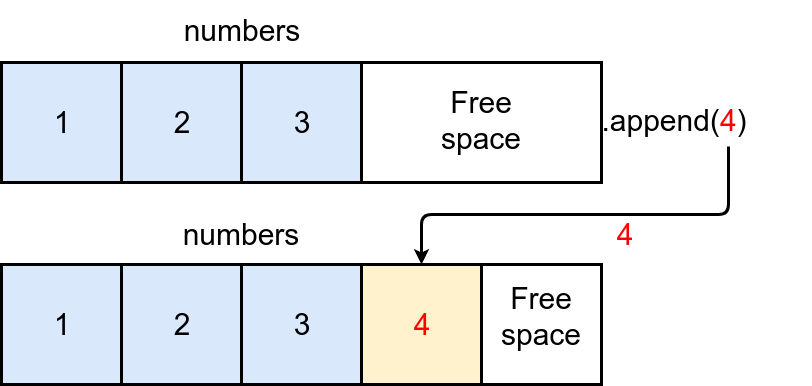
Python lists reserve extra space for new items at the end of the list. A call to .append() will place new items in the available space.
In practice, you can use .append() to add any kind of object to a given list:
>>> mixed = [1, 2]

>>> mixed.append(3)
>>> mixed
[1, 2, 3]

>>> mixed.append("four")
>>> mixed
[1, 2, 3, 'four']

>>> mixed.append(5.0)
>>> mixed
[1, 2, 3, 'four', 5.0]
Lists are sequences that can hold different data types and Python objects, so you can use .append() to add any object to a given list. In this example, you first add an integer number, then a string, and finally a floating-point number. However, you can also add another list, a dictionary, a tuple, a user-defined object, and so on.
Using .append() is equivalent to the following operation:
>>> numbers = [1, 2, 3]

>>> # Equivalent to numbers.append(4)
>>> numbers[len(numbers):] = [4]
>>> numbers
[1, 2, 3, 4]
In the highlighted line, you perform two operations at the same time:
- You take a slice from
numbersusing the expressionnumbers[len(numbers):]. - You assign an iterable to that slice.
The slicing operation takes the space after the last item in numbers. Meanwhile, the assignment operation unpacks the items in the list to the right of the assignment operator and adds them to numbers. However, there’s an important difference between using this kind of assignment and using .append(). With the assignment, you can add several items to the end of your list at once:
>>> numbers = [1, 2, 3]

>>> numbers[len(numbers):] = [4, 5, 6]
>>> numbers
[1, 2, 3, 4, 5, 6]
In this example, the highlighted line takes a slice from the end of numbers, unpacks the items in the list on the right side, and adds them to the slice as individual items.
.append() Adds a Single Item
With .append(), you can add a number, list, tuple, dictionary, user-defined object, or any other object to an existing list. However, you need to keep in mind that .append() adds only a single item or object at a time:
>>> x = [1, 2, 3, 4]
>>> y = (5, 6)

>>> x.append(y)
>>> x
[1, 2, 3, 4, (5, 6)]
What happens here is that .append() adds the tuple object y to the end of your target list, x. What if you want to add each item in y to the end of x as an individual item and get [1, 2, 3, 4, 5, 6]? In that case, you can use .extend():
>>> x = [1, 2, 3, 4]
>>> y = (5, 6, 7)
>>> x.extend(y)
>>> x
[1, 2, 3, 4, 5, 6, 7]

>>> x = [1, 2, 3, 4]
>>> y = (5, 6, 7)
>>> # Equivalent to x.extend(y)
>>> x[len(x):] = y
>>> x
[1, 2, 3, 4, 5, 6, 7]
.extend() takes an iterable as an argument, unpacks its items, and adds them to the end of your target list. This operation is equivalent to x[len(x):] = y, which is the same technique you saw in the previous section.
.append() Returns None
In practice, .append() does its work in place by modifying and growing the underlying list. This means that .append() doesn’t return a new list with an additional new item at the end. It returns None:
>>> x = [1, 2, 3, 4]
>>> y = x.append(5)
>>> y is None
True
>>> x
[1, 2, 3, 4, 5]
Like with several similar methods, .append() changes the underlying list in place. Trying to use the return value of .append() is a common mistake when it comes to learning how mutable sequence types work. Keeping this behavior of .append() in mind will help you prevent errors in your code.
Populating a List From Scratch
A common problem that you might face when working with lists in Python is how to populate them with several items for further processing. There are two ways to do this:
- Use
.append()and aforloop - Use a list comprehension
In the next few sections, you’ll learn how and when to use these techniques to create and populate Python lists from scratch.
Using .append()
One common use case of .append() is to completely populate an empty list using a for loop. Inside the loop, you can manipulate the data and use .append() to add successive results to the list. Say you need to create a function that takes a sequence of numbers and returns a list containing the square root of each number:
>>> import math

>>> def square_root(numbers):
...     result = []
...     for number in numbers:
...         result.append(math.sqrt(number))
...     return result
...

>>> numbers = [1, 4, 9, 16, 25, 36, 49, 64, 81]
>>> square_root(numbers)
[1.0, 2.0, 3.0, 4.0, 5.0, 6.0, 7.0, 8.0, 9.0]
Here, you define square_root(), which takes a list of numbers as an argument. Inside square_root(), you create an empty list called result and start a for loop that iterates over the items in numbers. In each iteration, you use math.sqrt() to calculate the square root of the current number and then use .append() to add the result to result. Once the loop finishes, you return the resulting list.
Note: In the above example, you use sqrt() from math. Python’s math module ships in the standard library and provides math-related functionalities. If you want to dive deeper into math, then check out The Python math Module: Everything You Need to Know.
This way of populating lists is fairly common in Python. However, the language provides some convenient constructs that can make the process a lot more efficient and Pythonic. One of these constructs is a list comprehension, which you’ll see in action in the next section.
Using a List Comprehension
In practice, you often replace .append() with a list comprehension when creating a list from scratch and populating it. With a list comprehension, you can reimplement square_root() like this:
>>> import math

>>> def square_root(numbers):
...     return [math.sqrt(number) for number in numbers]
...

>>> numbers = [1, 4, 9, 16, 25, 36, 49, 64, 81]
>>> square_root(numbers)
[1.0, 2.0, 3.0, 4.0, 5.0, 6.0, 7.0, 8.0, 9.0]
The list comprehension inside square_root() creates a list containing the square root of number for each number in numbers. This reads almost like plain English. Also, this new implementation will be more efficient in terms of processing time than the implementation that uses .append() along with a for loop.
Note: Python also offers other kinds of comprehensions, such as set comprehensions, dictionary comprehensions, and generator expressions.
To turn .append() into a list comprehension, you just need to put its argument followed by the loop header (without the colon) inside a pair of square brackets.
Switching Back to .append()
Even though list comprehensions can be more readable and efficient than .append() for populating lists, there might be situations where .append() is a better choice.
Suppose you need square_root() to provide your users with detailed information about the progress of calculating the square root of the input list of numbers. To report the operation progress, you can use print():
>>> import math

>>> def square_root(numbers):
...     result = []
...     n = len(numbers)
...     for i, number in enumerate(numbers):
...         print(f"Processing number: {number}")
...         result.append(math.sqrt(number))
...         print(f"Completed: {int((i + 1) / n * 100)}%")
...     return result
...

>>> numbers = [1, 4, 9, 16, 25, 36, 49, 64, 81]
>>> square_root(numbers)
Processing number: 1
Completed: 11%
...
Processing number: 81
Completed: 100%
[1.0, 2.0, 3.0, 4.0, 5.0, 6.0, 7.0, 8.0, 9.0]
Now think of how you can turn the body of square_root() into a list comprehension. Using print() inside a list comprehension doesn’t seem coherent or even possible unless you wrap part of the code in a helper function. So, in this example, using .append() is the right choice.
The moral behind the above example is that there are some situations in which you can’t replace .append() with a list comprehension or with any other construct.
Creating Stacks and Queues With Python’s .append()
So far, you’ve learned how to use .append() to add a single item to a list or to populate lists from scratch. Now it’s time for a different and more specific kind of example. In this section, you’ll learn how to use a Python list to create stack and queue data structures with the minimal required functionality using .append() and .pop().
Implementing a Stack
A stack is a data structure that stores items on top of each other. Items come in and out of the stack in a Last-In/First-Out (LIFO) fashion. Typically, a stack implements two main operations:
pushadds an item to the top, or end, of the stack.popremoves and returns the item at the top of the stack.
In a list, .append() is equivalent to a push operation, so you can use it to push items onto the stack. Lists also provide .pop(), which optionally takes an integer index as an argument. It returns the item at that index in the underlying list and also removes the item:
>>> numbers = [1, 2, 3]
>>> numbers.pop(1)
2
>>> numbers
[1, 3]

>>> numbers.pop()
3
>>> numbers
[1]

>>> numbers.pop()
1
>>> numbers
[]

>>> numbers.pop()
Traceback (most recent call last):
  File "<input>", line 1, in <module>
    numbers.pop()
IndexError: pop from empty list
If you supply an integer index as an argument to .pop(), then the method returns and removes the item at that index in the list. Calling .pop() without an argument returns the last item in the list. Note that .pop() also removes the item from the underlying list. Finally, if you call .pop() on an empty list, then you’ll get an IndexError.
With this knowledge, you’re ready to implement a stack using .append() and .pop(). Here’s a class that defines a stack. The class provides .push() and .pop() operations:
class Stack:
    def __init__(self):
        self._items = []

    def push(self, item):
        self._items.append(item)

    def pop(self):
        try:
            return self._items.pop()
        except IndexError:
            print("Empty stack")

    def __len__(self):
        return len(self._items)

    def __repr__(self):
        return f"Stack({self._items})"
In Stack, you first initialize the instance attribute ._items. This attribute holds an empty list that you’ll use to store the items in the stack. Then you code .push(), which implements the push operation using .append() on ._items.
You also implement the pop operation by calling .pop() on the underlying list, ._items. In this case, you use a try and except block to handle the IndexError that occurs when you call .pop() on an empty list.
Note: In Python, using exceptions to control the flow of a program is a common pattern. Python developers favor this coding style, known as EAFP (Easier to Ask for Forgiveness than Permission), over the coding style known as LBYL (Look Before You Leap). To learn more about these two coding styles, check out LBYL vs EAFP: Preventing or Handling Errors in Python.
EAFP can help you prevent race conditions, improve the general performance of a program or a code fragment, and prevent errors from passing silently.
You take advantage of a couple of special methods here. The special method .__len__() provides the required functionality for retrieving the length of the internal list ._items. The special method .__repr__() allows you to provide a user-friendly string representation of the stack when printing the data structure to the screen.
Here are some examples of how you can use Stack in practice:
>>> stack = Stack()

>>> # Push items onto the top of the stack
>>> stack.push(1)
>>> stack.push(2)

>>> # User-friendly printing format
>>> stack
Stack([1, 2])
>>> print(stack)
Stack([1, 2])

>>> # Retrieve the length of the stack
>>> len(stack)
2

>>> # Pop items from the top of the stack
>>> stack.pop()
2
>>> stack.pop()
1
>>> stack.pop()
Empty stack
>>> stack
Stack([])
That’s it! You’ve coded a stack data structure that implements the push and pop operations. It also provides functionality to get the length of the underlying list and to print the entire stack in a user-friendly manner.
Implementing a Queue
Queues are data structures that commonly manage their items in a First-In/First-Out (FIFO) fashion. Queues work like a pipe in which you push in new items at one end, and old items pop out from the other end.
Adding an item to the end of a queue is known as an enqueue operation, and removing an item from the front, or beginning, of a queue is known as a dequeue operation.
You can enqueue items using .append() and dequeue them using .pop(). This time, you need to provide 0 as an argument to .pop() just to make it retrieve the first item in the list instead of the last item. Here’s a class that implements a queue data structure using a list to store its items:
class Queue:
    def __init__(self):
        self._items = []

    def enqueue(self, item):
        self._items.append(item)

    def dequeue(self):
        try:
            return self._items.pop(0)
        except IndexError:
            print("Empty queue")

    def __len__(self):
        return len(self._items)

    def __repr__(self):
        return f"Queue({self._items})"
This class is quite similar to your Stack. The main difference is that .pop() takes 0 as an argument to return and removes the first item in the underlying list, ._items, rather than the last.
Note: Using .pop(0) on a Python list isn’t the most efficient way of consuming list items. Luckily, Python’s collections module provides a data structure called deque(), which implements .popleft() as an efficient way of consuming items from the beginning of the deque().
You’ll learn more about using deques a little later in the tutorial.
The rest of the implementation is almost identical but uses appropriate names, such as .enqueue() for adding items and .dequeue() for removing them. You can use Queue the same way you used Stack in the above section: just call .enqueue() to add items and .dequeue() to retrieve and remove them.
Using .append() in Other Data Structures
Other Python data structures also implement .append(). The operating principle is the same as the traditional .append() in a list. The method adds a single item to the end of the underlying data structure. However, there are some subtle differences.
In the next two sections, you’ll learn how .append() works in other data structures, such as array.array() and collections.deque().
array.append()
Python’s array.array() provides a sequence-like data structure that can compactly represent an array of values. These values must be of the same data type, which is limited to C-style data types, such as characters, integer numbers, and floating-point numbers.
array.array() takes the following two arguments:
| Argument | Content | Required |
|---|---|---|
typecode |
A single-character code that identifies the data type that the array can store | Yes |
initializer |
A list, bytes-like object, or iterable that serves as an initializer | No |
The documentation of array provides complete information about all the allowed type codes that you can use when creating arrays. The following example uses the "i" type code to create an array of integer numbers:
>>> from array import array

>>> # Array of integer numbers
>>> int_array = array("i", [1, 2, 3])
>>> int_array
array('i', [1, 2, 3])
>>> int_array[0]
1
>>> int_array[:2]
array('i', [1, 2])
>>> int_array[2] = 4
>>> int_array
array('i', [1, 2, 4])
To create an array, you need to provide a single-character code to define the data type of the values in the array. You can also provide an optional list of values with the appropriate type to initialize the array.
Arrays support most list operations, such as slicing and indexing. Like lists, array.array() also provides a method called .append(). This method works similarly to its list counterpart, adding a single value to the end of the underlying array. However, the value must have a data type that’s compatible with the existing values in the array. Otherwise, you’ll get a TypeError.
For example, if you have an array with integer numbers, then you can’t use .append() to add a floating-point number to that array:
>>> from array import array

>>> a = array("i", [1, 2, 3])
>>> a
array('i', [1, 2, 3])

>>> # Add a floating-point number
>>> a.append(1.5)
Traceback (most recent call last):
  File "<input>", line 1, in <module>
    a.append(1.5)
TypeError: integer argument expected, got float
If you try to add a floating-point number to a, then .append() fails with a TypeError. That’s because Python can’t automatically convert a floating-point number into an integer number without losing information.
In contrast, if you have an array with floating-point numbers and try to add integer numbers to it, then your operation will succeed:
>>> from array import array

>>> float_array = array("f", [1.0, 2.0, 3.0])
>>> float_array
array('f', [1.0, 2.0, 3.0])

>>> # Add and integer number
>>> float_array.append(4)
>>> float_array
array('f', [1.0, 2.0, 3.0, 4.0])
Here, you use .append() to add an integer number to an array of floating-point numbers. That’s possible because Python can automatically convert integer numbers into floating-point numbers without losing information in the process.
deque.append() and deque.appendleft()
collections.deque() is another data structure that implements a variation of .append(). A deque is a generalization of a stack and a queue specially designed to support fast and memory-efficient append and pop operations on both of its sides. So if you need to create a data structure with these features, then consider using a deque instead of a list.
Note: The name deque is pronounced “deck” and stands for double-ended queue.
collections.deque() takes the following two optional arguments:
| Argument | Content |
|---|---|
iterable |
An iterable that serves as an initializer |
maxlen |
An integer number that specifies the maximum length of the deque |
If you provide a value to maxlen, then your deque will only store up to maxlen items. Once the deque is full, adding a new item will automatically cause the item at the opposite end of the deque to be discarded. On the other hand, if you don’t supply a value to maxlen, then the deque can grow to an arbitrary number of items.
In deques, .append() also adds a single item to the end, or right side, of the underlying data structure:
>>> from collections import deque

>>> d = deque([1, "a", 3.0])
>>> d
deque([1, 'a', 3.0])

>>> d.append("b")
>>> d
deque([1, 'a', 3.0, 'b'])
Like lists, deques can hold different types of items, so .append() adds arbitrary items to the end of the deque. In other words, with .append(), you can add any object to a deque.
Besides .append(), deques also provide .appendleft(), which adds a single item to the beginning, or left side, of a deque. Similarly, deques provide .pop() and .popleft() to remove items from the right and left side of the deque, respectively:
>>> from collections import deque

>>> d = deque([1, "a", 3.0])
>>> d.appendleft(-1.0)
>>> d
deque([-1.0, 1, 'a', 3.0])

>>> d.pop()
3.0

>>> d.popleft()
-1.0

>>> d
deque([1, 'a'])
The call to .appendleft() adds -1.0 to the left side of d. On the other hand, .pop() returns and removes the last item in d, and .popleft() returns and removes the first item. As an exercise, you can try to implement your own stack or queue using a deque instead of a list. To do this, you can take advantage of the examples you saw in the section Creating Stacks and Queues With Python’s .append().
Conclusion
Python provides a method called .append() that you can use to add items to the end of a given list. This method is widely used either to add a single item to the end of a list or to populate a list using a for loop. Learning how to use .append() will help you process lists in your programs.
In this tutorial, you learned:
- How
.append()works - How to populate lists using
.append()along with aforloop - When to replace
.append()with a list comprehension - How
.append()works inarray.array()andcollections.deque()
In addition, you coded some examples of how to use .append() to create data structures, such as stacks and queues. This knowledge will allow you to use .append() to grow your lists efficiently and effectively.
Watch Now This tutorial has a related video course created by the Real Python team. Watch it together with the written tutorial to deepen your understanding: Building Lists With Python's .append()