The Model Context Protocol (MCP) is a new open protocol that allows AI models to interact with external systems in a standardized, extensible way. In this tutorial, you’ll install MCP, explore its client-server architecture, and work with its core concepts: prompts, resources, and tools. You’ll then build and test a Python MCP server that queries e-commerce data and integrate it with an AI agent in Cursor to see real tool calls in action.
By the end of this tutorial, you’ll understand:
- What MCP is and why it was created
- What MCP prompts, resources, and tools are
- How to build an MCP server with customized tools
- How to integrate your MCP server with AI agents like Cursor
You’ll get hands-on experience with Python MCP by creating and testing MCP servers and connecting your MCP to AI tools. To keep the focus on learning MCP rather than building a complex project, you’ll build a simple MCP server that interacts with a simulated e-commerce database. You’ll also use Cursor’s MCP client, which saves you from having to implement your own.
Note: If you’re curious about further discussions on MCP, then listen to the Real Python Podcast Episode 266: Dangers of Automatically Converting a REST API to MCP.
You’ll get the most out of this tutorial if you’re comfortable with intermediate Python concepts such as functions, object-oriented programming, and asynchronous programming. It will also be helpful if you’re familiar with AI tools like ChatGPT, Claude, LangChain, and Cursor.
Get Your Code: Click here to download the free sample code that shows you how to use Python MCP to connect your LLM With the World.
Take the Quiz: Test your knowledge with our interactive “Python MCP Server: Connect LLMs to Your Data” quiz. You’ll receive a score upon completion to help you track your learning progress:
Interactive Quiz
Python MCP Server: Connect LLMs to Your DataTest your knowledge of Python MCP. Practice installation, tools, resources, transports, and how LLMs interact with MCP servers.
Installing Python MCP
Python MCP is available on PyPI, and you can install it with pip. Open a terminal or command prompt, create a new virtual environment, and then run the following command:
(venv) $ python -m pip install "mcp[cli]"
This command will install the latest version of MCP from PyPI onto your machine. To verify that the installation was successful, start a Python REPL and import MCP:
>>> import mcp
If the import runs without error, then you’ve successfully installed MCP. You’ll also need pytest-asyncio for this tutorial:
(venv) $ python -m pip install pytest-asyncio
It’s a pytest plugin that adds asyncio support, which you’ll use to test your MCP server. With that, you’ve installed all the Python dependencies you need, and you’re ready to dive into MCP! You’ll start with a brief introduction to MCP and its core concepts.
What Is MCP?
Before diving into the code for this tutorial, you’ll learn what MCP is and the problem it tries to solve. You’ll then explore MCP’s core primitives—prompts, resources, and tools.
Understanding MCP
The Model Context Protocol is a protocol for AI language models, often referred to as large language models (LLMs), that standardizes how they interact with the outside world. This interaction most often involves performing actions like sending emails, writing and executing code, making API requests, browsing the web, and much more.
You might be wondering how LLMs are capable of this. How can an LLM that accepts text as input and returns text as output possibly perform actions? The key to this capability lies in function calling—a process through which LLMs execute predefined functions in a programming language like Python. At a high level, here’s what an LLM function-calling workflow might look like:
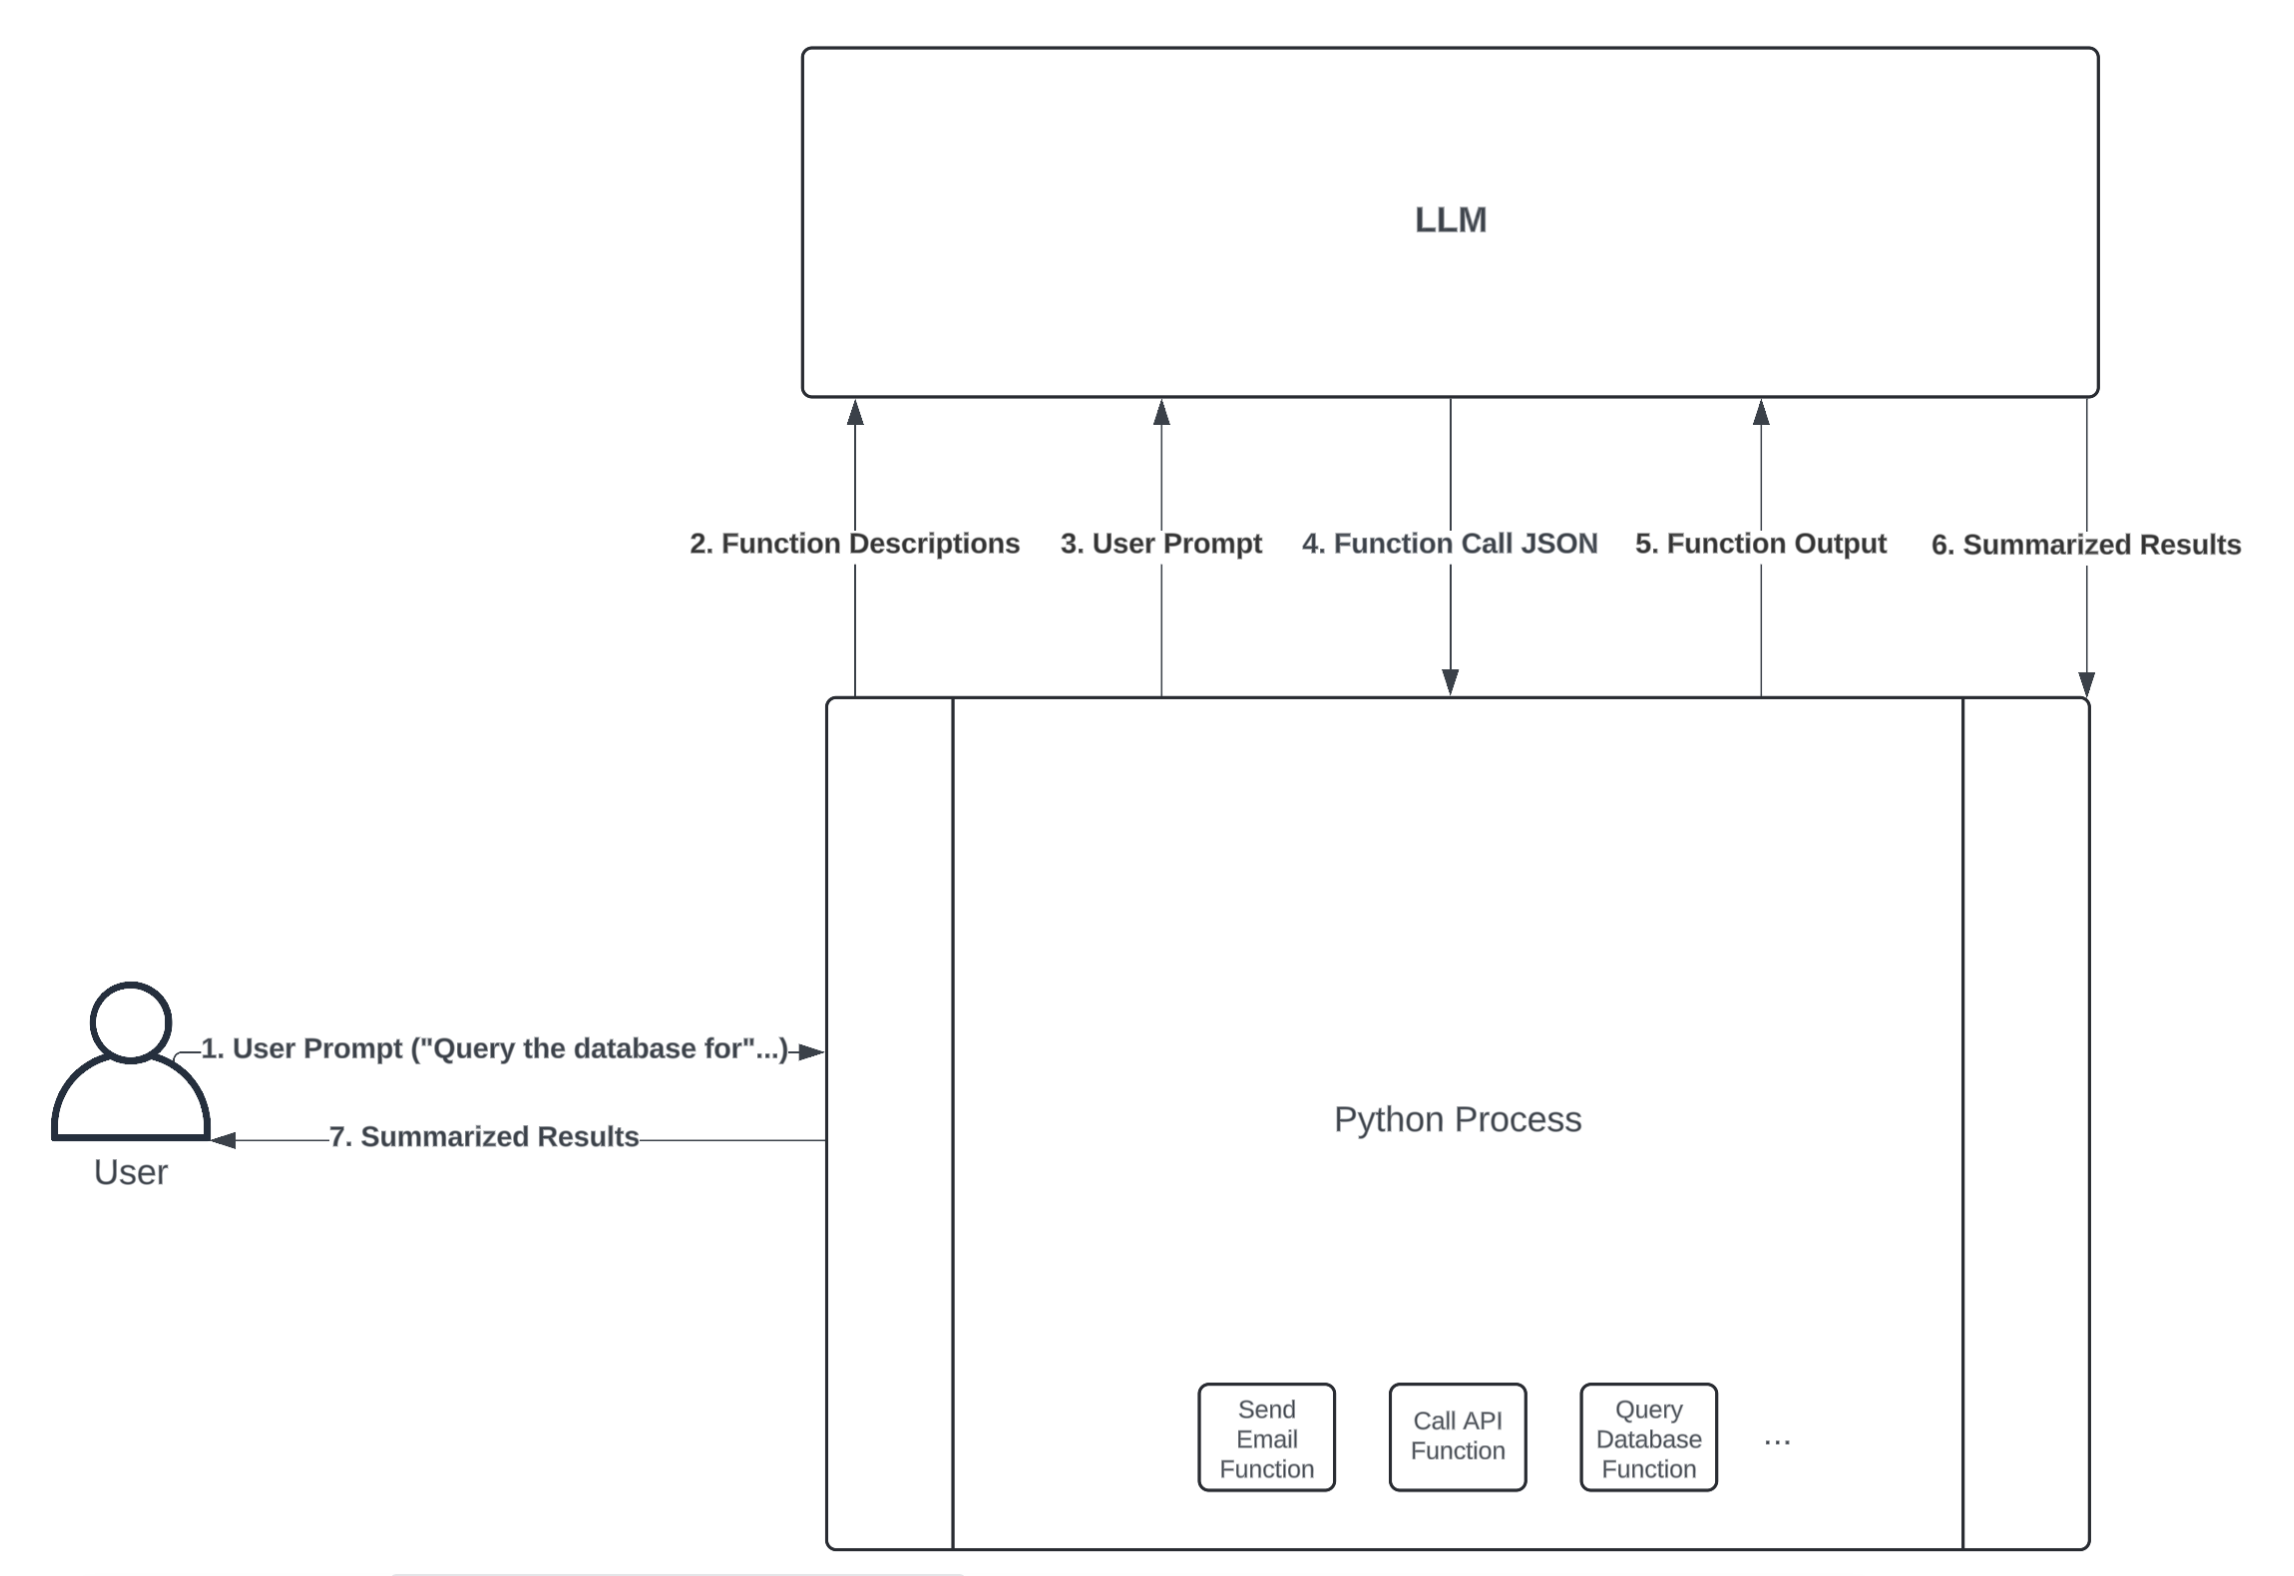
The diagram above illustrates how an LLM and Python process could interact to perform an action through function calling. Here’s a breakdown of each step:
-
User Prompt: The user first sends a prompt to the Python process. For example, the user might ask a question that requires a database query to answer, such as “How many customers have ordered our product today?”
-
Function Descriptions: The Python process can expose several functions to the LLM, allowing it to decide which one to call. You do this by type hinting your functions’ input arguments and writing thorough docstrings that describe what your functions do. An LLM framework like LangChain will convert your function definition into a text description and send it to an LLM along with the user prompt.
-
User Prompt: In combination with the function descriptions, the LLM also needs the user prompt to guide which function(s) it should call.
-
Function Call JSON: Once the LLM receives the user prompt and a description of each function available in your Python process, it can decide which function to call by sending back a JSON string. The JSON string must include the name of the function that the LLM wants to execute, as well as the inputs to pass to that function. If the JSON string is valid, then your Python process can convert it into a dictionary and call the respective function.
-
Function Output: If your Python process successfully executes the function call specified in the JSON string, it then sends the function’s output back to the LLM for further processing. This is useful because it allows the LLM to interpret and summarize the function’s output in a human-readable format.
-
Summarized Results: The LLM returns summarized results back to the Python process. For example, if the user prompt is “How many customers have ordered our product today?”, the summarized result might be “10 customers have placed orders today.” Despite all of the work happening between the Python process and the LLM to query the database in this example, the user experience is seamless.
-
Summarized Results: Lastly, the Python process gives the LLM’s summarized results to the user.
The power of MCP lies in its standardized architecture built around clients and servers. An MCP server is an API that hosts the prompts, resources, and tools you want to make available to an LLM. You’ll learn about prompts, resources, and tools shortly.
An MCP client acts as the bridge between the LLM and the server—exposing the server’s content, receiving input from the LLM, executing tools on the server, and returning the results back to the model or end user.
Note: You probably noticed that the user prompt goes through the Python process before reaching the LLM, and this might be a point of confusion. Tool calling processes, like LangChain or Cursor, receive your user prompt before passing it to the underlying LLM via an API call. In this way, you’re not directly interacting with the LLM API. Instead, the Python process, or any other tool you’re using, acts as a mediator between you and the LLM.
Unlike in the diagram above, where everything executes through a single process, you typically deploy MCP clients and servers as separate, decoupled processes. Users typically interact with MCP clients hosted in chat interfaces rather than making requests directly to servers. This is massively advantageous because any MCP client can interact with any server that adheres to the MCP protocol.
In other words, if you have an MCP client hosted in, say, a chat interface, you can connect as many MCP servers as the client supports. You, as an MCP server developer, can focus solely on creating the tools you need your LLM applications to use rather than spending time writing boilerplate code to create the interaction between your tools and the LLM.
For the broader open-source community, this means developers don’t have to waste time writing custom integrations for commonly used services like GitHub, Gmail, Slack, and others. In fact, the vast majority of companies that developers rely on have already created MCP servers for their services.
MCP is also useful if you work for a large organization or want to avoid rewriting logic when you switch LLM frameworks. Simply expose what your organization needs through MCP servers, and any application with an MCP client can leverage it.
For the remainder of this tutorial, you’ll focus solely on building, testing, and using MCP servers. You can read more about the intricacies of how MCP clients work in the official MCP documentation. Up next, you’ll briefly explore the core primitives of MCP servers—prompts, resources, and tools.
Exploring Prompts, Resources, and Tools
As already mentioned, MCP servers support three core primitives—prompts, resources, and tools—each serving a distinct role in how LLMs interact with external systems.
If you have any experience with LangChain, LangGraph, LlamaIndex, or any other prompt engineering framework, then you’re probably familiar with prompts. Prompts define reusable templates that guide LLM interactions. They allow servers to expose structured inputs and workflows that users or clients can invoke with minimal effort. Prompts can accept arguments, reference external context, and guide multi-step interactions.
Storing prompts on MCP servers allows you to reuse instructions that you’ve found helpful with LLM interactions in the past. You can think of a prompt as a formatted Python string. For example, if you want any LLM to read and summarize customer reviews, then you might add the following prompt to your MCP server:
"""
Your job is to use customer reviews to answer questions about
their shopping experience. Use the following context to answer
questions. Be as detailed as possible, but don't make up any
information that's not from the context. If you don't know an
answer, say you don't know.

{context}

{question}
"""
The LLM, and subsequently the MCP client, could fetch customer reviews, put them in place of the context parameter, and then place your specific question about the customer reviews in place of the question parameter. The benefit is that it saves you from having to rewrite the instruction in the prompt every time you want to analyze reviews.
The next server primitive you should understand is the resource. All you need to know about resources is that they expose data to the LLM. This data can be just about anything, but common examples include documents, files, images, database entries, logs, and even videos. Unlike prompts, resources are usually selected by the LLM, not the user. However, some clients require you to opt into specific resources, while others may infer usage contextually.
Resources are read-only and represented via URIs, supporting both text and binary formats. For example, you might expose your employee handbook as a resource with the URI file:///home/user/documents/employee_handbook.pdf. This way, any employee using an MCP client with access to your server can ask a question about the handbook, and the underlying LLM will use the file you’ve exposed to answer.
The last and most important primitive you should care about is the tool. Tools are nothing more than functions hosted by API endpoints that allow LLMs to trigger real-world actions. Tools can encapsulate virtually any logic that you can write in a programming language.
Unlike prompts and resources, tools are designed to be model-invoked with client-side approval as needed. Each tool is defined with a JSON schema for its input, and annotations can hint at safety properties like idempotence or potential destructiveness.
Tools are the most powerful and commonly used primitives, enabling LLMs to interact dynamically with external systems, and you’ll spend the next section building an MCP server with several tools. You won’t create your own prompts and resources in this tutorial, but if you’re interested in learning more, check out the MCP documentation.
Building an MCP Server
Now that you have a high-level understanding of MCP and the core primitives of MCP servers, you’re ready to build your own MCP server! In this section, you’ll build and test a server that’ll be used by an e-commerce LLM agent. You’ll build tools that can fetch customer information, order statuses, and inventory details. Later in this tutorial, you’ll learn how to expose these tools to an LLM agent through an MCP client.
Defining MCP Tools
Before you create your MCP server and define tools for your e-commerce business, you’ll want to create a few dictionaries to simulate tables in a transactional database. You can add the dictionaries in a script called transactional_db.py:
transactional_db.py
CUSTOMERS_TABLE = {
    "CUST123": {
        "name": "Alice Johnson",
        "email": "alice@example.com",
        "phone": "555-1234",
    },
    "CUST456": {
        "name": "Bob Smith",
        "email": "bob@example.com",
        "phone": "555-5678",
    },
}

ORDERS_TABLE = {
    "ORD1001": {
        "customer_id": "CUST123",
        "date": "2024-04-01",
        "status": "Shipped",
        "total": 89.99,
        "items": ["SKU100", "SKU200"],
    },
    "ORD1015": {
        "customer_id": "CUST123",
        "date": "2024-05-17",
        "status": "Processing",
        "total": 45.50,
        "items": ["SKU300"],
    },
    "ORD1022": {
        "customer_id": "CUST456",
        "date": "2024-06-04",
        "status": "Delivered",
        "total": 120.00,
        "items": ["SKU100", "SKU100"],
    },
}

PRODUCTS_TABLE = {
    "SKU100": {"name": "Wireless Mouse", "price": 29.99, "stock": 42},
    "SKU200": {"name": "Keyboard", "price": 59.99, "stock": 18},
    "SKU300": {"name": "USB-C Cable", "price": 15.50, "stock": 77},
}
In this simulated database, you have tables to store customer, order, and product information—the three tables are related through foreign keys. For example, the first entry in ORDERS_TABLE, ORD1001, was placed by Alice Johnson for a wireless mouse and keyboard. The wireless mouse and keyboard have product IDs SKU100 and SKU200, respectively, and Alice Johnson’s customer ID is CUST123.
These tables are the primary data that your MCP server tools will query, return to the MCP client, and ultimately expose to an LLM. To start, suppose that the first capability you want to add to your server is a customer ID lookup. For example, you might ask an LLM a question like, “Can you show me the information for customer CUST123?”, and it will know how to search through CUSTOMERS_TABLE to find the relevant information.
You can accomplish this with the following code in a new script called main.py:
main.py
import asyncio
from mcp.server.fastmcp import FastMCP
from transactional_db import CUSTOMERS_TABLE, ORDERS_TABLE, PRODUCTS_TABLE

mcp = FastMCP("ecommerce_tools")

@mcp.tool()
async def get_customer_info(customer_id: str) -> str:
    """Search for a customer using their unique identifier"""

    customer_info = CUSTOMERS_TABLE.get(customer_id)

    if not customer_info:
        return "Customer not found"

    return str(customer_info)
You first import dependencies along with the database dictionaries you created—you’ll use all of these in a moment. Then, you instantiate an MCP server named ecommerce_tools by calling FastMCP("ecommerce_tools"). Lastly, you create a tool, defined by get_customer_info(), which fetches customer information from CUSTOMERS_TABLE using the customer_id argument.
The decorator, @mcp.tool(), does a lot of work under the hood to ensure your tool is properly deployed and exposed to the MCP client. One of its most important roles is to convert your function definition into text so that an LLM can understand and use your tool. Because of this, it’s crucial to write informative docstrings and to annotate your MCP tool functions, so that an LLM understands what your tool does or how to call it.
Next, you’ll define a few more tools that you want your LLM agent to use:
main.py
# ...

@mcp.tool()
async def get_order_details(order_id: str) -> str:
    """Get details about a specific order."""
    await asyncio.sleep(1)
    order = ORDERS_TABLE.get(order_id)
    if not order:
        return f"No order found with ID {order_id}."

    items = [
        PRODUCTS_TABLE[sku]["name"]
        for sku in order["items"]
        if sku in PRODUCTS_TABLE
    ]
    return (
        f"Order ID: {order_id}\n"
        f"Customer ID: {order['customer_id']}\n"
        f"Date: {order['date']}\n"
        f"Status: {order['status']}\n"
        f"Total: ${order['total']:.2f}\n"
        f"Items: {', '.join(items)}"
    )

@mcp.tool()
async def check_inventory(product_name: str) -> str:
    """Search inventory for a product by product name."""
    await asyncio.sleep(1)
    matches = []
    for sku, product in PRODUCTS_TABLE.items():
        if product_name.lower() in product["name"].lower():
            matches.append(
                f"{product['name']} (SKU: {sku}) — Stock: {product['stock']}"
            )
    return "\n".join(matches) if matches else "No matching products found."

@mcp.tool()
async def get_customer_ids_by_name(customer_name: str) -> list[str]:
    """Get customer IDs by using a customer's full name"""
    await asyncio.sleep(1)
    return [
        cust_id
        for cust_id, info in CUSTOMERS_TABLE.items()
        if info.get("name") == customer_name
    ]

@mcp.tool()
async def get_orders_by_customer_id(
    customer_id: str,
) -> dict[str, dict[str, str]]:
    """Get orders by customer ID"""
    await asyncio.sleep(1)
    return {
        order_id: order
        for order_id, order in ORDERS_TABLE.items()
        if order.get("customer_id") == customer_id
    }

if __name__ == "__main__":
    mcp.run(transport="stdio")
Here’s what each tool does:
-
get_order_details(): Retrieves detailed information about a specific order using theorder_id, including customer ID, date, status, total, and item names. -
check_inventory(): Searches the product inventory byproduct_nameand returns matching products with their SKU and current stock level. -
get_customer_ids_by_name(): Looks up and returns all customer IDs associated with the given fullcustomer_name. -
get_orders_by_customer_id(): Returns a dictionary of all orders placed by the specifiedcustomer_id, with order IDs as keys and order details as values.
Later on, you’ll expose these tools to an LLM agent and see how they’re used. In this e-commerce example, you can imagine that there are several MCP clients hosted in chat interfaces throughout your company. By defining these tools in your MCP server and deploying them, everyone with these MCP clients can use your tools seamlessly. You’ll see this in action in the next section.
Note: You probably noticed that each tool in your MCP server code has an await asyncio.sleep() statement. This simulates a slight delay in querying the database, but it also releases the active thread so that your server can accept more requests. If your database calls were truly asynchronous, then this functionality would help your server scale to a larger request volume than if you used synchronous programming.
If you’re interested in learning more about asynchronous programming, check out the tutorial Getting Started With Async Features in Python.
The last two lines in main.py run your server. By specifying transport="stdio" in mcp.run(), you’re deploying your server using standard input/output (I/O) streams for communication between the client and server.
All you need to know for this tutorial is that stdio is great for testing your server locally. However, it’s not the right protocol for production use cases because it only allows single client connections, lacks network accessibility, and has no authentication mechanism.
With that, you’ve completed the development of your MCP server! Up next, you’ll run your server and test that everything is working.
Testing Your MCP Server
Before connecting your server to an MCP client, it’s important to verify that your server is running and that the tools you’ve created are available to the client. To do this, you’ll write a unit test that connects to your MCP server in the same way an MCP client would. This will give you a deeper understanding of how MCP clients interact with your server and expose tools to LLMs.
Start by importing dependencies and defining a few variables you’ll need in test_server.py, which you can create in a tests/ subfolder:
tests/test_server.py
import asyncio
import pytest
from contextlib import AsyncExitStack
from mcp import ClientSession, StdioServerParameters
from mcp.client.stdio import stdio_client

SERVER_PATH = "/path/to/your/file/main.py"
EXPECTED_TOOLS = [
    "get_customer_info",
    "get_order_details",
    "check_inventory",
    "get_customer_ids_by_name",
    "get_orders_by_customer_id",
]
After importing the dependencies you’ll use in your unit test, you define SERVER_PATH, which is the local file path to the code that runs your server. You should replace the placeholder text shown above with the actual path you’re using in your project.
You also define EXPECTED_TOOLS, which is a list of the tools you created in the last section that you expect your server to have. Note that the EXPECTED_TOOLS are the function names from your server.
You’re now ready to define a test for your server:
tests/test_server.py
15# ...
16
17@pytest.mark.asyncio
18async def test_mcp_server_connection():
19    """Connect to an MCP server and verify the tools"""
20
21    exit_stack = AsyncExitStack()
22
23    server_params = StdioServerParameters(
24        command="python", args=[SERVER_PATH], env=None
25    )
26
27    stdio_transport = await exit_stack.enter_async_context(
28        stdio_client(server_params)
29    )
30    stdio, write = stdio_transport
31    session = await exit_stack.enter_async_context(
32        ClientSession(stdio, write)
33    )
34
35    await session.initialize()
36
37    response = await session.list_tools()
38    tools = response.tools
39    tool_names = [tool.name for tool in tools]
40    tool_descriptions = [tool.description for tool in tools]
41
42    print("\nYour server has the following tools:")
43    for tool_name, tool_description in zip(tool_names, tool_descriptions):
44        print(f"{tool_name}: {tool_description}")
45
46    assert sorted(EXPECTED_TOOLS) == sorted(tool_names)
47
48    await exit_stack.aclose()
You defined test_mcp_server_connection() as an asynchronous function, which connects to your server, displays the server’s tool names and descriptions, and asserts that all of the expected tools are there.
You begin your function with a decorator, @pytest.mark.asyncio, allowing pytest to run your asynchronous function in an event loop. Then, you instantiate an AsyncExitStack object that manages multiple async with contexts for proper cleanup, especially for open connections to your server.
In lines 23 to 35, you connect to your server and initialize a client session. By doing so, you access a host of methods that interact with your server. For instance, on line 37, you call await session.list_tools(), which makes a request to your server to extract the names and descriptions of all the available tools. Recall that you never explicitly wrote a list_tools() function in your server—MCP takes care of this for you automatically.
In lines 38 to 48, you extract the names and descriptions of your tools, print this information, assert that you have all of the EXPECTED_TOOLS, and close the connection to your server.
You can run your test from a terminal using the pytest -s command, but don’t forget to update the SERVER_PATH constant if you haven’t already:
(venv) $ pytest -s
======================== test session starts========================

Your server has the following tools:
get_customer_info: Search for a customer using their unique identifier.
get_order_details: Get details about a specific order.
check_inventory: Search inventory for a product by product name.
get_customer_ids_by_name: Get customer IDs by using a customer's full name.
get_orders_by_customer_id: Get orders by customer ID.
.

======================== 1 passed in 0.96s =========================
You run pytest with the -s command to display the output of your print() calls. From the output, you can see that the client successfully extracted the tool names and descriptions from your server. This means that your server is running and that the tools are ready to use.
Don’t get too bogged down with the details in the code above. All you need to take away is the following:
- Your MCP server is running and all of the expected tools are present.
- An MCP client, and subsequently an LLM, can use your MCP server.
You’re now ready to hook your server into an actual MCP client and LLM using Cursor, and that’s what you’ll do in the next section!
Connecting an AI Agent to Your Server
The power of MCP is that you can seamlessly connect servers to clients hosted in various applications like Cursor, Claude Code, Windsurf, LangChain, and any other software that supports MCP clients. In this final section, you’ll let an LLM interact with your MCP server through Cursor—a popular AI code editor.
Setting Up Cursor
Cursor is an AI code editor that makes it straightforward to develop, test, and deploy AI-assisted code. Cursor is a fork of VS Code, which is arguably the most popular code editor worldwide. This gives you the familiarity and comfort of an editor that you probably already use, while also allowing you to fully leverage AI assistance. Most importantly for this tutorial, Cursor hosts an MCP client that allows you to connect to multiple servers.
To get started, visit Cursor’s website and download the version of Cursor that’s most compatible with your computer. Cursor has both a free and paid version. All the examples you’ll see in this tutorial use the free version, but keep in mind that the free version is substantially limited in the number of requests you can make and the LLMs you can use.
While the primary use case for Cursor is to write AI-assisted code through Tab completions and an agentic chat interface, you’ll exclusively use the chat interface in this section. Once you’ve installed and opened Cursor, the first thing you’ll want to do is open the settings:
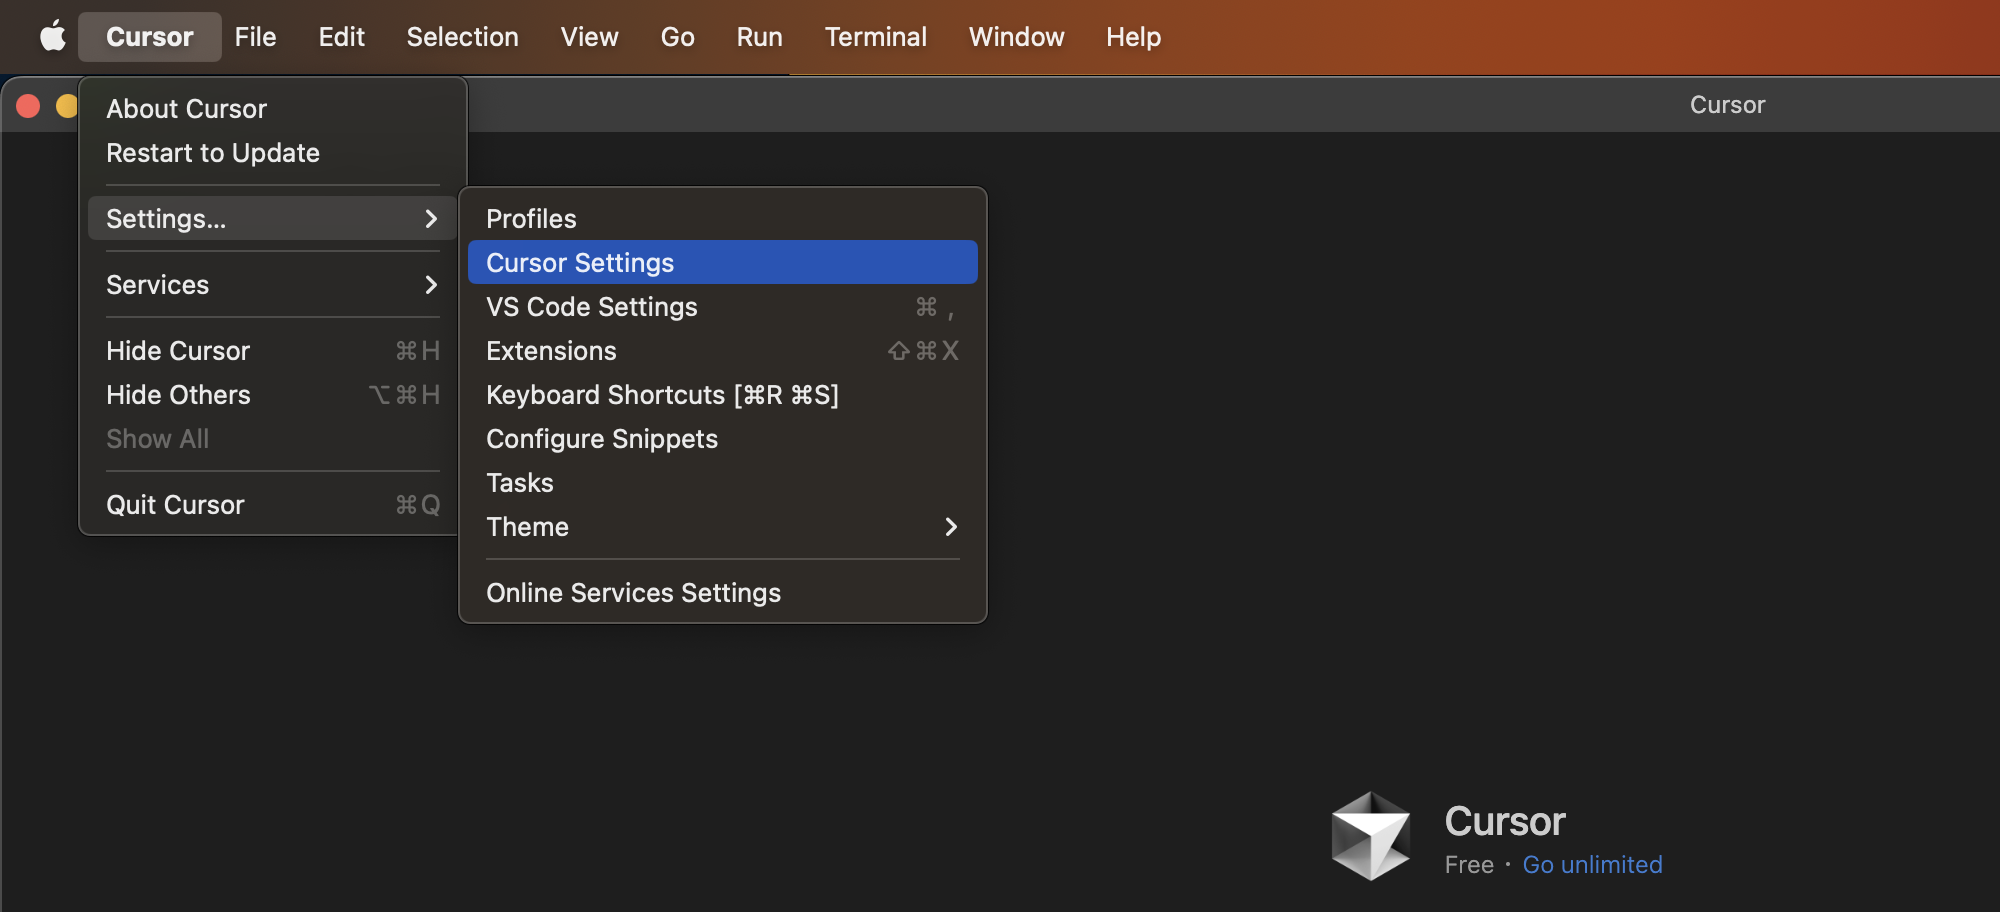
You must click the Sign in button under the General tab to get started with Cursor’s AI features. Then, switch to the MCP tab:
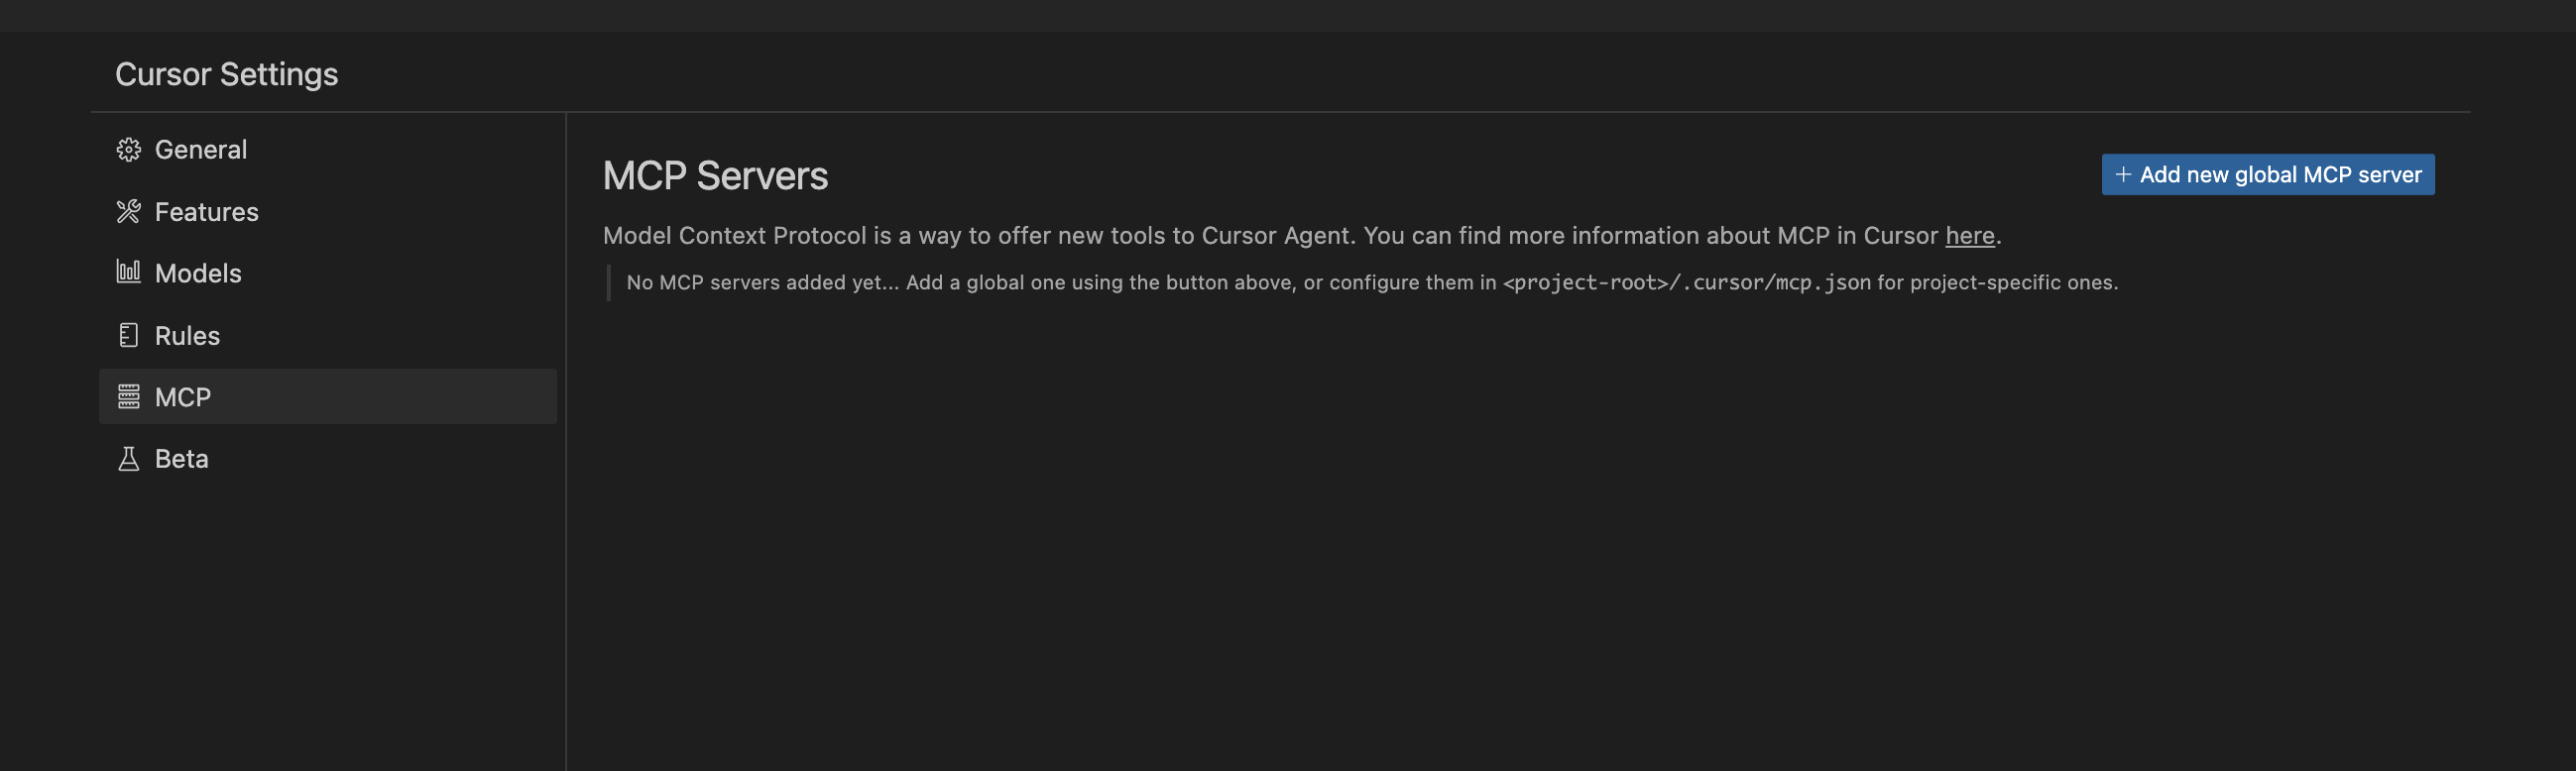
If you’ve never used MCP servers on Cursor before, this section should be empty. To add your e-commerce server, click Add new global MCP server. A JSON file will appear, which you can fill out to look something like this:
{
  "mcpServers": {
   "ecommerce-db-server": {
     "command": "/path/to/your/environment/.venv/bin/python",
     "args": [
       "/path/to/your/file/main.py"
     ],
     "description": "A set of tools that you can use to look up customer, order, and product information in a transactional database"
   }
 }
}
Here, you’ve defined your MCP server specifications and named it ecommerce-db-server. The command argument tells the MCP client where to find your Python environment, and the args list gives the client commands to run your server. Lastly, the description argument gives the LLM a brief explanation of what your server does. After you’ve saved this file, you can go back to the MCP settings and see that it’s running:
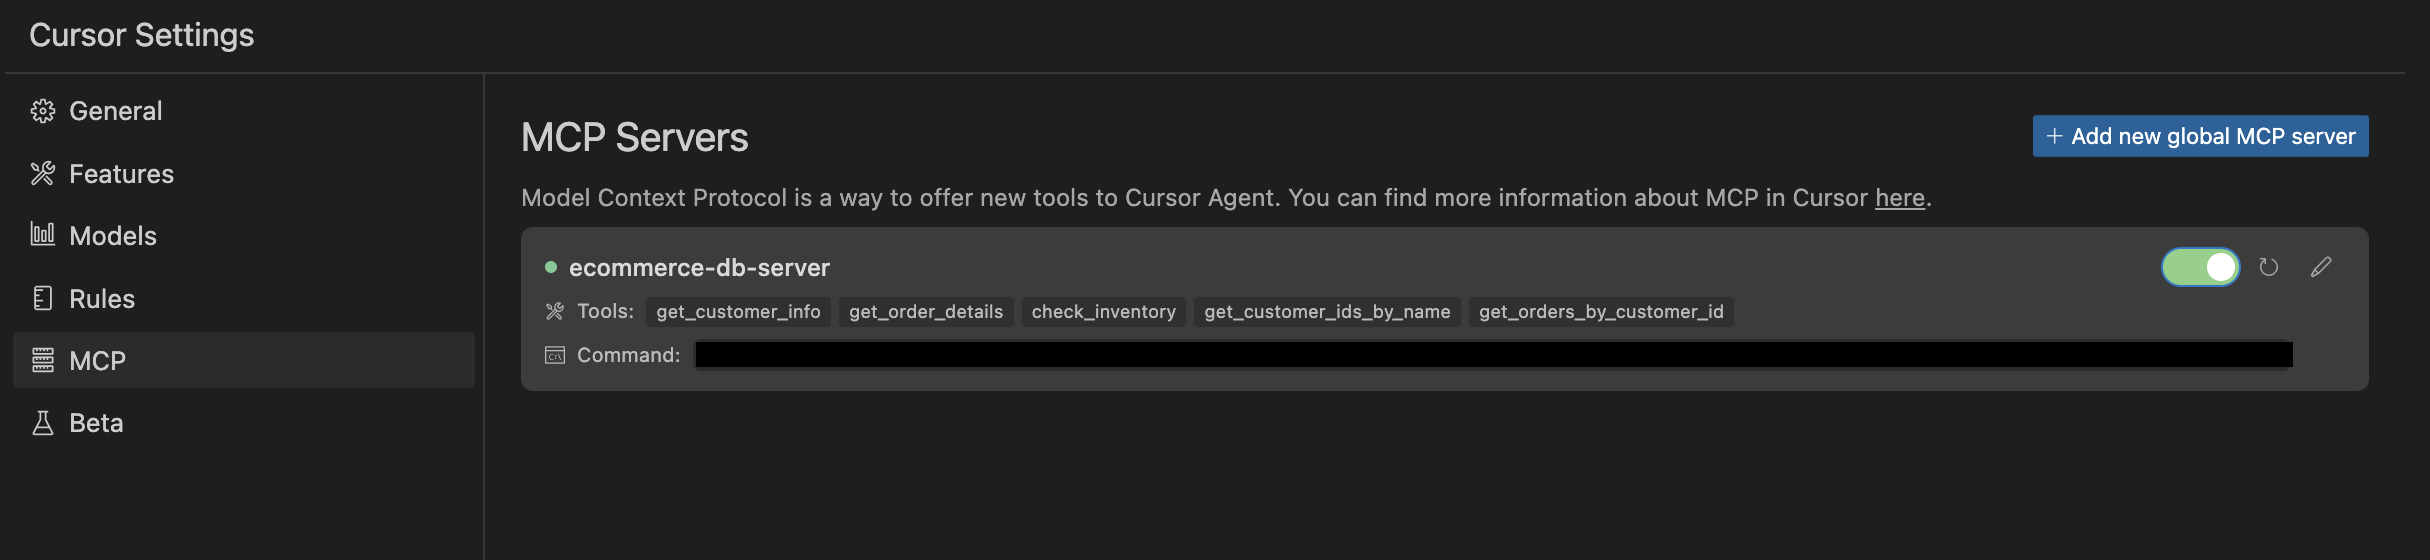
If you see a green dot next to your server name, this means Cursor’s MCP client recognizes your server and is ready to expose it to an LLM. You’re finally ready to let the rubber meet the road and use your MCP server in Cursor!
Using Your MCP Server in Cursor
To start using your server, open a Cursor chat window by clicking the icon in the top-right corner, just to the left of the settings gear:
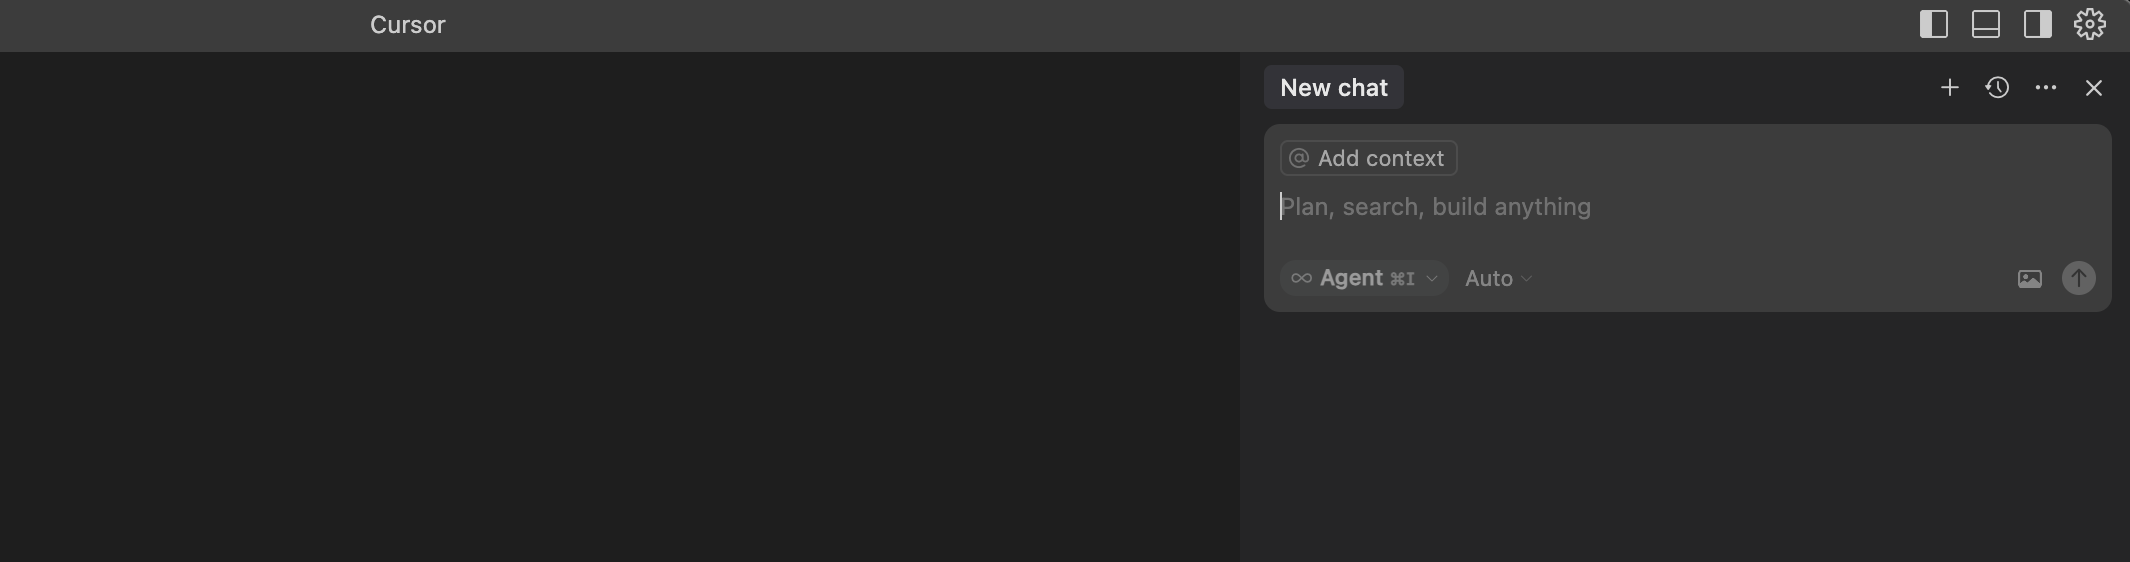
This chat window gives you access to an LLM that interacts with Cursor’s MCP client and any servers you add. Notice the dropdown labeled Auto, which you can click to select different LLMs. This tutorial uses the default LLM for the free versions of Cursor, which may change over time, but you can select a different LLM depending on your pricing tier.
Now that the chat window is up, you can ask the LLM a question about your e-commerce data:
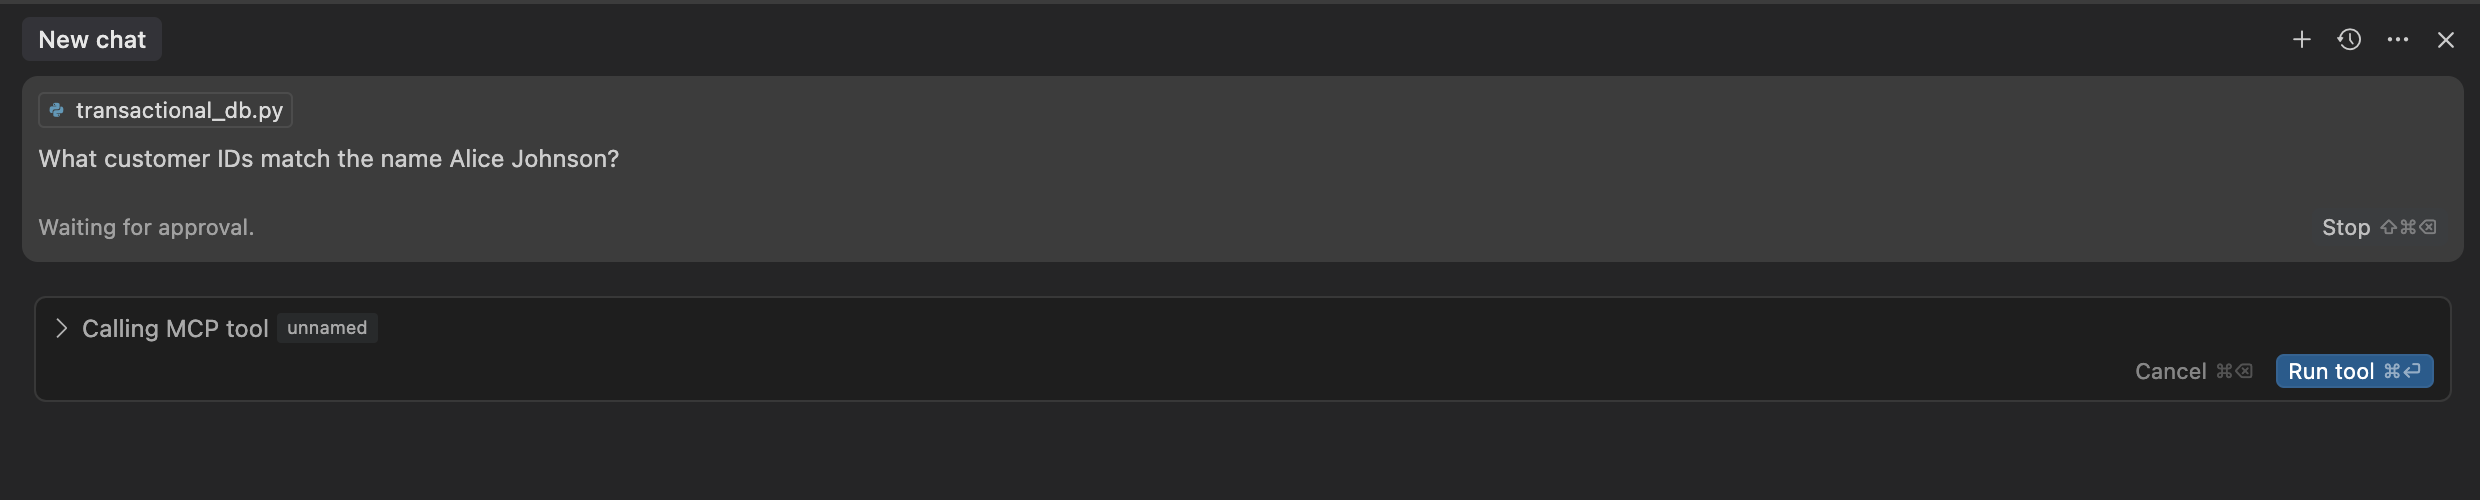
Here, you asked the LLM “What customer IDs match the name Alice Johnson?” Notice how the first thing you see is a “Waiting for approval” message and a button that says Run tool. Cursor’s MCP client exposed your server’s tools to an LLM, and the LLM is trying to use one of them. Before doing so, the client is ensuring that you give the LLM permission to run the tool. If you click Run tool, then you should see something like this:
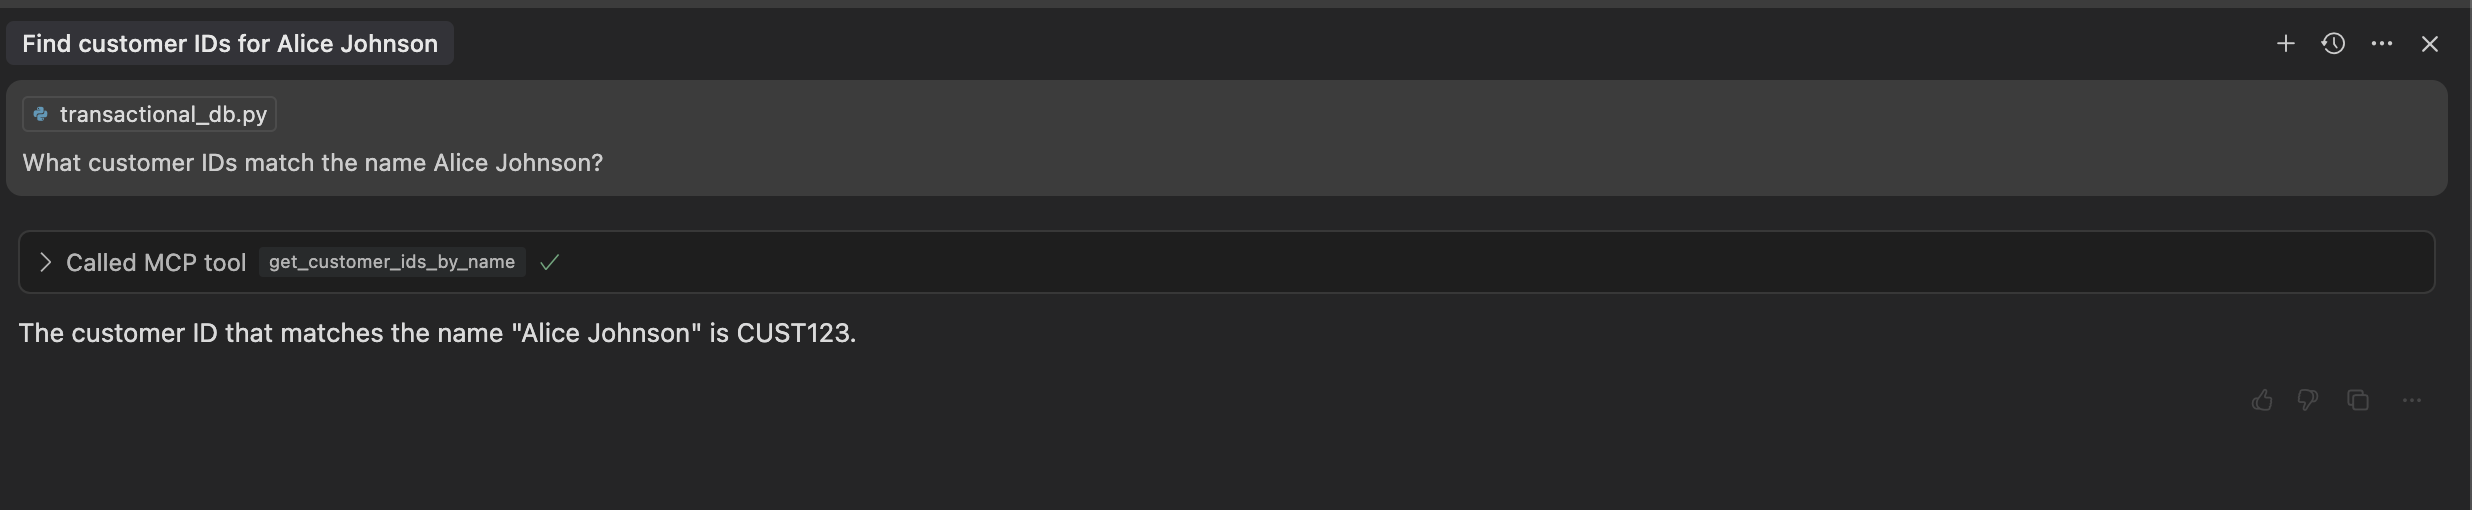
The output shows that Alice Johnson’s customer ID is CUST123—that’s pretty amazing! The LLM knew that it should use your get_customer_ids_by_name() tool! The MCP client called get_customer_ids_by_name() on your server, gave the results back to the LLM, and displayed the summarized results back to you in the chat interface. You can see more details about the tool call by clicking the Called MCP tool dropdown:

Under the Parameters section, you can see that the LLM sent a JSON object to the MCP client with a single entry, customer_name, and the value Alice Johnson. The MCP client sent this input to your get_customer_ids_by_name() tool on the server, which successfully executed and extracted the results.
You can build on this information by asking a question like “What has Alice ordered?”:
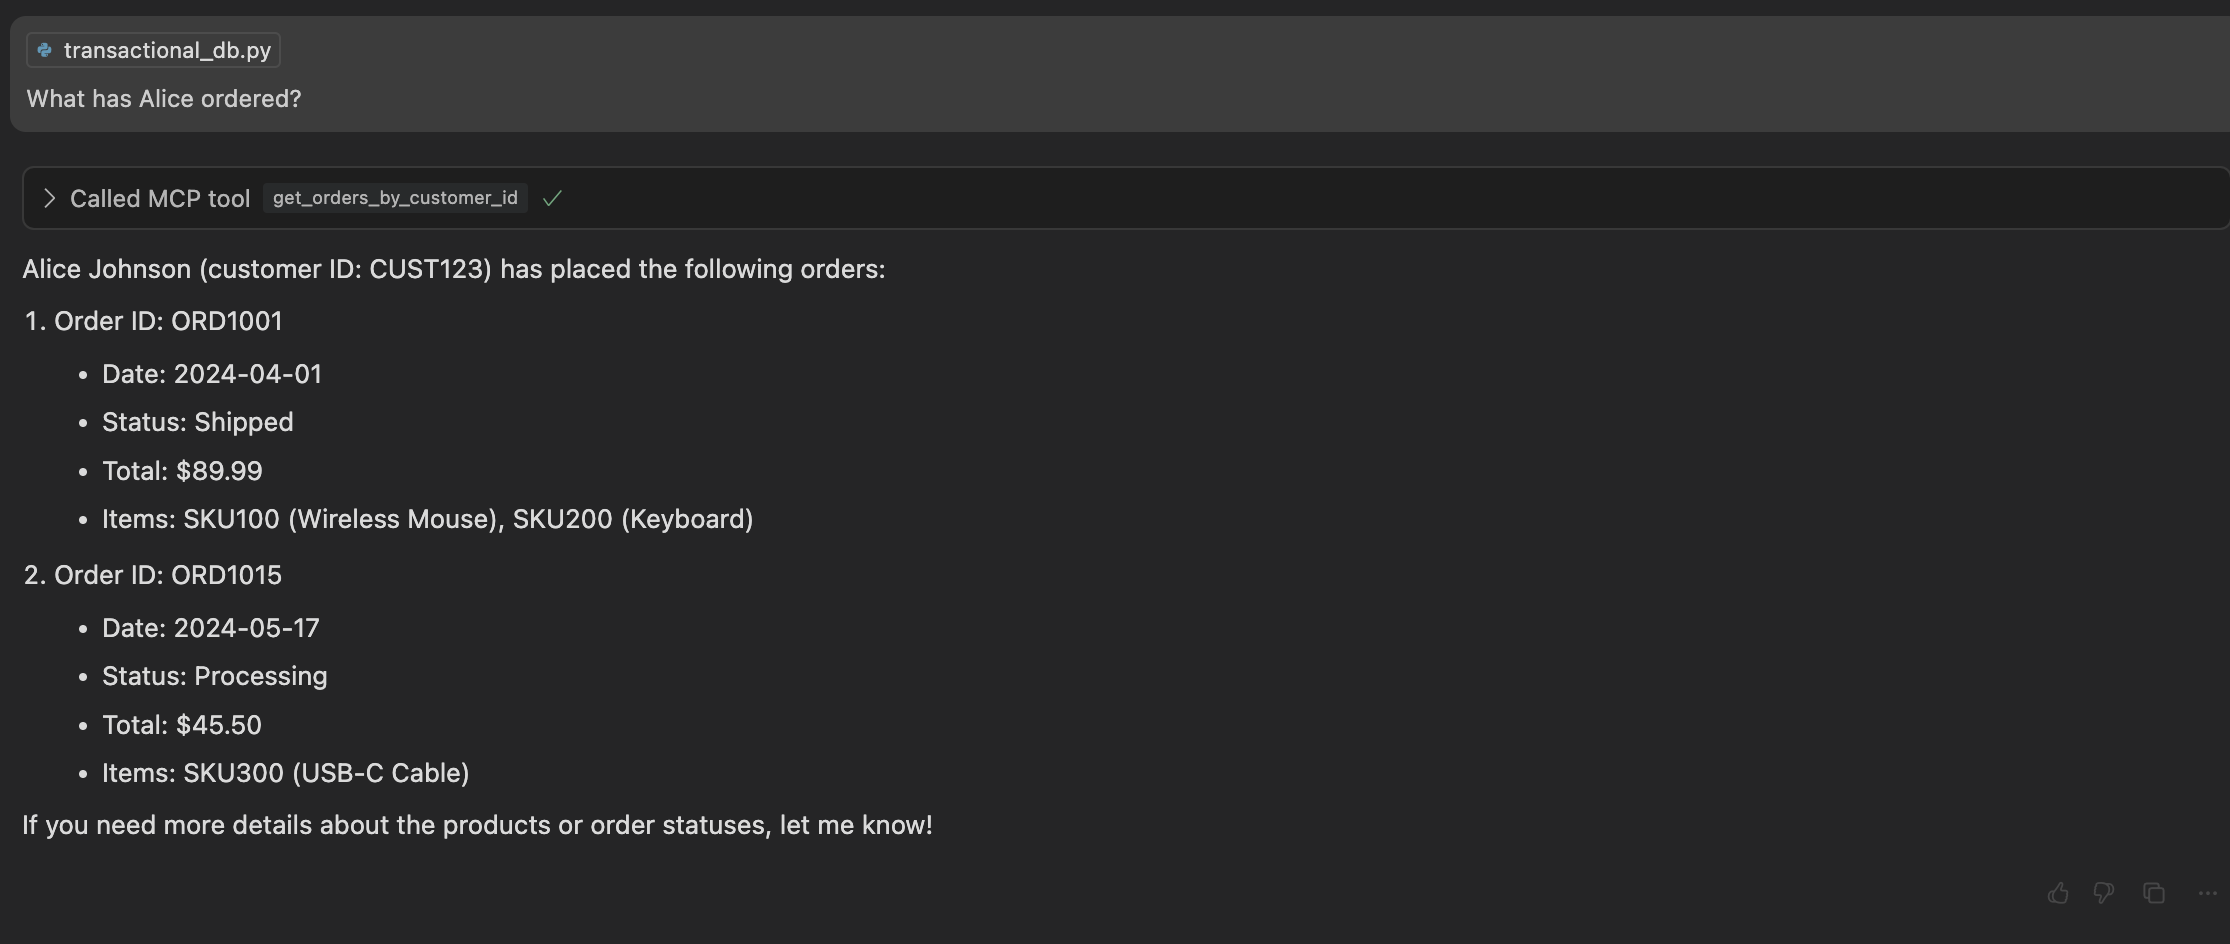
The output correctly shows that Alice placed orders ORD1001 and ORD1015. You can see that the LLM used her customer ID, extracted from the previous tool call, to look up orders for Alice Johnson using the get_orders_by_customer_id() tool. Note that the exact output may vary slightly depending on the model and its parameters.
Building on this, you could ask another question like the following:

Again, the LLM infers the product identifier you were talking about by analyzing the outputs of the previous tool call. It then took the product ID, SKU300, and passed it to the check_inventory() tool to get the answer you were looking for.
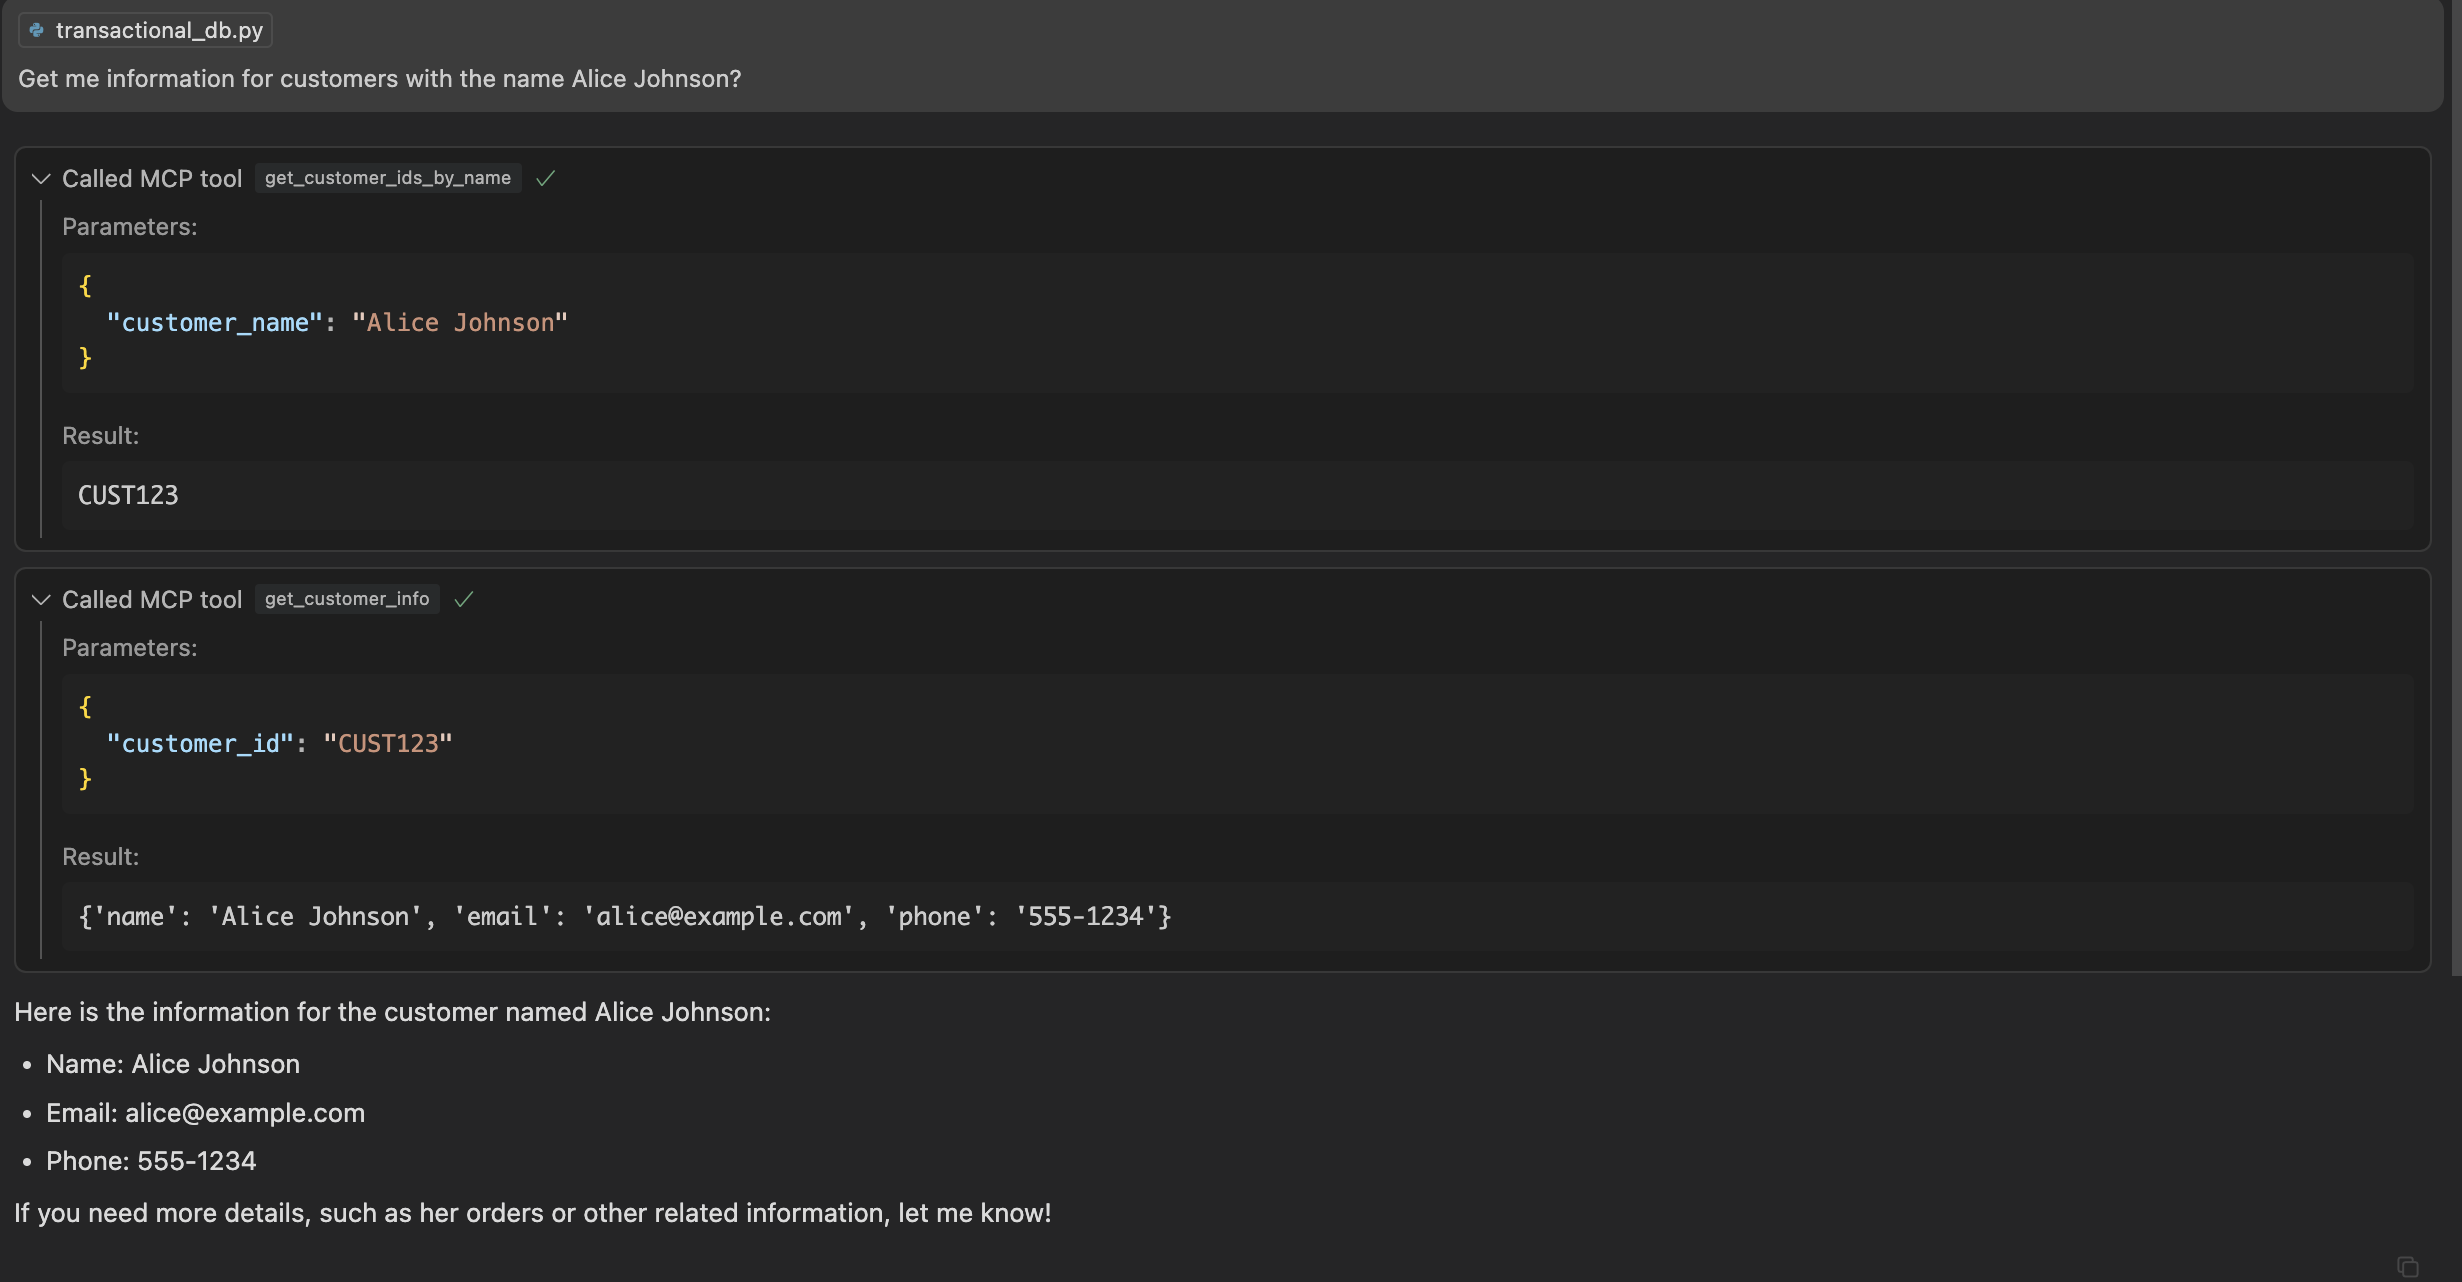
Lastly, you’ll see how the LLM can make several MCP tool calls in one go. For example, you can say “Get me information for customers with the name Alice Johnson”:
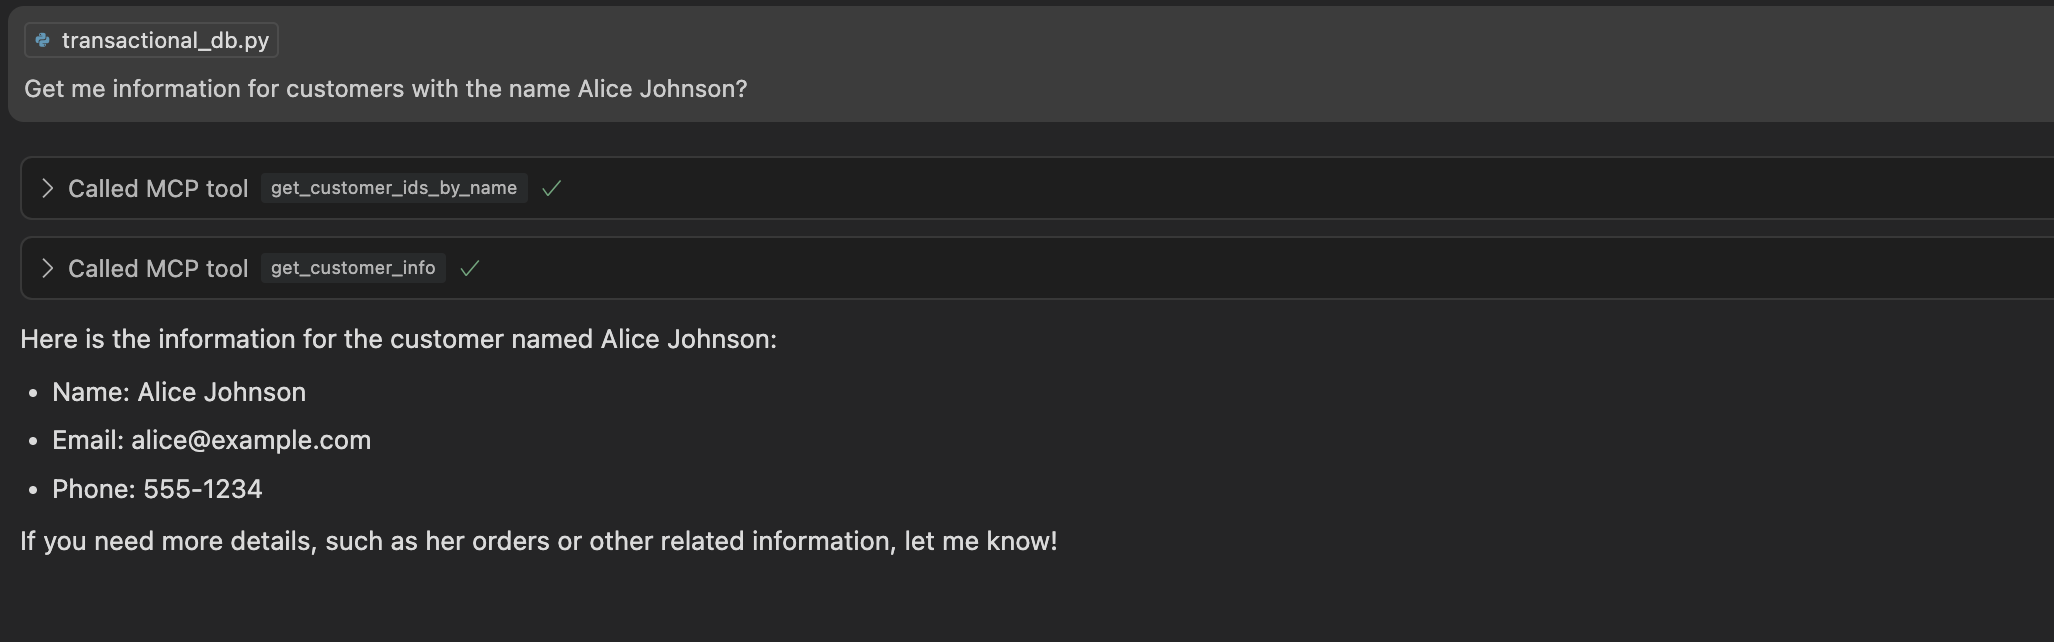
Amazingly, you can see that the LLM first called get_customer_ids_by_name() to get Alice’s customer ID, and then used that ID to call get_customer_info(). You can see the details of these tool calls again by clicking the Called MCP tool dropdowns:
By now, you’re probably seeing the power of MCP and tool calling. While the tools you created here were relatively simple, you can imagine the kinds of sophisticated tool-calling workflows you might be able to develop with MCP. As you use more intelligent LLMs, integrate prompts and resources, and add more servers, you can create more powerful LLM applications.
Conclusion
Congratulations on finishing this hands-on MCP tutorial! You now have a working MCP server and the skills to integrate it with a real AI agent like Cursor.
In this tutorial, you’ve learned how to:
- Understand the core concepts behind the Model Context Protocol (MCP)
- Build and test an MCP server
- Connect your MCP server to an AI agent and watch it interact intelligently
Now that you’ve learned the core ideas behind MCP and seen how prompts, resources, and tools let LLMs interact with real data, you’re ready to keep experimenting, extend your server, and explore the fast-growing MCP ecosystem.
Note: If you’re curious about further discussions on MCP, then listen to the Real Python Podcast Episode 266: Dangers of Automatically Converting a REST API to MCP. You can also check out the tutorial Build a Python MCP Client to Test Servers From Your Terminal.
You can find the complete source code and example project files in the supporting materials linked below:
Get Your Code: Click here to download the free sample code that shows you how to use Python MCP to connect your LLM With the World.
Frequently Asked Questions
Now that you have some experience with MCP in Python, you can use the questions and answers below to check your understanding and recap what you’ve learned.
These FAQs are related to the most important concepts you’ve covered in this tutorial. Click the Show/Hide toggle beside each question to reveal the answer.
You use MCP to enable AI models to call real tools through a standard client-server protocol. It removes boilerplate so you focus on defining prompts, resources, and tools that your LLM can call.
To install Python MCP, create a virtual environment and run python -m pip install "mcp[cli]". To confirm the install, you can optionally import mcp in a REPL.
You store reusable instructions as prompts, expose read-only data via resource URIs, and implement callable actions as tools. The client exposes these to the LLM so it can select resources and invoke tool functions.
To build a simple MCP server in Python, you create a FastMCP instance, decorate async tool functions with @mcp.tool(), and call mcp.run(transport="stdio") to serve them.
You open a ClientSession over stdio using StdioServerParameters and stdio_client(), then call session.initialize() followed by session.list_tools().
Take the Quiz: Test your knowledge with our interactive “Python MCP Server: Connect LLMs to Your Data” quiz. You’ll receive a score upon completion to help you track your learning progress:
Interactive Quiz
Python MCP Server: Connect LLMs to Your DataTest your knowledge of Python MCP. Practice installation, tools, resources, transports, and how LLMs interact with MCP servers.