When you pair with Claude Code, some steps shouldn’t be left to chance, and Claude Code hooks are how you lock them in. You want a heads-up when it finishes a long task, a guarantee that it sticks to your project’s approved tools, and a promise that every edit is formatted to your code standards, without repeating yourself each time. Asking the model to remember all of that works until it doesn’t.
Hooks make these actions deterministic: they fire on the event you choose, every time. A hook is nothing more than a command you register to run when a specific event happens. It doesn’t wait for the model to choose to act, which is what makes it reliable.
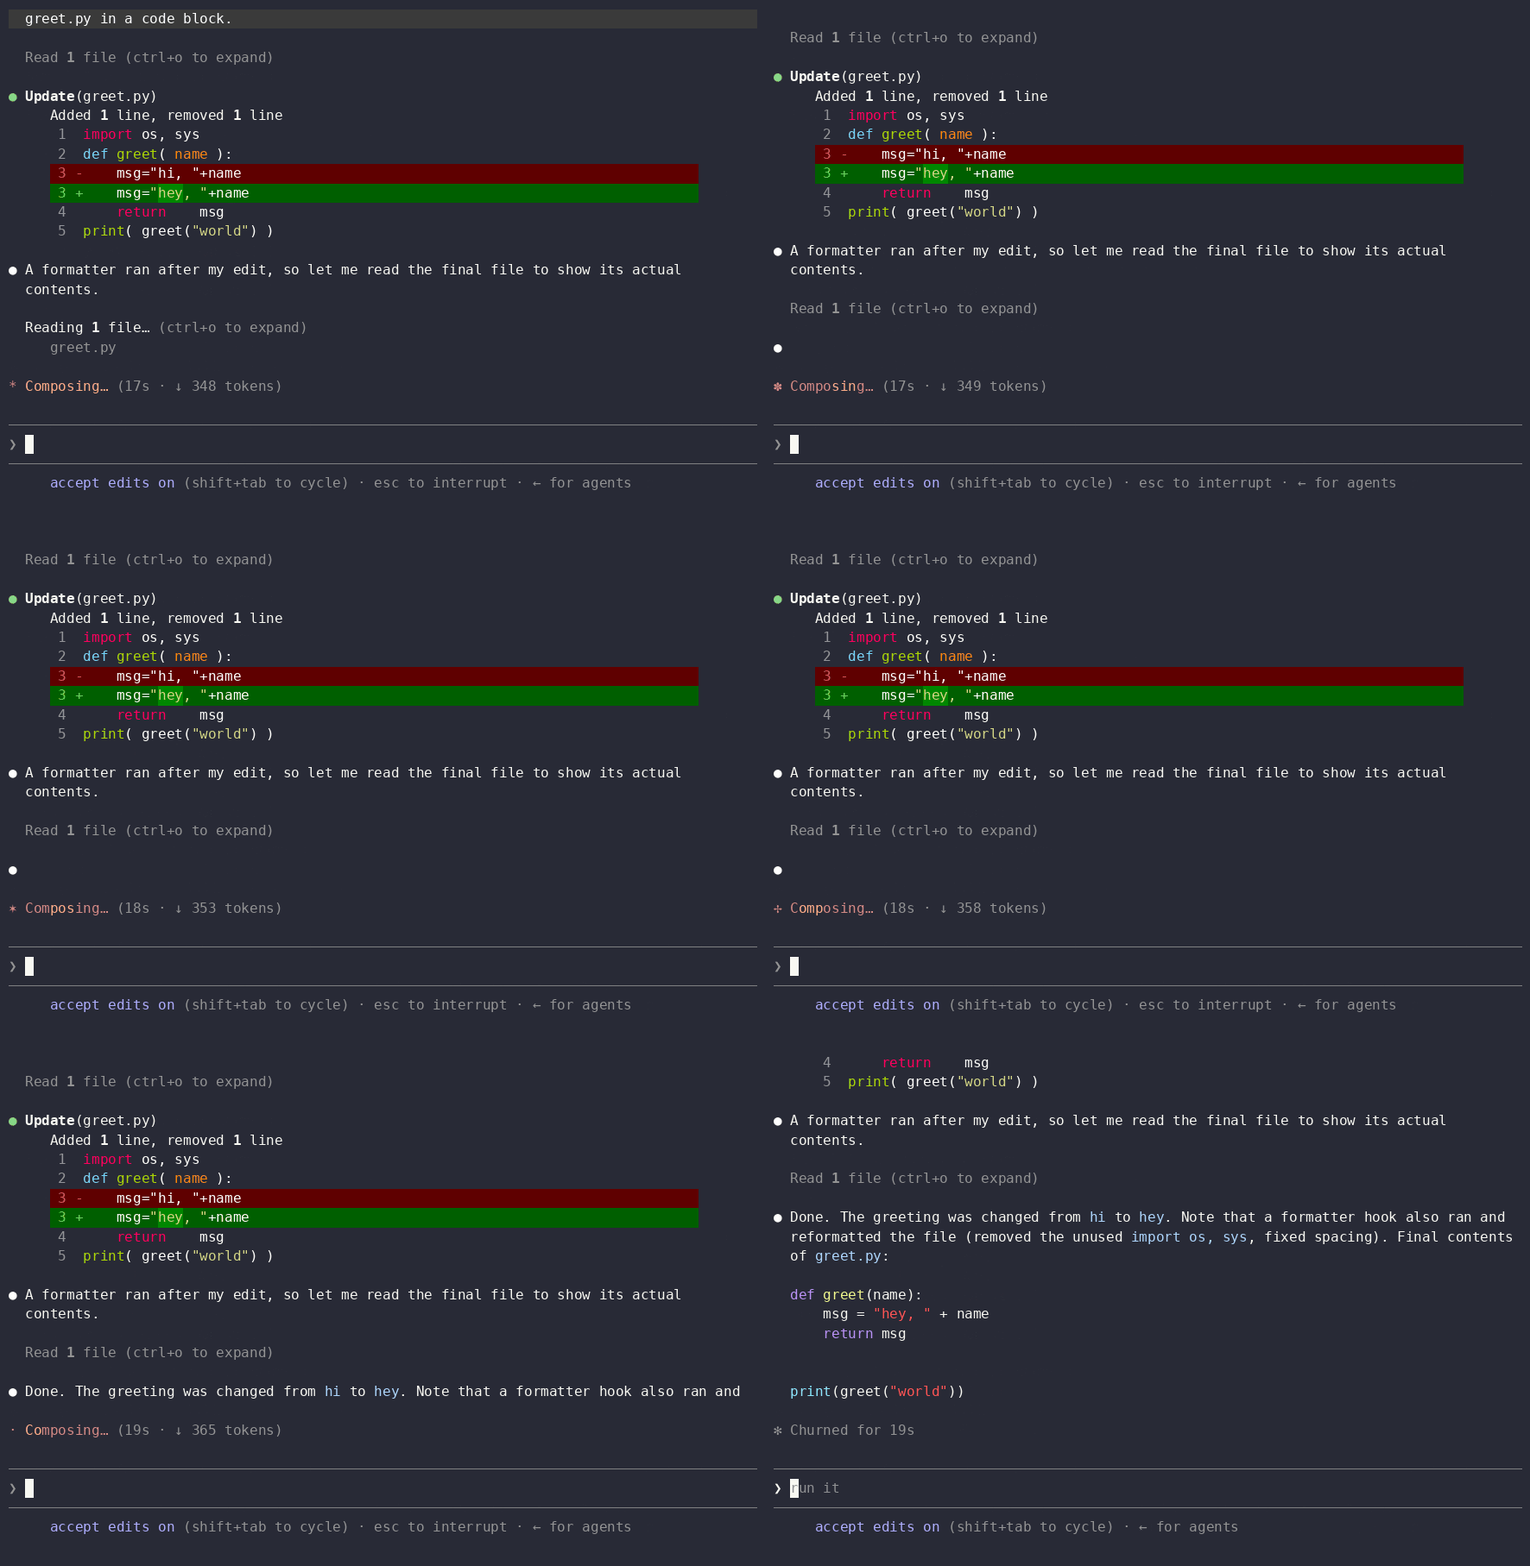
In this tutorial, you’ll set up these hooks in a project of your own. Here’s the auto-formatter at work, cleaning up a file the moment Claude edits it:
As you build them, you’ll learn the three parts a hook is made of and the exit-code contract that lets a hook block or redirect what the model is about to do.
Get Your Code: Click here to download the free sample code you’ll use to build the desktop notifier, pip guard, and auto-formatter hooks you wire up in this tutorial.
Take the Quiz: Test your knowledge with our interactive “How to Automate Your Workflow With Claude Code Hooks” quiz. You’ll receive a score upon completion to help you track your learning progress:
Interactive Quiz
How to Automate Your Workflow With Claude Code HooksTest your understanding of Claude Code hooks, including the Stop, PreToolUse, and PostToolUse events and the exit codes that block an action.
Prerequisites
To follow along, you should be comfortable with intermediate Python, the terminal, and reading a bit of JSON. You should also have spent some time in Claude Code already.
If it’s new to you, then Real Python’s How to Use Claude Code to Write and Debug Python tutorial walks through the basics, and the Getting Started With Claude Code video course covers the same ground on screen.
You’ll need a few tools on your system:
- Claude Code 2.1.187 or later
- Python 3.12 or later
uv0.11.6 or later- Ruff 0.15.20 or later
If you don’t have uv yet, then Real Python’s guide on installing uv walks you through it. You’ll install Ruff later, when you build the formatting hook.
Step 1: Ping Yourself After Every Claude Response
Start with a small uv-managed project, the kind you’d actually work in. Spin one up with uv:
$ uv init --no-package hooks-demo
Initialized project `hooks-demo` at `/home/you/hooks-demo`
$ cd hooks-demo
$ uv sync
...
That gives you a project to work in: a pyproject.toml, a starter main.py, and a few dotfiles. The uv sync step creates the project’s virtual environment up front, so the hooks can run cleanly from the start.
Now for your first improvement. When you hand Claude a long task and look away, you might miss the moment Claude wraps up and lose a few minutes before you circle back. A hook on the Stop event closes that gap, since Stop fires every time Claude finishes a response. That makes it the right place to send yourself a desktop notification.
Notifications look different on each operating system, so rather than hard-code one command, you’ll point the hook at a small Python script that works everywhere. Create a .claude/hooks/ folder at the root of your project, then save this as .claude/hooks/notify_desktop.py:
.claude/hooks/notify_desktop.py
import json
import platform
import subprocess
import sys


def notify(title, message):
    system = platform.system()
    if system == "Darwin":
        script = f'display notification "{message}" with title "{title}"'
        subprocess.run(["osascript", "-e", script], check=False)
    elif system == "Linux":
        subprocess.run(["notify-send", title, message], check=False)
    else:
        return False
    return True


def main():
    json.load(sys.stdin)
    try:
        notified = notify("Claude Code", "Claude just finished responding")
    except FileNotFoundError:
        notified = False
    if not notified:
        print("Claude just finished responding")
    return 0


if __name__ == "__main__":
    sys.exit(main())
The script reads the event that Claude Code sends on standard input, then picks the right notifier: osascript on macOS and notify-send on Linux. On Windows and other systems, or if the notifier isn’t installed, the hook falls back to a plain-text message so it never interrupts your session. You could also wire up a native Windows toast with a PowerShell module like BurntToast.
Project-level hooks live in .claude/settings.json, and every hook is made of three parts:
- Event: The moment the hook runs, like
Stop - Matcher: An optional filter that limits the hook to certain tools
- Command: The shell command to run
With the script saved, all that’s left is telling Claude Code when to run it. Create .claude/settings.json and point the Stop event at your script:
.claude/settings.json
{
  "hooks": {
    "Stop": [
      {
        "hooks": [
          {
            "type": "command",
            "command": "uv run .claude/hooks/notify_desktop.py"
          }
        ]
      }
    ]
  }
}
There’s no matcher, so the hook runs on every Stop.
To confirm the hook is registered, run the /hooks command inside a session:
❯ /hooks

Hooks
1 hook configured

This menu is read-only. To add or modify hooks, edit
settings.json directly or ask Claude.
The menu shows one hook configured. Now try it out: ask Claude to run a quick task, like List the files in this project. The moment it finishes, a desktop notification pops up. Keep in mind that Stop fires after every response, not just once when Claude is done for good.
You’ve made your first improvement: Claude now taps you on the shoulder when it’s done. Next, you’ll make sure it only reaches for the tools your project actually uses.
Step 2: Steer Claude From pip to uv
In a project that standardizes on uv, a stray pip install can quietly pollute your environment and bypass your lockfile. You want Claude to reach for uv every time, not just when it happens to remember. The PreToolUse event fires before Claude runs a tool, so a hook can catch a pip command and steer it back to uv.
To do that, the hook needs to see what Claude is about to run and decide whether to allow it. That adds two things to the pattern from Step 1: a matcher that targets the Bash tool, and an exit code that lets the script block the command.
The hook takes the event as JSON on standard input. For a Bash command, the event carries these key fields:
{
  // ...
  "hook_event_name": "PreToolUse",
  "tool_name": "Bash",
  "tool_input": {"command": "pip install requests"},
  // ...
}
Your hook loads that JSON, checks the command, and answers with its exit code. Save the script next to your notification script as .claude/hooks/guard_pip.py:
.claude/hooks/guard_pip.py
import json
import sys


def main():
    event = json.load(sys.stdin)
    if event.get("tool_name") != "Bash":
        return 0
    command = event.get("tool_input", {}).get("command", "")
    words = command.split()
    for i, word in enumerate(words[:-1]):
        if word not in {"pip", "pip3"} or words[i + 1] != "install":
            continue
        if i > 0 and words[i - 1] == "uv":
            continue
        print("Use 'uv add' instead of pip install.", file=sys.stderr)
        return 2
    return 0


if __name__ == "__main__":
    sys.exit(main())
That exit code is the whole contract. Return 0, and the action goes ahead. Return 2, and Claude Code blocks the action and hands your standard-error text back to Claude as feedback. Any other code is a non-blocking error, a distinction that trips up a lot of people: exit 1 looks like it should block, but it doesn’t. Only 2 does.
The part that turns this into a nudge, rather than a dead end, is where your standard-error text goes. On exit 2, Claude Code doesn’t just print that message for you. Claude receives that text as the reason the command failed, treats it like any other tool error, and adjusts.
Pick an exit code for guard_pip.py and replay the exchange to see which codes actually stop the command and which one hands your message to Claude:
Add the PreToolUse hook to .claude/settings.json. Each event gets its own entry under "hooks", so it sits alongside the Stop hook from Step 1. The // ... in the snippet stands for that Stop hook. JSON doesn’t allow comments, so replace those lines with your actual configuration before saving:
.claude/settings.json
{
  "hooks": {
    "Stop": [
      // ...
    ],
    "PreToolUse": [
      {
        "matcher": "Bash",
        "hooks": [
          {
            "type": "command",
            "command": "uv run .claude/hooks/guard_pip.py"
          }
        ]
      }
    ]
  }
}
The matcher here targets Bash, and you can match several tools at once with a pipe, like "Write|Edit".
Now watch the guardrail work. Start Claude Code in your project and ask it to install a package the wrong way. The whole exchange plays out on its own:
❯ Add the requests package by running pip install requests.

● I'll try your pip command first and fall back to uv add if needed.

● Bash(pip install requests)
  ⎿  Error: PreToolUse:Bash hook error:
     [uv run .claude/hooks/guard_pip.py]: Use 'uv add' instead of pip install.

● Bash(uv add requests)
  ⎿  Resolved 6 packages in 19ms
     Checked 5 packages in 0.30ms

● Done. requests is now a project dependency. Your pip install requests
  command was blocked by a hook (guard_pip.py) that enforces uv, so I
  ran uv add requests instead, adding it to pyproject.toml and uv.lock.
Claude tried pip install requests, but your PreToolUse hook exited 2 and handed its message back as feedback. Instead of giving up, Claude read the nudge and ran uv add requests. Now open pyproject.toml, and you’ll find the dependency Claude added through uv, not pip:
pyproject.toml
dependencies = [
    "requests>=2.34.2",
]
Steering Claude back to your tools, instead of just blocking it, is what keeps the guardrail from getting in your way. Exit codes and standard error cover most of what you’ll need, and they’re all that these examples use. Claude Code can also read a structured JSON reply on standard output for finer control, but you can reach for that the day you actually need it.
Step 3: Auto-Format Your Code After Every Edit
Every project has a code style, and you want Claude’s edits to match it without you reformatting by hand. The PostToolUse event runs after a tool finishes, so it’s the place to clean up whatever Claude just wrote. Here, that means running Ruff on the file Claude edited. A pre-commit hook or a CI job would catch bad formatting eventually, but a PostToolUse hook fixes it the instant the code lands, so you never review an unformatted diff.
This hook calls ruff, so install it as a uv tool first. That puts ruff on your PATH, where the hook can find it from any directory:
$ uv tool install ruff
...
Installed 1 executable: ruff
That global install matters because a hook inherits the environment Claude Code was launched with. In particular, Claude Code doesn’t activate your project’s virtual environment for you. Anything the hook calls has to be findable on the inherited PATH.
This time, the matcher targets two tools, since Claude changes files with both Write and Edit. And because a hook can be a plain command rather than a script, you can start with a single line:
.claude/settings.json
{
  "hooks": {
    "Stop": [
      // ...
    ],
    "PreToolUse": [
      // ...
    ],
    "PostToolUse": [
      {
        "matcher": "Write|Edit",
        "hooks": [
          {
            "type": "command",
            "command": "ruff check --fix . && ruff format ."
          }
        ]
      }
    ]
  }
}
That works, but it reformats the whole project on every edit. When Claude touches one file, you don’t want ruff walking the entire tree. So trade the one-liner for a script that reads the event and formats only the file Claude changed. The PostToolUse payload includes that file path:
{
  // ...
  "hook_event_name": "PostToolUse",
  "tool_name": "Edit",
  "tool_input": {"file_path": "greet.py"},
  // ...
}
A PostToolUse event also carries the tool’s result, so a hook here could react to what a command printed, though formatting doesn’t need that.
Save this as .claude/hooks/format_with_ruff.py:
.claude/hooks/format_with_ruff.py
import json
import subprocess
import sys
from pathlib import Path


def main():
    event = json.load(sys.stdin)
    if event.get("tool_name") not in {"Write", "Edit"}:
        return 0
    file_path = event.get("tool_input", {}).get("file_path", "")
    if not file_path.endswith(".py") or not Path(file_path).exists():
        return 0
    subprocess.run(["ruff", "check", "--fix", file_path], check=False)
    subprocess.run(["ruff", "format", file_path], check=False)
    return 0


if __name__ == "__main__":
    sys.exit(main())
The script pulls tool_input.file_path from the event and runs ruff on just that file, so a single edit no longer reformats your whole project.
Order matters for the two ruff calls. Run ruff check --fix before ruff format: --fix strips any unused imports first, and then ruff format tidies up the blank lines they leave behind. Flip the order, and ruff format spaces out the file before --fix deletes those imports, so the file comes back with stray blank lines at the top.
Point the hook at the script:
.claude/settings.json
{
  "hooks": {
    "Stop": [
      // ...
    ],
    "PreToolUse": [
      // ...
    ],
    "PostToolUse": [
      {
        "matcher": "Write|Edit",
        "hooks": [
          {
            "type": "command",
            "command": "uv run .claude/hooks/format_with_ruff.py"
          }
        ]
      }
    ]
  }
}
To see it in action, save a deliberately messy greet.py in your project:
greet.py
import os, sys
def greet( name ):
    msg="hi, "+name
    return    msg
print( greet("world") )
Then ask Claude for a small change and follow the whole session:
❯ Change the greeting in greet.py from hi to hey.

  Read 1 file

● Update(greet.py)
  ⎿  Added 1 line, removed 1 line
      1  import os, sys
      2  def greet( name ):
      3 -    msg="hi, "+name
      3 +    msg="hey, "+name
      4      return    msg
      5  print( greet("world") )

● Done. The greeting in greet.py now says "hey" instead of "hi". A
  formatter hook also ran on the file after my edit, so the spacing was
  cleaned up as well.
Claude changed a single line, but as soon as the file was saved, your PostToolUse hook ran ruff on it behind the scenes, stripping the unused imports and fixing the spacing. Open greet.py, and the whole thing is clean:
greet.py
def greet(name):
    msg = "hey, " + name
    return msg


print(greet("world"))
That’s exactly what the demo at the top showed: Claude’s edit lands, and the file comes back matching your project’s style, with nothing left for you to do.
If you want to get comfortable with Ruff itself before wiring it into more hooks, Real Python’s Modern Python Linting With Ruff video course walks through linting and formatting a project with it.
Troubleshooting Your Claude Code Hooks
Two problems account for most misbehaving hooks:
- The hook didn’t fire: Check for a matcher typo, a wrong event name, or invalid JSON in
.claude/settings.json, since one stray comma keeps the whole file from loading. Run/hooksin a session to see which hooks actually loaded. - Blocking does nothing: If a
PreToolUsehook should stop an action but doesn’t, then check that you’re returning2and not1. See the exit-code contract in Step 2.
When neither of those is the problem, start Claude with --debug-file to write the full log to a known path:
$ claude --debug-file /tmp/hooks-debug.txt
The log is verbose, but the pip guard from Step 2 leaves a clear trail. Scan for the lines around [DEBUG] Hook, and you can follow the whole decision to block from top to bottom:
 1[DEBUG] Hook output does not start with {, treating as plain text
 2[DEBUG] Hook PreToolUse:Bash (PreToolUse) error:
 3Use 'uv add' instead of pip install.
 4[DEBUG] Hook denied tool use for Bash
 5[DEBUG] Bash tool permission denied
Those five lines are the exit-code contract playing out step by step:
- Line 1: Claude Code first checks for a structured JSON reply on standard output. There’s none, so it falls back to the exit code and standard error, which is what your script uses.
- Lines 2 and 3: The hook exited non-zero and printed to standard error. That message is the text Claude receives as feedback.
- Line 4: Exit
2does its job and blocks the tool call. - Line 5: The
Bashcommand never runs.
The full log goes to the file you specified. grep -A2 Hook /tmp/hooks-debug.txt pulls those lines back out.
Next Steps
Your project now runs three hooks: one tells you when Claude finishes, one keeps it on uv, and one makes every edit follow your style rules. Each does its job automatically, on every matching event, so you never have to ask.
From here, the same patterns stretch further:
- Block dangerous commands: You could stop destructive deletes like
rm -rfthe same way you steered Claude away frompip, with aPreToolUseguard that reads the command and exits2. - Explore other events:
Stop,PreToolUse, andPostToolUseare three of the dozens of lifecycle events available, so there’s a hook for almost any moment you care about. - Go beyond command hooks: A hook can also be prompt-based or agent-based, HTTP-based, or MCP-tool-based, and you can share your hooks with your team by committing
.claude/settings.jsonto the repo.
To go deeper on Claude Code and the tools these hooks lean on, explore the following Real Python resources:
- Claude Code Hooks Cheat Sheet
- Claude Code Cheat Sheet
- How to Write a CLAUDE.md File for Claude Code
- uv vs pip: Managing Python Packages and Dependencies
- Ruff: A Modern Python Linter for Error-Free and Maintainable Code
- The subprocess Module: Wrapping Programs With Python
- Python Coding With AI
Hooks are one piece of a development setup that does the boring work for you, alongside the uv and Ruff workflows you wired up here. To round out that setup, work through Real Python’s Perfect Your Python Development Setup learning path.
Get Your Code: Click here to download the free sample code you’ll use to build the desktop notifier, pip guard, and auto-formatter hooks you wire up in this tutorial.
Take the Quiz: Test your knowledge with our interactive “How to Automate Your Workflow With Claude Code Hooks” quiz. You’ll receive a score upon completion to help you track your learning progress:
Interactive Quiz
How to Automate Your Workflow With Claude Code HooksTest your understanding of Claude Code hooks, including the Stop, PreToolUse, and PostToolUse events and the exit codes that block an action.