The GitHub Copilot CLI brings AI-assisted coding into your terminal. Unlike the older gh copilot extension, which only suggests and explains shell commands, Copilot CLI is a standalone agentic app that answers questions, writes and debugs code, and interacts with GitHub.com services through natural-language prompts.
For Python developers who feel at home on the command line, it offers a quick way to plan tasks, edit files, and run agentic workflows without leaving the shell.
By the end of this tutorial, you’ll understand that:
- GitHub Copilot CLI is a terminal-based AI agent that plans, writes, and debugs Python code from natural-language prompts.
- Subagents like explore and code-review do specialized work behind the scenes, and the
/fleetcommand runs them in parallel. - Standard, Plan, and Autopilot modes let you manage the agent’s autonomy.
- The same session can switch between Claude and GPT models with one
/modelcommand. - Native GitHub integration lets you work with issues, pull requests, and the cloud-based coding agent.
In this guide, you’ll use a small Python project as a playground while trying out the features of Copilot CLI. Familiarity with similar tools like Claude Code or Gemini CLI will be a plus.
Note: GitHub Copilot CLI is not the same as the GitHub CLI (gh). The GitHub CLI is the long-standing tool for Git and GitHub workflows. Copilot CLI is an AI-powered agent for coding workflows in the terminal. You can use both side by side.
Before you read this guide and explore the features of GitHub Copilot CLI, take a minute to set up the prerequisites below.
Get Your Code: Click here to download the free sample code you’ll use as a playground to plan, edit, and review a Python tic-tac-toe project with the GitHub Copilot CLI.
Take the Quiz: Test your knowledge with our interactive “How to Get Started With the GitHub Copilot CLI” quiz. You’ll receive a score upon completion to help you track your learning progress:
Interactive Quiz
How to Get Started With the GitHub Copilot CLITest your understanding of the GitHub Copilot CLI, from installing it to running prompts, switching agent modes, and reviewing code in your terminal.
Prerequisites
You’ll need a few things in place before you start. If you’re missing one or two pieces, each requirement links to a resource that can help get you set up:
- A GitHub account: You need a GitHub account to authenticate the CLI and access your repositories. If you don’t have one, you can sign up for free.
- An active Copilot subscription: Any Copilot plan works. If you don’t have one yet, the free tier includes a monthly allowance of AI credits that covers chat and CLI usage, which might be enough to follow along with this tutorial. Agentic tasks consume these credits quickly, though, so selecting the Auto option may help the free allowance go further.
- Basic terminal familiarity: You should be comfortable running commands in a terminal. If you’re not, then the terminal first-steps tutorial is a friendly starting point.
- A sample Python project: You’ll use a sample Python project as a playground.
Download the project before you continue. It requires Python 3.10 or later, so make sure you have a recent version installed. The project implements the tic-tac-toe game as a Tkinter application that looks and works as shown below:

With your environment in place, the rest of the tutorial follows a natural arc: install Copilot CLI, take it for a spin, and then put it to work on a real-world Python project. You’ll move from a cautious, read-only session to fully autonomous edits as your trust in the agent grows.
Step 1: Get Started With GitHub Copilot CLI
To kick things off, you’ll install Copilot CLI, sign in to GitHub, and get familiar with how to drive a session from the keyboard. By the end, you’ll be able to run prompts, use slash commands, and navigate the interactive CLI with confidence.
Install Copilot CLI
The most portable way to install Copilot CLI is from a terminal. On Linux and macOS, run the official install script, which downloads a prebuilt binary and drops it under ~/.local/bin. On Windows, use WinGet, which downloads the binary and adds copilot.exe to your PATH automatically:
During the installation, the script may ask if you want to add Copilot CLI to your PATH. If you say yes, then it adds the install location to your shell profile so you can run copilot from any terminal window.
If you’d rather use a package manager, Copilot CLI is also distributed through npm and Homebrew on macOS and Linux. Note that the npm method requires Node.js 22 or later:
$ # With npm
$ npm install -g @github/copilot

$ # With Homebrew
$ brew install github/copilot/copilot-cli
GitHub also publishes a Windows installer and source bundles for macOS and Linux on the Copilot CLI releases page. Use those if you need to pin a specific version or if your environment blocks the install commands above.
Once the installation finishes, close and reopen your terminal so the new copilot command is picked up. Then verify that it works:
$ copilot --version
1.0.54
Run 'copilot update' to check for updates.
If you see a version number, then the installation worked, and copilot is ready to use. If you get a command not found or similar error instead, then check the official installation guide for troubleshooting steps.
The next step is to sign in to GitHub so Copilot can reach the AI models and repositories tied to your account.
Authenticate With GitHub
Most of your work with Copilot CLI happens inside an interactive session where you have a conversation with the agent. To get started, run copilot with no arguments from the directory you want to work in:
$ copilot
You’ll be asked if you trust the files in the current directory. If you say yes, then you’ll land at the tool’s main UI. At the bottom of the window, you’ll find a text input box ready for you to start talking to the agent in natural language.
However, you first need to sign in with the /login command:
Copilot CLI Interactive Prompt
❯ /login
You’ll be asked whether you want to use GitHub.com or GitHub Enterprise. Choose GitHub.com and press Enter. Copilot will generate a code and provide a login URL. Open the URL in your browser, and the CLI will walk you through the GitHub OAuth flow.
After you authorize the app on your target account, the terminal session is authenticated and ready to go.
Note: Copilot CLI sends your prompts and file context to GitHub’s AI service to generate responses. If you work with sensitive or proprietary code, review your organization’s policy before pointing the agent at private repositories.
To confirm everything is wired up, ask Copilot a quick question:
Copilot CLI Interactive Prompt
❯ What version of Copilot CLI are you?
I'm GitHub Copilot CLI v1.0.54.
The agent answers directly from its session context. If you get a version number back, then you’re all set. You can run the /exit command to leave Copilot CLI and return to your shell.
Note: Because large language models are non-deterministic, the exact responses you see while following along will likely differ from the examples in this tutorial. The overall workflow stays the same.
Most of the time, you’ll use Copilot CLI in an interactive session like the one above. However, it’s also possible to run one-shot prompts directly from the command line.
Use One-Shot Prompts
You don’t always need an interactive session to use the copilot command. For quick questions or scriptable tasks, pass your prompt directly with the -p option:
$ copilot -p "Define Python in one sentence."
Python is a high-level, interpreted programming language known for its
readable syntax and versatility.


Changes   +0 -0
Requests  0.33 Premium (13s)
Tokens    ↑ 14.8k • ↓ 43 • 0 (cached) • 20 (reasoning)
This one-shot style is great for quick lookups or when you want to integrate Copilot into a shell script. The output includes the agent’s response, a summary of any file changes, stats about the requests, and a token usage breakdown.
Explore Useful Slash Commands
Run copilot again to start a new session. Inside the UI, you’ll have access to slash commands that allow you to control the session itself and your current project. If you run /help, then you’ll get the full list of slash commands and other useful information, including keyboard shortcuts.
The table below summarizes some of the most useful slash commands to get you started:
| Slash Command | Description |
|---|---|
/help |
Show help for all available interactive commands |
/init |
Initialize custom instructions and agentic features |
/new |
Clear the conversation history and start a new session |
/model |
Select or switch the AI model mid-session |
/diff |
Review the changes made in the current directory |
/review |
Run the code-review agent to analyze your changes |
/agent |
Browse and select from available agents |
/logout |
Log out of Copilot |
/exit |
Exit the CLI session |
In short, slash commands give you a quick way to steer a session from the keyboard. You’ll put several of them, like /init, /diff, and /model, to work in the upcoming sections.
Navigate the CLI
A handful of keyboard shortcuts can ensure you have a fluid interaction while working on your Python projects with Copilot CLI.
Here’s a quick reference to some of the handiest ones:
| Shortcut | Action |
|---|---|
| / | Access slash commands |
| @ | Mention files |
| # | Mention issues and pull requests |
| ! | Execute a shell command |
| Shift+Tab | Switch between agent modes |
| Esc | Cancel the current operation |
| Ctrl+L | Clear the screen |
| Ctrl+T | Toggle reasoning display |
The @ and # mentions boost your productivity by giving you a quick way to add files, issues, and pull requests as context in your interactive prompts. For example, typing @script.py pulls the content of that file into the agent’s context. Similarly, something like #42 brings the issue or pull request with that number into the conversation.
GitHub draws issue and pull request numbers from the same per-repository sequence, so each #N refers to exactly one item, whether it’s an issue or a pull request.
Step 2: Use Agents to Explore and Modify Your Code
Up to this point, you’ve used Copilot CLI to ask quick questions. That’s useful, but Copilot CLI is more capable when you allow the agent to take action. In this step, you’ll point it at the sample Python project, let it summarize the codebase, plan a change, and finally execute that change.
Before you start, make sure you’ve downloaded the sample Python project and decompressed the ZIP file into a tic-tac-toe/ directory. The archive is actually a Git repository with two branches: main holds the original code, and copilot-cli contains all the changes made with Copilot CLI for comparison.
Stay on main to follow along step by step. With the project folder in place, navigate into it and start a Copilot CLI session:
$ cd tic-tac-toe/
$ copilot
Starting Copilot CLI from inside the project root lets it pick up the source files, configuration, and instruction files without any extra setup. In this case, the project has a minimal structure, with a single main.py file that implements all the logic for the tic-tac-toe game.
Explore Your Codebase With Copilot CLI
With a fresh session running inside the project’s folder, ask Copilot to give you a summary of the codebase. First, run the /model command and select the Auto option, which lets Copilot choose a suitable model for you. Then, run the following prompt:
Copilot CLI Interactive Prompt
❯ Explore this project and tell me what it does.
The agent will analyze the files in the project, extract relevant information, and produce a concise summary. Click the Show/Hide toggle to see a sample response:
This is a tic-tac-toe game built with Python and Tkinter.
It’s a graphical, two-player implementation of the classic game where players take turns marking spaces on a 3×3 grid trying to get three marks in a row.
Key features:
- Two-player gameplay: Players are X (blue) and O (green) who alternate turns
- Game logic: Validates moves, detects wins (rows, columns, diagonals), and identifies tied games
- GUI: Built with Tkinter featuring:
- 3×3 clickable button grid for placing moves
- Display text showing whose turn it is and game outcomes
- Winning cells highlighted in red
- Menu bar with “Play Again” and “Exit” options
- Game flow:
- Shows whose turn it is after each move
- Displays the winner or tie result
- Allows resetting to play multiple rounds
The code is well-structured with separate classes for game logic (TicTacToeGame) and the GUI (TicTacToeBoard), using type hints and named tuples for clarity.
The output above gives you a short summary of the tic-tac-toe game and its main features. For tasks like this, Copilot’s main agent may delegate the work to a specialized subagent, which reads key files, walks the directory tree, and returns a focused summary without flooding the main agent’s context window with irrelevant information.
Delegation tends to kick in on bigger or parallelizable tasks. For a small project like this one, the main agent often handles the exploration directly. You’ll meet the full lineup of built-in subagents in a moment.
Understand Agent Modes
Beyond the agent itself, Copilot CLI exposes modes that control how the main agent behaves. Copilot CLI has three modes:
- Standard: The default ask-and-execute mode for general conversation and direct code generation.
- Plan: A read-only mode that confines the agent to producing and refining an implementation plan, with no file edits, command runs, or other side effects.
- Autopilot: A mode that allows Copilot to work autonomously, performing multiple steps to complete a goal on your behalf.
You switch modes by pressing Shift+Tab. The current mode is shown in the status bar at the bottom of the screen, so you can tell at a glance where you are. Note that the default mode, Standard, doesn’t display its name in the status bar. You’ll put Plan and Autopilot to work shortly, in the Plan Before You Act section.
Initialize the Agent Instructions
Because this is the first time you’re working on this project using GitHub Copilot CLI, you should create customized agent instructions based on the project. You can do this using the /init command. Go ahead and run the following:
Copilot CLI Interactive Prompt
❯ /init
Once you press Enter, the agent will scan your project and create the instruction file. By default, this file will live at .github/copilot-instructions.md.
While the agent works on creating this file, you may be asked about some needed actions. Answer as you prefer. At the end of the process, the agent will save the new instruction file. To see what this file might look like, open .github/copilot-instructions.md from the sample project’s root.
Whenever you start a new Copilot session in the project directory, the agent will automatically load this file and add it to its context for working on the project. You can tweak the file as you wish.
The instruction file works as persistent state between agent sessions. Anything you want Copilot to remember about the project, such as coding conventions, architecture, dependency management, or test commands, can live there and will survive across runs. However, keep an eye on the file size. If it grows too large, then the agent may struggle to use it effectively.
Commit the file to source control with the following commands:
$ git add .github/copilot-instructions.md
$ git commit -m "Initialize the agent instructions"
If you’re working with a team on the same project, then you can push this commit to the remote repository. From there, anyone on your team who uses Copilot CLI starts every session with the same baseline context. This keeps the agent’s actions consistent across runs and saves everyone from repeating the same instructions and conventions.
Understand Subagents
You’ve already seen the main agent at work. Behind it, Copilot CLI also has a roster of built-in subagents: internal workers that the main agent calls on for focused tasks. The main ones to know are the following:
- explore: Performs quick codebase analysis so you can ask questions about your code without adding to the main context.
- task: Runs commands such as tests and builds, providing a brief summary on success and the full output on failure.
- general-purpose: Mirrors the main agent’s full capabilities to handle complex, multi-step tasks in a separate context, keeping your main conversation focused.
- code-review: Reviews changes with a focus on surfacing only genuine issues, minimizing noise.
- research: Performs deep research across your codebase, related repositories, and the web, producing a detailed report. It’s invoked when you explicitly call the
/researchslash command. - rubber-duck: Acts as a constructive critic powered by a different model family. Copilot consults it automatically at key checkpoints, and you can also request a critique directly with prompts like “Rubber duck your plan.”
You won’t invoke these subagents directly most of the time. Copilot picks the right subagent for each request, which keeps your conversation tidy. In the next section, you’ll have Copilot review your code.
Review Your Code and Make Improvements
Now that Copilot has a sense of the project, you can ask it to review the code critically. A quick review is a low-risk way to surface bugs, dead code, or design choices that could be cleaner before you start changing anything yourself.
Try a prompt like the following:
Copilot CLI Interactive Prompt
❯ Review the code for bugs, edge cases, and anything that
  could be simplified. Focus on real issues, not style.
Depending on the project size and your prompt, Copilot may delegate this task to the code-review subagent or handle it inside the main agent. Either way, the review scans your code for issues like logic errors, unhandled edge cases, and other concerns, rather than commenting on code formatting. After a brief wait, you’ll get back a list of findings with suggested improvements.
Click the Show/Hide toggle below to see a sample response:
Issues Found:
- Anti-diagonal calculation (line 52): Fragile and hard to verify. Should use explicit coordinates:
[(i, board_size - 1 - i) for i in range(board_size)]. - No board size validation: Doesn’t validate
board_size >= 1upfront; usesstrict=Falsedefensively instead. - Redundant column config (lines 132–133): Loop calls
columnconfigure()multiple times for the same indices; should configure once before the loop. - Button event binding (line 145): Uses
<ButtonPress-1>(mouse down) instead of<Button-1>(mouse up), risking accidental double-clicks.
Most critical: #1 and #3 are real code quality issues worth fixing.
These findings may look compelling. However, you must analyze each one with a critical eye and make your own call. For this example, you can pick one suggestion and ask Copilot to fix it. Say that you want to start with the first issue:
Copilot CLI Interactive Prompt
❯ Let's fix the anti-diagonal calculation issue
Copilot will propose a change and ask for your approval before writing to the file. If you accept, then it makes the change. When the change is done, the agent may run a quick test to verify that the issue is resolved.
To see all the changes made so far, run the /diff command:
Copilot CLI Interactive Prompt
❯ /diff
You’ll see something like the following:
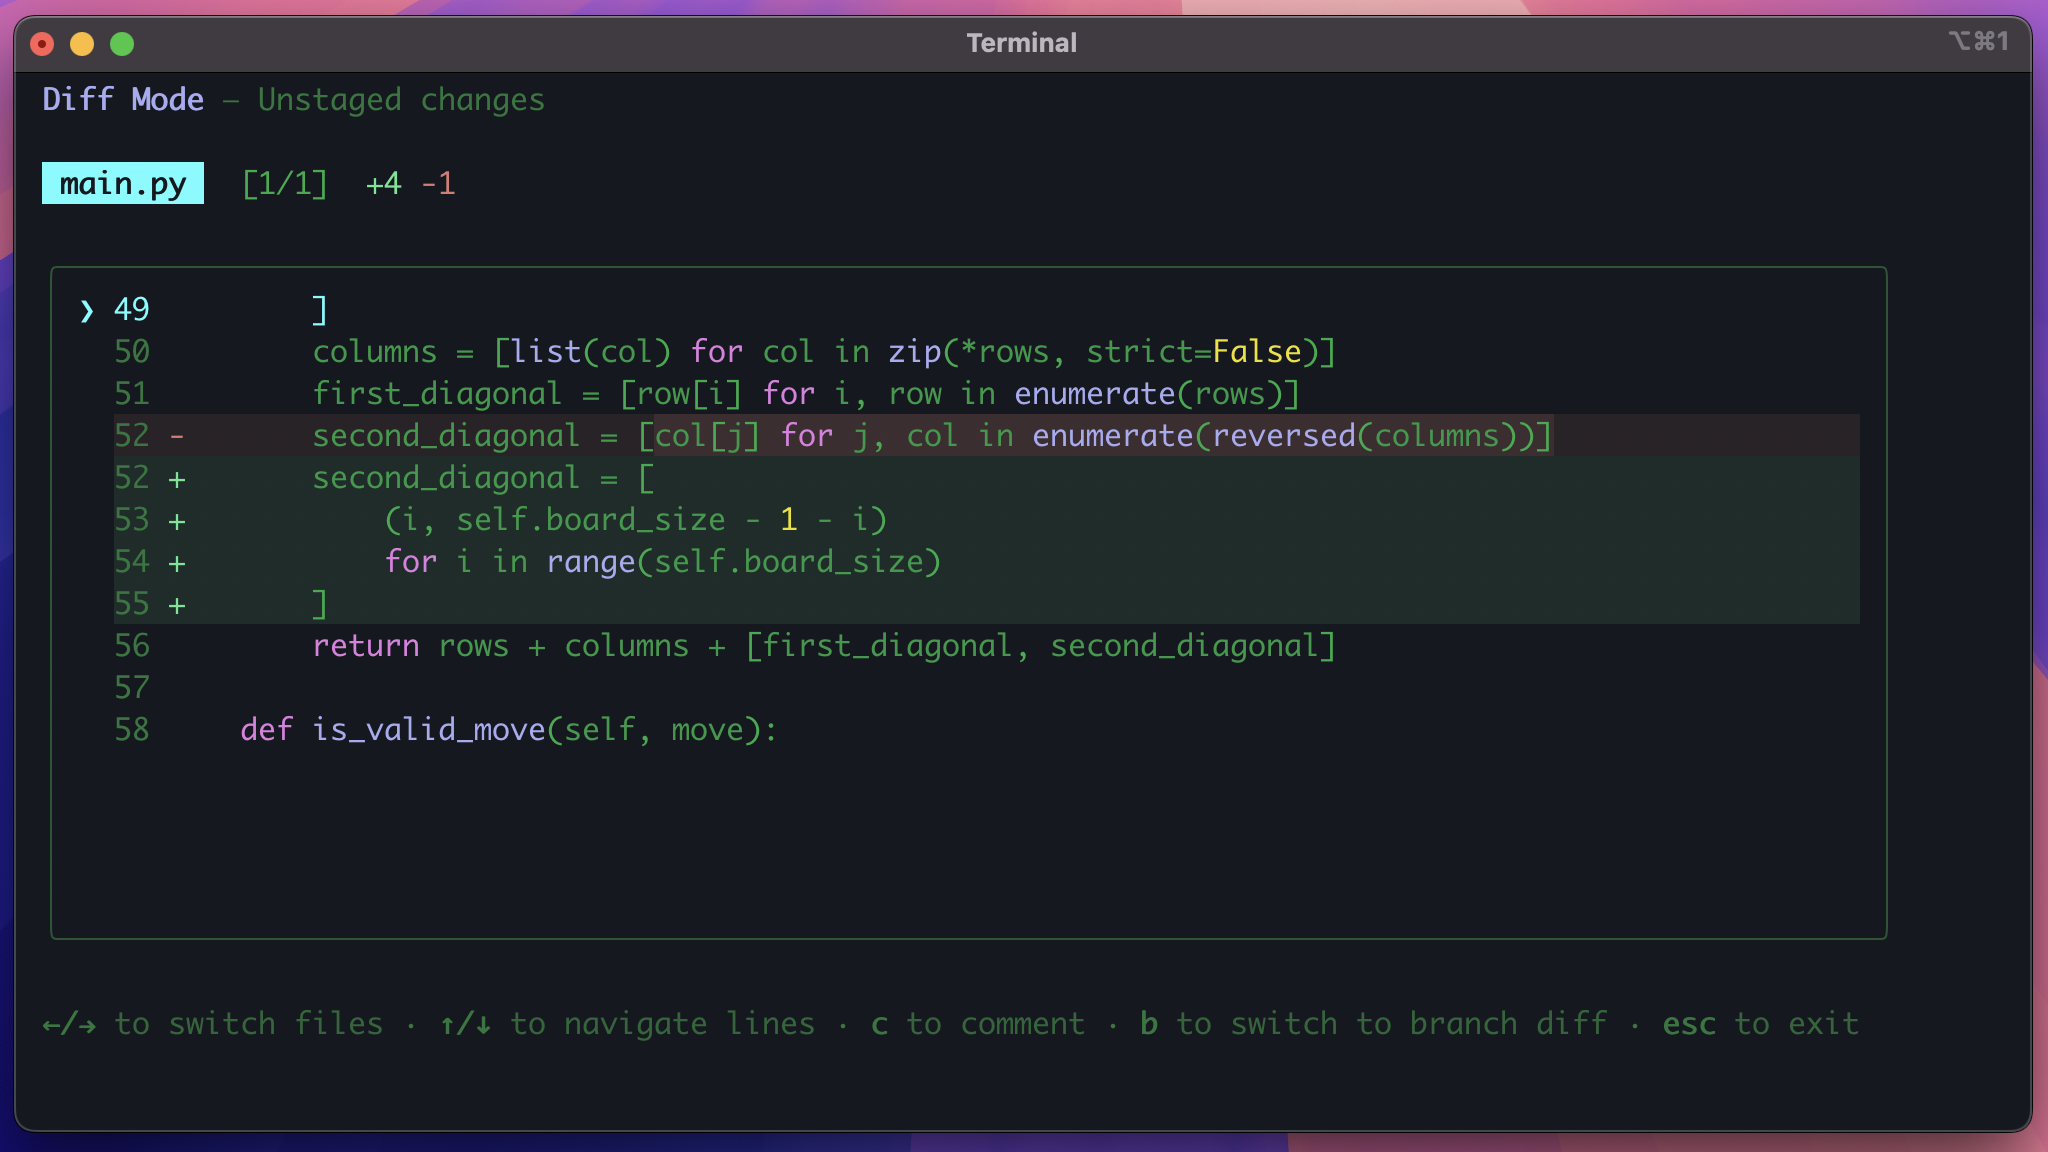
In this example, the diff shows that the agent has fixed the issue with the anti-diagonal calculation. Diff Mode also lets you add comments to individual lines so the agent can refine the change further. To leave Diff Mode, press Esc.
At this point, you can commit the changes if they look good to you. Note that the /diff command is based on Git’s diff, so being consistent with your commits is important.
As an exercise, you can go over the rest of the issues and get a feel for how Copilot CLI can help you improve your Python project without touching the code yourself. Once you’re done, move on to bigger changes in the following section.
Plan Before You Act
Before you switch to a new task, it’s best practice to clear your conversation with the /new command. The /clear alias also works if that name feels more familiar to you. A fresh context keeps the agent focused and avoids confusion from earlier, irrelevant exchanges.
For big refactors or new features, it’s worth taking some time to build a coherent action plan. You can use the agent for this planning stage. Press Shift+Tab once to switch to Plan mode and then describe what you want to achieve. For example, here’s a prompt to add a score tracker to the game:
Copilot CLI Interactive Prompt
❯ Add a score tracker that counts wins for X and O across multiple rounds.
In Plan mode, Copilot doesn’t touch your files. Instead, it analyzes the request, sometimes asks clarifying questions, and produces a structured plan you can review.
For this specific feature, Copilot CLI may ask you some questions before it writes the plan. For example, it may ask whether you want to persist the score across sessions or reset it when the app restarts. It may also ask how you want the score to be displayed in the UI, and so on. Answer the questions according to your preferences.
When the initial plan is ready, Copilot offers a menu of next steps, including the option to continue right into Autopilot mode and start executing the plan.
If the plan looks off, then you can skip the menu and refine it in plain English until it matches your intent. Once you’ve refined it, press Shift+Tab to switch to Standard or Autopilot mode and then ask Copilot to execute the plan.
Click the Show/Hide toggle below to see a sample plan summary for the score tracker feature:
Plan Ready for Review
- Approach: Add in-memory score tracking to the game backend, display scores below the board, and auto-update after wins/ties
- Backend: Add scores dict and record_win() method to TicTacToeGame class
- UI: Create a score display frame positioned below the grid with labels showing “X: N | O: N”
- Game flow: Increment scores when play() detects a win, update display on board reset
- Scope: Single file change (main.py), no persistence, no manual reset button
In Autopilot, the agent works through the plan with minimal interruption, checking in less often than in the other modes. You must review the final diff carefully before committing. If something goes wrong, then double-tap Esc to rewind the session to a previous state and try a different approach.
What Autopilot changes is when Copilot checks in with you, not what it’s allowed to do. If a step needs a permission you haven’t granted, like writing files, running shell commands, or reaching a URL, then Autopilot denies it automatically instead of pausing to ask. That can stall the task halfway through. To pre-approve everything for the session, run the /yolo command:
Copilot CLI Interactive Prompt
❯ /yolo
The /yolo command is a session-wide permission grant equivalent to /allow-all. Once it’s on, the agent can use any tool, touch any file, and reach any URL without asking. The grant survives /new and /restart, so you only need to enable it once per session.
To check the current state, run /yolo show. To revoke it, run /yolo off. You can also pre-approve everything at launch time by passing the --yolo or --allow-all-tools flags to copilot, which works for both interactive and non-interactive sessions.
Here’s how the new feature looks once implemented:
In a few minutes, you went from an idea to a working feature without writing a line of code yourself. You planned the change in Plan mode, handed execution off to Autopilot, and reviewed the final result. That plan-execute-review workflow is ideal for more involved tasks in Copilot CLI.
To have an overview of how agent modes flow, pick a mode and press Run. You will be asked to make a few choices:
Keep in mind that your role as the human developer in charge is to thoroughly review the plan and the implementation. If you neglect this responsibility, then you may end up with an unreliable, poor-quality, and hard-to-scale codebase.
Give Copilot a Scoped Coding Task
You can also hand the agent a concrete coding task for direct execution. For example, you may want to add type hints to the codebase. Press Shift+Tab to switch to Standard mode and then run a prompt like the following:
Copilot CLI Interactive Prompt
❯ Add type hints to all functions and methods in the codebase.
Copilot CLI will make the changes and display a summary of the edits. Again, you can run /diff to inspect the changes in Diff Mode.
Step 3: Explore What Makes GitHub Copilot CLI Different
By now, you have a feel for how to use Copilot CLI in your Python projects. This last step zooms in on features that set the tool apart from other terminal-based AI assistants: model provider choice, multi-agent orchestration, and GitHub integration.
Switch Between AI Providers
Copilot CLI gives you access to models from OpenAI and Anthropic, though the exact lineup depends on your Copilot plan. As of this writing, the Pro plan defaults to GPT-5.4 and also exposes other GPT-5 variants, alongside Anthropic’s Claude Sonnet 4.6 and Claude Haiku 4.5. Because the lineup also shifts with CLI releases, run /model to confirm what you have.
To switch to a different model, run /model inside an interactive session and pick from the list:
Copilot CLI Interactive Prompt
❯ /model
The initial picker lets you select the model, and a second picker allows you to choose the reasoning effort.
The reasoning effort controls how long the model thinks before it responds. A higher setting pays off on complex problems, while a lower one returns quicker answers for routine tasks. Note that more reasoning also consumes more tokens.
Switching models manually can be handy in two cases: when you need a faster model to push through a long task, or when a complex problem calls for stronger reasoning. If you’d rather not pick manually, then select the Auto option. That option lets Copilot choose the best model for each request based on the task and current system load, which can lead to faster responses, better performance, and lower token usage.
If one provider is having an outage, then you can swap to the other without restarting the session. Your conversation history follows you to the new model.
Run a Fleet of Agents
Copilot CLI can also run a task across multiple agents with the /fleet command. When you run it, the main agent analyzes your prompt, decides whether the work splits cleanly into independent subtasks, and then acts as an orchestrator that hands those subtasks to subagents.
A natural way to use /fleet is to run it after you build a plan using Plan mode. If the finished plan has multiple independent elements, then Copilot will offer an Accept plan and build on autopilot + /fleet option. Selecting it kicks off Autopilot mode with /fleet, allowing the subtasks to run in parallel and potentially saving you some development time.
Work Directly With GitHub Issues and Pull Requests
Copilot CLI integrates tightly with GitHub.com. Because the CLI authenticates against your GitHub account, it has native access to your repositories, issues, and pull requests. For example, you can ask Copilot CLI to fix an issue by its number:
Copilot CLI Interactive Prompt
❯ Fix issue #42
Copilot reads the issue, reviews the relevant files, and edits them in your working directory. When you’re ready to share the work, the /pr create command can open a pull request.
You can also use the /pr command with the following subcommands:
| Subcommand | Description |
|---|---|
/pr view |
Shows the status of the pull request for the current branch |
/pr fix |
Runs three fix phases in order: review feedback, merge conflicts, and CI failures |
/pr auto |
Opens the pull request if needed, then loops through the fix phases until all checks pass |
For longer-running work, you can hand a task off to GitHub’s cloud-based coding agent with the /delegate command.
Here’s an example of how you’d use /delegate to split the tic-tac-toe code into separate modules. Note that you can’t run this command on the sample project as is. If you want the command to work, then you’d have to push the project to a GitHub repository first:
Copilot CLI Interactive Prompt
❯ /delegate Split the tic-tac-toe code into separate modules
  for game logic and the Tkinter UI.
The delegated task will run on GitHub’s cloud infrastructure. The coding agent commits changes to a dedicated branch and opens a draft pull request right away, then works in the background and requests review when it’s done. This frees your local terminal for other work.
Reuse Instructions and Skills Across AI Tools
If you’ve used Claude Code or other coding agents before, then you’ve probably built up a collection of repo-level instruction files. Copilot CLI respects the same conventions, so you can drop in the following files to reuse your existing instructions:
AGENTS.mdfor tool-agnostic project rulesCLAUDE.mdfor instructions written for ClaudeGEMINI.mdfor instructions written for Gemini
For Copilot CLI to pick them up, the CLAUDE.md and GEMINI.md files must live at the root of your repository. The AGENTS.md file is more flexible. Copilot CLI looks for it at the repo root, in your current working directory, and in any directory listed in the COPILOT_CUSTOM_INSTRUCTIONS_DIRS environment variable.
Note that Claude Code and Gemini CLI themselves search for their own files across additional locations, so a layout that works for one of them may not match what Copilot CLI expects.
Copilot also supports the open Agent Skills standard, so any skill you’ve saved under .claude/skills/ is portable to Copilot CLI without changes. That portability lowers the cost of trying Copilot on an existing project. Bring your instructions, keep your skills, and switch tools when it suits you.
Troubleshooting
Some issues can come up when you start using Copilot CLI. If you run into one of them, then try the matching fix below:
- Authentication failure: Rerun
/logininside the Copilot session. If your browser blocks the popup, run the command again and watch for the device-code URL printed in the terminal. copilotcommand not found: Make sure the install location is on yourPATHand you’ve reloaded your shell. Fornpminstalls, checknpm config get prefixand confirm that<prefix>/binis in yourPATH. For Homebrew, runbrew doctor.- Session feels slow or unresponsive: When the conversation has grown long, run the
/compactcommand to compress the context window. You can also switch to a faster model with/model. For example, Claude Haiku 4.5 is a solid pick for quick tasks.
Check the official GitHub Copilot CLI documentation for more troubleshooting tips and support channels. If you don’t find a fix for your problem, run /feedback from inside Copilot to send a confidential bug report to GitHub.
Conclusion
You installed the GitHub Copilot CLI, signed in with your GitHub account, chatted with the agent about a Python codebase, and used agents and modes to plan, edit, and test code from the terminal. Along the way, you switched models on the fly, peeked at GitHub’s deeper integrations, and learned how to reuse instruction files you may already have.
In this tutorial, you’ve learned how to:
- Install GitHub Copilot CLI with
npm, Homebrew, the install script, or WinGet - Authenticate the CLI with your GitHub account using
/login - Use Standard, Plan, and Autopilot modes to match your comfort level
- Switch between Claude and GPT models mid-session
- Hand off long-running work to the GitHub coding agent with
/delegate
Copilot CLI combines two recent shifts in developer tooling: AI agents that can actually take action, and command-line workflows that don’t pull you out of your terminal. With the basics covered, you can keep exploring.
For your next steps, try comparing tools to see which suits your style: read the guide on how to use Gemini CLI, take the course on getting started with Claude Code, or skim the Gemini CLI vs Claude Code comparison.
If you’re curious about open-source alternatives, the OpenCode guide covers a fully self-hosted option. For a more structured approach, Real Python’s Python Coding With AI learning path organizes tutorials and video courses on AI-assisted coding into a curriculum you can work through in order.
Get Your Code: Click here to download the free sample code you’ll use as a playground to plan, edit, and review a Python tic-tac-toe project with the GitHub Copilot CLI.
Frequently Asked Questions
Now that you have some experience with the GitHub Copilot CLI in Python, you can use the questions and answers below to check your understanding and recap what you’ve learned.
These FAQs are related to the most important concepts you’ve covered in this tutorial. Click the Show/Hide toggle beside each question to reveal the answer.
The GitHub Copilot CLI is an AI agent that runs in your terminal. It can answer questions about a codebase, write and debug code, run commands on your behalf, and interact with GitHub repositories, issues, and pull requests.
The CLI itself is free to download, and you can use it with any Copilot plan, including the free tier. The free plan includes a monthly allowance of AI credits that covers chat and CLI usage, which might be enough to try out most of the features in this tutorial.
The most common method is npm install -g @github/copilot, which works on any platform with Node.js 22 or later. Alternatives include Homebrew on macOS and Linux, the curl install script, and WinGet on Windows.
No. The GitHub CLI (gh) is a long-standing tool for scripting Git and GitHub workflows. The GitHub Copilot CLI is a separate AI agent that integrates with GitHub but focuses on conversational coding tasks. You can install and use both side by side.
Take the Quiz: Test your knowledge with our interactive “How to Get Started With the GitHub Copilot CLI” quiz. You’ll receive a score upon completion to help you track your learning progress:
Interactive Quiz
How to Get Started With the GitHub Copilot CLITest your understanding of the GitHub Copilot CLI, from installing it to running prompts, switching agent modes, and reviewing code in your terminal.


