Antigravity CLI is a terminal-based AI coding tool that brings Google’s agent assistance into your workflow. After installing it and signing in with your Google account, you can ask questions about your code, add new features, track down bugs, and even dispatch multiple subagents to work on separate tasks in parallel, all without leaving your shell:

Antigravity CLI replaced Gemini CLI, which Google retired in June 2026. If you’ve used Gemini CLI, then a lot of this will feel familiar. Your skills, hooks, subagents, and plugins carry over, and the tool still reads its configuration from ~/.gemini/.
You don’t need any of that history to follow along, though. This is a hands-on guide to using Antigravity CLI, not a migration manual. But if you’re switching, then the Coming From Gemini CLI? section rounds up what changed and what to watch out for.
You’re about to install Antigravity CLI, sign in with your Google account, and put it to work on a Python project. It’ll read an unfamiliar module, review it against your conventions, and refactor the code while the agent verifies its own work.
Take the Quiz: Test your knowledge with our interactive “How to Use Google's Antigravity CLI for AI Code Assistance” quiz. You’ll receive a score upon completion to help you track your learning progress:
Interactive Quiz
How to Use Google's Antigravity CLI for AI Code AssistanceTest your knowledge of Google's Antigravity CLI, a terminal-based AI coding agent, and how to use it to read, review, and refactor Python code.
Prerequisites
To follow along with this tutorial, you’ll need the following:
- Google Account: A Google account lets you sign in to Antigravity CLI. A free account is enough to finish this tutorial, although the free tier’s usage limits are tight and have shifted since launch, so expect to bump into them on longer sessions.
- Python 3.12 or higher: You’ll work with a small Python command-line application. If you haven’t already, install Python, making sure the minimum version is Python 3.12.
Because Antigravity CLI is a command-line tool, you should feel comfortable navigating your terminal and running basic shell commands. The tool ships as a single binary for macOS, Linux, and Windows, so any of these platforms will work. Unlike Gemini CLI, it doesn’t depend on Node.js, which means there’s no separate runtime to install first.
Go ahead and download the supporting materials for the Python project you’ll work with throughout this tutorial:
Get Your Code: Click here to download the free sample code you’ll use to follow along as Antigravity CLI reads, reviews, and refactors a small Python command-line tool.
Once you’ve extracted the files, you’ll find an expense-report/ directory with a tiny command-line tool that reads a CSV of transactions and prints a per-category spending summary. To get the most out of this tutorial, initialize a new Git repository in that directory and make an initial commit so you have a clean baseline to diff against later:
$ cd expense-report/
$ git init
$ git add .
$ git commit -m "Initial commit"
This project is the kind of small, undocumented script you might inherit from a teammate, which makes it a good testing ground for Antigravity CLI’s code-reading and refactoring features.
Step 1: Install and Set Up Antigravity CLI
Before you can use Antigravity CLI, you need to install it and sign in with your Google account. In this step, you’ll run the official installer, verify the freshly installed agy command, authenticate, and pick a capable model.
Install the Binary
Antigravity CLI is distributed as a self-contained binary file that ships with the entire Go runtime, so you can download and install it using a single command. Here’s how you can run the official installer script for your platform:
The installer places the agy executable in a local bin/ directory, which is ~/.local/bin/ on macOS and Linux. As part of the same run, the installer’s setup step also tries to wire up your PATH and shell profile for you.
Open a new terminal session, or reload your shell profile, and then confirm that the installation worked by checking the version:
$ agy --version
1.0.12
If you see a version number, then you’re ready to authenticate. Because it’s a single Go binary, Antigravity CLI updates itself in place whenever a newer release is available. But you can trigger that manually at any time with agy update.
Authenticate With Google
The first time you launch Antigravity CLI, it walks you through a one-time sign-in and setup process. Navigate to the sample project and start a session by running agy on its own:
$ cd expense-report/
$ agy
Because Antigravity CLI can read, write, and run code on your behalf, only launch it from inside a specific project directory. This keeps the agent focused on the files that matter and avoids accidental changes elsewhere. Working under version control like Git also lets you review and undo any edits.
When you run agy for the first time, you’ll be presented with two authentication methods:
Select Google OAuth as the login method. This will automatically open your default web browser, letting you choose one of your Google accounts to sign in with and authorize the tool:
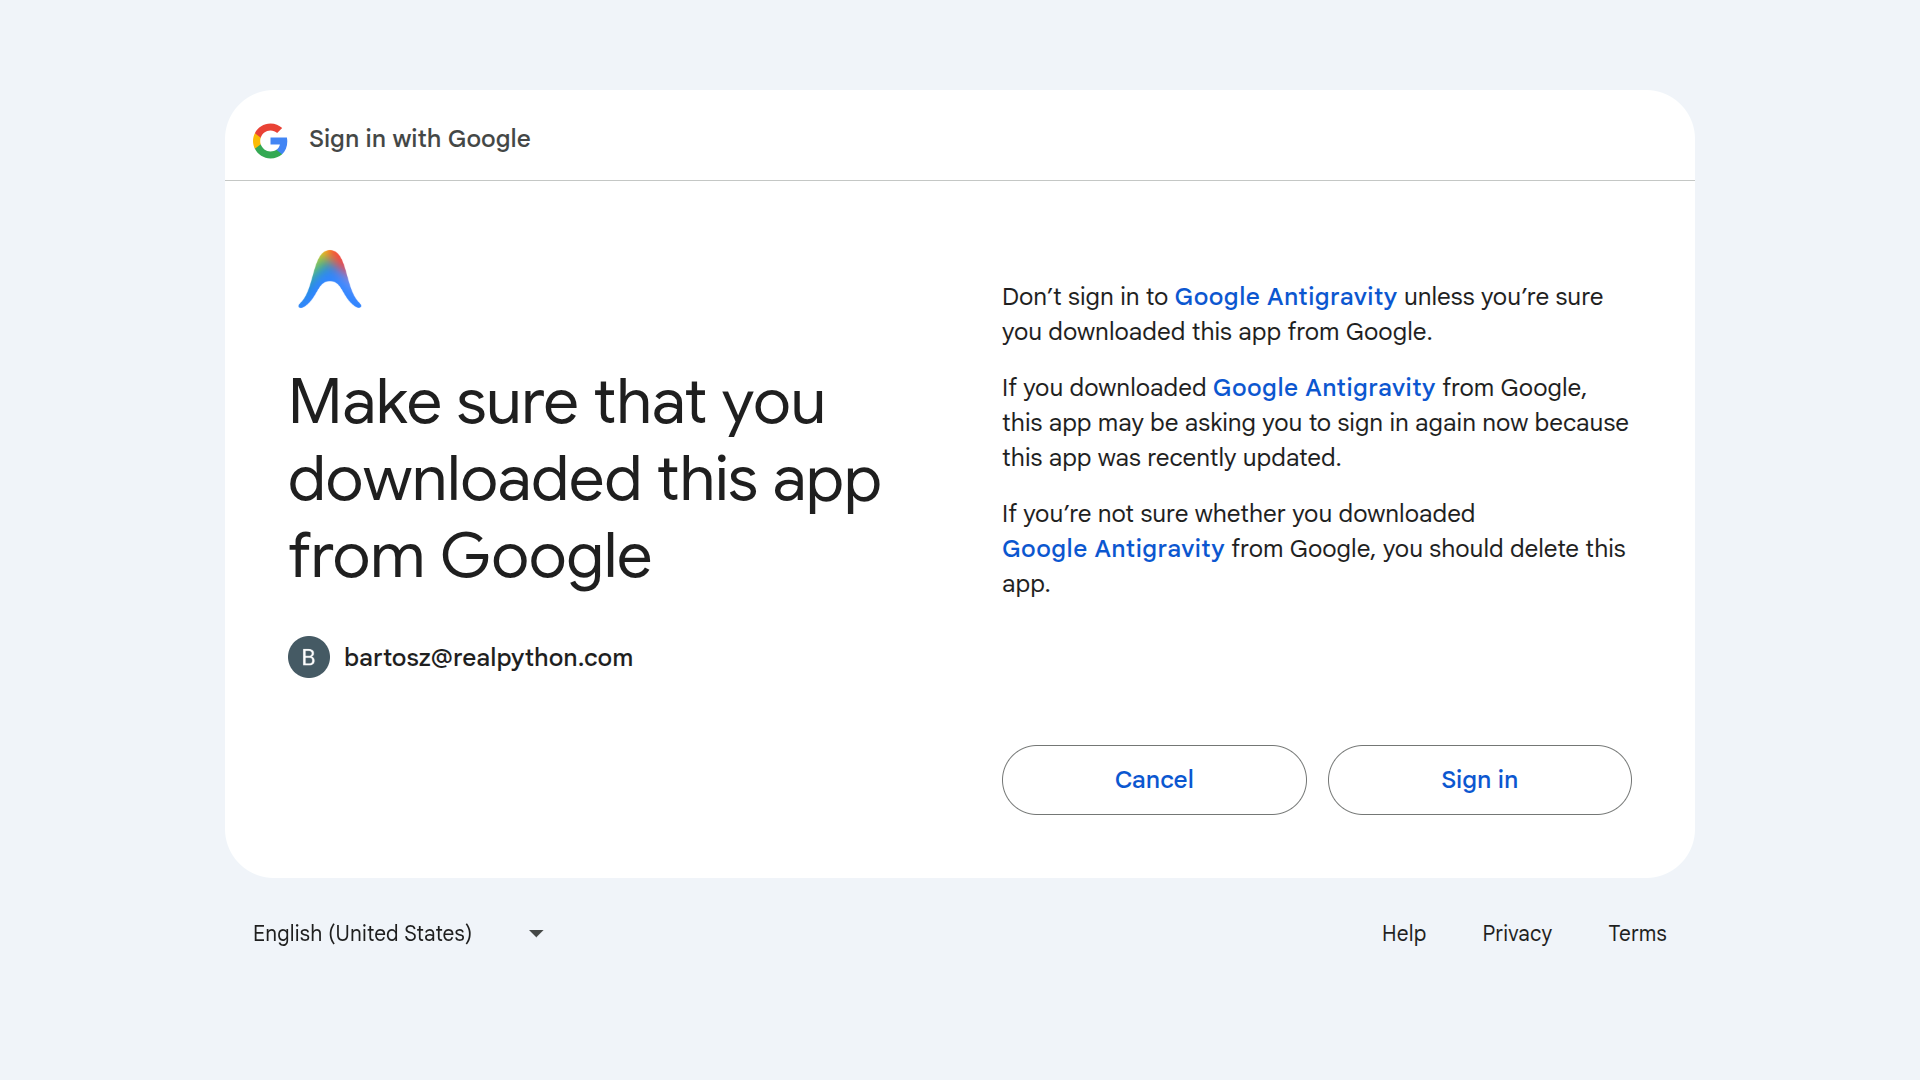
Next, copy your unique authorization code and paste it back into Antigravity CLI. After you confirm, Antigravity CLI securely stores the resulting access token in your operating system’s native keyring, reusing it for future sessions.
Note that if you’re working over SSH on a remote machine, then Antigravity CLI detects the headless session and prints an authorization URL for you to open in a local browser.
Choose Your Color Scheme
During the first launch, after successfully authenticating with your Google account, you’ll be able to select your preferred color scheme for Antigravity CLI:
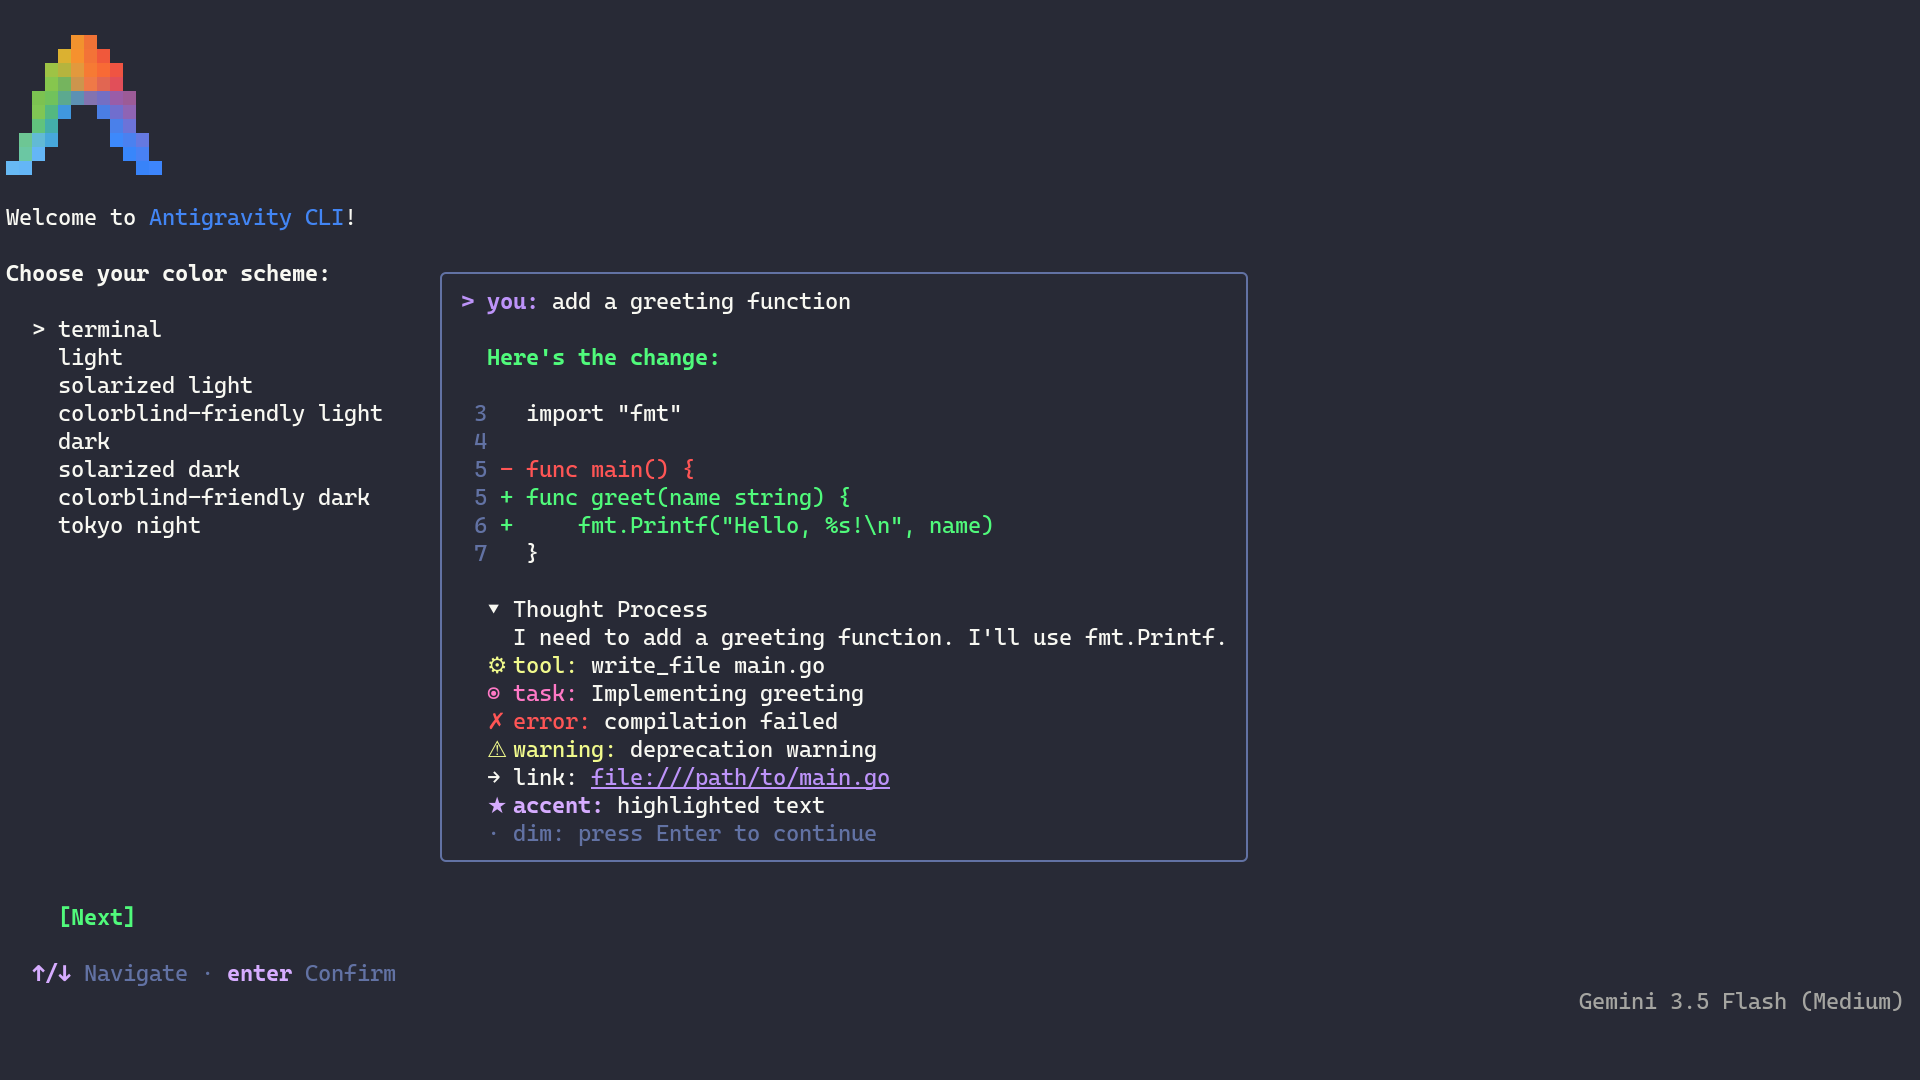
You can pick from a few options, ranging from your terminal emulator’s built-in color palette to the popular Solarized light and dark themes.
This choice, along with many other options, gets stored in a settings file, which you can edit manually if you later change your mind:
~/.gemini/antigravity-cli/settings.json
{
  "colorScheme": "solarized dark",
  "enableTelemetry": false
}
For a full list of the available configuration options, use the /config slash command or its /settings alias in Antigravity CLI itself.
Accept the Terms of Service
Before you can start using Antigravity CLI, you’ll need to accept the Terms of Service and Privacy Policy on the first run. Additionally, you may opt out of letting Google collect your data to improve its services:
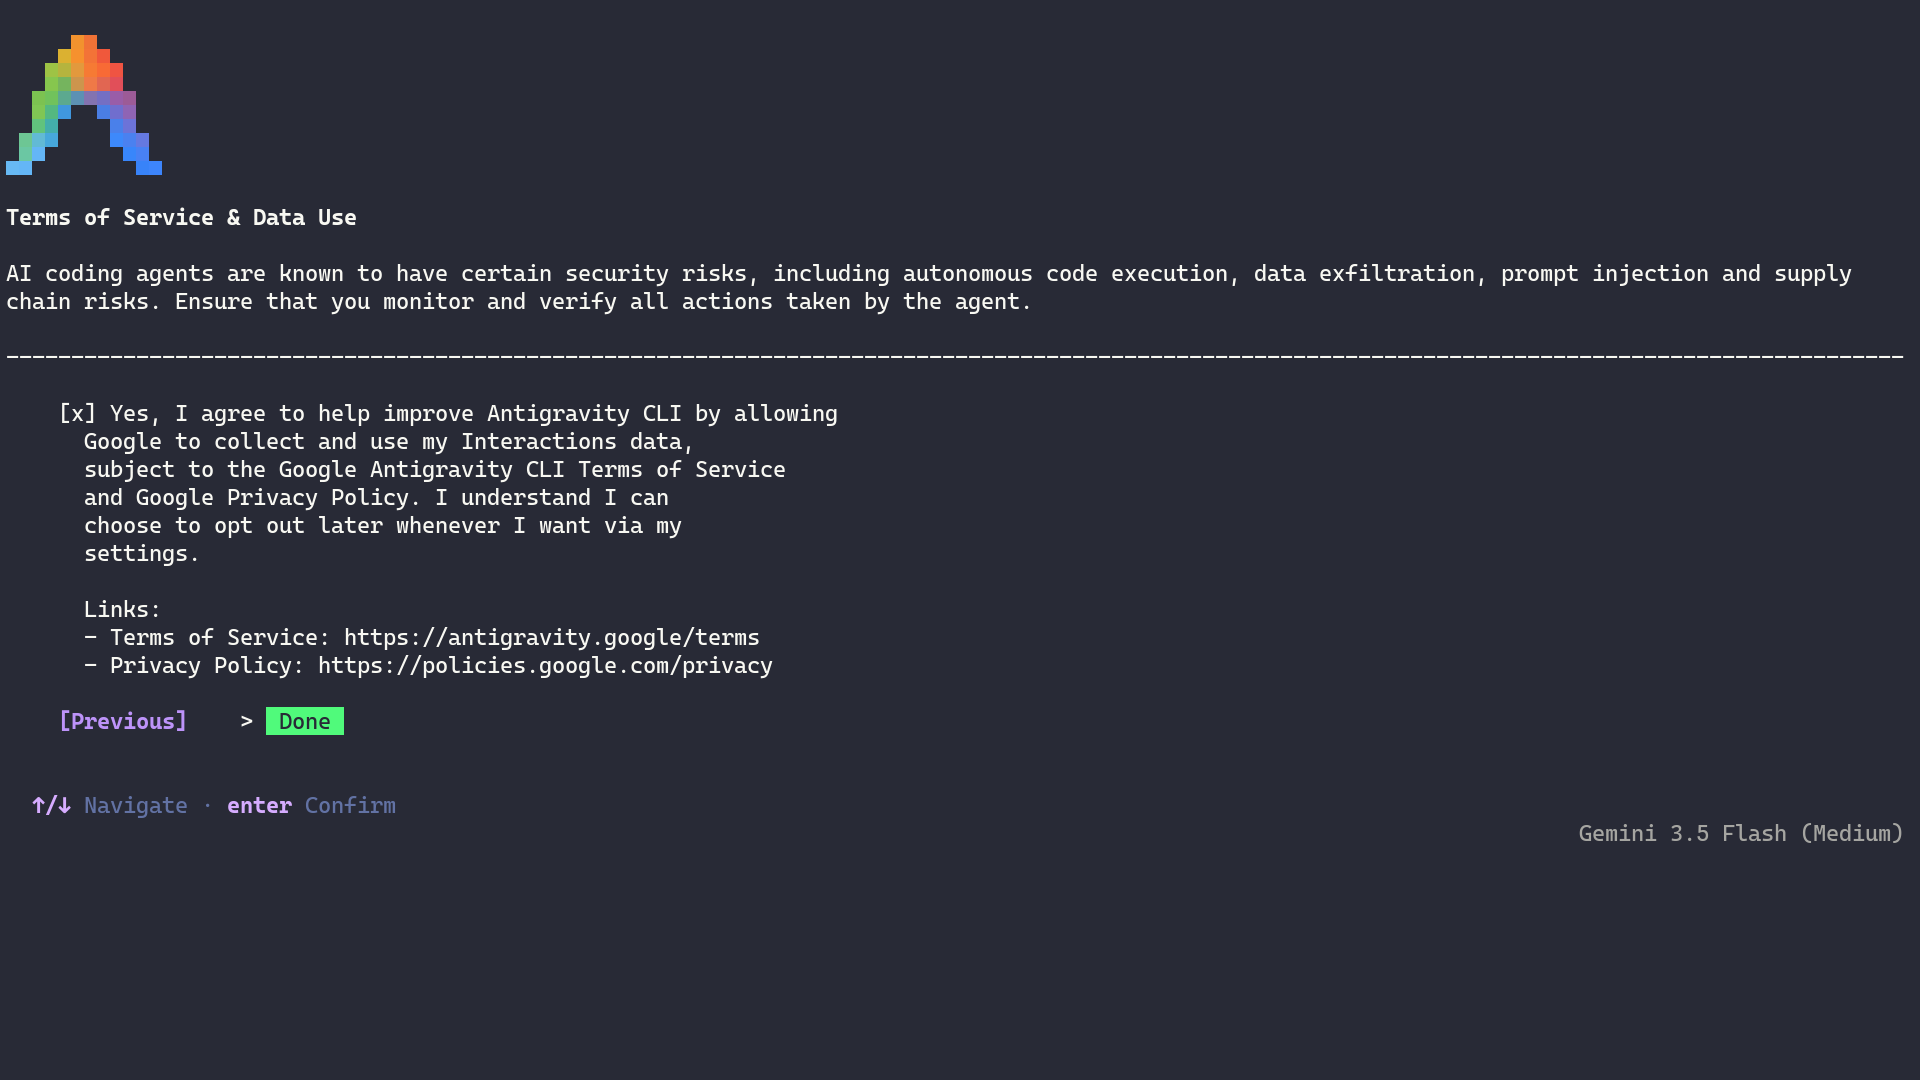
Keep in mind that when you use Antigravity CLI, your prompts and code are sent to Google’s models for processing. While this enables the tool’s features, be mindful of sensitive data or proprietary code, and review Google’s terms to understand how your data is handled.
Pick a Supported Model
Antigravity CLI uses a lightweight model by default to keep the interactions snappy. For real work, choose something stronger. From inside a session, the /model slash command lets you browse and switch models. You can also list what your account can reach from your terminal with the agy models subcommand:
$ agy models
Gemini 3.5 Flash (Medium)
Gemini 3.5 Flash (High)
Gemini 3.5 Flash (Low)
Gemini 3.1 Pro (Low)
Gemini 3.1 Pro (High)
Claude Sonnet 4.6 (Thinking)
Claude Opus 4.6 (Thinking)
GPT-OSS 120B (Medium)
This list is one of the genuine differences from Gemini CLI. The same tool can now drive Google’s Gemini models, Anthropic’s Claude, and an open-weight option. The values in parentheses determine each model’s reasoning effort, or how much it deliberates before answering.
Inside a session, run the /model slash command to switch, or launch with a specific model from the start using the --model flag:
$ agy --model "Gemini 3.1 Pro (High)"
The agentic tasks later in this tutorial go much better on a Gemini Pro or Claude model than on the lightweight default.
Test Your First Prompt
With an Antigravity CLI session running, confirm the connection with a quick prompt:
Antigravity CLI · Gemini 3.5 Flash (Medium)
────────────────────────────────────────────────────────────
> Reply with an emoji confirming you can read this prompt.

  👍
Alternatively, you can do this without the interactive user interface by using print mode (-p), which runs a single prompt and exits:
$ agy -p "Reply with an emoji confirming you can read this prompt."
👍
That confirms Antigravity CLI is talking to Google’s servers. When you launch a session inside a project directory, it registers the workspace so it can read your files and any AGENTS.md as soon as you start prompting. You’re now ready to give it a real coding task!
Step 2: Put Antigravity CLI to Work on a Codebase
Now you’ll point Antigravity CLI at the sample project and let the agent do real work—explain the code, review it against your conventions, and refactor it. Each example below was captured from an actual agy run using the specified model. Since the models are non-deterministic, your wording will likely differ, but the substance should match.
Ask What the Project Does
From inside the expense-report/ directory, run the agy command if you haven’t already, and ask the agent to summarize the project:
Antigravity CLI · Gemini 3.5 Flash (Medium)
────────────────────────────────────────────────────────────
> What does this project do? Give a concise high-level summary.

● ListDir(/home/realpython/expense-report)
● Read(/home/realpython/expense-report/README.md)
● Read(/home/realpython/expense-report/cli.py)
● Read(/home/realpython/expense-report/transactions.py)
● Read(/home/realpython/expense-report/transactions.csv) (ctrl+o to expand)
Antigravity CLI reads the files on its own, narrating each step as it goes. How much detail you see depends on your verbosity setting and model, but it’ll generally list the directory and read README.md, cli.py, transactions.py, and the CSV before it answers:
This project is a lightweight command-line tool written in Python that reads personal transaction data from a CSV file and outputs a formatted summary of expenses grouped by category.
Run it with:
$ python cli.py transactions.csv
Key files:
cli.py: Entrypoint, reads the CSV path from argstransactions.py: Parses CSV, aggregates by category, formats the report
In a few seconds, you have a working understanding of the project without reading every file yourself. Notice that the agent narrates each tool call as it goes, and that reading files happens automatically. It only pauses for your approval when it wants to run a shell command, which is the behavior you’ll lean on in the next two sections.
Review the Code’s Conventions
Antigravity CLI reads an AGENTS.md file from your project root, the same way Gemini CLI reads GEMINI.md. The sample project ships one that spells out a few house rules:
expense-report/AGENTS.md
# Project conventions

This is a small command-line tool that reads a CSV of personal transactions
and prints a per-category expense summary.

## Money

- Represent every monetary amount with `decimal.Decimal`, never `float`.
- Quantize money to exactly two decimal places before displaying it.

## Style

- Keep functions small and single-purpose.
- Standard library only. No third-party dependencies.
Now ask the agent to review the code against those rules, referencing a specific file. As you type, you can use the at-sign (@) followed by the beginning of a filename to trigger path suggestions, and then pick the one you want:
Antigravity CLI · Gemini 3.1 Pro (High)
────────────────────────────────────────────────────────────
> Review @transactions.py for correctness and code-quality problems,
  and check it against this project's conventions. Be specific about
  any bugs.
If your prompt grows too long to fit comfortably on a single line, then you can break it across multiple lines by ending each line with a backslash (\). This tells Antigravity CLI to treat the next line as a continuation of the same prompt. You can also edit the prompt in an external editor by using the Ctrl+G keyboard shortcut.
Instead of guessing, the agent may decide—with your permission—to run the program to see what it actually does:
Antigravity CLI · Gemini 3.1 Pro (High)
● Bash(python cli.py transactions.csv) (ctrl+o to expand)

Command
───────────────────────────────────────────────────────────────────────────────

  Requesting permission for: python cli.py transactions.csv

Do you want to proceed?
> 1. Yes
  2. Yes, and always allow in this conversation for commands that start
     with 'python cli.py transactions.csv'
  3. Yes, and always allow for commands that start with 'python cli.py
     transactions.csv' (Persist to settings.json)
  4. No
When you allow the command to run, the agent executes the program and sees the broken output firsthand. The long trailing decimals violate the project’s money conventions:
Expense report
================================
Groceries     76.79999999999998 (31.4%)
Utilities           64.3 (26.3%)
Transport          58.75 (24.0%)
Dining              44.6 (18.2%)
--------------------------------
TOTAL         244.45000000000002
10 transactions
Those trailing digits come from the way a binary float stores money. Most decimal amounts have no exact binary form, so Python keeps the nearest value it can instead. Use the inspector below to reveal the number that’s really stored, starting with the Groceries total:
Every amount in the report hides a tail like this, which usually stays out of sight because each line rounds to two decimals. Sum a column of them, though, and the tiny errors compound into the 76.79999999999998 you see above. That’s why the convention insists on decimal.Decimal, which holds these values exactly and is the fix the agent applies next.
At this point, the agent read the file, ran the program, and watched the convention break in real output. That’s a stronger position than a static review, because the bug is now confirmed rather than suspected. The natural next question is what the agent does with what it found, and how you get a say before any of it reaches your code.
Work With Artifacts
Next, the agent might autonomously write its findings to an artifact. Artifacts are files saved alongside your conversations that serve as a structured record of the agent’s plans, execution results, and summaries for your review. You can reveal them in the artifact review panel by pressing Ctrl+R or using the /artifact slash command at any time.
Note: If the agent doesn’t create one automatically, then you can explicitly prompt it to formalize its findings into an artifact for you to review.
The review panel lets you open an artifact in read-only mode with the ability to leave comments on its individual lines. You can also approve or reject an artifact in its current state:

In Antigravity CLI, approving, rejecting, and commenting on artifacts form the core feedback loop that keeps the agent’s work aligned with your expectations:
- Approving an artifact gives the agent the green light to proceed to the next phase of its task.
- Conversely, rejecting acts as a red light. The agent halts its current trajectory and typically prompts you for a reason. It then absorbs your feedback, rewrites the artifact, and presents the revised version for another round of review before it touches any code.
- Commenting on individual lines requires opening the artifact itself, where—much like leaving a comment in Google Docs—you can select a specific line and attach feedback to it. It’s a powerful way to course-correct the agent with extreme precision.
While the actual artifact might be much more comprehensive, here’s the heart of what the agent would’ve found:
- Float instead of Decimal (Convention Violation)
- Problem: The script parses the transaction amount as a
floatand uses0.0for totals. This causes the imprecise floating-point artifacts seen in the output above. Project conventions explicitly require usingdecimal.Decimalfor all monetary values. - Fix: Import
from decimal import Decimal. Initialize totals withDecimal("0.00")and parse row amounts usingDecimal(row["amount"]).
- Problem: The script parses the transaction amount as a
- Missing Quantization (Convention Violation)
- Problem: The output values aren’t formatted to exactly two decimal places, directly violating the project convention rules.
- Fix: Apply
.quantize(Decimal("0.00"))tototals[category]andgrand_totalwhen formatting the output strings.
- Monolithic Function (Convention/Quality Violation)
- Problem: The
report()function handles everything: reading the file, computing statistics, and string formatting. - Fix: Refactor
report()into smaller, single-purpose functions, such as:parse_transactions(path)calculate_totals(rows)format_report(totals, grand_total, count)
- Problem: The
- Potential
ZeroDivisionError(Bug)- Problem: Calculating the percentage share (
share = totals[category] / grand_total * 100) will throw aZeroDivisionErrorif all transactions net to zero. - Fix: Add a conditional check:
share = (totals[category] / grand_total * 100) if grand_total else Decimal("0.00").
- Problem: Calculating the percentage share (
- Inefficient Data Parsing & Aggregation (Code Quality)
- Problem: The script loads the entire CSV into memory as a list, and then uses a manual dictionary check to sum categories.
- Fix: Compute the totals immediately while iterating over the
csv.DictReader, and usecollections.defaultdict(Decimal)to clean up the category tracking logic without manual initialization checks.
The agent caught the floating-point money bug that the AGENTS.md convention warns about. It also flagged a ZeroDivisionError that the conventions never mentioned. That’s a subtle one.
An empty CSV won’t cause the bug because the loop that computes each category’s share never runs. The error only appears when the file has transactions whose amounts cancel out to a grand_total of zero—say, a refund that exactly offsets a charge—leaving a non-empty set of categories to divide by zero. Spotting an edge case like this, which only triggers on a specific, easily overlooked combination of inputs, is what agents excel at.
Like any AI model, it can still hallucinate, so treat its findings as a strong first pass, not gospel.
Apply the Suggested Fix
Now have the agent act on its review. Approve the plan from the earlier artifact, or tell it directly to implement the refactor and verify the result in one shot:
Antigravity CLI · Gemini 3.1 Pro (High)
────────────────────────────────────────────────────────────
> Implement the refactor you proposed and check if the code runs correctly.
Unlike most agentic coding tools, Antigravity CLI doesn’t wait for your approval before editing files, nor does it show you a diff upfront. By default, file reads and writes are automatically allowed inside your active project directory, so any edit the agent makes to a file in your workspace lands on disk immediately.
What the agent can’t do without asking is step outside that directory or run a command on your machine. When it’s time to verify a fix by executing your program, Antigravity CLI pauses and prompts you for permission. You can avoid this interruption in the future by allowing the command just for the current session, or by adding it to settings.json to make it permanent.
Note: While the --dangerously-skip-permissions flag also removes the remaining confirmation prompts, only reach for it inside a throwaway directory you’re prepared to lose.
Because Antigravity CLI edits files in your workspace without pausing for approval, version control is your safety net. For example, with Git, you can inspect every change the agent makes and roll back anything you don’t want. Run /diff inside the CLI to review the pending changes:
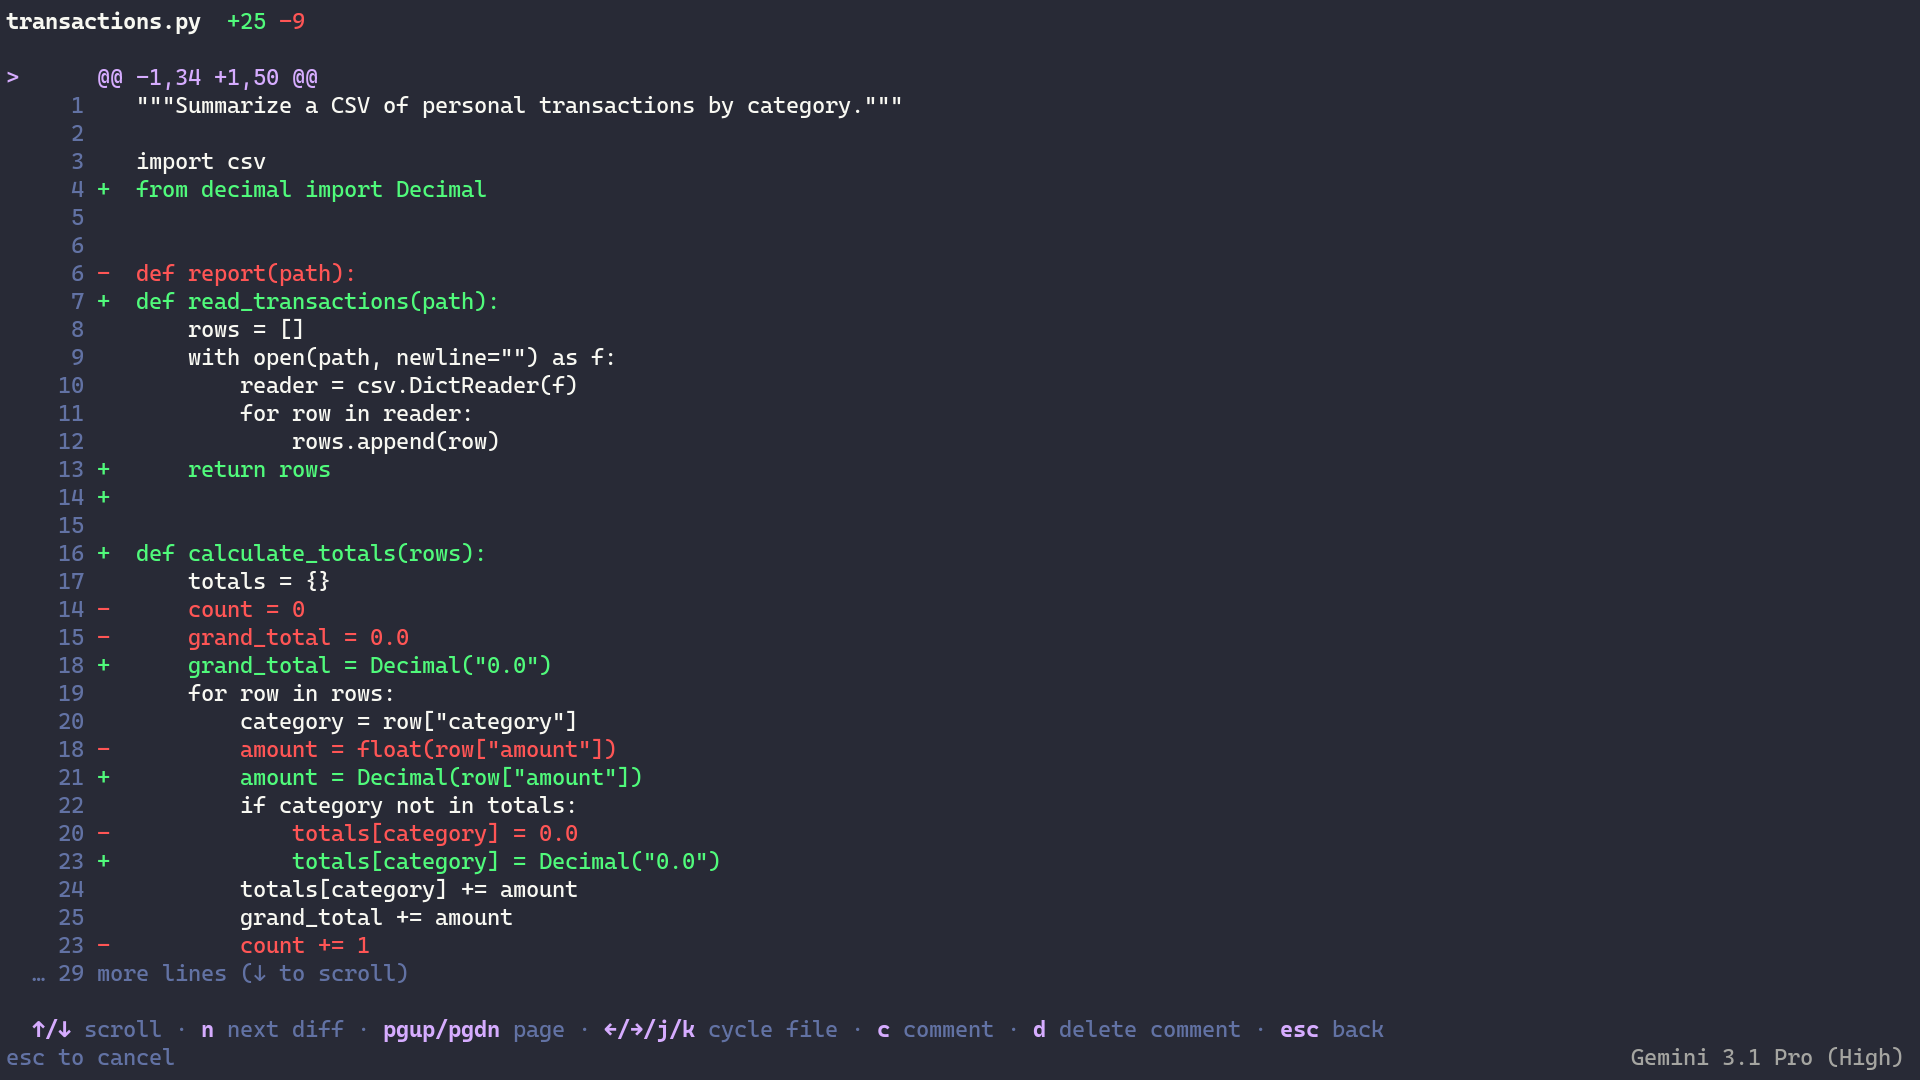
The project’s root directory must be a Git repository for this to work. In this case, the agent rewrote transactions.py, splitting the single report() function into focused helpers and switching the math to Decimal.
As with artifacts, you can leave inline comments on the edited files and have the agent make further changes. For example, you can tell it to incorporate modern Python features like type hints and docstrings, and to follow Pythonic code principles:
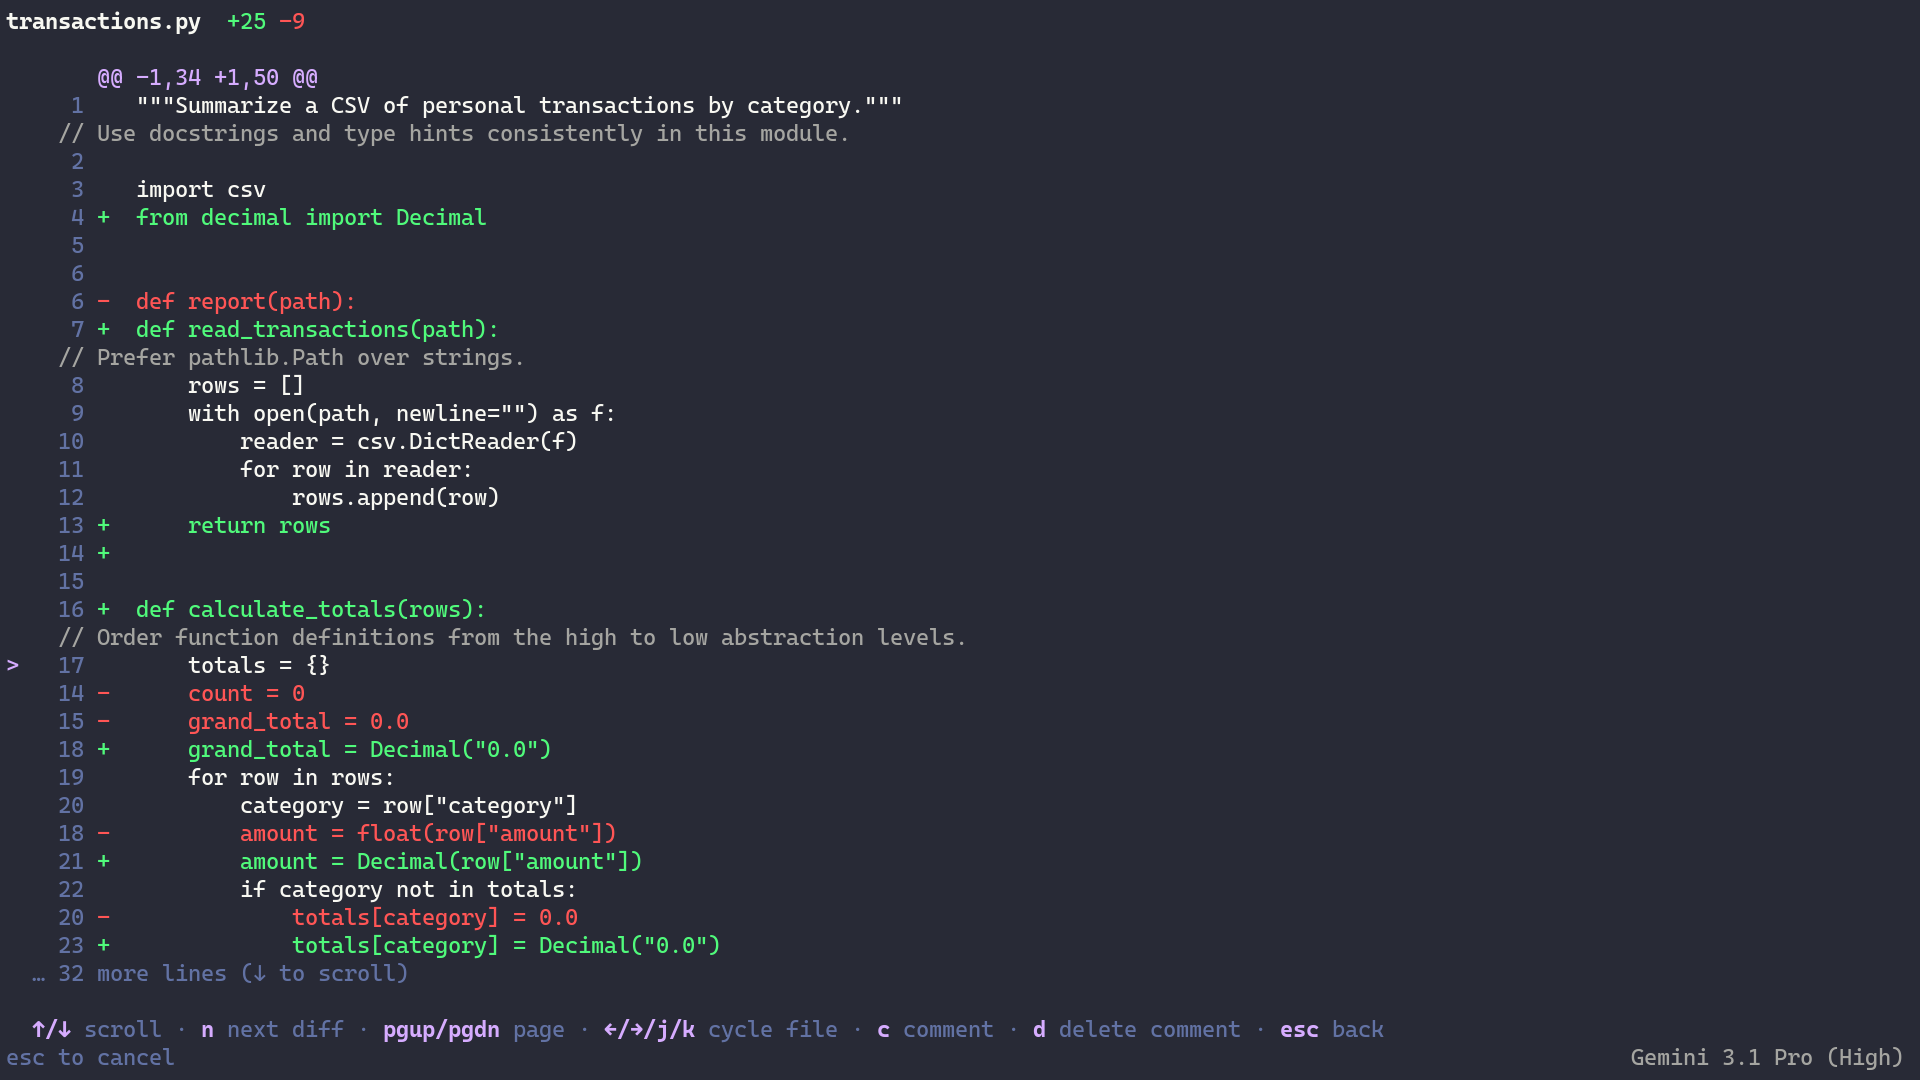
Once you’ve added these comments, the agent transforms the code into a more readable version that should look something like this:
expense-report/transactions.py
"""Summarize a CSV of personal transactions by category."""

import csv
from collections import defaultdict
from decimal import Decimal
from pathlib import Path

type TransactionRow = dict[str, str]
type CategoryTotals = defaultdict[str, Decimal]

def report(path: Path | str) -> str:
    """Main entry point to generate the report from a CSV path."""
    rows = read_transactions(Path(path))
    totals, grand_total, count = calculate_totals(rows)
    return format_report(totals, grand_total, count)

def read_transactions(path: Path) -> list[TransactionRow]:
    """Read and parse transaction records from the given CSV file."""
    with path.open(newline="") as f:
        return list(csv.DictReader(f))

def calculate_totals(
    rows: list[TransactionRow],
) -> tuple[CategoryTotals, Decimal, int]:
    """Calculate category totals and grand total."""
    totals: CategoryTotals = defaultdict(Decimal)
    grand_total = Decimal("0.00")
    count = 0
    for row in rows:
        amount = Decimal(row["amount"])
        totals[row["category"]] += amount
        grand_total += amount
        count += 1
    return totals, grand_total, count

def format_report(
    totals: CategoryTotals, grand_total: Decimal, count: int
) -> str:
    """Format the totals into a printable report string."""
    lines: list[str] = []
    lines.append("Expense report")
    lines.append("=" * 32)
    # Sort categories by total value descending
    for category in sorted(totals, key=lambda c: totals[c], reverse=True):
        if grand_total:
            share = (totals[category] / grand_total) * Decimal("100")
        else:
            share = Decimal("0.0")
        amount_str = totals[category].quantize(Decimal("0.00"))
        lines.append(f"{category:<14}{amount_str:>10} ({share:.1f}%)")
    lines.append("-" * 32)
    grand_total_str = grand_total.quantize(Decimal("0.00"))
    lines.append(f"{'TOTAL':<14}{grand_total_str:>10}")
    lines.append(f"{count} transactions")
    return "\n".join(lines)
Because you asked it to, the agent runs the program itself, so you don’t have to take the fix on faith. The floating-point noise is gone, and every amount now shows two decimal places:
Expense report
================================
Groceries          76.80 (31.4%)
Utilities          64.30 (26.3%)
Transport          58.75 (24.0%)
Dining             44.60 (18.2%)
--------------------------------
TOTAL             244.45
10 transactions
When it’s done, the agent recaps exactly what it changed, so you can match its summary against what you see in the diff:
- Decimal money representation: All
floattypes for money were replaced withdecimal.Decimalobjects. - Modular functions: The original
report()function was split into three small, single-purpose functions:read_transactions(),calculate_totals(), andformat_report(). - Quantization to two decimal places: Every category total and the grand total are quantized with
.quantize(Decimal("0.00"))before printing. - Division-by-zero guard: Added a guard when calculating each category’s share.
- CLI compatibility: The entry-point
report(path)function now composes the new helpers, keepingcli.pyworking unchanged.
In one pass, you’ve gone from an unfamiliar module to a refactored, verified fix. The agent made the edits, you reviewed them with /diff, and the program proved the totals are correct.
Step 3: Explore Power-User Workflows
The core loop from the previous step is one you’ll return to often. This step covers the parts that set Antigravity CLI apart from a plain chatbot. In the following sections, you’ll resume a past conversation without losing any context, run Antigravity CLI non-interactively inside scripts and pipelines, and delegate a multi-part job to parallel subagents. You’ll also bring over any setup you already have from Gemini CLI.
Resume a Past Conversation
Antigravity CLI keeps each conversation in a file-based SQLite database, so you can pick up exactly where you left off. Go ahead and exit agy now by issuing the /exit slash command or pressing Ctrl+D twice. Upon exiting, the command will reveal your conversation’s unique identifier:
Resume: agy --conversation=2aac6e9d-f723-4361-8b69-da94c2b6d89e (or -c)
The UUID you see here is the filename of the corresponding database stored in ~/.gemini/antigravity-cli/conversations/. This persistence mechanism allows you to resume any past conversation with its full context intact.
To resume your last session, make sure you’re still in the expense-report/ folder and follow the instructions given above:
$ agy --conversation=2aac6e9d-f723-4361-8b69-da94c2b6d89e
You’ll be immediately transported back into your previous conversation, with the entire message history loaded and ready to continue. Antigravity CLI replays the full context, so the agent remembers every file it touched, every command it ran, and every decision you made together.
Explicitly referencing a conversation by its UUID is useful when you need to return to a specific one from the past. To resume the most recent one instead, use the convenient -c or --continue flag. You can also combine this flag with the print mode (-p) you saw earlier:
$ agy -c -p "In one sentence, what did you just change?" | tail -n 1
I refactored **[transactions.py](file:///home/realpython/expense-report
/transactions.py)** to adhere to project conventions by using
`decimal.Decimal`, breaking logic into smaller functions, optimizing
memory usage, and upgrading to modern Python 3.12+ syntax.
The tail command at the end keeps only the final line of output. This is handy because when you continue a conversation, Antigravity CLI replays the previous messages along with the new response. By piping the result through tail -n 1, you discard that earlier output and isolate just the latest reply, which is ideal for scripting or capturing a clean, single-line summary.
Recall the --model flag you saw earlier, which you can pair with --conversation or --continue:
$ agy --conversation=2aac6e9d-f723-4361-8b69-da94c2b6d89e \
      --model="GPT-OSS 120B (Medium)"
This lets you resume a past session under a different model than the one you started with. And because the conversation lives in the database rather than in any single model’s memory, switching never costs you context, whether you do it here at startup or later with the /model slash command.
Having Gemini and Claude models reachable from the same tool, on the same conversation, is one of the few capabilities that genuinely sets Antigravity CLI apart from its predecessor, Gemini CLI.
Run the Non-Interactive Mode
Print mode (-p) is the same feature you used for your first prompt, and it’s what makes Antigravity CLI scriptable. Because it runs one prompt and exits, you can drop it into a shell pipeline, a continuous integration check, or a Git hook:
$ agy -p "Summarize the staged changes in one line for a commit message."
Here's a one-line commit message:

```
Refactor transactions.py: split report() into focused functions
⮑ and use Decimal for money
```
This isn’t unique to Antigravity CLI, since Gemini CLI scripts the same way, but the single Go binary makes it far easier to drop into automation, with no Node.js runtime to manage.
Delegate Bigger Jobs to Subagents
The feature Google leans on hardest is orchestration. The main agent can hand parts of a task to specialized subagents, each with its own context window, system prompt, and tools. It can then run several of them at once. For a big job like a sweeping multi-file refactor or researching several questions in parallel, it keeps your main session focused while the work fans out.
Note: To take a deeper look at why each subagent’s isolated context window matters and how to manage it, see Context Engineering for Python Codebases.
The refactor in the previous step didn’t need any of that. It was one file and one agent only. A better fit for orchestration is a job that splits into independent pieces with no shared state. Consider adding several export formats to your expense reporter. For example, JSON, Markdown, and HTML exporters have nothing to say to each other, so the agent can build all three at once.
Ask for them in a single prompt, and make the parallel structure explicit:
Antigravity CLI · Gemini 3.1 Pro (High)
────────────────────────────────────────────────────────────
> Add JSON, Markdown, and HTML export formats alongside the
  existing text report. Treat each as an independent job and
  spin up a subagent per format, each in its own formats
  module mirroring the format_report() signature. Then wire
  them into @cli.py behind a --format option and run the CLI
  once per format to verify.
Instead of working through the formats one at a time, the main agent dispatches a subagent for each and lets them run side by side. Crucially, each subagent writes to its own new module rather than editing transactions.py, so the parallel jobs never touch the same file. That isolation is what makes it safe to run them at once. It sidesteps the overwrite risk that parallel agents otherwise invite.
Note: Parallel subagents aren’t unique to Antigravity CLI. They arrived in Gemini CLI itself in April 2026, so treat agent orchestration as an inherited capability.
While the subagents work, you can follow one’s reasoning by expanding its trajectory with Ctrl+O, jump to one that’s waiting on you with Alt+J, and approve it quickly with Ctrl+K. The only indication of multiple agents at play is the status line. To see those agents in action and monitor their progress, use the /agents slash command:
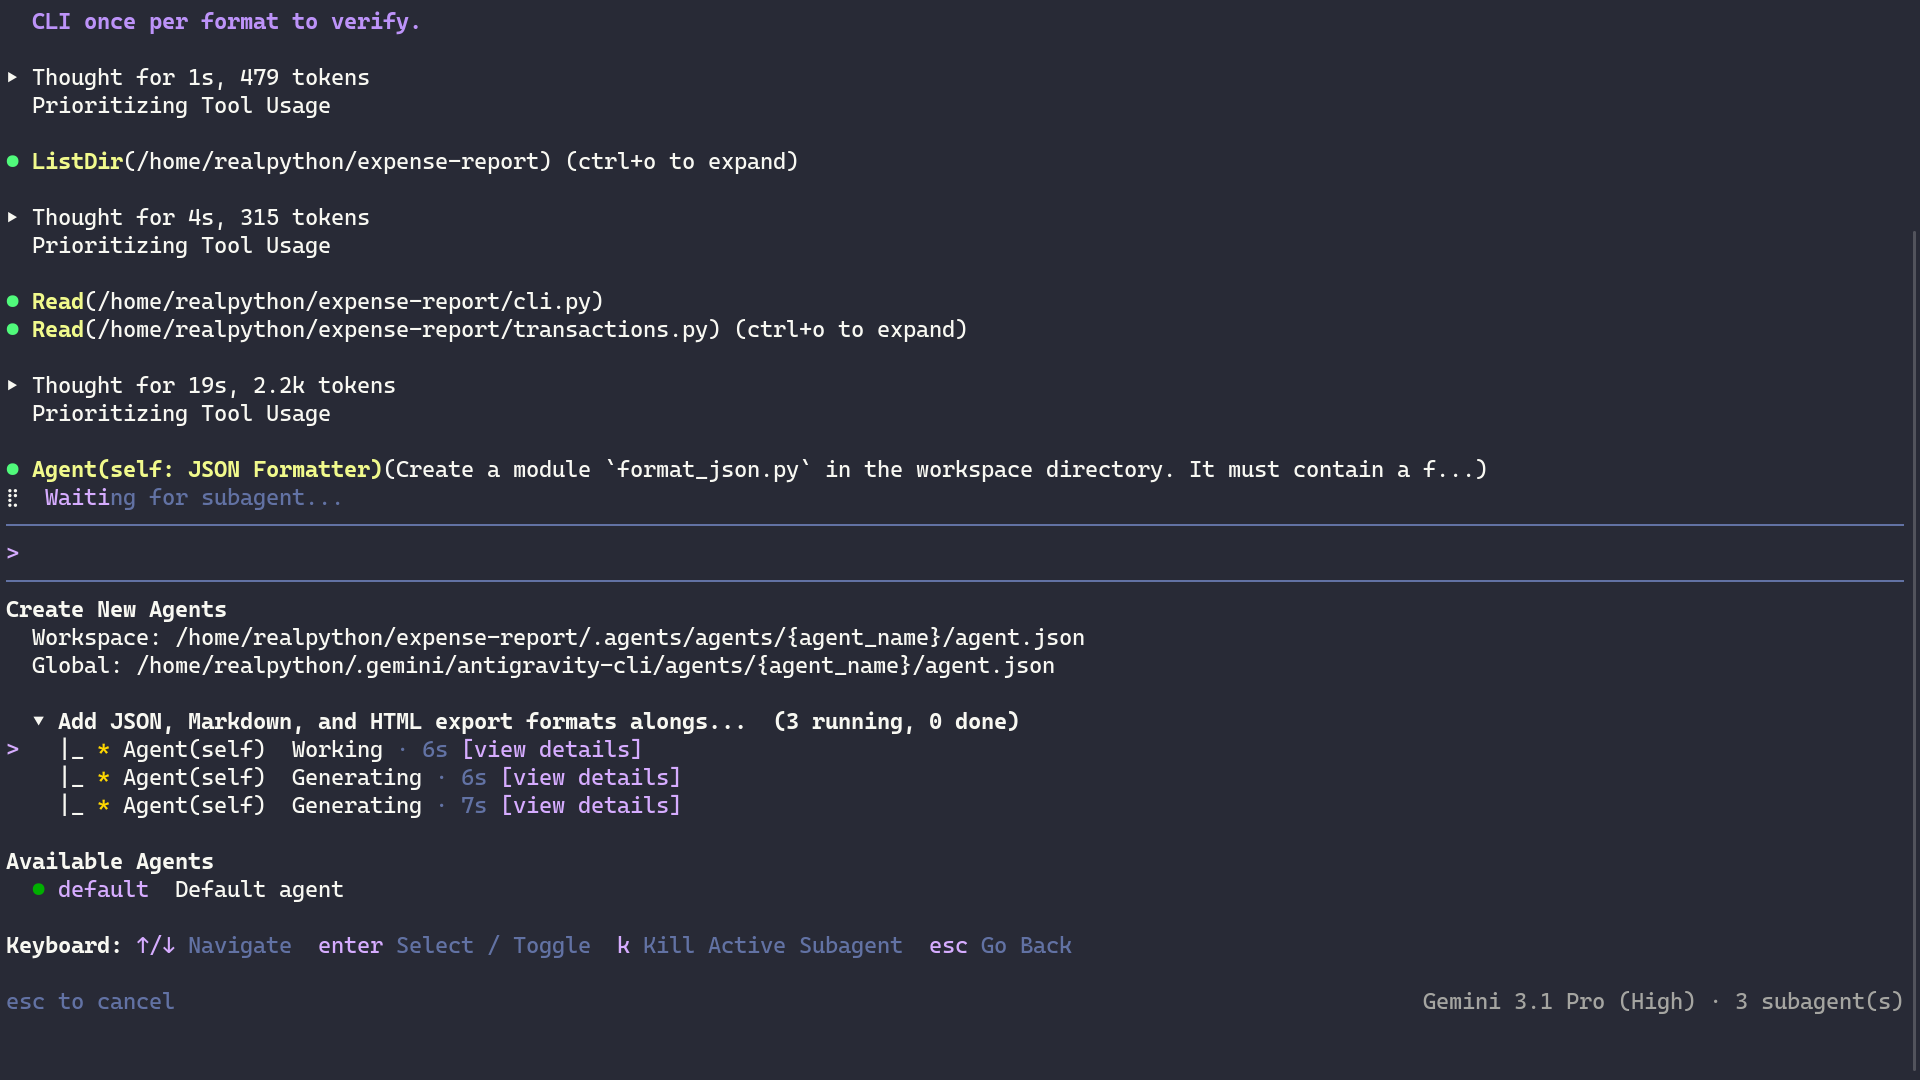
This view lists active and completed subagents, their status, and the step each subagent is currently running. Selecting one lets you inspect its full conversation, tool logs, and pending approvals, so it works as both a live dashboard and an audit trail of what each agent actually did.
Once the three subagents return, the main agent stitches their work together, adding the --format option to cli.py and running the program once per format to confirm each renders the same totals:
Every formatter reuses the existing format_report() signature and sticks to the standard library, in keeping with the project’s conventions:
format_html.py: Emits a minimal<table>you can drop into a web page.format_json.py: Serializes the report withjson.dumps(), keeping each amount as a quantized string so noDecimalprecision is lost.format_markdown.py: Renders a Markdown table of categories, amounts, and shares.cli.py: Gains a--format {text,json,markdown,html}option, defaulting totext, that selects the matching formatter.
Because the models are inherently non-deterministic, your mileage may differ. The agent sometimes organizes these into a common package and may even pull the existing text report into a matching formats/text.py for consistency, even though you only asked for the three new formats. Either layout is fine. What matters is that each format lives in its own module instead of touching transactions.py.
Running the new option proves that each subagent’s work integrates cleanly:
$ python cli.py transactions.csv --format markdown
# Expense Report

| Category | Total | Share |
|----------|------:|------:|
| Groceries | 76.80 | 31.4% |
| Utilities | 64.30 | 26.3% |
| Transport | 58.75 | 24.0% |
| Dining | 44.60 | 18.2% |

**Grand Total: 244.45** (10 transactions)
It’s a tidy result, but orchestration isn’t free or always the right call. Below, you’ll find a few honest caveats that are worth considering.
Where subagents help:
- Speed: Independent pieces run in parallel instead of one at a time, so a job that splits cleanly, like these three exporters, can finish in roughly the time of the slowest part rather than the sum.
- Context management: Each subagent reasons in its own context window with its own system prompt and tools, so your main session stays focused. It sees the finished modules, not the back-and-forth that produced them.
Where they don’t:
- Non-parallel tasks: Orchestration earns its keep only when the work splits into independent pieces with no shared state. A serial or interdependent task, like the single-file refactor earlier, gains nothing.
- Cost and conflicts: Running several subagents at once burns through your quota much faster, and they can overwrite one another if they touch the same files.
Keep those trade-offs in mind, and reach for subagents when the shape of the task actually rewards them rather than as a default.
Bring Your Gemini CLI Setup Along
If you used Gemini CLI or Claude Code extensions, then you can import them into Antigravity CLI as plugins:
$ agy plugin import
No gemini extensions found.
No claude extensions found.
On a machine with such extensions installed, this command brings them over. On a fresh setup like this one, it honestly reports that there’s nothing to import. You can list what’s active at any time with agy plugin list or install a new plugin directly with agy plugin install.
This is the hands-on side of migrating. For the bigger picture of what’s genuinely new versus what carried over from Gemini CLI, see the Coming From Gemini CLI? section below.
Troubleshooting
As you use Antigravity CLI, you might hit a few common snags. Here’s how to handle them:
-
You hit a quota or rate limit. Tight quotas are the most common complaint about Antigravity CLI. Developers have reported hitting their weekly limit with just a couple of requests, and Google has adjusted the limits more than once since launch. Check your remaining allowance inside the CLI with
/usageor/quota, switch to a lighter model with/model, or top up with G1 credits from the/creditspanel. -
You keep getting asked to sign in. If your session doesn’t persist and
agysends you back to the browser, then rerunagyto complete the sign-in. Sign-in tokens didn’t always stick early on, to the point that Google’s own changelog lists a fix for OAuth token persistence and authentication problems. Remember that aGEMINI_API_KEYin your environment won’t authenticate the CLI, so don’t rely on it. -
The agent reaches for a shortcut instead of doing the work. Lightweight models sometimes skip steps, like answering from the code without running it. If that happens, switch to a Pro or Claude model with
/modeland restate what you want, for example, asking it to run the program and show the output. -
Print mode gives up before the task finishes. A non-interactive
agy -prun waits up to five minutes by default, which a long agentic task can blow past. Raise the ceiling with the--print-timeoutoption, or move the task into an interactive session where there’s no such limit.
These cover the issues you’re most likely to encounter, but Antigravity CLI is evolving quickly, and the rough edges are still being smoothed out with each release. If you run into a problem that isn’t listed here or you’ve found a workaround worth sharing, then drop it in the comments below. Your experience might be exactly what helps the next reader get unstuck!
Coming From Gemini CLI?
If you’re migrating from Gemini CLI, then the good news is that your setup mostly comes along. Antigravity CLI keeps the concepts you already know, reads from the same ~/.gemini/ directory, and swaps GEMINI.md for AGENTS.md. Your agent skills, hooks, subagents, and MCP servers all made the jump, and your extensions transfer too—they’re now called plugins, and you can import them from Gemini CLI or Claude Code.
It helps to be clear-eyed about what actually changed from Gemini CLI, and what didn’t:
- One Go binary, no Node.js: Antigravity CLI installs as a single executable instead of an npm package, so there’s no separate runtime to manage.
- One CLI, several model providers: The model picker isn’t limited to Gemini. As you saw earlier, it also lists Anthropic’s Claude and an open-weight model.
- One shared engine: Antigravity CLI runs on the same agent harness as the entire Google Antigravity platform, including Antigravity 2.0, Antigravity IDE, and Antigravity SDK, so improvements to the core agents reach every surface at once.
- The agentic workflow isn’t new: Parallel subagents arrived in Gemini CLI itself in April 2026, two months before that tool’s retirement, so treat multi-agent orchestration as inherited, not as a reason to switch.
A few more things are worth keeping in mind as you make the move:
- Timing: Gemini CLI stopped serving requests on June 18, 2026, for free, Pro, and Ultra users, along with individual Gemini Code Assist subscribers. Organizations on a Code Assist Standard or Enterprise license keep their access.
- Feature parity: Google has said there won’t be one-to-one parity at launch, so spot-check any workflow that relies on a specific Gemini CLI feature.
- Open source: Gemini CLI was open source under Apache 2.0. Antigravity CLI is a closed-source product, so if an open codebase or self-hosting matters to you, factor that in.
- Usage limits: The free tier’s limits have changed repeatedly. Rather than trust a number you read online, run
/usageto see your current quota and check the official pricing.
If you’re switching, do it because Gemini CLI was retired and because you want Claude reachable from the same tool, not because you expect a brand-new way of working.
Next Steps
You’ve installed Antigravity CLI, signed in, explored a Python project, surfaced real bugs, and refactored a module with the agent verifying its own work. That’s the core workflow, but there’s more to explore:
-
Set project conventions: Flesh out the
AGENTS.mdfile with the standards you want the agent to follow, the way the sample project pins money toDecimal. -
Steer the planning loop: Two slash commands sit at opposite ends of the autonomy dial. Prefix a prompt with
/grill-me, and the agent interviews you with clarifying questions before it writes a single line, which suits fuzzy, underspecified tasks. Prefix it with/goal, and the agent runs straight through to completion without the intermediate approvals you saw earlier, which is best reserved for well-scoped jobs you’re happy to let run unattended. -
Plan before executing: Reach for
/planningwhen a task sits between those extremes. The agent works out an approach before it starts, which suits deep research, complex multi-step work, or collaborative sessions where you want to see the shape of the plan before code lands. -
Branch and rewind conversations: Building on the resume workflow, the
/forkcommand splits the current conversation so you can explore an alternative approach without losing your original thread. Meanwhile,/rewindrolls the history back to an earlier message when a session drifts off course. -
Sandbox risky commands: For an extra layer of safety, the sandbox runs shell commands inside an operating-system containment boundary. Enable it with the
--sandboxflag or the Sandbox Mode setting—a far more cautious counterpart to the--dangerously-skip-permissionsflag from Step 2. When the sandbox is on, the CLI still lets you wave a trusted command through without sandboxing it. When it’s off, you can force a risky one into it. -
Customize the status line: Run the
/statuslinecommand, or add astatusLineblock to yoursettings.json, to route live agent state into a script of your own. On every state change, the TUI pipes a JSON payload to your script and renders whatever it prints—ANSI colors included—in the prompt’s status line. -
Automate with hooks and MCP: Wire up hooks to run checks automatically, and connect Model Context Protocol (MCP) servers to give the agent access to external tools and data.
-
Move between terminal and desktop: When a task outgrows the shell, you can continue it in the Antigravity 2.0 desktop app, which wraps the same agent harness in a full graphical interface. While the two surfaces run on a shared backend, their settings and conversations are kept separate.
Antigravity CLI is one of several AI assistants for the terminal. To compare your options, read the sister tutorial on Gemini CLI for context, or explore Anthropic’s Claude Code and OpenAI’s Codex CLI. Each has its own strengths, pricing, and workflow.
If you’d rather follow a structured curriculum instead of picking tools one by one, Real Python’s Python Coding With AI learning path gathers tutorials and video courses on AI-assisted development into one guided track.
Get Your Code: Click here to download the free sample code you’ll use to follow along as Antigravity CLI reads, reviews, and refactors a small Python command-line tool.
Frequently Asked Questions
Now that you have some experience with Google’s Antigravity CLI, you can use the questions and answers below to check your understanding and recap what you’ve learned.
These FAQs are related to the most important concepts you’ve covered in this tutorial. Click the Show/Hide toggle beside each question to reveal the answer.
Antigravity CLI is a terminal-based AI coding tool that brings Google’s agent assistance into your shell. You can ask questions about your code, track down bugs, and dispatch subagents to handle separate tasks in parallel without ever leaving the command line.
Yes. Google retired Gemini CLI in June 2026, and Antigravity CLI takes its place. Your skills, hooks, subagents, and plugins carry over, and the tool still reads its configuration from the same ~/.gemini/ directory.
Google Antigravity is the overall platform, and the others are surfaces that run on top of it. Antigravity CLI is the terminal tool, Antigravity 2.0 and Antigravity IDE are desktop apps, and the SDK lets you build on the same foundation. They all share one agent harness, so improvements to the core agents reach every surface at once.
No. Antigravity CLI ships as a single self-contained binary that bundles the entire Go runtime, so there’s no separate runtime to install first. This is one of the main practical differences from Gemini CLI, which depended on Node.js.
The same tool can drive Google’s Gemini models, Anthropic’s Claude, and an open-weight option, all from one model picker. You can switch between them mid-conversation with the /model slash command without losing any context.
Take the Quiz: Test your knowledge with our interactive “How to Use Google's Antigravity CLI for AI Code Assistance” quiz. You’ll receive a score upon completion to help you track your learning progress:
Interactive Quiz
How to Use Google's Antigravity CLI for AI Code AssistanceTest your knowledge of Google's Antigravity CLI, a terminal-based AI coding agent, and how to use it to read, review, and refactor Python code.