In Python, you use the import keyword to make code in one module available in another. Imports in Python are important for structuring your code effectively. Using imports properly will make you more productive, allowing you to reuse code while keeping your projects maintainable.
This tutorial will provide a thorough overview of Python’s import statement and how it works. The import system is powerful, and you’ll learn how to harness this power. While you’ll cover many of the concepts behind Python’s import system, this tutorial is mostly example driven. You’ll learn from several code examples throughout.
In this tutorial, you’ll learn how to:
- Use modules, packages, and namespace packages
- Handle resources and data files inside your packages
- Import modules dynamically at runtime
- Customize Python’s import system
Throughout the tutorial, you’ll see examples of how to play with the Python import machinery in order to work most efficiently. While all the code is shown in the tutorial, you can also download it by clicking the box below:
Get the Source Code: Click here to get the source code you’ll use to learn about the Python import system in this tutorial.
Take the Quiz: Test your knowledge with our interactive “Python import: Advanced Techniques and Tips” quiz. You’ll receive a score upon completion to help you track your learning progress:

Interactive Quiz
Python import: Advanced Techniques and TipsIn this quiz, you'll test your understanding of Python's import statement and how it works. You'll revisit how to use modules and import them dynamically at runtime.
Basic Python import
Python code is organized into both modules and packages. This section will explain how they differ and how you can work with them.
Later in the tutorial, you’ll see some advanced and lesser-known uses of Python’s import system. However, let’s get started with the basics: importing modules and packages.
Modules
The Python.org glossary defines module as follows:
An object that serves as an organizational unit of Python code. Modules have a namespace containing arbitrary Python objects. Modules are loaded into Python by the process of importing. (Source)
In practice, a module usually corresponds to one .py file containing Python code.
The true power of modules is that they can be imported and reused in other code. Consider the following example:
>>> import math
>>> math.pi
3.141592653589793
In the first line, import math, you import the code in the math module and make it available to use. In the second line, you access the pi variable within the math module. math is part of Python’s standard library, which means that it’s always available to import when you’re running Python.
Note that you write math.pi and not just simply pi. In addition to being a module, math acts as a namespace that keeps all the attributes of the module together. Namespaces are useful for keeping your code readable and organized. In the words of Tim Peters:
Namespaces are one honking great idea—let’s do more of those! (Source)
You can list the contents of a namespace with dir():
>>> import math
>>> dir()
['__annotations__', '__builtins__', ..., 'math']

>>> dir(math)
['__doc__', ..., 'nan', 'pi', 'pow', ...]
Using dir() without any argument shows what’s in the global namespace. To see the contents of the math namespace, you use dir(math).
You’ve already seen the most straightforward use of import. However, there are other ways to use it that allow you to import specific parts of a module and to rename the module as you import it.
The following code imports only the pi variable from the math module:
>>> from math import pi
>>> pi
3.141592653589793

>>> math.pi
NameError: name 'math' is not defined
Note that this places pi in the global namespace and not within a math namespace.
You can also rename modules and attributes as they’re imported:
>>> import math as m
>>> m.pi
3.141592653589793

>>> from math import pi as PI
>>> PI
3.141592653589793
For more details about the syntax for importing modules, check out Python Modules and Packages – An Introduction.
Packages
You can use a package to further organize your modules. The Python.org glossary defines package as follows:
A Python module which can contain submodules or recursively, subpackages. Technically, a package is a Python module with an
__path__attribute. (Source)
Note that a package is still a module. As a user, you usually don’t need to worry about whether you’re importing a module or a package.
In practice, a package typically corresponds to a file directory containing Python files and other directories. To create a Python package yourself, you create a directory and a file named __init__.py inside it. The __init__.py file contains the contents of the package when it’s treated as a module. It can be left empty.
Note: Directories without an __init__.py file are still treated as packages by Python. However, these won’t be regular packages, but something called namespace packages. You’ll learn more about them later.
In general, submodules and subpackages aren’t imported when you import a package. However, you can use __init__.py to include any or all submodules and subpackages if you want. To show a few examples of this behavior, you’ll create a package for saying Hello world in a few different languages. The package will consist of the following directories and files:
world/
│
├── africa/
│   ├── __init__.py
│   └── zimbabwe.py
│
├── europe/
│   ├── __init__.py
│   ├── greece.py
│   ├── norway.py
│   └── spain.py
│
└── __init__.py
Each country file prints out a greeting, while the __init__.py files selectively import some of the subpackages and submodules. The exact contents of the files are as follows:
# world/africa/__init__.py  (Empty file)

# world/africa/zimbabwe.py
print("Shona: Mhoroyi vhanu vese")
print("Ndebele: Sabona mhlaba")

# world/europe/__init__.py
from . import greece
from . import norway

# world/europe/greece.py
print("Greek: Γειά σας Κόσμε")

# world/europe/norway.py
print("Norwegian: Hei verden")

# world/europe/spain.py
print("Castellano: Hola mundo")

# world/__init__.py
from . import africa
Note that world/__init__.py imports only africa and not europe. Similarly, world/africa/__init__.py doesn’t import anything, while world/europe/__init__.py imports greece and norway but not spain. Each country module will print a greeting when it’s imported.
Let’s play with the world package at the interactive prompt to get a better understanding of how the subpackages and submodules behave:
>>> import world
>>> world
<module 'world' from 'world/__init__.py'>

>>> # The africa subpackage has been automatically imported
>>> world.africa
<module 'world.africa' from 'world/africa/__init__.py'>

>>> # The europe subpackage has not been imported
>>> world.europe
AttributeError: module 'world' has no attribute 'europe'
When europe is imported, the europe.greece and europe.norway modules are imported as well. You can see this because the country modules print a greeting when they’re imported:
>>> # Import europe explicitly
>>> from world import europe
Greek: Γειά σας Κόσμε
Norwegian: Hei verden

>>> # The greece submodule has been automatically imported
>>> europe.greece
<module 'world.europe.greece' from 'world/europe/greece.py'>

>>> # Because world is imported, europe is also found in the world namespace
>>> world.europe.norway
<module 'world.europe.norway' from 'world/europe/norway.py'>

>>> # The spain submodule has not been imported
>>> europe.spain
AttributeError: module 'world.europe' has no attribute 'spain'

>>> # Import spain explicitly inside the world namespace
>>> import world.europe.spain
Castellano: Hola mundo

>>> # Note that spain is also available directly inside the europe namespace
>>> europe.spain
<module 'world.europe.spain' from 'world/europe/spain.py'>

>>> # Importing norway doesn't do the import again (no output), but adds
>>> # norway to the global namespace
>>> from world.europe import norway
>>> norway
<module 'world.europe.norway' from 'world/europe/norway.py'>
The world/africa/__init__.py file is empty. This means that importing the world.africa package creates the namespace but has no other effect:
>>> # Even though africa has been imported, zimbabwe has not
>>> world.africa.zimbabwe
AttributeError: module 'world.africa' has no attribute 'zimbabwe'

>>> # Import zimbabwe explicitly into the global namespace
>>> from world.africa import zimbabwe
Shona: Mhoroyi vhanu vese
Ndebele: Sabona mhlaba

>>> # The zimbabwe submodule is now available
>>> zimbabwe
<module 'world.africa.zimbabwe' from 'world/africa/zimbabwe.py'>

>>> # Note that zimbabwe can also be reached through the africa subpackage
>>> world.africa.zimbabwe
<module 'world.africa.zimbabwe' from 'world/africa/zimbabwe.py'>
Remember, importing a module both loads the contents and creates a namespace containing the contents. The last few examples show that it’s possible for the same module to be part of different namespaces.
Technical Detail: The module namespace is implemented as a Python dictionary and is available at the .__dict__ attribute:
>>> import math
>>> math.__dict__["pi"]
3.141592653589793
You rarely need to interact with .__dict__ directly. To learn more about .__dict__, you can check out the Using Python’s .__dict__ to Work With Attributes tutorial.
Similarly, Python’s global namespace is also a dictionary. You can access it through globals().
It’s fairly common to import subpackages and submodules in an __init__.py file to make them more readily available to your users. You can see one example of this in the popular requests package.
Absolute and Relative Imports
Recall the source code of world/__init__.py in the earlier example:
from . import africa
You’ve already seen from...import statements such as from math import pi, but what does the dot (.) in from . import africa mean?
The dot refers to the current package, and the statement is an example of a relative import. You can read it as “From the current package, import the subpackage africa.”
There’s an equivalent absolute import statement in which you explicitly name the current package:
from world import africa
In fact, all imports in world could have been done explicitly with similar absolute imports.
Relative imports must be in the form from...import, and the location you’re importing from must start with a dot.
The PEP 8 style guide recommends using absolute imports in general. However, relative imports are an alternative for organizing package hierarchies. For more information, see Absolute vs Relative Imports in Python.
Python’s Import Path
How does Python find the modules and packages it imports? You’ll see more details about the mechanics of the Python import system later. For now, just know that Python looks for modules and packages in its import path. This is a list of locations that are searched for modules to import.
Note: When you type import something, Python will look for something a few different places before searching the import path.
In particular, it’ll look in a module cache to see if something has already been imported, and it’ll search among the built-in modules.
You’ll learn more about the full Python import machinery in a later section.
You can inspect Python’s import path by printing sys.path. Broadly speaking, this list will contain three different kinds of locations:
- The directory of the current script (or the current directory if there’s no script, such as when Python is running interactively)
- The contents of the
PYTHONPATHenvironment variable - Other, installation-dependent directories
Typically, Python will start at the beginning of the list of locations and look for a given module in each location until the first match. Since the script directory or the current directory is always first in this list, you can make sure that your scripts find your self-made modules and packages by organizing your directories and being careful about which directory you run Python from.
However, you should also be careful that you don’t create modules that shadow, or hide, other important modules. As an example, say that you define the following math module:
# math.py

def double(number):
    return 2 * number
Using this module works as expected:
>>> import math
>>> math.double(3.14)
6.28
But this module also shadows the math module that’s included in the standard library. Unfortunately, that means our earlier example of looking up the value of π no longer works:
>>> import math
>>> math.pi
Traceback (most recent call last):
  File "<stdin>", line 1, in <module>
AttributeError: module 'math' has no attribute 'pi'

>>> math
<module 'math' from 'math.py'>
The problem is that Python now searches your new math module for pi instead of searching the math module in the standard library.
To avoid these kinds of issues, you should be careful with the names of your modules and packages. In particular, your top-level module and package names should be unique. If math is defined as a submodule within a package, then it won’t shadow the built-in module.
Example: Structure Your Imports
While it’s possible to organize your imports by using the current directory as well as by manipulating PYTHONPATH and even sys.path, the process is often unruly and prone to errors. To see a typical example, consider the following application:
structure/
│
├── files.py
└── structure.py
The app will re-create a given file structure by creating directories and empty files. The structure.py file contains the main script, and files.py is a library module with a few functions for dealing with files. The following is an example of output from the app, in this case by running it in the structure directory:
$ python structure.py .
Create file: /home/gahjelle/structure/001/structure.py
Create file: /home/gahjelle/structure/001/files.py
Create file: /home/gahjelle/structure/001/__pycache__/files.cpython-38.pyc
The two source code files as well as the automatically created .pyc file are re-created inside a new directory named 001.
Now take a look at the source code. The main functionality of the app is defined in structure.py:
 1# structure/structure.py
 2
 3# Standard library imports
 4import pathlib
 5import sys
 6
 7# Local imports
 8import files
 9
10def main():
11    # Read path from command line
12    try:
13        root = pathlib.Path(sys.argv[1]).resolve()
14    except IndexError:
15        print("Need one argument: the root of the original file tree")
16        raise SystemExit()
17
18    # Re-create the file structure
19    new_root = files.unique_path(pathlib.Path.cwd(), "{:03d}")
20    for path in root.rglob("*"):
21        if path.is_file() and new_root not in path.parents:
22            rel_path = path.relative_to(root)
23            files.add_empty_file(new_root / rel_path)
24
25if __name__ == "__main__":
26    main()
In lines 12 to 16, you read a root path from the command line. In the above example you use a dot, which means the current directory. This path will be used as the root of the file hierarchy that you’ll re-create.
The actual work happens in lines 19 to 23. First, you create a unique path, new_root, that will be the root of your new file hierarchy. Then you loop through all paths below the original root and re-create them as empty files inside the new file hierarchy.
For manipulating paths like this, pathlib in the standard library is quite useful. For more details on how it’s used, check out Python’s pathlib Module: Taming the File System.
On line 26, you call main(). You’ll learn more about the if test on line 25 later. For now, you should know that the special variable __name__ has the value __main__ inside scripts, but it gets the name of the module inside imported modules. For more information on __name__, check out Defining Main Functions in Python and What Does if name == “main” Do in Python?.
Note that you import files on line 8. This library module contains two utility functions:
# structure/files.py

def unique_path(directory, name_pattern):
    """Find a path name that does not already exist"""
    counter = 0
    while True:
        counter += 1
        path = directory / name_pattern.format(counter)
        if not path.exists():
            return path

def add_empty_file(path):
    """Create an empty file at the given path"""
    print(f"Create file: {path}")
    path.parent.mkdir(parents=True, exist_ok=True)
    path.touch()
unique_path() uses a counter to find a path that doesn’t already exist. In the app, you use it to find a unique subdirectory to use as the new_root of the re-created file hierarchy. Next, add_empty_file() makes sure all necessary directories are created before creating an empty file using .touch().
Have a look at the import of files again:
 7# Local imports
 8import files
It looks quite innocent. However, as the project grows, this line will cause you some headaches. Even though you import files from the structure project, the import is absolute: it doesn’t start with a dot. This means that files must be found in the import path for the import to work.
Luckily, the directory containing the current script is always in Python’s import path, so this works fine for now. However, if your project gains some traction, then it may be used in other ways.
For example, someone might want to import the script into a Jupyter Notebook and run it from there. Or they may want to reuse the files library in another project. They may even create an executable with PyInstaller to more easily distribute it. Unfortunately, any of these scenarios can create issues with the import of files.
To see an example, you can follow the PyInstaller guide and create an entry point to your application. Add an extra directory outside your application directory:
structure/
│
├── structure/
│   ├── files.py
│   └── structure.py
│
└── cli.py
In the outer directory, create the entry point script, cli.py:
# cli.py

from structure.structure import main

if __name__ == "__main__":
    main()
This script will import main() from your original script and run it. Note that main() isn’t run when structure is imported because of the if test on line 25 in structure.py. That means you need to run main() explicitly.
In theory, this should work similarly to running the app directly:
$ python cli.py structure
Traceback (most recent call last):
  File "cli.py", line 1, in <module>
    from structure.structure import main
  File "/home/gahjelle/structure/structure/structure.py", line 8, in <module>
    import files
ModuleNotFoundError: No module named 'files'
Why didn’t that work? Suddenly, the import of files raises an error.
The problem is that by starting the app with cli.py, you’ve changed the location of the current script, which in turn changes the import path. files is no longer on the import path, so it can’t be imported absolutely.
One possible solution is to change Python’s import path:
 7# Local imports
 8sys.path.insert(0, str(pathlib.Path(__file__).parent))
 9import files
This works because the import path includes the folder containing structure.py and files.py. The issue with this approach is that your import path can get very messy and hard to understand.
In practice, you’re re-creating a feature of early Python versions called implicit relative imports. These were removed from the language by PEP 328 with the following rationale:
In Python 2.4 and earlier, if you’re reading a module located inside a package, it is not clear whether
import foorefers to a top-level module or to another module inside the package. As Python’s library expands, more and more existing package internal modules suddenly shadow standard library modules by accident. It’s a particularly difficult problem inside packages because there’s no way to specify which module is meant. (Source)
Another solution is to use a relative import instead. Change the import in structure.py as follows:
 7# Local imports
 8from . import files
You can now start your app through the entry point script:
$ python cli.py structure
Create file: /home/gahjelle/structure/001/structure.py
Create file: /home/gahjelle/structure/001/files.py
Create file: /home/gahjelle/structure/001/__pycache__/structure.cpython-38.pyc
Create file: /home/gahjelle/structure/001/__pycache__/files.cpython-38.pyc
Unfortunately, you can no longer call the app directly:
$ python structure.py .
Traceback (most recent call last):
  File "structure.py", line 8, in <module>
    from . import files
ImportError: cannot import name 'files' from '__main__' (structure.py)
The problem is that relative imports are resolved differently in scripts than are imported modules. Of course, you could go back and restore the absolute import before running the script directly, or you could even do some try...except acrobatics to import files absolutely or relatively depending on what works.
There’s even an officially sanctioned hack to make relative imports work in scripts. Unfortunately, this also forces you to change sys.path in most cases. To quote Raymond Hettinger:
There must be a better way! (Source)
Indeed, a better—and more stable—solution is to play along with Python’s import and packaging system and install your project as a local package using pip.
Create and Install a Local Package
When you install a package from PyPI, that package is available to all scripts in your environment. However, you can also install packages from your local computer, and they’ll also be made available in the same way.
Creating a local package doesn’t involve much overhead. First, create minimal setup.cfg and setup.py files in the outer structure directory:
# setup.cfg

[metadata]
name = local_structure
version = 0.1.0

[options]
packages = structure

# setup.py

import setuptools

setuptools.setup()
In theory, the name and version can be whatever you like. However, they’ll be used by pip when referring to your package, so you should choose values that are recognizable and don’t collide with other packages you use.
One tip is to give all such local packages a common prefix like local_ or your username. packages should list the directory or directories containing your source code. You can then install the package locally using pip:
$ python -m pip install -e .
This command will install the package to your system. structure will then be found on Python’s import path, meaning you can use it anywhere without having to worry about the script directory, relative imports, or other complications. The -e option stands for editable, which is important because it allows you to change the source code of your package without reinstalling it.
Note: This kind of setup file works great when you’re working with projects on your own. However, if you plan to share the code with others, then you should add some more information to your setup file.
For more details on setup files, check out How to Publish an Open-Source Python Package to PyPI.
Now that structure is installed on your system, you can use the following import statement:
 7# Local imports
 8from structure import files
This will work no matter how you end up calling your application.
Tip: In your own code, you should consciously separate scripts and libraries. Here’s a good rule of thumb:
- A script is meant to be run.
- A library is meant to be imported.
You might have code that you want to both run on its own and import from other scripts. In that case, it’s usually worthwhile to refactor your code so that you split the common part into a library module.
While it’s a good idea to separate scripts and libraries, all Python files can be both executed and imported. In a later section, you’ll learn more about how to create modules that handle both well.
Namespace Packages
Python modules and packages are very closely related to files and directories. This sets Python apart from many other programming languages in which packages merely act as namespaces without enforcing how the source code is organized. See the discussion in PEP 402 for examples.
Namespace packages have been available in Python since version 3.3. These are less dependent on the underlying file hierarchy. In particular, namespace packages can be split across multiple directories. A namespace package is created automatically if you have a directory containing a .py file but no __init__.py. See PEP 420 for a detailed explanation.
Note: To be precise, implicit namespace packages were introduced in Python 3.3. In earlier versions of Python, you could create namespace packages manually in several different incompatible ways. PEP 420 unifies and simplifies these earlier approaches.
To get a better understanding of why namespace packages can be useful, let’s try to implement one. As a motivating example, you’ll have another go at the problem solved in The Factory Method Pattern and Its Implementation in Python: given a Song object, you want to convert it to one of several string representations. In other words, you want to serialize Song objects.
To be more concrete, you want to implement code that works something like this:
>>> song = Song(song_id="1", title="The Same River", artist="Riverside")
>>> song.serialize()
'{"id": "1", "title": "The Same River", "artist": "Riverside"}'
Let’s assume that you’re lucky and come across a third-party implementation of several of the formats that you need to serialize to, and it’s organized as a namespace package:
third_party/
│
└── serializers/
    ├── json.py
    └── xml.py
The file json.py contains code that can serialize an object to the JSON format:
# third_party/serializers/json.py

import json

class JsonSerializer:
    def __init__(self):
        self._current_object = None

    def start_object(self, object_name, object_id):
        self._current_object = dict(id=object_id)

    def add_property(self, name, value):
        self._current_object[name] = value

    def __str__(self):
        return json.dumps(self._current_object)
This serializer interface is a bit limited, but it’ll be enough to demonstrate how namespace packages work.
The file xml.py contains a similar XmlSerializer that can convert an object to XML:
# third_party/serializers/xml.py

import xml.etree.ElementTree as et

class XmlSerializer:
    def __init__(self):
        self._element = None

    def start_object(self, object_name, object_id):
        self._element = et.Element(object_name, attrib={"id": object_id})

    def add_property(self, name, value):
        prop = et.SubElement(self._element, name)
        prop.text = value

    def __str__(self):
        return et.tostring(self._element, encoding="unicode")
Note that both of these classes implement the same interface with .start_object(), .add_property(), and .__str__() methods.
You then create a Song class that can use these serializers:
# song.py

class Song:
    def __init__(self, song_id, title, artist):
        self.song_id = song_id
        self.title = title
        self.artist = artist

    def serialize(self, serializer):
        serializer.start_object("song", self.song_id)
        serializer.add_property("title", self.title)
        serializer.add_property("artist", self.artist)

        return str(serializer)
A Song is defined by its ID, title, and artist. Note that .serialize() doesn’t need to know which format it converts to because it uses the common interface defined earlier.
Assuming that you’ve installed the third-party serializers package, you can use it as follows:
>>> from serializers.json import JsonSerializer
>>> from serializers.xml import XmlSerializer
>>> from song import Song
>>> song = Song(song_id="1", title="The Same River", artist="Riverside")

>>> song.serialize(JsonSerializer())
'{"id": "1", "title": "The Same River", "artist": "Riverside"}'

>>> song.serialize(XmlSerializer())
'<song id="1"><title>The Same River</title><artist>Riverside</artist></song>'
By providing different serializer objects to .serialize(), you get different representations of your song.
Note: You might get a ModuleNotFoundError or an ImportError when running the code yourself. This is because serializers isn’t in your Python import path. You’ll soon see how to solve that.
So far, so good. However, now you realize that you also need to convert your songs to a YAML representation, which is not supported in the third-party library. Enter the magic of namespace packages: you can add your own YamlSerializer to the serializers package without touching the third-party library.
First, create a directory on your local file system called serializers. It’s important that the name of the directory matches the name of the namespace package that you’re customizing:
local/
│
└── serializers/
    └── yaml.py
In the yaml.py file, you define your own YamlSerializer. You base this on the PyYAML package, which must be installed from PyPI:
$ python -m pip install PyYAML
Since YAML and JSON are quite similar formats, you can reuse most of the implementation of JsonSerializer:
# local/serializers/yaml.py

import yaml
from serializers.json import JsonSerializer

class YamlSerializer(JsonSerializer):
    def __str__(self):
        return yaml.dump(self._current_object)
Note that the YamlSerializer is based on the JsonSerializer, which is imported from serializers itself. Since both json and yaml are part of the same namespace package, you could even use a relative import: from .json import JsonSerializer.
Continuing the above example, you can now convert the song to YAML as well:
>>> from serializers.yaml import YamlSerializer
>>> song.serialize(YamlSerializer())
"artist: Riverside\nid: '1'\ntitle: The Same River\n"
Just like regular modules and packages, namespace packages must be found on the Python import path. If you were following along with the previous examples, then you might have had issues with Python not finding serializers. In actual code, you would have used pip to install the third-party library, so it would be in your path automatically.
Note: In the original example, the choice of serializer was made more dynamically. You’ll see how to use namespace packages in a proper factory method pattern later.
You should also make sure that your local library is available like a normal package. As explained above, you can do this either by running Python from the proper directory or by using pip to install the local library as well.
In this example, you’re testing how to integrate a fake third-party package with your local package. If third_party were a real package, then you would download it from PyPI using pip. Since this isn’t possible, you can simulate it by installing third_party locally like you did in the structure example earlier.
Alternatively, you can mess with your import path. Put the third_party and local directories inside the same folder, then customize your Python path as follows:
>>> import sys
>>> sys.path.extend(["third_party", "local"])

>>> from serializers import json, xml, yaml
>>> json
<module 'serializers.json' from 'third_party/serializers/json.py'>

>>> yaml
<module 'serializers.yaml' from 'local/serializers/yaml.py'>
You can now use all serializers without worrying about whether they’re defined in the third-party package or locally.
Imports Style Guide
PEP 8, the Python style guide, has a couple of recommendations about imports. As always with Python, keeping your code both readable and maintainable is an important consideration. Here are a few general rules of thumb for how to style your imports:
- Keep imports at the top of the file.
- Write imports on separate lines.
- Organize imports into groups: first standard library imports, then third-party imports, and finally local application or library imports.
- Order imports alphabetically within each group.
- Prefer absolute imports over relative imports.
- Avoid wildcard imports like
from module import *.
isort and reorder-python-imports are great tools for enforcing a consistent style on your imports.
Here’s an example of an import section inside the Real Python feed reader package:
# Standard library imports
import sys
from typing import Dict, List

# Third party imports
import feedparser
import html2text

# Reader imports
from reader import URL
Note how this grouping makes the dependencies of this module clear: feedparser and html2text need to be installed on the system. You can generally assume that the standard library is available. Separating imports from within your package gives you some overview over the internal dependencies of your code.
There are cases in which it makes sense to bend these rules a little. You’ve already seen that relative imports can be an alternative to organizing package hierarchies. Later, you’ll see how in some cases you can move imports into a function definition to break import cycles.
Resource Imports
Sometimes you’ll have code that depends on data files or other resources. In small scripts, this isn’t a problem—you can specify the path to your data file and carry on!
However, if the resource file is important for your package and you want to distribute your package to other users, then a few challenges will arise:
-
You won’t have control over the path to the resource since that will depend on your user’s setup as well as on how the package is distributed and installed. You can try to figure out the resource path based on your package’s
__file__or__path__attributes, but this may not always work as expected. -
Your package may reside inside a ZIP file or an old
.eggfile, in which case the resource won’t even be a physical file on the user’s system.
There have been several attempts at solving these challenges, including setuptools.pkg_resources. However, with the introduction of importlib.resources into the standard library in Python 3.7, there’s now one standard way of dealing with resource files.
Introducing importlib.resources
importlib.resources gives access to resources within packages. In this context, a resource is any file located within an importable package. The file may or may not correspond to a physical file on the file system.
This has a couple of advantages. By reusing the import system, you get a more consistent way of dealing with the files inside your packages. It also gives you easier access to resource files in other packages. The documentation sums it up nicely:
If you can import a package, you can access resources within that package. (Source)
importlib.resources became part of the standard library in Python 3.7. However, on older versions of Python, a backport is available as importlib_resources. To use the backport, install it from PyPI:
$ python -m pip install importlib_resources
The backport is compatible with Python 2.7 as well as Python 3.4 and later versions.
There’s one requirement when using importlib.resources: your resource files must be available inside a regular package. Namespace packages aren’t supported. In practice, this means that the file must be in a directory containing an __init__.py file.
As a first example, assume you have resources inside a package like this:
books/
│
├── __init__.py
├── alice_in_wonderland.png
└── alice_in_wonderland.txt
__init__.py is just an empty file necessary to designate books as a regular package.
You can then use open_text() and open_binary() to open text and binary files, respectively:
>>> from importlib import resources
>>> with resources.open_text("books", "alice_in_wonderland.txt") as fid:
...     alice = fid.readlines()
...
>>> print("".join(alice[:7]))
CHAPTER I. Down the Rabbit-Hole

Alice was beginning to get very tired of sitting by her sister on the
bank, and of having nothing to do: once or twice she had peeped into the
book her sister was reading, but it had no pictures or conversations in
it, 'and what is the use of a book,' thought Alice 'without pictures or
conversations?'

>>> with resources.open_binary("books", "alice_in_wonderland.png") as fid:
...     cover = fid.read()
...
>>> cover[:8]  # PNG file signature
b'\x89PNG\r\n\x1a\n'
open_text() and open_binary() are equivalent to the built-in open() with the mode parameter set to rt and rb, respectively. Convenient functions for reading text or binary files directly are also available as read_text() and read_binary(). See the official documentation for more information.
Note: To seamlessly fall back to using the backport on older Python versions, you can import importlib.resources as follows:
try:
    from importlib import resources
except ModuleNotFoundError:
    import importlib_resources as resources
See the tips and tricks section of this tutorial for more information.
The rest of this section will show a few elaborate examples of using resource files in practice.
Example: Use Data Files
As a more complete example of using data files, you’ll see how to implement a quiz program based on United Nations population data. First, create a data package and download WPP2019_TotalPopulationBySex.csv from the UN web page:
data/
│
├── __init__.py
└── WPP2019_TotalPopulationBySex.csv
Open the CSV file and have a look at the data:
LocID,Location,VarID,Variant,Time,PopMale,PopFemale,PopTotal,PopDensity
4,Afghanistan,2,Medium,1950,4099.243,3652.874,7752.117,11.874
4,Afghanistan,2,Medium,1951,4134.756,3705.395,7840.151,12.009
4,Afghanistan,2,Medium,1952,4174.45,3761.546,7935.996,12.156
4,Afghanistan,2,Medium,1953,4218.336,3821.348,8039.684,12.315
...
Each line contains the population of a country for a given year and a given variant, which indicates what kind of scenario is used for the projection. The file contains population projections until the year 2100.
The following function reads this file and picks out the total population of each country for a given year and variant:
import csv
from importlib import resources

def read_population_file(year, variant="Medium"):
    population = {}

    print(f"Reading population data for {year}, {variant} scenario")
    with resources.open_text(
        "data", "WPP2019_TotalPopulationBySex.csv"
    ) as fid:
        rows = csv.DictReader(fid)

        # Read data, filter the correct year
        for row in rows:
            if row["Time"] == year and row["Variant"] == variant:
                pop = round(float(row["PopTotal"]) * 1000)
                population[row["Location"]] = pop

    return population
The highlighted lines show how importlib.resources is used to open the data file. For more information about working with CSV files, check out Reading and Writing CSV Files in Python.
The above function returns a dictionary with population numbers:
>>> population = read_population_file("2020")
Reading population data for 2020, Medium scenario

>>> population["Norway"]
5421242
You can do any number of interesting things with this population dictionary, including analysis and visualizations. Here, you’ll create a quiz game that asks users to identify which country in a set is most populous. Playing the game will look something like this:
$ python population_quiz.py

Question 1:
1. Tunisia
2. Djibouti
3. Belize

Which country has the largest population? 1
Yes, Tunisia is most populous (11,818,618)

Question 2:
1. Mozambique
2. Ghana
3. Hungary

Which country has the largest population? 2
No, Mozambique (31,255,435) is more populous than Ghana (31,072,945)

...
The details of the implementation are too far outside the topic of this tutorial, so they won’t be discussed here. However, you can expand the section below to see the complete source code.
The population quiz consists of two functions, one that reads the population data like you did above and one that runs the actual quiz:
 1# population_quiz.py
 2
 3import csv
 4import random
 5
 6try:
 7    from importlib import resources
 8except ModuleNotFoundError:
 9    import importlib_resources as resources
10
11def read_population_file(year, variant="Medium"):
12    """Read population data for the given year and variant"""
13    population = {}
14
15    print(f"Reading population data for {year}, {variant} scenario")
16    with resources.open_text(
17        "data", "WPP2019_TotalPopulationBySex.csv"
18    ) as fid:
19        rows = csv.DictReader(fid)
20
21        # Read data, filter the correct year
22        for row in rows:
23            if (
24                int(row["LocID"]) < 900
25                and row["Time"] == year
26                and row["Variant"] == variant
27            ):
28                pop = round(float(row["PopTotal"]) * 1000)
29                population[row["Location"]] = pop
30
31    return population
32
33def run_quiz(population, num_questions, num_countries):
34    """Run a quiz about the population of countries"""
35    num_correct = 0
36    for q_num in range(num_questions):
37        print(f"\n\nQuestion {q_num + 1}:")
38        countries = random.sample(population.keys(), num_countries)
39        print("\n".join(f"{i}. {a}" for i, a in enumerate(countries, start=1)))
40
41        # Get user input
42        while True:
43            guess_str = input("\nWhich country has the largest population? ")
44            try:
45                guess_idx = int(guess_str) - 1
46                guess = countries[guess_idx]
47            except (ValueError, IndexError):
48                print(f"Please answer between 1 and {num_countries}")
49            else:
50                break
51
52        # Check the answer
53        correct = max(countries, key=lambda k: population[k])
54        if guess == correct:
55            num_correct += 1
56            print(f"Yes, {guess} is most populous ({population[guess]:,})")
57        else:
58            print(
59                f"No, {correct} ({population[correct]:,}) is more populous "
60                f"than {guess} ({population[guess]:,})"
61            )
62
63    return num_correct
64
65def main():
66    """Read population data and run quiz"""
67    population = read_population_file("2020")
68    num_correct = run_quiz(population, num_questions=10, num_countries=3)
69    print(f"\nYou answered {num_correct} questions correctly")
70
71if __name__ == "__main__":
72    main()
Note that on line 24, you also check that the LocID is less than 900. Locations with a LocID of 900 and above are not proper countries, but aggregates like World, Asia, and so on.
Example: Add Icons to Tkinter GUIs
When building graphical user interfaces (GUIs), you often need to include resource files like icons. The following example shows how you can do that using importlib.resources. The final app will look quite basic, but it’ll have a custom icon as well as an illustration on the Goodbye button:
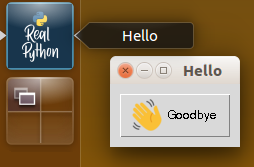
The example uses Tkinter, which is a GUI package available in the standard library. It’s based on the Tk windowing system, originally developed for the Tcl programming language. There are many other GUI packages available for Python. If you’re using a different one, then you should be able add icons to your app using ideas similar to the ones presented here.
In Tkinter, images are handled by the PhotoImage class. To create a PhotoImage, you pass in a path to an image file.
Remember, when distributing your package, you’re not even guaranteed that resource files will exist as physical files on the file system. importlib.resources solves this by providing path(). This function will return a path to the resource file, creating a temporary file if necessary.
To make sure any temporary files are cleaned up properly, you should use path() as a context manager using the keyword with:
>>> from importlib import resources
>>> with resources.path("hello_gui.gui_resources", "logo.png") as path:
...     print(path)
...
/home/gahjelle/hello_gui/gui_resources/logo.png
For the full example, assume you have the following file hierarchy:
hello_gui/
│
├── gui_resources/
│   ├── __init__.py
│   ├── hand.png
│   └── logo.png
│
└── __main__.py
If you want to try the example yourself, then you can download these files along with the rest of the source code used in this tutorial by clicking the link below:
Get the Source Code: Click here to get the source code you’ll use to learn about the Python import system in this tutorial.
The code is stored in a file with the special name __main__.py. This name indicates that the file is the entry point for the package. Having a __main__.py file allows your package to be executed with python -m:
$ python -m hello_gui
For more information on calling a package with -m, see How to Publish an Open-Source Python Package to PyPI.
The GUI is defined in a class called Hello. Note that you use importlib.resources to obtain the path of the image files:
 1# hello_gui/__main__.py
 2
 3import tkinter as tk
 4from tkinter import ttk
 5
 6try:
 7    from importlib import resources
 8except ModuleNotFoundError:
 9    import importlib_resources as resources
10
11class Hello(tk.Tk):
12    def __init__(self, *args, **kwargs):
13        super().__init__(*args, **kwargs)
14        self.wm_title("Hello")
15
16        # Read image, store a reference to it, and set it as an icon
17        with resources.path("hello_gui.gui_resources", "logo.png") as path:
18            self._icon = tk.PhotoImage(file=path)
19        self.iconphoto(True, self._icon)
20
21        # Read image, create a button, and store a reference to the image
22        with resources.path("hello_gui.gui_resources", "hand.png") as path:
23            hand = tk.PhotoImage(file=path)
24        button = ttk.Button(
25            self,
26            image=hand,
27            text="Goodbye",
28            command=self.quit,
29            compound=tk.LEFT,  # Add the image to the left of the text
30        )
31        button._image = hand
32        button.pack(side=tk.TOP, padx=10, pady=10)
33
34if __name__ == "__main__":
35    hello = Hello()
36    hello.mainloop()
If you want to learn more about building GUIs with Tkinter, then check out Python GUI Programming With Tkinter. The official documentation also has a nice list of resources to start with, and the tutorial at TkDocs is another great resource that shows how to use Tk in other languages.
Note: One source of confusion and frustration when working with images in Tkinter is that you must make sure the images aren’t garbage collected. Due to the way Python and Tk interact, the garbage collector in Python (at least in CPython) doesn’t register that images are used by .iconphoto() and Button.
To make sure that the images are kept around, you should manually add a reference to them. You can see examples of this in the code above on lines 18 and 31.
Dynamic Imports
One of Python’s defining features is that it’s a very dynamic language. Although it’s sometimes a bad idea, you can do many things to a Python program when it’s running, including adding attributes to a class, redefining methods, or changing the docstring of a module. For instance, you can change print() so that it doesn’t do anything:
>>> print("Hello dynamic world!")
Hello dynamic world!

>>> # Redefine the built-in print()
>>> print = lambda *args, **kwargs: None

>>> print("Hush, everybody!")
>>> # Nothing is printed
Technically, you’re not redefining print(). Instead, you’re defining another print() that shadows the built-in one. To return to using the original print(), you can delete your custom one with del print. If you’re so inclined, you can shadow any Python object that is built into the interpreter.
Note: In the above example, you redefine print() using a lambda function. You also could have used a normal function definition:
>>> def print(*args, **kwargs):
... pass
To learn more about lambda functions, see How to Use Python Lambda Functions.
In this section, you’ll learn how to do dynamic imports in Python. With them, you won’t have to decide what to import until your program is running.
Using importlib
So far, you’ve used Python’s import keyword to import modules and packages explicitly. However, the whole import machinery is available in the importlib package, and this allows you to do your imports more dynamically. The following script asks the user for the name of a module, imports that module, and prints its docstring:
# docreader.py

import importlib

module_name = input("Name of module? ")
module = importlib.import_module(module_name)
print(module.__doc__)
import_module() returns a module object that you can bind to any variable. Then you can treat that variable as a regularly imported module. You can use the script like this:
$ python docreader.py
Name of module? math
This module is always available.  It provides access to the
mathematical functions defined by the C standard.

$ python docreader.py
Name of module? csv
CSV parsing and writing.

This module provides classes that assist in the reading and writing
of Comma Separated Value (CSV) files, and implements the interface
described by PEP 305.  Although many CSV files are simple to parse,
the format is not formally defined by a stable specification and
is subtle enough that parsing lines of a CSV file with something
like line.split(",") is bound to fail.  The module supports three
basic APIs: reading, writing, and registration of dialects.

[...]
In each case, the module is imported dynamically by import_module().
Example: Factory Method With Namespace Packages
Think back to the serializers example from earlier. With serializers implemented as a namespace package, you had the ability to add custom serializers. In the original example from a previous tutorial, the serializers were made available through a serializer factory. Using importlib, you can do something similar.
Add the following code to your local serializers namespace package:
# local/serializers/factory.py

import importlib

def get_serializer(format):
    try:
        module = importlib.import_module(f"serializers.{format}")
        serializer = getattr(module, f"{format.title()}Serializer")
    except (ImportError, AttributeError):
        raise ValueError(f"Unknown format {format!r}") from None

    return serializer()

def serialize(serializable, format):
    serializer = get_serializer(format)
    serializable.serialize(serializer)
    return str(serializer)
The get_serializer() factory can create serializers dynamically based on the format parameter, and serialize() can then apply the serializer to any object that implements a .serialize() method.
The factory makes some strong assumptions about the naming of both the module and the class containing the individual serializers. In the next section, you’ll learn about a plugin architecture that allows more flexibility.
You can now re-create the earlier example as follows:
>>> from serializers import factory
>>> from song import Song
>>> song = Song(song_id="1", title="The Same River", artist="Riverside")

>>> factory.serialize(song, "json")
'{"id": "1", "title": "The Same River", "artist": "Riverside"}'

>>> factory.serialize(song, "yaml")
"artist: Riverside, id: '1', title: The Same River\n"

>>> factory.serialize(song, "toml")
ValueError: Unknown format 'toml'
In this case, you no longer need to explicitly import each serializer. Instead, you specify the name of a serializer with a string. The string could even be chosen by your user at runtime.
Note: In a regular package, you probably would have implemented get_serializer() and serialize() in an __init__.py file. That would have allowed you to simply import serializers and then call serializers.serialize().
However, namespace packages aren’t allowed to use __init__.py, so you need to implement these functions in a separate module instead.
The final example shows that you also get a decent error message if you try to serialize to a format that hasn’t been implemented.
Example: A Package of Plugins
Let’s look at another example of using dynamic imports. You can use the following module to set up a flexible plugin architecture in your code. This is similar to the previous example, in which you could plug in serializers for different formats by adding new modules.
One application that uses plugins effectively is the Glue exploratory visualization tool. Glue can read many different data formats out of the box. However, if your data format isn’t supported, then you can write your own custom data loader.
You do this by adding a function that you decorate and place in a special location to make it easy for Glue to find. You don’t need to alter any part of the Glue source code. See the documentation for all the details.
You can set up a similar plugin architecture that you can use in your own projects. Within the architecture, there are two levels:
- A plugin package is a collection of related plugins corresponding to a Python package.
- A plugin is a custom behavior made available in a Python module.
The plugins module that exposes the plugin architecture has the following functions:
# plugins.py

def register(func):
    """Decorator for registering a new plugin"""

def names(package):
    """List all plugins in one package"""

def get(package, plugin):
    """Get a given plugin"""

def call(package, plugin, *args, **kwargs):
    """Call the given plugin"""

def _import(package, plugin):
    """Import the given plugin file from a package"""

def _import_all(package):
    """Import all plugins in a package"""

def names_factory(package):
    """Create a names() function for one package"""

def get_factory(package):
    """Create a get() function for one package"""

def call_factory(package):
    """Create a call() function for one package"""
The factory functions are used to conveniently add functionality to plugin packages. You’ll see some examples of how they’re used shortly.
Looking at all the details of this code is outside the scope of this tutorial. If you’re interested, then you can see an implementation by expanding the section below.
The following code shows the implementation of plugins.py described above:
# plugins.py

import functools
import importlib
from collections import namedtuple
from importlib import resources

# Basic structure for storing information about one plugin
Plugin = namedtuple("Plugin", ("name", "func"))

# Dictionary with information about all registered plugins
_PLUGINS = {}

def register(func):
    """Decorator for registering a new plugin"""
    package, _, plugin = func.__module__.rpartition(".")
    pkg_info = _PLUGINS.setdefault(package, {})
    pkg_info[plugin] = Plugin(name=plugin, func=func)
    return func

def names(package):
    """List all plugins in one package"""
    _import_all(package)
    return sorted(_PLUGINS[package])

def get(package, plugin):
    """Get a given plugin"""
    _import(package, plugin)
    return _PLUGINS[package][plugin].func

def call(package, plugin, *args, **kwargs):
    """Call the given plugin"""
    plugin_func = get(package, plugin)
    return plugin_func(*args, **kwargs)

def _import(package, plugin):
    """Import the given plugin file from a package"""
    importlib.import_module(f"{package}.{plugin}")

def _import_all(package):
    """Import all plugins in a package"""
    files = resources.contents(package)
    plugins = [f[:-3] for f in files if f.endswith(".py") and f[0] != "_"]
    for plugin in plugins:
        _import(package, plugin)

def names_factory(package):
    """Create a names() function for one package"""
    return functools.partial(names, package)

def get_factory(package):
    """Create a get() function for one package"""
    return functools.partial(get, package)

def call_factory(package):
    """Create a call() function for one package"""
    return functools.partial(call, package)
This implementation is a bit simplified. In particular, it doesn’t do any explicit error handling. Check out the PyPlugs project for a more complete implementation.
You can see that _import() uses importlib.import_module() to dynamically load plugins. Additionally, _import_all() uses importlib.resources.contents() to list all available plugins in a given package.
Let’s look at some examples of how to use plugins. The first example is a greeter package that you can use to add many different greetings to your app. A full plugin architecture is definitely overkill for this example, but it shows how the plugins work.
Assume you have the following greeter package:
greeter/
│
├── __init__.py
├── hello.py
├── howdy.py
└── yo.py
Each greeter module defines a function that takes one name argument. Note how they’re all registered as plugins using the @register decorator:
# greeter/hello.py
import plugins

@plugins.register
def greet(name):
    print(f"Hello {name}, how are you today?")

# greeter/howdy.py
import plugins

@plugins.register
def greet(name):
    print(f"Howdy good {name}, honored to meet you!")

# greeter/yo.py
import plugins

@plugins.register
def greet(name):
    print(f"Yo {name}, good times!")
To learn more about decorators and how they’re used, check out Primer on Python Decorators.
Note: To simplify the discovery and import of plugins, each plugin’s name is based on the name of the module that contains it instead of the function name. This restricts you to having only one plugin per file.
To finish setting up greeter as a plugin package, you can use the factory functions in plugins to add functionality to the greeter package itself:
# greeter/__init__.py

import plugins

greetings = plugins.names_factory(__package__)
greet = plugins.call_factory(__package__)
You can now use greetings() and greet() as follows:
>>> import greeter
>>> greeter.greetings()
['hello', 'howdy', 'yo']

>>> greeter.greet(plugin="howdy", name="Guido")
Howdy good Guido, honored to meet you!
Note that greetings() automatically discovers all the plugins that are available in the package.
You can also more dynamically choose which plugin to call. In the following example, you choose a plugin at random. However, you could also select a plugin based on a configuration file or user input:
>>> import greeter
>>> import random

>>> greeting = random.choice(greeter.greetings())
>>> greeter.greet(greeting, name="Frida")
Hello Frida, how are you today?

>>> greeting = random.choice(greeter.greetings())
>>> greeter.greet(greeting, name="Frida")
Yo Frida, good times!
To discover and call the different plugins, you need to import them. Let’s have a quick look at how plugins handles imports. The main work is done in the following two functions inside plugins.py:
import importlib
import pathlib
from importlib import resources

def _import(package, plugin):
    """Import the given plugin file from a package"""
    importlib.import_module(f"{package}.{plugin}")

def _import_all(package):
    """Import all plugins in a package"""
    files = resources.contents(package)
    plugins = [f[:-3] for f in files if f.endswith(".py") and f[0] != "_"]
    for plugin in plugins:
        _import(package, plugin)
_import() looks deceptively straightforward. It uses importlib to import a module. But there are a couple of things also happening in the background:
- Python’s import system ensures that each plugin is imported only once.
@registerdecorators defined inside each plugin module register each imported plugin.- In a full implementation, there would also be some error handling to deal with missing plugins.
_import_all() discovers all the plugins within a package. Here’s how it works:
contents()fromimportlib.resourceslists all the files inside a package.- The results are filtered to find potential plugins.
- Each Python file not starting with an underscore is imported.
- Plugins in any of the files are discovered and registered.
Let’s end this section with a final version of the serializers namespace package. One outstanding issue was that the get_serializer() factory made strong assumptions about the naming of the serializer classes. You can make this more flexible using plugins.
First, add a line registering each of the serializers. Here is an example of how it’s done in the yaml serializer:
# local/serializers/yaml.py

import plugins
import yaml
from serializers.json import JsonSerializer

@plugins.register
class YamlSerializer(JsonSerializer):
    def __str__(self):
        return yaml.dump(self._current_object)
Next, update get_serializers() to use plugins:
# local/serializers/factory.py

import plugins

get_serializer = plugins.call_factory(__package__)

def serialize(serializable, format):
    serializer = get_serializer(format)
    serializable.serialize(serializer)
    return str(serializer)
You implement get_serializer() using call_factory() since that will automatically instantiate each serializer. With this refactoring, the serializers work just the same as earlier. However, you have more flexibility in naming your serializer classes.
For more information about using plugins, check out PyPlugs on PyPI and the Plug-ins: Adding Flexibility to Your Apps presentation from PyCon 2019.
The Python Import System
You’ve seen many ways to take advantage of Python’s import system. In this section, you’ll learn a bit more about what happens behind the scenes as modules and packages are imported.
As with most parts of Python, the import system can be customized. You’ll see several ways that you can change the import system, including automatically downloading missing packages from PyPI and importing data files as if they were modules.
Import Internals
The details of the Python import system are described in the official documentation. At a high level, three things happen when you import a module (or package). The module is:
- Searched for
- Loaded
- Bound to a namespace
For the usual imports—those done with the import statement—all three steps happen automatically. When you use importlib, however, only the first two steps are automatic. You need to bind the module to a variable or namespace yourself.
For instance, the following methods of importing and renaming math.pi are roughly equivalent:
>>> from math import pi as PI
>>> PI
3.141592653589793

>>> import importlib
>>> _tmp = importlib.import_module("math")
>>> PI = _tmp.pi
>>> del _tmp
>>> PI
3.141592653589793
Of course, in normal code you should prefer the former.
One thing to note is that, even when you import only one attribute from a module, the whole module is loaded and executed. The rest of the contents of the module just aren’t bound to the current namespace. One way to prove this is to have a look at what’s known as the module cache:
>>> from math import pi
>>> pi
3.141592653589793

>>> import sys
>>> sys.modules["math"].cos(pi)
-1.0
sys.modules acts as a module cache. It contains references to all modules that have been imported.
The module cache plays a very important role in the Python import system. The first place Python looks for modules when doing an import is in sys.modules. If a module is already available, then it isn’t loaded again.
This is a great optimization, but it’s also a necessity. If modules were reloaded each time they were imported, then you could end up with inconsistencies in certain situations, such as when the underlying source code changes while a script is running.
Recall the import path you saw earlier. It essentially tells Python where to search for modules. However, if Python finds a module in the module cache, then it won’t bother searching the import path for the module.
Example: Singletons as Modules
In object-oriented programming, a singleton is a class with at most one instance. While it’s possible to implement singletons in Python, most good uses of singletons can be handled by modules instead. You can trust the module cache to instantiate a class only once.
As an example, let’s return to the United Nations population data you saw earlier. The following module defines a class wrapping the population data:
# population.py

import csv
from importlib import resources

import matplotlib.pyplot as plt

class _Population:
    def __init__(self):
        """Read the population file"""
        self.data = {}
        self.variant = "Medium"

        print(f"Reading population data for {self.variant} scenario")
        with resources.open_text(
            "data", "WPP2019_TotalPopulationBySex.csv"
        ) as fid:
            rows = csv.DictReader(fid)

            # Read data, filter the correct variant
            for row in rows:
                if int(row["LocID"]) >= 900 or row["Variant"] != self.variant:
                    continue

                country = self.data.setdefault(row["Location"], {})
                population = float(row["PopTotal"]) * 1000
                country[int(row["Time"])] = round(population)

    def get_country(self, country):
        """Get population data for one country"""
        data = self.data[country]
        years, population = zip(*data.items())
        return years, population

    def plot_country(self, country):
        """Plot data for one country, population in millions"""
        years, population = self.get_country(country)
        plt.plot(years, [p / 1e6 for p in population], label=country)

    def order_countries(self, year):
        """Sort countries by population in decreasing order"""
        countries = {c: self.data[c][year] for c in self.data}
        return sorted(countries, key=lambda c: countries[c], reverse=True)

# Instantiate the Singleton
data = _Population()
Reading the data from disk takes some time. Since you don’t expect the data file to change, you instantiate the class when you load the module. The name of the class starts with an underscore to indicate to users that they shouldn’t use it.
You can use the population.data singleton to create a Matplotlib graph showing the population projection for the most populous countries:
>>> import matplotlib.pyplot as plt
>>> import population
Reading population data for Medium scenario

>>> # Pick out five most populous countries in 2050
>>> for country in population.data.order_countries(2050)[:5]:
...     population.data.plot_country(country)
...
>>> plt.legend()
>>> plt.xlabel("Year")
>>> plt.ylabel("Population [Millions]")
>>> plt.title("UN Population Projections")
>>> plt.show()
This creates a chart like the following:

Note that loading the data at import time is a kind of antipattern. Ideally, you want your imports to be as free of side effects as possible. A better approach would be to load the data lazily when you need it. You can do this quite elegantly using properties. Expand the following section to see an example.
The lazy implementation of population stores the population data in ._data the first time it’s read. The .data property handles this caching of data:
# population.py

import csv
from importlib import resources

import matplotlib.pyplot as plt

class _Population:
    def __init__(self):
        """Prepare to read the population file"""
        self._data = {}
        self.variant = "Medium"

    @property
    def data(self):
        """Read data from disk"""
        if self._data:  # Data has already been read, return it directly
            return self._data

        # Read data and store it in self._data
        print(f"Reading population data for {self.variant} scenario")
        with resources.open_text(
            "data", "WPP2019_TotalPopulationBySex.csv"
        ) as fid:
            rows = csv.DictReader(fid)

            # Read data, filter the correct variant
            for row in rows:
                if int(row["LocID"]) >= 900 or row["Variant"] != self.variant:
                    continue

                country = self._data.setdefault(row["Location"], {})
                population = float(row["PopTotal"]) * 1000
                country[int(row["Time"])] = round(population)
        return self._data

    def get_country(self, country):
        """Get population data for one country"""
        country = self.data[country]
        years, population = zip(*country.items())
        return years, population

    def plot_country(self, country):
        """Plot data for one country, population in millions"""
        years, population = self.get_country(country)
        plt.plot(years, [p / 1e6 for p in population], label=country)

    def order_countries(self, year):
        """Sort countries by population in decreasing order"""
        countries = {c: self.data[c][year] for c in self.data}
        return sorted(countries, key=lambda c: countries[c], reverse=True)

# Instantiate the singleton
data = _Population()
Now the data won’t be loaded at import time. Instead, it’ll be imported the first time you access the _Population.data dictionary. For more information about properties and the more general concept of descriptors, see Python Descriptors: An Introduction.
Reloading Modules
The module cache can be a little frustrating when you’re working in the interactive interpreter. It’s not trivial to reload a module after you change it. For example, take a look at the following module:
# number.py

answer = 24
As part of testing and debugging this module, you import it in a Python console:
>>> import number
>>> number.answer
24
Let’s say you realize that you have a bug in your code, so you update the number.py file in your editor:
# number.py

answer = 42
Returning to your console, you import the updated module to see the effect of your fix:
>>> import number
>>> number.answer
24
Why is the answer still 24? The module cache is doing its (now frustrating) magic: since Python imported number earlier, it sees no reason to load the module again even though you just changed it.
The most straightforward solution to this is to exit the Python console and restart it. This forces Python to clear its module cache as well:
>>> import number
>>> number.answer
42
However, restarting the interpreter isn’t always feasible. You might be in a more complicated session that has taken you a long time to set up. If that’s the case, then you can use importlib.reload() to reload a module instead:
>>> import number
>>> number.answer
24

>>> # Update number.py in your editor

>>> import importlib
>>> importlib.reload(number)
<module 'number' from 'number.py'>

>>> number.answer
42
Note that reload() requires a module object, not a string like import_module() does. Also, be aware that reload() has some caveats. In particular, variables referring to objects within a module are not re-bound to new objects when that module is reloaded. See the documentation for more details.
Finders and Loaders
You saw earlier that creating modules with the same name as standard libraries can create problems. For example, if you have a file named math.py in Python’s import path, then you won’t be able to import math from the standard library.
This isn’t always the case, though. Create a file named time.py with the following content:
# time.py

print("Now's the time!")
Next, open a Python interpreter and import this new module:
>>> import time
>>> # Nothing is printed

>>> time.ctime()
'Mon Jun 15 14:26:12 2020'

>>> time.tzname
('CET', 'CEST')
Something weird happened. It doesn’t seem like Python imported your new time module. Instead, it imported the time module from the standard library. Why are the standard library modules behaving inconsistently? You can get a hint by inspecting the modules:
>>> import math
>>> math
<module 'math' from '.../python/lib/python3.8/lib-dynload/math.cpython.so'>

>>> import time
>>> time
<module 'time' (built-in)>
You can see that math is imported from a file, whereas time is some kind of built-in module. It seems that built-in modules aren’t shadowed by local ones.
Note: The built-in modules are compiled into the Python interpreter. Typically, they’re foundational modules like builtins, sys, and time. Which modules are built in depends on your Python interpreter, but you can find their names in sys.builtin_module_names.
Let’s dig even deeper into Python’s import system. This will also show why built-in modules aren’t shadowed by local ones. There are several steps involved when importing a module:
-
Python checks if the module is available in the module cache. If
sys.modulescontains the name of the module, then the module is already available, and the import process ends. -
Python starts looking for the module using several finders. A finder will search for the module using a given strategy. The default finders can import built-in modules, frozen modules, and modules on the import path.
-
Python loads the module using a loader. Which loader Python uses is determined by the finder that located the module and is specified in something called a module spec.
You can extend the Python import system by implementing your own finder and, if necessary, your own loader. You’ll see a more useful example of a finder later. For now, you’ll learn how to do basic (and possibly silly) customizations of the import system.
sys.meta_path controls which finders are called during the import process:
>>> import sys
>>> sys.meta_path
[<class '_frozen_importlib.BuiltinImporter'>,
 <class '_frozen_importlib.FrozenImporter'>,
 <class '_frozen_importlib_external.PathFinder'>]
First, note that this answers the question from earlier: built-in modules aren’t shadowed by local modules because the built-in finder is called before the import path finder, which finds local modules. Second, note that you can customize sys.meta_path to your liking.
To quickly mess up your Python session, you can remove all finders:
>>> import sys
>>> sys.meta_path.clear()
>>> sys.meta_path
[]

>>> import math
Traceback (most recent call last):
  File "<stdin>", line 1, in <module>
ModuleNotFoundError: No module named 'math'

>>> import importlib  # Autoimported at start-up, still in the module cache
>>> importlib
<module 'importlib' from '.../python/lib/python3.8/importlib/__init__.py'>
Since there are no finders, Python can’t find or import new modules. However, Python can still import modules that are already in the module cache since it looks there before calling any finders.
In the example above, importlib was already loaded under the hood before you cleared the list of finders. If you really want to make your Python session completely unusable, then you can also clear the module cache, sys.modules.
The following is a slightly more useful example. You’ll write a finder that prints a message to the console identifying the module being imported. The example shows how to add your own finder, although it doesn’t actually attempt to find a module:
 1# debug_importer.py
 2
 3import sys
 4
 5class DebugFinder:
 6    @classmethod
 7    def find_spec(cls, name, path, target=None):
 8        print(f"Importing {name!r}")
 9        return None
10
11sys.meta_path.insert(0, DebugFinder)
All finders must implement a .find_spec() class method, which should try to find a given module. There are three ways that .find_spec() can terminate:
- By returning
Noneif it doesn’t know how to find and load the module - By returning a module spec specifying how to load the module
- By raising a
ModuleNotFoundErrorto indicate that the module can’t be imported
The DebugFinder prints a message to the console and then explicitly returns None to indicate that other finders should figure out how to actually import the module.
Note: Since Python implicitly returns None from any function or method without an explicit return, you can leave out line 9. However, in this case it’s good to include return None to make it clear that DebugFinder doesn’t find a module.
By inserting DebugFinder first in the list of finders, you get a running list of all modules being imported:
>>> import debug_importer
>>> import csv
Importing 'csv'
Importing 're'
Importing 'enum'
Importing 'sre_compile'
Importing '_sre'
Importing 'sre_parse'
Importing 'sre_constants'
Importing 'copyreg'
Importing '_csv'
You can, for instance, see that importing csv triggers the import of several other modules that csv depends on. Note that the verbose option to the Python interpreter, python -v, gives the same information and much, much more.
For another example, say that you’re on a quest to rid the world of regular expressions. (Now, why would you want such a thing? Regular expressions are great!) You could implement the following finder that bans the re regular expressions module:
# ban_importer.py

import sys

BANNED_MODULES = {"re"}

class BanFinder:
    @classmethod
    def find_spec(cls, name, path, target=None):
        if name in BANNED_MODULES:
            raise ModuleNotFoundError(f"{name!r} is banned")

sys.meta_path.insert(0, BanFinder)
Raising a ModuleNotFoundError ensures that no finder later in the list of finders will be executed. This effectively stops you from using regular expressions in Python:
>>> import ban_importer
>>> import csv
Traceback (most recent call last):
  File "<stdin>", line 1, in <module>
  File ".../python/lib/python3.8/csv.py", line 6, in <module>
    import re
  File "ban_importer.py", line 11, in find_spec
    raise ModuleNotFoundError(f"{name!r} is banned")
ModuleNotFoundError: 're' is banned
Even though you’re importing only csv, that module is importing re behind the scenes, so an error is raised.
Example: Automatically Install From PyPI
Because the Python import system is already quite powerful and useful, there are many more ways to mess it up than there are to extend it in a useful way. However, the following example can be useful in certain situations.
The Python Package Index (PyPI) is your one-stop cheese shop for finding third-party modules and packages. It’s also the place from which pip downloads packages.
In other Real Python tutorials, you may have seen instructions to use python -m pip install to install the third-party modules and packages you need for following along with examples. Wouldn’t it be great to have Python automatically install missing modules for you?
Warning: In most cases, it really wouldn’t be great to have Python install modules automatically. For instance, in most production settings you want to stay in control of your environment. Furthermore, the documentation cautions against using pip this way.
To avoid messing up your Python installation, you should play with this code only in environments that you wouldn’t mind deleting or reinstalling.
The following finder attempts to install modules using pip:
# pip_importer.py

from importlib import util
import subprocess
import sys

class PipFinder:
    @classmethod
    def find_spec(cls, name, path, target=None):
        print(f"Module {name!r} not installed.  Attempting to pip install")
        cmd = f"{sys.executable} -m pip install {name}"
        try:
            subprocess.run(cmd.split(), check=True)
        except subprocess.CalledProcessError:
            return None

        return util.find_spec(name)

sys.meta_path.append(PipFinder)
Compared to the finders you saw earlier, this one is slightly more complicated. By putting this finder last in the list of finders, you know that if you call PipFinder, then the module won’t be found on your system. The job of .find_spec() is therefore just to do the pip install. If the installation works, then the module spec will be created and returned.
Try to use the parse library without installing it yourself:
>>> import pip_importer
>>> import parse
Module 'parse' not installed.  Attempting to pip install
Collecting parse
  Downloading parse-1.15.0.tar.gz (29 kB)
Building wheels for collected packages: parse
  Building wheel for parse (setup.py) ... done
Successfully built parse
Installing collected packages: parse
Successfully installed parse-1.15.0

>>> pattern = "my name is {name}"
>>> parse.parse(pattern, "My name is Geir Arne")
<Result () {'name': 'Geir Arne'}>
Normally, import parse would’ve raised a ModuleNotFoundError, but in this case parse is installed and imported.
While the PipFinder seemingly works, there are some challenges with this approach. One major problem is that the import name of a module doesn’t always correspond to its name on PyPI. For example, the Real Python feed reader is called realpython-reader on PyPI, but the import name is simply reader.
Using PipFinder to import and install reader ends up installing the wrong package:
>>> import pip_importer
>>> import reader
Module 'reader' not installed.  Attempting to pip install
Collecting reader
  Downloading reader-1.2-py3-none-any.whl (68 kB)
...
This could have disastrous consequences for your project.
One situation in which automatic installations can be quite helpful is when you’re running Python in the cloud with more limited control over your environment, such as when you’re running Jupyter-style notebooks at Google Colaboratory. The Colab notebook environment is great for doing cooperative data exploration.
A typical notebook comes with many data science packages installed, including NumPy, Pandas, and Matplotlib, and you can add new packages with pip. But you can also activate automatic installation:
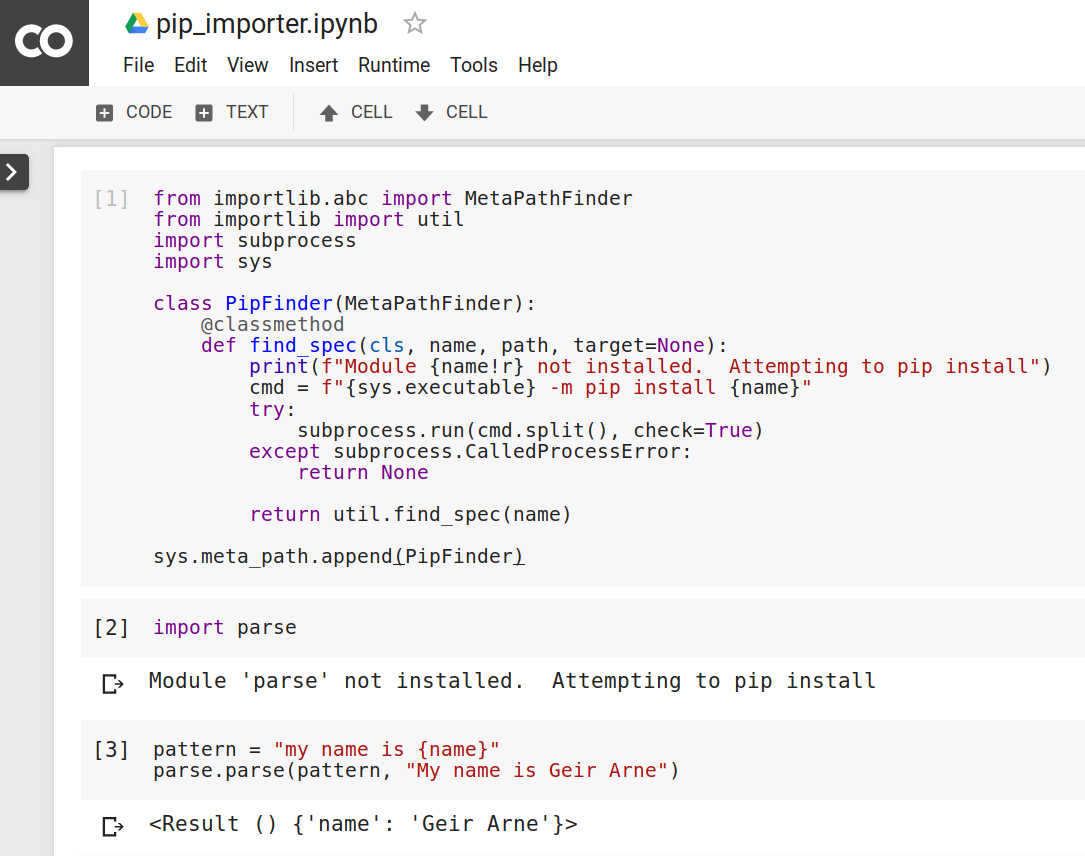
Since pip_importer isn’t available locally on the Colab server, the code is copied into the first cell of the notebook.
Example: Import Data Files
The final example in this section is inspired by Aleksey Bilogur’s great blog post Import Almost Anything in Python: An Intro to Module Loaders and Finders. You’ve already seen how to use importlib.resources to import datafiles. Here, you’ll instead implement a custom loader that can import a CSV file directly.
Earlier, you worked with a huge CSV file with population data. To make the custom loader example more manageable, consider the following smaller employees.csv file:
name,department,birthday month
John Smith,Accounting,November
Erica Meyers,IT,March
The first line is a header naming three fields, and the following two rows of data each contain information about an employee. For more information about working with CSV files, check out Reading and Writing CSV Files in Python.
Your goal in this section is to write a finder and a loader that allow you to import the CSV file directly so that you can write code like the following:
>>> import csv_importer
>>> import employees

>>> employees.name
('John Smith', 'Erica Meyers')

>>> for row in employees.data:
...     print(row["department"])
...
Accounting
IT

>>> for name, month in zip(employees.name, employees.birthday_month):
...     print(f"{name} is born in {month}")
...
John Smith is born in November
Erica Meyers is born in March

>>> employees.__file__
'employees.csv'
The job of the finder will be to search for and recognize CSV files. The loader’s job will be to import the CSV data. Often, you can implement finders and corresponding loaders in one common class. That’s the approach you’ll take here:
 1# csv_importer.py
 2
 3import csv
 4import pathlib
 5import re
 6import sys
 7from importlib.machinery import ModuleSpec
 8
 9class CsvImporter():
10    def __init__(self, csv_path):
11        """Store path to CSV file"""
12        self.csv_path = csv_path
13
14    @classmethod
15    def find_spec(cls, name, path, target=None):
16        """Look for CSV file"""
17        package, _, module_name = name.rpartition(".")
18        csv_file_name = f"{module_name}.csv"
19        directories = sys.path if path is None else path
20        for directory in directories:
21            csv_path = pathlib.Path(directory) / csv_file_name
22            if csv_path.exists():
23                return ModuleSpec(name, cls(csv_path))
24
25    def create_module(self, spec):
26        """Returning None uses the standard machinery for creating modules"""
27        return None
28
29    def exec_module(self, module):
30        """Executing the module means reading the CSV file"""
31        # Read CSV data and store as a list of rows
32        with self.csv_path.open() as fid:
33            rows = csv.DictReader(fid)
34            data = list(rows)
35            fieldnames = tuple(_identifier(f) for f in rows.fieldnames)
36
37        # Create a dict with each field
38        values = zip(*(row.values() for row in data))
39        fields = dict(zip(fieldnames, values))
40
41        # Add the data to the module
42        module.__dict__.update(fields)
43        module.__dict__["data"] = data
44        module.__dict__["fieldnames"] = fieldnames
45        module.__file__ = str(self.csv_path)
46
47    def __repr__(self):
48        """Nice representation of the class"""
49        return f"{self.__class__.__name__}({str(self.csv_path)!r})"
50
51def _identifier(var_str):
52    """Create a valid identifier from a string
53
54    See https://stackoverflow.com/a/3305731
55    """
56    return re.sub(r"\W|^(?=\d)", "_", var_str)
57
58# Add the CSV importer at the end of the list of finders
59sys.meta_path.append(CsvImporter)
There’s quite a bit of code in this example! Luckily, most of the work is done in .find_spec() and .exec_module(). Let’s look at them in more detail.
As you saw earlier, .find_spec() is responsible for finding the module. In this case, you’re looking for CSV files, so you create a filename with a .csv suffix. name contains the full name of the module that is imported. For example, if you use from data import employees, then name will be data.employees. In this case, the filename will be employees.csv.
For top-level imports, path will be None. In that case, you look for the CSV file in the full import path, which will include the current working directory. If you’re importing a CSV file within a package, then path will be set to the path or paths of the package. If you find a matching CSV file, then a module spec is returned. This module spec tells Python to load the module using CsvImporter.
The CSV data is loaded by .exec_module(). You can use csv.DictReader from the standard library to do the actual parsing of the file. Like most things in Python, modules are backed by dictionaries. By adding the CSV data to module.__dict__, you make it available as attributes of the module.
For instance, adding fieldnames to the module dictionary on line 44 allows you to list the field names in the CSV file as follows:
>>> employees.fieldnames
('name', 'department', 'birthday_month')
In general, CSV field names can contain spaces and other characters that aren’t allowed in Python attribute names. Before adding the fields as attributes on the module, you sanitize the field names using a regular expression. This is done in _identifier() starting on line 51.
You can see an example of this effect in the birthday_month field name above. If you look at the original CSV file, then you’ll see that the header says birthday month with a space instead of an underscore.
By hooking this CsvImporter into the Python import system, you get a fair bit of functionality for free. For example, the module cache will make sure that the data file is loaded only once.
Import Tips and Tricks
To round out this tutorial, you’ll see a few tips about how to handle certain situations that come up from time to time. You’ll see how to deal with missing packages, cyclical imports, and even packages stored inside ZIP files.
Handle Packages Across Python Versions
Sometimes you need to deal with packages that have different names depending on the Python version. You’ve already seen one example of this: importlib.resources has only been available since Python 3.7. In earlier versions of Python, you need to install and use importlib_resources instead.
As long as the different versions of the package are compatible, you can handle this by renaming the package with as:
try:
    from importlib import resources
except ModuleNotFoundError:
    import importlib_resources as resources
In the rest of the code, you can refer to resources and not worry about whether you’re using importlib.resources or importlib_resources.
Normally, it’s easiest to use a try...except statement to figure out which version to use. Another option is to inspect the version of the Python interpreter. However, this may add some maintenance cost if you need to update the version numbers.
You could rewrite the previous example as follows:
import sys
if sys.version_info >= (3, 7):
    from importlib import resources
else:
    import importlib_resources as resources
This would use importlib.resources on Python 3.7 and newer while falling back to importlib_resources on older versions of Python. See the flake8-2020 project for good and future-proof advice on how to check which Python version is running.
Handle Missing Packages: Use an Alternative
The following use case is closely related to the previous example. Assume there’s a compatible reimplementation of a package. The reimplementation is better optimized, so you want to use it if it’s available. However, the original package is more easily available and also delivers acceptable performance.
One such example is quicktions, which is an optimized version of fractions from the standard library. You can handle these preferences the same way you handled different package names earlier:
try:
    from quicktions import Fraction
except ModuleNotFoundError:
    from fractions import Fraction
This will use quicktions if it’s available and fall back to fractions if not.
Another similar example is the UltraJSON package, an ultrafast JSON encoder and decoder that can be used as a replacement for json in the standard library:
try:
    import ujson as json
except ModuleNotFoundError:
    import json
By renaming ujson to json, you don’t have to worry about which package was actually imported.
Handle Missing Packages: Use a Mock Instead
A third, related example is adding a package that provides a nice-to-have feature that’s not strictly necessary for your app. Again, this can be solved by adding try...except to your imports. The extra challenge is how you will replace the optional package if it’s not available.
For a concrete example, say that you’re using Colorama to add colored text in the console. Colorama mainly consists of special string constants that add color when printed:
>>> import colorama
>>> colorama.init(autoreset=True)

>>> from colorama import Back, Fore
>>> Fore.RED
'\x1b[31m'

>>> print(f"{Fore.RED}Hello Color!")
Hello Color!

>>> print(f"{Back.RED}Hello Color!")
Hello Color!
Unfortunately, the color doesn’t render in the example above. In your terminal it’ll look something like this:
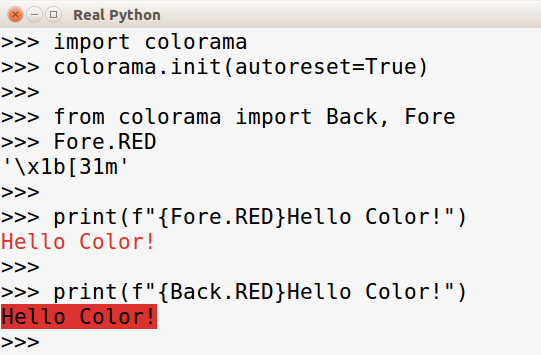
Before you start using Colorama colors, you should call colorama.init(). Setting autoreset to True means that the color directives will be automatically reset at the end of the string. It’s a useful setting if you want to color just one line at a time.
If you’d rather have all your output be (for example) blue, then you can let autoreset be False and add Fore.BLUE to the beginning of your script. The following colors are available:
>>> from colorama import Fore
>>> sorted(c for c in dir(Fore) if not c.startswith("_"))
['BLACK', 'BLUE', 'CYAN', 'GREEN', 'LIGHTBLACK_EX', 'LIGHTBLUE_EX',
 'LIGHTCYAN_EX', 'LIGHTGREEN_EX', 'LIGHTMAGENTA_EX', 'LIGHTRED_EX',
 'LIGHTWHITE_EX', 'LIGHTYELLOW_EX', 'MAGENTA', 'RED', 'RESET',
 'WHITE', 'YELLOW']
You can also use colorama.Style to control the style of your text. You can choose between DIM, NORMAL, and BRIGHT.
Finally, colorama.Cursor provides codes for controlling the position of the cursor. You can use it to display the progress or status of a running script. The following example displays a countdown from 10:
# countdown.py

import colorama
from colorama import Cursor, Fore
import time

colorama.init(autoreset=True)
countdown = [f"{Fore.BLUE}{n}" for n in range(10, 0, -1)]
countdown.append(f"{Fore.RED}Lift off!")

print(f"{Fore.GREEN}Countdown starting:\n")
for count in countdown:
    time.sleep(1)
    print(f"{Cursor.UP(1)}{count} ")
Note how the counter stays in place instead of printing on separate lines as it normally would:
Let’s get back to the task at hand. For many applications, adding color to your console output is cool but not critical. To avoid adding yet another dependency to your app, you want to use Colorama only if it’s available on the system and not break the app if it isn’t.
To do this, you can take inspiration from testing and its use of mocks. A mock can substitute for another object while allowing you to control its behavior. Here’s a naïve attempt at mocking Colorama:
>>> from unittest.mock import Mock
>>> colorama = Mock()
>>> colorama.init(autoreset=True)
<Mock name='mock.init()' id='139887544431728'>

>>> Fore = Mock()
>>> Fore.RED
<Mock name='mock.RED' id='139887542331320'>

>>> print(f"{Fore.RED}Hello Color!")
<Mock name='mock.RED' id='139887542331320'>Hello Color!
This doesn’t quite work, because Fore.RED is represented by a string that messes up your output. Instead, you want to create an object that always renders as the empty string.
It’s possible to change the return value of .__str__() on Mock objects. However, in this case, it’s more convenient to write your own mock:
# optional_color.py

try:
    from colorama import init, Back, Cursor, Fore, Style
except ModuleNotFoundError:
    from collections import UserString

    class ColoramaMock(UserString):
        def __call__(self, *args, **kwargs):
            return self
        def __getattr__(self, key):
            return self

    init = ColoramaMock("")
    Back = Cursor = Fore = Style = ColoramaMock("")
ColoramaMock("") is an empty string that will also return the empty string when it’s called. This effectively gives us a reimplementation of Colorama, just without the colors.
The final trick is that .__getattr__() returns itself, so that all colors, styles, and cursor movements that are attributes on Back, Fore, Style, and Cursor are mocked as well.
The optional_color module is designed to be a drop-in replacement for Colorama, so you can update the countdown example using search and replace:
# countdown.py

import optional_color
from optional_color import Cursor, Fore
import time

optional_color.init(autoreset=True)
countdown = [f"{Fore.BLUE}{n}" for n in range(10, 0, -1)]
countdown.append(f"{Fore.RED}Lift off!")

print(f"{Fore.GREEN}Countdown starting:\n")
for count in countdown:
    time.sleep(1)
    print(f"{Cursor.UP(1)}{count} ")
If you run this script on a system in which Colorama isn’t available, then it’ll still work, but it may not look as nice:
With Colorama installed, you should see the same results as earlier.
Import Scripts as Modules
One difference between scripts and library modules is that scripts typically do something, whereas libraries provide functionality. Both scripts and libraries live inside regular Python files, and as far as Python is concerned, there’s no difference between them.
Instead, the difference is in how the file is meant to be used: should it be executed with python file.py or imported with import file inside another script?
Sometimes you’ll have a module that works as both a script and a library. You could try to refactor your module into two different files.
One example of this in the standard library is the json package. You usually use it as a library, but it also comes bundled with a script that can prettify JSON files. Assume you have the following colors.json file:
{"colors": [{"color": "blue", "category": "hue", "type": "primary",
"code": {"rgba": [0,0,255,1], "hex": "#00F"}}, {"color": "yellow",
"category": "hue", "type": "primary", "code": {"rgba": [255,255,0,1],
"hex": "#FF0"}}]}
As JSON is often read only by machines, many JSON files aren’t formatted in a readable fashion. In fact, it’s quite common for JSON files to consist of one very long line of text.
json.tool is a script that uses the json library to format JSON in a more readable fashion:
$ python -m json.tool colors.json --sort-keys
{
    "colors": [
        {
            "category": "hue",
            "code": {
                "hex": "#00F",
                "rgba": [
                    0,
                    0,
                    255,
                    1
                ]
            },
            "color": "blue",
            "type": "primary"
        },
        {
            "category": "hue",
            "code": {
                "hex": "#FF0",
                "rgba": [
                    255,
                    255,
                    0,
                    1
                ]
            },
            "color": "yellow",
            "type": "primary"
        }
    ]
}
Now the structure of the JSON file becomes much less complicated to grasp. You can use the --sort-keys option to sort keys alphabetically.
While it’s good practice to split scripts and libraries, Python has an idiom that makes it possible to treat a module as both a script and a library at the same time. As noted earlier, the value of the special __name__ module variable is set at runtime based on whether the module is imported or run as a script.
Let’s test it out! Create the following file:
# name.py

print(__name__)
If you run this file, then you’ll see that __name__ is set to the special value __main__:
$ python name.py
__main__
However, if you import the module, then __name__ is set to the name of the module:
>>> import name
name
This behavior is leveraged in the following pattern:
def main():
    ...

if __name__ == "__main__":
    main()
Let’s use this in a bigger example. In an attempt to keep you young, the following script will replace any “old” age (25 or above) with 24:
 1# feel_young.py
 2
 3def make_young(text):
 4    words = [replace_by_age(w) for w in text.split()]
 5    return " ".join(words)
 6
 7def replace_by_age(word, new_age=24, age_range=(25, 120)):
 8    if word.isdigit() and int(word) in range(*age_range):
 9        return str(new_age)
10    return word
11
12if __name__ == "__main__":
13    text = input("Tell me something: ")
14    print(make_young(text))
You can run this as a script, and it will interactively make the age you type younger:
$ python feel_young.py
Tell me something: Forever young - Bob is 79 years old
Forever young - Bob is 24 years old
You can also use the module as an importable library. The if test on line 12 makes sure that there are no side effects when you import the library. Only the functions make_young() and replace_by_age() are defined. You can, for instance, use this library as follows:
>>> from feel_young import make_young

>>> headline = "Twice As Many 100-Year-Olds"
>>> make_young(headline)
'Twice As Many 24-Year-Olds'
Without the protection of the if test, the import would have triggered the interactive input() and made feel_young very hard to use as a library.
Run Python Scripts From ZIP Files
A slightly obscure feature of Python is that it can run scripts packaged into ZIP files. The main advantage of this is that you can distribute a full package as a single file.
Note, however, that this still requires Python to be installed on the system. If you want to distribute your Python application as a stand-alone executable file, then see Using PyInstaller to Easily Distribute Python Applications.
If you give the Python interpreter a ZIP file, then it’ll look for a file named __main__.py inside the ZIP archive, extract it, and run it. As a basic example, create the following __main__.py file:
# __main__.py

print(f"Hello from {__file__}")
This will print a message when you run it:
$ python __main__.py
Hello from __main__.py
Now add it to a ZIP archive. You may be able to do this on the command line:
$ zip hello.zip __main__.py
  adding: __main__.py (stored 0%)
On Windows, you can instead use point and click. Select the file in the File Explorer, then right-click and select Send to → Compressed (zipped) folder.
Since __main__ isn’t a very descriptive name, you named the ZIP file hello.zip. You can now call it directly with Python:
$ python hello.zip
Hello from hello.zip/__main__.py
Note that your script is aware that it lives inside hello.zip. Furthermore, the root of your ZIP file is added to Python’s import path so that your scripts can import other modules inside the same ZIP file.
Think back to the earlier example in which you created a quiz based on population data. It’s possible to distribute this whole application as a single ZIP file. importlib.resources will make sure the data file is extracted from the ZIP archive when it’s needed.
The app consists of the following files:
population_quiz/
│
├── data/
│   ├── __init__.py
│   └── WPP2019_TotalPopulationBySex.csv
│
└── population_quiz.py
You could add these to a ZIP file in the same way you did above. However, Python comes with a tool called zipapp that streamlines the process of packing applications into ZIP archives. You use it as follows:
$ python -m zipapp population_quiz -m population_quiz:main
This command essentially does two things: it creates an entry point and packages your application.
Remember that you needed a __main__.py file as an entry point inside your ZIP archive. If you supply the -m option with information about how your app should be started, then zipapp creates this file for you. In this example, the generated __main__.py looks like this:
# -*- coding: utf-8 -*-
import population_quiz
population_quiz.main()
This __main__.py is packaged, along with the contents of the population_quiz directory, into a ZIP archive named population_quiz.pyz. The .pyz suffix signals that this is a Python file wrapped into a ZIP archive.
Note: By default, zipapp doesn’t compress any files. It only packages them into a single file. You can tell zipapp to compress the files as well by adding the -c option.
However, this feature is available only in Python 3.7 and later. See the zipapp documentation for more information.
On Windows, .pyz files should already be registered as Python files. On Mac and Linux, you can have zipapp create executable files by using the -p interpreter option and specifying which interpreter to use:
$ python -m zipapp population_quiz -m population_quiz:main \
>   -p "/usr/bin/env python"
The -p option adds a shebang (#!) that tells the operating system how to run the file. Additionally, it makes the .pyz file executable so that you can run the file just by typing its name:
$ ./population_quiz.pyz
Reading population data for 2020, Medium scenario

Question 1:
1. Timor-Leste
2. Viet Nam
3. Bermuda

Which country has the largest population?
Notice the ./ in front of the filename. This is a typical trick on Mac and Linux to run executable files in the current directory. If you move the file to a directory on your PATH, or if you’re using Windows, then you should be able to use only the filename: population_quiz.pyz.
Note: On Python 3.6 and older, the previous command will fail with a message saying that it couldn’t find the population data resource in the data directory. This is due to a limitation in zipimport.
A workaround is to supply the absolute path to population_quiz.pyz. On Mac and Linux, you can do this with the following trick:
$ `pwd`/population_quiz.pyz
The pwd command expands to the path of the current directory.
Let’s close this section by looking at a nice effect of using importlib.resources. Remember that you used the following code to open the data file:
from importlib import resources

with resources.open_text("data", "WPP2019_TotalPopulationBySex.csv") as fid:
    ...
A more common way to open data files is to locate them based on your module’s __file__ attribute:
import pathlib

DATA_DIR = pathlib.Path(__file__).parent / "data"
with open(DATA_DIR / "WPP2019_TotalPopulationBySex.csv") as fid:
    ...
This approach usually works well. However, it falls apart when your application is packed into a ZIP file:
$ python population_quiz.pyz
Reading population data for 2020, Medium scenario
Traceback (most recent call last):
  ...
NotADirectoryError: 'population_quiz.pyz/data/WPP2019_TotalPopulationBySex.csv'
Your data file is inside the ZIP archive, so open() isn’t able to open it. importlib.resources, on the other hand, will extract your data to a temporary file before opening it.
Handle Cyclical Imports
A cyclical import happens when you have two or more modules importing each other. More concretely, imagine that the module yin uses import yang and the module yang similarly imports yin.
Python’s import system is to some extent designed to handle import cycles. For instance, the following code—while not very useful—runs fine:
# yin.py

print(f"Hello from yin")
import yang
print(f"Goodbye from yin")

# yang.py

print(f"Hello from yang")
import yin
print(f"Goodbye from yang")
Trying to import yin in the interactive interpreter imports yang as well:
>>> import yin
Hello from yin
Hello from yang
Goodbye from yang
Goodbye from yin
Note that yang is imported in the middle of the import of yin, precisely at the import yang statement in the source code of yin. The reason this doesn’t end up in endless recursion is our old friend the module cache.
When you type import yin, a reference to yin is added to the module cache even before yin is loaded. When yang tries to import yin later, it simply uses the reference in the module cache.
You can also have modules that do something slightly more useful. If you define attributes and functions in your modules, then it all still works:
# yin.py

print(f"Hello from yin")
import yang
number = 42

def combine():
    return number + yang.number

print(f"Goodbye from yin")

# yang.py

print(f"Hello from yang")
import yin
number = 24

def combine():
    return number + yin.number

print(f"Goodbye from yang")
Importing yin works the same as before:
>>> import yin
Hello from yin
Hello from yang
Goodbye from yang
Goodbye from yin
The issues associated with recursive imports start popping up when you actually use the other module at import time instead of just defining functions that will use the other module later. Add one line to yang.py:
# yin.py

print(f"Hello from yin")
import yang
number = 42

def combine():
    return number + yang.number

print(f"Goodbye from yin")

# yang.py

print(f"Hello from yang")
import yin
number = 24

def combine():
    return number + yin.number

print(f"yin and yang combined is {combine()}")
print(f"Goodbye from yang")
Now Python gets confused by the import:
>>> import yin
Hello from yin
Hello from yang
Traceback (most recent call last):
  ...
  File ".../yang.py", line 8, in combine
    return number + yin.number
AttributeError: module 'yin' has no attribute 'number'
The error message may seem a bit puzzling at first. Looking back at the source code, you can confirm that number is defined in the yin module.
The problem is that number isn’t defined in yin at the time yang gets imported. Consequently, yin.number is used by the call to combine().
To add to the confusion, you’ll have no issues importing yang:
>>> import yang
Hello from yang
Hello from yin
Goodbye from yin
yin and yang combined is 66
Goodbye from yang
By the time yang calls combine(), yin is fully imported and yin.number is well defined. As a final twist, because of the module cache you saw earlier, import yin might work if you do some other imports first:
>>> import yang
Hello from yang
Hello from yin
Goodbye from yin
yin and yang combined is 66
Goodbye from yang

>>> yin
Traceback (most recent call last):
  File "<stdin>", line 1, in <module>
NameError: name 'yin' is not defined

>>> import yin
>>> yin.combine()
66
So how can you avoid being bogged down and confused by cyclical imports? Having two or more modules importing each other is often a sign that you can improve the design of your modules.
Often, the easiest time to fix cyclical imports is before you implement them. If you see cycles in your architecture sketches, have a closer look and try to break the cycles.
Still, there are times when it’s reasonable to introduce an import cycle. As you saw above, this isn’t a problem so long as your modules define only attributes, functions, classes, and so on. The second tip—which is also good design practice—is to keep your modules free of side effects at import time.
If you really need modules with import cycles and side effects, there’s still another way out: do your imports locally inside functions.
Note that in the following code, import yang is done inside combine(). This has two consequences. First, yang is available only inside the combine() function. More importantly, the import doesn’t happen until you call combine() after yin has been fully imported:
# yin.py

print(f"Hello from yin")
number = 42

def combine():
    import yang
    return number + yang.number

print(f"Goodbye from yin")

# yang.py

print(f"Hello from yang")
import yin
number = 24

def combine():
    return number + yin.number

print(f"yin and yang combined is {combine()}")
print(f"Goodbye from yang")
Now there are no issues importing and using yin:
>>> import yin
Hello from yin
Goodbye from yin

>>> yin.combine()
Hello from yang
yin and yang combined is 66
Goodbye from yang
66
Notice that yang is, in fact, not imported until you call combine(). For another perspective on cyclical imports, see Fredrik Lundh’s classic note.
Profile Imports
One concern when importing several modules and packages is that it will add to the startup time of your script. Depending on your application, this may or may not be critical.
Since the release of Python 3.7, you’ve had a quick way of knowing how much time it takes to import packages and modules. Python 3.7 supports the -X importtime command-line option, which measures and prints how much time each module takes to import:
$ python -X importtime -c "import datetime"
import time: self [us] | cumulative | imported package
...
import time:        87 |         87 |   time
import time:       180 |        180 |   math
import time:       234 |        234 |   _datetime
import time:       820 |       1320 | datetime
The cumulative column shows the cumulative time of import (in microseconds) on a per-package basis. You can read the listing as follows: Python spent 1320 microseconds to fully import datetime, which involved importing time, math, and the C implementation _datetime as well.
The self column shows the time it took to import only the given module, excluding any recursive imports. You can see that time took 87 microseconds to import, math took 180, _datetime took 234, and the import of datetime itself took 820 microseconds. All in all, this adds up to a cumulative time of 1320 microseconds (within rounding errors).
Have a look at the countdown.py example from the Colorama section:
$ python3.7 -X importtime countdown.py
import time: self [us] | cumulative | imported package
...
import time:       644 |       7368 |       colorama.ansitowin32
import time:       310 |      11969 |     colorama.initialise
import time:       333 |      12301 |   colorama
import time:       297 |      12598 | optional_color
import time:       119 |        119 | time
In this example, importing optional_color took almost 0.013 seconds. Most of that time was spent importing Colorama and its dependencies. The self column shows the import time excluding nested imports.
For an extreme example, consider the population singleton from earlier. Because it’s loading a big data file, it’s extremely slow to import. To test this, you can run import population as a script with the -c option:
$ python3.7 -X importtime -c "import population"
import time: self [us] | cumulative | imported package
...
import time:      4933 |     322111 |   matplotlib.pyplot
import time:      1474 |       1474 |     typing
import time:       420 |       1894 |   importlib.resources
Reading population data for Medium scenario
import time:   1593774 |    1921024 | population
In this case, it takes almost 2 seconds to import population, of which about 1.6 seconds are spent in the module itself, mainly for loading the data file.
-X importtime is a great tool for optimizing your imports. If you need to do more general monitoring and optimization of your code, then check out Python Timer Functions: Three Ways to Monitor Your Code.
Conclusion
In this tutorial, you’ve gotten to know the Python import system. Like many things in Python, it’s fairly straightforward to use for basic tasks like importing modules and packages. At the same time, the import system is quite complex, flexible, and extendable. You’ve learned several import-related tricks that you can take advantage of in your own code.
In this tutorial, you’ve learned how to:
- Create namespace packages
- Import resources and data files
- Decide what to import dynamically at runtime
- Extend Python’s import system
- Handle different versions of packages
Throughout the tutorial, you’ve seen many links to further info. The most authoritative source on the Python import system is the official documentation:
You can put your knowledge of Python imports to use by following along with the examples in this tutorial. Click the link below for access to the source code:
Get the Source Code: Click here to get the source code you’ll use to learn about the Python import system in this tutorial.
Take the Quiz: Test your knowledge with our interactive “Python import: Advanced Techniques and Tips” quiz. You’ll receive a score upon completion to help you track your learning progress:
Interactive Quiz
Python import: Advanced Techniques and TipsIn this quiz, you'll test your understanding of Python's import statement and how it works. You'll revisit how to use modules and import them dynamically at runtime.