Are you a Python beginner looking for a tool that can support your learning? This article is for you! Every programmer needs a place to write their code. This article will discuss an awesome tool called Thonny that will enable you to start working with Python in a beginner-friendly environment.
In this article, you’ll learn:
How to install Thonny on your computer
How to navigate Thonny’s user interface to use its built-in features
How to use Thonny to write and run your code
How to use Thonny to debug your code
By the end of this article, you’ll be comfortable with the development workflow in Thonny and ready to use it for your Python learning.
So what is Thonny? Great question!
Thonny is a free Python Integrated Development Environment (IDE) that was especially designed with the beginner Pythonista in mind. Specifically, it has a built-in debugger that can help when you run into nasty bugs, and it offers the ability to do step through expression evaluation, among other really awesome features.
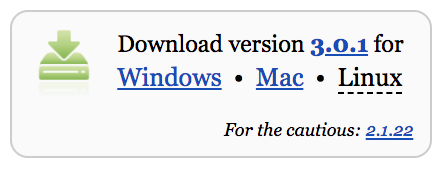
The web download can be accessed via a web browser by visiting the Thonny website. Once on the page, you will see a light gray box in the top right corner like this:
Once you’ve found the gray box, click the appropriate link for your operating system. This tutorial assumes you’ve downloaded version 3.0.1.
Command Line Download
You can also install Thonny via your system’s command line. On Windows, you can do this by starting a program called Command Prompt, while on macOS and Linux you start a program called Terminal. Once you’ve done that, enter the following command:
Language: Shell
$ pipinstallthonny
The User Interface
Let’s make sure you understand what Thonny has to offer. Think of Thonny as the workroom in which you will create amazing Python projects. Your workroom contains a toolbox containing many tools that will enable you to be a rock star Pythonista. In this section, you’ll learn about each of the features of the UI that’ll help you use each of the tools in your Thonny toolbox.
The Code Editor and Shell
Now that you have Thonny installed, open the application. You should see a window with several icons across the top, and two white areas:
Notice the two main sections of the window. The top section is your code editor, where you will write all of your code. The bottom half is your Shell, where you will see outputs from your code.
The Icons
Across the top you’ll see several icons. Let’s explore what each of them does. You’ll see an image of the icons below, with a letter above each one. We will use these letters to talk about each of the icons:
Working our way from left to right, below is a description of each of the icons in the image.
A: The paper icon allows you to create a new file. Typically in Python you want to separate your programs into separate files. You’ll use this button later in the tutorial to create your first program in Thonny!
B: The open folder icon allows you to open a file that already exists on your computer. This might be useful if you come back to a program that you worked on previously.
C: The floppy disk icon allows you to save your code. Press this early and often. You’ll use this later to save your first Thonny Python program.
D: The play icon allows you to run your code. Remember that the code you write is meant to be executed. Running your code means you’re telling Python, “Do what I told you to do!” (In other words, “Read through my code and execute what I wrote.”)
E: The bug icon allows you to debug your code. It’s inevitable that you will encounter bugs when you’re writing code. A bug is another word for a problem. Bugs can come in many forms, sometimes appearing when you use inappropriate syntax and sometimes when your logic is incorrect.
Thonny’s bug button is typically used to spot and investigate bugs. You’ll work with this later in the tutorial. By the way, if you’re wondering why they’re called bugs, there’s also a fun story of how it came about!
F-H: The arrow icons allow you to run your programs step by step. This can be very useful when you’re debugging or, in other words, trying to find those nasty bugs in your code. These icons are used after you press the bug icon. You’ll notice as you hit each arrow, a yellow highlighted bar will indicate which line or section Python is currently evaluating:
The F arrow tells Python to take a big step, meaning jumping to the next line or block of code.
The G arrow tells Python to take a small step, meaning diving deep into each component of an expression.
The H arrow tells Python to exit out of the debugger.
I: The resume icon allows you to return to play mode from debug mode. This is useful in the instance when you no longer want to go step by step through the code, and instead want your program to finish running.
J: The stop icon allows you to stop running your code. This can be particularly useful if, let’s say, your code runs a program that opens a new window, and you want to stop that program. You’ll use the stop icon later in the tutorial.
Let’s Try It!
Get ready to write your first official Python program in Thonny:
Enter the following code into the code editor:
Language: Python
print("Hello World")
Click the play button to run your program.
See the output in the Shell window.
Click the play button again to see that it says hello one more time.
Congratulations! You’ve now completed your first program in Thonny! You should see Hello world! printed inside the Shell, also known as the console. This is because your program told Python to print this phrase, and the console is where you see the output of this execution.
To see more of the other features that Thonny has to offer, navigate to the menu bar and select the View dropdown. You should see that Shell has a check mark next to it, which is why you see the Shell section in Thonny’s application window:
Let’s explore some of the other offerings, specifically those that will be useful to a beginning Pythonista:
Help: You’ll select the Help view if you want more information about working with Thonny. Currently this section offers more reading on the following topics: Running Programs Step-wise, how to install 3rd Party Packages, or using Scientific Python Packages.
Variables: This feature can be very valuable. A variable in Python is a value that you define in code. Variables can be numbers, strings, or other complex data structures. This section allows you to see the values assigned to all of the variables in your program.
Assistant: The Assistant is there to give you helpful hints when you hit Exceptions or other types of errors.
The other features will become useful as you advance your skills. Check them out once you get more comfortable with Thonny!
The Code Editor
Now that you have an understanding of the UI, let’s use Thonny to write another little program. In this section, you’ll go through the features of Thonny that will help guide you through your development workflow.
Write Some Code
In the code editor (top portion of the UI), add the following function:
Before we move on, let’s save your program. Last time, you were prompted to do this after pressing the play button. You can also do this by clicking the blue floppy disk icon or by going to the menu bar and selecting File > Save. Let’s call the program factorial.py.
Run Your Code
In order to run your code, find and press the play icon. The output should look like this:
Debug Your Code
To truly understand what this function is doing, try the step feature. Take a few large and small steps through the function to see what is happening. Remember you can do this by pressing the arrow icons:
As you can see, the steps will show how the computer is evaluating each part of the code. Each pop up window is like a piece of scratch paper that the computer is using to compute each portion of the code. Without this awesome feature, this may have been hard to conceptualize—but now you’ve got it!
So far, there hasn’t been a need to hit the stop icon for this program, particularly because it exits as soon as it has executed print(). Try increasing the number being passed to the factorial function to 100:
Then step through the function. After a while, you will notice that you will be clicking for a long time to reach the end. This is a good time to use the stop button. The stop button can be really useful to stop a program that is either intentionally or unintentionally running continuously.
Find Syntax Errors in Your Code
Now that you have a simple program that works, let’s break it! By intentionally creating an error in your factorial program, you’ll be able to see how Thonny handles these types of issues.
We will be creating what is called a syntax error. A syntax error is an error that indicates that your code is syntactically incorrect. In other words, your code does not follow the proper way to write Python. When Python notices the error, it will display a syntax error to complain about your invalid code.
Above the print statement, let’s add another print statement that says print("The factorial of 100 is:"). Now let’s go ahead and create syntax errors. In the first print statement, remove the second quotation mark, and in the other remove the second parenthesis.
As you do this, you should see that Thonny will highlight your SyntaxErrors. Missing quotations are highlighted in green, and missing parenthesis are in gray:
For beginners, this is a great resource that will allow you to help spot any typos while you’re writing. Some of the most common and frustrating errors when you start programming are missing quotes and mismatched parentheses.
If you have your Assistant View turned on, you will also notice that it will give you a helpful message to guide you in the right direction when you are debugging:
As you get more comfortable with Thonny, the Assistant can be a useful tool to help you get unstuck!
The Package Manager
As you continue to learn Python, it can be quite useful to download a Python package to use inside of your code. This allows you to use code that someone else has written inside of your program.
Consider an example where you want to do some calculations in your code. Instead of writing your own calculator, you might want to use a third-party package called simplecalculator. In order to do this, you’ll use Thonny’s package manager.
The package manager will allow you to install packages that you will need to use with your program. Specifically, it allows you to add more tools to your toolbox. Thonny has the built-in benefit of handling any conflicts with other Python interpreters.
To access the package manager, go to the menu bar and select Tools > Manage Packages… This should pop open a new window with a search field. Type simplecalculator into that field and click the Search button.
The output should look similar to this:
Go ahead and click Install to install this package. You will see a small window pop up showing the system’s logs while it installs the package. Once it completes, you are ready to use simplecalculator in your code!
In the next section, you will use the simplecalculator package along with some of the other skills you’ve learned in this tutorial to create a simple calculator program.
You’ve learned so much about Thonny so far! Here’s what you’ve learned:
Where to write your code
How to save your code
How to run your code
How to stop your code from running
Where to see your code execute
How to spot SyntaxErrors
How to install third party packages
Let’s check your understanding of these concepts.
Now that you have simplecalculator installed, let’s create a simple program that will use this package. You’ll also use this as an opportunity to check that you understand some of the UI and development features that you’ve learned thus far in the tutorial.
Part 1: Create a File, Add Some Code, and Understand the Code
In Part 1, you will create a file, and add some code to it! Do your best to try to dig into what the code is actually doing. If you get stuck, check out the Take a Deeper Look window. Let’s get started:
Start a new file.
Add the following code into your Thonny code editor:
This code will print out the result of 2 * 2 to the Thonny Shell in the main UI. To understand what each part of the code is doing, check out the Take a Deeper Look section below.
Line 1: This code imports the library calculator inside of the package called simplecalculator. From this library, we import the class called SimpleCalculator from a file called simple.py. You can see the code here.
Lines 2: This is a blank line behind code blocks, which is generally a preferred style. Read more about Python Code Quality in this article.
Line 3: Here we create an instance of the class SimpleCalculator and assign it to a variable called my_calculator. This can be used to run different calculators. If you’re new to classes, you can learn more about object-oriented programming here.
Line 4: Here we have the calculator run the operation 2 * 2 by calling run() and passing in the expression as a string.
Line 5: Here we print the result of the calculation. You’ll notice in order to get the most recent calculation result, we must access the attribute called lcd.
Great! Now that you know exactly what your calculator code is doing, let’s move on to running this code!
Part 2: Save the File, View the Variables, and Run Your Code
Now it’s time to save and run your code. In this section, you’ll make use of two of the icons we reviewed earlier:
Save your new file as calculations.py.
Open the Variables window and make note of the two variables listed. You should see SimpleCalculator and my_calculator. This section also gives you insight into the value that each variable is pointing to.
Run your code! You should see 4.0 in the output:
Great job! Next you’ll explore how Thonny’s debugger can help you to better understand this code.
Other Great Beginner Features
As you get more comfortable with Thonny, the features in this section will come in quite handy.
Debugging
Using your calculations.py script, you’re going to use the debugger to investigate what is happening. Update your code in calculations.py to the following:
Language: Python
fromcalculator.simpleimportSimpleCalculatordefcreate_add_string(x,y):'''Returns a string containing an addition expression.'''return'x + y'my_calculator=SimpleCalculator()my_calculator.run(create_add_string(2,2))print(my_calculator.lcd)
Hit the save icon to save this version.
You’ll notice the code has a new function called create_add_string(). If you’re unfamiliar with Python functions, learn more in this awesome Real Python course!
As you inspect the function, you may notice why this script will not work as expected. If not, that’s okay! Thonny is going to help you see exactly what is going on, and squash that bug! Go ahead and run your program and see what happens. The Shell output should be the following:
Language: Python
>>>%Runcalculations.py0
Oh no! Now you can see there is a bug in your program. The answer should be 4! Next, you’ll use Thonny’s debugger to find the bug.
Let’s Try It!
Now that we have a bug in our program, this is a great chance to use Thonny’s debugging features:
Click the bug icon at the top of the window. This enters debugger mode.
You should see the import statements highlighted. Click the small step arrow icon, the yellow arrow in the middle. Keep pressing this to see how the debugger works. You should notice that it highlights each step that Python takes to evaluate your program. Once it hits create_add_string(), you should see a new window pop up.
Examine the pop up window carefully. You should see that it shows the values for x and y. Keep pressing the small step icon until you see the value that Python will return to your program. It will be enclosed in a light-blue box:
Oh no! There’s the bug! It looks like Python will return a string containing the letters x and y (meaning 'x + y' and not a string containing the values of those variables, like '2 + 2', which is what the calculator is expecting.) Each time you see a light-blue box, you can think of this as Python replacing subexpressions with their values, step by step. The pop up window can be thought of as a piece of scratch paper that Python uses to figure out those values. Continue to step through the program to see how this bug results in a calculation of 0.
defcreate_add_string(x,y):'''Returns a string containing an addition expression.'''returnf'{x} + {y}'
Run your program again. You should see the following output:
Language: Python
>>>%Runcalculations.py4.0
Success! You have just demonstrated how the step-by-step debugger can help you find a problem in your code! Next you’ll learn about some other fun Thonny features.
Thonny offers variable highlighting to remind you that the same name doesn’t always mean the same variable. In order for this feature to work, on the menu bar, go to Thonny > Preferences and ensure that Highlight matching names is checked.
Notice in the code snippet below, that create_add_string() now has a new variable called my_calculator, though this is not the same as the my_calculator on lines 10 and 11. You should be able to tell because Thonny highlights the variables that reference the same thing. This my_calculator inside the function only exists within the scope of that function, which is why it is not highlighted when the cursor is on the other my_calculator variable on line 10:
This feature can really help you avoid typos and understand the scope of your variables.
Code Completion
Thonny also offers code completion for APIs. Notice in the snapshot below how pressing the Tab key shows the methods available from the random library:
This can be very useful when you’re working with libraries and don’t want to look at the documentation to find a method or attribute name.
Working on a Pre-Existing Project
Now that you’ve learned the basic features of Thonny, let’s explore how you can use it to work on a pre-existing project.
Find a File on Your Computer
Opening a file on your computer is as easy as going to the menu bar, selecting File > Open, and using your browser to navigate to the file. You can also use the open folder icon at the top of the screen to do this as well.
If you have a requirements.txt file and pip locally installed, you can pip install these from the Thonny system Shell. If you don’t have pip installed, remember you can use the Package Manager to install it:
Language: Shell
$ pipinstall-rrequirements.txt
Work on a Project From Github
Now that you are a Thonny expert, you can use it to work on the exercises from Real Python Course 1: Introduction to Python:
Click the green button labeled Clone or download and select Download Zip.
Click the opening folder icon to navigate and find the downloaded files. You should find a folder called book1-exercises1.
Open one of the files and start working!
This is useful because there are tons of cool projects available on GitHub!
Conclusion
Awesome job getting through this tutorial on Thonny!
You can now start using Thonny to write, debug, and run Python code! If you like Thonny, you might also like some of the other IDEs we’ve listed in Python IDEs and Code Editors (Guide).
Thonny is actively maintained, and new features are being added all the time. There are several awesome new features that are currently in beta that can be found on the Thonny Blog. Thonny’s main development takes place at the Institute of Computer Science of the University of Tartu, Estonia, as well as by contributors around the world.
Each tutorial at Real Python is created by a team of developers so that it meets our high quality standards. The team members who worked on this tutorial are: