Finding the right code editor for Python development can be tricky. Many developers explore numerous editors as they grow and learn. To choose the right code editor, you have to start by knowing which features are important to you. Then, you can try to find editors that have those features. One of the most feature-rich editors available is Emacs.
Emacs started in the mid-1970s as a set of macro extensions for a different code editor. It was adopted into the GNU project by Richard Stallman in the early 1980s, and GNU Emacs has been continuously maintained and developed ever since. To this day, GNU Emacs and the XEmacs variant are available on every major platform, and GNU Emacs continues to be a combatant in the Editor Wars.
In this tutorial, you’ll learn about using Emacs for Python development, including how to:
- Install Emacs on your selected platform
- Set up an Emacs initialization file to configure Emacs
- Build a basic Python configuration for Emacs
- Write Python code to explore Emacs capabilities
- Run and Test Python code in the Emacs environment
- Debug Python code using integrated Emacs tools
- Add source control functionality using Git
For this tutorial, you’ll use GNU Emacs 25 or later, although most of the techniques shown will work on older versions (and XEmacs) as well. You should have some experience developing in Python, and your machine should have a Python distribution already installed and ready to go.
Updates:
- 10/09/2019: Major update adding new code samples, updated package availability and info, basic tutorial, Jupyter walk-through, debugging walk-through, testing walk-through, and updated visuals.
- 11/03/2015: Initial tutorial published.
You can download all the files referenced in this tutorial at the link below:
Download Code: Click here to download the code you’ll use to learn about Emacs for Python in this tutorial.
Installation and Basics
Before you can explore Emacs and all it has to offer a Python developer, you need to install it and learn some of the basics.
Installation
When you install Emacs, you have to consider your platform. This guide, provided by ErgoEmacs, provides everything you need to get up and running with a basic Emacs installation on Linux, Mac, or Windows.
Once the installation has finished, you can start Emacs:
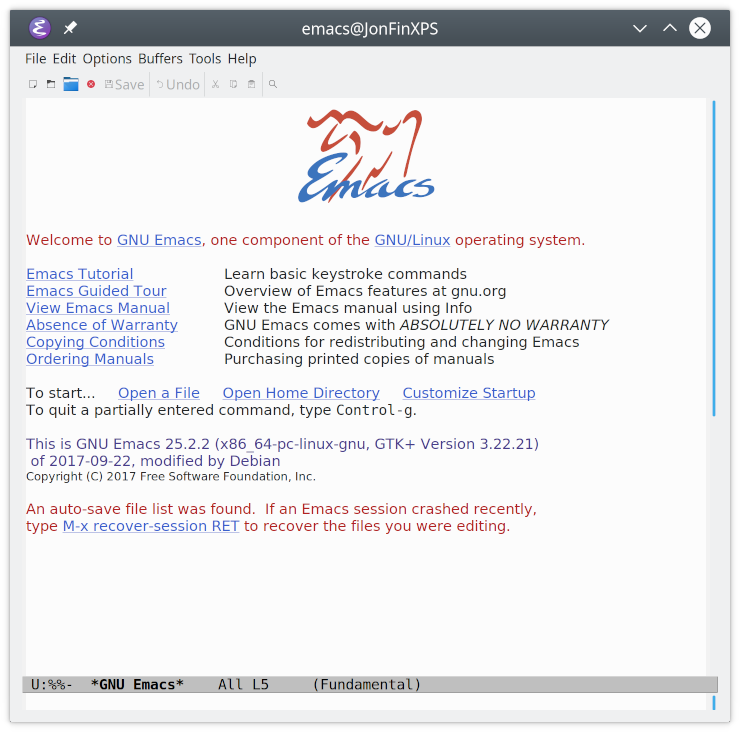
You should be greeted with the default startup screen.
Basic Emacs
First, let’s go through a quick example to cover some basic Emacs for Python development. You’ll see how to edit a program using vanilla Emacs, and how much Python support is built into the program. With Emacs open, use the following steps to create a quick Python program:
- Hit Ctrl+X Ctrl+F to open a new file.
- Type
sieve.pyto name the file. - Hit Enter.
- Emacs may ask you to confirm your choice. If so, then hit Enter again.
Now type the following code:
 1MAX_PRIME = 100
 2
 3sieve = [True] * MAX_PRIME
 4for i in range(2, MAX_PRIME):
 5  if sieve[i]:
 6    print(i)
 7      for j in range(i * i, MAX_PRIME, i):
 8        sieve[j] = False
You may recognize this code as the Sieve of Eratosthenes, which finds all primes below a given maximum. As you type the code, you’ll notice:
- Emacs highlights variables and constants differently from Python keywords.
- Emacs indents lines following
forandifstatements automatically. - Emacs changes the indentation to appropriate locations when you hit Tab on an indented line.
- Emacs highlights the opening bracket or parenthesis whenever you type a closing bracket or parenthesis.
- Emacs responds as expected to the arrow keys, as well as the Enter, Backspace, Del, Home, End, and Tab keys.
There are some odd key mappings in Emacs, however. If you try to paste code into Emacs, for instance, then you may find the standard Ctrl+V keystroke doesn’t work.
The easiest way to learn which keys do what in Emacs is to follow the built-in tutorial. You can access it by positioning the cursor over the words Emacs Tutorial on the Emacs start screen and pressing Enter, or by typing Ctrl+H T at any time thereafter. You’ll be greeted with the following passage:
Emacs commands generally involve the CONTROL key (sometimes labeled
CTRL or CTL) or the META key (sometimes labeled EDIT or ALT).  Rather than
write that in full each time, we'll use the following abbreviations:

 C-<chr>  means hold the CONTROL key while typing the character <chr>
          Thus, C-f would be: hold the CONTROL key and type f.
 M-<chr>  means hold the META or EDIT or ALT key down while typing <chr>.
          If there is no META, EDIT or ALT key, instead press and release the
          ESC key and then type <chr>.  We write <ESC> for the ESC key.

Important Note: to end the Emacs session, type C-x C-c.  (Two characters.)
To quit a partially entered command, type C-g.
When you scan the text from the passage, you’ll see that Emacs keystrokes are shown in the Emacs documentation using the notation C-x C-s. This is the command to save the contents of the current buffer. This notation indicates that the Ctrl and X keys are pressed at the same time, followed by the Ctrl and S keys.
Note: In this tutorial, Emacs keystrokes are shown as Ctrl+X Ctrl+S.
Emacs uses some terminology that can be traced back to its text-based UNIX roots. Since these terms have different meanings now, it’s a good idea to review them, as you’ll be reading about them as the tutorial progresses:
-
The window you see when you start Emacs is referred to as a frame. You can open as many Emacs frames as you wish, on as many monitors as you wish, and Emacs will track them all.
-
The panes within each Emacs frame are referred to as windows. Emacs frames initially contain a single window, but you can open multiple windows in each frame, either manually or by running special commands.
-
Within each window, the contents displayed are called a buffer. Buffers can contain the contents of files, the output of commands, the lists of menu options, or other items. Buffers are where you interact with Emacs.
-
When Emacs needs your input, it asks in a special one-line area at the bottom of the currently active frame called the mini-buffer. If you ever find yourself there unexpectedly, then you can cancel whatever got you there with Ctrl+G.
Now that you’ve covered the basics, it’s time to start customizing and configuring Emacs for Python development!
Initialization File
One of the great benefits of Emacs is its powerful configuration options. The core of Emacs configuration is the initialization file, which is processed every time Emacs is started.
This file contains commands written in Emacs Lisp, which is executed every time Emacs is started. Don’t worry, though! You don’t need to know Lisp to use or customize Emacs. In this tutorial, you’ll find everything you need to get started. (After all, this is Real Python, not Real Lisp!)
On startup, Emacs looks for the initialization file in three places:
- First, it looks in your home user folder for the file
.emacs. - If it’s not there, then Emacs looks in your home user folder for the file
emacs.el. - Finally, if neither is found, then it looks in your home folder for
.emacs.d/init.el.
The last option, .emacs.d/init.el, is the current recommended initialization file. However, if you’ve previously used and configured Emacs, then you may already have one of the other initialization files present. If so, then continue to use that file as you read this tutorial.
When you first install Emacs, there is no .emacs.d/init.el, but you can create this file fairly quickly. With the Emacs window open, follow these steps:
- Hit Ctrl+X Ctrl+F.
- Type
~/.emacs.d/init.elin the mini-buffer. - Hit Enter.
- Emacs may ask you to confirm your choice. If so, then hit Enter again.
Let’s take a closer look at what’s happening here:
-
You tell Emacs that you want to find and open a file with the keystrokes Ctrl+X Ctrl+F.
-
You tell Emacs what file to open by giving it a path to the file. The path
~/.emacs.d/init.elhas three parts:- The leading tilde
~is a shortcut to your home folder. On Linux and Mac machines, this is usually/home/<username>. On Windows machines, it’s the path specified in the HOME environment variable. - The folder
.emacs.dis where Emacs stores all its configuration information. You can use this folder to quickly set up Emacs on a new machine. To do so, copy the contents of this folder to your new machine, and Emacs is good to go! - The file
init.elis your initialization file.
- The leading tilde
-
You tell Emacs, “Yes, I do want to create this new file.” (This step is required since the file doesn’t exist. Normally, Emacs will simply open the file specified.)
After Emacs creates the new file, it opens that file in a new buffer for you to edit. This action doesn’t actually create the file yet, though. You must save the blank file using Ctrl+X Ctrl+S to create it on disk.
Throughout this tutorial, you’ll see initialization code snippets that enable different features. Create the initialization file now if you want to follow along! You can also find the complete initialization file at the link below:
Download Code: Click here to download the code you’ll use to learn about Emacs for Python in this tutorial.
Customization Packages
Now that you have an initialization file, you can add customization options to tailor Emacs for Python development. There are a few ways you can customize Emacs, but the one with the fewest steps is adding Emacs packages. These come from a variety of sources, but the primary package repository is MELPA, or the Milkypostman’s Emacs Lisp Package Archive.
Think of MELPA as PyPI for Emacs packages. Everything you need and will use in this tutorial can be found there. To begin using it, expand the code block below and copy the configuration code to your init.el file:
 1;; .emacs.d/init.el
 2
 3;; ===================================
 4;; MELPA Package Support
 5;; ===================================
 6;; Enables basic packaging support
 7(require 'package)
 8
 9;; Adds the Melpa archive to the list of available repositories
10(add-to-list 'package-archives
11             '("melpa" . "http://melpa.org/packages/") t)
12
13;; Initializes the package infrastructure
14(package-initialize)
15
16;; If there are no archived package contents, refresh them
17(when (not package-archive-contents)
18  (package-refresh-contents))
19
20;; Installs packages
21;;
22;; myPackages contains a list of package names
23(defvar myPackages
24  '(better-defaults                 ;; Set up some better Emacs defaults
25    material-theme                  ;; Theme
26    )
27  )
28
29;; Scans the list in myPackages
30;; If the package listed is not already installed, install it
31(mapc #'(lambda (package)
32          (unless (package-installed-p package)
33            (package-install package)))
34      myPackages)
35
36;; ===================================
37;; Basic Customization
38;; ===================================
39
40(setq inhibit-startup-message t)    ;; Hide the startup message
41(load-theme 'material t)            ;; Load material theme
42(global-linum-mode t)               ;; Enable line numbers globally
43
44;; User-Defined init.el ends here
As you read through the code, you’ll see that init.el is broken into sections. Each section is separated by comment blocks that begin with two semicolons (;;). The first section is titled MELPA Package Support:
 1;; .emacs.d/init.el
 2
 3;; ===================================
 4;; MELPA Package Support
 5;; ===================================
 6;; Enables basic packaging support
 7(require 'package)
 8
 9;; Adds the Melpa archive to the list of available repositories
10(add-to-list 'package-archives
11             '("melpa" . "http://melpa.org/packages/") t)
12
13;; Initializes the package infrastructure
14(package-initialize)
15
16;; If there are no archived package contents, refresh them
17(when (not package-archive-contents)
18  (package-refresh-contents))
This section begins by setting up the packaging infrastructure:
- Line 7 tells Emacs to use packages.
- Lines 10 and 11 add the MELPA archive to the list of package sources.
- Line 14 initializes the packaging system.
- Lines 17 and 18 build the current package content list if it doesn’t already exist.
The first section continues from line 20:
20;; Installs packages
21;;
22;; myPackages contains a list of package names
23(defvar myPackages
24  '(better-defaults                 ;; Set up some better Emacs defaults
25    material-theme                  ;; Theme
26    )
27  )
28
29;; Scans the list in myPackages
30;; If the package listed is not already installed, install it
31(mapc #'(lambda (package)
32          (unless (package-installed-p package)
33            (package-install package)))
34      myPackages)
At this point, you’re all set to programmatically install Emacs packages:
- Lines 23 to 27 define a list of package names to install. You’ll add more packages as you progress through the tutorial:
- Line 24 adds
better-defaults. This is a collection of minor changes to the Emacs defaults that make it more user-friendly. It’s also a great base for further customization. - Line 25 adds the
material-themepackage, which is a nice dark style found in other environments.
- Line 24 adds
- Lines 31 to 34 traverse the list and install any packages that are not already installed.
Note: You don’t need to use the Material theme. There are many different Emacs themes available on MELPA for you to choose from. Pick one that suits your style!
After you install your packages, you can move on to the section titled Basic Customization:
36;; ===================================
37;; Basic Customization
38;; ===================================
39
40(setq inhibit-startup-message t)    ;; Hide the startup message
41(load-theme 'material t)            ;; Load material theme
42(global-linum-mode t)               ;; Enable line numbers globally
43
44;; User-Defined init.el ends here
Here, you add a few other customizations:
- Line 40 disables the initial Emacs screen containing the tutorial information. You may want to leave this commented out by using a double semicolon (
;;) until you’re more comfortable with Emacs. - Line 41 loads and activates the Material theme. If you want to install a different theme, then use its name here instead. You can also comment out this line to use the default Emacs theme.
- Line 42 displays line numbers in every buffer.
Now that you have a complete basic configuration file in place, you can save the file using Ctrl+X Ctrl+S. Then, close and restart Emacs to see the changes.
The first time Emacs runs with these options, it may take a few seconds to start as it sets up the packaging infrastructure. When that’s finished, you’ll see that your Emacs window looks a bit different:
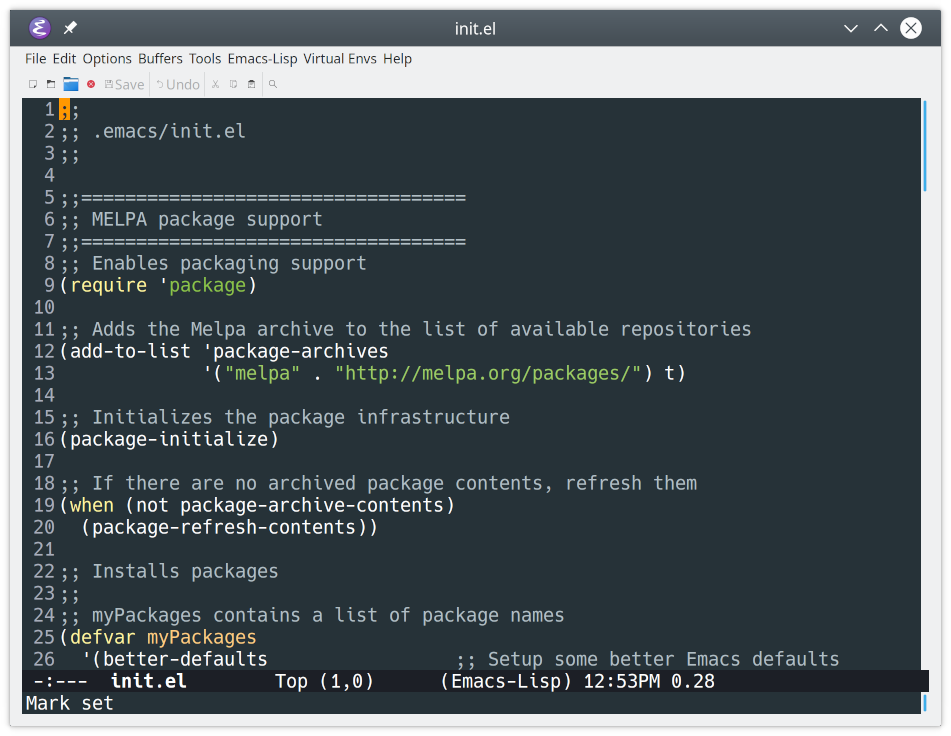
After the restart, Emacs skipped the initial screen and instead opened the last active file. The Material theme is applied, and line numbers have been added to the buffer.
Note: You can add packages interactively after the packaging infrastructure is set up. Hit Alt+X, then type package-show-package-list to see all the packages available to install in Emacs. As of this writing, there are over 4300 available.
With the list of packages visible, you can:
- Quickly filter the list by package name by hitting F.
- View the details of any package by clicking its name.
- Install the package from the package view by clicking the Install link.
- Close the package list using Q.
In the next section, you’ll walk through setting up IDE-like features for your Python development workflow using Elpy. This works also with older Emacs versions.
If you’re using Emacs 29 or newer, you may prefer a Language Server Protocol (LSP) setup instead of Elpy. Emacs includes Eglot (an LSP client), which can be paired with a Python language server like Pyright or basedpyright for completion, jump-to-definition, diagnostics, and more:
;; Emacs 29+: Eglot + Python LSP (example: basedpyright)
(add-to-list 'eglot-server-programs
             '((python-mode python-ts-mode) . ("basedpyright-langserver" "--stdio")))
(add-hook 'python-mode-hook 'eglot-ensure)
(add-hook 'python-ts-mode-hook 'eglot-ensure)
The LSP setup is a modern approach that’s often favored by seasoned Emacs users. Choose either Eglot or Elpy for your setup. Running both can duplicate or override similar IDE features.
Emacs for Python Development With elpy
Emacs is ready out of the box to edit Python code. The library file python.el provides python-mode, which enables basic indentation and syntax highlighting support. However, this built-in package doesn’t provide much else. To properly compete with Python-specific IDEs (Integrated Development Environments), you’ll add more capabilities.
Note:
The elpy package (Emacs Lisp Python Environment) provides a near-complete set of Python IDE features, including:
- Automatic indentation
- Syntax highlighting
- Auto completion
- Syntax checking
- Python REPL integration
- Virtual environment support
To install and enable elpy, you add the package to your Emacs configuration. The following change to init.el will do the trick:
23(defvar myPackages
24  '(better-defaults                 ;; Set up some better Emacs defaults
25    elpy                            ;; Emacs Lisp Python Environment
26    material-theme                  ;; Theme
27    )
28  )
Once elpy is installed, you need to enable it. Add the following code just before the end of your init.el file:
45;; ====================================
46;; Development Setup
47;; ====================================
48;; Enable elpy
49(elpy-enable)
50
51;; User-Defined init.el ends here
You now have a new section titled Development Setup. Line 49 enables elpy.
Note: Unfortunately, Emacs will only read the contents of the initialization file once when it starts. If you make any changes to it, then the easiest and safest way to load them is to restart Emacs.
To see the new mode in action, go back to the Sieve of Eratosthenes code you entered earlier. Create a new Python file and retype the Sieve code directly:
 1MAX_PRIME = 100
 2
 3sieve = [True] * MAX_PRIME
 4for i as range(2, MAX_PRIME):
 5  if sieve[i]:
 6    print(i)
 7    for j in range(i*i, MAX_PRIME, i):
 8      sieve[j] = False
Note the intentional syntax error on line 4.
This is what your Python file would look like in Emacs:
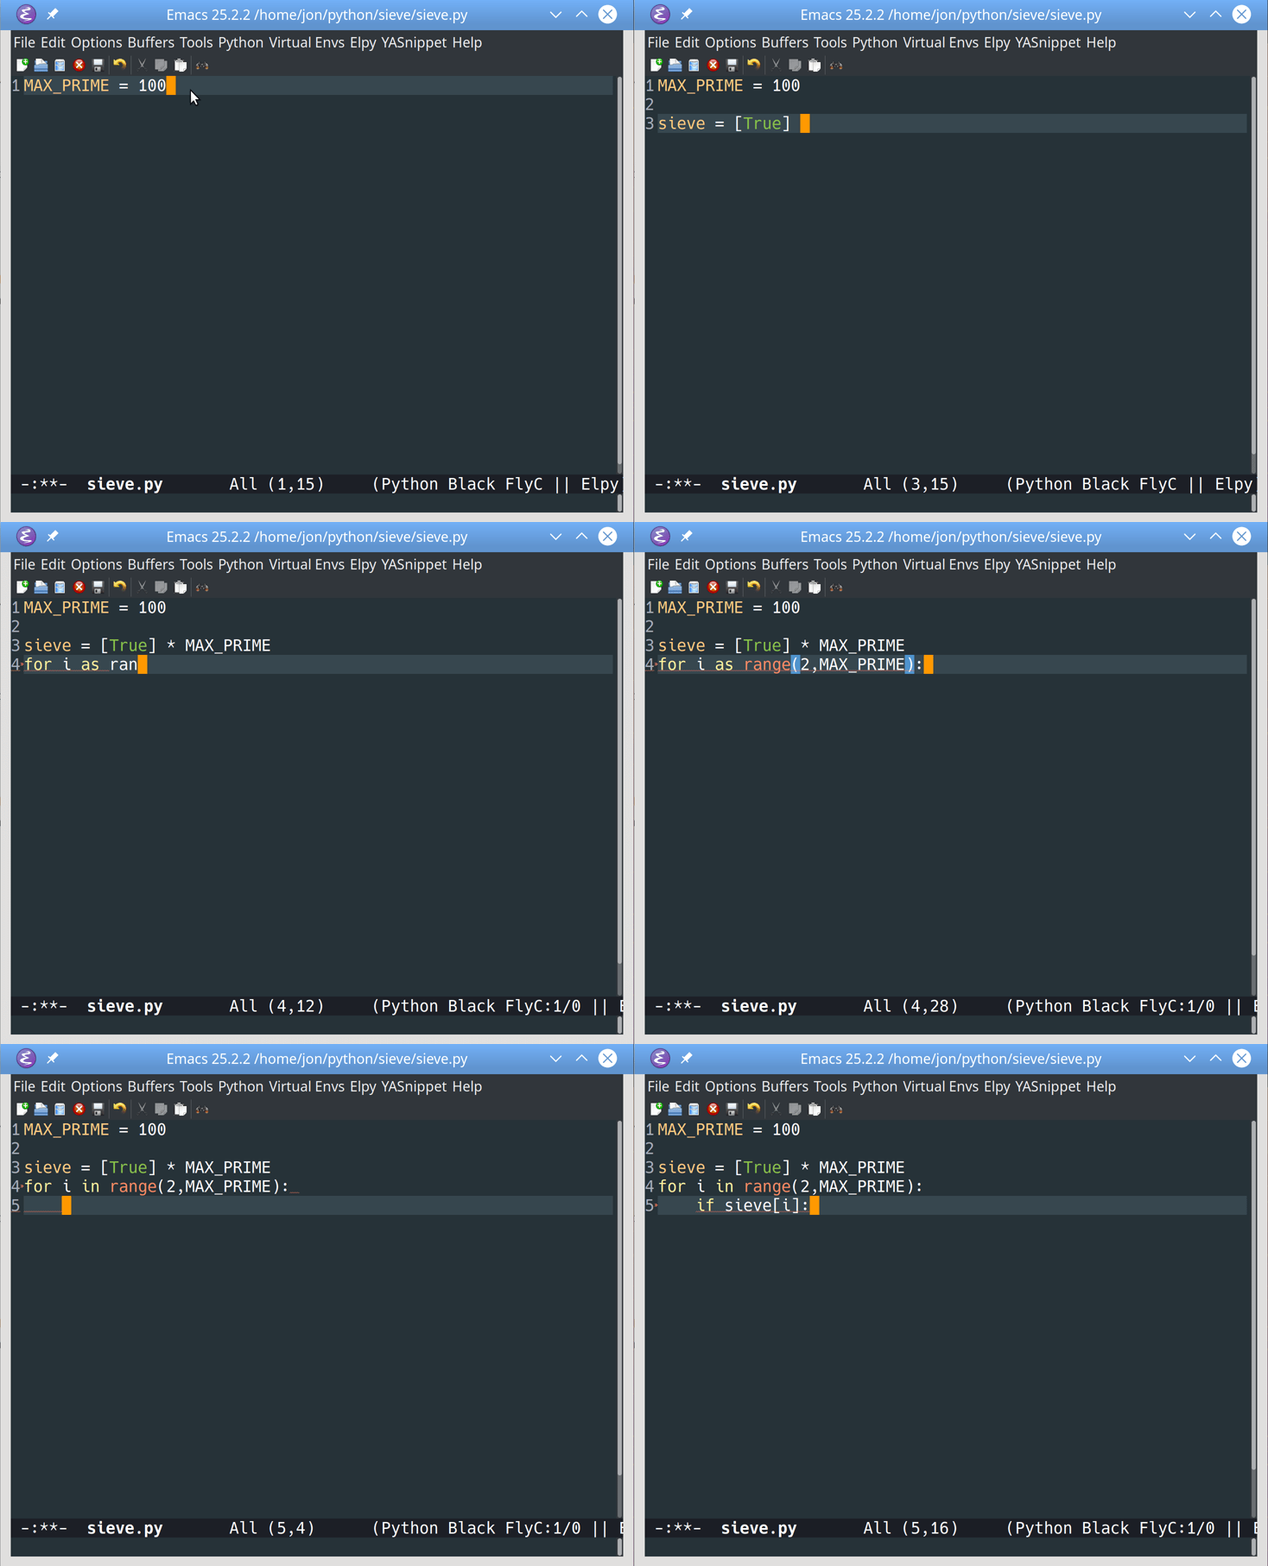
Auto-indentation and keyword highlighting still work as before. However, you should also see an error indicator on line 4:
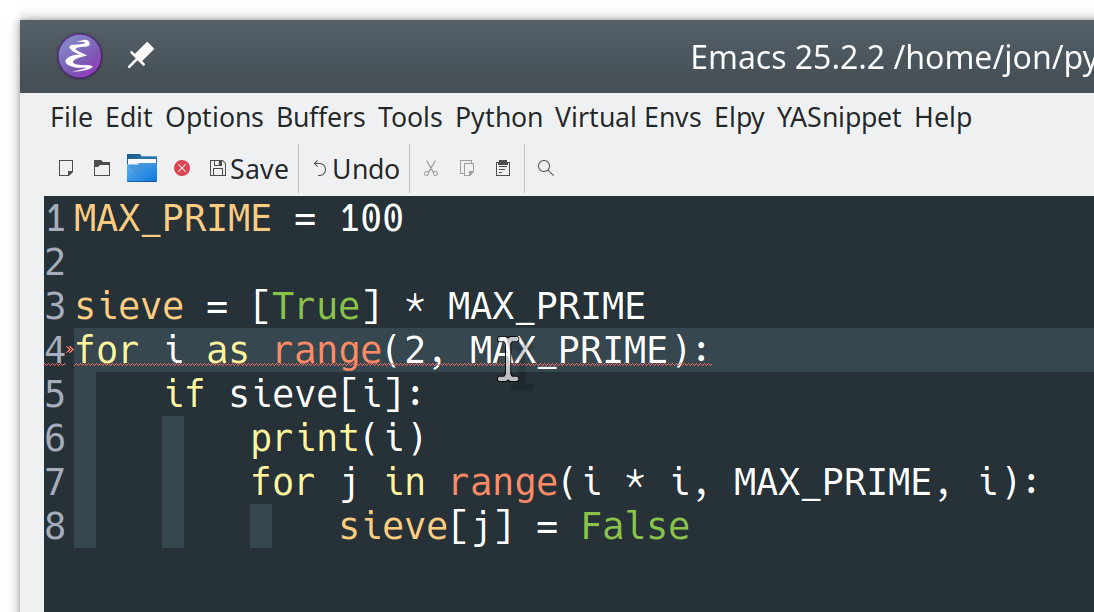
This error indicator pops up in the for loop when you typed as instead of in.
Correct that error, then type Ctrl+C Ctrl+C while in the Python buffer to run the file without leaving Emacs:
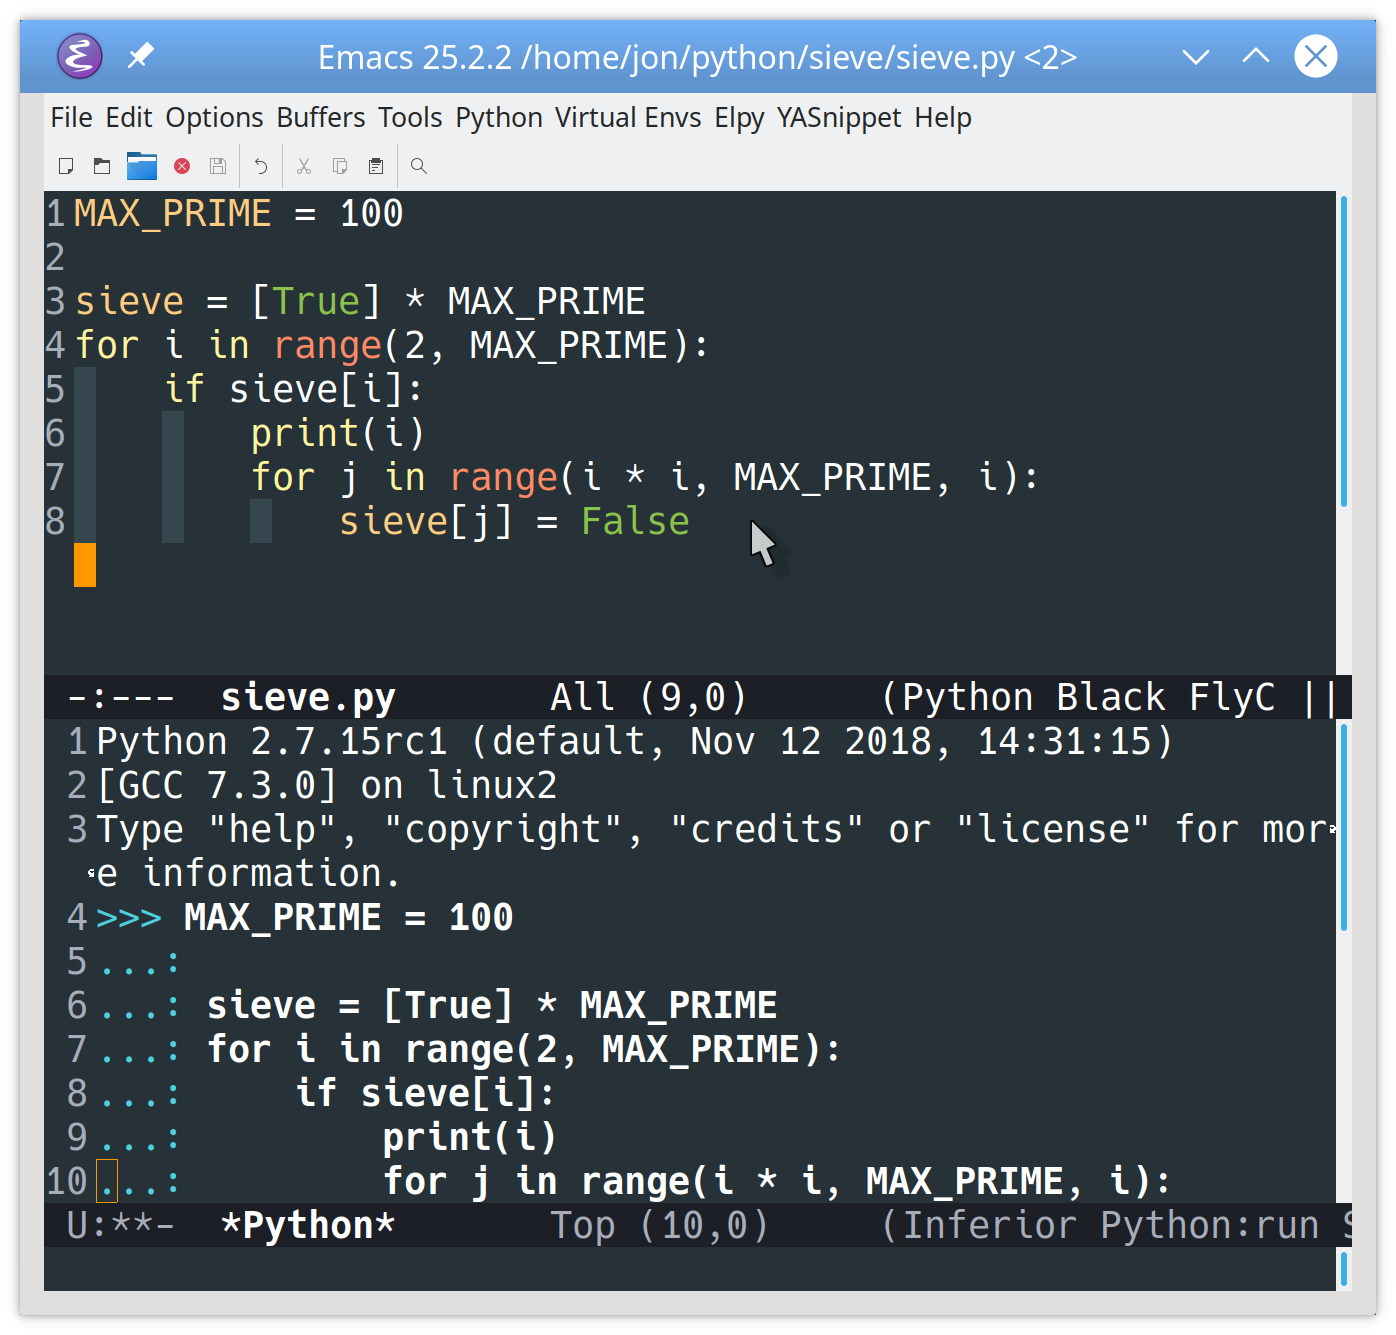
When you use this command, Emacs will do the following:
- Create a new buffer named *Python*
- Open your Python interpreter and connect it to that buffer
- Create a new window under your current code window to display the buffer
- Send the code to the interpreter to execute
You can scroll through the *Python* buffer to see which interpreter was run and how the code was started. You can even type commands at the prompt (>>>) at the bottom.
Often, you’ll want to execute your code in a virtual environment using the interpreter and packages specified for that environment. Fortunately, elpy includes the pyvenv package, which provides built-in support for virtual environments.
To use an existing virtual environment in Emacs, type Alt+X pyvenv-workon. Emacs will ask for the name of the virtual environment to use and activate it. You can deactivate the current virtual environment with Alt+X pyvenv-deactivate. You can also access this functionality from the Emacs menu, under Virtual Envs.
You can also configure elpy from within Emacs. Type Alt+X elpy-config to display the following dialog:
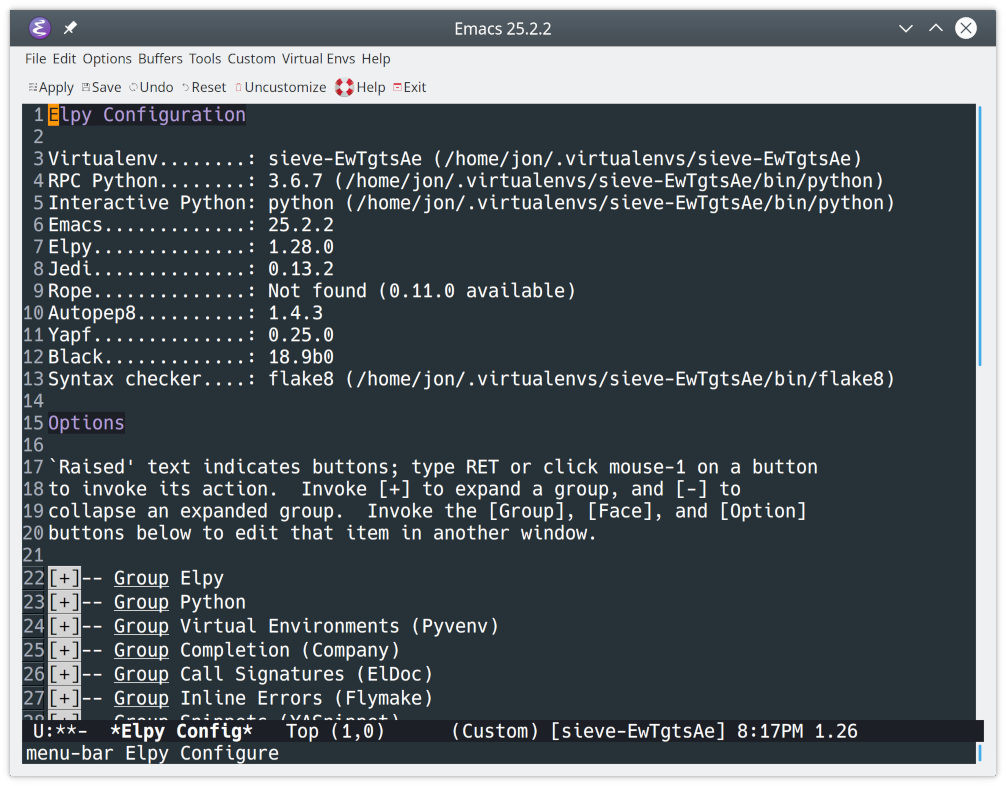
You should see valuable debugging information, as well as options to configure elpy.
Now you’ve put all of the basics of using Emacs with Python in place. Time to put some icing on this cake!
Additional Python Language Features
In addition to all of the basic IDE features described above, there are other syntax features you can use with Emacs for Python development. In this tutorial, you’ll cover these three:
- Syntax checking with
flycheck - Code formatting with PEP 8 and
black - Integration with Jupyter and IPython
This is not an exhaustive list, however! Feel free to play around with Emacs and Python to see what other syntax features you can discover.
Syntax Checking
By default, elpy uses a syntax-checking package called flymake. While flymake is built into Emacs, it only has native support four languages, and it requires significant effort to be able to support new languages.
Luckily, there is a newer and more complete solution available! The syntax-checking package flycheck supports real-time syntax checking in over 50 languages and is designed to be quickly configured for new languages. You can read about the differences between flymake and flycheck in the documentation.
You can quickly switch elpy to use flycheck instead of flymake. First, add flycheck to your init.el:
23(defvar myPackages
24  '(better-defaults                 ;; Set up some better Emacs defaults
25    elpy                            ;; Emacs Lisp Python Environment
26    flycheck                        ;; On the fly syntax checking
27    material-theme                  ;; Theme
28    )
29  )
flycheck will now be installed with the other packages.
Then, add the following lines in the Development Setup section:
46;; ====================================
47;; Development Setup
48;; ====================================
49;; Enable elpy
50(elpy-enable)
51
52;; Enable Flycheck
53(when (require 'flycheck nil t)
54  (setq elpy-modules (delq 'elpy-module-flymake elpy-modules))
55  (add-hook 'elpy-mode-hook 'flycheck-mode))
This will enable flycheck when Emacs runs your initialization file. Now you’ll see real-time syntax feedback whenever you use Emacs for Python code editing:
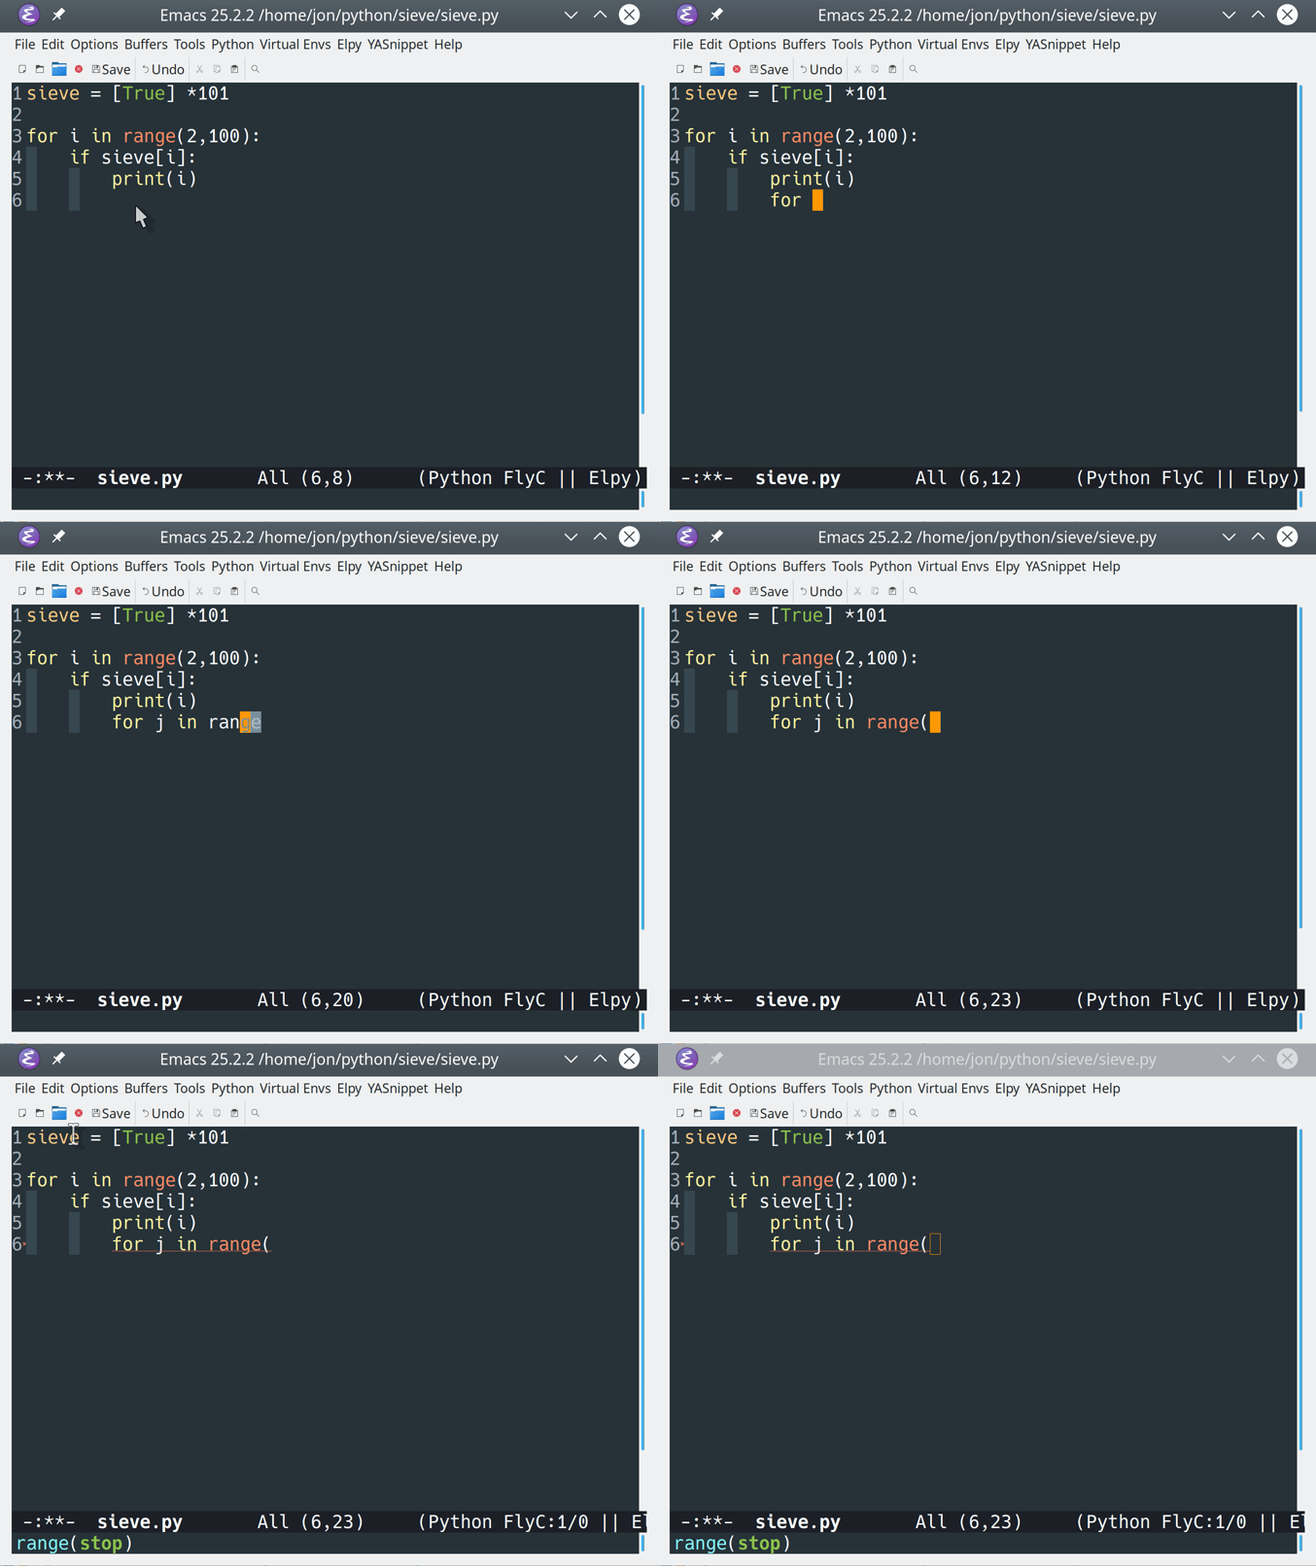
Notice the syntax reminder for range(), which appears at the bottom of the window as you type.
Code Formatting
Love it or hate it, PEP 8 is here to stay. If you want to follow all or some of the standards, then you’ll probably want an automated way to do so. Two popular solutions are autopep8 and black. These code formatting tools must be installed in your Python environment before they can be used. To learn more about how to install an auto-formatter, check out How to Write Beautiful Python Code With PEP 8.
Once the auto-formatter is available, you can install the proper Emacs package to enable it:
py-autopep8connectsautopep8to Emacs.blackenenablesblackto run from within Emacs.
You only need to install one of these in Emacs. To do so, add one of the following highlighted lines to your init.el:
23(defvar myPackages
24  '(better-defaults                 ;; Set up some better Emacs defaults
25    elpy                            ;; Emacs Lisp Python Environment
26    flycheck                        ;; On the fly syntax checking
27    py-autopep8                     ;; Run autopep8 on save
28    blacken                         ;; Black formatting on save
29    material-theme                  ;; Theme
30    )
31  )
If you’re using black, then you’re done! elpy recognizes the blacken package and will enable it automatically.
If you’re using autopep8, however, then you’ll need to enable the formatter in the Development Setup section:
48;; ====================================
49;; Development Setup
50;; ====================================
51;; Enable elpy
52(elpy-enable)
53
54;; Enable Flycheck
55(when (require 'flycheck nil t)
56  (setq elpy-modules (delq 'elpy-module-flymake elpy-modules))
57  (add-hook 'elpy-mode-hook 'flycheck-mode))
58
59;; Enable autopep8
60(require 'py-autopep8)
61(add-hook 'elpy-mode-hook 'py-autopep8-enable-on-save)
62
63;; User-Defined init.el ends here
Now, every time you save your Python code, the buffer is automatically formatted and saved, and the contents reloaded. You can see how this works with some badly formatted Sieve code and the black formatter:
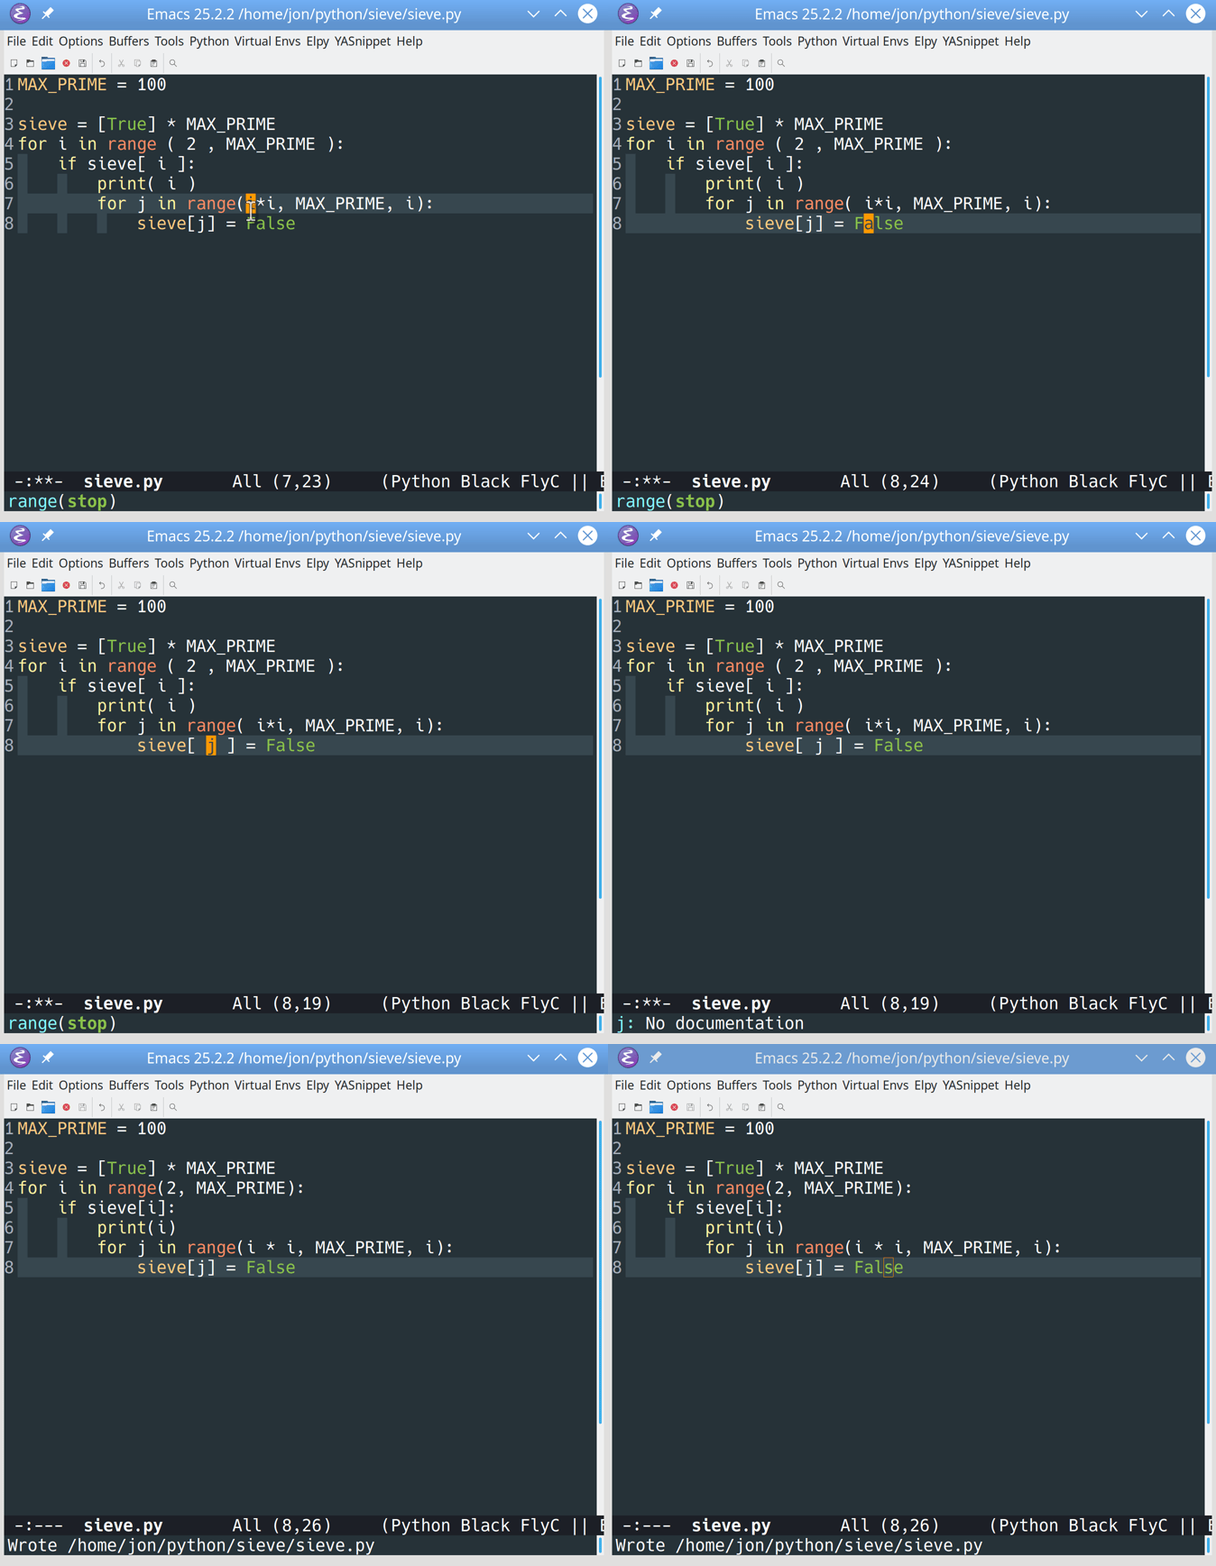
You can see that after the file is saved, it’s reloaded in the buffer with the proper black formatting applied.
Integration With Jupyter and IPython
Emacs can also work with Jupyter Notebooks and the IPython REPL. If you don’t already have Jupyter installed, then check out Jupyter Notebook: An Introduction. Once Jupyter is ready to go, add the following lines to your init.el after the call to enable elpy:
48;; ====================================
49;; Development Setup
50;; ====================================
51;; Enable elpy
52(elpy-enable)
53
54;; Use IPython for REPL
55(setq python-shell-interpreter "jupyter"
56      python-shell-interpreter-args "console --simple-prompt"
57      python-shell-prompt-detect-failure-warning nil)
58(add-to-list 'python-shell-completion-native-disabled-interpreters
59             "jupyter")
60
61;; Enable Flycheck
62(when (require 'flycheck nil t)
63  (setq elpy-modules (delq 'elpy-module-flymake elpy-modules))
64  (add-hook 'elpy-mode-hook 'flycheck-mode))
This will update Emacs to use IPython rather than the standard Python REPL. Now when you run your code with Ctrl+C Ctrl+C, you’ll see the IPython REPL:
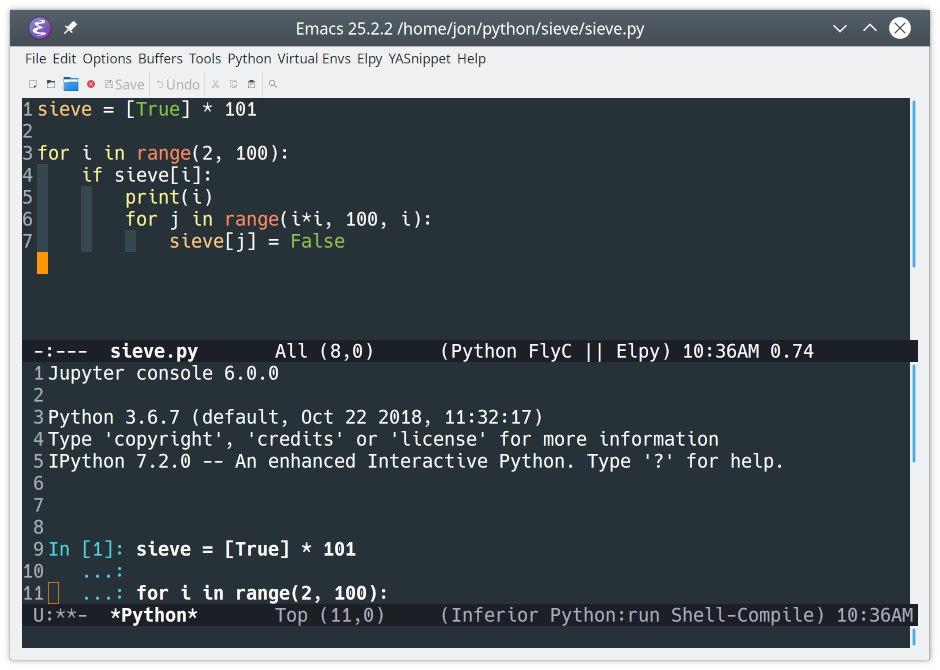
While this is pretty useful on its own, the real magic is in the Jupyter Notebook integration. As always, you need to add a bit of configuration to enable everything. The ein package enables an IPython Notebook client in Emacs. You can add it to your init.el like so:
23(defvar myPackages
24  '(better-defaults                 ;; Set up some better Emacs defaults
25    elpy                            ;; Emacs Lisp Python Environment
26    flycheck                        ;; On the fly syntax checking
27    py-autopep8                     ;; Run autopep8 on save
28    blacken                         ;; Black formatting on save
29    ein                             ;; Emacs IPython Notebook
30    material-theme                  ;; Theme
31    )
32  )
You can now start a Jupyter server and work with Notebooks from within Emacs.
To start the server, use the command Alt+X ein:jupyter-server-start. Then provide a folder in which to run the server. You’ll see a new buffer showing the Jupyter Notebooks available in the folder selected:
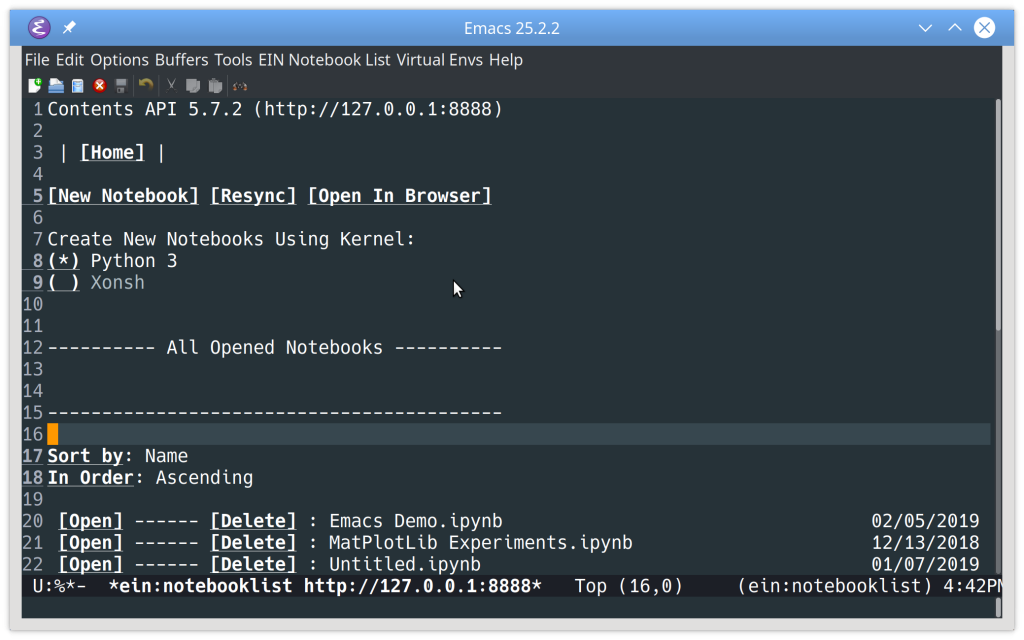
From here you can create a new Notebook with a selected kernel by clicking New Notebook, or open an existing Notebook from the list at the bottom by clicking Open:
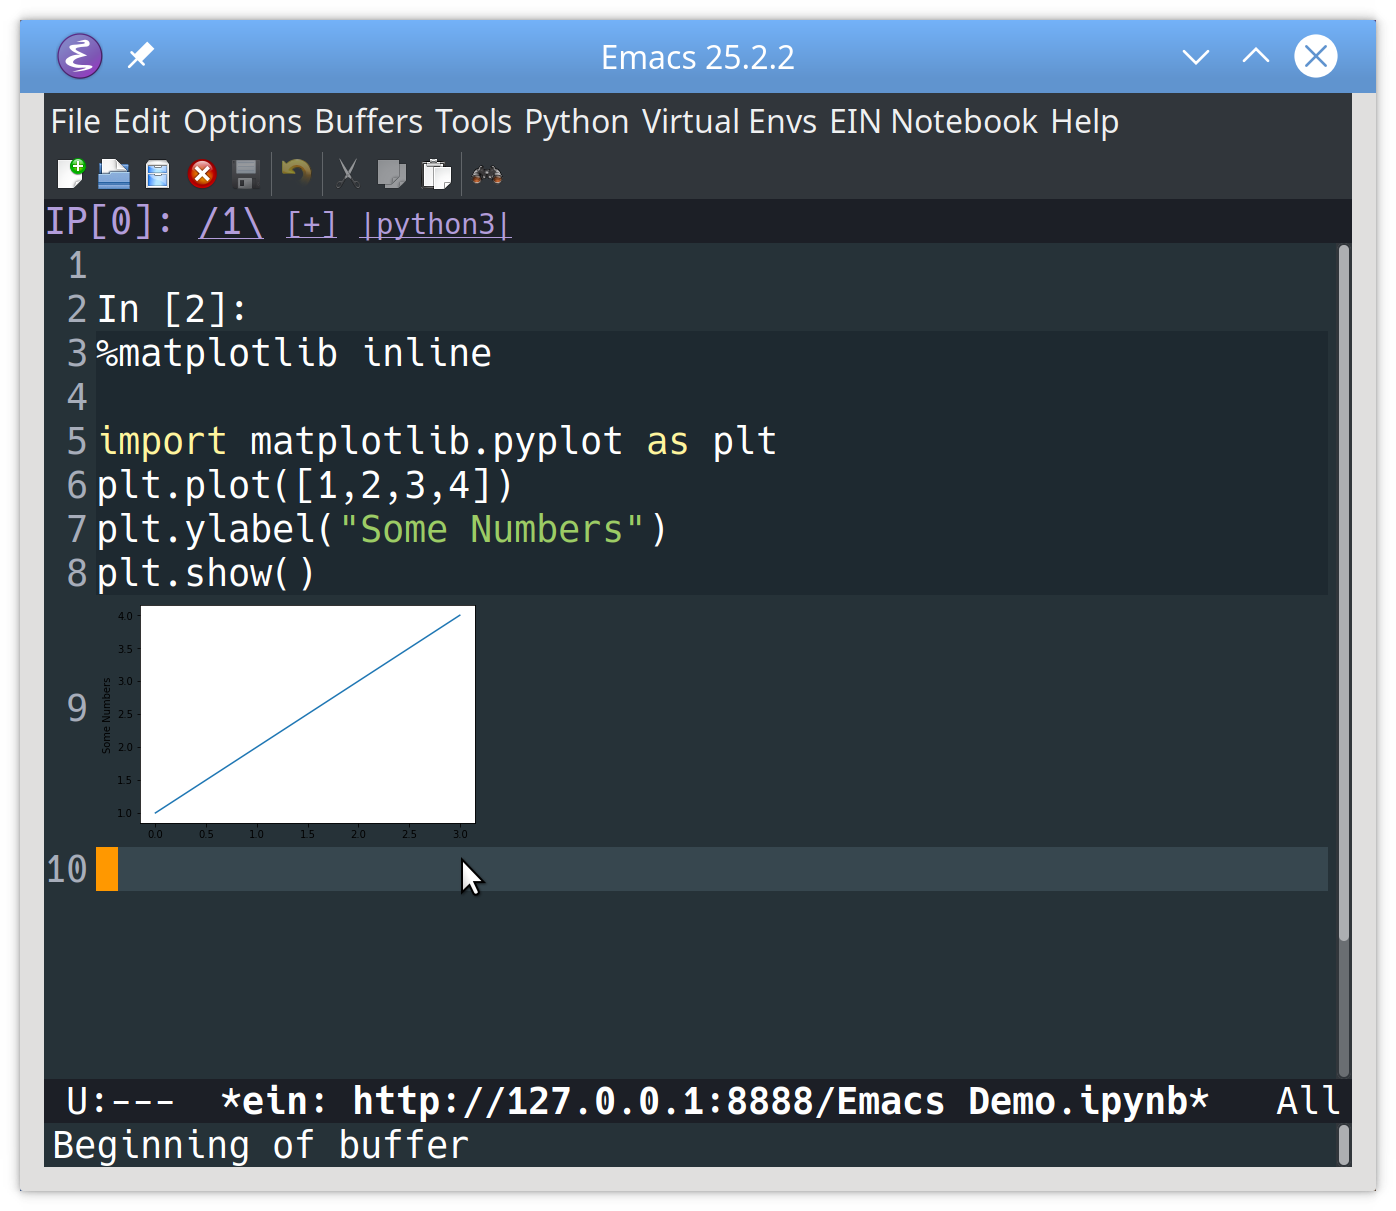
You can complete the exact same task by typing Ctrl+X Ctrl+F, and then typing Ctrl+C Ctrl+Z. This will open the Jupyter Notebook directly in Emacs as a file.
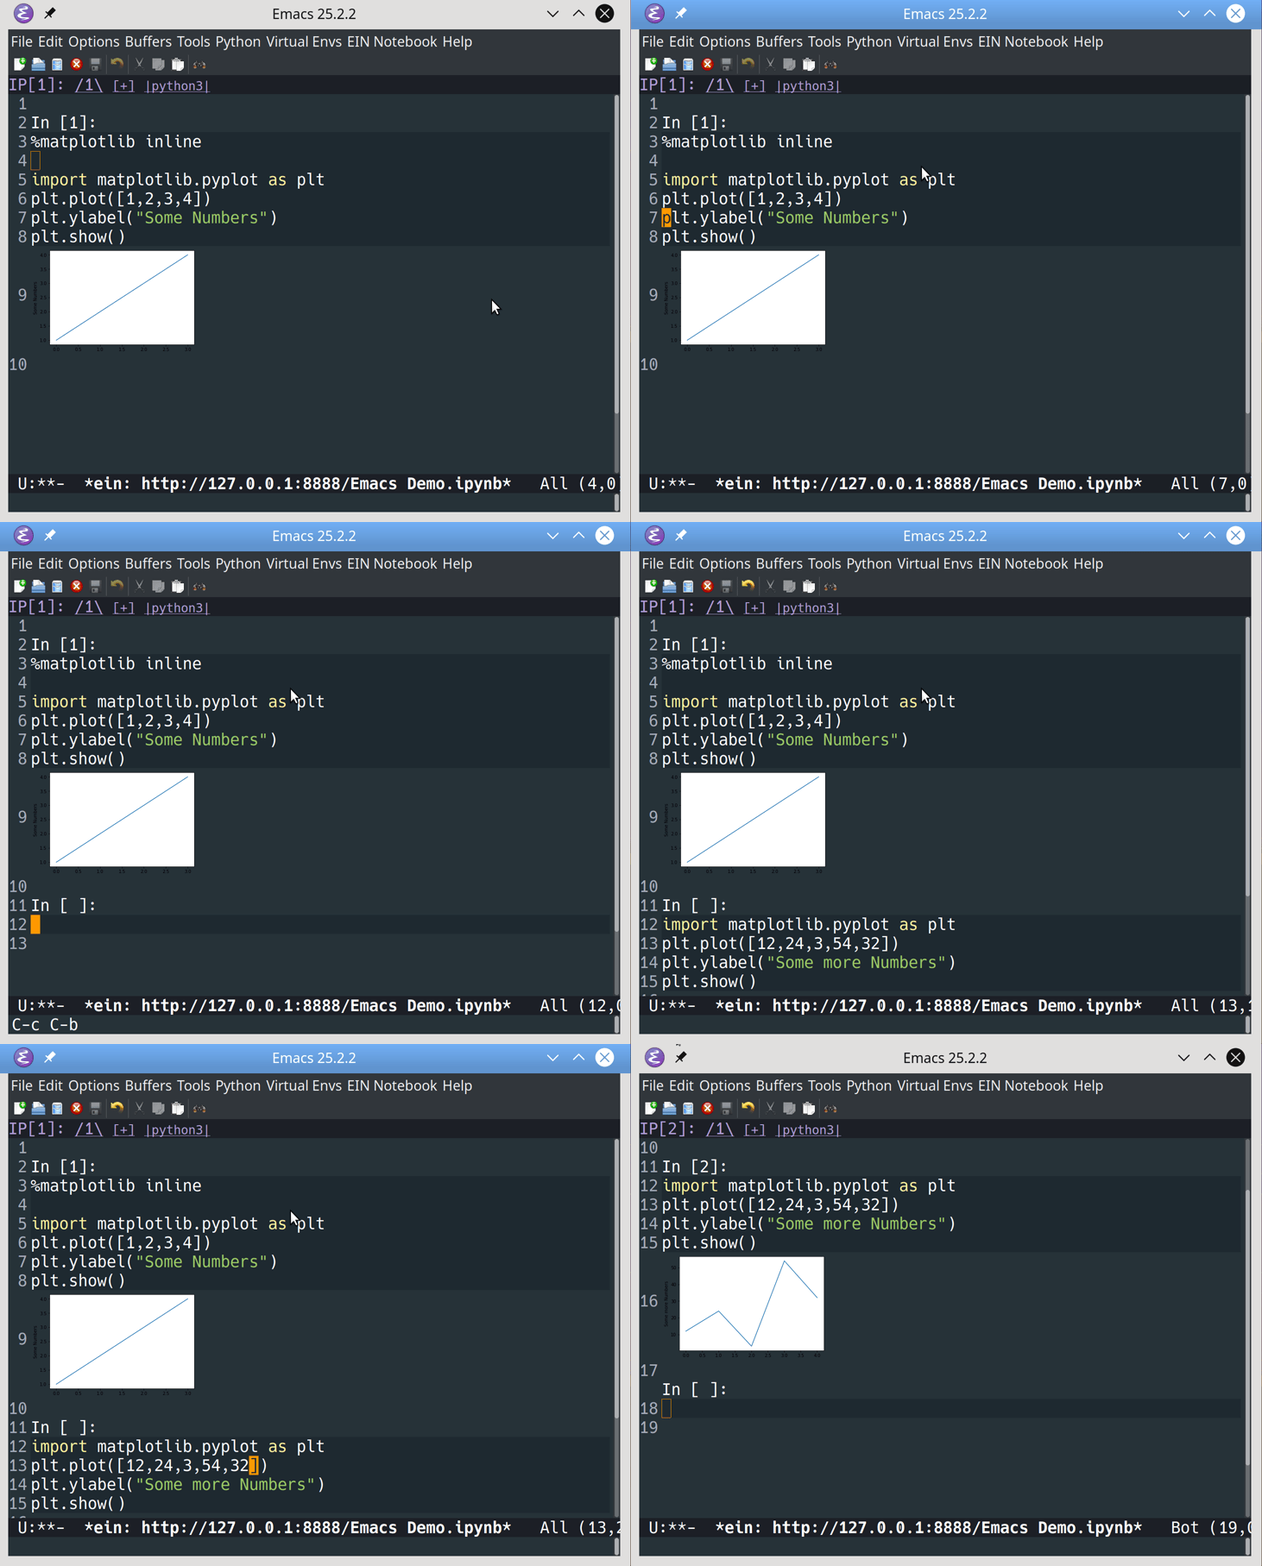
With a Notebook open, you can:
- Move around the Notebook cells using the arrow keys
- Add a new cell above the current cell using Ctrl+A
- Add a new cell below the current cell using Ctrl+B
- Execute new cells using either Ctrl+C Ctrl+C or Alt+Enter
Here’s an example of how to move around a Notebook, add a new cell, and execute it:
You can save your work using Ctrl+X Ctrl+S.
When you’re done working in your notebook, you can close it using Ctrl+C Ctrl+Shift+3. You can stop the Jupyter server completely by hitting Alt+X ein:jupyter-server-stop. Emacs will ask you if you want to kill the server and close all open Notebooks.
Of course, this is just the tip of the Jupyter iceberg! You can explore everything the ein package can do in the documentation.
Testing Support
Do you write perfect code that has no side-effects and performs well under all conditions? Of course… not! If this sounds like you, though, then you’re free to skip ahead a bit. But for most developers, testing code is a requirement.
elpy provides extensive support for running tests, including support for:
To demonstrate the testing capabilities, the code for this tutorial includes a version of Edsger Dijkstra’s shunting yard algorithm. This algorithm parses mathematical equations that are written using infix notation. You can download the code at the link below:
Download Code: Click here to download the code you’ll use to learn about Emacs for Python in this tutorial.
To start, let’s get a more complete picture of the project by viewing the project folder. You can open a folder in Emacs using Ctrl+X D. Next, you’ll display two windows in the same frame by splitting the frame vertically with Ctrl+X 3. Finally, you navigate to the test file in the left window, and click on it to open it in the right window:
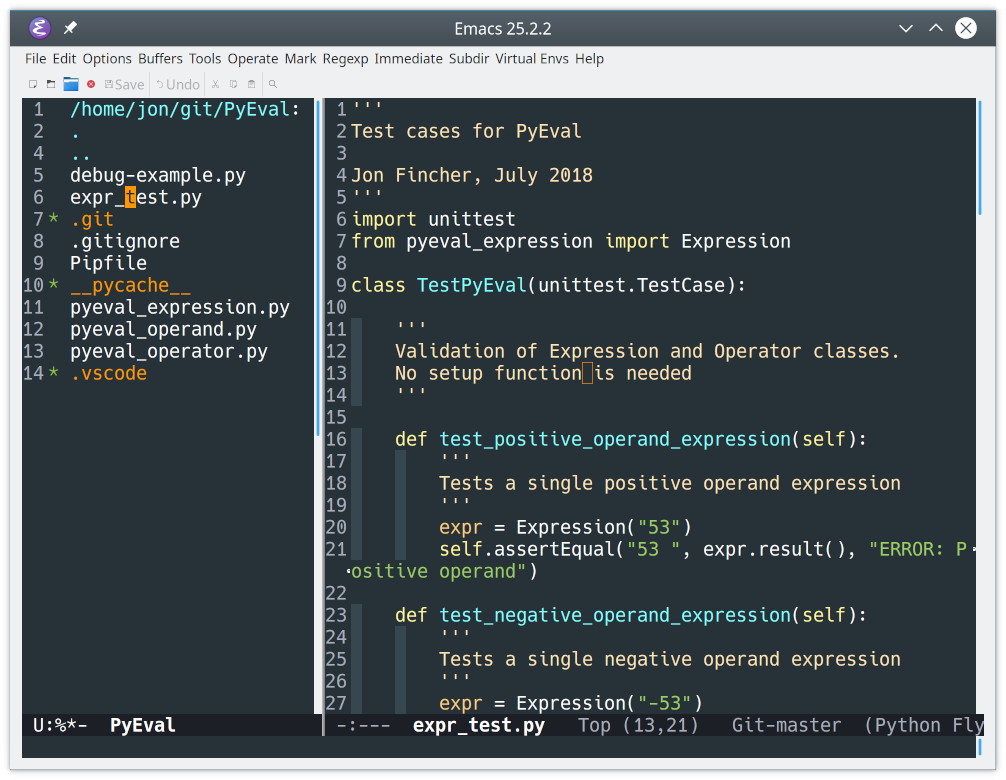
The test file expr_test.py is a basic unittest file that contains a single test case with six tests. To run the test case, type Ctrl+C Ctrl+T:
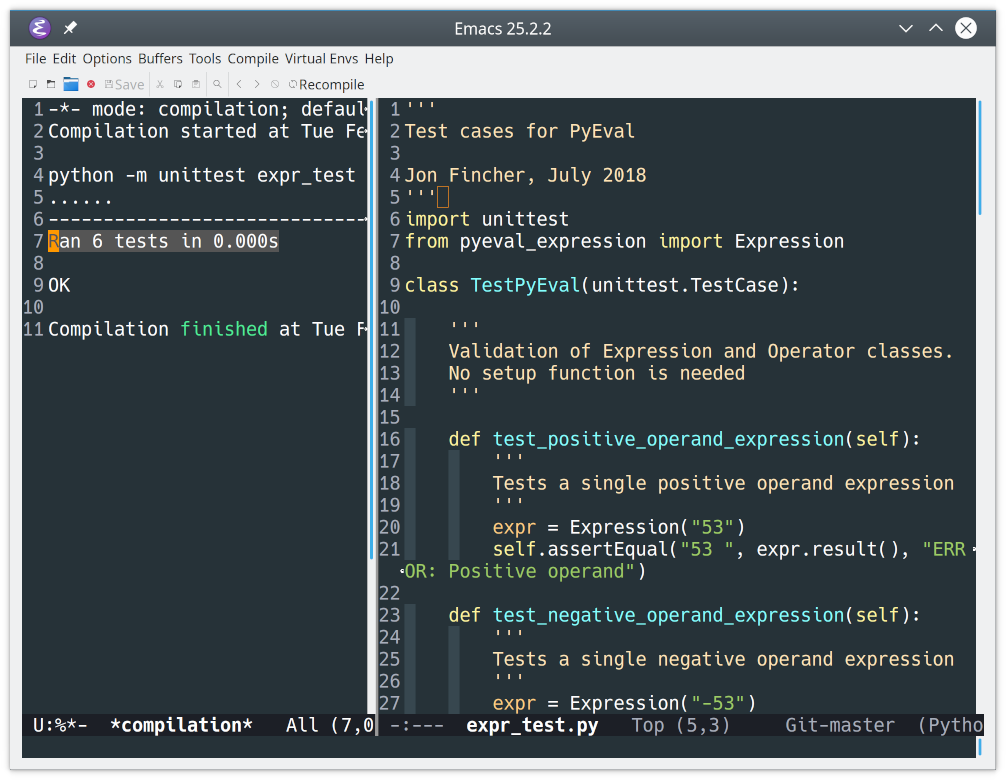
The results are displayed in the left window. Notice how all six tests were run. You can run a single test in a test file by putting the cursor in that test before typing Ctrl+C Ctrl+T.
Debugging Support
When tests fail, you’ll need to delve into the code to figure out why. The built-in python-mode allows you to use Emacs for Python code debugging with pdb. For an introduction to pdb, check out Python Debugging with Pdb.
Here’s how to use pdb in Emacs:
- Open the
debug-example.pyfile in the PyEval project. - Type Alt+X
pdbto start the Python debugger. - Type
debug-example.pyEnter to run the file under the debugger.
Once it’s running, pdb will split the frame horizontally and open itself in a window above the file you’re debugging:
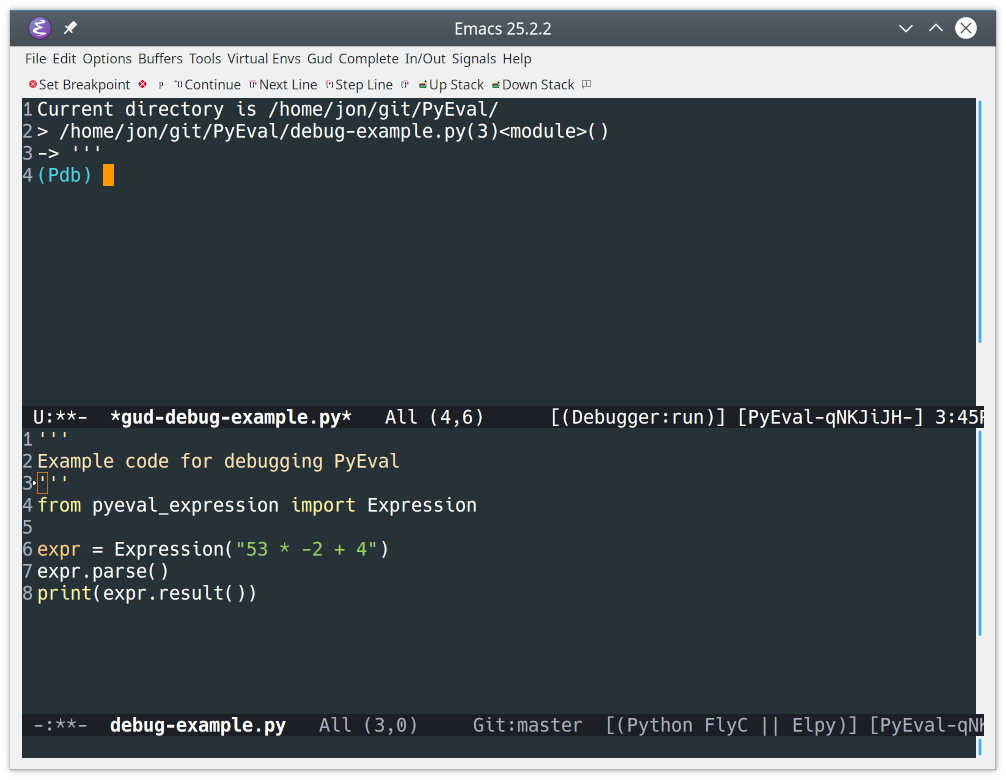
All debuggers in Emacs run as part of the Grand Unified Debugger library, also called the GUD. This library provides a consistent interface for debugging all supported languages. The name of the buffer created, *gud-debug-example.py*, shows that the debug window was created by the GUD.
The GUD also connects pdb to the actual source file in the bottom window, which tracks your current location. Let’s step through this code to see how that works:
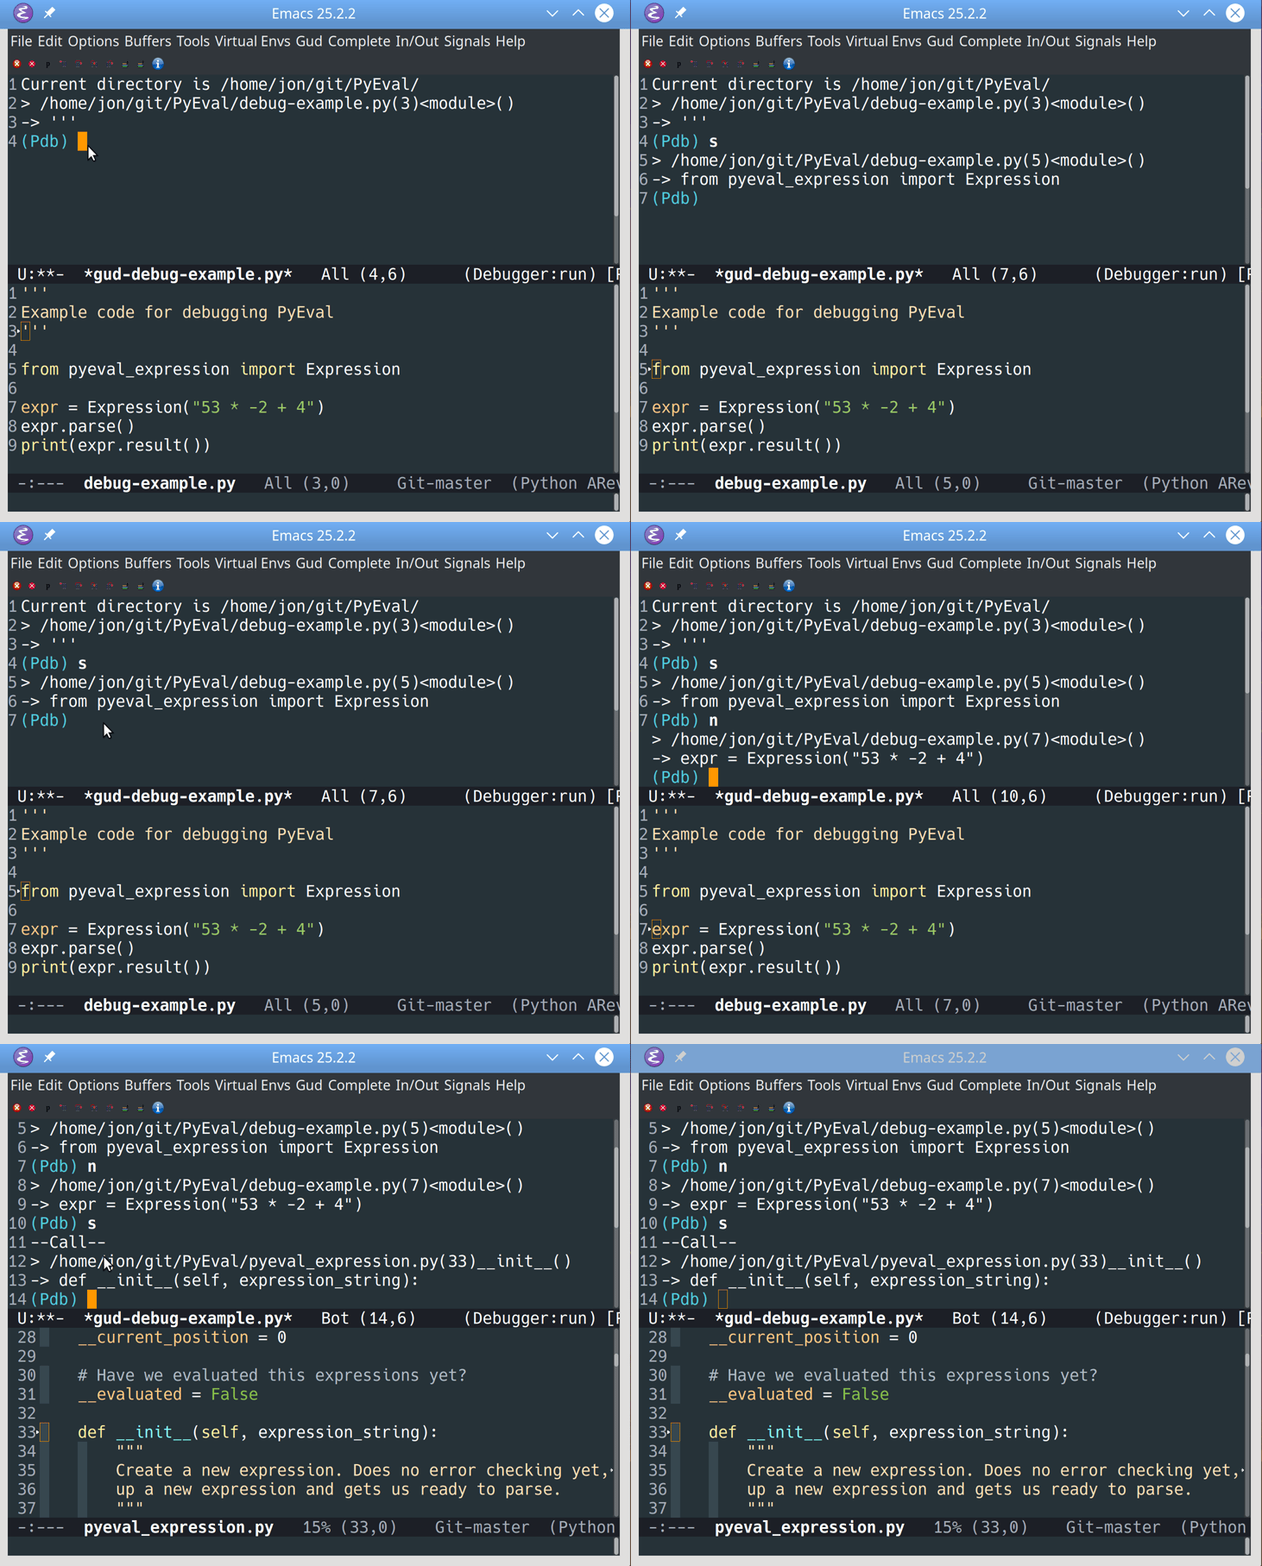
You can step through code in pdb using one of two keys:
- S steps into other functions.
- N steps over other functions.
You’ll see the cursor move in the lower source window to keep track of the execution point. As you follow function calls, pdb opens local files as required to keep you moving forward.
Git Support
No modern IDE would be complete without support for source control. While numerous source control options exist, it’s a fair bet that most programmers are using Git. If you’re not using source control, or need to learn more about Git, then check out Introduction to Git and GitHub for Python developers.
In Emacs, source control support is provided by the magit package. You install magit by listing it in your init.el file:
23(defvar myPackages
24  '(better-defaults                 ;; Set up some better Emacs defaults
25    elpy                            ;; Emacs Lisp Python Environment
26    ein                             ;; Emacs iPython Notebook
27    flycheck                        ;; On the fly syntax checking
28    py-autopep8                     ;; Run autopep8 on save
29    blacken                         ;; Black formatting on save
30    magit                           ;; Git integration
31    material-theme                  ;; Theme
32    )
33  )
After you restart Emacs, magit will be ready to use.
Let’s take a look at an example. Open any of the files in the PyEval folder, then type Alt+X magit-status. You’ll see the following appear:
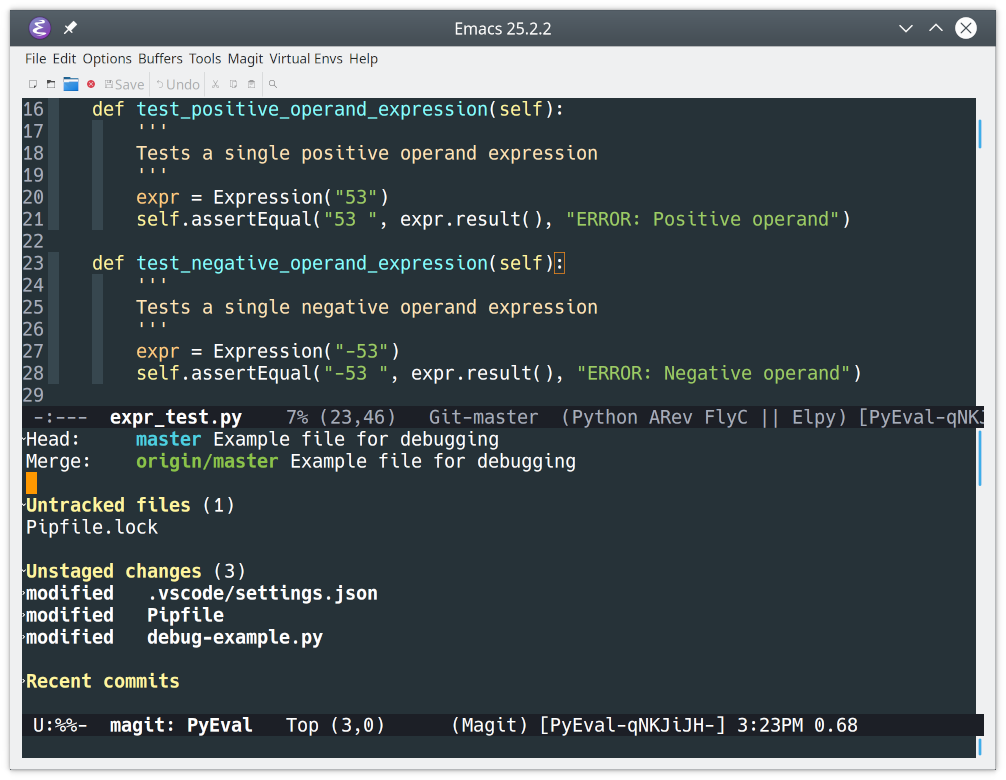
When activated, magit splits the Emacs frame and displays its status buffer in the lower window. This snapshot lists the staged, unstaged, untracked, and any other files in your repo folder.
Most of the interaction you do with magit will be in this status buffer. For example, you can:
- Move between sections in the status buffer using P for Previous and N for Next
- Expand or collapse a section using Tab
- Stage changes using S
- Unstage changes using U
- Refresh the contents of the status buffer using G
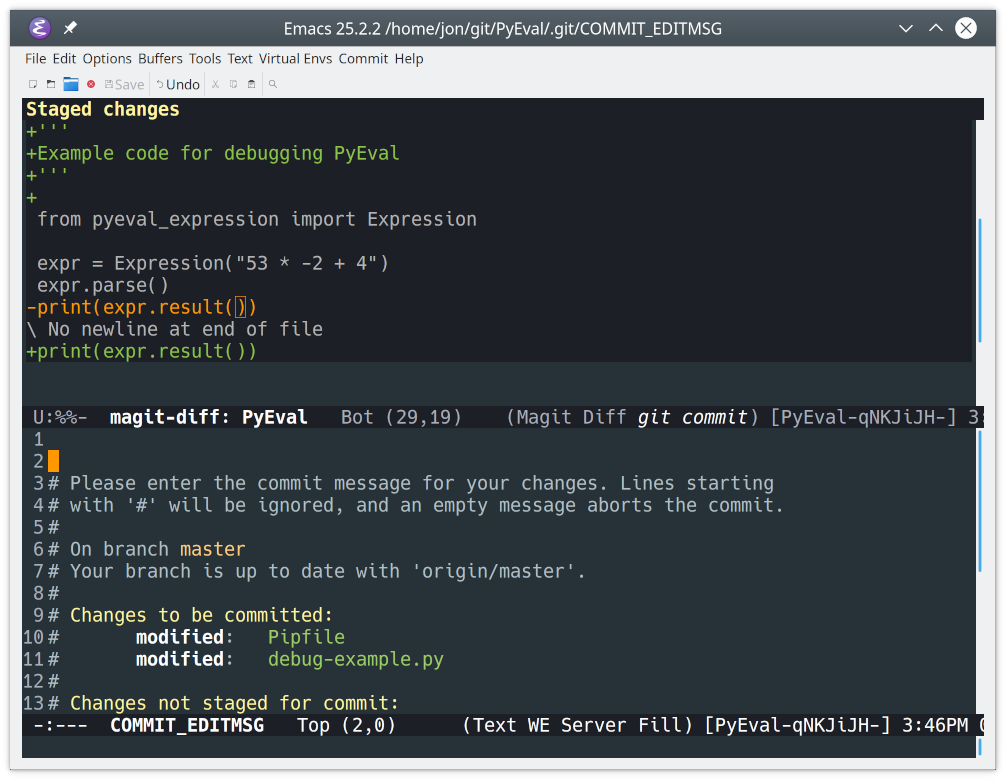
Once a change is staged, you commit it using C. You’ll be presented with a variety of commit variations. For a normal commit, hit C again. You’ll see two new buffers appear:
- The lower window contains the COMMIT_EDITMSG buffer, which is where you add your commit message.
- The upper window contains the magit-diff buffer, which displays the changes you are committing.
After entering your commit message, type Ctrl+C Ctrl+C to commit the changes:
You may have noticed the top of the status buffer displaying both the Head (local) and Merge (remote) branches. This allows you to push your changes to the remote branch quickly.
Look in the status buffer under Unmerged into origin/master and find the changes you want to push. Then, hit Shift+P to open the push options, and P to push the changes:
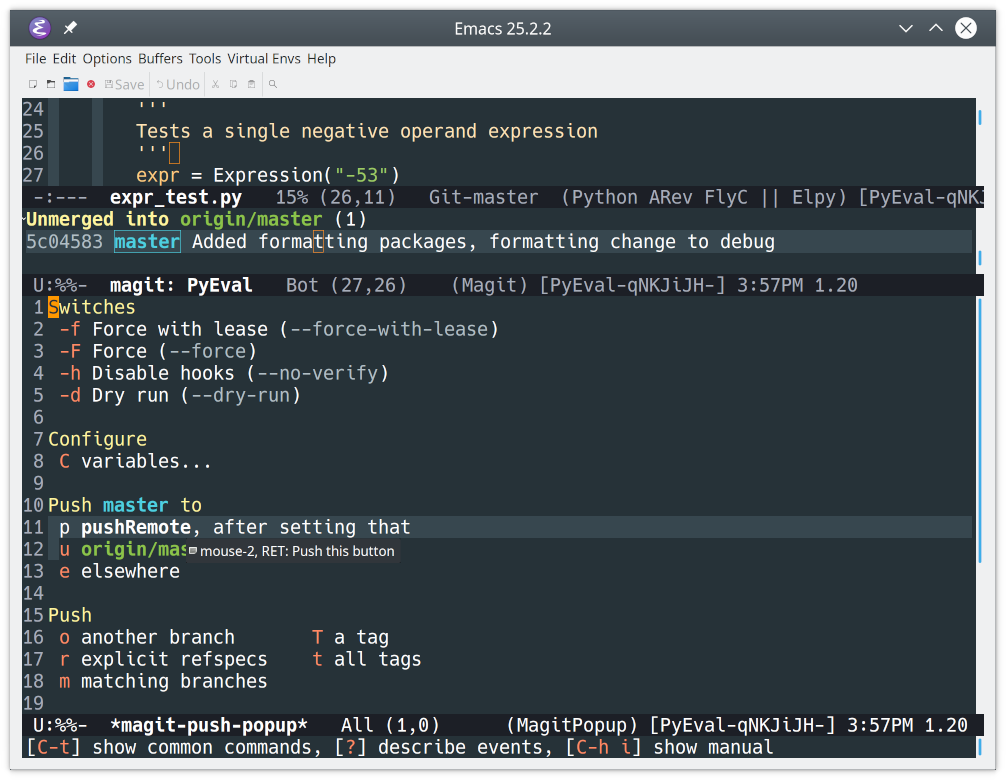
Out of the box, magit will talk to GitHub and GitLab, as well as a host of other source control tools. For more info on magit and its capabilities, check out the full documentation.
Additional Emacs Modes
One of the major benefits of using Emacs over a Python-specific IDE is the ability to work in other languages. As a developer, you might have to work with Python, Golang, JavaScript, Markdown, JSON, shell scripts, and more, all in a single day! Having complex and complete support for all of these languages in a single code editor will increase your efficiency.
There are tons of example Emacs initialization files available for you to review and use to build your own configuration. One of the best sources is GitHub. A GitHub search for emacs.d turns up a plethora of options for you to sift through.
Alternatives
Of course, Emacs is only one of several editors available for Python developers. If you’re interested in alternatives, then check out:
Conclusion
As one of the most feature-rich editors available, Emacs is great for Python programmers. Available on every major platform, Emacs is extremely customizable and adaptable to many different tasks.
Now you can:
- Install Emacs on your selected platform
- Set up an Emacs initialization file to configure Emacs
- Build a basic Python configuration for Emacs
- Write Python code to explore Emacs capabilities
- Run and Test Python code in the Emacs environment
- Debug Python code using integrated Emacs tools
- Add source control functionality using Git
Give Emacs a try on your next Python project! You can download all the files referenced in this tutorial at the link below:
Download Code: Click here to download the code you’ll use to learn about Emacs for Python in this tutorial.


