
Do you have a phone that you can unlock with your face? Have you ever wondered how that works? Have you ever wanted to build your own face recognizer? With Python, some data, and a few helper packages, you can create your very own. In this project, you’ll use face detection and face recognition to identify faces in a given image.
In this tutorial, you’ll build your own face recognition tool using:
- Face detection to find faces in an image
- Machine learning to power face recognition for given images
- Command-line arguments to direct your application with
argparse - Bounding boxes to label faces with the help of Pillow
With these techniques, you’ll gain a solid foundation in computer vision. After implementing your knowledge in this project, you’ll be ready to apply these techniques in solving real-world problems beyond face recognition.
Click the link below to download the complete source code for this project:
Free Bonus: Click here to download the full source code to build your own face recognition app with Python.
Demo
When you’re done with this project, you’ll have a face recognition application that you can train on any set of images. Once it’s trained, you’ll be able to give your application a new image, and the app will draw boxes on any faces that it finds and label each face by name:
In this video, you saw this project in action: training a new model on a list of images, validating it against an image with known faces, and then testing it with a brand-new image. After finishing this tutorial, you’ll have your very own application that works just like this.
Project Overview
Your program will be a typical command-line application, but it’ll offer some impressive capabilities. To accomplish this feat, you’ll first use face detection, or the ability to find faces in an image. Then, you’ll implement face recognition, which is the ability to identify detected faces in an image. To that end, your program will do three primary tasks:
- Train a new face recognition model.
- Validate the model.
- Test the model.
When training, your face recognizer will need to open and read many image files. It’ll also need to know who appears in each one. To accomplish this, you’ll set up a directory structure to give your program information about the data. Specifically, your project directory will contain three data directories:
training/validation/output/
You can put images directly into validation/. For training/, you should have images separated by subject into directories with the subject’s name.
Setting your training directory up this way will allow you to give your face recognizer the information that it needs to associate a label—the person pictured—with the underlying image data.
Note: This strategy works well for training on images that contain a single face. If you want to train on images with multiple identifiable faces, then you’ll have to investigate an alternative strategy for marking the faces in the training images.
You’ll walk through this project step by step, starting with preparing your environment and data. After that, you’ll be ready to load your training data and get to work on training your model to recognize unlabeled faces.
Once your app is able to do that, you’ll need a way to display your results. You’ll build a command-line interface so that users can interact with your app.
Finally, you’ll run the app through all of its paces. This is of vital importance because it’ll help you see your application through the eyes of a user. That way, you can better understand how your application works in practice, a process that’s key to finding bugs.
Prerequisites
To build this face recognition application, you won’t need advanced linear algebra, deep machine learning algorithm knowledge, or even any experience with OpenCV, one of the leading Python libraries enabling a lot of computer vision work.
Instead, you should have an intermediate-level understanding of Python. You should be comfortable with:
- Installing third-party modules with
pip - Using
argparseto create a command-line interface - Opening and reading files with
pathlib - Serializing and deserializing Python objects with
pickle
With these skills in hand, you’ll be more than ready to start on step one of this project: preparing your environment and data.
Step 1: Prepare Your Environment and Data
In this step, you’ll create a project environment, install necessary dependencies, and set the stage for your application.
First, create your project and data directories:
Running these commands creates a directory called face_recognizer/, moves to it, then creates the folders output/, training/, and validation/, which you’ll use throughout the project. Now you can create a virtual environment using the tool of your choice.
Before you start installing this project’s dependencies with pip, you’ll need to ensure that you have CMake and a C compiler like gcc installed on your system. If your system doesn’t already have them installed, then follow these instructions to get started:
After following these steps for your operating system, you’ll have Cmake and gcc installed and ready to assist you in building your project.
Now open your favorite text editor to create your requirements.txt file:
dlib==19.24.0
face-recognition==1.3.0
numpy==1.24.2
Pillow==9.4.0
This tells pip which dependencies your project will be using and pins them to these specific versions. This is important because future versions could have changes to their APIs that break your code. When you specify the versions needed, you have full control over what versions are compatible with your project.
Note: This project was built on Python 3.9 and also tested on 3.10. Because some of the packages used in this tutorial still use the legacy setup.py installation method, you may run into issues if you use 3.11.
After creating the requirements file and activating your virtual environment, you can install all of your dependencies at once:
(venv) $ python -m pip install -r requirements.txt
This command calls pip and tells it to install the dependencies in the requirements.txt file that you just created.
Next, you’ll need to find a dataset for training and validating your data. Celebrity images are a popular choice for testing face recognition because so many celebrity headshots are widely available. That’s the approach that you’ll take in this tutorial.
If you haven’t already, you can download everything you need for data training and validation by clicking the link below:
Free Bonus: Click here to download the full source code to build your own face recognition app with Python.
As an alternative, it can be great practice to set up your own dataset and folder structure. If you’d like to give that a try, then you can use this dataset or pictures of your own.
If your dataset isn’t already split into training and validation sets, then you should go ahead and make that split now.
In the training/ directory, you should create a separate folder for each person who appears in your training images. Then you can put all the images into their appropriate folders:
face_recognizer/
│
├── output/
│
├── training/
│   └── ben_affleck/
│       ├── img_1.jpg
│       └── img_2.png
│
├── validation/
│   ├── ben_affleck1.jpg
│   └── michael_jordan1.jpg
│
├── detector.py
├── requirements.txt
└── unknown.jpg
You can place the validation images directly into the validation/ directory. Your validation images need to be images that you don’t train with, but you can identify the people who appear in them.
In this step, you’ve prepared your environment. First, you created a directory and several subdirectories to house your project and its data.
Then you created a virtual environment, installed some dependencies manually, and then created a requirements.txt file with your project dependencies pinned to a specific version.
With that, you used pip to install your project dependencies. Then, you downloaded a dataset and split it into training and validation sets. Next, you’ll write the code to load the data and train your model.
Step 2: Load Training Data and Train Your Model
In this step, you’ll start writing code. This code will load your training data and start training your model. By the end of this step, you’ll have loaded your training data, detected faces in each image, and saved them as encodings.
First, you’ll need to load images from training/ and train your model on them. To do that, open your favorite editor, create a file called detector.py, and start writing some code:
# detector.py

from pathlib import Path

import face_recognition

DEFAULT_ENCODINGS_PATH = Path("output/encodings.pkl")

Path("training").mkdir(exist_ok=True)
Path("output").mkdir(exist_ok=True)
Path("validation").mkdir(exist_ok=True)

def encode_known_faces(
    model: str = "hog", encodings_location: Path = DEFAULT_ENCODINGS_PATH
) -> None:
    names = []
    encodings = []
    for filepath in Path("training").glob("*/*"):
        name = filepath.parent.name
        image = face_recognition.load_image_file(filepath)
You start your script by importing pathlib.Path from Python’s standard library, along with face_recognition, a third-party library that you installed in the previous step.
Then, you define a constant for the default encoding path. Keeping this path as a constant toward the top of your script will help you down the line if you want to change that path.
Next, you add three calls to .mkdir() and set exist_ok to True. You may not need these lines of code if you already created the three directories in the previous step. However, for convenience, this code automatically creates all the directories that you’ll use if they don’t already exist.
Finally, you define encode_known_faces(). This function uses a for loop to go through each directory within training/, saves the label from each directory into name, then uses the load_image_file() function from face_recognition to load each image.
As input, encode_known_faces() will require a model type and a location to save the encodings that you’ll generate for each image.
Note: You’re not using the required arguments yet, but you’ll add more code to encode_known_faces() that relies on these arguments in just a moment.
The model determines what you’ll use to locate faces in the input images. Valid model type choices are "hog" and "cnn", which refer to the respective algorithms used:
- HOG (histogram of oriented gradients) is a common technique for object detection. For this tutorial, you only need to remember that it works best with a CPU.
- CNN (convolutional neural network) is another technique for object detection. In contrast to a HOG, a CNN works better on a GPU, otherwise known as a video card.
These algorithms don’t rely on deep learning. If you’d like to learn more about how algorithms like these work under the hood, then Traditional Face Detection With Python is your guide.
Next, you’ll use face_recognition to detect the face in each image and get its encoding. This is an array of numbers describing the features of the face, and it’s used with the main model underlying face_recognition to reduce training time while improving the accuracy of a large model. This is known as transfer learning.
Then, you’ll add all the names and encodings to the lists names and encodings, respectively:
 1# detector.py
 2
 3# ...
 4
 5def encode_known_faces(
 6    model: str = "hog", encodings_location: Path = DEFAULT_ENCODINGS_PATH
 7) -> None:
 8    names = []
 9    encodings = []
10
11    for filepath in Path("training").glob("*/*"):
12        name = filepath.parent.name
13        image = face_recognition.load_image_file(filepath)
14
15        face_locations = face_recognition.face_locations(image, model=model)
16        face_encodings = face_recognition.face_encodings(image, face_locations)
17
18        for encoding in face_encodings:
19            names.append(name)
20            encodings.append(encoding)
After updating your project with this code, your encode_known_faces() function is ready to collect names and encodings from all the files in your training/ directory:
-
Line 15 uses
face_recognition.face_locations()to detect the locations of faces in each image. The function returns a list of four-element tuples, one tuple for each detected face. The four elements per tuple provide the four coordinates of a box that could surround the detected face. Such a box is also known as a bounding box. -
Line 16 uses
face_recognition.face_encodings()to generate encodings for the detected faces in an image. Remember that an encoding is a numeric representation of facial features that’s used to match similar faces by their features. -
Lines 18 to 20 add the names and their encodings to separate lists.
Now you’ve generated encodings and added them, along with the label for each image, to a list. Next, you’ll combine them into a single dictionary and save that dictionary to disk.
Note: You’re saving your encodings to disk because generating them can be time-consuming, especially if you don’t have a dedicated GPU. Once they’re generated, saving them allows you to reuse the encodings in other parts of your code without re-creating them every time.
Import pickle from the standard library and use it to save the name-encoding dictionary:
# detector.py

# ...

import pickle

# ...

def encode_known_faces(
    model: str = "hog", encodings_location: Path = DEFAULT_ENCODINGS_PATH
) -> None:
    names = []
    encodings = []

    for filepath in Path("training").glob("*/*"):
        name = filepath.parent.name
        image = face_recognition.load_image_file(filepath)

        face_locations = face_recognition.face_locations(image, model=model)
        face_encodings = face_recognition.face_encodings(image, face_locations)

        for encoding in face_encodings:
            names.append(name)
            encodings.append(encoding)

    name_encodings = {"names": names, "encodings": encodings}
    with encodings_location.open(mode="wb") as f:
        pickle.dump(name_encodings, f)

encode_known_faces()
With this addition to encode_known_faces(), you create a dictionary that puts the names and encodings lists together and denotes which list is which. Then, you use pickle to save the encodings to disk.
Finally, you add a call to encode_known_faces() at the end so that you can test whether it works. You can now run your script to confirm that it creates your encodings:
$ python detector.py
After some time, your script should finish execution, having created a file called encodings.pkl in your output/ directory. Well done, you’ve completed this step!
In this section, you created the encode_known_faces() function, which loads your training images, finds the faces within the images, and then creates a dictionary containing the two lists that you created with each image.
You then saved that dictionary to disk so that you could reuse the encodings. Now you’re ready to deal with unlabeled faces!
Step 3: Recognize Unlabeled Faces
In this step, you’ll build the recognize_faces() function, which recognizes faces in images that don’t have a label.
First, you’ll open the encodings that you saved in the previous step and load the unlabeled image with face_recognition.load_image_file():
# detector.py

# ...

def recognize_faces(
    image_location: str,
    model: str = "hog",
    encodings_location: Path = DEFAULT_ENCODINGS_PATH,
) -> None:
    with encodings_location.open(mode="rb") as f:
        loaded_encodings = pickle.load(f)

    input_image = face_recognition.load_image_file(image_location)

# Removed encode_known_faces()
After adding this code, your recognize_faces() function will now be able to open and load the saved face encodings using pickle and then load the image in which you want to recognize faces. This is also known as your test image.
You’ll pass the location of the unlabeled image, the model you want to use for face detection, and the location of the saved encodings from the previous step to this function. Then you’ll open the encodings file and load the data with pickle. You’ll also load the image with face_recognition.load_image_file() and assign the output to input_image.
You’ll use face_recognition to find the face in input_image and get its encoding:
# detector.py

# ...

def recognize_faces(
    image_location: str,
    model: str = "hog",
    encodings_location: Path = DEFAULT_ENCODINGS_PATH,
) -> None:
    with encodings_location.open(mode="rb") as f:
        loaded_encodings = pickle.load(f)

    input_image = face_recognition.load_image_file(image_location)

    input_face_locations = face_recognition.face_locations(
        input_image, model=model
    )
    input_face_encodings = face_recognition.face_encodings(
        input_image, input_face_locations
    )
Your recognize_faces() function has just gotten more interesting. With these lines of code, you can detect faces in your input image and get their encodings, which will aid your code in identifying the faces.
Now you’ll use the encoding of the detected face to make a comparison with all of the encodings that you found in the previous step. This will happen within a loop so that you can detect and recognize multiple faces in your unknown image:
# detector.py

# ...

def recognize_faces(
    image_location: str,
    model: str = "hog",
    encodings_location: Path = DEFAULT_ENCODINGS_PATH,
) -> None:

    # ...

    for bounding_box, unknown_encoding in zip(
        input_face_locations, input_face_encodings
    ):
        name = _recognize_face(unknown_encoding, loaded_encodings)
        if not name:
            name = "Unknown"
        print(name, bounding_box)
In this additional code, you iterate through input_face_locations and input_face_encodings in parallel using zip(). Then, you call the non-public function _recognize_face(), passing the encodings for the unknown image and the loaded encodings. This function doesn’t yet exist, but you’ll build it in just a moment.
Note: Looping over two iterables at the same time using Python’s zip() function is called parallel iteration. This comes in handy when you need to do an operation on all the elements of two lists at the same time.
You also add a conditional statement that assigns "Unknown" to name if _recognize_face() doesn’t find a match. Finally, you print name and the coordinates of the identified face that are saved in bounding_box.
Before you can run recognize_faces(), you’ll need to implement _recognize_face(). This helper function will take the unknown and loaded encodings. It’ll make a comparison between the unknown encoding and each of the loaded encodings using compare_faces() from face_recognition. Ultimately, _recognize_face() will return the most likely match, or it’ll implicitly return None if the function exits without reaching a return statement:
# detector.py

from collections import Counter

# ...

def _recognize_face(unknown_encoding, loaded_encodings):
    boolean_matches = face_recognition.compare_faces(
        loaded_encodings["encodings"], unknown_encoding
    )
    votes = Counter(
        name
        for match, name in zip(boolean_matches, loaded_encodings["names"])
        if match
    )
    if votes:
        return votes.most_common(1)[0][0]

recognize_faces("unknown.jpg")
You’ve now created _recognize_face(), which does the hard work of identifying each face in the given image. In this function, you call compare_faces() to compare each unknown encoding in your test image with the encodings that you loaded previously.
The compare_faces() function returns a list of True and False values for each loaded encoding. The indices of this list are equal to those of the loaded encodings, so the next thing you do is keep track of votes for each possible match.
You do this with Counter, which you imported from collections at the top of your script. Using Counter allows you to track how many votes each potential match has by counting the True values for each loaded encoding by the associated name. You then return the name that has the most votes in its favor.
But what’s a vote, and who’s voting? Think back to the first function that you wrote in this tutorial, where you generated encodings for a bunch of training images of celebrities’ faces.
When you call compare_faces(), your unknown face is compared to every known face that you have encodings for. Each match acts as a vote for the person with the known face. Since you should have multiple images of each known face, a closer match will have more votes than one that isn’t as close a match.
Finally, outside of the function definition, you add a call to recognize_faces() to test that it’s working as expected.
Note: Remember to remove the call to encode_known_faces() that you previously used to create the encodings. Unless you change the training data, you won’t have to run this function again, and it would unnecessarily use computing time.
In its current state, recognize_faces() fetches the encodings that you created in step two and compares them to the encodings that it generates on an input image. It does that for all the faces that it can find in an image.
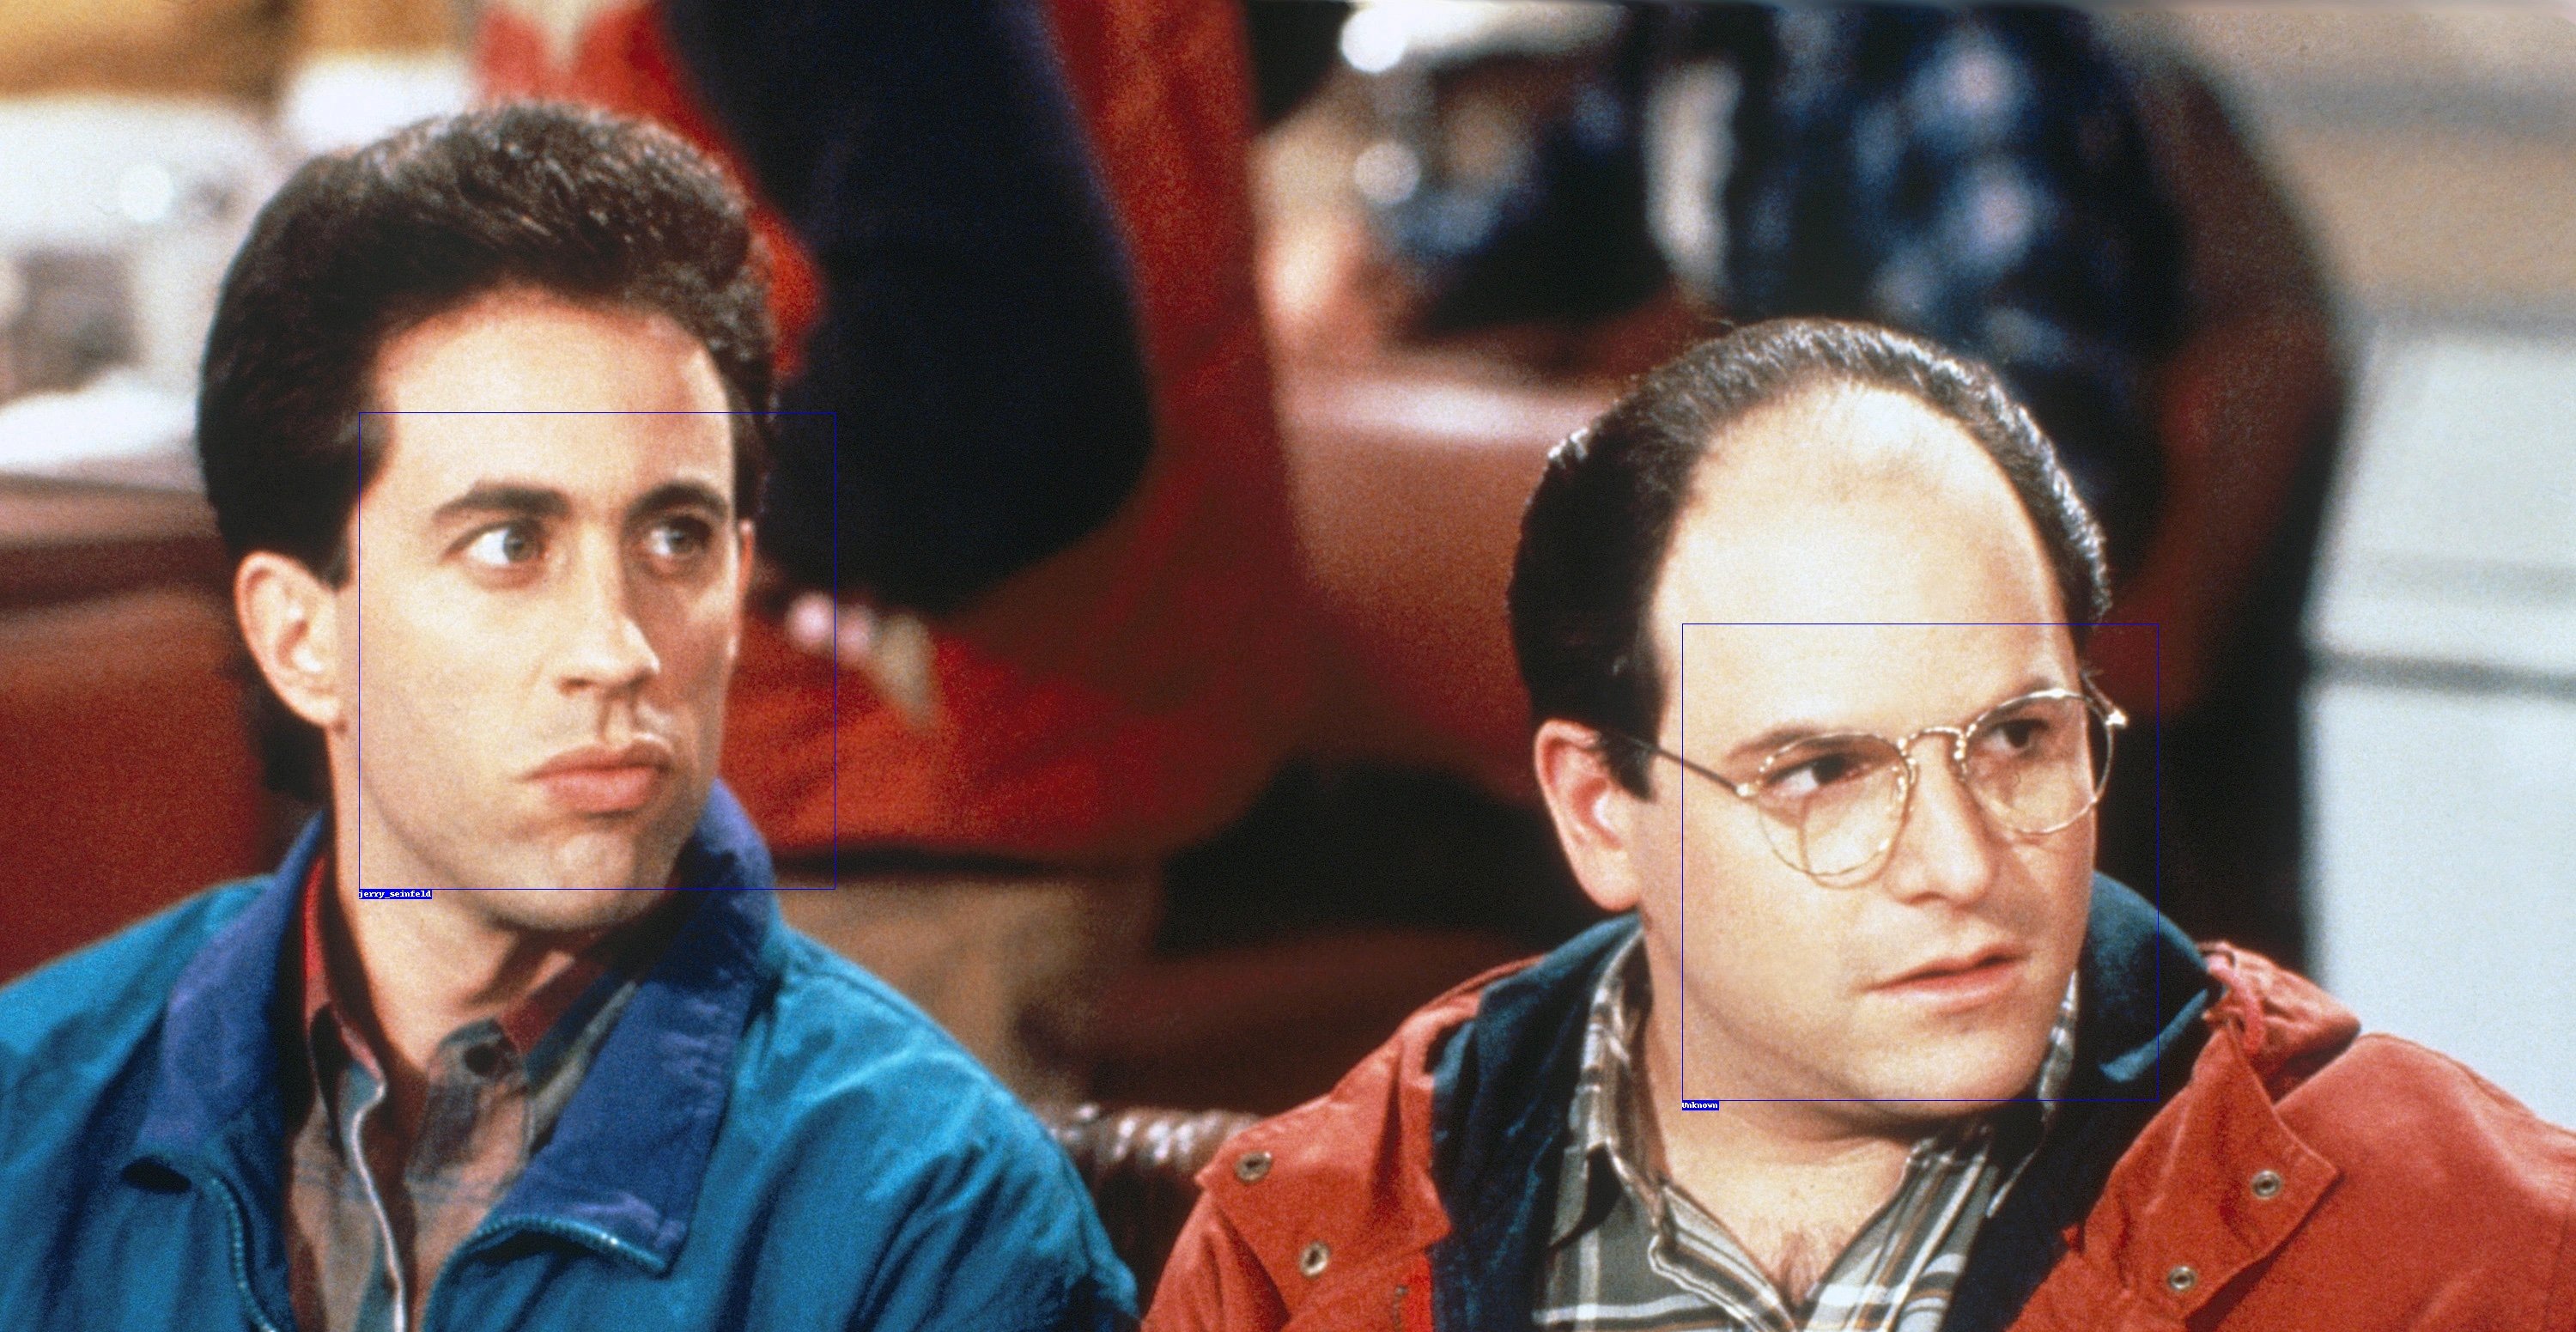
For example, if you download the example code for step three, then you’ll find an image called unknown.jpg that shows two characters from the American sitcom Seinfeld:
Free Bonus: Click here to download the full source code to build your own face recognition app with Python.
Recall that at the end of the last snippet, you added a test call to recognize_faces() with the parameter "unknown.jpg". If you use that image, then running detector.py should give you output like this:
$ python detector.py
jerry_seinfeld (480, 972, 1035, 418)
Unknown (726, 2513, 1281, 1959)
Your script will recognize only one of the two people shown in the image because you only included one of the two characters’ faces in the training data. Python will label any face that the script locates but can’t identify from the encoding that you generated in the previous step as "Unknown". Try it out with some other images!
Now that you’ve gotten the prediction for your image, you’ll extend this function to show it to the user. One way to do this is to display the results on the input image itself. This has the bonus of being clear for the user and requiring little extra work on their part.
Step 4: Display Results
Now comes the time to draw on your input image! This will help the user see which face is being identified and what it’s being identified as.
A popular technique is to draw a bounding box around the face and give it a label. To do this, you’ll use Pillow, a high-powered image processing library for Python.
Note: Are you interested in image processing with Python? If so, check out the Real Python podcast interview with Mike Driscoll.
For now, just load the image into Pillow and create an ImageDraw object in the recognize_faces() function:
 1# detector.py
 2
 3from PIL import Image, ImageDraw
 4
 5# ...
 6
 7def recognize_faces(
 8    image_location: str,
 9    model: str = "hog",
10    encodings_location: Path = DEFAULT_ENCODINGS_PATH,
11) -> None:
12
13    # ...
14
15    pillow_image = Image.fromarray(input_image)
16    draw = ImageDraw.Draw(pillow_image)
17
18    for bounding_box, unknown_encoding in zip(
19        input_face_locations, input_face_encodings
20    ):
21        name = _recognize_face(unknown_encoding, loaded_encodings)
22        if not name:
23            name = "Unknown"
24        # Removed print(name, bounding_box)
25        _display_face(draw, bounding_box, name)
26
27    del draw
28    pillow_image.show()
Here, you start by adding three lines of code that set up the ability to draw on an existing image:
- Line 3 at the top of your script imports the
ImageandImageDrawmodules fromPIL. - Line 15 creates a Pillow image object from your loaded input image.
- Line 16 creates an
ImageDrawobject, which will help you draw a bounding box around detected faces.
Next, within the for loop in recognize_faces(), you remove the print() call from step three, and in line 25, you make a call to another new helper function, this one named _display_face().
Finally, you add some housekeeping that Pillow requires. You manually remove the draw object from the current scope with the del statement in line 27. Then you show the image by calling .show() in line 28.
Next, you’ll implement the _display_face() function, which will draw a bounding box on the recognized face and add a caption to that bounding box with the name of the identified face, or Unknown if it doesn’t match any known face.
To do this, _display_face() will need to take as parameters the ImageDraw object, the tuple of points that define a square area around a recognized face, and the name that you got from _recognize_face():
# detector.py

BOUNDING_BOX_COLOR = "blue"
TEXT_COLOR = "white"

# ...

def _display_face(draw, bounding_box, name):
    top, right, bottom, left = bounding_box
    draw.rectangle(((left, top), (right, bottom)), outline=BOUNDING_BOX_COLOR)
    text_left, text_top, text_right, text_bottom = draw.textbbox(
        (left, bottom), name
    )
    draw.rectangle(
        ((text_left, text_top), (text_right, text_bottom)),
        fill="blue",
        outline="blue",
    )
    draw.text(
        (text_left, text_top),
        name,
        fill="white",
    )
You start by creating two constants near the top of your script and assigning them to two common HTML color names, "blue" and "white". You then use these constants multiple times in _display_face(). Defining them as constants means that you’ll have less maintenance effort if you want to change the colors later on.
Then, in the first line of your new helper function, you unpack the bounding_box tuple into its four parts: top, right, bottom, and left. You use these coordinates in the next line to draw a rectangle around the recognized face using the .rectangle() method in ImageDraw.
The next step is to determine the bounding box for the text caption. You do this with .textbbox(), which takes a pair of anchor coordinates and the caption text as parameters and returns the four coordinates of a bounding box that fits the caption.
The anchor is a coordinate tuple of where you want the box to start. Because you read English left to right, and captions are typically on the bottom, you use the left and bottom coordinates of the face’s bounding box as the anchor for your caption box.
Next, you draw another rectangle, but for this one, you define the rectangle with the bounding box coordinates that you got in the previous line. You also color in the rectangle by using the fill parameter. This second rectangle serves as the caption area directly under the bounding box that surrounds the recognized face.
And last, you call .text() on the ImageDraw object to write the name in the caption box that you just drew. You use the fill parameter again, but in this case, it determines the color of the text.
After you define _display_face(), your recognize_faces() function is complete. You just wrote the backbone of your project, which takes an image with an unknown face, gets its encoding, checks that against all the encodings made during the training process, and then returns the most likely match for it.
You can now use this function when you want to recognize an unknown face. If you run your script at the end of this step, then Python will display the image for you with the predictions of who’s in the image baked right into the image:
The next step is to validate your model to ensure that your model isn’t overfitted or tuned too specifically to the training data.
Step 5: Validate Your Model
Model validation is a technique that tests your trained model by providing data that it hasn’t seen before but that you have. Knowing the correct label for each image allows you to get an idea of your model’s performance on new data.
At the most basic level, you’re just running your recognize_faces() function on images that already contain a known face. In step one, you created a validation directory that contains images with faces that you can recognize.
The function that you’ll build next will use pathlib to open each of the validation images and then call recognize_faces() on them:
 1# detector.py
 2
 3# ...
 4
 5def validate(model: str = "hog"):
 6    for filepath in Path("validation").rglob("*"):
 7        if filepath.is_file():
 8            recognize_faces(
 9                image_location=str(filepath.absolute()), model=model
10            )
11
12# Removed recognize_faces("unknown.jpg")
13validate()
In line 6, you open the validation/ directory with pathlib.Path and then use .rglob() to get all the files in that directory. You confirm that the resource is a file in line 7. Then, in lines 8 to 10, you call the recognize_faces() function from step three on the current image file.
Finally, in line 13, you add a call to validate() so that you can test your script. If you run detector.py now, then Python will make all the images from within validate/ pop up with predictions baked right into the images:
A more robust validation could include accuracy measures and visualizations, such as a confusion matrix showing the true positives, true negatives, false positives, and false negatives from your validation run.
How else could you extend this? In addition to the traditional confusion matrix, you could calculate model evaluation measures such as overall accuracy and true positive rate, also known as recall.
Once you’ve built your validation function, it’s time to tie your app together and make it user-friendly.
Step 6: Add Command-Line Arguments
To make sure that users can access your app’s functionality, you’ll build a command-line interface for your script using the standard library’s argparse module. Think about the types of tasks that you think your users might want to do before reading on.
What did you come up with? Maybe your user will want to:
- Train the model
- Validate the model
- Evaluate an unknown image
- Pick a model to use
- Provide the filename of an unlabeled image
First, use argparse to set up the input arguments for each of these activities at the top of your file:
 1# detector.py
 2
 3import argparse
 4import pickle
 5from collections import Counter
 6from pathlib import Path
 7
 8import face_recognition
 9from PIL import Image, ImageDraw
10
11DEFAULT_ENCODINGS_PATH = Path("output/encodings.pkl")
12BOUNDING_BOX_COLOR = "blue"
13TEXT_COLOR = "white"
14
15parser = argparse.ArgumentParser(description="Recognize faces in an image")
16parser.add_argument("--train", action="store_true", help="Train on input data")
17parser.add_argument(
18    "--validate", action="store_true", help="Validate trained model"
19)
20parser.add_argument(
21    "--test", action="store_true", help="Test the model with an unknown image"
22)
23parser.add_argument(
24    "-m",
25    action="store",
26    default="hog",
27    choices=["hog", "cnn"],
28    help="Which model to use for training: hog (CPU), cnn (GPU)",
29)
30parser.add_argument(
31    "-f", action="store", help="Path to an image with an unknown face"
32)
33args = parser.parse_args()
34
35# ...
Here you import argparse at the top of your script. Then, starting in line 15, you create a few Boolean arguments, a limited-choice argument for picking the model used for training, and a string argument for getting the filename of the image that you want to check.
Next, you’ll use these arguments in the main part of your script to call the correct functions and pass in the correct arguments. The arguments passed to the script from the user are all attributes in the args variable that you created on line 33.
You’ll then set up a name-main idiom at the bottom of your script, and use the attributes of args there:
# detector.py

# ...

# Removed call to validate()

if __name__ == "__main__":
    if args.train:
        encode_known_faces(model=args.m)
    if args.validate:
        validate(model=args.m)
    if args.test:
        recognize_faces(image_location=args.f, model=args.m)
And with that, you’re ready for the final step: play! Save your script and run it, testing out the options that you set up with argparse, including --help. You didn’t set that one up yourself, but argparse builds a nice help menu from all of the help parameters that you passed to .add_argument().
In this step, you made your code more user-friendly by adding command-line arguments to create a simple user interface that allows your users to easily interact with your code.
Step 7: Perform Face Recognition With Python
Now that you’ve built your project, it’s time to actually perform face recognition. You might have saved and played with your program already, but it’s always worthwhile to take it for another spin. That way, you can diagnose bugs, uncover different uses, and more. Watch the video below for a short guided tour through your new project:
This video shows you all of the options that you can use to interact with your face recognizer. These are:
--helpwill show you a list of options, a description of what each of them does, and any arguments that they take.--trainwill start the training process. You can optionally specify whether to use the CPU-based HOG method or a GPU-based CNN.--validatewill run the validation process, where the model takes images with known faces and tries to identify them correctly.--testis the option that you’ll probably use the most. Use this along with the-foption to specify the location of an image with unknown faces that you want to identify. Under the hood, this works the same as validation except that you specify the image location yourself.
Before your first use, you’ll want to train the model with your training images. This will allow your model to be especially good at identifying those particular faces. You can check the accuracy of your model by running the validation process with new images of the same people in your training data and seeing if the labels match the faces.
If you’re not satisfied with the results, then try adding more images to your training data, retraining the model, and attempting validation again. If you got the desired results, then you can start using the --test option with images that you choose.
Conclusion
Congratulations, you’ve built your very own face recognition tool! With it, you can train a model to identify specific faces. Then, you can test that model against other images and give it images with unknown faces to identify.
You took it a step further, though. You also made your code user-friendly by anticipating your users’ needs and likely workflow, and you used argparse to build an interface to address those needs.
While building this project, you’ve learned how to:
- Build usable datasets for face recognition
- Use
face_recognitionto detect faces - Generate face encodings from detected face images
- Recognize a known face in an unknown image
- Use
argparseto build a command-line interface - Use Pillow to draw bounding boxes
You built a face recognition application from start to finish and expanded your mastery of Python. Great work! What’s next?
Free Bonus: Click here to download the full source code to build your own face recognition app with Python.
Next Steps
There are several directions you can take this project now that you’ve finished it. Here are several ideas to build on your already-impressive project and stretch your newfound skills:
- Extend this project to work with video. Your project will detect faces in each frame of a video and give real-time predictions for each detected face.
- Change your training data. You can update this project to recognize the faces of your friends and family. How about a pet? Do you think it’ll work just as well with a pet’s face? Why or why not?
- Build a portable security camera. The
face_recognitionpackage is tested to work on single-board computers like the Raspberry Pi. Can you adapt this project to work with a camera connected to a Raspberry Pi to identify people and alert you to unknown guests?
Can you think of more ways to extend this project? Post your ideas and suggestions in the comments below.