Python IDLE is the default integrated development environment (IDE) that comes bundled with every Python installation, helping you to start coding right out of the box. In this tutorial, you’ll explore how to interact with Python directly in IDLE, edit and execute Python files, and even customize the environment to suit your preferences.
By the end of this tutorial, you’ll understand that:
- Python IDLE is completely free and comes packaged with the Python language itself.
- Python IDLE is an IDE included with Python installations, designed for basic editing, execution, and debugging of Python code.
- You open IDLE through your system’s application launcher or terminal, depending on your operating system.
- You can customize IDLE to make it a useful tool for writing Python.
Understanding the basics of Python IDLE will allow you to write, test, and debug Python programs without installing any additional software.
Get Your Cheat Sheet: Click here to download your free cheat sheet that will help you find the best coding font when starting with IDLE.
Take the Quiz: Test your knowledge with our interactive “Getting Started With Python IDLE” quiz. You’ll receive a score upon completion to help you track your learning progress:
Interactive Quiz
Getting Started With Python IDLEIn this quiz, you'll test your understanding of Python IDLE, the default integrated development environment (IDE) that comes bundled with every Python installation. You'll revisit how to interact with Python directly in IDLE, edit and execute Python files.
Open Python’s IDLE for the First Time
Python IDLE is free and comes included in Python installations on Windows and macOS. If you’re a Linux user, then you should be able to find and download Python IDLE using your package manager. Once you’ve installed it, you can then open Python IDLE and use it as an interactive interpreter or as a file editor.
Note: IDLE stands for “Integrated Development and Learning Environment.” It’s a wordplay with IDE, which stands for Integrated Development Environment.
The procedure for opening IDLE depends on how you installed Python and varies from one operating system to another. Select your operating system below and follow the steps to open IDLE:
Once you’ve started IDLE successfully, you should see a window titled IDLE Shell 3.x.x, where 3.x.x corresponds to your version of Python:
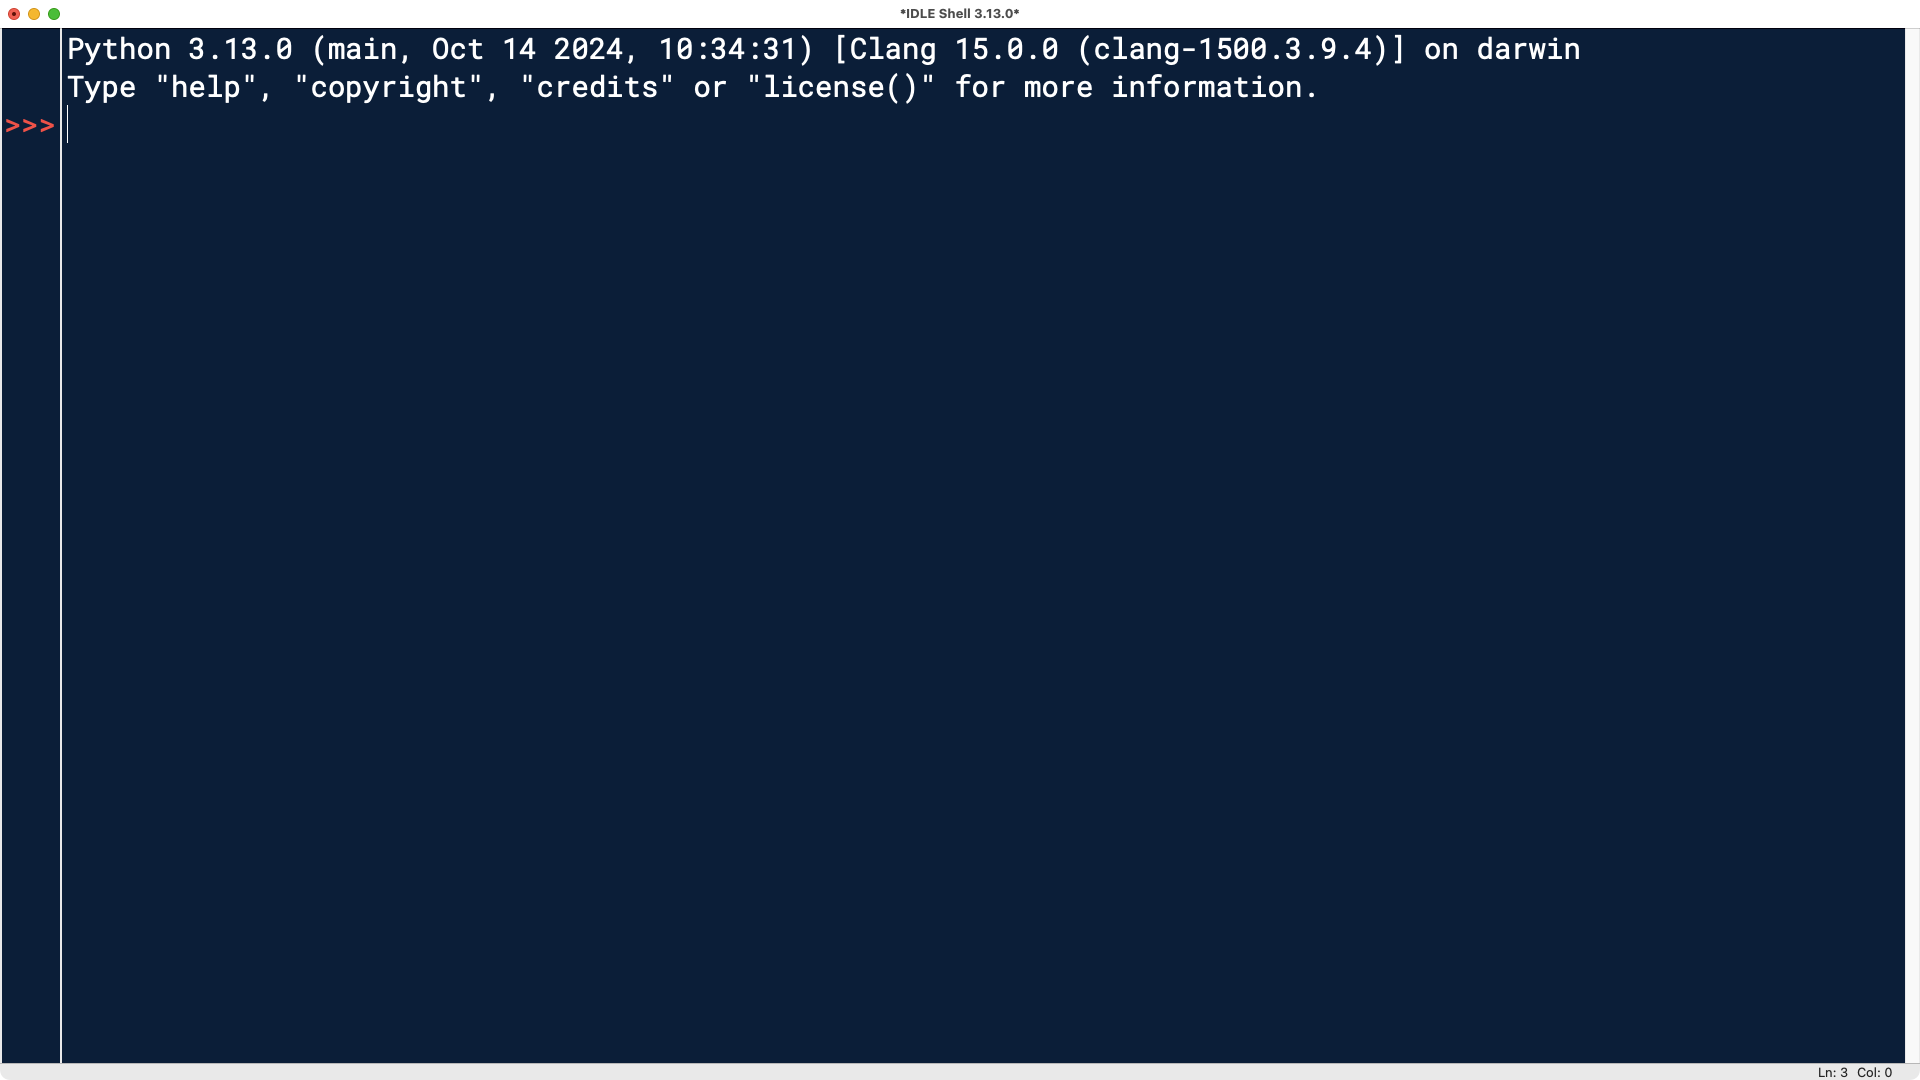
The window that you’re seeing is the IDLE shell, which is an interactive interpreter that IDLE opens by default.
Get to Know the Python IDLE Shell
When you open IDLE, the shell is the first thing that you see. The shell is the default mode of operation for Python IDLE. It’s a blank Python interpreter window, which you can use to interact with Python immediately.
Understanding the Interactive Interpreter
The interactive interpreter is a basic Read-Eval-Print Loop (REPL). It reads a Python statement, evaluates the result of that statement, and then prints the result on the screen. Then, it loops back to read the next statement.
Note: For a full guide to the standard Python REPL, check out The Python Standard REPL: Try Out Code and Ideas Quickly.
The IDLE shell is an excellent place to experiment with small code snippets and test short lines of code.
Interacting With the IDLE Shell
When you launch Python’s IDLE, it will immediately start a Python shell for you. Go ahead and write some Python code in the shell:
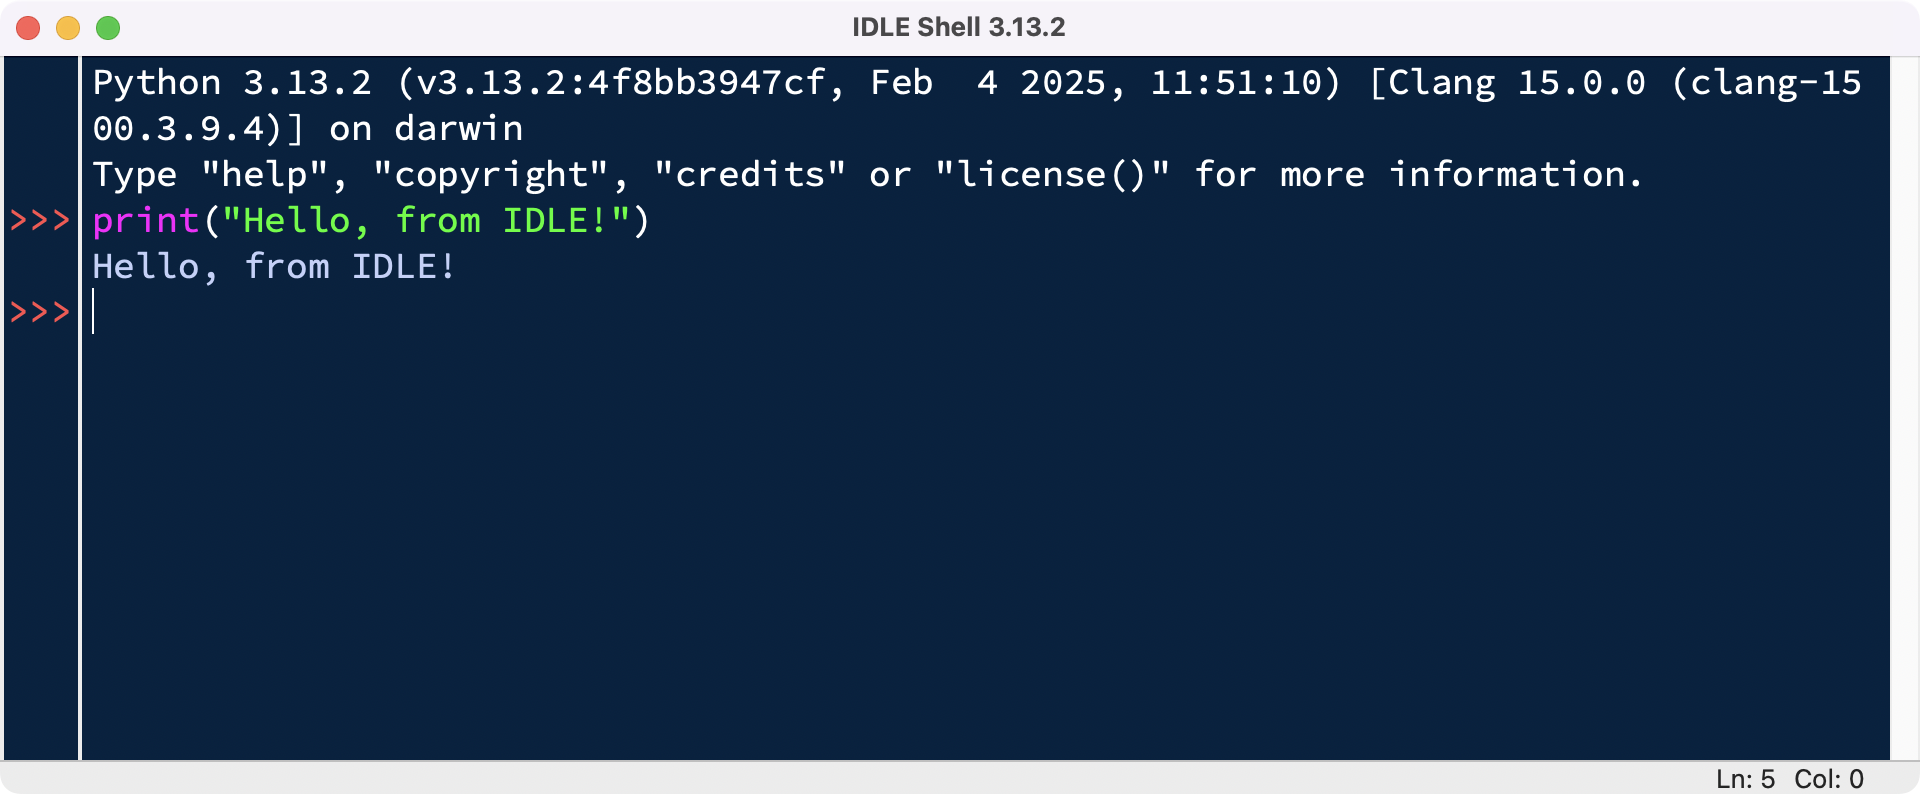
Here, you used print() to output the string "Hello, from IDLE!" to your screen. This is the most basic way to interact with Python IDLE. You type in commands one at a time and Python responds with the result of each command.
Next, take a look at the menu bar. You’ll see a few options for using the shell:
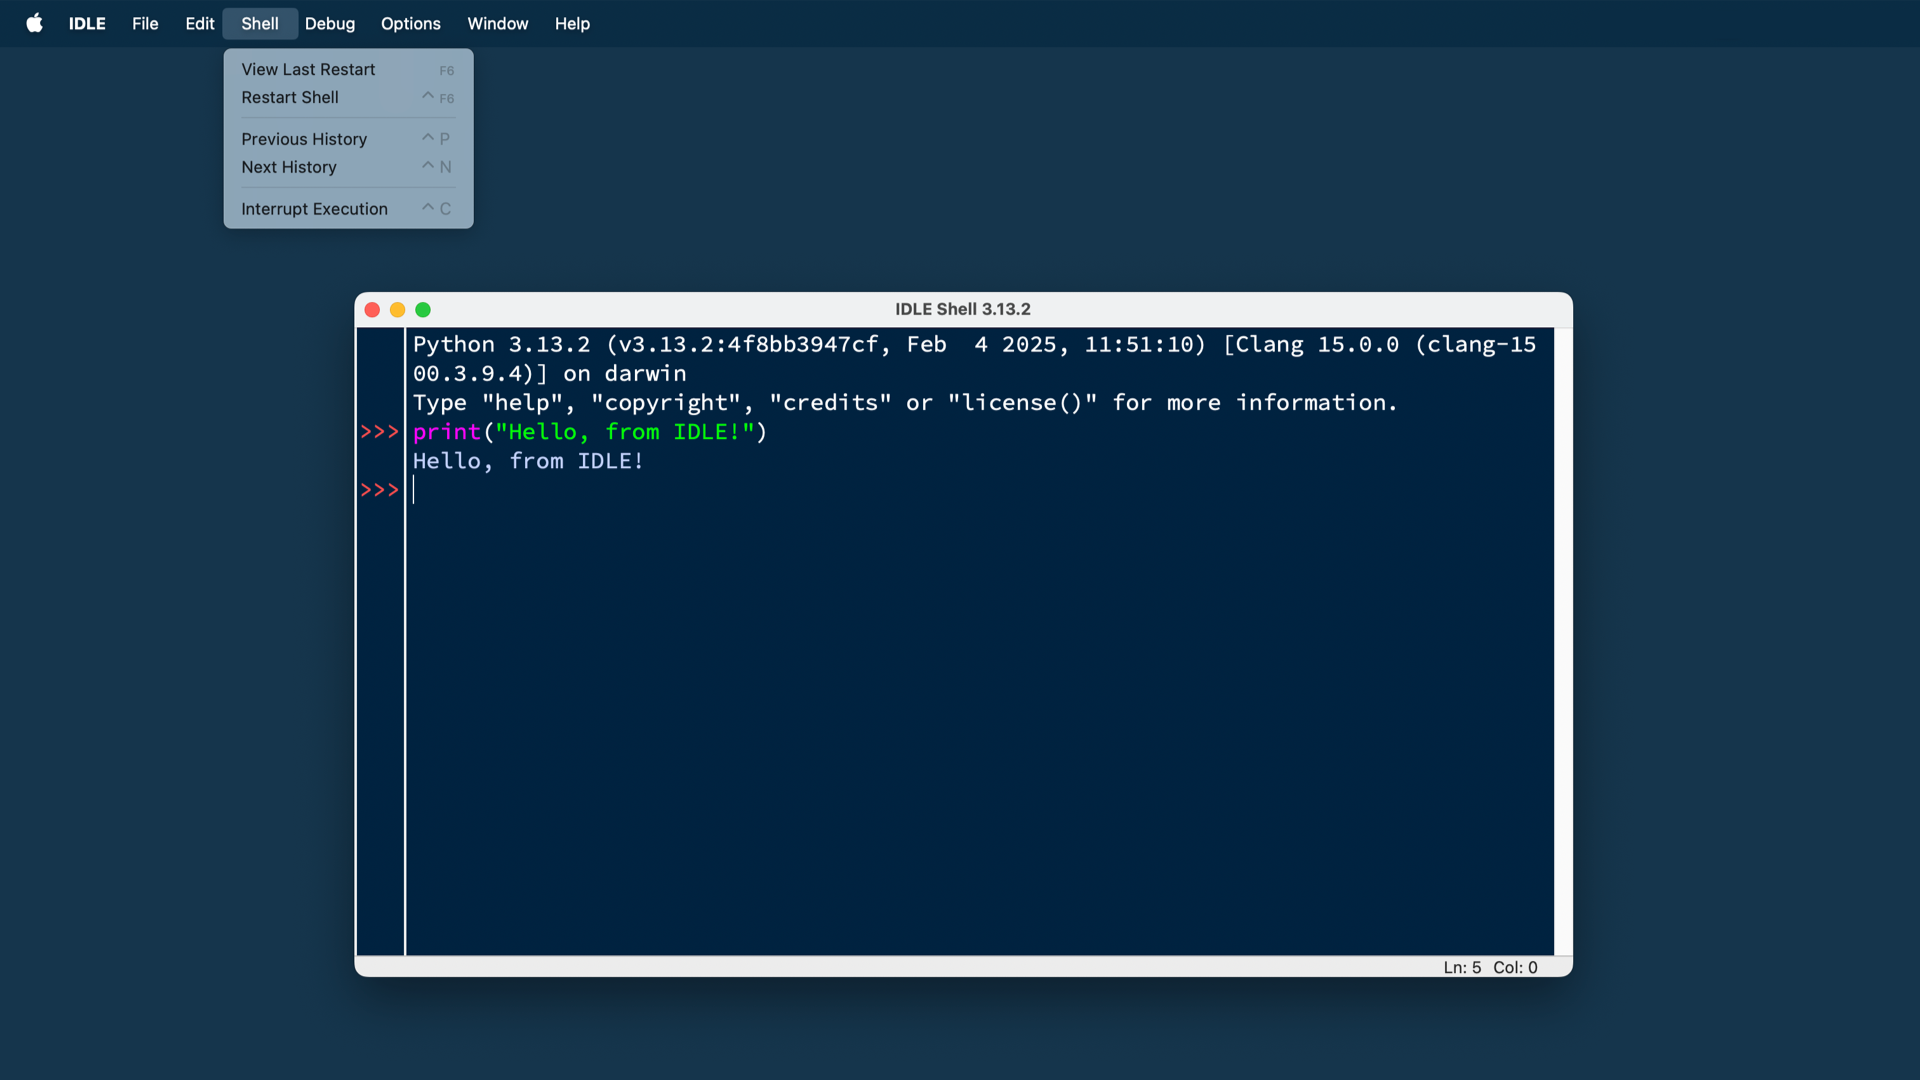
You can restart the shell from this menu. If you select the restart option, then you’ll clear the state of the shell. It will act as though you’ve started a fresh instance of Python IDLE. The shell will forget about everything from its previous state:
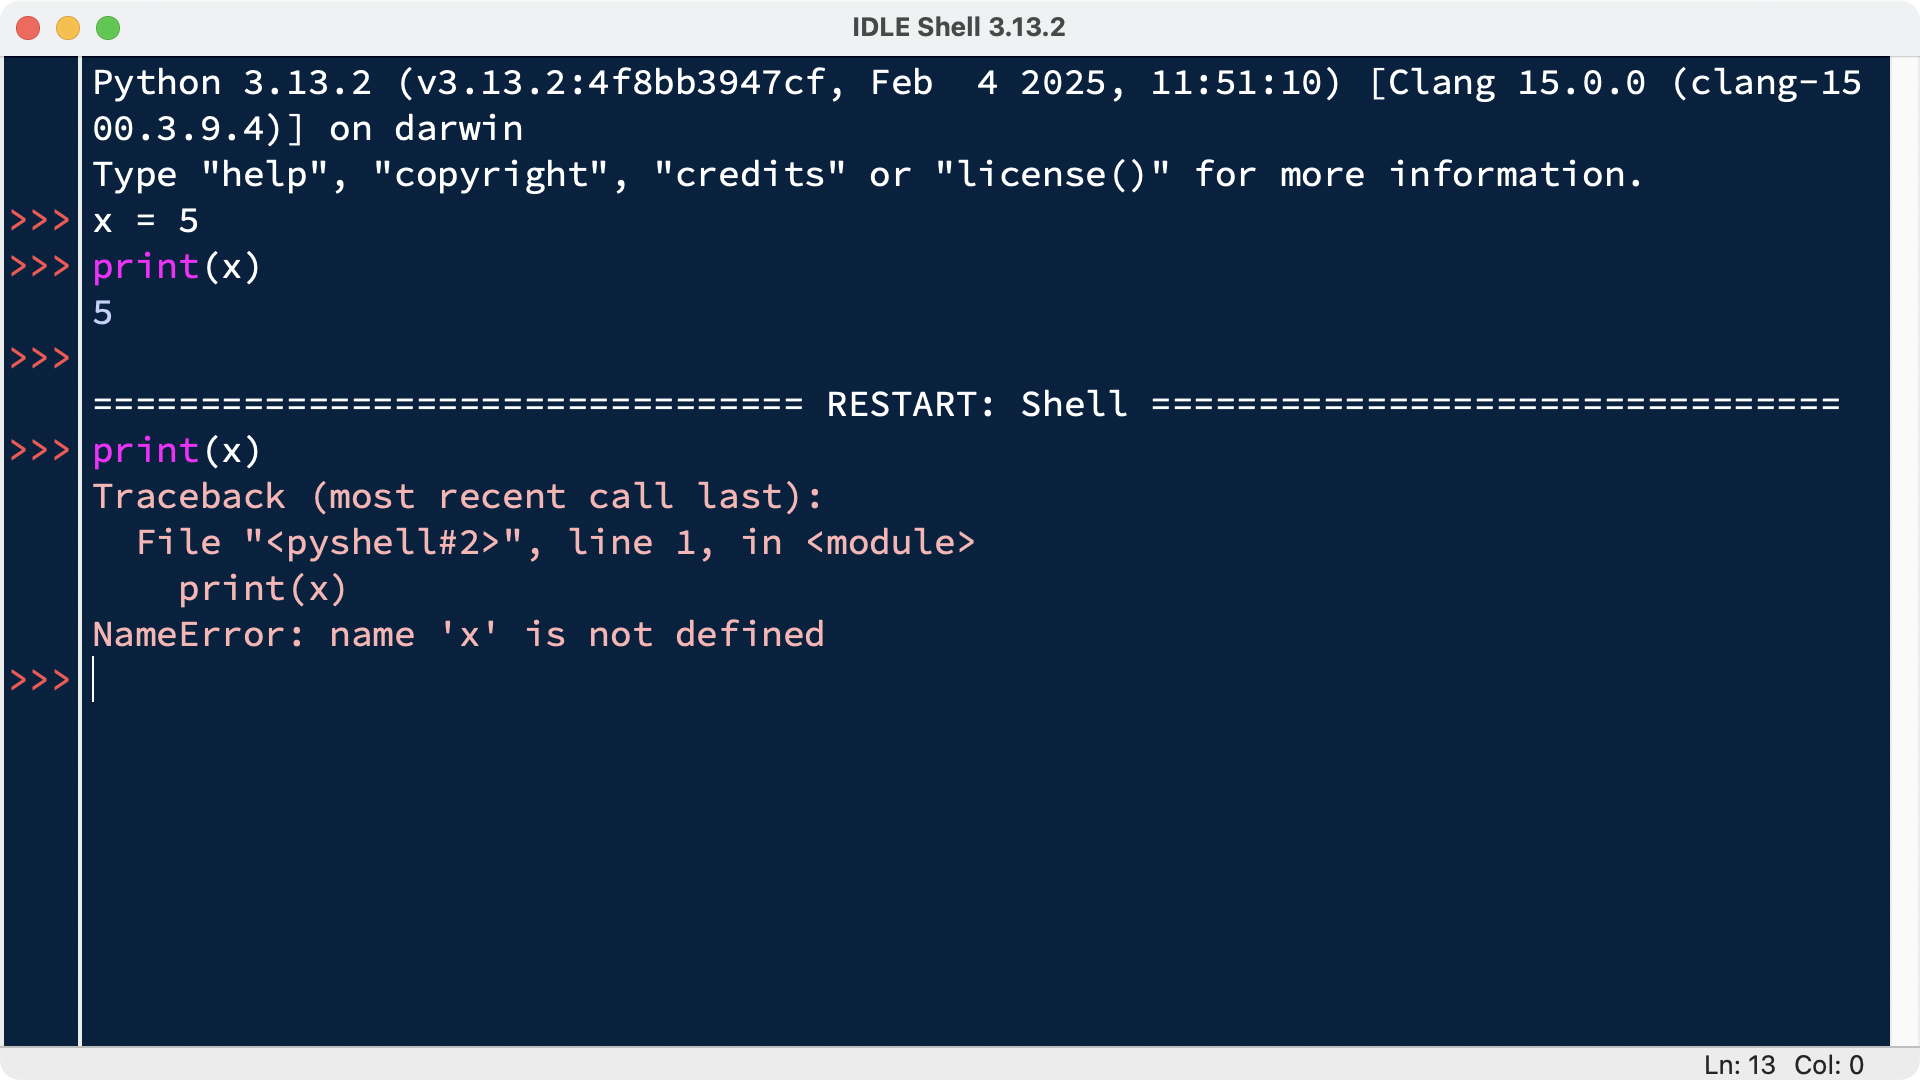
In the image above, you first declare a variable, x = 5. When you call print(x), the shell shows the correct output, which is the number 5. However, when you restart the shell and try to call print(x) again, you can see that the shell prints a traceback. This is an error message that says the variable x is not defined. The shell has forgotten about everything that came before it was restarted.
Interrupting Processes
You can also interrupt the execution of the shell from this menu. Selecting Interrupt Execution will stop any program or statement that’s running in the shell at the time of interruption:
In the video above, you create an infinite while loop. When you select Interrupt Execution from the Shell menu, the program receives the interrupt and stops executing. Then, IDLE shows a KeyboardInterrupt error message:
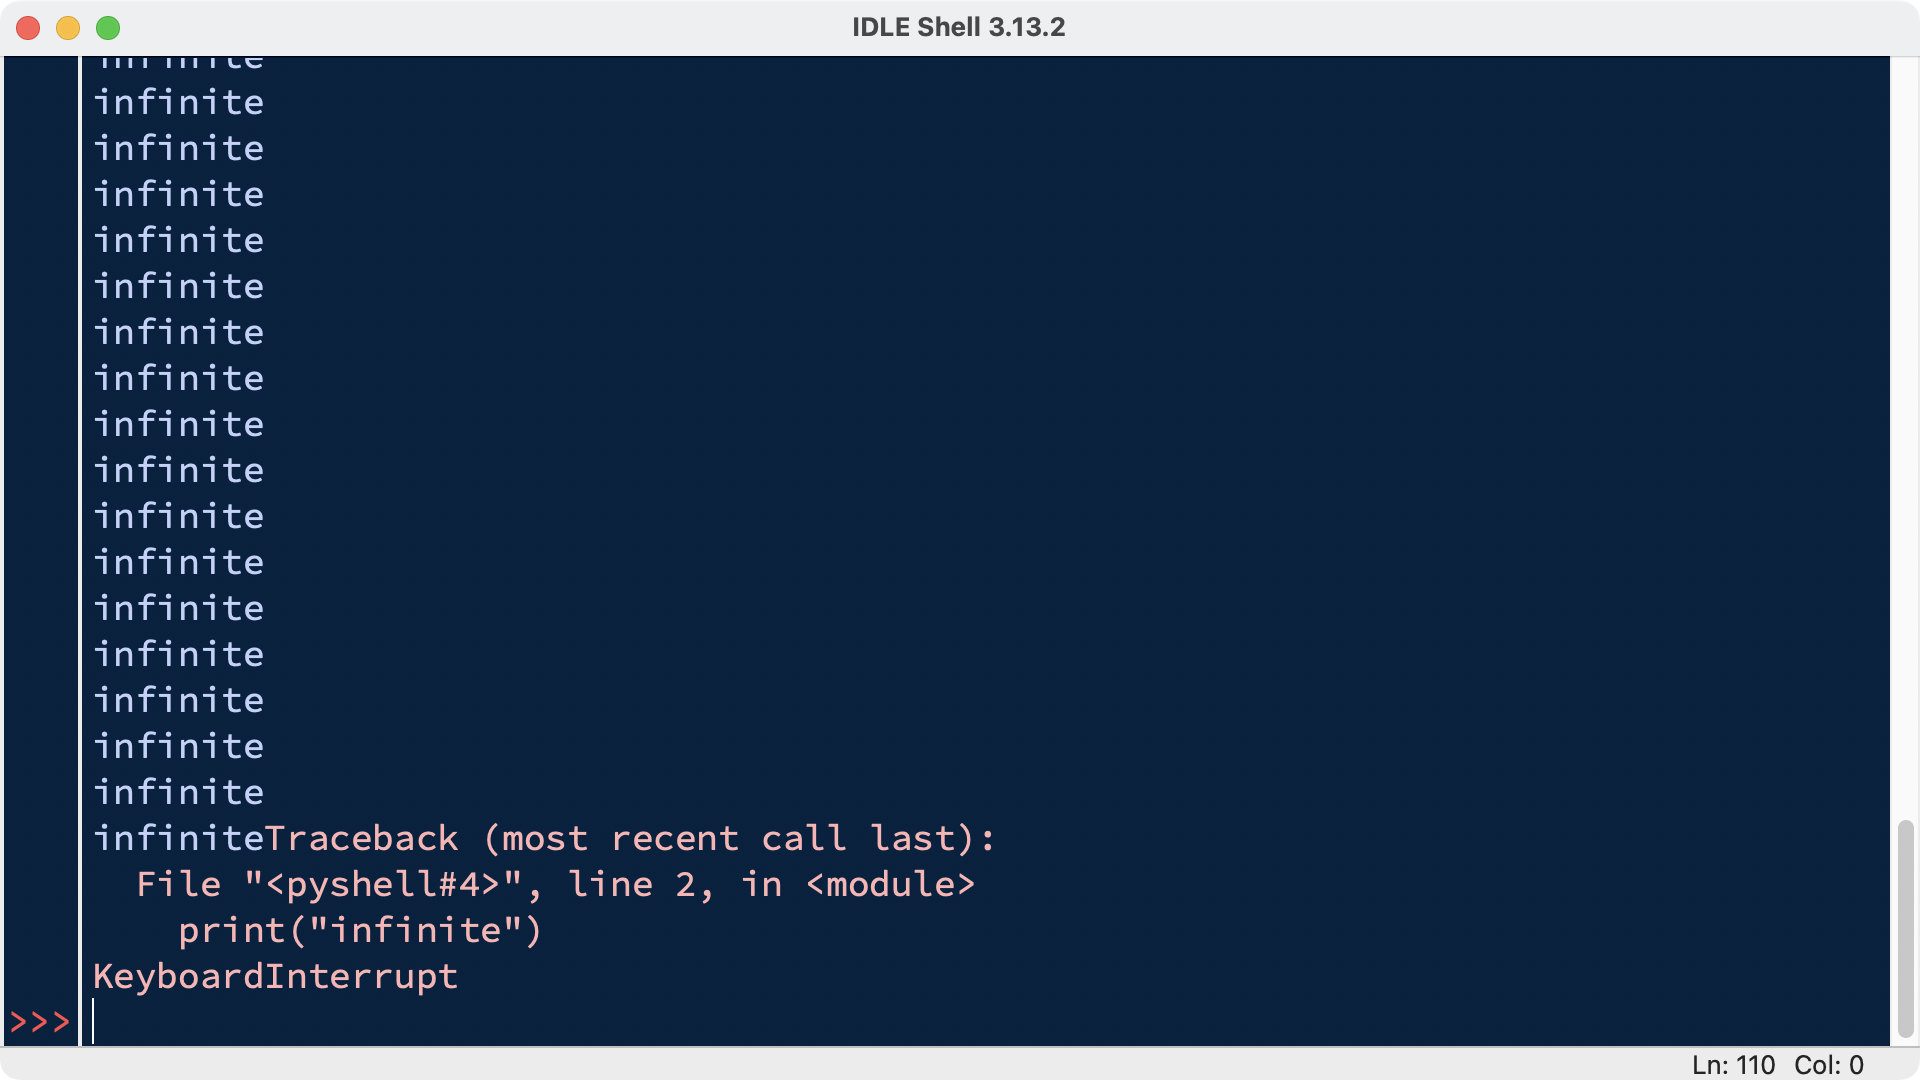
Instead of using the menu, you can also use the interrupt key combination, which is Ctrl+C.
An interactive interpreter is a great place to try things out. However, the IDLE shell really shows its true potential when you’re using it together with IDLE’s file editor.
Work With Python Files in IDLE
As a programmer, you need to be able to edit and save text files. Python programs are files with the .py extension that contain lines of Python code. Python IDLE gives you the ability to create and edit these files with ease.
Python IDLE also provides several useful features that you’ll see in a professional integrated development environment (IDE). These features include basic syntax highlighting, code completion, and auto-indentation.
If you’re just beginning your Python programming journey, then Python IDLE is a great alternative to other IDEs.
Opening a File
Python IDLE offers a full-fledged file editor with its edit window. The edit window gives you the ability to write and execute Python programs from within this program.
To start a new Python file, select File → New File from the menu bar. This will open a blank file in the editor, like this:
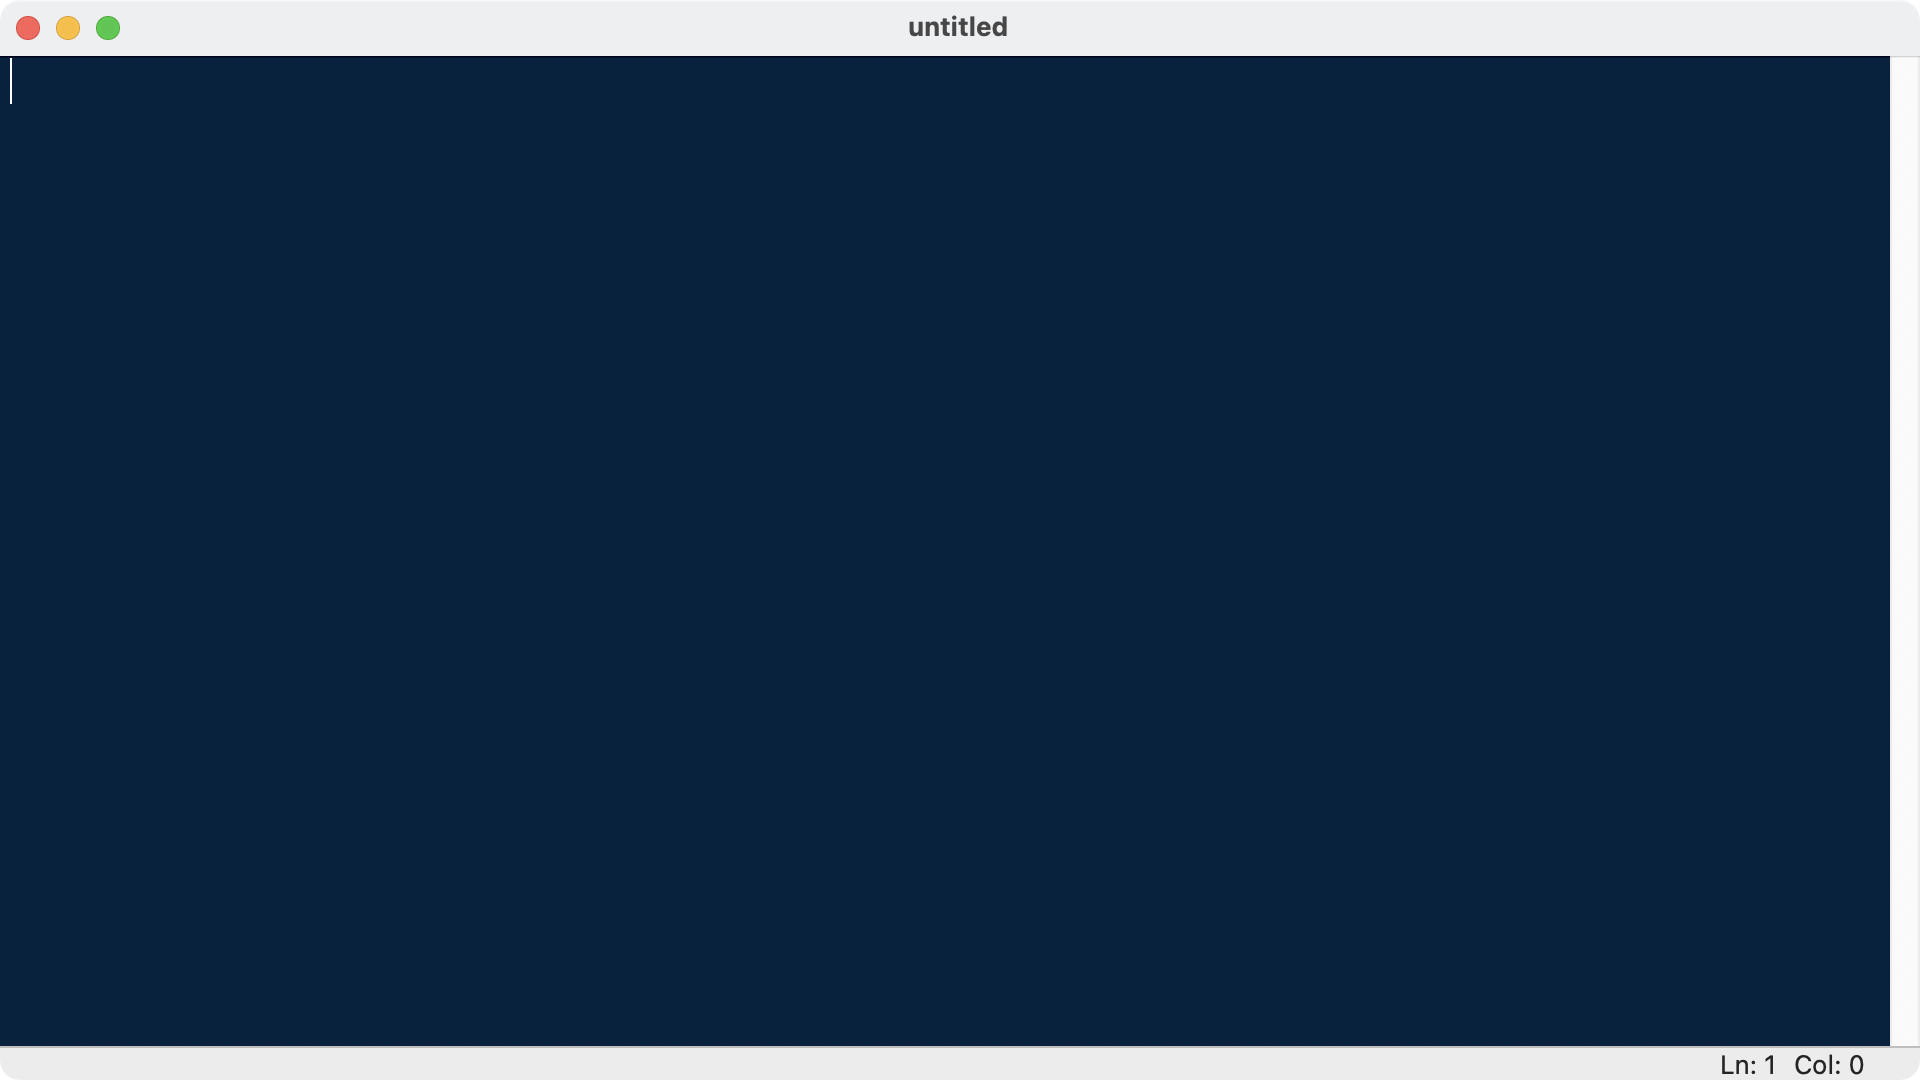
From this window, you can write a new Python file or open an existing one by selecting File → Open… from the menu bar. This will open your operating system’s file browser, where you can select the Python file you want to open.
If you’re interested in reading the source code for a Python module, then you can select File → Path Browser. The content of this window will be the same as the paths that are returned when you access sys.path. You can traverse through the folder tree and explore the inner structure of Python. When you double-click a Python file, the file editor will open up and you’ll be able to read the source code:
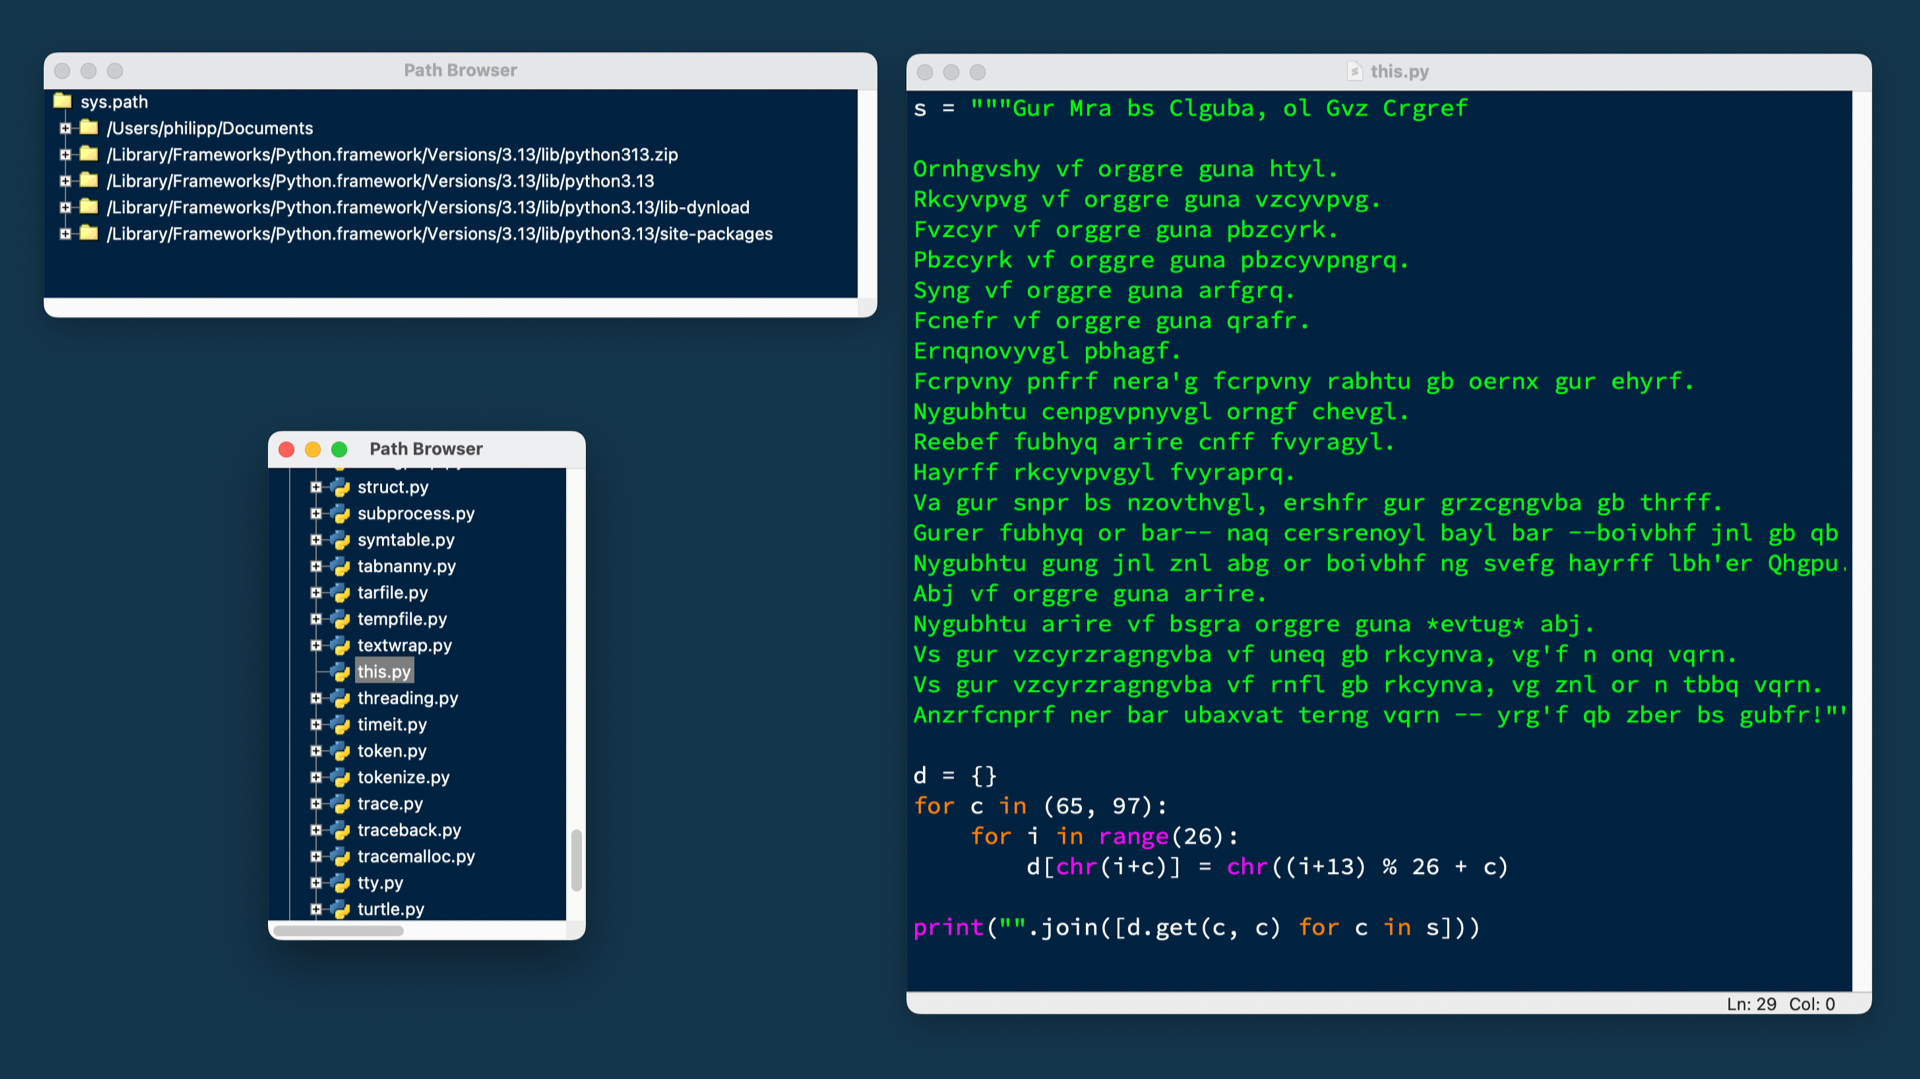
In the screenshot above, you can see the source code of Python’s this.py. If you’re curious about this Easter egg in Python, then you can check out the What’s the Zen of Python? tutorial.
If you know the name of a specific module you want to view, then you can select File → Module Browser and type in the name of the module in the box that appears.
As you can see, IDLE is a great tool for exploring Python’s inner workings. Of course, you can create your own files from scratch and save them for later.
Saving a File
To save a file, you need a file first. If you don’t have a blank file open, then you can select File → New File from the menu bar.
Even when your Python file is empty, you can save it. Go ahead and save your Python file by selecting File → Save:
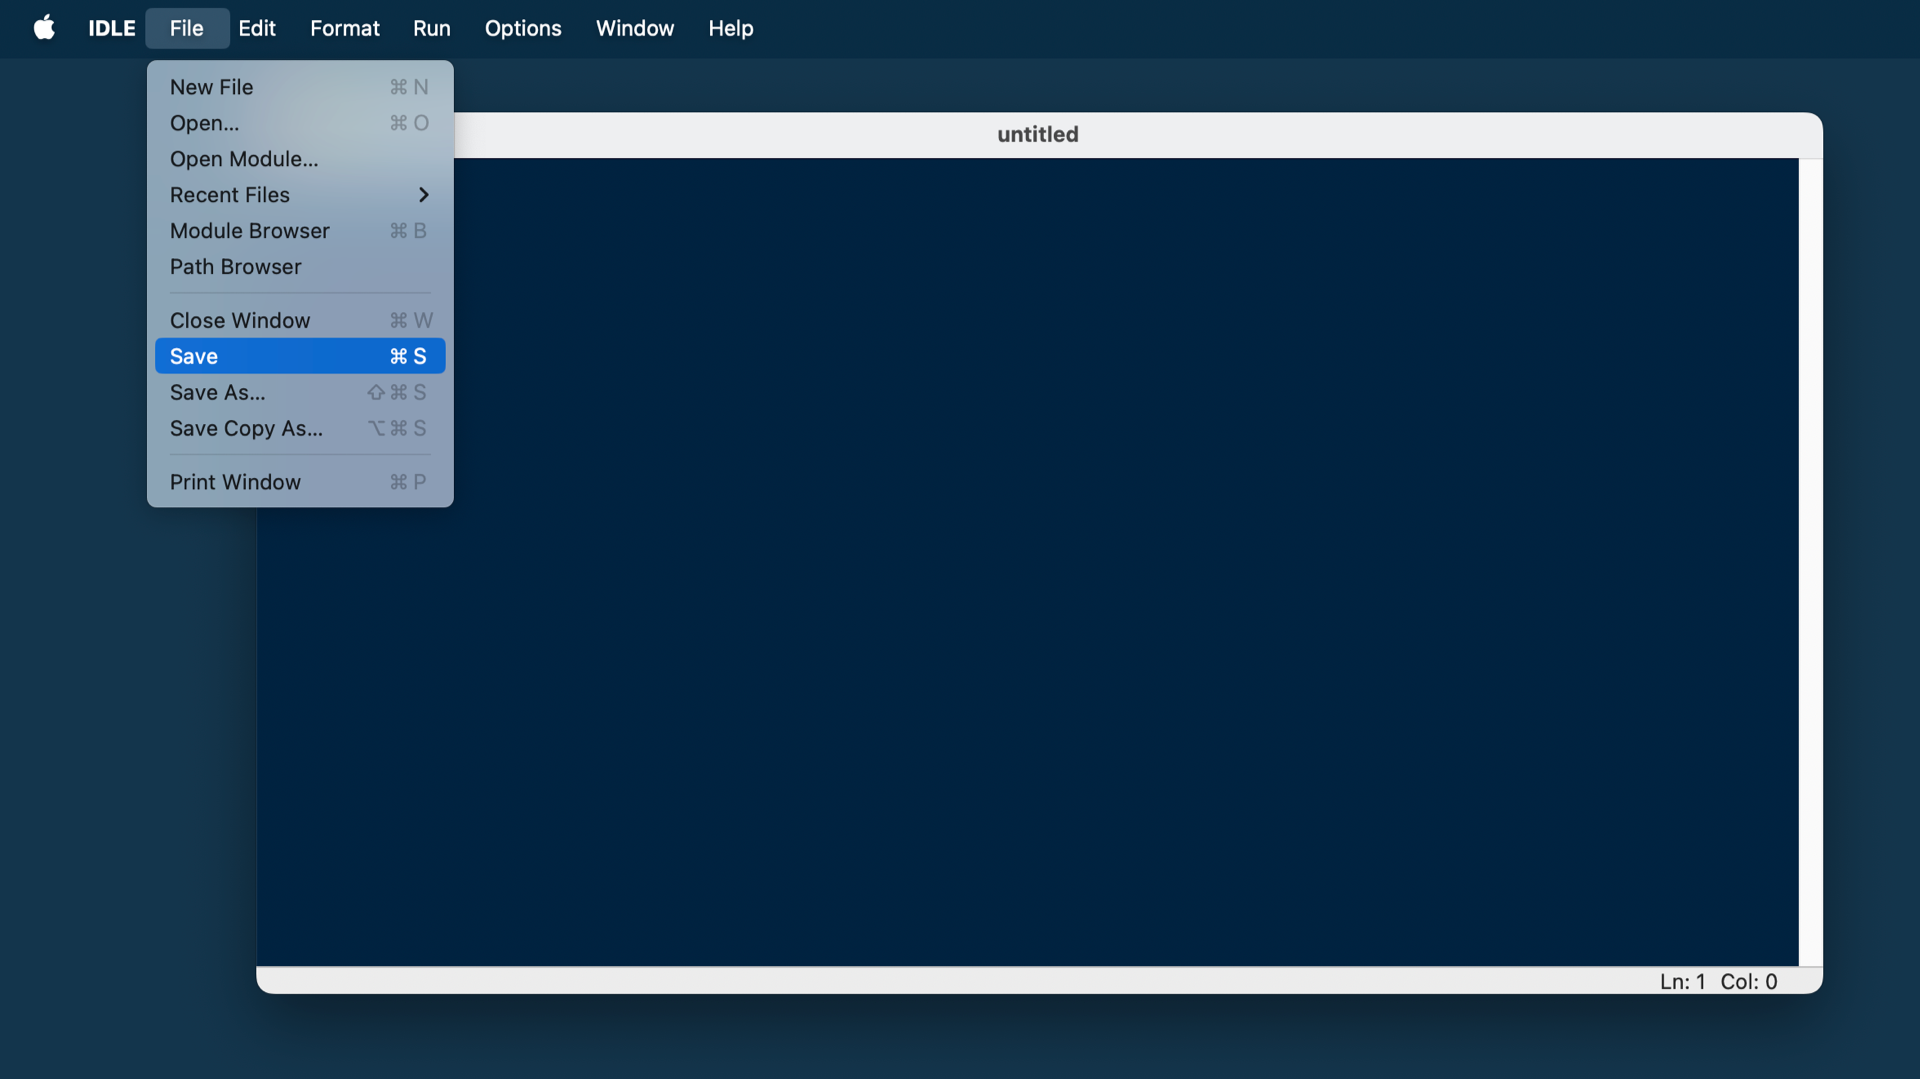
Once you click Save, you’ll see your system’s file dialog. If you want to follow along closely, then you can name the file hello.py.
Editing a File
Once you’ve opened a file in Python IDLE, you can then make changes to it. The contents of your file are displayed in the open window. The bar along the top of the window contains the name of the file that you’re editing.
There are also two numbers in the bottom right corner of the window:
- Ln: Displays the line number that your cursor is on.
- Col: Displays the column number that your cursor is on.
These numbers can help you locate errors quickly and make sure you’re staying within a certain line width.
There are a few visual cues in this window that will help you remember to save your work. If you look closely, then you’ll see that Python IDLE uses asterisks (*) to let you know that your file has unsaved changes:
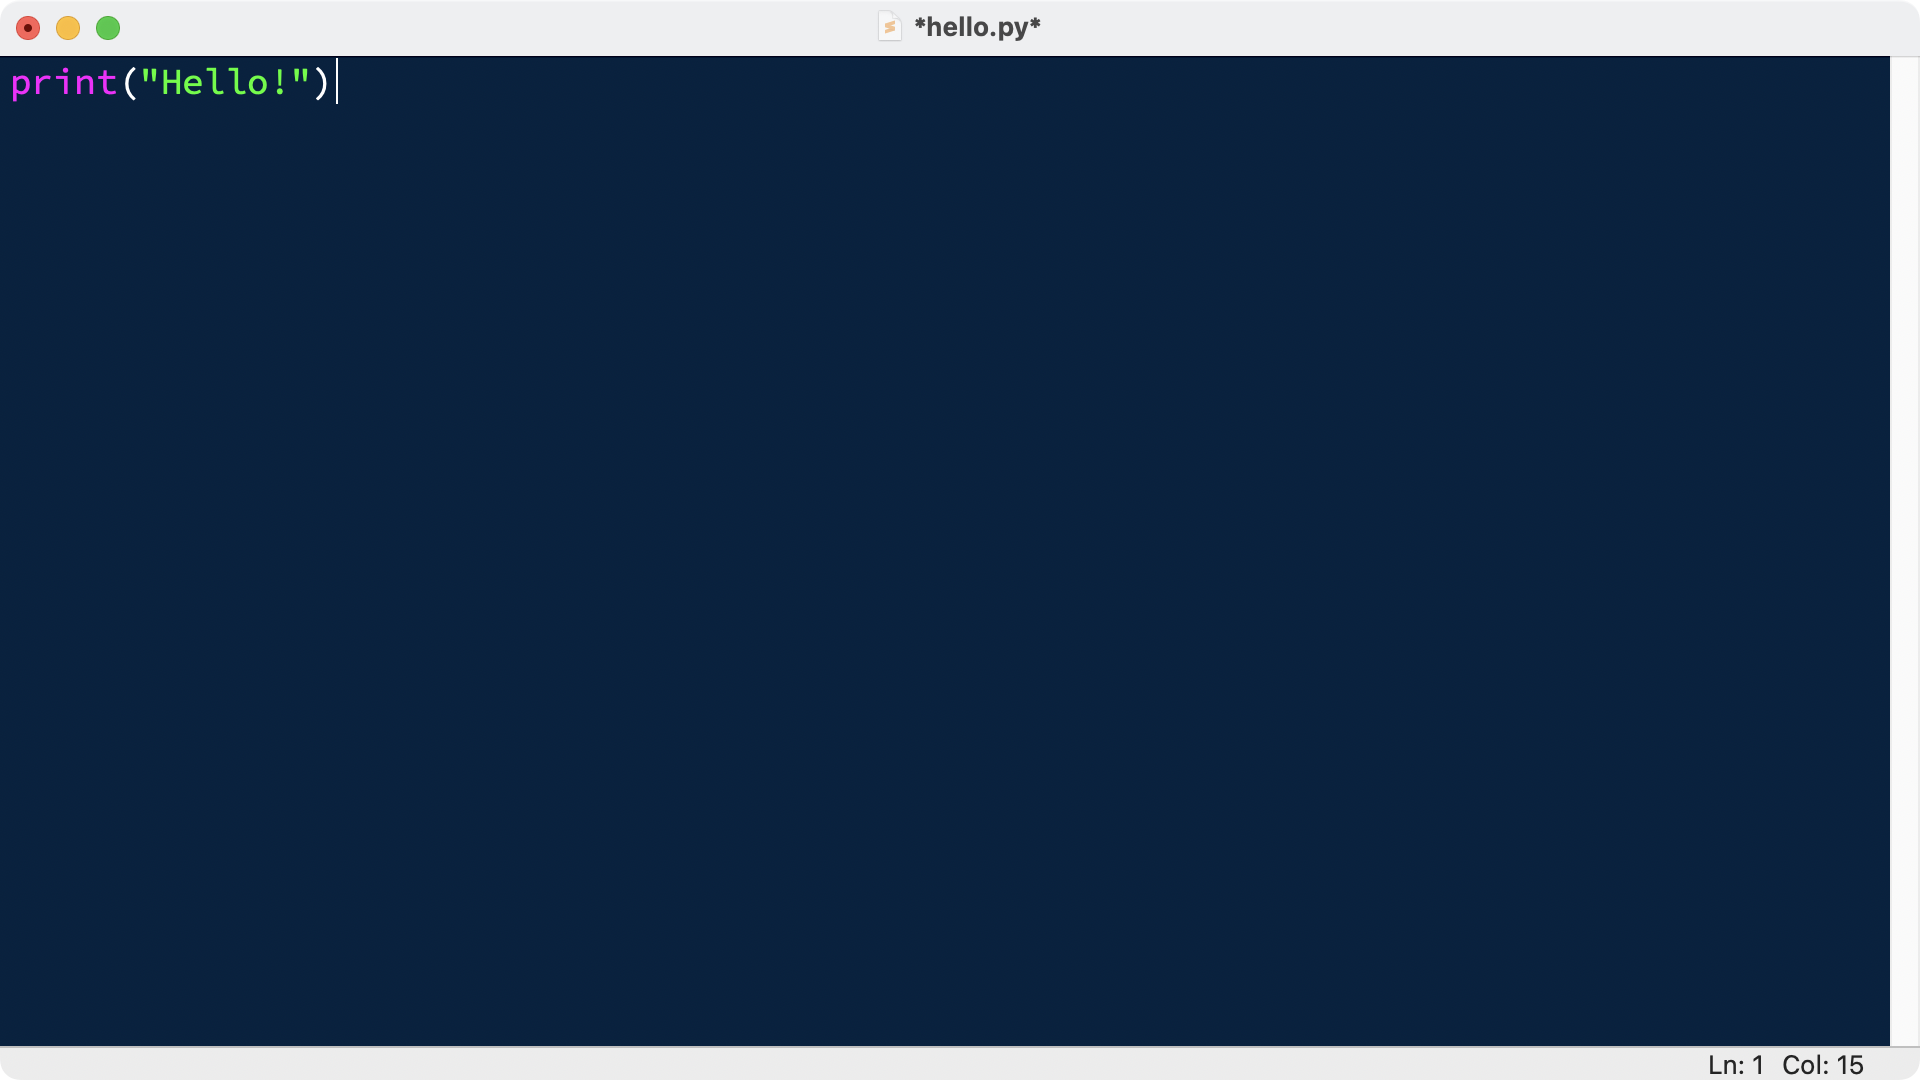
The filename shown at the top of the IDLE window has asterisks on either side. This means that there are unsaved changes in your editor. You can save these changes with your system’s standard keyboard shortcut, or you can select File → Save from the menu bar. Make sure that you save your file with the .py extension so that syntax highlighting will be enabled.
Showing Line Numbers
Seeing the line number of your cursor position in the lower right corner is helpful. However, line numbers are even more useful when they appear next to the line.
Add a few more lines of code to your hello.py file. For example, a greet() function:
hello.py
def greet(name):
    return f"Hello, {name}!"

greeting = greet("Tappan")
print(greeting)
While you’re typing the code, you can see the Ln and Col numbers changing in the lower right corner.
Next, select Options → Show Line Numbers from the menu bar. Once selected, you’ll see the line numbers next to your code:
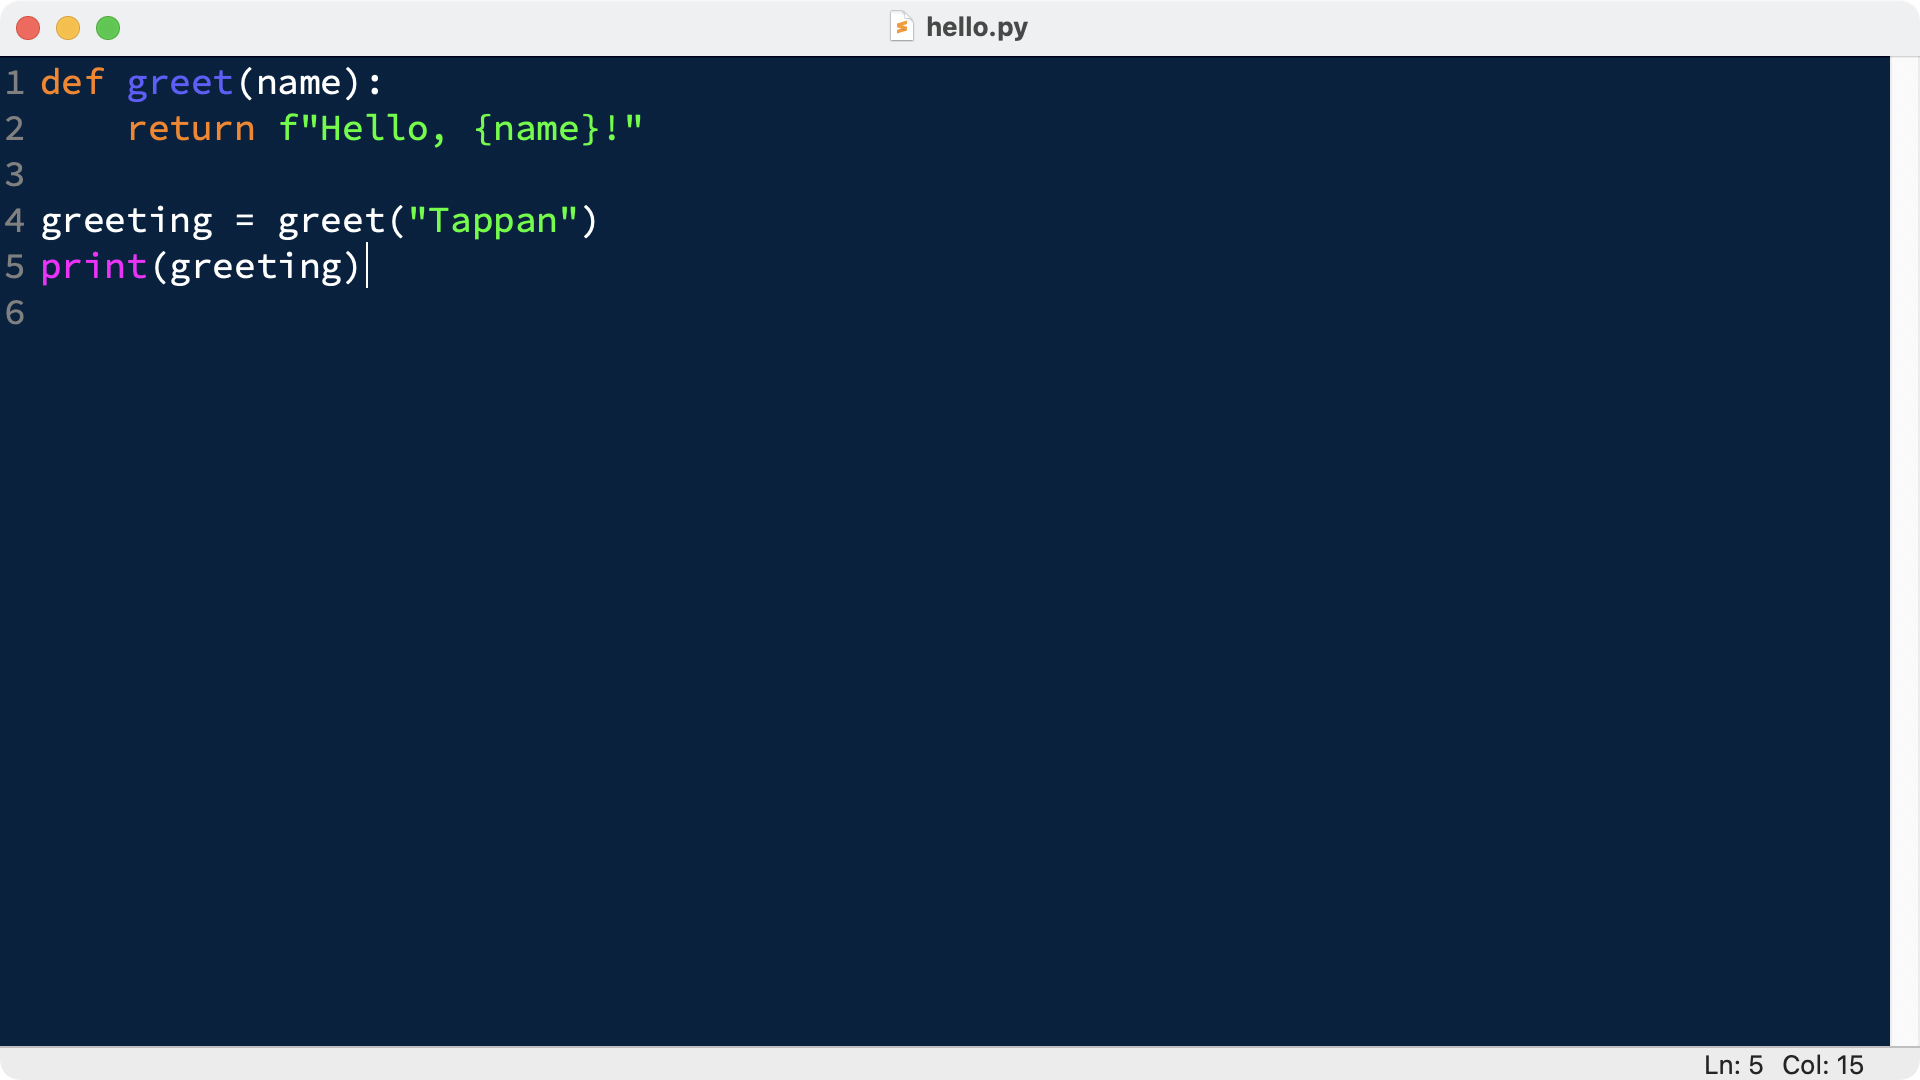
By enabling line numbers, you can conveniently refer to parts of your code without first moving the cursor to the line. The line numbers will also help you to investigate errors and exceptions more conveniently.
Executing a File
When you want to execute a file that you’ve created in IDLE, you should first make sure that it’s saved. Remember, you can see if your file is properly saved by looking for asterisks around the filename at the top of the file editor window.
Note: Don’t worry if you forget to save your Python file. IDLE will remind you to save whenever you attempt to execute an unsaved file.
To execute a file in IDLE, you can press the F5 key on your keyboard. You can also select Run → Run Module from the menu bar. Either option will restart the Python interpreter, and then run the code that you’ve written with a fresh interpreter:
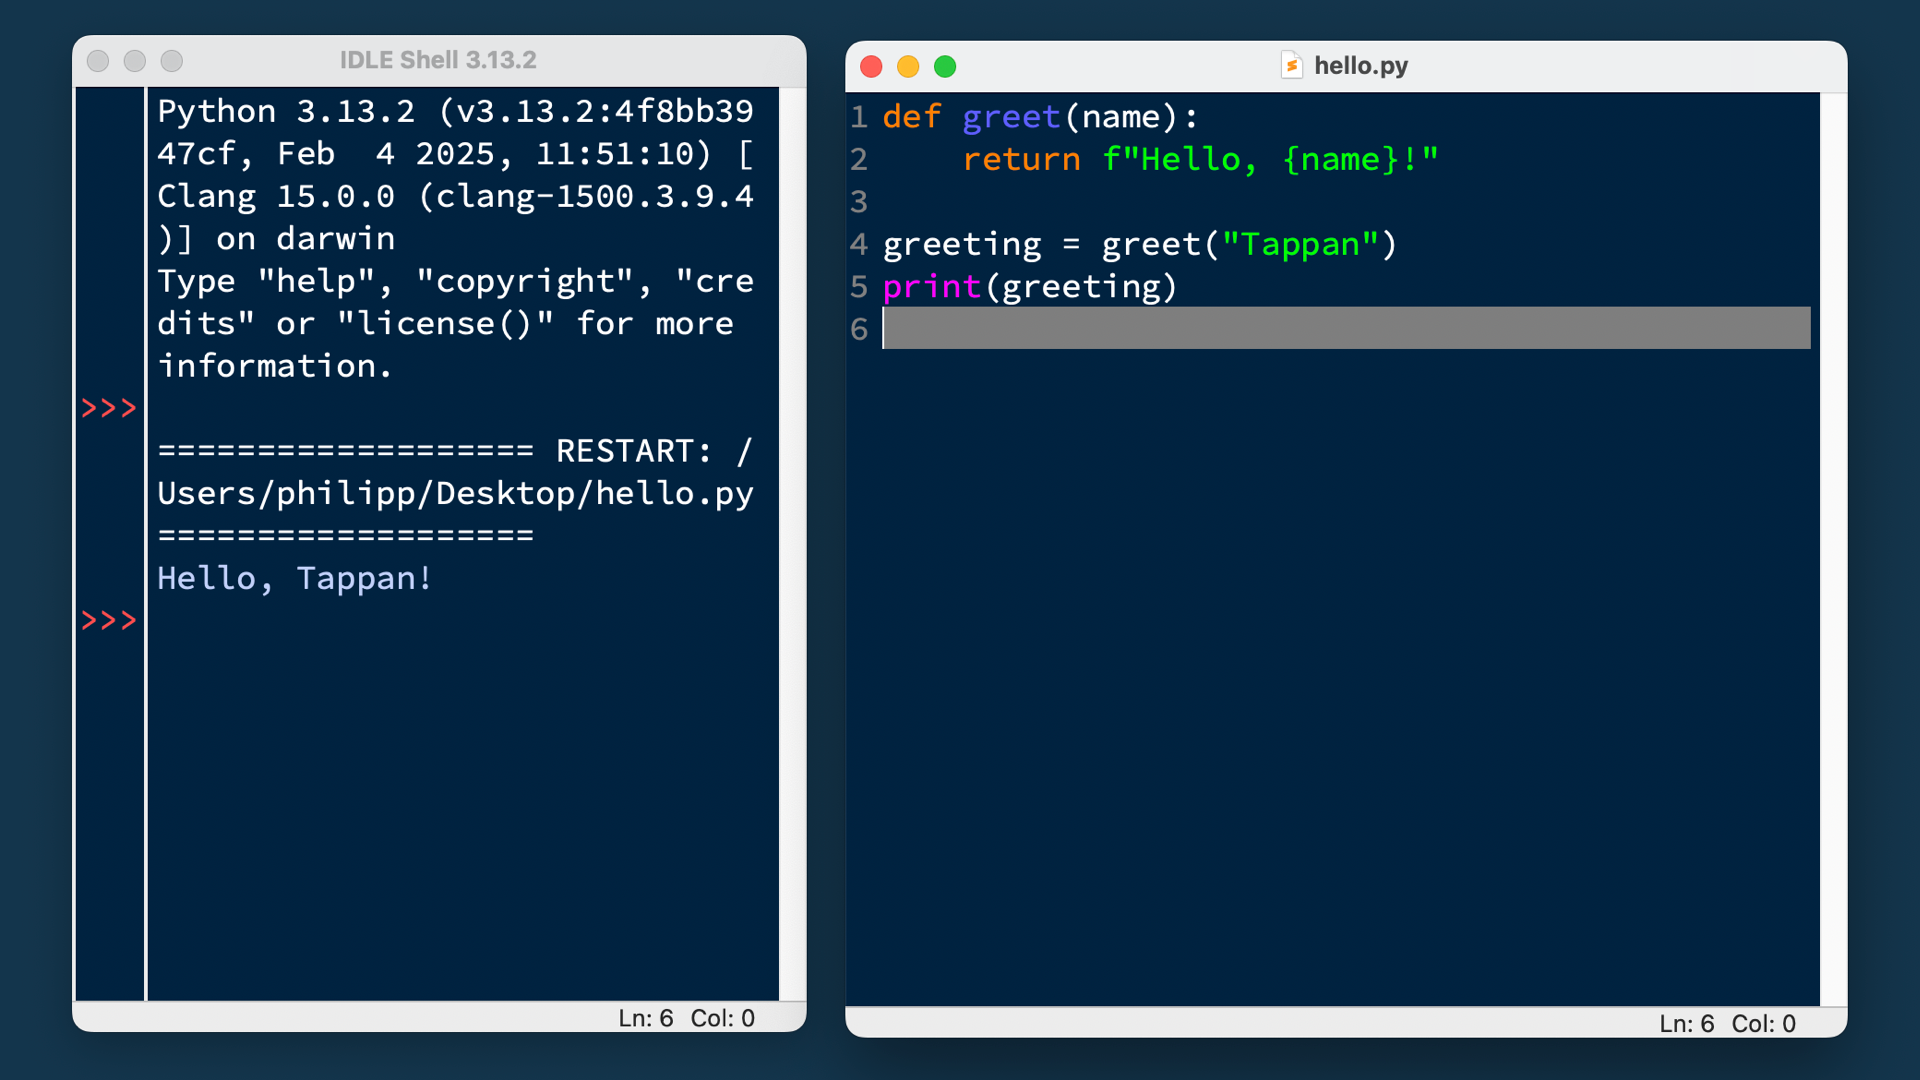
When your code is done executing, the interpreter will know everything about your code, including any global variables, functions, and classes:
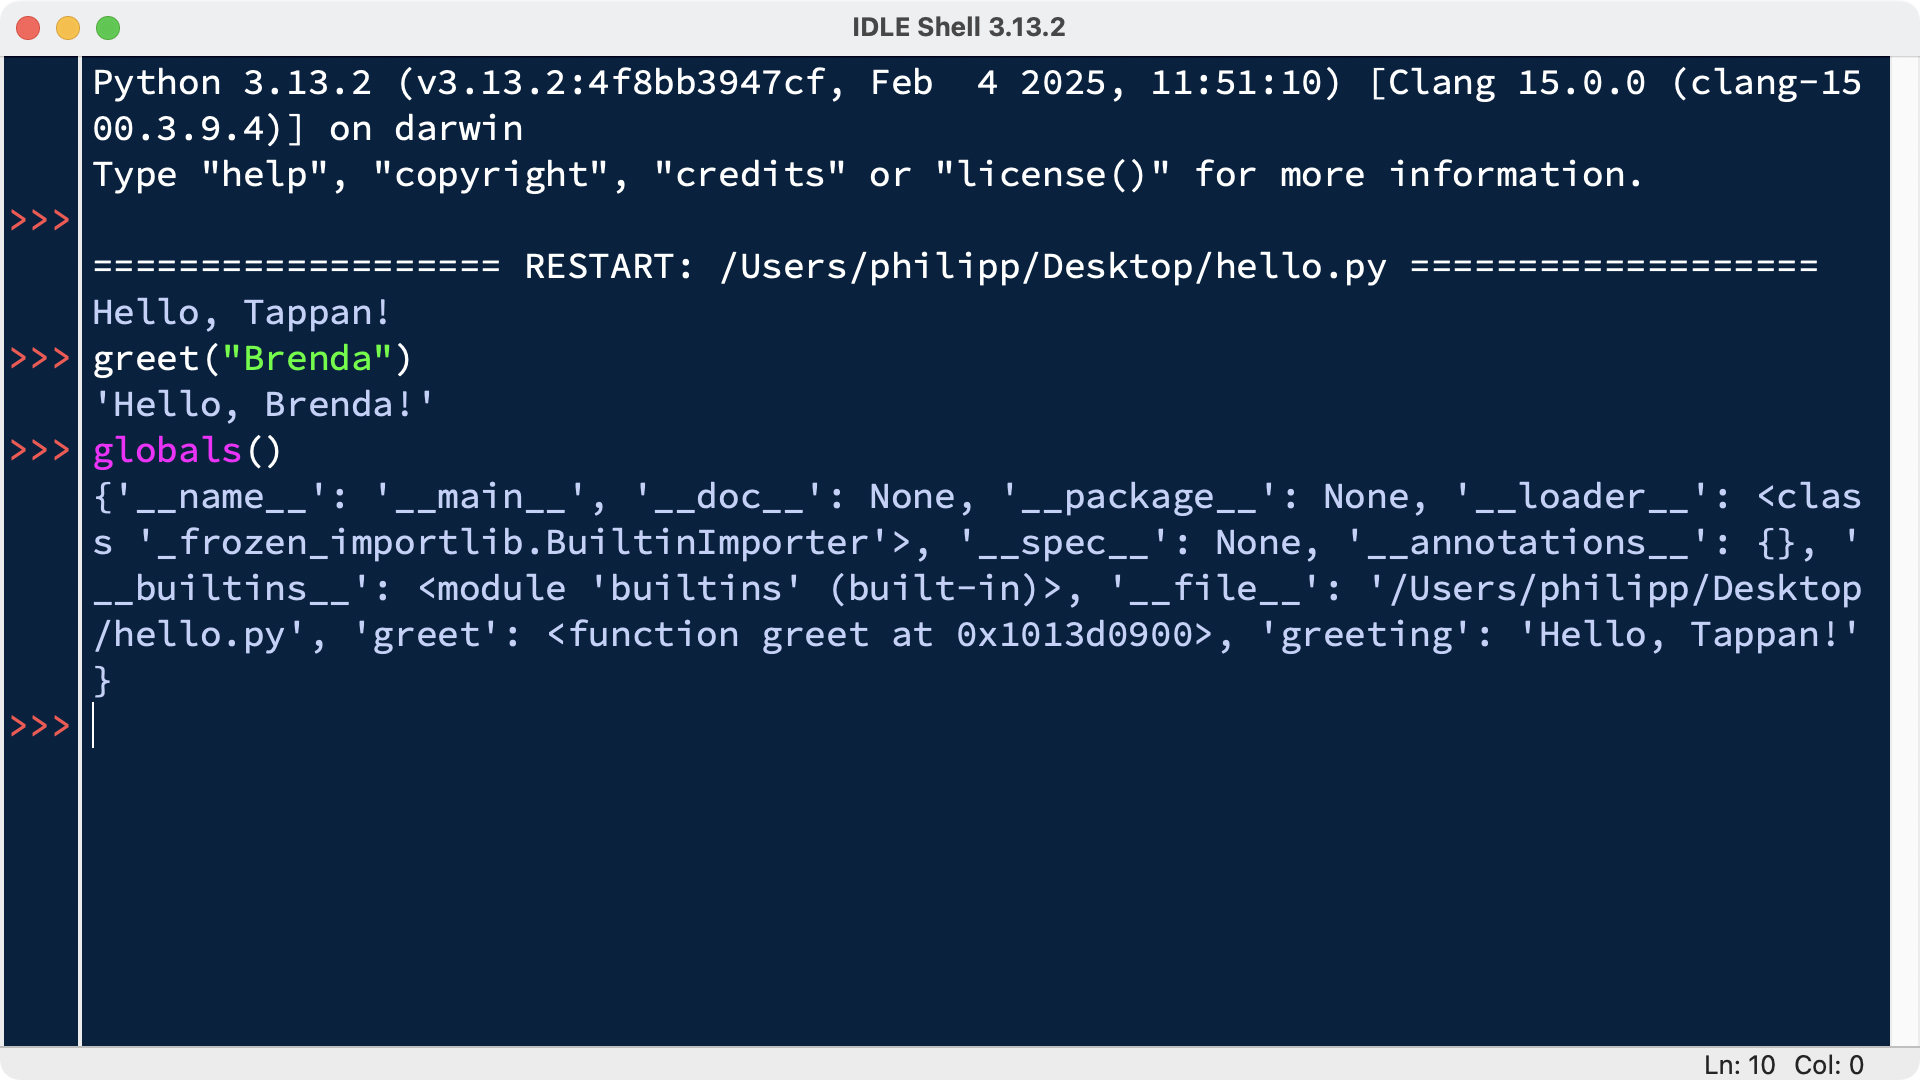
After running your Python code, you can explore your Python code further. For example, you can run a Python function with different arguments.
The IDLE shell and the IDLE file window are a powerful team. These two IDLE windows make Python IDLE a great place to inspect your Python code and support you in your development workflow.
Improve Your IDLE Workflow
The Python IDLE editor offers a few features that you’ll see in most professional IDEs to help you code faster. These features include automatic indentation, code completion and call tips, and code context.
In this section, you’ll explore some of these features so you can decide if you want to incorporate them into your IDLE coding workflow for improved productivity.
Automatic Indentation
IDLE will automatically indent your code when it needs to start a new block. This usually happens after you type a colon (:). When you hit the Enter key after the colon, your cursor will automatically move over a certain number of spaces and begin a new code block.
The default indentation is four spaces, and it’s a good idea to stick with that.
Note: The developers of Python agreed on a standard style for well-written Python code, and this includes rules on indentation, whitespace, and more. This standard style was formalized and is now known as PEP 8. To learn more about it, check out How to Write Beautiful Python Code With PEP 8.
However, there can be situations where you’ll want to deviate from the default setting—for example, when you’re making programming videos and your horizontal screen space is sparse.
You can configure how many spaces the cursor will move in the settings:
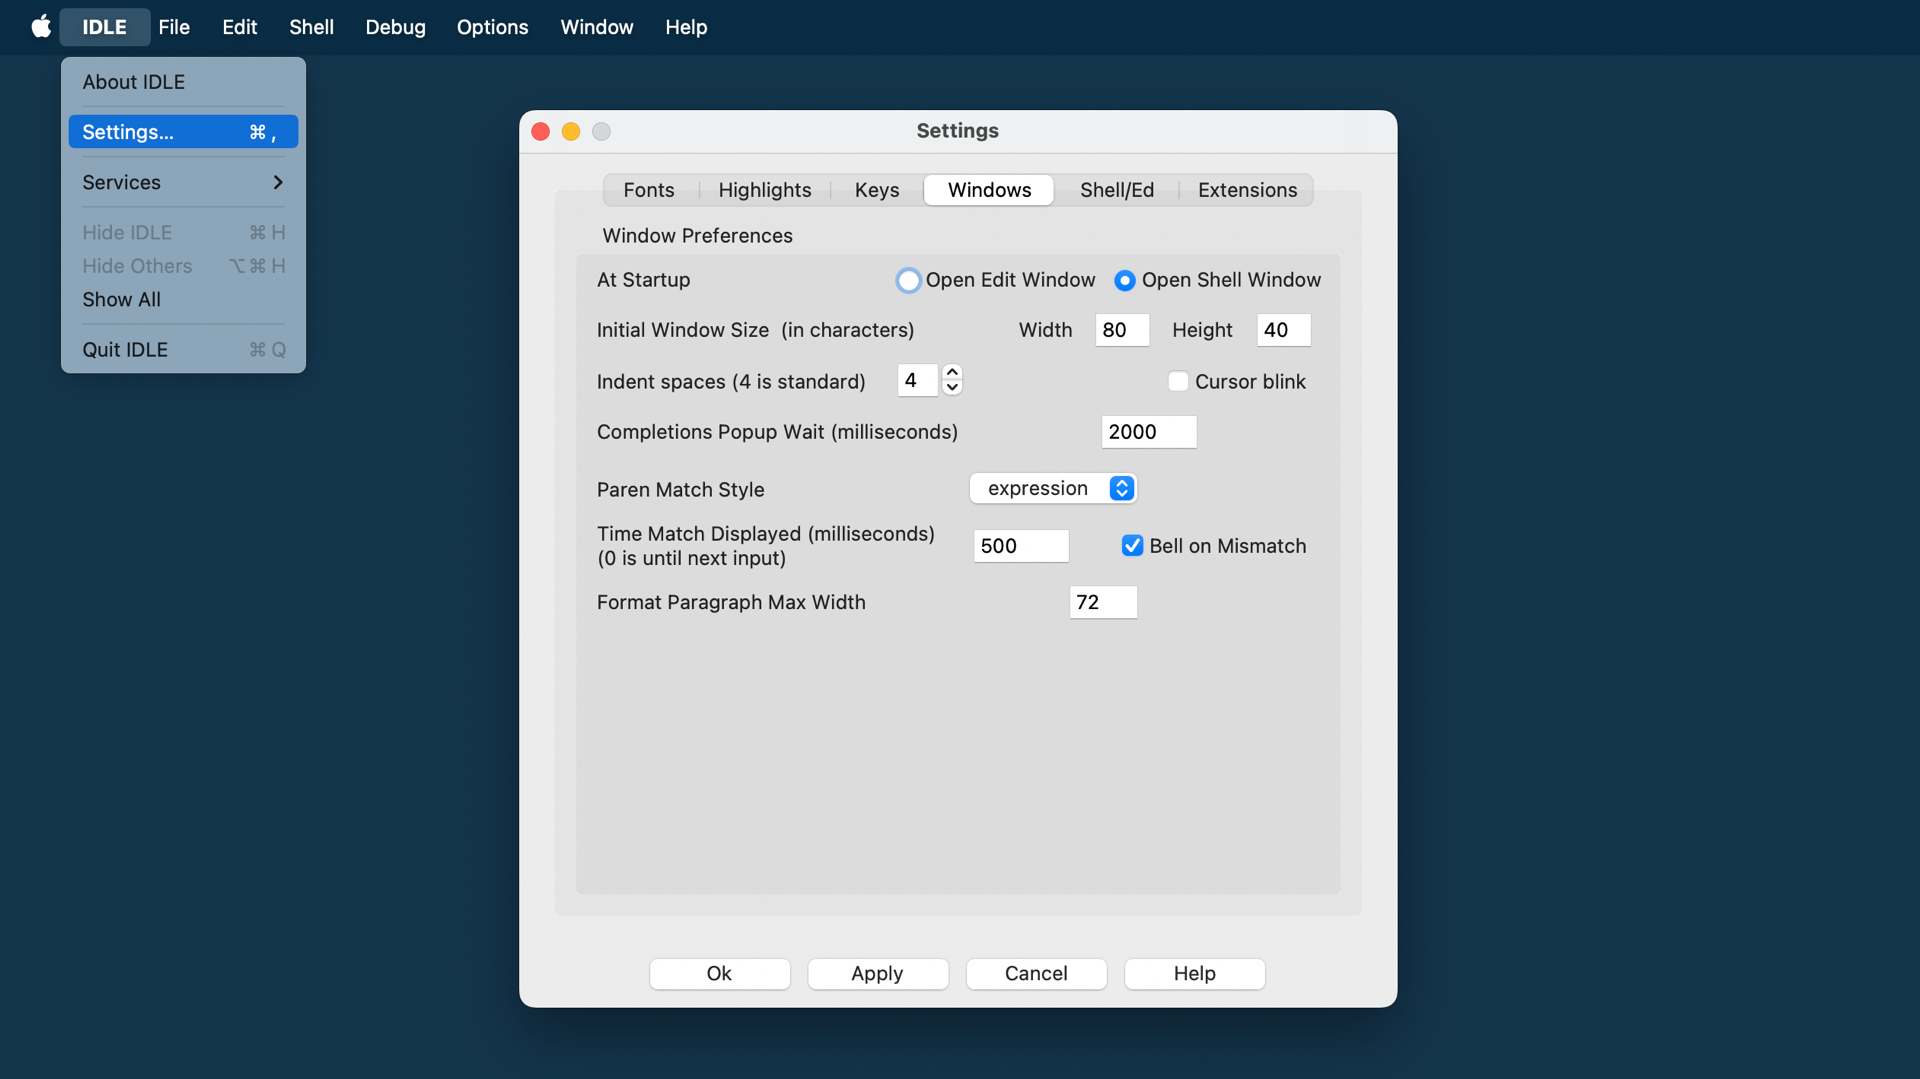
When you go to Settings → Windows, also accessible through the Options → Configure IDLE menu, you can adjust the Indent spaces amount. While you’re in the Windows settings, it’s worth exploring other options as well.
Code Completion and Call Tips
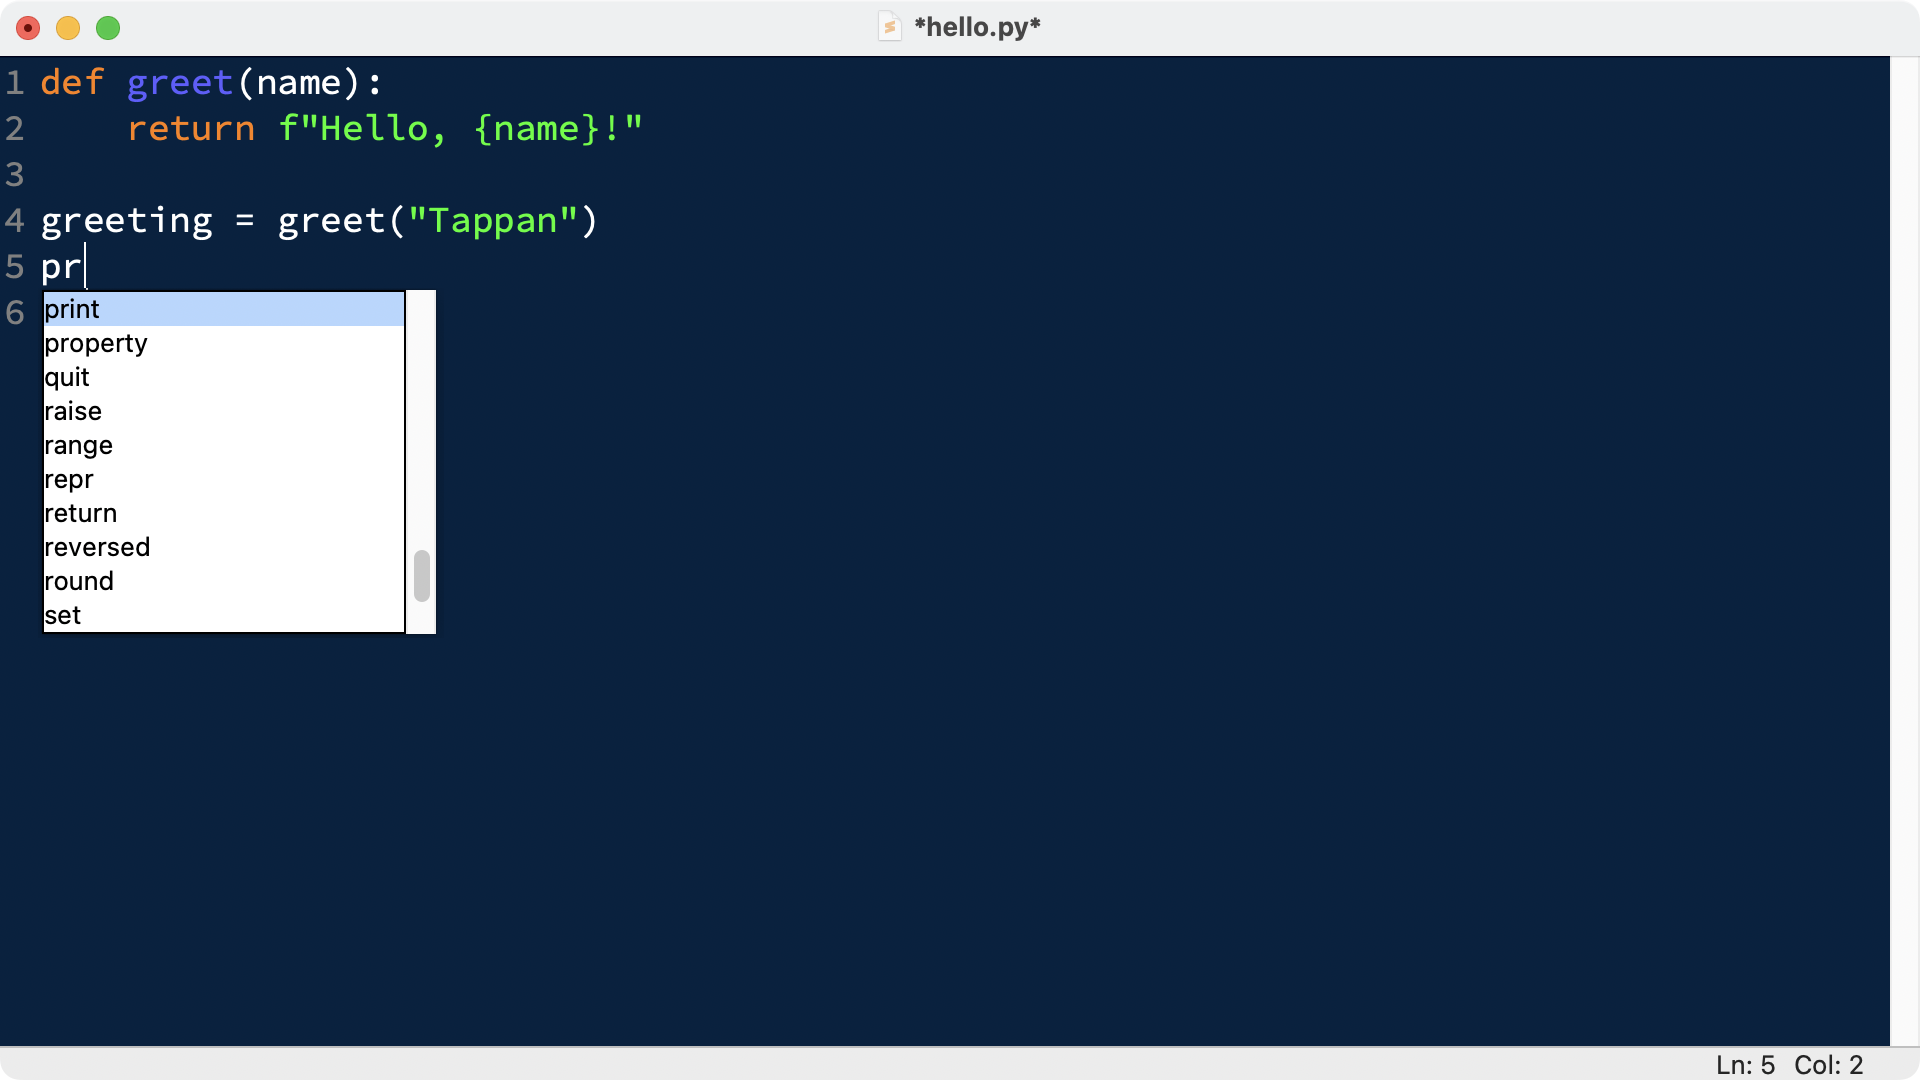
When you’re writing code for a large project or a complicated problem, you can spend a lot of time just typing out all of the code you need. Code completion can save you typing time by helping to finish your code for you. Python IDLE has basic code completion functionality, which can autocomplete the names of functions and classes. To use autocompletion in the editor, just press the Tab key after typing a sequence of text:
Python IDLE will also provide call tips. A call tip is like a hint for a certain part of your code to help you remember what that element needs. After you type the left parenthesis to begin a function call, a call tip will appear if you don’t type anything for a few seconds. For example, if you can’t quite remember how to append to a list, then you can pause after the opening parenthesis to bring up the call tip:
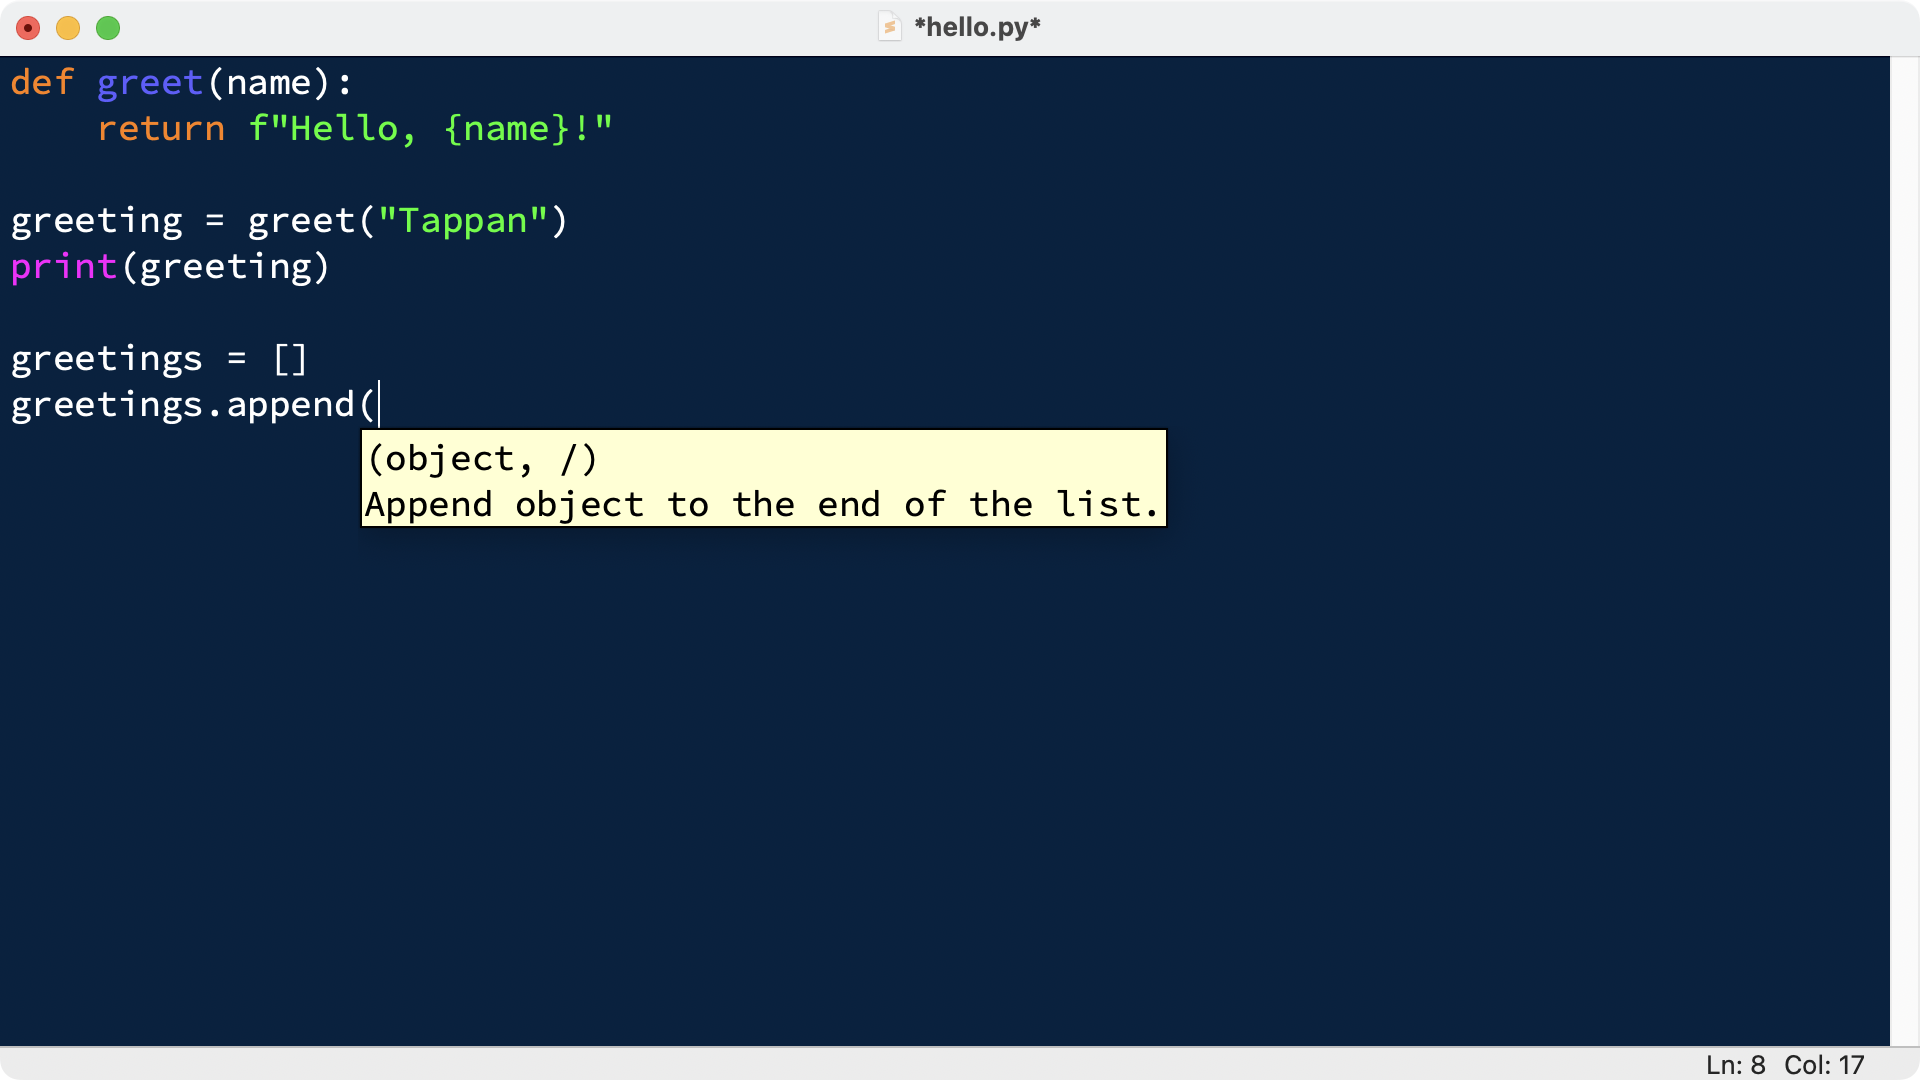
The call tip will display as a popup note, reminding you how to append to a list. Call tips like these provide useful information as you’re writing code.
Code Context
The code context functionality is a neat feature of the Python IDLE file editor. It will show you the scope of a function, class, loop, or other construct. This is particularly useful when you’re scrolling through a lengthy file and need to keep track of where you are while reviewing code in the editor.
To turn it on, select Options → Show Code Context in the menu bar. You’ll see a gray bar appear at the top of the editor window:
As you scroll down through your code, the context that contains each line of code will stay inside of this gray bar. When you reach a line that’s outside the scope of this function, the content in the bar will disappear.
Debug in IDLE
A bug is an unexpected problem in your program. They can appear in many forms, and some are more difficult to fix than others. Some bugs are tricky enough that you won’t be able to catch them by just reading through your code. Luckily, Python IDLE provides some basic tools that will help you debug your programs!
Interpreter DEBUG Mode
If you want to run your code with the built-in debugger, then you’ll need to turn this feature on. To do so, you must have an IDLE shell open. Then, you can select Debug → Debugger from the Python IDLE menu bar:
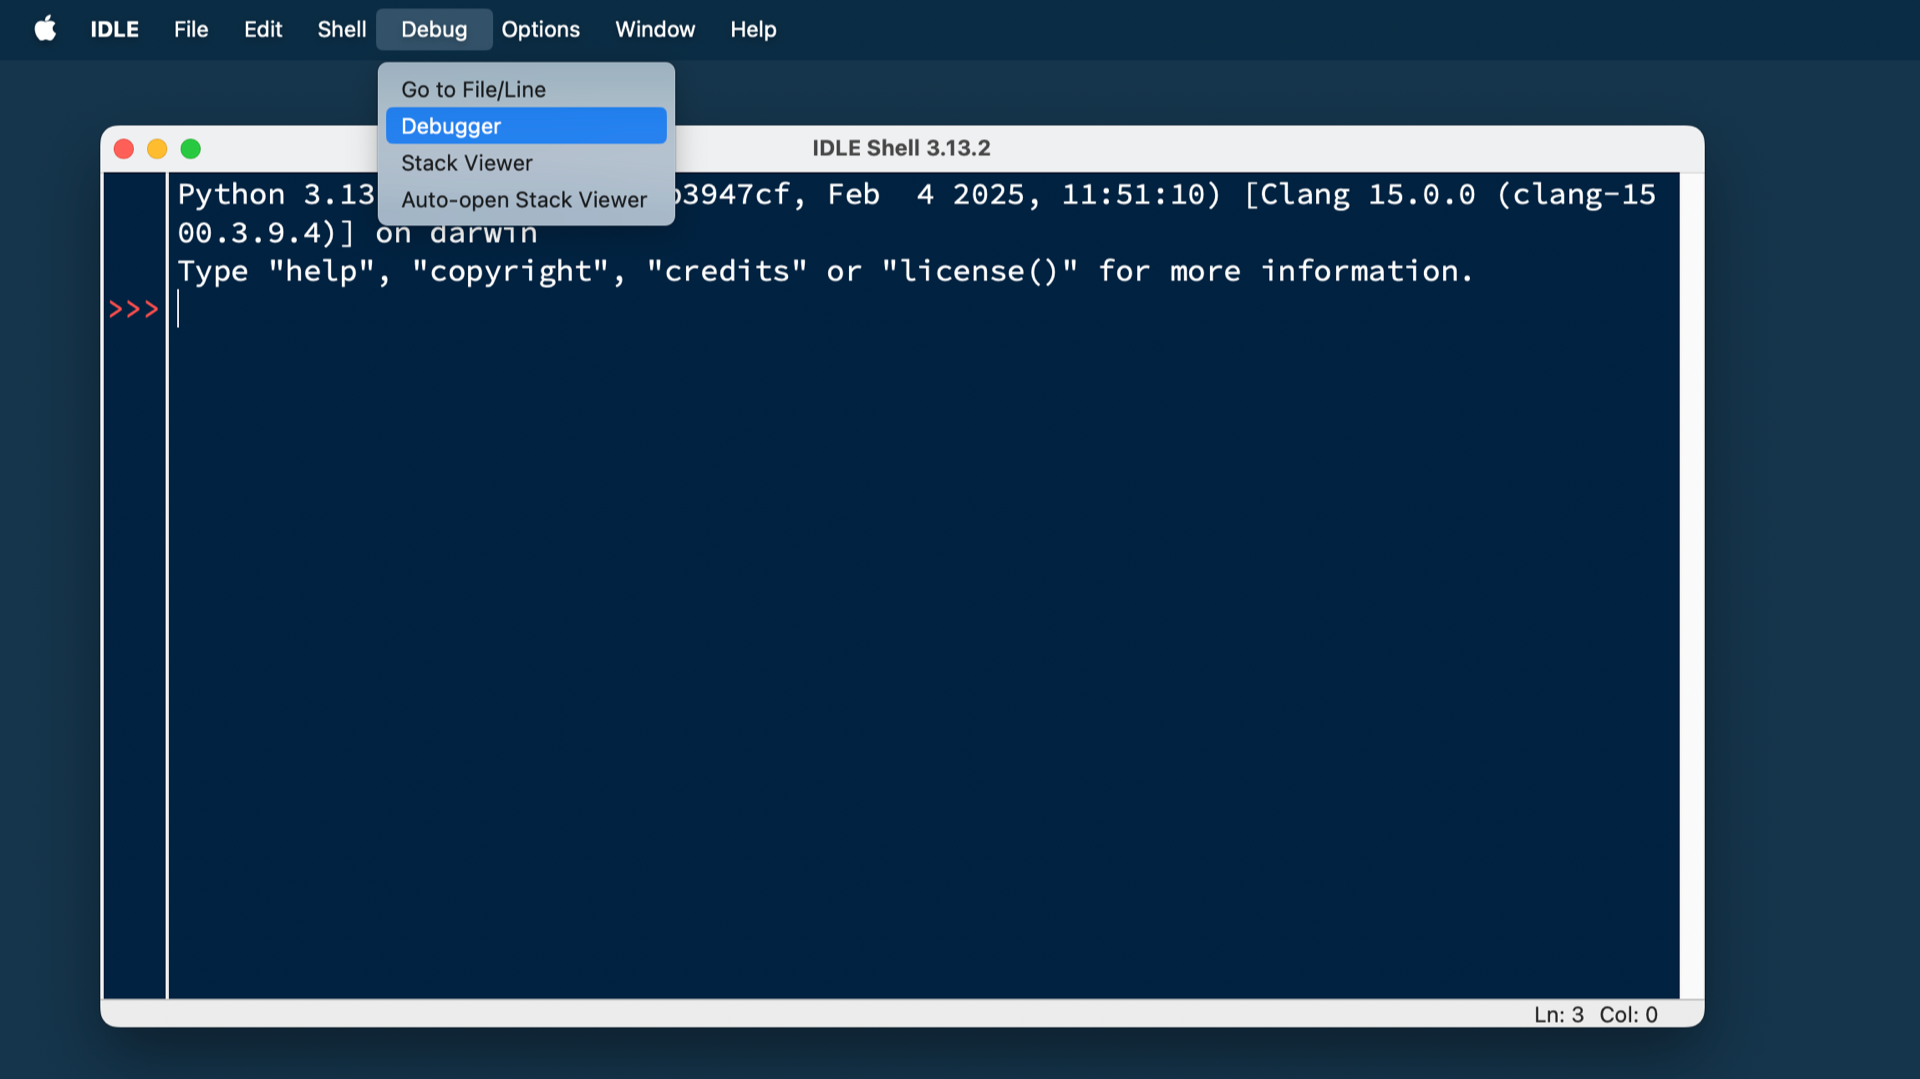
In the interpreter, you should see [DEBUG ON] appear in the IDLE shell and the debugger window displayed:
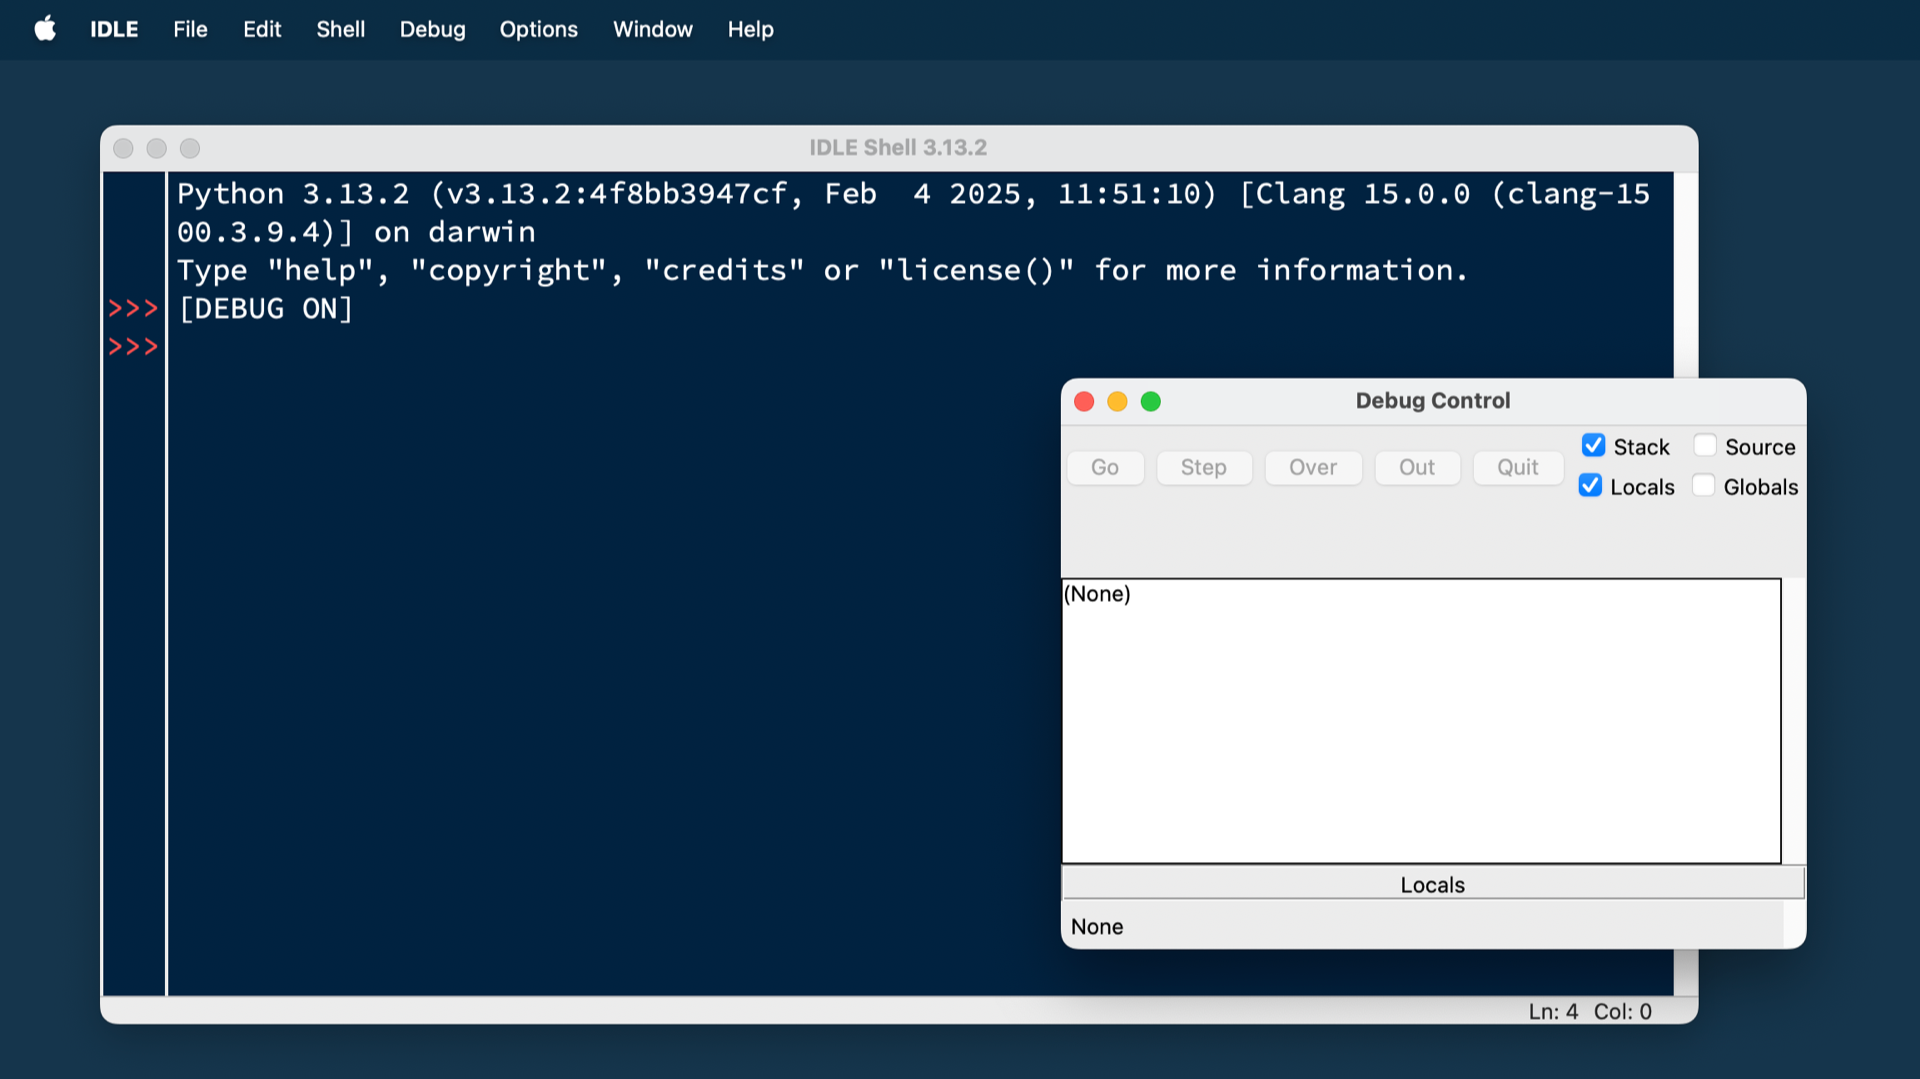
In this window, you can inspect the values of your local and global variables as your code executes. This gives you insight into how your data is being manipulated as your code runs.
You can also click the following buttons to move through your code:
- Go: Click this to advance execution to the next
breakpoint. You’ll learn about these in the next section. - Step: Click this to execute the current line and go to the next one.
- Over: If the current line of code contains a function call, then click this to step over that function. In other words, execute that function and go to the next line, but don’t pause while executing the function, unless there is a breakpoint.
- Out: If the current line of code is in a function, then click this to step out of this function. In other words, continue the execution of the function until you return from it.
Be careful, because there’s no reverse button! You can only step forward in time through your program’s execution.
You’ll also see four checkboxes in the debug window:
- Globals: Displays your program’s global information.
- Locals: Shows your program’s local information during execution.
- Stack: Lists the functions running during execution.
- Source: Displays your file in the IDLE editor.
When you select one of these, you’ll see the relevant information in your debug window.
Breakpoints
A breakpoint is a line of code that you’ve identified as a place where the interpreter should pause while running your code.
To set a breakpoint, right-click on the line of code that you wish to pause:
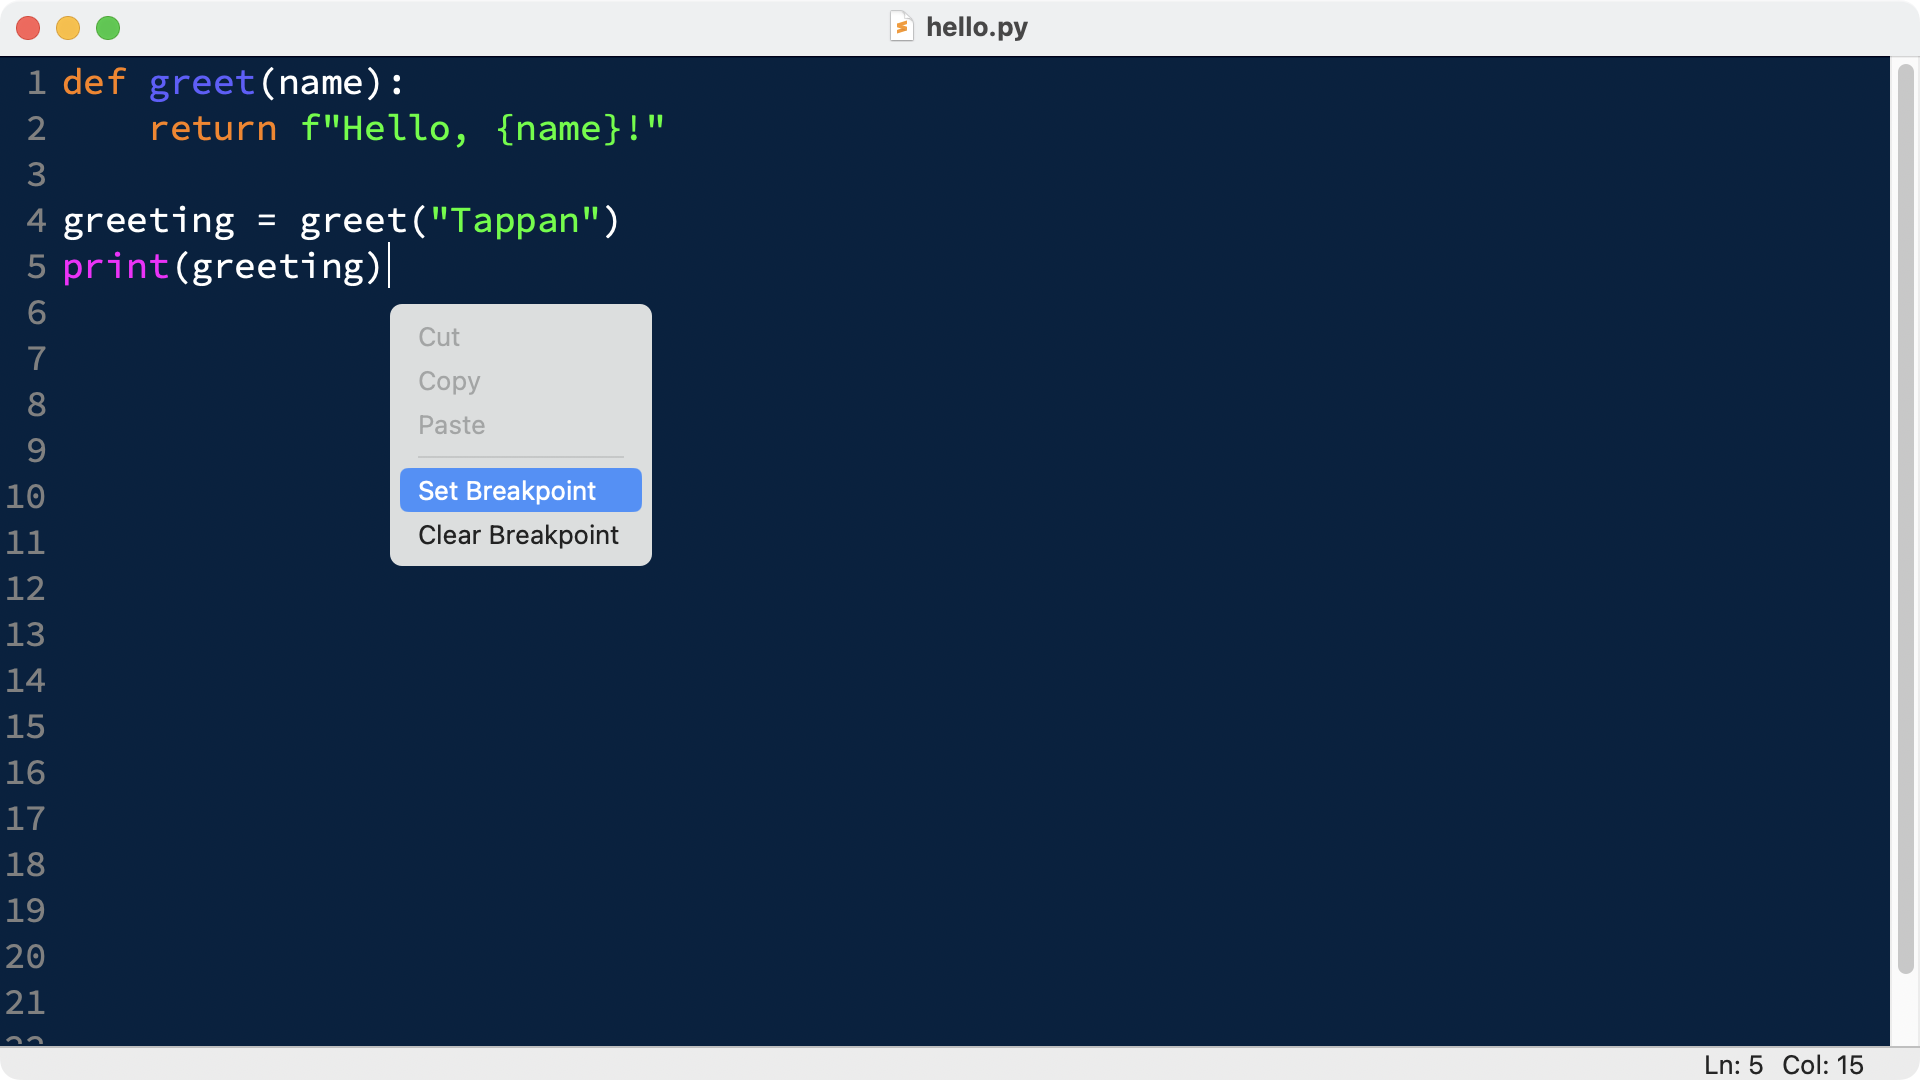
Setting a breakpoint will highlight the line of code in yellow as a visual indication of a set breakpoint. You can set as many breakpoints in your code as you like. To undo a breakpoint, right-click the same line again and select Clear Breakpoint:
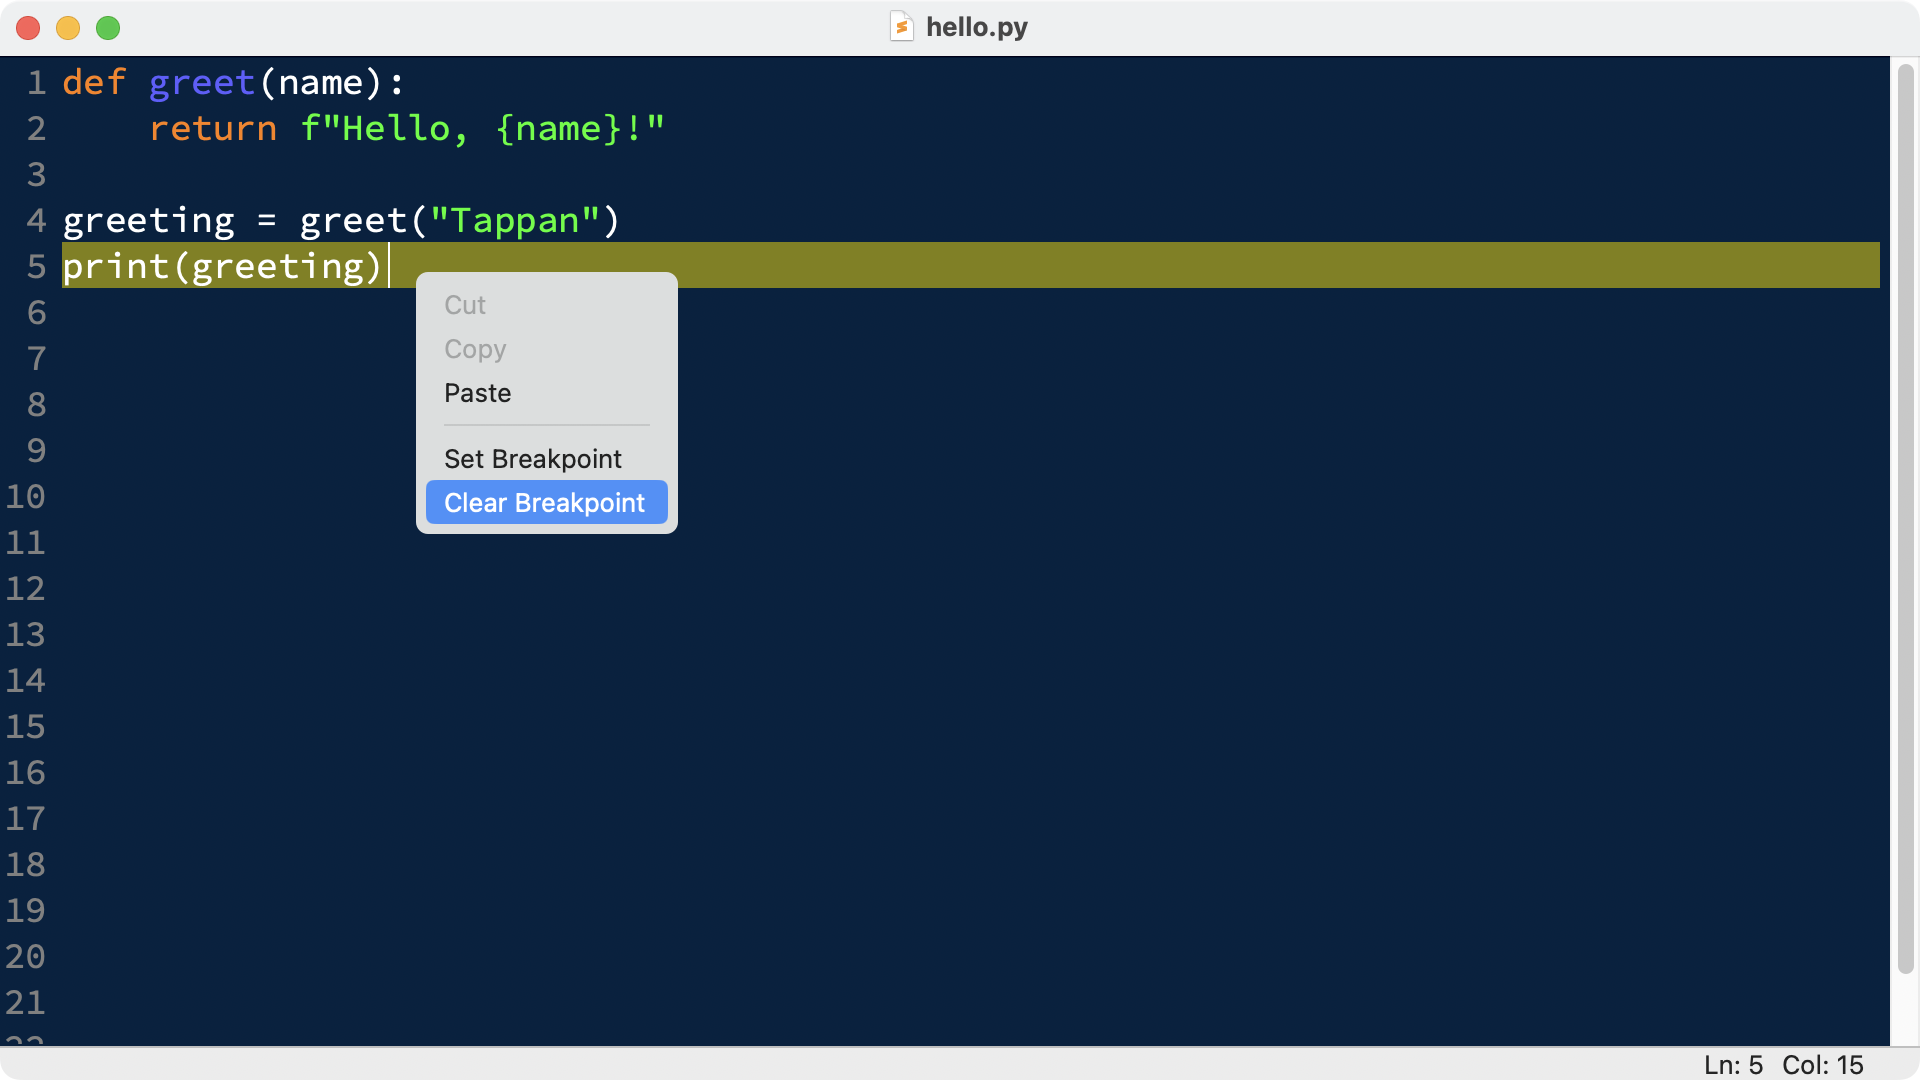
Once you’ve set your breakpoints and turned on DEBUG mode, you can run your code as you would normally. The debugger window will pop up, and you can start stepping through your code manually.
Handle Errors and Exceptions
Dealing with errors is a fundamental part of programming. Errors and exceptions can happen when you least expect them, so you need to learn how to spot them if you want robust and reliable code.
Luckily, Python’s IDLE editor has a few features in place that help you handle errors and exceptions in your code.
Get Notifications Before Running Code
Since IDLE is so closely connected to Python, IDLE checks your code before running it and informs you about a SyntaxError right away:
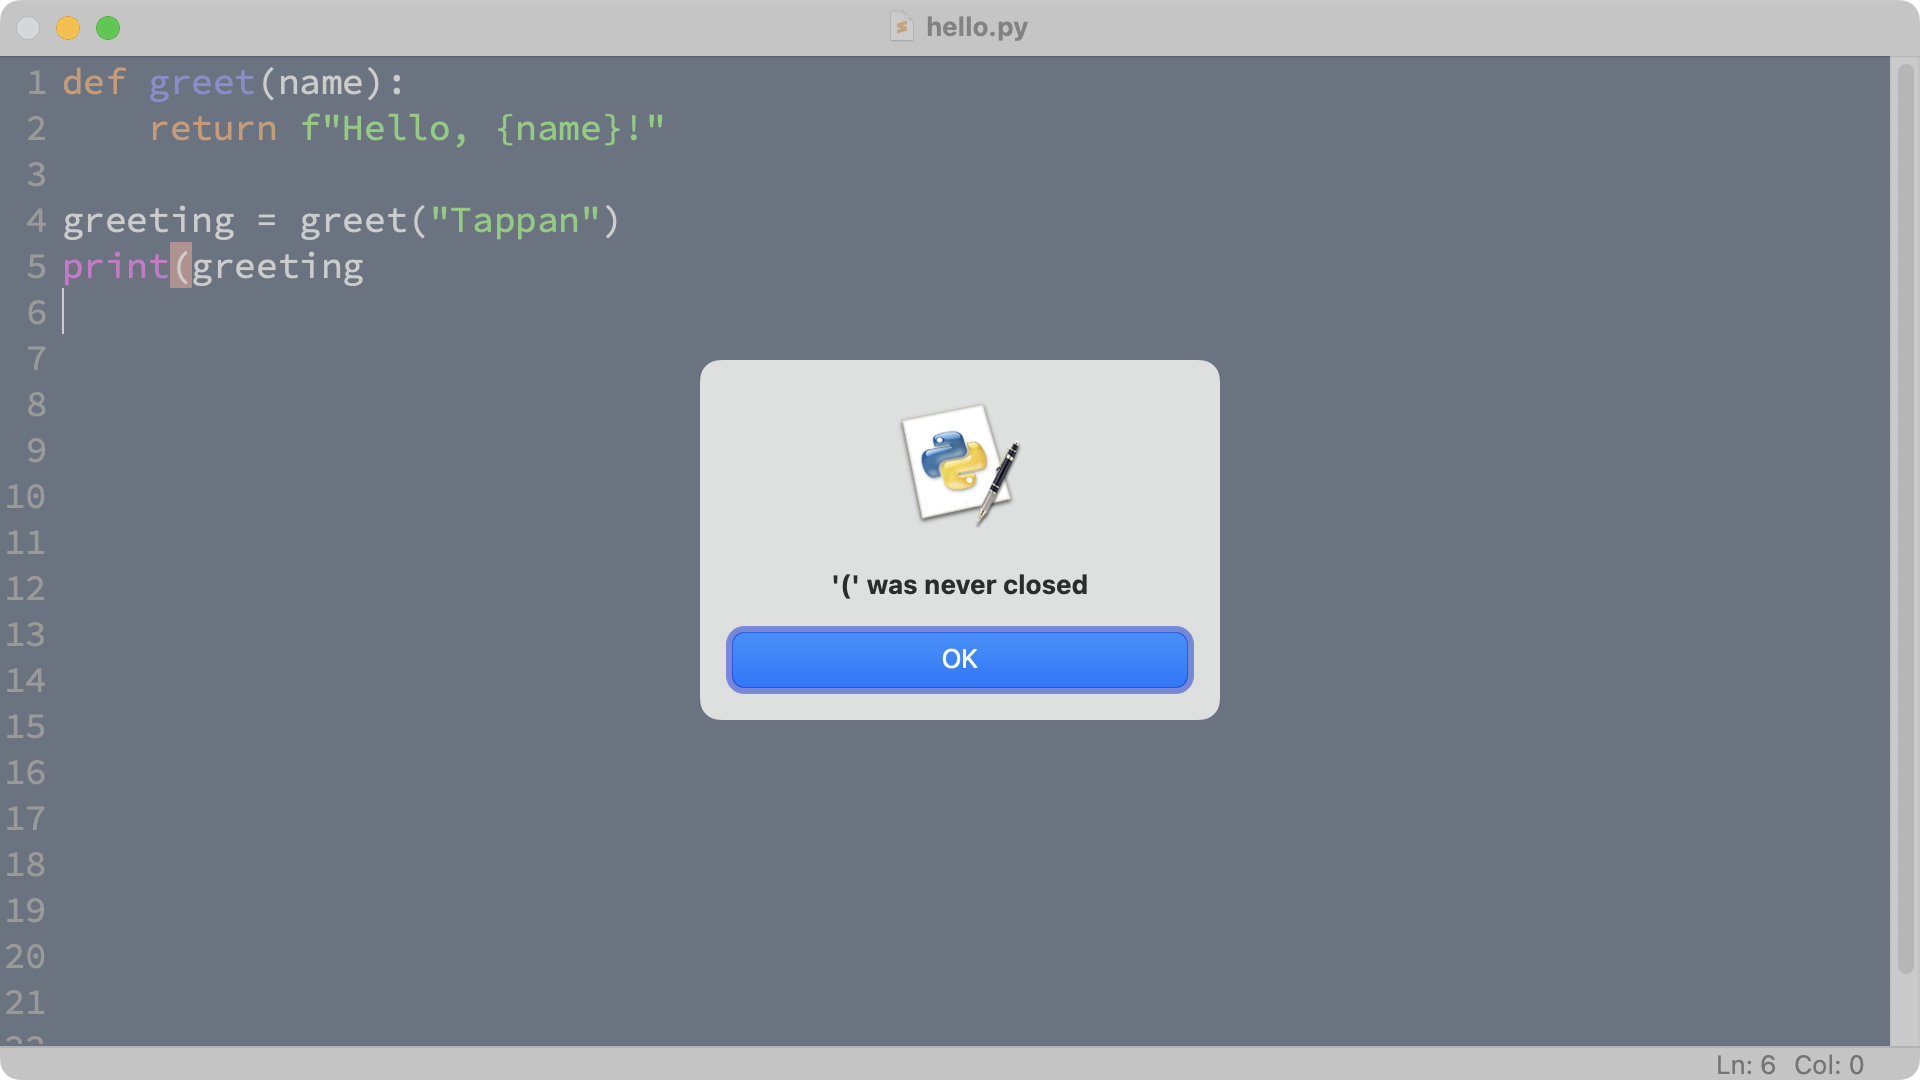
In this code example, you forgot to add a closing parenthesis in your print() call. When you try running your code, you get a notification, and you can go back to your code to fix the error before continuing.
Other errors are not as easy to spot and only get raised when Python executes the code. Fortunately, IDLE comes with some handy features to help you find the lines where errors occur.
Jump to the Error Source
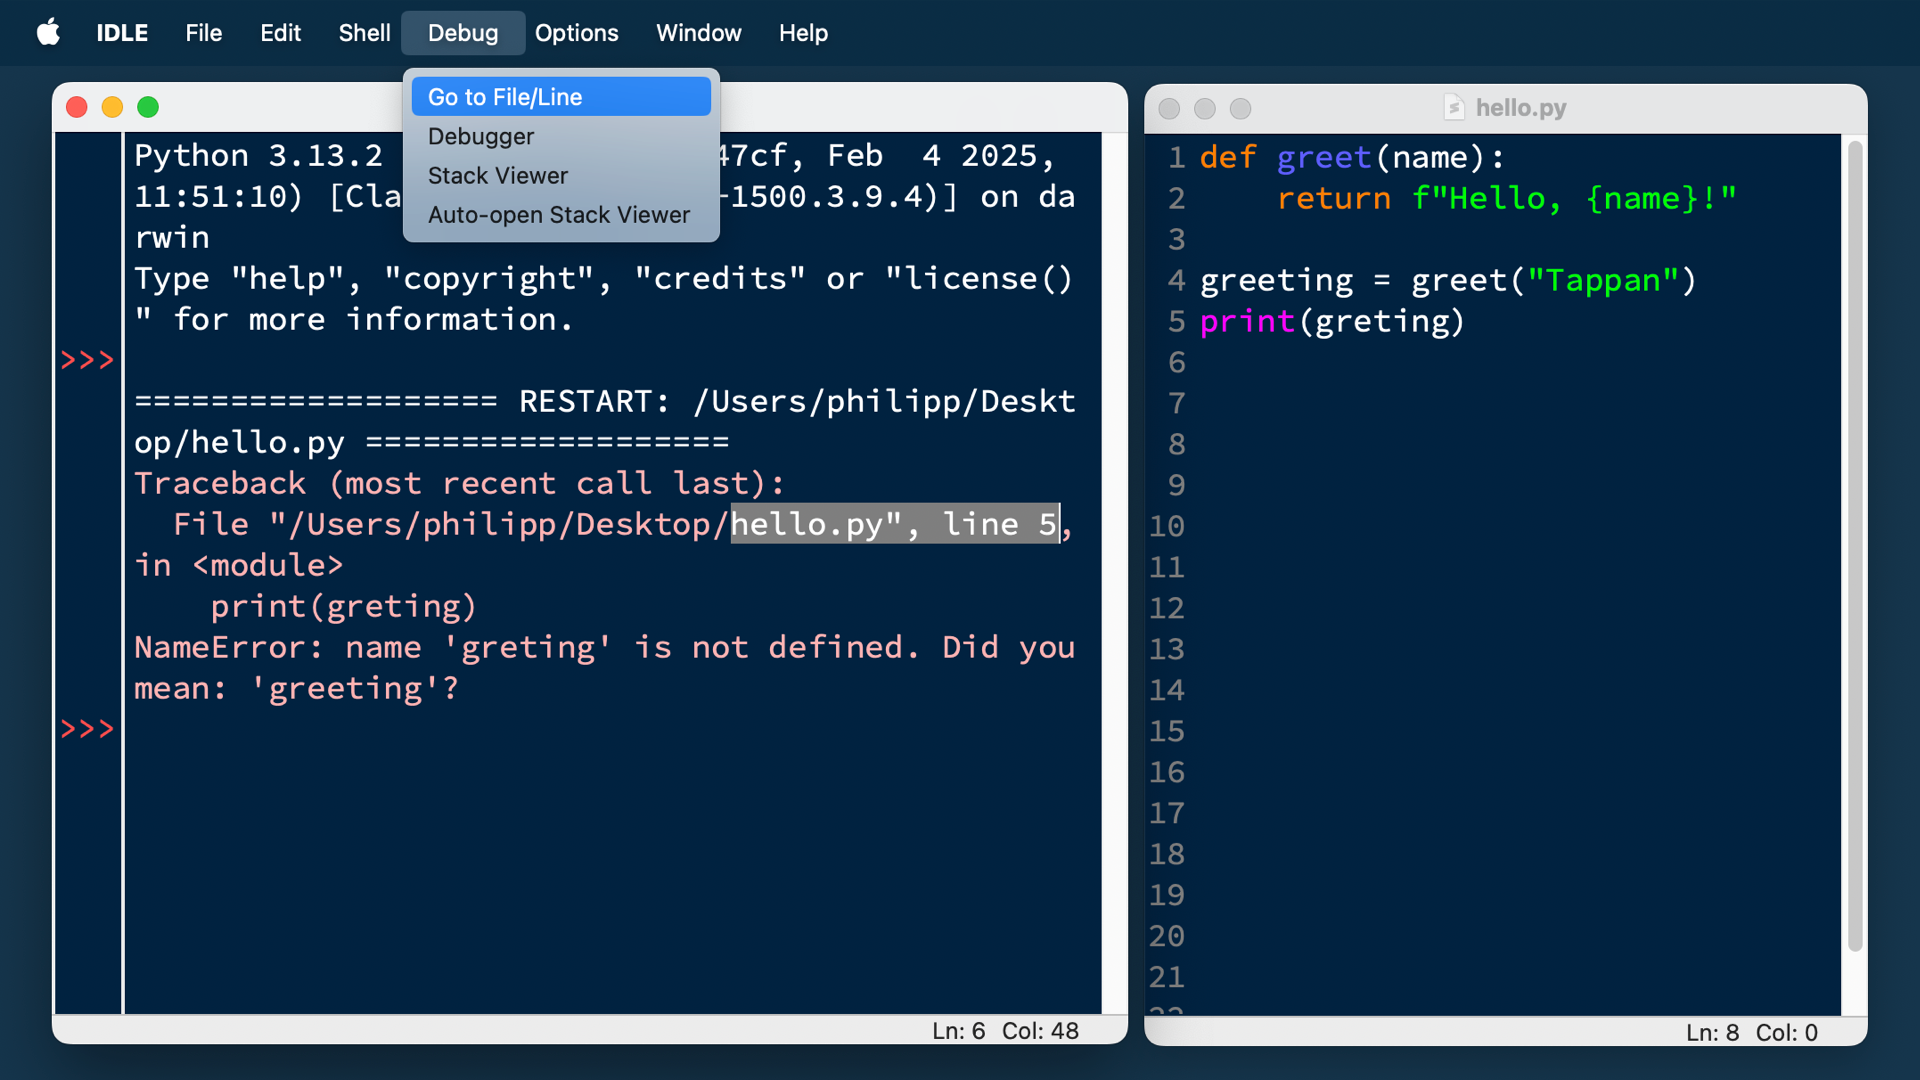
When you see an error reported to you in the interpreter, Python IDLE lets you jump right to the offending file or line from the menu bar. All you have to do is put your cursor over the error message with the reported filename and line number and select Debug → Go to File/Line from the menu bar:
Alternatively, you can also right-click the highlighted text and select Go to file/line from there:
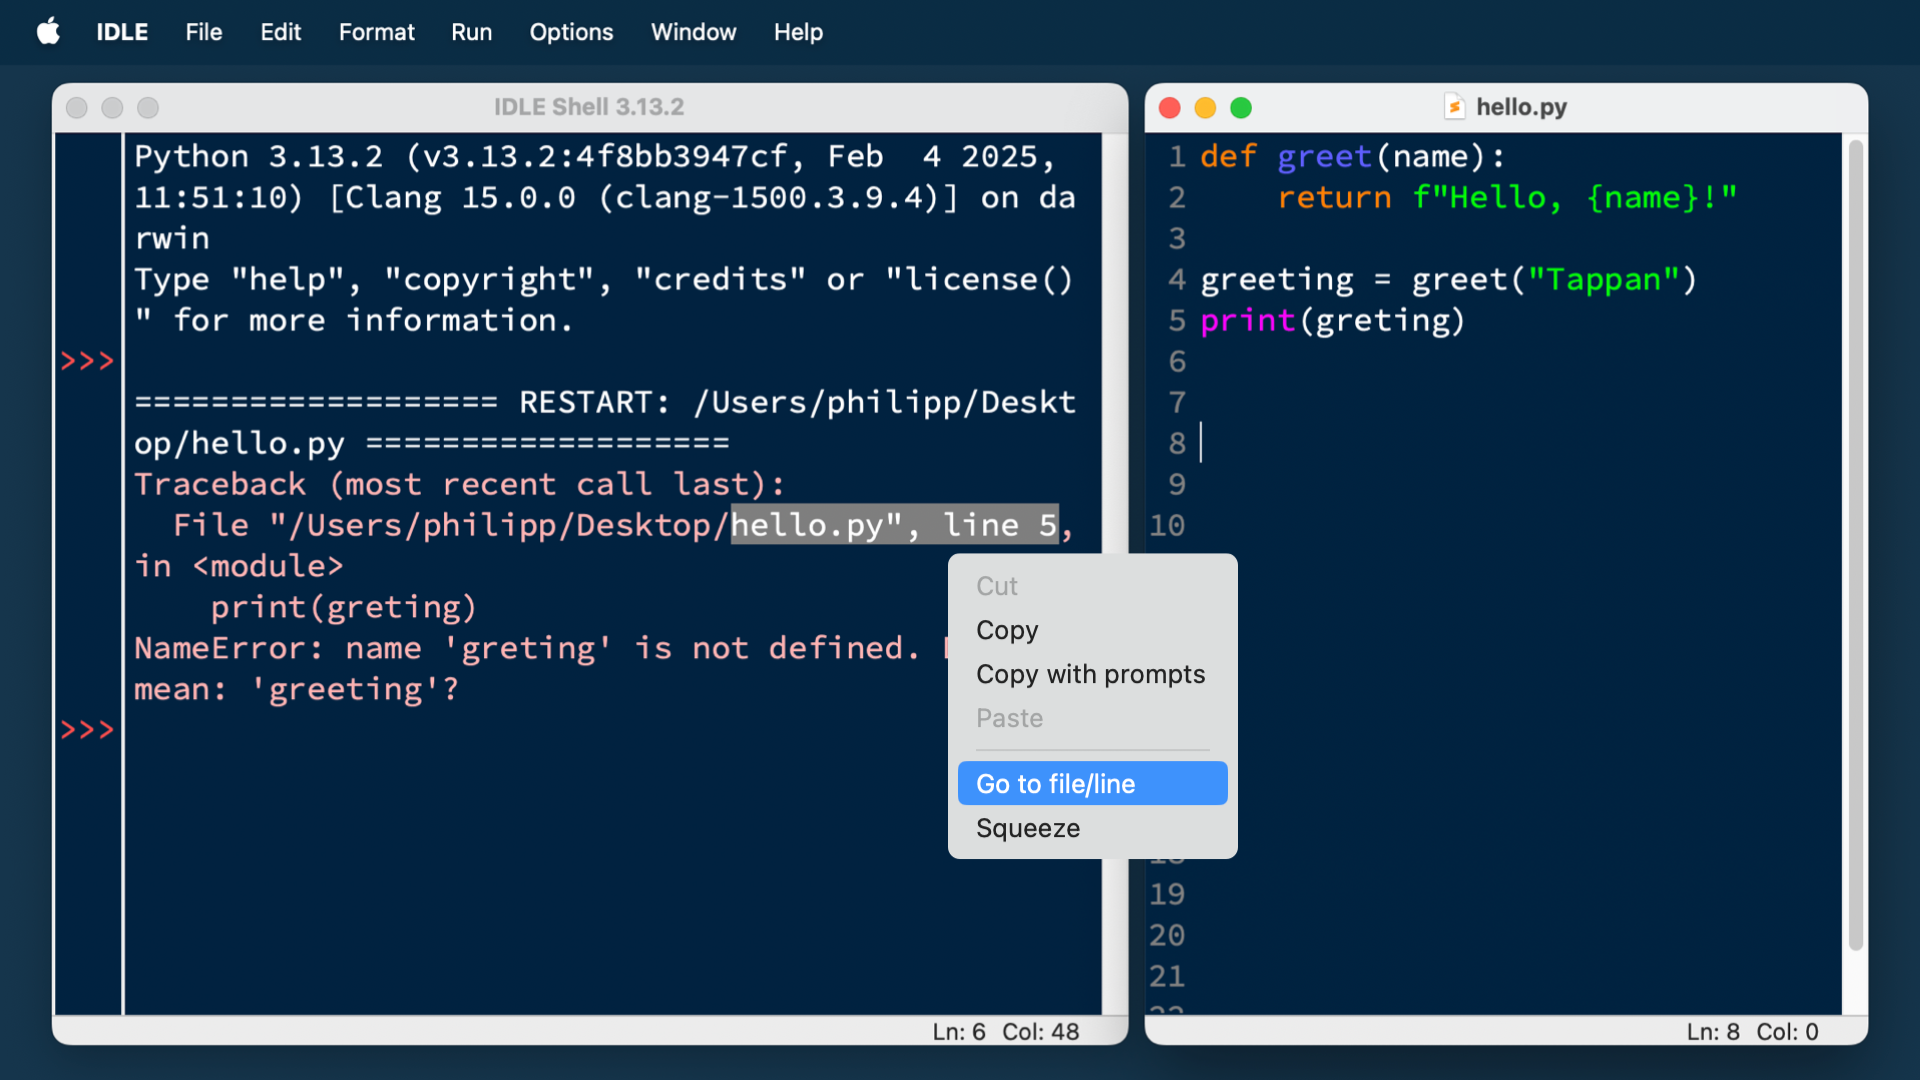
This will open up the offending file and take you to the line that contains the error. This feature works regardless of whether or not DEBUG mode is turned on.
Use the Stack Viewer
Python IDLE also provides a tool called a stack viewer. You can access it under the Debug option in the menu bar. This tool will show you the traceback of an error as it appears on the stack of the last error or exception that Python IDLE encountered while running your code:
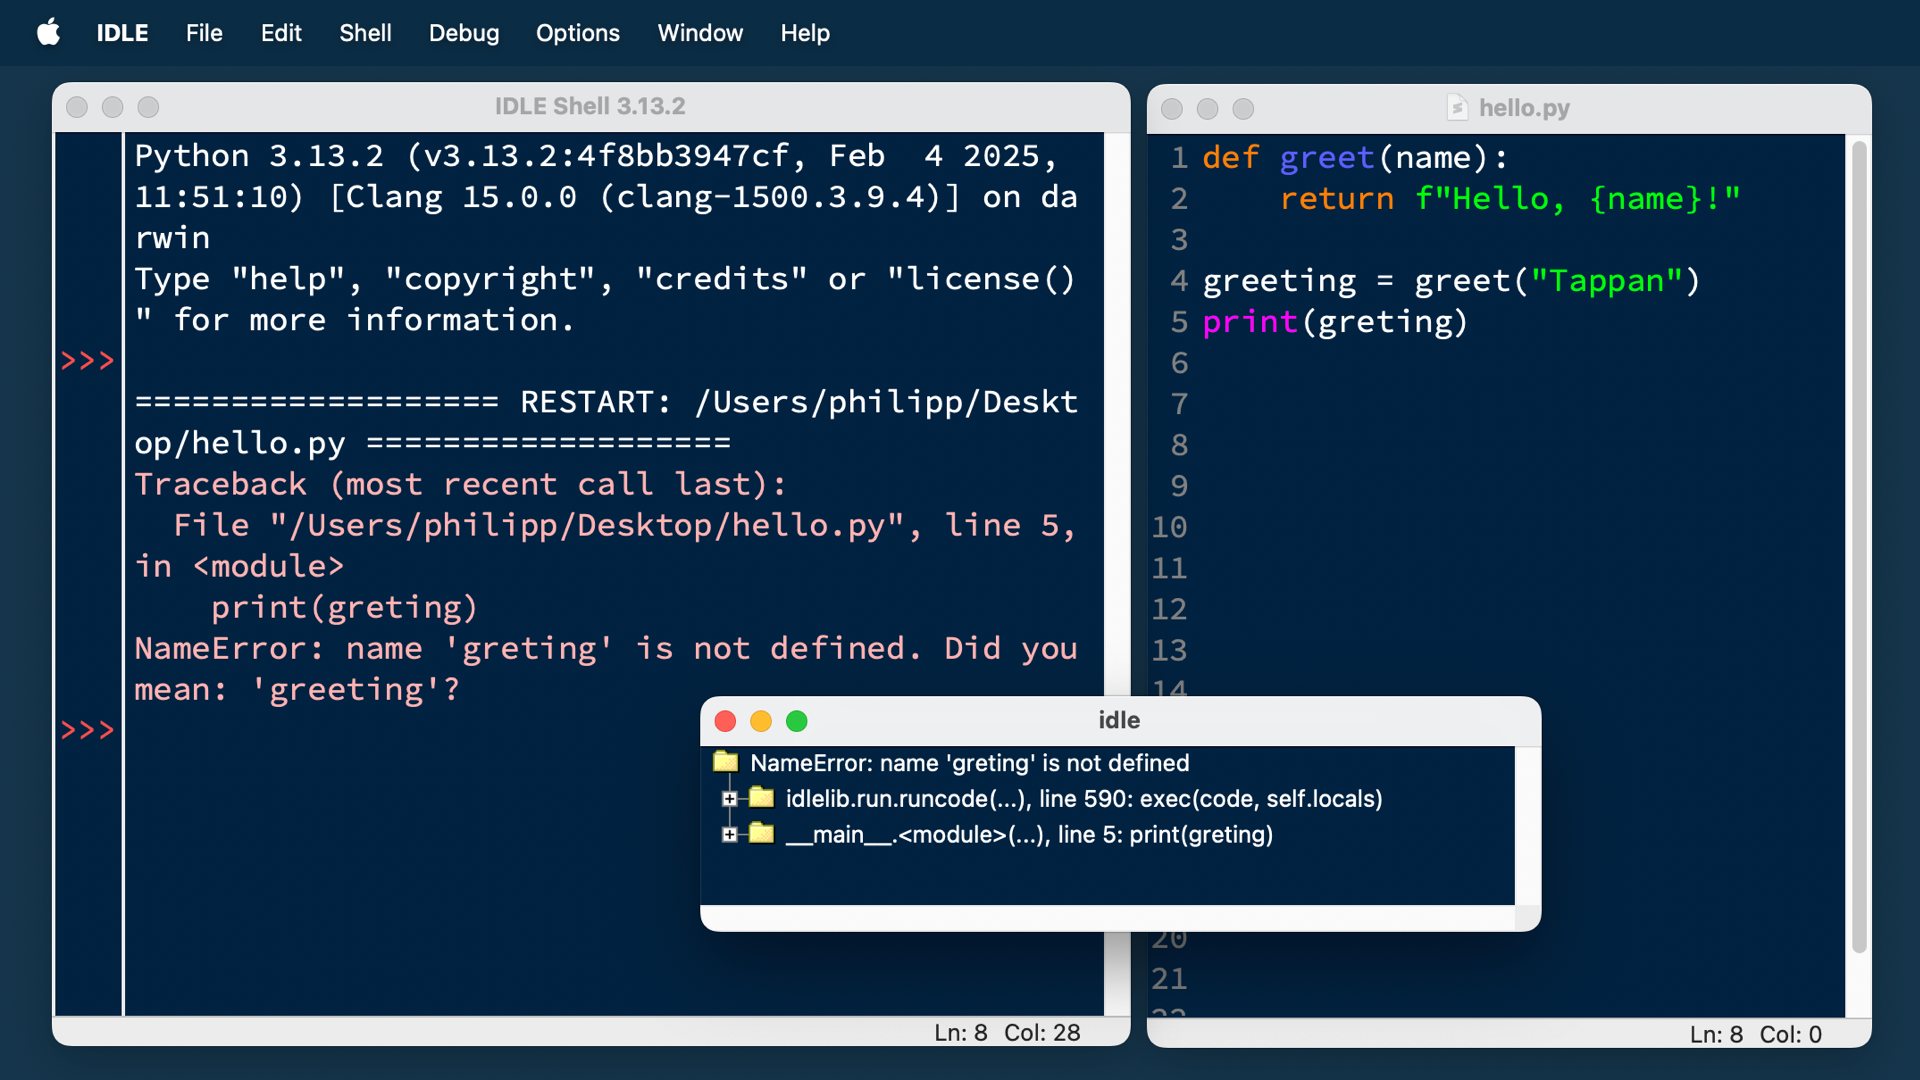
When an unexpected or interesting error occurs, you might find it helpful to take a look at the stack. This feature can be useful when you’re writing very complicated code and you really want to investigate the source of your problem.
Customize Settings in Python IDLE
There are many ways that you can customize IDLE to suit you better. While you can adjust some parts in the Options menu, you can perform more impactful customizations in the settings window.
To access the settings window, you need to go to the Settings menu. On macOS, you can find this under the IDLE menu at the top of the screen. On Windows and Linux, you can access it by selecting Options and then choosing Configure IDLE.
To preview the result of a change you want to make, click Apply. When you’re done customizing Python IDLE, click OK to save all of your changes. If you don’t want to save your changes, then simply click Cancel.
There are six areas of Python IDLE that you can customize:
- Fonts
- Highlights
- Keys
- Windows
- Shell and Editor
- Extensions
You’ll take a look at each of them now.
Fonts
The first tab allows you to change things like font color, font size, and font style. You can change the font to almost any style you like, depending on what’s available for your operating system.
You can use the scrolling pane on the left to select which font you prefer. Ideally, you should choose a fixed-width font. Once you’ve selected a font, you can see a preview in the Font Sample pane:
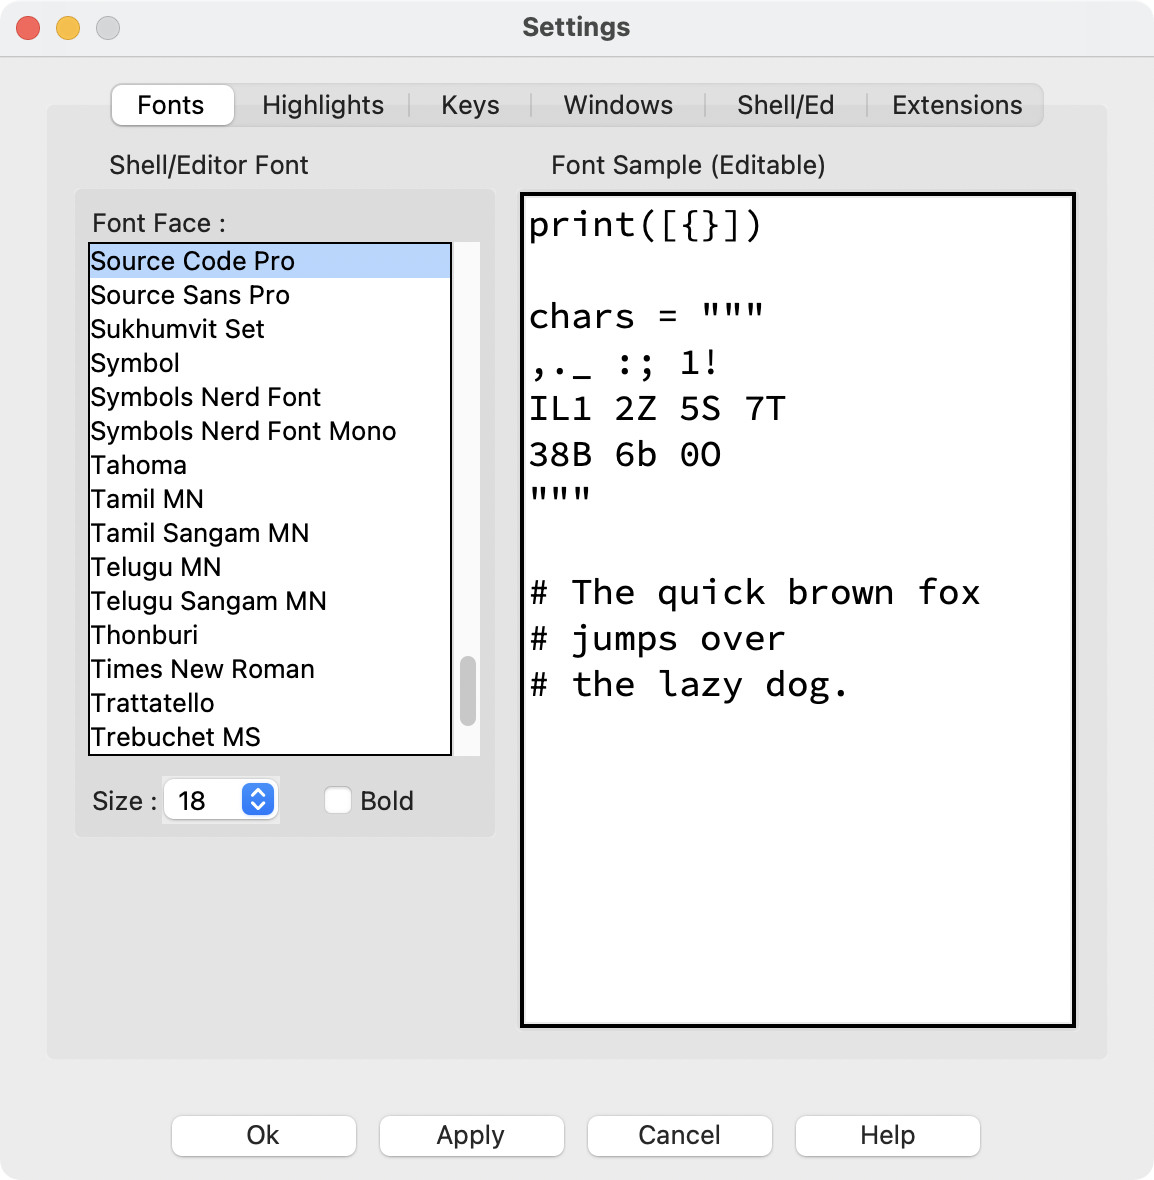
Notice that it says Editable next to Font Sample. That means you can paste in your own code to preview a font.
Here’s a useful snippet to evaluate your coding font:
print([{}])

chars = """
,._ :; 1!
IL1 2Z 5S 7T
38B 6b 0O
"""

# The quick brown fox
# jumps over
# the lazy dog.
With the snippet above, you can get a good impression of how legible your selected font is and how different characters look.
Get Your Cheat Sheet: Click here to download your free cheat sheet that will help you find the best coding font when starting with IDLE.
Highlights
The second customization tab will let you change highlights. Syntax highlighting is an important feature of any IDE, as it highlights the syntax of the language you’re working in. This helps you visually distinguish between the different Python constructs and the data used in your code.
Python IDLE allows you to fully customize the appearance of your Python code. It comes pre-installed with three different highlight themes:
- IDLE Classic
- IDLE Dark
- IDLE New
You can select from these pre-installed themes, or you can even create your own custom theme right in this window:
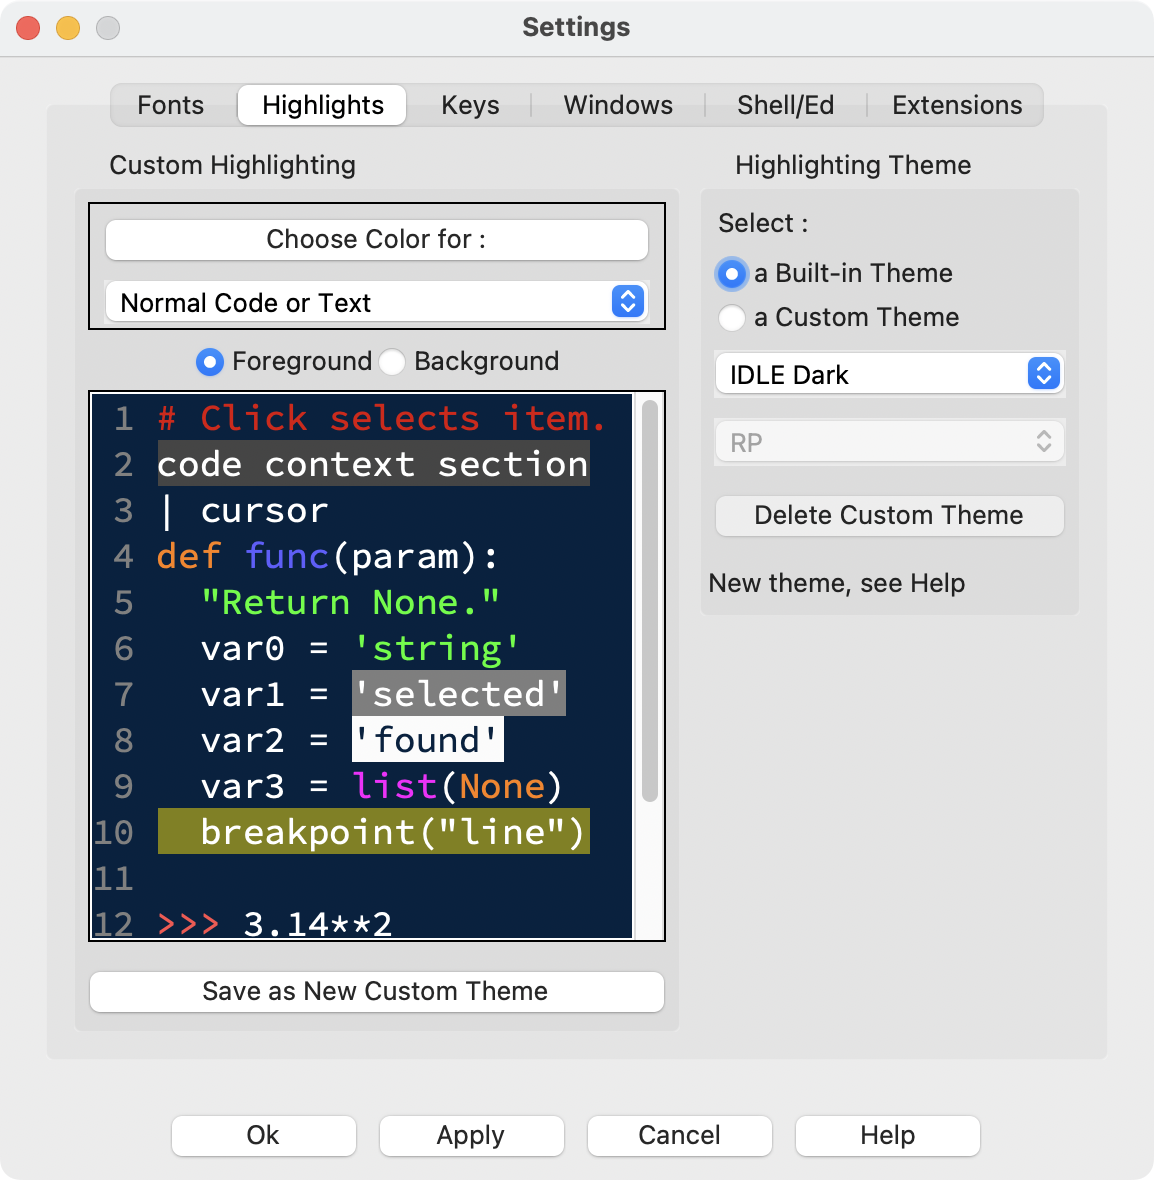
Unfortunately, IDLE doesn’t allow you to import custom themes from a file. Any custom themes that you create in this window will stay in your IDLE installation. If that works for you, then you can start changing the colors for different items.
To customize a theme, select an item in the text or the drop-down menu, and then select Choose Color for. You’ll be brought to a color picker, where you can select the exact color that you want to use.
You’ll then be prompted to save this theme as a new custom theme, and you can enter a name of your choosing. You can then continue changing the colors of different items if you’d like. Remember to click Apply to see your changes in action!
Keys
The third customization tab lets you map different key presses to actions, also known as keyboard shortcuts. These are a vital component of your productivity whenever you use an IDE. You can either come up with your own keyboard shortcuts, or you can use the ones that come with IDLE. The pre-installed shortcuts are a good place to start:
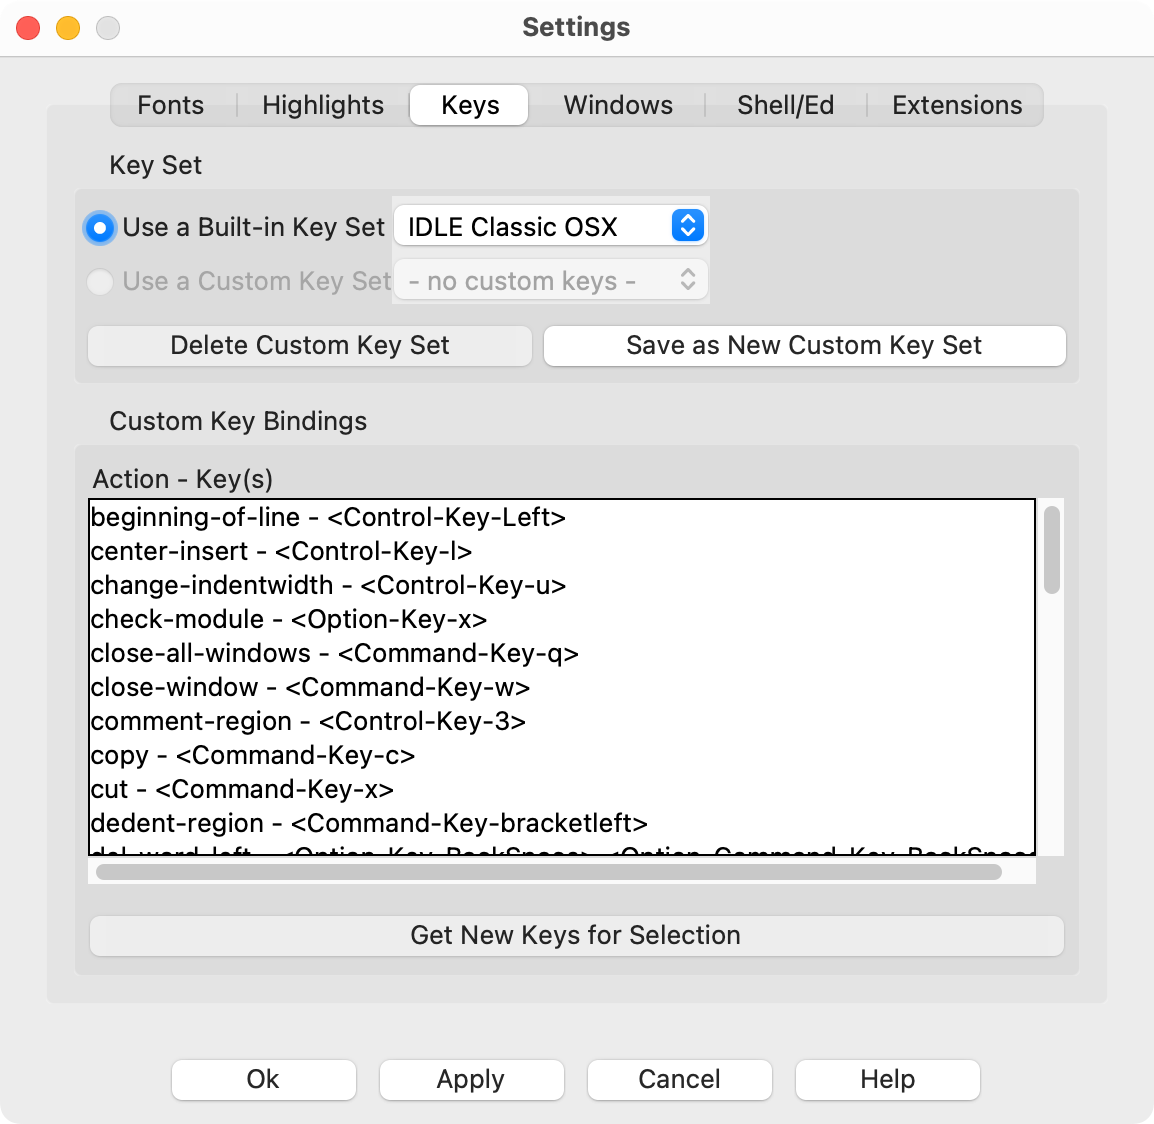
The keyboard shortcuts are listed in alphabetical order by action. They’re listed in the format Action - Key(s), where Action is what will happen when you press the key combination. If you want to use a built-in key set, then select a mapping that matches your operating system.
You can create a custom set of shortcuts from the Keys tab. To do so, select one pair from the list and click Get New Keys for Selection. A new window will pop up where you can use the checkboxes and scrolling menu to select the combination of keys that you want to use for this shortcut.
Windows
The fourth tab of the settings is a place for general window settings. Most of the settings are visual settings that affect you. The only exception is the indent level:
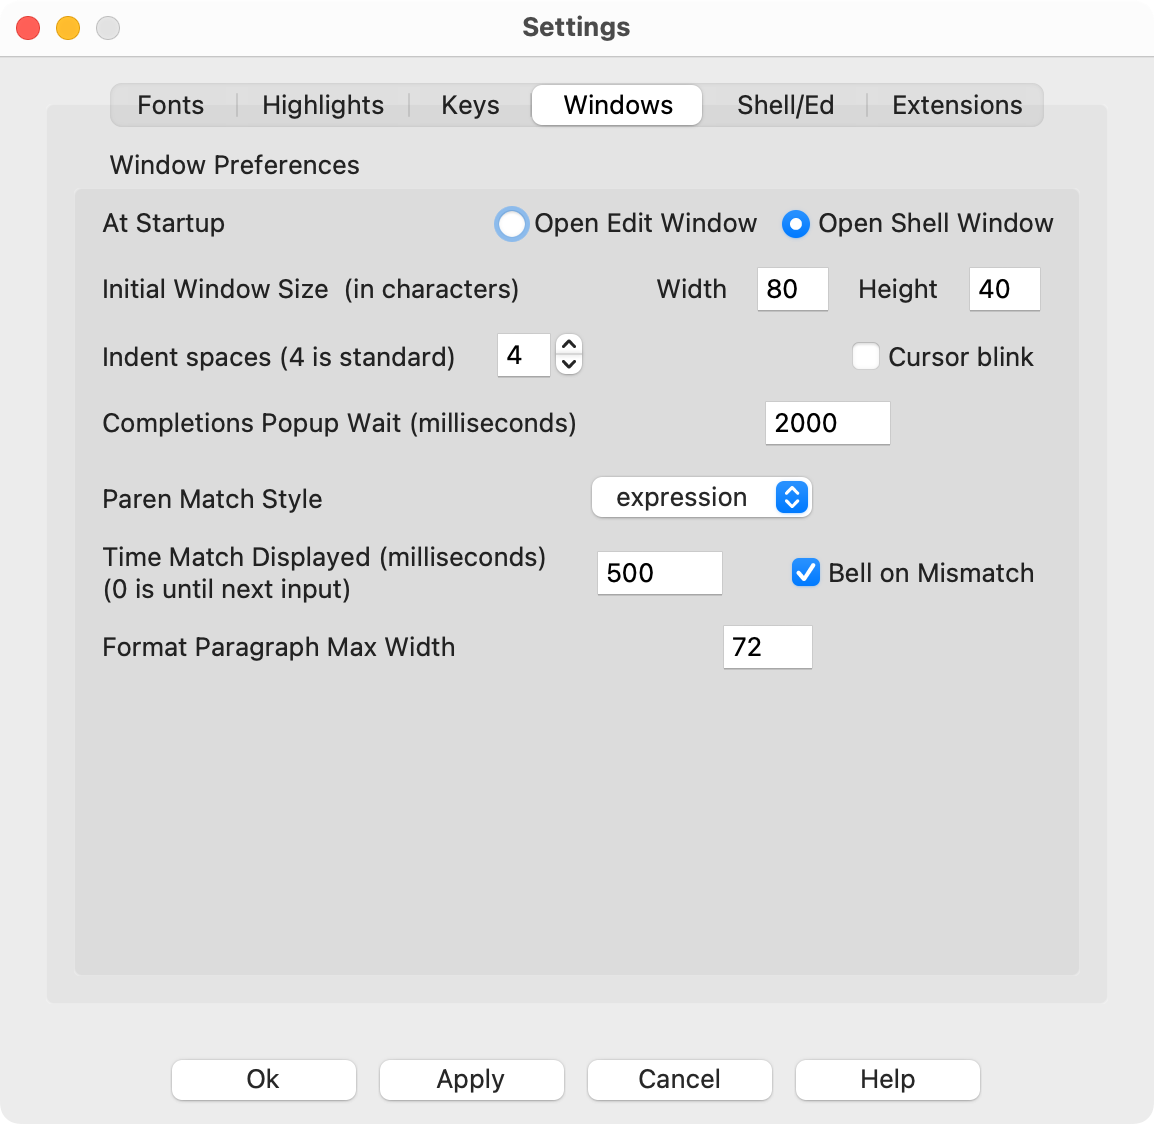
If you change the indentation level, the effect will take place on all indentations you set from now on. As mentioned earlier, the standard is four spaces, and it’s a good idea to keep it that way.
Other than that, you can customize things like the window size and whether the shell or the file editor opens when you first start Python IDLE. These settings are safe to play around with.
Shell and Editor
The Shell/Ed tab contains the settings for the shell and the editor. Here, you find some settings that you can otherwise find in the Options menu bar of IDLE:
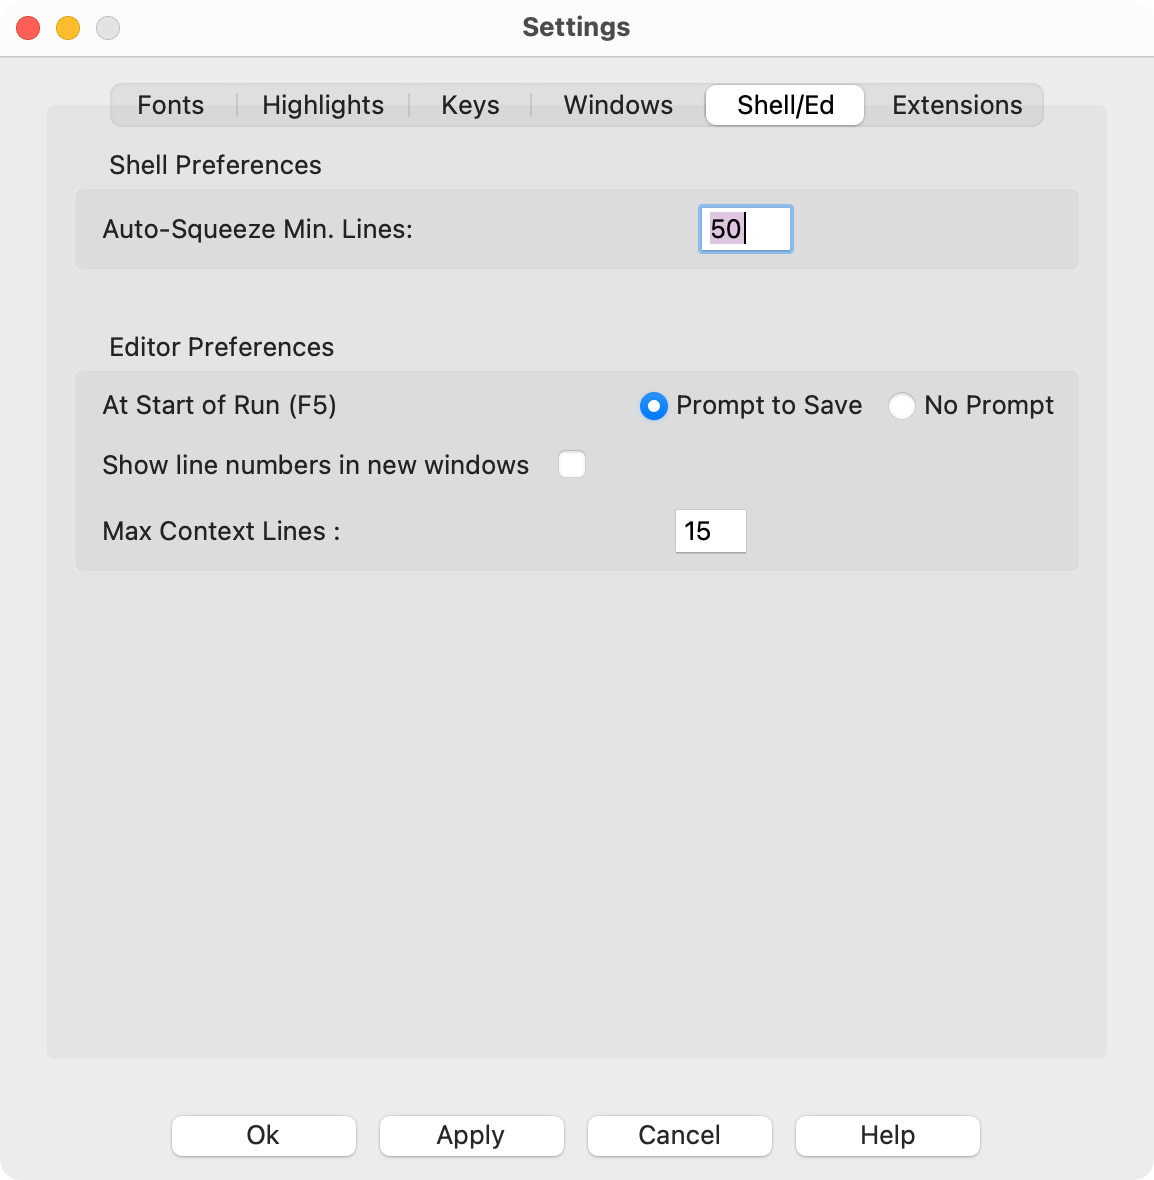
The two most notable settings are probably to show line numbers in new windows by default and to notify you when running unsaved code.
Extensions
The sixth tab of the customization window lets you add extensions to Python IDLE. Extensions allow you to add features to the editor and the interpreter window:
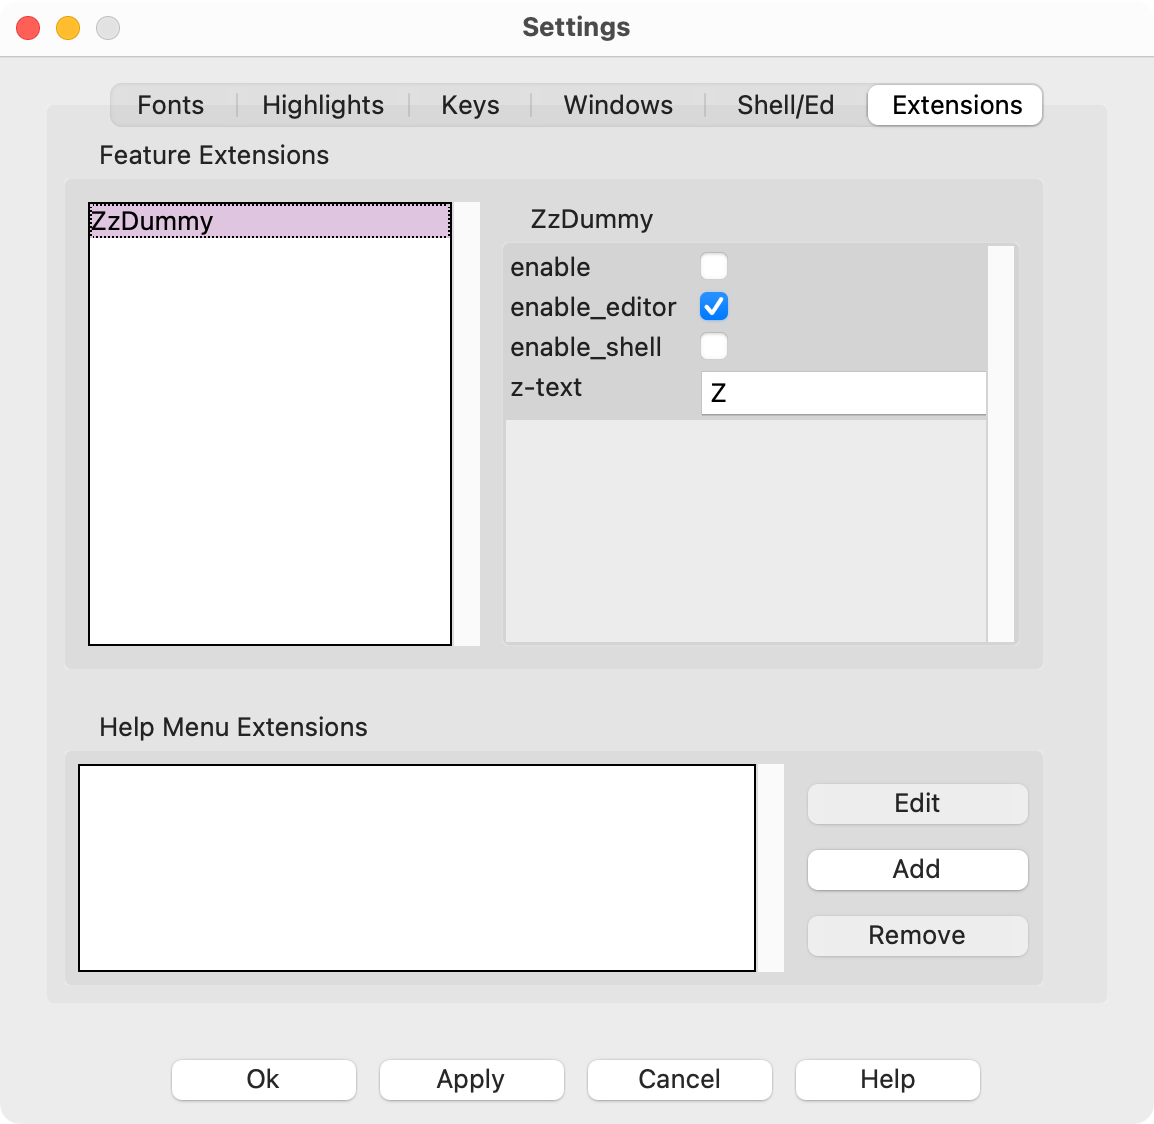
By default, you can find a mysterious extension named ZzDummy in the Feature Extensions pane:
The only current default extension is zzdummy, an example also used for testing. (Source)
If you feel adventurous, then you can visit the IdleX website, which contains over twenty extensions that you can install for IDLE. However, keep in mind that there haven’t been any updates to the package since 2022.
Alternatively, you can write your own extensions by following the instructions on writing IDLE extensions. If you do write your own extension for IDLE, then make sure to let the Real Python community know in the comments below!
Conclusion
In this tutorial, you’ve learned all the basics of using IDLE to write Python programs. You know what Python IDLE is and how you can use it to interact with Python directly. You’ve also learned how to work with Python files and customize Python IDLE to your liking.
You’ve learned how to:
- Work with the Python IDLE shell
- Use Python IDLE as a file editor
- Improve your workflow with features to help you code faster
- Debug your code and view errors and exceptions
- Customize Python IDLE to your liking
Now you’re armed with a free tool that will let you write Python code without needing to install additional software.
Frequently Asked Questions
Now that you have some experience with Python IDLE, you can use the questions and answers below to check your understanding and recap what you’ve learned.
These FAQs are related to the most important concepts you’ve covered in this tutorial. Click the Show/Hide toggle beside each question to reveal the answer.
Python IDLE is Python’s default integrated development environment (IDE) that comes bundled with every Python installation, allowing you to write, edit, and execute Python code.
You can run Python IDLE by searching for “IDLE” in your operating system’s search function or by using the terminal command like idle3, depending on your OS.
Yes, Python IDLE is free and comes included with every Python installation.
The ZzDummy extension in Python’s IDLE is an example extension used for testing and does not provide any functional features.
Take the Quiz: Test your knowledge with our interactive “Getting Started With Python IDLE” quiz. You’ll receive a score upon completion to help you track your learning progress:
Interactive Quiz
Getting Started With Python IDLEIn this quiz, you'll test your understanding of Python IDLE, the default integrated development environment (IDE) that comes bundled with every Python installation. You'll revisit how to interact with Python directly in IDLE, edit and execute Python files.
