Sentiment analysis is a powerful tool that allows computers to understand the underlying subjective tone of a piece of writing. This is something that humans have difficulty with, and as you might imagine, it isn’t always so easy for computers, either. But with the right tools and Python, you can use sentiment analysis to better understand the sentiment of a piece of writing.
Why would you want to do that? There are a lot of uses for sentiment analysis, such as understanding how stock traders feel about a particular company by using social media data or aggregating reviews, which you’ll get to do by the end of this tutorial.
In this tutorial, you’ll learn:
- How to use natural language processing (NLP) techniques
- How to use machine learning to determine the sentiment of text
- How to use spaCy to build an NLP pipeline that feeds into a sentiment analysis classifier
This tutorial is ideal for beginning machine learning practitioners who want a project-focused guide to building sentiment analysis pipelines with spaCy.
You should be familiar with basic machine learning techniques like binary classification as well as the concepts behind them, such as training loops, data batches, and weights and biases. If you’re unfamiliar with machine learning, then you can kickstart your journey by learning about logistic regression.
When you’re ready, you can follow along with the examples in this tutorial by downloading the source code from the link below:
Get the Source Code: Click here to get the source code you’ll use to learn about sentiment analysis with natural language processing in this tutorial.
Using Natural Language Processing to Preprocess and Clean Text Data
Any sentiment analysis workflow begins with loading data. But what do you do once the data’s been loaded? You need to process it through a natural language processing pipeline before you can do anything interesting with it.
The necessary steps include (but aren’t limited to) the following:
- Tokenizing sentences to break text down into sentences, words, or other units
- Removing stop words like “if,” “but,” “or,” and so on
- Normalizing words by condensing all forms of a word into a single form
- Vectorizing text by turning the text into a numerical representation for consumption by your classifier
All these steps serve to reduce the noise inherent in any human-readable text and improve the accuracy of your classifier’s results. There are lots of great tools to help with this, such as the Natural Language Toolkit, TextBlob, and spaCy. For this tutorial, you’ll use spaCy.
Note: spaCy is a very powerful tool with many features. For a deep dive into many of these features, check out Natural Language Processing With spaCy.
Before you go further, make sure you have spaCy and its English model installed:
$ pip install spacy==2.3.5
$ python -m spacy download en_core_web_sm
The first command installs spaCy, and the second uses spaCy to download its English language model. spaCy supports a number of different languages, which are listed on the spaCy website.
Warning: This tutorial only works with spaCy 2.X and is not compatible with spaCy 3.0. For the best experience, please install the version specificed above.
Next, you’ll learn how to use spaCy to help with the preprocessing steps you learned about earlier, starting with tokenization.
Tokenizing
Tokenization is the process of breaking down chunks of text into smaller pieces. spaCy comes with a default processing pipeline that begins with tokenization, making this process a snap. In spaCy, you can do either sentence tokenization or word tokenization:
- Word tokenization breaks text down into individual words.
- Sentence tokenization breaks text down into individual sentences.
In this tutorial, you’ll use word tokenization to separate the text into individual words. First, you’ll load the text into spaCy, which does the work of tokenization for you:
>>> import spacy
>>> text = """
... Dave watched as the forest burned up on the hill,
... only a few miles from his house. The car had
... been hastily packed and Marta was inside trying to round
... up the last of the pets. "Where could she be?" he wondered
... as he continued to wait for Marta to appear with the pets.
... """

>>> nlp = spacy.load("en_core_web_sm")
>>> doc = nlp(text)
>>> token_list = [token for token in doc]
>>> token_list
[
, Dave, watched, as, the, forest, burned, up, on, the, hill, ,,
, only, a, few, miles, from, his, house, ., The, car, had,
, been, hastily, packed, and, Marta, was, inside, trying, to, round,
, up, the, last, of, the, pets, ., ", Where, could, she, be, ?, ", he, wondered,
, as, he, continued, to, wait, for, Marta, to, appear, with, the, pets, .,
]
In this code, you set up some example text to tokenize, load spaCy’s English model, and then tokenize the text by passing it into the nlp constructor. This model includes a default processing pipeline that you can customize, as you’ll see later in the project section.
After that, you generate a list of tokens and print it. As you may have noticed, “word tokenization” is a slightly misleading term, as captured tokens include punctuation and other nonword strings.
Tokens are an important container type in spaCy and have a very rich set of features. In the next section, you’ll learn how to use one of those features to filter out stop words.
Removing Stop Words
Stop words are words that may be important in human communication but are of little value for machines. spaCy comes with a default list of stop words that you can customize. For now, you’ll see how you can use token attributes to remove stop words:
>>> filtered_tokens = [token for token in doc if not token.is_stop]
>>> filtered_tokens
[
, Dave, watched, forest, burned, hill, ,,
, miles, house, ., car,
, hastily, packed, Marta, inside, trying, round,
, pets, ., ", ?, ", wondered,
, continued, wait, Marta, appear, pets, .,
]
In one line of Python code, you filter out stop words from the tokenized text using the .is_stop token attribute.
What differences do you notice between this output and the output you got after tokenizing the text? With the stop words removed, the token list is much shorter, and there’s less context to help you understand the tokens.
Normalizing Words
Normalization is a little more complex than tokenization. It entails condensing all forms of a word into a single representation of that word. For instance, “watched,” “watching,” and “watches” can all be normalized into “watch.” There are two major normalization methods:
- Stemming
- Lemmatization
With stemming, a word is cut off at its stem, the smallest unit of that word from which you can create the descendant words. You just saw an example of this above with “watch.” Stemming simply truncates the string using common endings, so it will miss the relationship between “feel” and “felt,” for example.
Lemmatization seeks to address this issue. This process uses a data structure that relates all forms of a word back to its simplest form, or lemma. Because lemmatization is generally more powerful than stemming, it’s the only normalization strategy offered by spaCy.
Luckily, you don’t need any additional code to do this. It happens automatically—along with a number of other activities, such as part of speech tagging and named entity recognition—when you call nlp(). You can inspect the lemma for each token by taking advantage of the .lemma_ attribute:
>>> lemmas = [
...     f"Token: {token}, lemma: {token.lemma_}"
...     for token in filtered_tokens
... ]
>>> lemmas
['Token: \n, lemma: \n', 'Token: Dave, lemma: Dave',
 'Token: watched, lemma: watch', 'Token: forest, lemma: forest',
 # ...
]
All you did here was generate a readable list of tokens and lemmas by iterating through the filtered list of tokens, taking advantage of the .lemma_ attribute to inspect the lemmas. This example shows only the first few tokens and lemmas. Your output will be much longer.
Note: Notice the underscore on the .lemma_ attribute. That’s not a typo. It’s a convention in spaCy that gets the human-readable version of the attribute.
The next step is to represent each token in way that a machine can understand. This is called vectorization.
Vectorizing Text
Vectorization is a process that transforms a token into a vector, or a numeric array that, in the context of NLP, is unique to and represents various features of a token. Vectors are used under the hood to find word similarities, classify text, and perform other NLP operations.
This particular representation is a dense array, one in which there are defined values for every space in the array. This is in opposition to earlier methods that used sparse arrays, in which most spaces are empty.
Like the other steps, vectorization is taken care of automatically with the nlp() call. Since you already have a list of token objects, you can get the vector representation of one of the tokens like so:
>>> filtered_tokens[1].vector
array([ 1.8371646 ,  1.4529226 , -1.6147211 ,  0.678362  , -0.6594443 ,
        1.6417935 ,  0.5796405 ,  2.3021278 , -0.13260496,  0.5750932 ,
        1.5654886 , -0.6938864 , -0.59607106, -1.5377437 ,  1.9425622 ,
       -2.4552505 ,  1.2321601 ,  1.0434952 , -1.5102385 , -0.5787632 ,
        0.12055647,  3.6501784 ,  2.6160972 , -0.5710199 , -1.5221789 ,
        0.00629176,  0.22760668, -1.922073  , -1.6252862 , -4.226225  ,
       -3.495663  , -3.312053  ,  0.81387717, -0.00677544, -0.11603224,
        1.4620426 ,  3.0751472 ,  0.35958546, -0.22527039, -2.743926  ,
        1.269633  ,  4.606786  ,  0.34034157, -2.1272311 ,  1.2619178 ,
       -4.209798  ,  5.452852  ,  1.6940253 , -2.5972986 ,  0.95049495,
       -1.910578  , -2.374927  , -1.4227567 , -2.2528825 , -1.799806  ,
        1.607501  ,  2.9914255 ,  2.8065152 , -1.2510269 , -0.54964066,
       -0.49980402, -1.3882618 , -0.470479  , -2.9670253 ,  1.7884955 ,
        4.5282774 , -1.2602427 , -0.14885521,  1.0419178 , -0.08892632,
       -1.138275  ,  2.242618  ,  1.5077229 , -1.5030195 ,  2.528098  ,
       -1.6761329 ,  0.16694719,  2.123961  ,  0.02546412,  0.38754445,
        0.8911977 , -0.07678384, -2.0690763 , -1.1211847 ,  1.4821006 ,
        1.1989193 ,  2.1933236 ,  0.5296372 ,  3.0646474 , -1.7223308 ,
       -1.3634219 , -0.47471118, -1.7648507 ,  3.565178  , -2.394205  ,
       -1.3800384 ], dtype=float32)
Here you use the .vector attribute on the second token in the filtered_tokens list, which in this set of examples is the word Dave.
Note: If you get different results for the .vector attribute, don’t worry. This could be because you’re using a different version of the en_core_web_sm model or, potentially, of spaCy itself.
Now that you’ve learned about some of the typical text preprocessing steps in spaCy, you’ll learn how to classify text.
Using Machine Learning Classifiers to Predict Sentiment
Your text is now processed into a form understandable by your computer, so you can start to work on classifying it according to its sentiment. You’ll cover three topics that will give you a general understanding of machine learning classification of text data:
- What machine learning tools are available and how they’re used
- How classification works
- How to use spaCy for text classification
First, you’ll learn about some of the available tools for doing machine learning classification.
Machine Learning Tools
There are a number of tools available in Python for solving classification problems. Here are some of the more popular ones:
This list isn’t all-inclusive, but these are the more widely used machine learning frameworks available in Python. They’re large, powerful frameworks that take a lot of time to truly master and understand.
TensorFlow is developed by Google and is one of the most popular machine learning frameworks. You use it primarily to implement your own machine learning algorithms as opposed to using existing algorithms. It’s fairly low-level, which gives the user a lot of power, but it comes with a steep learning curve.
PyTorch is Facebook’s answer to TensorFlow and accomplishes many of the same goals. However, it’s built to be more familiar to Python programmers and has become a very popular framework in its own right. Because they have similar use cases, comparing TensorFlow and PyTorch is a useful exercise if you’re considering learning a framework.
scikit-learn stands in contrast to TensorFlow and PyTorch. It’s higher-level and allows you to use off-the-shelf machine learning algorithms rather than building your own. What it lacks in customizability, it more than makes up for in ease of use, allowing you to quickly train classifiers in just a few lines of code.
Luckily, spaCy provides a fairly straightforward built-in text classifier that you’ll learn about a little later. First, however, it’s important to understand the general workflow for any sort of classification problem.
How Classification Works
Don’t worry—for this section you won’t go deep into linear algebra, vector spaces, or other esoteric concepts that power machine learning in general. Instead, you’ll get a practical introduction to the workflow and constraints common to classification problems.
Once you have your vectorized data, a basic workflow for classification looks like this:
- Split your data into training and evaluation sets.
- Select a model architecture.
- Use training data to train your model.
- Use test data to evaluate the performance of your model.
- Use your trained model on new data to generate predictions, which in this case will be a number between -1.0 and 1.0.
This list isn’t exhaustive, and there are a number of additional steps and variations that can be done in an attempt to improve accuracy. For example, machine learning practitioners often split their datasets into three sets:
- Training
- Validation
- Test
The training set, as the name implies, is used to train your model. The validation set is used to help tune the hyperparameters of your model, which can lead to better performance.
Note: Hyperparameters control the training process and structure of your model and can include things like learning rate and batch size. However, which hyperparameters are available depends very much on the model you choose to use.
The test set is a dataset that incorporates a wide variety of data to accurately judge the performance of the model. Test sets are often used to compare multiple models, including the same models at different stages of training.
Now that you’ve learned the general flow of classification, it’s time to put it into action with spaCy.
How to Use spaCy for Text Classification
You’ve already learned how spaCy does much of the text preprocessing work for you with the nlp() constructor. This is really helpful since training a classification model requires many examples to be useful.
Additionally, spaCy provides a pipeline functionality that powers much of the magic that happens under the hood when you call nlp(). The default pipeline is defined in a JSON file associated with whichever preexisting model you’re using (en_core_web_sm for this tutorial), but you can also build one from scratch if you wish.
Note: To learn more about creating your own language processing pipelines, check out the spaCy pipeline documentation.
What does this have to do with classification? One of the built-in pipeline components that spaCy provides is called textcat (short for TextCategorizer), which enables you to assign categories (or labels) to your text data and use that as training data for a neural network.
This process will generate a trained model that you can then use to predict the sentiment of a given piece of text. To take advantage of this tool, you’ll need to do the following steps:
- Add the
textcatcomponent to the existing pipeline. - Add valid labels to the
textcatcomponent. - Load, shuffle, and split your data.
- Train the model, evaluating on each training loop.
- Use the trained model to predict the sentiment of non-training data.
- Optionally, save the trained model.
Note: You can see an implementation of these steps in the spaCy documentation examples. This is the main way to classify text in spaCy, so you’ll notice that the project code draws heavily from this example.
In the next section, you’ll learn how to put all these pieces together by building your own project: a movie review sentiment analyzer.
Building Your Own NLP Sentiment Analyzer
From the previous sections, you’ve probably noticed four major stages of building a sentiment analysis pipeline:
- Loading data
- Preprocessing
- Training the classifier
- Classifying data
For building a real-life sentiment analyzer, you’ll work through each of the steps that compose these stages. You’ll use the Large Movie Review Dataset compiled by Andrew Maas to train and test your sentiment analyzer. Once you’re ready, proceed to the next section to load your data.
Loading and Preprocessing Data
If you haven’t already, download and extract the Large Movie Review Dataset. Spend a few minutes poking around, taking a look at its structure, and sampling some of the data. This will inform how you load the data. For this part, you’ll use spaCy’s textcat example as a rough guide.
You can (and should) decompose the loading stage into concrete steps to help plan your coding. Here’s an example:
- Load text and labels from the file and directory structures.
- Shuffle the data.
- Split the data into training and test sets.
- Return the two sets of data.
This process is relatively self-contained, so it should be its own function at least. In thinking about the actions that this function would perform, you may have thought of some possible parameters.
Since you’re splitting data, the ability to control the size of those splits may be useful, so split is a good parameter to include. You may also wish to limit the total amount of documents you process with a limit parameter. You can open your favorite editor and add this function signature:
def load_training_data(
    data_directory: str = "aclImdb/train",
    split: float = 0.8,
    limit: int = 0
) -> tuple:
With this signature, you take advantage of Python 3’s type annotations to make it absolutely clear which types your function expects and what it will return.
The parameters here allow you to define the directory in which your data is stored as well as the ratio of training data to test data. A good ratio to start with is 80 percent of the data for training data and 20 percent for test data. All of this and the following code, unless otherwise specified, should live in the same file.
Next, you’ll want to iterate through all the files in this dataset and load them into a list:
import os

def load_training_data(
    data_directory: str = "aclImdb/train",
    split: float = 0.8,
    limit: int = 0
) -> tuple:
    # Load from files
    reviews = []
    for label in ["pos", "neg"]:
        labeled_directory = f"{data_directory}/{label}"
        for review in os.listdir(labeled_directory):
            if review.endswith(".txt"):
                with open(f"{labeled_directory}/{review}") as f:
                    text = f.read()
                    text = text.replace("<br />", "\n\n")
                    if text.strip():
                        spacy_label = {
                            "cats": {
                                "pos": "pos" == label,
                                "neg": "neg" == label
                            }
                        }
                        reviews.append((text, spacy_label))
While this may seem complicated, what you’re doing is constructing the directory structure of the data, looking for and opening text files, then appending a tuple of the contents and a label dictionary to the reviews list.
The label dictionary structure is a format required by the spaCy model during the training loop, which you’ll see soon.
Note: Throughout this tutorial and throughout your Python journey, you’ll be reading and writing files. This is a foundational skill to master, so make sure to review it while you work through this tutorial.
Since you have each review open at this point, it’s a good idea to replace the <br /> HTML tags in the texts with newlines and to use .strip() to remove all leading and trailing whitespace.
For this project, you won’t remove stop words from your training data right away because it could change the meaning of a sentence or phrase, which could reduce the predictive power of your classifier. This is dependent somewhat on the stop word list that you use.
After loading the files, you want to shuffle them. This works to eliminate any possible bias from the order in which training data is loaded. Since the random module makes this easy to do in one line, you’ll also see how to split your shuffled data:
import os
import random

def load_training_data(
    data_directory: str = "aclImdb/train",
    split: float = 0.8,
    limit: int = 0
) -> tuple:
    # Load from files
    reviews = []
    for label in ["pos", "neg"]:
        labeled_directory = f"{data_directory}/{label}"
        for review in os.listdir(labeled_directory):
            if review.endswith(".txt"):
                with open(f"{labeled_directory}/{review}") as f:
                    text = f.read()
                    text = text.replace("<br />", "\n\n")
                    if text.strip():
                        spacy_label = {
                            "cats": {
                                "pos": "pos" == label,
                                "neg": "neg" == label}
                        }
                        reviews.append((text, spacy_label))
    random.shuffle(reviews)

    if limit:
        reviews = reviews[:limit]
    split = int(len(reviews) * split)
    return reviews[:split], reviews[split:]
Here, you shuffle your data with a call to random.shuffle(). Then you optionally truncate and split the data using some math to convert the split to a number of items that define the split boundary. Finally, you return two parts of the reviews list using list slices.
Here’s a sample output, truncated for brevity:
(
    'When tradition dictates that an artist must pass (...)',
    {'cats': {'pos': True, 'neg': False}}
)
To learn more about how random works, take a look at Generating Random Data in Python (Guide).
Note: The makers of spaCy have also released a package called thinc that, among other features, includes simplified access to large datasets, including the IMDB review dataset you’re using for this project.
You can find the project on GitHub. If you investigate it, look at how they handle loading the IMDB dataset and see what overlaps exist between their code and your own.
Now that you’ve got your data loader built and have some light preprocessing done, it’s time to build the spaCy pipeline and classifier training loop.
Training Your Classifier
Putting the spaCy pipeline together allows you to rapidly build and train a convolutional neural network (CNN) for classifying text data. While you’re using it here for sentiment analysis, it’s general enough to work with any kind of text classification task as long as you provide it with the training data and labels.
In this part of the project, you’ll take care of three steps:
- Modifying the base spaCy pipeline to include the
textcatcomponent - Building a training loop to train the
textcatcomponent - Evaluating the progress of your model training after a given number of training loops
First, you’ll add textcat to the default spaCy pipeline.
Modifying the spaCy Pipeline to Include textcat
For the first part, you’ll load the same pipeline as you did in the examples at the beginning of this tutorial, then you’ll add the textcat component if it isn’t already present. After that, you’ll add the labels that your data uses ("pos" for positive and "neg" for negative) to textcat. Once that’s done, you’ll be ready to build the training loop:
import os
import random
import spacy

def train_model(
    training_data: list,
    test_data: list,
    iterations: int = 20
) -> None:
    # Build pipeline
    nlp = spacy.load("en_core_web_sm")
    if "textcat" not in nlp.pipe_names:
        textcat = nlp.create_pipe(
            "textcat", config={"architecture": "simple_cnn"}
        )
        nlp.add_pipe(textcat, last=True)
If you’ve looked at the spaCy documentation’s textcat example already, then this should look pretty familiar. First, you load the built-in en_core_web_sm pipeline, then you check the .pipe_names attribute to see if the textcat component is already available.
If it isn’t, then you create the component (also called a pipe) with .create_pipe(), passing in a configuration dictionary. There are a few options that you can work with described in the TextCategorizer documentation.
Finally, you add the component to the pipeline using .add_pipe(), with the last parameter signifying that this component should be added to the end of the pipeline.
Next, you’ll handle the case in which the textcat component is present and then add the labels that will serve as the categories for your text:
import os
import random
import spacy

def train_model(
    training_data: list,
    test_data: list,
    iterations: int = 20
) -> None:
    # Build pipeline
    nlp = spacy.load("en_core_web_sm")
    if "textcat" not in nlp.pipe_names:
        textcat = nlp.create_pipe(
            "textcat", config={"architecture": "simple_cnn"}
        )
        nlp.add_pipe(textcat, last=True)
    else:
        textcat = nlp.get_pipe("textcat")

    textcat.add_label("pos")
    textcat.add_label("neg")
If the component is present in the loaded pipeline, then you just use .get_pipe() to assign it to a variable so you can work on it. For this project, all that you’ll be doing with it is adding the labels from your data so that textcat knows what to look for. You’ll do that with .add_label().
You’ve created the pipeline and prepared the textcat component for the labels it will use for training. Now it’s time to write the training loop that will allow textcat to categorize movie reviews.
Build Your Training Loop to Train textcat
To begin the training loop, you’ll first set your pipeline to train only the textcat component, generate batches of data for it with spaCy’s minibatch() and compounding() utilities, and then go through them and update your model.
A batch is just a subset of your data. Batching your data allows you to reduce the memory footprint during training and more quickly update your hyperparameters.
Note: Compounding batch sizes is a relatively new technique and should help speed up training. You can learn more about compounding batch sizes in spaCy’s training tips.
Here’s an implementation of the training loop described above:
 1import os
 2import random
 3import spacy
 4from spacy.util import minibatch, compounding
 5
 6def train_model(
 7    training_data: list,
 8    test_data: list,
 9    iterations: int = 20
10) -> None:
11    # Build pipeline
12    nlp = spacy.load("en_core_web_sm")
13    if "textcat" not in nlp.pipe_names:
14        textcat = nlp.create_pipe(
15            "textcat", config={"architecture": "simple_cnn"}
16        )
17        nlp.add_pipe(textcat, last=True)
18    else:
19        textcat = nlp.get_pipe("textcat")
20
21    textcat.add_label("pos")
22    textcat.add_label("neg")
23
24    # Train only textcat
25    training_excluded_pipes = [
26        pipe for pipe in nlp.pipe_names if pipe != "textcat"
27    ]
On lines 25 to 27, you create a list of all components in the pipeline that aren’t the textcat component. You then use the nlp.disable() context manager to disable those components for all code within the context manager’s scope.
Now you’re ready to add the code to begin training:
import os
import random
import spacy
from spacy.util import minibatch, compounding

def train_model(
    training_data: list,
    test_data: list,
    iterations: int = 20
) -> None:
    # Build pipeline
    nlp = spacy.load("en_core_web_sm")
    if "textcat" not in nlp.pipe_names:
        textcat = nlp.create_pipe(
            "textcat", config={"architecture": "simple_cnn"}
        )
        nlp.add_pipe(textcat, last=True)
    else:
        textcat = nlp.get_pipe("textcat")

    textcat.add_label("pos")
    textcat.add_label("neg")

    # Train only textcat
    training_excluded_pipes = [
        pipe for pipe in nlp.pipe_names if pipe != "textcat"
    ]
    with nlp.disable_pipes(training_excluded_pipes):
        optimizer = nlp.begin_training()
        # Training loop
        print("Beginning training")
        batch_sizes = compounding(
            4.0, 32.0, 1.001
        )  # A generator that yields infinite series of input numbers
Here, you call nlp.begin_training(), which returns the initial optimizer function. This is what nlp.update() will use to update the weights of the underlying model.
You then use the compounding() utility to create a generator, giving you an infinite series of batch_sizes that will be used later by the minibatch() utility.
Now you’ll begin training on batches of data:
import os
import random
import spacy
from spacy.util import minibatch, compounding

def train_model(
    training_data: list,
    test_data: list,
    iterations: int = 20
) -> None:
    # Build pipeline
    nlp = spacy.load("en_core_web_sm")
    if "textcat" not in nlp.pipe_names:
        textcat = nlp.create_pipe(
            "textcat", config={"architecture": "simple_cnn"}
        )
        nlp.add_pipe(textcat, last=True)
    else:
        textcat = nlp.get_pipe("textcat")

    textcat.add_label("pos")
    textcat.add_label("neg")

    # Train only textcat
    training_excluded_pipes = [
        pipe for pipe in nlp.pipe_names if pipe != "textcat"
    ]
    with nlp.disable_pipes(training_excluded_pipes):
        optimizer = nlp.begin_training()
        # Training loop
        print("Beginning training")
        batch_sizes = compounding(
            4.0, 32.0, 1.001
        )  # A generator that yields infinite series of input numbers
        for i in range(iterations):
            loss = {}
            random.shuffle(training_data)
            batches = minibatch(training_data, size=batch_sizes)
            for batch in batches:
                text, labels = zip(*batch)
                nlp.update(
                    text,
                    labels,
                    drop=0.2,
                    sgd=optimizer,
                    losses=loss
                )
Now, for each iteration that is specified in the train_model() signature, you create an empty dictionary called loss that will be updated and used by nlp.update(). You also shuffle the training data and split it into batches of varying size with minibatch().
For each batch, you separate the text and labels, then fed them, the empty loss dictionary, and the optimizer to nlp.update(). This runs the actual training on each example.
The dropout parameter tells nlp.update() what proportion of the training data in that batch to skip over. You do this to make it harder for the model to accidentally just memorize training data without coming up with a generalizable model.
This will take some time, so it’s important to periodically evaluate your model. You’ll do that with the data that you held back from the training set, also known as the holdout set.
Evaluating the Progress of Model Training
Since you’ll be doing a number of evaluations, with many calculations for each one, it makes sense to write a separate evaluate_model() function. In this function, you’ll run the documents in your test set against the unfinished model to get your model’s predictions and then compare them to the correct labels of that data.
Using that information, you’ll calculate the following values:
-
True positives are documents that your model correctly predicted as positive. For this project, this maps to the positive sentiment but generalizes in binary classification tasks to the class you’re trying to identify.
-
False positives are documents that your model incorrectly predicted as positive but were in fact negative.
-
True negatives are documents that your model correctly predicted as negative.
-
False negatives are documents that your model incorrectly predicted as negative but were in fact positive.
Because your model will return a score between 0 and 1 for each label, you’ll determine a positive or negative result based on that score. From the four statistics described above, you’ll calculate precision and recall, which are common measures of classification model performance:
-
Precision is the ratio of true positives to all items your model marked as positive (true and false positives). A precision of 1.0 means that every review that your model marked as positive belongs to the positive class.
-
Recall is the ratio of true positives to all reviews that are actually positive, or the number of true positives divided by the total number of true positives and false negatives.
The F-score is another popular accuracy measure, especially in the world of NLP. Explaining it could take its own article, but you’ll see the calculation in the code. As with precision and recall, the score ranges from 0 to 1, with 1 signifying the highest performance and 0 the lowest.
For evaluate_model(), you’ll need to pass in the pipeline’s tokenizer component, the textcat component, and your test dataset:
def evaluate_model(
    tokenizer, textcat, test_data: list
) -> dict:
    reviews, labels = zip(*test_data)
    reviews = (tokenizer(review) for review in reviews)
    true_positives = 0
    false_positives = 1e-8  # Can't be 0 because of presence in denominator
    true_negatives = 0
    false_negatives = 1e-8
    for i, review in enumerate(textcat.pipe(reviews)):
        true_label = labels[i]
        for predicted_label, score in review.cats.items():
            # Every cats dictionary includes both labels. You can get all
            # the info you need with just the pos label.
            if (
                predicted_label == "neg"
            ):
                continue
            if score >= 0.5 and true_label["pos"]:
                true_positives += 1
            elif score >= 0.5 and true_label["neg"]:
                false_positives += 1
            elif score < 0.5 and true_label["neg"]:
                true_negatives += 1
            elif score < 0.5 and true_label["pos"]:
                false_negatives += 1
    precision = true_positives / (true_positives + false_positives)
    recall = true_positives / (true_positives + false_negatives)

    if precision + recall == 0:
        f_score = 0
    else:
        f_score = 2 * (precision * recall) / (precision + recall)
    return {"precision": precision, "recall": recall, "f-score": f_score}
In this function, you separate reviews and their labels and then use a generator expression to tokenize each of your evaluation reviews, preparing them to be passed in to textcat. The generator expression is a nice trick recommended in the spaCy documentation that allows you to iterate through your tokenized reviews without keeping every one of them in memory.
You then use the score and true_label to determine true or false positives and true or false negatives. You then use those to calculate precision, recall, and f-score. Now all that’s left is to actually call evaluate_model():
def train_model(training_data: list, test_data: list, iterations: int = 20):
    # Previously seen code omitted for brevity.
        # Training loop
        print("Beginning training")
        print("Loss\tPrecision\tRecall\tF-score")
        batch_sizes = compounding(
            4.0, 32.0, 1.001
        )  # A generator that yields infinite series of input numbers
        for i in range(iterations):
            loss = {}
            random.shuffle(training_data)
            batches = minibatch(training_data, size=batch_sizes)
            for batch in batches:
                text, labels = zip(*batch)
                nlp.update(
                    text,
                    labels,
                    drop=0.2,
                    sgd=optimizer,
                    losses=loss
                )
            with textcat.model.use_params(optimizer.averages):
                evaluation_results = evaluate_model(
                    tokenizer=nlp.tokenizer,
                    textcat=textcat,
                    test_data=test_data
                )
                print(
                    f"{loss['textcat']}\t{evaluation_results['precision']}"
                    f"\t{evaluation_results['recall']}"
                    f"\t{evaluation_results['f-score']}"
                )
Here you add a print statement to help organize the output from evaluate_model() and then call it with the .use_params() context manager in order to use the model in its current state. You then call evaluate_model() and print the results.
Once the training process is complete, it’s a good idea to save the model you just trained so that you can use it again without training a new model. After your training loop, add this code to save the trained model to a directory called model_artifacts located within your working directory:
# Save model
with nlp.use_params(optimizer.averages):
    nlp.to_disk("model_artifacts")
This snippet saves your model to a directory called model_artifacts so that you can make tweaks without retraining the model. Your final training function should look like this:
def train_model(
    training_data: list,
    test_data: list,
    iterations: int = 20
) -> None:
    # Build pipeline
    nlp = spacy.load("en_core_web_sm")
    if "textcat" not in nlp.pipe_names:
        textcat = nlp.create_pipe(
            "textcat", config={"architecture": "simple_cnn"}
        )
        nlp.add_pipe(textcat, last=True)
    else:
        textcat = nlp.get_pipe("textcat")

    textcat.add_label("pos")
    textcat.add_label("neg")

    # Train only textcat
    training_excluded_pipes = [
        pipe for pipe in nlp.pipe_names if pipe != "textcat"
    ]
    with nlp.disable_pipes(training_excluded_pipes):
        optimizer = nlp.begin_training()
        # Training loop
        print("Beginning training")
        print("Loss\tPrecision\tRecall\tF-score")
        batch_sizes = compounding(
            4.0, 32.0, 1.001
        )  # A generator that yields infinite series of input numbers
        for i in range(iterations):
            print(f"Training iteration {i}")
            loss = {}
            random.shuffle(training_data)
            batches = minibatch(training_data, size=batch_sizes)
            for batch in batches:
                text, labels = zip(*batch)
                nlp.update(text, labels, drop=0.2, sgd=optimizer, losses=loss)
            with textcat.model.use_params(optimizer.averages):
                evaluation_results = evaluate_model(
                    tokenizer=nlp.tokenizer,
                    textcat=textcat,
                    test_data=test_data
                )
                print(
                    f"{loss['textcat']}\t{evaluation_results['precision']}"
                    f"\t{evaluation_results['recall']}"
                    f"\t{evaluation_results['f-score']}"
                )

    # Save model
    with nlp.use_params(optimizer.averages):
        nlp.to_disk("model_artifacts")
In this section, you learned about training a model and evaluating its performance as you train it. You then built a function that trains a classification model on your input data.
Classifying Reviews
Now that you have a trained model, it’s time to test it against a real review. For the purposes of this project, you’ll hardcode a review, but you should certainly try extending this project by reading reviews from other sources, such as files or a review aggregator’s API.
The first step with this new function will be to load the previously saved model. While you could use the model in memory, loading the saved model artifact allows you to optionally skip training altogether, which you’ll see later. Here’s the test_model() signature along with the code to load your saved model:
def test_model(input_data: str=TEST_REVIEW):
    #  Load saved trained model
    loaded_model = spacy.load("model_artifacts")
In this code, you define test_model(), which includes the input_data parameter. You then load your previously saved model.
The IMDB data you’re working with includes an unsup directory within the training data directory that contains unlabeled reviews you can use to test your model. Here’s one such review. You should save it (or a different one of your choosing) in a TEST_REVIEW constant at the top of your file:
import os
import random
import spacy
from spacy.util import minibatch, compounding

TEST_REVIEW = """
Transcendently beautiful in moments outside the office, it seems almost
sitcom-like in those scenes. When Toni Colette walks out and ponders
life silently, it's gorgeous.<br /><br />The movie doesn't seem to decide
whether it's slapstick, farce, magical realism, or drama, but the best of it
doesn't matter. (The worst is sort of tedious - like Office Space with less humor.)
"""
Next, you’ll pass this review into your model to generate a prediction, prepare it for display, and then display it to the user:
def test_model(input_data: str = TEST_REVIEW):
    #  Load saved trained model
    loaded_model = spacy.load("model_artifacts")
    # Generate prediction
    parsed_text = loaded_model(input_data)
    # Determine prediction to return
    if parsed_text.cats["pos"] > parsed_text.cats["neg"]:
        prediction = "Positive"
        score = parsed_text.cats["pos"]
    else:
        prediction = "Negative"
        score = parsed_text.cats["neg"]
    print(
        f"Review text: {input_data}\nPredicted sentiment: {prediction}"
        f"\tScore: {score}"
    )
In this code, you pass your input_data into your loaded_model, which generates a prediction in the cats attribute of the parsed_text variable. You then check the scores of each sentiment and save the highest one in the prediction variable.
You then save that sentiment’s score to the score variable. This will make it easier to create human-readable output, which is the last line of this function.
You’ve now written the load_data(), train_model(), evaluate_model(), and test_model() functions. That means it’s time to put them all together and train your first model.
Connecting the Pipeline
So far, you’ve built a number of independent functions that, taken together, will load data and train, evaluate, save, and test a sentiment analysis classifier in Python.
There’s one last step to make these functions usable, and that is to call them when the script is run. You’ll use the if __name__ == "__main__": idiom to accomplish this:
if __name__ == "__main__":
    train, test = load_training_data(limit=2500)
    train_model(train, test)
    print("Testing model")
    test_model()
Here you load your training data with the function you wrote in the Loading and Preprocessing Data section and limit the number of reviews used to 2500 total. You then train the model using the train_model() function you wrote in Training Your Classifier and, once that’s done, you call test_model() to test the performance of your model.
Note: With this number of training examples, training can take ten minutes or longer, depending on your system. You can reduce the training set size for a shorter training time, but you’ll risk having a less accurate model.
What did your model predict? Do you agree with the result? What happens if you increase or decrease the limit parameter when loading the data? Your scores and even your predictions may vary, but here’s what you should expect your output to look like:
$ python pipeline.py
Training model
Beginning training
Loss    Precision       Recall  F-score
11.293997120810673      0.7816593886121546      0.7584745762390477      0.7698924730851658
1.979159922178951       0.8083333332996527      0.8220338982702527      0.8151260503859189
[...]
0.000415042785704145    0.7926829267970453      0.8262711864056664      0.8091286306718204
Testing model
Review text:
Transcendently beautiful in moments outside the office, it seems almost
sitcom-like in those scenes. When Toni Colette walks out and ponders
life silently, it's gorgeous.<br /><br />The movie doesn't seem to decide
whether it's slapstick, farce, magical realism, or drama, but the best of it
doesn't matter. (The worst is sort of tedious - like Office Space with less humor.)

Predicted sentiment: Positive   Score: 0.8773064017295837
As your model trains, you’ll see the measures of loss, precision, and recall and the F-score for each training iteration. You should see the loss generally decrease. The precision, recall, and F-score will all bounce around, but ideally they’ll increase. Then you’ll see the test review, sentiment prediction, and the score of that prediction—the higher the better.
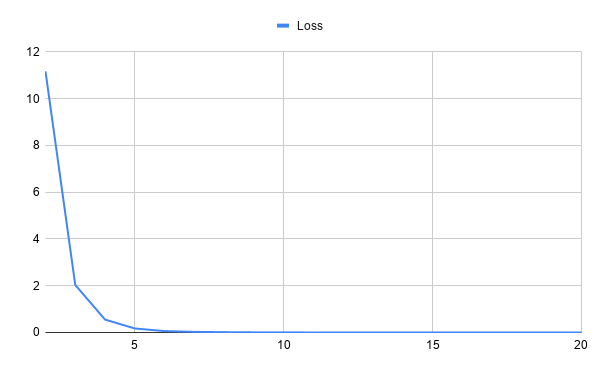
You’ve now trained your first sentiment analysis machine learning model using natural language processing techniques and neural networks with spaCy! Here are two charts showing the model’s performance across twenty training iterations. The first chart shows how the loss changes over the course of training:
While the above graph shows loss over time, the below chart plots the precision, recall, and F-score over the same training period:
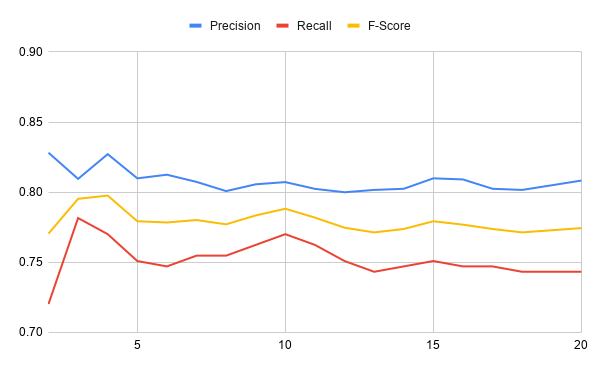
In these charts, you can see that the loss starts high but drops very quickly over training iterations. The precision, recall, and F-score are pretty stable after the first few training iterations. What could you tinker with to improve these values?
Conclusion
Congratulations on building your first sentiment analysis model in Python! What did you think of this project? Not only did you build a useful tool for data analysis, but you also picked up on a lot of the fundamental concepts of natural language processing and machine learning.
In this tutorial, you learned how to:
- Use natural language processing techniques
- Use a machine learning classifier to determine the sentiment of processed text data
- Build your own NLP pipeline with spaCy
You now have the basic toolkit to build more models to answer any research questions you might have. If you’d like to review what you’ve learned, then you can download and experiment with the code used in this tutorial at the link below:
Get the Source Code: Click here to get the source code you’ll use to learn about sentiment analysis with natural language processing in this tutorial.
What else could you do with this project? See below for some suggestions.
Next Steps With Sentiment Analysis and Python
This is a core project that, depending on your interests, you can build a lot of functionality around. Here are a few ideas to get you started on extending this project:
-
The data-loading process loads every review into memory during
load_data(). Can you make it more memory efficient by using generator functions instead? -
Rewrite your code to remove stop words during preprocessing or data loading. How does the mode performance change? Can you incorporate this preprocessing into a pipeline component instead?
-
Use a tool like Click to generate an interactive command-line interface.
-
Deploy your model to a cloud platform like AWS and wire an API to it. This can form the basis of a web-based tool.
-
Explore the configuration parameters for the
textcatpipeline component and experiment with different configurations. -
Explore different ways to pass in new reviews to generate predictions.
-
Parametrize options such as where to save and load trained models, whether to skip training or train a new model, and so on.
This project uses the Large Movie Review Dataset, which is maintained by Andrew Maas. Thanks to Andrew for making this curated dataset widely available for use.