To review AI-generated code efficiently, you need to put your attention where AI coding agents are most likely to be wrong. This makes your code reviews faster and more accurate.
Reviewing an agent’s code isn’t fundamentally different from reviewing a teammate’s. A code review is the process of looking at a change to a codebase before accepting it, so you can confirm that the code does what it should and that it’s correct, secure, and maintainable. This responsibility doesn’t change when the author is an agent. What changes is the amount of code, how fast it arrives, and the mix of potential issues.
An AI coding agent writes code faster than any human can read it, which makes you the bottleneck. Your job and responsibilities stay the same, but the volume and speed increase.
To manage this, you need to review the code with a plan. You can’t read every line, so focus on the parts where the risk is highest.
Note: What you’re checking for is the same as with a teammate’s code, but it’s harder in practice because the code comes faster and in bigger chunks. As both the speed and size increase, you’re more likely to miss mistakes. Most people start to lose focus after about four hundred lines of code or an hour of work.
AI-generated code also changes the kinds of mistakes you’ll find. The logic can look correct but be wrong. The code can call APIs or import packages that don’t exist. It can also skip edge cases. A piece of code with these types of issues can look fine at first glance.
In this tutorial, you’ll learn a five-step workflow to review AI-generated code in an efficient and repeatable way:
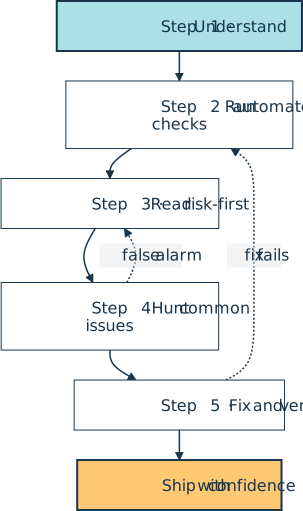
You start with the code’s intent, then run some automated checks. After that, you read what’s left, starting with the trickiest parts. At this stage, you catch the mistakes that agents often make. You’ll also confirm each problem by running the code before you fix it.
Get Your Cheat Sheet: Click here to download your free checklist for reviewing AI-generated code and keep every mistake worth hunting for within reach on your next review.
Take the Quiz: Test your knowledge with our interactive “How to Review AI-Generated Python Code Efficiently” quiz. You’ll receive a score upon completion to help you track your learning progress:
Interactive Quiz
How to Review AI-Generated Python Code EfficientlyTest your understanding of how to review AI-generated Python code, from automated checks to the bugs that coding agents get wrong most often.
Prerequisites
To follow along, you should be comfortable reading Python code and working with a coding agent, such as Claude Code, GitHub Copilot CLI, Antigravity CLI, and OpenCode. You’ll also get more from it if you’re already familiar with debugging Python errors, type checking, and reading a Git diff.
Ideally, you’ll want to practice with some AI-generated code. You’ll learn the most when you run the workflow on a real agent pull request or a small project that an agent has generated. Use the Python version that the target project uses. For a new project, you can choose a recent one. Python 3.14 is a good choice.
You’ll also need some tools to run quality checks on your code, such as linters, static type checkers, security scanners, and test runners. You can install them into your project’s virtual environment. Here’s a minimal set of tools you can use:
(venv) $ python -m pip install ruff mypy bandit pytest pytest-cov pip-audit
These are development dependencies, so they should stay separate from the packages your project needs to run. If you manage your project with uv, then you can add them to a dedicated dev dependency group instead:
$ uv add --dev ruff mypy bandit pytest pytest-cov pip-audit
If you prefer a faster type checker, swap mypy for ty, a newer alternative from the makers of Ruff.
For the deeper maintainability checks, add the extended set when you need it:
(venv) $ python -m pip install pylint radon import-linter pydeps
You can configure the core tools in one place. This minimal configuration turns on the rules that matter most for AI-generated code:
pyproject.toml
# ...

[tool.ruff.lint]
select = ["F", "E", "B", "S", "UP", "DTZ"]

[tool.mypy]
strict = true

[tool.coverage.run]
branch = true
You’ll also want a way to see what changed in the code. Most code reviews happen on a GitHub pull request (PR). There, you can read the diff in the browser with a friendly user interface (UI).
You can also read the diff locally in your terminal. The GitHub CLI tool prints a pull request’s changes with gh pr diff, and when there’s no PR yet, Git shows them with git diff.
You might also be able to review the diff inside your favorite AI coding agent. Tools like Claude Code, GitHub Copilot CLI, and Antigravity CLI have a /diff slash command for this task.
Finally, download the cheat sheet for reviewing AI-generated code. It condenses the mistakes you’ll hunt for into a single page, so you can keep it handy as you follow along now and reuse it in your own reviews later:
Get Your Cheat Sheet: Click here to download your free checklist for reviewing AI-generated code and keep every mistake worth hunting for within reach on your next review.
Set the Ground Rules to Review AI-Generated Code
Five principles guide the proposed review workflow. They’ll keep you from trusting generated code just because it looks right:
- You own the result, no matter who wrote it: You, as the human reviewer or developer, are the one who confirms correctness, security, and maintainability. The agent is a helper, not a substitute, and won’t take responsibility for failed code.
- Reviewing AI-generated code is hands-on: Unlike with a teammate’s pull request, there’s no separate author to send the review comments back to, so you’ll often make the fix yourself instead of just leaving comments. You can prompt the agent for some issues and fix others manually.
- Plausible isn’t the same as correct: Modern agents can write code that looks right but may be logically wrong, insecure, or unmaintainable.
- You review against the code’s intent: You check the code against what it’s supposed to do, not just whether it runs or passes tests. The agent can misread the prompts and write code that looks fine but doesn’t meet the requirements.
- Automated code-quality checks are necessary but never sufficient: Linters, type checkers, security scanners, and tests clear the mechanical issues, but they miss logic bugs and bad abstractions. Running them handles the routine noise, so you can focus on the problems that matter.
These principles are the mindset behind the review workflow, not a checklist you tick off. They don’t map one-to-one onto the steps that follow. Instead, each principle shows up across several of them.
This workflow has five steps:
- Understand What the Code Should Do: Work out the goal before reading the code, so you judge the code against intent rather than plausibility.
- Run Automated Code-Quality Checks: Use linters, a type checker, a security scanner, and tests to clear the mechanical issues.
- Read With a Plan, Not Top to Bottom: Read what’s left risk-first and outside-in, following the code’s flow.
- Hunt for Common Issues in AI-Generated Code: Check the things that AI agents normally get wrong, then confirm each flag.
- Fix the Issues, Then Verify the Fix: Fix what you confirmed, then rerun to verify the fix holds.
Steps 1, 2, 3, and 5 include practices that you commonly use when doing a code review for a teammate. However, the workflow accounts for the presence of an active AI coding agent. Step 4 is where you do the AI-specific checks. Now, it’s time to explore each step in order, starting with the code’s goal.
Step 1: Understand What the Code Should Do
A quick way to spot a bad diff is to know what a correct one should look like. In an AI-assisted coding environment, a common failure looks like this: the agent misreads your prompt and context, then implements that misreading flawlessly. The syntax will be fine, but the code can take an unexpected path. As with a human-generated diff, your review starts before the code.
First, figure out the change’s intent. To this end, you can use some of the following sources, depending on what triggered the code diff:
- An issue ticket or bug report
- A feature specification
- A failing test (red-green cycle)
- An acceptance criterion
- A commit message or pull request description
- A prompt you gave the agent or a conversation history
Once you have a clear idea of what the code should do, keep that intent in front of you. You’ll check the code against that intent rather than whether it looks reasonable.
When you review a new AI-generated project, you’ll have no diff to start with. You can gather the code’s intent from the project specification, the agent’s implementation plan, the prompts you originally gave the agent, and so on. In this case, you should review the project by modules or packages, one piece at a time. Working in small, logical chunks keeps your accuracy high and stops you from getting lost in a big wall of code.
Note: You can ask your AI agent to restate the code’s intent in plain words and suggest review-sized chunks. Treat that as a starting point, not the final truth. You still own the reading. Try a prompt like the following:
Summarize what this change does, then list the files and functions I should review, grouped into small, logical chunks.
With a clear idea of the code’s intent, you have a good starting point to check its correctness. However, before you read a single line, you should run some automated checks to make sure the code is clean.
Step 2: Run Automated Code-Quality Checks
Linters, static type checkers, security scanners, and test runners are fast and deterministic. They help you catch boring and repetitive issues so you can focus on the important parts. Let them clear the mechanical noise for you first.
Here are four tools you can run as a first pass:
ruffas a linter, including theFrules that flag undefined or unused namesmypyin strict mode to catch type mismatches and impossible callsbanditas a security scanner for issues like hardcoded secrets and unsafe defaultspytestwith branch coverage, which flags untested error cases that happy-path-only code tends to skip
For example, with the pyproject.toml file from the prerequisites section in place, one hardcoded key that the agent left behind gets caught right away:
auth.py
# ...

SECRET_KEY = "sk-live-1234567890abcdef"
Ruff reports the key as a hardcoded secret through its S rules, and Bandit catches it with its default settings. You can fix this security issue by reading the key from an environment variable or a .env file.
Note: If you already committed a hardcoded secret to the Git repository, then it can be accessed from your Git history. In this situation, you must rotate the secret immediately to avoid unauthorized access.
A few more checks could help with AI-generated code:
- Dependency audit: Use a tool like
pip-auditto catch dependencies with known vulnerabilities. - Outdated constructs: Use Ruff’s
UPandDTZrules to flag potentially dated patterns likedatetime.utcnow()ortyping.Listthat models regurgitate from their training data. - Code duplication check: Use
pylintand itsduplicate-codecheck to catch the same block of code pasted in multiple places. Pass all the modules in a single run, since the check only compares the files that it sees together. - Code complexity check: Use a tool like
radonto measure how complex your code is.
These are just a sample. There are many more linters and checkers out there, so pick the ones that fit your project and stack instead of running them all blindly.
Note: You can let an agent run the checks and summarize the failures. Then, you can read the summary and ask the agent to fix the issues for you. Try a prompt like the following:
Run ruff, mypy, bandit, and pytest on this code, then summarize only the failures worth my attention.
If you later ask the agent to fix the issues, then you must still confirm that the fixes hold. The agent can misread the checker’s output and apply a fix that doesn’t actually improve the code. For example, some code blocks can be intentionally duplicated for performance reasons, and a hardcoded secret can be a deliberate test key.
Running linters and checkers is necessary but not sufficient. The next step is where you read what’s left.
Step 3: Read With a Plan, Not Top to Bottom
Now it’s time for you to read the code. However, don’t do a top-to-bottom pass through the diff in the order it’s listed. Instead, you should look at the risky parts first. For example, you can start with the code that handles the following aspects, roughly in this order:
- Security: Missing authorization checks, hardcoded secrets, and unauthorized access are the kinds of flaws that end in data breaches, account takeovers, and full system compromise.
- Input validation: Unsanitized user input, missing type or length checks, and unescaped query parameters can lead to code injection attacks, application crashes, and silent data corruption.
- Data handling: Unsafe deserialization of untrusted data, logging user credentials in plaintext, and leaky error messages can cause data exposure, compliance violations, and remote code execution.
- Control flow: A missing early
returnorbreak, a never-changing condition, or an unhandled error path can cause incorrect results, inconsistent state, and hard-to-debug behavior. - Public interfaces: Changing a function’s signature or return type, renaming public methods, or exposing internal details can break client code, cause downstream outages, and force user rewrites.
Overall, you should read outside-in, following the code’s flow rather than the diff order. First, get a general idea of the change from its entry points and structure. Only then read the internal line-level details.
If you’re reviewing a freshly generated project, then you have no history to diff against. So, use the module layout and the import arrangement to check the structure first. Then, dive into the modules and packages by relevance, according to the project’s intent.
Note: Again, you can get help from your AI agent. In a fresh session, try a prompt like the following:
Rank the files and functions in this diff by risk (security, input handling, and control flow first), and give me a reading order from highest to lowest risk.
So far, you’ve looked at the review strategy, which is how you move through the code or diff. Next, you need specific targets to make the review efficient. In human-generated code, bugs are scattered and hard to predict, which makes your job harder. In AI-generated code, the issues fall into a few predictable types, which makes your job easier. You can turn those issue types into a short checklist that guides your review.
Make sure you’ve downloaded the cheat sheet for reviewing AI-generated code, which gathers those mistakes into a single page you can keep beside you as you work through this tutorial—and on every review afterward.
Step 4: Hunt for Common Issues in AI-Generated Code
This step is where reviewing AI-generated code differs from reviewing a teammate’s pull request. The types of issues you’ll find may not be new, but the mix is. Also, the issues tend to be more predictable than the ones you find in human-written code. Remember, AI is pretty good at making things look plausible, but that doesn’t mean they’re correct.
In the following sections, you’ll explore some common issues in AI-generated code, from high-level to low-level. First, you’ll check whether the change fits into the codebase structure. Next, you’ll look at bugs that break things. Finally, you’ll see how problems can build up over time.
Architecture, Modularization, and Fit
Before you read the line-level changes, make sure the broad change belongs where it is. For this, you need to have the code’s intent fresh in your mind.
Agents usually work in a few files at a time and may not see the whole project structure. As a result, a change can be locally reasonable but globally wrong. If the code sits in the wrong place or reinvents something that already exists, then you need to fix the structure.
Here’s a short checklist for architecture, modularization, and fit issues:
| Issue | Question | Check for |
|---|---|---|
| Layering | Is each code piece in the right layer? | Logic in the wrong layer of the application layout, a grab-bag utils dumping ground, or circular imports |
| Modularization | Is the code split into the right modules and packages? | A single module doing the work of several, or related code spread across many files instead of one module or package |
| Cohesion | Does each module or class do just one thing? | A class or module mixing unrelated responsibilities |
| Fit | Does it match the project’s conventions and patterns? | Code that ignores the project’s conventions or uses an approach that differs from the rest of the codebase |
To show some of these issues, say that you find the following Helper class in the cli.py file of a command-line interface (CLI) tool:
cli.py
# ...

class Helper:
    def parse_csv(self, path):
        """Parse a CSV file using the csv module."""
        # Implementation here...

    def send_email(self, to, subject):
        """Send an email using the smtplib module."""
        # Implementation here...

    def resize_image(self, path, width):
        """Resize an image using the Pillow library."""
        # Implementation here...
In this Helper class, nothing belongs together. The .parse_csv(), .send_email(), and .resize_image() methods pull in separate dependencies and change for different reasons. Each one could live in its own module and probably its own class. Also, why is this class in the cli.py module at all? That module should contain only CLI-related code. The answer is in your domain, not the agent’s.
Logic Bugs
Logic bugs normally slip past automated checks, including linters, type checkers, and even complexity evaluations. However, they can cause the code to produce wrong and dangerous results, which makes them core to your code review.
Here’s a short checklist for logic bugs you could find in AI-generated code:
| Issue | Question | Check for |
|---|---|---|
| Silently wrong result | Does the output match intent? | Plausible output that’s incorrect |
| Wrong or flipped condition | Do the branches match the intended logic? | Inverted Booleans, and/or mix-ups, < vs. <=, or a missing else branch |
| Wrong number or date math | Are money and time handled with the right types? | Floats used for money, or timezone-naive datetimes |
| Off-by-one | Do loop and slice bounds match the intended count? | A loop or slice that starts or stops one item off |
An off-by-one bug can slip through because the output still looks fine. Say you have a function that averages each sliding window over a list of numbers:
>>> def moving_averages(values, window):
...     """Return the average of each sliding window over the values."""
...     averages = []
...     for start in range(len(values) - window):
...         averages.append(sum(values[start : start + window]) / window)
...     return averages
...

>>> moving_averages([1, 2, 3, 4], 2)
[1.5, 2.5]
A list of n numbers has n - window + 1 windows to average, but range(len(values) - window) runs only n - window times, so it skips the last window. That’s why it returns two averages instead of three. It runs, it returns a list, and nothing complains.
The fix is range(len(values) - window + 1), and checking the output length against what you expect is what catches it.
Missing Edge Cases and Swallowed Errors
Agents often optimize the code for the happy path in the prompt and skip the inputs that you didn’t mention. They also tend to hide failures instead of showing them. This behavior can be a common source of bugs, so you should check for it in your reviews.
Here’s a short checklist to consider:
| Issue | Question | Check for |
|---|---|---|
| Missing edge cases | Does it handle inputs beyond the happy path? | No handling for empty, None, zero, negative, or oversized inputs |
| Swallowed errors | Do failures surface instead of getting silenced? | Exceptions caught and ignored, so failures go unnoticed |
A broad except that swallows the error turns a real failure into a silent one:
try:
    config = load_config(path)
except Exception:
    config = {}
In this example, when load_config() breaks, the code quietly falls back to an empty dictionary and keeps going. You never learn whether the configuration file was missing or malformed.
AI agents often assert against mocks or skip edge cases, so tests stay green even when the code can fail outside the happy path. Skim the test cases related to the code under review to confirm they exercise these inputs, not just the common case.
Security Weaknesses
Security is where a plausible-looking line does real damage, so read the data-access and authentication paths first.
Here’s a quick checklist for security issues you could find in AI-generated code:
| Issue | Question | Check for |
|---|---|---|
| Hardcoded secrets | Are keys and tokens kept out of the source? | API keys, passwords, or tokens left in the code |
| Missing authorization | Is every sensitive path behind a login and ownership check? | A dropped login or ownership check |
| Unsafe defaults | Are TLS and hashing set to safe defaults? | TLS verification off, or weak hashes like MD5 and SHA-1 |
| Injection | Is user input kept out of SQL, eval(), and exec()? |
SQL built from strings, or eval() and exec() on user input |
| Secrets in logs | Do logs stay free of tokens and payloads? | Tokens, passwords, or whole requests written to logs |
In Step 2, you scanned the code to catch many of these, but those checks aren’t infallible. Bandit and Ruff flag hardcoded secrets by the variable’s name, so a real key stored under an ordinary name can slip right past them. That’s why it’s worth a second look.
As an example, the query below interpolates user input straight into SQL code, which allows injection:
def find_user(cursor, username):
    cursor.execute(
        f"SELECT * FROM users WHERE name = '{username}'"
    )
    return cursor.fetchone()
In this example, a username like ' OR '1'='1 makes the WHERE clause match every row in the users table, so the function hands back the first user it finds instead of the one you asked for. The fix is to pass query parameters instead of building strings directly with the user input. You can read more about this security issue in the Preventing SQL Injection Attacks With Python tutorial.
Made-Up APIs and Packages
AI agents can generate plausible-sounding code, and sometimes the plausible thing doesn’t exist. The code seems right, but the agent invented a method, import, or package. This can be a common failure mode for AI-generated code, and it’s often hard to flag if you don’t know the target API. When in doubt, check the API documentation or ask the agent to run the code and make sure it doesn’t break.
Here’s a quick checklist that can help you in your reviews:
| Issue | Question | Check for |
|---|---|---|
| Nonexistent API | Does every method and import actually exist? | Methods or imports the agent could have invented |
| Fake packages | Is every dependency a real, published package? | A dependency name the agent hallucinated |
For example, in the code below, the agent calls a method that looks right but isn’t real:
import pathlib

settings = pathlib.Path("config.toml").read_toml()
There’s no .read_toml() on the Path class. In this case, a tool like mypy will flag the call. However, subtler inventions show up only when you read or run the code.
Fake packages are a real risk. Frontier models hallucinate far fewer of them than smaller ones, but the danger is still there and can become a critical security issue because attackers can register popular hallucinated names to serve malware.
Performance and Resource Traps
Performance is another critical aspect of your code review. For example, you can face a situation where the code works on your laptop with ten rows of data, but it breaks in production with ten million rows. The tests rarely catch this type of issue because they often run on small datasets. So, you should check for performance traps in your review.
Below is a short checklist for performance and resource issues you could find in AI-generated code:
| Issue | Question | Check for |
|---|---|---|
| Slow database access | Do queries stay out of loops and avoid full scans? | One query per loop item (N+1), or full-table scans |
| Slow algorithms | Do hot paths avoid nested loops over big data? | Nested loops over big data, or O(n²) on hot paths |
| Resource leaks | Is every file or connection closed? | Files, sessions, or connections opened but never closed |
An N+1 query looks harmless because each line is a normal database call:
def order_totals(connection, order_ids):
    """Return the total for each of the given order IDs."""
    totals = []
    for order_id in order_ids:
        cursor = connection.execute(
            "SELECT total FROM orders WHERE id = ?", (order_id,)
        )
        totals.append(cursor.fetchone()[0])
    return totals
In this example, the loop runs one query per order instead of fetching them in a single batch. A request that’s instant with ten orders gets slow with ten thousand. The agent can’t see your data volume, so it optimizes for readable code, not scale.
In the widget below, slide the order count between ten and ten thousand to watch the N+1 loop’s cost climb while a single batched query stays flat:
The takeaway for your review is that a query inside a loop scales with your data, not your code. The cost stays invisible at the volumes you test with and only surfaces in production. When you spot one, check whether a single batched query can replace the whole loop.
Concurrency and Async Bugs
Concurrency is one of the hardest areas to get right, and it’s where AI-generated code most often looks convincing while hiding serious problems. The code runs cleanly in development, where requests arrive one at a time, then corrupts data or hangs under real load.
Linters and type checkers rarely help because each line is valid on its own, and the bug lives in how the lines interleave.
Here’s a short checklist for concurrency and async issues you could find in your reviews:
| Issue | Question | Check for |
|---|---|---|
| Race conditions | Is shared state guarded against concurrent access? | Reading then updating shared state without a lock |
| Unsafe shared state | Does mutable state cross task or thread boundaries safely? | Mutable globals, caches, or instance attributes written from more than one task |
| Blocking the event loop | Does async code stay free of blocking calls? | Synchronous I/O, time.sleep(), or CPU-heavy work inside an async def function |
| Deadlocks | Are locks always acquired in a consistent order? | Nested locks, or a lock held across an await |
A blocking call is the most common async slip because the code still looks asynchronous:
import requests

async def fetch_prices(symbols):
    """Return the current price for each of the given symbols."""
    prices = {}
    for symbol in symbols:
        response = requests.get(f"https://api.example.com/price/{symbol}")
        prices[symbol] = response.json()["price"]
    return prices
Here, requests.get() is a synchronous call, so it blocks the entire event loop on every request. While one request is in flight, no other coroutine can run.
It reads like async code, but the async keyword buys you nothing. The fix is to use an async HTTP client like httpx or aiohttp, so each request yields control while it waits.
Maintainability Problems
Maintainability issues may not break anything today, but they pile up, and over time, the codebase gets hard to change. You’ll struggle to add new features, fix bugs, or scale the code. These are the problems that agents most often introduce, since they lack the relevant context.
The mechanical issues—like exact code duplication, high complexity, and outdated constructs—are handled by your automated checks back in Step 2. What’s left for you here is what reads fine to those tools but wrong to a person who can see where the codebase is headed.
Here are some points that you can check while considering maintainability problems in AI-generated code:
| Issue | Question | Check for |
|---|---|---|
| Vague names | Does each name pin down what it holds or does? | Valid but generic names like data, result, or process() that don’t reveal the concept |
| Needless abstraction | Does each layer of indirection earn its keep? | Speculative options, wrappers, or generality that nothing uses yet |
| Semantic duplication | Is the same logic reimplemented in disguise? | The same behavior rewritten differently, so duplicate-code checks miss it |
| Stale comments | Do comments and docstrings still match the code? | Docstrings or comments describing what the code used to do |
This is also the one category that seems to be getting worse rather than better. As AI assistance has spread, a large-scale analysis of real codebases has found rising code duplication and churn, along with less refactoring.
A vague name is the clearest example because it satisfies every tool but tells the next reader nothing:
def process(data):
    return [row for row in data if row.is_active]
In this example, both process() and data are valid and pass every tool, but neither name says what’s going on. The body only keeps the active rows, so a name like get_active_rows(rows) shows the intent and reads better.
You’ve now seen the full set of failure modes to watch for in AI-generated code. Keep the cheat sheet for reviewing AI-generated code handy so you have them all in front of you the next time an agent hands you a diff.
Step 5: Fix the Issues, Then Verify the Fix
Now you have a list of common issues. Work through them one at a time and look into each fix before you apply it. Re-prompt the agent for small or mechanical gaps, like a missing edge case or an outdated construct.
Structural issues, like a wrong abstraction, take judgment and context that the agent may not have. You can fix those yourself, or you can ask the agent to propose a fix and then confirm it.
Run the code and the full set of tests to confirm the fix works and didn’t break anything nearby. For a whole generated project, run it from scratch because there’s no earlier working state to rely on.
Note: Give the agent a confirmed issue with specific instructions. Try out a prompt like the following:
Here’s a confirmed bug: [paste it]. Propose a fix that resolves it without touching unrelated code, and explain why it’s the best possible solution.
Depending on the project’s internal rules, you might not fix the issues yourself. In that case, you can report the issues as review comments for another human developer to handle, with or without an agent’s help.
Troubleshooting
A few problems come up often, even once you know the workflow. None of them mean you’re doing it wrong. They’re just part of reviewing this much code this fast, and each one has a quick fix:
- The automated checks produce too much output: Ask the agent to apply fixes one by one in a loop until everything is cleared out.
- The agent keeps missing the point: Clear the conversation or start a fresh session with a better prompt and context. Alternatively, you can fix the issue yourself and then ask the agent to confirm it.
- The amount of code overwhelms you: Take a break, and when you’re back, split the code into smaller chunks. Use the agent as a helper tool. You’re not a machine, and your accuracy drops when you try to read too much at once.
The thread through all three is the same: don’t let the pace push you into skimming the code or accepting changes blindly. When the review gets away from you, shrink the problem, slow down, and stay the one who decides what’s actually fixed.
Next Steps
You now have a repeatable workflow for reviewing AI-generated code. From here, you can go deeper on the parts that matter most for your project and team:
- Get better at writing high-quality Python code.
- Learn more about Python’s exceptions for error handling, the
withstatement for avoiding resource leaks, and thedatetimemodule for correct date math. - Master AI-assisted coding with the AI coding agents guide and specific agents like Claude Code, GitHub Copilot CLI, Antigravity CLI, and OpenCode.
- Learn how to manage the agent’s context window effectively, so you can improve the generated code.
- Explore the other side of the workflow with GitHub Copilot’s automated code review, where an AI agent reviews the pull request for you.
- Follow a structured curriculum with Real Python’s Python Coding With AI learning path, which gathers tutorials and video courses on coding with AI tools into one guided track.
Reviewing AI-generated code effectively is how you keep the productivity and augmented capabilities that agents give you without compromising your codebase’s future. By following and fine-tuning this workflow, you’ll be able to ship high-quality code faster and with confidence.
Get Your Cheat Sheet: Click here to download your free checklist for reviewing AI-generated code and keep every mistake worth hunting for within reach on your next review.
Frequently Asked Questions
Now that you have a workflow for reviewing AI-generated code in Python, you can use the questions and answers below to check your understanding and recap what you’ve learned.
These FAQs are related to the most important concepts you’ve covered in this tutorial. Click the Show/Hide toggle beside each question to reveal the answer.
Reviewing AI-generated code means checking code written by an AI coding agent to confirm that it’s correct, secure, and maintainable before you ship it. It uses the same discipline as reviewing a human’s pull request, plus extra attention for the mistakes agents make most often.
Work out what the code should do, let linters and tests clear the mechanical noise, then read what’s left risk-first instead of top to bottom. Hunt for common mistakes, confirm each issue you find, then fix it and verify the fix.
The skills are mostly the same, but the amount of modified code and the mix of mistakes are different. Agent code tends to look plausible while hiding wrong logic, hallucinated APIs, skipped edge cases, and similar problems.
Common problems in AI-generated code include plausible output that’s actually wrong, off-by-one or flipped-condition bugs, missing edge cases, hardcoded secrets, and calls to APIs or packages that don’t exist. They slip through because the code runs and looks right, even when the result is wrong.
Take the Quiz: Test your knowledge with our interactive “How to Review AI-Generated Python Code Efficiently” quiz. You’ll receive a score upon completion to help you track your learning progress:
Interactive Quiz
How to Review AI-Generated Python Code EfficientlyTest your understanding of how to review AI-generated Python code, from automated checks to the bugs that coding agents get wrong most often.