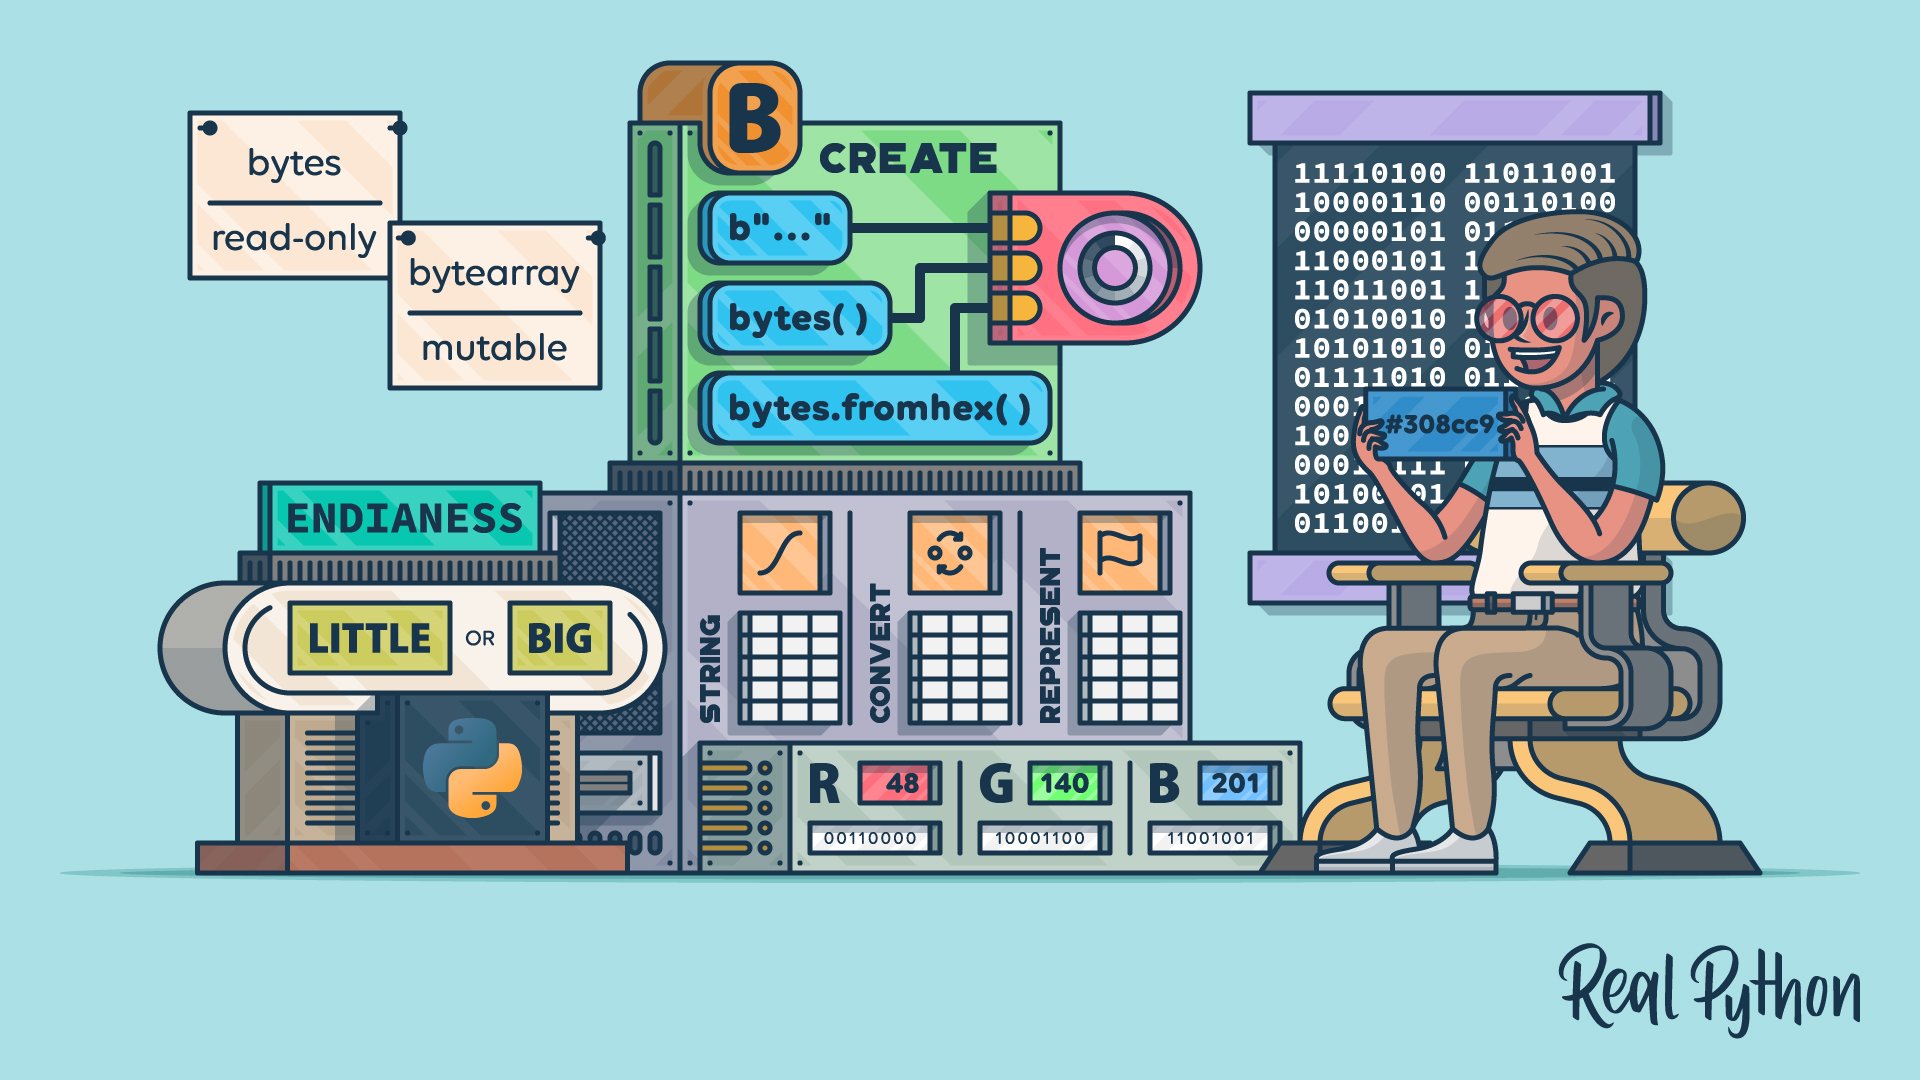
The bytes data type is an immutable sequence of unsigned bytes used for handling binary data in Python. You can create a bytes object using the literal syntax, the bytes() function, or the bytes.fromhex() method. Since bytes are closely related to strings, you often convert between the two data types, applying the correct character encoding.
By the end of this tutorial, you’ll understand that:
- Python
bytesobjects are immutable sequences of unsigned bytes used for handling binary data. - The difference between
bytesandbytearrayis thatbytesobjects are read-only, whilebytearrayobjects are mutable. - You convert a Python string to
bytesusing thestr.encode()method, thebytes()function, or thecodecsmodule. - Endianness refers to the byte order used to represent binary data in memory, which can be either little-endian or big-endian.
This tutorial starts with a brief overview of binary data fundamentals, setting the scene for the remaining part, which delves into creating and manipulating bytes objects in Python. Along the way, it touches on related topics, such as bytearray, bytes-like objects, and the buffer protocol. To top it off, you’ll find several real-life examples and exercises at the end, which demonstrate the concepts discussed.
To get the most out of this tutorial, you should be familiar with Python basics, particularly built-in data types.
Get Your Code: Click here to download the free sample code that you’ll use to learn about bytes objects and handling binary data in Python.
Take the Quiz: Test your knowledge with our interactive “Python Bytes” quiz. You’ll receive a score upon completion to help you track your learning progress:
Interactive Quiz
Python BytesIn this quiz, you'll test your understanding of Python bytes objects. By working through this quiz, you'll revisit the key concepts related to this low-level data type.
Brushing Up on Binary Fundamentals
If you’re new to binary data or need a quick refresher, then consider sticking around. This section will provide a brief overview of binary representations, emphasizing a Python programmer’s perspective. On the other hand, if you’re already comfortable with the basics, then feel free to dive right into creating bytes objects in Python.
Bits, Bytes, and Binary Data
Virtually every piece of information, from books and music to movies, can be stored as binary data in a computer’s memory. The word binary implies that the information is stored as a sequence of binary digits, or bits for short. Each bit can hold a value of either one or zero, which is particularly well-suited for storage in electronic devices since they often use distinct voltage levels to represent these binary states.
For example, the binary sequence below may represent the color of a pixel in an image:
1 1 0 0 0 0 1 0 0 0 1 1 0 0 1 1 0 0 1 0 0 1 |
To make the interpretation of such binary sequences more systematic, you often arrange the individual bits into uniform groups. The standard unit of information in modern computing consists of exactly eight bits, which is why it’s sometimes known as an octet, although most people call it a byte. A single 8-bit byte allows for 256 possible bit combinations (28).
With this in mind, you can break up the bit sequence above into these three bytes:
0 0 1 1 0 0 0 0 |
1 0 0 0 1 1 0 0 |
1 1 0 0 1 0 0 1 |
Notice that the leftmost byte has been padded with two leading zeros to ensure a consistent number of bits across all bytes. Together, they form a 24-bit color depth, letting you choose from more than 16 million (224) unique colors per pixel.
In this case, each byte corresponds to one of three primary colors (red, green, and blue) within the RGB color model, effectively serving as coordinates in the RGB color space. Changing their proportions can be loosely compared to mixing paints to achieve a desired hue.
Note: Strictly speaking, the RGB color model is an additive one, meaning it combines specific wavelengths of light to synthesize complex colors. In contrast, paint mixing follows a subtractive model, where pigments absorb certain wavelengths of light from the visible spectrum.
To reveal the pixel’s primary colors as decimal numbers, you can open the Python REPL and define binary literals by prefixing the corresponding bit sequences with 0b:
>>> 0b00110000, 0b10001100, 0b11001001
(48, 140, 201)
Binary literals are an alternative way of defining integers in Python. Other types of numeric literals include hexadecimal and octal. For example, you can represent the integer 48 as 0x30 in hexadecimal or 0o60 in octal, allowing you to write the same number differently.
Having such flexibility comes in handy since it’s customary to express byte values using the hexadecimal numeral system. By rewriting each byte as a two-digit hex number, you can represent your pixel color much more compactly compared to the equivalent binary sequence:
>>> hex(48), hex(140), hex(201)
('0x30', '0x8c', '0xc9')

>>> int("308cc9", base=16)
3181769

>>> int("001100001000110011001001", base=2)
3181769
Calling the built-in hex() function on an integer returns the corresponding hexadecimal literal as a string. When you combine the resulting hex numbers, you’re able to describe a 24-bit color with just six digits (308cc9). Go ahead and open an online color picker to see what that encoded value looks like:
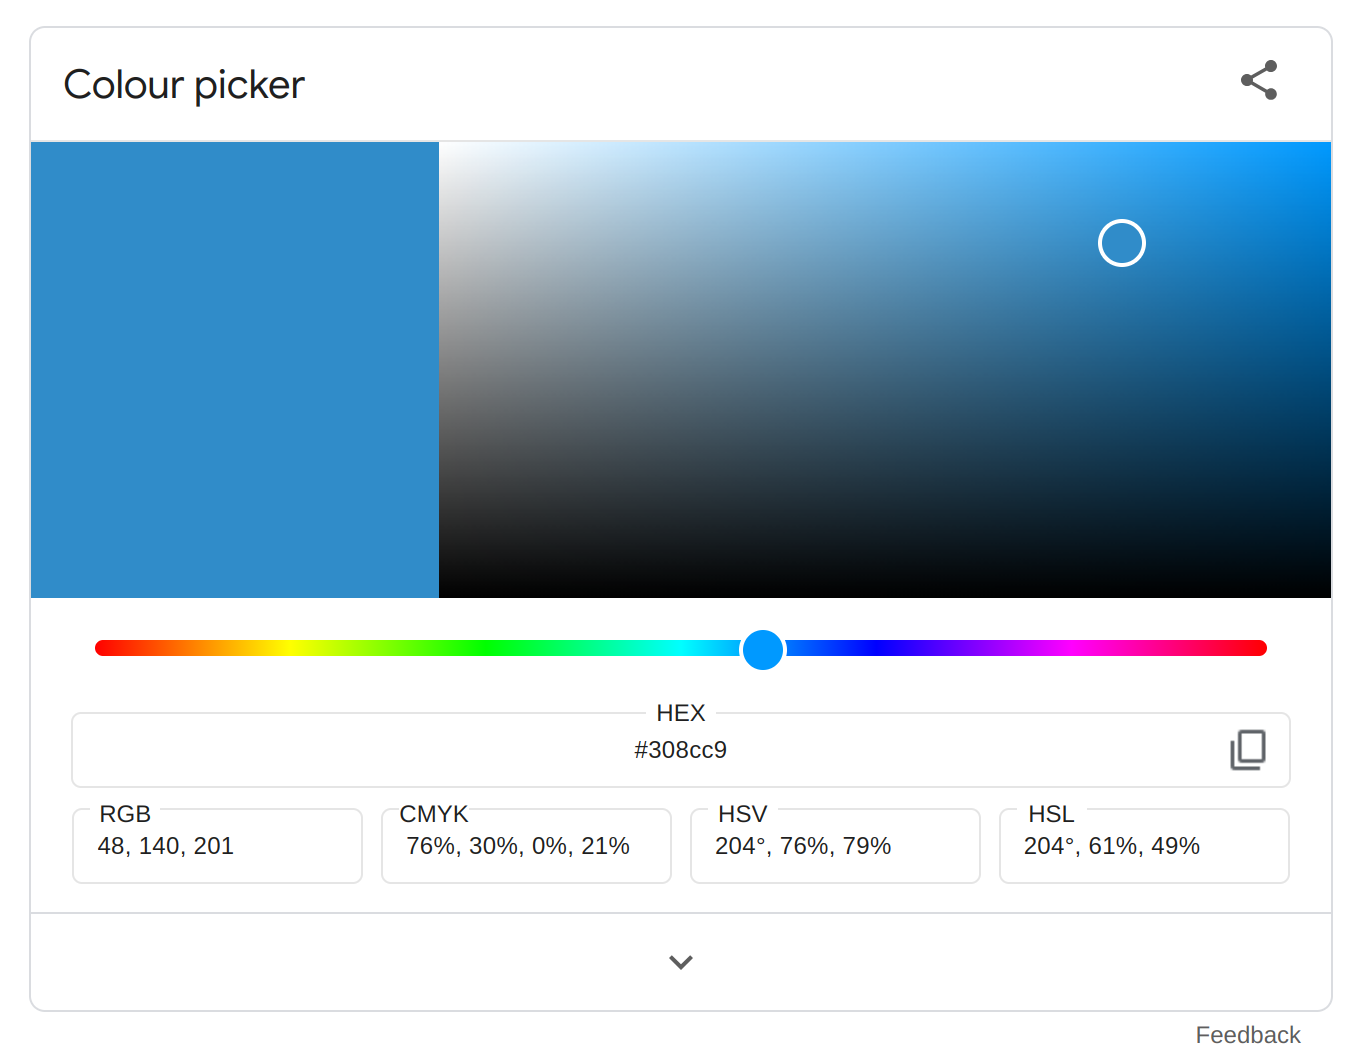
You can play around with this tool to explore different primary color combinations and see how they affect the resulting hexadecimal value.
The RGB model deliberately fits each color channel onto a byte, making this representation simple and memory-efficient. However, if you wanted to use a greater color depth to achieve higher fidelity, then you’d need to allocate more than one byte per channel. Furthermore, most computers read and write data in chunks of certain sizes for better performance, often requiring your data to be properly aligned.
Bits and bytes are fundamental building blocks of digital data, giving structure and meaning to your binary sequences. In the next section, you’ll learn how to manage binary numbers longer than a byte and how to cope with the associated challenges.
Binary Words and Endianness
When single bytes don’t cut it, you can group them into larger units of information called words. The size of a binary word in bytes is usually a multiple of a power of two, as reflected by most data types native to popular programming languages. For example, here are a few basic types supported by Java with their byte sizes:
| Type | Size | Minimum Value | Maximum Value |
|---|---|---|---|
byte |
20 = 1 byte | -128 | 127 |
short |
21 = 2 bytes | -32,768 | 32,767 |
int |
22 = 4 bytes | -2,147,483,648 | 2,147,483,647 |
long |
23 = 8 bytes | -9,223,372,036,854,775,808 | 9,223,372,036,854,775,807 |
Neither Java nor Python provides a built-in numeric type capable of representing a three-byte value, effectively forcing you to use more memory than necessary for each pixel. Alternatively, you could create a custom data structure to store pixels as byte triplets, but you would inevitably introduce additional complexity and performance overhead in your code.
Note that as soon as you start using more than one byte to represent a value, it raises an interesting conundrum known as the endianness or byte order. Depending on how you decide to store your multi-byte numbers in memory, their interpretation can vary significantly.
The following example demonstrates this using the integer’s .to_bytes() method, which you’ll explore in more detail later:
>>> color = 0x308cc9

>>> list(color.to_bytes(length=4, byteorder="little"))
[201, 140, 48, 0]

>>> list(color.to_bytes(length=4, byteorder="big"))
[0, 48, 140, 201]
You specify an RGB color as a numeric value using the hexadecimal notation. By calling .to_bytes() with the length=4 parameter, you convert the number into a sequence of four bytes, which is why you see an extra byte with the value of zero in the output. The byteorder parameter allows you to control the order in which these bytes are arranged.
Endianness is primarily expressed as big-endian or little-endian. In little-endian, you arrange the subsequent bytes starting with the least significant byte—in this case, hexadecimal 0xc9 or decimal 201—at the lowest address. Conversely, in big-endian, you first start with the most significant byte, which is zero. This is very much like choosing whether to read a sentence forward or backward, word by word.
When you apply the wrong endianness to a piece of binary data, you’ll likely get an incorrect value. Here’s another code snippet that illustrates this with Python’s bytes data type, which you’ll learn about soon:
>>> data = bytes([0, 48, 140, 201])

>>> int.from_bytes(data, byteorder="little")
3381407744

>>> int.from_bytes(data, byteorder="big")
3181769
Notice how different the resulting numbers are, even though you derived them from the same sequence of bytes! This goes to show the importance of choosing the right byte order when working with longer byte sequences.
Note: Contrary to popular belief, the complete bit sequences produced by little-endian and big-endian orders aren’t mirror reflections of each other:
>>> little_endian = format(3381407744, "032b")
>>> big_endian = format(3181769, "032b")

>>> print(little_endian, big_endian, sep="\n")
11001001100011000011000000000000
00000000001100001000110011001001

>>> little_endian == big_endian[::-1]
False
If you look closely at the two bit patterns above, then you’ll quickly notice that they don’t match when one is reversed. Remember that it’s the whole bytes that are stored in reverse order, but the internal bit numbering within each byte remains consistent and unambiguous:
>>> import textwrap
>>> print(
...     " ".join(textwrap.wrap(little_endian, 8)),
...     " ".join(textwrap.wrap(big_endian, 8)),
...     sep="\n"
... )
11001001 10001100 00110000 00000000
00000000 00110000 10001100 11001001
For example, the bit sequence in the leftmost byte of the first highlighted line is identical to that of the rightmost byte of the following line. Similarly, the next byte from the left on the first line matches the second byte from the right on the line below, and so on. In fact, both binary values consist of the same set of four bytes, just placed in reverse order.
How do you know which byte order to use? Usually, you don’t care because Python works hard to remain neutral about the byte order as much as possible, making your code portable across platforms that may have different endianness. To find out your hardware’s native byte order, use the sys module:
>>> import sys
>>> sys.byteorder
'little'
This means that Python internally stores values in little-endian byte order, which is what most computers use these days. That said, if you’re still on an older Apple computer or work with some enterprise systems, then you might stumble on big-endian or even bi-endian.
As long as you don’t interface with the outside world, you can ignore these differences in byte order. Unfortunately, that’s only one side of the coin. If you plan to communicate with other systems over the network or exchange data through binary files—especially using Python’s low-level constructs—then you might need to ensure appropriate conversion yourself. Otherwise, you’re gambling with potential data corruption at some point.
Note: When you decide to process binary data at a low level, always check the file format or transmission protocol specification to ensure the correct byte order. For example, major network protocols have adopted big-endian, sometimes called network byte order in this context, as a standard. Also, beware of mixed byte orders in certain file formats, like multimedia containers.
You can represent arbitrary data in digital form by combining bytes into longer sequences. It’s entirely up to you how you want to interpret these byte sequences, though. Depending on the context, the same piece of binary data can mean different things.
So far, you’ve learned about bits, bytes, binary words, and endianness. But, to fully understand how to handle binary data, you’ll need to delve into another key concept: signedness.
Signedness and the Sign Bit
As mentioned earlier, an 8-bit byte consists of 256 unique bit combinations (28). It can represent either a small unsigned integer ranging from 0 to 255, or a signed integer in the range of -128 to 127. Python only understands unsigned bytes, but there are ways to emulate signed bytes should you need to—more on that later.
Note: You could theoretically represent a floating-point number on a single byte by encoding the sign, exponent, and mantissa using fewer bits. However, such a data type would suffer from extremely low precision and a limited range of values, rendering it impractical.
In some applications, however, you might encounter a half-precision data format, which strikes a balance between accuracy and storage. It encodes floating-point values on just two bytes instead of the usual four (single precision) or eight (double precision).
Therefore, it’s more common to think about individual bytes as small integers for pragmatic reasons.
The signedness of a number may play a role in certain data formats, such as those representing digital audio samples, which encode amplitude levels. When dealing with low-level binary data, you must know beforehand whether a given bit sequence is signed or unsigned. This applies to both single bytes and binary words comprised of more than one byte. Otherwise, you may misinterpret the data, akin to choosing the wrong endianness:
>>> data = bytes([0b10101010])

>>> int.from_bytes(data, signed=True)
-86

>>> int.from_bytes(data, signed=False)
170
Here, for example, you tell Python to interpret the specified bit sequence as a signed integer and then as an unsigned one. Consequently, you get two completely different values. Note that this won’t always be the case:
>>> data = bytes([0b01010101])

>>> int.from_bytes(data, signed=True)
85

>>> int.from_bytes(data, signed=False)
85
After having changed the bit sequence ever so slightly, you now get two identical values regardless of the mode. Read on to find out what’s different about this particular bit pattern!
If you haven’t dipped your toes into other programming languages, then unsigned numbers might be a foreign concept to you. After all, Python’s numeric types let you store positive and negative values—as well as zero—at will. Such a design choice makes it straightforward to think about numbers when you solve programming problems, but it doesn’t always translate well to binary data formats. Why does this distinction at the binary level exist?
While unsigned types can’t store negative values, they double the range of positive values compared to signed types with the same number of bits. If you know for sure that your data will never include negative values, then choosing an unsigned type will maximize your storage efficiency. Think of tracking a video view count, for example.
This doubling of positive values stems from an extra bit that you gain by not having to keep the sign of your number. The bulk of signed number representations repurpose the most significant bit—located on the far left of the sequence—as a sign bit, which indicates whether the number is positive or negative. However, that only leaves you with the remaining bits to represent the magnitude of the number.
When the sign bit is switched on (1), it means that the stored number is negative. On the other hand, when the sign bit is switched off (0), then the number is either positive or equal to zero. Tying this information back to the two previous examples, you can conclude the following:
- The leftmost bit in the first bit pattern was equal to one, serving as the sign bit when you specified
signed=True. Conversely, in the unsigned mode, the same bit acted as a regular bit, contributing to the number’s value, which is why you saw two different results. - In the second bit pattern, however, the leftmost bit was zero, making no contribution to the number’s magnitude in either of the modes. Moreover, it didn’t affect the sign of the number, allowing it to remain positive or zero in both signed and unsigned interpretations.
Beneath the surface, modern computers represent signed integers as bit sequences using two’s complement, which is by far the most efficient method for binary arithmetic and hardware design, making it a widely accepted standard. Things get more tricky in Python, which takes an adaptive approach to seamlessly store integers of arbitrary precision. It accomplishes this by using a custom representation without an explicit sign bit.
The technical details of Python’s integer representations are beyond the scope of this tutorial. Still, you might want to know about various ways to emulate the sign bit when working with fixed-length binary sequences in Python. You’ll learn about them now.
Two’s Complement vs Python
Despite not having an explicit sign bit in their internal representations, the numeric types in Python are indeed signed. At the same time—as if that weren’t confusing enough—Python can only represent unsigned bytes with its bytes data type. So, if you try to define a byte sequence containing at least one negative value, then you’ll get a ValueError exception:
>>> bytes([-42])
Traceback (most recent call last):
  ...
    bytes([-42])
    ~~~~~^^^^^^^
ValueError: bytes must be in range(0, 256)
The error message tells you that each of the bytes in your sequence must fit between 0 and 255, inclusive. The 256 in the message is there because a range() object corresponds to a right-open interval, meaning it includes the start but not the end value.
To work around this limitation, you can choose from many options. Arguably, the most straightforward way to use two’s complement when reading or writing binary data in Python is to call an integer’s .to_bytes() and .from_bytes() methods with the signed parameter set to True:
>>> for number in [42, 2, 1, -1, -2, -42]:
...     binary_word = number.to_bytes(length=2, byteorder="big", signed=True)
...     bytes_binary = " ".join(format(byte, "08b") for byte in binary_word)
...     bytes_decimal = ", ".join(format(byte, "3d") for byte in binary_word)
...     print(f"{number:3d}: [{bytes_binary}] [{bytes_decimal}]")
...
 42: [00000000 00101010] [  0,  42]
  2: [00000000 00000010] [  0,   2]
  1: [00000000 00000001] [  0,   1]
 -1: [11111111 11111111] [255, 255]
 -2: [11111111 11111110] [255, 254]
-42: [11111111 11010110] [255, 214]

>>> int.from_bytes(bytes([255, 214]), byteorder="big", signed=True)
-42
In this case, you loop over a few sample integers and convert them into binary words, each consisting of two unsigned bytes. Because you specify big-endian byte order, the most significant byte appears first. Setting the signed parameter to True enables two’s complement, preventing an overflow error during the conversion.
In two’s complement, you can represent negative numbers by inverting all the bits of their positive counterparts and adding one to the obtained value. For example, you derive -42 by first taking the binary representation of 42, which is 00000000 00101010, inverting the bits, and then adding one to get 11111111 11010110. The resulting bit pattern corresponds to two bytes, 255 and 214 in decimal, which encode the value -42 in two’s complement.
Later, you restore one of the binary words to its original form by using int.from_bytes() and specifying matching argument values. Try changing those parameters to see their effect on the output.
Other techniques for dealing with signed bytes and words in Python include using bitmasks and bit shifting, the modulo operator (%), as well as various modules that ship with Python:
| Technique | Example |
|---|---|
| Bitmask | bytes([-42 & 0x00ff, (-42 & 0xff00) >> 8]) |
| Modulo | bytes([-42 % 2**8, -42 % 2**16 // 2**8]) |
| Array | array.array("h", [-42]).tobytes() |
| C Struct | struct.pack("<h", -42) |
| C Types | ctypes.string_at(ctypes.byref(ctypes.c_short(-42)), 2) |
These are only examples, so you don’t need to fully understand them right now. If you’d like to learn more about these methods, then check out the tutorial on bitwise operators in Python. Keep in mind that array and ctypes rely on your system’s native byte order, so you’ll need to handle them with care.
Now that you have a solid understanding of binary data fundamentals, you can move on to explore how Python handles bytes and words. Next up, you’ll learn about the bytes data type in more depth, including bytes-like objects and the buffer protocol.
Getting to Know the bytes Object in Python
Python is a high-level programming language that comes with batteries included, meaning it provides a rich set of abstractions for all sorts of tasks out of the box. But, even if you can’t find the desired tool for your specific problem in the standard library, there’s a good chance a third-party package exists to fill the gap. In other words, writing Python code often feels like assembling a puzzle from prefabricated pieces.
Because of this, you rarely need a deep understanding of how Python works under the hood when crunching or pushing data around. But it doesn’t completely shield you from these aspects if you choose to engage with them.
One such scenario is manipulating binary data directly, which enables fine-grained control and can be valuable for educational purposes. Occasionally, it may be your only option when there’s no built-in alternative for your specific use case.
Note: Unless you have a compelling reason, it’s generally preferable to stick to the available high-level abstractions rather than reinvent the wheel. Not only will you save time, but you’ll also ensure better performance in most cases and increase reliability and convenience. Only go down the low-level path when absolutely necessary!
Without further ado, it’s time to introduce a few lesser-known data types that allow you to handle raw binary data in Python.
Bytes-Like Objects and bytes
Binary data can be interpreted and manipulated differently depending on its structure. At a fundamental level, you can view a chunk of binary data in two primary ways:
- As Individual Bytes: An ordered series of byte values, each carrying some meaning
- As a Complex Structure: Multiple fields packed together, with fixed or varying sizes
The image below illustrates these concepts by showing the binary representation of ASCII characters, uniformly sized pixel values, and various fields within image metadata:
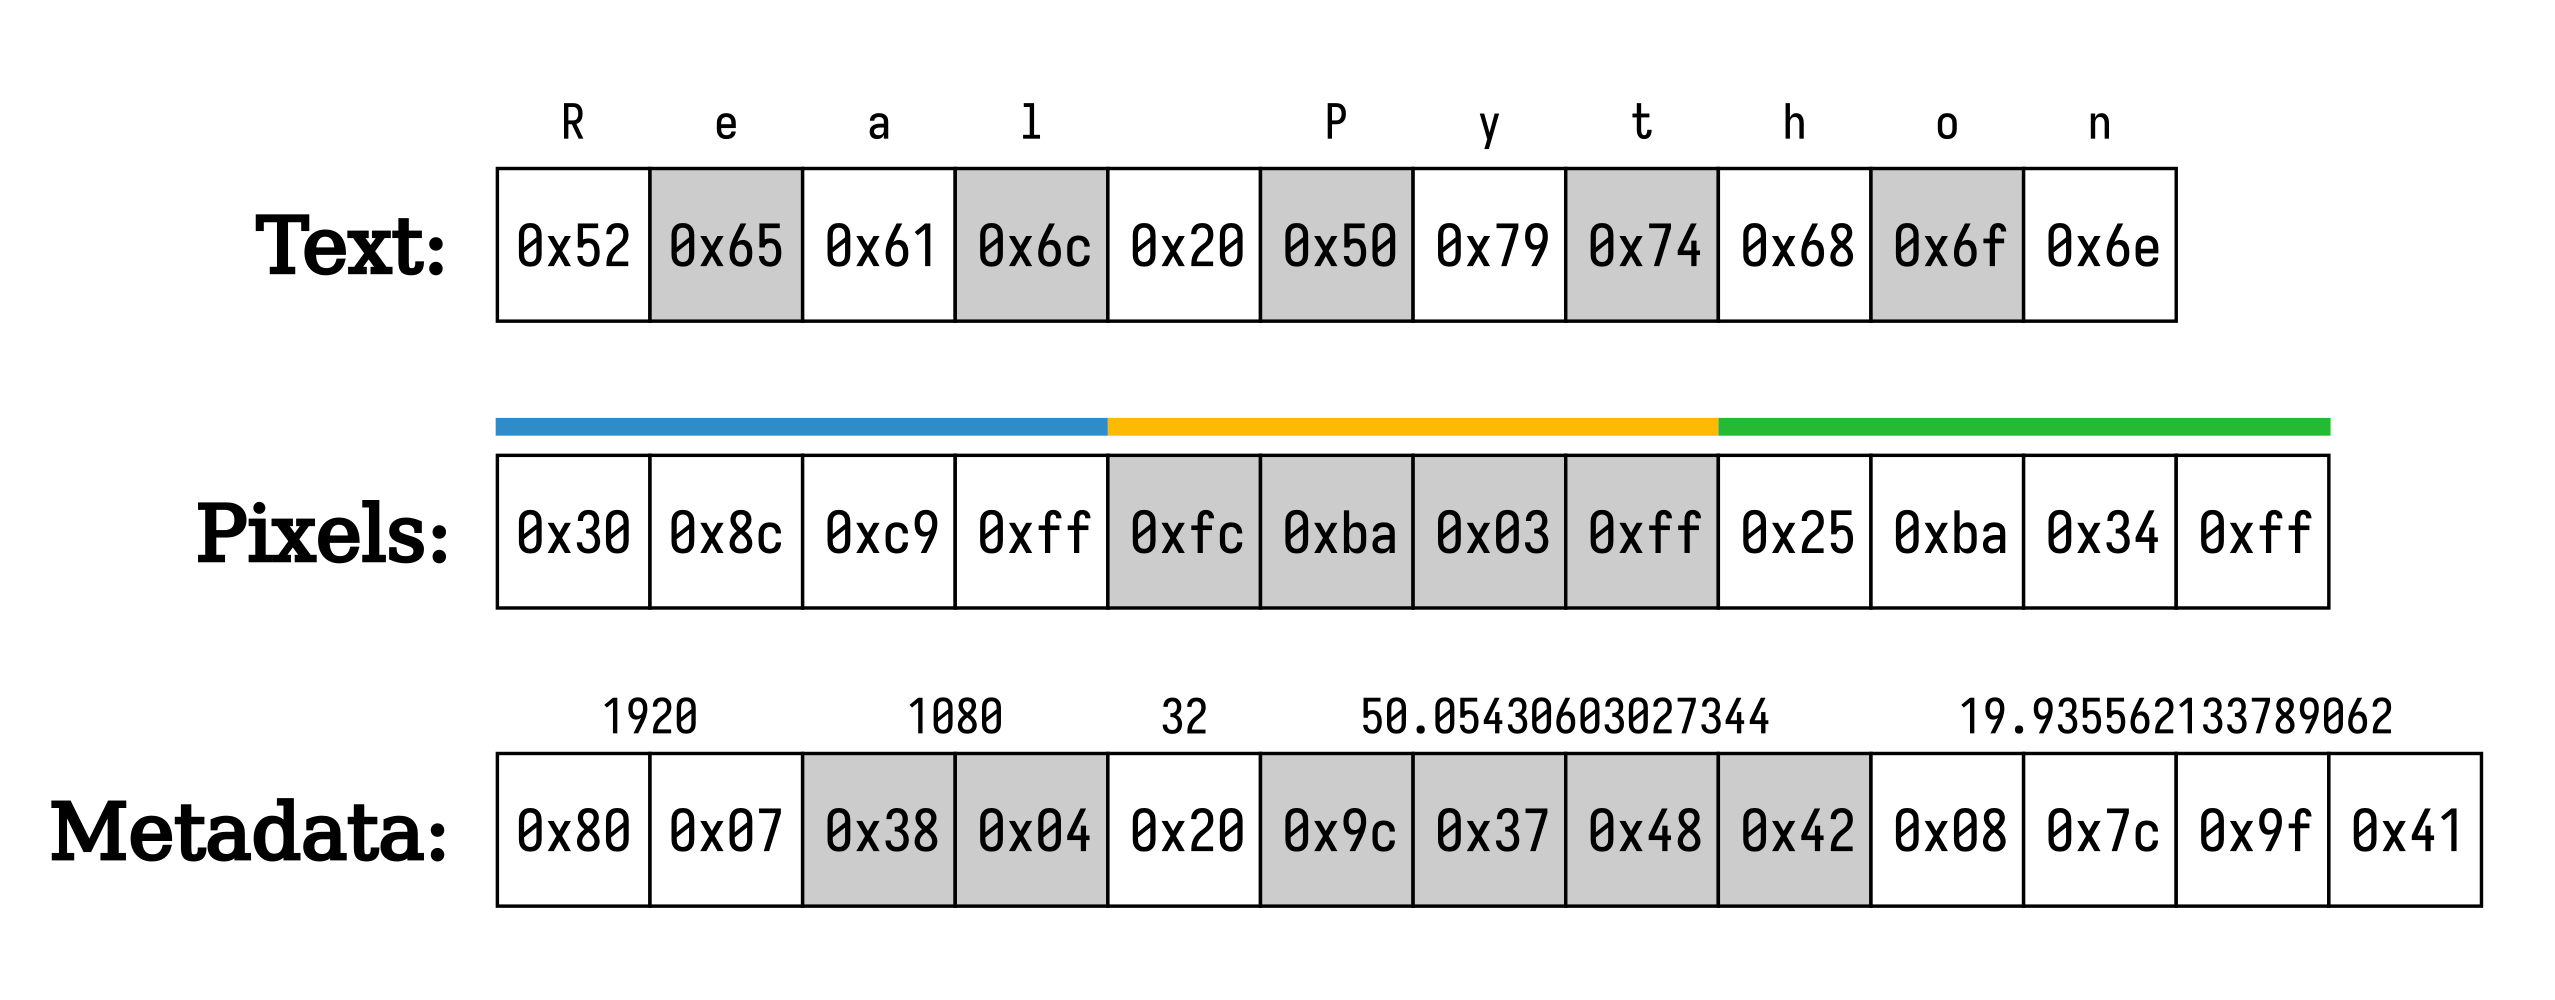
A text file is typically a sequence of simple bytes representing characters. Unless you want to encode non-ASCII letters, which may require more than one byte per character, each byte corresponds directly to a character’s ordinal value in the given code page. For example, the hexadecimal byte value 0x52 (82 in decimal) represents the letter R in ASCII.
Many image file formats store pixels as a sequence of three-byte words consisting of red, green, and blue primary colors. However, in the example above, each pixel has an extra byte for the alpha channel, representing the transparency level. This makes each pixel four bytes long. For example, the first pixel comprises the hexadecimal values 0x30 for red, 0x8c for green, 0xc9 for blue, and 0xff for the alpha channel, which indicates full opacity.
Meanwhile, an image file header contains structured metadata to help graphics-editing software correctly interpret the pixels. Such metadata may include details like image dimensions—for example, 1920 pixels wide by 1080 pixels high—a 32-bit color depth, and GPS coordinates captured by the camera when the photo was taken. These fields are packed together one after another as distinct binary words whose sizes you must know upfront.
If you plan to work with single bytes in Python, then you’ll get the greatest level of control by using one of its built-in binary sequence types:
bytes: A read-only sequence of unsigned bytesbytearray: A mutable counterpart ofbytesmemoryview: A lightweight view into the memory of a bytes-like object
Conversely, when working with multi-byte fields, you’ll likely prefer higher-level abstractions from the standard library, such as:
array.array: A homogeneous sequence of numeric valuesstruct: A module for working with C-style data structuresctypes: A foreign function library for manipulating C data typesio.BytesIO: A file-like object for handling binary data streams
The three built-in types listed earlier, along with the array data structure above, are examples of Python’s bytes-like objects designed for efficient sharing of large amounts of binary data.
Note: You can use a memoryview to work with both byte-oriented and multi-byte-oriented data, as it automatically computes memory offsets for given index positions based on the underlying item size.
To read the data depicted in the diagram above, you can use Python’s bytes-like objects, the modules mentioned, or you can hand-craft a list of byte values using hexadecimal literals as follows:
>>> data = [0x52, 0x65, 0x61, 0x6c, 0x20, 0x50, 0x79, 0x74, 0x68, 0x6f, 0x6e]
>>> "".join(map(chr, data))
'Real Python'
After mapping each byte value into the corresponding character with Python’s chr() function, you .join() them into the string 'Real Python'. Keep in mind that this approach only works for byte values within the ASCII range. To decipher foreign Unicode characters, which may be encoded using more than one byte, you’ll have to specify the respective character encoding:
>>> data = [0x63, 0x61, 0x66, 0xc3, 0xa9]

>>> bytes(data).decode("utf-8")
'café'

>>> "".join(map(chr, data))
'café'
The accented letter é uses two bytes when represented in the UTF-8 encoding. Therefore, you wrap your list of hexadecimal values in a bytes() object and call its .decode() method with an appropriate encoding. Otherwise, when you try to interpret each byte individually as before, you end up with the garbled text 'café'.
For image pixels, which occupy a fixed number of bytes each, Python’s numeric array is a more suitable choice:
>>> from array import array
>>> from PIL import Image

>>> pixels = array("I", bytes([
...     0x30, 0x8c, 0xc9, 0xff,
...     0xfc, 0xba, 0x03, 0xff,
...     0x25, 0xba, 0x34, 0xff,
...       ⋮     ⋮      ⋮     ⋮
...     0xfc, 0xba, 0x03, 0xff,
... ]))

>>> image = Image.new(mode="RGBA", size=(1920, 1080))
>>> image.putdata(pixels)
>>> image.save("image.png")
You can pass your array straight to a Pillow image instance, making sure to match the image mode and dimensions correctly. Additionally, you may sometimes need to swap the bytes in the array elements, depending on your system’s endianness.
Note: In practice, most users who work with Pillow choose NumPy arrays over Python arrays due to their efficiency and versatility. You’ll see an example of this in the next section.
Unlike the individual ASCII characters or image pixels, a file header typically consists of multiple data fields with varying sizes, which are placed next to each other. While you could read them one at a time, the struct module offers a more concise and convenient way to untangle such a group of fields all at once:
>>> import struct
>>> struct.unpack("<HHBff", bytes([
...     0x80, 0x07,
...     0x38, 0x04,
...     0x20,
...     0x9c, 0x37, 0x48, 0x42,
...     0x08, 0x7c, 0x9f, 0x41
... ]))
(1920, 1080, 32, 50.05430603027344, 19.935562133789062)
The first argument to struct.unpack() is a format string that specifies how the sequence of bytes passed as the second argument should be interpreted. In this case, the less-than symbol (<) determines little-endian byte order, while the following characters correspond to the expected types of the subsequent data fields. Here they are:
HH: Two consecutive unsigned shorts (16-bit integers)B: One unsigned byte (8-bit integer)ff: Two single-precision floats (32-bit float)
As a result, you get a tuple of five elements representing the decoded values from the header according to the specified format.
Okay. You’ve now seen an overview of the tools available in Python for handling different types of binary data, most of which are considered bytes-like objects. One of them is the bytes data type, which you’ll explore in more detail later in this tutorial. But first, you’ll learn what makes bytes-like objects special.
Python’s Buffer Protocol
Bytes-like objects conform to the buffer protocol, which describes a standard interface for objects to directly access their internal data buffers. This mechanism eliminates the need for expensive copying when you slice or pass large amounts of data around, improving both performance and memory use.
So far, you’ve only seen a few bytes-like objects built into Python, which can be useful for working with binary data at a low level. However, the real power of the underlying buffer protocol lies elsewhere: it can facilitate efficient interoperability between third-party libraries. For example, you may feed a Pillow image with a NumPy array instead of a Python array of pixels:
generate_image.py
import numpy as np
from PIL import Image

pixels = np.random.default_rng().random((1080, 1920, 3)) * 255
image = Image.fromarray(pixels.astype("uint8"))
image.save("image.png")
This code snippet creates a Pillow image from a NumPy array filled with random pixel values and saves it to a file in your current working directory using the Portable Network Graphics (PNG) format.
Both libraries leverage compiled C extension modules for the heavy lifting to maximize performance. Since the Python interpreter loads them into the same system process, they share a common address space. NumPy exposes an array-like region of memory to Python through the buffer protocol. This allows Pillow to read and manipulate data managed by NumPy without unnecessary copying, even for arrays containing millions of pixels.
Although you can exchange data in a similar fashion using alternative methods, the buffer protocol offers several advantages:
- Interoperability: It’s widely supported by popular Python libraries, especially those in the scientific ecosystem, ensuring their seamless integration.
- Efficiency: It allows raw memory to be accessed directly without the overhead of copying or type conversions.
- Safety: It relies on Python’s automatic memory management, reducing the risk of memory leaks and segmentation faults.
- Convenience: It supports complex memory layouts by handling strides and offsets for you.
It’s worth noting that the buffer protocol is a low-level C API, which hasn’t traditionally been accessible in pure Python. Previously, implementing a custom bytes-like object required writing and building a C extension module. However, this changed with the introduction of PEP 688 in Python 3.12, which brought two new special methods:
.__buffer__(): Returns the buffer wrapped in amemoryviewobject.__release_buffer__(): Optionally frees any buffer-related resources
These methods let you implement the buffer protocol in your own Python classes, making them usable as buffers in compiled code. The buffer itself might be allocated by a C extension module or a built-in data type like bytes or array.
You can quickly check whether a given object supports the buffer protocol by calling memoryview() on it:
>>> text_bytes = bytes([0x63, 0x61, 0x66, 0xc3, 0xa9])
>>> text = text_bytes.decode("utf-8")

>>> memoryview(text_bytes)
<memory at 0x764ca33de5c0>

>>> memoryview(text)
Traceback (most recent call last):
  ...
    memoryview(text)
    ~~~~~~~~~~^^^^^^
TypeError: memoryview: a bytes-like object is required, not 'str'
Upon success, you’ll get a new instance of the memoryview class. Otherwise, Python will raise a TypeError exception with a message explaining that the object in question isn’t a bytes-like one. NumPy arrays also expose their underlying data as a buffer, which you can access in Python using memoryview.
At this point, you know that bytes is one of Python’s built-in binary sequence types, representing a read-only series of unsigned bytes. It’s also a bytes-like object that implements the buffer protocol for low-level binary data manipulation. With that covered, it’s time to explore how to create and work with bytes in Python.
Creating Python bytes by Hand
In this section, you’ll explore three different ways to create bytes objects in Python, including a bytes literal, the bytes() function, and the bytes.fromhex() class method. Each one is suited to specific use cases, which you’ll discover as you delve deeper into their distinct features.
The Bytes Literal Format
The quickest way to produce a bytes object in Python resembles defining a string literal, only prefixed with the letter b or B:
>>> MAGIC_NUMBER = b"GIF89a"
>>> type(MAGIC_NUMBER)
<class 'bytes'>
This method works best when your binary sequence consists of reasonably few bytes that you know upfront and you want to embed them in your Python source code in literal form. Such a literal could serve as a constant meant to represent a binary file signature, also known as a “magic number.”
In this case, the byte values stored in your bytes object happen to have a human-readable representation because they correspond to well-known character codes:
| Character | G | I | F | 8 | 9 | a |
| Code Point | 71 | 73 | 70 | 56 | 57 | 97 |
To embed non-printable values, you’ll have to rewrite them using a special notation. That’s because bytes literals are limited to ASCII characters, making them slightly more restrictive than string literals, which can contain any Unicode character, including emojis.
Thankfully, string and bytes literals have a lot in common. They both support escape character sequences, letting you encode certain symbols like quotation marks or special characters like newlines with plain ASCII.
An escape sequence always begins with a backslash (\) followed by one or more ASCII characters. For example, you can use the hexadecimal (\xhh) or octal (\ooo) notation, where h denotes a hexadecimal digit and o an octal one, to represent any numeric byte value:
>>> b"caf\xc3\251"
b'caf\xc3\xa9'
The hexadecimal sequence \xc3 corresponds to the byte value 195 in the decimal system, while the octal sequence \251 represents the byte value 169. Together, these two bytes encode the accented letter é in UTF-8. While neither of the two bytes can fit into the ASCII range between 0 and 127, the individual characters of their escape sequences do. As you can see, Python prefers the hexadecimal notation when displaying bytes in the REPL.
Note: Python bytes literals support nearly all escape sequences available in string literals, except for a handful that are specific to encoding Unicode characters.
Another similarity between string and bytes literals is that they have their raw counterparts. A raw string literal disables the interpretation of escape character sequences, which could conflict with the syntax of regular expressions, for example. Likewise, raw bytes literals are often used to define regex patterns when searching, matching, or substituting parts of binary content:
find_timestamps.py
import re
from pathlib import Path

binary_data = Path("picture.jpg").read_bytes()
pattern = rb"\d{4}:\d{2}:\d{2} \d{2}:\d{2}:\d{2}"

for match in re.finditer(pattern, binary_data):
    print(match)
To define a raw bytes literal in Python, you can use any combination of the lowercase or uppercase letters r and b as a prefix. In this example, you look for timestamps in a JPEG file, which usually keeps the camera’s original date, file creation date, and last modified date within its Exif metadata.
Declaring your literal as raw instructs Python to treat the sequence \d literally as a pair of characters instead of failing due to an invalid escape sequence. Alternatively, you could escape each backslash in a plain bytes literal to achieve a similar effect:
pattern = b"\\d{4}:\\d{2}:\\d{2} \\d{2}:\\d{2}:\\d{2}"
However, this makes the pattern less readable and doesn’t scale well since the regular expression syntax involves other conflicting symbols.
Note: Unlike Python strings, bytes don’t support formatted string literals, commonly referred to as f-strings. When you want to format a bytes object, consider using an f-string literal first, and then convert it to a sequence of bytes.
Finally, you may occasionally need to declare an empty bytes literal, for instance, when reading a binary file in chunks:
read_chunks.py
def read_chunks(filename, max_bytes=1024):
    with open(filename, mode="rb") as file:
        while True:
            chunk = file.read(max_bytes)
            if chunk == b"":
                break
            yield chunk

for chunk in read_chunks("picture.jpg"):
    print(len(chunk))
Python reports reaching the end of the file (EOF) through an empty bytes object returned from the file.read() method. By comparing the returned value to an empty bytes literal (b""), you’ll know when to stop reading from the file.
Literals are great for static byte sequences of relatively short length that you know ahead of time. In contrast, if you want to create a bytes object dynamically based on some data or conditions that can change at runtime, then use the bytes() function.
The Built-in bytes() Function
To create a new bytes instance, you can invoke its class constructor just like a regular Python function. For simplicity, you’ll refer to it as a built-in function in this section. Depending on how many arguments and what types you pass to bytes(), you can create bytes objects in several different ways:
# Argumentless:
bytes()

# Single argument:
bytes(length: int)
bytes(data: Buffer)
bytes(instance: CustomClass)
bytes(values: Iterable[int])

# Two or three arguments:
bytes(text: str, encoding: str[, errors: str = "strict"])
When called without arguments, the bytes() function creates an empty bytes object:
>>> bytes()
b''
The resulting object is a byte sequence of length zero, which you may use as a sentinel value to indicate an absence of data in a binary stream.
Calling bytes() with a positive integer as an argument allocates a sequence of the specified length, and then fills it with zeros or null bytes. Note that calling bytes(0) has the same effect as declaring an empty bytes literal (b""):
>>> bytes(5)
b'\x00\x00\x00\x00\x00'

>>> bytes(0)
b''
A zero-filled bytes object can be useful as padding since it’s inherently read-only. For example, you might use one to pad the rows of pixels in a bitmap image.
The next type of argument that you can pass into bytes() is another bytes-like object, which implements the buffer protocol. Calling bytes() on such an object allows you to break down a sequence of binary words into a sequence of their individual bytes:
>>> from array import array
>>> bytes(array("f", [50.05430603027344, 19.935562133789062]))
b'\x9c7HB\x08|\x9fA'
Here, you start with a Python array containing two single-precision floats (32-bit), which you then convert into raw bytes. This technique opens up the possibility to reinterpret the underlying binary data in completely new ways:
>>> coordinates = array("I")
>>> coordinates.frombytes(b"\x9c7HB\x08|\x9fA")
>>> latitude, longitude = coordinates
>>> latitude, longitude
(1112029084, 1100971016)
For example, you can load the resulting bytes object into an array of unsigned integers. As long as you take responsibility for potential conversion failures, it’ll let you treat the original floating-point numbers as if they were integers all along. The best part is that you can reverse this process without losing a single bit of information!
Another use case for calling bytes() on a bytes-like object is when you want to obtain its read-only copy:
>>> mutable = bytearray([0x30, 0x8c, 0xc9, 0xff])
>>> immutable = bytes(mutable)
>>> mutable == immutable
True
>>> mutable.clear()
>>> mutable == immutable
False
A bytearray is writable, allowing you to modify its contents, whereas a bytes object is fixed, providing a read-only version of the data. The comparison between these two data types is similar to that between lists and tuples, since one is mutable and the other immutable. Notice that modifying the original bytes-like object has no effect on the copy you created with bytes().
Note: You can also use the bytes() function on instances of a custom class, provided that it implements the .__bytes__() special method:
>>> class UserStatus:
...     def __init__(self, user_id, message):
...         self.user_id = user_id
...         self.message = message
...
...     def __bytes__(self):
...         return b"".join([
...             self.user_id.to_bytes(4, "little", signed=False),
...             self.message.encode("utf-8")
...         ])
...
>>> user_status = UserStatus(42, "Away from keyboard \N{PALM TREE}")
>>> bytes(user_status)
b'*\x00\x00\x00Away from keyboard \xf0\x9f\x8c\xb4'
This method allows you to represent your object as a series of bytes, which are ready for transmission over a network or storage in a binary file. Keep in mind that .__bytes__() takes precedence over the buffer protocol’s .__buffer__() method, so avoid using them together.
The last way to call the single-argument flavor of bytes() involves using an iterable of small integers as input:
>>> bytes([0x30, 0x8c, 0xc9, 0xff])
b'0\x8c\xc9\xff'

>>> bytes(range(65, 91))
b'ABCDEFGHIJKLMNOPQRSTUVWXYZ'
You’ve seen this method of specifying byte sequences many times over in this tutorial. The first iterable in the example above is a list of integers defined as hexadecimal literals, whereas the second iterable is a range() object. While your iterable can be eagerly or lazily evaluated, it must have a fixed size to avoid crashing the computer due to excessive memory use. So, please don’t use an infinite iterator from the itertools module!
Remember that each element of the input iterable represents a byte value, which must be greater than or equal to 0 and less than 256. Otherwise, you’ll face a familiar error:
>>> bytes([-128, 0, 127, 256])
Traceback (most recent call last):
  ...
    bytes([-128, 0, 127, 256])
    ~~~~~^^^^^^^^^^^^^^^^^^^^^
ValueError: bytes must be in range(0, 256)
Both -128 and 256 aren’t valid unsigned byte values, as they fall outside the permissible range.
Finally, you can call the bytes() function with two arguments, both of which must be Python strings. The first argument is an ordinary piece of text, while the second argument is the desired character encoding:
>>> bytes("café", "utf-8")
b'caf\xc3\xa9'
Calling bytes() like that turns a string into a bytes object. The resulting binary sequence might be longer than the original number of Unicode characters, depending on their code points and the chosen encoding.
Note: A more Pythonic way to encode a string into bytes entails calling its str.encode() method instead of the bytes() function.
Sometimes, a string character might not have a corresponding binary representation in the given encoding. For instance, you can’t translate the accented letter é, which has an ordinal value of 233, to one of the 128 ASCII values:
>>> bytes("café", "ascii")
Traceback (most recent call last):
  ...
    bytes("café", "ascii")
    ~~~~~^^^^^^^^^^^^^^^^^
UnicodeEncodeError: 'ascii' codec can't encode character '\xe9'
⮑ in position 3: ordinal not in range(128)

>>> ord("é")
233
To prevent Python from raising an error in cases like this, you can relax the default strategy for handling encoding errors with an optional third argument to bytes():
>>> bytes("café", "ascii", errors="ignore")
b'caf'

>>> bytes("café", "ascii", errors="replace")
b'caf?'

>>> bytes("café", "ascii", errors="namereplace")
b'caf\\N{LATIN SMALL LETTER E WITH ACUTE}'

>>> bytes("café", "ascii", errors="backslashreplace")
b'caf\\xe9'

>>> bytes("café", "ascii", errors="xmlcharrefreplace")
b'café'
In fact, calling bytes() with two arguments is the same as calling it with an implicit third argument, errors="strict" by default. The offending characters won’t be considered at all when you choose to ignore the encoding errors. Alternatively, you can replace those characters with a placeholder or an ASCII-safe replacement sequence.
Python provides yet another way to create a new bytes object directly from a string of hexadecimal digits, which you’ll learn about next.
The bytes.fromhex() Class Method
If you’ve been following along, then you know that using the hexadecimal system is a popular way of representing byte values concisely. In this notation, you need between one and two hexadecimal digits for every byte. Once you exceed the maximum value of 255, you’ll require three digits or more:
>>> hex(9)
'0x9'

>>> hex(10)
'0xa'

>>> hex(42)
'0x2a'

>>> hex(256)
'0x100'
When you run out of the decimal digits (0-9), you start using the first six letters of the alphabet (A-F) to represent the values between 10 and 15. But even when you technically only need one hexadecimal digit, it’s common to use two by putting a zero in front of it:
>>> 0x09
9
This practice ensures that every byte is displayed with the same number of hexadecimal digits, which helps maintain consistent formatting. It can be especially useful when you want to print and align multiple bytes in columns or rows.
Because hex is such a widespread notation, Python provides a convenient class method in its bytes data type, which converts a string of hexadecimal digits into a new bytes instance:
>>> bytes.fromhex("308cc9")
b'0\x8c\xc9'
You’re free to use a mix of lowercase and uppercase letters in the string. Additionally, any whitespace characters are ignored for better readability:
>>> bytes.fromhex("30 8C C9")
b'0\x8c\xc9'
There’s a companion method in the resulting bytes object that converts the byte sequence back into a hexadecimal string:
>>> b"0\x8c\xc9".hex()
'308cc9'
But that’s just one of many features of bytes available to you in Python. Now that you know how to create a bytes object, you’ll explore what you can do with it.
Manipulating Bytes Objects in Python
Python’s bytes objects share many similarities with strings but are specifically designed for handling binary data. In this section, you’ll explore how they compare to strings and how you can convert between the two data types. Finally, you’ll discover alternative ways to interpret the underlying byte values.
Use bytes Like a Python String
As already hinted at by their literal forms, Python’s bytes and str data types have many similarities. That’s no coincidence since bytes were often synonymous with characters in the early days of computing. For example, the C programming language still lacks a separate type to represent bytes, instead relying on the char data type to handle both characters and bytes. Likewise, explicit bytes didn’t appear in Python until the 3.0 release.
Note: You can check the official release notes to find out the differences between Python 2.x and Python 3.x concerning binary data and Unicode handling.
First and foremost, bytes and strings fall under the broad category of Python sequences. Like other sequence types in Python, the bytes data type supports standard sequence operations, such as:
| Operation | Bytes Example | String Example |
|---|---|---|
| Indexing | data[-1] |
text[-1] |
| Slicing | data[3:7:2] |
text[3:7:2] |
| Iterating | iter(data) |
iter(text) |
| Reversing | reversed(data) |
reversed(text) |
| Measuring the Length | len(data) |
len(text) |
| Finding the Index | data.index(b"\xff\xe1") |
text.index("Python") |
| Counting Occurrences | data.count(b"\xff\xe1") |
text.count("Python") |
| Checking Membership | b"\xff\xe1" in data |
"Python" in text |
Just like strings, bytes objects support two additional operators. The star operator (*) allows you to repeat the same byte sequence multiple times, while the plus operator (+) lets you concatenate two or more bytes instances into one:
>>> (b"\xAA" * 7) + b"\xAB"
b'\xaa\xaa\xaa\xaa\xaa\xaa\xaa\xab'
The code above uses both operators to construct the preamble and start frame delimiter (SFD) for an Ethernet packet, consisting of seven repeated bytes of 0xAA followed by a single byte of 0xAB. The underlying bit pattern alternates between ones and zeros until it’s broken by the delimiter, helping network devices synchronize their timing with the incoming data.
You can use Python bytes in any context where an iterable object is expected, for example, to count the frequency of unique byte values:
>>> from collections import Counter
>>> Counter(bytes.fromhex("beef babe"))
Counter({190: 2, 239: 1, 186: 1})
In this example, you take advantage of the Counter class from the collections module to create a mapping of numeric byte values to their counts. Along the way, you demonstrate a whimsical use of hexspeak by using the hexadecimal values of 0xBE 0xEF and 0xBA 0xBE.
Other than that, Python bytes and str share over eighty percent of methods in their public interfaces. After all, operations like finding and replacing substrings or splitting and joining strings can be just as useful for byte sequences:
>>> from pathlib import Path

>>> def has_exif(path):
...     return path.read_bytes().find(b"\xff\xe1") != -1
...

>>> has_exif(Path("camera_photo.jpg"))
True

>>> has_exif(Path("exif_stripped.jpg"))
False
In this example, you call .find() to determine the offset of the first occurrence of an Exif segment marker (0xFF 0xE1) in a JPEG file. If the given byte sequence isn’t found, then the method returns -1. Note that the above implementation isn’t the most efficient since it loads the entire file into memory before searching.
The last major similarity between Python bytes and strings is that they’re both immutable, making their instances read-only:
>>> byte_sequence = b"Real Python"

>>> byte_sequence[:4] = b"Monty"
Traceback (most recent call last):
  ...
    byte_sequence[:4] = b"Monty"
    ~~~~~~~~~~~~~^^^^
TypeError: 'bytes' object does not support item assignment

>>> del byte_sequence[:5]
Traceback (most recent call last):
  ...
    del byte_sequence[:5]
        ~~~~~~~~~~~~~^^^^
TypeError: 'bytes' object does not support item deletion
You can’t modify bytes and strings once they’re created because they don’t support assignments or deletions. The best you can do is to wrap them in a mutable bytearray, modify the contents as needed, and then convert back to the respective immutable type, effectively creating a copy.
While bytes and strings look mostly similar at first glance, they have some notable differences. For instance, one quirk of bytes is that indexing returns an integer while slicing returns a bytes object, whereas performing the same operations on a string object always results in another string:
>>> byte_sequence = b"Real Python"
>>> byte_sequence[5]
80
>>> byte_sequence[5:]
b'Python'

>>> text = "Real Python"
>>> text[5]
'P'
>>> text[5:]
'Python'
Because Python doesn’t have a distinct type for Unicode characters, it must represent individual characters as single-element strings. In contrast, a bytes object is a sequence of numeric byte values, which are stored as integers.
Consequently, when you apply the membership test operators in and not in against a byte sequence, you can check for individual elements using integers and for subsequences using bytes:
>>> 80 in byte_sequence
True

>>> b"P" in byte_sequence
True

>>> b"Python" in byte_sequence
True
The decimal value 80 is a code point for the letter P in ASCII, which is present in the sequence. Similarly, both the byte string b"Python" and the single-byte sequence b"P" are found within the full sequence.
The length reported by bytes and strings representing precisely the same piece of text may differ:
>>> len("café")
4
>>> len(bytes("café", "raw_unicode_escape"))
4
>>> len(bytes("café", "utf-8"))
5
>>> len(bytes("café", "utf-16"))
10
A Python string is a sequence of Unicode characters, each having a unique ordinal value or code point. These code points can range from zero to over a million, which is far beyond the standard byte range, necessitating a clever binary representation. Depending on your chosen encoding, the same character might use fewer or more bytes per code point.
Unlike in legacy Python 2, you can’t mix numeric bytes with strings in one expression unless you do an explicit conversion one way or the other:
>>> b"Real Python" == "Real Python"
False

>>> b"Real" + "Python"
Traceback (most recent call last):
  ...
    b"Real" + "Python"
     ~~~~~~~~^~~~~~~~~~
TypeError: can't concat str to bytes

>>> b"Real".decode() + "Python"
'RealPython'

>>> b"Real" + "Python".encode()
b'RealPython'
Python enforces a clear distinction between text (str) and binary data (bytes), reducing the likelihood of errors and making your code more predictable. This applies equally to operators, such as == and +, and methods like .find().
Since you’ll often need to encode a string into bytes or decode bytes back into a string, you’ll revisit how to convert between these two closely related types in the next section.
Convert Between Bytes and Strings
Strings and byte sequences in Python exhibit symmetry by providing two complementary methods, which allow you to convert between them seamlessly:
Encoding a string turns its characters into a sequence of bytes, while decoding binary data reverses this process:
>>> "café" == "café".encode("utf-8").decode("utf-8")
True
As you can see, chaining .encode() and .decode() with the same encoding as arguments preserves the original text.
In addition to these two methods, you can convert between bytes and strings by calling the bytes() and str() functions, as well as using the codecs module from the standard library:
>>> bytes("café", "utf-8")
b'caf\xc3\xa9'
>>> str(b"caf\xc3\xa9", "utf-8")
'café'

>>> import codecs
>>> codecs.encode("café", "utf-8")
b'caf\xc3\xa9'
>>> codecs.decode(b"caf\xc3\xa9", "utf-8")
'café'
While most of these tools assume some default encoding, it’s highly recommended to always specify one explicitly to avoid surprises. That’s because different operating systems may use incompatible encodings by default. Your best bet is usually to use the UTF-8 encoding, which is widely supported and can handle a wide range of characters from various spoken languages.
Note: Python will start using UTF-8 as the default encoding on all supported platforms in the near future.
The three conversion methods are largely interchangeable, so you can choose whichever you like most. However, calling str.encode() and bytes.decode() directly on your Python strings and bytes is the most readable and common way to convert between them.
On the other hand, the codecs module supports advanced encodings, including a few special ones that only apply to bytes rather than strings:
>>> codecs.encode(b"0\x8c\xc9", "base64")
b'MIzJ\n'

>>> codecs.encode("secret_password", "rot-13")
'frperg_cnffjbeq'
The Base64 encoding allows you to represent binary data as text using only ASCII characters, while ROT-13 is a basic substitution cipher that rotates letters in your string by thirteen places. You can also leverage codecs to apply custom encodings previously registered with Python.
Keep in mind that the conversion between strings and bytes will only work as long you use the correct character encoding:
>>> "żółć".encode("ascii")
Traceback (most recent call last):
  ...
    "żółć".encode("ascii")
UnicodeEncodeError: 'ascii' codec can't encode characters
⮑ in position 0-3: ordinal not in range(128)

>>> "żółć".encode("iso-8859-2").decode("iso-8859-1")
'¿ó³æ'
When you attempt to decode bytes with the wrong encoding—or the other way around—you’ll likely get an error. In the worst-case scenario, the conversion will fail silently without errors, producing incorrect output. So, always ensure that you use the right encoding when working with text and bytes.
By now, you’re familiar with creating bytes instances from scratch and from strings, as well as manipulating them. However, the default string representation of byte sequences in the REPL isn’t always the most readable. Next up, you’ll discover ways to customize the display of bytes, making them easier to understand.
Represent Bytes in Python Differently
When your byte sequence contains only ASCII characters, its default representation in the Python REPL looks similar to that of a string:
>>> b"Real Python"
b'Real Python'
This is perfectly readable and straightforward. However, as soon as you add non-printable ASCII characters, such as the carriage return control character or non-ASCII byte values to the mix, then the output becomes less intuitive:
>>> bytes.fromhex("89 50 4e 47 0d 0a 1a 0a")
b'\x89PNG\r\n\x1a\n'
This piece of binary data includes a few values that can’t be expressed with pure ASCII—they must be properly escaped, either using a predefined escape sequence like \n or hexadecimal notation (\x1a). Fortunately, Python consistently formats such hexadecimal numbers with two digits so their boundaries remain clearly visible.
To reveal the numeric values behind those bytes, you can convert your bytes object to another sequence type, such as a Python list:
>>> list(b"\x89PNG\r\n\x1a\n")
[137, 80, 78, 71, 13, 10, 26, 10]
This allows you to see the decimal value of each byte in your sequence, which can be useful for debugging or understanding the structure of binary data. Remember that these values represent unsigned integers, meaning they range from 0 to 255.
If you’d like to uncover the underlying bit patterns of each individual byte, then consider the following code snippet:
>>> " ".join(format(byte, "08b") for byte in b"\x89PNG\r\n\x1a\n")
'10001001 01010000 01001110 01000111 00001101 00001010 00011010 00001010'
You use a nifty generator expression that iterates over each byte and calls format() to convert it to an 8-bit binary string. The format specifier ("08b") ensures appropriate padding to maintain a consistent length for each byte. Lastly, you combine the resulting bit patterns into a single string with spaces separating them.
Alternatively, you might want to convert your byte sequence into a hexadecimal string by calling the bytes.hex() method:
>>> color = b"0\x8c\xc9\xff"
>>> color.hex()
'308cc9ff'
>>> print(f"#{color.hex()}")
#308cc9ff
Here, you also take advantage of Python’s f-string literal to format the resulting string according to a popular color code format.
The .hex() method accepts two optional parameters: a separator character and the number of bytes per group between these separators. Both are particularly useful for formatting IPv6 addresses as strings:
>>> ipv6 = b" \x01\r\xb8\x85\xa3\x00\x00\x00\x00\x8a.\x03ps4"

>>> ipv6.hex()
'20010db885a3000000008a2e03707334'

>>> ipv6.hex(":")
'20:01:0d:b8:85:a3:00:00:00:00:8a:2e:03:70:73:34'

>>> ipv6.hex(":", 2)
'2001:0db8:85a3:0000:0000:8a2e:0370:7334'
The separator can be either a Python string or a bytes object containing a single ASCII character. The second argument determines how many bytes to group together before the separator gets inserted. This number can be either positive or negative, although you’ll only see the difference with an uneven number of bytes in the sequence, as shown below:
>>> color = b"0\x8c\xc9"

>>> color.hex(" ", 2)
'30 8cc9'

>>> color.hex(" ", -2)
'308c c9'
When the second parameter is a positive number, Python calculates the separator placements from the right, so the two bytes 0x8c and 0xc9 in the example above end up being grouped together, while the byte 0x30 remains separate. Using a negative value reverses the direction, which aligns with your natural left-to-right reading order. Note that splitting an RGB color like this isn’t practical and only serves as an illustration.
Last but not least, a sequence of raw bytes might represent structured data or a series of more complex values. Eventually, you’ll want to transform these low-level bytes into a collection of data types understood by Python to work more comfortably. You can do so by leveraging one of the few modules you saw earlier when you first learned about the bytes-like objects and bytes. Here they are as a quick reminder:
arraystructctypesio
Another noteworthy module in the Python standard library is pickle, which you typically use to serialize data:
>>> import pickle

>>> instance = pickle.loads(bytes([
...     0x80, 0x04, 0x95, 0x2f, 0x00, 0x00, 0x00, 0x00,
...     0x00, 0x00, 0x00, 0x8c, 0x0b, 0x63, 0x6f, 0x6c,
...     0x6c, 0x65, 0x63, 0x74, 0x69, 0x6f, 0x6e, 0x73,
...     0x94, 0x8c, 0x07, 0x43, 0x6f, 0x75, 0x6e, 0x74,
...     0x65, 0x72, 0x94, 0x93, 0x94, 0x7d, 0x94, 0x28,
...     0x4b, 0xbe, 0x4b, 0x02, 0x4b, 0xef, 0x4b, 0x01,
...     0x4b, 0xba, 0x4b, 0x01, 0x75, 0x85, 0x94, 0x52,
...     0x94, 0x2e,
... ]))

>>> instance
Counter({190: 2, 239: 1, 186: 1})

>>> type(instance)
<class 'collections.Counter'>
When you call pickle.loads() with a bytes object as an argument, Python attempts to deserialize an object from the underlying byte stream, which must conform to a certain data format. In this case, the operation succeeds, and you get a new collections.Counter instance reconstructed from the byte stream.
That was a ton of information to take in! Hopefully, you now have a solid understanding of how to handle low-level binary data in Python and can begin applying your new knowledge to real-world problems. In the next section, you’ll put it into action by exploring a few practical examples.
Working With Python Bytes in Practice
It can’t be stressed enough that reaching for low-level Python constructs, such as bytes, to manipulate raw byte sequences should be your last resort. In real life, higher-level abstractions and libraries are often a better choice. That said, studying and reverse-engineering established binary file formats and network protocols can still be valuable, even when more efficient tools and solutions already exist.
In this section, you’ll implement bits of Python code to handle various binary data formats, including:
- Base64 Encoding
- Bitmap File Format
- Custom File Format
- Executable File Format
- OpenStreetMap File Format
- Pickle Serialization Protocol
- Python Bytecode
- Redis Serialization Protocol
- Waveform Audio File Format
These exercises will help you understand the intricacies of binary data manipulation, not just in Python but in general.
Read and Write Binary Files of Varying Sizes
Two of the most fundamental tasks associated with handling binary data are storing and retrieving byte sequences from a file on disk. If your file is relatively small, then you can load its contents into memory as a whole, process it somehow, and save the modified data. The most concise way to achieve this is with the help of the pathlib module, whose Path object exposes convenient methods for reading and writing raw bytes in one go:
checksum.py
import hashlib
import sys
from pathlib import Path

python_path = Path(sys.executable)
checksum_path = python_path.with_suffix(".md5")

machine_code = python_path.read_bytes()
checksum_path.write_bytes(hashlib.md5(machine_code).digest())

print("Saved", checksum_path)
The script above reads the entire binary content of the Python interpreter as raw bytes, effectively loading its machine code into a variable. Next, it calculates the file’s MD5 digest and saves the resulting binary checksum to a new file with the same name as your Python interpreter, but with an .md5 extension.
If you’re dealing with a slightly larger file, then loading it at once might be too slow for all practical purposes. In such cases, it’s usually better to read your file incrementally in small chunks, which may optionally overlap to ensure data continuity:
checksum_incremental.py
import hashlib
import sys
from pathlib import Path

def calculate_checksum(path, chunk_size=4096):
    checksum = hashlib.md5()
    with path.open(mode="rb") as file:
        while chunk := file.read(chunk_size):
            checksum.update(chunk)
    return checksum.digest()

print(calculate_checksum(Path(sys.executable)))
In this version of your script, you read the specified file in chunks of four kilobytes by default, updating the checksum with each chunk until the entire file is processed. This method can be more efficient for larger files, especially when you’re only interested in processing a small portion of the file. Take note of the walrus operator (:=), which enables you to read a chunk of data and simultaneously check if the chunk is non-empty.
To handle very large files—on the order of tens of gigabytes or more—which wouldn’t possibly fit into your computer’s physical memory, you can use memory-mapped files, or mmap for short. This technique gives you the illusion of unlimited memory by projecting parts of the file onto a virtual address space. For example, here’s how you can leverage memory mapping to process OpenStreetMap (OSM) data stored in a massive XML file:
osm_mmap.py
from mmap import ACCESS_READ, mmap
from pathlib import Path

class OpenStreetMap:
    def __init__(self, path):
        self.file = path.open(mode="rb")
        self.stream = mmap(self.file.fileno(), 0, access=ACCESS_READ)

    def __enter__(self):
        return self

    def __exit__(self, exc_type, exc_val, exc_tb):
        self.stream.close()
        self.file.close()

    def __iter__(self):
        end = 0
        while (begin := self.stream.find(b"<way", end)) != -1:
            end = self.stream.find(b"</way>", begin)
            yield self.stream[begin:end + len(b"</way>")]

if __name__ == "__main__":
    with OpenStreetMap(Path("map.osm")) as osm:
        for way_tag in osm:
            print(way_tag)
The code snippet above reads the file in a streaming fashion, discarding fragments that are of no interest to you and letting you process only relevant XML tags as soon as they’re found.
While XML is a text-based data format, the mmap module gives you direct access to the underlying bytes on disk. Depending on the access mode, you may quickly seek a specific byte offset or use the subscript notation to modify the file contents in place, as if it were a really long Python byte sequence!
If you’re looking for a hands-on example demonstrating how to work with a well-known binary data file format, then check out our tutorial on reading and writing WAV files in Python. On the other hand, if you’re interested in designing a custom binary file format from scratch and using it in Python, then follow the steps outlined in the maze solver project.
Communicate Over a Binary Network Protocol
Clients and servers communicate through the network by exchanging messages that adhere to a well-defined set of rules, collectively known as a protocol. Some communication protocols are text-based, while others are binary. For example, HTTP uses a plain text format, while its secure counterpart HTTPS turns the same payload into encrypted binary data.
Unless you’re working with a highly specialized protocol developed for your own needs, you’ll often find a plethora of third-party libraries and software development kits (SDKs) that can handle the mundane details for you. However, to learn the mechanics of a binary protocol, you’ll use socket programming to build a minimal Python client that connects to a Redis database.
Note: This exercise isn’t meant as a replacement for mature libraries like redis-py. For production applications, you should choose battle-tested solutions offering optimal performance, security, and reliability.
Under the hood, Redis uses a protocol known as RESP, which was intentionally designed to be human-readable. Although it’s a binary protocol, the transmitted messages contain predominantly ASCII characters. The first byte of every message determines its type, which can be simple, bulk, or aggregate. The table below shows a few sample RESP messages:
| Redis Type | Example |
|---|---|
| Simple String | +PONG\r\n |
| Error Message | -ERR Unknown command 'FOO'\r\n |
| Integer | :1738769911\r\n |
| Bulk String | $5\r\ncaf\xc3\xa9\r\n |
| NIL | $-1\r\n |
| Empty Array | *0\r\n |
| Array | *2\r\n$5\r\nviews\r\n$8\r\nsessions\r\n |
You’ll notice that each message is terminated with a Windows-style newline (\r\n) or CRLF, which stands for carriage return (CR) and line feed (LF). This control character can appear more than once, acting as a delimiter separating different parts of the more complex messages. For instance, the dollar sign ($) indicates a bulk string consisting of the total number of bytes and the UTF-8 encoded string.
The communication with Redis is based on the request-response model, where the client sends a request to the server and waits for a response. A RESP request is an array of bulk strings, with the first—and sometimes the second—element representing a Redis command, followed by any optional arguments. Here are some examples:
| Command | Request | Response |
|---|---|---|
| PING | *1\r\n$4\r\nPING\r\n |
+PONG\r\n |
| KEYS | *2\r\n$4\r\nKEYS\r\n$1\r\n*\r\n |
*0\r\n |
| SET | *3\r\n$3\r\nSET\r\n$3\r\nkey\r\n$5\r\nvalue\r\n |
+OK\r\n |
| GET | *2\r\n$3\r\nGET\r\n$3\r\nkey\r\n |
$-1\r\n |
| DEL | *2\r\n$3\r\nDEL\r\n$3\r\nkey\r\n |
:1\r\n |
Knowing these details allows you to implement the following helper functions for constructing such messages in Python:
redis_client.py
def array(*items):
    binary = bytearray(f"*{len(items)}\r\n".encode("ascii"))
    for item in items:
        binary.extend(item)
    return bytes(binary)

def bulk_string(value):
    binary = value.encode("utf-8")
    return f"${len(binary)}\r\n".encode("utf-8") + binary + b"\r\n"
The first function takes a variable number of arguments, which must be bytes-like objects, and concatenates them into a single bytes object representing an array. The other function takes a Python string argument and encodes it as a Redis bulk string. Both functions are sufficient to encode most RESP messages.
You can now use these functions to send raw bytes to the Redis server. Go ahead and define the following RedisClient class at the top of your script:
redis_client.py
import socket

class RedisClient:
    def __init__(self, address="localhost", port=6379):
        self._socket = socket.create_connection((address, port))

    def __enter__(self):
        return self

    def __exit__(self, exc_type, exc_val, exc_tb):
        self._socket.close()

    def ping(self):
        self._socket.sendall(array(bulk_string("PING")))

# ...
The class constructor opens a new TCP connection to the host and port number specified as arguments. Your class implements the context manager interface, which manages the life cycle of the underlying client socket. Finally, the .ping() method sends a binary message to the server, testing whether the connection is still alive.
To receive the server’s response, you’ll initially want to read the first line of the message, which determines the interpretation of the remaining data. The best approach is to load the individual bytes into a mutable bytearray using a loop until you find the first CRLF occurrence:
redis_client.py
import socket

class RedisClient:
    # ...

    def get_response(self):
        line = bytearray()
        while not line.endswith(b"\r\n"):
            line.extend(self._socket.recv(1))

# ...
Please note that this simplified implementation ignores error handling to keep things clear.
Now that you know the first line, you can use pattern matching to decide how to convert raw bytes into Python values:
redis_client.py
 1import socket
 2
 3class RedisClient:
 4    # ...
 5
 6    def get_response(self):
 7        line = bytearray()
 8        while not line.endswith(b"\r\n"):
 9            line.extend(self._socket.recv(1))
10        match prefix := line[:1]:
11            case b"+" | b"-":
12                return line[1:-2].decode("ascii")
13            case b":":
14                return int(line[1:-2])
15            case b"$":
16                if (length := int(line[1:])) == -1:
17                    return None
18                else:
19                    data = self._socket.recv(length + 2)
20                    return data[:-2].decode("utf-8")
21            case b"*":
22                return [self.get_response() for _ in range(int(line[1:]))]
23            case _:
24                raise ValueError(f"Unsupported type: {prefix}")
25
26# ...
You keep processing the response from Redis based on the first byte, which indicates a specific RESP data type. Here’s a line-by-line breakdown of how this process works:
- Line 10: You begin by extracting the first byte from the first line of the response, and you assign it to a variable called
prefix. - Lines 11 and 12: If the prefix is a plus (
+) or minus sign (-), then you decode the line as a simple ASCII string without the trailing CRLF control character. - Lines 13 and 14: Otherwise, if the prefix is a colon (
:), then you interpret the line as an integer. - Line 15: The dollar sign (
$) indicates either anilvalue or a bulk string, so you extract the length field from the line and proceed as follows:- Lines 16 and 17: If the length equals -1, then you return
None. - Lines 18-20: Otherwise, you read the specified number of bytes from the socket, taking into account the extra two bytes for the CRLF control character, and then you decode the resulting data as a UTF-8 string.
- Lines 16 and 17: If the length equals -1, then you return
- Lines 21 and 22: If the prefix is a star (
*), you interpret the response as an array whose length is determined by the rest of the line. Next, you read the subsequent array elements by recursively calling.get_response(). - Lines 23 and 24: Finally, when none of the above cases match, then you raise a
ValueErrorindicating an unsupported RESP type.
Before moving any further, make sure that you have a running server instance. If you don’t want to install Redis, then you can spin up a Docker container with Redis inside by using the following command:
$ docker run -p 6379:6379 redis
The -p option maps the container’s port 6379 to your host’s port 6379, allowing you to access Redis on its default port from a local machine.
Putting it together, you can test drive your custom Redis client using the Python REPL:
>>> from redis_client import RedisClient
>>> with RedisClient() as redis:
...     redis.ping()
...     redis.get_response()
...
'PONG'
Great! As long as the server is running and is accessible from your local machine, you should get a response.
Go ahead and implement the rest of the Redis commands mentioned earlier using the RESP protocol. The supporting materials include a sample Redis client implementation, which covers a few more commands.
Serialize Python Objects Using a Binary Format
To dump your objects to a binary file or transfer them over the wire and later reconstruct on a remote machine, you can use the pickle module again. It supports a subset of Python built-in types, collections, and abstract data types from the standard library:
>>> import pickle

>>> pickle.dumps(42)
b'\x80\x04K*.'

>>> from collections import deque
>>> pickle.dumps(deque([42]))
b'\x80\x04\x95\x1f...\x05deque\x94\x93\x94)R\x94K*a.'

>>> from datetime import date
>>> pickle.dumps(date.today())
b'\x80\x04\x95...\x04\x07\xe9\x02\x06\x94\x85\x94R\x94.'
In each case, you get a bytes object, which is ready to be written to a file or sent over a network connection. You can then deserialize these raw byte sequences back into their original form:
>>> pickle.loads(b"\x80\x04K*.")
42
For more advanced uses cases, which might include dealing with stateful objects or instances of custom classes, check out the tutorial on data serialization in Python. It also covers other binary serialization protocols.
Manipulate Pixel Data to Conceal a Hidden Message
If you’re looking for an advanced yet fun example of using low-level binary processing in Python, then enter digital steganography:
You can find a detailed discussion on this topic in the last section of the bitwise operators tutorial. In a nutshell, this technique allows you to store a secret file within the pixel data by flipping specific bits while maintaining the overall appearance of the original image.
Embed an Image in Markdown Using Base64
Markdown is a popular markup language used to format all sorts of text documents, ranging from README files to entire books. It’s lightweight, human-readable, and widely supported. While it contains only plain text, you can embed binary images in it by using the Base64 encoding. Here’s how to do this using Python:
embed.py
from base64 import b64encode
from pathlib import Path
def embed_image(path: Path, label: str = "") -> str:
ascii_string = b64encode(path.read_bytes()).decode("ascii")
return f""
if __name__ == "__main__":
output_path = Path("picture.md")
output_path.write_text(embed_image(Path("picture.jpg")))
print("Saved", output_path)
In this example, you read the entire binary content of a JPEG file into Python and encode it using the base64 module. Next, you embed the image directly into your document using the corresponding Markdown syntax. As a result, the size of your original binary data increases by one third, so this method only makes sense for relatively small images!
Compile and Execute Python Bytecode
As the name implies, Python bytecode is a low-level representation of Python code, consisting of bytes that correspond to specific instructions known as opcodes. These opcodes serve as commands for the Python interpreter, which executes them at runtime. Unlike human-readable Python source code that you write by hand or generate with AI, bytecode is more compact and efficient for execution.
If you’re curious about how to read, manipulate, and even execute such raw byte sequences using Python, then check out the tutorial on the __pycache__ folder.
Conclusion
By now, you should feel comfortable working with bytes objects in Python, whether you’re processing binary data, handling file input/output (I/O), or dealing with networking protocols. Understanding these low-level constructs allows you to work efficiently with performance-sensitive applications, custom binary formats, and data interoperability between different systems.
In this tutorial, you’ve learned how to:
- Differentiate between
bytes,bytearray, and other bytes-like objects - Create instances of the Python
bytesdata type in various ways - Convert between Python strings and
bytesusing character encoding - Interpret binary words comprised of multiple bytes correctly
- Manipulate
bytesobjects using standard sequence operations - Use
bytesin file I/O, network communication, and data serialization
Now, it’s your turn! Try out some of the concepts you’ve learned by working with real-world binary data, and don’t hesitate to experiment. If you have questions or want to share your experiences, join the discussion in the comments!
Get Your Code: Click here to download the free sample code that you’ll use to learn about bytes objects and handling binary data in Python.
Frequently Asked Questions
Now that you have some experience with bytes objects in Python, you can use the questions and answers below to check your understanding and recap what you’ve learned.
These FAQs are related to the most important concepts you’ve covered in this tutorial. Click the Show/Hide toggle beside each question to reveal the answer.
bytes objects in Python are immutable sequences of unsigned 8-bit integers, used to handle binary data.
You can create a bytes object by using a bytes literal, the bytes() function, or the bytes.fromhex() method.
While both represent sequences of bytes, bytes is immutable, whereas bytearray is mutable, allowing modifications.
You convert a string to bytes by using the str.encode() method and specifying the desired character encoding.
Endianness refers to the order of bytes in multi-byte data types, either starting with the least significant byte (little-endian) or the most significant byte (big-endian).
Take the Quiz: Test your knowledge with our interactive “Python Bytes” quiz. You’ll receive a score upon completion to help you track your learning progress:
Interactive Quiz
Python BytesIn this quiz, you'll test your understanding of Python bytes objects. By working through this quiz, you'll revisit the key concepts related to this low-level data type.