Whether you’re a data scientist crunching big data in a distributed cluster, a back-end engineer building scalable microservices, or a front-end developer consuming web APIs, you should understand data serialization. In this comprehensive guide, you’ll move beyond XML and JSON to explore several data formats that you can use to serialize data in Python. You’ll explore them based on their use cases, learning about their distinct categories.
By the end of this tutorial, you’ll have a deep understanding of the many data interchange formats available. You’ll master the ability to persist and transfer stateful objects, effectively making them immortal and transportable through time and space. Finally, you’ll learn to send executable code over the network, unlocking the potential of remote computation and distributed processing.
In this tutorial, you’ll learn how to:
- Choose a suitable data serialization format
- Take snapshots of stateful Python objects
- Send executable code over the wire for distributed processing
- Adopt popular data formats for HTTP message payloads
- Serialize hierarchical, tabular, and other shapes of data
- Employ schemas for validating and evolving the structure of data
To get the most out of this tutorial, you should have a good understanding of object-oriented programming principles, including classes and data classes, as well as type hinting in Python. Additionally, familiarity with the HTTP protocol and Python web frameworks would be a plus. This knowledge will make it easier for you to follow along with the tutorial.
You can download all the code samples accompanying this tutorial by clicking the link below:
Get Your Code: Click here to download the free sample code that shows you how to serialize your data with Python.
Feel free to skip ahead and focus on the part that interests you the most, or buckle up and get ready to catapult your data management skills to a whole new level!
Take the Quiz: Test your knowledge with our interactive “Serialize Your Data With Python” quiz. You’ll receive a score upon completion to help you track your learning progress:
Interactive Quiz
Serialize Your Data With PythonPractice serializing Python objects to JSON, pickle, CSV, Parquet, and Protocol Buffers, and learn when to pick each format.
Get an Overview of Data Serialization
Serialization, also known as marshaling, is the process of translating a piece of data into an interim representation that’s suitable for transmission through a network or persistent storage on a medium like an optical disk. Because the serialized form isn’t useful on its own, you’ll eventually want to restore the original data. The inverse operation, which can occur on a remote machine, is called deserialization or unmarshaling.
Note: Although the terms serialization and marshaling are often used interchangeably, they can have slightly different meanings for different people. In some circles, serialization is only concerned with the translation part, while marshaling is also about moving data from one place to another.
The precise meaning of each term depends on whom you ask. For example, Java programmers tend to use the word marshaling in the context of remote method invocation (RMI). In Python, marshaling refers almost exclusively to the format used for storing the compiled bytecode instructions.
Check out the comparison of serialization and marshaling on Wikipedia for more details.
The name serialization implies that your data, which may be structured as a dense graph of objects in the computer’s memory, becomes a linear sequence—or a series—of bytes. Such a linear representation is perfect to transmit or store. Raw bytes are universally understood by various programming languages, operating systems, and hardware architectures, making it possible to exchange data between otherwise incompatible systems.
When you visit an online store using your web browser, chances are it runs a piece of JavaScript code in the background to communicate with a back-end system. That back end might be implemented in Flask, Django, or FastAPI, which are Python web frameworks. Because JavaScript and Python are two different languages with distinct syntax and data types, they must share information using an interchange format that both sides can understand.
In other words, parties on opposite ends of a digital conversation may deserialize the same piece of information into wildly different internal representations due to their technical constraints and specifications. However, it would still be the same information from a semantic point of view.
Tools like Node.js make it possible to run JavaScript on the back end, including isomorphic JavaScript that can run on both the client and the server in an unmodified form. This eliminates language discrepancies altogether but doesn’t address more subtle nuances, such as big-endian vs little-endian differences in hardware.
Other than that, transporting data from one machine to another still requires converting it into a network-friendly format. Specifically, the format should allow the sender to partition and put the data into network packets, which the receiving machine can later correctly reassemble. Network protocols are fairly low-level, so they deal with streams of bytes rather than high-level data types.
Depending on your use case, you’ll want to pick a data serialization format that offers the best trade-off between its pros and cons. In the next section, you’ll learn about various categories of data formats used in serialization. If you already have prior knowledge about these formats and would like to explore their respective scenarios, then feel free to skip the basic introduction coming up next.
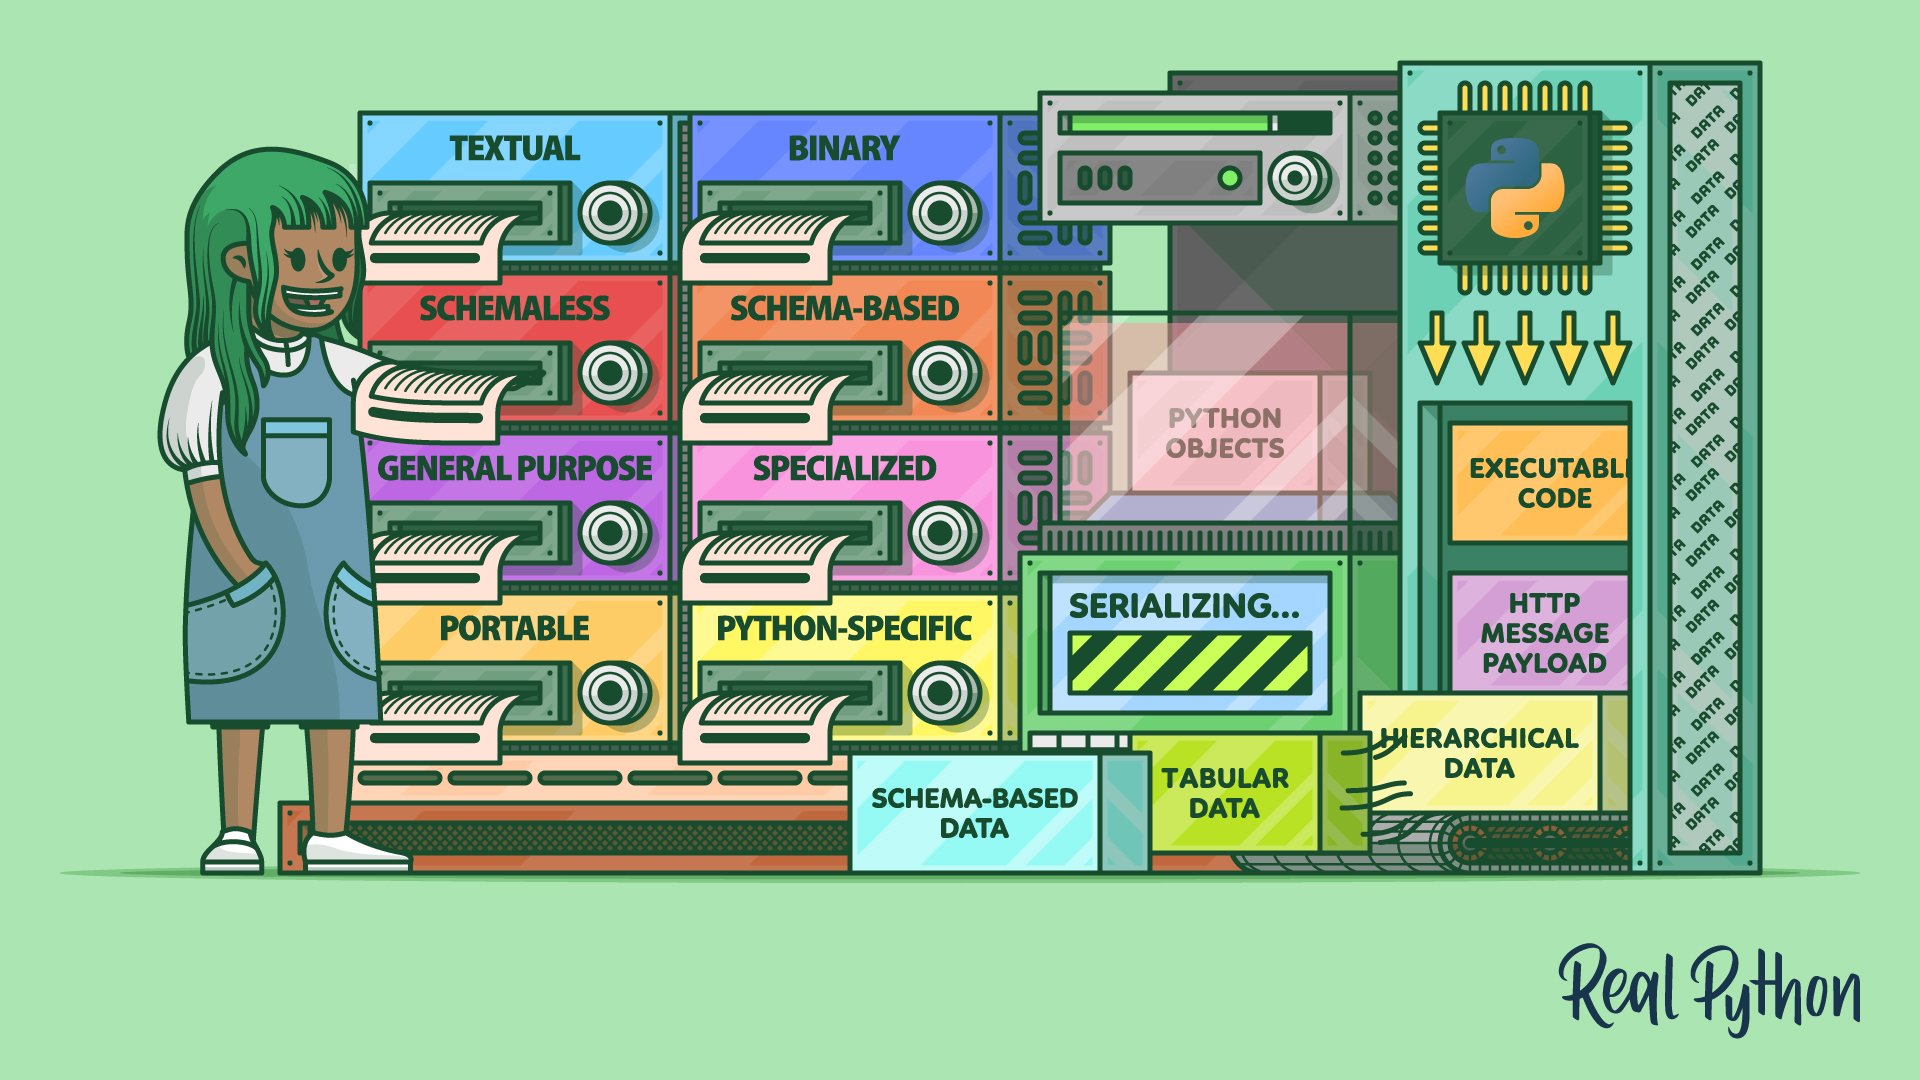
Compare Data Serialization Formats
There are many ways to classify data serialization formats. Some of these categories aren’t mutually exclusive, making certain formats fall under a few of them simultaneously. In this section, you’ll find an overview of the different categories, their trade-offs, and use cases, as well as examples of popular data serialization formats.
Later, you’ll get your hands on some practical applications of these data serialization formats under different programming scenarios. To follow along, download the sample code mentioned in the introduction and install the required dependencies from the included requirements.txt file into an active virtual environment by issuing the following command:
(venv) $ python -m pip install -r requirements.txt
This will install several third-party libraries, frameworks, and tools that will allow you to navigate through the remaining part of this tutorial smoothly.
Textual vs Binary
At the end of the day, all serialized data becomes a stream of bytes regardless of its original shape or form. But some byte values—or their specific arrangement—may correspond to Unicode code points with a meaningful and human-readable representation. Data serialization formats whose syntax consists purely of characters visible to the naked eye are called textual data formats, as opposed to binary data formats meant for machines to read.
The main benefit of a textual data format is that people like you can read serialized messages, make sense of them, and even edit them by hand when needed. In many cases, these data formats are self-explanatory, with descriptive element or attribute names. For example, take a look at this excerpt from the Real Python web feed with information about the latest tutorials and courses published:
<?xml version="1.0" encoding="utf-8"?>
<feed xmlns="http://www.w3.org/2005/Atom">
<title>Real Python</title>
<link href="https://realpython.com/atom.xml" rel="self"/>
<link href="https://realpython.com/"/>
<updated>2023-09-15T12:00:00+00:00</updated>
<id>https://realpython.com/</id>
<author>
<name>Real Python</name>
</author>
<entry>
<title>Bypassing the GIL for Parallel Processing in Python</title>
<id>https://realpython.com/python-parallel-processing/</id>
<link href="https://realpython.com/python-parallel-processing/"/>
<updated>2023-09-13T14:00:00+00:00</updated>
<summary>In this tutorial, you'll take a deep dive (...)</summary>
<content type="html">
<div><p>Unlocking Python's true potential (...)
</content>
</entry>
(...)
</feed>
The Real Python feed uses the XML-based Atom Syndication Format, which is a form of a data serialization format. You can open the document above in any text editor without needing specialized software or libraries. Furthermore, just by looking at this feed, you can immediately break down its structure and probably guess the meaning of the individual elements without checking the format’s specification.
Now, compare the text-based Atom feed above with an equivalent binary feed. You can generate one by parsing atom.xml with xmltodict and dumping the resulting dictionary to a file using MongoDB’s BSON format. When you do, the result will look something like this:
$ hexdump -C atom.bson | head
00000000  51 d2 01 00 03 66 65 65  64 00 46 d2 01 00 02 40  |Q....feed.F....@|
00000010  78 6d 6c 6e 73 00 1c 00  00 00 68 74 74 70 3a 2f  |xmlns.....http:/|
00000020  2f 77 77 77 2e 77 33 2e  6f 72 67 2f 32 30 30 35  |/www.w3.org/2005|
00000030  2f 41 74 6f 6d 00 02 74  69 74 6c 65 00 0c 00 00  |/Atom..title....|
00000040  00 52 65 61 6c 20 50 79  74 68 6f 6e 00 04 6c 69  |.Real Python..li|
00000050  6e 6b 00 72 00 00 00 03  30 00 3f 00 00 00 02 40  |nk.r....0.?....@|
00000060  68 72 65 66 00 20 00 00  00 68 74 74 70 73 3a 2f  |href. ...https:/|
00000070  2f 72 65 61 6c 70 79 74  68 6f 6e 2e 63 6f 6d 2f  |/realpython.com/|
00000080  61 74 6f 6d 2e 78 6d 6c  00 02 40 72 65 6c 00 05  |atom.xml..@rel..|
00000090  00 00 00 73 65 6c 66 00  00 03 31 00 28 00 00 00  |...self...1.(...|
In this case, you use the command-line tool hexdump to view the contents of your binary file, but it’s rather difficult to understand. While there are bits of text here and there, much of the data looks like gibberish.
Another great advantage of a textual data format is that text has a uniform and mostly unambiguous interpretation. As long as you know the correct character encoding, which is almost always the ubiquitous UTF-8 these days, then you’ll be able to read your serialized messages everywhere on any hardware and system imaginable. No wonder so many popular serialization formats like XML, JSON, YAML, and CSV are all based on text.
Note: As a Python programmer, you might be accustomed to using TOML for your project’s metadata in the pyproject.toml file. Build systems like setuptools and Poetry know how to read this file to build your Python package before you can publish it on PyPI.
While there’s some resemblance to other text-based formats, TOML is different. It’s not a data serialization format, primarily due to its rigid syntax and limited data types. Instead, TOML advertises itself as a configuration file format based on INI files, intended to make editing the configuration easier for humans.
Unfortunately, there’s no rose without a thorn. Text-based data serialization formats are slower to process than their binary counterparts because text has to be translated to native data types. They also use the available space less efficiently, which can limit their usefulness in larger datasets. Therefore, textual formats aren’t as common in data science and other fields that have to deal with big data.
Moreover, textual formats tend to become overly verbose and may contain a lot of redundant boilerplate. Notice how each element in the Atom feed above, such as the author of the feed, is wrapped in at least one pair of opening and closing XML tags, adding to the bloat. You can try compressing the serialized data to mitigate that, but it’ll add some overhead without providing predictable message sizes.
If you’re able to describe your data using plain English, then a textual data format is all you need. But what if you need to mix both text and binary assets in one text message? It’s possible. After all, email uses a text-based protocol, yet it lets you include binary attachments like pictures or PDF documents.
Embedding binary data in a text-based format requires expressing arbitrary bytes using a limited number of characters. One such technique involves Base64 encoding, which turns bytes into ASCII characters. The downside is that it increases the size of the binary asset by about thirty percent. So, sharing your vacation photos with colleagues at work through email can quickly bring your department’s network down!
Note: A common work-around to this problem is to strip the message from binary assets, send them separately using a different communication channel, and only include their handles in the serialized text.
For example, some email providers implement this feature behind the scenes by uploading binary assets to the cloud while linking to them in your message. The same is true for many web APIs, whose responses include hyperlinks to files stored elsewhere instead of directly embedding them in the serialized message.
There’s also the issue of security risks associated with leaking sensitive information due to the ease of reading textual data formats. In contrast, making sense of a message serialized to a binary data format is more challenging but certainly not impossible. Therefore, serializing private information like passwords or credit card numbers always requires strong encryption regardless of the data format!
To sum up, here’s how textual and binary data formats stack up against each other:
| Textual | Binary | |
|---|---|---|
| Examples | CSV, JSON, XML, YAML | Avro, BSON, Parquet, Protocol Buffers |
| Readability | Human and machine-readable | Machine-readable |
| Processing Speed | Slow with bigger datasets | Fast |
| Size | Large due to wasteful verbosity and redundancy | Compact |
| Portability | High | May require extra care to ensure platform-independence |
| Structure | Fixed or evolving, often self-documenting | Usually fixed, which must be agreed on beforehand |
| Types of Data | Mostly text, less efficient when embedding binary data | Text or binary data |
| Privacy and Security | Exposes sensitive information | Makes it more difficult to extract information, but not completely immune |
With this table, you can understand the key differences between textual and binary data serialization formats before deciding which one fits your specific needs. Once you know the answer, the next question should be whether to use a schema or not.
Schemaless vs Schema-Based
Regardless of whether they’re textual or binary, many data serialization formats require a schema document, which is a formal description of the expected structure of serialized data. At the same time, some formats are schemaless, while others can work with or without a schema:
| Schemaless | Schema-Based | |
|---|---|---|
| Textual | JSON, XML, YAML | JSON+JSON Schema, XML+XML Schema (XSD), XML+Document Type Definition (DTD) |
| Binary | BSON, pickle | Avro, Protocol Buffers |
Depending on the format at hand, you can express the corresponding schema differently. For example, it’s common to provide an XML-based XSD schema for XML documents, while the binary Avro format relies on JSON for its schemas. Protocol Buffers use their own interface definition language (IDL), on the other hand.
The schema for the Atom feed that you saw earlier leverages a somewhat dated RELAX NG format, which stands for regular language for XML next generation. Unlike the more widespread XML Schema (XSD), it’s not based on XML itself:
# -*- rnc -*-
# RELAX NG Compact Syntax Grammar for the
# Atom Format Specification Version 11

namespace atom = "http://www.w3.org/2005/Atom"
namespace xhtml = "http://www.w3.org/1999/xhtml"
namespace s = "http://www.ascc.net/xml/schematron"
namespace local = ""

start = atomFeed | atomEntry

# Common attributes

atomCommonAttributes =
   attribute xml:base { atomUri }?,
   attribute xml:lang { atomLanguageTag }?,
   undefinedAttribute*

# ...
A schema typically defines the allowed set of elements and attributes, their arrangement, relationships, and the associated constraints, such as whether an element is required or what range of values it can take. You can think of it as the vocabulary and grammar of a data serialization language.
This concept is analogous to a relational database schema, which specifies the tables, their column types, foreign keys, and so on. It’s a blueprint for re-creating the database from scratch, which can also act as a form of documentation. At runtime, the database schema governs your data’s referential integrity. Lastly, it helps facilitate object-relational mapping (ORM) in frameworks like Django.
Note: Within the realm of web services, two popular technologies that rely heavily on data serialization schemas are SOAP and WSDL. These days, however, modern alternatives like GraphQL, REST combined with JSON, and gRPC have mostly superseded them.
The benefits of using a schema in a data serialization format include:
- Automation: The formal specification of data allows you to generate code stubs in different programming languages to handle automatic serialization and deserialization of each language’s native data types. This is also known as data binding when you use the XML format.
- Consistency: The schema enforces a standard structure for serialized data, ensuring its integrity and consistency across different systems.
- Documentation: The schema provides a clear definition of the structure of the data, which can help you quickly understand how the information is organized.
- Efficiency: Referencing the schema instead of including explicit field names reduces the size of serialized data. The schema can be known ahead of time or be embedded in the serialized message.
- Interoperability: Sharing the schema between different applications or services can facilitate their integration by allowing them to communicate with each other.
- Validation: The schema can be used to validate serialized data in an automated way, catching potential errors early on.
While there are many benefits to employing a schema, it also comes with some drawbacks, which you should weigh before deciding whether or not to use one. The highest price to pay for adopting a schema is the limited flexibility of the serialized data. The schema enforces a rigid structure, which may not be desirable if your data evolves over time or is dynamic in the sense that it doesn’t have a fixed layout.
Moreover, it can be difficult to alter a schema once you commit to one. Even though some schema-based formats, such as Avro, allow for schema versioning, this may generally break the consistency of data that you previously serialized. To mitigate this problem, some tools in the relational database domain offer schema migration, which gradually transforms data from an old schema to a new one.
For rapid prototyping or when working with unstructured data with unpredictable layouts, a schemaless data serialization format may be more suitable. Conceptually, this is like having a NoSQL database that can accept and process data from multiple sources. New types of elements or unknown attributes would be ignored without breaking the system instead of failing the schema validation.
All in all, these are the most important pros and cons of schemaless and schema-based data serialization formats:
| Schemaless | Schema-Based | |
|---|---|---|
| Flexibility | High | Can’t handle unstructured data or easily modify its shape |
| Consistency | Data integrity can become a problem | High |
| Size | Large due to repetitive inclusion of metadata | Compact, especially when the schema is separate |
| Efficiency | Fast storage, slow lookup | Querying the data is fast thanks to its uniform structure |
| Simplicity | Straightforward to implement | Requires more effort and planning up front |
All right, you’ve successfully narrowed down your options regarding the numerous types of data serialization formats. You’ve determined whether choosing a binary format over a textual one is more suitable in your case. Additionally, you understand when to use a schema-based format. Nonetheless, there are still a few choices left on the table, so you must ask yourself some more questions.
General-Purpose vs Specialized
Some data serialization formats are expressive enough to represent arbitrary data, making them universal formats. For example, JSON has become the prevailing data serialization format, especially in web development and REST API design. This format has a minimalistic syntax with only a few essential building blocks that are straightforward to map onto numerous data types in the vast landscape of programming languages.
Note: In the past, the ubiquitous XML format played a similar role but lost its popularity due to the sudden rise of JSON. The biggest argument for using JSON was its cheap deserialization cost on the client side, thanks to being modeled after JavaScript literals. Moreover, people started using XML for purposes that it wasn’t designed for, which led to a growing dislike and a reputation for being notoriously problematic.
On the opposite end of the spectrum, you’ll find specialized formats that can only represent a particular type of data. For example, XML continues to be an excellent format for describing deeply nested hierarchical data like user interfaces. After all, XML belongs to the same family of markup languages as HTML, which is widely used to structure content on the Internet.
Another example of a specialized data serialization format is the comma-separated values (CSV) format. It works best with flat tabular data like spreadsheets, database tables, or DataFrames. While you might be able to serialize a data record by mapping its attributes to table columns, modeling hierarchical data with CSV is less convenient than with XML. But, as a textual format, CSV can reach its limits even when handling tabular data.
Note: When researching data formats, you may come across an alternative nomenclature. Some people refer to tabular data formats as flat, while they call hierarchical formats structured.
In data science, you often have to process enormous amounts of data. To optimize performance and reduce storage costs, it’s usually preferable to choose a binary data serialization format dedicated to such large datasets.
These days, Parquet and Feather are gaining popularity in the data science space. They’re both compatible with Arrow, which is an in-memory specification that allows data-sharing between different libraries and even different programming languages. A couple of older but still popular ones are HDF5 and NetCDF. Their newer counterpart, Zarr, offers better support for distributed data storage and computation.
Special data serialization formats emerged in other domains, as well. Some examples include the following:
- DICOM: A binary format for storing and transmitting medical images
- GeoJSON: A specialized flavor of JSON for serializing geographic features
- GPX: An XML-based format for exchanging GPS coordinates
- MusicXML: An XML-based format for storing musical notation
- OBJ: A textual format for storing three-dimensional models
Whether you can use a textual or binary format, with or without a schema, may actually depend on your use case. Some specialized data serialization formats give you little choice in that regard. But there’s one final question that you must ask yourself before choosing the right data serialization format for you. You’ll read about it in the next section.
Portable vs Python-Specific
Another criterion to consider when choosing a data serialization format for your use case is where you’re going to use it. If you wish to exchange information between foreign systems, then opt for a popular data serialization format that’s globally understood. For example, JSON and Protocol Buffers are widely adopted across different programming languages and platforms.
On the other hand, if you only intend to serialize and deserialize data within Python, then you may choose a Python-specific format for practicality reasons. It’ll be a more efficient and convenient option, provided that you’re not planning to share the serialized data with other systems.
Python ships with the following modules in the standard library, which provide binary data serialization formats for different purposes:
pickle: Python object serializationmarshal: Internal object serializationshelve: Python object persistencedbm: An interface to Unix databases
In practice, you’ll almost always want to serialize your objects with pickle, which is the standard data serialization format in Python. The rest on the list are either low-level formats used internally by the interpreter or legacy formats kept for compatibility. You’ll review them now to get a complete picture of the available options.
Python uses marshal behind the scenes to read and write special files containing the bytecode of the imported modules. When you import a module for the first time, the interpreter builds a corresponding .pyc file with compiled instructions to speed up subsequent imports. Here’s a short code snippet that roughly demonstrates what happens under the hood when you import a module:
>>> import marshal

>>> def import_pyc(path):
...     with path.open(mode="rb") as file:
...         _ = file.read(16)  # Skip the file header
...         code = marshal.loads(file.read())
...         exec(code, globals())
...
>>> import sysconfig
>>> from pathlib import Path

>>> cache_dir = Path(sysconfig.get_path("stdlib")) / "__pycache__"
>>> module_path = cache_dir / "decimal.cpython-312.pyc"

>>> import_pyc(module_path)
>>> Decimal(3.14)
Decimal('3.140000000000000124344978758017532527446746826171875')
First, you locate the compiled .pyc file of the decimal module in Python’s standard library and then use marshal to execute its bytecode. As a result, you can access the Decimal class in the highlighted line without having to import it explicitly.
Note: The filename decimal.cpython-312.pyc contains your Python version and flavor. Depending on which Python interpreter you use, the corresponding file may be named slightly differently. Head over to the supporting materials to see how you can locate the correct .pyc file in your system.
The marshal module is fairly limited in functionality. It can only serialize a few primitive values like integers and strings, but not user-defined or built-in classes. The implementation details of the format are left intentionally undocumented to deter you from using it. The module authors don’t give any guarantees about its backward compatibility. Your marshaled data could become unreadable or incompatible with newer Python versions one day.
The official documentation makes it clear that you’re not supposed to use marshal in your code. Again, you should generally prefer pickle to transmit or persistently store Python objects. But sometimes, you want a simple key-value store for your objects, which might be the case for caching purposes. In such a case, you can take advantage of shelve, which combines pickle and a lower-level dbm module:
>>> import shelve
>>> with shelve.open("/tmp/cache.db") as shelf:
...     shelf["last_updated"] = 1696846049.8469703
...     shelf["user_sessions"] = {
...         "jdoe@domain.com": {
...             "user_id": 4185395169,
...             "roles": {"admin", "editor"},
...             "preferences": {
...                 "language": "en_US",
...                 "dark_theme": False
...             }
...         }
...     }
...
The resulting shelf is a dictionary-like object or, more specifically, a hash table whose keys must be Python strings and whose values must be picklable objects. The module automatically calls .encode() on the keys to apply the default character encoding and uses pickle to convert the corresponding values to byte sequences.
Note: As a rule of thumb, only one program should have a shelf open for writing, because the module doesn’t support concurrent read and write access. However, simultaneous reads are thread-safe.
Because shelve is a convenience module that builds on top of pickle and dbm, you can use the latter to take a peek at what’s inside the created file:
>>> import dbm
>>> with dbm.open("/tmp/cache.db") as db:
...     for key in db.keys():
...         print(f"{key} = {db[key]}")
...
b'user_sessions' = b'\x80\x04\x95{\x00\x00\x00\x00\x00\x00\x00}…'
b'last_updated' = b'\x80\x04\x95\n\x00\x00\x00\x00\x00\x00\x00G…'
Both keys and values in the file are stored as raw bytes. Additionally, the values comply with the pickle protocol, which shelve uses internally to serialize Python objects.
Python’s dbm module is an interface to DBM databases popular on Unix. For instance, the manual pages on Unix-like operating systems use this format to index the individual documentation pages. Note that a DBM instance only supports a few basic operations of the regular Python dictionary, so it might not expose methods like .copy() or support the union operators and iteration.
If you have special needs that the standard pickle format can’t fulfill, then consider installing a third-party library like dill, which extends its capabilities while remaining compatible with pickle. It can handle more sophisticated data types, including lambda expressions and Python modules.
Fun Fact: The name dill is a play on the word pickle, continuing the theme of preserving and storing food items for later use. Dill is a common herb used in pickling, which adds a distinctive flavor to pickled cucumbers.
One key point to keep in mind when choosing a Python-specific serialization format, regardless of which one, is the security ramifications. Because serialized data may contain malicious code that could compromise or damage your system, you should only deserialize data from trusted sources! This applies to pickle and other formats that allow arbitrary code execution during deserialization.
As you can see, there’s no one-size-fits-all data serialization format, as each comes with its own pros and cons. While this section gave you a comprehensive overview of the various categories, it’s now time dive deeper into concrete formats to understand them better.
Serialize Python Objects
Over the following sections, you’ll practice serializing various types of Python objects that mainly carry data, using popular binary and textual formats. After dipping your toe into the pickle module and tweaking its inner workings, you’ll learn about its limitations. Finally, you’ll represent some of your objects using the widely adopted JSON format.
Pickle Your Python Objects
As you’ve learned, pickle is the standard data serialization format in Python, and it’s capable of representing a wide range of native data types as well as user-defined classes. It’s a binary format specific to Python, which requires no schema definition and can handle data in almost any shape or form. If you need to persist your Python objects for later use or send them to another Python interpreter, then this should be your preferred choice.
Note: The pickle module ships with the interpreter’s standard library, making the corresponding serialization format ubiquitous. As a result, you can call data serialization and deserialization in Python pickling and unpickling, respectively.
Getting started with pickle is fairly straightforward:
>>> import pickle

>>> data = 255
>>> with open("filename.pkl", mode="wb") as file:
...     pickle.dump(data, file)
...

>>> pickle.dumps(data)
b'\x80\x04K\xff.'
First, you need to import the pickle module and then call either dump() or dumps() to turn an arbitrary Python object into a bytes instance. The first function expects a file-like object open in binary mode for writing, and the latter returns the sequence of bytes to the caller. Both functions allow you to choose the underlying protocol version, which might produce slightly different output:
>>> for protocol in range(pickle.HIGHEST_PROTOCOL + 1):
...     print(f"v{protocol}:", pickle.dumps(data, protocol))
...
v0: b'I255\n.'
v1: b'K\xff.'
v2: b'\x80\x02K\xff.'
v3: b'\x80\x03K\xff.'
v4: b'\x80\x04K\xff.'
v5: b'\x80\x05K\xff.'

>>> pickle.DEFAULT_PROTOCOL
4
At the time of writing, protocol version 5 was the highest, and version 4 was the default. In general, higher versions are more efficient but may not work in older Python releases. Therefore, it’s usually good practice to stick with the relatively conservative defaults if you want your code to remain portable across Python versions. You can always try compressing the resulting byte stream to reduce its size.
Note: If you’d like to analyze the pickled byte sequence to get more information, then you can disassemble it into opcodes using the pickletools module, which also comes with Python.
Deserializing pickled data boils down to calling the module’s load() or loads(), which are counterparts of the two functions mentioned earlier:
>>> with open("filename.pkl", mode="rb") as file:
...     pickle.load(file)
...
255

>>> pickle.loads(b"\x80\x04K\xff.")
255
When unpickling data, you don’t get the option to specify the protocol version because it gets baked into the pickled byte sequence during serialization. This ensures that you can correctly unpickle your data using the right protocol.
Note: While pickling data always results in an immutable bytes object, you can unpickle any byte-like object, including an array.array, bytearray, bytes, or memoryview:
>>> import array
>>> import pickle
>>> pickle.loads(array.array("B", [128, 4, 75, 255, 46]))
255
In this case, you deserialize pickled data that was stored in a binary array of unsigned bytes.
The pickle module can deal with most data types that you’ll ever work with. Moreover, it can handle objects with reference cycles, such as graphs, including recursive data structures and even deeply nested ones up to the recursion limit in Python:
>>> cycle = {}
>>> cycle["sibling"] = {"sibling": cycle}
>>> pickle.loads(pickle.dumps(cycle))
{'sibling': {'sibling': {...}}}

>>> recursive = []
>>> recursive.append(recursive)
>>> pickle.loads(pickle.dumps(recursive))
[[...]]

>>> import sys
>>> deeply_nested = []
>>> for _ in range(sys.getrecursionlimit() // 2):
...     deeply_nested = [deeply_nested]
...
>>> pickle.loads(pickle.dumps(deeply_nested))
[[[[[[[[[[[[[[[[[[[[[[[[[[[[[[[[[[[[...]]]]]]]]]]]]]]]]]]]]]]]]]]]]]]]]]]]]
The variable cycle in the code snippet above is a dictionary whose only key-value pair holds another dictionary, which in turn contains a reference back to the original dictionary, forming a cycle. The recursive list above has only one element, which is a reference to itself. Finally, the deeply_nested list uses half of Python’s maximum recursion limit to wrap lists inside one another like a Matryoshka doll.
However, there are a few notable exceptions that will cause an error when you try to pickle an object. In particular, instances of the following data types aren’t picklable by design:
- Very deeply nested data structures approaching Python’s recursion limit
- Lambda expressions
- Generator objects
- Python modules
- File objects
- Network sockets
- Database connections
- Threads
- Stack frames
For example, these are the kinds of errors that you’ll get when you try to pickle a lambda expression, a Python module, and a very deeply nested list:
>>> pickle.dumps(lambda: None)
Traceback (most recent call last):
  ...
_pickle.PicklingError: Can't pickle <function <lambda> at 0x7fdd14107920>:
⮑ attribute lookup <lambda> on __main__ failed

>>> pickle.dumps(pickle)
Traceback (most recent call last):
  ...
TypeError: cannot pickle 'module' object

>>> very_deeply_nested = []
>>> for _ in range(sys.getrecursionlimit()):
...     very_deeply_nested = [very_deeply_nested]
...
>>> pickle.dumps(very_deeply_nested)
Traceback (most recent call last):
  ...
RecursionError: maximum recursion depth exceeded while pickling an object
This limitation particularly affects inter-process communication (IPC) in Python, which uses pickle to serialize and deserialize data exchanged between the running interpreter processes:
from concurrent.futures import ProcessPoolExecutor

def worker(function, parameter):
    return function(parameter)

if __name__ == "__main__":
    with ProcessPoolExecutor() as pool:
        future = pool.submit(worker, lambda x: x**2, 10)
        future.result()
This code will result in a pickling error because of the attempt to send a lambda expression to another system process. When you use a process pool from concurrent.futures or the equivalent pool from the multiprocessing module, then you won’t be able to share certain types of data between your workers running in parallel.
Note: There’s a third-party fork of multiprocessing called multiprocess, which uses dill instead of pickle under the hood, giving you much more flexibility. You’ll learn more about dill throughout this tutorial.
Similarly, copying objects in Python relies on the pickle module, which suffers from the same deficiencies:
>>> def generator():
...     yield
...

>>> import copy
>>> copy.copy(generator())
Traceback (most recent call last):
  ...
TypeError: cannot pickle 'generator' object
If that’s too prohibitive for your needs, then consider using the third-party dill package, which acts as a drop-in replacement for pickle. It has the same interface as pickle and adheres to its underlying protocol while extending it to some extent:
>>> import pickle
>>> pickle.dumps(42)
b'\x80\x04K*.'

>>> import dill
>>> dill.dumps(42)
b'\x80\x04K*.'

>>> dill.loads(dill.dumps(lambda: None))
<function <lambda> at 0x7f78e793e660>

>>> dill.dumps(generator())
Traceback (most recent call last):
  ...
TypeError: cannot pickle 'generator' object
For basic data types, dill behaves similarly to pickle but lets you serialize some of the more exotic types, such as lambda expressions. At the same time, it can’t serialize everything—including generator objects.
Note: You can use the following idiom in your code to seamlessly fall back on pickle when the third-party dill isn’t available:
try:
    import dill as pickle
except ModuleNotFoundError:
    import pickle
Because both modules have a similar interface, you can use them interchangeably if you don’t need the extra features that dill provides.
Anyway, as long as you stay within most of the native data types in Python, classes from the standard library, or even classes of your own, then pickle is all you need. However, in some cases, you’ll want more control over the serialization and deserialization processes.
Customize the Pickling Process
When you serialize a custom object, Python uses type introspection to discover the underlying class attributes and instance attributes. Whether these attributes are stored in .__dict__ or .__slots__, the pickle module can correctly recognize them. Their names and the corresponding values will be encoded on the target byte stream along with the fully qualified name of your class, which includes the module name where you defined the class.
Note: Pickling a class instance serializes the data—that is, the names and values of its attributes. It doesn’t serialize any Python code that your class methods encapsulate. In other words, you need the class definition on the other end to unpickle the serialized object. What’s more, you must define your class at the top level of an importable module, as opposed to inside a function.
Deserializing a pickled class instance resembles cloning an object, as it bypasses the initializer method completely. This may not be ideal when your initializer method contains important setup code for the object.
Other situations that may require customizing the pickling or unpickling process include:
- Adding metadata: During pickling, you can introduce extra attributes that aren’t part of your object to augment the serialized byte stream with additional information, like timestamps.
- Hiding sensitive information: To avoid serializing passwords and other secrets, you can exclude one or more attributes from pickling.
- Unpickling stateful objects: If your object has a non-picklable state, such as a database connection or an open file that can’t be directly serialized, then you might need to include some extra logic to handle the state during pickling and unpickling.
- Providing default values: When the structure of your class evolves, it may gain new attributes that old instances lack. In such cases, you can provide default values for missing attributes when unpickling old objects.
- Reducing pickled size: During unpickling, you can recalculate some attributes instead of persisting them on the byte stream if they take a lot of space in serialized form.
To hook into the pickling process, you can specify these two special methods in your class:
Python will call the first one before pickling an instance of your class, expecting the method to return a dictionary of attribute names and their values. Conversely, during unpickling, Python will call the second method and pass a dictionary of attributes to let you properly initialize your object after its state has been deserialized.
Say that you have the following data class representing a user in your system, which has the .name and .password attributes:
customize-pickle/models.py
 1import time
 2from dataclasses import dataclass
 3
 4@dataclass
 5class User:
 6    name: str
 7    password: str
 8
 9    def __getstate__(self):
10        state = self.__dict__.copy()
11        state["timestamp"] = int(time.time())
12        del state["password"]
13        return state
14
15    def __setstate__(self, state):
16        self.__dict__.update(state)
17        with open("/dev/random", mode="rb") as file:
18            self.password = file.read(8).decode("ascii", errors="ignore")
To control the pickling and unpickling of your instances, you defined the two special methods above. Here’s how they work line by line:
- Line 10 makes a copy of the object’s internal dictionary of attributes comprising the user’s name and password.
- Line 11 injects an extra attribute named
timestampwith the current Unix timestamp into the copied dictionary. - Line 12 removes the key-value pair corresponding to the user’s password from the new dictionary.
- Line 13 returns the new dictionary with the modified state of your object to the
picklemodule. - Line 16 populates the object’s internal dictionary using the deserialized state provided by the
picklemodule. - Lines 17 and 18 set a new password based on random bytes loaded from the
/dev/randomfile on a Unix-like operating system.
As you can see, pickle leaves the door open to overriding its default behavior, giving you plenty of flexibility. If you need even more freedom, then consider defining a custom Pickler object to serialize references of objects persisted externally—for example, in a database. You can also create a private dispatch table to decide when to use a custom serialization code and when to fall back to the default one.
With the protocol version 5 proposed and described in PEP 574, you can now efficiently pickle out-of-bound data. This can help serialize very large datasets, such as NumPy arrays or pandas DataFrames, meant for transferring between processes or distributed machines rather than persisting on disk. By leveraging buffers managed outside the usual pickling process, data engineers can avoid unnecessary copies and significantly reduce memory use.
So far, you’ve seen examples of serializing Python objects to a byte stream using the standard pickle module. It’s the most versatile, efficient, and battle-proven method for object serialization in Python. But it won’t always be the best choice due to its lack of cross-language compatibility and potential security risks, which you’ll learn how to mitigate later.
And now, it’s time to look into serializing Python objects using the text-based JSON format, which enjoys widespread use beyond the Python ecosystem.
Encode Objects Using JSON
Unlike the binary protocols that the pickle module uses, JSON is a textual serialization format readable by humans. Thanks to its huge popularity and simplicity, it’s become a universally accepted standard for data exchange across various programming languages and platforms.
Note: Because JSON is just text, deserializing it from an untrusted source doesn’t pose the risk of arbitrary code execution. However, it’s possible for an attacker to craft a malicious JSON string that will bring your computer down by exhausting the available CPU and memory resources. The idea behind it is similar to the infamous XML bomb attack.
Unfortunately, you can only represent a few Python data types with pure JSON, whereas pickle is able to handle nearly all Python data types out of the box, including more advanced cases like user-defined classes. That said, you’ll learn how to customize the serialization of various types with JSON in this section.
The interface of the json module looks similar to pickle and other serialization-related modules like PyYAML. You get the familiar dump() and dumps() methods, along with their load() and loads() counterparts.
Note: One notable difference between json and pickle is that you can only dump your data to a JSON file once without corrupting the file. With pickle, on the other hand, you may repeatedly dump multiple objects one after the other and then retrieve them in the same order later.
In the following example, you dump a Python object to a JSON string:
>>> import json

>>> data = {
...     "email": None,
...     "name": "John Doe",
...     "age": 42.5,
...     "married": True,
...     "children": ["Alice", "Bob"],
... }

>>> print(json.dumps(data, indent=4, sort_keys=True))
{
    "age": 42.5,
    "children": [
        "Alice",
        "Bob"
    ],
    "email": null,
    "married": true,
    "name": "John Doe"
}
In this case, you serialize a Python dictionary whose keys are strings mapped to a few different data types. What you get as a result is a Python string formatted according to the grammar rules of JSON. Notice that you can optionally request to pretty-print the output and sort the keys alphabetically to improve the readability of larger objects.
The JSON format supports only six native data types:
- Array:
[1, 2, 3] - Boolean:
true,false - Null:
null - Number:
42,3.14 - Object:
{"key1": "value", "key2": 42} - String:
"Hello, World!"
In some cases, the json module will be able to convert your Python values to their closest JSON equivalents. At other times, it’ll fail with the following error:
>>> json.dumps({"Saturday", "Sunday"})
Traceback (most recent call last):
  ...
TypeError: Object of type set is not JSON serializable
The error message above tells you that a Python set isn’t serializable using the JSON format. However, you can teach the json module how to deal with such non-standard data types or even custom classes.
There are two ways to do so. You can provide callback functions to the dumping and loading functions, or you can extend the encoder and decoder classes from the json module.
To serialize a Python set as a JSON string using the first approach, you could define the following callback function and pass its reference to json.dump() or json.dumps() through the default parameter:
>>> def serialize_custom(value):
...     if isinstance(value, set):
...         return {
...             "type": "set",
...             "elements": list(value)
...         }
...

>>> data = {"weekend_days": {"Saturday", "Sunday"}}
>>> json.dumps(data, default=serialize_custom)
'{"weekend_days": {"type": "set", "elements": ["Sunday", "Saturday"]}}'
Python will now call serialize_custom() for every object that it can’t serialize as JSON by itself. It’ll pass down that object as an argument to your function, which should return one of the known data types. In this case, the function represents a Python set as a dictionary with elements encoded as a list and a type field denoting the intended Python data type.
If you’re happy with this new representation, then you’re essentially done. Otherwise, you can implement the corresponding deserialization callback to retrieve the original Python set from its current JSON representation:
>>> def deserialize_custom(value):
...     match value:
...         case {"type": "set", "elements": elements}:
...             return set(elements)
...         case _:
...             return value
...
>>> json_string = """
...     {
...         "weekend_days": {
...             "type": "set",
...             "elements": ["Sunday", "Saturday"]
...         }
...     }
... """

>>> json.loads(json_string, object_hook=deserialize_custom)
{'weekend_days': {'Sunday', 'Saturday'}}
Here, you pass a reference to deserialize_custom() through the object_hook parameter of json.loads(). Your custom function takes a Python dictionary as an argument, letting you convert it into an object of your choice. Using structural pattern matching, you identify if the dictionary describes a set, and if so, return a Python set instance. Otherwise, you return the dictionary as is.
Note: Alternatively, you can specify another callback through the object_pairs_hook parameter, in which case you’ll get an ordered list of key-value tuples instead of a dictionary. This was preferable when you wanted to preserve the original order of key-value pairs before Python 3.7 made dictionaries maintain insertion order as a language feature.
In addition to these generic callbacks, you can specify a few specialized ones to override how to deserialize integer and floating-point number literals in JSON:
>>> json.loads("42", parse_int=float)
42.0

>>> from decimal import Decimal
>>> json.loads("3.14", parse_float=Decimal)
Decimal('3.14')

>>> json.loads("[NaN, Infinity, -Infinity]", parse_constant=str)
['NaN', 'Infinity', '-Infinity']
In the code snippet above, you convert all integers to Python floats and all floating-point number literals to decimal numbers. You also treat the special constants defined in the IEEE 754 standard, such as NaN, as regular strings.
If you prefer a more object-oriented approach to customizing the logic behind JSON serialization in Python, then extend the JSONEncoder and JSONDecoder classes. They’ll let you keep your reusable code in one place while giving you even more fine-grained control, including a streaming API. However, the general principles are the same as with the callback-based approach.
When you decide to use JSON over the binary pickle format, remember that you’ll have to take care of many corner cases manually. One such area is the handling of reference cycles, which pickle accounts for automatically:
>>> cycle = {}
>>> cycle["sibling"] = {"sibling": cycle}

>>> json.dumps(cycle)
Traceback (most recent call last):
  ...
ValueError: Circular reference detected

>>> json.dumps(cycle, check_circular=False)
Traceback (most recent call last):
  ...
RecursionError: maximum recursion depth exceeded while encoding a JSON object
When an object contains a cycle, the pure json module is unable to serialize it. You must implement some mechanism of tracking the objects that you’ve already serialized and reconstruct the original object graph in memory during deserialization.
This exhausts the list of data serialization formats supported natively by Python. Next, you’ll look into some third-party alternatives.
Use Formats Foreign to Python
Both pickle and JSON have their pros and cons. The first one can automatically serialize many types of Python objects out of the box but isn’t portable or human-readable. On the other hand, the text-based JSON is widely supported outside of Python but comes with only a few basic data types. Fortunately, you can combine the best of both worlds with the help of the jsonpickle library.
Note: Don’t confuse jsonpickle—a mature, well-documented, and maintained library—with a separate picklejson package.
Contrary to what the name suggests, jsonpickle doesn’t actually use pickle under the hood to serialize Python objects. That would defeat the purpose of creating a more portable and human-readable format. Instead, it uses a custom serialization format on top of JSON to allow you to serialize complex Python objects.
If you still have your User data class around, then this is how you can serialize it to a JSON-formatted string with jsonpickle:
>>> import jsonpickle
>>> from models import User
>>> user = User(name="John", password="*%!U8n9erx@GdqK(@J")
>>> user_json = jsonpickle.dumps(user, indent=4)
>>> print(user_json)
{
    "py/object": "models.User",
    "py/state": {
        "name": "John",
        "timestamp": 1699805990
    }
}

>>> jsonpickle.loads(user_json)
User(name='John', password='\\\x06,\x19')
As you can see, the library respects the standard .__getstate__() and .__setstate__() methods that pickle uses. Moreover, it retains the type’s fully qualified name as a plain string in the resulting JSON under the "py/object" key. This means that the corresponding class must be importable when you try deserializing one of its instances.
That idea sounds remarkably similar to application-specific tags that some YAML parsers use to extend their capabilities. For example, this is what the same user object will look like when you serialize it using the PyYAML library:
>>> print(yaml.dump(user))
!!python/object:models.User
name: John
timestamp: 1699807790
The first line, which starts with a double exclamation mark (!!), uses a custom tag to let you store a User object. YAML is an excellent data serialization format because it supports a large number of data types that you’ll find in many programming languages. Even so, you can extend it with custom data types like the User class above for your specific needs.
Now that you know how to serialize Python objects representing data, you can tackle the task of serializing executable Python code.
Serialize Executable Code
Modern computers are designed with von Neumann architecture in mind, allowing low-level code and data to coexist in the same memory space. On the one hand, this played a role in the emergence of computer viruses, but on the other hand, it was a revolutionary and innovative idea that made compilers possible.
While the low-level instructions can only run on the specific type of hardware that they were compiled for, high-level languages like Python enjoy greater portability. Python code is interpreted, which means it can run on any device with the necessary interpreter installed. This makes it worthwhile to serialize Python code. But why would you want to do that in the first place?
Serializing executable code can be useful when you need to distribute chunks of work over a number of remote workers to achieve parallel processing. When you have a cluster of computers, you can let each one run a different function, for example.
Note: In theory, you can treat program instructions as ordinary data when, for example, you want to serialize them. However, accessing executable units of code inside a running program is only possible when the underlying programming language allows for that.
Fortunately, Python has first-class functions, which is a fancy way of saying that functions are objects that you can manipulate just like any other value. In particular, you can assign them to variables, pass them around, and even return them from other functions. You’ll see examples of this in action soon.
In the following sections, you’ll take a closer look at some of the challenges associated with the serialization of Python code.
Pickle Importable Symbols
In Python, modules, functions, and classes are the most fundamental building blocks of any program, encapsulating its logic. The pickle module can serialize functions and classes but with certain limitations.
If you followed along with the earlier section on customizing the pickling process, then you might recall that pickle only retains the names of your functions and classes. Later, it uses those names to look up the corresponding source code in your virtual environment.
Say you have a Python module with the following definitions, which you’d like to serialize using pickle:
pickle-importable/plus.py
def create_plus(x):
    def plus(y):
        return x + y

    return plus

plus_one = create_plus(1)
plus_two = lambda x: x + 2
The create_plus() function is an example of a higher-order function, or more specifically, a factory function that returns a brand-new function closure created dynamically at runtime. The outer function takes a number, x, as input and returns an inner function, which takes another number, y, as an argument and adds that number to the first one.
The two variables at the bottom, plus_one and plus_two, represent callable objects. The first is a function closure returned by the factory function defined earlier, while the other one is a lambda expression.
Now, because Python modules aren’t picklable, you can’t serialize the entire module using pickle:
>>> import pickle
>>> import plus
>>> pickle.dumps(plus)
Traceback (most recent call last):
  ...
TypeError: cannot pickle 'module' object
By the same token, you can’t serialize inner functions and lambda expressions imported from your module, as well as code objects of regular functions. To get the code object associated with your function, you can access its .__code__ attribute, as shown at the bottom of the following code snippet:
>>> pickle.dumps(plus.plus_one)
Traceback (most recent call last):
  ...
AttributeError: Can't pickle local object 'create_plus.<locals>.plus'

>>> pickle.dumps(plus.plus_two)
Traceback (most recent call last):
  ...
_pickle.PicklingError: Can't pickle <function <lambda> at 0x7f6f32f2a480>:
⮑ attribute lookup <lambda> on plus failed

>>> pickle.dumps(plus.create_plus.__code__)
Traceback (most recent call last):
  ...
TypeError: cannot pickle code objects
The first error message tells you that you can’t pickle a local object, which is a function defined inside another function in this case. Python must be able to reference your object from the global namespace to serialize it. Similarly, a lambda is an anonymous function defined on the fly as an expression that doesn’t belong to the global scope.
You can only pickle top-level functions, such as create_plus(), that you defined with the def keyword in the global namespace of a module:
>>> pickle.dumps(plus.create_plus)
b'\x80\x04\x95\x18\x00\x00\x00\x00\x00\x00\x00\x8c
⮑ \x04plus\x94\x8c\x0bcreate_plus\x94\x93\x94.'
Notice that the resulting byte stream is fairly short and contains the fully qualified name of your function, including the enclosing module name, plus. You can now store this byte sequence on disk or transfer it to another Python interpreter over a network. However, if the receiving end has no access to the corresponding functions or class definitions, then you still won’t be able to unpickle the serialized code:
>>> # This runs on a remote computer without the "plus" module
>>> import pickle
>>> pickle.loads(
...     b"\x80\x04\x95\x18\x00\x00\x00\x00\x00\x00\x00\x8c"
...     b"\x04plus\x94\x8c\x0bcreate_plus\x94\x93\x94."
... )
Traceback (most recent call last):
  ...
ModuleNotFoundError: No module named 'plus'
As you can see, Python is able to deserialize your byte stream correctly, knowing which module to import, but it fails to find the missing plus module.
In contrast, when the enclosing module of your serialized function or class is on the import path, making the module importable, then you’ll be able to retrieve the original object from the byte stream:
>>> # This runs where the "plus" module is importable
>>> import pickle
>>> pickle.loads(
...     b"\x80\x04\x95\x18\x00\x00\x00\x00\x00\x00\x00\x8c"
...     b"\x04plus\x94\x8c\x0bcreate_plus\x94\x93\x94."
... )
<function create_plus at 0x7f89d84a2700>
Here, you get a reference to the create_plus() function, which Python imported for you behind the scenes. It’s as if you had imported it yourself.
The lack of a built-in mechanism for serializing Python source code is a bit disappointing. A quick and dirty way to work around this limitation of the pickle module is to share the code in literal form for the exec() function to execute later:
>>> import importlib
>>> import inspect

>>> def get_module_source(module_name):
...     module = importlib.import_module(module_name)
...     return inspect.getsource(module)
...
>>> source_code = get_module_source("plus")
>>> print(source_code)
def create_plus(x):
    def plus(y):
        return x + y

    return plus

plus_one = create_plus(1)
plus_two = lambda x: x + 2

>>> exec(source_code)
>>> plus_two(3)
5
You define get_module_source() for dynamically importing a Python module by name with the help of importlib. Additionally, you rely on inspect to return the Python source code of the imported module as a string. Then, you use your new helper function to obtain the source code of the plus module that you defined earlier and execute the associated code with its function definitions. Finally, you call one of those functions without importing it.
This trick avoids serializing the code altogether, but it comes with its own set of problems. What if you only wanted to share a specific function or class without revealing the rest of your module? Perhaps executing the module causes unwanted side effects. Maybe you don’t have access to the high-level Python source code because it’s a compiled C extension module. Do you trust that the code will remain intact and secure when you execute it again?
Note: If you use dill instead of pickle, then you can conveniently narrow down the source code to extract from a module:
>>> import dill.source
>>> from plus import plus_two
>>> dill.source.getsource(plus_two)
'plus_two = lambda x: x + 2\n'
You only get the source code of the plus_two() callable, which you defined as a lambda expression. Nevertheless, dill offers a better way to serialize code, which you’ll explore now.
The next few sections will address these concerns and provide alternative solutions to serializing executable code in Python using the third-party dill library.
Serialize Python Modules
You’ve already heard of the third-party dill library a few times in this tutorial. One of its main advantages over the standard library’s pickle module is the ability to serialize Python source code without requiring an importable enclosing module. However, there’s a catch that you need to be aware of, which you’ll learn about soon.
First of all, you can call dump_module(), which is specific to dill, in order to retain and later restore the state of global variables defined in a module. Unless you specify otherwise, dill serializes the special __main__ module by default. This can be useful when you’re experimenting in the interactive Python REPL and would like to continue the session where you left off, potentially on another computer:
>>> from dataclasses import dataclass

>>> @dataclass
... class Person:
...     first_name: str
...     last_name: str
...
>>> jdoe = Person("John", "Doe")

>>> import dill
>>> dill.dump_module("session.pkl")
Here, you define a data class, create an instance of it, and assign the resulting object to a global variable. Then, you dump the current session to a binary file, which you can load in a new Python REPL session later:
>>> import dill
>>> dill.load_module("session.pkl")

>>> jdoe
Person(first_name='John', last_name='Doe')

>>> Person("Jack", "Ryan")
Person(first_name='Jack', last_name='Ryan')
After loading the serialized module, you continue working with the object that you created before and the class that you defined earlier as if you’d never left the original session.
Note: If your module depends on external modules, or if you dump a custom module other than the default __main__, then you must ensure that these modules are importable before loading the associated binary file. Otherwise, you’ll get the ModuleNotFoundError exception:
>>> import dill
>>> dill.load_module("plus.pkl")
Traceback (most recent call last):
  ...
ModuleNotFoundError: No module named 'plus'
In this case, you dumped your custom plus module, which Python can’t find anymore during an attempt to load its serialized state.
Okay. Dumping Python modules with dill allows you to share your functions and classes between Python interpreters, but what if you wanted to be more selective about what you serialize? What about a situation where your recipient doesn’t have access to your source code? In such cases, you can use dill to dump a specific code object associated with a function or class.
Serialize Code Objects
Somewhat surprisingly, when you try serializing a function imported from another module, such as your create_plus() factory function from the plus module, dill and pickle may sometimes produce an identical binary sequence:
>>> import pickle
>>> import dill
>>> import plus

>>> pickle.dumps(plus.create_plus)
b'\x80\x04\x95\x18\x00\x00\x00\x00\x00\x00\x00\x8c
⮑ \x04plus\x94\x8c\x0bcreate_plus\x94\x93\x94.'

>>> dill.dumps(plus.create_plus)
b'\x80\x04\x95\x18\x00\x00\x00\x00\x00\x00\x00\x8c
⮑ \x04plus\x94\x8c\x0bcreate_plus\x94\x93\x94.'
This seems to break the promise made by dill to be capable of serializing such code without needing the enclosing module.
However, if you dump your function from within that module, then you’ll get the expected result. To do so, you can run your module through the Python interpreter with the -i option, which lets you inspect the finished program’s state in an interactive Python shell:
$ python -i plus.py
>>> import dill
>>> dill.dumps(create_plus)
b'\x80\x04\x95U\x01\x00\x00\x00\x00\x00\x00\x8c
⮑ \ndill._dill\x94\x8c\x10_create_function\x94
⮑ \x93\x94(h\x00\x8c\x0c_create_code\x94\x93
⮑ \x94(C\x04\x04\x01\n\x03\x94K\x01K\x00K\x00K
⮑ \x02K\x02K\x03C\x12\x87\x00\x97\x00\x88\x00f
⮑ \x01d\x01\x84\x08}\x01|\x01S\x00\x94Nh\x04(C
⮑ \x02\x04\x01\x94K\x01K\x00K\x00K\x01K\x02K
⮑ \x13C\x0e\x95\x01\x97\x00\x89\x01|\x00z\x00
⮑ \x00\x00S\x00\x94N\x85\x94)\x8c\x01y\x94\x85
⮑ \x94\x8c\x0c/tmp/plus.py\x94\x8c\x04plus\x94
⮑ \x8c\x19create_plus.<locals>.plus\x94K\x02C
⮑ \x0c\xf8\x80\x00\xd8\x0f\x10\x901\x89u\x88
⮑ \x0c\x94C\x00\x94\x8c\x01x\x94\x85\x94)t\x94R
⮑ \x94\x86\x94)h\x11h\r\x86\x94h\x0c\x8c
⮑ \x0bcreate_plus\x94h\x17K\x01C\x0f\xf8\x80\x00
⮑ \xf4\x02\x01\x05\x15\xf0\x06\x00\x0c\x10\x80K
⮑ \x94h\x10)h\x11\x85\x94t\x94R\x94c__builtin__
⮑ \n__main__\nh\x17NNt\x94R\x94}\x94}\x94\x8c
⮑ \x0f__annotations__\x94}\x94s\x86\x94b.'
With this option, Python executes the code in your module, including the function definitions, while letting you stay in the interactive shell to inspect global variables and other symbols afterward.
Because create_plus() is now a part of the global namespace, dill can serialize the function properly. It finally outputs a much longer byte sequence, which includes the serialized code object that you can deserialize without having the plus module in your virtual environment:
>>> # This runs on a remote computer without the "plus" module
>>> import dill
>>> create_plus = dill.loads(
...     b"\x80\x04\x95U\x01\x00\x00\x00\x00\x00\x00\x8c"
...     b"\ndill._dill\x94\x8c\x10_create_function\x94"
...     b"\x93\x94(h\x00\x8c\x0c_create_code\x94\x93"
...     b"\x94(C\x04\x04\x01\n\x03\x94K\x01K\x00K\x00K"
...     b"\x02K\x02K\x03C\x12\x87\x00\x97\x00\x88\x00f"
...     b"\x01d\x01\x84\x08}\x01|\x01S\x00\x94Nh\x04(C"
...     b"\x02\x04\x01\x94K\x01K\x00K\x00K\x01K\x02K"
...     b"\x13C\x0e\x95\x01\x97\x00\x89\x01|\x00z\x00"
...     b"\x00\x00S\x00\x94N\x85\x94)\x8c\x01y\x94\x85"
...     b"\x94\x8c\x0c/tmp/plus.py\x94\x8c\x04plus\x94"
...     b"\x8c\x19create_plus.<locals>.plus\x94K\x02C"
...     b"\x0c\xf8\x80\x00\xd8\x0f\x10\x901\x89u\x88"
...     b"\x0c\x94C\x00\x94\x8c\x01x\x94\x85\x94)t\x94R"
...     b"\x94\x86\x94)h\x11h\r\x86\x94h\x0c\x8c"
...     b"\x0bcreate_plus\x94h\x17K\x01C\x0f\xf8\x80\x00"
...     b"\xf4\x02\x01\x05\x15\xf0\x06\x00\x0c\x10\x80K"
...     b"\x94h\x10)h\x11\x85\x94t\x94R\x94c__builtin__"
...     b"\n__main__\nh\x17NNt\x94R\x94}\x94}\x94\x8c"
...     b"\x0f__annotations__\x94}\x94s\x86\x94b."
... )
>>> create_plus
<function create_plus at 0x7f0f88324220>
>>> plus_three = create_plus(3)
>>> plus_three
<function create_plus.<locals>.plus at 0x7f0f883242c0>
>>> plus_three(2)
5
When you pass the same byte sequence to dill.loads(), it returns a new function object that works exactly like your original create_plus() factory function. Even if the plus module with the corresponding Python source code can’t be found, the deserialized function still works as expected.
Note: If you’re curious about how dill reconstructs functions, lambda expressions, classes, and other kinds of code elements from their serialized form, then have a look at the types module in the Python standard library. It provides classes like FunctionType that let you dynamically create types based on compiled code objects augmented with bits of metadata. Thanks to this, dill can serialize local functions defined inside other functions.
Inspecting a module to serialize one of its functions or classes is a lot of hassle. Sure, you could always slap the call to dill.dumps() at the bottom of your module and call it a day:
pickle-importable/plus.py
import dill

def create_plus(x):
    def plus(y):
        return x + y

    return plus

plus_one = create_plus(1)
plus_two = lambda x: x + 2

print(dill.dumps(create_plus))
This might work in some cases, but you generally prefer your code to be flexible so that you can decide later which function or class to serialize. Fortunately, you have another trick up your sleeve. You can manually substitute the special .__module__ attribute and instruct dill to recursively traverse the globals() dictionary:
>>> import dill
>>> import plus

>>> plus.create_plus.__module__
'plus'
>>> dill.dumps(plus.create_plus)
b'\x80\x04\x95\x18\x00\x00\x00\x00\x00\x00\x00\x8c
⮑ \x04plus\x94\x8c\x0bcreate_plus\x94\x93\x94.'

>>> plus.create_plus.__module__ = None
>>> dill.dumps(plus.create_plus, recurse=True)
b'\x80\x04\x95N\x01\x00\x00\x00\x00\x00\x00\x8c
⮑ \ndill._dill\x94\x8c\x10_create_function\x94
⮑ \x93\x94(h\x00\x8c\x0c_create_code\x94\x93\x94
⮑ (C\x04\x04\x01\n\x03\x94K\x01K\x00K\x00K\x02K
⮑ \x02K\x03C\x12\x87\x00\x97\x00\x88\x00f\x01d
⮑ \x01\x84\x08}\x01|\x01S\x00\x94Nh\x04(C\x02
⮑ \x04\x01\x94K\x01K\x00K\x00K\x01K\x02K\x13C
⮑ \x0e\x95\x01\x97\x00\x89\x01|\x00z\x00\x00\x00S
⮑ \x00\x94N\x85\x94)\x8c\x01y\x94\x85\x94\x8c
⮑ \x0c/tmp/plus.py\x94\x8c\x04plus\x94\x8c\x19
⮑ create_plus.<locals>.plus\x94K\x02C\x0c\xf8\x80
⮑ \x00\xd8\x0f\x10\x901\x89u\x88\x0c\x94C\x00\x94
⮑ \x8c\x01x\x94\x85\x94)t\x94R\x94\x86\x94)h\x11h
⮑ \r\x86\x94h\x0c\x8c\x0bcreate_plus\x94h\x17K
⮑ \x01C\x0f\xf8\x80\x00\xf4\x02\x01\x05\x15\xf0
⮑ \x06\x00\x0c\x10\x80K\x94h\x10)h\x11\x85\x94t
⮑ \x94R\x94}\x94\x8c\x08__name__\x94Nsh\x17NNt
⮑ \x94R\x94}\x94}\x94\x8c\x0f__annotations__\x94}
⮑ \x94s\x86\x94b.'
The .__module__ attribute of a function or a class indicates the name of the Python module it belongs to. As you might expect, the initial value of the create_plus() function’s .__module__ attribute is plus. This triggers the fallback mechanism, which delegates the serialization to pickle, resulting in a short byte sequence comprising only the fully qualified name of your function instead of the code object.
By artificially changing this attribute’s value to None, you detach the function from its module. However, callable objects have another special attribute, .__globals__, which is a dictionary representing the global namespace where you defined them. Some of its elements may be redundant, forcing dill to serialize more than necessary and potentially making the enclosing module required for deserialization.
The .__globals__ attribute is read-only, so you can’t easily override it. What you can do, though, is instruct dill to recursively traverse that namespace and cherry-pick objects to serialize as needed. In contrast, when you remove the recurse=True parameter from one of the highlighted lines above, the resulting byte sequence will be a few times longer!
Finally, it’s worth noting that recursive functions need special attention when you deserialize them. Here’s a sample function, which calculates the nth Fibonacci number, represented as a byte stream produced by dill:
>>> import dill
>>> fn = dill.loads(
...     b"\x80\x04\x95-\x01\x00\x00\x00\x00\x00\x00\x8c\ndill._dill"
...     b"\x94\x8c\x10_create_function\x94\x93\x94(h\x00\x8c\x0c"
...     b"_create_code\x94\x93\x94(C\x02\x02\x01\x94K\x01K\x00K\x00K"
...     b"\x01K\x05K\x03CJ\x97\x00|\x00d\x01k\x02\x00\x00r\x02d\x02S"
...     b"\x00t\x01\x00\x00\x00\x00\x00\x00\x00\x00|\x00d\x01z\n\x00"
...     b"\x00\xab\x01\x00\x00\x00\x00\x00\x00t\x01\x00\x00\x00\x00"
...     b"\x00\x00\x00\x00|\x00d\x02z\n\x00\x00\xab\x01\x00\x00\x00"
...     b"\x00\x00\x00z\x00\x00\x00S\x00\x94NK\x02K\x01\x87\x94\x8c"
...     b"\x03fib\x94\x85\x94\x8c\x01n\x94\x85\x94\x8c\x0b/tmp/fib.py"
...     b"\x94h\x08h\x08K\x01C(\x80\x00\xd8\x10\x11\x90A\x92\x05\x881"
...     b"\xd0\x042\x9c3\x98q\xa01\x99u\x9b:\xac\x03\xa8A\xb0\x01\xa9E"
...     b"\xab\n\xd1\x1b2\xd0\x042\x94C\x00\x94))t\x94R\x94c__builtin__"
...     b"\n__main__\nh\x08NNt\x94R\x94}\x94}\x94\x8c\x0f__annotations__"
...     b"\x94}\x94s\x86\x94b."
... )
>>> fn
<function fib at 0x7fd6b68dc220>
>>> fn(5)
Traceback (most recent call last):
  ...
NameError: name 'fib' is not defined
You successfully load the function from that byte stream and assign it to a variable named fn. Later, you use your new variable to call the deserialized function, which fails with a NameError due to referencing an undefined symbol, fib. What’s going on?
A recursive function calls itself until the base condition is met. However, to call itself, the function must know its own name. In the serialized version, the function was named fib, as indicated by the code object that you evaluated in the Python REPL. But there’s no such name in your current scope.
To fix this problem, you can create an alias for the function, like so:
>>> fib = fn
>>> [fib(n) for n in range(10)]
[1, 1, 2, 3, 5, 8, 13, 21, 34, 55]
Great! With the function assigned to fib, the recursive calls now succeed because the correct function name exists in your scope.
You’ve covered a lot of ground when it comes to serializing executable code. Before closing this topic, you should address the elephant in the room, which is the potential security risk associated with deserializing code that can run on your computer.
Protect From Malicious Code
When you browse Python’s documentation of the various data serialization formats that allow you to serialize code, you’ll notice prominent warnings about the potential security risks involved. These can enable the execution of arbitrary code during deserialization, exposing you to hacker attacks.
The official documentation page of pickle demonstrates an example of a handmade byte stream, which results in running a system command when unpickled:
>>> import pickle
>>> pickle.loads(b"cos\nsystem\n(S'echo hello world'\ntR.")
hello world
0
After unpickling this cleverly crafted byte sequence, Python automatically imports the os module and calls the system() function, passing a command to run in your shell. It merely executes the innocent echo command, which prints hello world on the screen. However, it could potentially do anything, including deleting files from your system, stealing sensitive data, installing malware, or even giving unauthorized access to your computer.
As a rule of thumb, you should always double-check that you can trust the source of the code before allowing it to run. But even that may not be enough when someone in the middle tampers with your code. The recommended practice is to either use a safer serialization format that requires input validation or implement countermeasures to prevent malicious code injection.
When using pickle, you can restrict which functions and classes are allowed to be deserialized by extending the Unpickler class and overriding its .find_class() method:
digital-signature/safe_unpickler.py
import importlib
import io
import pickle

class SafeUnpickler(pickle.Unpickler):
    ALLOWED = {
        "builtins": ["print"],
        "sysconfig": ["get_python_version"],
    }

    @classmethod
    def safe_loads(cls, serialized_data):
        file = io.BytesIO(serialized_data)
        return cls(file).load()

    def find_class(self, module_name, name):
        if module_name in self.ALLOWED:
            if name in self.ALLOWED[module_name]:
                module = importlib.import_module(module_name)
                return getattr(module, name)
        raise pickle.UnpicklingError(f"{module_name}.{name} is unsafe")
The SafeUnpickler class defined above contains a custom whitelist consisting of the only functions that you can deserialize. The .safe_loads() class method conveniently wraps the input byte sequence into a file-like object, which the unpickler expects. Finally, the overridden .find_class() method either calls one of the approved functions—returning its result to the caller—or raises an exception.
Any attempt to unpickle a function or class that’s not on your whitelist will fail. At the same time, you can execute deserialized code that’s been marked as safe:
>>> from safe_unpickler import SafeUnpickler

>>> SafeUnpickler.safe_loads(b"cos\nsystem\n(S'echo hello world'\ntR.")
Traceback (most recent call last):
  ...
_pickle.UnpicklingError: os.system is unsafe

>>> SafeUnpickler.safe_loads(b"cbuiltins\nprint\n(S'hello world'\ntR.")
hello world

>>> SafeUnpickler.safe_loads(b"csysconfig\nget_python_version\n(tR.")
'3.12'
By limiting what the pickle module can process, you provide a more secure way of deserializing executable code. But what if that’s too restrictive? Perhaps you really want to be able to call certain functions when the data is coming from a trusted source.
A common method of establishing trust is to digitally sign the serialized code with a shared secret key that only you and your recipient know. In Python, you can take advantage of the standard library module named hmac, which implements the HMAC algorithm used in cryptography for checking the authenticity and integrity of your messages.
Here’s how you can combine dill, hmac, and hashlib to make the serialization of executable code in Python trustworthy:
digital-signature/trustworthy.py
import hashlib
import hmac
import dill

def safe_dump(obj, file, secret_key):
    serialized_data = dill.dumps(obj)
    signature = sign(serialized_data, secret_key)
    dill.dump(signature, file)
    file.write(serialized_data)

def safe_load(file, secret_key):
    signature = dill.load(file)
    serialized_data = file.read()
    if signature == sign(serialized_data, secret_key):
        return dill.loads(serialized_data)
    raise dill.UnpicklingError("invalid digital signature")

def sign(message, secret_key, algorithm=hashlib.sha256):
    return hmac.new(secret_key, message, algorithm).digest()
The safe_dump() function takes an arbitrary Python object as the first argument, followed by a file-like object, which must be open in binary mode for writing, and a secret byte sequence used for signing. It then dumps the signature of your pickled data to the file using dill and writes the pickled data in the same file right after the signature.
Conversely, the safe_load() function expects a file-like object open for reading in binary mode and a secret byte sequence as arguments. It loads the signature from the file along with pickled data and calculates the signature for that data using the secret key supplied as an argument. If the two signatures compare equal, then the function unpickles and returns your data.
Both functions call the sign() helper to calculate the digital signature of your executable code. By default, the function uses the SHA-256 algorithm, which is popular for storing hashed passwords. However, you can replace it with any available cryptographic algorithm that fits your specific needs.
To verify if this works as expected, import and use your trustworthy module in a new Python shell:
>>> from pathlib import Path
>>> from trustworthy import safe_dump, safe_load

>>> path = Path("code.pkl")
>>> code = lambda a, b: a + b

>>> with path.open(mode="wb") as file:
...     safe_dump(code, file, b"top-secret")
...
>>> with path.open(mode="rb") as file:
...     safe_load(file, b"top-secret")
...
<function <lambda> at 0x7fa1248d0180>
You start by defining a path object to indicate the location of a binary file for your serialized code. The code that you’re going to serialize is a lambda expression stored in a variable named code. Then, you open the indicated file for writing and safely dump your code using top-secret as the key to sign the data with.
Later, you open the same file for reading and safely load its content using the correct secret key. As a result, you get a new callable object, which is a faithful replica of your original lambda expression.
Now, if someone tries to alter the code that you serialized, they’ll need to update the corresponding signature, which they can’t do without knowing the secret key. That’s why it’s important to keep the key secret! If you do, then you’ll immediately know when something’s wrong. The same is true when you supply an incorrect secret key:
>>> with path.open(mode="rb") as file:
...     safe_load(file, b"wrong-key")
...
Traceback (most recent call last):
  ...
_pickle.UnpicklingError: invalid digital signature
The key used to digitally sign the serialized data is different from the one used for deserialization. Therefore, the signatures don’t match, which should raise your suspicion.
Note: Using a digital signature doesn’t encrypt your message, which everyone can see! To keep your serialized data private, you should encrypt the file separately.
Deserializing executable code often carries the risk of introducing potential security threats. If you don’t trust the source where the serialized data is coming from, then it’s best to use a safer format or introduce measures to prevent unauthorized code execution.
Serialize HTTP Message Payloads
Data serialization often comes up in scenarios involving client-server communication based on the HTTP protocol, which forms the backbone of data exchange on the modern Web. Most clients are either web browsers or mobile apps, while servers typically represent back-end services implemented in a wide range of technologies, such as Python. To make the communication between them possible, you must represent data using a commonly understood format.
The HTTP acronym stands for Hypertext Transfer Protocol, suggesting that the protocol wasn’t designed to handle binary data. However, even in the early days of the Internet, binary resources like digital images often accompanied HTML pages served through HTTP. This was possible thanks to a text-friendly media-type encoding that was originally meant for email attachments and can convert bytes into a series of alphanumeric characters.
Every HTTP message consists of three parts:
The first two parts convey metadata about the message itself, such as the resource address or the message’s content length, while the third part is optional. The message body or payload is where your data goes when you send or receive an HTTP message. It could represent the content of an HTML document, a CSS style sheet, a JavaScript bundle, an image file, or any other kind of data.
In Python, you’re most likely to use the payload of an HTTP message as a carrier of the data served by a web API, such as a REST or GraphQL one. If you’re building an API back-end service from scratch, then it’s technically up to you how you want to format this data. Otherwise, when you’re making a consumer of an existing API, you’ll have to follow one of the data formats that the given API supports.
Historically, the Extensible Markup Language (XML) has been the first major data format used for serializing the payload of HTTP messages carrying data served by web APIs. To this day, web browsers expose the aptly named XMLHttpRequest object to JavaScript code running on web pages so that you can make HTTP requests in the background. Even though you rarely use XML in the payload anymore, the name has stuck as XML’s legacy.
Note: Developers of contemporary JavaScript applications usually prefer the newer Fetch API over XMLHttpRequest to download data asynchronously. Because the Fetch API is based on the promise pattern, it avoids nesting callbacks, also known as callback hell or the Pyramid of Doom. This can make your code much more readable and maintainable.
The biggest problems associated with XML as a data serialization format are its verbosity and the high cost of parsing, especially on the client side. But, given XML’s popularity back then, you can certainly find commercial APIs that still rely on that format today. If you need to consume XML-based APIs, then check out the roadmap to XML parsers in Python, which takes you through several different approaches to processing XML data.
Nowadays, JavaScript Object Notation (JSON) is by far the most popular data serialization format in web APIs. Its popularity is primarily due to native support by the JavaScript language, resulting in excellent parsing performance in web browsers. JSON’s straightforward syntax allowed its widespread adoption in many programming languages. Moreover, messages serialized with JSON are relatively small and fairly readable.
Although JSON reigns in web APIs, some programmers choose YAML as an alternative data serialization format for their services. YAML is even more human-readable than JSON, supports several data types that you’d find in most programming languages, and offers powerful features like anchors and aliases. On the flip side, parsing YAML’s complicated syntax is a challenge, making the format a better fit for configuration files rather than transmission.
In this section, you’ll review a selection of popular web frameworks and libraries for Python, which automate the serialization of data to and from JSON.
Build a REST API Using Flask
Flask is a popular web framework that gives you plenty of flexibility in terms of structuring your project and choosing its internal components. It’s quick to start with, as long as you only need the bare-bones functionality or you know exactly what you’re doing and want fine-grained control over every aspect of your application.
This framework is ideal for creating simple REST APIs because it supports JSON out of the box, building on top of Python’s json module. When your view function returns a dictionary or list, then you don’t need to take any extra steps. Flask serializes your data into a JSON-formatted string behind the scenes, wraps the payload in an HTTP response, and sets the Content-Type header to application/json before sending it back to the client.
Note: In codebases using an older Flask release, you may stumble on view functions calling jsonify() before returning an object to serialize. But, even with a modern Flask version, you may still need to call this function explicitly in your views to aid with the serialization of more exotic types like data classes.
Unlike the pure json module, the default serializer in Flask can handle a few additional data types, including data classes, dates and times, decimal numbers, and UUIDs. Below is a sample Flask application demonstrating these capabilities by implementing a basic REST API and using JSON for data serialization:
flask-rest-api/main.py
 1from dataclasses import dataclass
 2from datetime import datetime
 3from uuid import UUID, uuid4
 4
 5from flask import Flask, jsonify, request
 6
 7app = Flask(__name__)
 8
 9@dataclass
10class User:
11    id: UUID
12    name: str
13    created_at: datetime
14
15    @classmethod
16    def create(cls, name):
17        return cls(uuid4(), name, datetime.now())
18
19users = [
20    User.create("Alice"),
21    User.create("Bob"),
22]
23
24@app.route("/users", methods=["GET", "POST"])
25def view_users():
26    if request.method == "GET":
27        return users
28    elif request.method == "POST":
29        if request.is_json:
30            payload = request.get_json()
31            user = User.create(payload["name"])
32            users.append(user)
33            return jsonify(user), 201
This code takes on a few responsibilities that you’d typically organize better in separate Python modules. However, they’re combined here for the sake of brevity. So, to make sense of it, you can scrutinize the code line by line:
- Lines 9 to 17 define a
Usermodel as a Python data class with three properties. The named constructor,.create(), sets two of those properties for you using a random UUID and the current date and time. - Lines 19 to 22 specify a collection of users with two sample users named Alice and Bob.
- Lines 24 to 33 define the only REST endpoint,
/users, which responds to the HTTP GET and HTTP POST methods. - Line 27 returns a list of all users, which Flask serializes as a JSON array.
- Lines 30 to 32 create a new user based on JSON deserialized from the payload and append it to the collection of all users.
- Line 33 returns a tuple comprising the newly created user and an HTTP 201 status code. To help Flask with serializing an instance of your data class, you call
jsonify()on the user object to return.
When you run this server in debug mode, then Flask will automatically format your JSON responses using extra indentation, making the payload easier to read. Otherwise, the framework will remove all unnecessary whitespace to make your HTTP responses smaller, conserving the network bandwidth.
As you can see, choosing Flask as your web framework can help you quickly build a REST API with JSON-formatted responses and requests. Frequently, you’ll want to combine Flask with SQLAlchemy or another object-relational mapper (ORM) library. In cases like this, you’ll need an extra tool, such as marshmallow, to serialize the modeled data into JSON.
What if you’re already working with another web framework, such as Django, and would like to use your existing Django models as payload for REST API endpoints? You’ll find out next.
Serialize Django Models With DRF
The Django web framework alone is meant for creating conventional web applications, which typically query a relational database for data that gets weaved into an HTML page template, such as Jinja2. If you’d like to build a REST API on top of your existing Django models, then you’ll need to install a Django extension that provides an additional layer of functionality.
Django REST Framework (DRF) is among the most popular choices, offering numerous features for building robust REST APIs in Django. Assuming you have a working Django project, you can conveniently turn your models into REST API resources by defining serializers, which are strikingly similar to model forms in standard Django.
Say you have the following model class representing a user in your Django application:
django-rest-api/rest_api/models.py
import uuid

from django.db import models
from django.utils import timezone

class User(models.Model):
    id = models.UUIDField(primary_key=True, default=uuid.uuid4)
    name = models.CharField(max_length=200)
    created_at = models.DateTimeField(default=timezone.now)
This model is analogous to the data class that you saw earlier in the Flask example. But, because it extends the Model class from Django, you can take advantage of the Django ORM and other features built into the framework to make your life easier.
There are many different ways in which you can leverage the Django REST Framework to expose your models through an API. One approach to replicate the same REST API as before is to define two separate serializers for the incoming and outgoing messages:
django-rest-api/rest_api/serializers.py
from rest_framework import serializers

from . import models

class UserSerializerOut(serializers.ModelSerializer):
    class Meta:
        model = models.User
        fields = "__all__"

class UserSerializerIn(serializers.ModelSerializer):
    class Meta:
        model = models.User
        fields = ["name"]
The first serializer includes all fields in your model, as indicated by the special string "__all__". On the other hand, the second serializer only takes the .name property into account while disregarding the others, including unknown properties.
You can use these serializers to either serialize model instances into JSON or deserialize JSON the other way around. Additionally, you can attach one or more validators to your serializers, just as you would with form validation in Django.
Note: The default rendering format for the serialized data is JSON, but the Django REST Framework supports other formats through custom renderers, as well. If you don’t want to start from scratch, then you’ll be happy to know that third-party packages already cover popular formats like YAML and XML.
You can now define a view function for your REST API endpoint:
django-rest-api/rest_api/views.py
from rest_framework import status
from rest_framework.decorators import api_view
from rest_framework.response import Response

from .models import User
from .serializers import UserSerializerIn, UserSerializerOut

@api_view(["GET", "POST"])
def handle_users(request):
    if request.method == "GET":
        users = User.objects.all()
        serializer = UserSerializerOut(users, many=True)
        return Response(serializer.data)
    elif request.method == "POST":
        serializer_in = UserSerializerIn(data=request.data)
        if serializer_in.is_valid():
            user = serializer_in.save()
            serializer_out = UserSerializerOut(user)
            return Response(serializer_out.data, status.HTTP_201_CREATED)
        return Response(serializer_in.errors, status.HTTP_400_BAD_REQUEST)
In this case, you use the @api_view decorator to define a function-based view, which handles both the HTTP GET and HTTP POST methods.
When a client requests your resource with a GET request, you query the database for all users and dump them to JSON using the first serializer, which retains all the attributes of each user.
On a POST request, you try deserializing the incoming payload using the other serializer. If it succeeds, then you save the new user into your database, which sets the next ID of a user. Finally, you return the newly created user to the client by serializing all of its attributes using the first serializer again.
Note: When you access your endpoint in a web browser, the Django Web Framework will show a graphical user interface that lets you interact with the API. On the other hand, accessing the API through a command-line tool like cURL will get you raw JSON responses.
This is barely scratching the surface, as the Django REST Framework has much more to offer. Still, there are cases when you’ll need to look elsewhere. For instance, if you want full support for Python’s asynchronous processing, then your best bet would be to explore frameworks like FastAPI.
Leverage FastAPI for Performance
As the name implies, the FastAPI framework promises high performance and quick development time by combining the best features of existing components. It stands on the shoulders of giants, namely the Starlette web framework and Pydantic data validation library.
Fun Fact: The core of Pydantic is implemented in Rust and compiled down to machine code in order to leverage a much faster execution speed compared to pure Python.
Thanks to being asynchronous from the ground up, FastAPI claims to be one of the fastest Python web frameworks today, making it suitable for high-traffic web applications that must handle real-time data. It’s also quick to start with because it resembles Flask, which should make you feel at home if you’re familiar with the latter. Finally, FastAPI lets you use modern Python syntax to write concise and expressive code that’s cheap to maintain.
As a bonus, compatibility with the OpenAPI specification and the JSON Schema standard allows the framework to automatically generate interactive documentation of your API endpoints, as well as serialize and validate their JSON payloads. By default, FastAPI generates two alternative documentation pages based on Swagger UI and Redoc, but it’s not limited to those.
As with Flask, you can return a dictionary or list in your view functions to have them automatically serialized to their JSON counterparts. In addition to this, FastAPI supports the conversion between Pydantic models and JSON-formatted payloads, so you don’t need to write custom serializers like in the Django REST Framework.
If you wish to rewrite the sample REST API that you saw earlier into FastAPI, then this is what it could look like:
fastapi-rest-api/main.py
 1from datetime import datetime
 2from uuid import UUID, uuid4
 3
 4from fastapi import FastAPI
 5from pydantic import BaseModel, Field
 6
 7app = FastAPI()
 8
 9class UserIn(BaseModel):
10    name: str
11
12class UserOut(UserIn):
13    id: UUID = Field(default_factory=uuid4)
14    created_at: datetime = Field(default_factory=datetime.now)
15
16users = [
17    UserOut(name="Alice"),
18    UserOut(name="Bob"),
19]
20
21@app.get("/users")
22async def get_users():
23    return users
24
25@app.post("/users", status_code=201)
26async def create_user(user_in: UserIn):
27    user_out = UserOut(name=user_in.name)
28    users.append(user_out)
29    return user_out
Again, it helps to break this code down line by line:
- Lines 9 and 10 define a user model comprising the
.nameproperty, which you’ll receive as payload on incoming HTTP POST requests. - Lines 12 to 14 define another user model, which extends the former through inheritance by adding two extra properties initialized automatically at creation time. This is what you’ll send back to the client.
- Lines 16 to 19 specify a collection of users populated with two sample users named Alice and Bob.
- Lines 21 to 23 define an API endpoint triggered by an HTTP GET request, which returns the list of users.
- Lines 25 to 29 define another API endpoint, which responds to HTTP POST requests by adding a new user to the collection and returning it to the client.
Although you could’ve used the regular def keyword, you implemented both endpoints using async def, which is the preferred approach in FastAPI. The underlying web server runs those functions in an asynchronous event loop. When you use plain old synchronous functions in FastAPI, the framework wraps them in a pool of threads to avoid blocking the event loop.
Note: Whether you should use def or async def in your FastAPI code largely depends on other libraries, which may support either the synchronous or asynchronous processing mode. For example, some SQL libraries are only available in one flavor.
Another noteworthy point is that FastAPI heavily relies on type hinting to serialize, validate, and document your models. Using type hints can make your code more readable and less prone to defects. Your code editor can leverage them, too, by warning you about errors and even providing suggestions as you write your code. Most importantly, FastAPI lets you specify additional constraints for your data right in your models.
So far, you’ve built a REST API using several Python web frameworks. In the next section, you’ll switch gears and explore how to consume one.
Parse JSON Responses With Pydantic
Once you know Pydantic—for example, through FastAPI—you can start using it in your REST API consumers to deserialize the JSON content into Python objects.
Say you’re building a client for the /users endpoint that you saw earlier in this tutorial. To build such an API consumer from scratch, you can use the venerable requests library. Alternatively, you can install the slightly newer HTTPX library, which remains mostly compatible with the latter but supports an asynchronous interface if needed.
This is what a basic API consumer might look like when you incorporate Pydantic and HTTPX:
pydantic-demo/main.py
from datetime import datetime
from uuid import UUID

import httpx
from pydantic import BaseModel, Field, field_validator

class Metadata(BaseModel):
    uuid: UUID = Field(alias="id")
    created_at: datetime

class User(Metadata):
    name: str

    @field_validator("name")
    def check_user_name(cls, name):
        if name[0].isupper():
            return name
        raise ValueError("name must start with an uppercase letter")

if __name__ == "__main__":
    response = httpx.get("http://localhost:8000/users")
    for item in response.json():
        user = User(**item)
        print(repr(user))
The Metadata model defines a base class with two properties that your User model inherits. Notice that you rename the original "id" attribute received from the server as JSON into a .uuid counterpart on the client side using an alias. You may sometimes need this to adapt the responses of a REST API to your internal models.
Additionally, you specify a custom validation rule for the user’s name so that only names starting with a capital letter can get through. Your .check_user_name() method acts as a class method, taking the class instance as the first positional argument. Using the explicit @classmethod decorator isn’t necessary here, while its incorrect placement could cause the validation to fail silently.
Then, you make an HTTP request, asking the server for all users serialized as a JSON-formatted string, which you convert to a Python dictionary by calling response.json(). At this point, you only deal with Python’s primitive data types, such as strings. To turn them into an instance of your Pydantic model, you pass the corresponding keys and values to the User model’s constructor, which triggers the validation.
Although this works, there’s an even better way. Pydantic can deserialize the payload directly, simultaneously parsing and validating a JSON-formatted string in one go using high-performance code. To take advantage of this, you must specify a so-called root model and call .model_validate_json() on your new model class, like so:
pydantic-demo/main.py
from datetime import datetime
from uuid import UUID

import httpx
from pydantic import BaseModel, Field, RootModel, field_validator

# ...

Users = RootModel[list[User]]

if __name__ == "__main__":
    response = httpx.get("http://localhost:8000/users")
    users = Users.model_validate_json(response.text)
    print(users.root)
As a bonus, your code becomes more concise. The root model differs from a regular model in that it operates on the root of your JSON data, which may not have named attributes.
Nowadays, the vast majority of REST APIs out there use JSON as the underlying data serialization format, allowing everyone to quickly integrate with them. Python libraries like Pydantic and web frameworks such as Flask, Django REST Framework, and FastAPI make working with these APIs and JSON data even more convenient and efficient.
Serialize Hierarchical Data
You’ve looked into the fundamentals of data serialization as a concept. You’ve compared different kinds of serialization formats with their concrete examples, and you’ve learned about the challenges of data serialization in Python. Additionally, you’ve explored the use case of serializing data in the realm of web APIs.
Now, it’s time to take the shape of data into consideration, which may affect your choice of data serialization formats. In many cases, your data will resemble a hierarchy or a tree-like structure of elements arranged in a parent-child relationship. A graphical user interface consisting of nested visual components is a common example, but it’s certainly not the only one.
Imagine you were designing a repository of training plans available for personal trainers or their clients to use for workouts at the gym. Each training program might consist of the following elements:
- Metadata: Information about the program’s author, target audience, fitness goals, workout type, required equipment, and so on.
- Exercise definitions: A collection of named exercises, such as a plank or push-ups, with detailed instructions on how to perform the exercise and the muscle groups it targets.
- Day definitions: A collection of reusable day patterns, including rest days and specific workout routines. Each routine could be a sequence of exercises that one has to perform within the given time limit or until reaching a specified number of reps.
- Schedule: A sequence of days that make up the training plan for its total duration. This could include alternating activity and rest days or escalating intensity and complexity patterns.
A training plan like this naturally translates to a hierarchy of elements. At the top level of this hierarchy is the schedule consisting of the individual days. Each day, in turn, follows a given workout routine comprising a sequence of exercises augmented with parameters like weights, reps, or break duration.
In this section, you’ll use this example to compare a few popular data serialization formats suitable for representing such hierarchical data.
Textual: XML, YAML, and JSON
As you learned before, hierarchical data is the perfect use case for XML representation, so you’ll start with that. Expand the collapsible section below to reveal what a sample training program might look like when you express it using this format:
To avoid duplication, you give the exercises and days unique identifiers, which you refer to later in your document:
<?xml version="1.0" encoding="utf-8" ?>
<program>
    <metadata>
        <author>John Doe</author>
        <goals>
            <goal>health improvement</goal>
            <goal>fat loss</goal>
        </goals>
    </metadata>
    <exercises>
        <exercise id="plank">
            <muscles>
                <muscle>abs</muscle>
                <muscle>core</muscle>
                <muscle>shoulders</muscle>
            </muscles>
        </exercise>
        <exercise id="push-ups">
            <muscles>
                <muscle>chest</muscle>
                <muscle>biceps</muscle>
                <muscle>triceps</muscle>
            </muscles>
        </exercise>
    </exercises>
    <days>
        <day id="rest-day">
            <type>rest</type>
        </day>
        <day id="workout-1">
            <type>workout</type>
            <routine>
                <segment>
                    <type ref="plank"/>
                    <duration seconds="60"/>
                </segment>
                <segment>
                    <type>rest</type>
                    <duration seconds="10"/>
                </segment>
                <segment>
                    <type ref="push-ups"/>
                    <duration seconds="60"/>
                </segment>
            </routine>
        </day>
    </days>
    <schedule>
        <day ref="workout-1"/>
        <day ref="rest-day"/>
        <day ref="rest-day"/>
        <day ref="workout-1"/>
        <day ref="rest-day"/>
    </schedule>
</program>
The pure XML standard doesn’t provide a mechanism for automatically substituting those references with their corresponding elements, so you must implement such a mechanism yourself.
You have several options for deserializing such an XML document in Python, using either the standard library or a number of third-party packages.
Here are the XML parsers that ship with Python:
Additionally, you can install external Python libraries to parse or dump XML documents, including the following:
If you’d like to learn more about them, then head over to the Roadmap to XML Parsers in Python, which takes you on a deep dive into various interesting ways of dealing with XML content in Python. Choose the best approach that meets your requirements.
The downside of using XML as a data serialization format is its verbosity, which often results in large documents even when there isn’t that much data in them. This also affects readability and performance. Despite being a textual format, XML is arguably challenging for a human to read. Finally, the elements in an XML document don’t translate well into common data structures that you’d find in popular programming languages.
That’s where YAML enters the picture. Below, you’ll find an equivalent training program written as a YAML document:
In contrast to XML, you can take advantage of YAML’s anchors and aliases to define an element once and let the parser fill in the gaps:
program:
  metadata:
    author: John Doe
    goals:
      - health improvement
      - fat loss
  exercises:
    - &plank
      muscles:
        - abs
        - core
        - shoulders
    - &pushups
      muscles:
        - chest
        - biceps
        - triceps
  days:
    - &restday
      type: rest
    - &workout1
      type: workout
      segments:
        - type: *plank
          duration:
            seconds: 60
        - type: rest
          duration:
            seconds: 10
        - type: *pushups
          duration:
            seconds: 60
  schedule:
   - day: *workout1
   - day: *restday
   - day: *restday
   - day: *workout1
   - day: *restday
This gap-filling is an inherent feature of the YAML’s syntax, so there’s no need to write custom extensions like with XML, for example. This makes it possible to reuse the same exercise across multiple days as part of different workout routines without creating redundancy in your document.
When you load this YAML document into Python using, for example, the PyYAML library, you’ll receive a dictionary that you can traverse using the square brackets syntax:
>>> import yaml
>>> with open("training.yaml", encoding="utf-8") as file:
...     document = yaml.safe_load(file)
...
>>> document["program"]["schedule"][0]["day"]
{
    'type': 'workout',
    'segments': [
        {
            'type': {'muscles': ['abs', 'core', 'shoulders']},
            'duration': {'seconds': 60}
        },
        {
            'type': 'rest',
            'duration': {'seconds': 10}
        },
        {
            'type': {'muscles': ['chest', 'biceps', 'triceps']},
            'duration': {'seconds': 60}
        }
    ]
}
Notice how the individual segments of a workout routine on a specified day end up populated with the exercises defined at the top of the document.
YAML is an excellent data serialization format, which fits this particular scenario perfectly. Unfortunately, it’s a missing battery that Python doesn’t support out of the box. Therefore, you’ll need to choose and install an external serializer to start using this format in your programs.
At the same time, YAML has a fairly complicated syntax, which can make serializing data a relatively slow process. If you seek the ultimate performance and portability without sacrificing too much readability, then you should stick to more widespread formats.
Here’s a hypothetical JSON document representing the same training program as before:
Just as with XML, you can’t rely on plain JSON to refer to elements that you defined earlier. One way to avoid this redundancy is to devise a custom syntax extension by, for example, prefixing identifiers with an at sign (@):
{
    "program": {
        "metadata": {
            "author": "John Doe",
            "goals": ["health improvement", "fat loss"]
        },
        "exercises": {
            "plank": {"muscles": ["abs", "core", "shoulders"]},
            "push-ups": {"muscles": ["chest", "biceps", "triceps"]}
        },
        "days": {
            "rest-day": {"type": "rest"},
            "workout-1": {
                "type": "workout",
                "segments": [
                    {"type": "@plank", "seconds": 60},
                    {"type": "rest", "seconds": 10},
                    {"type": "@push-ups", "seconds": 60}
                ]
            }
        },
        "schedule": [
            "@workout-1",
            "@rest-day",
            "@rest-day",
            "@workout-1",
            "@rest-day"
        ]
    }
}
This looks pretty good. Still, you must implement code tailored to handling such cross-references on your own.
For more tips and tricks on working with JSON data in Python, check out the corresponding tutorial.
All three data serialization formats that you’ve explored so far in this section were textual. Next up, you’ll look into binary formats suitable for serializing hierarchical data.
Binary: BSON
Choosing a binary data serialization format can often be beneficial for improving speed and storage efficiency. Perhaps the most straightforward binary format that you can use to represent a hierarchy of objects is BSON, which stands for Binary JSON. It was invented for the sake of representing JSON-like documents in MongoDB, a popular NoSQL database.
The main idea behind BSON was to make the serialized documents traversable as efficiently as possible to allow quick querying. This was achieved by encoding length and terminator fields, eliminating the need to parse the entire document when looking for a specific piece of information.
BSON is one example of schemaless formats, which are often preferable to schema-based ones in NoSQL databases. These databases typically store unstructured data, unlike their relational counterparts. The lack of a schema gives you more flexibility. On the other hand, it adds overhead to BSON documents, which must encode the field names within the serialized byte stream.
A notable limitation of BSON is that it can only serialize JSON objects or Python dictionaries. So, if you want to represent scalar values or lists, then you must wrap them in a dictionary with at least one key. On the flip side, you have a few additional data types in BSON at your disposal, such as a 128-bit decimal floating point or a UTC date and time, that aren’t available in plain JSON.
To work with BSON in Python, you must first install the official MongoDB driver for Python called PyMongo. Installing it brings a few top-level packages into your virtual environment, including bson.
Note: Don’t confuse the bson package provided by PyMongo with the stand-alone bson library, which is a completely separate artifact. Unlike the official PyMongo driver, the latter is implemented in pure Python, doesn’t seem to be maintained any longer, and isn’t compliant with the BSON specification.
To serialize the sample training program that you saw earlier, you can take its JSON representation from the previous section and dump it into BSON like so:
>>> import json
>>> import bson

>>> with open("training.json", encoding="utf-8") as file:
...     document = json.load(file)
...     bson.encode(document)
...
b'9\x02\x00\x00\x03program\x00+\x02\x00\x00\x03metadata
⮑ \x00P\x00\x00\x00\x02author\x00\t\x00\x00\x00John Doe
⮑ \x00\x04goals\x00/\x00\x00\x00\x020\x00\x13\x00\x00\x00
⮑ health improvement\x00\x021\x00\t\x00\x00\x00fat loss
⮑ \x00\x00\x00\x03exercises\x00\x8e\x00\x00\x00\x03plank
⮑ \x00;\x00\x00\x00\x04muscles\x00-\x00\x00\x00\x020\x00
⮑ \x04\x00\x00\x00abs\x00\x021\x00\x05\x00\x00\x00core\x00
⮑ \x022\x00\n\x00\x00\x00shoulders\x00\x00\x00\x03push-ups
⮑ \x00=\x00\x00\x00\x04muscles\x00/\x00\x00\x00\x020\x00\x06
⮑ \x00\x00\x00chest\x00\x021\x00\x07\x00\x00\x00biceps\x00
⮑ \x022\x00\x08\x00\x00\x00triceps\x00\x00\x00\x00\x03days
⮑ \x00\xc7\x00\x00\x00\x03rest-day\x00\x14\x00\x00\x00\x02
⮑ type\x00\x05\x00\x00\x00rest\x00\x00\x03workout-1\x00\x99
⮑ \x00\x00\x00\x02type\x00\x08\x00\x00\x00workout\x00\x04
⮑ segments\x00x\x00\x00\x00\x030\x00#\x00\x00\x00\x02type
⮑ \x00\x07\x00\x00\x00@plank\x00\x10seconds\x00<\x00\x00
⮑ \x00\x00\x031\x00!\x00\x00\x00\x02type\x00\x05\x00\x00\x00
⮑ rest\x00\x10seconds\x00\n\x00\x00\x00\x00\x032\x00&\x00\x00
⮑ \x00\x02type\x00\n\x00\x00\x00@push-ups\x00\x10seconds\x00<
⮑ \x00\x00\x00\x00\x00\x00\x00\x04schedule\x00\\\x00\x00\x00
⮑ \x020\x00\x0b\x00\x00\x00@workout-1\x00\x021\x00\n\x00\x00
⮑ \x00@rest-day\x00\x022\x00\n\x00\x00\x00@rest-day\x00\x023
⮑ \x00\x0b\x00\x00\x00@workout-1\x00\x024\x00\n\x00\x00\x00
⮑ @rest-day\x00\x00\x00\x00'
This produces a long byte sequence conforming to the BSON specification. In fact, when you compare it to the original JSON string, you’ll conclude that it’s actually longer! Despite using a compact binary representation, the serialized BSON data contains the extra fields mentioned earlier, which help speed up document queries. Unfortunately, they take up additional space.
While you can use BSON to serialize hierarchical data, you’re limited to a dozen basic data types that it supports. If you want to go beyond that—for example, to serialize a hierarchy of custom objects—then you need to use something else. Protocol Buffers is a good choice, which you’ll explore later when you delve into schema-based data serialization.
Serialize Tabular Data
Another popular data shape widely used in relational databases, spreadsheets, and data analysis is a two-dimensional table. Tabular data is a structured way of organizing and storing data in rows and columns, where each row represents a single record of information or a data point, and each column corresponds to a specific attribute or field of that record.
You’ll often work with tabular data when exploring a dataset using tools like pandas, Excel, or SQL. This data shape lends itself to storing and sharing data models between different systems, which is why databases can export or import their tables using formats like CSV. Tabular data is also frequently found in big data thanks to its role in efficiently processing large datasets.
There are two main approaches to arranging data in a tabular format, whose choice depends on how you plan to use your data and how it’s distributed:
| Row-Oriented | Column-Oriented | |
|---|---|---|
| Storage Space | Higher because columns of different types are stored together | Compact thanks to column-wise compression |
| Writing | Fast, especially when writing or updating whole records | Slow because a single record is scattered across columns |
| Reading | Optimized for reading all columns in a single record | Optimized for reading specific columns of many records |
| Querying | Slower because it always scans all columns | Fast, even when querying a few columns at a time |
| Examples | CSV, Apache Avro | Apache Parquet |
In a row-oriented layout, you keep all the values of a single record together. For instance, each line in a CSV document constitutes a stand-alone data record. This makes it quick to write or update the entire record at once. On the other hand, performing aggregate queries, such as finding the sum or average of data based on a single column across many rows, can be slower because you have to read through all the rows.
In contrast, a columnar layout ensures that all the values of a column are stored next to each other. This facilitates more efficient storage because of data locality that avoids unnecessary I/O operations. Moreover, the consecutive values share a common data type, which allows for their compression. As a result, querying by a subset of columns becomes significantly faster.
In this section, you’ll practice serializing tabular data using both layouts, including textual and binary data formats.
Textual Spreadsheets: CSV
For starters, why don’t you try the comma-separated values (CSV) file format? It’s arguably the most common data format out there. It’s a text-based, schemaless, and row-oriented serialization format suitable for tabular data like spreadsheets or database tables.
Although this format seems pretty straightforward, don’t be tempted to implement it yourself! It has a few dialects that hide surprising edge cases. Usually, you’re better off using either Python’s csv module or third-party packages like pandas or polars to read and write CSV files.
Say you wanted to dump a collection of users into a CSV file with the help of the csv module from the standard library in Python. Because the writer object exposed by that module expects each row to be a sequence of values, you can conveniently define your user as a named tuple. This will make it possible for you to pass an instance of the User class directly to the CSV writer without further fiddling.
Here’s what your User class might look like:
csv-demo/models.py
from datetime import datetime
from enum import StrEnum
from typing import NamedTuple

class Language(StrEnum):
    DE = "de"
    EN = "en"
    ES = "es"
    FR = "fr"
    IT = "it"

class User(NamedTuple):
    id: int
    name: str
    email: str
    language: Language
    registered_at: datetime
A user has five properties, which are a mix of built-in types, a standard library class, and a user-defined class. One of them is a datetime instance, and another one is a custom enumeration of language codes that you defined just above.
Next, you can populate a list of fake users while taking advantage of the Faker library to generate plausible values for testing:
csv-demo/models.py
import random
from datetime import datetime
from enum import StrEnum
from typing import NamedTuple

from faker import Faker

# ...

class User(NamedTuple):
    id: int
    name: str
    email: str
    language: Language
    registered_at: datetime

    @classmethod
    def fake(cls):
        language = random.choice(list(Language))
        generator = Faker(language)
        return cls(
            generator.pyint(),
            generator.name(),
            generator.email(),
            language,
            generator.date_time_this_year(),
        )
You’ve added a named constructor called .fake() to your class, which creates and returns a new instance with fake attribute values filled in. In it, you randomly choose the language to initialize the generator with and then use it to produce the respective values.
Later, you can import the User class in a Python REPL and call its new method in a list comprehension to generate fifty fake users:
>>> from models import User
>>> users = [User.fake() for _ in range(50)]
Each should look similar to this one:
User(
    id=3042,
    name='Anna Arellano Trujillo',
    email='almansaamarilis@example.org',
    language=<Language.ES: 'es'>,
    registered_at=datetime.datetime(2023, 5, 25, 9, 5, 42),
)
Notice how you populated the properties for each user with credible data reflecting the chosen language. For example, a user with 'ES' as their language code has a Spanish name. However, the generated numeric identifiers may not be globally unique.
Now, you can dump these fake users to a CSV file in one go by providing the corresponding list to the writer object’s .writerows() method:
>>> import csv

>>> with open("users.csv", mode="w", encoding="utf-8", newline="") as file:
...     writer = csv.writer(file)
...     writer.writerows(users)
...
Whenever you open a text file in Python, it’s a good practice to explicitly set the character encoding to ensure portability across the operating systems. Additionally, when working with CSV files, it’s recommended to disable the universal newline translation mechanism to avoid issues with quoting field values.
When you run this code, you should see a file named users.csv appear in your current working directory with content that looks like this:
1261,Anna Scott,jessica11@example.org,en,2023-04-04 05:13:12
2821,Steve Townsend,pamela65@example.net,en,2023-05-10 12:53:32
1449,Alderano Pagnotto,ermes07@example.org,it,2023-09-18 09:20:50
1825,Hortense Rocher,usalmon@example.org,fr,2023-06-11 14:17:17
6618,Adolfine Wernecke,salzliane@example.net,de,2023-04-24 15:11:38
4729,Horacio Egea Sarmiento,piriarte@example.com,es,2023-04-15 03:32:02
 ⋮
Great! You can share this file with your colleagues or import it into other software that supports the CSV format.
How about loading those users back into Python from the file that you’ve just created? To do so, you can use the corresponding reader object:
>>> with open("users.csv", mode="r", encoding="utf-8", newline="") as file:
...     reader = csv.reader(file)
...     next(reader)
...
['1261', 'Anna Scott', 'jessica11@example.org', 'en', '2023-04-04 05:13:12']
Here, you call the built-in next() function to take a peek at the first row in the CSV file by advancing the reader object, which happens to be a Python iterator. As you can see, each row is a list of strings, regardless of what the original data types were. Additionally, the order of fields in each row determines their meaning.
Alternatively, you can use a more specific DictReader instance to convert each row into a Python dictionary, where the keys correspond to the field names:
>>> with open("users.csv", mode="r", encoding="utf-8", newline="") as file:
...     reader = csv.DictReader(file, fieldnames=User._fields)
...     next(reader)
...
{
    'id': '1261',
    'name': 'Anna Scott',
    'email': 'jessica11@example.org',
    'language': 'en',
    'registered_at': '2023-04-04 05:13:12'
}
Because you haven’t included a column header in your CSV file, you must specify the field names by hand. In this case, you use the ._fields attribute of your named tuple.
To make your life just a little bit easier, you can write another class method in your User class to perform the necessary type conversions from strings:
csv-demo/models.py
# ...

class User(NamedTuple):
    # ...

    @classmethod
    def from_dict(cls, row_dict):
        transforms = {
            "id": int,
            "name": str.title,
            "language": Language,
            "registered_at": datetime.fromisoformat,
        }
        return cls(**{
            key: transforms.get(key, lambda x: x)(value)
            for key, value in row_dict.items()
        })
This method takes a dictionary of fields provided by DictReader as an argument, defines the transformation functions for select fields, and applies them in a dictionary comprehension before returning a new User instance. The lambda expression represents an identity function used as a default value in case there’s no transformation for the given key.
This is how you can use this new class method to load your users from a CSV file:
>>> with open("users.csv", mode="r", encoding="utf-8", newline="") as file:
...     reader = csv.DictReader(file, fieldnames=User._fields)
...     users = [User.from_dict(row_dict) for row_dict in reader]
...

>>> users[0]
User(
    id=1261,
    name='Anna Scott',
    email='jessica11@example.org',
    language=<Language.EN: 'en'>,
    registered_at=datetime.datetime(2023, 4, 4, 5, 13, 12),
)
You get a list of User instances filled with the expected types of values. Additionally, one of the transformations, str.title(), ensures that user names will always appear in the title case even when they aren’t stored that way in the file.
With that out of the way, it’s now time to look at serializing and deserializing your tabular data using a binary format. This can be especially helpful when you have a massive dataset and want to save disk space while improving the processing time.
Binary DataFrames: Parquet
Apache Parquet is yet another serialization format that’s widely used for representing tabular data. It’s binary, schema-based, and columnar, making it blazingly fast and space-efficient compared to CSV files. It enjoys native support in many cloud providers and libraries, including pandas and Dask. Plus, it integrates well with popular frameworks for distributed computing like Apache Spark and Apache Hadoop.
To work with Parquet files in Python, you must install the necessary libraries. For example, when using pandas, you have two options on the table:
While pandas comes with the high-level functions to interface with Parquet files, it lacks the underlying implementation by default. It’s one of the optional dependencies that provides the necessary logic. If you have both dependencies installed, then pandas prefers pyarrow’s implementation, but you can override this by specifying the engine parameter when reading or writing a DataFrame:
>>> import pandas as pd
>>> df1 = pd.read_parquet("/path/to/file")
>>> df2 = pd.read_parquet("/path/to/file", engine="fastparquet")
>>> df2.to_parquet("/path/to/another_file", engine="pyarrow")
In addition to using these libraries in conjunction with pandas, you can use them on their own:
>>> import pyarrow.parquet as pq
>>> table = pq.read_table("/path/to/file")
>>> df1 = table.to_pandas()

>>> import fastparquet
>>> pf = fastparquet.ParquetFile("/path/to/file")
>>> df2 = pf.to_pandas()

>>> df1.equals(df2)
True
In most cases, you should expect identical or similar results regardless of which engine you use. However, pyarrow has a few tricks up its sleeve that fastparquet currently lacks.
Note: When working with pyarrow directly, read_table() provides the high-level interface for quickly accessing the entire dataset stored in a Parquet file. If you need more control, then consider using the low-level ParquetFile data type to reveal the file’s metadata and leverage the format’s unique features.
One of the most powerful features of Parquet that pyarrow exposes is row filtering, also known as predicate pushdown filtering, which you can apply when reading the file. This has a significant impact on performance, memory use, and network bandwidth, as it lets you request only a small subset of rows from a large dataset before reading them into memory for further processing.
For example, assuming you have a Parquet file equivalent to the CSV counterpart that you worked with in the last section, you can cherry-pick users whose language is French:
>>> import pandas as pd
>>> df = pd.read_parquet(
...     "users.parquet",
...     filters=[("language", "=", "fr")],
...     engine="pyarrow"
... )
>>> df.head()
     id                      name  ... language        registered_at
0  9875           Aurélie Foucher  ...       fr  2023-06-27 00:47:34
1  7269  Jeannine-Josette Clément  ...       fr  2023-05-10 13:23:11
2  4887   Richard Albert-Ollivier  ...       fr  2023-03-08 17:29:38
3  8494    Bertrand Boulay-Brunel  ...       fr  2023-05-10 23:13:19
4  7133            Hélène Guillet  ...       fr  2023-02-27 23:05:35

[5 rows x 5 columns]
By specifying the predicate expression through the filters parameter, you can skip the majority of data stored in your file. Note that this only works as intended with pyarrow configured as the Parquet engine in pandas. Otherwise, the filter may fail to apply, or it may only work partially.
Another great feature of any columnar data format, including Parquet, is column pruning or projection. To further improve your performance, you can specify which columns to read, ignoring all the rest:
>>> df = pd.read_parquet(
...     "users.parquet",
...     filters=[("language", "=", "fr")],
...     columns=["id", "name"],
...     engine="pyarrow"
... )
>>> df.head()
     id                      name
0  9875           Aurélie Foucher
1  7269  Jeannine-Josette Clément
2  4887   Richard Albert-Ollivier
3  8494    Bertrand Boulay-Brunel
4  7133            Hélène Guillet

[5 rows x 2 columns]
Because the data is stored in a column-oriented way, skipping uninteresting columns becomes straightforward. It’s not uncommon to deal with really big datasets that contain hundreds of columns or even more. Focusing on the relevant ones can drastically reduce the computational load.
As you learned earlier, columnar formats compress better than their row-based counterparts, and Parquet is no exception. When you dump a DataFrame to a Parquet file, pandas applies compression by default. You can optionally choose one of several compression algorithms that pandas supports.
Parquet is a schema-based data serialization format because it retains the column names and their types. This eliminates the risk of incorrect type inference or guessing, which often plagues schemaless data serialization formats like CSV. While Parquet supports only a handful of primitive types, which are mostly numerical, it builds more sophisticated logical types on top of them. For instance, strings are merely annotated byte arrays.
To view the schema of a Parquet file, you can use either of the engine libraries:
>>> import pyarrow.parquet as pq
>>> pf = pq.ParquetFile("users.parquet")
>>> pf.schema
<pyarrow._parquet.ParquetSchema object at 0x7f212cba42c0>
required group field_id=-1 schema {
  optional int64 field_id=-1 id;
  optional binary field_id=-1 name (String);
  optional binary field_id=-1 email (String);
  optional binary field_id=-1 language (String);
  optional int64 field_id=-1 registered_at (
    Timestamp(
        isAdjustedToUTC=false,
        timeUnit=nanoseconds,
        is_from_converted_type=false,
        force_set_converted_type=false
    ));
}
>>> pf.schema.to_arrow_schema()
id: int64
name: string
email: string
language: dictionary<values=string, indices=int32, ordered=0>
registered_at: timestamp[ns]
-- schema metadata --
pandas: '{"index_columns":
⮑ [{"kind": "range", "name": null, "start": 0, "' + 867

>>> import fastparquet
>>> pf = fastparquet.ParquetFile("users.parquet")
>>> print(pf.schema)
- schema: REQUIRED
| - id: INT64, OPTIONAL
| - name: BYTE_ARRAY, STRING, UTF8, OPTIONAL
| - email: BYTE_ARRAY, STRING, UTF8, OPTIONAL
| - language: BYTE_ARRAY, STRING, UTF8, OPTIONAL
  - registered_at: INT64, TIMESTAMP[NANOS], OPTIONAL
In any case, you can see the column names followed by their types, optional annotations, and whether they can take empty values.
As a column-oriented data format, Parquet makes schema evolution possible. You can add, update, or delete columns without having to rewrite the entire file from scratch. At the same time, your data remains immutable, as you can’t easily change a single value in an existing file without saving a new one. This can help prevent you from introducing sneaky bugs by accidentally modifying data without realizing it.
Note: The Parquet format specification relies on Apache Thrift to define its building blocks. You can check out the official type definitions for more details.
While pandas itself doesn’t give you direct control over the schema of a Parquet file, you can manage it to some extent by using one of the underlying engine libraries. For example, you may convert your DataFrame to a pyarrow table and configure its schema accordingly.
In the next section, you’ll learn about other data serialization formats that give you such control.
Serialize Schema-Based Data
Although you can use schemas with text-based formats like XML, JSON, and YAML, their primary use case concerns data validation rather than serialization.
For example, you can validate your XML documents in Python against one of the XML schema formats, including DTD and XSD, using the third-party lxml library. With the jsonschema package, you’ll be able to validate JSON, although indirectly, through an already-deserialized Python object. Because of this, you can reuse the same library to validate objects deserialized from YAML. After all, YAML is a superset of JSON.
As for using the schema to generate Python code responsible for automated data serialization, you don’t have many options regarding the mentioned formats. There used to be tools that would generate models from an XML schema, but they’re obsolete and haven’t been maintained for years. Today, you can still bind XML data to Python objects with lxml.objectify, but it’s a semiautomatic approach.
That being said, some data serialization formats always require a schema. They use it not just for validation or documentation purposes but also to facilitate the serialization itself. Most of these schema-based formats are binary, leveraging an interface description language (IDL) of some sort to define the structure of your data. It allows them to efficiently store and transmit data, making them ideal for high-performance systems.
Additionally, you can use their schema to generate code stubs for various programming languages that will automatically handle the serialization and deserialization for you. This streamlines the development process and ensures data integrity across different services that must exchange serialized messages with each other.
In this section, you’re going to look at a few popular schema-based binary serialization formats. You’ll use the User model defined in an earlier section, which you can download along with other supporting materials by clicking the link below:
Get Your Code: Click here to download the free sample code that shows you how to serialize your data with Python.
Big Data: Apache Avro
Apache Avro is one of the most common data serialization formats in Apache Hadoop and Apache Kafka, among many other contexts. The first is a framework used for big data analytics, while the second is a distributed event streaming platform originally developed at LinkedIn.
Fun Fact: The Avro data serialization format borrowed its name and logo from a British aircraft manufacturer A. V. Roe and Company, which operated between 1910 and 1963.
The format ticks all the boxes for large-scale data processing and real-time communication systems, including:
- Efficiency: As a binary format, it’s compact and quick to process, whether you need to persist your data or send it over the wire.
- Data Consistency: Thanks to always using a schema for serializing and deserializing data, it reduces the risk of data corruption or misinterpretation.
- Self-Explanation: Every message embeds the corresponding schema, so consumers don’t need to know it ahead of time to correctly interpret the payload. At the same time, they can optionally receive the schema separately while processing schemaless messages to improve performance further.
- Backward Compatibility: Because the format has excellent support for schema evolution, you can safely and seamlessly change the structure of your data over time without breaking anything.
- Language Independence: The format supports a range of programming languages, making it a good fit for distributed multi-language computing environments.
In a way, Avro is similar to Parquet. They’re both schema-based binary formats used in the Hadoop ecosystem, but they serve slightly different purposes and have different strengths and weaknesses. The biggest difference is how they organize data.
Parquet is column-oriented, while Avro is row-oriented, making it faster for write-centric operations where you must append data in real time. On the other hand, Parquet is more suitable for query-heavy analytics due to the efficient vectorization that it enables. Additionally, Avro supports complex data types, requiring you to define a detailed schema yourself, while Parquet usually infers its few basic column types directly from your data.
Avro closely resembles other binary serialization formats, including Protocol Buffers, which you’ll learn about in the next section. They all achieve similar goals. However, Avro differentiates itself by offering unique features, like:
- Support for Dynamic Languages: You can consume an Avro message at runtime without having to generate the serialization code tailored to the specific schema beforehand, although you can if you want to. It’s an optional optimization step, which makes sense in compiled and statically typed languages like Java. Because of that, Avro’s official binding for Python doesn’t support code generation from a schema.
- Symbolic Field Names: Avro schemas contain symbolic field names, whereas some other formats require that you manually assign numeric identifiers to those fields. Operating on numbers can get in the way when you try to resolve differences between the evolved versions of your schema.
Apart from the data serialization and storage scenarios, you can use Avro to facilitate remote procedure calls (RPCs) by specifying a custom protocol and messages of your remote interface. Check out the Avro RPC Quick Start guide to learn how you can use Avro to overcome programming language barriers for distributed communication. Note that this project hasn’t received updates for several years, so it may not reflect the current practices.
Note: Don’t confuse data serialization formats with the architectural styles of your API, such as RPC, SOAP, REST, or GraphQL. You can use different data formats, such as JSON or Avro, independently from your API’s architecture.
GraphQL gives your clients the most granular control over the specific data to query, which is preferable when you don’t know how they might want to access your data. REST is slightly more coarse, limiting you to thinking of your data in terms of resources. Finally, RPC is the most specific of them all but also the most efficient.
When defining a schema or an RPC interface, you typically reach for the widely used JSON data format, which must adhere to the Avro specification. Additionally, if you’re only interested in specifying an RPC interface, then you can use Avro IDL. It’s an alternative format with a syntax resembling a programming language, which may appeal to users experienced with traditional interface description languages in frameworks like Protocol Buffers.
To serialize Python dictionaries as Avro records or the other way around, you need a schema and a third-party library. The official avro package is implemented in pure Python, making it relatively slow. If you’re looking for something snappier, then consider installing the fastavro library, which offers speeds comparable to its Java counterpart. It leverages Cython to generate C extension modules for much better performance.
Here’s an Avro schema corresponding to the User class that you defined earlier when working with the CSV format:
avro-demo/user.avsc
{
    "name": "User",
    "type": "record",
    "fields": [
        {"name": "id", "type": "long"},
        {"name": "name", "type": "string"},
        {"name": "email", "type": "string"},
        {
            "name": "language",
            "type": {
                "name": "Language",
                "type": "enum",
                "symbols": ["de", "en", "es", "fr", "it"]
            }
        },
        {
            "name": "registered_at",
            "type": {"type": "long", "logicalType": "timestamp-millis"}
        }
    ]
}
This JSON document defines an Avro record consisting of a 64-bit integer identifier followed by two string fields, a custom enumeration of language codes, and a timestamp. Assuming that you can load this schema from a local file named user.avsc and you can import the models.User class, this is how you can dump a few fake users to an object container file:
>>> from fastavro.schema import load_schema
>>> from fastavro import writer
>>> from models import User

>>> users = [User.fake() for _ in range(5)]
>>> with open("users.avro", mode="wb") as file:
...     schema = load_schema("user.avsc")
...     writer(file, schema, [user._asdict() for user in users])
...
Notice that writer() expects an iterable of Python dictionaries, so you call ._asdict() in a list comprehension to convert your named tuples into plain dictionaries.
Reading the resulting users.avro file is even more straightforward. Because the file already contains the schema, you don’t need to load it yourself. Each binary record gets deserialized into a Python dictionary, which you can unpack into the User class constructor with a double asterisk (**):
>>> from fastavro import reader
>>> from models import User

>>> with open("users.avro", mode="rb") as file:
...     for record in reader(file):
...         print(User(**record))
...
User(
    id=9103,
    name='Barbara Barsanti',
    email='paulinatedesco@example.org',
    language='it',
    registered_at=datetime.datetime(2023, 1, 24, 14, 54, 31,
tzinfo=datetime.timezone.utc)
)
⋮
The timestamp field is correctly converted to a Python datetime instance with a UTC time zone, but the language enumeration remains a string. If you don’t prefer that, then you can customize the deserialization by overriding the language key accordingly:
>>> from fastavro import reader
>>> from models import Language, User

>>> with open("users.avro", mode="rb") as file:
...     for record in reader(file):
...         print(User(**record | {
...             "language": Language(record["language"])
...         }))
...
User(
    id=9103,
    name='Barbara Barsanti',
    email='paulinatedesco@example.org',
    language=<Language.IT: 'it'>,
    registered_at=datetime.datetime(2023, 1, 24, 14, 54, 31,
tzinfo=datetime.timezone.utc)
)
⋮
Here, you use the pipe operator (|) to perform a union of two dictionaries. The one on the right, which has your converted Language instance, replaces the corresponding key-value pairs in the dictionary on the left.
Overall, Avro is a great data interchange format for big data analytics and distributed systems, which is why some of the most popular frameworks choose it by default. However, if you need an even leaner and faster data serialization format that can handle high-speed data streams and real-time processing, then consider alternatives such as Apache Thrift or Protocol Buffers. You’ll learn about the latter now.
Microservices: Protocol Buffers
Protocol Buffers, or Protobuf for short, is another binary, row-oriented, schema-based, and language-neutral data serialization format for structured data. It gained popularity when Google made it open source in 2008 for public use. Nowadays, many organizations use Protocol Buffers to efficiently transmit data between a large number of heterogeneous microservices based on different technology stacks.
Note: Protocol Buffers is the default data interchange format in microservices built with gRPC, a Google framework for remote procedure calls that uses HTTP/2 for transport.
Unlike Avro, the Protocol Buffers format requires a compiler to translate your schema into language-specific bindings that you can use straightaway in your application. The resulting code is optimized for speed and tailored to handle the serialization and deserialization of your data automatically. That’s what makes the format so compact, as the messages contain only raw binary data without much metadata to explain their structure.
When you choose Python as the compiler’s output, the generated code will depend on the third-party protobuf package, which you can find on PyPI. But first, you need to install the Protocol Buffers schema compiler (protoc), which is implemented in C++. You have three options to get it working on your computer:
- Compiling the C++ source code on your local machine
- Downloading a pre-built binary release for your platform
- Installing the corresponding package for your operating system
The third option is probably the quickest and most straightforward. Depending on your operating system, you can issue one of the following commands in your terminal:
To confirm that the installation was successful, type protoc at your command prompt to check if a help message appears on the screen.
Next, you can specify a schema using Protobuf’s interface description language. You’ll translate your existing Avro schema for the user object from an earlier section into the corresponding protocol:
users.proto
 1syntax = "proto3";
 2
 3package com.realpython;
 4
 5import "google/protobuf/timestamp.proto";
 6
 7enum Language {
 8  DE = 0;
 9  EN = 1;
10  ES = 2;
11  FR = 3;
12  IT = 4;
13}
14
15message User {
16  int64 id = 1;
17  string name = 2;
18  string email = 3;
19  Language language = 4;
20  google.protobuf.Timestamp registered_at = 5;
21}
22
23message Users {
24  repeated User users = 1;
25}
Have a look at your users.proto file line by line:
- Line 1 states that the rest of the file should be interpreted using version 3 of the Protocol Buffers syntax.
- Line 3 sets an optional namespace for your definitions, which might be necessary in languages like Java.
- Line 5 imports the
Timestamptype that Protocol Buffers provides. - Lines 7 to 13 specify a custom
Languageenumeration. Depending on how you want to scope your types, you could nest this enumeration under theUsermessage type, for example. - Lines 15 to 21 define a message type named
Userwith five fields. Each field has a type and a unique numeric identifier, which must start at one—in contrast to zero-indexed enumeration members. Make sure to read the official documentation for the recommended practices around field numbering! - Lines 23 to 25 define another message type,
Users, which holds a sequence of repeatedUsermessages.
When using Protocol Buffers with compiled languages, you can integrate the schema compilation step into your normal build process using tools like Maven. With Python, you typically run the protoc command by hand to generate the Python code based on your interface description file:
$ protoc --python_out=. --pyi_out=. users.proto
Both the --python_out and --pyi_out options indicate the target directory paths where the generated files should be saved. On Unix-based operating systems, a dot (.) indicates the current working directory.
When you run the above command, two new files pop up:
users_pb2.pyusers_pb2.pyi
Their names end with the _pb2 suffix regardless of which Protocol Buffers syntax you used, which can be a bit confusing, so just ignore that. Now, why do you need two files?
The short answer is to stop your IDE from complaining about the missing declarations of dynamically generated classes. By specifying the --pyi_out option, you tell the Protobuf’s compiler to produce the corresponding stub files (.pyi) with type hints.
While most of the compiler’s target languages are statically typed, Python is among the few that are dynamically typed. Nevertheless, the generated Python code is a notable exception in the way that it handles the data serialization. The compiler turns your human-readable interface description into a binary form, feeds it into the so-called descriptor, and works with a metaclass provided by protobuf to build a Python class at runtime.
Admittedly, this is odd and a bit unfortunate. On top of that, the generated Python code shows its age, looking as if a C# programmer wrote it, ignoring PEP 8 and the common Python naming conventions. On the plus side, it doesn’t matter all that much because you won’t be looking at or editing the generated code, which is supposed to just work.
Here’s how you can use your new dynamically synthesized class to serialize users with Protocol Buffers:
>>> from users_pb2 import Language as LanguageDAO
>>> from users_pb2 import User as UserDAO
>>> from users_pb2 import Users as UsersDAO

>>> from models import User
>>> users = [User.fake() for _ in range(5)]

>>> users_dao = UsersDAO()
>>> for user in users:
...     user_dao = UserDAO()
...     user_dao.id = user.id
...     user_dao.name = user.name
...     user_dao.email = user.email
...     user_dao.language = LanguageDAO.Value(user.language.name)
...     user_dao.registered_at.FromDatetime(user.registered_at)
...     users_dao.users.append(user_dao)
...
>>> buffer = users_dao.SerializeToString()
>>> print(buffer)
b'\n3\x08\x15\x12\x12Frau Adeline Dobes\x1a\x13
⮑ qhoevel@example.org*\x06\x08\xdc\xce\xe1\xa7
⮑ \x06\n6\x08\xf8 \x12\x0fBeata M\xc3\xbclichen
⮑ \x 1a\x18anatoljessel@example.net*\x06\x08\xd9
⮑ \x98\xe8\x9f\x06\n9\x08\xf68\x12\rBrittany Wall
⮑ \x1a\x1bchristineharris@example.com \x01*\x06
⮑ \x0 8\x8a\xe5\xae\xa4\x06\n6\x08\xdd%\x12\x0e
⮑ William Cousin\x1a\x17blancjoseph@example.net
⮑ \x03*\x06\x08\xe7\x8f\x8d\xa0\x06\nF\x08\xe0\x02
⮑ \x1 2\x17Filippa Mennea-Proietti\x1a\x1epacelli
⮑ piergiorgio@example.net \x04*\x06\x08\x92\xae
⮑ \xc5\x9d\x06'
During importing, you rename the generated class from User to UserDAO, which stands for data access object, to avoid a naming conflict with your existing model class. Alternatively, you could’ve chosen a different name for the message in your users.proto file.
The interface of the data access classes that the compiler generated resembles old-school Java or C#. It could’ve been improved had the compiler taken advantage of modern Python features, such as data classes. The current interface won’t save you from issues like temporal coupling, for example, when you try serializing a UserDAO instance too early. But you can also pass the field values to the initializer method all at once.
Other than that, the method naming is slightly misleading because .SerializeToString() returns a sequence of bytes instead of the suggested Python string. This is likely reminiscent of strings in Python 2, which were essentially byte sequences. Similarly, the method responsible for deserialization, .ParseFromString(), also expects bytes:
>>> from models import Language

>>> users_dao = UsersDAO()
>>> users_dao.ParseFromString(buffer)
283
>>> users = [
...     User(
...         id=user_dao.id,
...         name=user_dao.name,
...         email=user_dao.email,
...         language=list(Language)[user_dao.language],
...         registered_at=user_dao.registered_at.ToDatetime()
...     )
...     for user_dao in users_dao.users
... ]

>>> users[0]
User(
    id=4725,
    name='Janko Buchholz',
    email='eigenwilligbianca@example.com',
    language=<Language.DE: 'de'>,
    registered_at=datetime.datetime(2023, 4, 30, 4, 36, 38)
)
The highlighted method returns the number of bytes read from the binary buffer and updates the internal state of a new users_dao object. In the code block above, you use a list comprehension to iterate over the .users attribute of the deserialized data access object, collecting information into a new models.User instance. Notice how the user attributes are represented with the correct data types.
Protocol Buffers is a compact and efficient data serialization format that supports multiple programming languages, making it a perfect choice for interconnecting microservices. Although using it in Python may feel antiquated due to its Java-esque interface, the underlying protocol is quite elegant. You can read more to learn how it encodes data at the bit level if you’re interested. Maybe you can even write your own Pythonic implementation!
Conclusion
That was a long journey, so keep this tutorial handy as a reference guide whenever you need to recall any of the concepts or techniques that you learned about.
At this point, you’re well equipped to handle data serialization in your Python projects. You have a solid understanding of the underlying theory and can implement it in practice. You know about the different data format categories, data shapes, and use cases that influence your choice of the serialization format. Additionally, you can choose the best Python library that suits your data serialization needs.
In this tutorial, you learned how to:
- Choose a suitable data serialization format
- Take snapshots of stateful Python objects
- Send executable code over the wire for distributed processing
- Adopt popular data formats for HTTP message payloads
- Serialize hierarchical, tabular, and other shapes of data
- Employ schemas for validating and evolving the structure of data
Have you experimented with any unconventional data formats in your projects? Share your experiences and insights in the comments below!
Take the Quiz: Test your knowledge with our interactive “Serialize Your Data With Python” quiz. You’ll receive a score upon completion to help you track your learning progress:
Interactive Quiz
Serialize Your Data With PythonPractice serializing Python objects to JSON, pickle, CSV, Parquet, and Protocol Buffers, and learn when to pick each format.
Get Your Code: Click here to download the free sample code that shows you how to serialize your data with Python.


