Invented over half a century ago, the hash table is a classic data structure that has been fundamental to programming. To this day, it helps solve many real-life problems, such as indexing database tables, caching computed values, or implementing sets. It often comes up in job interviews, and Python uses hash tables all over the place to make name lookups almost instantaneous.
Even though Python comes with its own hash table called dict, it can be helpful to understand how hash tables work behind the curtain. A coding assessment may even task you with building one. This tutorial will walk you through the steps of implementing a hash table from scratch as if there were none in Python. Along the way, you’ll face a few challenges that’ll introduce important concepts and give you an idea of why hash tables are so fast.
In addition to this, you’ll get a hands-on crash course in test-driven development (TDD) and will actively practice it while building your hash table in a step-by-step fashion. You’re not required to have any prior experience with TDD, but at the same time, you won’t get bored even if you do!
Take the Quiz: Test your knowledge with our interactive “Build a Hash Table in Python With TDD” quiz. You’ll receive a score upon completion to help you track your learning progress:
Interactive Quiz
Build a Hash Table in Python With TDDLearn how Python hashing spreads values into buckets and powers hash tables. Practice collisions, uniform distribution, and test-driven development.
In this tutorial, you’ll learn:
- How a hash table differs from a dictionary
- How you can implement a hash table from scratch in Python
- How you can deal with hash collisions and other challenges
- What the desired properties of a hash function are
- How Python’s
hash()works behind the scenes
It’ll help if you’re already familiar with Python dictionaries and have basic knowledge of object-oriented programming principles. To get the complete source code and the intermediate steps of the hash table implemented in this tutorial, follow the link below:
Source Code: Click here to download the source code that you’ll use to build a hash table in Python.
Get to Know the Hash Table Data Structure
Before diving deeper, you should familiarize yourself with the terminology because it can get slightly confusing. Colloquially, the term hash table or hash map is often used interchangeably with the word dictionary. However, there’s a subtle difference between the two concepts as the former is more specific than the latter.
Hash Table vs Dictionary
In computer science, a dictionary is an abstract data type made up of keys and values arranged in pairs. Moreover, it defines the following operations for those elements:
- Add a key-value pair
- Delete a key-value pair
- Update a key-value pair
- Find a value associated with the given key
In a sense, this abstract data type resembles a bilingual dictionary, where the keys are foreign words, and the values are their definitions or translations to other languages. But there doesn’t always have to be a sense of equivalence between keys and values. A phone book is another example of a dictionary, which combines names with the corresponding phone numbers.
Note: Anytime you map one thing to another or associate a value with a key, you’re essentially using a kind of a dictionary. That’s why dictionaries are also known as maps or associative arrays.
Dictionaries have a few interesting properties. One of them is that you can think of a dictionary as a mathematical function that projects one or more arguments to exactly one value. The direct consequences of that fact are the following:
- Only Key-Value Pairs: You can’t have a key without the value or the other way around in a dictionary. They always go together.
- Arbitrary Keys and Values: Keys and values can belong to two disjoint sets of the same or separate types. Both keys and values may be almost anything, such as numbers, words, or even pictures.
- Unordered Key-Value Pairs: Because of the last point, dictionaries don’t generally define any order for their key-value pairs. However, that might be implementation-specific.
- Unique Keys: A dictionary can’t contain duplicate keys, because that would violate the definition of a function.
- Non-Unique Values: The same value can be associated with many keys, but it doesn’t have to.
There are related concepts that extend the idea of a dictionary. For example, a multimap lets you have more than one value per key, while a bidirectional map not only maps keys to values but also provides mapping in the opposite direction. However, in this tutorial, you’re only going to consider the regular dictionary, which maps exactly one value to each key.
Here’s a graphical depiction of a hypothetical dictionary, which maps some abstract concepts to their corresponding English words:

It’s a one-way map of keys to values, which are two completely different sets of elements. Right away, you can see fewer values than keys because the word bow happens to be a homonym with multiple meanings. Conceptually, this dictionary still contains four pairs, though. Depending on how you decided to implement it, you could reuse repeated values to conserve memory or duplicate them for simplicity.
Now, how do you code such a dictionary in a programming language? The right answer is you don’t, because most modern languages come with dictionaries as either primitive data types or classes in their standard libraries. Python ships with a built-in dict type, which already wraps a highly optimized data structure written in C so that you don’t have to write a dictionary yourself.
Python’s dict lets you perform all the dictionary operations listed at the beginning of this section:
>>> glossary = {"BDFL": "Benevolent Dictator For Life"}
>>> glossary["GIL"] = "Global Interpreter Lock"  # Add
>>> glossary["BDFL"] = "Guido van Rossum"  # Update
>>> del glossary["GIL"]  # Delete
>>> glossary["BDFL"]  # Search
'Guido van Rossum'
>>> glossary
{'BDFL': 'Guido van Rossum'}
With the square bracket syntax ([ ]), you can add a new key-value pair to a dictionary. You can also update the value of or delete an existing pair identified by a key. Finally, you can look up the value associated with the given key.
That said, you may ask a different question. How does the built-in dictionary actually work? How does it map keys of arbitrary data types, and how does it do it so quickly?
Finding an efficient implementation of this abstract data type is known as the dictionary problem. One of the most well-known solutions takes advantage of the hash table data structure that you’re about to explore. However, note that it isn’t the only way to implement a dictionary in general. Another popular implementation builds on top of a red-black tree.
Hash Table: An Array With a Hash Function
Have you ever wondered why accessing sequence elements in Python works so quickly, regardless of which index you request? Say you were working with a very long string of characters, like this one:
>>> import string
>>> text = string.ascii_uppercase * 100_000_000

>>> text[:50]  # Show the first 50 characters
'ABCDEFGHIJKLMNOPQRSTUVWXYZABCDEFGHIJKLMNOPQRSTUVWX'

>>> len(text)
2600000000
There are 2.6 billion characters from repeating ASCII letters in the text variable above, which you can count with Python’s len() function. Yet, getting the first, middle, last, or any other character from this string is equally quick:
>>> text[0]  # The first element
'A'

>>> text[len(text) // 2]  # The middle element
'A'

>>> text[-1]  # The last element, same as text[len(text) - 1]
'Z'
The same is true for all sequence types in Python, such as lists and tuples. How come? The secret to such a blazing speed is that sequences in Python are backed by an array, which is a random-access data structure. It follows two principles:
- The array occupies a contiguous block of memory.
- Every element in the array has a fixed size known up front.
When you know the memory address of an array, which is called the offset, then you can get to the desired element in the array instantly by calculating a fairly straightforward formula:

You start at the array’s offset, which is also the address of the array’s first element, with the index zero. Next, you move forward by adding the required number of bytes, which you get by multiplying the element size by the target element’s index. It always takes the same amount of time to multiply and add a few numbers together.
Note: Unlike arrays, Python’s lists can contain heterogeneous elements of varying sizes, which would break the above formula. To mitigate this, Python adds another level of indirection by introducing an array of pointers to memory locations rather than storing values directly in the array:
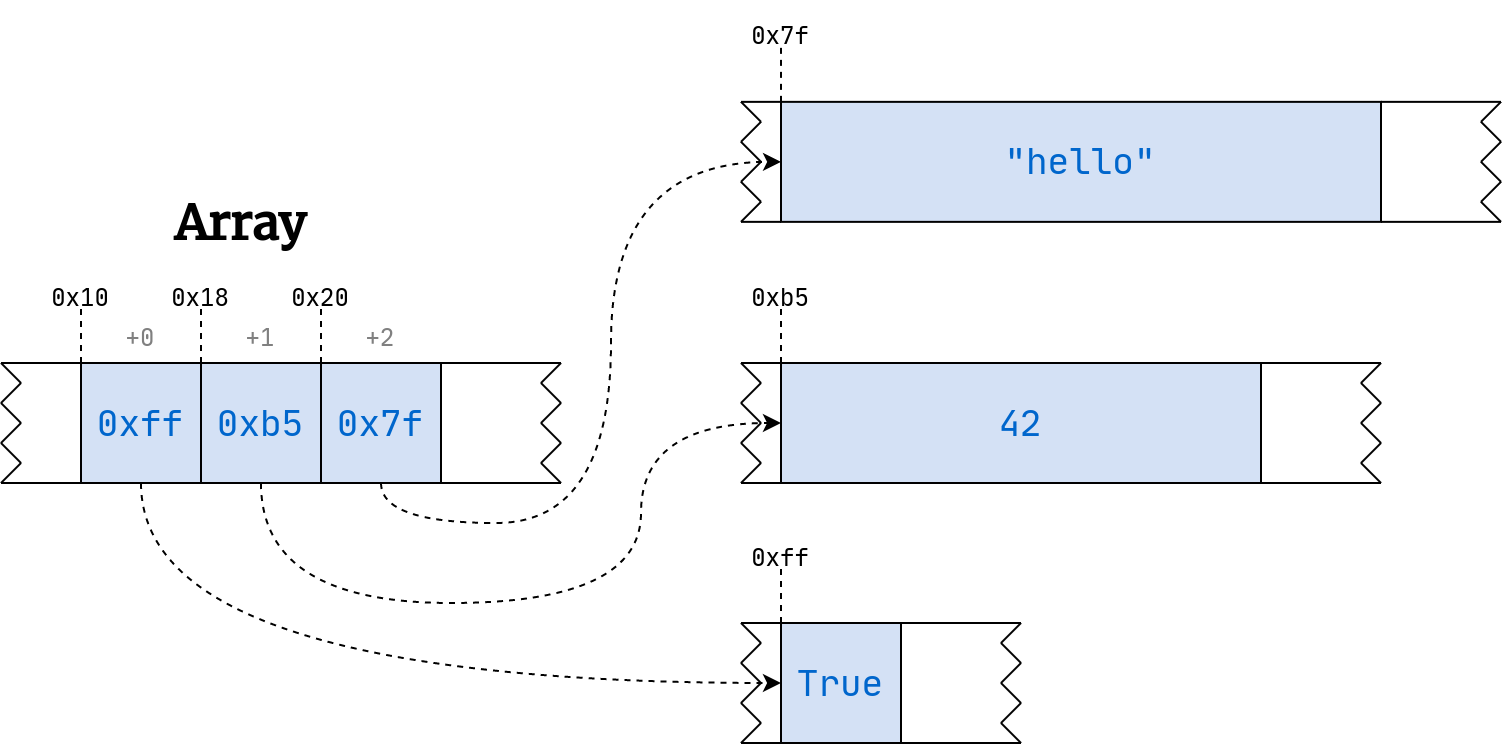
Pointers are merely integer numbers, which always take up the same amount of space. It’s customary to denote memory addresses using the hexadecimal notation. Python and some other languages prefix such numbers with 0x.
Okay, so you know that finding an element in an array is quick, no matter where that element is physically located. Can you take the same idea and reuse it in a dictionary? Yes!
Hash tables get their name from a trick called hashing, which lets them translate an arbitrary key into an integer number that can work as an index in a regular array. So, instead of searching a value by a numeric index, you’ll look it up by an arbitrary key without a noticeable performance loss. That’s neat!
In practice, hashing won’t work with every key, but most built-in types in Python can be hashed. If you follow a few rules, then you’ll be able to create your own hashable types too. You’ll learn more about hashing in the next section.
Understand the Hash Function
A hash function performs hashing by turning any data into a fixed-size sequence of bytes called the hash value or the hash code. It’s a number that can act as a digital fingerprint or a digest, usually much smaller than the original data, which lets you verify its integrity. If you’ve ever fetched a large file from the Internet, such as a disk image of a Linux distribution, then you may have noticed an MD5 or SHA-2 checksum on the download page.
Aside from verifying data integrity and solving the dictionary problem, hash functions help in other fields, including security and cryptography. For example, you typically store hashed passwords in databases to mitigate the risk of data leaks. Digital signatures involve hashing to create a message digest before encryption. Blockchain transactions are another prime example of using a hash function for cryptographic purposes.
Note: A cryptographic hash function is a special type of hash function that must meet a few additional requirements. In this tutorial, you’ll only encounter the most basic form of the hash function used in the hash table data structure, though.
While there are many hashing algorithms, they all share a few common properties that you’re about to discover in this section. Implementing a good hash function correctly is a difficult task that may require the understanding of advanced math involving prime numbers. Fortunately, you don’t usually need to implement such an algorithm by hand.
Python comes with a built-in hashlib module, which provides a variety of well-known cryptographic hash functions, as well as less secure checksum algorithms. The language also has a global hash() function, used primarily for quick element lookup in dictionaries and sets. You can study how it works first to learn about the most important properties of hash functions.
Examine Python’s Built-in hash()
Before taking a stab at implementing a hash function from scratch, hold on for a moment and analyze Python’s hash() to distill its properties. This will help you understand what problems are involved when designing a hash function of your own.
Note: The choice of a hash function can dramatically impact your hash table’s performance. Therefore, you’ll rely on the built-in hash() function when building a custom hash table later on in this tutorial. Implementing a hash function in this section only serves as an exercise.
For starters, try your hand at calling hash() on a few data type literals built into Python, such as numbers and strings, to see how the function behaves:
>>> hash(3.14)
322818021289917443

>>> hash(3.14159265358979323846264338327950288419716939937510)
326490430436040707

>>> hash("Lorem")
7677195529669851635

>>> hash("Lorem ipsum dolor sit amet, consectetur adipisicing elit,"
... "sed do eiusmod tempor incididunt ut labore et dolore magna"
... "aliqua. Ut enim ad minim veniam, quis nostrud exercitation"
... "ullamco laboris nisi ut aliquip ex ea commodo consequat."
... "Duis aute irure dolor in reprehenderit in voluptate velit"
... "esse cillum dolore eu fugiat nulla pariatur. Excepteur sint"
... "occaecat cupidatat non proident, sunt in culpa qui officia"
... "deserunt mollit anim id est laborum.")
1107552240612593693
There are already several observations that you can make by looking at the result. First, the built-in hash function may return different values on your end for some of the inputs shown above. While the numeric input always seems to produce an identical hash value, the string most likely doesn’t. Why is that? It may seem like hash() is a non-deterministic function, but that couldn’t be further from the truth!
When you call hash() with the same argument within your existing interpreter session, then you’ll keep getting the same result:
>>> hash("Lorem")
7677195529669851635

>>> hash("Lorem")
7677195529669851635

>>> hash("Lorem")
7677195529669851635
That’s because hash values are immutable and don’t change throughout an object’s lifetime. However, as soon as you exit Python and start it again, then you’ll almost certainly see different hash values across Python invocations. You can test this by trying the -c option to run a one-liner script in your terminal:
That’s expected behavior, which was implemented in Python as a countermeasure against a Denial-of-Service (DoS) attack that exploited a known vulnerability of hash functions in web servers. Attackers could abuse a weak hash algorithm to deliberately create so-called hash collisions, overloading the server and making it inaccessible. Ransom was a typical motive for the attack as most victims made money through an uninterrupted online presence.
Today, Python enables hash randomization by default for some inputs, such as strings, to make the hash values less predictable. This makes hash() a bit more secure and the attack more difficult. You can disable randomization, though, by setting a fixed seed value through the PYTHONHASHSEED environment variable, for example:
Now, each Python invocation yields the same hash value for a known input. This can help in partitioning or sharing data across a cluster of distributed Python interpreters. Just be careful and understand the risks involved in disabling hash randomization. All in all, Python’s hash() is indeed a deterministic function, which is one of the most fundamental features of the hash function.
Additionally, hash() seems fairly universal as it takes arbitrary inputs. In other words, it takes values of various types and sizes. The function accepts strings and floating-point numbers regardless of their length or magnitude without complaining. In fact, you can calculate a hash value of more exotic types too:
>>> hash(None)
5904497366826

>>> hash(hash)
2938107101725

>>> class Person:
...     pass
...

>>> hash(Person)
5904499092884

>>> hash(Person())
8738841746871

>>> hash(Person())
8738841586112
Here, you called the hash function on Python’s None object, the hash() function itself, and even a custom Person class with a few of its instances. That said, not all objects have a corresponding hash value. The hash() function will raise an exception if you try calling it against one of those few objects:
>>> hash([1, 2, 3])
Traceback (most recent call last):
  File "<stdin>", line 1, in <module>
TypeError: unhashable type: 'list'
The input’s underlying type will determine whether or not you can calculate a hash value. In Python, instances of built-in mutable types—like lists, sets, and dicts—aren’t hashable. You’ve gotten a hint of why that is, but you’ll learn more in a later section. For now, you can assume that most data types should work with a hash function in general.
Dive Deeper Into Python’s hash()
Another interesting characteristic of hash() is that it always produces a fixed-size output no matter how big the input was. In Python, the hash value is an integer with a moderate magnitude. Occasionally, it may come out as a negative number, so take that into account if you plan to rely on hash values in one way or another:
>>> hash("Lorem")
-972535290375435184
The natural consequence of a fixed-size output is that most of the original information gets irreversibly lost during the process. That’s fine since you want the resulting hash value to act as a unified digest of arbitrarily large data, after all. However, because the hash function projects a potentially infinite set of values onto a finite space, this can lead to a hash collision when two different inputs produce the same hash value.
Note: If you’re mathematically inclined, then you could use the pigeonhole principle to describe hash collisions more formally:
Given m items and n containers, if m > n, then there’s at least one container with more than one item.
In this context, items are a potentially infinite number of values that you feed into the hash function, while containers are their hash values assigned from a finite pool.
Hash collisions are an essential concept in hash tables, which you’ll revisit later in more depth when implementing your custom hash table. For now, you can think of them as highly undesirable. You should avoid hash collisions as much as possible because they can lead to very inefficient lookups and could be exploited by hackers. Therefore, a good hash function must minimize the likelihood of a hash collision for both security and efficiency.
In practice, this often means that the hash function must assign uniformly distributed values over the available space. You can visualize the distribution of hash values produced by Python’s hash() by plotting a textual histogram in your terminal. Copy the following block of code and save it in a file named hash_distribution.py:
# hash_distribution.py

from collections import Counter

def distribute(items, num_containers, hash_function=hash):
    return Counter([hash_function(item) % num_containers for item in items])

def plot(histogram):
    for key in sorted(histogram):
        count = histogram[key]
        padding = (max(histogram.values()) - count) * " "
        print(f"{key:3} {'■' * count}{padding} ({count})")
It uses a Counter instance to conveniently represent the histogram of hash values of the provided items. The hash values are spread over the specified number of containers by wrapping them with the modulo operator. Now, you can take one hundred printable ASCII characters, for example, then calculate their hash values and show their distribution:
>>> from hash_distribution import plot, distribute
>>> from string import printable

>>> plot(distribute(printable, num_containers=2))
0 ■■■■■■■■■■■■■■■■■■■■■■■■■■■■■■■■■■■■■■■■■■■■■■■■■■■ (51)
1 ■■■■■■■■■■■■■■■■■■■■■■■■■■■■■■■■■■■■■■■■■■■■■■■■■   (49)

>>> plot(distribute(printable, num_containers=5))
0 ■■■■■■■■■■■■■■■            (15)
1 ■■■■■■■■■■■■■■■■■■■■■■■■■■ (26)
2 ■■■■■■■■■■■■■■■■■■■■■■     (22)
3 ■■■■■■■■■■■■■■■■■■         (18)
4 ■■■■■■■■■■■■■■■■■■■        (19)
When there are only two containers, you should expect roughly a fifty-fifty distribution. Adding more containers should result in filling them more or less evenly. As you can see, the built-in hash() function is pretty good but not perfect at distributing the hash values uniformly.
Related to that, the uniform distribution of hash values is typically pseudo-random, which is especially important for cryptographic hash functions. This prevents potential attackers from using statistical analysis to try and predict the correlation between input and output of the hash function. Consider altering a single letter in a string, and check how that affects the resulting hash value in Python:
>>> hash("Lorem")
1090207136701886571

>>> hash("Loren")
4415277245823523757
It’s a completely different hash value now, despite only one letter being different. Hash values are often subject to an avalanche effect, as even the smallest input change gets amplified. Nevertheless, this feature of the hash function isn’t essential for the sake of implementing a hash table data structure.
In most cases, Python’s hash() exhibits yet another nonessential feature of cryptographic hash functions, which stems from the pigeonhole principle mentioned earlier. It behaves like a one-way function because finding its inverse is next to impossible in the majority of cases. However, there are notable exceptions:
>>> hash(42)
42
Hash values of small integers are equal to themselves, which is an implementation detail that CPython uses for simplicity and efficiency. Bear in mind that the actual hash values don’t matter as long as you can calculate them in a deterministic way.
Last but not least, calculating a hash value in Python is fast, even for very big inputs. On a modern computer, calling hash() with a string of 100 million characters as the argument returns instantaneously. If it weren’t so fast, then the additional overhead of the hash value computation would offset the benefits of hashing in the first place.
Identify Hash Function Properties
Based on what you’ve learned so far about Python’s hash(), you can now draw conclusions about the desired properties of a hash function in general. Here’s a summary of those features, comparing the regular hash function with its cryptographic flavor:
| Feature | Hash Function | Cryptographic Hash Function |
|---|---|---|
| Deterministic | ✔️ | ✔️ |
| Universal Input | ✔️ | ✔️ |
| Fixed-Sized Output | ✔️ | ✔️ |
| Fast to Compute | ✔️ | ✔️ |
| Uniformly Distributed | ✔️ | ✔️ |
| Randomly Distributed | ✔️ | |
| Randomized Seed | ✔️ | |
| One-Way Function | ✔️ | |
| Avalanche Effect | ✔️ |
The goals of both hash function types overlap, so they share a few common features. On the other hand, a cryptographic hash function provides additional guarantees around security.
Before building your own hash function, you’ll take a look at another function built into Python that’s seemingly its most straightforward substitute.
Compare an Object’s Identity With Its Hash
Probably one of the most straightforward hash function implementations imaginable in Python is the built-in id(), which tells you an object’s identity. In the standard Python interpreter, identity is the same as the object’s memory address expressed as an integer:
>>> id("Lorem")
139836146678832
The id() function has most of the desired hash function properties. After all, it’s super fast and works with any input. It returns a fixed-size integer in a deterministic way. At the same time, you can’t easily retrieve the original object based on its memory address. The memory addresses themselves are immutable during an object’s lifetime and somewhat randomized between interpreter runs.
So, why does Python insist on using a different function for hashing then?
First of all, the intent of id() is different from hash(), so other Python distributions may implement identity in alternative ways. Second, memory addresses are predictable without having a uniform distribution, which is both insecure and severely inefficient for hashing. Finally, equal objects should generally produce the same hash code even if they have distinct identities.
Note: Later, you’ll learn more about the contract between the equality of values and the corresponding hash codes.
With that out of the way, you can finally think of making your own hash function.
Make Your Own Hash Function
Designing a hash function that meets all requirements from scratch is hard. As mentioned before, you’ll be using the built-in hash() function to create your hash table prototype in the next section. However, trying to build a hash function from the ground up is a great way of learning how it works. By the end of this section, you’ll only have a rudimentary hash function that’s far from perfect, but you’ll have gained valuable insights.
In this exercise, you can limit yourself to only one data type at first and implement a crude hash function around it. For example, you could consider strings and sum up the ordinal values of the individual characters in them:
>>> def hash_function(text):
...     return sum(ord(character) for character in text)
You iterate over the text using a generator expression, then turn each individual character into the corresponding Unicode code point with the built-in ord() function, and finally sum the ordinal values together. This will throw out a single number for any given text provided as an argument:
>>> hash_function("Lorem")
511

>>> hash_function("Loren")
512

>>> hash_function("Loner")
512
Right away, you’ll notice a few problems with this function. Not only is it string-specific, but it also suffers from poor distribution of hash codes, which tend to form clusters at similar input values. A slight change in the input has little effect on the observed output. Even worse, the function remains insensitive to character order in the text, which means anagrams of the same word, such as Loren and Loner, lead to a hash code collision.
To fix the first problem, try converting the input to a string with a call to str(). Now, your function will be able to deal with any type of argument:
>>> def hash_function(key):
...     return sum(ord(character) for character in str(key))

>>> hash_function("Lorem")
511

>>> hash_function(3.14)
198

>>> hash_function(True)
416
You can call hash_function() with an argument of any data type, including a string, a floating-point number, or a Boolean value.
Note that this implementation will only be as good as the corresponding string representation. Some objects may not have a textual representation suitable for the code above. In particular, custom class instances without the special methods .__str__() and .__repr__() properly implemented are a good example. Plus, you won’t be able to distinguish between different data types anymore:
>>> hash_function("3.14")
198

>>> hash_function(3.14)
198
In reality, you’d want to treat the string "3.14" and the floating-point number 3.14 as distinct objects with different hash codes. One way to mitigate this would be to trade str() for repr(), which encloses the representation of strings with additional apostrophes ('):
>>> repr("3.14")
"'3.14'"

>>> repr(3.14)
'3.14'
That’ll improve your hash function to some extent:
>>> def hash_function(key):
...     return sum(ord(character) for character in repr(key))

>>> hash_function("3.14")
276

>>> hash_function(3.14)
198
Strings are now distinguishable from numbers. To tackle the issue with anagrams, like Loren and Loner, you might modify your hash function by taking into consideration the character’s value as well as its position within the text:
>>> def hash_function(key):
...     return sum(
...         index * ord(character)
...         for index, character in enumerate(repr(key), start=1)
...     )
Here, you take the sum of products derived from multiplying the ordinal values of characters and their corresponding indices. Notice you enumerate the indices from one rather than zero. Otherwise, the first character would always be discarded as its value would be multiplied by zero.
Now your hash function is fairly universal and doesn’t cause nearly as many collisions as before, but its output can grow arbitrarily large because the longer the string, the bigger the hash code. Also, it’s quite slow for larger inputs:
>>> hash_function("Tiny")
1801

>>> hash_function("This has a somewhat medium length.")
60919

>>> hash_function("This is very long and slow!" * 1_000_000)
33304504435500117
You can always address unbounded growth by taking the modulo (%) of your hash code against a known maximum size, such as one hundred:
>>> hash_function("Tiny") % 100
1

>>> hash_function("This has a somewhat medium length.") % 100
19

>>> hash_function("This is very long and slow!" * 1_000_000) % 100
17
Remember that choosing a smaller pool of hash codes increases the likelihood of hash code collisions. If you don’t know the number of your input values up front, then it’s best to leave that decision until later if you can. You may also impose a limit on your hash codes by assuming a reasonable maximum value, such as sys.maxsize, which represents the highest value of integers supported natively in Python.
Ignoring the function’s slow speed for a moment, you’ll notice another peculiar issue with your hash function. It results in suboptimal distribution of hash codes through clustering and by not taking advantage of all the available slots:
>>> from hash_distribution import plot, distribute
>>> from string import printable

>>> plot(distribute(printable, 6, hash_function))
  0 ■■■■■■■■■■■■■■■■■■■■■■■■■■■■■■■   (31)
  1 ■■■■                              (4)
  2 ■■■■■■■■■■■■■■■■■■■■■■■■■■■■■■■   (31)
  4 ■■■■■■■■■■■■■■■■■■■■■■■■■■■■■■■■■ (33)
  5 ■                                 (1)
The distribution is uneven. Moreover, there are six containers available, but one is missing from the histogram. This problem stems from the fact that the two apostrophes added by repr() cause virtually all keys in this example to result in an even hash number. You can avoid this by removing the left apostrophe if it exists:
>>> hash_function("a"), hash_function("b"), hash_function("c")
(350, 352, 354)

>>> def hash_function(key):
...     return sum(
...         index * ord(character)
...         for index, character in enumerate(repr(key).lstrip("'"), 1)
...     )

>>> hash_function("a"), hash_function("b"), hash_function("c")
(175, 176, 177)

>>> plot(distribute(printable, 6, hash_function))
  0 ■■■■■■■■■■■■■■■■   (16)
  1 ■■■■■■■■■■■■■■■■   (16)
  2 ■■■■■■■■■■■■■■■    (15)
  3 ■■■■■■■■■■■■■■■■■■ (18)
  4 ■■■■■■■■■■■■■■■■■  (17)
  5 ■■■■■■■■■■■■■■■■■■ (18)
The call to str.lstrip() will only affect a string if it starts with the specified prefix to strip.
Naturally, you can continue improving your hash function further. If you’re curious about the implementation of hash() for strings and byte sequences in Python, then it currently uses the SipHash algorithm, which might fall back to a modified version of FNV if the former is unavailable. To find out which hash algorithm your Python interpreter is using, reach for the sys module:
>>> import sys
>>> sys.hash_info.algorithm
'siphash24'
At this point, you have a pretty good grasp of the hash function, how it’s supposed to work, and what challenges you might face in implementing it. In the upcoming sections, you’ll use a hash function to build a hash table. The choice of a particular hash algorithm will influence the hash table’s performance. With that knowledge as your foundation, you can feel free to stick with the built-in hash() from now on.
Build a Hash Table Prototype in Python With TDD
In this section, you’re going to create a custom class representing the hash table data structure. It won’t be backed by a Python dictionary, so you can build a hash table from scratch and practice what you’ve learned so far. At the same time, you’ll model your implementation after the built-in dictionary by mimicking its most essential features.
Note: This is just a quick reminder that implementing a hash table is only an exercise and an educational tool to teach you about the problems that this data structure solves. Just like coding a custom hash function before, a pure-Python hash table implementation has no practical use in real-life applications.
Below is a list of the high-level requirements for your hash table, which you’ll be implementing now. By the end of this section, your hash table will exhibit the following core features. It’ll let you:
- Create an empty hash table
- Insert a key-value pair to the hash table
- Delete a key-value pair from the hash table
- Find a value by key in the hash table
- Update the value associated with an existing key
- Check if the hash table has a given key
In addition to these, you’ll implement a few nonessential but still useful features. Specifically, you should be able to:
- Create a hash table from a Python dictionary
- Create a shallow copy of an existing hash table
- Return a default value if the corresponding key is not found
- Report the number of key-value pairs stored in the hash table
- Return the keys, values, and key-value pairs
- Make the hash table iterable
- Make the hash table comparable by using the equality test operator
- Show a textual representation of the hash table
While implementing these features, you’ll actively exercise test-driven development by gradually adding more features to your hash table. Note that your prototype will only cover the basics. You’ll learn how to cope with some more advanced corner cases a bit later in this tutorial. In particular, this section won’t cover how to:
- Resolve hash code collisions
- Retain insertion order
- Resize the hash table dynamically
- Calculate the load factor
Feel free to use the supplementary materials as control checkpoints if you get stuck or if you’d like to skip some of the intermediate refactoring steps. Each subsection ends with a complete implementation stage and the corresponding tests that you can start from. Grab the following link and download the supporting materials with the complete source code and the intermediate steps used in this tutorial:
Source Code: Click here to download the source code that you’ll use to build a hash table in Python.
Take a Crash Course in Test-Driven Development
Now that you know the high-level properties of a hash function and its purpose, you can exercise a test-driven development approach to build a hash table. If you’ve never tried this programming technique before, then it boils down to three steps that you tend to repeat in a cycle:
- 🟥 Red: Think of a single test case and automate it using a unit testing framework of your choice. Your test will fail at this point, but that’s okay. Test runners typically indicate a failing test with the red color, hence the name of this cycle phase.
- 🟩 Green: Implement the bare minimum to make your test pass, but no more! This will ensure higher code coverage and spare you from writing redundant code. The test report will light up to a satisfying green color afterward.
- ♻️ Refactor: Optionally, modify your code without changing its behavior as long as all test cases still pass. You can use this as an opportunity to remove duplication and improve the readability of your code.
Python comes with the unittest package out of the box, but the third-party pytest library has an arguably shallower learning curve, so you’ll use that in this tutorial instead. Go ahead and install pytest in your virtual environment now:
Remember that you can verify each implementation stage against several control checkpoints. Next, create a file named test_hashtable.py and define a dummy test function in it to check if pytest will pick it up:
# test_hashtable.py

def test_should_always_pass():
    assert 2 + 2 == 22, "This is just a dummy test"
The framework leverages the built-in assert statement to run your tests and report their results. That means you can just use regular Python syntax, without importing any specific API until absolutely necessary. It also detects test files and test functions as long as their names start with the test prefix.
The assert statement takes a Boolean expression as an argument, followed by an optional error message. When the condition evaluates to True, then nothing happens, as if there were no assertion at all. Otherwise, Python will raise an AssertionError and display the message on the standard error stream (stderr). Meanwhile, pytest intercepts assertion errors and builds a report around them.
Now, open the terminal, change your working directory to wherever you saved that test file, and run the pytest command without any arguments. Its output should look similar to this:
Uh-oh. There’s a failure in your test. To find the root cause, increase the verbosity of pytest’s output by appending the -v flag to the command. Now you can pinpoint where the problem lies:
    def test_should_always_pass():
>       assert 2 + 2 == 22, "This is just a dummy test"
E       AssertionError: This is just a dummy test
E       assert 4 == 22
E         +4
E         -22
The output shows what the actual and expected values were for the failed assertion. In this case, adding two plus two results in four rather than twenty-two. You can fix the code by correcting the expected value:
# test_hashtable.py

def test_should_always_pass():
    assert 2 + 2 == 4, "This is just a dummy test"
When you rerun pytest, there should be no test failures anymore:
That’s it! You’ve just learned the essential steps in automating test cases for your hash table implementation. Naturally, you can use an IDE such as PyCharm or an editor like VS Code that integrates with testing frameworks if that’s more convenient for you. Next up, you’re going to put this new knowledge into practice.
Define a Custom HashTable Class
Remember to follow the red-green-refactor cycle described earlier. Therefore, you must start by identifying your first test case. For example, you should be able to instantiate a new hash table by calling the hypothetical HashTable class imported from the hashtable module. This call should return a non-empty object:
# test_hashtable.py

from hashtable import HashTable

def test_should_create_hashtable():
    assert HashTable() is not None
At this point, your test will refuse to run because of an unsatisfied import statement at the top of the file. You’re in the red phase, after all. The red phase is the only time when you’re allowed to add new features, so go on and create another module named hashtable.py and put the HashTable class definition in it:
# hashtable.py

class HashTable:
    pass
It’s a bare-bones class placeholder, but it should be just enough to make your test pass. By the way, if you’re using a code editor, then you can conveniently split the view into columns, displaying the code under test and the corresponding tests side by side:
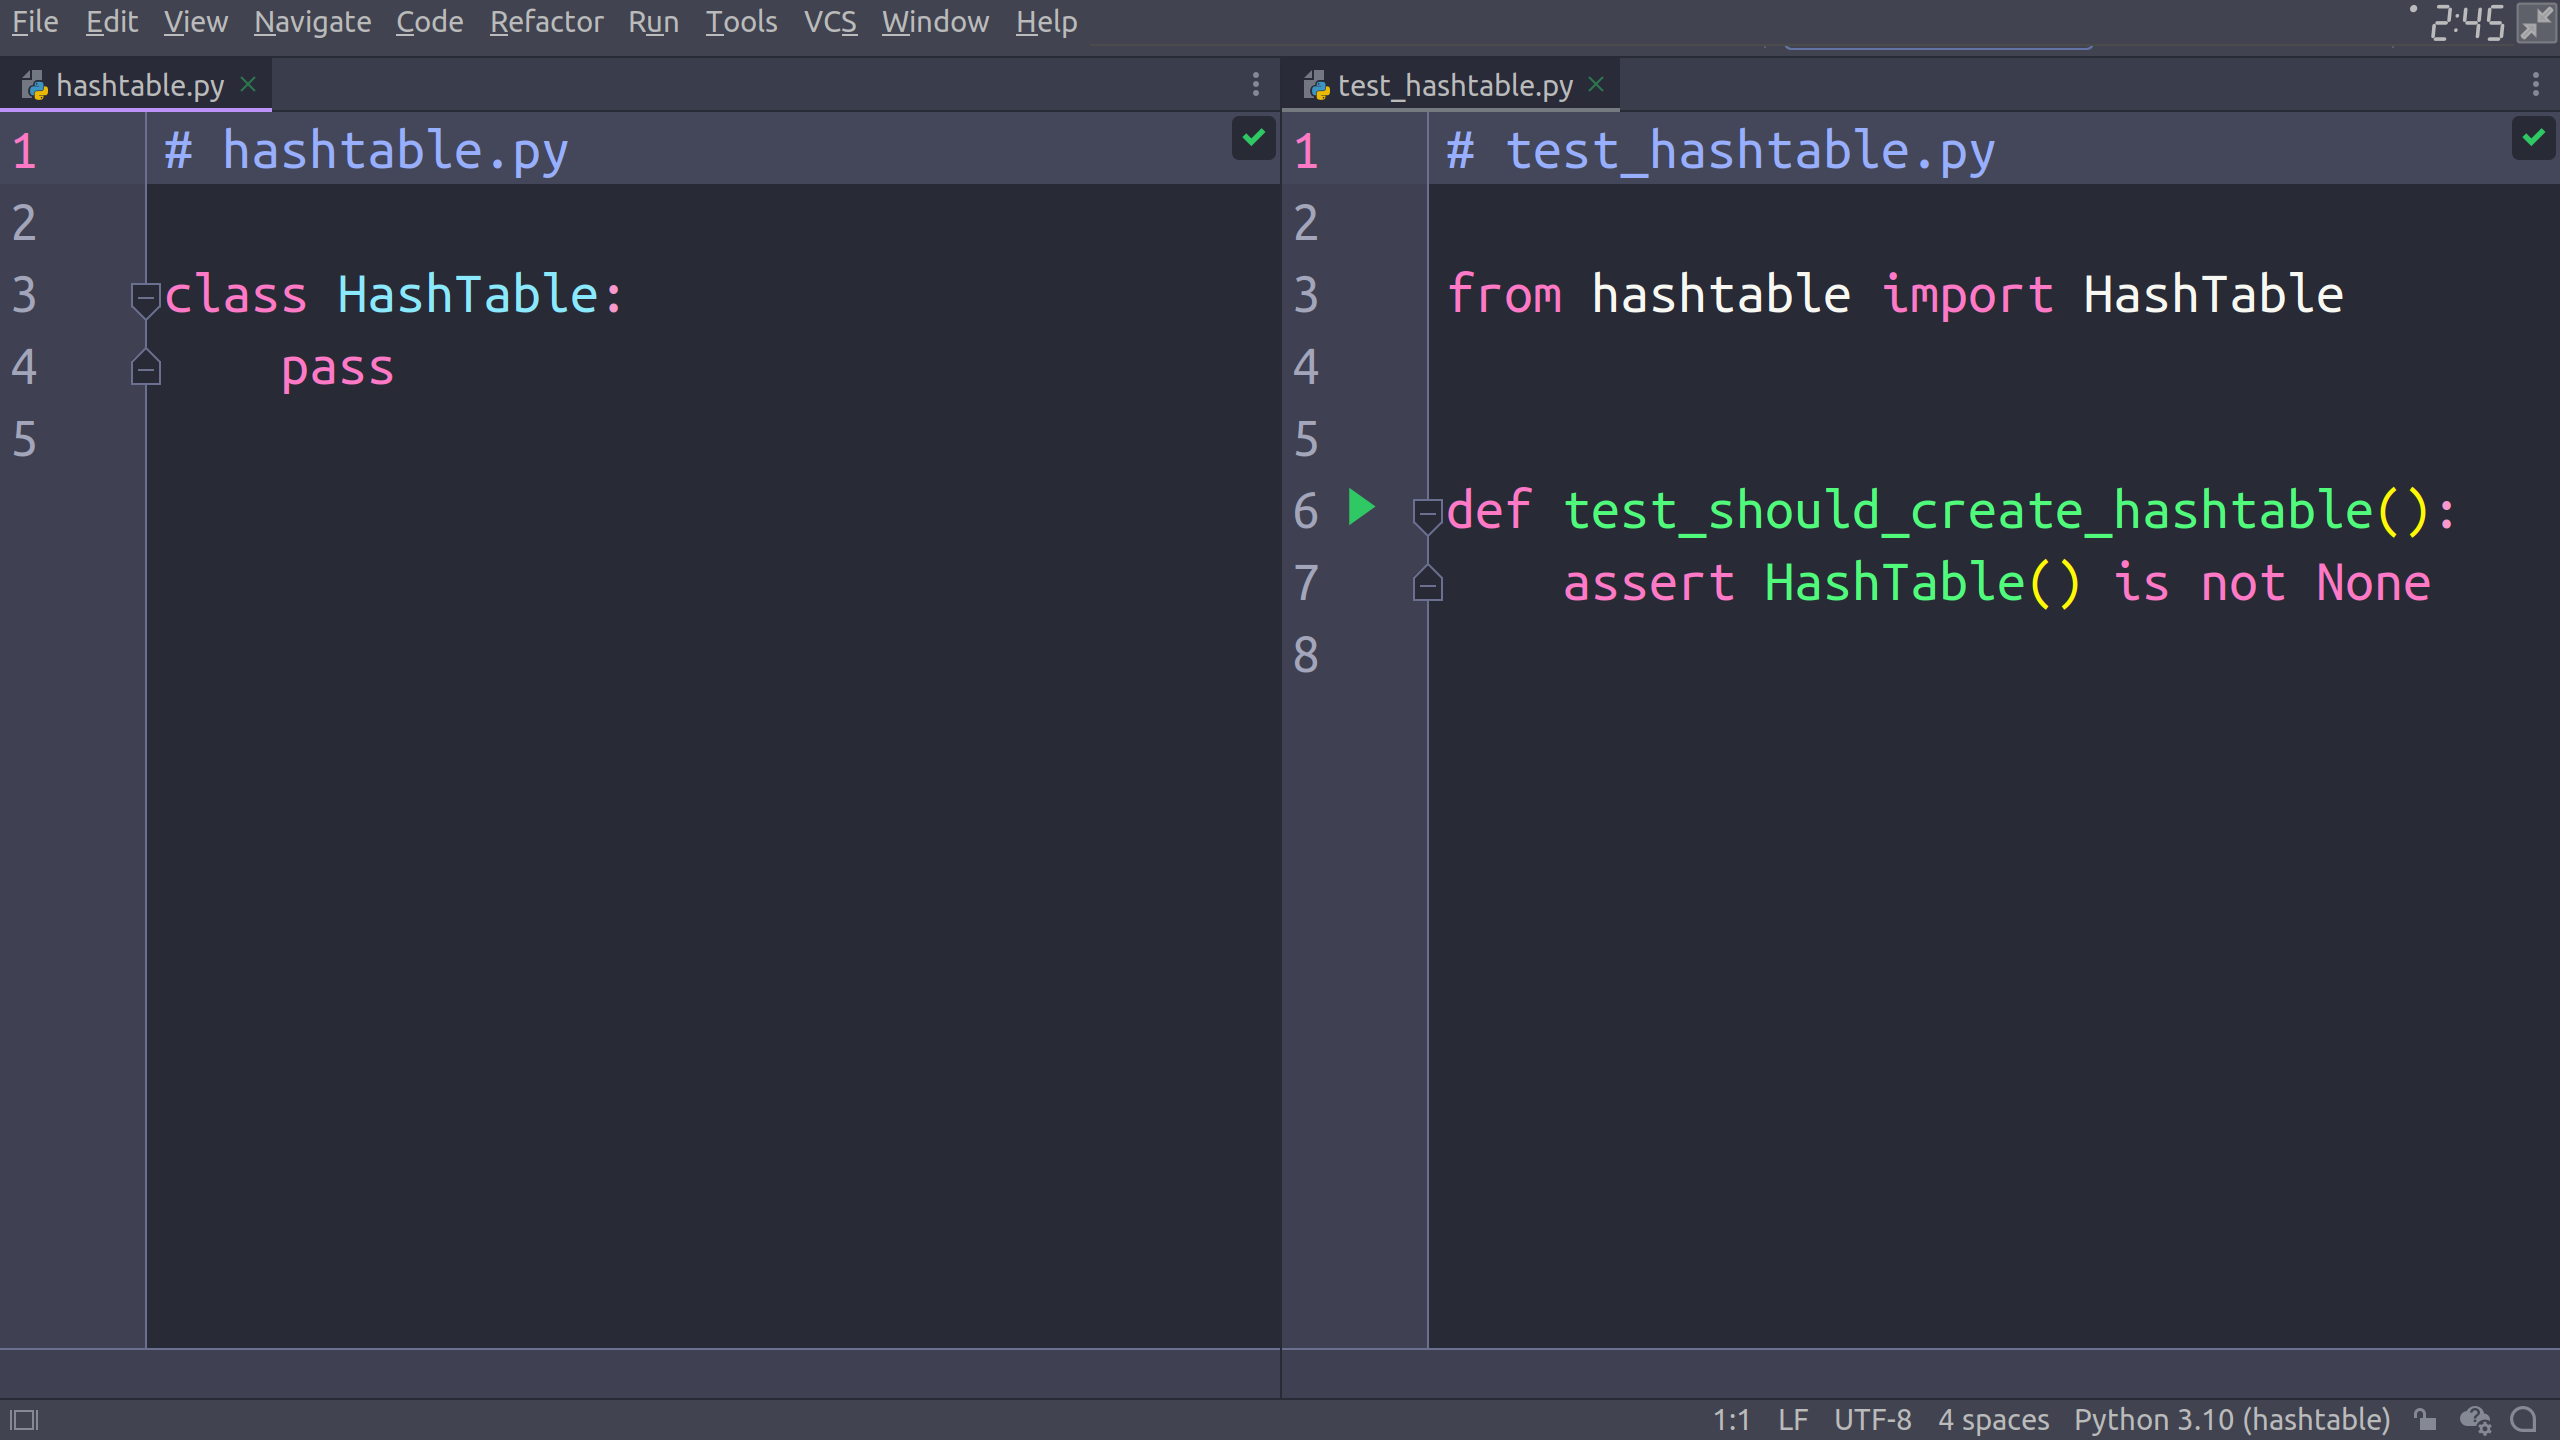
If you’re curious about the color scheme depicted in the screenshot above, then it’s the Dracula Theme. It’s available for many code editors and not just PyCharm.
Once running pytest succeeds, then you can start thinking of another test case since there’s barely anything to refactor yet. For example, a basic hash table should contain a sequence of values. At this early stage, you can assume the sequence to have a fixed size established at the hash table’s creation time. Modify your existing test case accordingly:
# test_hashtable.py

from hashtable import HashTable

def test_should_create_hashtable():
    assert HashTable(size=100) is not None
You specify the size using a keyword argument. However, before adding new code to the HashTable class, rerun your tests to confirm that you’ve entered the red phase again. Witnessing a failing test can be invaluable. When you implement a piece of code later, you’ll know whether it satisfies a particular group of tests or if they remain unaffected. Otherwise, your tests could lie to you by verifying something different than you thought!
After confirming that you’re in the red phase, declare the .__init__() method in the HashTable class with the expected signature, but don’t implement its body:
# hashtable.py

class HashTable:
    def __init__(self, size):
        pass
Boom! You’re back in the green phase once more, so how about a bit of refactoring this time? For instance, you could rename the size argument to capacity if that’s more descriptive to you. Don’t forget to change the test case first, then run pytest, and always update the code under test as the final step:
# hashtable.py

class HashTable:
    def __init__(self, capacity):
        pass
As you can tell, the red-green-refactor cycle consists of brief stages, often lasting no more than a few seconds each. So, why don’t you continue by adding more test cases? It would be nice if your data structure could report back the hash table’s capacity using Python’s built-in len() function. Add another test case and observe how it fails miserably:
# test_hashtable.py

from hashtable import HashTable

def test_should_create_hashtable():
    assert HashTable(capacity=100) is not None

def test_should_report_capacity():
    assert len(HashTable(capacity=100)) == 100
To handle len() correctly, you must implement the special method .__len__() in your class and remember the capacity supplied through the class initializer:
# hashtable.py

class HashTable:
    def __init__(self, capacity):
        self.capacity = capacity

    def __len__(self):
        return self.capacity
You may think that TDD isn’t moving you in the right direction. That’s not how you might have envisioned the hash table implementation. Where’s the sequence of values that you started with in the beginning? Unfortunately, taking baby steps and making many course corrections along the way is something that test-driven development gets a lot of criticism for. Therefore, it may not be appropriate for projects involving lots of experimentation.
On the other hand, implementing a well-known data structure such as a hash table is a perfect application of this software development methodology. You have clear expectations that are straightforward to codify as test cases. Soon, you’ll see for yourself that taking the next step will lead to a slight change in the implementation. Don’t worry about it, though, because perfecting the code itself is less important than making your test cases pass.
As you keep adding more constraints through the test cases, you frequently have to rethink your implementation. For example, a new hash table should probably start with empty slots for the stored values:
# test_hashtable.py

# ...

def test_should_create_empty_value_slots():
    assert HashTable(capacity=3).values == [None, None, None]
In other words, a new hash table should expose a .values attribute having the requested length and being filled with the None elements. By the way, it’s common to use such verbose function names because they’ll appear in your test report. The more readable and descriptive your tests, the more quickly you’ll figure out what part needs fixing.
Note: As a rule of thumb, your test cases should be as independent and atomic as possible, which usually means using only one assertion per function. Nevertheless, your test scenarios may sometimes need a bit of setup or teardown. They may also involve a few steps. In such cases, it’s customary to structure your function around the so-called given-when-then convention:
def test_should_create_empty_value_slots():
    # Given
    expected_values = [None, None, None]
    hash_table = HashTable(capacity=3)

    # When
    actual_values = hash_table.values

    # Then
    assert actual_values == expected_values
The given part describes the initial state and preconditions to your test case, while when represents the action of your code under test, and then is responsible for asserting the resulting outcome.
This is one of many possible ways to satisfy your existing tests:
# hashtable.py

class HashTable:
    def __init__(self, capacity):
        self.values = capacity * [None]

    def __len__(self):
        return len(self.values)
You replace the .capacity attribute with a list of the requested length containing only None elements. Multiplying a number by a list or the other way around is a quick way to populate that list with the given value or values. Other than that, you update the special method .__len__() so that all tests will pass.
Note: A Python dictionary has a length corresponding to the actual number of key-value pairs stored instead of its internal capacity. You’ll achieve a similar effect soon.
Now that you’re acquainted with TDD, it’s time to dive deeper and add the remaining features to your hash table.
Insert a Key-Value Pair
Now that you can create a hash table, it’s time to give it some storage capabilities. The traditional hash table is backed by an array capable of storing only one data type. Because of this, hash table implementations in many languages, such as Java, require you to declare the type for their keys and values up front:
Map<String, Integer> phonesByNames = new HashMap<>();
This particular hash table maps strings to integers, for example. However, because arrays aren’t native to Python, you’ll keep using a list instead. As a side effect, your hash table will be able to accept arbitrary data types for both the keys and values, just like Python’s dict.
Note: Python has an efficient array collection, but it’s intended for numeric values only. You may sometimes find it convenient for processing raw binary data.
Now add another test case for inserting key-value pairs into your hash table using the familiar square bracket syntax:
# test_hashtable.py

# ...

def test_should_insert_key_value_pairs():
    hash_table = HashTable(capacity=100)

    hash_table["hola"] = "hello"
    hash_table[98.6] = 37
    hash_table[False] = True

    assert "hello" in hash_table.values
    assert 37 in hash_table.values
    assert True in hash_table.values
First, you create a hash table with one hundred empty slots and then populate it with three pairs of keys and values of various types, including strings, floating-point numbers, and Booleans. Finally, you assert that the hash table contains the expected values in whatever order. Note that your hash table only remembers the values but not the associated keys at the moment!
The most straightforward and perhaps slightly naive implementation that would satisfy this test is as follows:
# hashtable.py

class HashTable:
    def __init__(self, capacity):
        self.values = capacity * [None]

    def __len__(self):
        return len(self.values)

    def __setitem__(self, key, value):
        self.values.append(value)
It completely ignores the key and just appends the value to the right end of the list, increasing its length. You may very well immediately think of another test case. Inserting elements into the hash table shouldn’t grow its size. Similarly, removing an element shouldn’t shrink the hash table, but you only take a mental note of that, because there’s no ability to remove key-value pairs yet.
Note: You could also write a placeholder test and tell pytest to skip it unconditionally until later:
import pytest

@pytest.mark.skip
def test_should_not_shrink_when_removing_elements():
    pass
It leverages one of the decorators provided by pytest.
In the real world, you’d want to create separate test cases with descriptive names dedicated to testing these behaviors. However, because this is only a tutorial, you’re going to add a new assertion to the existing function for brevity:
# test_hashtable.py

# ...

def test_should_insert_key_value_pairs():
    hash_table = HashTable(capacity=100)

    hash_table["hola"] = "hello"
    hash_table[98.6] = 37
    hash_table[False] = True

    assert "hello" in hash_table.values
    assert 37 in hash_table.values
    assert True in hash_table.values

    assert len(hash_table) == 100
You’re in the red phase now, so rewrite your special method to keep the capacity fixed at all times:
# hashtable.py

class HashTable:
    def __init__(self, capacity):
        self.values = capacity * [None]

    def __len__(self):
        return len(self.values)

    def __setitem__(self, key, value):
        index = hash(key) % len(self)
        self.values[index] = value
You turn an arbitrary key into a numeric hash value and use the modulo operator to constrain the resulting index within the available address space. Great! Your test report lights up green again.
Note: The code above relies on Python’s built-in hash() function, which has an element of randomization, as you already learned. Therefore, your test might fail in rare cases when two keys happen to produce an identical hash code by coincidence. Because you’ll deal with hash code collisions later, you can disable hash randomization or use a predictable seed when running pytest in the meantime:
Make sure to pick a hash seed that won’t cause any collisions in your sample data. Finding one can involve a bit of a trial and error. In my case, value 128 seemed to work fine.
But can you think of some edge cases, maybe? What about inserting None into your hash table? It would create a conflict between a legitimate value and the designated sentinel value that you chose to indicate blanks in your hash table. You’ll want to avoid that.
As always, start by writing a test case to express the desired behavior:
# test_hashtable.py

# ...

def test_should_not_contain_none_value_when_created():
    assert None not in HashTable(capacity=100).values
One way to work around this would be to replace None in your .__init__() method with another unique value that users are unlikely to insert. For example, you could define a special constant by creating a brand-new object to represent blank spaces in your hash table:
# hashtable.py

BLANK = object()

class HashTable:
    def __init__(self, capacity):
        self.values = capacity * [BLANK]

    # ...
You only need a single blank instance to mark the slots as empty. Naturally, you’ll need to update an older test case to get back to the green phase:
# test_hashtable.py

from hashtable import HashTable, BLANK

# ...

def test_should_create_empty_value_slots():
    assert HashTable(capacity=3).values == [BLANK, BLANK, BLANK]

# ...
Then, write a positive test case exercising the happy path for handling the insertion of a None value:
def test_should_insert_none_value():
    hash_table = HashTable(capacity=100)
    hash_table["key"] = None
    assert None in hash_table.values
You create an empty hash table with one hundred slots and insert None associated with some arbitrary key. It should work like a charm if you’ve been closely following the steps so far. If not, then look at the error messages because they often contain clues as to what went wrong. Alternatively, check the sample code available for download at this link:
Source Code: Click here to download the source code that you’ll use to build a hash table in Python.
In the next subsection, you’ll add the ability to retrieve values by their associated keys.
Find a Value by Key
To retrieve a value from the hash table, you’ll want to leverage the same square brackets syntax as before, only without using the assignment statement. You’ll also need a sample hash table. To avoid duplicating the same setup code across the individual test cases in your test suite, you can wrap it in a test fixture exposed by pytest:
# test_hashtable.py

import pytest

# ...

@pytest.fixture
def hash_table():
    sample_data = HashTable(capacity=100)
    sample_data["hola"] = "hello"
    sample_data[98.6] = 37
    sample_data[False] = True
    return sample_data

def test_should_find_value_by_key(hash_table):
    assert hash_table["hola"] == "hello"
    assert hash_table[98.6] == 37
    assert hash_table[False] is True
A test fixture is a function annotated with the @pytest.fixture decorator. It returns sample data for your test cases, such as a hash table populated with known keys and values. Your pytest will automatically call that function for you and inject its result into any test function that declares an argument with the same name as your fixture. In this case, the test function expects a hash_table argument, which corresponds to your fixture name.
To be able to find values by key, you can implement the element lookup through another special method called .__getitem__() in your HashTable class:
# hashtable.py

BLANK = object()

class HashTable:
    def __init__(self, capacity):
        self.values = capacity * [BLANK]

    def __len__(self):
        return len(self.values)

    def __setitem__(self, key, value):
        index = hash(key) % len(self)
        self.values[index] = value

    def __getitem__(self, key):
        index = hash(key) % len(self)
        return self.values[index]
You calculate the index of an element based on the hash code of the provided key and return whatever sits under that index. But what about missing keys? As of now, you might return a blank instance when a given key hasn’t been used before, an outcome which isn’t all that helpful. To replicate how a Python dict would work in such a case, you should raise a KeyError exception instead:
# test_hashtable.py

# ...

def test_should_raise_error_on_missing_key():
    hash_table = HashTable(capacity=100)
    with pytest.raises(KeyError) as exception_info:
        hash_table["missing_key"]
    assert exception_info.value.args[0] == "missing_key"
You create an empty hash table and try accessing one of its values through a missing key. The pytest framework includes a special construct for testing exceptions. Up above, you use the pytest.raises context manager to expect a specific kind of exception within the following code block. Handling this case is a matter of adding a conditional statement to your accessor method:
# hashtable.py

# ...

class HashTable:
    # ...

    def __getitem__(self, key):
        index = hash(key) % len(self)
        value = self.values[index]
        if value is BLANK:
            raise KeyError(key)
        return value
If the value at the given index is blank, then you raise the exception. By the way, you use the is operator instead of the equality test operator (==) to ensure that you’re comparing the identities rather than values. Although the default implementation of the equality test in custom classes falls back to comparing the identities of their instances, most built-in data types distinguish between the two operators and implement them differently.
Because you can now determine whether a given key has an associated value in your hash table, you might as well implement the in operator to mimic a Python dictionary. Remember to write and cover these test cases individually to respect test-driven development principles:
# test_hashtable.py

# ...

def test_should_find_key(hash_table):
    assert "hola" in hash_table

def test_should_not_find_key(hash_table):
    assert "missing_key" not in hash_table
Both test cases take advantage of the test fixture that you prepared earlier and verify the .__contains__() special method, which you can implement in the following way:
# hashtable.py

# ...

class HashTable:
    # ...

    def __contains__(self, key):
        try:
            self[key]
        except KeyError:
            return False
        else:
            return True
When accessing the given key raises a KeyError, you intercept that exception and return False to indicate a missing key. Otherwise, you combine the try … except block with an else clause and return True. Exception handling is great but can sometimes be inconvenient, which is why dict.get() lets you specify an optional default value. You can replicate the same behavior in your custom hash table:
# test_hashtable.py

# ...

def test_should_get_value(hash_table):
    assert hash_table.get("hola") == "hello"

def test_should_get_none_when_missing_key(hash_table):
    assert hash_table.get("missing_key") is None

def test_should_get_default_value_when_missing_key(hash_table):
    assert hash_table.get("missing_key", "default") == "default"

def test_should_get_value_with_default(hash_table):
    assert hash_table.get("hola", "default") == "hello"
The code of .get() looks similar to the special method you’ve just implemented:
# hashtable.py

# ...

class HashTable:
    # ...

    def get(self, key, default=None):
        try:
            return self[key]
        except KeyError:
            return default
You attempt to return the value corresponding to the provided key. In case of an exception, you return the default value, which is an optional argument. When the user leaves it unspecified, then it equals None.
For completeness, you’ll add the capability to delete a key-value pair from your hash table in the upcoming subsection.
Delete a Key-Value Pair
Python dictionaries let you delete previously inserted key-value pairs using the built-in del keyword, which removes information about both the key and the value. Here’s how this could work with your hash table:
# test_hashtable.py

# ...

def test_should_delete_key_value_pair(hash_table):
    assert "hola" in hash_table
    assert "hello" in hash_table.values

    del hash_table["hola"]

    assert "hola" not in hash_table
    assert "hello" not in hash_table.values
First, you verify if the sample hash table has the desired key and value. Then, you delete both by indicating only the key and repeat the assertions but with inverted expectations. You can make this test pass as follows:
# hashtable.py

# ...

class HashTable:
    # ...

    def __delitem__(self, key):
        index = hash(key) % len(self)
        del self.values[index]
You calculate the index associated with a key and remove the corresponding value from the list unconditionally. However, you immediately remember your mental note from earlier about asserting that your hash table should not shrink when you delete elements from it. So, you add two more assertions:
# test_hashtable.py

# ...

def test_should_delete_key_value_pair(hash_table):
    assert "hola" in hash_table
    assert "hello" in hash_table.values
    assert len(hash_table) == 100

    del hash_table["hola"]

    assert "hola" not in hash_table
    assert "hello" not in hash_table.values
    assert len(hash_table) == 100
These will ensure that the size of your hash table’s underlying list remains unaffected. Now, you need to update your code so that it marks a slot as blank instead of throwing it away completely:
# hashtable.py

# ...

class HashTable:
    # ...

    def __delitem__(self, key):
        index = hash(key) % len(self)
        self.values[index] = BLANK
Considering that you’re in the green phase again, you can take this opportunity to spend some time refactoring. The same index formula appears three times in different places. You can extract it and simplify the code:
# hashtable.py

# ...

class HashTable:
    # ...

    def __delitem__(self, key):
        self.values[self._index(key)] = BLANK

    def __setitem__(self, key, value):
        self.values[self._index(key)] = value

    def __getitem__(self, key):
        value = self.values[self._index(key)]
        if value is BLANK:
            raise KeyError(key)
        return value

    # ...

    def _index(self, key):
        return hash(key) % len(self)
Suddenly, after applying only this slight modification, a pattern emerges. Deleting an item is equivalent to inserting a blank object. So, you can rewrite your deletion routine to take advantage of the mutator method:
# hashtable.py

# ...

class HashTable:
    # ...

    def __delitem__(self, key):
        self[key] = BLANK

    # ...
Assigning a value through the square brackets syntax delegates to the .__setitem__() method. All right, that’s enough refactoring for now. It’s much more important to think of other test cases at this point. For example, what happens when you request to delete a missing key? Python’s dict raises a KeyError exception in such a case, so you can do the same:
# hashtable.py

# ...

def test_should_raise_key_error_when_deleting(hash_table):
    with pytest.raises(KeyError) as exception_info:
        del hash_table["missing_key"]
    assert exception_info.value.args[0] == "missing_key"
Covering this test case is relatively straightforward as you can rely on the code that you wrote when implementing the in operator:
# hashtable.py

# ...

class HashTable:
    # ...

    def __delitem__(self, key):
        if key in self:
            self[key] = BLANK
        else:
            raise KeyError(key)

    # ...
If you find the key in your hash table, then you overwrite the associated value with the sentinel value to remove that pair. Otherwise, you raise an exception. All right, there’s one more basic hash table operation to cover, which you’ll do next.
Update the Value of an Existing Pair
The insertion method should already take care of updating a key-value pair, so you’re only going to add a relevant test case and check if it works as expected:
# test_hashtable.py

# ...

def test_should_update_value(hash_table):
    assert hash_table["hola"] == "hello"

    hash_table["hola"] = "hallo"

    assert hash_table["hola"] == "hallo"
    assert hash_table[98.6] == 37
    assert hash_table[False] is True
    assert len(hash_table) == 100
After modifying the value, hello, of an existing key and changing it to hallo, you also check if other key-value pairs, as well as the hash table’s length, remain untouched. That’s it. You already have a basic hash table implementation, but a few extra features that are relatively cheap to implement are still missing.
Get the Key-Value Pairs
It’s time to address the elephant in the room. Python dictionaries let you iterate over their keys, values, or key-value pairs called items. However, your hash table is really only a list of values with fancy indexing on top of it. If you ever wanted to retrieve the original keys put into your hash table, then you’d be out of luck because the current hash table implementation won’t ever remember them.
In this subsection, you’ll refactor your hash table heavily to add the ability to retain keys and values. Bear in mind that there will be several steps involved, and many tests will start failing as a result of that. If you’d like to skip those intermediate steps and see the effect, then jump ahead to defensive copying.
Wait a minute. You keep reading about key-value pairs in this tutorial, so why not replace values with tuples? After all, tuples are straightforward in Python. Even better, you could use named tuples to take advantage of their named element lookup. But first, you need to think of a test.
Note: Remember to focus on the high-level user-facing functionality when figuring out a test case. Don’t go about testing a piece of code that you may anticipate based on your programmer’s experience or gut feeling. It’s the tests that should ultimately drive your implementation in TDD, not the other way around.
First of all, you’re going to need another attribute in your HashTable class to hold the key-value pairs:
# test_hashtable.py

# ...

def test_should_return_pairs(hash_table):
    assert ("hola", "hello") in hash_table.pairs
    assert (98.6, 37) in hash_table.pairs
    assert (False, True) in hash_table.pairs
The order of key-value pairs is unimportant at this point, so you can assume that they might come out in any order each time you request them. However, instead of introducing another field to the class, you could reuse .values by renaming it to .pairs and making other necessary adjustments. There are a few. Just be aware that this will temporarily make some tests fail until you fix the implementation.
Note: If you’re using a code editor, then you can conveniently rename a variable or a class member with a single click of a button by leveraging the refactoring capabilities. In PyCharm, for example, you can right-click on a variable, choose Refactor from the context menu, and then Rename…. Or you can use the corresponding keyboard shortcut:
That’s the most straightforward and reliable way of changing the name of a variable in your project. The code editor will update all variable references across your project files.
When you’ve renamed .values to .pairs in hashtable.py and test_hashtable.py, then you’ll also need to update the .__setitem__() special method. In particular, it should store tuples of the key and the associated value now:
# hashtable.py

# ...

class HashTable:
    # ...

    def __setitem__(self, key, value):
        self.pairs[self._index(key)] = (key, value)
Inserting an element in your hash table wraps the key and the value in a tuple and then puts that tuple at the desired index in your list of pairs. Note that your list will initially contain only blank objects instead of tuples, so you’ll be using two different data types in your list of pairs. One is a tuple, while the other one could be anything but a tuple to denote a blank slot.
Because of that, you don’t need any special sentinel constant anymore to mark a slot as empty. You can safely remove your BLANK constant and replace it with the plain None again where necessary, so go ahead and do that now.
Note: Removing code may be hard to accept at first, but less is better! As you can see, test-driven development can sometimes make you run in circles.
You can take another step back to regain control over deleting an item:
# hashtable.py

# ...

class HashTable:
    # ...

    def __delitem__(self, key):
        if key in self:
            self.pairs[self._index(key)] = None
        else:
            raise KeyError(key)
Unfortunately, your .__delitem__() method can no longer take advantage of the square brackets syntax because this would result in wrapping whatever sentinel value you chose in an unnecessary tuple. You must use an explicit assignment statement here to avoid needlessly complicated logic down the road.
The last important piece of the puzzle is updating the .__getitem__() method:
# hashtable.py

# ...

class HashTable:
    # ...

    def __getitem__(self, key):
        pair = self.pairs[self._index(key)]
        if pair is None:
            raise KeyError(key)
        return pair[1]
You peek at an index, expecting to find a key-value pair. If you get nothing at all, then you raise an exception. On the other hand, if you see something interesting, then you grab the tuple’s second element at index one, which corresponds to the mapped value. However, you can write this more elegantly using a named tuple, as suggested earlier:
# hashtable.py

from typing import NamedTuple, Any

class Pair(NamedTuple):
    key: Any
    value: Any

class HashTable:
    # ...

    def __setitem__(self, key, value):
        self.pairs[self._index(key)] = Pair(key, value)

    def __getitem__(self, key):
        pair = self.pairs[self._index(key)]
        if pair is None:
            raise KeyError(key)
        return pair.value

    # ...
The Pair class consists of the .key and .value attributes, which are free to take values of any data type. Simultaneously, your class inherits all the regular tuple’s behaviors because it extends the NamedTuple parent. Note that you have to explicitly call Pair() on your key and value in the .__setitem__() method to take advantage of the named attribute access in .__getitem__().
Note: Despite using a custom data type to represent key-value pairs, you can write your tests to expect either Pair instances or regular tuples, thanks to the compatibility of both types.
Naturally, you have a few test cases to update at this point before the report can turn green again. Take your time and carefully review your test suite. Alternatively, look at the code from the supporting materials if you feel stuck, or take a peek here:
# test_hashtable.py

# ...

def test_should_insert_key_value_pairs():
    hash_table = HashTable(capacity=100)

    hash_table["hola"] = "hello"
    hash_table[98.6] = 37
    hash_table[False] = True

    assert ("hola", "hello") in hash_table.pairs
    assert (98.6, 37) in hash_table.pairs
    assert (False, True) in hash_table.pairs

    assert len(hash_table) == 100

# ...

def test_should_delete_key_value_pair(hash_table):
    assert "hola" in hash_table
    assert ("hola", "hello") in hash_table.pairs
    assert len(hash_table) == 100

    del hash_table["hola"]

    assert "hola" not in hash_table
    assert ("hola", "hello") not in hash_table.pairs
    assert len(hash_table) == 100
There will be another test case that needs special care. Specifically, it’s about verifying that an empty hash table has no None values when created. You’ve just replaced a list of values with a list of pairs. To fish the values out again, you can use a list comprehension such as this:
# test_hashtable.py

# ...

def test_should_not_contain_none_value_when_created():
    hash_table = HashTable(capacity=100)
    values = [pair.value for pair in hash_table.pairs if pair]
    assert None not in values
If you’re concerned about stuffing too much logic into the test case, then you’d be absolutely right. After all, you want to test the hash table’s behavior. But don’t worry about that just yet. You’ll revisit this test case shortly.
Use Defensive Copying
Once you’re back in the green phase, try to figure out possible corner cases. For example, .pairs are exposed as a public attribute that anyone could intentionally or unintentionally tamper with. In practice, accessor methods should never leak your internal implementation but should make defensive copies to protect mutable attributes from external modifications:
# test_hashtable.py

# ...

def test_should_return_copy_of_pairs(hash_table):
    assert hash_table.pairs is not hash_table.pairs
Whenever you request the key-value pairs from a hash table, you expect to get a brand-new object with a unique identity. You can hide a private field behind a Python property, so create one and replace every reference to .pairs with ._pairs in your HashTable class only. The leading underscore is a standard naming convention in Python that indicates internal implementation:
# hashtable.py

# ...

class HashTable:
    def __init__(self, capacity):
        self._pairs = capacity * [None]

    def __len__(self):
        return len(self._pairs)

    def __delitem__(self, key):
        if key in self:
            self._pairs[self._index(key)] = None
        else:
            raise KeyError(key)

    def __setitem__(self, key, value):
        self._pairs[self._index(key)] = Pair(key, value)

    def __getitem__(self, key):
        pair = self._pairs[self._index(key)]
        if pair is None:
            raise KeyError(key)
        return pair.value

    def __contains__(self, key):
        try:
            self[key]
        except KeyError:
            return False
        else:
            return True

    def get(self, key, default=None):
        try:
            return self[key]
        except KeyError:
            return default

    @property
    def pairs(self):
        return self._pairs.copy()

    def _index(self, key):
        return hash(key) % len(self)
When you request a list of key-value pairs stored in your hash table, you’ll get their shallow copy each time. Because you won’t have a reference to your hash table’s internal state, it’ll remain unaffected by potential changes to its copy.
Note: The order of class methods that you arrived at might slightly differ from that in the code block presented above. That’s okay because method ordering doesn’t matter from Python’s standpoint. However, it’s customary to start with static or class methods, followed by your class’s public interface, which you’re most likely to look at. The internal implementation should typically appear at the very end.
To avoid having to jump around your code, it’s a good idea to organize methods in a way that resembles a story. Specifically, a higher-level function should be listed before the low-level functions that are called.
To further mimic dict.items() in your property, the resulting list of pairs shouldn’t include blank slots. In other words, there shouldn’t be any None values in that list:
# test_hashtable.py

# ...

def test_should_not_include_blank_pairs(hash_table):
    assert None not in hash_table.pairs
To satisfy this test, you can filter empty values out by adding a condition to the list comprehension in your property:
# hashtable.py

# ...

class HashTable:
    # ...

    @property
    def pairs(self):
        return [pair for pair in self._pairs if pair]
You don’t need an explicit call to .copy() because the list comprehension creates a new list. For every pair in the original list of the key-value pairs, you check if that particular pair is truthy and keep it in the resulting list. However, this will break two other tests that you need to update now:
# test_hashtable.py

# ...

def test_should_create_empty_value_slots():
    assert HashTable(capacity=3)._pairs == [None, None, None]

# ...

def test_should_insert_none_value():
    hash_table = HashTable(100)
    hash_table["key"] = None
    assert ("key", None) in hash_table.pairs
That’s not ideal because one of your tests reaches out for the internal implementation instead of focusing on public interfaces. Nevertheless, such testing is known as white-box testing, which has its place.
Get the Keys and Values
Do you remember the test case that you modified by adding a list comprehension to retrieve the values from your key-value pairs? Well, here it is again if you need to refresh your memory:
# test_hashtable.py

# ...

def test_should_not_contain_none_value_when_created():
    hash_table = HashTable(capacity=100)
    values = [pair.value for pair in hash_table.pairs if pair]
    assert None not in values
The highlighted line looks just like what you’d need to implement the .values property, which you replaced with .pairs earlier. You may update the test function to take advantage of .values again:
# test_hashtable.py

# ...

def test_should_not_contain_none_value_when_created():
    assert None not in HashTable(capacity=100).values
It might feel as though it was a wasted effort. But, these values are now evaluated dynamically through a getter property, whereas they were stored in a fixed-size list before. To satisfy this test, you can reuse part of its old implementation, which employs a list comprehension:
# hashtable.py

# ...

class HashTable:
    # ...

    @property
    def values(self):
        return [pair.value for pair in self.pairs]
Notice that you no longer have to specify the optional filtering condition here, because there’s already one lurking behind the .pairs property.
Purists might think of using a set comprehension instead of a list comprehension to communicate the lack of guarantees for the order of values. However, that would result in losing information about duplicate values in the hash table. Protect yourself from such a possibility up front by writing another test case:
# test_hashtable.py

# ...

def test_should_return_duplicate_values():
    hash_table = HashTable(capacity=100)
    hash_table["Alice"] = 24
    hash_table["Bob"] = 42
    hash_table["Joe"] = 42
    assert [24, 42, 42] == sorted(hash_table.values)
If you have a hash table with names and ages, for example, and more than one person has the same age, then .values should keep all repeated age values. You can sort the ages to ensure repeatable test runs. While this test case doesn’t require writing new code, it’ll guard against regressions.
It’s worthwhile to check the expected values, their types, and their number. However, you can’t compare two lists directly because the actual values in a hash table might appear in an unpredictable order. To disregard the order in your test, you could convert both lists to sets or sort them like before. Unfortunately, sets remove potential duplicates, while sorting isn’t possible when lists contain incompatible types.
To reliably check if two lists have exactly the same elements of arbitrary types with potential duplicates while ignoring their order, you might use the following Python idiom:
def have_same_elements(list1, list2):
    return all(element in list1 for element in list2)
It leverages the built-in all() function, but it’s quite verbose. You’re probably better off using the pytest-unordered plugin. Don’t forget to install it into your virtual environment first:
Next, import the unordered() function into your test suite and use it to wrap the hash table’s values:
# test_hashtable.py

import pytest
from pytest_unordered import unordered

from hashtable import HashTable

# ...

def test_should_get_values(hash_table):
    assert unordered(hash_table.values) == ["hello", 37, True]
Doing so converts the values to an unordered list, which redefines the equality test operator so that it doesn’t take order into account when comparing list elements. Additionally, values of an empty hash table should be an empty list, while the .values property should always return a new list copy:
# test_hashtable.py

# ...

def test_should_get_values_of_empty_hash_table():
    assert HashTable(capacity=100).values == []

def test_should_return_copy_of_values(hash_table):
    assert hash_table.values is not hash_table.values
On the other hand, the hash table’s keys must be unique, so it makes sense to emphasize that by returning a set rather than a list of keys. After all, sets are by definition unordered collections of items with no duplicates:
# test_hashtable.py

# ...

def test_should_get_keys(hash_table):
    assert hash_table.keys == {"hola", 98.6, False}

def test_should_get_keys_of_empty_hash_table():
    assert HashTable(capacity=100).keys == set()

def test_should_return_copy_of_keys(hash_table):
    assert hash_table.keys is not hash_table.keys
There’s no empty set literal in Python, so you have to call the built-in set() function directly in this case. The implementation of the corresponding getter function will look familiar:
# hashtable.py

# ...

class HashTable:
    # ...

    @property
    def keys(self):
        return {pair.key for pair in self.pairs}
It resembles the .values property. The difference is that you use curly brackets instead of square brackets and refer to the .key attribute instead of .value in your named tuple. Alternatively, you could use pair[0] if you wanted to, but it would seem less readable.
This also reminds you about the need for a similar test case that you missed when covering the .pairs attribute. It makes sense to return a set of pairs for the sake of consistency:
# test_hashtable.py

# ...

def test_should_return_pairs(hash_table):
    assert hash_table.pairs == {
        ("hola", "hello"),
        (98.6, 37),
        (False, True)
    }

def test_should_get_pairs_of_empty_hash_table():
    assert HashTable(capacity=100).pairs == set()
So, the .pairs property will also use a set comprehension from now on:
# hashtable.py

# ...

class HashTable:
    # ...

    @property
    def pairs(self):
        return {pair for pair in self._pairs if pair}
You don’t need to worry about losing any information, because each key-value pair is unique. At this point, you should be in the green phase again.
Note that you can take advantage of the .pairs property to convert your hash table to a plain old dictionary and use .keys and .values to test that:
def test_should_convert_to_dict(hash_table):
    dictionary = dict(hash_table.pairs)
    assert set(dictionary.keys()) == hash_table.keys
    assert set(dictionary.items()) == hash_table.pairs
    assert list(dictionary.values()) == unordered(hash_table.values)
To disregard the order of elements, remember to wrap the dictionary keys and key-value pairs with sets before making the comparison. In contrast, your hash table’s values come out as a list, so be sure to use the unordered() function to compare lists while ignoring the element order.
Okay, your hash table is really beginning to take shape now!
Report the Hash Table’s Length
There’s one small detail that you intentionally left broken for simplicity until now. It’s the length of your hash table, which currently reports its maximum capacity even when there are only empty slots. Fortunately, it doesn’t take much effort to fix this. Find your function named test_should_report_capacity(), rename as shown below, and check if an empty hash table’s length is equal to zero rather than one hundred:
# test_hashtable.py

# ...

def test_should_report_length_of_empty_hash_table():
    assert len(HashTable(capacity=100)) == 0
To make the capacity independent from the length, modify your special method .__len__() so that it refers to the public property with filtered pairs instead of the private list of all slots:
# hashtable.py

# ...

class HashTable:
    # ...

    def __len__(self):
        return len(self.pairs)

    # ...
You just removed the leading underscore from the variable name. But that small change is now causing a whole bunch of tests to end abruptly with an error and a few to fail.
Note: Failed tests are less severe because their assertions evaluate to False, while errors indicate utterly unexpected behavior in your code.
It seems that most test cases suffer from the same unhandled exception due to division by zero when mapping the key to an index. That makes sense because ._index() uses the hash table’s length to find the remainder from dividing the hashed key by the number of slots available. However, the hash table’s length has a different meaning now. You need to take the length of the internal list instead:
# hashtable.py

class HashTable:
    # ...

    def _index(self, key):
        return hash(key) % len(self._pairs)
That’s much better now. The three test cases that still fail use wrong assumptions about the hash table’s length. Change those assumptions to make the tests pass:
# test_hashtable.py

# ...

def test_should_insert_key_value_pairs():
    hash_table = HashTable(capacity=100)

    hash_table["hola"] = "hello"
    hash_table[98.6] = 37
    hash_table[False] = True

    assert ("hola", "hello") in hash_table.pairs
    assert (98.6, 37) in hash_table.pairs
    assert (False, True) in hash_table.pairs

    assert len(hash_table) == 3

# ...

def test_should_delete_key_value_pair(hash_table):
    assert "hola" in hash_table
    assert ("hola", "hello") in hash_table.pairs
    assert len(hash_table) == 3

    del hash_table["hola"]

    assert "hola" not in hash_table
    assert ("hola", "hello") not in hash_table.pairs
    assert len(hash_table) == 2

# ...

def test_should_update_value(hash_table):
    assert hash_table["hola"] == "hello"

    hash_table["hola"] = "hallo"

    assert hash_table["hola"] == "hallo"
    assert hash_table[98.6] == 37
    assert hash_table[False] is True
    assert len(hash_table) == 3
You’re back in the game, but the ZeroDivisionError was a red flag that should immediately make you want to add additional test cases:
# test_hashtable.py

# ...

def test_should_not_create_hashtable_with_zero_capacity():
    with pytest.raises(ValueError):
        HashTable(capacity=0)

def test_should_not_create_hashtable_with_negative_capacity():
    with pytest.raises(ValueError):
        HashTable(capacity=-100)
Creating a HashTable with a non-positive capacity doesn’t make much sense. How could you have a container with a negative length? So you should raise an exception if someone were to attempt that, either on purpose or by accident. The standard way to indicate such incorrect input arguments in Python is by raising a ValueError exception:
# hashtable.py

# ...

class HashTable:
    def __init__(self, capacity):
        if capacity < 1:
            raise ValueError("Capacity must be a positive number")
        self._pairs = capacity * [None]

    # ...
If you’re diligent, then you should probably also check for invalid argument types, but that’s beyond the scope of this tutorial. You can treat it as a voluntary exercise.
Next, add another scenario for testing the length of a non-empty hash table provided as a fixture by pytest:
# test_hashtable.py

# ...

def test_should_report_length(hash_table):
    assert len(hash_table) == 3
There are three key-value pairs, so the length of the hash table should also be three. This test shouldn’t require any additional code. Finally, because you’re in the refactoring phase now, you can add a bit of syntactic sugar by introducing the .capacity property and using it where possible:
# test_hashtable.py

# ...

def test_should_report_capacity_of_empty_hash_table():
    assert HashTable(capacity=100).capacity == 100

def test_should_report_capacity(hash_table):
    assert hash_table.capacity == 100
The capacity is constant and determined at the hash table’s creation time. You can derive it from the length of the underlying list of pairs:
# hashtable.py

# ...

class HashTable:
    # ...

    @property
    def capacity(self):
        return len(self._pairs)

    def _index(self, key):
        return hash(key) % self.capacity
As you introduce new vocabulary to your problem domain, it helps you discover new opportunities for more accurate, unambiguous naming. For example, you’ve seen the word pairs used interchangeably to refer to both the actual key-value pairs stored in your hash table and an internal list of slots for pairs. It might be a good opportunity to refactor your code by changing ._pairs to ._slots everywhere.
Then, one of your earlier test cases will communicate its intent more clearly:
# test_hashtable.py

# ...

def test_should_create_empty_value_slots():
    assert HashTable(capacity=3)._slots == [None, None, None]
Perhaps it would make even more sense to rename this test by replacing the word value with pair in it:
# test_hashtable.py

# ...

def test_should_create_empty_pair_slots():
    assert HashTable(capacity=3)._slots == [None, None, None]
You might think that such philosophical musings aren’t necessary. However, the more descriptive your names, the more readable your code will be—if not for others, then certainly for you in the future. There are even books and jokes about it. Your tests are a form of documentation, so it pays off to maintain the same level of attention to detail for them as for your code under test.
Make the Hash Table Iterable
Python lets you iterate over a dictionary through the keys, the values, or the key-value pairs known as items. You want the same behavior in your custom hash table, so you start by sketching out a few test cases:
# test_hashtable.py

# ...

def test_should_iterate_over_keys(hash_table):
    for key in hash_table.keys:
        assert key in ("hola", 98.6, False)

def test_should_iterate_over_values(hash_table):
    for value in hash_table.values:
        assert value in ("hello", 37, True)

def test_should_iterate_over_pairs(hash_table):
    for key, value in hash_table.pairs:
        assert key in hash_table.keys
        assert value in hash_table.values
Iteration by keys, values, or key-value pairs works out of the box with the current implementation because the underlying sets and lists can already handle that. On the other hand, to make instances of your HashTable class iterable, you must define another special method, which will let you cooperate directly with for loops:
# test_hashtable.py

# ...

def test_should_iterate_over_instance(hash_table):
    for key in hash_table:
        assert key in ("hola", 98.6, False)
Unlike before, you hand over a reference to the HashTable instance here, but the behavior is the same as if you were iterating over the .keys property. This behavior is compatible with the built-in dict in Python.
The special method you need, .__iter__(), must return an iterator object, which the loop uses internally:
# hashtable.py

# ...

class HashTable:
    # ...

    def __iter__(self):
        yield from self.keys
This is an example of a generator iterator, which takes advantage of the yield keyword in Python.
Note: The yield from expression delegates the iteration to a sub-generator, which can be another iterable object, such as a list or a set.
The yield keyword lets you define an in-place iterator using a functional style without creating another class. The special method named .__iter__() gets called by the for loop when it starts.
Okay, only a few nonessential features are missing from your hash table at this point.
Represent the Hash Table in Text
The next bit that you’re going to implement in this section will make your hash table look pleasant when printed onto the standard output. The textual representation of your hash table will look similar to a Python dict literal:
# test_hashtable.py

# ...

def test_should_use_dict_literal_for_str(hash_table):
    assert str(hash_table) in {
        "{'hola': 'hello', 98.6: 37, False: True}",
        "{'hola': 'hello', False: True, 98.6: 37}",
        "{98.6: 37, 'hola': 'hello', False: True}",
        "{98.6: 37, False: True, 'hola': 'hello'}",
        "{False: True, 'hola': 'hello', 98.6: 37}",
        "{False: True, 98.6: 37, 'hola': 'hello'}",
    }
The literal uses curly braces, commas, and colons, while keys and values have their respective representations. For example, strings are enclosed in single apostrophes. As you don’t know the exact order of the key-value pairs, you check if the string representation of your hash table conforms to one of the possible pair permutations.
To make your class work with the built-in str() function, you must implement the corresponding special method in HashTable:
# hashtable.py

# ...

class HashTable:
    # ...

    def __str__(self):
        pairs = []
        for key, value in self.pairs:
            pairs.append(f"{key!r}: {value!r}")
        return "{" + ", ".join(pairs) + "}"
You iterate over keys and values through the .pairs property and use f-strings to format the individual pairs. Notice the !r conversion flag in the template string, which enforces calling repr() instead of the default str() on keys and values. This ensures more explicit representation, which varies between data types. For example, it wraps strings in single apostrophes.
The difference between str() and repr() is subtler. In general, both are meant for converting objects to strings. However, while you can expect str() to return human-friendly text, repr() often returns a valid piece of Python code that you can evaluate to recreate the original object:
>>> from fractions import Fraction
>>> quarter = Fraction("1/4")

>>> str(quarter)
'1/4'

>>> repr(quarter)
'Fraction(1, 4)'

>>> eval(repr(quarter))
Fraction(1, 4)
In this example, the string representation of a Python fraction is '1/4', but the canonical string representation of the same object represents a call to the Fraction class.
You can achieve a similar effect in your HashTable class. Unfortunately, your class initializer doesn’t allow for creating new instances out of values at the moment. You’ll address this by introducing a class method that’ll let you create HashTable instances from Python dictionaries:
# test_hashtable.py

# ...

def test_should_create_hashtable_from_dict():
    dictionary = {"hola": "hello", 98.6: 37, False: True}

    hash_table = HashTable.from_dict(dictionary)

    assert hash_table.capacity == len(dictionary) * 10
    assert hash_table.keys == set(dictionary.keys())
    assert hash_table.pairs == set(dictionary.items())
    assert unordered(hash_table.values) == list(dictionary.values())
This plays nicely with your earlier conversion, which was in the opposite direction. However, you’ll need to assume a sufficiently large capacity for the hash table to hold all the key-value pairs from the original dictionary. A reasonable estimate seems to be ten times the number of pairs. You can hard-code it for now:
# hashtable.py

# ...

class HashTable:

    @classmethod
    def from_dict(cls, dictionary):
        hash_table = cls(len(dictionary) * 10)
        for key, value in dictionary.items():
            hash_table[key] = value
        return hash_table
You create a new hash table and set its capacity using an arbitrary factor. Then, you insert key-value pairs by copying them from the dictionary passed as an argument to the method. You can allow for overriding the default capacity if you want to, so add a similar test case:
# test_hashtable.py

# ...

def test_should_create_hashtable_from_dict_with_custom_capacity():
    dictionary = {"hola": "hello", 98.6: 37, False: True}

    hash_table = HashTable.from_dict(dictionary, capacity=100)

    assert hash_table.capacity == 100
    assert hash_table.keys == set(dictionary.keys())
    assert hash_table.pairs == set(dictionary.items())
    assert unordered(hash_table.values) == list(dictionary.values())
To make the capacity optional, you may take advantage of the short-circuit evaluation of Boolean expressions:
# hashtable.py

# ...

class HashTable:

    @classmethod
    def from_dict(cls, dictionary, capacity=None):
        hash_table = cls(capacity or len(dictionary) * 10)
        for key, value in dictionary.items():
            hash_table[key] = value
        return hash_table
If the capacity isn’t specified, then you fall back to the default behavior, which multiplies the dictionary’s length by ten. With this, you’re finally able to provide a canonical string representation for your HashTable instances:
# test_hashtable.py

# ...

def test_should_have_canonical_string_representation(hash_table):
    assert repr(hash_table) in {
        "HashTable.from_dict({'hola': 'hello', 98.6: 37, False: True})",
        "HashTable.from_dict({'hola': 'hello', False: True, 98.6: 37})",
        "HashTable.from_dict({98.6: 37, 'hola': 'hello', False: True})",
        "HashTable.from_dict({98.6: 37, False: True, 'hola': 'hello'})",
        "HashTable.from_dict({False: True, 'hola': 'hello', 98.6: 37})",
        "HashTable.from_dict({False: True, 98.6: 37, 'hola': 'hello'})",
    }
As before, you check for all the possible attribute order permutations in the resulting representation. The canonical string representation of a hash table looks mostly the same as with str(), but it also wraps the dict literal in a call to your new .from_dict() class method. The corresponding implementation delegates to the special method .__str__() by calling the built-in str() function:
# hashtable.py

# ...

class HashTable:
    # ...

    def __repr__(self):
        cls = self.__class__.__name__
        return f"{cls}.from_dict({str(self)})"
Note that you don’t hard-code the class name, to avoid issues if you ever choose to rename your class at a later time.
Your hash table prototype is almost ready, as you’ve implemented nearly all core and nonessential features from the list mentioned in the introduction to this section. You’ve just added the ability to create a hash table from a Python dict and provided string representations for its instances. The last and final bit is ensuring that hash table instances can be compared by value.
Test the Equality of Hash Tables
Hash tables are like sets in the sense that they don’t impose any specific order for their contents. In fact, hash tables and sets have more in common than you might think, as they’re both backed by a hash function. It’s the hash function that makes the key-value pairs in a hash table unordered. However, remember that starting from Python 3.6, dict does indeed retain insertion order as an implementation detail.
Two hash tables should compare equal if and only if they have the same set of key-value pairs. However, Python compares object identities by default because it doesn’t know how to interpret values of custom data types. So, two instances of your hash table would always compare unequal even if they shared the same set of key-value pairs.
To fix this, you can implement the equality test operator (==) by providing the special .__eq__() method in your HashTable class. Additionally, Python will call this method for you to evaluate the not equal operator (!=) unless you also implement .__ne__() explicitly.
You want the hash table to be equal to itself, its copy, or another instance with the same key-value pairs regardless of their order. Conversely, a hash table should not be equal to an instance with a different set of key-value pairs or a completely different data type:
# test_hashtable.py

# ...

def test_should_compare_equal_to_itself(hash_table):
    assert hash_table == hash_table

def test_should_compare_equal_to_copy(hash_table):
    assert hash_table is not hash_table.copy()
    assert hash_table == hash_table.copy()

def test_should_compare_equal_different_key_value_order(hash_table):
    h1 = HashTable.from_dict({"a": 1, "b": 2, "c": 3})
    h2 = HashTable.from_dict({"b": 2, "a": 1, "c": 3})
    assert h1 == h2

def test_should_compare_unequal(hash_table):
    other = HashTable.from_dict({"different": "value"})
    assert hash_table != other

def test_should_compare_unequal_another_data_type(hash_table):
    assert hash_table != 42
You use .from_dict(), introduced in the previous subsection, to quickly populate new hash tables with values. You can take advantage of the same class method to make a new copy of a hash table instance. Here’s the code that satisfies these test cases:
# hashtable.py

# ...

class HashTable:
    # ...

    def __eq__(self, other):
        if self is other:
            return True
        if type(self) is not type(other):
            return False
        return set(self.pairs) == set(other.pairs)

    # ...

    def copy(self):
        return HashTable.from_dict(dict(self.pairs), self.capacity)
The special method .__eq__() takes some object to compare as an argument. If that object happens to be the current instance of HashTable, then you return True because the same identity implies value equality. Otherwise, you proceed by comparing the types and the sets of key-value pairs. The conversion to sets helps make the ordering irrelevant even if you decide to turn .pairs into another ordered list in the future.
By the way, the resulting copy should have not only the same key-value pairs but also the same capacity as the source hash table. At the same time, two hash tables with different capacities should still compare equal:
# test_hashtable.py

# ...

def test_should_copy_keys_values_pairs_capacity(hash_table):
    copy = hash_table.copy()
    assert copy is not hash_table
    assert set(hash_table.keys) == set(copy.keys)
    assert unordered(hash_table.values) == copy.values
    assert set(hash_table.pairs) == set(copy.pairs)
    assert hash_table.capacity == copy.capacity

def test_should_compare_equal_different_capacity():
    data = {"a": 1, "b": 2, "c": 3}
    h1 = HashTable.from_dict(data, capacity=50)
    h2 = HashTable.from_dict(data, capacity=100)
    assert h1 == h2
These two tests will work with your current HashTable implementation, so you don’t need to code anything extra.
Your custom hash table prototype is still missing a couple of nonessential features that the built-in dictionary provides. You may try adding them yourself as an exercise. For example, you could replicate other methods from Python dictionaries, such as dict.clear() or dict.update(). Other than that, you might implement one of the bitwise operators supported by dict since Python 3.9, which allow for a union operation.
Well done! This is the finished test suite for the tutorial, and your hash table has passed all unit tests. Give yourself a well-deserved pat on the back because that was a heck of a great job. Or was it?
Suppose you reduce the capacity of your hash table to only account for the inserted pairs. The following hash table should accommodate all three key-value pairs stored in the source dictionary:
>>> from hashtable import HashTable
>>> source = {"hola": "hello", 98.6: 37, False: True}
>>> hash_table = HashTable.from_dict(source, capacity=len(source))
>>> str(hash_table)
'{False: True}'
However, when you reveal the keys and values of the resulting hash table, you’ll sometimes find that there are fewer items. To make this code snippet repeatable, run it with hash randomization disabled by setting the PYTHONHASHSEED environment variable to 0.
More often than not, you’ll end up losing information even though there’s enough space available in the hash table. That’s because most hash functions aren’t perfect, causing hash collisions, which you’ll learn how to resolve next.
Resolve Hash Code Collisions
In this section, you’ll explore the two most common strategies for dealing with hash code collisions, and you’ll implement them in your HashTable class. If you’d like to follow the examples below, then don’t forget to set the PYTHONHASHSEED variable to 0 to disable Python’s hash randomization.
By now, you should already have a good idea of what a hash collision is. It’s when two keys produce identical hash code, leading distinct values to collide with each other at the same index in the hash table. For example, in a hash table with one hundred slots, the keys "easy" and "difficult" happen to share the same index when hash randomization is disabled:
>>> hash("easy") % 100
43

>>> hash("difficult") % 100
43
As of now, your hash table can’t detect attempts at storing different values in the same slot:
>>> from hashtable import HashTable

>>> hash_table = HashTable(capacity=100)
>>> hash_table["easy"] = "Requires little effort"
>>> hash_table["difficult"] = "Needs much skill"

>>> print(hash_table)
{'difficult': 'Needs much skill'}

>>> hash_table["easy"]
'Needs much skill'
Not only do you end up overwriting the pair identified by the "easy" key, but even worse, retrieving the value of this now-nonexistent key gives you an incorrect answer!
There are three strategies available to you for addressing hash collisions:
| Strategy | Description |
|---|---|
| Perfect Hashing | Choose a perfect hash function to avoid hash collisions in the first place. |
| Open Addressing | Spread the collided values in a predictable way that lets you retrieve them later. |
| Closed Addressing | Keep the collided values in a separate data structure to search through. |
While perfect hashing is only possible when you know all the values up front, the other two hash collision resolution methods are more practical, so you’ll take a closer look at them in this tutorial. Note that open addressing can be represented by several specific algorithms, including:
In contrast, closed addressing is best known for separate chaining. Additionally, there’s also coalesced hashing, which combines the ideas behind both open and closed addressing into one algorithm.
To follow test-driven development, you’re going to need to design a test case first. But how do you test a hash collision? Python’s built-in function uses hash randomization for some of its data types by default, which makes predicting its behavior extremely difficult. Choosing a hash seed manually with the PYTHONHASHSEED environment variable would be impractical and make your test cases fragile.
The best way to work around this is using a mocking library, such as Python’s unittest.mock:
from unittest.mock import patch

@patch("builtins.hash", return_value=42)
def test_should_detect_hash_collision(hash_mock):
    assert hash("foobar") == 42
Patching temporarily replaces one object with another. For example, you can substitute the built-in hash() function with a fake one that always returns the same expected value, making your tests repeatable. This substitution only has an effect during the function call, after which the original hash() is brought back again.
You can apply the @patch decorator against your whole test function or limit the mock object’s scope with a context manager:
from unittest.mock import patch

def test_should_detect_hash_collision():
    assert hash("foobar") not in [1, 2, 3]
    with patch("builtins.hash", side_effect=[1, 2, 3]):
        assert hash("foobar") == 1
        assert hash("foobar") == 2
        assert hash("foobar") == 3
With a context manager, you can access the built-in hash() function as well as its mocked version within the same test case. You could even have multiple flavors of the mocked function if you wanted to. The side_effect parameter lets you specify an exception to raise or a sequence of values that your mock object will return on consecutive invocations.
In the remaining part of this tutorial, you’ll continue adding more features to your HashTable class without strictly following test-driven development. New tests will be omitted for brevity, while modifying the class will cause some of the existing test to fail. However, you’ll find a working test suite in the accompanying materials available for download.
Find Collided Keys Through Linear Probing
Stop for a moment to understand the theory behind hash code collisions. When it comes to handling them, linear probing is one of the oldest, most straightforward, and most effective techniques, all at the same time. It requires a few extra steps for the insert, lookup, delete, and update operations, which you’re about to learn.
Consider a sample hash table representing the Python glossary with common acronyms. It has a capacity of ten slots in total, but four of them are already taken by the following key-value pairs:
| Index | Key | Value |
|---|---|---|
| 0 | ||
| 1 | BDFL | Benevolent Dictator For Life |
| 2 | ||
| 3 | REPL | Read–Evaluate–Print Loop |
| 4 | ||
| 5 | ||
| 6 | ||
| 7 | ||
| 8 | PEP | Python Enhancement Proposal |
| 9 | WSGI | Web Server Gateway Interface |
Now you want to put another term into your glossary to define the MRO acronym, which stands for method resolution order. You calculate the hash code of the key and truncate it with the modulo operator to get an index between zero and nine:
>>> hash("MRO")
8199632715222240545

>>> hash("MRO") % 10
5
Instead of using the modulo operator, you could alternatively truncate the hash code with a proper bitmask, which is how Python’s dict works internally.
Note: To get consistent hash codes, set the PYTHONHASHSEED environment variable to 0 to disable hash randomization.
Great! There’s a free slot in your hash table at index five, where you can insert a new key-value pair:
| Index | Key | Value |
|---|---|---|
| 0 | ||
| 1 | BDFL | Benevolent Dictator For Life |
| 2 | ||
| 3 | REPL | Read–Evaluate–Print Loop |
| 4 | ||
| 5 | MRO | Method Resolution Order |
| 6 | ||
| 7 | ||
| 8 | PEP | Python Enhancement Proposal |
| 9 | WSGI | Web Server Gateway Interface |
So far, so good. Your hash table is still 50 percent free space, so you keep adding more terms until you try inserting the EAFP acronym. It turns out the hash code of EAFP truncates to one, which is the index of a slot occupied by the BDFL term:
>>> hash("EAFP")
-159847004290706279

>>> hash("BDFL")
-6396413444439073719

>>> hash("EAFP") % 10
1

>>> hash("BDFL") % 10
1
The likelihood of hashing two different keys into colliding hash codes is relatively small. However, projecting those hash codes onto a small range of array indices is a different story. With linear probing, you can detect and mitigate such collisions by storing the collided key-value pairs next to each other:
| Index | Key | Value |
|---|---|---|
| 0 | ||
| 1 | BDFL | Benevolent Dictator For Life |
| 2 | EAFP | Easier To Ask For Forgiveness Than Permission |
| 3 | REPL | Read–Evaluate–Print Loop |
| 4 | ||
| 5 | MRO | Method Resolution Order |
| 6 | ||
| 7 | ||
| 8 | PEP | Python Enhancement Proposal |
| 9 | WSGI | Web Server Gateway Interface |
Although BDFL and EAFP keys give the same index equal to one, only the first inserted key-value pair winds up taking it. Whichever pair comes second will be placed next to the occupied index. Therefore, linear probing makes the hash table sensitive to the insertion order.
Note: When you use linear probing or other hash collision resolution methods, then you can’t rely merely on the hash code to find the corresponding slot. You also need to compare the keys.
Consider adding another acronym, ABC, for abstract base classes, whose hash code truncates to index eight. You can’t insert it in the following position this time because it’s already taken by WSGI. Under normal circumstances, you’d continue looking for a free slot further down, but because you reached the last index, you must wrap around and insert the new acronym at index zero:
| Index | Key | Value |
|---|---|---|
| 0 | ABC | Abstract Base Class |
| 1 | BDFL | Benevolent Dictator For Life |
| 2 | EAFP | Easier To Ask For Forgiveness Than Permission |
| 3 | REPL | Read–Evaluate–Print Loop |
| 4 | ||
| 5 | MRO | Method Resolution Order |
| 6 | ||
| 7 | ||
| 8 | PEP | Python Enhancement Proposal |
| 9 | WSGI | Web Server Gateway Interface |
To search for key-value pairs stuffed into the hash table like this, follow a similar algorithm. Start by looking at the expected index first. For example, to find the value associated with the ABC key, calculate its hash code and map it to an index:
>>> hash("ABC")
-4164790459813301872

>>> hash("ABC") % 10
8
There’s a key-value pair stored at index eight, but it has a different key equal to PEP, so you skip it by increasing the index. Again, that slot is occupied by an unrelated term, WSGI, so you bounce off and wrap around to finally find your pair with a matching key at index zero. That’s your answer.
In general, there are three possible stopping conditions for the search operation:
- You found a matching key.
- You exhausted all slots without finding the matching key.
- You found an empty slot, which also indicates a missing key.
The last point makes deleting an existing key-value pair more tricky. If you just removed an entry from the hash table, then you’d introduce a blank slot, which would stop the lookup there regardless of any previous collisions. To make the collided key-value pairs reachable again, you’d have to either rehash them or use a lazy deletion strategy.
The latter is less difficult to implement but has the additional cost of increasing the number of necessary lookup steps. Essentially, rather than deleting a key-value pair, you replace it with a sentinel value, depicted by a red cross (❌) below, which makes finding entries that had previously collided possible. Say you wanted to delete the BDFL and PEP terms:
| Index | Key | Value |
|---|---|---|
| 0 | ABC | Abstract Base Class |
| 1 | ❌ | |
| 2 | EAFP | Easier To Ask For Forgiveness Than Permission |
| 3 | REPL | Read–Evaluate–Print Loop |
| 4 | ||
| 5 | MRO | Method Resolution Order |
| 6 | ||
| 7 | ||
| 8 | ❌ | |
| 9 | WSGI | Web Server Gateway Interface |
You’ve replaced the corresponding key-value pairs with two instances of the sentinel value. Later, when you look for the ABC key, for example, you bounce off the sentinel at index eight, then continue to WSGI, and finally arrive at index zero with the matching key. Without one of the sentinels, you’d stop the search much earlier, falsely concluding there’s no such key.
Note: Your hash table’s capacity remains unaffected because you’re free to overwrite sentinels when inserting new key-value pairs. On the other hand, if you were to fill up the hash table and delete most of its elements, then you’d practically end up with the linear search algorithm.
So far, you’ve learned about insertion, deletion, and lookup. However, there’s one catch about updating the value of an existing entry in a hash table with linear probing. When searching for a pair to update, you should only skip the slot if it’s occupied by another pair with a different key or if it contains a sentinel value. On the other hand, if the slot is empty or has a matching key, then you should set the new value.
In the next subsection, you’re going to modify your HashTable class to use linear probing for hash collision resolution.
Use Linear Probing in the HashTable Class
After a brief detour into linear probing theory, you’re back to coding now. Because linear probing will be used in all four basic CRUD operations in the hash table, it helps to write a helper method in your class to encapsulate the logic of visiting the hash table’s slots:
# hashtable.py

# ...

class HashTable:
    # ...

    def _probe(self, key):
        index = self._index(key)
        for _ in range(self.capacity):
            yield index, self._slots[index]
            index = (index + 1) % self.capacity
Given a key, you start by using the corresponding hash code to find its expected index in the hash table. Then, you loop through all the available slots in the hash table, starting from the calculated index. At each step, you return the current index and the associated pair, which might be empty or marked as deleted. Afterward, you increase the index, wrapping around the origin if necessary.
Next, you can rewrite your .__setitem__() method. Don’t forget about the need for a new sentinel value. This value will let you differentiate between slots that have never been occupied and those that had collided before but are now deleted:
# hashtable.py

DELETED = object()

# ...

class HashTable:
    # ...

    def __setitem__(self, key, value):
        for index, pair in self._probe(key):
            if pair is DELETED: continue
            if pair is None or pair.key == key:
                self._slots[index] = Pair(key, value)
                break
        else:
            raise MemoryError("Not enough capacity")
If the slot is empty or contains a pair with the matching key, then you reassign a new key-value pair at the current index and stop the linear probing. Otherwise, if another pair occupies that slot and has a different key, or the slot is marked as deleted, then you move forward until you find a free slot or exhaust all the available slots. If you run out of available slots, you raise a MemoryError exception to indicate the hash table’s insufficient capacity.
Note: Coincidentally, the .__setitem__() method also covers updating the value of an existing pair. Because pairs are represented by immutable tuples, you replace the entire pair with the matching key and not just its value component.
Getting and deleting key-value pairs from a hash table using linear probing works almost the same way:
# hashtable.py

DELETED = object()

# ...

class HashTable:
    # ...

    def __getitem__(self, key):
        for _, pair in self._probe(key):
            if pair is None:
                raise KeyError(key)
            if pair is DELETED:
                continue
            if pair.key == key:
                return pair.value
        raise KeyError(key)

    def __delitem__(self, key):
        for index, pair in self._probe(key):
            if pair is None:
                raise KeyError(key)
            if pair is DELETED:
                continue
            if pair.key == key:
                self._slots[index] = DELETED
                break
        else:
            raise KeyError(key)
The only difference is in the highlighted lines. To delete a pair, you must know where it’s located in the hash table to replace it with the sentinel value. On the other hand, you’re only interested in the corresponding value when searching by key. If this code duplication bothers you, then you can try refactoring it as an exercise. However, having it written explicitly helps make the point.
Note: This is a textbook implementation of the hash table, which probes elements by comparing keys using the equality test operator (==). However, it’s a potentially costly operation, which real-life implementations avoid by storing the hash code, along with keys and values, in triplets rather than pairs. Hash codes are cheap to compare, on the other hand.
You can leverage the hash-equal contract to speed things up. If two hash codes are different, then they’re guaranteed to stem from different keys, so there’s no need to perform a costly equality test in the first place. This trick dramatically reduces the number of key comparisons.
There’s yet another important detail to note. The hash table’s slots can no longer be in one of only two states—that is, empty or occupied. Inserting the sentinel value into the hash table to mark a slot as deleted messes up the hash table’s .pairs, .keys, and .values properties and reports the length incorrectly. To fix this, you have to filter out both None and DELETED values when returning key-value pairs:
# hashtable.py

# ...

class HashTable:
    # ...

    @property
    def pairs(self):
        return {
            pair for pair in self._slots
            if pair not in (None, DELETED)
        }
With that little update, your hash table should now be able to deal with hash collisions by spreading the collided pairs and looking for them in a linear fashion:
>>> from unittest.mock import patch
>>> from hashtable import HashTable

>>> with patch("builtins.hash", return_value=24):
...     hash_table = HashTable(capacity=100)
...     hash_table["easy"] = "Requires little effort"
...     hash_table["difficult"] = "Needs much skill"

>>> hash_table._slots[24]
Pair(key='easy', value='Requires little effort')

>>> hash_table._slots[25]
Pair(key='difficult', value='Needs much skill')
Despite having the same hash code equal to twenty-four, both collided keys, "easy" and "difficult", appear next to each other on the ._slots list. Notice they’re listed in the same order in which you added them to the hash table. Try swapping the insertion order or changing the hash table’s capacity and observe how that affects the slots.
As of now, the hash table’s capacity remains fixed. Before implementing linear probing, you remained oblivious and kept overwriting collided values. Now, you can detect when there’s no more space in your hash table and raise a corresponding exception. However, wouldn’t it be better to let the hash table dynamically scale its capacity as necessary?
Let the Hash Table Resize Automatically
There are two different strategies when it comes to resizing a hash table. You can wait until the very last moment and only resize the hash table when it becomes full, or you can do so eagerly after reaching a certain threshold. Both ways have their pros and cons. The lazy strategy is arguably more straightforward to implement, so you’ll take a closer look at it first. However, it can lead to more collisions and worse performance.
The only time you absolutely have to increase the number of slots in your hash table is when the insertion of a new pair fails, raising the MemoryError exception. Go ahead and replace the raise statement with a call to another helper method that you’ll create, followed by a recursive call to .__setitem__() through the square brackets syntax:
# hashtable.py

# ...

class HashTable:
    # ...

    def __setitem__(self, key, value):
        for index, pair in self._probe(key):
            if pair is DELETED: continue
            if pair is None or pair.key == key:
                self._slots[index] = Pair(key, value)
                break
        else:
            self._resize_and_rehash()
            self[key] = value
When you determine that all slots are occupied, by either a legitimate pair or the sentinel value, you must allocate more memory, copy the existing pairs, and try inserting that new key-value pair again.
Note: Putting your old key-value pairs into a bigger hash table will make them hash to entirely different slots. Rehashing takes advantage of the extra slots that you just created, reducing the number of collisions in the new hash table. Moreover, it saves space by reclaiming slots that used to be marked as deleted with the sentinel value. You don’t need to worry about past collisions, because the key-value pairs will find new slots anyway.
Now, implement resizing and rehashing in the following way:
# hashtable.py

# ...

class HashTable:
    # ...

    def _resize_and_rehash(self):
        copy = HashTable(capacity=self.capacity * 2)
        for key, value in self.pairs:
            copy[key] = value
        self._slots = copy._slots
Create a local copy of the hash table. Because it’s difficult to predict how many more slots you may need, take a wild guess and double the capacity size. Then, iterate over your existing set of key-value pairs and insert them into the copy. Finally, reassign the ._slots attribute in your instance so that it points to the enlarged list of slots.
Your hash table can now dynamically increase its size when needed, so give it a spin. Create an empty hash table with a capacity of one and try inserting some key-value pairs into it:
In successfully inserting twenty key-value pairs, you never got any errors. With this rough depiction, you can clearly see the doubling of slots, which takes place when the hash table becomes full and needs more slots.
Thanks to the automatic resizing that you’ve just implemented, you can assume a default capacity for new hash tables. This way, creating an instance of the HashTable class will no longer require specifying the initial capacity, although doing so could improve performance. A common choice for the initial capacity is a small power of two, such as eight:
# hashtable.py

# ...

class HashTable:
    @classmethod
    def from_dict(cls, dictionary, capacity=None):
        hash_table = cls(capacity or len(dictionary))
        for key, value in dictionary.items():
            hash_table[key] = value
        return hash_table

    def __init__(self, capacity=8):
        if capacity < 1:
            raise ValueError("Capacity must be a positive number")
        self._slots = capacity * [None]

    # ...
That makes it possible to create hash tables with a call to the parameterless initializer HashTable(). Note that you can also update your class method HashTable.from_dict() to use the dictionary’s length as the initial capacity. Previously, you multiplied the dictionary’s length by an arbitrary factor, which was necessary to make your tests pass, due to unhandled hash collisions.
As stated before, there’s one problem with the lazy resizing strategy, and that’s the increased likelihood of collisions. You’re going to address that next.
Calculate the Load Factor
Waiting until your hash table becomes saturated isn’t optimal. You can try an eager strategy to resize the hash table before reaching its total capacity, keeping the collisions from happening in the first place. How do you decide on the best moment to resize and rehash? Use the load factor!
The load factor is the ratio of the number of currently occupied slots, including the deleted ones, to all slots in the hash table. The higher the load factor, the bigger the chance of a hash collision, which results in worse lookup performance. Therefore, you want the load factor to remain relatively small at all times. Bumping up the hash table’s size is due whenever the load factor reaches a certain threshold.
The choice of a particular threshold is a classic example of the space–time trade-off in computer science. More frequent hash table resizing is cheaper and leads to better performance at the cost of more memory consumption. Conversely, waiting longer can save you some memory, but the key lookups will be slower. The chart below depicts the relationship between the amount of allocated memory and the average number of collisions:

The data behind this chart measures the average number of collisions caused by inserting one hundred elements into an empty hash table with an initial capacity of one. The measurement was repeated many times for various load factor thresholds, at which the hash table resized itself in discrete jumps by doubling its capacity.
The intersection of both plots, which appears at around 0.75, indicates the threshold’s sweet spot, with the lowest amount of memory and number of collisions. Using a higher load factor threshold doesn’t provide significant memory savings, but it increases the number of collisions exponentially. A smaller threshold improves the performance but for a high price of mostly wasted memory. Remember that all you really need is one hundred slots!
You can experiment with different load factor thresholds, but resizing the hash table when 60 percent of its slots are taken might be a good starting point. Here’s how you can implement the load factor calculation in your HashTable class:
# hashtable.py

# ...

class HashTable:
    # ...

    @property
    def load_factor(self):
        occupied_or_deleted = [slot for slot in self._slots if slot]
        return len(occupied_or_deleted) / self.capacity
You start by filtering slots that are truthy, which would be anything but None, and then take the ratio according to the load factor’s definition. Note that if you decide to use a comprehension expression, then it must be a list comprehension to count all sentinel value occurrences. In this case, using a set comprehension would filter out the repeated markers of deleted pairs, leaving only one instance and resulting in a wrong load factor.
Next, modify your class to accept an optional load factor threshold and use it to eagerly resize and rehash the slots:
# hashtable.py

# ...

class HashTable:
    # ...

    def __init__(self, capacity=8, load_factor_threshold=0.6):
        if capacity < 1:
            raise ValueError("Capacity must be a positive number")
        if not (0 < load_factor_threshold <= 1):
            raise ValueError("Load factor must be a number between (0, 1]")
        self._slots = capacity * [None]
        self._load_factor_threshold = load_factor_threshold

    # ...

    def __setitem__(self, key, value):
        if self.load_factor >= self._load_factor_threshold:
            self._resize_and_rehash()

        for index, pair in self._probe(key):
            if pair is DELETED: continue
            if pair is None or pair.key == key:
                self._slots[index] = Pair(key, value)
                break
The load factor threshold defaults to 0.6, which means 60 percent of all slots are occupied. You use a weak inequality (>=) instead of a strict one (>) to account for the load factor threshold at its maximum value, which can never be greater than one. If the load factor equals one, then you must also resize the hash table before inserting another key-value pair.
Brilliant! Your hash table has just become a bit faster. That concludes the open addressing example in this tutorial. Next up, you’re going to resolve hash collisions using one of the most popular closed addressing techniques.
Isolate Collided Keys With Separate Chaining
Separate chaining is another extremely popular hash collision resolution method, perhaps even more widespread than linear probing. The idea is to group similar items by a common feature into so-called buckets to narrow down the search space. For example, you could imagine harvesting fruits and collecting them into color-coded baskets:
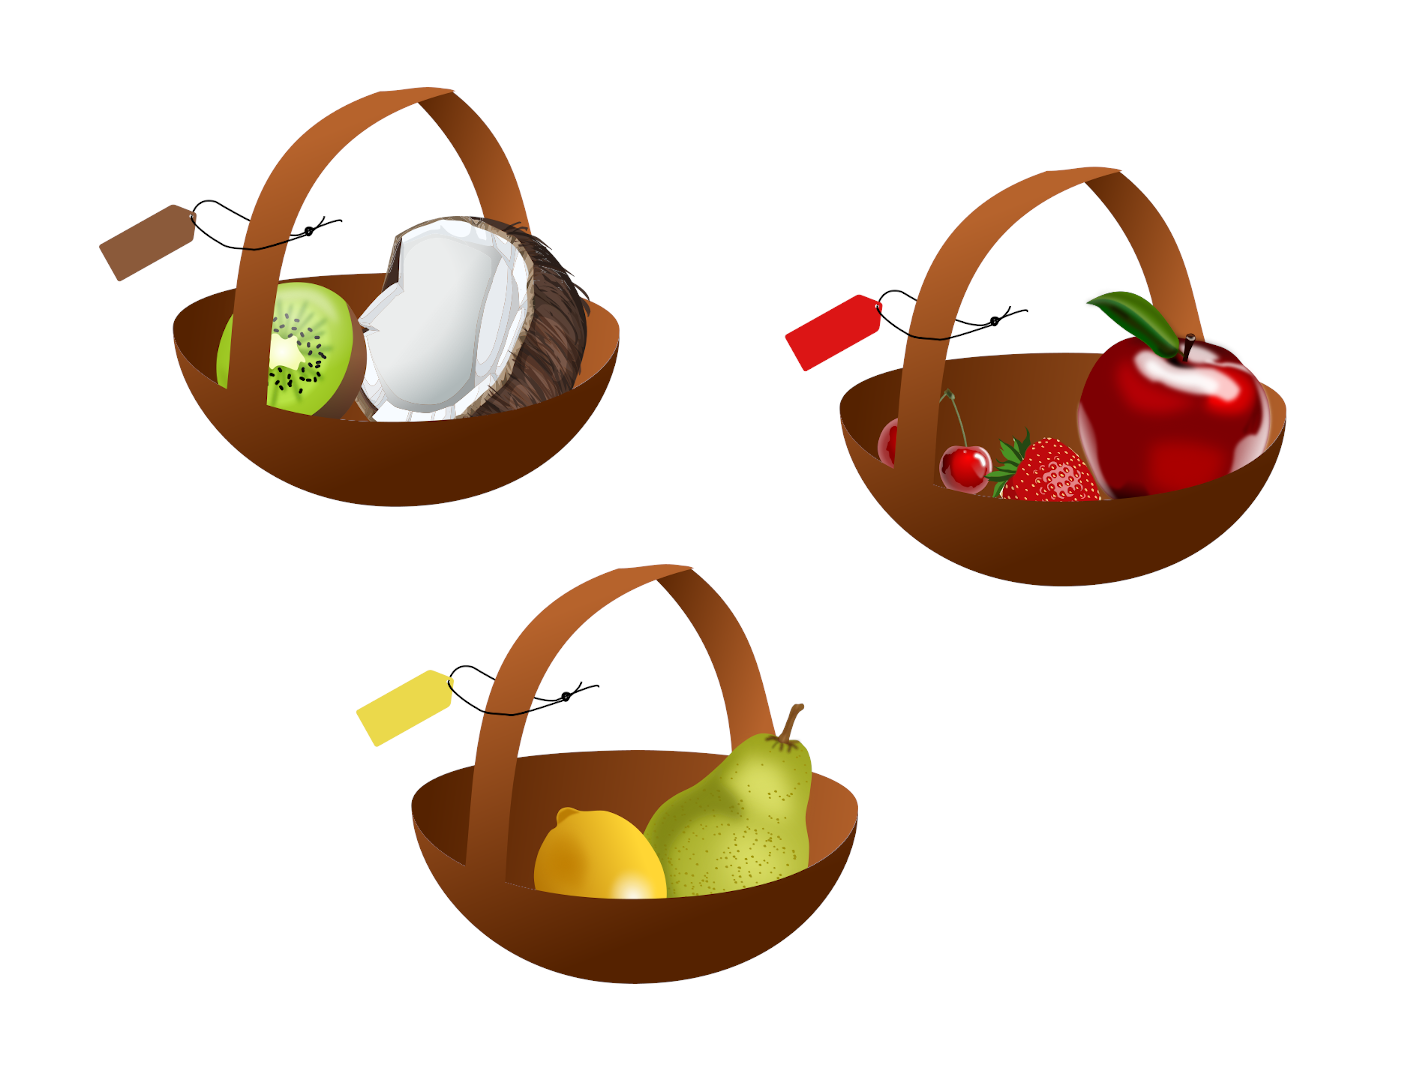
Each basket contains fruits of roughly the same color. So, when you’re craving an apple, for example, you only need to search through the basket labeled with red. In an ideal world, each basket should contain no more than one element, making the search instantaneous. You can think of the labels as hash codes and the fruits with the same color as the collided key-value pairs.
A hash table based on separate chaining is a list of references to buckets, typically implemented as linked lists that form chains of elements:
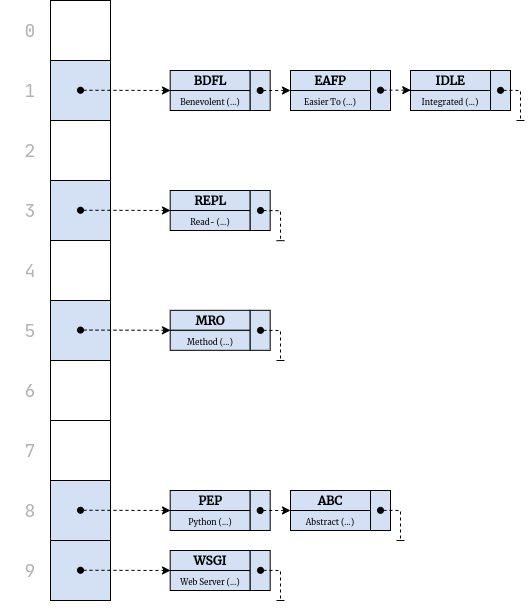
Each linked list contains key-value pairs whose keys share the same hash code due to a collision. When looking for a value by key, you need to locate the right bucket first, then traverse it using linear search to find the matching key, and finally return the corresponding value. Linear search just means going through each item in the bucket, one by one, until you find the right key.
Note: Linked lists’ elements have a small memory overhead because every node contains a reference to the next element. At the same time, such a memory layout makes appending and removing elements very quick compared to a regular array.
The visualizer below makes this interactive (it labels each bucket as a numbered slot): insert keys to watch collisions chain into a bucket, then find a key to locate its bucket and scan just that short chain. It uses a simple hash that sums the key’s character codes, so the arithmetic stays visible:
To adapt your HashTable class to use separate chaining, start by removing the ._probe() method and replacing slots with buckets. Now, instead of having a None value or a pair at each index, you’ll make each index hold a bucket that might be empty or not. Each bucket will be a linked list:
# hashtable.py

from collections import deque

# ...

class HashTable:
    # ...

    def __init__(self, capacity=8, load_factor_threshold=0.6):
        if capacity < 1:
            raise ValueError("Capacity must be a positive number")
        if not (0 < load_factor_threshold <= 1):
            raise ValueError("Load factor must be a number between (0, 1]")
        self._buckets = [deque() for _ in range(capacity)]
        self._load_factor_threshold = load_factor_threshold

    # ...

    def _resize_and_rehash(self):
        copy = HashTable(capacity=self.capacity * 2)
        for key, value in self.pairs:
            copy[key] = value
        self._buckets = copy._buckets
Instead of implementing a linked list from scratch, you may take advantage of Python’s double-ended queue, or deque, available in the collections module, which uses a doubly-linked list under the hood. It lets you append and remove elements more efficiently than a plain list.
Don’t forget to update the .pairs, .capacity, and .load_factor properties so that they refer to buckets instead of slots:
# hashtable.py

# ...

class HashTable:
    # ...

    @property
    def pairs(self):
        return {pair for bucket in self._buckets for pair in bucket}

    # ...

    @property
    def capacity(self):
        return len(self._buckets)

    # ...

    @property
    def load_factor(self):
        return len(self) / self.capacity
You no longer need the sentinel value to mark elements as deleted, so go ahead and remove the DELETED constant. This makes the key-value pairs and the load factor’s definitions more straightforward. The capacity is synonymous with the number of buckets because you want to keep at most one key-value pair in each bucket, minimizing the number of hash code collisions.
Note: The load factor defined like this can become greater than one when the number of key-value pairs stored in the hash table exceeds the number of buckets.
By the way, allowing too many collisions will effectively degenerate your hash table into a flat list with linear time complexity, significantly degrading its performance. Attackers might take advantage of this fact by artificially creating as many collisions as possible.
With separate chaining, all basic hash table operations boil down to finding the right bucket and searching through it, which makes the corresponding methods look similar:
# hashtable.py

# ...

class HashTable:
    # ...

    def __delitem__(self, key):
        bucket = self._buckets[self._index(key)]
        for index, pair in enumerate(bucket):
            if pair.key == key:
                del bucket[index]
                break
        else:
            raise KeyError(key)

    def __setitem__(self, key, value):
        if self.load_factor >= self._load_factor_threshold:
            self._resize_and_rehash()

        bucket = self._buckets[self._index(key)]
        for index, pair in enumerate(bucket):
            if pair.key == key:
                bucket[index] = Pair(key, value)
                break
        else:
            bucket.append(Pair(key, value))

    def __getitem__(self, key):
        bucket = self._buckets[self._index(key)]
        for pair in bucket:
            if pair.key == key:
                return pair.value
        raise KeyError(key)
Deque instances take care of updating their internal references when you delete an item by index. If you had used a custom linked list, you’d have to rewire the collided key-value pairs manually after each modification. As before, updating an existing key-value pair requires replacing the old one with a brand-new one because key-value pairs are immutable.
If you’d like to avoid repeating yourself, then try refactoring the three methods above using structural pattern matching, introduced in Python 3.10. You’ll find one possible solution in the accompanying materials.
Okay, you know how to cope with hash code collisions, and you’re now ready to move on. Next up, you’ll make your hash table return keys and values in their insertion order.
Retain Insertion Order in a Hash Table
Because the classic hash table data structure uses hashing to spread the keys uniformly and sometimes pseudo-randomly, it can’t guarantee their order. As a rule of thumb, you should never assume that hash table elements will come in a consistent order when you request them. But it may sometimes be useful or even necessary to impose a specific order on your elements.
Up until Python 3.6, the only way to enforce order on dictionary elements was to use the OrderedDict wrapper from the standard library. Later, the built-in dict data type started preserving the insertion order of the key-value pairs. Regardless, it may still be wise to assume a lack of element order to make your code compatible with older or alternative Python versions.
How can you replicate a similar insertion order preservation in your custom HashTable class? One way could be to remember the sequence of keys as you insert them and iterate over that sequence to return keys, values, and pairs. Start by declaring another internal field in your class:
# hashtable.py

# ...

class HashTable:
    # ...

    def __init__(self, capacity=8, load_factor_threshold=0.6):
        if capacity < 1:
            raise ValueError("Capacity must be a positive number")
        if not (0 < load_factor_threshold <= 1):
            raise ValueError("Load factor must be a number between (0, 1]")
        self._keys = []
        self._buckets = [deque() for _ in range(capacity)]
        self._load_factor_threshold = load_factor_threshold
It’s an empty list of keys that’ll grow and shrink as you modify the hash table’s contents:
# hashtable.py

# ...

class HashTable:
    # ...

    def __delitem__(self, key):
        bucket = self._buckets[self._index(key)]
        for index, pair in enumerate(bucket):
            if pair.key == key:
                del bucket[index]
                self._keys.remove(key)
                break
        else:
            raise KeyError(key)

    def __setitem__(self, key, value):
        if self.load_factor >= self._load_factor_threshold:
            self._resize_and_rehash()

        bucket = self._buckets[self._index(key)]
        for index, pair in enumerate(bucket):
            if pair.key == key:
                bucket[index] = Pair(key, value)
                break
        else:
            bucket.append(Pair(key, value))
            self._keys.append(key)
You remove the key when there’s no longer an associated key-value pair in the hash table. On the other hand, you only add a key when you insert a brand-new key-value pair into the hash table for the first time. You don’t want to insert a key when you do an update, because that would result in multiple copies of the same key.
Next, you can change the three properties .keys, .values, and .pairs so that they follow the same order of the inserted keys:
# hashtable.py

# ...

class HashTable:
    # ...

    @property
    def keys(self):
        return self._keys.copy()

    @property
    def values(self):
        return [self[key] for key in self.keys]

    @property
    def pairs(self):
        return [(key, self[key]) for key in self.keys]
Make sure to return a copy of your keys to avoid leaking the internal implementation. Also, note that all of these three properties now return lists instead of sets because you want them to retain the right order. In turn, this lets you zip keys and values to make pairs:
>>> from hashtable import HashTable
>>> hash_table = HashTable.from_dict({
...     "hola": "hello",
...     98.6: 37,
...     False: True
... })

>>> hash_table.keys
['hola', 98.6, False]

>>> hash_table.values
['hello', 37, True]

>>> hash_table.pairs
[('hola', 'hello'), (98.6, 37), (False, True)]

>>> hash_table.pairs == list(zip(hash_table.keys, hash_table.values))
True
Keys and values are always returned in the same order so that, for example, the first key and the first value map to each other. This means that you can zip them like in the example above.
Now you know how to keep the insertion order of the key-value pairs in your hash table. On the other hand, if you want to sort them by more advanced criteria, then you can follow the same techniques as with sorting a built-in dictionary. There’s no additional code to write at this point.
Use Hashable Keys
Your hash table is complete and fully functional now. It can map arbitrary keys to values using the built-in hash() function. It can detect and resolve hash code collisions and even retain the insertion order of the key-value pairs. You could theoretically use it over Python dict if you wanted to, without noticing much difference apart from the poor performance and occasionally more verbose syntax.
Note: As mentioned before, you should rarely need to implement a data structure such as a hash table yourself. Python comes with many useful collections that have unparalleled performance and are tested in the field by countless developers. For specialized data structures, you should check PyPI for third-party libraries before attempting to make one of your own. You’ll save yourself a lot of time and significantly reduce the risk of bugs.
Until now, you’ve taken it for granted that most built-in types in Python can work as hash table keys. However, to use any hash table implementation in practice, you’ll have to restrict keys to only hashable types and understand the implications of doing so. That’ll be especially helpful when you decide to bring custom data types into the equation.
Hashability vs Immutability
You learned earlier that some data types, including most primitive data types in Python, are hashable, while others aren’t. The primary trait of hashability is the ability to calculate the hash code of a given object:
>>> hash(frozenset(range(10)))
3895031357313128696

>>> hash(set(range(10)))
Traceback (most recent call last):
  File "<input>", line 1, in <module>
    hash(set(range(10)))
TypeError: unhashable type: 'set'
For example, instances of the frozenset data type in Python are hashable, while ordinary sets don’t implement hashing at all. Hashability directly impacts whether objects of certain types can become dictionary keys or set members, as both of these data structures use the hash() function internally:
>>> hashable = frozenset(range(10))
>>> {hashable: "set of numbers"}
{frozenset({0, 1, 2, 3, 4, 5, 6, 7, 8, 9}): 'set of numbers'}
>>> {hashable}
{frozenset({0, 1, 2, 3, 4, 5, 6, 7, 8, 9})}

>>> unhashable = set(range(10))
>>> {unhashable: "set of numbers"}
Traceback (most recent call last):
  File "<input>", line 1, in <module>
    {unhashable: "set of numbers"}
TypeError: unhashable type: 'set'
>>> {unhashable}
Traceback (most recent call last):
  File "<input>", line 1, in <module>
    {unhashable}
TypeError: unhashable type: 'set'
While an instance of frozenset is hashable, the corresponding set with precisely the same values is not. Be aware that you can still use an unhashable data type for the dictionary values. It’s the dictionary keys that must be able to calculate their corresponding hash codes.
Note: When you insert an unhashable object into a hashable container, such as a frozenset, then that container also becomes unhashable.
Hashability is closely related to mutability, or the ability to change the internal state of an object during its lifetime. The relationship between the two is a bit like changing an address. When you move to another place, you’re still the same person, but your old friends might have a hard time trying to find you.
Unhashable types in Python, such as lists, sets, or dictionaries, happen to be mutable containers, as you can modify their values by adding or removing elements. On the other hand, most built-in hashable types in Python are immutable. Does this mean mutable types can’t be hashable?
The correct answer is they can be both mutable and hashable, but they rarely should be! Mutating a key would result in changing its memory address within a hash table. Consider this custom class as an example:
>>> class Person:
...     def __init__(self, name):
...         self.name = name
This class represents a person with a name. Python provides a default implementation for the special method .__hash__() in your classes, which merely uses the object’s identity to derive its hash code:
>>> hash(Person("Joe"))
8766622471691

>>> hash(Person("Joe"))
8766623682281
Each individual Person instance has a unique hash code even when it’s logically equal to other instances. To make the object’s value determine its hash code, you can override the default implementation of .__hash__() like so:
>>> class Person:
...     def __init__(self, name):
...         self.name = name
...
...     def __hash__(self):
...         return hash(self.name)

>>> hash(Person("Joe")) == hash(Person("Joe"))
True
You call hash() on the .name attribute so that instances of the Person class with equal names always have the same hash code. This is convenient for looking them up in a dictionary, for example.
Note: You can explicitly mark your class as unhashable by setting its .__hash__ attribute equal to None:
>>> class Person:
...     __hash__ = None
...
...     def __init__(self, name):
...         self.name = name

>>> hash(Person("Alice"))
Traceback (most recent call last):
  File "<input>", line 1, in <module>
    hash(Person("Alice"))
TypeError: unhashable type: 'Person'
This will prevent hash() from working on instances of your class.
Another trait of hashable types is the ability to compare their instances by value. Recall that a hash table compares keys with the equality test operator (==), so you must implement another special method, .__eq__(), in your class to allow for that:
>>> class Person:
...     def __init__(self, name):
...         self.name = name
...
...     def __eq__(self, other):
...         if self is other:
...             return True
...         if type(self) is not type(other):
...             return False
...         return self.name == other.name
...
...     def __hash__(self):
...         return hash(self.name)
This code fragment should look familiar if you went through the equality test of hash tables before. In a nutshell, you check if the other object is the exact same instance, an instance of another type, or another instance of the same type and equal value to the .name attribute.
Note: Coding special methods such as .__eq__() and .__hash__() can be repetitive, tedious, and error-prone. If you’re on Python 3.7 or above, then you can achieve the same effect more compactly by using data classes:
@dataclass(unsafe_hash=True)
class Person:
    name: str
While a data class generates .__eq__() based on your class attributes, you must set the unsafe_hash option to enable the correct .__hash__() method generation.
Having implemented .__eq__() and .__hash__(), you can use the Person class instances as dictionary keys:
>>> alice = Person("Alice")
>>> bob = Person("Bob")

>>> employees = {alice: "project manager", bob: "engineer"}

>>> employees[bob]
'engineer'

>>> employees[Person("Bob")]
'engineer'
Perfect! It doesn’t matter if you find an employee by the bob reference that you created earlier or a brand-new Person("Bob") instance. Unfortunately, things get complicated when Bob suddenly decides to change his name and go by Bobby instead:
>>> bob.name = "Bobby"

>>> employees[bob]
Traceback (most recent call last):
  File "<input>", line 1, in <module>
    employees[bob]
KeyError: <__main__.Person object at 0x7f607e325e40>

>>> employees[Person("Bobby")]
Traceback (most recent call last):
  File "<input>", line 1, in <module>
    employees[Person("Bobby")]
KeyError: <__main__.Person object at 0x7f607e16ed10>

>>> employees[Person("Bob")]
Traceback (most recent call last):
  File "<input>", line 1, in <module>
    employees[Person("Bob")]
KeyError: <__main__.Person object at 0x7f607e1769e0>
You no longer have a way of retrieving the corresponding value even though you still use the original key object that you inserted before. What’s more surprising, though, is that you can’t access the value through a new key object with the updated person’s name or with the old one. Can you tell why?
The hash code of the original key determined which bucket the associated value got stored in. Mutating the state of your key made its hash code indicate a completely different bucket or slot, which doesn’t contain the expected value. But using a key with the old name doesn’t help either. While it points to the right bucket, the stored key has mutated, making equality comparison between "Bob" and "Bobby" evaluate to False rather than matching.
Therefore, hash codes must be immutable for the hashing to work as expected. Since hash codes are typically derived from an object’s attributes, their state should be fixed and never change over time. In practice, this also means that objects intended as hash table keys should be immutable themselves.
To sum up, a hashable data type has the following traits:
- Has a
.__hash__()method to calculate the instance’s hash code - Has an
.__eq__()method to compare instances by value - Has immutable hash codes, which don’t change during instances’ lifetimes
- Conforms to the hash-equal contract
The fourth and final trait of hashable types is that they must comply with the hash-equal contract, which you’ll learn more about in the following subsection. In short, objects with equal values must have identical hash codes.
The Hash-Equal Contract
To avoid problems when using custom classes as hash table keys, they should comply with the hash-equal contract. If there’s one thing to remember about that contract, it’s that when you implement .__eq__(), you should always implement a corresponding .__hash__(). The only time you don’t have to implement both methods is when you use a wrapper such as a data class or an immutable named tuple that already does this for you.
Also, not implementing both methods can be okay as long as you’re absolutely sure that you won’t ever use objects of your data type as dictionary keys or set members. But can you be so sure?
Note: If you can’t use a data class or a named tuple, and you’d like to manually compare and hash more than one field in a class, then wrap them in a tuple:
class Person:
    def __init__(self, name, date_of_birth, married):
        self.name = name
        self.date_of_birth = date_of_birth
        self.married = married

    def __hash__(self):
        return hash(self._fields)

    def __eq__(self, other):
        if self is other:
            return True
        if type(self) is not type(other):
            return False
        return self._fields == other._fields

    @property
    def _fields(self):
        return self.name, self.date_of_birth, self.married
It makes sense to define a private property to return that tuple if there are relatively many fields in your class.
While you can implement both methods however you like, they must satisfy the hash-equal contract, which states that two equal objects must hash to equal hash codes. This makes it possible to find the right bucket based on a provided key. However, the reverse isn’t true, because collisions may occasionally cause the same hash code to be shared by unequal values. You can express this more formally by using these two implications:
a = b⇒hash(a) = hash(b)hash(a) = hash(b)⇏a = b
The hash-equal contract is a one-way contract. If two keys are logically equal, then their hash codes must also be equal. On the other hand, if two keys share the same hash code, it’s likely they’re the same key, but it’s also possible that they’re different keys. You need to compare them to be sure if they really match. By the law of contraposition, you can derive another implication from the first one:
hash(a) ≠ hash(b) ⇒ a ≠ b
If you know that two keys have different hash codes, then there’s no point in comparing them. That can help improve performance, as the equality test tends to be costly.
Some IDEs offer to automatically generate the .__hash__() and .__eq__() methods for you, but you need to remember to regenerate them every time you modify your class attributes. Therefore, stick to Python’s data classes or named tuples whenever you can to guarantee the proper implementation of hashable types.
Conclusion
At this point, you can implement a hash table from scratch in Python, using different strategies to resolve hash collisions. You know how to make your hash table resize and rehash dynamically to accommodate more data and how to preserve the insertion order of key-value pairs. Along the way, you practiced test-driven development (TDD) by adding features to your hash table step by step.
Other than that, you have a deep understanding of Python’s built-in hash() function and can create one of your own. You understand the hash-equal contract, the difference between hashable and unhashable data types, and their relationship with immutable types. You know how to create custom hashable classes using various tools in Python.
In this tutorial, you learned:
- How a hash table differs from a dictionary
- How you can implement a hash table from scratch in Python
- How you can deal with hash collisions and other challenges
- What the desired properties of a hash function are
- How Python’s
hash()works behind the scenes
With this knowledge, you’re prepared to answer most questions that you might get on a job interview related to the hash table data structure.
You can download the complete source code and the intermediate steps used throughout this tutorial by clicking the link below:
Source Code: Click here to download the source code that you’ll use to build a hash table in Python.
Take the Quiz: Test your knowledge with our interactive “Build a Hash Table in Python With TDD” quiz. You’ll receive a score upon completion to help you track your learning progress:
Interactive Quiz
Build a Hash Table in Python With TDDLearn how Python hashing spreads values into buckets and powers hash tables. Practice collisions, uniform distribution, and test-driven development.